1984 CROSSBOW OWNER’S MANUAL - parkerbows.com€¦ · DO NOT ATTEMPT TO OPERATE OR SHOOT THIS...
60
DO NOT ATTEMPT TO OPERATE OR SHOOT THIS PRODUCT UNTIL YOU HAVE READ THIS ENTIRE MANUAL. To Prevent Damage to the Crossbow and to Protect Your Warranty, USE ONLY Parker or RED HOT Arrows with CAPTURE NOCKS. 2/18 1984 CROSSBOW OWNER’S MANUAL
Transcript of 1984 CROSSBOW OWNER’S MANUAL - parkerbows.com€¦ · DO NOT ATTEMPT TO OPERATE OR SHOOT THIS...

DO NOT ATTEMPT TO OPERATE OR SHOOT THIS PRODUCT UNTIL YOU HAVE READ THIS ENTIRE MANUAL.
To Prevent Damage to the Crossbow and to Protect Your Warranty,
USE ONLY Parker or RED HOT Arrows with CAPTURE NOCKS.
2/18
1984
CROSSBOW OWNER’S MANUAL

Thank you for your purchase of this Parker Crossbow. Each Parker Crossbow is designed, engineered and
manufactured by hunters like you.
Attention to detail and pride in our products drive each of us at Parker to make the best hunting equipment on the market.
Anytime you have a question, a comment or suggestion regarding your Parker Crossbow, please give us a call at
(540) 337-5426 or send us an email at [email protected].
We value your experience and ideas, and enjoy sharing in your success.
For more information on the current product line of ParkerCrossbows and RED HOT Accessories, visit our website at:
www.parkerbows.com
Good luck and safe shooting!
Parker’s Customer Service Representative will need the following information to match your warranty card as follows:
KEEP A COPY OF YOUR RECEIPT WITH THIS MANUAL
IMPORTANT INFORMATION
Owner’s Name:Crossbow Model:
Serial Number:Purchase Date:
Store Where Purchased:
1984

TABLE OF CONTENTS 1984
ANATOMY 1GETTING STARTED 2ASSEMBLY 3LIMB ADJUSTMENT* 13COCKING 15ARROW SAFETY 21SHOOTING 26SCOPE INSTRUCTIONS 30UN-COCKING 32TROUBLESHOOTING 34SHOOTING SAFETY 51ACCESSORIES 54WARRANTY INFORMATION 55
Page
*Ambusher

1
ANATOMY1984
• Congratulations on your purchase of a new Parker Crossbow. This crossbow has been carefully designed and crafted by engineers and hunters that are committed to delivering a quality product that will enhance your experience in the woods.
• As you read this manual there may be terms or descriptions that are unfamiliar to you. Below is a diagram that will help you understand the common terminology and parts of your Crossbow.
Butt
CombSafety Lever ScopeScope Ring
StringCam or Wheel
String Suppressors
Buss Cables
Forearm
Quiver
Limb
Stirrup
Retention Spring
Barrel
Stock
ThunderHawk Pro with Multi-Reticle Scope shown.
Safety Lever
Trigger Assembly
Pistol Grip
Trigger
Trigger Housing
Anti Dry-fire Device
Retention Spring or Finger
Trigger Latch
7/8” Sight Bridge (top)
Riser
Cable Slot
ANATOMY OF A PARKER CROSSBOW
ANATOMY OF THE PARKER TRIGGER

2
GETTING STARTED
1984
• Empty the contents from the box your new Parker Crossbow was packaged in. The contents should include:
• Crossbow with the scope installed• Quiver• Arrows with Field Points• Hardware Pack• Owner’s Manual Packet
• Place all contents in a clear and organized space such as a work bench, tabletop or flat surface where you may inventory and easily identify all the parts and components of this package.
• You will only be required to assemble a few parts with a few screws.
• You will only need a couple of simple tools such as a Phillips screwdriver, and/or a hex wrench set
• When assembling your Parker Crossbow make sure all screws are snug but not over tightened.
Before you begin...
Instructional Videos
DO NOT RETURN THE CROSSBOW TO THE STORE. CALL PARKER AT 540-337-5426
FOR SERVICE YOU MAY REQUIRE.
Visit www.parkerbows.com/videos to access Parker’s Instructional Videos and learn how to:
• Assemble your crossbow• Sight in your crossbow• Unload and shoot your crossbow• Operate Parker’s G2 Trigger• and much more!

3
ASSEMBLY1984
STEP 1
HURRICANETake inventory of the items you will need:A. Barrel/Front-end AssemblyB. StockC. Stock ScrewsD. Stirrup
E. Stirrup ScrewsF. Quiver & 4 arrows w/ field pointsG. Quiver Mount BracketH. Quiver Mount with 2 screws
B
C
D
Insert the trigger end of the Barrel/Front-end Assembly into the stock making sure the trigger goes through the hole at the top of the trigger guard. Press the barrel all the way to the bottom and back of the stock so the screw holes align in the bottom of the stock.
E F
H
A
G

4
ASSEMBLY1984STEP 2
Insert the long Stock Screw in the hole behind the grip. Using a 3/32” hex wrench, snug the screw down. Insert the short Stock Screw in the hole in front of the trigger guard. Using a 3/32” hex wrench snug the screw down.
STEP 3Using the Stirrup Screws and a 3/16” hex wrench, attach the stirrup to the front of the front-end assembly. NOTE: Position the Stirrup Offset down to match the Offset in the Riser.
IMPORTANT: These screws come with a nylon patch on the threads. Do not use any form of liquid loc-tite on the screws.
Do NOT Cross-thread Do NOT Overtighten
Do NOT Cross-thread Do NOT Overtighten
Riser Offset(Down)
Stirrup Offset(Down)

5
ASSEMBLY1984
STEP 1Insert the trigger end of the Barrel/Front-end Assembly into the stock making sure the trigger goes through the hole at the top of the trigger guard. Press the barrel all the way to the bottom and back into the stock so the six screw holes (three on each side of the stock) align with the holes in the barrel.
TORNADOTake inventory of the items you will need:A. Barrel/Front-end AssemblyB. StockC. Stock ScrewsD. Stirrup
E. Stirrup ScrewsF. Quiver & 4 arrows w/ field pointsG. Quiver Mount with 2 screws
B
C
D
E F
G
A

6
ASSEMBLY1984
STEP 2Using the six (6) Stock Screws, start each screw in the side of the stock before tightening them all down. After starting all the screws, go back and tighten each one using a 3/32” hex wrench.
Do NOT Cross-thread Do NOT Overtighten
IMPORTANT: These screws come with a nylon patch on the threads. Do not use any form of liquid loc-tite on the screws.
STEP 3Using the Stirrup Screws and a 3/16” hex wrench, attach the stirrup to the front of the front-end assembly. NOTE: Position the Stirrup Offset down to match the Offset in the Riser.
Do NOT Cross-thread Do NOT Overtighten
Riser Offset(Down)
Stirrup Offset(Down)

7
ASSEMBLY1984
Installing the Quiver on Hurricane & TornadoSTEP 1• Slide the Quiver Mount Bracket onto the Picatinny Rail, starting
from the stirrup. Once in position, use a 5/32” hex wrench to tighten the bracket mount screws (Fig. A).
• Install the Quiver Mount to the Picatinny Quiver Mount Bracket with the Quiver Mount Screws using a 5/32” hex wrench (Fig. B).
• Note the Lever Arm on the Quiver Mount should face away from the Riser when mounted on the right side and towards the riser when mounted on the left. Lever Arm
Quiver Mount
Call 540-337-5426 for Parker Customer Service should you require any assistance.
STEP 2Attach the Quiver to the Quiver Mount, and lock in place using the Lever Arm.
Lever Arm
Fig. A Fig. B
Slide into position
starting from the stirrup.

8
ASSEMBLY1984
AMBUSHER, CENTERFIRE XXT, HAMMER325, MP315 & THUNDERHAWK PRO
Attaching the Front-endSTEP 1Prior to attaching the Riser to the Stock, place the Cable Slide on the buss cables (crossed cables) as shown. The cables will fit into the grooves on the bottom side of the Cable Slide. Make sure the cables cross on the LEFT side (from top view).Top View
Cross cables on LEFT side of Cable Slide
Riser
Cable Slide
Top View
Take inventory of the items you will need:A. Front-endB. Stock with ScopeC. Cable SlideD. (1) Mounting BoltE. (2) Top Screws
F. Quiver & 4 arrows w/ field pointsG. Quiver MountH. (2) Quiver Mount Screws
G
FH
D EA
B
C

9
ASSEMBLY1984
STEP 3Push the Riser down onto the Stock Insert, making sure to first align the Riser Hole with the Stock Insert.
NOTE: The Riser and Stock coming together may be a rather snug to fit, this is common.
Cable Slot
Stock Insert aligned with Riser Hole
Bottom View
Riser
Hold the Cable Slide in place with your thumb and forefinger. Insert the Cable Slide and cables into the Cable Slot in the stock, while keeping the string on TOP of the barrel.
Cable Slide
String on Top of barrel
Cable Slot
CABLES CROSS ON LEFT SIDE OF BARREL
STEP 2
Top View

10
ASSEMBLY1984
Mounting Bolt
Bottom View
STEP 4
STEP 5
Apply a drop of Blue Loctite® to the threads of the Mounting Bolt. Using a 3/16 hex wrench, install and tighten the Mounting Bolt through the riser hole and secure the Front-End Assembly to the stock.
Install the button-head screws (2) through the top of the barrel on either side of the flight groove using a 3/32 hex wrench. Do NOT over tighten screws. Inspect all attachment points to be sure screws are firmly in place and tightened.
The flight groove is the slot in the barrel where the cock vane of the arrow travels during the shot.
IMPORTANT: If you followed these instructions, you have successfully attached the Front-end to the Stock, and you may now proceed to installing the Quiver.
Call 540-337-5426 for Parker Customer Service should you require any assistance.

11
ASSEMBLY1984
STEP 1
STEP 2
Position the Quiver Mount on the bottom side of the Riser aligning the holes in the Quiver Mount with the holes in the Riser.
Attach the Bracket to the Riser using the Hex head screws and a 5/32 Hex wrench. Snug the screws but do NOT over-tighten.
Installing the Quiver
Quiver Mount
Riser
Lever Arm

12
ASSEMBLY1984
Installing the Crossbow Quiver Mount (optional accessory)
STEP 3Attach the Quiver to the Quiver Mount, and lock in place using the Lever Arm.
Lever Arm
Quiver
STEP 1
STEP 2
STEP 3
Using the screws provided with the Quiver Bracket Assembly, attach the assembly to the bottom of the crossbow riser as shown.
Using the screws provided with the Parker Quiver, attached the Quiver Mount to the Crossbow Quiver Mount Assembly as shown.
Attach Parker Quiver to the Crossbow Quiver Mount Assembly as shown.
NOTE: For left-handed shooters, install the Sidearm Assembly in the opposite direction and rotate the Sidearm Plate so the offset is to the rear.

13
LIMB ADJUSTMENT1984
The AMBUSHER crossbow is designed to have an adjustable draw weight range. Do NOT Use a Bowpress to Adjust Weight Range.Ambusher Limb Adjustment 135 lbs to 160 lbs
What you will need:
3/16 Hex Wrench
Small Flathead Screwdriver
Step 1 - Loosen Limb Bolts 2 Full Turns
Step 3 - Tighten Limb Bolts Completely
Increasing Draw Weight
Gap 2x
Limb Spacer
Tighten Limb Bolt
Limb flush against Riser (no Gap)
Step 4 - Put Spacers in Safe Place for Future Use
ATTENTION: Do NOT shoot the crossbow unless both Spacers are IN or both Spacers are OUT.
ATTENTION: Do NOT Use a Bowpress to Adjust Weight Range
WARNING: DO NOT shoot the crossbow without the limb bolts tightened all the way down.
Limb Spacer (included)
Challenger Shown
Challenger Shown
Step 2 - Push Spacers Out
Limb Spacer
Screwdriver
Push
Challenger Shown

14
LIMB ADJUSTMENT1984
Decreasing Draw Weight
Should you require any assistance, please call Parker Customer Service at
540-337-5426
Step 1 - Loosen Limb Bolts 5 Full Turns Step 2 - Insert Spacer
Step 4 - Re-tighten Limb Bolts CompletelyStep 3 - Ensure Spacer Fits Flush
Gap
Loosen Limb Bolt 5 Full Turns
ATTENTION: Do NOT loosen the limb bolts on each side more than 5 full turns (which is 10 half turns) in order to reinsert the spacer.
ATTENTION: Make sure the Tab on the Spacer fits into the Groove in the Riser.
ATTENTION: Do NOT Use a Bowpress to Adjust Weight Range
Tab on Spacer
Tab on Spacer will fit into Groove in Riser
Limb Spacer flush with base of limb pocket Tighten
Limb BoltLimb flush with top of Limb Spacer (no gap)
5x
ATTENTION: Do NOT shoot the crossbow unless both Spacers are IN or both Spacers are OUT.
WARNING: DO NOT shoot the crossbow without the limb bolts tightened all the way down.
Challenger Shown Challenger Shown
Challenger ShownChallenger Shown

15
COCKING1984
WARNING: Completely familiarize yourself with the cocking device prior to usage. Carefully review the pictures and instructions before you attempt to cock your crossbow with the cocking device. WARNING: DO NOT attempt to cock your crossbow by hand.WARNING: DO NOT attempt to un-cock a crossbow with a cocking device under any circumstances.WARNING: Wear shooting glasses while operating and shooting the crossbow.
STEP 1
USING A ROPE COCKING DEVICE
Place the crossbow on the ground, resting it on its Stirrup, with the Butt of the stock pointing up facing you. Place one foot securely inside the Stirrup and firmly place your weight on the Stirrup to ensure the crossbow will not move (Fig. A). Use extra caution with smooth bottom shoes, wet shoes, slick surfaces and/or wet ground. Fig. A
STEP 2
Fig. B
Hold the Rope Cocking Device with one hook in each hand and with the hook opening facing towards you (Fig. B). Leave 6 inches of rope between the hooks and place the rope in the groove on the Stock below the Trigger Assembly.
Ensure Trigger latch is UP. If Trigger Latch is DOWN, see page 37.

16
COCKING1984
While holding a string hook in each hand, lean over the bow and attach the string hooks to the bow string, one hook on either side of the stock, and snug to the side of the Barrel. Make sure the hooks are facing down (towards your legs). On some models, you may have to pull the string up slightly to attach the rope cocker hooks.
STEP 3
Fig. C
Before cocking, check (Fig. C) to make sure rope cocking device is in the correct position. Grab the handles, now using the larger muscle groups of your legs, back and arms, stand up and raise (pull) the handles up and back towards your hips (Fig. D) until the string audibly “clicks” securely into the Trigger Assembly. The click will be the sound you hear when the Safety “automati-cally” engages. Your crossbow is now ready to load & shoot.
STEP 4
Fig. D
ATTENTION: DO NOT pull the handles up to your chest or shoulders. This technique is more difficult and could result in the hooks pulling off of the Barrel.
WARNING: DO NOT leave your crossbow cocked or loaded when not in use, or unsupervised.

17
COCKING1984
USING SIDEWINDER CRANK COCKING DEVICE
Cocking Device Boot
String HooksRatchet Spool
Ratchet Release Lever
Crank Arm and Handle
STEP 1
STEP 2
Place the crossbow on the ground, resting it on its Stirrup, with the Butt of the stock pointing up facing you. Place one foot securely inside the Stirrup and firmly place your weight on the Stirrup to ensure the crossbow will not move (Fig. A). Use extra caution with smooth bottom shoes, wet shoes, slick surfaces and/or wet ground.
Place the sidewinder crank cocking device on the butt stock as shown (Fig. B). Making sure the cocking device is firmly seated on the butt of the stock.
Fig. A
Fig. B

18
COCKING1984
STEP 3Depress the ratchet spool release lever to allow the cord and hooks to free spool, and be unwound (Fig. C).
Fig. C
Fig. D
STEP 4Pull the string hooks completely out of the sidewinder until all the cord is unwound. Inspect the cord for fraying before and after every use (Fig. D).
Fig. E
STEP 5Move the trigger safety into the “fire” (up) position. (This is important for step #8) Holding one hook in each hand, make sure the cocking rope is seated into the rope cocker groove in the Stock below the trigger housing (Fig. E).
Rope Cocker Groove
Safety “OFF”
Up

19
COCKING1984
Fig. G
Fig. H
Fig. F
While holding a hook in each hand, lean over the crossbow and attach the hooks to the bowstring one on each side of the barrel. Make sure each hook is snug to the side of the barrel. Make sure hooks are facing down and towards your legs.
Slide the crank lever firmly into the slot in the ratchet spool until you hear a “click”. Use one thumb screw to secure the crank lever to the ratchet spool (Fig. G). Tighten thumb screw “FIRMLY”.
Begin winding slowly and carefully in a clockwise direction until the string is drawn back into the trigger and securely locks in place (Fig. H). The trigger safety should automatically “click” into the safe (down) position at this time.
STEP 6
STEP 7
STEP 8
Slide
Clockwise
Thumb Screw
Safety in Down Position
WARNING: Stop winding when the safety lever moves to the “safe” down position to avoid damaging your crossbow or Side-winder cocking aid.

20
COCKING1984
CAUTION: ONLY AFTER THE CROSSBOW IS FULLY COCKED AND THE SAFETY IS ENGAGED, while holding the crank lever securely, depress the ratchet spool release lever and slowly unwind a small amount of cord until you can easily remove the string hooks from the crossbow string.
Remove the sidewinder from the crossbow and set it aside. At the end of your shooting session, carefully wind up the loose cord and store the crank lever in it’s own slot on the sidewinder housing. Use the second thumb screw to secure it.
STEP 9
STEP 10
WARNING: DO NOT leave your crossbow cocked or loaded when not in use, or unsupervised.
WARNING: Wear shooting glasses while operating and shooting the crossbow.

21
ARROW SAFETY
1984
SAFE AND PROPER USE
• The safe shooting of your Parker crossbow requires that the string groove of the arrow nock be aligned properly to avoid dry firing the crossbow.
• Dry firing may result in serious injury to the shooter and bystanders. Further, it may cause damage to the crossbow itself. Always check the nock alignment on every crossbow arrow before shooting.
• Proper orientation of the string groove is at 90 degrees to the cock vane (odd color vane) on the arrow. When the arrow is placed on the crossbow with the cock vane down in the flight groove the Capture Nock should be in line with the string. If the nock groove is in any other position in the arrow it may not engage the String properly, and could result in a dry fire.
Capture Nock
Arrow Shaft
Cock Vaneodd color fletch
String Groove
String groove in capture nock
Odd colorfletch
at 6:00 infletch groove
Fletch groove in stock
Barrel Profile View
WARNING: After each shot, examine your crossbow arrows for damage to the shaft or nock. DO NOT use damaged arrows.
grooveString

22
ARROW SAFETY
1984
String Groove
String groove in capture nock
PROPER SELECTION• The proper selection of crossbow arrows and nocks is critical to the
safe function of your Parker crossbow and to reduce the risk of damaging your crossbow or possibly injuring you or bystanders.
ONLY USE
Fig. ADO NOT USE
WARNING: DO NOT USE Moon Nocks (Fig. B) or Flat or Omni Nocks (Fig. C) with your Parker Crossbow.
Fig. B Fig. C
ATTENTION: Parker REQUIRES using ONLY Parker or RED HOT Brand Crossbow Arrows that are 20 inches in length with Capture Nocks installed and having a finished mass weight* of a minimum of 400 grains (Fig. A).* A finished mass weight is the total weight of the arrow with a field point or broadhead installed.
SHOOT PARKER
ORRED HOTBRAND
ARROWSONLY
Moon nock
Omni nock
GO
STOP

23
ARROW SAFETY
1984
Groove in Capture Nock is in-line with string
Groove in Capture Nock is NOT in-line with string
Barrel profile view
Barrel profile view
String
String
Odd colorfletch
at 6:00 infletch groove
Odd colorfletch
at 6:00 infletch groove
• The safe shooting of your Parker crossbow requires that the nocks be “indexed” correctly. Indexing refers to the ability to turn the nock in the arrow shaft
• Correct indexing means: The groove in the Capture Nock is oriented (turned) “in-line” with the direction of the string (Fig. A).
• If the nock is not in-line with the string, it is possible the string will travel over the nock and produce a dry-fire (Fig. B).
• Further, any nock that is not securely pressed into the arrow shaft and can be easily turned in the shaft should be discarded. The nock should be replaced immediately with a new one that is safe and indexes correctly. Note: The arrow may also have to be discarded.
CORRECT INDEXING
Capture Nock indexed correctly
Fig. A
Capture Nock NOTindexed correctly
Fig. B
groove
groove
WARNING: BEFORE EACH SHOT, examine your arrow and nock and be certain the nock is indexed correctly.
STOP
GO

24
ARROW SAFETY
1984
Barrel profile view
Barrel profile view
String orientation
String orientation
Cock vane correctly down in Barrel
Cock vane NOT correctly down in Barrel
• The safe shooting of your Parker crossbow requires that the cock vane be “loaded” correctly.
• Correct loading means: The cock vane, (or odd color vane) is oriented and placed DOWN and INSIDE the Barrel. Second, the Capture Nock is oriented (turned) 90 degrees to the direction of the cock vane (Fig. A).
• If the cock vane is any position other than down and inside the Barrel, it introduces the possibility the string will travel over the nock and produce a dry-fire (Fig. B).
CORRECT LOADING
Cock vane and Capture Nock
indexed correctlyFig. A
Capture Nock NOT oriented correctly
Fig. B
WARNING: BEFORE you shoot, BE CERTAIN the Cock Vane is DOWN and INSIDE the Barrel.
groovegroove
STOP
GO

25
ARROW SAFETY
1984
Full Engagement
FULL ENGAGEMENT
Fig. A
Fig. B
• The safe operation of your Parker crossbow requires that the Capture Nock is pushed all the way back into the Trigger Assembly, making Full Engagement with the string (Fig. A).
• Leaving a gap between the Capture Nock and string may cause the string to travel over the nock, producing a dry-fire (Fig. B).
TriggerAssembly
TriggerAssembly
Barrel
Barrel
string
stringGap
WARNING: BE CERTAIN the Capture Nock fully engages the string and makes contact.
STOP
GO

26
SHOOTING1984
GO
STEP 1Place an arrow on the Barrel with the odd color vane down and in the flight groove. Slide the arrow back toward the sight bridge, under the Retention spring until the nock fully engages the string. The arrow Re-tention Spring is factory set and the down pressure holds your arrow in place. DO NOT remove or bend the Retention Spring upward.
Slide the arrow under the Retention Spring, cock vane down until the nock is firmly seated against the string.
DANGER: Make sure your hand, thumb and fingers remain OUTSIDE the string path when loading the arrow. Failure to do so may result in SERIOUS injury to the shooters hand, including possible thumb or finger amputation.
PROPER LOADING AND SHOOTING
ATTENTION: Parker REQUIRES using ONLY Parker or RED HOT Brand Crossbow Arrows with Capture Nocks installed and having a finished mass weight of a minimum of 400 grains. DO NOT USE MOON NOCKS OR FLAT NOCKS. SEE PAGE 21.
STEP 2Always keep your crossbow pointed safely down range. Raise the crossbow to your shoulder as you would a rifle or shotgun with your front hand on the thick part of the Forearm.
27
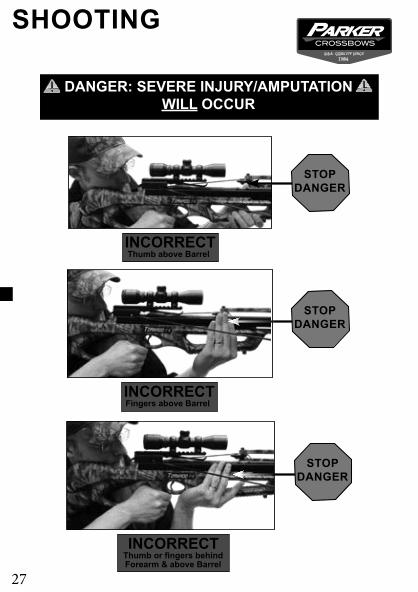
SHOOTING1984
Thumb above Barrel
Fingers above Barrel
INCORRECT
INCORRECT
STOPDANGER
STOPDANGER
STOPDANGER
Thumb or fingers behindForearm & above Barrel
INCORRECT
DANGER: SEVERE INJURY/AMPUTATION WILL OCCUR

28
SHOOTING1984
Hand securely gripping Forearm, with fingers and thumb below the Barrel and string’s path.
DANGER: Make sure your hand, thumb and fingers remain BELOW the string and surface of the Barrel. Failure to do so may result in SERIOUS injury to the shooters hand, including possible thumb or finger amputation.
CORRECT GO
STEP 3Now that the arrow is properly loaded, slide the Safety off by pushing the Safety Lever “UP” to the “Fire” position (red).
Safety “ON”
Safety “OFF”
Up
Down
29
SHOOTING1984
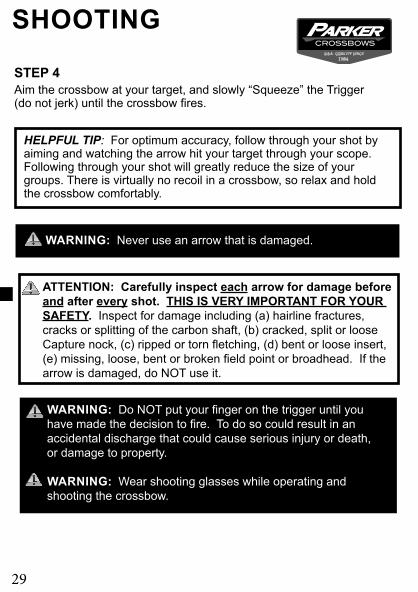
STEP 4Aim the crossbow at your target, and slowly “Squeeze” the Trigger (do not jerk) until the crossbow fires.
HELPFUL TIP: For optimum accuracy, follow through your shot by aiming and watching the arrow hit your target through your scope. Following through your shot will greatly reduce the size of your groups. There is virtually no recoil in a crossbow, so relax and hold the crossbow comfortably.
WARNING: Do NOT put your finger on the trigger until you have made the decision to fire. To do so could result in an accidental discharge that could cause serious injury or death, or damage to property.
WARNING: Wear shooting glasses while operating and shooting the crossbow.
WARNING: Never use an arrow that is damaged.
ATTENTION: Carefully inspect each arrow for damage before and after every shot. THIS IS VERY IMPORTANT FOR YOUR SAFETY. Inspect for damage including (a) hairline fractures, cracks or splitting of the carbon shaft, (b) cracked, split or loose Capture nock, (c) ripped or torn fletching, (d) bent or loose insert, (e) missing, loose, bent or broken field point or broadhead. If the arrow is damaged, do NOT use it.

SCOPE INSTRUCTIONS
30
1984
READ INSTRUCTIONS CAREFULLY BEFORE MOUNTING OR USING SCOPE.
IMPORTANT: If you purchased a Parker crossbow, it came from the factory with the RED HOT / HAWKE Scope pre-mounted and laser bore-sighted. You should only need to make fine-tuning adjustments to complete the sighting-in of your crossbow. See Sighting-In Procedure below.
SCOPE ANATOMY
Light Adjustment/Battery Cover
Windage Adjustment
MULTI-RETICLE SCOPE
ILLUMINATED MR SCOPE
Elevation Adjustment Eyebell
Objective Lens
EYEPIECE FOCUSINGHold the scope about three or four inches from your eye and look through the eyepiece at a featureless, flatly lit bright area such as a wall or open sky. If the reticle is not sharply defined instantly, turn the eyebell (either direction) a few turns. Quickly glance through the scope again. If the focus has improved, but is still not perfect, continue turning. If the focus condition became worse, turn it the opposite way.
MOUNTINGTo achieve the best accuracy from your crossbow, the scope must be mounted properly. Use a high-quality mount with bases designed to fit your particular crossbow. We recommend the RED HOT Medium Height Match Grade Rings (Item # 38-2144). Before tightening the mount rings, look through the scope in your normal shooting position. Adjust the scope (either for-ward or backward) until you find the furthest point forward (to ensure maximum eye relief) that allows you to see a full field of view. Rotate the scope in the rings until the crosshairs are level to the bore and the elevation adjustment is on top. Then tighten the mounting screws.
WARNING: Avoid over-tightening the rings. this can damage the scope, affecting performance or rendering it inoperable. there should be a slight & even gap between the top half and bottom half of the rings when tightened.

SCOPE INSTRUCTIONS
31
1984
SIGHTING INTo sight-in your crossbow start at 10 yards. Use matched weight arrows that are identical to each other and in new condition. Make sure the crossbow limbs are not near or against any object. From a steady rest position, shoot three arrows at a crossbow backstop target 10 yards away. Observe point of impact on the target and adjust windage and elevation screws as needed to correct aim. The arrow group should be about 2” high and center — now move back to 20 yards and shoot 3 arrows; you should be dead on depending on the speed of your bow. If not, make final scope adjustments so arrows impact center of bull’s-eye at 20 yards.
NOTE: 10 CLICKS = 1 INCH ADJUSTMENT @ 20 YARDSExample: If your shot is 4 inches Above and 2 inches to the Right of the bullseye, you’ll need to adjust:
1. Elevation 2. Windage
Do
wn 40 Clicks Le
ft 20 Clicks
2” Right
4” Above
MAINTAINING YOUR CROSSBOW SCOPEYour scope, though amazingly tough, is a precision instrument that deserves reasonable and cautious care. Do not attempt to disassemble or clean the scope internally. The external optical surfaces should occasionally be wiped clean with a lens cloth or an optical quality lens paper. Keep the protective lens covers in place when the scope is not in use. Remove any external dirt or sand with a soft brush so as to avoid scratching the finish. Wipe the scope with a damp cloth, following with a dry cloth. Then go over the metal portions of the scope with a silicone treated cloth in order to protect the scope against corrosion. Store the scope in a mois-ture-free environment. Do not put your scope in water or other liquids. Avoid storing the scope in hot places, such as in vehicles on hot days. The high temperatures could adversely affect the lubricants and sealants. Never leave the scope where direct sunlight can enter either the objective or the eyepiece lens. Damage may result from the concentration of the sun’s rays.
INSTALLING BATTERIESThe Illuminated Multi-Reticle Scope is powered by 3V “coin style” lithium batteries, type CR2032. To install batteries, unscrew the battery compartment and insert the batteries positive (“+”) side up. Replace battery cover. If the reticle dims or does not light at all, replace the bat-teries. Turn off scope when not in use.
32
UN-COCKING1984
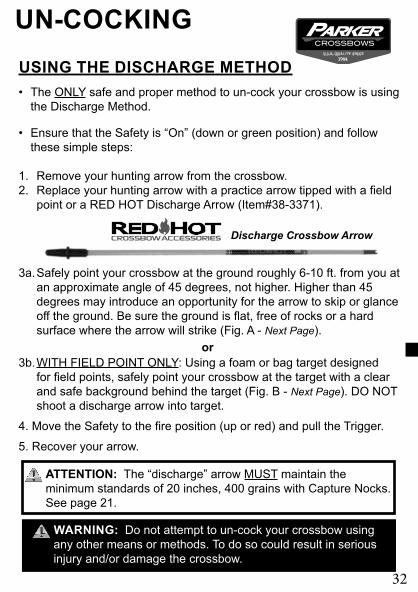
USING THE DISCHARGE METHOD• The ONLY safe and proper method to un-cock your crossbow is using
the Discharge Method.
• Ensure that the Safety is “On” (down or green position) and follow these simple steps:
1. Remove your hunting arrow from the crossbow.2. Replace your hunting arrow with a practice arrow tipped with a field
point or a RED HOT Discharge Arrow (Item#38-3371).
3a. Safely point your crossbow at the ground roughly 6-10 ft. from you at an approximate angle of 45 degrees, not higher. Higher than 45 degrees may introduce an opportunity for the arrow to skip or glance off the ground. Be sure the ground is flat, free of rocks or a hard surface where the arrow will strike (Fig. A - Next Page).
3b. WITH FIELD POINT ONLY: Using a foam or bag target designed for field points, safely point your crossbow at the target with a clear and safe background behind the target (Fig. B - Next Page). DO NOT shoot a discharge arrow into target.
4. Move the Safety to the fire position (up or red) and pull the Trigger.5. Recover your arrow.
WARNING: Do not attempt to un-cock your crossbow using any other means or methods. To do so could result in serious injury and/or damage the crossbow.
or
ATTENTION: The “discharge” arrow MUST maintain the minimum standards of 20 inches, 400 grains with Capture Nocks. See page 21.
4” AboveCROSSBOW ACCESSORIESRED HOT Discharge Crossbow Arrow

33
UN-COCKING1984
45º45º
Shoot into a target designed for
crossbow arrows.Fig. B
Shoot info soft flat ground clear of debris,
rocks, or branches.Fig. A
GO
6 - 10 feet
6 feet
GO

34
TROUBLE SHOOTING
1984
The following troubleshooting guide should be used if you experience any problems with your Crossbow. If the symptom you are experienc-ing is NOT covered in these pages, or your issue is NOT resolved by following the troubleshooting guide, please do the following:
1. Visit our website for additional information, including briefings and additional troubleshooting information:
WWW.PARKERBOWS.COM
2. Call our Customer Service Department at (540) 337-5426 and our highly skilled service technicians will gladly assist.
Your Parker crossbow features a highly advanced Trigger that has been designed and engineered for years of trouble free operation. It features an Anti Dry-fire mechanism that is designed to prevent dam-age to your crossbow, you and others. It is important to:
• Keep the Trigger clean and free of all debris, dirt, mud, etc.• DO NOT use lubricants in the Trigger or on other internal
components• DO NOT attempt to open or dismantle the crossbow. Doing so
WILL VOID YOUR WARRANTY• Keep the Retention Spring on the crossbow in good working order;
it is designed to apply consistent down pressure on the arrow when the crossbow is cocked and loaded.

35
TROUBLE SHOOTING
1984
PROBLEM: My crossbow will not fire when I pull the Trigger. What should I do?
Carefully check these items in this order:
1. With your arrow properly loaded, make sure the safety is in the Fire (up or red position). If it is not, push the safety to the fire (up) posi-tion and try shooting again.
2. Make sure the Capture Nock is firmly seated against the string, mak-ing sure the retention spring (or finger) is pressing the arrow firmly down, engaging the anti dry-fire device. If the arrow is not seated against the string and you have already squeezed the trigger without the crossbow firing, you will have to “Re-set” the trigger. Continue to 3.
3. In this case the anti dry-fire device has engaged, preventing you from accidentally dry firing and damaging your crossbow and voiding your warranty. To re-set the trigger, REMOVE THE ARROW FROM THE CROSSBOW, AND MOVE THE SAFETY LEVER TO THE SAFE POSITION. Continue to 4 to safely reset the trigger.
ATTENTION: When the Anti Dry-fire device has engaged, It will remain locked in the “Up” position until the trigger is reset.

36
TROUBLE SHOOTING
1984
Anti Dry-fire Device locked “Up”
TRIGGER MUST BE RESET
DO NOT TRY TO JAM OR PRY ANTI DRY-FIRE DEVICE DOWN
4. To Reset Trigger: Review the Cocking Section of this manual, beginning on page 15. Repeat the steps beginning on page 15, using a rope cocker or on page 17 using a Side-winder cocking device to properly reset the trigger and re-cock your crossbow. Note: Since the string is cocked, you will have to attach the hooks to the string on either side of the trigger. Pull the rope cocker or sidewinder back FIRMLY approximately 1/8 inch to reset the trigger. Even though you will see or feel very little movement, you should hear a “click”. At this point the crossbow trigger is re-set and you may place an arrow in the crossbow and shoot it normally.
WARNING: DO NOT attempt to forcibly depress the Anti Dry-fire Device if your crossbow is cocked. DO NOT jam or pry any object (arrow or screwdriver) into the Trigger to try and force the Anti Dry-fire down.

37
TROUBLE SHOOTING
1984
PROBLEM: My Crossbow won’t cock. The Trigger Latch is down, and I can’t get the string to catch. What should I do?
1. Move the Safety Lever up to the fire position.2. With a small object like a pencil with an eraser, depress the
Anti Dry-fire Mechanism.
3. Pull the Trigger. You should notice the Trigger Latch opens up.
4. To cock the crossbow follow the instructions beginning on page 15.
Trigger Latch down
Latch down
Latch Up
Anti Dry-fire Mechanism

38
TROUBLE SHOOTING
1984
PROBLEM: The Safety seems stiff or hard to move into the fire position. What should I do?
1. First, remove the arrow from the crossbow. Make sure there is no mud, dirt or debris inhibiting the Safety from moving. If you feel a gritty or scratchy sensation when you move the Safety there is likely dirt or foreign material in the mechanism.
2. Using compressed air, spray the entire Trigger mechanism including the grooves, seams and crevasses where there are moving parts to remove the foreign material.
3. If the above does not resolve the problem, call Parker for Customer Service.
PROBLEM: The Safety is “jammed”, and will not move. What should I do?
1. First, remove the arrow from the crossbow, and review Problem above. If still jammed, try lightly tapping on the Safety with a hard object such as the handle on a screwdriver, getting progressively harder until the Safety moves to the fire position.
2. If the Safety cannot be moved to the fire position, call Parker for Customer Service.
WARNING: DO NOT ATTEMPT TO DISASSEMBLE THE TRIGGER. TO DO SO WILL VOID YOUR WARRANTY.
WARNING: DO NOT ATTEMPT TO UNCOCK A CROSSBOW WITH A COCKING DEVICE UNDER ANY CIRCUMSTANCES.

39
TROUBLE SHOOTING
1984
PROBLEM: The Retention Spring is broken or is bent. What should I do?
1. The arrow Retention Spring is made of a highly durable composite material. It is designed to keep consistent down pressure on the arrow, ensuring the arrow does not move just prior to the shot, as well as to reduce noise. If it were to break, contact Parker for a replacement.
Retention Spring
WARNING: Do NOT shoot your crossbow without a retention spring. to do so will void your warranty.

40
TROUBLE SHOOTING
1984
2. The arrow Retention Spring can be damaged (broken or bent) if improper rope cocking technique is used. When improper technique is used, the rope cocker hooks can “jump” up on top of the Barrel, impacting the Retention Spring and breaking it. To avoid the hooks from jumping up, pull the handles close to your hips or pockets when cocking.
Proper cocking technique illustrated below
STOP GO
NOTICE Rope position with improper technique - hooks are pulled “up” onto
the top of the Barrel.
NOTICE Rope position with proper technique - hooks
are pulled “down” along the sides of the Barrel.
CORRECT:Hands pulling up
towards hip or pockets
INCORRECT:Hands away from body,
pulling up to chest.

41
TROUBLE SHOOTING
1984
PROBLEM: My crossbow shoots good groups with field points but not broadheads. What should I do? 1. Most often the broadhead weight does not match the field point
weight. Ensure you’re using broadheads that have the same weight as the field points. Parker recommends using 100 grain field points and 100 grain broadheads.
2. Often the problems in broadhead flight arise from using a fixed blade broadhead that is too big in diameter so it wind-planes (steers from the front), or the ferrule is much longer than the field point, changing its front of center balance point.
3. Most mechanical broadheads fly well, providing the blades do not open in flight (called Flashing). On bows under 300 FPS this generally is not a problem. High performance bows do see this often enough to warrant choosing a proper fixed blade broadhead. The RED HOT brand of High Performance Accessories has a fixed blade broadhead that is specifically designed for Crossbows shooting over 300 FPS. The Crosspro 100 broadhead has the same ferrule length as a field point, large vents in the blades to dramatically reduce wind-planing, and a 1 1/16” cutting Diameter, which is large enough to produce devastating wound channels, but not large enough to counter the fletching’s steering properties on the back of the shaft.
4. To ensure your broadheads are properly sighted in, you will have to shoot the broadheads and make sight adjustments.

42
TROUBLE SHOOTING
1984
PROBLEM: My arrows shoot erratically or group right or left of the bullseye. Why? What should I do?
1. If you use your “hands only” to cock the crossbow, you will load the string more to the left or right, depending on which arm is stronger or longer. We do NOT recommend using your hands only to cock the crossbow. The problem is resolved using a rope cocker to equalize the limb load properly.
2. Check to make sure the arrow is loaded correctly each time you shoot. Ensure the cock vane (the odd color fletching that rides inside the Barrel – see below) is loaded “down”. Index (or turn) your Capture Nock to make sure it is in-line with the string when loaded, fully engaging the string.
ATTENTION: Parker REQUIRES using ONLY Parker or RED HOT Brand Crossbow Arrows with Capture Nocks installed and having a finished mass weight of a minimum of 400 grains. DO NOT USE SLOTTED MOON NOCKS OR FLAT NOCKS.
SHOOT PARKER
ORRED HOTBRAND
ARROWSONLY
String groove in capture nock
Odd colorfletch
at 6:00 infletch groove
Fletch groove in stock
Barrel Profile View
grooveString
43
TROUBLE SHOOTING
1984
Tighten
Tighten
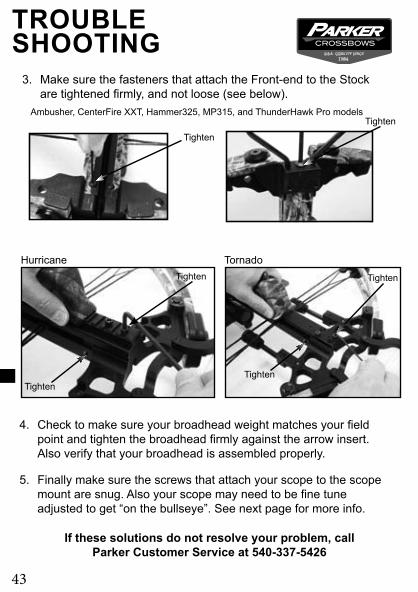
Ambusher, CenterFire XXT, Hammer325, MP315, and ThunderHawk Pro models
Hurricane Tornado
3. Make sure the fasteners that attach the Front-end to the Stock are tightened firmly, and not loose (see below).
4. Check to make sure your broadhead weight matches your field point and tighten the broadhead firmly against the arrow insert. Also verify that your broadhead is assembled properly.
5. Finally make sure the screws that attach your scope to the scope mount are snug. Also your scope may need to be fine tune adjusted to get “on the bullseye”. See next page for more info.
If these solutions do not resolve your problem, call Parker Customer Service at 540-337-5426
Tighten
Tighten
Tighten
Tighten

44
TROUBLE SHOOTING
1984
The scope turret adjustments are 10 clicks per 1 inch at 20 yards.
Scope Turret
PROBLEM: My scope will not adjust high enough or far enough left or right? What should I do?
1. Your Parker Crossbow came factory installed with a Hawke or RED HOT Scope, which is manufactured to have a turret adjust-ment for both windage and elevation of one click equals 1/2” of adjustment at 100 yards. At 20 yards, (being five times closer) the same 1/2” of movement is now 5 clicks. To move the crosshairs one inch is 10 clicks. REMEMBER 10 clicks per 1 inch at 20 yards (10 – 1 – 20).
2. You may not have adjusted the scope turrets far enough. Follow the turret ratio’s above and try again.
Example: If your shot is 4 inches Above and 2 inches to the Right of the bullseye, you’ll need to adjust: 1. Elevation - Down 40 clicks 2. Windage - Left 20 clicks
2” Right
4” Above
If these solutions do not resolve your problem, call Parker Customer Service at 540-337-5426
3. If the above recommendations do not resolve your issue, it is possible the scope rings are not properly seated in the sight bridge. Check to make sure that both scope ring bases are firmly seated in the sight bridge grooves. Also ensure that the ring bodies themselves are firmly and evenly tightened around the scope tube.

45
TROUBLE SHOOTING
1984
PROBLEM: The cables are becoming worn. What should I do?
1. If the cable slide (PIC. 1) was not installed, was installed incorrectly, or it has come out of the cable slot, the cables will wear and appear frayed or fuzzy as they pass through the cable slot of the barrel.
2. Check to see if the cable slide is installed properly.
3. If it is not, call Parker for replacement and install it per the assembly instructions starting on page 3, 5 or 8 before shooting the crossbow again.
Cable Slide
PIC. 1

46
TROUBLE SHOOTING
1984
Note: A quality string and cable wax will enhance your crossbow’s performance and extend the life of your string and cables. The RED HOT brand string and cable wax is formulated for high velocity crossbows and is recommended by Parker (Item #38-2150).
PROBLEM: The string and/or cables are becoming worn. What should I do?1. The individual strands of the string and cables can wear over time
with use.
2. If the string and cable strands have a couple, small frayed (or fuzzy) areas (PIC. 2), this is considered normal and a small amount of wax should be applied to and worked into the strands.
PIC. 2
COUPLE, SMALL FRAYED AREAS - NORMAL - WAX
Wax & Lube KitCROSSBOW ACCESSORIESRED HOT

47
TROUBLE SHOOTING
1984
PROBLEM: The serving(s) on the string and/or cables are becoming worn. What should I do?1. The servings that are wrapped around the string and cables in
various locations are designed to protect the individual strands of the string and cables.
PIC. 4
CUT / TORN STRING - REPLACE
PIC. 3
MANY, LARGE FRAYED AREAS - REPLACE
3. If the string and cable strands have many, large frayed (or fuzzy) areas (PIC. 3), or if the strands get cut or torn (PIC. 4), you should immediately replace your string and cables with new Parker or RED HOT brand string and cables.

48
TROUBLE SHOOTING
1984
PIC. 5
PIC. 6
SLIGHT SERVING SEPARATION / FLAT SPOT - NORMAL
LOOSE UNRAVELING SERVING - REPLACE
2. If any of the servings begin to separate slightly or if the servings develop flat spots, yet remains tight, this is considered normal (PIC. 5). However, you should apply RED HOT lube to the barrel of the crossbow to reduce friction.
3. If any of the servings become loose, begin to unravel (PIC. 6), come off, or get cut or torn (PIC. 7 - next page), you should immediately replace your string and/or cables with new Parker or RED HOT brand string and cables.

49
TROUBLE SHOOTING
1984
ATTENTION: Under normal conditions and for string and cables that are routinely waxed, you can expect to get from 1-2 years of life from the original factory set, depending on the amount of shooting you do. String and Cables do wear and are not covered under warranty. Replacing the Strings and Cables on your Parker crossbow is IMPORTANT routine maintenance, and we make the process both easy and inexpensive. You can arrange to ship your crossbow back to Parker for replacement String and Cables by calling 540-337-5426 (see page 56 for details on getting an RA # and returning your crossbow). You can also visit your local Parker Dealer to have them replaced.
NOTE: Parker recommends using only RED HOT brand rope cockers, which are specifically, designed with smooth, radiused surfaces that contact the center serving when cocking the crossbow. Other brands of cocking aids have sharp edges that can damage the center serving.
EZ Roller Rope CockerCROSSBOW ACCESSORIESRED HOT
PIC. 7
CUT / TORN SERVING - REPLACE

50
TROUBLE SHOOTING
1984
ATTENTION: WAX: Wax should be applied only to the exposed strands of the string, cables, and the servings (except center serving). Apply wax sparingly and fully work into the strands and servings with your fingers. Do NOT apply wax to the surface of the Barrel of a Parker Crossbow. Wax is a sticky substance that will attract dirt and debris and compromise the function of the Trigger.In addition, using wax on the center serving will pull wax into the Trigger mechanism along with any collected dirt or debris and over time compromise the performance of the Trigger.LUBE: Although there is little string pressure on the Barrel of Parker Crossbows, using Barrel lubricant is recommended to help extend the life of the center serving.
ATTENTION: DO NOT LUBRICATE THE INTERNAL COMPONENTS OF YOUR TRIGGER. The Trigger has been engineered to be maintenance free. Applying lubricants or oils to the Trigger will attract dirt and debris and impair its performance and safety.
ATTENTION: Use ONLY Parker or RED HOT Strings and Buss Cables, which are specifically designed in length, strands, serving location, serving size, etc. Using other brands of strings or cables will void your Parker Warranty.
WARNING: The string and cables are under significant loads and operating a crossbow with a string or cables that should be replaced is dangerous and could result in serious injury, death and/or damage to property.

51
SHOOTING SAFETY
1984
1. Your crossbow is a lethal weapon that is designed for hunting and target shooting only. Do NOT use it for any other purpose. It should never be handled as a toy.
2. Your crossbow is capable of casting an arrow in excess of 500 yards and harvesting the world’s largest big game. It is important to always be aware of your target background as well as your backstop material when shooting, so that any arrow that may miss your target will not endanger people, pets, or property down range. Use a quality target designed for use with crossbow arrows.
3. Always treat your crossbow as you would a firearm, particularly when it is cocked, or cocked and loaded with an arrow.
4. Never use an arrow that is damaged.5. Carefully inspect each arrow for damage before and
after every shot. THIS IS VERY IMPORTANT FOR YOUR SAFETY. Inspect for damage including (a) hairline fractures, cracks or splitting of the carbon shaft, (b) cracked, split or loose Capture nock, (c) ripped or torn fletching, (d) bent or loose insert, (e) missing, loose, bent or broken field point or broadhead. If the arrow is damaged, do NOT use it.
6. It is NOT safe or recommended to cock a crossbow in a tree stand. Cock your crossbow while on the ground before climb-ing into your tree stand.
7. Never climb into a tree stand while carrying your crossbow. Place your cocked and unloaded crossbow on the ground in a safe position, then climb into your stand. After you secure yourself in the tree stand with a safety harness, use a hoist rope attached to your crossbow to pull your crossbow up into the stand. Once you and your crossbow are safely and securely in the tree stand, load the arrow – you are now ready to hunt.

52
SHOOTING SAFETY
1984
8. Following your hunt, remove your arrow and secure it in your quiver. If you are in a tree stand, attached the unloaded crossbow to the hoist rope and carefully lower it to the ground.
9. As with any bow or crossbow, there is a forward movement of the limbs when fired. Never attempt to shoot your crossbow when the limbs are in contact with or near an object, such as a window pane, tree branches, etc. If your crossbow limbs were to hit an object during the shot, you could damage the crossbow, knock yourself off your tree stand or otherwise cause serious injury.
10. Never attempt to shoot your crossbow while in an awkward or unnatural position.
11. Always be aware of where your fingers and thumb are on the Forearm. Shooting from awkward and unnatural positions may distract you from proper Forearm hand placement.
12. While aiming your crossbow, be sure to hold the crossbow level. Do not slope or dip the limbs to one side. Keeping the bow level will greatly improve your shooting and consistency.
13. Do NOT put your finger on the trigger until you have made the decision to fire. To do so could result in an accidental discharge that could cause serious injury or death, or damage to property.
14. We strongly recommend wearing shooting glasses while practicing or hunting with your crossbow.
15. Never walk around carrying your crossbow with an arrow loaded in it.
16. Never hand your crossbow to another person with an arrow loaded in it.
17. When carrying a cocked and unloaded crossbow, make sure the safety is in the Safe position (down and green).

53
SHOOTING SAFETY
1984
WARNING: Do NOT allow any person who has not read this entire crossbow owner’s manual to shoot your crossbow. It is your responsibility to make sure all persons have been properly trained, informed, and warned of all the dangers and risks associated with operating this crossbow.
18. Never operate a crossbow with string and cables that should be replaced (cut or torn string, loose unraveling or missing center serving, etc.). See pages 46-50 for details.
19. Never carry the crossbow with your hands, fingers or any other part of your body in the string path.
20. Never load an arrow in your crossbow until you are at a place where you plan to stay until shooting your crossbow.
21. Never leave your crossbow cocked or loaded when not in use or unsupervised.
22. Keep your crossbow, arrows, broadheads and other hunting gear out of the reach of children
23. Do NOT modify your crossbow or use non-factory replacement parts. To do so will void your warranty and could result in damage to the crossbow, property or injury or death.
24. Do NOT consume drugs or alcohol before or while using your crossbow. Your vision, coordination and judgment could be impaired, making your operation of the crossbow unsafe.

54
ACCESSORIES CROSSBOW ACCESSORIESRED HOT
Parker recommends the following RED HOT high performance crossbow accessories to achieve optimum performance and accuracy from your crossbow.
Powered By
RED HOT Lighted Capture NocksModel# 38-3367 - 3 Pack (HD Orange)Model# 38-3368 - 3 Pack (Red) Model# 38-3369 - 3 Pack (Green) Fits the Following Crossbow Arrow Brands: Parker Hunter Arrows (2013) and others with inside diameters of 0.300”.
FEATURING
• Ensure Proper Arrow & String Alignment• Increase Accuracy• Avoid Accidental Dryfires
#38-225 RED HOT High Velocity Carbon Arrow – 6 PK
#38-220 – Parker Hunter Crossbow Arrow – 6 PK
#38-201 RED HOT EZ Roller Rope Cocker
• GLIDE UP BARREL • WILL NOT SCRATCH • REDUCE COCKING EFFORT
PATENTED ROLLERS
See more RED HOT Accessories at www.parkerbows.com

55
WARRANTY INFORMATION
1984
LIFETIME WARRANTYTo activate Parker’s Lifetime Warranty, the warranty card must be completed in full and mailed by the
purchaser within 15 days of purchase date; or you may register on-line at http://www.parkerbows.com/registration.html.
Parker Compound Bows and Parker Crossbows are warrantied for the lifetime of the original purchaser to be free from defects in materials and workmanship. This warranty excludes normal wear on strings, buss cables, servings, bow camo finish, rust, scopes, and accessories.
The determination regarding defects in materials and/or workmanship and whether the service or repairs are covered under warranty shall be in Parker’s sole discretion. Parker reserves the right to charge for repairs if the warranty has not been activated. Parker reserves the right to make substitutions and charge accordingly when completing repair work for any reason. Parker and Authorized Parker Dealers reserve the right to charge for labor, non-warranty parts, and freight expenses for any work performed.
Accessories included on the Outfitter Compound Bow packages are warrantied for 30 days and may be returned to Parker for replacement. Other accessories, such as rests, quivers, sights, etc. added by anyone other than the Parker factory are not warrantied by Parker.
THE FOLLOWING WILL VOID THE WARRANTY:1. Mishandling, abuse, neglect, dry-fire, or partial dry-fire of the bow.2. NOT following ALL of the safety and operating instructions in the Owner’s Manual.3. Loaning or renting the bow to others without providing proper instructions to the user.4. Altering or modifying the bow from its original condition (interchanging parts and cosmetic refinishing).5. Using a brand of strings or buss cables other than Parker or Red Hot brand, which are specifically
designed to Parker’s proprietary specifications.6. Shooting improperly spined or under-weight arrows (less than 400 grains with point for crossbows).7. Shooting arrows that have been damaged or compromised in any way.8. Using brands of crossbow arrows other than Parker and Red Hot with Capture Nocks.9. Using crossbow arrows without Capture Nocks (including but not limited to flat nocks, moon nocks, omni
nocks).10. Loading crossbow arrows incorrectly (cock vane is not down).11. Shooting arrows with improperly indexed nocks (nock groove does not fully engage string).
IMPORTANT NOTES: A. Altering or modifying a bow could cause damage to the bow or personal injury. Altered and/or modified
parts determined to be unsafe will NOT be returned with the repaired bow.B. Using strings or cables that are the improper length, improper material, and/or the incorrect number of
twists can significantly affect the performance and cause damage to the bow or personal injury.C. Failure to follow #4-11 above with crossbows can cause the string to “Over-Shoot” or “Under-Shoot”
the arrow, which can result in damage to the crossbow, the arrow or even personal injury. When this happens, the arrow does not absorb the full energy from the shot; instead the energy is absorbed by the bows components (e.g.: limbs, cams, strings, etc.), causing damage to the bow or personal injury.
To expedite service and repairs and to ensure everything meets factory specifications, Parker compound bows and crossbow should be returned to Parker. BEFORE RETURNING ANY ITEM, call 540-337-5426 to speak with a customer service representative and obtain a Return Authorization Number. All items returned to Parker without a Return Authorization Number (RA#) clearly marked on the outside of the box will be refused by Parker. The customer is responsible for the cost of shipping to Parker. Parker will pay return shipping costs on units received by Parker. All items must be shipped in a cardboard box. DO NOT SHIP BOWS OR CROSSBOWS IN A HARDCASE, IT WILL BE REFUSED.
DO NOT USE A HARD BOW CASE FOR SHIPPING
Parker Crossbows3022 Lee Jackson Hwy. Staunton, VA 24401RA#

56
WARRANTY INFORMATION
1984
-Warranty Return Process-PARKER’S WARRANTY EXTENDS TO THE ORIGINAL
PURCHASER ONLYDO NOT RETURN ANYTHING TO PARKER BEFORE CALLING AND
OBTAINING A RETURN AUTHORIZATION NUMBER.
To ensure a prompt return of your crossbow, complete the following:
1. Contact Parker Customer Service at 540-337-5426 to review your issues with a trained Parker Technician or to obtain a Return Authorization Number (RA#).
2. In many situations, we are able to resolve the issue by phone. However, some issues may not be resolved over the phone and will require the bow be return to Parker for service. At this time the Parker Technician will issue a Return Authorization Number (RA#). Remove all accessories before shipping unless otherwise instructed by the Parker Technician.
3. Return the crossbow to Parker at the following Address:
4. Please package your bow carefully, wrapping the bow in paper or foam. Ensure the bow cannot move around in the box and that there are no loose parts that could shift during delivery and damage the bow. Include a description of your warranty request, and make sure you include your name, address, phone number, email address and the RA #.
DO NOT USE A HARD BOW CASE FOR SHIPPING
ATTENTION: This warranty excludes normal wear on strings, buss cables, servings, bow camo finish, rust and accessories.
Parker Crossbows3022 Lee Jackson Hwy. Staunton, VA 24401RA#
Make sure you write your name and your shipping address on the box - NOT simply the UPS address.

1. USE ONLY CAPTURE NOCKS
2. Index Nock Correctly
3. Load Cock Vane (Odd Color) Down
NOT FOLLOWING THESE INSTRUCTIONS CAN VOID YOUR WARRANTY AND LEAD TO THIS
Capture NockCaCa Nockpture NoCapture Nock Moon NockMMoon NockMMoon NMoon Nock Flat NockF ocFlat NocFlat Nock
YES NO NO
String
String
Odd Color Vane
String
String
STRING GROOVE
STRING GROOVE
STRI
NG G
ROOV
E STRING GROOVE
NO NOYES
Odd Color Vane Down
Barrel
String Sttring
NO NOYES
STRIN
G GRO
OVE
STRING GROOVE
Odd ColorVane Down
ONOYYES
STST GNGRRI E G GG G
ROGRO