150-157.B1 Slatted Bookcase€¦ · bookcase is mortise and tenon joinery. All the cuts are square,...
10
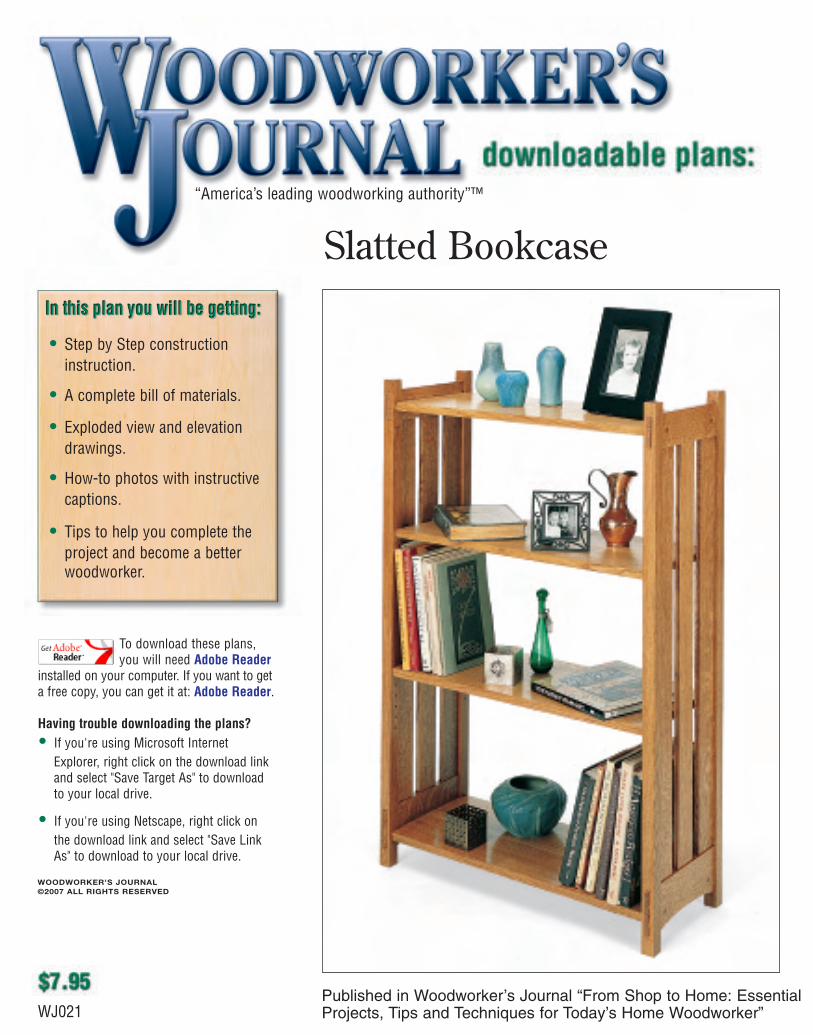
• Step by Step construction instruction. • A complete bill of materials. • Exploded view and elevation drawings. • How-to photos with instructive captions. • Tips to help you complete the project and become a better woodworker. To download these plans, you will need Adobe Reader installed on your computer. If you want to get a free copy, you can get it at: Adobe Reader. Having trouble downloading the plans? • If you're using Microsoft Internet Explorer, right click on the download link and select "Save Target As" to download to your local drive. • If you're using Netscape, right click on the download link and select "Save Link As" to download to your local drive. WJ021 “America’s leading woodworking authority”™ Slatted Bookcase Published in Woodworker’s Journal “From Shop to Home: Essential Projects, Tips and Techniques for Today’s Home Woodworker” WOODWORKER'S JOURNAL ©2007 ALL RIGHTS RESERVED
Transcript of 150-157.B1 Slatted Bookcase€¦ · bookcase is mortise and tenon joinery. All the cuts are square,...
• Step by Step constructioninstruction.
• A complete bill of materials.
• Exploded view and elevationdrawings.
• How-to photos with instructivecaptions.
• Tips to help you complete theproject and become a betterwoodworker.
To download these plans,you will need Adobe Reader
installed on your computer. If you want to geta free copy, you can get it at: Adobe Reader.
Having trouble downloading the plans?• If you're using Microsoft Internet
Explorer, right click on the download linkand select "Save Target As" to downloadto your local drive.
• If you're using Netscape, right click onthe download link and select "Save LinkAs" to download to your local drive.
WJ021
“America’s leading woodworking authority”™
Slatted Bookcase
Published in Woodworker’s Journal “From Shop to Home: EssentialProjects, Tips and Techniques for Today’s Home Woodworker”
WOODWORKER'S JOURNAL ©2007 ALL RIGHTS RESERVED
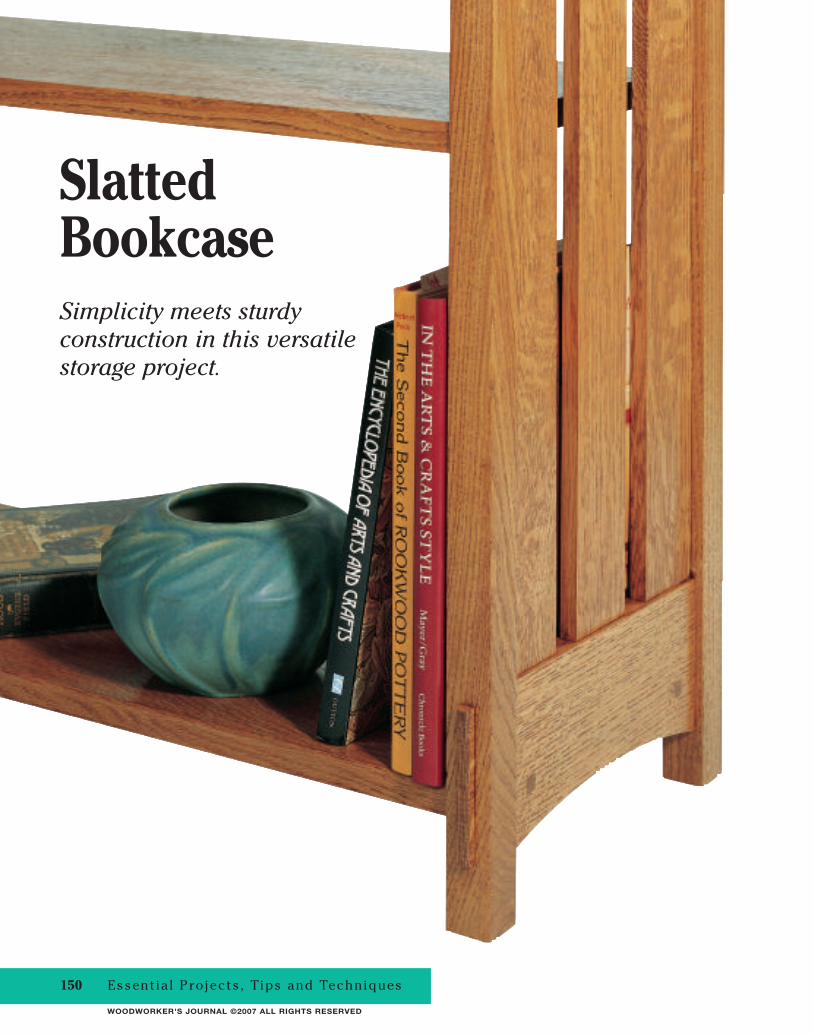
Slatted BookcaseSimplicity meets sturdyconstruction in this versatilestorage project.
150 Essential Projects, Tips and Techniques
WOODWORKER'S JOURNAL ©2007 ALL RIGHTS RESERVED
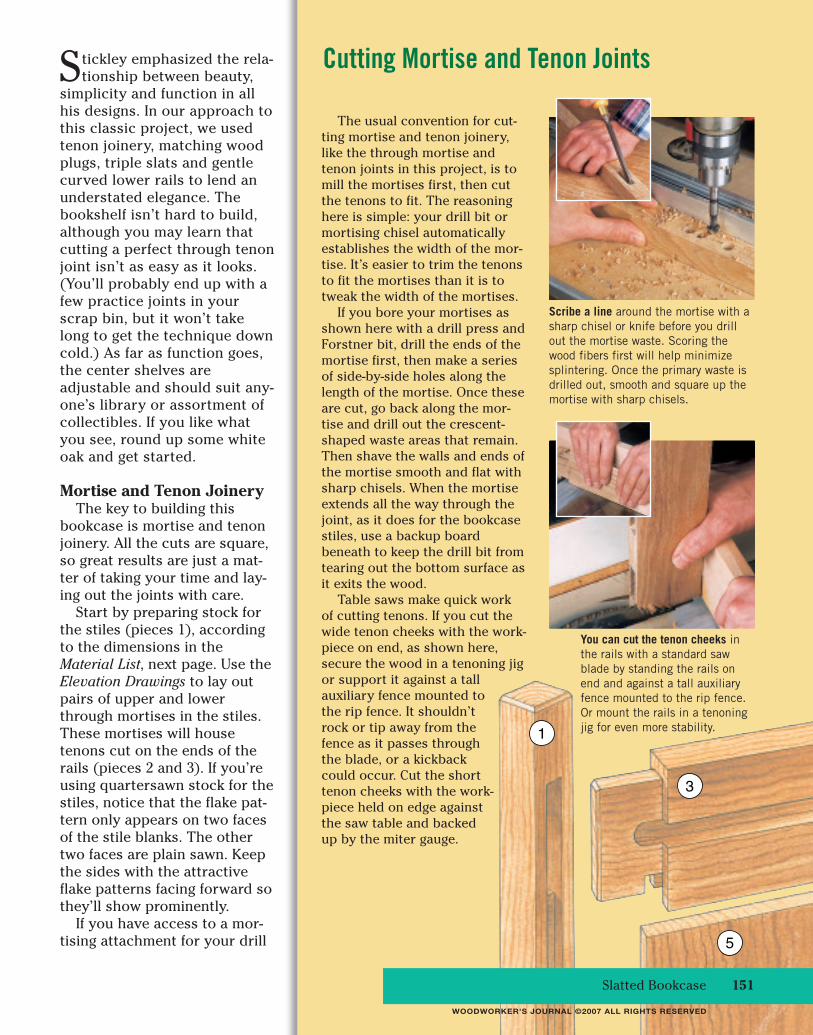
Stickley emphasized the rela-tionship between beauty,
simplicity and function in allhis designs. In our approach tothis classic project, we usedtenon joinery, matching woodplugs, triple slats and gentlecurved lower rails to lend anunderstated elegance. Thebookshelf isn’t hard to build,although you may learn thatcutting a perfect through tenonjoint isn’t as easy as it looks.(You’ll probably end up with afew practice joints in yourscrap bin, but it won’t takelong to get the technique downcold.) As far as function goes,the center shelves areadjustable and should suit any-one’s library or assortment ofcollectibles. If you like whatyou see, round up some whiteoak and get started.
Mortise and Tenon JoineryThe key to building this
bookcase is mortise and tenonjoinery. All the cuts are square,so great results are just a mat-ter of taking your time and lay-ing out the joints with care.
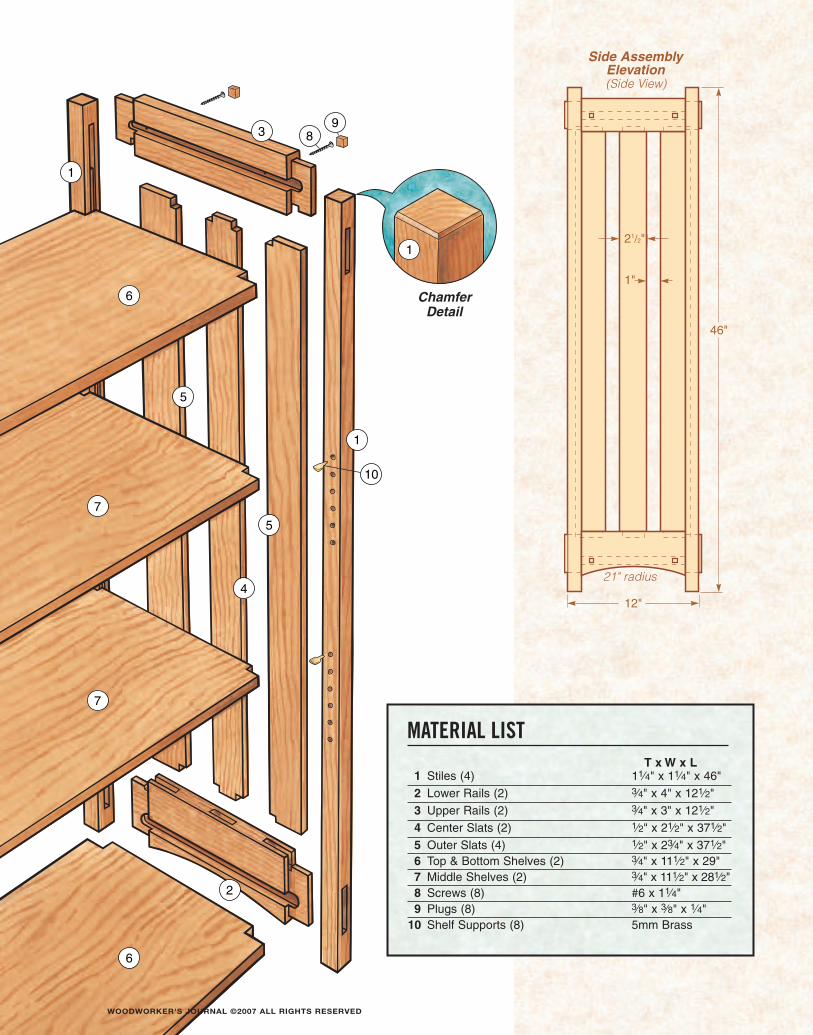
Start by preparing stock forthe stiles (pieces 1), accordingto the dimensions in theMaterial List, next page. Use theElevation Drawings to lay outpairs of upper and lowerthrough mortises in the stiles.These mortises will housetenons cut on the ends of therails (pieces 2 and 3). If you’reusing quartersawn stock for thestiles, notice that the flake pat-tern only appears on two facesof the stile blanks. The othertwo faces are plain sawn. Keepthe sides with the attractiveflake patterns facing forward sothey’ll show prominently.
If you have access to a mor-tising attachment for your drill
The usual convention for cut-ting mortise and tenon joinery,like the through mortise andtenon joints in this project, is tomill the mortises first, then cutthe tenons to fit. The reasoninghere is simple: your drill bit ormortising chisel automaticallyestablishes the width of the mor-tise. It’s easier to trim the tenonsto fit the mortises than it is totweak the width of the mortises.
If you bore your mortises asshown here with a drill press andForstner bit, drill the ends of themortise first, then make a seriesof side-by-side holes along thelength of the mortise. Once theseare cut, go back along the mor-tise and drill out the crescent-shaped waste areas that remain.Then shave the walls and ends ofthe mortise smooth and flat withsharp chisels. When the mortiseextends all the way through thejoint, as it does for the bookcasestiles, use a backup boardbeneath to keep the drill bit fromtearing out the bottom surface asit exits the wood.
Table saws make quick workof cutting tenons. If you cut thewide tenon cheeks with the work-piece on end, as shown here,secure the wood in a tenoning jigor support it against a tallauxiliary fence mounted tothe rip fence. It shouldn’trock or tip away from thefence as it passes throughthe blade, or a kickbackcould occur. Cut the shorttenon cheeks with the work-piece held on edge againstthe saw table and backedup by the miter gauge.
Cutting Mortise and Tenon Joints
You can cut the tenon cheeks inthe rails with a standard sawblade by standing the rails onend and against a tall auxiliaryfence mounted to the rip fence.Or mount the rails in a tenoningjig for even more stability.
Scribe a line around the mortise with asharp chisel or knife before you drillout the mortise waste. Scoring thewood fibers first will help minimizesplintering. Once the primary waste isdrilled out, smooth and square up themortise with sharp chisels.
1
3
5
1
3
5
1
3
5Slatted Bookcase 151
WOODWORKER'S JOURNAL ©2007 ALL RIGHTS RESERVED
3/4"
46"
1"
12"
115/16"
21/2"
1
10
2
3
4
5
6
7
8
9Chamfer Detail
Side AssemblyElevation(Side View)
21" radius
T x W x L1 Stiles (4) 11⁄4" x 11⁄4" x 46"
2 Lower Rails (2) 3⁄4" x 4" x 121⁄2"
3 Upper Rails (2) 3⁄4" x 3" x 121⁄2"
4 Center Slats (2) 1⁄2" x 21⁄2" x 371⁄2"
5 Outer Slats (4) 1⁄2" x 23⁄4" x 371⁄2"6 Top & Bottom Shelves (2) 3⁄4" x 111⁄2" x 29"7 Middle Shelves (2) 3⁄4" x 111⁄2" x 281⁄2"8 Screws (8) #6 x 11⁄4"9 Plugs (8) 3⁄8" x 3⁄8" x 1⁄4"
10 Shelf Supports (8) 5mm Brass
MATERIAL LIST
1
1
10
2
3
4
5
5
6
6
7
7
89
1
WOODWORKER'S JOURNAL ©2007 ALL RIGHTS RESERVED

Slatted Bookcase 153
1
1 1
2
3
4
4
5
5 5
6
7
3
5/8"
13/4"
31/2"
1"
1"
21/4"
3/4"
123/4"
26"
1/2"
1/4"
1/4"
1/2"
1/4"
1"
11/4"
35/8"
21/2" 11/4"
11/2"1/4"
1/4"
1/8"
11/4"
21/2"
21/2"
1/4"
21/2"
11/2"
51/4"
21/2"23/4"
2"
1/2"
1/4"
31/2"
3/4"
NOTE: All the corners of the shelves are
notched according to the details above.
Side Panel Assembly
Slat Notch Detail
Upper Rail and Stile Joinery Detail
Stile
Middle Shelf Notch Detail
(Top View)
Top and Bottom ShelfNotch Detail
(Top View)
(Top View)
(Side View)
21" Radius
3/4" x 3/8" groove
WOODWORKER'S JOURNAL ©2007 ALL RIGHTS RESERVED
154 Essential Projects, Tips and Techniques
press, cutting true, squaremortises is easy work.However, most of us drillout the waste on a drillpress, then clean up with asharp chisel (as shown inthe sidebar on page 151).Whichever method you use,make a few test mortisesfirst. Grain direction is a sig-nificant issue with widegrained species such aswhite oak: a sharp cut alongthe grain can cause split-ting, so work across thegrain whenever possible.One last tip on this proce-dure: be sure the surfaceyou are drilling into is with-out voids to steer clear ofunsightly tearout.
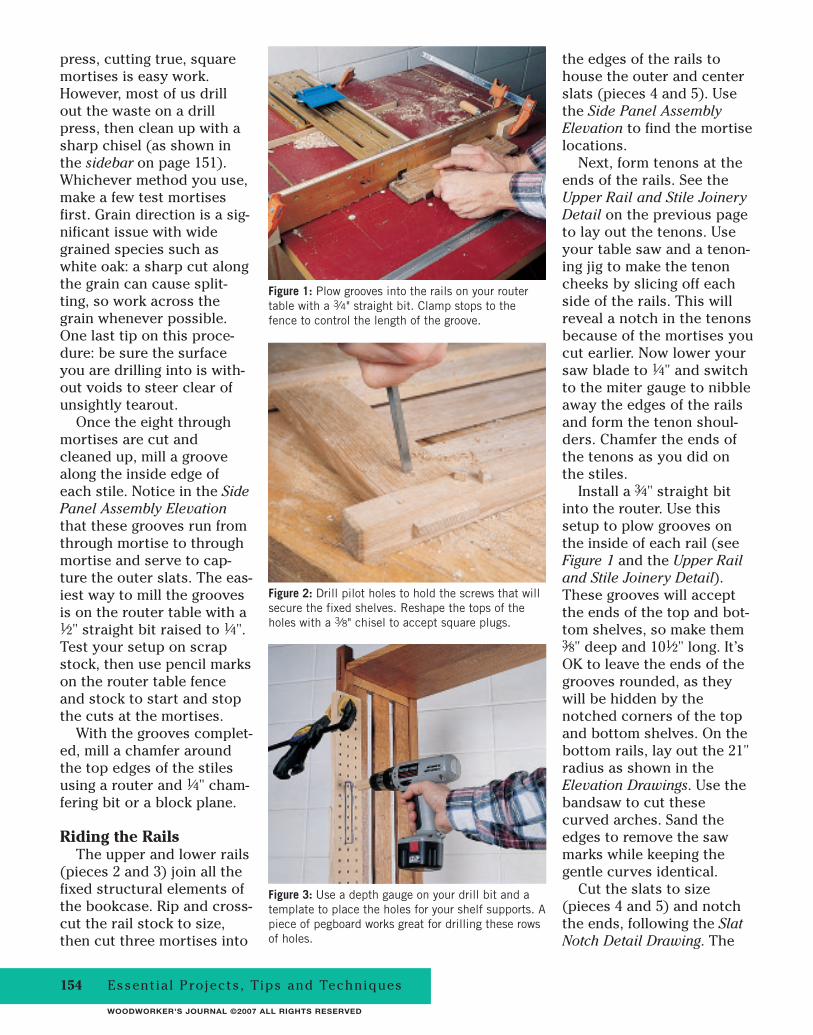
Once the eight throughmortises are cut andcleaned up, mill a groovealong the inside edge ofeach stile. Notice in the SidePanel Assembly Elevationthat these grooves run fromthrough mortise to throughmortise and serve to cap-ture the outer slats. The eas-iest way to mill the groovesis on the router table with a1⁄2" straight bit raised to 1⁄4".Test your setup on scrapstock, then use pencil markson the router table fenceand stock to start and stopthe cuts at the mortises.
With the grooves complet-ed, mill a chamfer aroundthe top edges of the stilesusing a router and 1⁄4" cham-fering bit or a block plane.
Riding the RailsThe upper and lower rails
(pieces 2 and 3) join all thefixed structural elements ofthe bookcase. Rip and cross-cut the rail stock to size,then cut three mortises into
the edges of the rails tohouse the outer and centerslats (pieces 4 and 5). Usethe Side Panel AssemblyElevation to find the mortiselocations.
Next, form tenons at theends of the rails. See theUpper Rail and Stile JoineryDetail on the previous pageto lay out the tenons. Useyour table saw and a tenon-ing jig to make the tenoncheeks by slicing off eachside of the rails. This willreveal a notch in the tenonsbecause of the mortises youcut earlier. Now lower yoursaw blade to 1⁄4" and switchto the miter gauge to nibbleaway the edges of the railsand form the tenon shoul-ders. Chamfer the ends ofthe tenons as you did onthe stiles.
Install a 3⁄4" straight bitinto the router. Use thissetup to plow grooves onthe inside of each rail (seeFigure 1 and the Upper Railand Stile Joinery Detail).These grooves will acceptthe ends of the top and bot-tom shelves, so make them3⁄8" deep and 101⁄2" long. It’sOK to leave the ends of thegrooves rounded, as theywill be hidden by thenotched corners of the topand bottom shelves. On thebottom rails, lay out the 21"radius as shown in theElevation Drawings. Use thebandsaw to cut thesecurved arches. Sand theedges to remove the sawmarks while keeping thegentle curves identical.
Cut the slats to size(pieces 4 and 5) and notchthe ends, following the SlatNotch Detail Drawing. The
Figure 1: Plow grooves into the rails on your routertable with a 3⁄4" straight bit. Clamp stops to thefence to control the length of the groove.
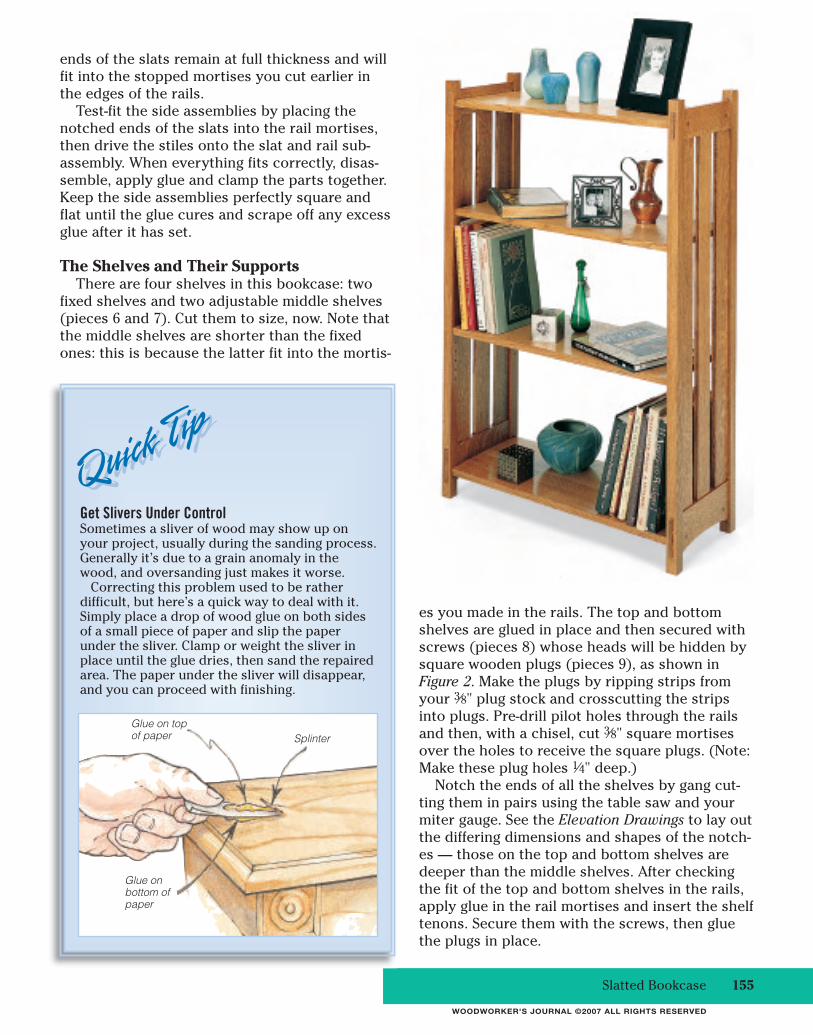
Figure 2: Drill pilot holes to hold the screws that willsecure the fixed shelves. Reshape the tops of theholes with a 3⁄8" chisel to accept square plugs.
Figure 3: Use a depth gauge on your drill bit and atemplate to place the holes for your shelf supports. Apiece of pegboard works great for drilling these rowsof holes.
WOODWORKER'S JOURNAL ©2007 ALL RIGHTS RESERVED
ends of the slats remain at full thickness and willfit into the stopped mortises you cut earlier inthe edges of the rails.
Test-fit the side assemblies by placing thenotched ends of the slats into the rail mortises,then drive the stiles onto the slat and rail sub-assembly. When everything fits correctly, disas-semble, apply glue and clamp the parts together.Keep the side assemblies perfectly square andflat until the glue cures and scrape off any excessglue after it has set.
The Shelves and Their SupportsThere are four shelves in this bookcase: two
fixed shelves and two adjustable middle shelves(pieces 6 and 7). Cut them to size, now. Note thatthe middle shelves are shorter than the fixedones: this is because the latter fit into the mortis-
es you made in the rails. The top and bottomshelves are glued in place and then secured withscrews (pieces 8) whose heads will be hidden bysquare wooden plugs (pieces 9), as shown inFigure 2. Make the plugs by ripping strips fromyour 3⁄8" plug stock and crosscutting the stripsinto plugs. Pre-drill pilot holes through the railsand then, with a chisel, cut 3⁄8" square mortisesover the holes to receive the square plugs. (Note:Make these plug holes 1⁄4" deep.)
Notch the ends of all the shelves by gang cut-ting them in pairs using the table saw and yourmiter gauge. See the Elevation Drawings to lay outthe differing dimensions and shapes of the notch-es — those on the top and bottom shelves aredeeper than the middle shelves. After checkingthe fit of the top and bottom shelves in the rails,apply glue in the rail mortises and insert the shelftenons. Secure them with the screws, then gluethe plugs in place.
Slatted Bookcase 155
Get Slivers Under ControlSometimes a sliver of wood may show up onyour project, usually during the sanding process.Generally it’s due to a grain anomaly in thewood, and oversanding just makes it worse.
Correcting this problem used to be ratherdifficult, but here’s a quick way to deal with it.Simply place a drop of wood glue on both sidesof a small piece of paper and slip the paperunder the sliver. Clamp or weight the sliver inplace until the glue dries, then sand the repairedarea. The paper under the sliver will disappear,and you can proceed with finishing.
Glue on topof paper
Glue onbottom ofpaper
Splinter
WOODWORKER'S JOURNAL ©2007 ALL RIGHTS RESERVED
All that stands between youand the finishing room is tomake four rows of shelf pinholes in the stiles of each sideassembly for the two adjustableshelves. Refer to the ElevationDrawings again to determine thestarting and stopping points ofthese rows. Drill the holes usinga piece of pegboard as a tem-plate and with a sharp bradpoint bit fitted with a depth col-lar. Clamp the template evenlyin place on each stile beforeboring the shelf pin holes.
Give all the project
surfaces a thorough sanding upto 220 grit before proceedingwith finish.
A Safer Stickley FinishStickley developed a unique
method of fuming white oakwith ammonia to create aglowing aged and mellowcolor. Mimicking the uniquelook of the Stickley finish wasa challenge we took seriously.We used Bartley’s honey gelstain to approximate the samefumed effect with much lessfuss and danger. It’s also con-venient for staining verticalsurfaces without the drippymess. Just be sure to wipe allthe excess gel out of nooksand crannies. Protect thewood with a few coats of satinvarnish — the gel variety goeson smoothly and won’t sag ifyou accidentally apply toomuch. It produces a rich lusterthat is much in keeping withthe Arts & Crafts tradition.
There are other good, safefinish options for Arts & Craftsfurniture that you may want totry instead of gel stain. Formore more options, seeMichael Dresdner’s sug-gestions on thenext page.
The shelf supports (pieces10) are the brass plug-in type;install them after the finishdries thoroughly.
This is such a classic book-shelf that we’ll wager you’remaking a second or third assoon as this one finds aprominent spot in the livingroom or den.
Matching the traditional fumed Stickleyfinish with less toxic alternatives is achallenge. We found that using a gelstain followed by a complementarygel varnish does the job quitehandily — and without theneed for a fuming tent,chemical gloves or arespirator.
Teflon Keeps Finish Fresh
While clearglass jars are
handy forstoringfinishes,all it
takes isa bit ofresidual fin-ish on therim to seal
the lid andmake it diffi-
cult to remove. Here’s a sim-ple solution: Teflon tape soldfor sealing pipe threads.First, wipe the top of the jarclean, then wrap a couple lay-ers of tape over the threads,winding it on clockwise. Letsome tape lap over on thetop lip of the container aswell. Most finishes and paintswon’t stick to the tape, so thejar will open easily and safelythe next time you need it.
Teflon tape
WOODWORKER’SGLOSSARY
WOODWORKER’SGLOSSARY
Mortise and Tenon:A type of joinery used toattach two perpendicularpieces of wood where a pro-truding tenon on one work-piece fits into a matchingmortise hole in the other.
156 Essential Projects, Tips and Techniques
WOODWORKER'S JOURNAL ©2007 ALL RIGHTS RESERVED
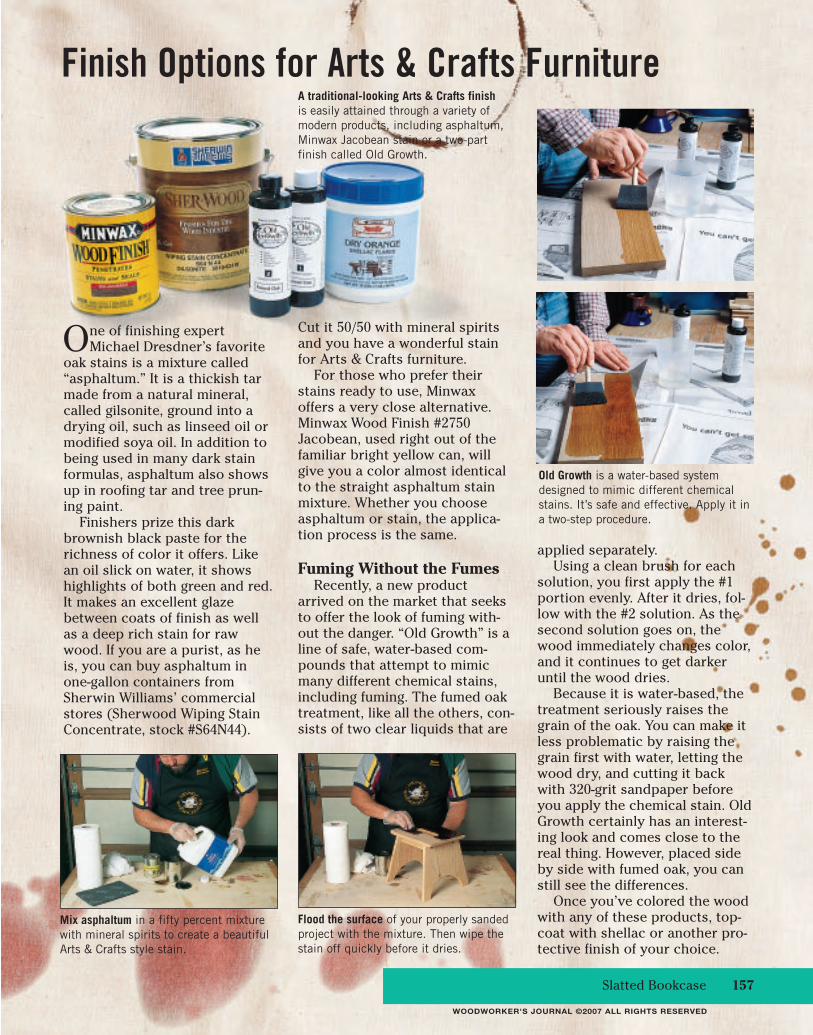
One of finishing expertMichael Dresdner’s favorite
oak stains is a mixture called“asphaltum.” It is a thickish tarmade from a natural mineral,called gilsonite, ground into adrying oil, such as linseed oil ormodified soya oil. In addition tobeing used in many dark stainformulas, asphaltum also showsup in roofing tar and tree prun-ing paint.
Finishers prize this darkbrownish black paste for therichness of color it offers. Likean oil slick on water, it showshighlights of both green and red.It makes an excellent glazebetween coats of finish as wellas a deep rich stain for rawwood. If you are a purist, as heis, you can buy asphaltum inone-gallon containers fromSherwin Williams’ commercialstores (Sherwood Wiping StainConcentrate, stock #S64N44).
Cut it 50/50 with mineral spiritsand you have a wonderful stainfor Arts & Crafts furniture.
For those who prefer theirstains ready to use, Minwaxoffers a very close alternative.Minwax Wood Finish #2750Jacobean, used right out of thefamiliar bright yellow can, willgive you a color almost identicalto the straight asphaltum stainmixture. Whether you chooseasphaltum or stain, the applica-tion process is the same.
Fuming Without the FumesRecently, a new product
arrived on the market that seeksto offer the look of fuming with-out the danger. “Old Growth” is aline of safe, water-based com-pounds that attempt to mimicmany different chemical stains,including fuming. The fumed oaktreatment, like all the others, con-sists of two clear liquids that are
Mix asphaltum in a fifty percent mixturewith mineral spirits to create a beautifulArts & Crafts style stain.
A traditional-looking Arts & Crafts finish is easily attained through a variety ofmodern products, including asphaltum,Minwax Jacobean stain or a two-partfinish called Old Growth.
Old Growth is a water-based systemdesigned to mimic different chemicalstains. It’s safe and effective. Apply it ina two-step procedure.
applied separately. Using a clean brush for each
solution, you first apply the #1portion evenly. After it dries, fol-low with the #2 solution. As thesecond solution goes on, thewood immediately changes color,and it continues to get darkeruntil the wood dries.
Because it is water-based, thetreatment seriously raises thegrain of the oak. You can make itless problematic by raising thegrain first with water, letting thewood dry, and cutting it backwith 320-grit sandpaper beforeyou apply the chemical stain. OldGrowth certainly has an interest-ing look and comes close to thereal thing. However, placed sideby side with fumed oak, you canstill see the differences.
Once you’ve colored the woodwith any of these products, top-coat with shellac or another pro-tective finish of your choice.
Flood the surface of your properly sandedproject with the mixture. Then wipe thestain off quickly before it dries.
Finish Options for Arts & Crafts Furniture
Slatted Bookcase 157
WOODWORKER'S JOURNAL ©2007 ALL RIGHTS RESERVED

Woodworker’s Journal Downloadable Plans are much-loved woodworking projects from ourlibrary of back issues. Please note that specific products and sources cited in a plan when itoriginally appeared may no longer be available.
We have many more Downloadable Plans for sale on our website.
Please visit http://woodworkersjournal.com/plans to browse our selection and purchase one (or one dozen) today!
If you experience any problems with this plan, please contact: [email protected]
or
Attn: Classic ProjectsWoodworker’s Journal 4365 Willow DriveMedina, MN 55340
Happy woodworking!
Matt BeckerInternet Production Coordinator
© 2012 Woodworker’s Journal