
1/4/2013 10:58:30 AM FS-P250 Quick Start Guide · FS-P250 Quick Start Guide This document is a...
18
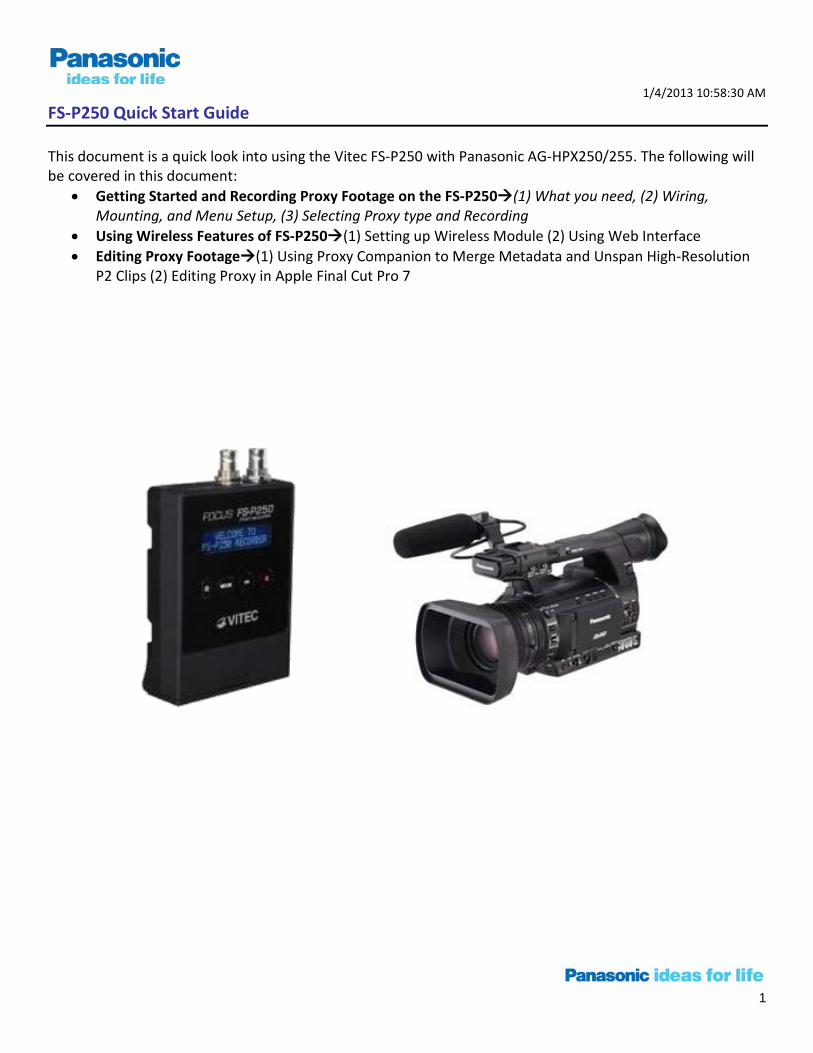
1/4/2013 10:58:30 AM 1 FS-P250 Quick Start Guide This document is a quick look into using the Vitec FS-P250 with Panasonic AG-HPX250/255. The following will be covered in this document: • Getting Started and Recording Proxy Footage on the FS-P250(1) What you need, (2) Wiring, Mounting, and Menu Setup, (3) Selecting Proxy type and Recording • Using Wireless Features of FS-P250(1) Setting up Wireless Module (2) Using Web Interface • Editing Proxy Footage(1) Using Proxy Companion to Merge Metadata and Unspan High-Resolution P2 Clips (2) Editing Proxy in Apple Final Cut Pro 7
Transcript of 1/4/2013 10:58:30 AM FS-P250 Quick Start Guide · FS-P250 Quick Start Guide This document is a...
1/4/2013 10:58:30 AM
1
FS-P250 Quick Start Guide
This document is a quick look into using the Vitec FS-P250 with Panasonic AG-HPX250/255. The following will be covered in this document:
• Getting Started and Recording Proxy Footage on the FS-P250(1) What you need, (2) Wiring, Mounting, and Menu Setup, (3) Selecting Proxy type and Recording
• Using Wireless Features of FS-P250(1) Setting up Wireless Module (2) Using Web Interface • Editing Proxy Footage(1) Using Proxy Companion to Merge Metadata and Unspan High-Resolution
P2 Clips (2) Editing Proxy in Apple Final Cut Pro 7
1/4/2013 10:58:30 AM
2
Contents
1. GETTING STARTED AND RECORDING PROXY FOOTAGE ON THE FS-P250 ............................................................. 3 1. 1: WHAT YOU NEED: ............................................................................................................................................................................... 3 1.2: WIRING, MOUNTING, AND MENU SETUP ................................................................................................................................................ 3 1.3: SELECTING PROXY TYPE AND RECORDING ................................................................................................................................................. 4
2. USING WIRELESS FEATURES OF FS-P250 ........................................................................................................................... 5 2.1 INSTALLING AND SETTING UP WIRELESS DONGLE ON FS-P250 ..................................................................................................................... 5 2.2 CONNECTING TO FS-P250 WIRELESSLY ................................................................................................................................................ 6 2.3 RECORD/PLAYBACK OF PROXY ............................................................................................................................................................ 8 2.4 DOWNLOADING PROXY CLIPS .............................................................................................................................................................. 9 2.5 LIVE STREAMING OF PROXY ................................................................................................................................................................ 9 2.6 ZOOMING PROXY OR LIVE STREAMING PLAYBACK ................................................................................................................................. 10 2.7 INPUTTING TEXT MEMOS & METADATA ............................................................................................................................................. 10
3. EDITING PROXY ....................................................................................................................................................................... 12 3.1 USING PROXY COMPANION TO TRANSFER METADATA BETWEEN PROXY & P2 AND SPLITTING SPANNED CLIPS ........................................................ 12 3.2 USING APPLE FINAL CUT PRO 7 (FCP) TO EDIT PROXY AND CONFORM TO HIGH RESOLUTION .......................................................................... 13
4. APPENDIX ................................................................................................................................................................................... 17 APPENDIX A: SUPPORTED INPUT AND OUTPUT FORMATS OF FS-P250: ............................................................................................................. 17 APPENDIX B: SYSTEM REQUIREMENTS FOR WEB APPLICATION .......................................................................................................................... 17 APPENDIX C: NON-LINEAR EDITING SYSTEMS (NLES) THAT SUPPORT PROXY EDITING AND HIGH RESOLUTION CONFORM............................................ 18 APPENDIX D: RESOURCES .......................................................................................................................................................................... 18

1/4/2013 10:58:30 AM
3
1. Getting Started and Recording Proxy Footage on the FS-P250
1. 1: What you need: 1. Panasonic AG-HPX250 OR AG-HPX255 with charged battery pack or AC Adaptor. Note: Ensure that
AG-HPX250 firmware used is v10.59 or later (if AG-HPX255-v10.22 or later) 2. Vitec FS-P250 with charged battery pack or AC Adaptor. 3. (1) P2 Card (of desired size) and (1) SD Card (of desired size). 4. BT-MOUNT (To mount FS-P250 to camera Unit)-OPTIONAL
1.2: Wiring, Mounting, and Menu Setup A. Wiring Diagram:
Take SDI OUT of AG-HPX250/255 into the SDI IN of FS-P250. (Note on earlier models of the FS-P250, SDI in and SDI Loop have been mislabeled. If user does not see video input, try switching between SDI IN and SDI LOOP on FS-P250.) B. Mounting (OPTIONAL): A user may use the BT-MOUNT to mount the FS-P250 to the AG-HPX250 as seen below:
C. Menu Setup:
- Press MENU button on AG-HPX250
.

1/4/2013 10:58:30 AM
4
- Select 7. OUTPUT SEL. - Select EXPANDED for SDI METADATA
- Press MENU, to go back to main menu and then select 5. RECORDING SETUP
- Select FRMRATE for UB MODE (Set by default)
Note: If user is having difficulties, be sure to check the following menu settings:
1. Under 5. RECORDING SETUP, REC FUNCTION set to NORMAL ( not INTERVAL, ONE SHOT, or LOOP) 2. MODE switch (used to turn camera on/off & switch mode) is set to CAMERA (not PB/THUMBNAIL or PC
MODE) 3. Under 1. SCENE FILE, VFR set to OFF 4. Under 2. SYSTEM SETUP, REC SIGNAL cannot be set to 1394.
1.3: Selecting Proxy Type and Recording A. To Select Proxy type, press MODE on the FS-P250 until you see the desired proxy format and press
OK to confirm. See Appendix A of this document for proxy output types and video input types. B. Once you have the desired proxy type selected, you are ready to record. Insert P2 card in camera
and SD card in FS-P250 recorder, if you have already not done so. Now press RECORD on HPX250, FS-P250 will record synchronized and both P2 high resolution and SD proxy footage will record.
If you see “RECORD” on the FS-P250 when you press RECORD on the HPX250, then you have successfully setup the unit for synchronized proxy recording.
1/4/2013 10:58:30 AM
5
2. Using Wireless Features of FS-P250 This section will show you how to (1) Install Wireless Dongle for FS-P250, (2) Connect to FS-P250 Wirelessly (3) Record/Playback of Proxy (4) Live Streaming of Proxy (5) Inputting Text Memos & Metadata
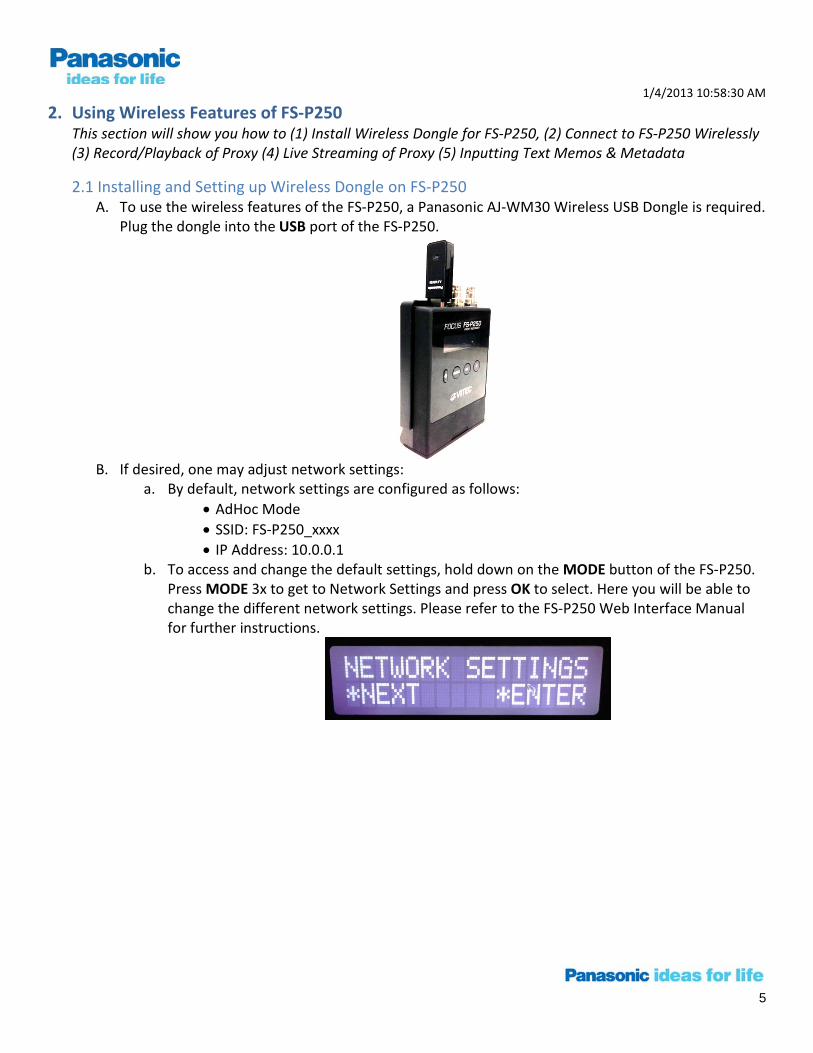
2.1 Installing and Setting up Wireless Dongle on FS-P250 A. To use the wireless features of the FS-P250, a Panasonic AJ-WM30 Wireless USB Dongle is required.
Plug the dongle into the USB port of the FS-P250.
B. If desired, one may adjust network settings:
a. By default, network settings are configured as follows: • AdHoc Mode • SSID: FS-P250_xxxx • IP Address: 10.0.0.1
b. To access and change the default settings, hold down on the MODE button of the FS-P250. Press MODE 3x to get to Network Settings and press OK to select. Here you will be able to change the different network settings. Please refer to the FS-P250 Web Interface Manual for further instructions.

1/4/2013 10:58:30 AM
6
2.2 Connecting to FS-P250 Wirelessly FS-P250 Wireless Web Interface is compatible with PC, Mac, and iOS Platforms. For detailed specifications and compatibility refer to Appendix B of this document. A. Connect to the network with SSID: FS-P250_xxxx on your PC, Mac, or iOS device. See below to see
WIFI connection utilities on PC, Mac, and iPhone (iOS) (each device may look slightly different).:
B. Open up the available browser (Internet Explorer, Safari, Firefox) on your device and enter 10.0.0.1 (factory default) in the browser address bar.
Fig 2.2(a): PC Fig 2.2(b): iPhone (iOS) Fig 2.2(c): Mac
1/4/2013 10:58:30 AM
7
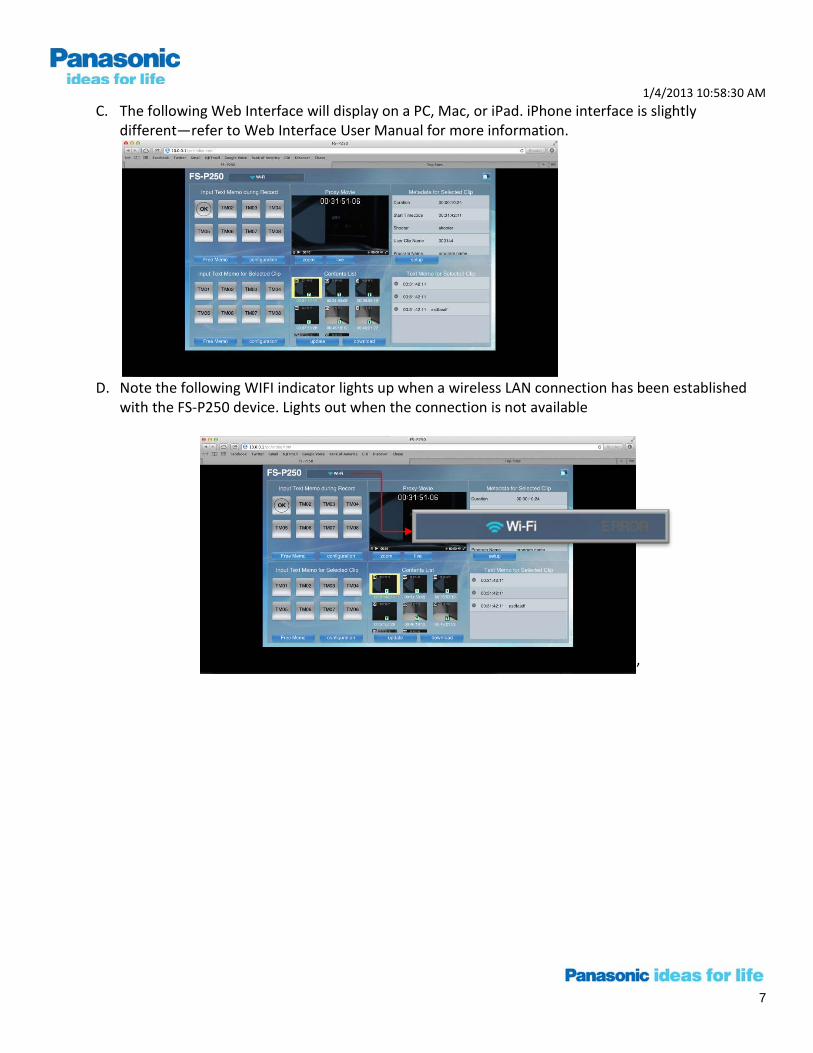
C. The following Web Interface will display on a PC, Mac, or iPad. iPhone interface is slightly different—refer to Web Interface User Manual for more information.
D. Note the following WIFI indicator lights up when a wireless LAN connection has been established
with the FS-P250 device. Lights out when the connection is not available
’

1/4/2013 10:58:30 AM
8
2.3 Record/Playback of Proxy A. Recording & the Record Indicator
A. To Record, press the Record Button on the HPX250/255 Camera. B. For the user monitoring through the Web Browser, the Record Indicator will light up when
the camera is in record mode.
B. Playback Clips
A. To Playback a Clip, under the Contents List Module, Click the desired clip. The clip will playback above that module.
Click Clip to Playback
Preview of Selected Clip
1/4/2013 10:58:30 AM
9
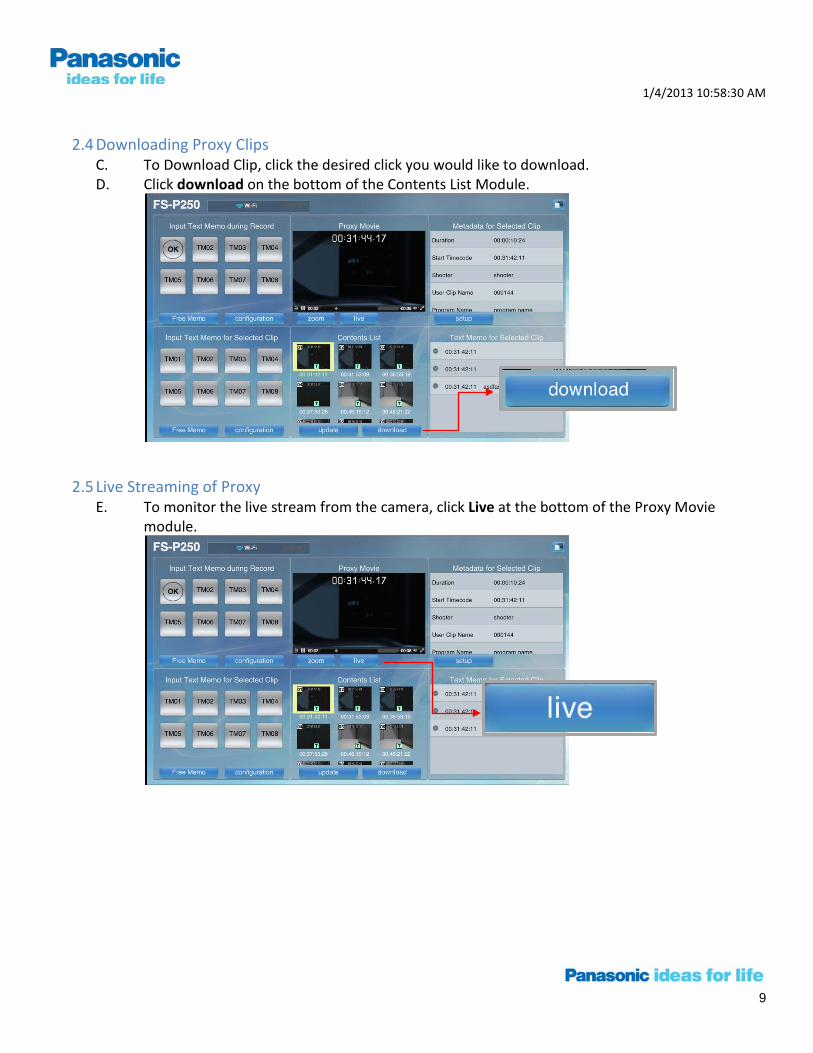
2.4 Downloading Proxy Clips C. To Download Clip, click the desired click you would like to download. D. Click download on the bottom of the Contents List Module.
2.5 Live Streaming of Proxy E. To monitor the live stream from the camera, click Live at the bottom of the Proxy Movie
module.
1/4/2013 10:58:30 AM
10
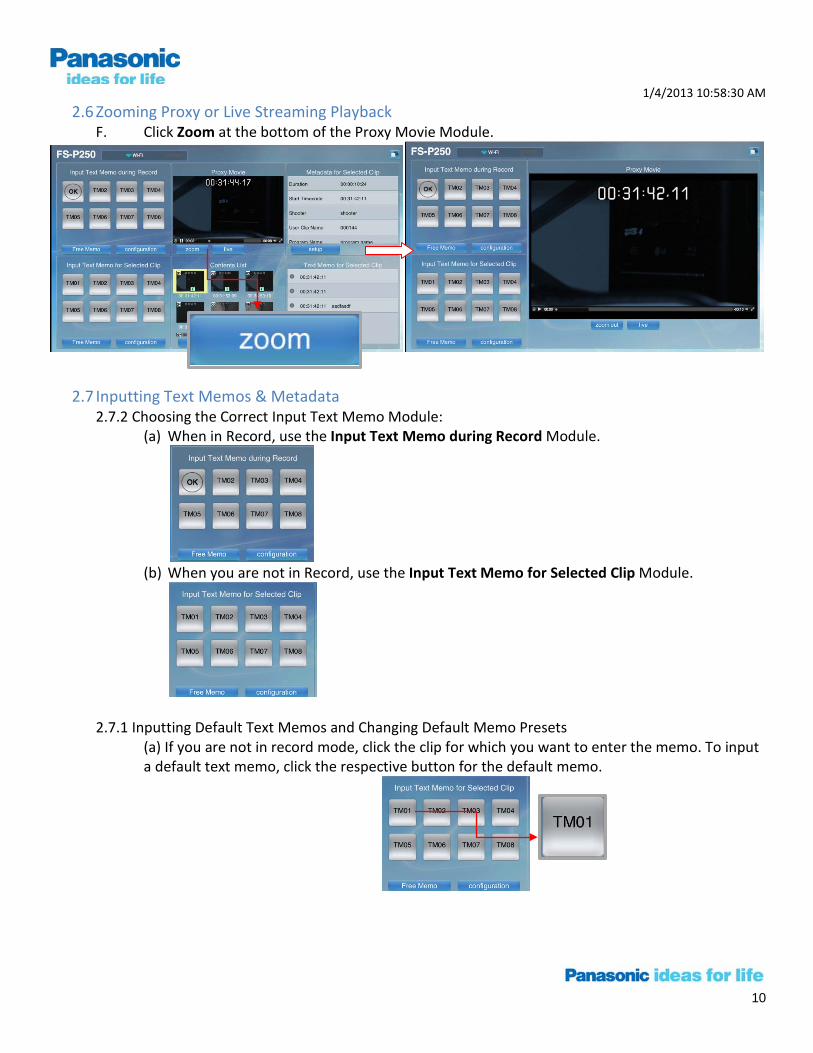
2.6 Zooming Proxy or Live Streaming Playback F. Click Zoom at the bottom of the Proxy Movie Module.
2.7 Inputting Text Memos & Metadata 2.7.2 Choosing the Correct Input Text Memo Module:
(a) When in Record, use the Input Text Memo during Record Module.
(b) When you are not in Record, use the Input Text Memo for Selected Clip Module.
2.7.1 Inputting Default Text Memos and Changing Default Memo Presets (a) If you are not in record mode, click the clip for which you want to enter the memo. To input a default text memo, click the respective button for the default memo.
1/4/2013 10:58:30 AM
11
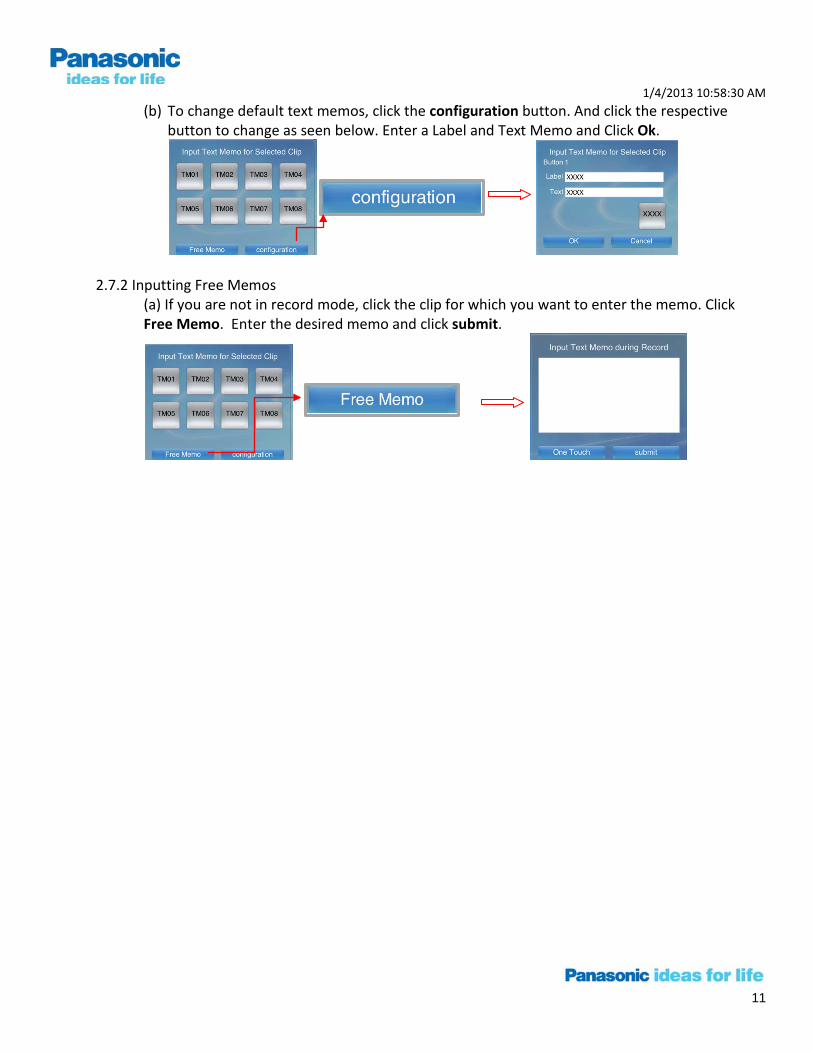
(b) To change default text memos, click the configuration button. And click the respective button to change as seen below. Enter a Label and Text Memo and Click Ok.
2.7.2 Inputting Free Memos (a) If you are not in record mode, click the clip for which you want to enter the memo. Click Free Memo. Enter the desired memo and click submit.
1/4/2013 10:58:30 AM
12
3. Editing Proxy
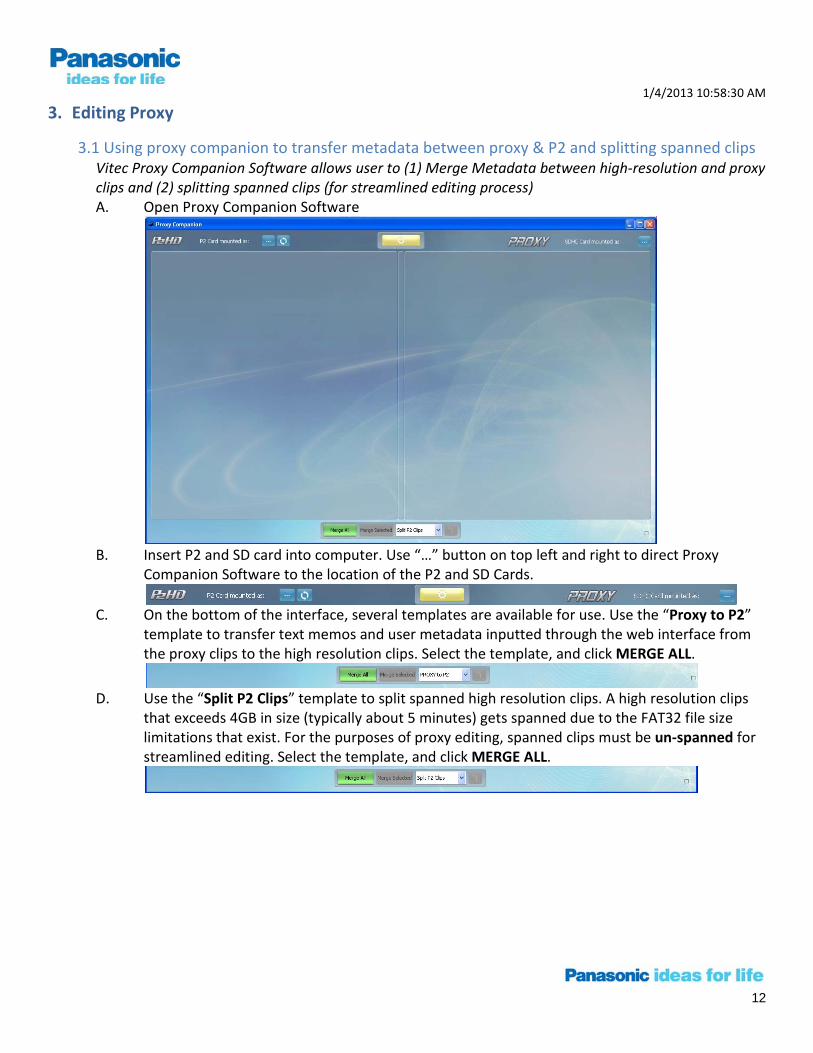
3.1 Using proxy companion to transfer metadata between proxy & P2 and splitting spanned clips Vitec Proxy Companion Software allows user to (1) Merge Metadata between high-resolution and proxy clips and (2) splitting spanned clips (for streamlined editing process) A. Open Proxy Companion Software
B. Insert P2 and SD card into computer. Use “…” button on top left and right to direct Proxy
Companion Software to the location of the P2 and SD Cards.
C. On the bottom of the interface, several templates are available for use. Use the “Proxy to P2”
template to transfer text memos and user metadata inputted through the web interface from the proxy clips to the high resolution clips. Select the template, and click MERGE ALL.
D. Use the “Split P2 Clips” template to split spanned high resolution clips. A high resolution clips
that exceeds 4GB in size (typically about 5 minutes) gets spanned due to the FAT32 file size limitations that exist. For the purposes of proxy editing, spanned clips must be un-spanned for streamlined editing. Select the template, and click MERGE ALL.
1/4/2013 10:58:30 AM
13
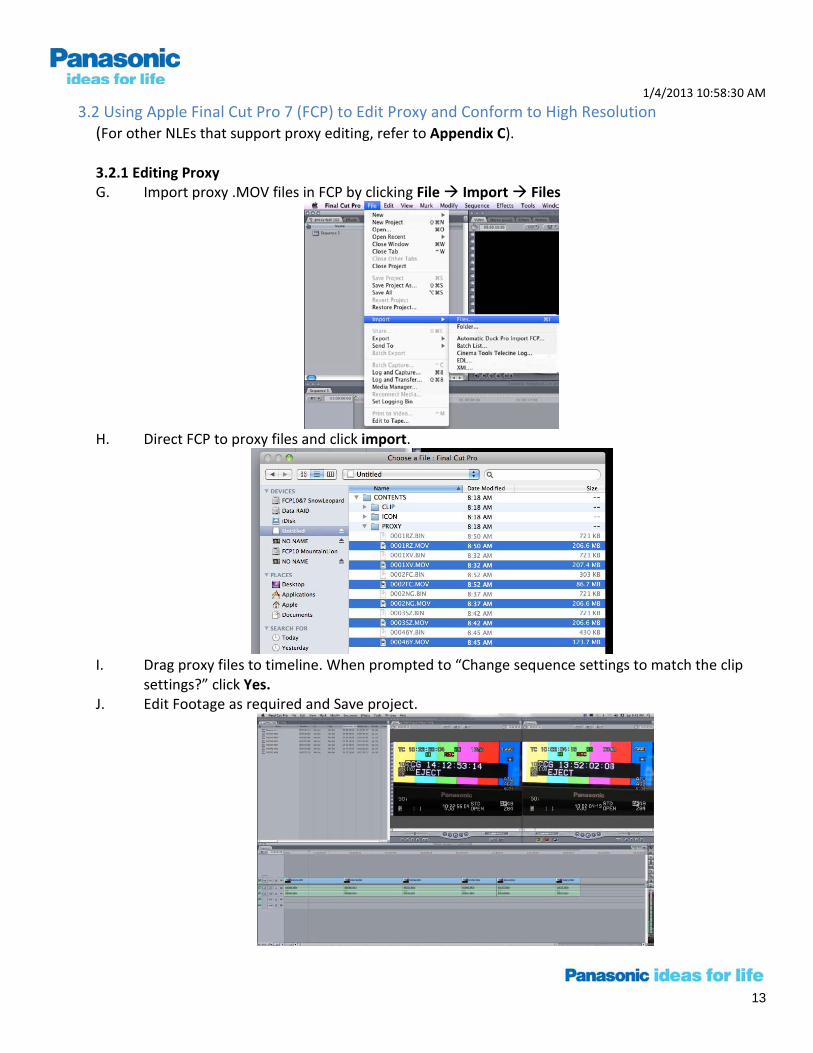
3.2 Using Apple Final Cut Pro 7 (FCP) to Edit Proxy and Conform to High Resolution (For other NLEs that support proxy editing, refer to Appendix C). 3.2.1 Editing Proxy G. Import proxy .MOV files in FCP by clicking File Import Files
H. Direct FCP to proxy files and click import.
I. Drag proxy files to timeline. When prompted to “Change sequence settings to match the clip
settings?” click Yes. J. Edit Footage as required and Save project.
1/4/2013 10:58:30 AM
14
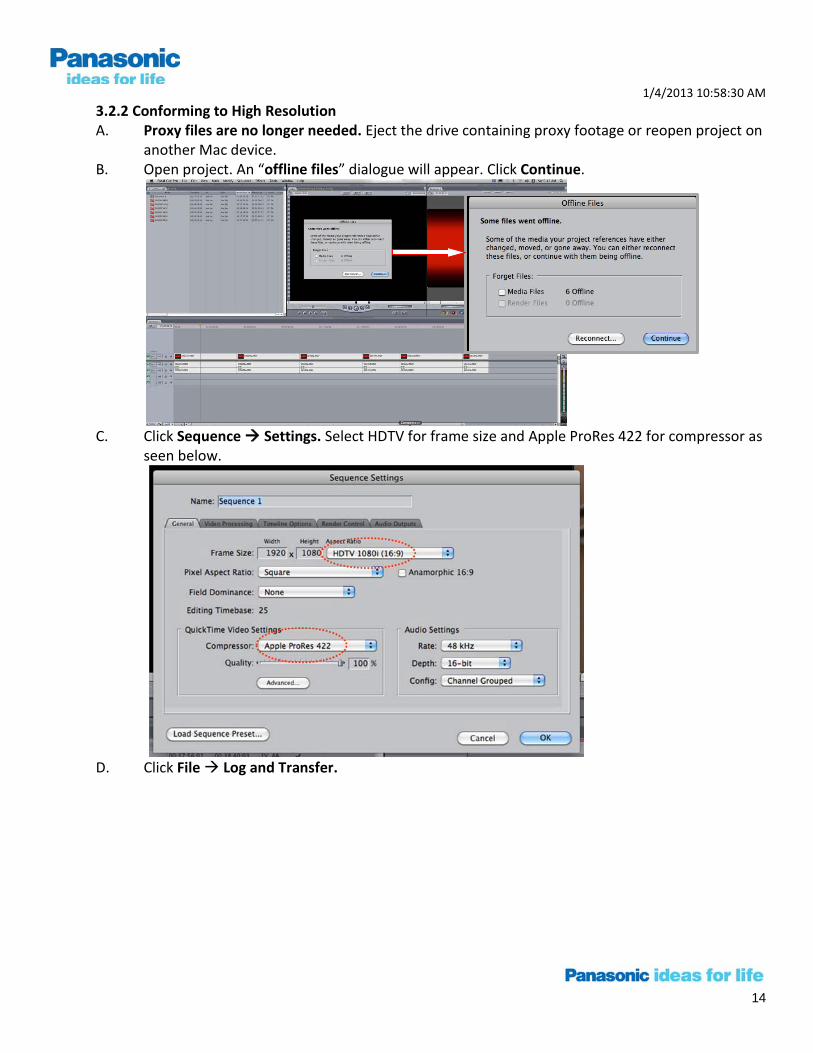
3.2.2 Conforming to High Resolution A. Proxy files are no longer needed. Eject the drive containing proxy footage or reopen project on
another Mac device. B. Open project. An “offline files” dialogue will appear. Click Continue.
C. Click Sequence Settings. Select HDTV for frame size and Apple ProRes 422 for compressor as
seen below.
D. Click File Log and Transfer.
1/4/2013 10:58:30 AM
15
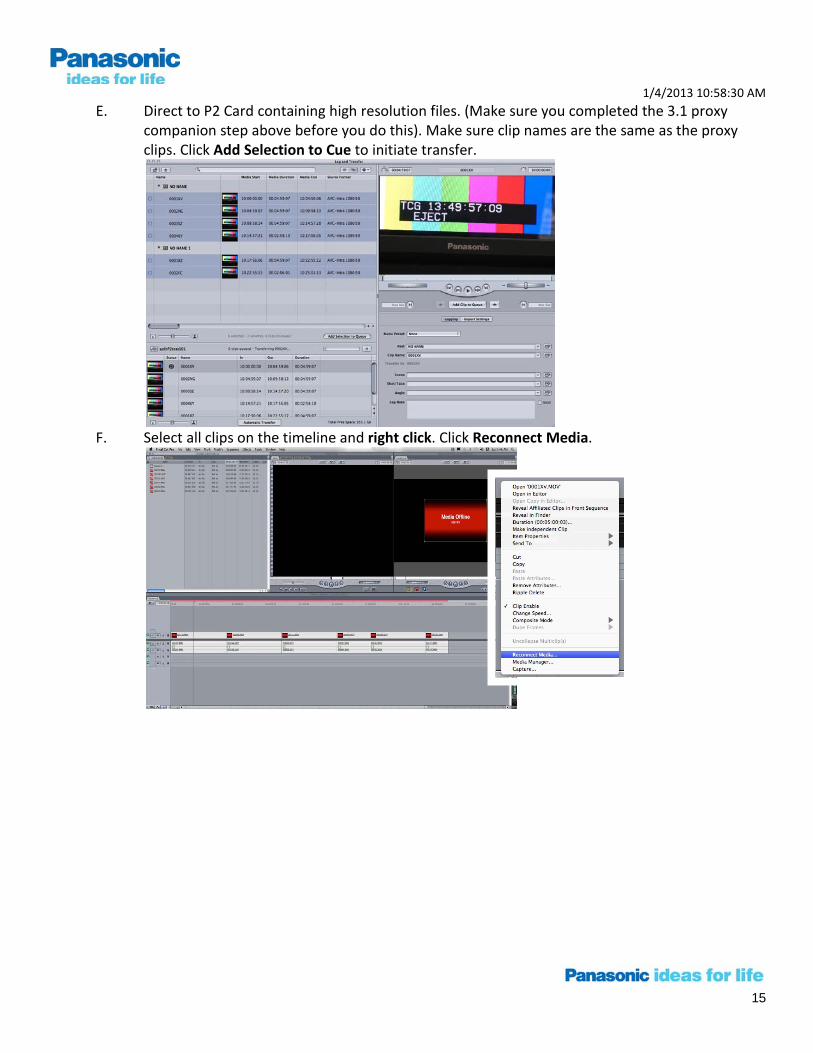
E. Direct to P2 Card containing high resolution files. (Make sure you completed the 3.1 proxy companion step above before you do this). Make sure clip names are the same as the proxy clips. Click Add Selection to Cue to initiate transfer.
F. Select all clips on the timeline and right click. Click Reconnect Media.
1/4/2013 10:58:30 AM
16
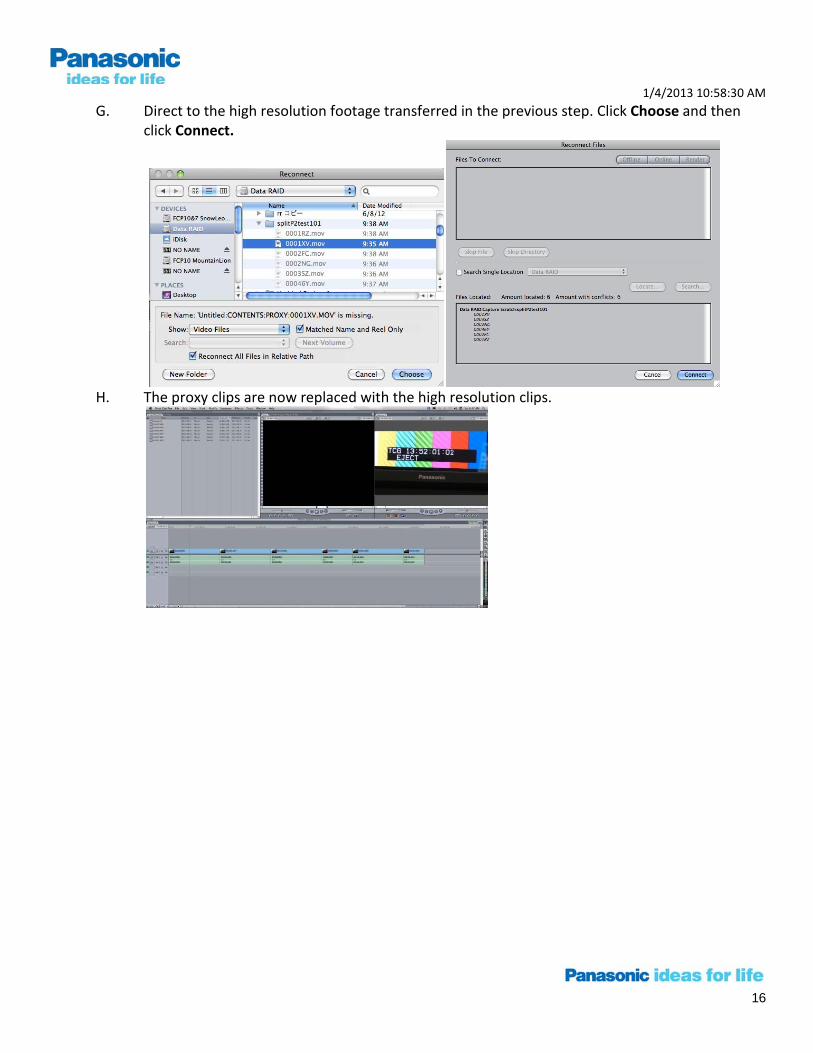
G. Direct to the high resolution footage transferred in the previous step. Click Choose and then click Connect.
H. The proxy clips are now replaced with the high resolution clips.
1/4/2013 10:58:30 AM
17
4. Appendix
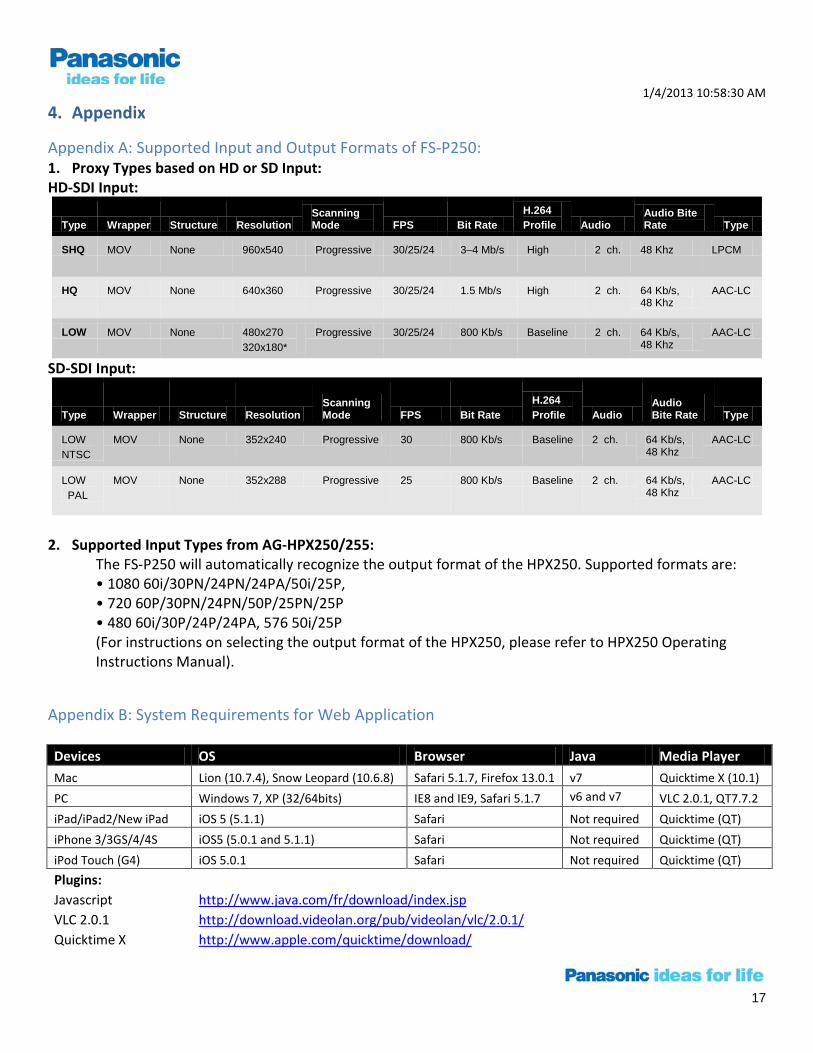
Appendix A: Supported Input and Output Formats of FS-P250: 1. Proxy Types based on HD or SD Input: HD-SDI Input:
Type Wrapper Structure Resolution Scanning Mode FPS Bit Rate
H.264 Profile Audio
Audio Bite Rate Type
SHQ MOV None 960x540 Progressive 30/25/24 3–4 Mb/s High 2 ch. 48 Khz LPCM
HQ MOV None 640x360 Progressive 30/25/24 1.5 Mb/s High 2 ch. 64 Kb/s, 48 Khz
AAC-LC
LOW MOV None 480x270 320x180*
Progressive 30/25/24 800 Kb/s Baseline 2 ch. 64 Kb/s, 48 Khz
AAC-LC
SD-SDI Input:
Type Wrapper Structure Resolution Scanning Mode FPS Bit Rate
H.264 Profile Audio
Audio Bite Rate Type
LOW NTSC
MOV None 352x240 Progressive 30 800 Kb/s Baseline 2 ch. 64 Kb/s, 48 Khz
AAC-LC
LOW PAL
MOV None 352x288 Progressive 25 800 Kb/s Baseline 2 ch. 64 Kb/s, 48 Khz
AAC-LC
2. Supported Input Types from AG-HPX250/255:
The FS-P250 will automatically recognize the output format of the HPX250. Supported formats are: • 1080 60i/30PN/24PN/24PA/50i/25P, • 720 60P/30PN/24PN/50P/25PN/25P • 480 60i/30P/24P/24PA, 576 50i/25P (For instructions on selecting the output format of the HPX250, please refer to HPX250 Operating Instructions Manual).
Appendix B: System Requirements for Web Application Devices OS Browser Java Media Player
Mac Lion (10.7.4), Snow Leopard (10.6.8) Safari 5.1.7, Firefox 13.0.1 v7 Quicktime X (10.1)
PC Windows 7, XP (32/64bits) IE8 and IE9, Safari 5.1.7 v6 and v7 VLC 2.0.1, QT7.7.2
iPad/iPad2/New iPad iOS 5 (5.1.1) Safari Not required Quicktime (QT)
iPhone 3/3GS/4/4S iOS5 (5.0.1 and 5.1.1) Safari Not required Quicktime (QT)
iPod Touch (G4) iOS 5.0.1 Safari Not required Quicktime (QT)
Plugins: Javascript http://www.java.com/fr/download/index.jsp
VLC 2.0.1 http://download.videolan.org/pub/videolan/vlc/2.0.1/
Quicktime X http://www.apple.com/quicktime/download/
1/4/2013 10:58:30 AM
18
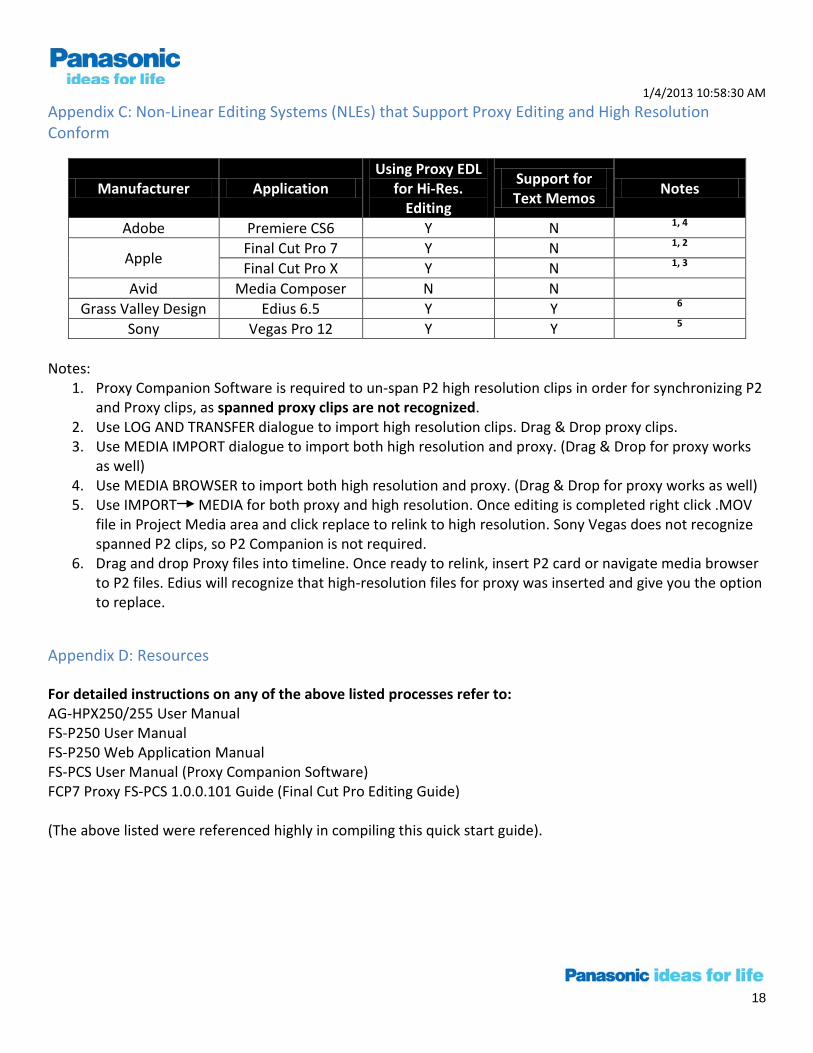
Appendix C: Non-Linear Editing Systems (NLEs) that Support Proxy Editing and High Resolution Conform
Manufacturer Application Using Proxy EDL
for Hi-Res. Editing
Support for Text Memos
Notes
Adobe Premiere CS6 Y N 1, 4
Apple Final Cut Pro 7 Y N 1, 2
Final Cut Pro X Y N 1, 3
Avid Media Composer N N
Grass Valley Design Edius 6.5 Y Y 6
Sony Vegas Pro 12 Y Y 5
Notes:
1. Proxy Companion Software is required to un-span P2 high resolution clips in order for synchronizing P2 and Proxy clips, as spanned proxy clips are not recognized.
2. Use LOG AND TRANSFER dialogue to import high resolution clips. Drag & Drop proxy clips. 3. Use MEDIA IMPORT dialogue to import both high resolution and proxy. (Drag & Drop for proxy works
as well) 4. Use MEDIA BROWSER to import both high resolution and proxy. (Drag & Drop for proxy works as well) 5. Use IMPORT MEDIA for both proxy and high resolution. Once editing is completed right click .MOV
file in Project Media area and click replace to relink to high resolution. Sony Vegas does not recognize spanned P2 clips, so P2 Companion is not required.
6. Drag and drop Proxy files into timeline. Once ready to relink, insert P2 card or navigate media browser to P2 files. Edius will recognize that high-resolution files for proxy was inserted and give you the option to replace.
Appendix D: Resources For detailed instructions on any of the above listed processes refer to: AG-HPX250/255 User Manual FS-P250 User Manual FS-P250 Web Application Manual FS-PCS User Manual (Proxy Companion Software) FCP7 Proxy FS-PCS 1.0.0.101 Guide (Final Cut Pro Editing Guide) (The above listed were referenced highly in compiling this quick start guide).