12+6 - 30pin Molex Adapter v2 - intriguingindustries.co.uk
14
12+6 - 30pin Molex Adapter v2 15inch,17inch (A1286,A1297) Installation Instructions Thanks for purchasing a 12+6 adapter please follow the instructions below to install your adapter, if you have any issues or questions please contact Support or check the FAQs ***Please carefully read the Compatibility Guide before starting installation*** Time The installation of the adapter is intricate, and will take at least 1.5Hrs. Preparation Make sure you have a clean well lit workspace and have taken the appropriate anti-static precautions. Please read all the instructions carefully before proceeding. You will need: • 12+6 - 30pin Kit (you should have the adapter, 4 IPEX adapters, a piece of 3m VHB tape and 3 sizes of heat shrink) • Suitable 12+6 WiFi Card • Tape (kapton or thin electrical tape) • This guide, preferably on another device You will need the following tools: • #00 Phillips screwdriver • Plastic Spudger • Metal file • A hot air gun or hairdryer • Scalpel or knife ***It is always good practice to back up your data and make sure your machine has been shut down properly before you start any work. This is a DIY unsupported modification to your laptop that you are undertaking at your own risk and intriguing industries will take no responsibly for any damage or data loss*** ***The 15inch,17inch (A1286,A1297) are virtually identical apart from size and none of the differences will affect the installation of the adapter*** Page of 1 14 www.intriguingindustries.co.uk v2.5
Transcript of 12+6 - 30pin Molex Adapter v2 - intriguingindustries.co.uk

12+6 - 30pin Molex Adapter v2 15inch,17inch (A1286,A1297) Installation Instructions
Thanks for purchasing a 12+6 adapter please follow the instructions below to install your adapter, if you have any issues or questions please contact Support or check the FAQs
***Please carefully read the Compatibility Guide before starting installation***
Time The installation of the adapter is intricate, and will take at least 1.5Hrs.
Preparation Make sure you have a clean well lit workspace and have taken the appropriate anti-static precautions. Please read all the instructions carefully before proceeding.
You will need:• 12+6 - 30pin Kit (you should have the adapter, 4 IPEX adapters, a piece of 3m VHB tape and 3
sizes of heat shrink)• Suitable 12+6 WiFi Card • Tape (kapton or thin electrical tape)• This guide, preferably on another device
You will need the following tools:• #00 Phillips screwdriver• Plastic Spudger• Metal file• A hot air gun or hairdryer• Scalpel or knife
***It is always good practice to back up your data and make sure your machine has been shut down properly before you start any work. This is a DIY unsupported modification to
your laptop that you are undertaking at your own risk and intriguing industries will take no responsibly for any damage or data loss***
***The 15inch,17inch (A1286,A1297) are virtually identical apart from size and none of the differences will affect the installation of the adapter***
Page of 1 14 www.intriguingindustries.co.uk v2.5

1. Remove the bottom cover and the existing WiFi card Follow the great iFixit instructions to remove the bottom case and wifi card and cage.
2. (Optional) Remove and modify the cable retention bracket If you are using a wider WiFi card from a iMac/Mac Pro you will need to file the bracket down slightly so the card will fit. This is held in place by one phillips #00. Replace the bracket after modification.
Page of 2 14 www.intriguingindustries.co.uk v2.5

3. Insulate the installation area Insulate the installation area shown on both the bottom cover and DVD drive with either Kapton or electrical tape.
Page of 3 14 www.intriguingindustries.co.uk v2.5

4. Install the IPEX antenna adapters ***These are fragile please be careful ! Try not to pull or bend at the conector, a spare is
supplied with the kit if you have any issues. Once in the heat shrink they are much stronger***
***If you are using a wider WiFi card from a iMac/Mac Pro that has IPEX 1 connectors you can skip this step ***
***If you are using a BCM943602CDP complete the modification guide HERE first***
***Skip step a. if you only have 3 antenna cables ( Mid 2010 A1286/A1297)*** a. You will have 4 antenna cables , take the longest (This is not needed as the Bluetooth antenna
design changed in the newer WiFi cards.) and run it down the grove along the edge of the DVD drive and secure it out of the way with some tape. Depending on you choice of WiFi card you may also only need 2 of the antenna cables, if this is the case take the next longest cable and also tape it out of the way.
Page of 4 14 www.intriguingindustries.co.uk v2.5

b. Carefully attach the square end of the IPEX adapters to the remaining antenna cables. This is best done by using your thumb and fore finger and carefully compressing them together. If the antenna cables have never been removed and reattached before they will be quite stiff. Be careful as the square end is very fragile and will break easily. Try not to bend the cables at the point they attach together. If one breaks they can be removed with the careful use of a set of tweezers or a knife, don’t pull them out push the square end out
c. Carefully slide the heat shrink over the connectors and shrink them either using a hot air gun or hair dryer.
Page of 5 14 www.intriguingindustries.co.uk v2.5

5. Insulate the Long USB/Camera cable The covering of this cable is conductive, if it makes contact with components on the WiFi card it may cause a short. It will also help protect it from abrasion with the routing that will be needed. Take the RED heat shrink and cut it too 10cm and slide it down the cable until it is just before where the cable bends into the hinge (Squashing the heat shrink as you move the connector down it will make it easier). Shrink it either using a hot air gun or hair dryer . Don’t worry to much about the exact position as it will slide up and down the cable.
Page of 7 14 www.intriguingindustries.co.uk v2.5
6. Install the 12+6 card into the adapter and attach the 30pin flex cable Carefully install your Wifi card into the adapter it is keyed and will only fit one way make sure it is fully seated and attach the flex cable.
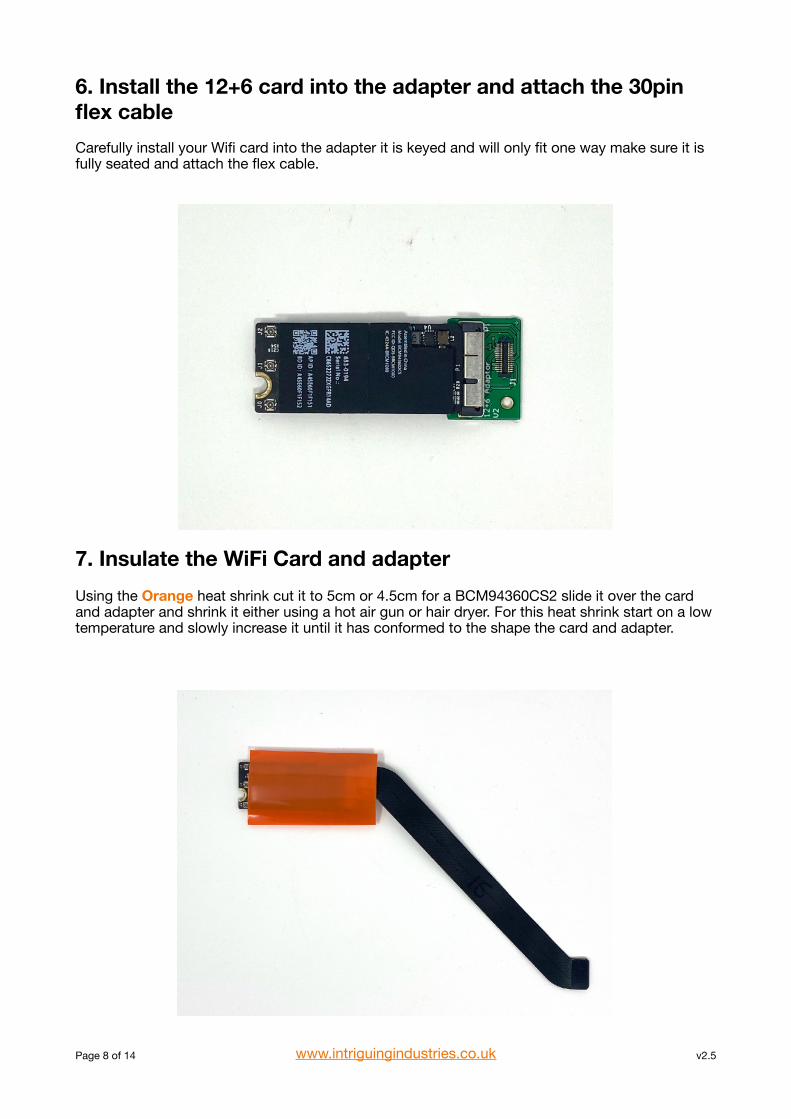
7. Insulate the WiFi Card and adapter Using the Orange heat shrink cut it to 5cm or 4.5cm for a BCM94360CS2 slide it over the card and adapter and shrink it either using a hot air gun or hair dryer. For this heat shrink start on a low temperature and slowly increase it until it has conformed to the shape the card and adapter.
Page of 8 14 www.intriguingindustries.co.uk v2.5

8. Attach the antenna cables to the WiFi card Carefully attach the antenna cables to the card these will be stiff, again compress them between your thumb and forefinger, trying not to bend them. The order is important, as it will make it easier to route and pack in the cables if they are done in order of shortest to longest working away from the hinge. This is important. These connectors will be tight you may find compressing them with the flat end of a spudger will help you attach them.
***If using a WiFi card from an iMac/Mac Pro that has IPEX 1 connectors the longer bluetooth antenna cable is connected to the connector labelled A3 ***
9. Attach the 30pin cable between the adapter and the Logic board and test fit Test fit the adapter in the laptop the 30 pin cable should be sitting nearly flat. The Mid 2010 A1286/A1297 have a longer flex cable if you are using the original flex cable you will need to loose some of the excess in-between the DVD Burner and logic board by forming a U and also when the cable drops down to connect to the Adaptor, at these points you should add an extra layer of tape to the edge of the drive to stop any chance of abrasion.
Page of 10 14 www.intriguingindustries.co.uk v2.5

10. Apply the 3M VHB tape to the adapter and card Depending of the card used and the difference in height across the bottom oaf the adapter and card cut a small piece of the double-sided tape about 20mm15mm and stick it to the back of the adapter. Use the remaining tape to build up a layer of tape on the WiFi card so in will sit flat when installed. This will vary depending on the type of card used.
Page of 11 14 www.intriguingindustries.co.uk v2.5

11. Remove the tape backing and carefully stick the adapter and card in place The tape is activated by pressure and time so if you are careful you will be able to readjust it slightly quite easily. If you have issues with the fit and need to readjust latter you may find it easier to peal the tape of taking the whole assembly with it and readjusting.
12. Route and secure the antenna cables and USB/Camera cable Route the antenna cables and USB/Camera cable in the space remaining, this will vary depending on your card choice and the number of antenna cables required. (Be careful to not put them where they will be squashed when the case is closed). Secure them in place with tape. Test fit with the bottom case in place. This will take some time and patience, see the photo for ideas of how to route the excess.
Page of 12 14 www.intriguingindustries.co.uk v2.5

13. Reassemble the laptop Reassemble the laptop using the iFixit Guide in reverse. Be very careful that the antenna cables are not squashed. The fit is tight, as the space is so limited but the case should close properly. Don’t forget to Screw the WiFi cage screw back in place so it is not lost, and the screw which held the cage to the hinge bracket.
14. Test the card Before testing be sure to Reset the Pram and Reset the SMC
You should be able to now connect via WiFi and Bluetooth as normal with the new features available with the card of your choice.
***There is a small chance that you will have software issues because this will vary by OS etc they are out of the scope of this guide if so please contact Support and we will do our
best to help you***
Troubleshooting Links
Continuity System Requirements
Apple Watch Unlocking
Handoff Support
Continuity Activation Tool
Pram Reset
SMC Reset
Change Log
v1 - Initial versionv2- added photosv2.2 updated notes for Mid 2010 A1286/A1297v2.4 Fixed and added Troubleshooting Linksv2.5 Added BCM943602CDP Links
Page of 13 14 www.intriguingindustries.co.uk v2.5