101 Great Youth Soccer Drills (McGraw-Hill, 2005)
160
-
Upload
ivan-f-clement -
Category
Documents
-
view
100 -
download
15
description
Simple, practical ideas on sharpening soccer skills for youth
Transcript of 101 Great Youth Soccer Drills (McGraw-Hill, 2005)

00 (i-xiiB) front matter 3/1/05 10:24 AM Page ii
This page intentionally left blank.
101YOUTHSOCCERDRILLS
Great
GREAT DRILLS AND SKILLS FOR BETTER FUNDAMENTAL PLAY
R O B E R T K O G E R
Copyright © 2005 by Robert Koger. All rights reserved. Manufactured in the United States of America. Except as permitted under the United States Copyright Act of 1976, no part of this publication may be reproduced or distributed in any form or by any means, or stored in a database or retrieval system, without the prior written permission of the publisher. 0-07-146950-8 The material in this eBook also appears in the print version of this title: 0-07-44468-8. All trademarks are trademarks of their respective owners. Rather than put a trademark symbol after every occurrence of a trademarked name, we use names in an editorial fashion only, and to the benefit of the trademark owner, with no intention of infringement of the trademark. Where such designations appear in this book, they have been printed with initial caps. McGraw-Hill eBooks are available at special quantity discounts to use as premiums and sales promotions, or for use in corporate training programs. For more information, please contact George Hoare, Special Sales, at [email protected] or (212) 904-4069. TERMS OF USE This is a copyrighted work and The McGraw-Hill Companies, Inc. (“McGraw-Hill”) and its licensors reserve all rights in and to the work. Use of this work is subject to these terms. Except as permitted under the Copyright Act of 1976 and the right to store and retrieve one copy of the work, you may not decompile, disassemble, reverse engineer, reproduce, modify, create derivative works based upon, transmit, distribute, disseminate, sell, publish or sublicense the work or any part of it without McGraw-Hill’s prior consent. You may use the work for your own noncommercial and personal use; any other use of the work is strictly prohibited. Your right to use the work may be terminated if you fail to comply with these terms. THE WORK IS PROVIDED “AS IS.” McGRAW-HILL AND ITS LICENSORS MAKE NO GUARANTEES OR WARRANTIES AS TO THE ACCURACY, ADEQUACY OR COMPLETENESS OF OR RESULTS TO BE OBTAINED FROM USING THE WORK, INCLUDING ANY INFORMATION THAT CAN BE ACCESSED THROUGH THE WORK VIA HYPERLINK OR OTHERWISE, AND EXPRESSLY DISCLAIM ANY WARRANTY, EXPRESS OR IMPLIED, INCLUDING BUT NOT LIMITED TO IMPLIED WARRANTIES OF MERCHANTABILITY OR FITNESS FOR A PARTICULAR PURPOSE. McGraw-Hill and its licensors do not warrant or guarantee that the functions contained in the work will meet your requirements or that its operation will be uninterrupted or error free. Neither McGraw-Hill nor its licensors shall be liable to you or anyone else for any inaccuracy, error or omission, regardless of cause, in the work or for any damages resulting therefrom. McGraw-Hill has no responsibility for the content of any information accessed through the work. Under no circumstances shall McGraw-Hill and/or its licensors be liable for any indirect, incidental, special, punitive, consequential or similar damages that result from the use of or inability to use the work, even if any of them has been advised of the possibility of such damages. This limitation of liability shall apply to any claim or cause whatsoever whether such claim or cause arises in contract, tort or otherwise. DOI: 10.1036/0071469508

������������
Want to learn more?We hope you enjoy this McGraw-Hill eBook! If
you’d like more information about this book, its author, or related books and websites, please click here.
v
Contents
Foreword: John Ellinger, Head Coach, U.S.
Under-17 Men’s National Team . . . . . . . . . . . . . . . . . . . . vii
Preface . . . . . . . . . . . . . . . . . . . . . . . . . . . . . . . . . . . . . . . . ix
Acknowledgments . . . . . . . . . . . . . . . . . . . . . . . . . . . . . . . xi
1 Beginning a Practice—Warming Up and Stretching . . . . 1
2 Teaching Techniques and Skills. . . . . . . . . . . . . . . . . . . . 13
3 General Practice Skills and Technique Drills—
U-6/U-8 . . . . . . . . . . . . . . . . . . . . . . . . . . . . . . . . . . . . . . . 15
4 Passing and Kicking Instruction and Drills . . . . . . . . . . . 19
5 Trapping and Receiving Instruction and Drills . . . . . . . . 29
6 Heading Instruction and Drills . . . . . . . . . . . . . . . . . . . . . 33
7 Shooting Instruction and Drills. . . . . . . . . . . . . . . . . . . . . 39
8 Shielding Instruction and Drills . . . . . . . . . . . . . . . . . . . . 47
9 Dribbling Instruction and Drills . . . . . . . . . . . . . . . . . . . . . 51
10 Juggling Instruction and Drills . . . . . . . . . . . . . . . . . . . . . 59
11 Throw-In Instruction and Drills. . . . . . . . . . . . . . . . . . . . . 63
For more information about this title, click here
12 Volley Instruction and Drills . . . . . . . . . . . . . . . . . . . . . . . 67
13 Goalkeeping Instruction and Drills. . . . . . . . . . . . . . . . . . 71
14 Offensive and Defensive Drills . . . . . . . . . . . . . . . . . . . . . 79
15 Basic Skills and Individual Technique Drills. . . . . . . . . . . 91
16 Game Strategy and Drills . . . . . . . . . . . . . . . . . . . . . . . . . 93
17 Formations and Drills . . . . . . . . . . . . . . . . . . . . . . . . . . . 101
18 Special Formations and Drills . . . . . . . . . . . . . . . . . . . . 115
Appendix: Glossary of Soccer Terms . . . . . . . . . . . . . . 127
Index . . . . . . . . . . . . . . . . . . . . . . . . . . . . . . . . . . . . . . . . 141
vi Contents
00 (i-xiiB) front matter 3/1/05 10:24 AM Page vi
vii
Foreword
Coaching soccer begins with teaching individual players the basic tech-niques, or skills, they will need to deal with the ball under all of the var-ious conditions that occur in a game. As we master our techniquesthrough drills during our training sessions, we then move on to teach-ing our players tactics. We do this by starting with the smallest unit pos-sible—1 player versus 1 player (1 vs. 1)—and gradually working up tothe entire team situation—11 players versus 11 players (11 vs. 11). In101 Great Youth Soccer Drills, it is the players for game situations thatthe author has focused upon, and that is what makes it such a specialcoaching manual. There is a need for this type of literature in coachingsoccer at the youth level.
Players have to become technically sound in soccer at a young age;once a player learns a technique, it takes countless hours of practicethrough training drills for this technique to become skill, which is theability to use the technique to advantage during conditions and restric-tions of a game.
As the U.S. Under-17 Men’s National Team head coach, I use train-ing drills every day to improve players’ technical ability and their tacti-cal awareness. Players such as Landon Donovan, DaMarcus Beasley,Bobby Convey, and Freddy Adu have spent many hours on the soccerfields in Bradenton, Florida, mastering technique and becoming bettertactically in order to become successful international soccer stars. As acoach I am a big believer in practicing the same drill over and over again
Copyright © 2005 by Robert Koger. Click here for terms of use.
until that technique becomes skill and tactical awareness becomesinstinct.
To me, teaching the game is the heart and soul of our sport. In allmy years involved in coaching this sport, which has included highschool, college, youth teams, amateur teams, and professional andnational teams, I look back on my teaching time as the most rewarding.In the coaching profession it has always been the desire to create aresource to help the youth soccer coach in developing our young play-ers technically and tactically by following a simple and organized plan.Robert Koger’s drills will bring out the best in our youth players. Theyare challenging, competitive, and entertaining. The author delivers orga-nized training drills that cover all the essential elements important toimproving development in youth soccer players. While the game itselfoffers many opportunities for a young player to improve, it is still impor-tant for the coach to have a book that contains game-related drills, small-sided games, and basic coaching drills.
As a coach you have to plan that next training session. Whether it ispreseason or postmatch, you must give some thought to utilizing theright drills that are appropriate to reach the desired result. 101 GreatYouth Soccer Drills is an excellent resource for helping the youthcoaches find solutions to any problems they may encounter in the game.Bottom line is always the players and how the coach can make them bet-ter technically and tactically. Each drill has been diagrammed, showingthe correct organization and identifying the objective and propersequence.
All of us involved in this wonderful sport of soccer can enjoy watch-ing a game at the highest level and having an appreciation for how theball is played, the connection of a team through intricate passing, andthe pure passion when a goal is scored, but there is always a beginningto this final product, and that is the countless hours spent on a field prac-ticing as a young player with a coach running organized training drillswith the objective of getting to the next level of play.
—John Ellinger, Head CoachU.S. Under-17 Men’s
National Team
viii Foreword
00 (i-xiiB) front matter 3/1/05 10:24 AM Page viii
ix
Preface
A few years ago I was teaching a beginners coaching clinic. As I lookedout at the group, I saw a man I knew had been coaching at least 10 years.I finished the clinic and walked over to the coach and asked him whyhe was there. He stated that his team was not winning and that now heknew why. He said that he had gotten away from the basics. This bookprepares the beginning coach, assists and refreshes experienced coaches,and provides all the basic drills for coaching.
101 Great Youth Soccer Drills is the only “how-to” book you will everneed on soccer drills. With this book you can go from a beginner to anadvanced coach. It is laid out in a sequence that allows any coach tobecome a master at teaching soccer. For those coaches who are new, itsteps sequentially through the skills and the drills. For experiencedcoaches, each section is formatted to enable you to quickly find the infor-mation you need to conduct productive training. All information is easyto understand and is written to be used in a separate and stand-alonesequence. This allows you to teach what you need, when you need it.
This book completely covers the needed drills to prepare your play-ers. It will become ragged with use. It is specifically designed to be usedfrom the beginning of your journey as a coach to becoming the expert.No matter how experienced or inexperienced you are, you will not leavethis book on the shelf once you have scanned the comprehensive con-tents and seen the easy-to-use format. This book is organized from thesimple to the complex, using a building-block sequence. This allows you,
Copyright © 2005 by Robert Koger. Click here for terms of use.

the coach, to design your personalized training program by using drillsto teach your players the game of soccer.
The information here is a result of more than 25 years of coachingyouth soccer. Many of the drills and exercises are not original but havebeen picked up over the years and found to be the most effective indeveloping skills. There are many soccer books on the market, but veryfew take into consideration that you, the coach, do not have access to awide array of equipment for training. Nor do you have an excessiveamount of time. One book I read said to use a 50-foot-long wall, threefeet high, and in another section it talked about the sandpit for goal-keeper training. These are not normally on the fields used to teach youthsoccer. All of the equipment and field areas used for the drills in thisbook are easily available.
Coaching soccer can be fun. If you know what to do and your teamis performing well, it is a lot of fun. If you don’t know what you are doingand your team looks like an undertrained kickball team, fun is not aword you would use. This book provides the information that you needto start coaching and produce a real soccer team, making soccer enjoy-able for you and the players.
My soccer philosophy is that success is measured by a team that playswell together, has fun, and learns soccer and athletic skills. The greaterthe degree of each of these three components, the greater the odds yourteam will be a winning team. Soccer is a game that allows every childto have fun and be part of a team. Size, shape, and special talent are notthe key factors. Teams range from playing for fun to highly competitive.Every child can find a place in soccer. You, the coach, must decide onthe balance for your team and, more important, what kind of coach youwant to be.
Remember, soccer is more than just another athletic sport. It is anopportunity for children to socialize in a safe, structured environment.It is a chance for families to enjoy activities together and give life-criticalsupport to children developing confidence and a sense of identity. Themore fun you make the game for the players and the more conduciveyou make the game for the whole family, the more successful you andyour team will be. You are the most important aspect of youth soccer.You are the coach.
x Preface
00 (i-xiiB) front matter 3/1/05 10:24 AM Page x
xi
Acknowledgments
I would like to thank Editor Mark Weinstein, Editorial Team LeaderCraig Bolt, and the staff at McGraw-Hill for giving me this opportunity.Mark and Craig are the ideal editors. They know what is needed and arestraight and to the point. They are a real asset for an author. I would alsolike to thank the dynamic duo of literary agents, Chamein Canton andEric Smith of the Canton Smith Literary Agency. They took a chanceon a beginning writer and worked hard to get my book published.
Another big thank-you has to go to my children, Denise, Jay, andTony. They allowed me to be their coach and let me spend time withthem. Last but certainly not least is my wife, Mary. She is my mostardent fan and strictest critic. Many games she would come down out ofthe stands and whisper sweet nothings in my ear, such as, “Your left half-back isn’t overlapping,” or “The other team’s right fullback always movesto the right and clears with the right foot.” She supported me with thepractices and games as well as the book. She reviews everything, andwithout her this book would not have been possible.
Copyright © 2005 by Robert Koger. Click here for terms of use.

This page intentionally left blank.
1
1
Beginning aPractice—Warming
Up and StretchingIt is essential to have a practice that supports and prepares the devel-opment of the players. Performing drills that enhance the players’ skillsis a must, but there is no shortcut to success. Your players must buildstrengths needed for the game. The drills in this book are all designednot only to teach the skills but also to develop cardiac endurance andstrength.
Teaching the basics through the use of drills in practice must bedone as a stair -step process. Every practice must start with warm-up andstretch, progress into the teaching of technique training and drills, andthen move into drills that teach game tactics. This chapter addresseshow to run a practice and then focuses on the first step in that process.
Ingredients of a Good Practice
• Warm-up and stretching activities enable the players to stretch their
muscles, develop needed muscles, and get ready for practice.
Copyright © 2005 by Robert Koger. Click here for terms of use.
• Technique training/drills help players develop skills necessary to play
soccer.
• Teaching tactics allows players to learn how to play in formation, move
to open space, etc.
Overall Practice ObjectivesEach practice must have a specific objective. Concentrate on one or twoskills per week. Make a practice schedule that covers different drills perweek. Once you have started playing the games, do the drills requiredto highlight the skills that you notice your team is lacking during gameplay.
Fitness is a must. Many games are won at the end when the otherteam wears out. Make sure your fitness activities are drills that includethe soccer ball as much as you can. Don’t just run the players; have themwork with and dribble the ball during all of your activities.
Fitness Categories
• Cardiovascular endurance. Building endurance is necessary to fully
compete.
• Muscular strength. Soccer builds different muscular strength from what
is required in other sports, and you must focus on what is needed for
soccer.
2 101 Great Youth Soccer Dril ls
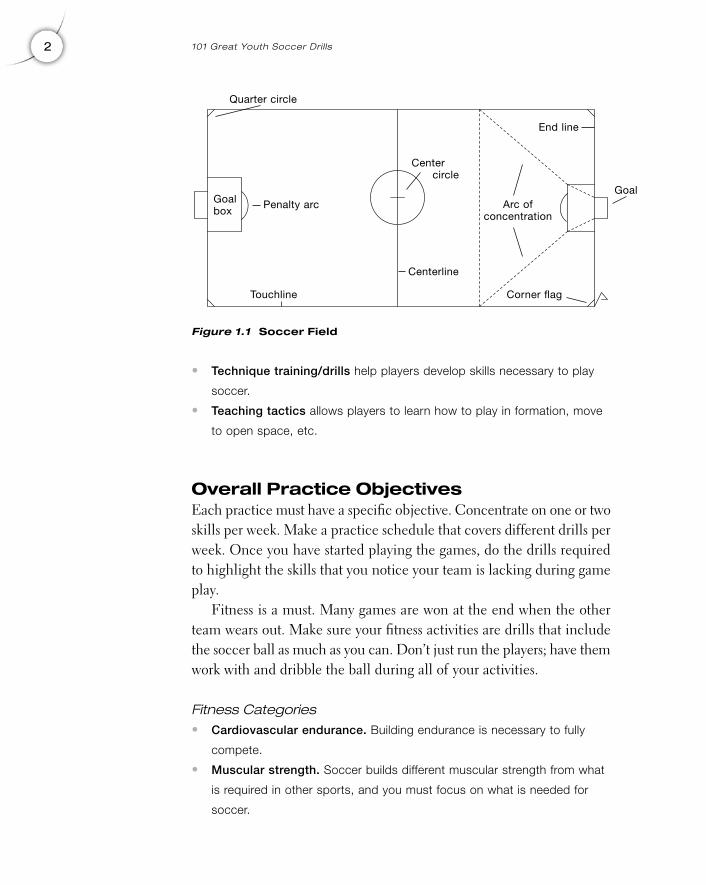
Figure 1.1 Soccer Field
Quarter circle
End line
Touchline Corner flag
Center circle
Centerline
Goalbox
GoalPenalty arc Arc of
concentration
01 (001-012B) chapter 1 3/1/05 10:25 AM Page 2
Outcome of Fitness
• Endurance allows for long-term play in practices, games, and multigame
tournaments.
• Mind control is necessary to be able to think under the stress of
running, getting bumped, etc. Controlling the mind is a must to control
the body through fitness.
• Agility allows players to be able to move with balance.
• Strength lets players jump, run, and move quickly.
• Quick reaction time is helpful to think quickly and then execute the
desired move.
• Speed and quickness are required to execute the skills needed for
offense and defense.
• Coordination is important to stay on the ball, see other players, and
execute plays.
When you set up the teams, or groups, to compete against each other,use Team A or B, not 1 or 2. Children learn early that it is important tobe number one, and they feel put down, or not worthy, if they are num-ber two.
Note: Make sure each player brings a ball to practice.
Warm-Up and Stretch
Slow Running Drills
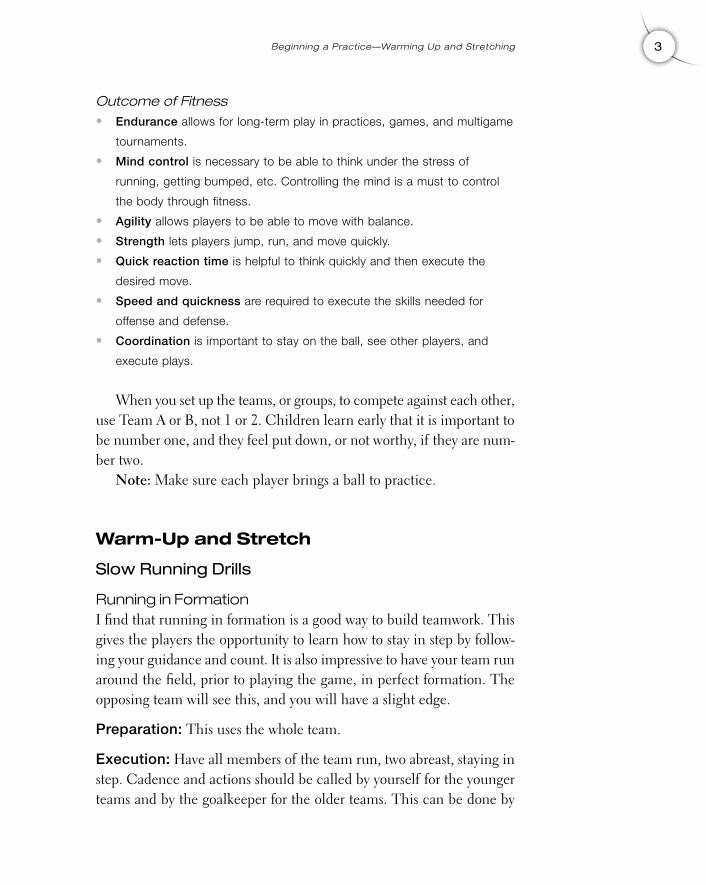
Running in FormationI find that running in formation is a good way to build teamwork. Thisgives the players the opportunity to learn how to stay in step by follow-ing your guidance and count. It is also impressive to have your team runaround the field, prior to playing the game, in perfect formation. Theopposing team will see this, and you will have a slight edge.
Preparation: This uses the whole team.
Execution: Have all members of the team run, two abreast, staying instep. Cadence and actions should be called by yourself for the youngerteams and by the goalkeeper for the older teams. This can be done by
3Beginning a Practice—Warming Up and Stretching
01 (001-012B) chapter 1 3/1/05 10:25 AM Page 3
saying, “left, left, left, right, left,” as the players’ feet hitthe ground.
After the team has learned to run in formation, youcan easily add aspects that enhance the warm-up run,teach soccer skills, and make it fun. While the team isrunning in formation, you or the goalkeeper (last personin the formation) should yell things like, “header.” On thenext step, all players jump up and do a header movement.Others are, “high step” (lifting the knees high while run-ning), “side step” (running sideways, making sure theplayers’ legs never cross over each other), and “handtouch” (touching the ground with the right or left hand).You can use anything that incorporates soccer skills.Sometimes the players will have some of their own they
may want to do. This makes the running more interesting and con-tributes to the warm-up of the players.
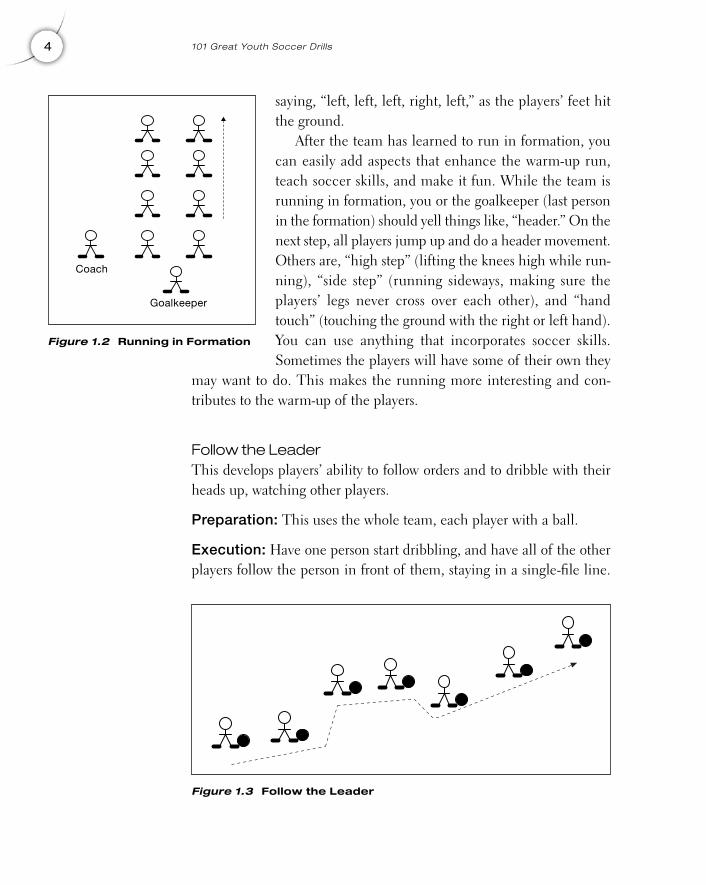
Follow the LeaderThis develops players’ ability to follow orders and to dribble with theirheads up, watching other players.
Preparation: This uses the whole team, each player with a ball.
Execution: Have one person start dribbling, and have all of the otherplayers follow the person in front of them, staying in a single-file line.
4 101 Great Youth Soccer Dril ls
Figure 1.2 Running in Formation
Coach
Goalkeeper
Figure 1.3 Follow the Leader
01 (001-012B) chapter 1 3/1/05 10:25 AM Page 4
The lead player makes numerous moves, and each player must imitatethose moves. The leader can dribble, jump, roll, do a somersault, etc.The players who follow must dribble the ball and do the same things theleader does. Pick out an outgoing player or use the assistant coach tolead the pack. As the coach, you must watch and correct the dribbling,jumping, etc.
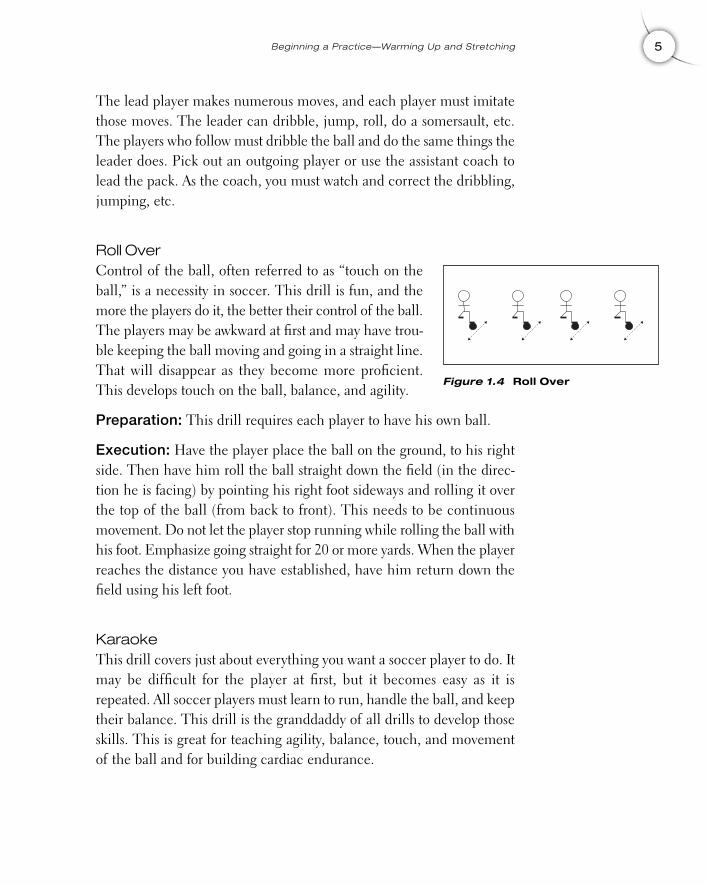
Roll Over Control of the ball, often referred to as “touch on theball,” is a necessity in soccer. This drill is fun, and themore the players do it, the better their control of the ball.The players may be awkward at first and may have trou-ble keeping the ball moving and going in a straight line.That will disappear as they become more proficient.This develops touch on the ball, balance, and agility.
Preparation: This drill requires each player to have his own ball.
Execution: Have the player place the ball on the ground, to his rightside. Then have him roll the ball straight down the field (in the direc-tion he is facing) by pointing his right foot sideways and rolling it overthe top of the ball (from back to front). This needs to be continuousmovement. Do not let the player stop running while rolling the ball withhis foot. Emphasize going straight for 20 or more yards. When the playerreaches the distance you have established, have him return down thefield using his left foot.
Karaoke This drill covers just about everything you want a soccer player to do. Itmay be difficult for the player at first, but it becomes easy as it isrepeated. All soccer players must learn to run, handle the ball, and keeptheir balance. This drill is the granddaddy of all drills to develop thoseskills. This is great for teaching agility, balance, touch, and movementof the ball and for building cardiac endurance.
5Beginning a Practice—Warming Up and Stretching
Figure 1.4 Roll Over
01 (001-012B) chapter 1 3/1/05 10:25 AM Page 5
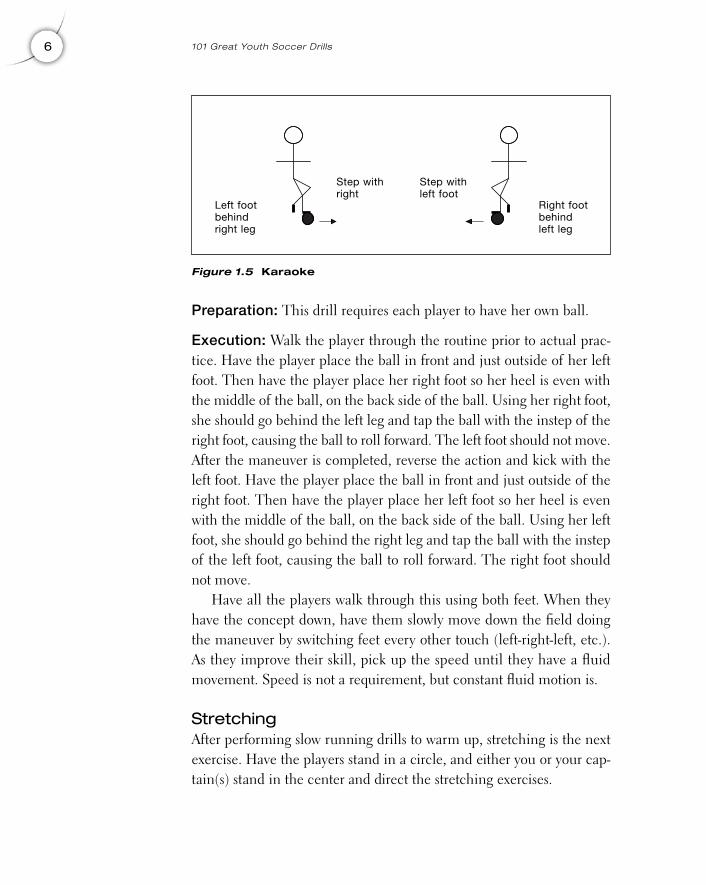
Preparation: This drill requires each player to have her own ball.
Execution: Walk the player through the routine prior to actual prac-tice. Have the player place the ball in front and just outside of her leftfoot. Then have the player place her right foot so her heel is even withthe middle of the ball, on the back side of the ball. Using her right foot,she should go behind the left leg and tap the ball with the instep of theright foot, causing the ball to roll forward. The left foot should not move.After the maneuver is completed, reverse the action and kick with theleft foot. Have the player place the ball in front and just outside of theright foot. Then have the player place her left foot so her heel is evenwith the middle of the ball, on the back side of the ball. Using her leftfoot, she should go behind the right leg and tap the ball with the instepof the left foot, causing the ball to roll forward. The right foot shouldnot move.
Have all the players walk through this using both feet. When theyhave the concept down, have them slowly move down the field doingthe maneuver by switching feet every other touch (left-right-left, etc.).As they improve their skill, pick up the speed until they have a fluidmovement. Speed is not a requirement, but constant fluid motion is.
StretchingAfter performing slow running drills to warm up, stretching is the nextexercise. Have the players stand in a circle, and either you or your cap-tain(s) stand in the center and direct the stretching exercises.
6 101 Great Youth Soccer Dril ls
Figure 1.5 Karaoke
Left footbehindright leg
Right footbehindleft leg
Step withright
Step withleft foot
01 (001-012B) chapter 1 3/1/05 10:25 AM Page 6
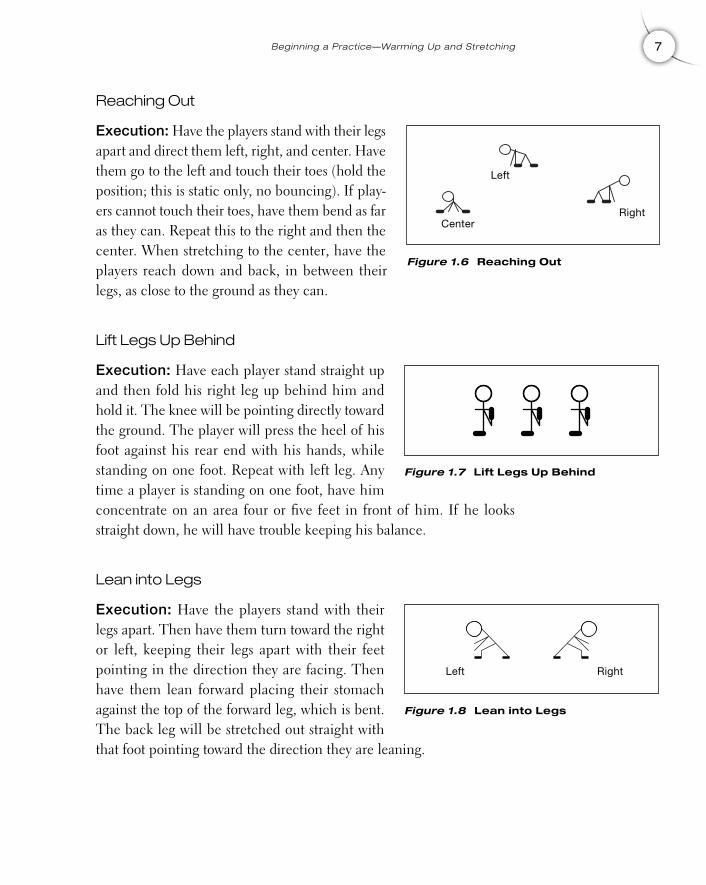
Reaching Out
Execution: Have the players stand with their legsapart and direct them left, right, and center. Havethem go to the left and touch their toes (hold theposition; this is static only, no bouncing). If play-ers cannot touch their toes, have them bend as faras they can. Repeat this to the right and then thecenter. When stretching to the center, have theplayers reach down and back, in between theirlegs, as close to the ground as they can.
Lift Legs Up Behind
Execution: Have each player stand straight upand then fold his right leg up behind him andhold it. The knee will be pointing directly towardthe ground. The player will press the heel of hisfoot against his rear end with his hands, whilestanding on one foot. Repeat with left leg. Anytime a player is standing on one foot, have himconcentrate on an area four or five feet in front of him. If he looksstraight down, he will have trouble keeping his balance.
Lean into Legs
Execution: Have the players stand with theirlegs apart. Then have them turn toward the rightor left, keeping their legs apart with their feetpointing in the direction they are facing. Thenhave them lean forward placing their stomachagainst the top of the forward leg, which is bent.The back leg will be stretched out straight withthat foot pointing toward the direction they are leaning.
7Beginning a Practice—Warming Up and Stretching
Figure 1.6 Reaching Out
Center
Left
Right
Figure 1.7 Lift Legs Up Behind
Figure 1.8 Lean into Legs
Left Right
01 (001-012B) chapter 1 3/1/05 10:25 AM Page 7
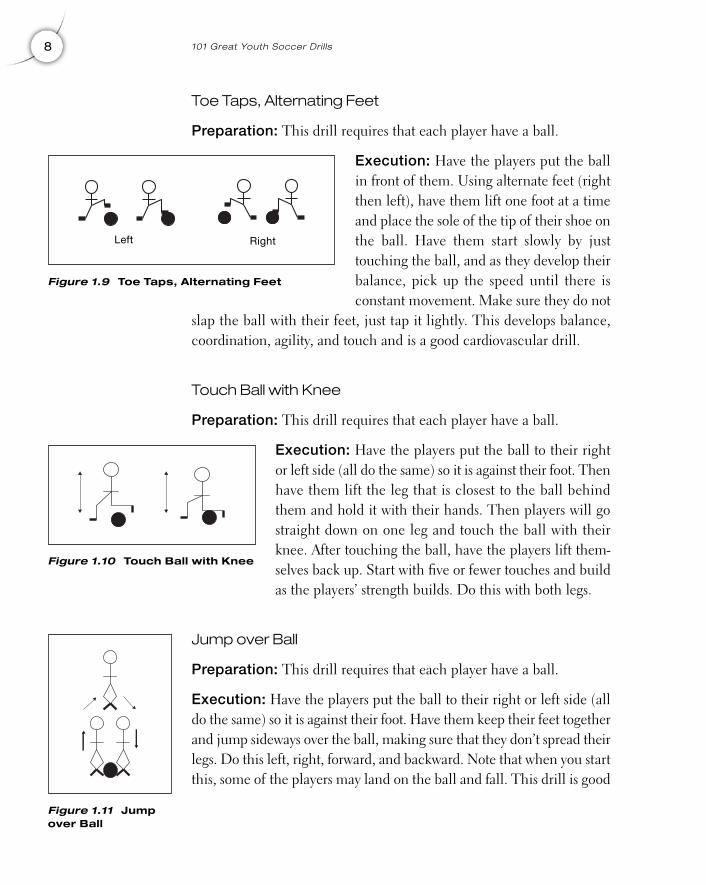
Toe Taps, Alternating Feet
Preparation: This drill requires that each player have a ball.
Execution: Have the players put the ballin front of them. Using alternate feet (rightthen left), have them lift one foot at a timeand place the sole of the tip of their shoe onthe ball. Have them start slowly by justtouching the ball, and as they develop theirbalance, pick up the speed until there isconstant movement. Make sure they do not
slap the ball with their feet, just tap it lightly. This develops balance,coordination, agility, and touch and is a good cardiovascular drill.
Touch Ball with Knee
Preparation: This drill requires that each player have a ball.
Execution: Have the players put the ball to their rightor left side (all do the same) so it is against their foot. Thenhave them lift the leg that is closest to the ball behindthem and hold it with their hands. Then players will gostraight down on one leg and touch the ball with theirknee. After touching the ball, have the players lift them-selves back up. Start with five or fewer touches and buildas the players’ strength builds. Do this with both legs.
Jump over Ball
Preparation: This drill requires that each player have a ball.
Execution: Have the players put the ball to their right or left side (alldo the same) so it is against their foot. Have them keep their feet togetherand jump sideways over the ball, making sure that they don’t spread theirlegs. Do this left, right, forward, and backward. Note that when you startthis, some of the players may land on the ball and fall. This drill is good
8 101 Great Youth Soccer Dril ls
Figure 1.9 Toe Taps, Alternating Feet
Left Right
Figure 1.10 Touch Ball with Knee
Figure 1.11 Jumpover Ball
01 (001-012B) chapter 1 3/1/05 10:25 AM Page 8

for the cardiovascular system, and it builds leg strength and headingability.
Back to Back
Preparation: This drill requires one ball for every two players.
Execution: Have pairs of players stand with their backs to eachother. Give a ball to one of the players, and have her lift the ballup over her head while the other player lifts his hands to take theball. The player with the ball hands the ball to the other player,who then takes the ball, bends over, and passes it to the otherplayer between the legs. Keep this action moving as steadily andas quickly as possible while maintaining control. This allows theplayers to stretch all of the muscles while working together.
Other Warm-Up Exercises for Under-6 andUnder-8
Crab Crawl
Execution: Get the players ontheir hands and feet in a four -point stance facing down or fac-ing up, and have them crawl inthis position. This is fun andstretches the arms, legs, back,and stomach muscles.
Touch Ball
Preparation: This drill requires that each player have a ball.
Execution: Have the players place the ball in front of them. Call outa part of the body that the players should use to touch the ball. You cancall out “forehead,” “elbow,” “foot,” etc. This gets the players to bendand stretch their arms, legs, back, and stomach muscles.
9Beginning a Practice—Warming Up and Stretching
Figure 1.12 Back to Back
Figure 1.13 Crab Crawl
01 (001-012B) chapter 1 3/1/05 10:25 AM Page 9
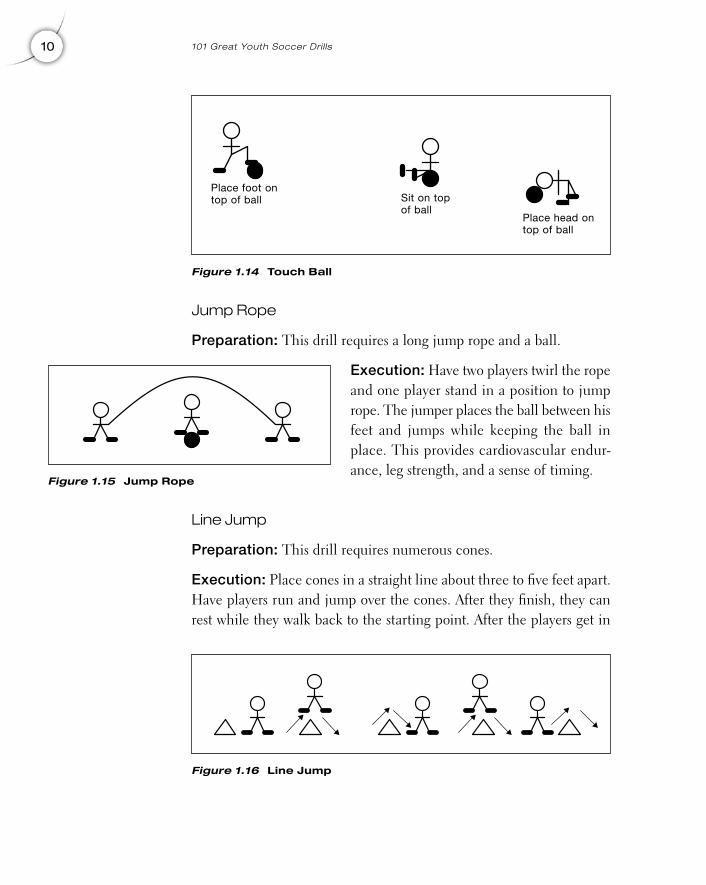
Jump Rope
Preparation: This drill requires a long jump rope and a ball.
Execution: Have two players twirl the ropeand one player stand in a position to jumprope. The jumper places the ball between hisfeet and jumps while keeping the ball inplace. This provides cardiovascular endur-ance, leg strength, and a sense of timing.
Line Jump
Preparation: This drill requires numerous cones.
Execution: Place cones in a straight line about three to five feet apart.Have players run and jump over the cones. After they finish, they canrest while they walk back to the starting point. After the players get in
10 101 Great Youth Soccer Dril ls
Figure 1.14 Touch Ball
Figure 1.15 Jump Rope
Place foot ontop of ball Sit on top
of ballPlace head ontop of ball
Figure 1.16 Line Jump
01 (001-012B) chapter 1 3/1/05 10:25 AM Page 10
better shape, work for continuous movement. Place the cones in a cir-cle, and have players run and jump until you blow the whistle for themto stop. This provides cardiovascular endurance and leg strength.
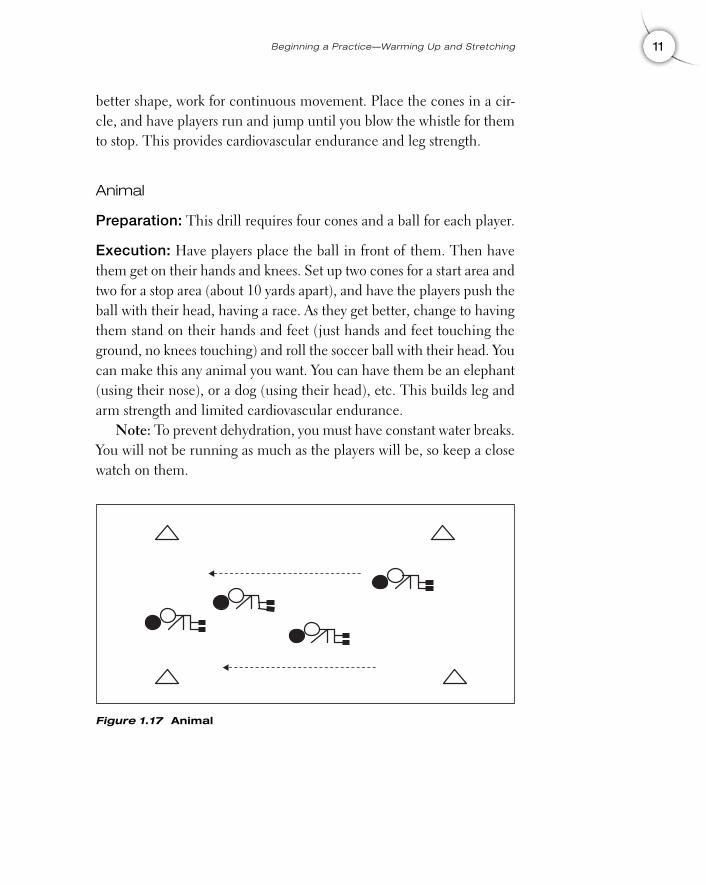
Animal
Preparation: This drill requires four cones and a ball for each player.
Execution: Have players place the ball in front of them. Then havethem get on their hands and knees. Set up two cones for a start area andtwo for a stop area (about 10 yards apart), and have the players push theball with their head, having a race. As they get better, change to havingthem stand on their hands and feet (just hands and feet touching theground, no knees touching) and roll the soccer ball with their head. Youcan make this any animal you want. You can have them be an elephant(using their nose), or a dog (using their head), etc. This builds leg andarm strength and limited cardiovascular endurance.
Note: To prevent dehydration, you must have constant water breaks.You will not be running as much as the players will be, so keep a closewatch on them.
11Beginning a Practice—Warming Up and Stretching
Figure 1.17 Animal
01 (001-012B) chapter 1 3/1/05 10:25 AM Page 11

This page intentionally left blank.
2
13
TeachingTechniques
and Skills
Technique TypesThere are three types of techniques that must be taught. Different peo-ple call them by different names. I use “FIG” because it is something Ican easily remember. Here are the definitions for “FIG.”
• Foundation (F). These techniques are the lowest level of training. They
are used to develop the basic soccer skills needed by each player but do
not get into actual game conditions. Building a strong foundation is
necessary. As with building a house, the stronger the foundation, the
bigger and more varied the house can be. These foundation skills are a
must for every player.
• Intermediate (I). These are intermediate or midlevel techniques that are
necessary to tie the foundation skills to the game skills. These are not
Copyright © 2005 by Robert Koger. Click here for terms of use.
the actual game skills but are used as building blocks to develop the
actual game skills.
• Game (G). These are the actual skills needed for playing the game.
These teach the players to be able to conduct themselves during games.
Note: The letters F, I, and G will be used in the drills to identify theskill level that is being taught.
TeachingTeaching soccer techniques/skills is no different from teaching any otherpsychomotor skills. Use the demonstration-performance method fol-lowing a simple teaching format: introduction, body, and conclusion.Tell players what you are going to teach them, demonstrate the tech-nique/skill, and then have them perform. To learn, one must be told howto, be shown how to, and then practice how to. A suggested easy-to-useformat follows. Remember, the younger the player, the shorter the atten-tion span. Don’t spend a lot of time lecturing.
• Introduction. Introduce the technique/skill to be taught and tell players
why they are doing it and how it can help them learn soccer.
• The Basics
1. Explain how the technique/skill works.
2. Demonstrate the technique/skill you want the players to do.
3. Have the players practice the technique/skill. While they are prac-
ticing, use general comments to get them to do the technique/skill
correctly. These can be as simple as, “Keep moving; do not stop,” or
as complex as, “Roll your foot over the ball with the toe of your foot.
Do not kick it.” During the practice, walk among the players and give
them specific corrections while still encouraging them. This can be
done by saying things like, “That’s pretty good, but if you do [what-
ever], it will be easier.” When they do it correctly, you can then say,
“Yes, that was perfect,” or “Great job,” and call them by name.
• The Drills. Run as many repetitions as is necessary to learn the
technique/skill.
• Conclusion. Tell players how they did and make any overall corrections
that are required.
14 101 Great Youth Soccer Dril ls
02 (013-014) chapter 2 3/1/05 10:25 AM Page 14
3
15
General PracticeSkills and Technique
Drills—U-6/U-8This chapter is made up of general practice drills designed foryounger—Under-6 (U-6) and Under-8 (U-8)—players. Remember thatall children like to have fun, and the more fun you make it, the happierthey will be and the more eager to learn soccer.
Each of the drills in this section is set up so they can stand alone—you do not have to follow the sequence of the book. Go with the orderof skills and techniques you want your team to learn. These are generalpractice drills and do not include the teaching of the skill. After the drillhas been taught, these drills can be used to add fun to the practice. Eachdrill explanation includes a statement of what the drill accomplishes.
General Practice Drills—U-6/U-8
Snapping Turtle (F)Have half of the team lie on the ground and use their arms to be the“snappers” while the other half, each with a ball, try to dribble through
Copyright © 2005 by Robert Koger. Click here for terms of use.
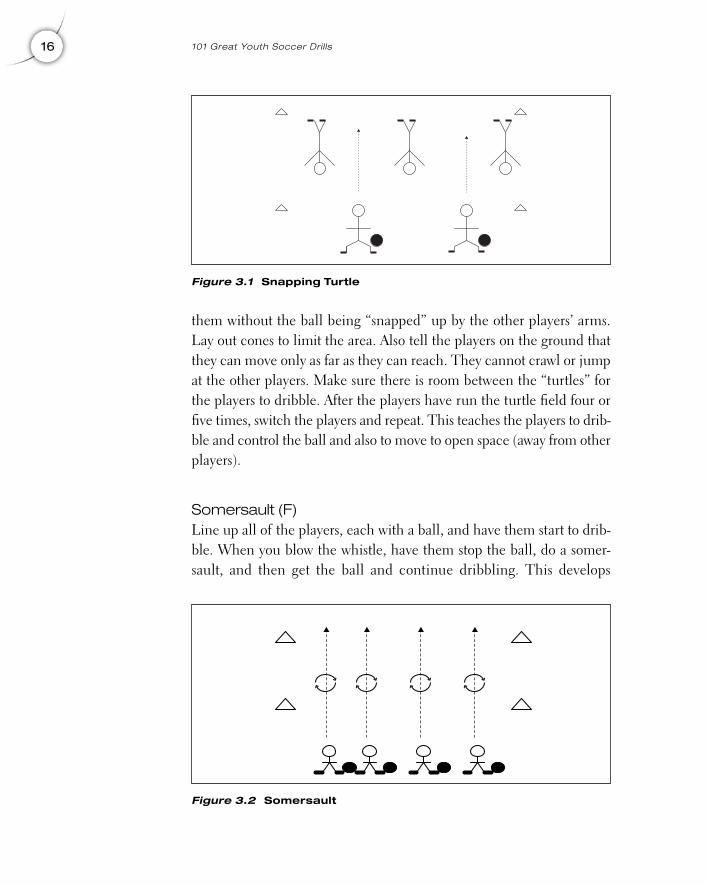
them without the ball being “snapped” up by the other players’ arms.Lay out cones to limit the area. Also tell the players on the ground thatthey can move only as far as they can reach. They cannot crawl or jumpat the other players. Make sure there is room between the “turtles” forthe players to dribble. After the players have run the turtle field four orfive times, switch the players and repeat. This teaches the players to drib-ble and control the ball and also to move to open space (away from otherplayers).
Somersault (F)Line up all of the players, each with a ball, and have them start to drib-ble. When you blow the whistle, have them stop the ball, do a somer-sault, and then get the ball and continue dribbling. This develops
16 101 Great Youth Soccer Dril ls
Figure 3.1 Snapping Turtle
Figure 3.2 Somersault
03 (015-018) chapter 3 3/1/05 10:26 AM Page 16
cardiovascular endurance, teaches dribbling and picking up the ball,and stretches the players while they have fun.
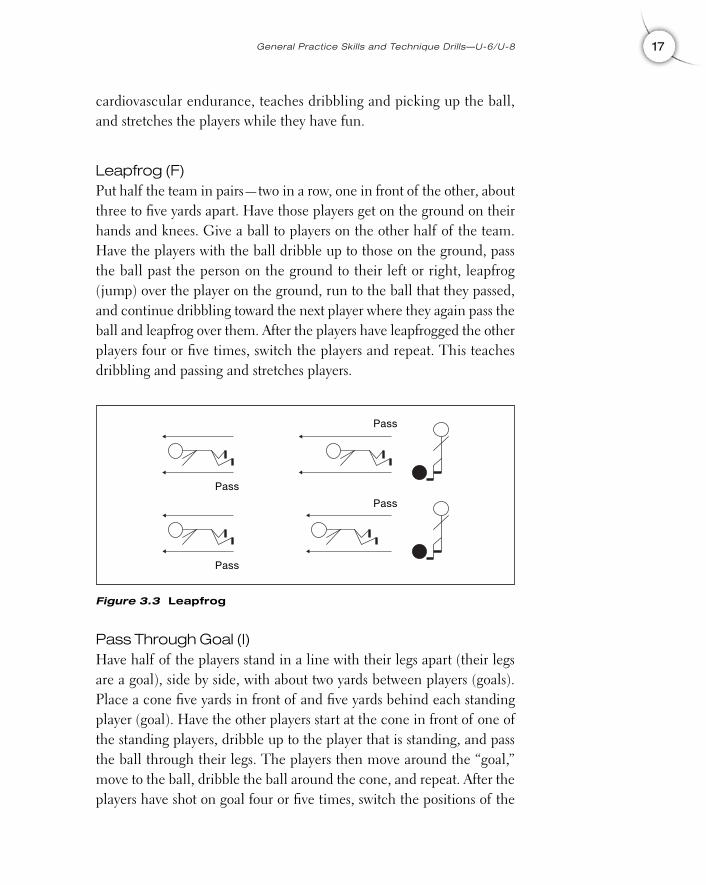
Leapfrog (F)Put half the team in pairs—two in a row, one in front of the other, aboutthree to five yards apart. Have those players get on the ground on theirhands and knees. Give a ball to players on the other half of the team.Have the players with the ball dribble up to those on the ground, passthe ball past the person on the ground to their left or right, leapfrog(jump) over the player on the ground, run to the ball that they passed,and continue dribbling toward the next player where they again pass theball and leapfrog over them. After the players have leapfrogged the otherplayers four or five times, switch the players and repeat. This teachesdribbling and passing and stretches players.
Pass Through Goal (I)Have half of the players stand in a line with their legs apart (their legsare a goal), side by side, with about two yards between players (goals).Place a cone five yards in front of and five yards behind each standingplayer (goal). Have the other players start at the cone in front of one ofthe standing players, dribble up to the player that is standing, and passthe ball through their legs. The players then move around the “goal,”move to the ball, dribble the ball around the cone, and repeat. After theplayers have shot on goal four or five times, switch the positions of the
17General Practice Skills and Technique Drills—U-6/U-8
Figure 3.3 Leapfrog
Pass
Pass
Pass
Pass
03 (015-018) chapter 3 3/1/05 10:26 AM Page 17
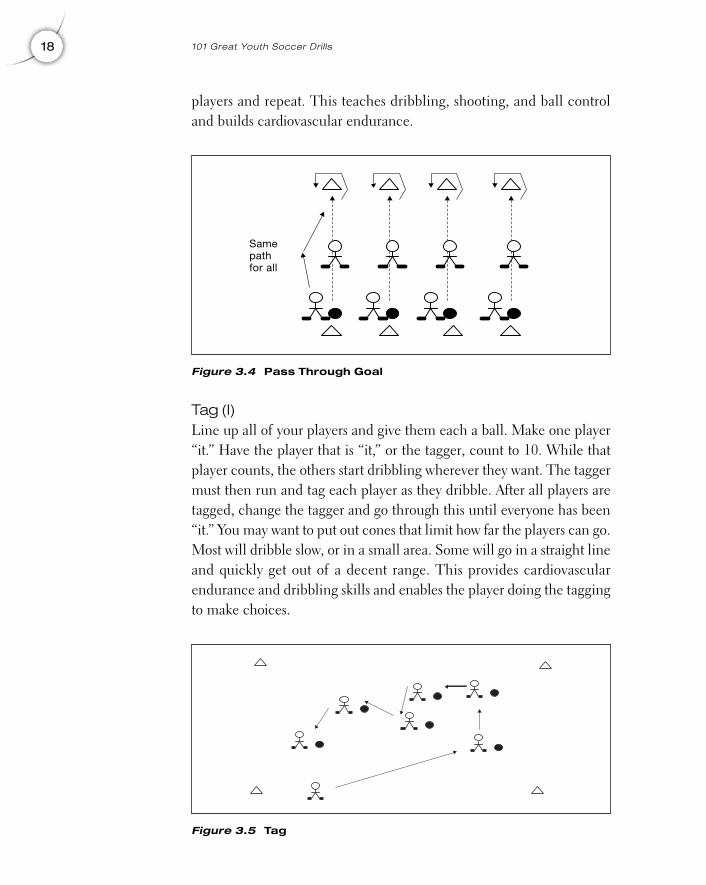
players and repeat. This teaches dribbling, shooting, and ball controland builds cardiovascular endurance.
Tag (I)Line up all of your players and give them each a ball. Make one player“it.” Have the player that is “it,” or the tagger, count to 10. While thatplayer counts, the others start dribbling wherever they want. The taggermust then run and tag each player as they dribble. After all players aretagged, change the tagger and go through this until everyone has been“it.” You may want to put out cones that limit how far the players can go.Most will dribble slow, or in a small area. Some will go in a straight lineand quickly get out of a decent range. This provides cardiovascularendurance and dribbling skills and enables the player doing the taggingto make choices.
18 101 Great Youth Soccer Dril ls
Figure 3.4 Pass Through Goal
Figure 3.5 Tag
Samepathfor all
03 (015-018) chapter 3 3/1/05 10:26 AM Page 18
4
19
Passing and KickingInstruction and Drills
Passing the soccer ball is how you get the ball from yourself to anotherplayer. You do this by kicking the ball. Kicking with accuracy is neces-sary in passing and scoring.
Note: When kicking the ball toward the goal, do not kick directly tothe goalie. Teach this from the beginning. Place two or three cones inthe right and left corners of the goal, and have the players shoot at thecones. The players will have a tendency to see the goalie and kickdirectly to the goalie. The goalie is the danger area, and all kicks mustbe away from the goalie (to the right or to the left).
The Basics1. You must pass/kick the ball to the feet of the other player. If the pass is
not accurate, the other team’s players can get the ball.
2. Your body should be balanced over the ball with the knee pointing down-
ward toward the ball.
3. Plant your foot next to the ball, with that foot pointing in the direction of
the pass/kick you are going to make.
4. Hold the ankle of the foot passing/kicking the ball rigid, and let your foot
and leg follow through on the kick.
Copyright © 2005 by Robert Koger. Click here for terms of use.
Note: All players have a “sweet spot” on their foot—that place thatwill give them uniform and accurate kicks. It’s located on the laces ofthe shoe, although the exact location varies by a small amount fromplayer to player.
To help your players find their sweet spot, have them sit on theground with their feet in front of them about 6 to 12 inches out fromtheir body. They should be sitting comfortably and able to raise theirfoot, knee, and leg straight up. Then have them hold a ball above theirhead, drop it straight down toward the laces of their shoe, and raise theirfoot until it meets the ball. When they hit the sweet spot on their foot,the ball will go back up without any spin or rotation. If they hit the balltoo high on the laces, it will spin away from them. If the ball is hit belowthe sweet spot, it will come back toward them. Hitting to either side ofthe sweet spot will cause the ball to go right or left away from them.
They should repeat this action until they are able to strike the balland cause it to go straight up and straight back down without any spinor rotation. Mark this spot on the shoe using chalk or adhesive tape. Dodrills using that marked spot on the shoe so the players can get used tohitting on the sweet spot.
Do not let players kick with their toe. If the kick is with the toe andhappens be kicked perfectly, it will go straight. If the kick is to the rightof center of the toe, the ball will go right; if it is left of center, the ballwill be propelled left. Players cannot kick accurately by using the toe.
Passing/Kicking Drills
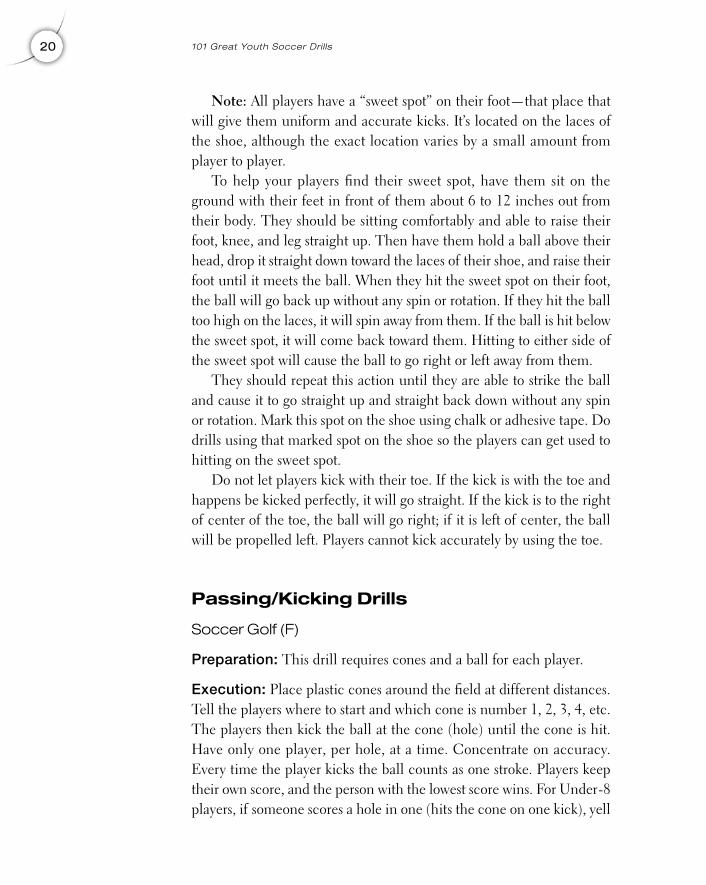
Soccer Golf (F)
Preparation: This drill requires cones and a ball for each player.
Execution: Place plastic cones around the field at different distances.Tell the players where to start and which cone is number 1, 2, 3, 4, etc.The players then kick the ball at the cone (hole) until the cone is hit.Have only one player, per hole, at a time. Concentrate on accuracy.Every time the player kicks the ball counts as one stroke. Players keeptheir own score, and the person with the lowest score wins. For Under-8players, if someone scores a hole in one (hits the cone on one kick), yell
20 101 Great Youth Soccer Dril ls
04 (019-028) chapter 4 3/1/05 10:26 AM Page 20
out his name and tell him how good that was; this compels the othersto try harder. This drill teaches accuracy, touch on the ball, and distanceand is a fun game.
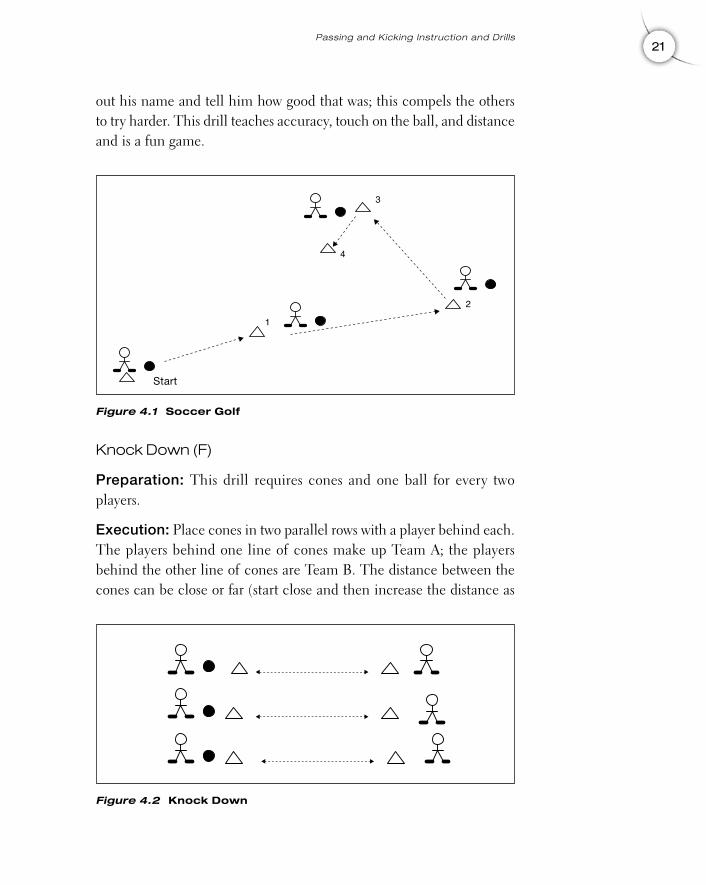
Knock Down (F)
Preparation: This drill requires cones and one ball for every twoplayers.
Execution: Place cones in two parallel rows with a player behind each.The players behind one line of cones make up Team A; the playersbehind the other line of cones are Team B. The distance between thecones can be close or far (start close and then increase the distance as
21Passing and Kicking Instruction and Drills
1
2
3
4
Figure 4.1 Soccer Golf
Figure 4.2 Knock Down
Start
04 (019-028) chapter 4 3/1/05 10:26 AM Page 21
the players improve). Have Team A kick to the opposite line of conesfirst and see how many they knock down, and then have Team B kick totheir opposite line. Leave the knocked cones down. The team to knockall of the cones down first wins. This teaches accuracy and proper pass-ing techniques.
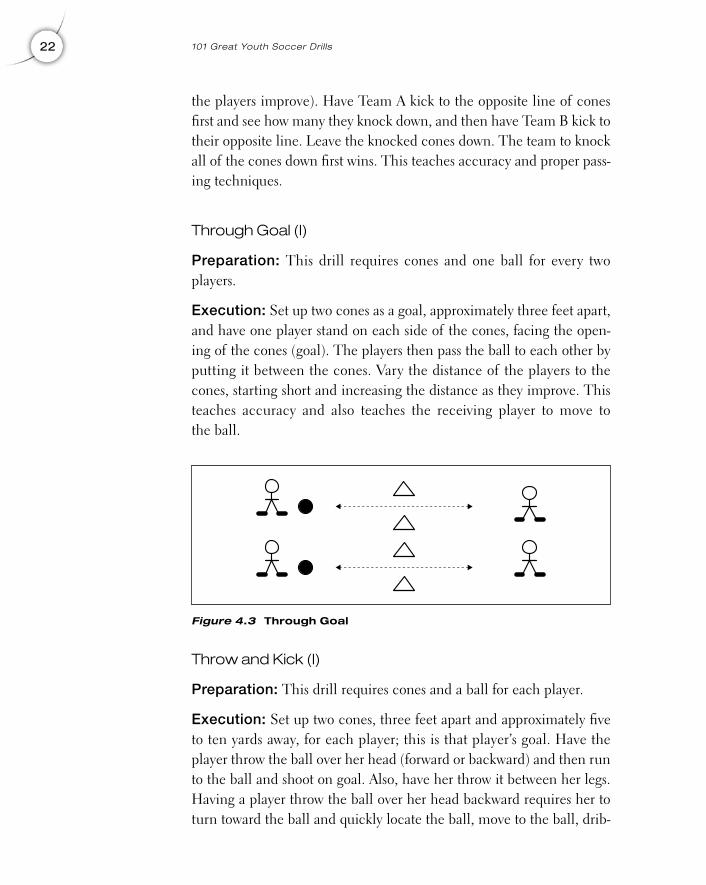
Through Goal (I)
Preparation: This drill requires cones and one ball for every twoplayers.
Execution: Set up two cones as a goal, approximately three feet apart,and have one player stand on each side of the cones, facing the open-ing of the cones (goal). The players then pass the ball to each other byputting it between the cones. Vary the distance of the players to thecones, starting short and increasing the distance as they improve. Thisteaches accuracy and also teaches the receiving player to move tothe ball.
Throw and Kick (I)
Preparation: This drill requires cones and a ball for each player.
Execution: Set up two cones, three feet apart and approximately fiveto ten yards away, for each player; this is that player’s goal. Have theplayer throw the ball over her head (forward or backward) and then runto the ball and shoot on goal. Also, have her throw it between her legs.Having a player throw the ball over her head backward requires her toturn toward the ball and quickly locate the ball, move to the ball, drib-
22 101 Great Youth Soccer Dril ls
Figure 4.3 Through Goal
04 (019-028) chapter 4 3/1/05 10:26 AM Page 22
ble, and then shoot. This teaches movement to the ball, dribbling, andpassing/shooting.
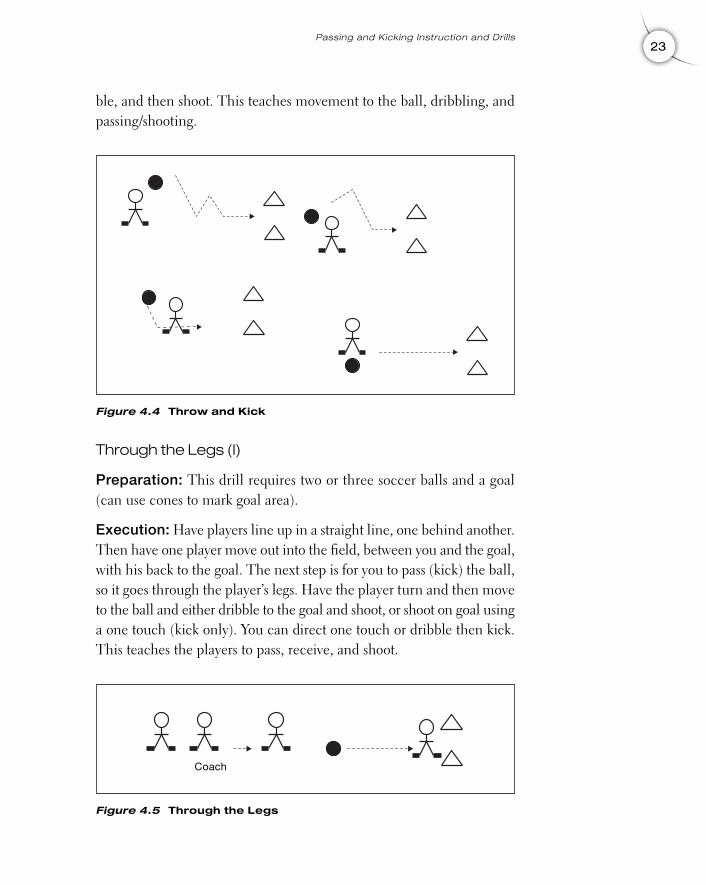
Through the Legs (I)
Preparation: This drill requires two or three soccer balls and a goal(can use cones to mark goal area).
Execution: Have players line up in a straight line, one behind another.Then have one player move out into the field, between you and the goal,with his back to the goal. The next step is for you to pass (kick) the ball,so it goes through the player’s legs. Have the player turn and then moveto the ball and either dribble to the goal and shoot, or shoot on goal usinga one touch (kick only). You can direct one touch or dribble then kick.This teaches the players to pass, receive, and shoot.
23Passing and Kicking Instruction and Drills
Figure 4.4 Throw and Kick
Figure 4.5 Through the Legs
Coach
04 (019-028) chapter 4 3/1/05 10:26 AM Page 23
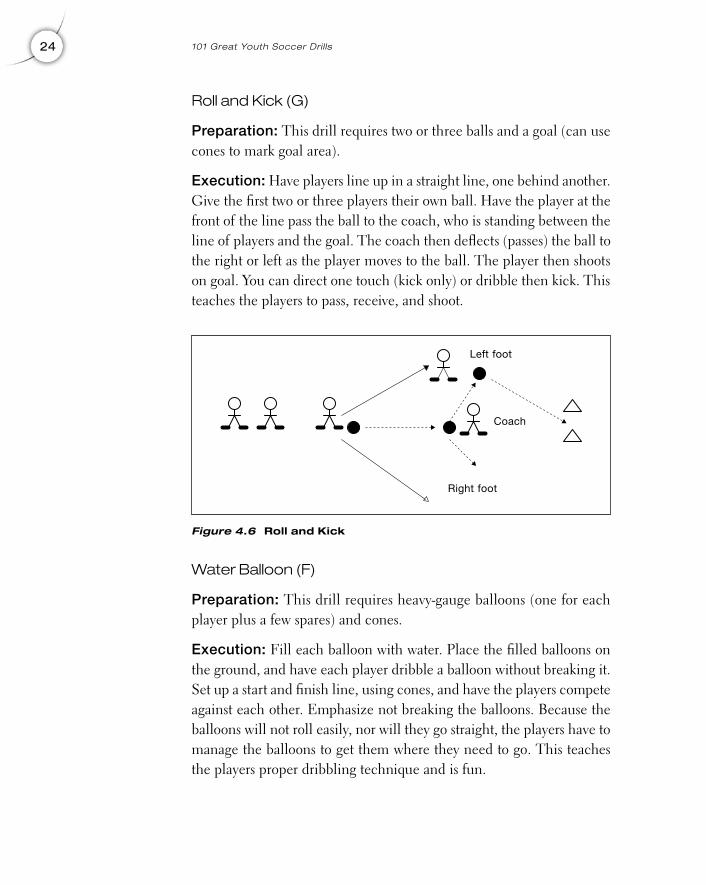
Roll and Kick (G)
Preparation: This drill requires two or three balls and a goal (can usecones to mark goal area).
Execution: Have players line up in a straight line, one behind another.Give the first two or three players their own ball. Have the player at thefront of the line pass the ball to the coach, who is standing between theline of players and the goal. The coach then deflects (passes) the ball tothe right or left as the player moves to the ball. The player then shootson goal. You can direct one touch (kick only) or dribble then kick. Thisteaches the players to pass, receive, and shoot.
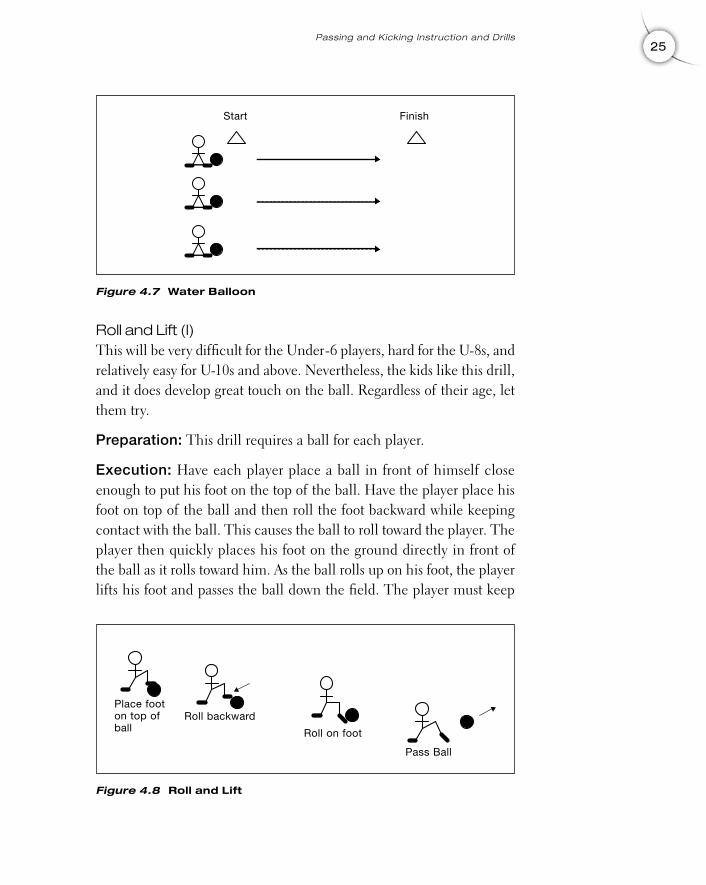
Water Balloon (F)
Preparation: This drill requires heavy-gauge balloons (one for eachplayer plus a few spares) and cones.
Execution: Fill each balloon with water. Place the filled balloons onthe ground, and have each player dribble a balloon without breaking it.Set up a start and finish line, using cones, and have the players competeagainst each other. Emphasize not breaking the balloons. Because theballoons will not roll easily, nor will they go straight, the players have tomanage the balloons to get them where they need to go. This teachesthe players proper dribbling technique and is fun.
24 101 Great Youth Soccer Dril ls
Figure 4.6 Roll and Kick
Left foot
Coach
Right foot
04 (019-028) chapter 4 3/1/05 10:26 AM Page 24
Roll and Lift (I)This will be very difficult for the Under-6 players, hard for the U-8s, andrelatively easy for U-10s and above. Nevertheless, the kids like this drill,and it does develop great touch on the ball. Regardless of their age, letthem try.
Preparation: This drill requires a ball for each player.
Execution: Have each player place a ball in front of himself closeenough to put his foot on the top of the ball. Have the player place hisfoot on top of the ball and then roll the foot backward while keepingcontact with the ball. This causes the ball to roll toward the player. Theplayer then quickly places his foot on the ground directly in front ofthe ball as it rolls toward him. As the ball rolls up on his foot, the playerlifts his foot and passes the ball down the field. The player must keep
25Passing and Kicking Instruction and Drills
Figure 4.7 Water Balloon
Figure 4.8 Roll and Lift
Start Finish
Place footon top ofball
Roll backward
Roll on foot
Pass Ball
04 (019-028) chapter 4 3/1/05 10:26 AM Page 25

his ankle locked to do this drill. Let each player keep doing this until hecan pass the ball straight. After this is taught, every time you ask theplayer to throw you the ball, have him use his feet rather than his hands.
Player Turn (I)
Preparation: This drill uses three players and two balls.
Execution: Put one player in the center, and the other two oppositeeach other, in front of and behind the center player. Have the centerplayer turn her back to the outside person passing the ball. As the out-side player passes the ball to the person in the center, he yells, “Turn.”The player in the center turns, locates the ball, and passes (kicks) theball directly back to the player that originally passed the ball. As soon as
the center player passes the ball back, the other outside player passes theball and yells, “Turn.” This movement continues without stop. Thisrequires the players to pass with both their right and left feet. Rotate play-ers after 25 to 50 passes. This teaches the players to communicate on thefield, quickly locate the ball, receive, and pass using both feet.
Weave (I)
Preparation: This uses three players, one ball, and a goal.
Execution: Have the three players line up on the centerline or end linewith one player in the center and one player on each side. Make sure
26 101 Great Youth Soccer Dril ls
Figure 4.9 Player Turn
Start
Step 1
Step 2Finish
04 (019-028) chapter 4 3/1/05 10:26 AM Page 26
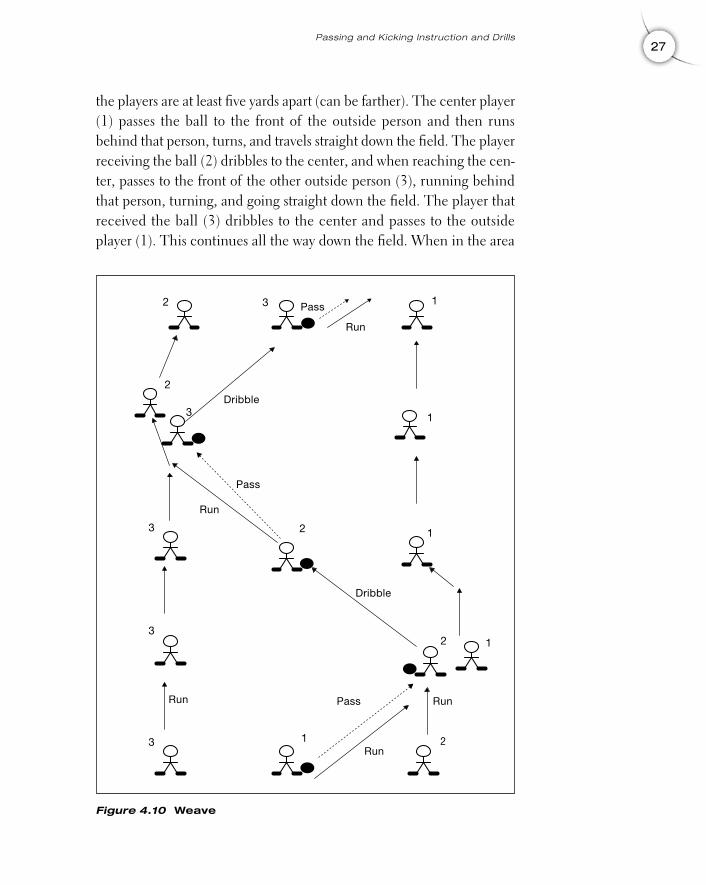
the players are at least five yards apart (can be farther). The center player(1) passes the ball to the front of the outside person and then runsbehind that person, turns, and travels straight down the field. The playerreceiving the ball (2) dribbles to the center, and when reaching the cen-ter, passes to the front of the other outside person (3), running behindthat person, turning, and going straight down the field. The player thatreceived the ball (3) dribbles to the center and passes to the outsideplayer (1). This continues all the way down the field. When in the area
27Passing and Kicking Instruction and Drills
23
3
3
3
3
1
1
2
2
2
2
1
1
1
Figure 4.10 Weave
Pass
Pass
Pass
Run
Run
Run
RunRun
Dribble
Dribble
04 (019-028) chapter 4 3/1/05 10:26 AM Page 27
of the goal, whoever is on the outside and has the ball centers it whilethe other two shoot on goal. Make sure the players pass to the feet (whileleading the player) and then go behind the person they passed to. Thisteaches them to lead their passes, cover the position of the player theypassed to, dribble, center, and shoot on goal.
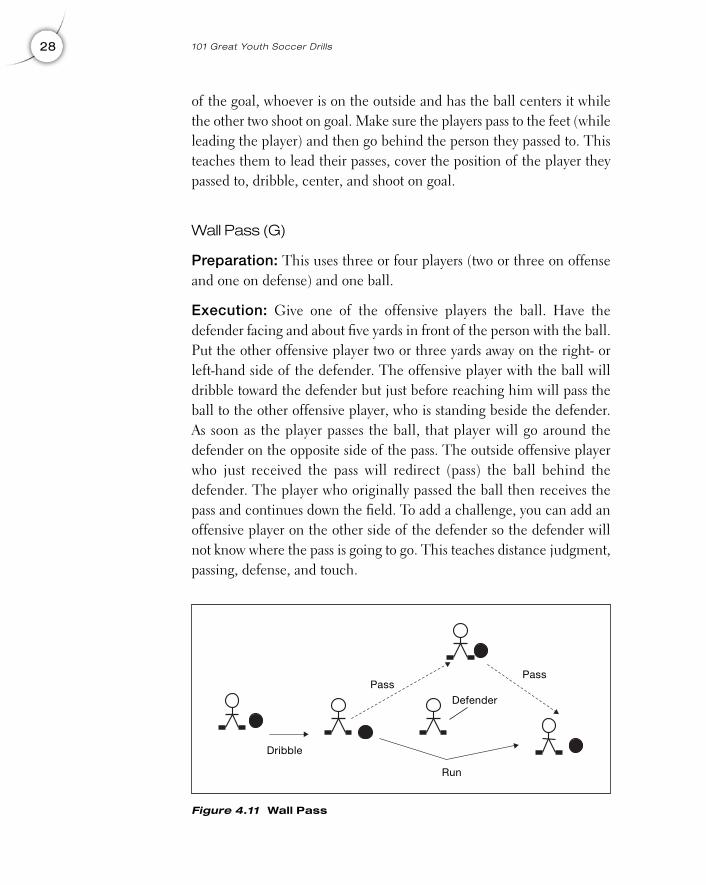
Wall Pass (G)
Preparation: This uses three or four players (two or three on offenseand one on defense) and one ball.
Execution: Give one of the offensive players the ball. Have thedefender facing and about five yards in front of the person with the ball.Put the other offensive player two or three yards away on the right- orleft-hand side of the defender. The offensive player with the ball willdribble toward the defender but just before reaching him will pass theball to the other offensive player, who is standing beside the defender.As soon as the player passes the ball, that player will go around thedefender on the opposite side of the pass. The outside offensive playerwho just received the pass will redirect (pass) the ball behind thedefender. The player who originally passed the ball then receives thepass and continues down the field. To add a challenge, you can add anoffensive player on the other side of the defender so the defender willnot know where the pass is going to go. This teaches distance judgment,passing, defense, and touch.
28 101 Great Youth Soccer Dril ls
Figure 4.11 Wall Pass
Run
PassPass
Defender
Dribble
04 (019-028) chapter 4 3/1/05 10:26 AM Page 28
5
29
Trapping andReceiving
Instruction and DrillsPassing the soccer ball is imperative, but the person receiving the ballmust be able to stop it or control it to complete the action. This is calledreceiving the ball. Trapping the ball is stopping the ball. You can receivethe ball with your head, chest, thigh, or foot.
The Basics1. When you see the ball coming, watch the ball, and move in front of it so
you are ready to receive the ball.
2. Meet the ball with your foot, and then withdraw your foot (move your
foot in the direction the ball was going) at contact to stop and retain the
ball. If you stick your foot straight out and strike the ball, it will go away
from you.
3. Control the ball on the ground with no bounce or roll away from you.
4. Move (dribble) to open space and play the ball to an open teammate as
soon as possible.
05 (029-032) chapter 5 3/1/05 10:27 AM Page 29
Copyright © 2005 by Robert Koger. Click here for terms of use.
Trapping/Receiving Drills
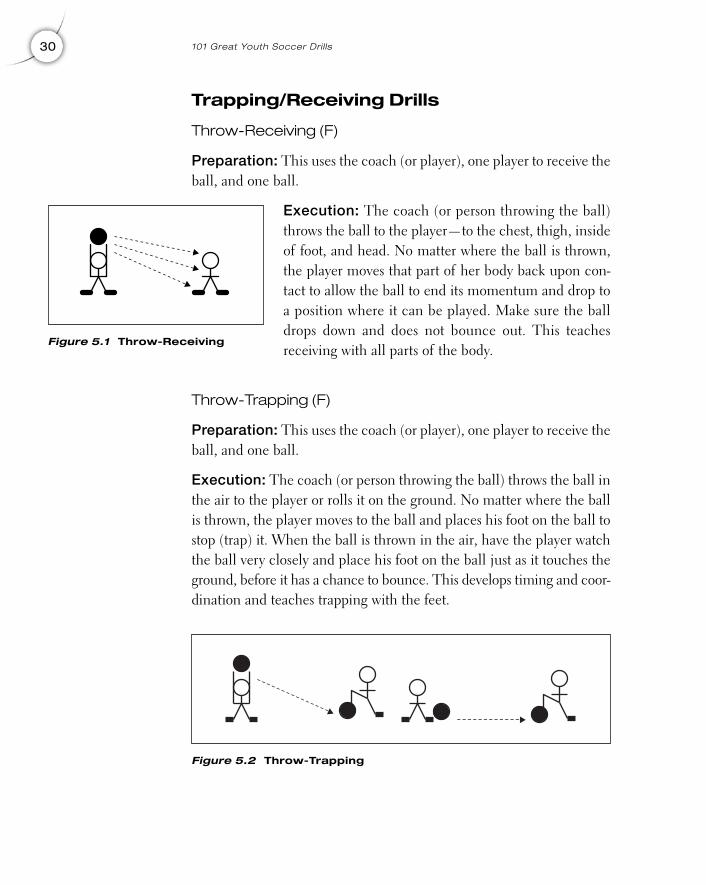
Throw-Receiving (F)
Preparation: This uses the coach (or player), one player to receive theball, and one ball.
Execution: The coach (or person throwing the ball)throws the ball to the player—to the chest, thigh, insideof foot, and head. No matter where the ball is thrown,the player moves that part of her body back upon con-tact to allow the ball to end its momentum and drop toa position where it can be played. Make sure the balldrops down and does not bounce out. This teachesreceiving with all parts of the body.
Throw-Trapping (F)
Preparation: This uses the coach (or player), one player to receive theball, and one ball.
Execution: The coach (or person throwing the ball) throws the ball inthe air to the player or rolls it on the ground. No matter where the ballis thrown, the player moves to the ball and places his foot on the ball tostop (trap) it. When the ball is thrown in the air, have the player watchthe ball very closely and place his foot on the ball just as it touches theground, before it has a chance to bounce. This develops timing and coor-dination and teaches trapping with the feet.
30 101 Great Youth Soccer Dril ls
Figure 5.1 Throw-Receiving
Figure 5.2 Throw-Trapping
05 (029-032) chapter 5 3/1/05 10:27 AM Page 30
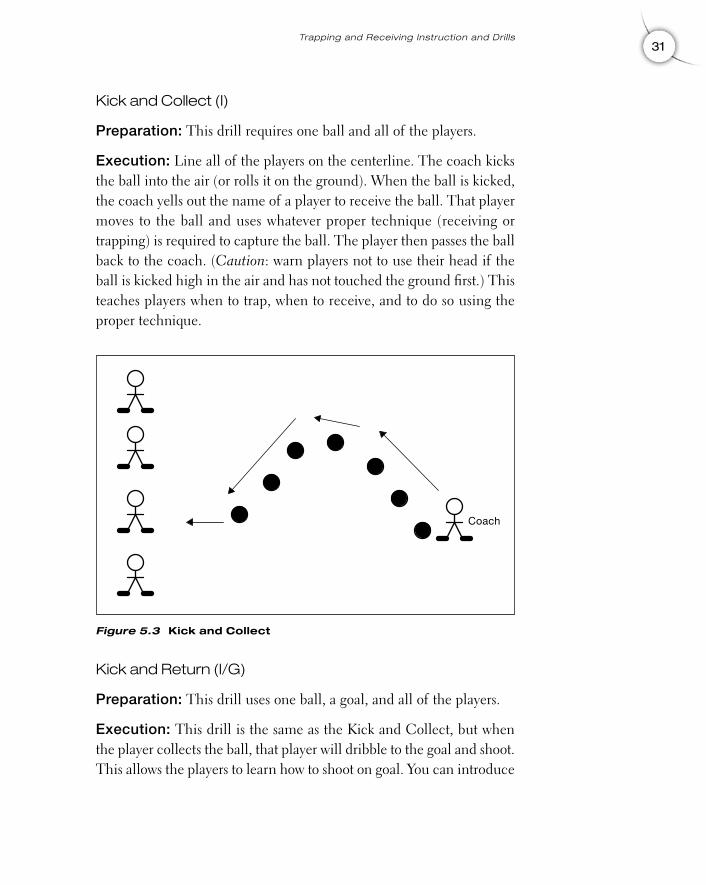
Kick and Collect (I)
Preparation: This drill requires one ball and all of the players.
Execution: Line all of the players on the centerline. The coach kicksthe ball into the air (or rolls it on the ground). When the ball is kicked,the coach yells out the name of a player to receive the ball. That playermoves to the ball and uses whatever proper technique (receiving ortrapping) is required to capture the ball. The player then passes the ballback to the coach. (Caution: warn players not to use their head if theball is kicked high in the air and has not touched the ground first.) Thisteaches players when to trap, when to receive, and to do so using theproper technique.
Kick and Return (I/G)
Preparation: This drill uses one ball, a goal, and all of the players.
Execution: This drill is the same as the Kick and Collect, but whenthe player collects the ball, that player will dribble to the goal and shoot.This allows the players to learn how to shoot on goal. You can introduce
31Trapping and Receiving Instruction and Drills
Figure 5.3 Kick and Collect
Coach
05 (029-032) chapter 5 3/1/05 10:27 AM Page 31
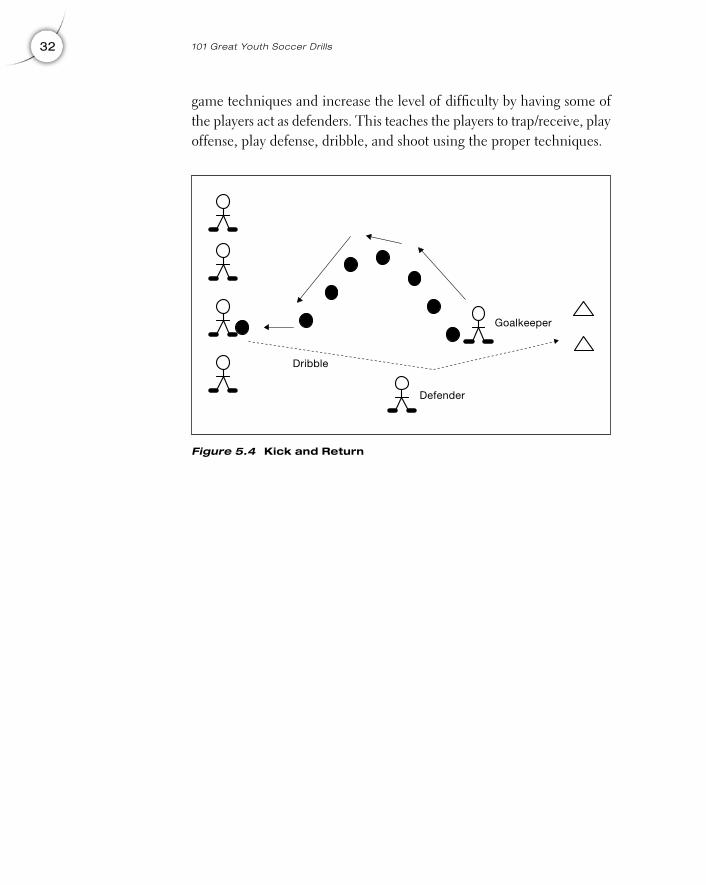
game techniques and increase the level of difficulty by having some ofthe players act as defenders. This teaches the players to trap/receive, playoffense, play defense, dribble, and shoot using the proper techniques.
32 101 Great Youth Soccer Dril ls
Figure 5.4 Kick and Return
Goalkeeper
Defender
Dribble
05 (029-032) chapter 5 3/1/05 10:27 AM Page 32
6
33
Heading Instructionand Drills
Using your head is an effective way to redirect the ball when it is in theair. If this is done correctly, it will not hurt the player. Heading can beused to pass the ball to another player or to shoot on goal. When firstteaching the players to head the ball, deflate the ball so it is soft. Also,be prepared to deal with bloodied noses.
The Basics1. When the ball is coming, move so you are facing the ball and your body
is directly in front of it.
2. Watch the ball all the way in, and continue watching the ball as it strikes
your forehead.
3. Keep your eyes open—do not close them or you will get hurt—and
watch the ball coming to you and going away from you.
4. Strike the ball with the upper-front portion of your forehead, not with your
temples or the top of your head.
5. Move your head back and then forward to strike the ball; do not just
stand still and let the ball hit you.
Copyright © 2005 by Robert Koger. Click here for terms of use.
Heading DrillsAll of these drills emphasize the movement involved in properly headingthe ball. The players have to time their head movement with the arrivalof the ball. The head must be moving forward as it strikes the ball.
Sitting and Knees (F)
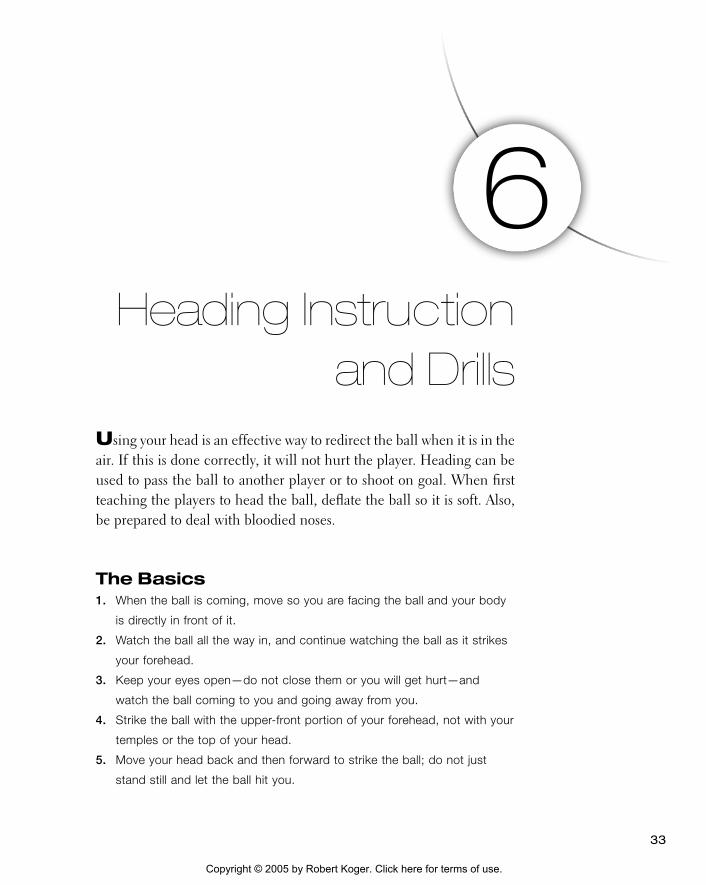
Preparation: This uses two players and one ball.
Execution: Have one player sit on the ground with herfeet straight out in front of her. Have the other playerstand directly in front of her and throw the ball, under-handed, toward her. Make the throw short so the playerheading the ball has to move forward to strike the ball.This teaches the player to move into the ball and not tolet the ball strike her. Do the same with the player posi-
tioned with both knees on the ground. Again throw the ball short so theplayer has to lunge forward to strike the ball. The player can use herhands to keep herself from hitting the ground. This teaches proper tech-niques for using the head to direct the ball.
Head Out of Hands (F)
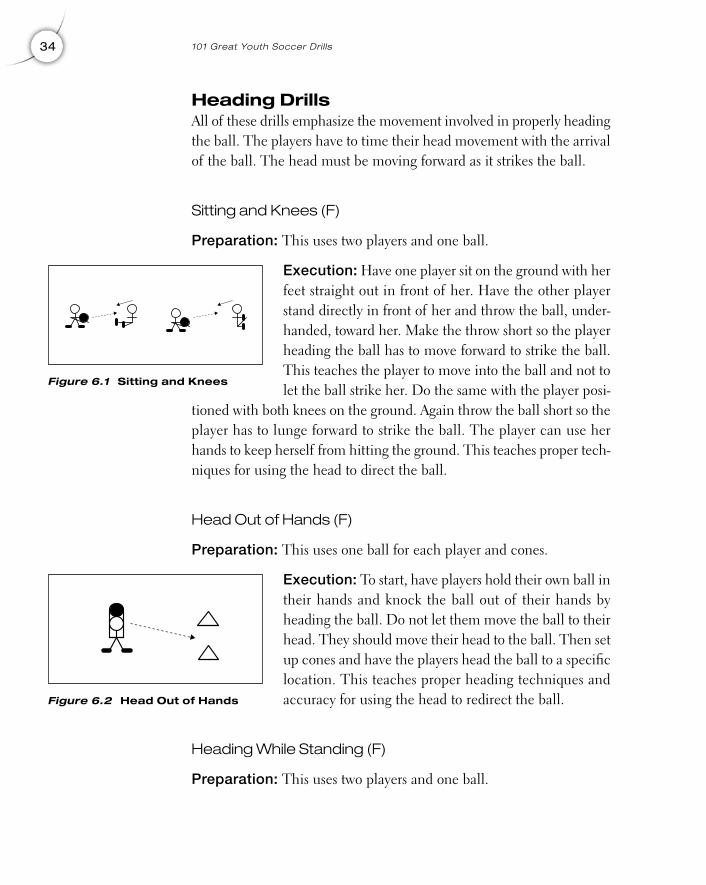
Preparation: This uses one ball for each player and cones.
Execution: To start, have players hold their own ball intheir hands and knock the ball out of their hands byheading the ball. Do not let them move the ball to theirhead. They should move their head to the ball. Then setup cones and have the players head the ball to a specificlocation. This teaches proper heading techniques andaccuracy for using the head to redirect the ball.
Heading While Standing (F)
Preparation: This uses two players and one ball.
34 101 Great Youth Soccer Dril ls
Figure 6.1 Sitting and Knees
Figure 6.2 Head Out of Hands
06 (033-038B) chapter 6 3/1/05 10:27 AM Page 34
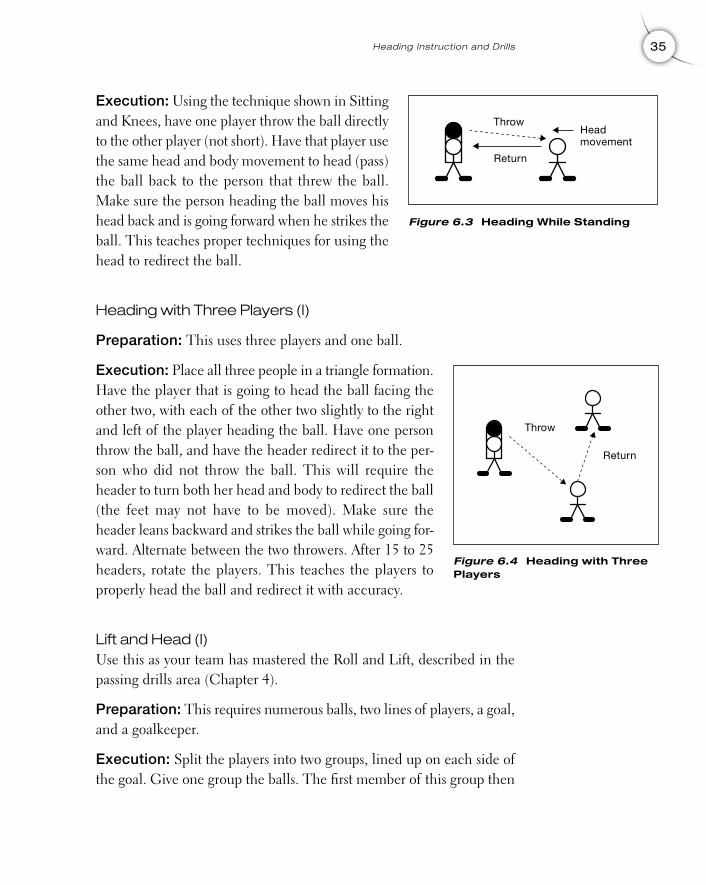
Execution: Using the technique shown in Sittingand Knees, have one player throw the ball directlyto the other player (not short). Have that player usethe same head and body movement to head (pass)the ball back to the person that threw the ball.Make sure the person heading the ball moves hishead back and is going forward when he strikes theball. This teaches proper techniques for using thehead to redirect the ball.
Heading with Three Players (I)
Preparation: This uses three players and one ball.
Execution: Place all three people in a triangle formation.Have the player that is going to head the ball facing theother two, with each of the other two slightly to the rightand left of the player heading the ball. Have one personthrow the ball, and have the header redirect it to the per-son who did not throw the ball. This will require theheader to turn both her head and body to redirect the ball(the feet may not have to be moved). Make sure theheader leans backward and strikes the ball while going for-ward. Alternate between the two throwers. After 15 to 25headers, rotate the players. This teaches the players toproperly head the ball and redirect it with accuracy.
Lift and Head (I)Use this as your team has mastered the Roll and Lift, described in thepassing drills area (Chapter 4).
Preparation: This requires numerous balls, two lines of players, a goal,and a goalkeeper.
Execution: Split the players into two groups, lined up on each side ofthe goal. Give one group the balls. The first member of this group then
35Heading Instruction and Drills
Figure 6.3 Heading While Standing
Figure 6.4 Heading with ThreePlayers
Throw
Throw
Return
Return
Headmovement
06 (033-038B) chapter 6 3/1/05 10:27 AM Page 35
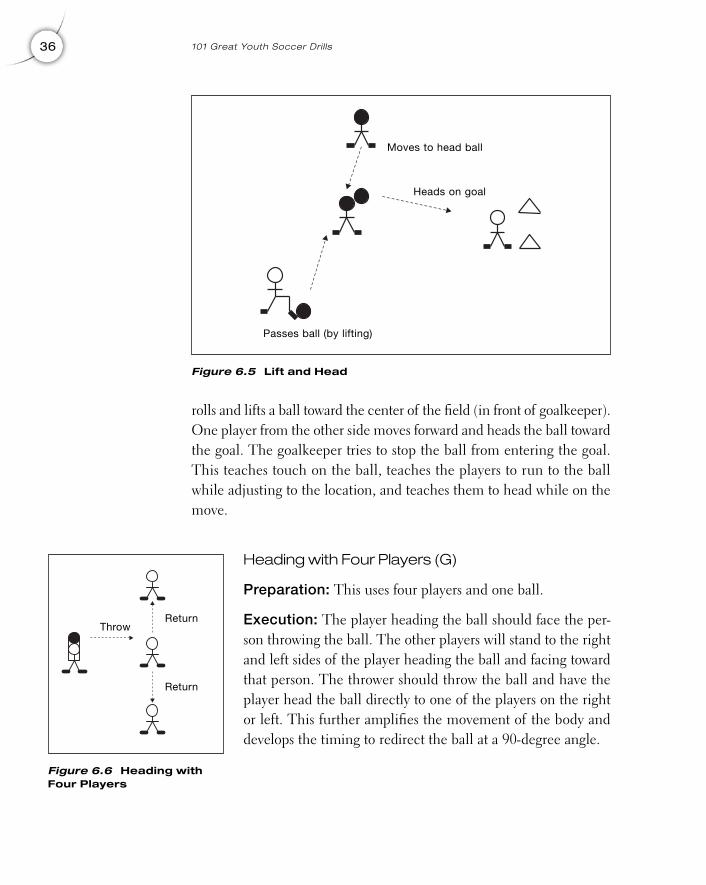
rolls and lifts a ball toward the center of the field (in front of goalkeeper).One player from the other side moves forward and heads the ball towardthe goal. The goalkeeper tries to stop the ball from entering the goal.This teaches touch on the ball, teaches the players to run to the ballwhile adjusting to the location, and teaches them to head while on themove.
Heading with Four Players (G)
Preparation: This uses four players and one ball.
Execution: The player heading the ball should face the per-son throwing the ball. The other players will stand to the rightand left sides of the player heading the ball and facing towardthat person. The thrower should throw the ball and have theplayer head the ball directly to one of the players on the rightor left. This further amplifies the movement of the body anddevelops the timing to redirect the ball at a 90-degree angle.
36 101 Great Youth Soccer Dril ls
Figure 6.5 Lift and Head
Moves to head ball
Heads on goal
Passes ball (by lifting)
Figure 6.6 Heading withFour Players
ThrowReturn
Return
06 (033-038B) chapter 6 3/1/05 10:27 AM Page 36
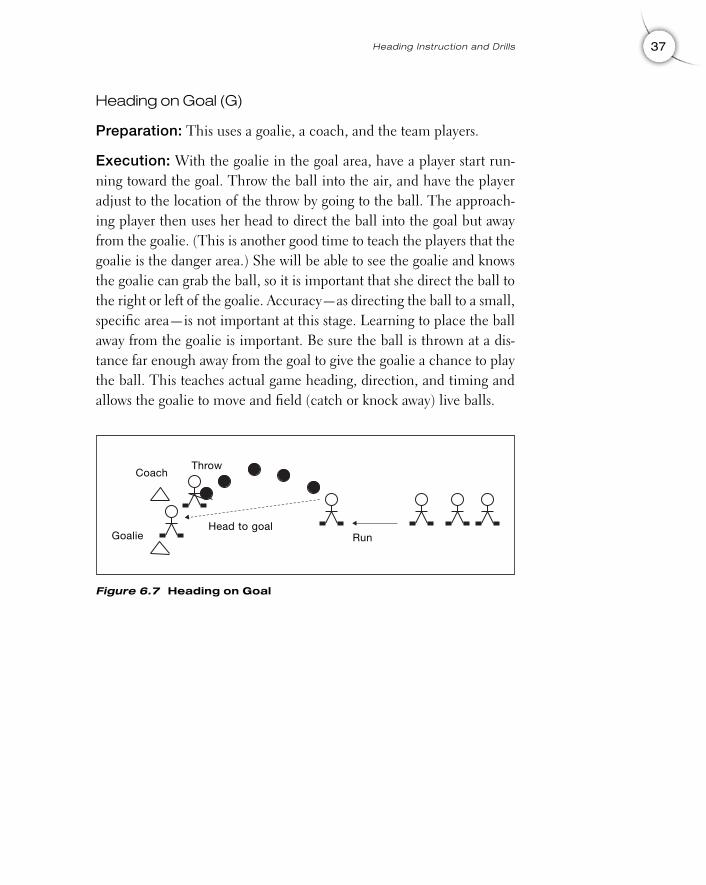
Heading on Goal (G)
Preparation: This uses a goalie, a coach, and the team players.
Execution: With the goalie in the goal area, have a player start run-ning toward the goal. Throw the ball into the air, and have the playeradjust to the location of the throw by going to the ball. The approach-ing player then uses her head to direct the ball into the goal but awayfrom the goalie. (This is another good time to teach the players that thegoalie is the danger area.) She will be able to see the goalie and knowsthe goalie can grab the ball, so it is important that she direct the ball tothe right or left of the goalie. Accuracy—as directing the ball to a small,specific area—is not important at this stage. Learning to place the ballaway from the goalie is important. Be sure the ball is thrown at a dis-tance far enough away from the goal to give the goalie a chance to playthe ball. This teaches actual game heading, direction, and timing andallows the goalie to move and field (catch or knock away) live balls.
37Heading Instruction and Drills
Figure 6.7 Heading on Goal
Goalie
CoachThrow
RunHead to goal
06 (033-038B) chapter 6 3/1/05 10:27 AM Page 37

This page intentionally left blank.
7
39
Shooting Instructionand Drills
Shooting the ball is necessary to score. If you can’t shoot properly, youwill not be able to compete in the game.
The Basics1. When you shoot, do it quickly; do not hesitate or broadcast the shot. (In
other words, don’t stop the ball and back up to kick it, and don’t dribble
after you get it.)
2. Shoot the ball away from the goalie.
3. Put your weight into the kick and follow through with your leg.
4. Watch where you kicked the ball and move in the direction of the kick in
anticipation of getting another shot.
Note: Do not let your players kick with their toe. If the kick is withthe toe and happens be kicked directly in the center, it will go straight.If the kick is to the right of center of the toe, the soccer ball will go right.If left of center, the ball will be propelled left. Players cannot kick accu-rately by using the toe.
Copyright © 2005 by Robert Koger. Click here for terms of use.
Shooting Drills
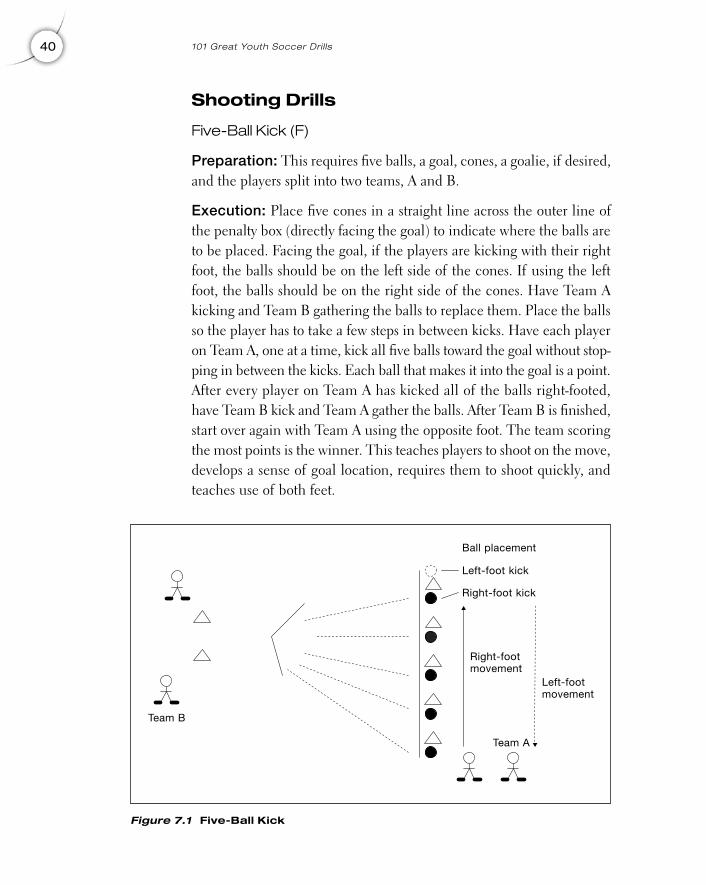
Five-Ball Kick (F)
Preparation: This requires five balls, a goal, cones, a goalie, if desired,and the players split into two teams, A and B.
Execution: Place five cones in a straight line across the outer line ofthe penalty box (directly facing the goal) to indicate where the balls areto be placed. Facing the goal, if the players are kicking with their rightfoot, the balls should be on the left side of the cones. If using the leftfoot, the balls should be on the right side of the cones. Have Team Akicking and Team B gathering the balls to replace them. Place the ballsso the player has to take a few steps in between kicks. Have each playeron Team A, one at a time, kick all five balls toward the goal without stop-ping in between the kicks. Each ball that makes it into the goal is a point.After every player on Team A has kicked all of the balls right-footed,have Team B kick and Team A gather the balls. After Team B is finished,start over again with Team A using the opposite foot. The team scoringthe most points is the winner. This teaches players to shoot on the move,develops a sense of goal location, requires them to shoot quickly, andteaches use of both feet.
40 101 Great Youth Soccer Dril ls
Figure 7.1 Five-Ball Kick
Team B
Team A
Ball placement
Right-footmovement
Left-footmovement
Left-foot kick
Right-foot kick
07 (039-046) chapter 7 3/1/05 10:28 AM Page 40
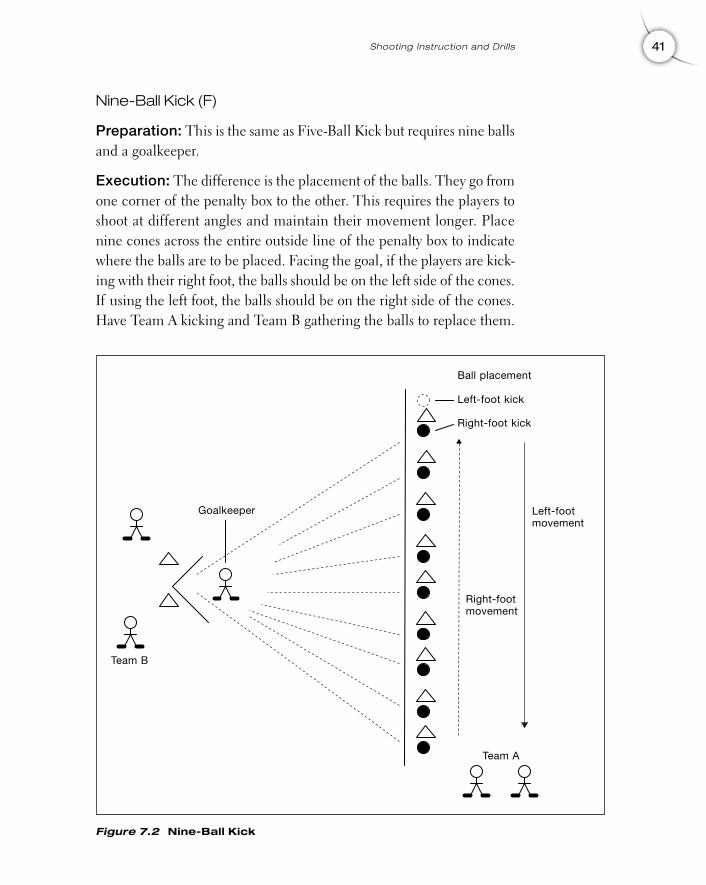
Nine-Ball Kick (F)
Preparation: This is the same as Five-Ball Kick but requires nine ballsand a goalkeeper.
Execution: The difference is the placement of the balls. They go fromone corner of the penalty box to the other. This requires the players toshoot at different angles and maintain their movement longer. Placenine cones across the entire outside line of the penalty box to indicatewhere the balls are to be placed. Facing the goal, if the players are kick-ing with their right foot, the balls should be on the left side of the cones.If using the left foot, the balls should be on the right side of the cones.Have Team A kicking and Team B gathering the balls to replace them.
41Shooting Instruction and Drills
Figure 7.2 Nine-Ball Kick
Team B
Team A
Ball placement
Goalkeeper
Right-footmovement
Left-footmovement
Left-foot kick
Right-foot kick
07 (039-046) chapter 7 3/1/05 10:28 AM Page 41
Place the balls so the player has to take a few steps in between kicks.Have each player on Team A, one at a time, kick all nine balls towardthe goal without stopping in between the kicks. Each ball that is withinthe left and right posts of the goal is a point. Have the goalie field theballs. After Team A has kicked all of the balls right-footed, have TeamB kick and Team A gather the balls. After Team B is finished, start overagain with Team A using the opposite foot. The team scoring the mostpoints is the winner. This teaches players to shoot on the move, devel-ops a sense of goal location, requires players to shoot quickly, teachesthe use of both feet, and gives the goalie field practice.
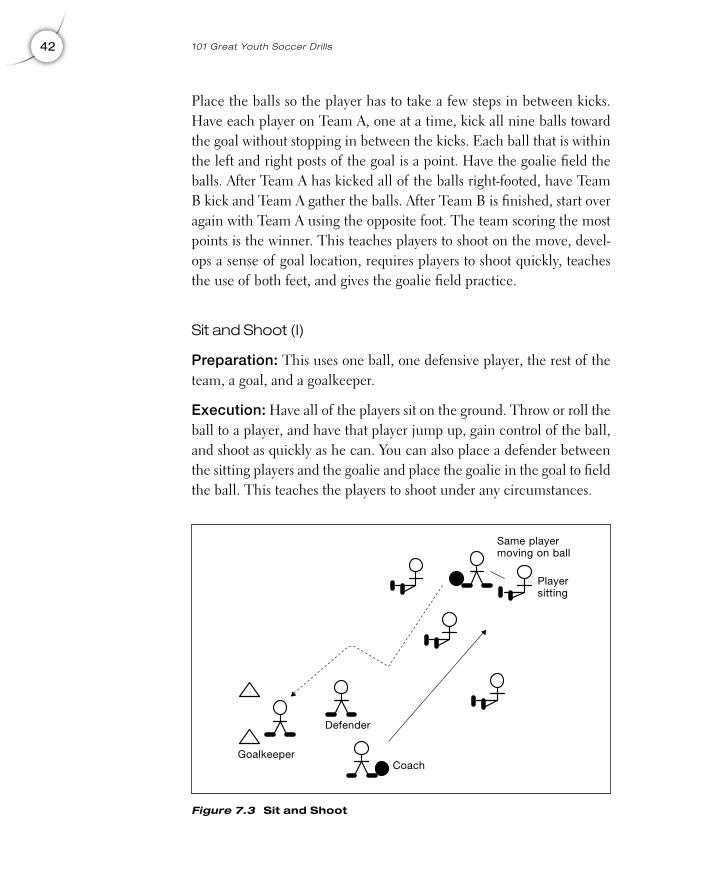
Sit and Shoot (I)
Preparation: This uses one ball, one defensive player, the rest of theteam, a goal, and a goalkeeper.
Execution: Have all of the players sit on the ground. Throw or roll theball to a player, and have that player jump up, gain control of the ball,and shoot as quickly as he can. You can also place a defender betweenthe sitting players and the goalie and place the goalie in the goal to fieldthe ball. This teaches the players to shoot under any circumstances.
42 101 Great Youth Soccer Dril ls
Figure 7.3 Sit and Shoot
Coach
Defender
Same playermoving on ball
Playersitting
Goalkeeper
07 (039-046) chapter 7 3/1/05 10:28 AM Page 42
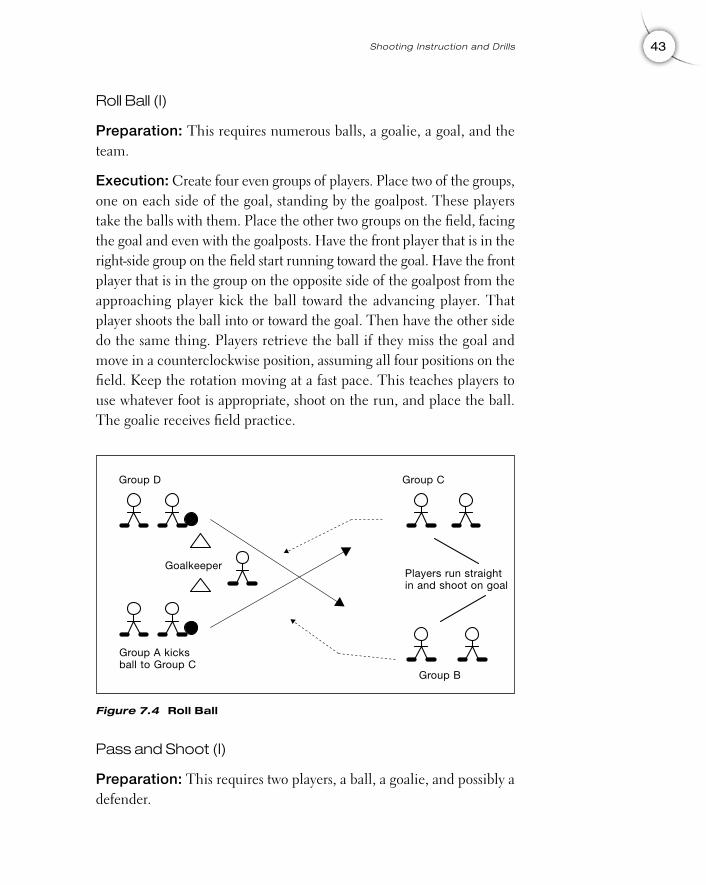
Roll Ball (I)
Preparation: This requires numerous balls, a goalie, a goal, and theteam.
Execution: Create four even groups of players. Place two of the groups,one on each side of the goal, standing by the goalpost. These playerstake the balls with them. Place the other two groups on the field, facingthe goal and even with the goalposts. Have the front player that is in theright-side group on the field start running toward the goal. Have the frontplayer that is in the group on the opposite side of the goalpost from theapproaching player kick the ball toward the advancing player. Thatplayer shoots the ball into or toward the goal. Then have the other sidedo the same thing. Players retrieve the ball if they miss the goal andmove in a counterclockwise position, assuming all four positions on thefield. Keep the rotation moving at a fast pace. This teaches players touse whatever foot is appropriate, shoot on the run, and place the ball.The goalie receives field practice.
Pass and Shoot (I)
Preparation: This requires two players, a ball, a goalie, and possibly adefender.
43Shooting Instruction and Drills
Figure 7.4 Roll Ball
Group D
Goalkeeper
Group C
Group B
Group A kicksball to Group C
Players run straightin and shoot on goal
07 (039-046) chapter 7 3/1/05 10:28 AM Page 43
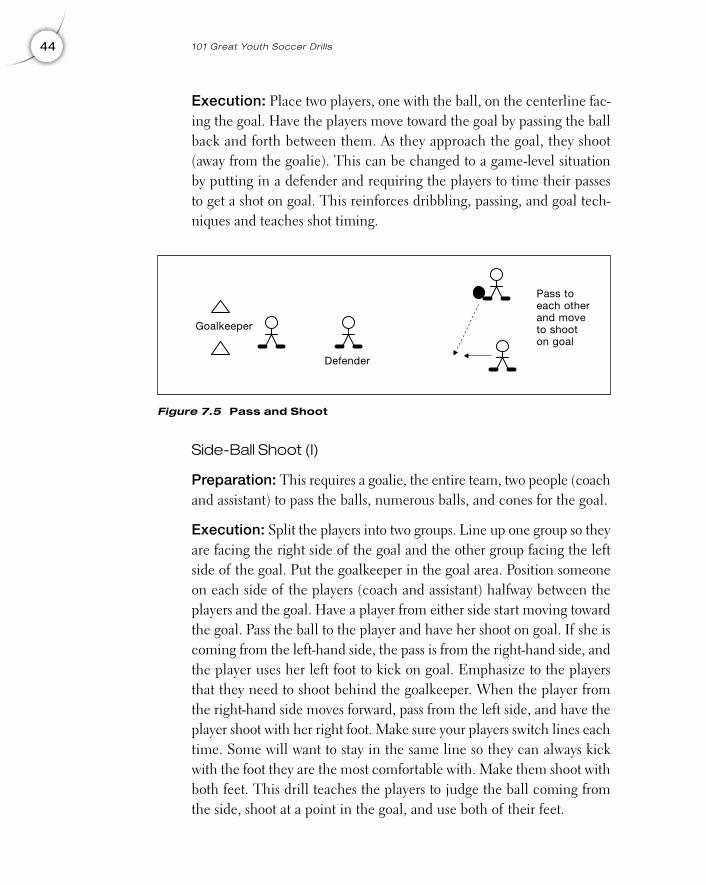
Execution: Place two players, one with the ball, on the centerline fac-ing the goal. Have the players move toward the goal by passing the ballback and forth between them. As they approach the goal, they shoot(away from the goalie). This can be changed to a game-level situationby putting in a defender and requiring the players to time their passesto get a shot on goal. This reinforces dribbling, passing, and goal tech-niques and teaches shot timing.
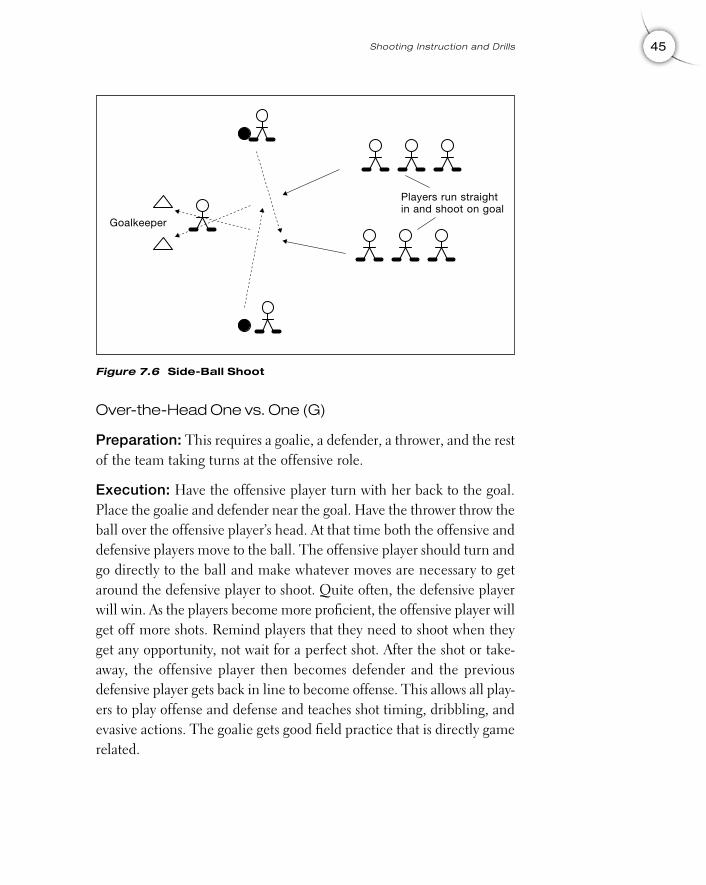
Side-Ball Shoot (I)
Preparation: This requires a goalie, the entire team, two people (coachand assistant) to pass the balls, numerous balls, and cones for the goal.
Execution: Split the players into two groups. Line up one group so theyare facing the right side of the goal and the other group facing the leftside of the goal. Put the goalkeeper in the goal area. Position someoneon each side of the players (coach and assistant) halfway between theplayers and the goal. Have a player from either side start moving towardthe goal. Pass the ball to the player and have her shoot on goal. If she iscoming from the left-hand side, the pass is from the right-hand side, andthe player uses her left foot to kick on goal. Emphasize to the playersthat they need to shoot behind the goalkeeper. When the player fromthe right-hand side moves forward, pass from the left side, and have theplayer shoot with her right foot. Make sure your players switch lines eachtime. Some will want to stay in the same line so they can always kickwith the foot they are the most comfortable with. Make them shoot withboth feet. This drill teaches the players to judge the ball coming fromthe side, shoot at a point in the goal, and use both of their feet.
44 101 Great Youth Soccer Dril ls
Figure 7.5 Pass and Shoot
Goalkeeper
Pass toeach otherand moveto shooton goal
Defender
07 (039-046) chapter 7 3/1/05 10:28 AM Page 44
Over-the-Head One vs. One (G)
Preparation: This requires a goalie, a defender, a thrower, and the restof the team taking turns at the offensive role.
Execution: Have the offensive player turn with her back to the goal.Place the goalie and defender near the goal. Have the thrower throw theball over the offensive player’s head. At that time both the offensive anddefensive players move to the ball. The offensive player should turn andgo directly to the ball and make whatever moves are necessary to getaround the defensive player to shoot. Quite often, the defensive playerwill win. As the players become more proficient, the offensive player willget off more shots. Remind players that they need to shoot when theyget any opportunity, not wait for a perfect shot. After the shot or take-away, the offensive player then becomes defender and the previousdefensive player gets back in line to become offense. This allows all play-ers to play offense and defense and teaches shot timing, dribbling, andevasive actions. The goalie gets good field practice that is directly gamerelated.
45Shooting Instruction and Drills
Figure 7.6 Side-Ball Shoot
Goalkeeper
Players run straightin and shoot on goal
07 (039-046) chapter 7 3/1/05 10:28 AM Page 45
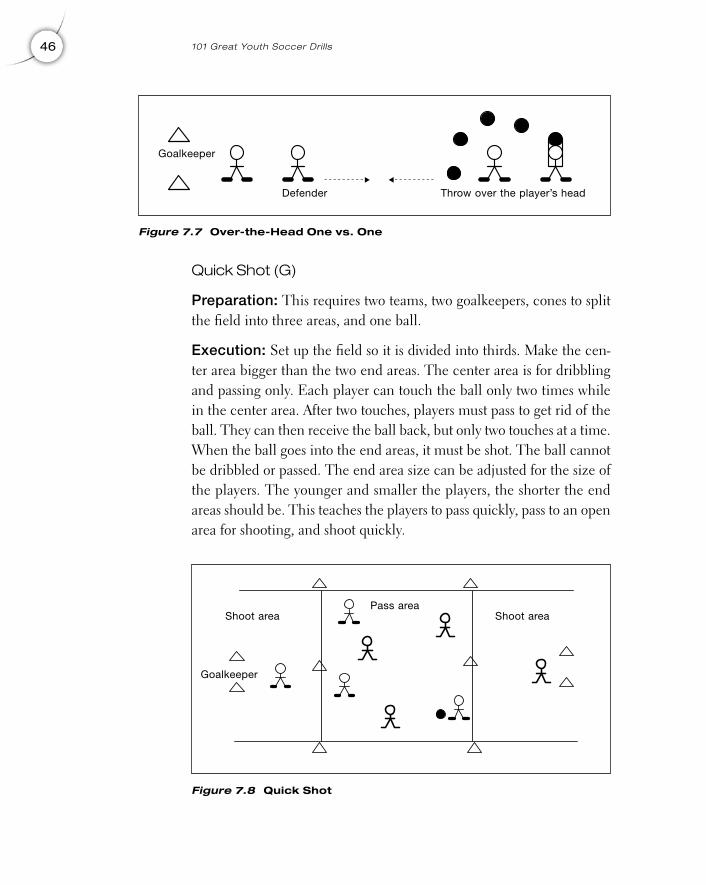
Quick Shot (G)
Preparation: This requires two teams, two goalkeepers, cones to splitthe field into three areas, and one ball.
Execution: Set up the field so it is divided into thirds. Make the cen-ter area bigger than the two end areas. The center area is for dribblingand passing only. Each player can touch the ball only two times whilein the center area. After two touches, players must pass to get rid of theball. They can then receive the ball back, but only two touches at a time.When the ball goes into the end areas, it must be shot. The ball cannotbe dribbled or passed. The end area size can be adjusted for the size ofthe players. The younger and smaller the players, the shorter the endareas should be. This teaches the players to pass quickly, pass to an openarea for shooting, and shoot quickly.
46 101 Great Youth Soccer Dril ls
Figure 7.7 Over-the-Head One vs. One
Goalkeeper
Throw over the player’s headDefender
Figure 7.8 Quick Shot
Shoot area Shoot areaPass area
Goalkeeper
07 (039-046) chapter 7 3/1/05 10:28 AM Page 46
8
47
Shielding Instructionand Drills
Shielding is a method used to keep the ball away from the defenderwhile maintaining control. Shielding is used as an interim step only untilyou can move away from the defender or pass the ball to anotherteammate.
The Basics1. Keep your head up and look for another person on your team to pass to,
or dribble away from the opponent.
2. Keep the ball close to yourself so you can maintain control.
3. Position your body between the ball and the opponent.
4. Expect to be pushed by your opponent or be knocked off the ball. This is
normal; keep your cool, and play on.
Shielding Drills
Roll Over (F)
Preparation: This uses one player and one ball.
Copyright © 2005 by Robert Koger. Click here for terms of use.
Execution: Have the player roll the ball by moving her foot overthe top of the ball in the direction she wants the ball to go. The foottouches the ball gently and moves from back to front, front to back,right to left, or left to right depending on the direction the ball is tobe moved. The player can move in circles, back and forth, or anydirection. The player can also use her heel or toe. This teaches touchand ball control.
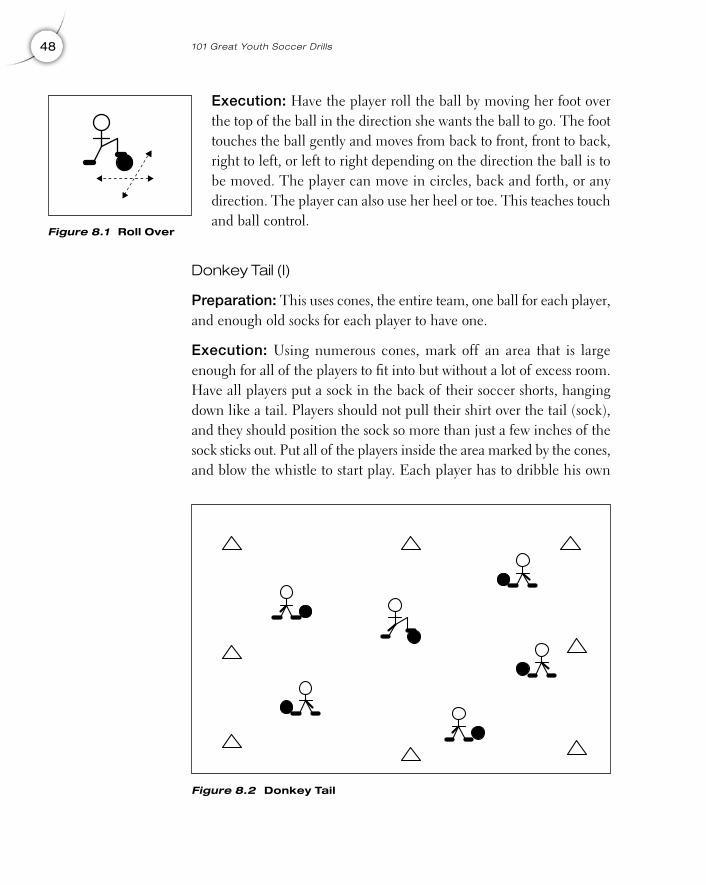
Donkey Tail (I)
Preparation: This uses cones, the entire team, one ball for each player,and enough old socks for each player to have one.
Execution: Using numerous cones, mark off an area that is largeenough for all of the players to fit into but without a lot of excess room.Have all players put a sock in the back of their soccer shorts, hangingdown like a tail. Players should not pull their shirt over the tail (sock),and they should position the sock so more than just a few inches of thesock sticks out. Put all of the players inside the area marked by the cones,and blow the whistle to start play. Each player has to dribble his own
48 101 Great Youth Soccer Dril ls
Figure 8.1 Roll Over
Figure 8.2 Donkey Tail
08 (047-050) chapter 8 3/1/05 10:28 AM Page 48
ball and maintain control while trying to pull the tail off of anotherplayer. If a player loses control of his ball and it goes out of the marked-off area, he must step outside the cones and wait until the next game toparticipate again. Each player that has his tail pulled must also step out-side the cones. Have the players drop the tails on the ground when theyremove one from another player. You will get down to just a couple ofplayers who are left with their tails. As you get fewer and fewer players,you may want to decrease the size of the cone area. You can stop thedrill when two players are left on the field. With just two players, it cango on forever. This teaches the players to shield and control the ball andto be aware of what is happening around them.
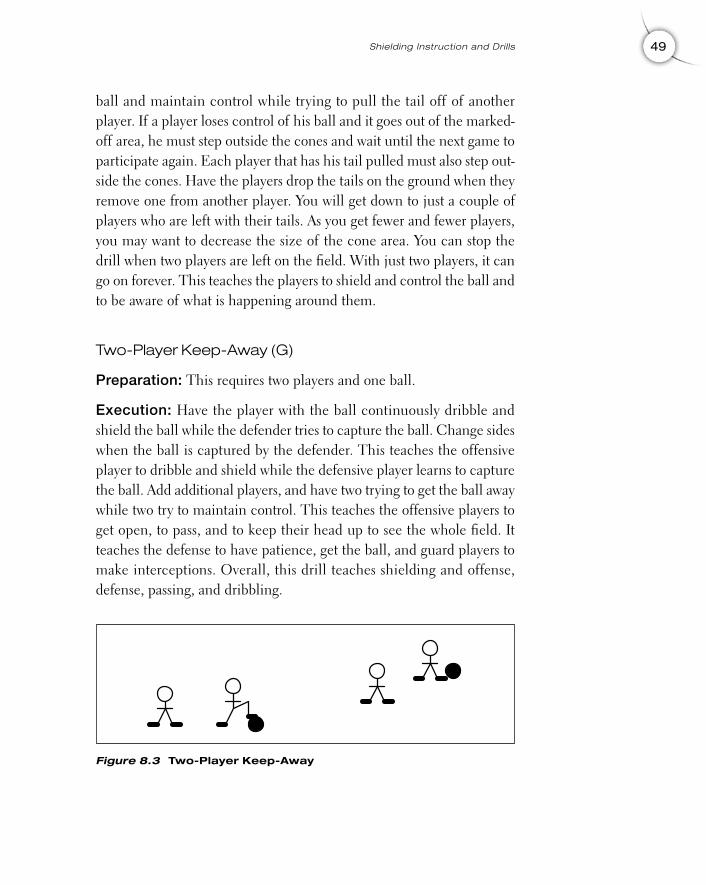
Two-Player Keep-Away (G)
Preparation: This requires two players and one ball.
Execution: Have the player with the ball continuously dribble andshield the ball while the defender tries to capture the ball. Change sideswhen the ball is captured by the defender. This teaches the offensiveplayer to dribble and shield while the defensive player learns to capturethe ball. Add additional players, and have two trying to get the ball awaywhile two try to maintain control. This teaches the offensive players toget open, to pass, and to keep their head up to see the whole field. Itteaches the defense to have patience, get the ball, and guard players tomake interceptions. Overall, this drill teaches shielding and offense,defense, passing, and dribbling.
49Shielding Instruction and Drills
Figure 8.3 Two-Player Keep-Away
08 (047-050) chapter 8 3/1/05 10:28 AM Page 49
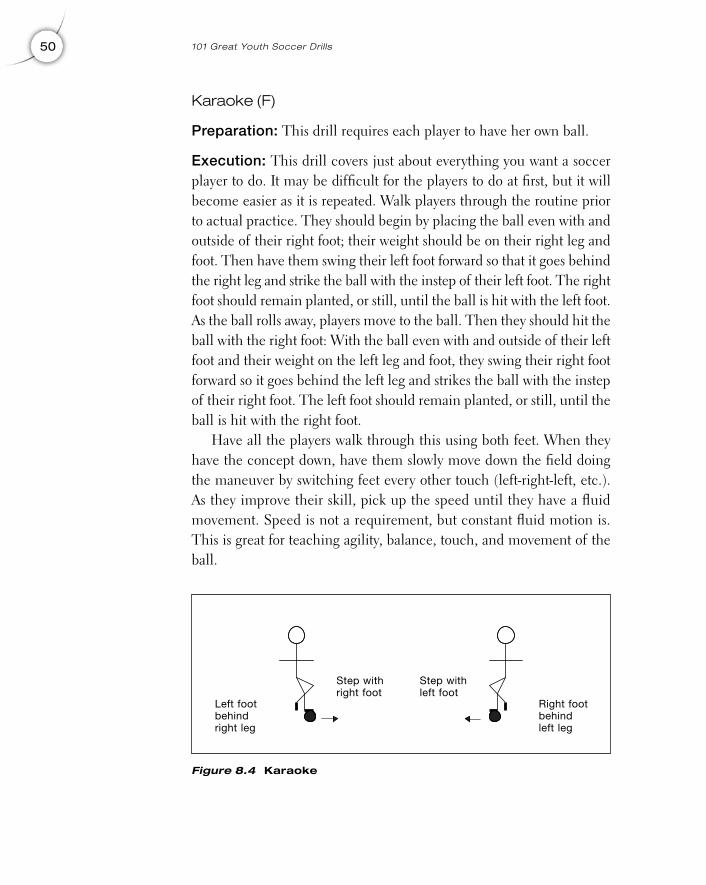
Karaoke (F)
Preparation: This drill requires each player to have her own ball.
Execution: This drill covers just about everything you want a soccerplayer to do. It may be difficult for the players to do at first, but it willbecome easier as it is repeated. Walk players through the routine priorto actual practice. They should begin by placing the ball even with andoutside of their right foot; their weight should be on their right leg andfoot. Then have them swing their left foot forward so that it goes behindthe right leg and strike the ball with the instep of their left foot. The rightfoot should remain planted, or still, until the ball is hit with the left foot.As the ball rolls away, players move to the ball. Then they should hit theball with the right foot: With the ball even with and outside of their leftfoot and their weight on the left leg and foot, they swing their right footforward so it goes behind the left leg and strikes the ball with the instepof their right foot. The left foot should remain planted, or still, until theball is hit with the right foot.
Have all the players walk through this using both feet. When theyhave the concept down, have them slowly move down the field doingthe maneuver by switching feet every other touch (left-right-left, etc.).As they improve their skill, pick up the speed until they have a fluidmovement. Speed is not a requirement, but constant fluid motion is.This is great for teaching agility, balance, touch, and movement of theball.
50 101 Great Youth Soccer Dril ls
Figure 8.4 Karaoke
Left footbehindright leg
Right footbehindleft leg
Step withright foot
Step withleft foot
08 (047-050) chapter 8 3/1/05 10:28 AM Page 50
9
51
Dribbling Instructionand Drills
Dribbling is the method used to move the soccer ball from one placeon the field to another with the feet. The ball must stay close to yourfeet so you can maintain control. It is very important to not continuouslywatch the soccer ball. You must keep your head up so you can see thefield and your teammates.
The Basics1. When dribbling, keep the ball as close to your feet as possible. Do not
kick the ball and run to it.
2. Dribble with your head up. Do not focus on the ball.
3. When approaching your opponent, watch her hips and feet plant. This
will tell you which direction to go. (If your opponent is facing left, go to
his right so he has to turn to go with you; this gives you a few steps’
head start. Also, if the player has one foot in front of the other, then
dribble to the side of the advanced foot. Again, the person must reposi-
tion to catch up with you.)
4. Use fake movements—leaning right and going left, for example.
Copyright © 2005 by Robert Koger. Click here for terms of use.
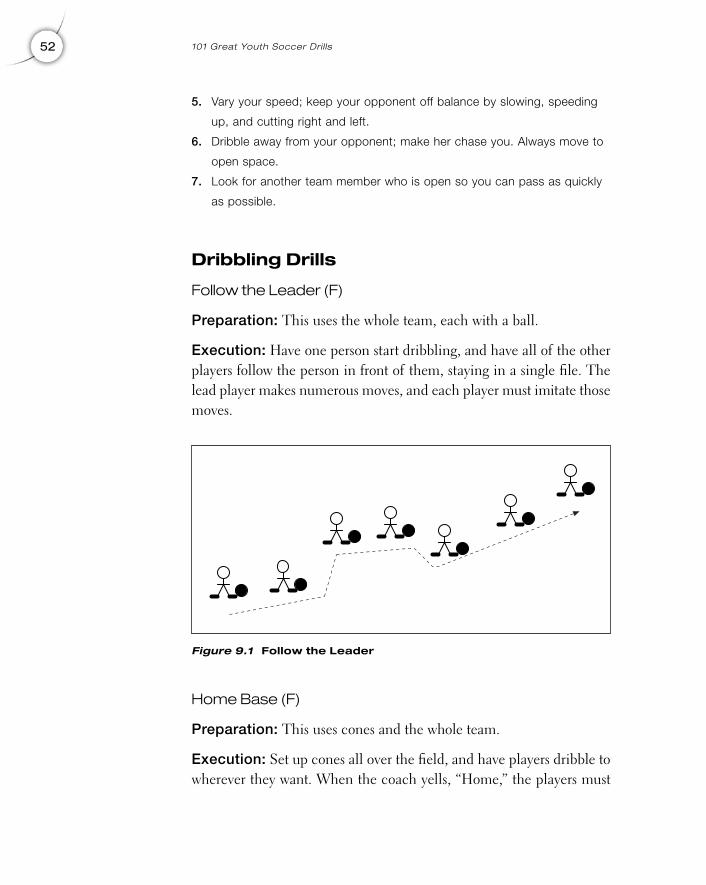
5. Vary your speed; keep your opponent off balance by slowing, speeding
up, and cutting right and left.
6. Dribble away from your opponent; make her chase you. Always move to
open space.
7. Look for another team member who is open so you can pass as quickly
as possible.
Dribbling Drills
Follow the Leader (F)
Preparation: This uses the whole team, each with a ball.
Execution: Have one person start dribbling, and have all of the otherplayers follow the person in front of them, staying in a single file. Thelead player makes numerous moves, and each player must imitate thosemoves.
Home Base (F)
Preparation: This uses cones and the whole team.
Execution: Set up cones all over the field, and have players dribble towherever they want. When the coach yells, “Home,” the players must
52 101 Great Youth Soccer Dril ls
Figure 9.1 Follow the Leader
09 (051-058B) chapter 9 3/1/05 10:29 AM Page 52
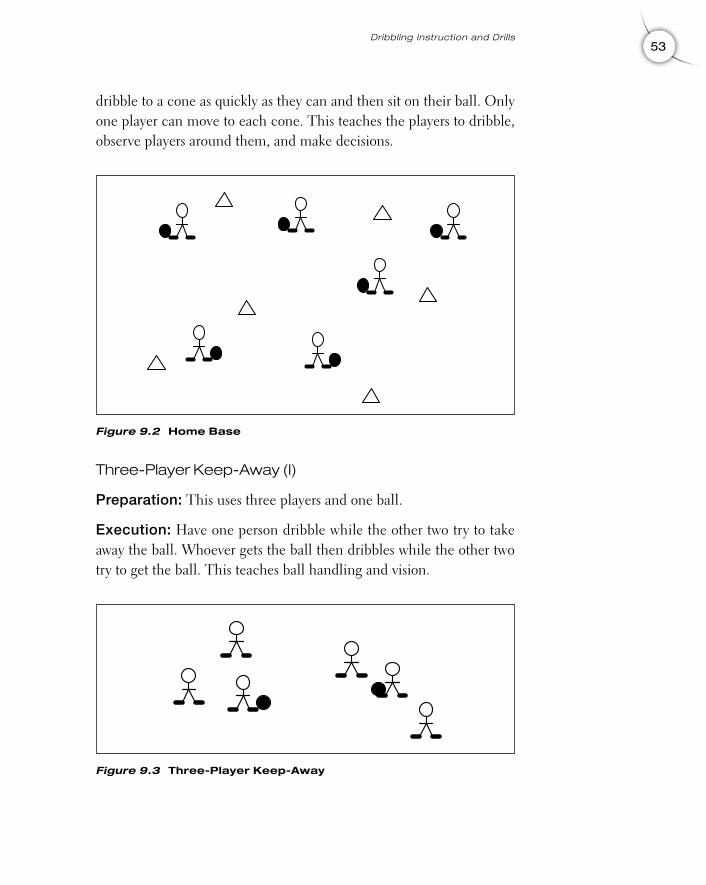
dribble to a cone as quickly as they can and then sit on their ball. Onlyone player can move to each cone. This teaches the players to dribble,observe players around them, and make decisions.
Three-Player Keep-Away (I)
Preparation: This uses three players and one ball.
Execution: Have one person dribble while the other two try to takeaway the ball. Whoever gets the ball then dribbles while the other twotry to get the ball. This teaches ball handling and vision.
53Dribbling Instruction and Drills
Figure 9.3 Three-Player Keep-Away
Figure 9.2 Home Base
09 (051-058B) chapter 9 3/1/05 10:29 AM Page 53
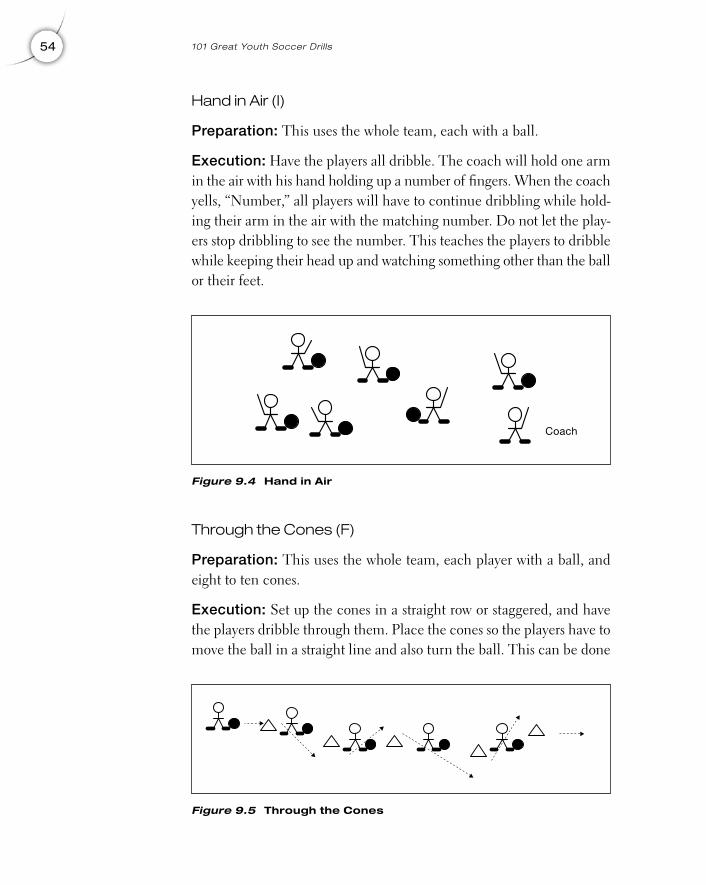
Hand in Air (I)
Preparation: This uses the whole team, each with a ball.
Execution: Have the players all dribble. The coach will hold one armin the air with his hand holding up a number of fingers. When the coachyells, “Number,” all players will have to continue dribbling while hold-ing their arm in the air with the matching number. Do not let the play-ers stop dribbling to see the number. This teaches the players to dribblewhile keeping their head up and watching something other than the ballor their feet.
Through the Cones (F)
Preparation: This uses the whole team, each player with a ball, andeight to ten cones.
Execution: Set up the cones in a straight row or staggered, and havethe players dribble through them. Place the cones so the players have tomove the ball in a straight line and also turn the ball. This can be done
54 101 Great Youth Soccer Dril ls
Figure 9.4 Hand in Air
Figure 9.5 Through the Cones
Coach
09 (051-058B) chapter 9 3/1/05 10:29 AM Page 54
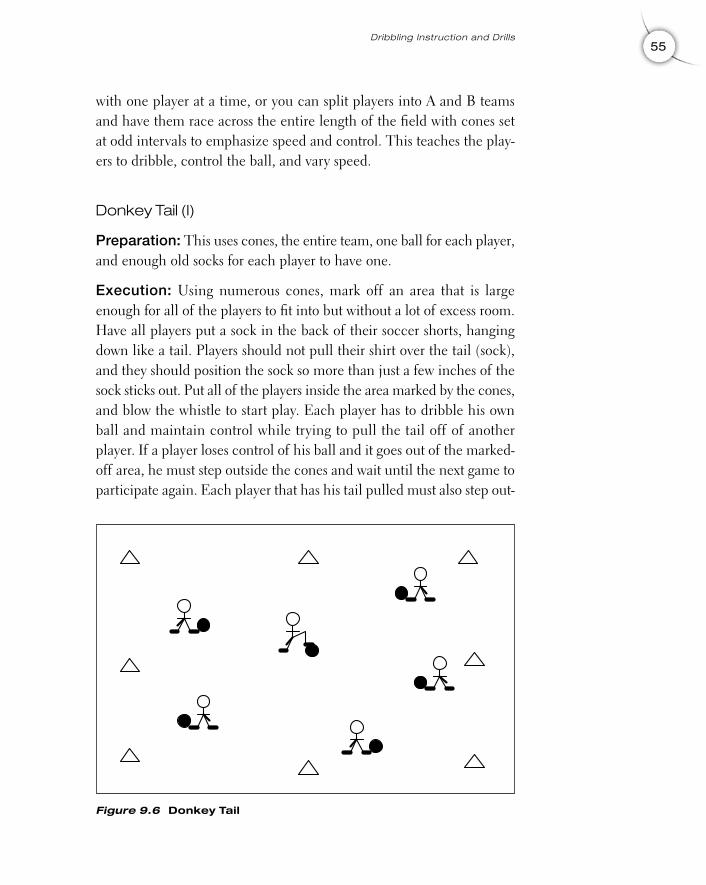
with one player at a time, or you can split players into A and B teamsand have them race across the entire length of the field with cones setat odd intervals to emphasize speed and control. This teaches the play-ers to dribble, control the ball, and vary speed.
Donkey Tail (I)
Preparation: This uses cones, the entire team, one ball for each player,and enough old socks for each player to have one.
Execution: Using numerous cones, mark off an area that is largeenough for all of the players to fit into but without a lot of excess room.Have all players put a sock in the back of their soccer shorts, hangingdown like a tail. Players should not pull their shirt over the tail (sock),and they should position the sock so more than just a few inches of thesock sticks out. Put all of the players inside the area marked by the cones,and blow the whistle to start play. Each player has to dribble his ownball and maintain control while trying to pull the tail off of anotherplayer. If a player loses control of his ball and it goes out of the marked-off area, he must step outside the cones and wait until the next game toparticipate again. Each player that has his tail pulled must also step out-
55Dribbling Instruction and Drills
Figure 9.6 Donkey Tail
09 (051-058B) chapter 9 3/1/05 10:29 AM Page 55
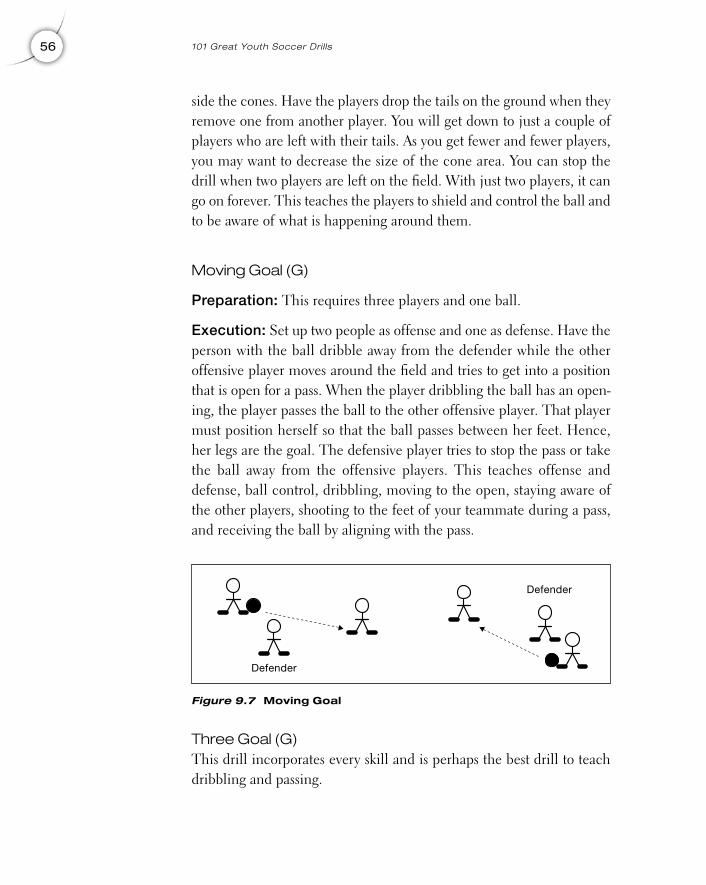
side the cones. Have the players drop the tails on the ground when theyremove one from another player. You will get down to just a couple ofplayers who are left with their tails. As you get fewer and fewer players,you may want to decrease the size of the cone area. You can stop thedrill when two players are left on the field. With just two players, it cango on forever. This teaches the players to shield and control the ball andto be aware of what is happening around them.
Moving Goal (G)
Preparation: This requires three players and one ball.
Execution: Set up two people as offense and one as defense. Have theperson with the ball dribble away from the defender while the otheroffensive player moves around the field and tries to get into a positionthat is open for a pass. When the player dribbling the ball has an open-ing, the player passes the ball to the other offensive player. That playermust position herself so that the ball passes between her feet. Hence,her legs are the goal. The defensive player tries to stop the pass or takethe ball away from the offensive players. This teaches offense anddefense, ball control, dribbling, moving to the open, staying aware ofthe other players, shooting to the feet of your teammate during a pass,and receiving the ball by aligning with the pass.
Three Goal (G)This drill incorporates every skill and is perhaps the best drill to teachdribbling and passing.
56 101 Great Youth Soccer Dril ls
Figure 9.7 Moving Goal
Defender
Defender
09 (051-058B) chapter 9 3/1/05 10:29 AM Page 56
Preparation: This drill uses the entire team (broken into A and Bteams), one ball, and six cones.
Execution: Place the cones into three sets of two, each put in a trian-gle placement with about 10 to 20 yards between the pairs and aboutthree feet between the two cones serving as the goals. Place the conesfar enough apart so there is plenty of room to move and play soccer. Theplayers can move anywhere on the field but cannot stand directly in frontof any goal to block it. To start play, throw the ball in the air and let eachteam fight to get possession. Each team then moves the ball by dribbling,passing, etc., and they can shoot on any goal, from either side. However,after the ball passes through the goal, it must be touched first by one oftheir own teammates before it counts as a point. After each goal, restartplay by throwing the ball into the air. To vary this drill, you can assigngoalies to each team and let them use their hands, or you can make arule that each player can touch the ball only one, two, or three timesafter the initial receipt. This drill incorporates every action a player usesin a game and teaches players to work together.
57Dribbling Instruction and Drills
Figure 9.8 Three Goal
Ball can be passedthrough goal fromoutside or inside
09 (051-058B) chapter 9 3/1/05 10:29 AM Page 57

This page intentionally left blank.
10
59
Juggling Instructionand Drills
Juggling is not something that is normally done in a game. It is amethod to teach control and touch on the ball and have fun whiledoing it.
The Basics1. Drop the ball onto your foot (or thigh or head), and then pop the ball
back into the air. Keep the ball moving up and down without using your
hands.
2. When you are juggling the ball with your feet, thighs, or head, keep the
ball at a constant level (low) while watching the ball closely. Do not hit it
really hard and high into the air.
3. You can use your feet, thighs (just above the knee), or head to bounce
the ball.
4. Set a goal of so many strikes, and try to reach it. Be sure to use your
feet, thighs, and head. It is easier to use the knee, but the players need
to use everything to control and juggle the ball.
Copyright © 2005 by Robert Koger. Click here for terms of use.
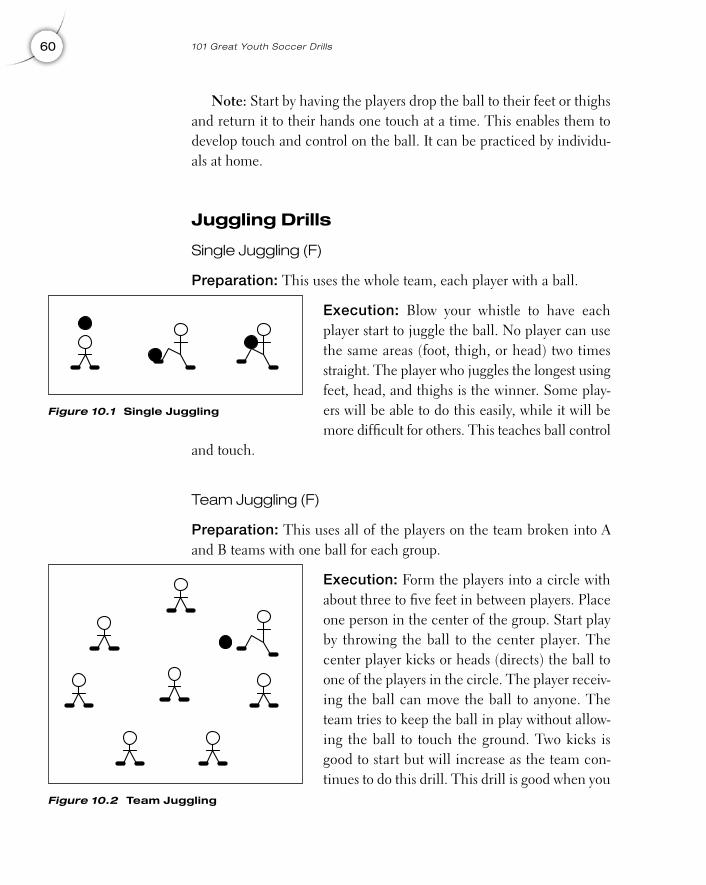
Note: Start by having the players drop the ball to their feet or thighsand return it to their hands one touch at a time. This enables them todevelop touch and control on the ball. It can be practiced by individu-als at home.
Juggling Drills
Single Juggling (F)
Preparation: This uses the whole team, each player with a ball.
Execution: Blow your whistle to have eachplayer start to juggle the ball. No player can usethe same areas (foot, thigh, or head) two timesstraight. The player who juggles the longest usingfeet, head, and thighs is the winner. Some play-ers will be able to do this easily, while it will bemore difficult for others. This teaches ball control
and touch.
Team Juggling (F)
Preparation: This uses all of the players on the team broken into Aand B teams with one ball for each group.
Execution: Form the players into a circle withabout three to five feet in between players. Placeone person in the center of the group. Start playby throwing the ball to the center player. Thecenter player kicks or heads (directs) the ball toone of the players in the circle. The player receiv-ing the ball can move the ball to anyone. Theteam tries to keep the ball in play without allow-ing the ball to touch the ground. Two kicks isgood to start but will increase as the team con-tinues to do this drill. This drill is good when you
60 101 Great Youth Soccer Dril ls
Figure 10.1 Single Juggling
Figure 10.2 Team Juggling
10 (059-062B) chapter 10 3/1/05 10:29 AM Page 60
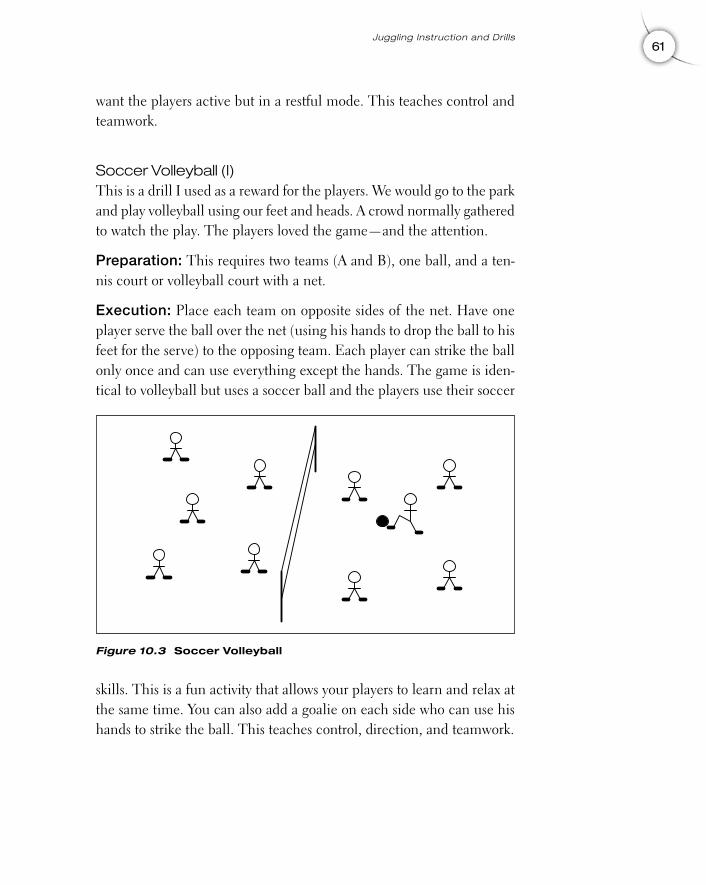
want the players active but in a restful mode. This teaches control andteamwork.
Soccer Volleyball (I)This is a drill I used as a reward for the players. We would go to the parkand play volleyball using our feet and heads. A crowd normally gatheredto watch the play. The players loved the game—and the attention.
Preparation: This requires two teams (A and B), one ball, and a ten-nis court or volleyball court with a net.
Execution: Place each team on opposite sides of the net. Have oneplayer serve the ball over the net (using his hands to drop the ball to hisfeet for the serve) to the opposing team. Each player can strike the ballonly once and can use everything except the hands. The game is iden-tical to volleyball but uses a soccer ball and the players use their soccer
skills. This is a fun activity that allows your players to learn and relax atthe same time. You can also add a goalie on each side who can use hishands to strike the ball. This teaches control, direction, and teamwork.
61Juggling Instruction and Drills
Figure 10.3 Soccer Volleyball
10 (059-062B) chapter 10 3/1/05 10:29 AM Page 61

This page intentionally left blank.
11
63
Throw-In Instructionand Drills
Throw-ins are how play is restarted after the ball goes out of play bypassing over the touchline. Proper throwing of the soccer ball can be areal advantage to a team by allowing the team to maintain possession ofthe ball.
Some players will see a throw-in where the player runs forward,places the ball on the ground with her arms straight out, tumbles overto her feet, and throws the ball. This is done to get better distance. Neverlet your players do this. They can easily injure their necks or backs. Also,the goal of a throw-in is to get the ball to your own teammate. It is impos-sible to be accurate when doing the flip-type throw-in. Moves like thatshould be done only in gymnastics.
The Basics1. Rules are very simple on throw-ins. Both feet must be on the ground
when the ball is thrown, the hands must be directly over the head, and
the ball must be thrown straight with equal pressure on each side
(cannot spin right or left).
11 (063-066) chapter 11 3/1/05 10:29 AM Page 63
Copyright © 2005 by Robert Koger. Click here for terms of use.

2. A perfectly thrown ball spins forward, directly to the player.
3. To throw, place one hand on each side of the ball, just back of center.
Looking at your hands, the thumbs and index fingers will form a letter W.
4. Bring the ball back so it is over and behind your head.
5. Throw the ball onto the field, to your teammate, making sure the ball
does not twist to the right or left.
6. The throw can be to a player’s head, feet, or chest. The ball can also be
directed back to the player that threw the ball. If you are going to do this,
throw the ball and then step into the field of play to receive or kick the
ball.
Note: Referees will call a bad throw and give the ball to the oppos-ing team if the player throwing the ball throws it over one side or theother of her head. The ball must come directly over the top of the head.
Throw-In Drills
Line Throw (F)
Preparation: This requires the entire team and enough soccer ballsfor half of them.
Execution: Place the players in two parallel lines facing each other.Give the players on one side the balls. Have those players throw the ballsto the players opposite them on the field. Then have those players return
64 101 Great Youth Soccer Dril ls
Figure 11.1 Line Throw
Return
Throw
11 (063-066) chapter 11 3/1/05 10:29 AM Page 64
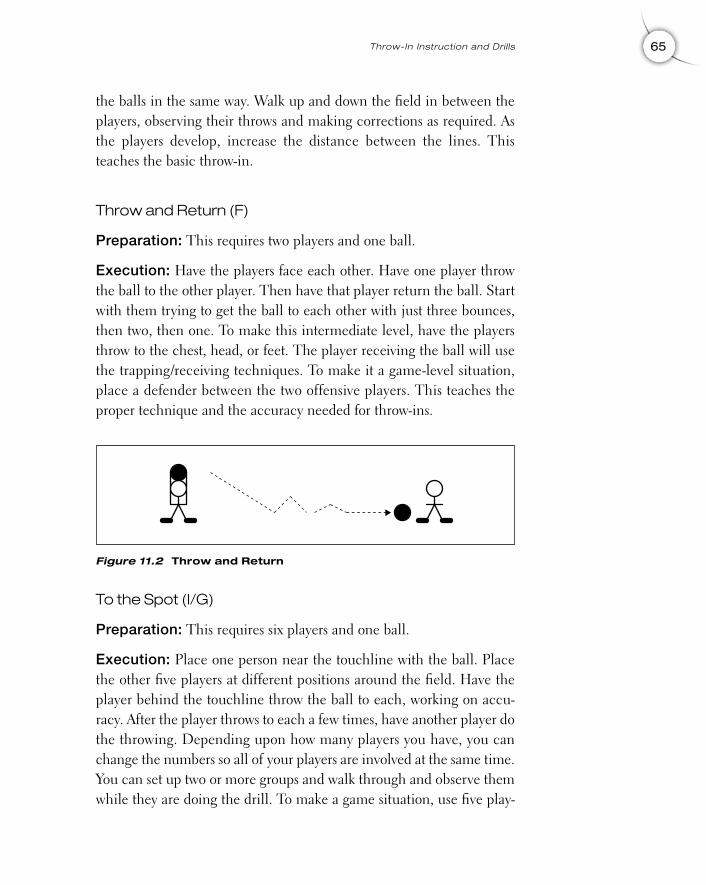
the balls in the same way. Walk up and down the field in between theplayers, observing their throws and making corrections as required. Asthe players develop, increase the distance between the lines. Thisteaches the basic throw-in.
Throw and Return (F)
Preparation: This requires two players and one ball.
Execution: Have the players face each other. Have one player throwthe ball to the other player. Then have that player return the ball. Startwith them trying to get the ball to each other with just three bounces,then two, then one. To make this intermediate level, have the playersthrow to the chest, head, or feet. The player receiving the ball will usethe trapping/receiving techniques. To make it a game-level situation,place a defender between the two offensive players. This teaches theproper technique and the accuracy needed for throw-ins.
To the Spot (I/G)
Preparation: This requires six players and one ball.
Execution: Place one person near the touchline with the ball. Placethe other five players at different positions around the field. Have theplayer behind the touchline throw the ball to each, working on accu-racy. After the player throws to each a few times, have another player dothe throwing. Depending upon how many players you have, you canchange the numbers so all of your players are involved at the same time.You can set up two or more groups and walk through and observe themwhile they are doing the drill. To make a game situation, use five play-
65Throw-In Instruction and Drills
Figure 11.2 Throw and Return
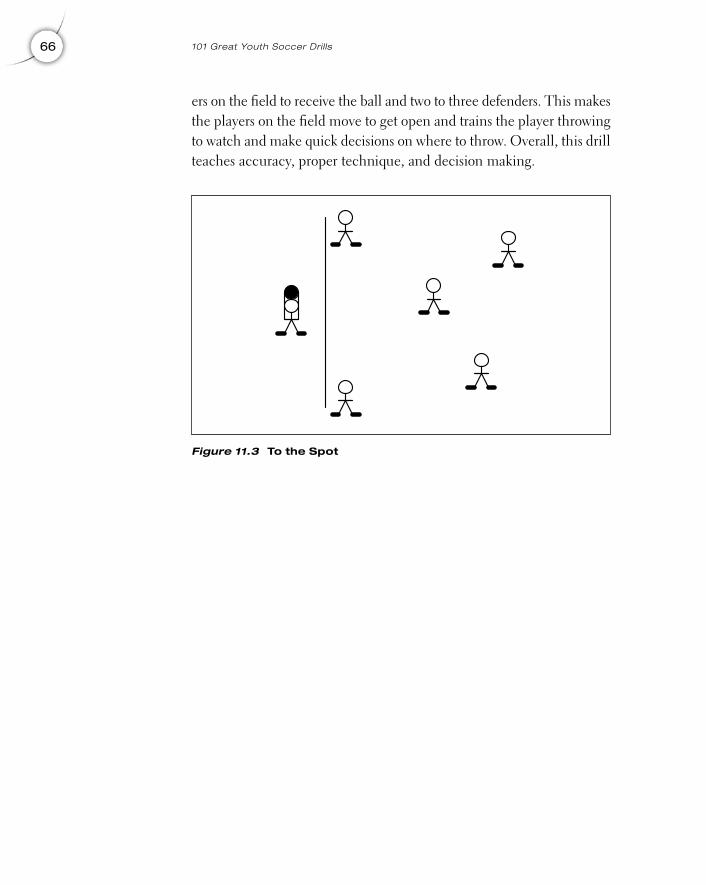
ers on the field to receive the ball and two to three defenders. This makesthe players on the field move to get open and trains the player throwingto watch and make quick decisions on where to throw. Overall, this drillteaches accuracy, proper technique, and decision making.
66 101 Great Youth Soccer Dril ls
Figure 11.3 To the Spot
12
67
Volley Instructionand Drills
A volley is a type of kick that happens when the ball is kicked while itis in the air. A half volley is the same type of kick, but after the ball hasbounced. This is a power kick—very accurate and very hard to defend.When the volley is done correctly, the ball will travel forward with top-spin (top to bottom) and will curve down as it travels. When it hits theground, it will shoot forward with the spin. If it hits an uneven area itcan move right or left.
The Basics1. Volleys are simple to do, and they are very effective.
2. To do a volley, one foot must be planted on the ground. The upper
portion of your other leg is in the air, perpendicular with your body, and
the lower portion of your leg is pointing toward the ground.
3. Your kicking foot must be pointing down with your ankle locked.
4. As the ball approaches, bring the lower half of your leg back and strike
the ball sharply. Do not follow through on the kick; this will cause the ball
to go into the air. Just quickly strike the ball and bring your leg back.
Copyright © 2005 by Robert Koger. Click here for terms of use.
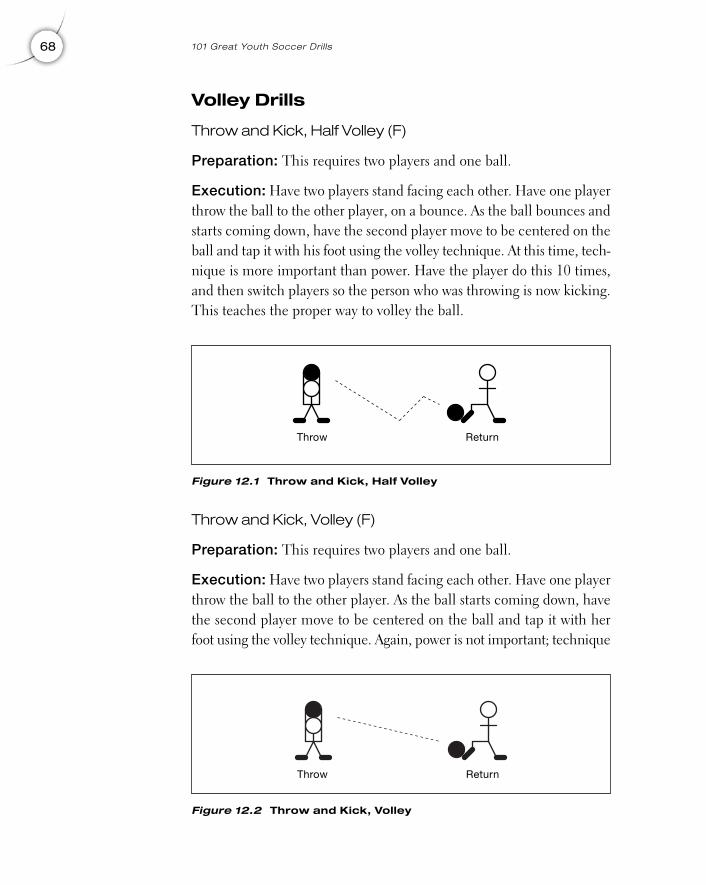
Volley Drills
Throw and Kick, Half Volley (F)
Preparation: This requires two players and one ball.
Execution: Have two players stand facing each other. Have one playerthrow the ball to the other player, on a bounce. As the ball bounces andstarts coming down, have the second player move to be centered on theball and tap it with his foot using the volley technique. At this time, tech-nique is more important than power. Have the player do this 10 times,and then switch players so the person who was throwing is now kicking.This teaches the proper way to volley the ball.
Throw and Kick, Volley (F)
Preparation: This requires two players and one ball.
Execution: Have two players stand facing each other. Have one playerthrow the ball to the other player. As the ball starts coming down, havethe second player move to be centered on the ball and tap it with herfoot using the volley technique. Again, power is not important; technique
68 101 Great Youth Soccer Dril ls
Figure 12.1 Throw and Kick, Half Volley
Throw Return
Figure 12.2 Throw and Kick, Volley
Throw Return
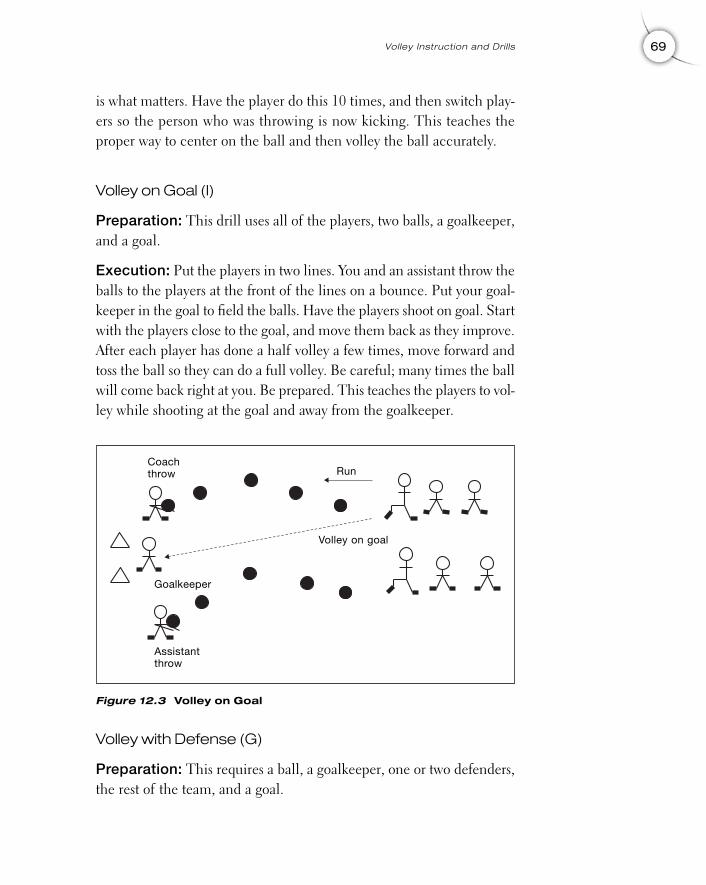
is what matters. Have the player do this 10 times, and then switch play-ers so the person who was throwing is now kicking. This teaches theproper way to center on the ball and then volley the ball accurately.
Volley on Goal (I)
Preparation: This drill uses all of the players, two balls, a goalkeeper,and a goal.
Execution: Put the players in two lines. You and an assistant throw theballs to the players at the front of the lines on a bounce. Put your goal-keeper in the goal to field the balls. Have the players shoot on goal. Startwith the players close to the goal, and move them back as they improve.After each player has done a half volley a few times, move forward andtoss the ball so they can do a full volley. Be careful; many times the ballwill come back right at you. Be prepared. This teaches the players to vol-ley while shooting at the goal and away from the goalkeeper.
Volley with Defense (G)
Preparation: This requires a ball, a goalkeeper, one or two defenders,the rest of the team, and a goal.
69Volley Instruction and Drills
Figure 12.3 Volley on Goal
Coachthrow Run
Volley on goal
Goalkeeper
Assistantthrow
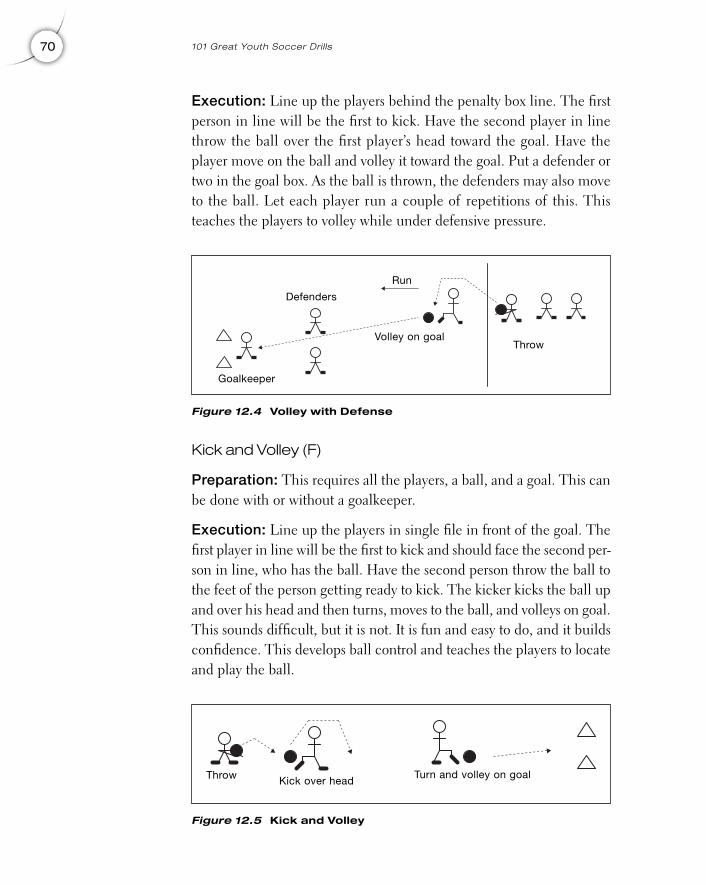
Execution: Line up the players behind the penalty box line. The firstperson in line will be the first to kick. Have the second player in linethrow the ball over the first player’s head toward the goal. Have theplayer move on the ball and volley it toward the goal. Put a defender ortwo in the goal box. As the ball is thrown, the defenders may also moveto the ball. Let each player run a couple of repetitions of this. Thisteaches the players to volley while under defensive pressure.
Kick and Volley (F)
Preparation: This requires all the players, a ball, and a goal. This canbe done with or without a goalkeeper.
Execution: Line up the players in single file in front of the goal. Thefirst player in line will be the first to kick and should face the second per-son in line, who has the ball. Have the second person throw the ball tothe feet of the person getting ready to kick. The kicker kicks the ball upand over his head and then turns, moves to the ball, and volleys on goal.This sounds difficult, but it is not. It is fun and easy to do, and it buildsconfidence. This develops ball control and teaches the players to locateand play the ball.
70 101 Great Youth Soccer Dril ls
Figure 12.4 Volley with Defense
Run
Defenders
Goalkeeper
Volley on goalThrow
Figure 12.5 Kick and Volley
Turn and volley on goalKick over headThrow
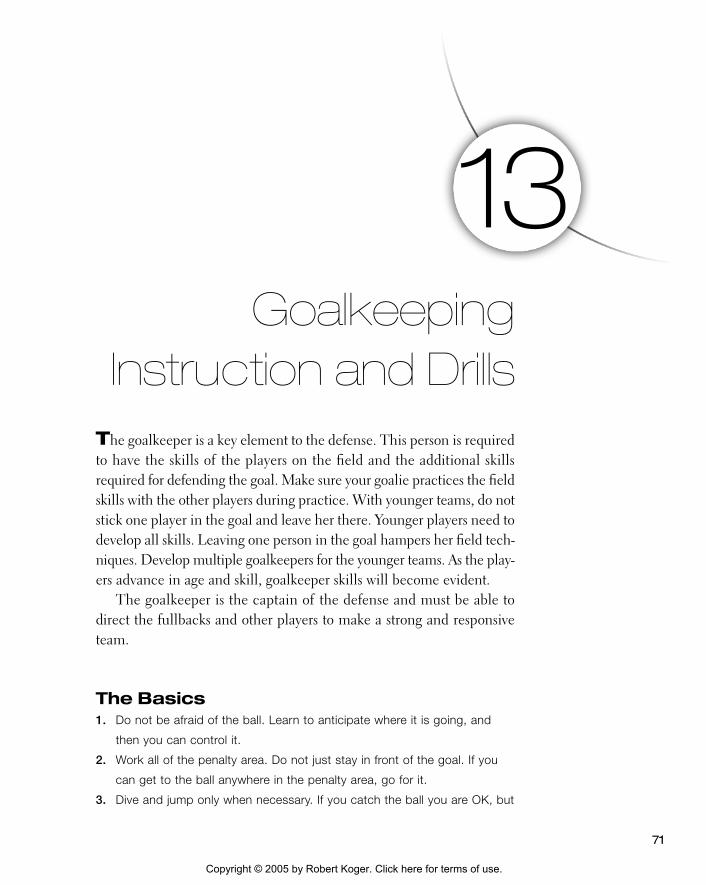
13
71
GoalkeepingInstruction and Drills
The goalkeeper is a key element to the defense. This person is requiredto have the skills of the players on the field and the additional skillsrequired for defending the goal. Make sure your goalie practices the fieldskills with the other players during practice. With younger teams, do notstick one player in the goal and leave her there. Younger players need todevelop all skills. Leaving one person in the goal hampers her field tech-niques. Develop multiple goalkeepers for the younger teams. As the play-ers advance in age and skill, goalkeeper skills will become evident.
The goalkeeper is the captain of the defense and must be able todirect the fullbacks and other players to make a strong and responsiveteam.
The Basics1. Do not be afraid of the ball. Learn to anticipate where it is going, and
then you can control it.
2. Work all of the penalty area. Do not just stay in front of the goal. If you
can get to the ball anywhere in the penalty area, go for it.
3. Dive and jump only when necessary. If you catch the ball you are OK, but
Copyright © 2005 by Robert Koger. Click here for terms of use.
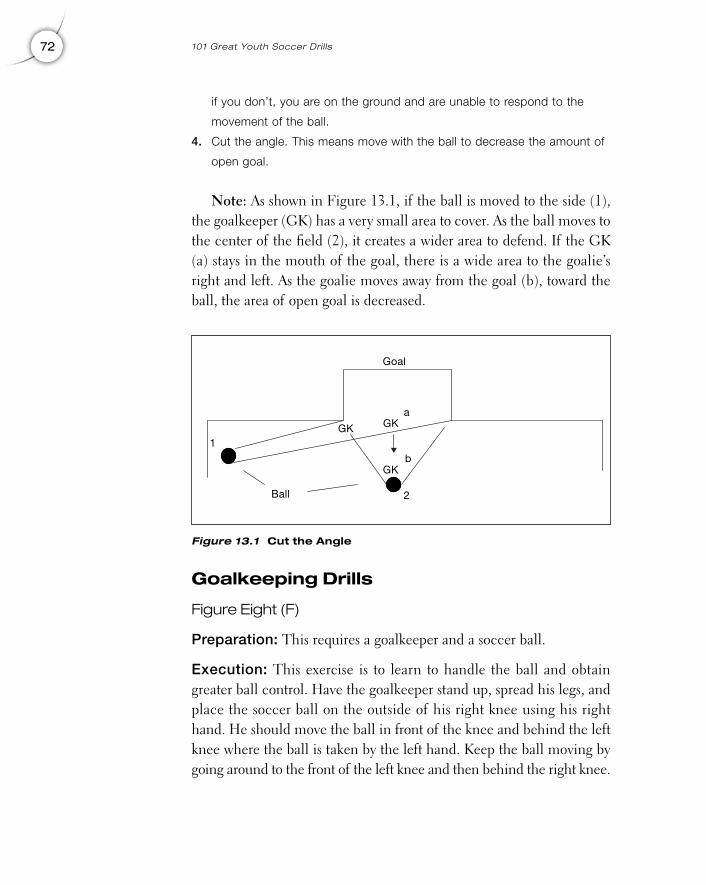
if you don’t, you are on the ground and are unable to respond to the
movement of the ball.
4. Cut the angle. This means move with the ball to decrease the amount of
open goal.
Note: As shown in Figure 13.1, if the ball is moved to the side (1),the goalkeeper (GK) has a very small area to cover. As the ball moves tothe center of the field (2), it creates a wider area to defend. If the GK(a) stays in the mouth of the goal, there is a wide area to the goalie’sright and left. As the goalie moves away from the goal (b), toward theball, the area of open goal is decreased.
Goalkeeping Drills
Figure Eight (F)
Preparation: This requires a goalkeeper and a soccer ball.
Execution: This exercise is to learn to handle the ball and obtaingreater ball control. Have the goalkeeper stand up, spread his legs, andplace the soccer ball on the outside of his right knee using his righthand. He should move the ball in front of the knee and behind the leftknee where the ball is taken by the left hand. Keep the ball moving bygoing around to the front of the left knee and then behind the right knee.
72 101 Great Youth Soccer Dril ls
Figure 13.1 Cut the Angle
Ball
Goal
GKGK1
2
b
a
GK
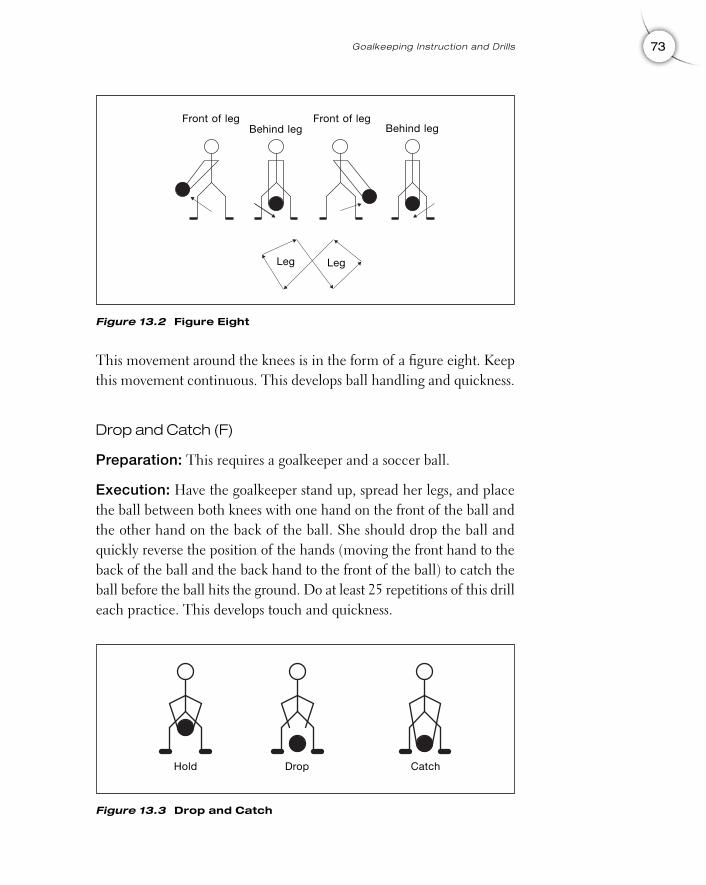
This movement around the knees is in the form of a figure eight. Keepthis movement continuous. This develops ball handling and quickness.
Drop and Catch (F)
Preparation: This requires a goalkeeper and a soccer ball.
Execution: Have the goalkeeper stand up, spread her legs, and placethe ball between both knees with one hand on the front of the ball andthe other hand on the back of the ball. She should drop the ball andquickly reverse the position of the hands (moving the front hand to theback of the ball and the back hand to the front of the ball) to catch theball before the ball hits the ground. Do at least 25 repetitions of this drilleach practice. This develops touch and quickness.
73Goalkeeping Instruction and Drills
Figure 13.3 Drop and Catch
Hold Drop Catch
Figure 13.2 Figure Eight
Front of leg
Leg Leg
Front of legBehind leg Behind leg
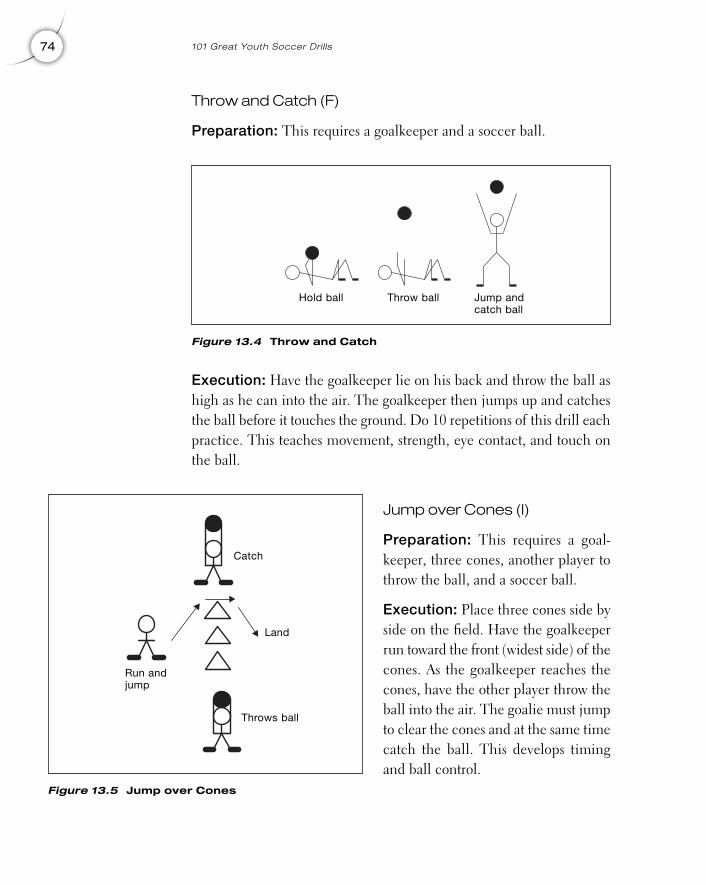
Throw and Catch (F)
Preparation: This requires a goalkeeper and a soccer ball.
Execution: Have the goalkeeper lie on his back and throw the ball ashigh as he can into the air. The goalkeeper then jumps up and catchesthe ball before it touches the ground. Do 10 repetitions of this drill eachpractice. This teaches movement, strength, eye contact, and touch onthe ball.
Jump over Cones (I)
Preparation: This requires a goal-keeper, three cones, another player tothrow the ball, and a soccer ball.
Execution: Place three cones side byside on the field. Have the goalkeeperrun toward the front (widest side) of thecones. As the goalkeeper reaches thecones, have the other player throw theball into the air. The goalie must jumpto clear the cones and at the same timecatch the ball. This develops timingand ball control.
74 101 Great Youth Soccer Dril ls
Figure 13.4 Throw and Catch
Hold ball Throw ball Jump andcatch ball
Figure 13.5 Jump over Cones
Catch
Land
Throws ball
Run andjump
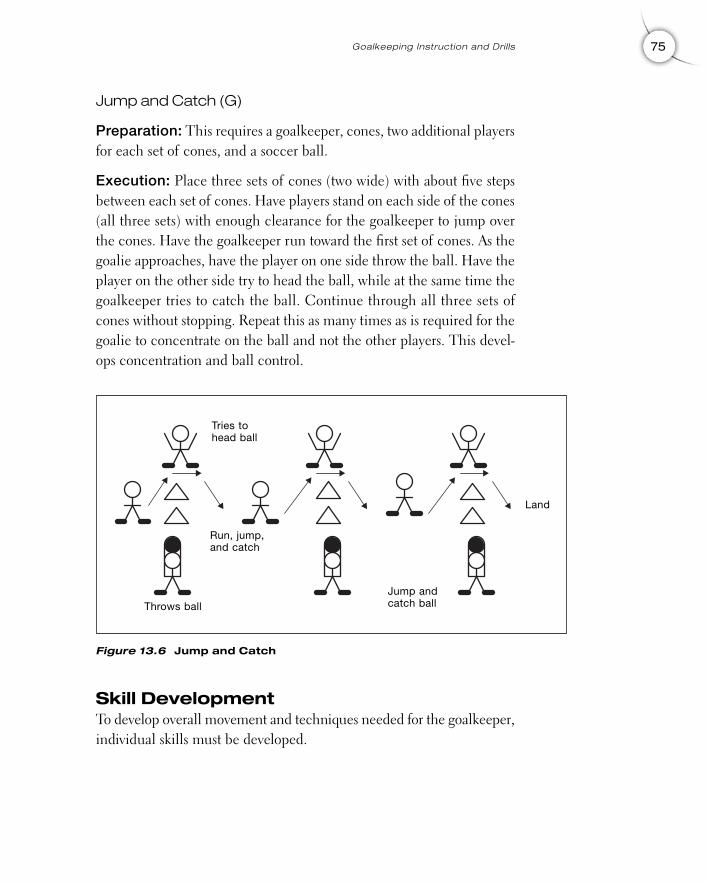
Jump and Catch (G)
Preparation: This requires a goalkeeper, cones, two additional playersfor each set of cones, and a soccer ball.
Execution: Place three sets of cones (two wide) with about five stepsbetween each set of cones. Have players stand on each side of the cones(all three sets) with enough clearance for the goalkeeper to jump overthe cones. Have the goalkeeper run toward the first set of cones. As thegoalie approaches, have the player on one side throw the ball. Have theplayer on the other side try to head the ball, while at the same time thegoalkeeper tries to catch the ball. Continue through all three sets ofcones without stopping. Repeat this as many times as is required for thegoalie to concentrate on the ball and not the other players. This devel-ops concentration and ball control.
Skill DevelopmentTo develop overall movement and techniques needed for the goalkeeper,individual skills must be developed.
75Goalkeeping Instruction and Drills
Figure 13.6 Jump and Catch
Tries tohead ball
Run, jump,and catch
Throws ball
Land
Jump andcatch ball
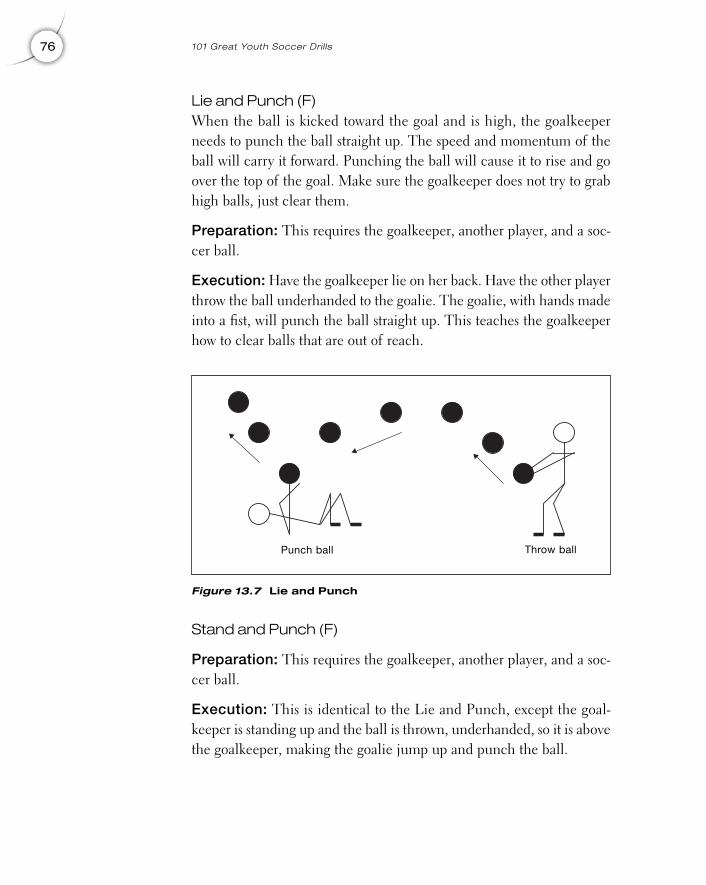
Lie and Punch (F)When the ball is kicked toward the goal and is high, the goalkeeperneeds to punch the ball straight up. The speed and momentum of theball will carry it forward. Punching the ball will cause it to rise and goover the top of the goal. Make sure the goalkeeper does not try to grabhigh balls, just clear them.
Preparation: This requires the goalkeeper, another player, and a soc-cer ball.
Execution: Have the goalkeeper lie on her back. Have the other playerthrow the ball underhanded to the goalie. The goalie, with hands madeinto a fist, will punch the ball straight up. This teaches the goalkeeperhow to clear balls that are out of reach.
Stand and Punch (F)
Preparation: This requires the goalkeeper, another player, and a soc-cer ball.
Execution: This is identical to the Lie and Punch, except the goal-keeper is standing up and the ball is thrown, underhanded, so it is abovethe goalkeeper, making the goalie jump up and punch the ball.
76 101 Great Youth Soccer Dril ls
Figure 13.7 Lie and Punch
Punch ball Throw ball
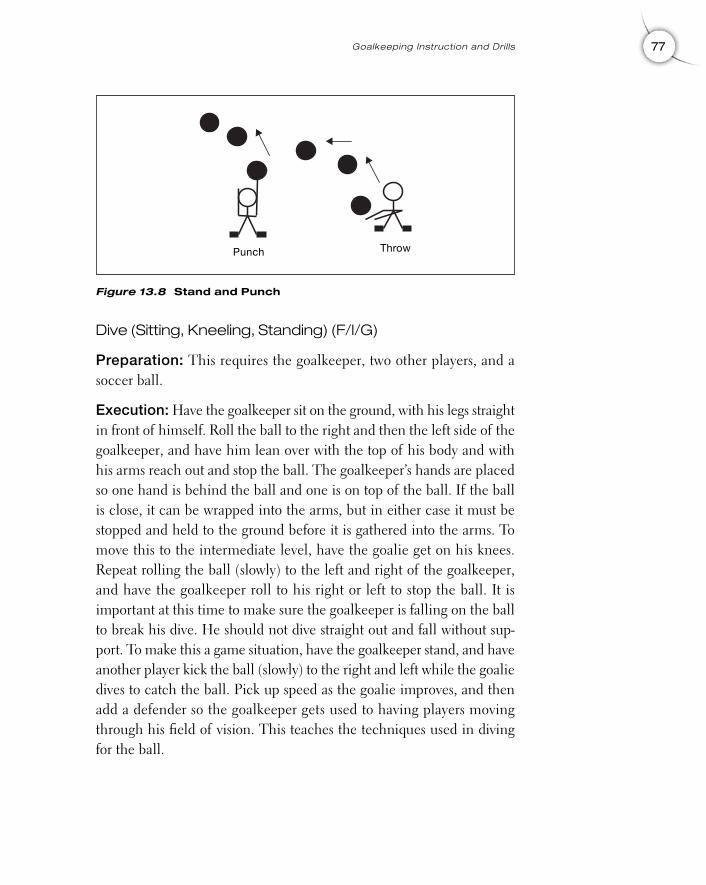
Dive (Sitting, Kneeling, Standing) (F/I/G)
Preparation: This requires the goalkeeper, two other players, and asoccer ball.
Execution: Have the goalkeeper sit on the ground, with his legs straightin front of himself. Roll the ball to the right and then the left side of thegoalkeeper, and have him lean over with the top of his body and withhis arms reach out and stop the ball. The goalkeeper’s hands are placedso one hand is behind the ball and one is on top of the ball. If the ballis close, it can be wrapped into the arms, but in either case it must bestopped and held to the ground before it is gathered into the arms. Tomove this to the intermediate level, have the goalie get on his knees.Repeat rolling the ball (slowly) to the left and right of the goalkeeper,and have the goalkeeper roll to his right or left to stop the ball. It isimportant at this time to make sure the goalkeeper is falling on the ballto break his dive. He should not dive straight out and fall without sup-port. To make this a game situation, have the goalkeeper stand, and haveanother player kick the ball (slowly) to the right and left while the goaliedives to catch the ball. Pick up speed as the goalie improves, and thenadd a defender so the goalkeeper gets used to having players movingthrough his field of vision. This teaches the techniques used in divingfor the ball.
77Goalkeeping Instruction and Drills
Figure 13.8 Stand and Punch
Punch Throw
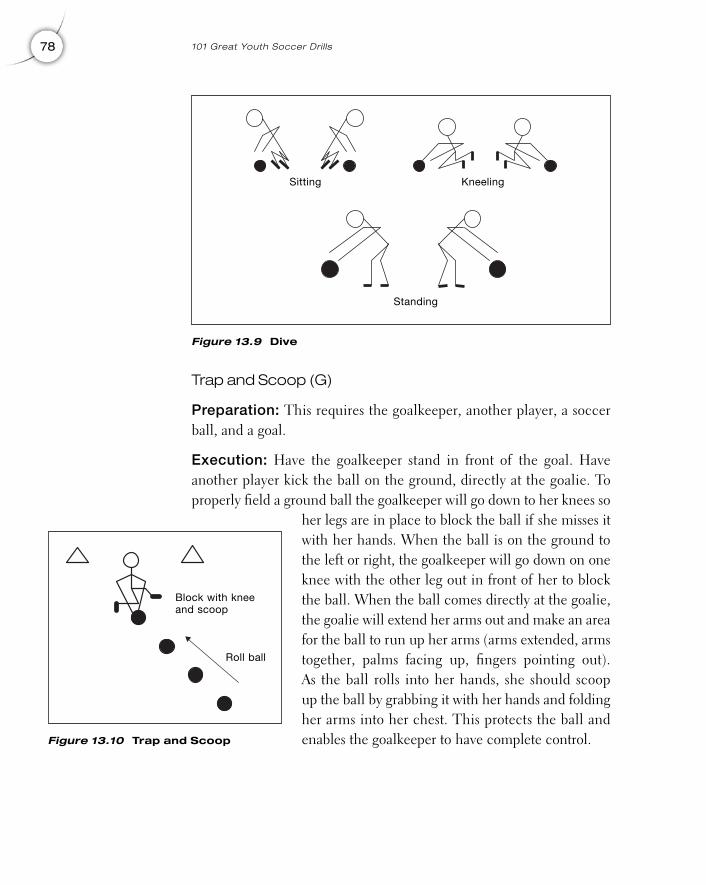
Trap and Scoop (G)
Preparation: This requires the goalkeeper, another player, a soccerball, and a goal.
Execution: Have the goalkeeper stand in front of the goal. Haveanother player kick the ball on the ground, directly at the goalie. Toproperly field a ground ball the goalkeeper will go down to her knees so
her legs are in place to block the ball if she misses itwith her hands. When the ball is on the ground tothe left or right, the goalkeeper will go down on oneknee with the other leg out in front of her to blockthe ball. When the ball comes directly at the goalie,the goalie will extend her arms out and make an areafor the ball to run up her arms (arms extended, armstogether, palms facing up, fingers pointing out).As the ball rolls into her hands, she should scoopup the ball by grabbing it with her hands and foldingher arms into her chest. This protects the ball andenables the goalkeeper to have complete control.
78 101 Great Youth Soccer Dril ls
Figure 13.9 Dive
Figure 13.10 Trap and Scoop
Sitting Kneeling
Block with kneeand scoop
Roll ball
Standing
14
79
Offensive andDefensive Drills
Drills that incorporate and enhance the skills and techniques that theplayers have learned are a necessity to move your team forward andmake them competitive. Don’t just scrimmage all of the time; thesedrills can hone the on-field skills and techniques, getting all of theplayers involved. The more the players touch the ball, the better theywill be.
Offensive and Defensive Drills
Centering (G)The perfect goal attempt is when the players bring the ball down theright or left side of the field and then center the ball to the players inthe center of the field. This spreads the defense and also has them mov-ing backward toward their own goal. Practice makes this move practical.
Preparation: This requires one soccer ball, three offensive players, onegoalkeeper, two defenders, and a goal.
Execution: Line up the three offensive players so one player is on theoutside near the touchline and the other two are even with the outside
Copyright © 2005 by Robert Koger. Click here for terms of use.
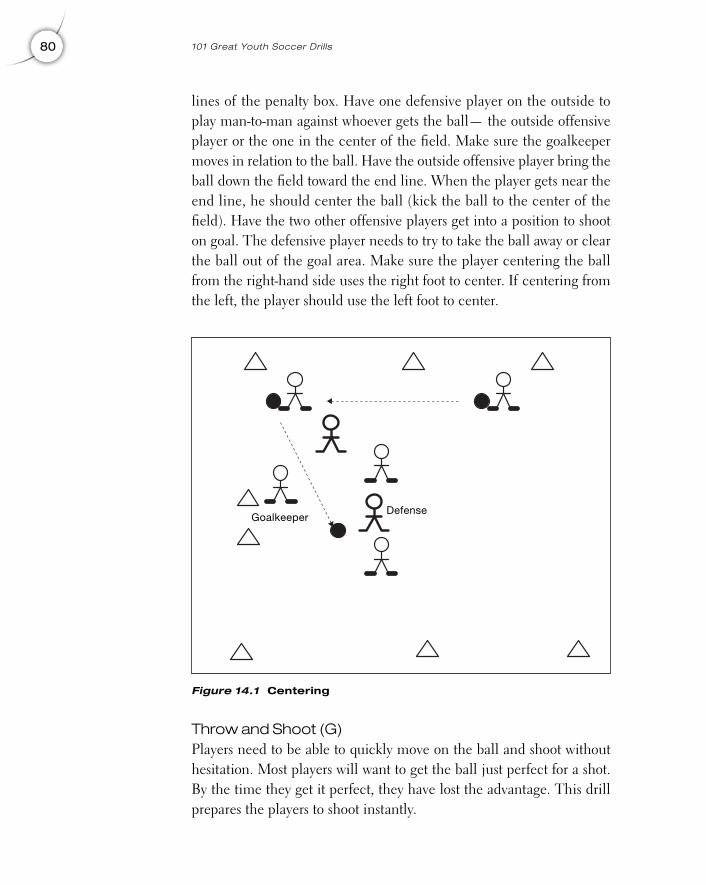
lines of the penalty box. Have one defensive player on the outside toplay man-to-man against whoever gets the ball— the outside offensiveplayer or the one in the center of the field. Make sure the goalkeepermoves in relation to the ball. Have the outside offensive player bring theball down the field toward the end line. When the player gets near theend line, he should center the ball (kick the ball to the center of thefield). Have the two other offensive players get into a position to shooton goal. The defensive player needs to try to take the ball away or clearthe ball out of the goal area. Make sure the player centering the ballfrom the right-hand side uses the right foot to center. If centering fromthe left, the player should use the left foot to center.
Throw and Shoot (G)Players need to be able to quickly move on the ball and shoot withouthesitation. Most players will want to get the ball just perfect for a shot.By the time they get it perfect, they have lost the advantage. This drillprepares the players to shoot instantly.
80 101 Great Youth Soccer Dril ls
Figure 14.1 Centering
GoalkeeperDefense
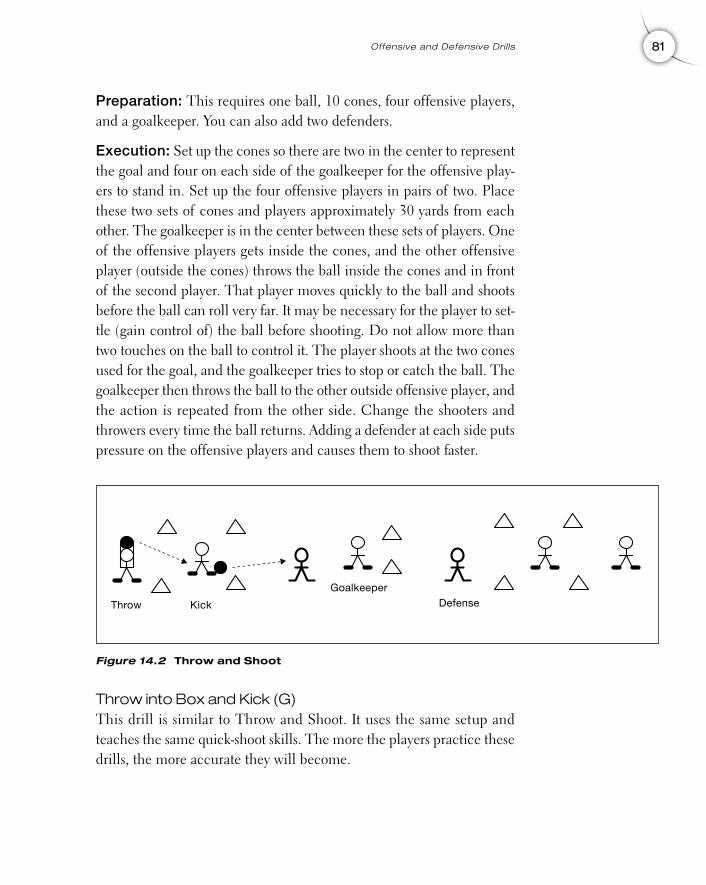
Preparation: This requires one ball, 10 cones, four offensive players,and a goalkeeper. You can also add two defenders.
Execution: Set up the cones so there are two in the center to representthe goal and four on each side of the goalkeeper for the offensive play-ers to stand in. Set up the four offensive players in pairs of two. Placethese two sets of cones and players approximately 30 yards from eachother. The goalkeeper is in the center between these sets of players. Oneof the offensive players gets inside the cones, and the other offensiveplayer (outside the cones) throws the ball inside the cones and in frontof the second player. That player moves quickly to the ball and shootsbefore the ball can roll very far. It may be necessary for the player to set-tle (gain control of) the ball before shooting. Do not allow more thantwo touches on the ball to control it. The player shoots at the two conesused for the goal, and the goalkeeper tries to stop or catch the ball. Thegoalkeeper then throws the ball to the other outside offensive player, andthe action is repeated from the other side. Change the shooters andthrowers every time the ball returns. Adding a defender at each side putspressure on the offensive players and causes them to shoot faster.
Throw into Box and Kick (G)This drill is similar to Throw and Shoot. It uses the same setup andteaches the same quick-shoot skills. The more the players practice thesedrills, the more accurate they will become.
81Offensive and Defensive Dril ls
Figure 14.2 Throw and Shoot
Throw Kick
GoalkeeperDefense
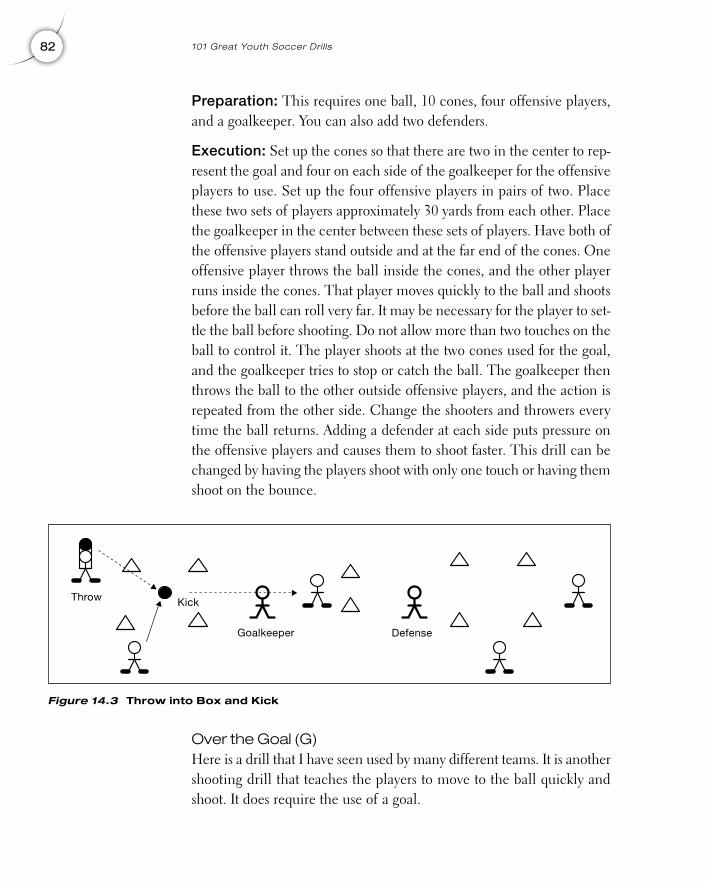
Preparation: This requires one ball, 10 cones, four offensive players,and a goalkeeper. You can also add two defenders.
Execution: Set up the cones so that there are two in the center to rep-resent the goal and four on each side of the goalkeeper for the offensiveplayers to use. Set up the four offensive players in pairs of two. Placethese two sets of players approximately 30 yards from each other. Placethe goalkeeper in the center between these sets of players. Have both ofthe offensive players stand outside and at the far end of the cones. Oneoffensive player throws the ball inside the cones, and the other playerruns inside the cones. That player moves quickly to the ball and shootsbefore the ball can roll very far. It may be necessary for the player to set-tle the ball before shooting. Do not allow more than two touches on theball to control it. The player shoots at the two cones used for the goal,and the goalkeeper tries to stop or catch the ball. The goalkeeper thenthrows the ball to the other outside offensive players, and the action isrepeated from the other side. Change the shooters and throwers everytime the ball returns. Adding a defender at each side puts pressure onthe offensive players and causes them to shoot faster. This drill can bechanged by having the players shoot with only one touch or having themshoot on the bounce.
Over the Goal (G)Here is a drill that I have seen used by many different teams. It is anothershooting drill that teaches the players to move to the ball quickly andshoot. It does require the use of a goal.
82 101 Great Youth Soccer Dril ls
Figure 14.3 Throw into Box and Kick
Throw Kick
Goalkeeper Defense
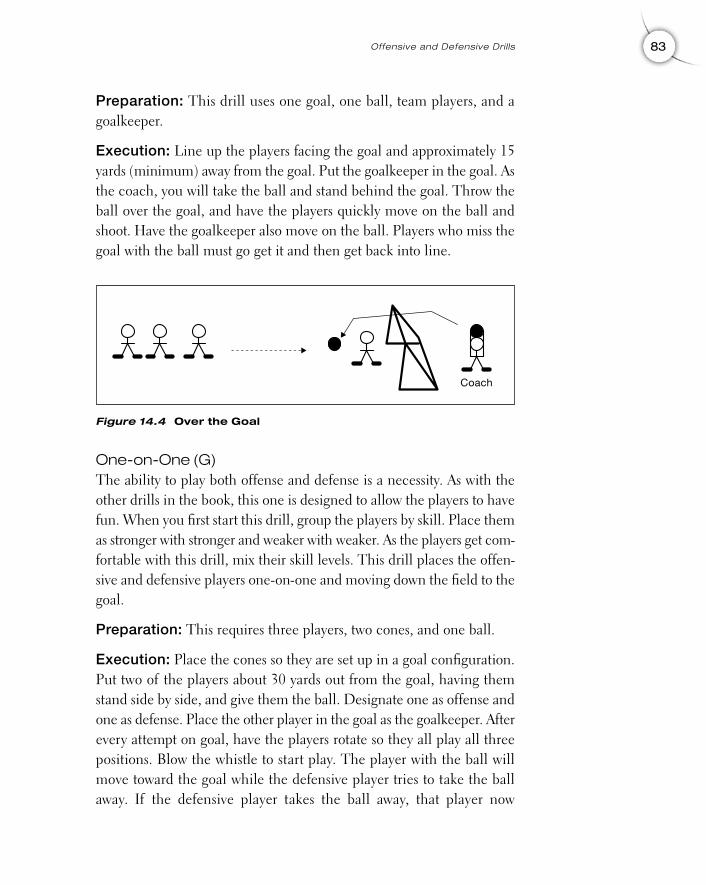
Preparation: This drill uses one goal, one ball, team players, and agoalkeeper.
Execution: Line up the players facing the goal and approximately 15yards (minimum) away from the goal. Put the goalkeeper in the goal. Asthe coach, you will take the ball and stand behind the goal. Throw theball over the goal, and have the players quickly move on the ball andshoot. Have the goalkeeper also move on the ball. Players who miss thegoal with the ball must go get it and then get back into line.
One-on-One (G)The ability to play both offense and defense is a necessity. As with theother drills in the book, this one is designed to allow the players to havefun. When you first start this drill, group the players by skill. Place themas stronger with stronger and weaker with weaker. As the players get com-fortable with this drill, mix their skill levels. This drill places the offen-sive and defensive players one-on-one and moving down the field to thegoal.
Preparation: This requires three players, two cones, and one ball.
Execution: Place the cones so they are set up in a goal configuration.Put two of the players about 30 yards out from the goal, having themstand side by side, and give them the ball. Designate one as offense andone as defense. Place the other player in the goal as the goalkeeper. Afterevery attempt on goal, have the players rotate so they all play all threepositions. Blow the whistle to start play. The player with the ball willmove toward the goal while the defensive player tries to take the ballaway. If the defensive player takes the ball away, that player now
83Offensive and Defensive Dril ls
Figure 14.4 Over the Goal
Coach
14 (079-090B) chapter 14 3/1/05 10:31 AM Page 83
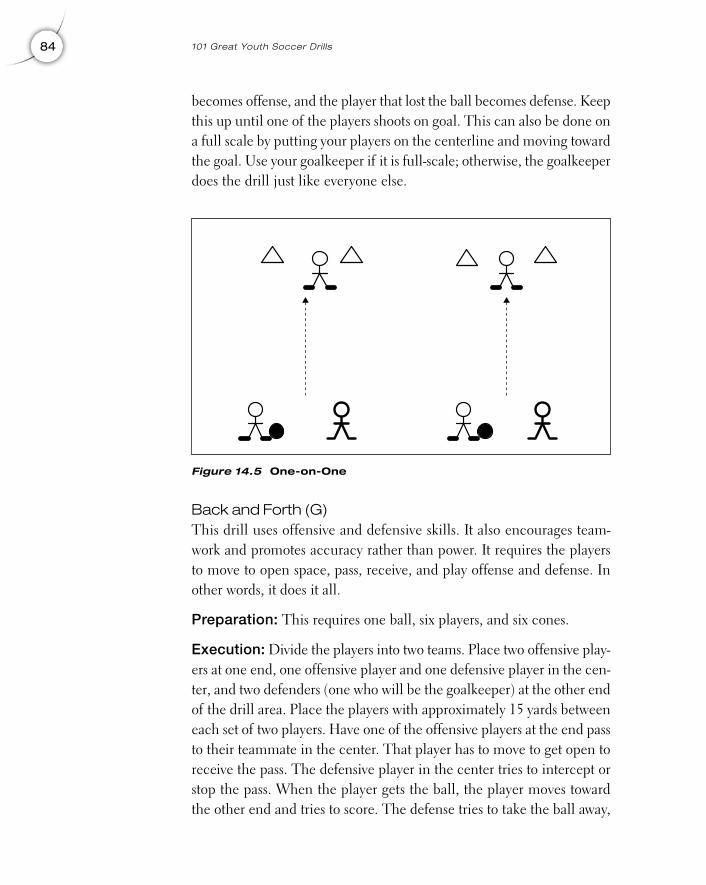
becomes offense, and the player that lost the ball becomes defense. Keepthis up until one of the players shoots on goal. This can also be done ona full scale by putting your players on the centerline and moving towardthe goal. Use your goalkeeper if it is full-scale; otherwise, the goalkeeperdoes the drill just like everyone else.
Back and Forth (G)This drill uses offensive and defensive skills. It also encourages team-work and promotes accuracy rather than power. It requires the playersto move to open space, pass, receive, and play offense and defense. Inother words, it does it all.
Preparation: This requires one ball, six players, and six cones.
Execution: Divide the players into two teams. Place two offensive play-ers at one end, one offensive player and one defensive player in the cen-ter, and two defenders (one who will be the goalkeeper) at the other endof the drill area. Place the players with approximately 15 yards betweeneach set of two players. Have one of the offensive players at the end passto their teammate in the center. That player has to move to get open toreceive the pass. The defensive player in the center tries to intercept orstop the pass. When the player gets the ball, the player moves towardthe other end and tries to score. The defense tries to take the ball away,
84 101 Great Youth Soccer Dril ls
Figure 14.5 One-on-One
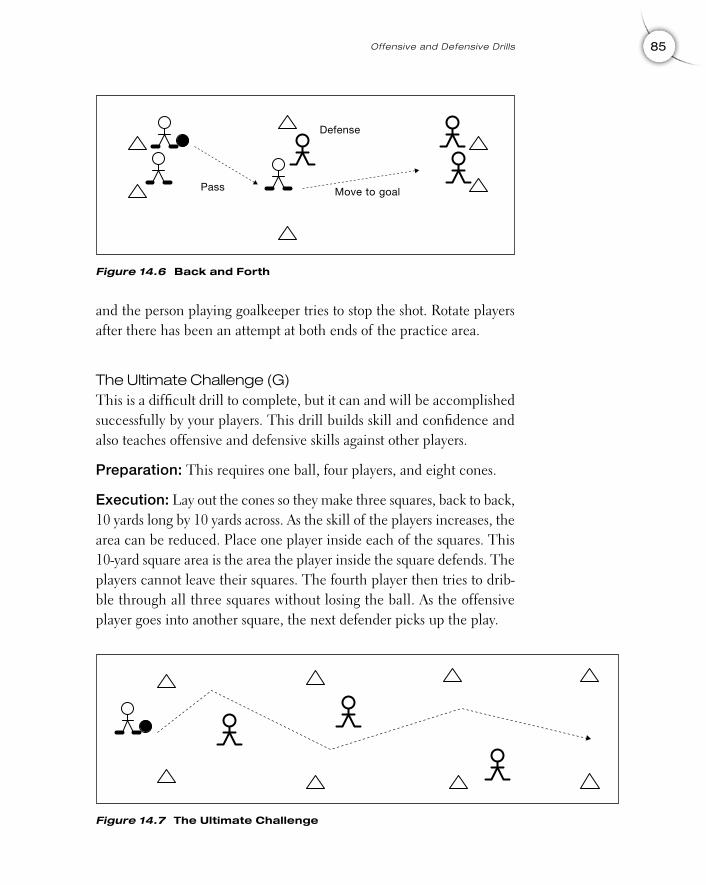
and the person playing goalkeeper tries to stop the shot. Rotate playersafter there has been an attempt at both ends of the practice area.
The Ultimate Challenge (G)This is a difficult drill to complete, but it can and will be accomplishedsuccessfully by your players. This drill builds skill and confidence andalso teaches offensive and defensive skills against other players.
Preparation: This requires one ball, four players, and eight cones.
Execution: Lay out the cones so they make three squares, back to back,10 yards long by 10 yards across. As the skill of the players increases, thearea can be reduced. Place one player inside each of the squares. This10-yard square area is the area the player inside the square defends. Theplayers cannot leave their squares. The fourth player then tries to drib-ble through all three squares without losing the ball. As the offensiveplayer goes into another square, the next defender picks up the play.
85Offensive and Defensive Dril ls
Figure 14.6 Back and Forth
Pass Move to goal
Defense
Figure 14.7 The Ultimate Challenge
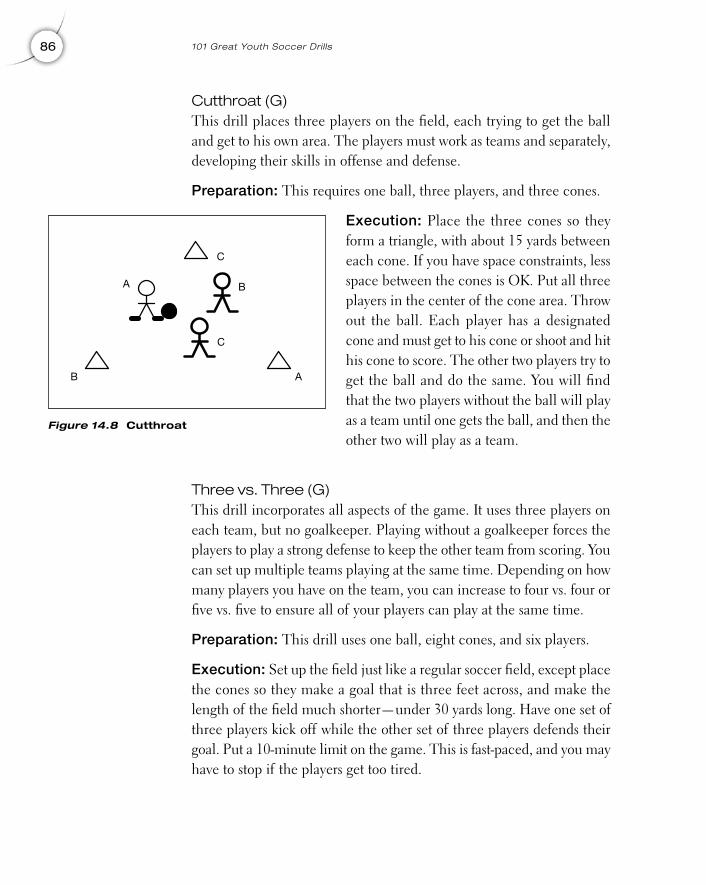
Cutthroat (G)This drill places three players on the field, each trying to get the balland get to his own area. The players must work as teams and separately,developing their skills in offense and defense.
Preparation: This requires one ball, three players, and three cones.
Execution: Place the three cones so theyform a triangle, with about 15 yards betweeneach cone. If you have space constraints, lessspace between the cones is OK. Put all threeplayers in the center of the cone area. Throwout the ball. Each player has a designatedcone and must get to his cone or shoot and hithis cone to score. The other two players try toget the ball and do the same. You will findthat the two players without the ball will playas a team until one gets the ball, and then theother two will play as a team.
Three vs. Three (G)This drill incorporates all aspects of the game. It uses three players oneach team, but no goalkeeper. Playing without a goalkeeper forces theplayers to play a strong defense to keep the other team from scoring. Youcan set up multiple teams playing at the same time. Depending on howmany players you have on the team, you can increase to four vs. four orfive vs. five to ensure all of your players can play at the same time.
Preparation: This drill uses one ball, eight cones, and six players.
Execution: Set up the field just like a regular soccer field, except placethe cones so they make a goal that is three feet across, and make thelength of the field much shorter—under 30 yards long. Have one set ofthree players kick off while the other set of three players defends theirgoal. Put a 10-minute limit on the game. This is fast-paced, and you mayhave to stop if the players get too tired.
86 101 Great Youth Soccer Dril ls
Figure 14.8 Cutthroat
B
BA
A
C
C
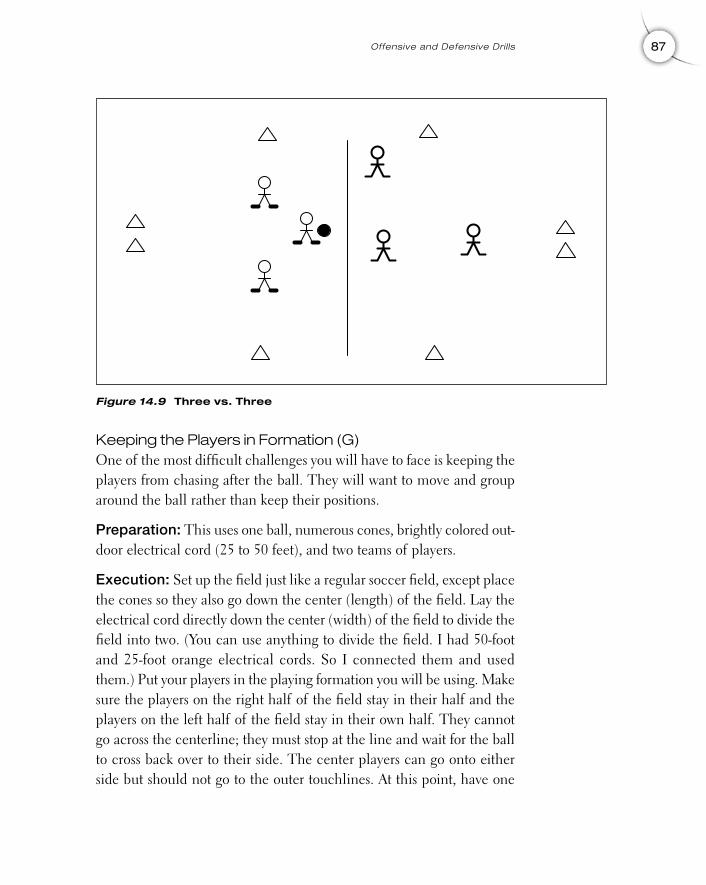
Keeping the Players in Formation (G)One of the most difficult challenges you will have to face is keeping theplayers from chasing after the ball. They will want to move and grouparound the ball rather than keep their positions.
Preparation: This uses one ball, numerous cones, brightly colored out-door electrical cord (25 to 50 feet), and two teams of players.
Execution: Set up the field just like a regular soccer field, except placethe cones so they also go down the center (length) of the field. Lay theelectrical cord directly down the center (width) of the field to divide thefield into two. (You can use anything to divide the field. I had 50-footand 25-foot orange electrical cords. So I connected them and usedthem.) Put your players in the playing formation you will be using. Makesure the players on the right half of the field stay in their half and theplayers on the left half of the field stay in their own half. They cannotgo across the centerline; they must stop at the line and wait for the ballto cross back over to their side. The center players can go onto eitherside but should not go to the outer touchlines. At this point, have one
87Offensive and Defensive Dril ls
Figure 14.9 Three vs. Three
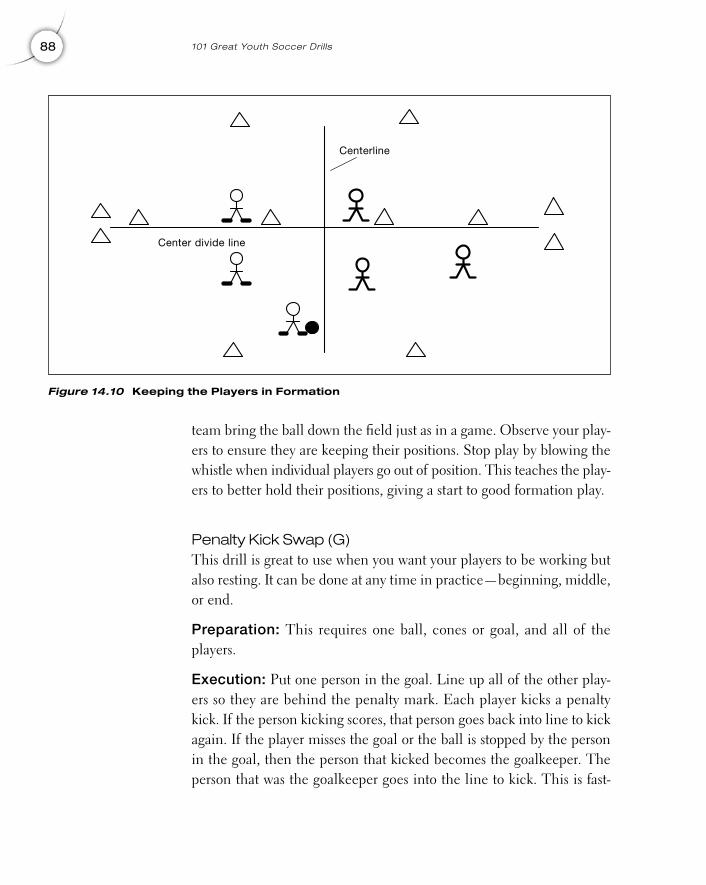
team bring the ball down the field just as in a game. Observe your play-ers to ensure they are keeping their positions. Stop play by blowing thewhistle when individual players go out of position. This teaches the play-ers to better hold their positions, giving a start to good formation play.
Penalty Kick Swap (G)This drill is great to use when you want your players to be working butalso resting. It can be done at any time in practice—beginning, middle,or end.
Preparation: This requires one ball, cones or goal, and all of theplayers.
Execution: Put one person in the goal. Line up all of the other play-ers so they are behind the penalty mark. Each player kicks a penaltykick. If the person kicking scores, that person goes back into line to kickagain. If the player misses the goal or the ball is stopped by the personin the goal, then the person that kicked becomes the goalkeeper. Theperson that was the goalkeeper goes into the line to kick. This is fast-
88 101 Great Youth Soccer Dril ls
Figure 14.10 Keeping the Players in Formation
Center divide line
Centerline
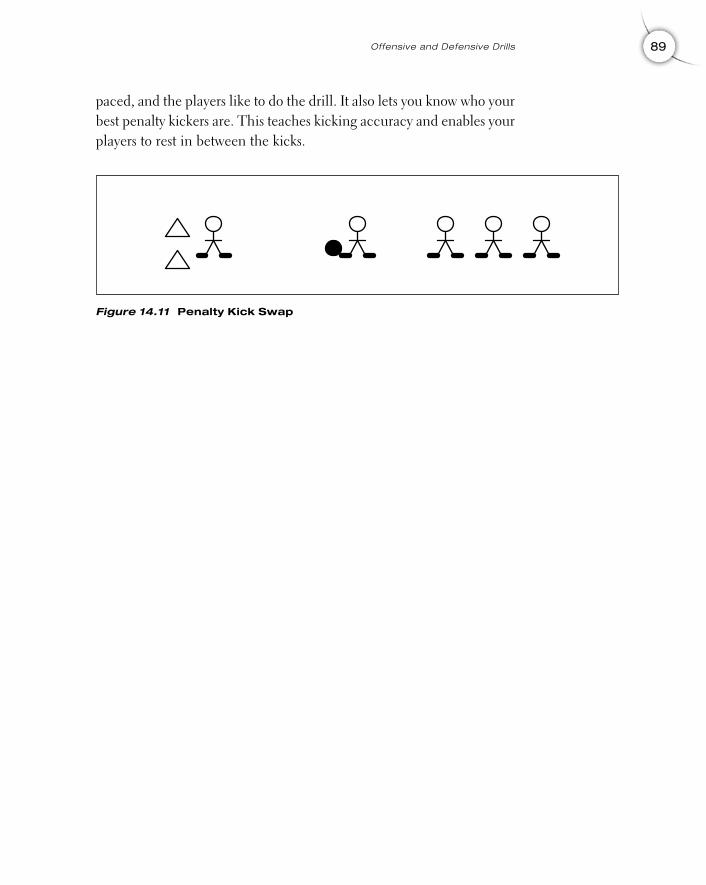
paced, and the players like to do the drill. It also lets you know who yourbest penalty kickers are. This teaches kicking accuracy and enables yourplayers to rest in between the kicks.
89Offensive and Defensive Dril ls
Figure 14.11 Penalty Kick Swap

This page intentionally left blank.

15
91
Basic Skills and Individual
Technique Drills
Individual PracticeGive your players these drills to do as homework. Ask them to use theplastic bag for five minutes and to juggle until they reach a certain num-ber of kicks—5, 10, or 20, depending on age and skill.
Plastic BagThis teaches the proper placement of the kick and builds strength.
The best way to practice kicking is by placing the soccer ball in alarge plastic bag and having the player hold onto the top of the bag sothe ball cannot come out of the bag. While standing, walking, or run-ning, the player should continuously kick the ball. The player can tellif it is a good kick by the way the ball travels away from the kick. If itgoes to the side or twists, it is a bad kick. If it goes straight out and back,it is a good kick. This is a good way to practice alone; a player can get a
Copyright © 2005 by Robert Koger. Click here for terms of use.
kick every second. Kicking the ball against a building, wall, or fence orto another person limits the kicks. More can be accomplished in min-utes with the bag than in hours with other people.
JugglingThis teaches ball control and touch.
The player should drop the ball onto her foot (or thigh or head), andthen pop the ball back into the air. She must keep the ball moving upand down without using her hands. When the player is juggling the ballwith her feet, thighs (just above the knees), or head, she should keep theball at a constant low level while watching the ball very closely. Sheshould not hit it really hard and high into the air. The player should seehow many times she can touch the ball without the ball touching theground.
92 101 Great Youth Soccer Dril ls
16
93
Game Strategy and Drills
DefenseDefense is the foundation of soccer. A perfectly played defensive soccergame is one with a score of 0–0. However, games are won by demon-strating outstanding defense and having a great offense that is able toovercome the other team’s defense. Remember, if your team cannot getthe ball, they cannot score. Some teams will train their players to playonly offense or defense. Proper training and play has all players playingdefense when the other team has the ball and offense when their teamhas the ball.
Immediate ChasePlayers who lose the ball must immediately go after the ball.
The person who loses the ball is the first to go after the ball. Thatplayer is the closest, and it is very important that he apply pressure onthe person who now has the ball. This means he tries to get the ball backas quickly as he can and allows the other members of the team to recoverand get into their defensive positions without giving free run on the field
Copyright © 2005 by Robert Koger. Click here for terms of use.
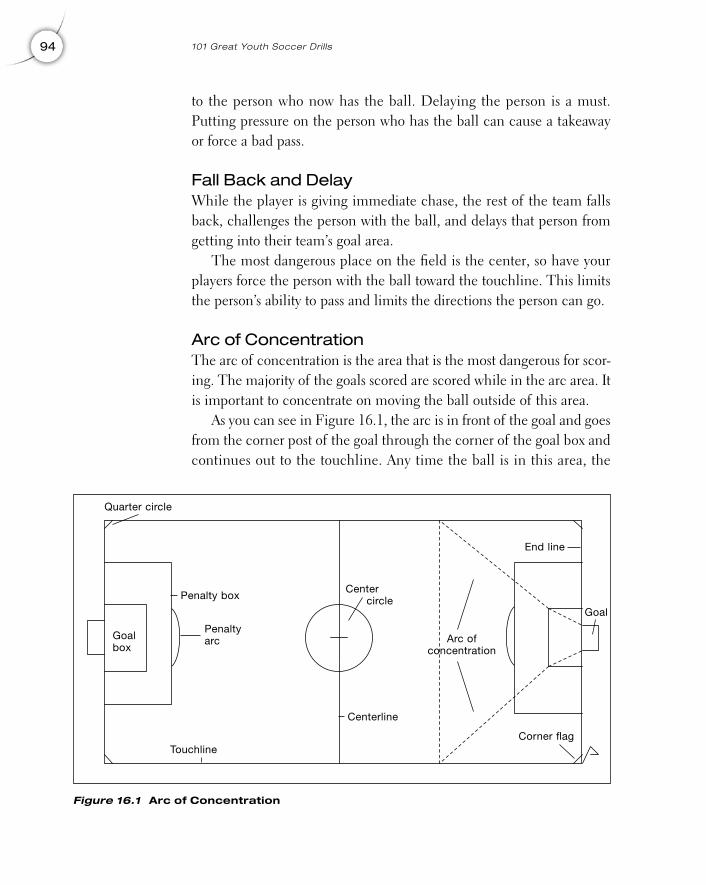
to the person who now has the ball. Delaying the person is a must.Putting pressure on the person who has the ball can cause a takeawayor force a bad pass.
Fall Back and DelayWhile the player is giving immediate chase, the rest of the team fallsback, challenges the person with the ball, and delays that person fromgetting into their team’s goal area.
The most dangerous place on the field is the center, so have yourplayers force the person with the ball toward the touchline. This limitsthe person’s ability to pass and limits the directions the person can go.
Arc of ConcentrationThe arc of concentration is the area that is the most dangerous for scor-ing. The majority of the goals scored are scored while in the arc area. Itis important to concentrate on moving the ball outside of this area.
As you can see in Figure 16.1, the arc is in front of the goal and goesfrom the corner post of the goal through the corner of the goal box andcontinues out to the touchline. Any time the ball is in this area, the
94 101 Great Youth Soccer Dril ls
Figure 16.1 Arc of Concentration
Quarter circle
Penalty box
Goalbox
Arc ofconcentration
Penaltyarc
Centerline
End line
Corner flag
Goal
Touchline
Center circle
chances for scoring increase. Emphasize to your team that they mustclear the ball from this area as quickly as possible. They should not everplay with the ball in this area. Most defenders will receive the ball andmove to their left or right (closest direction) toward the touchline beforepassing or clearing the ball.
BalanceBalance is important to the defense. This is how the team addresses theother team’s players—in other words, how they play in relation to theperson with the ball.
The players that are nearest to the ball will play tight, meaning theystay as close to the ball as they can. The players that are away from theball play loose, which means they put themselves in a position to coverany possibilities and not just one person. They cover a specific area.
ControlIt is important to get the ball back as quickly as possible. Your team is incontrol when they have the ball. If the other team has the ball, you willlack the control.
Get the ball away from the opposing player as quickly and efficientlyas you can. Many players try to tackle the ball (slide into the ball, with-out touching the other player, to knock the ball away from the oppo-nent). This is often a mistake. If the players miss the ball, they are nowon the ground, and the other player is on the way toward the goal withthe ball. Tackle only when necessary.
Midfield PlayMost games are won in the midfield battles. If you cannot win the ballat the midfield, then you cannot advance the ball forward. Always los-ing the ball at midfield means your team is on defense all of the time.Eventually the other team will score in this situation.
Get PossessionIt is a must to gain possession of the ball. Once your player gets the ball,have her dribble to open space, away from the other team’s players. Drib-
95Game Strategy and Drills
bling to open space allows the rest of your team to get open. As soon asyour player gets out of traffic, she must use passes to move the ballquickly. It is best to have the other team chasing the ball. They can keepup with a person dribbling the ball, but they cannot run as fast as theball can be passed. Use the whole team when you are passing. Pass back-ward to the fullbacks, forward to your forwards, or sideways to other mid-fielders. Anyone open is the right person to pass the ball to. Keepchanging the direction of the ball. Don’t always pass forward or back-ward. Move it around, and keep the other team moving. When the otherplayers are moving and do not know where the ball is going, they can-not set up an adequate defense, and you have the advantage.
AttackTo take the ball away from the other team, your players must be aggres-sive. They must go after the person with the ball so your team can getpossession. This means they must stop the player with the ball from mov-ing to open space. If one player can stop the player with the ball, thenanother player from your team can assist and double-team the player toget the ball. When your players get the ball, they should stay on theattack, but now as offense. They should move quickly to open space toavoid being trapped.
OffenseAs in defense, when the team goes on offense, all players are on offense.With your defense solid, it is important to break down the other team’sdefense so your team can score. This is done by using techniques dif-ferent from those used on defense.
MobilityIt is important that the offense be mobile. Your players must keep mov-ing and keep the other team’s defense off balance.
As stated previously, when your players get the ball, they must moveto open space. This is the only way they will be able to get open to getthe ball to their teammates. Moving the ball constantly throws off thedefense, and this is what you want. You want to be in control by having
96 101 Great Youth Soccer Dril ls
the other team responding to what your players are doing on the field.Constantly moving the ball creates open spots. Your players and the ballmust be in continuous motion.
RunsPlayers cannot be predictable. Emphasize that they must be creative.The players on the other team can never know what your players aregoing to do. The opposing players will pick up on what is happeningafter a player does the same thing once or twice. If they figure out thatplayers do the same thing every time, the other team will set up to stopthe person. As a result, your players must vary what they do on the field.
There are many different ways to effectively move the ball. Your play-ers are limited only by their own imagination. The diagonal run, wherethe player moves diagonally across the field rather than straight, advancesthe ball but causes the defense to adjust. The blind-side run is when theplayer with the ball goes to the back side of the player that is providingdefense. The on-side run is going directly in front of the defensive player.
Bending or curving is going right and left, moving like the curves ina road; this does not allow the defense to keep up with the player whohas the ball. Because the player who has the ball knows what she wantsto do, she can do it at any time. The defense is constantly kept off bal-ance by the person curving or bending around the field.
Perhaps the most effective is the start-and-stop run. When dribbling,it is important to change your speed. Stopping and then quickly startingagain and going in a different direction causes the defense to stay in pur-suit. The other team is unable to effectively establish a strong defense.
SupportAt all times, the members of your team must be in a position to supporttheir teammates. I prefer to teach the diamond (triangle) method. It iseasy to understand and easy to execute. Figure 16.2 shows a full teamof 11. The P is a player, and the G is the goalkeeper. This method canbe done for players of any age, no matter how many there are. Althoughnot every position in the diagram has dotted lines connecting them, itis easy to see that everyone makes up a triangle or a full diamond. As
97Game Strategy and Drills
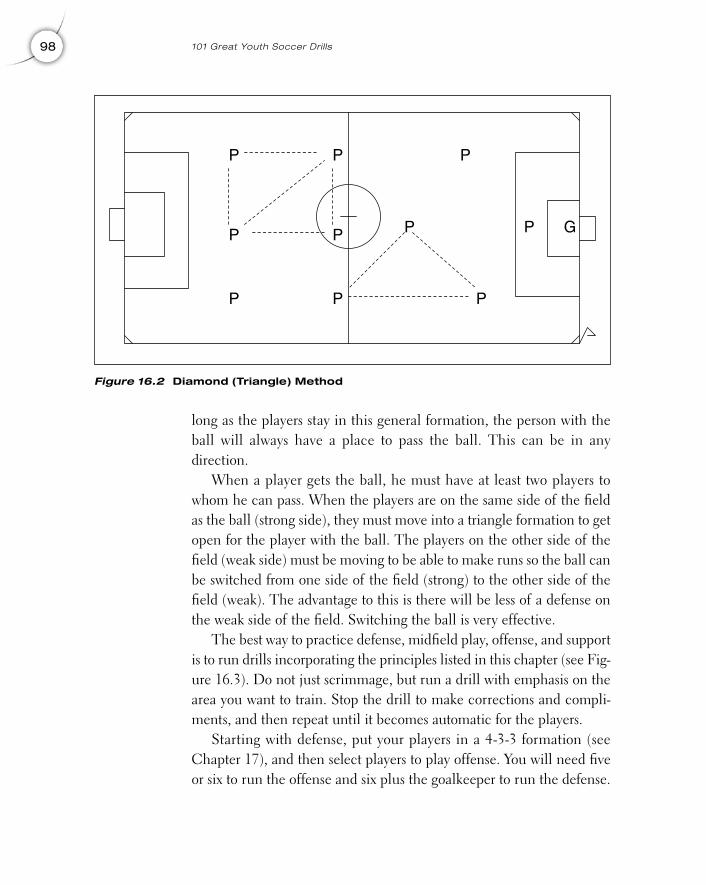
long as the players stay in this general formation, the person with theball will always have a place to pass the ball. This can be in anydirection.
When a player gets the ball, he must have at least two players towhom he can pass. When the players are on the same side of the fieldas the ball (strong side), they must move into a triangle formation to getopen for the player with the ball. The players on the other side of thefield (weak side) must be moving to be able to make runs so the ball canbe switched from one side of the field (strong) to the other side of thefield (weak). The advantage to this is there will be less of a defense onthe weak side of the field. Switching the ball is very effective.
The best way to practice defense, midfield play, offense, and supportis to run drills incorporating the principles listed in this chapter (see Fig-ure 16.3). Do not just scrimmage, but run a drill with emphasis on thearea you want to train. Stop the drill to make corrections and compli-ments, and then repeat until it becomes automatic for the players.
Starting with defense, put your players in a 4-3-3 formation (seeChapter 17), and then select players to play offense. You will need fiveor six to run the offense and six plus the goalkeeper to run the defense.
98 101 Great Youth Soccer Dril ls
P
P
P
P
P
P
P
P
P
P G
Figure 16.2 Diamond (Triangle) Method
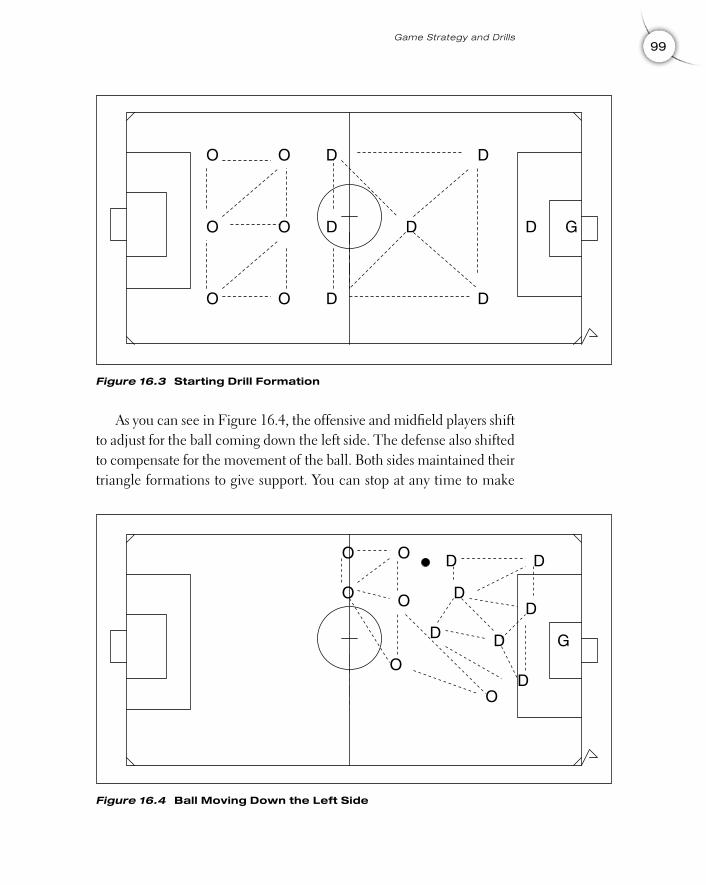
As you can see in Figure 16.4, the offensive and midfield players shiftto adjust for the ball coming down the left side. The defense also shiftedto compensate for the movement of the ball. Both sides maintained theirtriangle formations to give support. You can stop at any time to make
99Game Strategy and Drills
O
O
O
D
D
D
D
D
D
D G
O
O
O
Figure 16.3 Starting Drill Formation
O
O
O
D
D
D
D
D
D
D
G
O
O
O
Figure 16.4 Ball Moving Down the Left Side
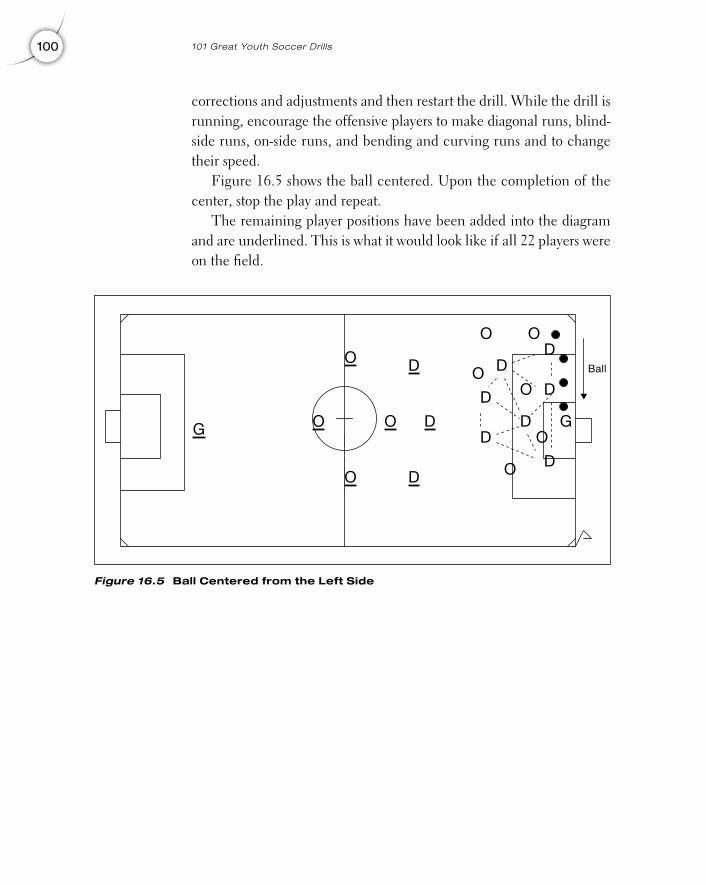
corrections and adjustments and then restart the drill. While the drill isrunning, encourage the offensive players to make diagonal runs, blind-side runs, on-side runs, and bending and curving runs and to changetheir speed.
Figure 16.5 shows the ball centered. Upon the completion of thecenter, stop the play and repeat.
The remaining player positions have been added into the diagramand are underlined. This is what it would look like if all 22 players wereon the field.
100 101 Great Youth Soccer Dril ls
O
O
O
D
D
D
D
D
D
D
G
O
O
O
D
D
D
O
O
O
OG
Figure 16.5 Ball Centered from the Left Side
Ball
17
101
Formations and Drills
A formation is how the players are positioned on the field, and forma-tions are the backbone of soccer. You must perform drills using the for-mations so your players will know how to react on the field. This chaptercovers standard formations. Place your players in the appropriate for-mation and run the formation as you would any other drill. You are notplaying a real soccer game; you are drilling your players on proper posi-tion and reaction to the location and play of the ball. Run the forma-tion drill, stop, make corrections, and run the drill again. Keep repeatinguntil all of your players know how to react properly and maintain theirposition.
FormationsThe formations are designed to provide the ultimate offense anddefense. They are balanced throughout. Any arrangement that providesbalance is acceptable. There are common formations, but sometimesyou have to be creative and go with a special setup. If it works, then itis a good formation. Formations are designed to provide strong offenseand defense with equal-strength players. If you do not have equal-
Copyright © 2005 by Robert Koger. Click here for terms of use.
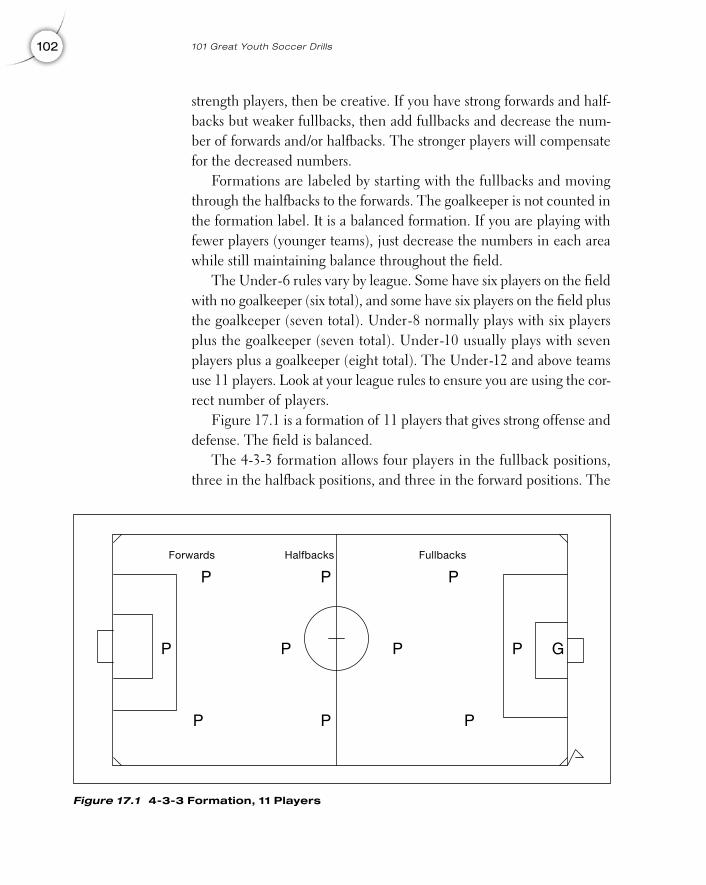
strength players, then be creative. If you have strong forwards and half-backs but weaker fullbacks, then add fullbacks and decrease the num-ber of forwards and/or halfbacks. The stronger players will compensatefor the decreased numbers.
Formations are labeled by starting with the fullbacks and movingthrough the halfbacks to the forwards. The goalkeeper is not counted inthe formation label. It is a balanced formation. If you are playing withfewer players (younger teams), just decrease the numbers in each areawhile still maintaining balance throughout the field.
The Under-6 rules vary by league. Some have six players on the fieldwith no goalkeeper (six total), and some have six players on the field plusthe goalkeeper (seven total). Under-8 normally plays with six playersplus the goalkeeper (seven total). Under-10 usually plays with sevenplayers plus a goalkeeper (eight total). The Under-12 and above teamsuse 11 players. Look at your league rules to ensure you are using the cor-rect number of players.
Figure 17.1 is a formation of 11 players that gives strong offense anddefense. The field is balanced.
The 4-3-3 formation allows four players in the fullback positions,three in the halfback positions, and three in the forward positions. The
102 101 Great Youth Soccer Dril ls
P
P
P
P
P
P
P
P
P
P G
Figure 17.1 4-3-3 Formation, 11 Players
Forwards Halfbacks Fullbacks
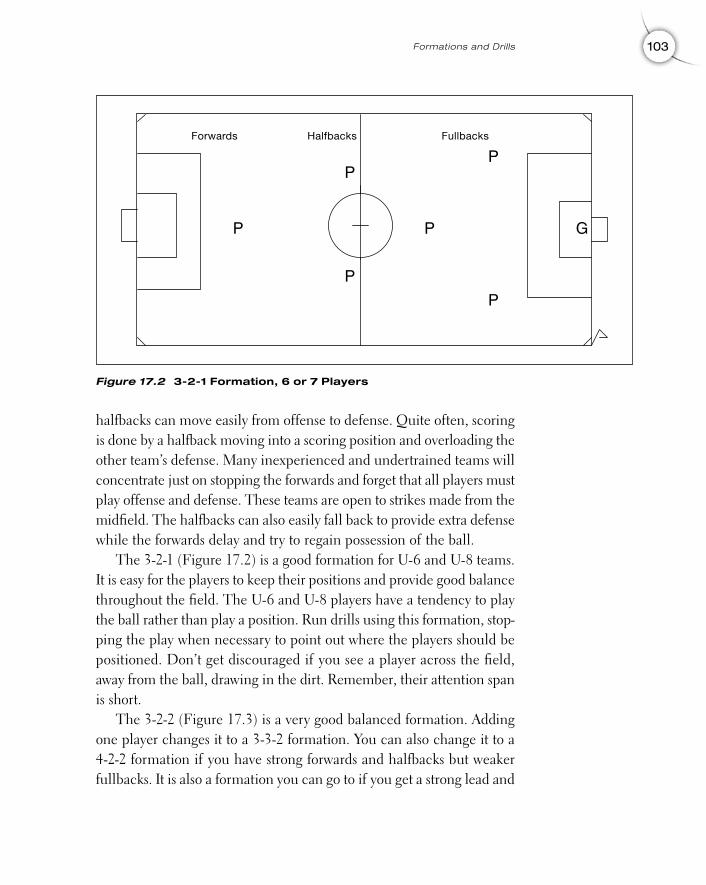
halfbacks can move easily from offense to defense. Quite often, scoringis done by a halfback moving into a scoring position and overloading theother team’s defense. Many inexperienced and undertrained teams willconcentrate just on stopping the forwards and forget that all players mustplay offense and defense. These teams are open to strikes made from themidfield. The halfbacks can also easily fall back to provide extra defensewhile the forwards delay and try to regain possession of the ball.
The 3-2-1 (Figure 17.2) is a good formation for U-6 and U-8 teams.It is easy for the players to keep their positions and provide good balancethroughout the field. The U-6 and U-8 players have a tendency to playthe ball rather than play a position. Run drills using this formation, stop-ping the play when necessary to point out where the players should bepositioned. Don’t get discouraged if you see a player across the field,away from the ball, drawing in the dirt. Remember, their attention spanis short.
The 3-2-2 (Figure 17.3) is a very good balanced formation. Addingone player changes it to a 3-3-2 formation. You can also change it to a4-2-2 formation if you have strong forwards and halfbacks but weakerfullbacks. It is also a formation you can go to if you get a strong lead and
103Formations and Drills
P
P
P
P
P
P G
Figure 17.2 3-2-1 Formation, 6 or 7 Players
Forwards Halfbacks Fullbacks
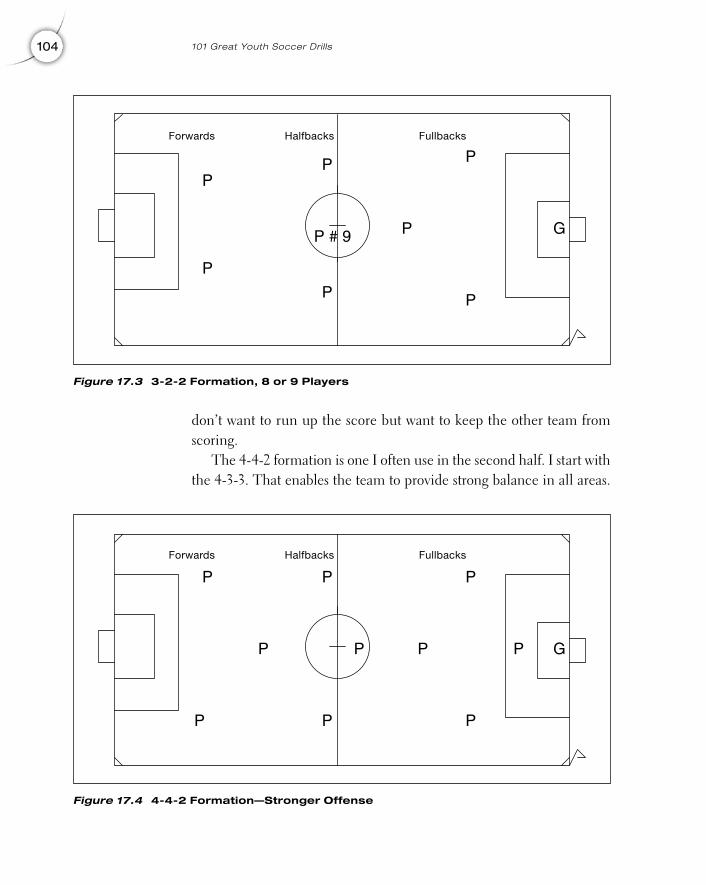
don’t want to run up the score but want to keep the other team fromscoring.
The 4-4-2 formation is one I often use in the second half. I start withthe 4-3-3. That enables the team to provide strong balance in all areas.
104 101 Great Youth Soccer Dril ls
P
P
P
P
P
P
P
P
P
P G
Figure 17.4 4-4-2 Formation—Stronger Offense
Forwards Halfbacks Fullbacks
PP
P
P
P
P G
P
P # 9
Figure 17.3 3-2-2 Formation, 8 or 9 Players
Forwards Halfbacks Fullbacks
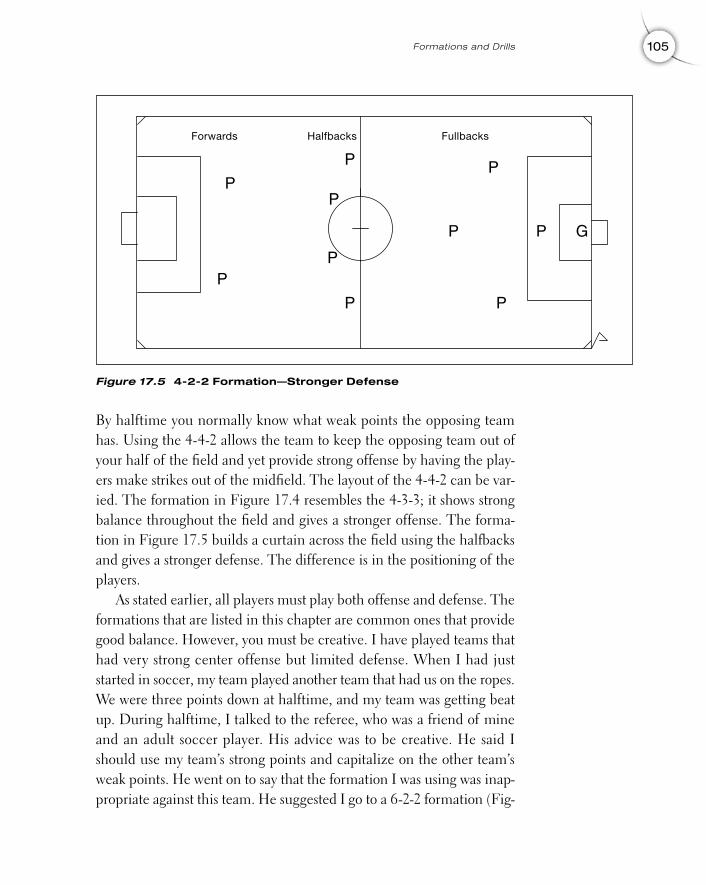
By halftime you normally know what weak points the opposing teamhas. Using the 4-4-2 allows the team to keep the opposing team out ofyour half of the field and yet provide strong offense by having the play-ers make strikes out of the midfield. The layout of the 4-4-2 can be var-ied. The formation in Figure 17.4 resembles the 4-3-3; it shows strongbalance throughout the field and gives a stronger offense. The forma-tion in Figure 17.5 builds a curtain across the field using the halfbacksand gives a stronger defense. The difference is in the positioning of theplayers.
As stated earlier, all players must play both offense and defense. Theformations that are listed in this chapter are common ones that providegood balance. However, you must be creative. I have played teams thathad very strong center offense but limited defense. When I had juststarted in soccer, my team played another team that had us on the ropes.We were three points down at halftime, and my team was getting beatup. During halftime, I talked to the referee, who was a friend of mineand an adult soccer player. His advice was to be creative. He said Ishould use my team’s strong points and capitalize on the other team’sweak points. He went on to say that the formation I was using was inap-propriate against this team. He suggested I go to a 6-2-2 formation (Fig-
105Formations and Drills
P
PP
P
P
P
P
P
P
P G
Figure 17.5 4-2-2 Formation—Stronger Defense
Forwards Halfbacks Fullbacks
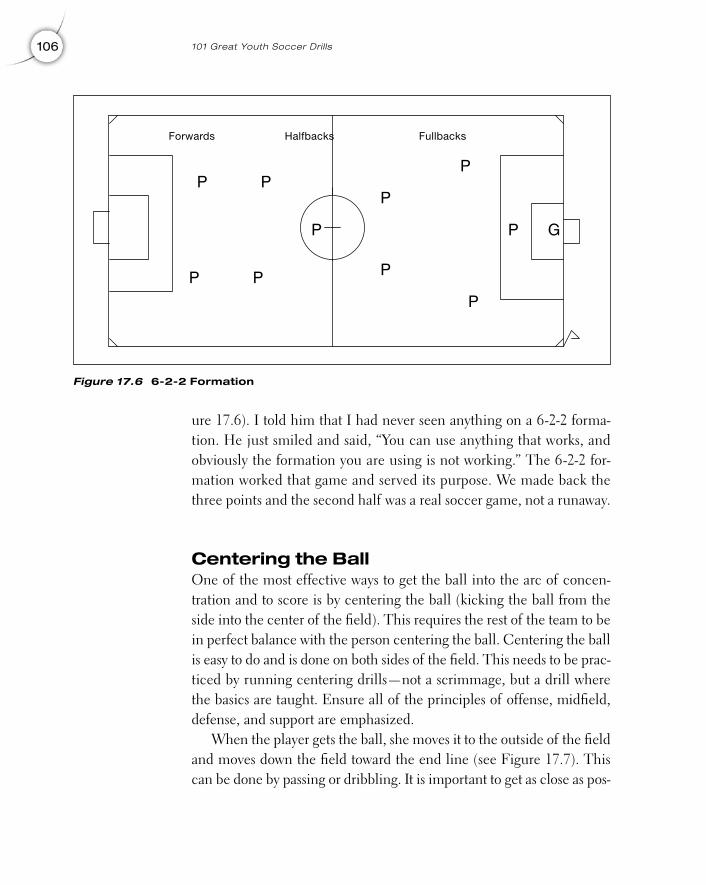
ure 17.6). I told him that I had never seen anything on a 6-2-2 forma-tion. He just smiled and said, “You can use anything that works, andobviously the formation you are using is not working.” The 6-2-2 for-mation worked that game and served its purpose. We made back thethree points and the second half was a real soccer game, not a runaway.
Centering the BallOne of the most effective ways to get the ball into the arc of concen-tration and to score is by centering the ball (kicking the ball from theside into the center of the field). This requires the rest of the team to bein perfect balance with the person centering the ball. Centering the ballis easy to do and is done on both sides of the field. This needs to be prac-ticed by running centering drills—not a scrimmage, but a drill wherethe basics are taught. Ensure all of the principles of offense, midfield,defense, and support are emphasized.
When the player gets the ball, she moves it to the outside of the fieldand moves down the field toward the end line (see Figure 17.7). Thiscan be done by passing or dribbling. It is important to get as close as pos-
106 101 Great Youth Soccer Dril ls
P
PP
P
P
P
P
P
P
P G
Figure 17.6 6-2-2 Formation
Forwards Halfbacks Fullbacks
17 (101-114B) chapter 17 3/1/05 10:32 AM Page 106
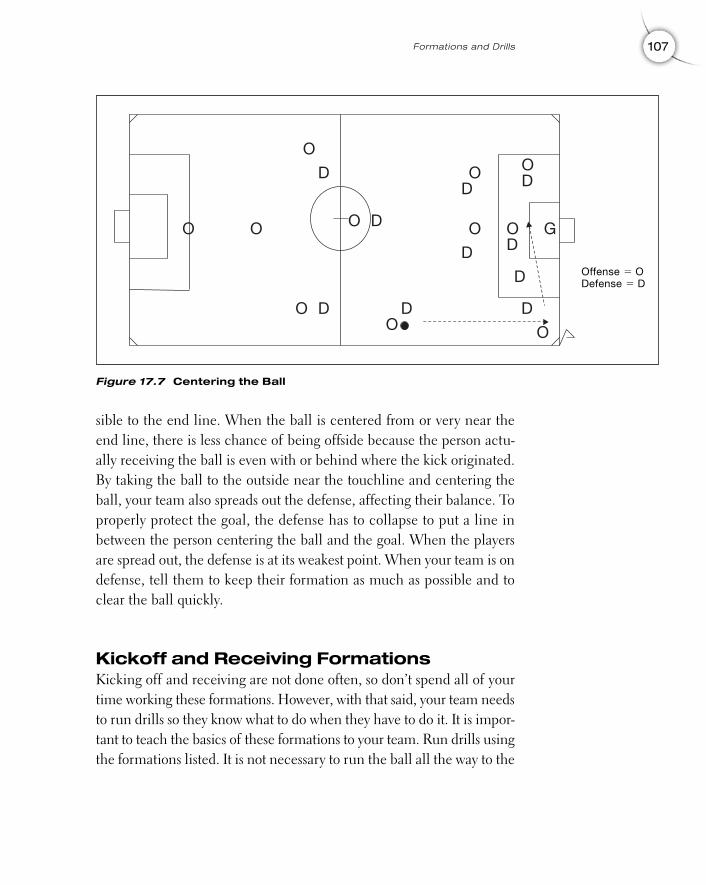
sible to the end line. When the ball is centered from or very near theend line, there is less chance of being offside because the person actu-ally receiving the ball is even with or behind where the kick originated.By taking the ball to the outside near the touchline and centering theball, your team also spreads out the defense, affecting their balance. Toproperly protect the goal, the defense has to collapse to put a line inbetween the person centering the ball and the goal. When the playersare spread out, the defense is at its weakest point. When your team is ondefense, tell them to keep their formation as much as possible and toclear the ball quickly.
Kickoff and Receiving FormationsKicking off and receiving are not done often, so don’t spend all of yourtime working these formations. However, with that said, your team needsto run drills so they know what to do when they have to do it. It is impor-tant to teach the basics of these formations to your team. Run drills usingthe formations listed. It is not necessary to run the ball all the way to the
107Formations and Drills
O
O
O
O
O
O
O
O
O
O GO
D
D D
D
D
D
D D
D
D
Figure 17.7 Centering the Ball
Offense � ODefense � D
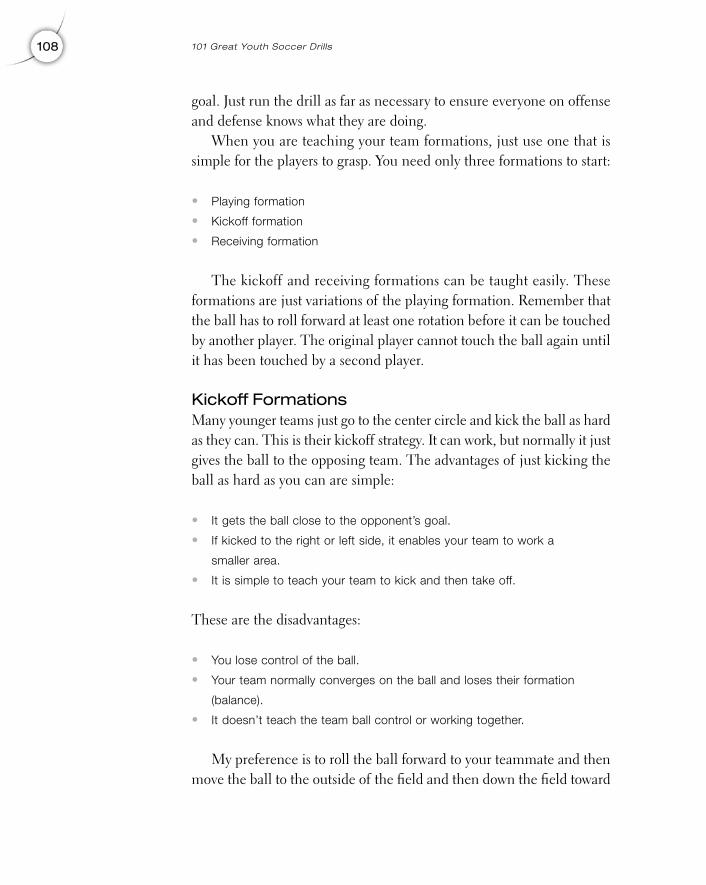
goal. Just run the drill as far as necessary to ensure everyone on offenseand defense knows what they are doing.
When you are teaching your team formations, just use one that issimple for the players to grasp. You need only three formations to start:
• Playing formation
• Kickoff formation
• Receiving formation
The kickoff and receiving formations can be taught easily. Theseformations are just variations of the playing formation. Remember thatthe ball has to roll forward at least one rotation before it can be touchedby another player. The original player cannot touch the ball again untilit has been touched by a second player.
Kickoff FormationsMany younger teams just go to the center circle and kick the ball as hardas they can. This is their kickoff strategy. It can work, but normally it justgives the ball to the opposing team. The advantages of just kicking theball as hard as you can are simple:
• It gets the ball close to the opponent’s goal.
• If kicked to the right or left side, it enables your team to work a
smaller area.
• It is simple to teach your team to kick and then take off.
These are the disadvantages:
• You lose control of the ball.
• Your team normally converges on the ball and loses their formation
(balance).
• It doesn’t teach the team ball control or working together.
My preference is to roll the ball forward to your teammate and thenmove the ball to the outside of the field and then down the field toward
108 101 Great Youth Soccer Dril ls
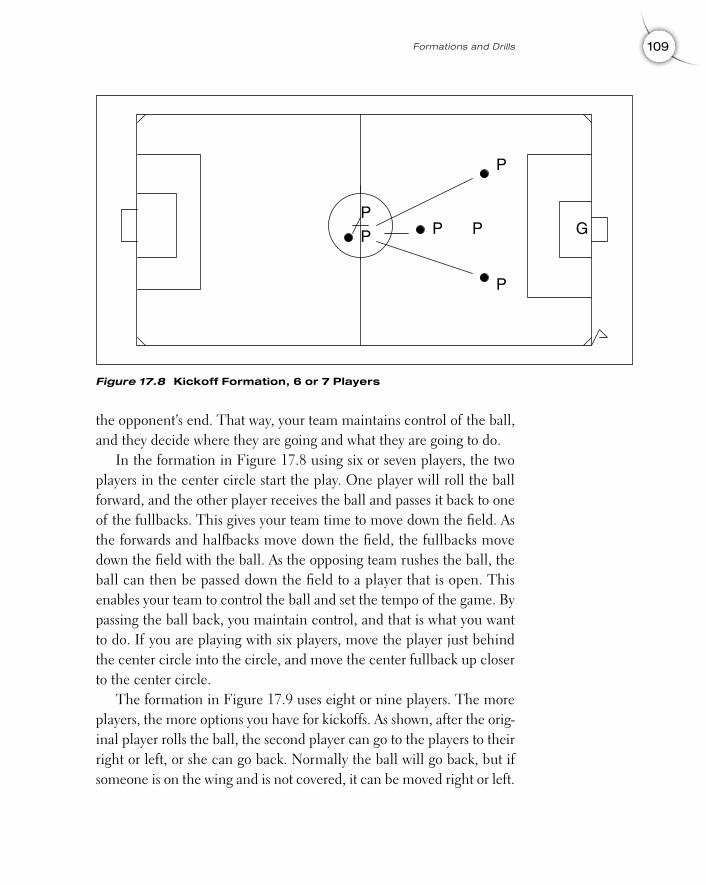
the opponent’s end. That way, your team maintains control of the ball,and they decide where they are going and what they are going to do.
In the formation in Figure 17.8 using six or seven players, the twoplayers in the center circle start the play. One player will roll the ballforward, and the other player receives the ball and passes it back to oneof the fullbacks. This gives your team time to move down the field. Asthe forwards and halfbacks move down the field, the fullbacks movedown the field with the ball. As the opposing team rushes the ball, theball can then be passed down the field to a player that is open. Thisenables your team to control the ball and set the tempo of the game. Bypassing the ball back, you maintain control, and that is what you wantto do. If you are playing with six players, move the player just behindthe center circle into the circle, and move the center fullback up closerto the center circle.
The formation in Figure 17.9 uses eight or nine players. The moreplayers, the more options you have for kickoffs. As shown, after the orig-inal player rolls the ball, the second player can go to the players to theirright or left, or she can go back. Normally the ball will go back, but ifsomeone is on the wing and is not covered, it can be moved right or left.
109Formations and Drills
PPP
P
P
P G
Figure 17.8 Kickoff Formation, 6 or 7 Players
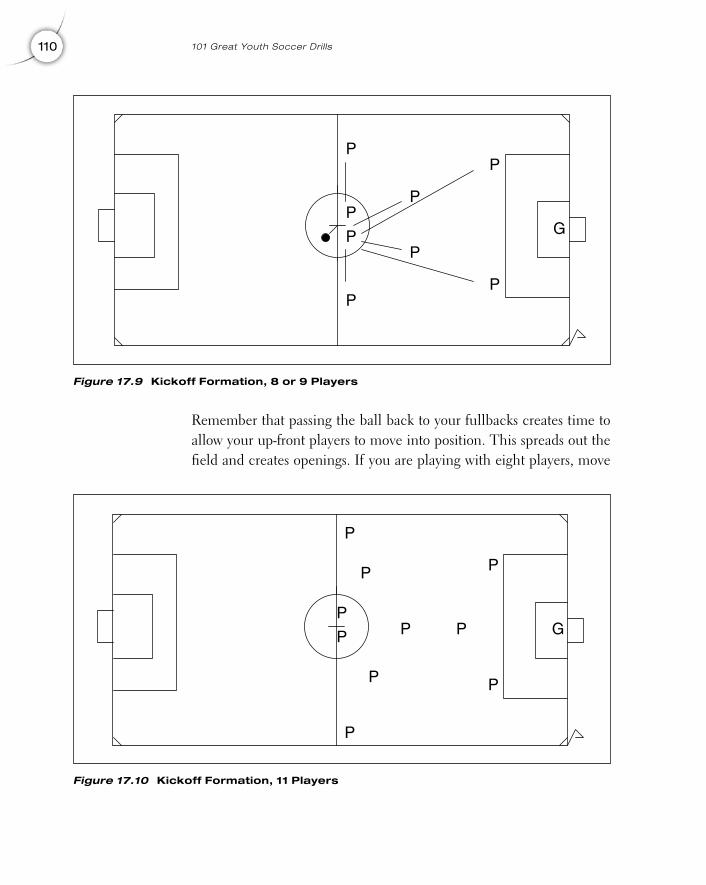
Remember that passing the ball back to your fullbacks creates time toallow your up-front players to move into position. This spreads out thefield and creates openings. If you are playing with eight players, move
110 101 Great Youth Soccer Dril ls
P
P
P
P
P
P
P
P
G
Figure 17.9 Kickoff Formation, 8 or 9 Players
P
P
P
P
P
P P
P
P
P G
Figure 17.10 Kickoff Formation, 11 Players
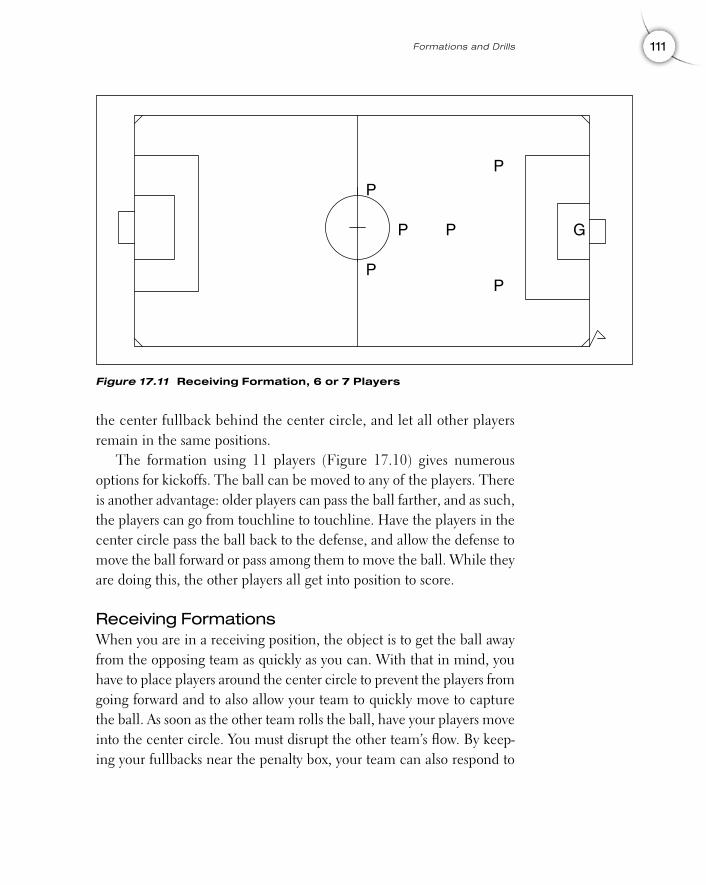
the center fullback behind the center circle, and let all other playersremain in the same positions.
The formation using 11 players (Figure 17.10) gives numerousoptions for kickoffs. The ball can be moved to any of the players. Thereis another advantage: older players can pass the ball farther, and as such,the players can go from touchline to touchline. Have the players in thecenter circle pass the ball back to the defense, and allow the defense tomove the ball forward or pass among them to move the ball. While theyare doing this, the other players all get into position to score.
Receiving FormationsWhen you are in a receiving position, the object is to get the ball awayfrom the opposing team as quickly as you can. With that in mind, youhave to place players around the center circle to prevent the players fromgoing forward and to also allow your team to quickly move to capturethe ball. As soon as the other team rolls the ball, have your players moveinto the center circle. You must disrupt the other team’s flow. By keep-ing your fullbacks near the penalty box, your team can also respond to
111Formations and Drills
P
P
P
P
P
P G
Figure 17.11 Receiving Formation, 6 or 7 Players
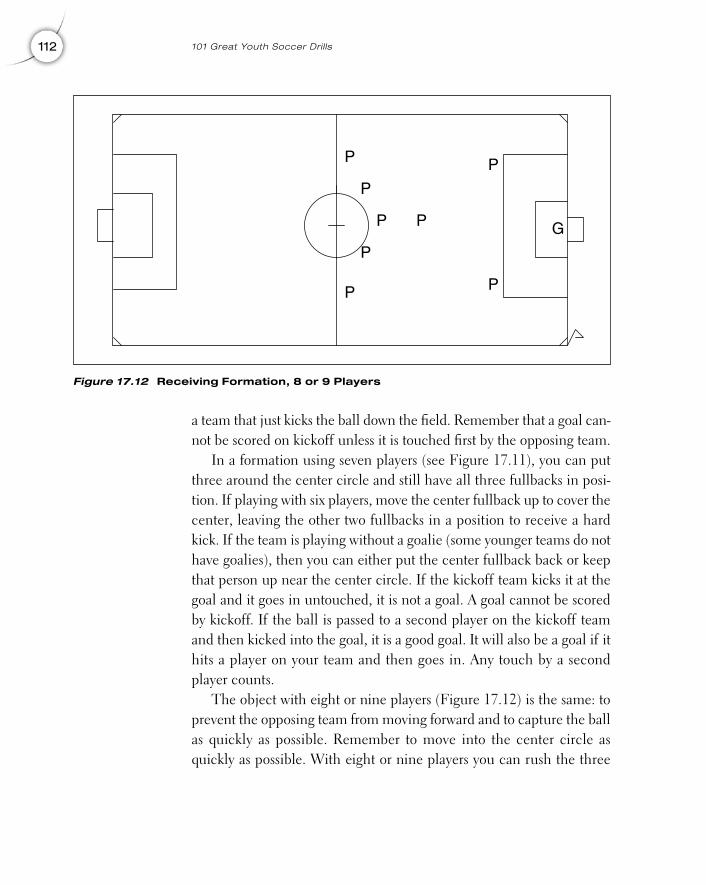
a team that just kicks the ball down the field. Remember that a goal can-not be scored on kickoff unless it is touched first by the opposing team.
In a formation using seven players (see Figure 17.11), you can putthree around the center circle and still have all three fullbacks in posi-tion. If playing with six players, move the center fullback up to cover thecenter, leaving the other two fullbacks in a position to receive a hardkick. If the team is playing without a goalie (some younger teams do nothave goalies), then you can either put the center fullback back or keepthat person up near the center circle. If the kickoff team kicks it at thegoal and it goes in untouched, it is not a goal. A goal cannot be scoredby kickoff. If the ball is passed to a second player on the kickoff teamand then kicked into the goal, it is a good goal. It will also be a goal if ithits a player on your team and then goes in. Any touch by a secondplayer counts.
The object with eight or nine players (Figure 17.12) is the same: toprevent the opposing team from moving forward and to capture the ballas quickly as possible. Remember to move into the center circle asquickly as possible. With eight or nine players you can rush the three
112 101 Great Youth Soccer Dril ls
P
P
P
P
P
P
P
P G
Figure 17.12 Receiving Formation, 8 or 9 Players
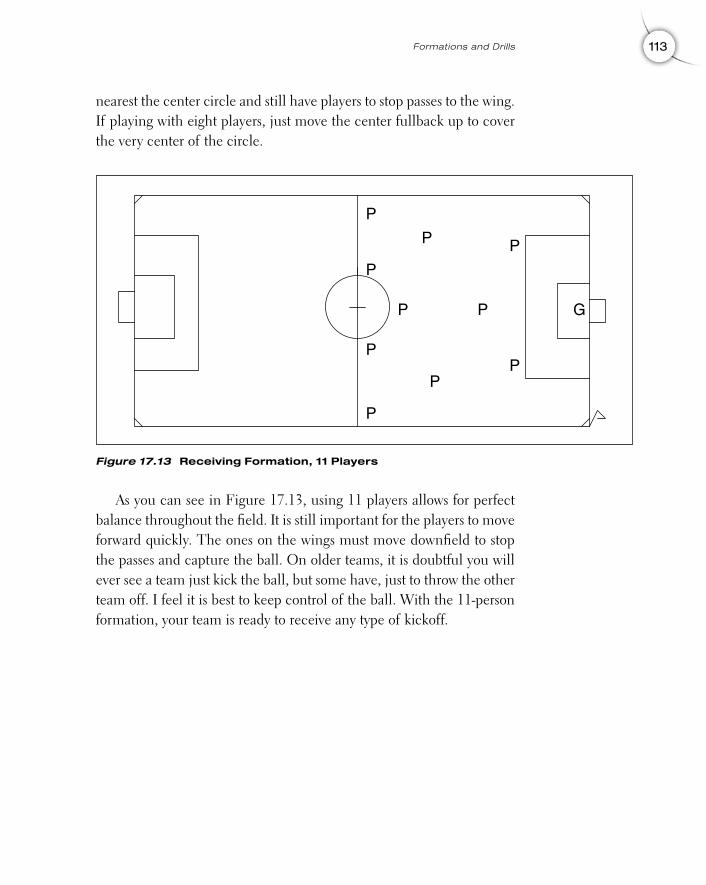
nearest the center circle and still have players to stop passes to the wing.If playing with eight players, just move the center fullback up to coverthe very center of the circle.
As you can see in Figure 17.13, using 11 players allows for perfectbalance throughout the field. It is still important for the players to moveforward quickly. The ones on the wings must move downfield to stopthe passes and capture the ball. On older teams, it is doubtful you willever see a team just kick the ball, but some have, just to throw the otherteam off. I feel it is best to keep control of the ball. With the 11-personformation, your team is ready to receive any type of kickoff.
113Formations and Drills
P
P
P
P
P
P
P
P
P
P G
Figure 17.13 Receiving Formation, 11 Players

This page intentionally left blank.
18
115
Special Formationsand Drills
There are a few different plays that require a specially designed forma-tion. Your team will have to do the following:
• Goal kick
• Corner kick
• Direct kick
• Indirect kick
• Penalty kick
• Goalkeeper kick or throw
Having your team prepared to perform these actions and to defendthese actions is important. It can often make the difference between win-ning and losing. It is necessary to run practice drills using the forma-tions for offense and defense. These can be done when you are runningcentering drills, or support drills, or even kickoff and receiving drills.When the specific situation occurs, stop play and do the formation as adrill. If it doesn’t work, stop play and repeat. Make sure that your play-ers are in the correct positions and have the proper balance and supportat all times.
Copyright © 2005 by Robert Koger. Click here for terms of use.
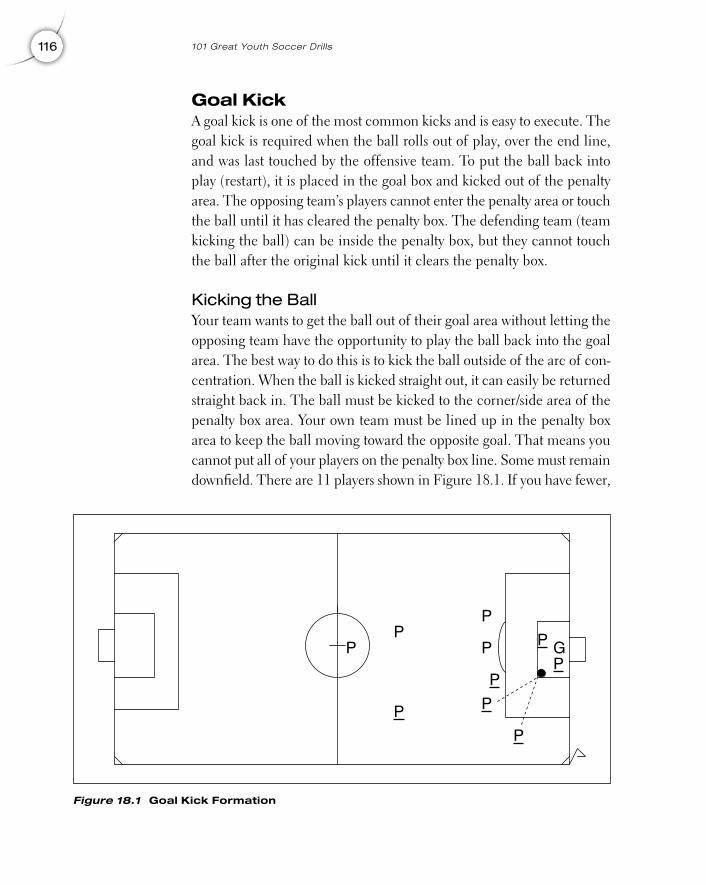
Goal KickA goal kick is one of the most common kicks and is easy to execute. Thegoal kick is required when the ball rolls out of play, over the end line,and was last touched by the offensive team. To put the ball back intoplay (restart), it is placed in the goal box and kicked out of the penaltyarea. The opposing team’s players cannot enter the penalty area or touchthe ball until it has cleared the penalty box. The defending team (teamkicking the ball) can be inside the penalty box, but they cannot touchthe ball after the original kick until it clears the penalty box.
Kicking the BallYour team wants to get the ball out of their goal area without letting theopposing team have the opportunity to play the ball back into the goalarea. The best way to do this is to kick the ball outside of the arc of con-centration. When the ball is kicked straight out, it can easily be returnedstraight back in. The ball must be kicked to the corner/side area of thepenalty box area. Your own team must be lined up in the penalty boxarea to keep the ball moving toward the opposite goal. That means youcannot put all of your players on the penalty box line. Some must remaindownfield. There are 11 players shown in Figure 18.1. If you have fewer,
116 101 Great Youth Soccer Dril ls
P
P
P
PP
P
P
P
PP G
Figure 18.1 Goal Kick Formation
18 (115-126) chapter 18 3/15/05 10:21 AM Page 116
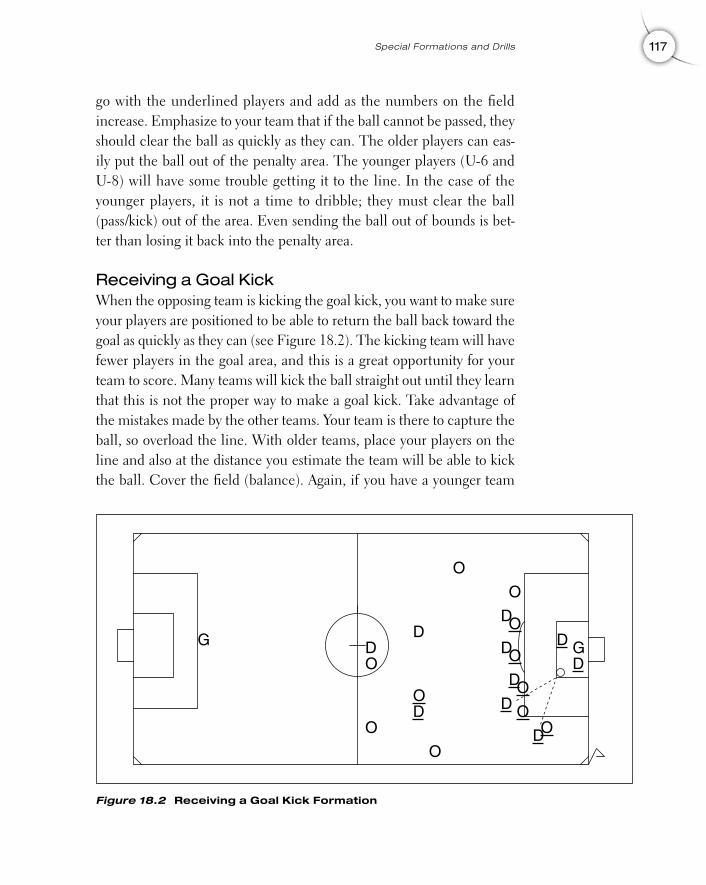
go with the underlined players and add as the numbers on the fieldincrease. Emphasize to your team that if the ball cannot be passed, theyshould clear the ball as quickly as they can. The older players can eas-ily put the ball out of the penalty area. The younger players (U-6 andU-8) will have some trouble getting it to the line. In the case of theyounger players, it is not a time to dribble; they must clear the ball(pass/kick) out of the area. Even sending the ball out of bounds is bet-ter than losing it back into the penalty area.
Receiving a Goal KickWhen the opposing team is kicking the goal kick, you want to make sureyour players are positioned to be able to return the ball back toward thegoal as quickly as they can (see Figure 18.2). The kicking team will havefewer players in the goal area, and this is a great opportunity for yourteam to score. Many teams will kick the ball straight out until they learnthat this is not the proper way to make a goal kick. Take advantage ofthe mistakes made by the other teams. Your team is there to capture theball, so overload the line. With older teams, place your players on theline and also at the distance you estimate the team will be able to kickthe ball. Cover the field (balance). Again, if you have a younger team
117Special Formations and Drills
D
D
D
DD
D
D
D
DD G
O
O
O
O
O
O
O
O
O
O
O
G
Figure 18.2 Receiving a Goal Kick Formation
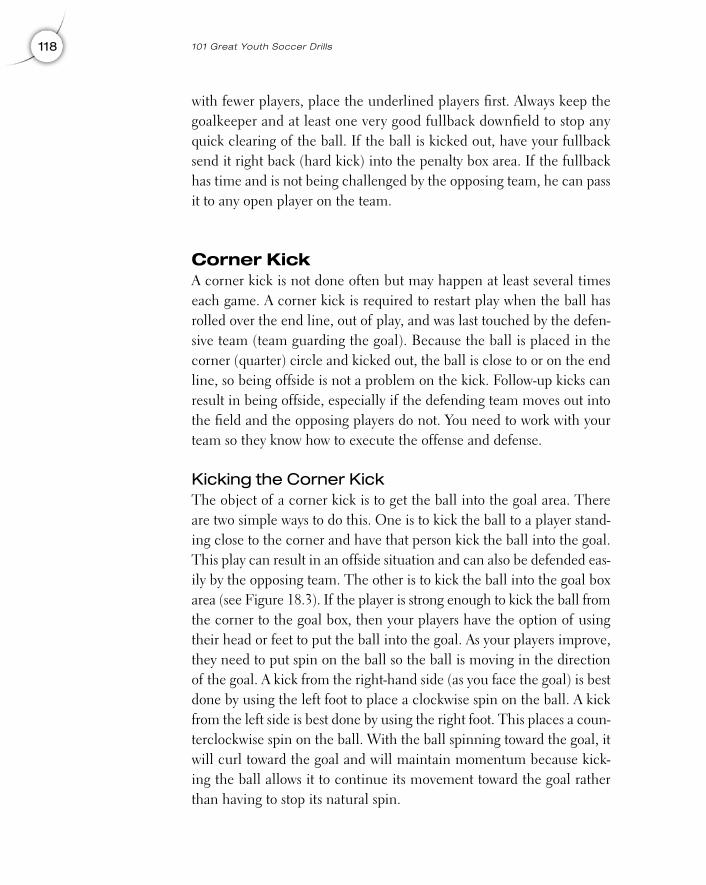
with fewer players, place the underlined players first. Always keep thegoalkeeper and at least one very good fullback downfield to stop anyquick clearing of the ball. If the ball is kicked out, have your fullbacksend it right back (hard kick) into the penalty box area. If the fullbackhas time and is not being challenged by the opposing team, he can passit to any open player on the team.
Corner KickA corner kick is not done often but may happen at least several timeseach game. A corner kick is required to restart play when the ball hasrolled over the end line, out of play, and was last touched by the defen-sive team (team guarding the goal). Because the ball is placed in thecorner (quarter) circle and kicked out, the ball is close to or on the endline, so being offside is not a problem on the kick. Follow-up kicks canresult in being offside, especially if the defending team moves out intothe field and the opposing players do not. You need to work with yourteam so they know how to execute the offense and defense.
Kicking the Corner KickThe object of a corner kick is to get the ball into the goal area. Thereare two simple ways to do this. One is to kick the ball to a player stand-ing close to the corner and have that person kick the ball into the goal.This play can result in an offside situation and can also be defended eas-ily by the opposing team. The other is to kick the ball into the goal boxarea (see Figure 18.3). If the player is strong enough to kick the ball fromthe corner to the goal box, then your players have the option of usingtheir head or feet to put the ball into the goal. As your players improve,they need to put spin on the ball so the ball is moving in the directionof the goal. A kick from the right-hand side (as you face the goal) is bestdone by using the left foot to place a clockwise spin on the ball. A kickfrom the left side is best done by using the right foot. This places a coun-terclockwise spin on the ball. With the ball spinning toward the goal, itwill curl toward the goal and will maintain momentum because kick-ing the ball allows it to continue its movement toward the goal ratherthan having to stop its natural spin.
118 101 Great Youth Soccer Dril ls
To put spin on the ball, have your player kick low on the ball and leftor right of center, depending upon which spin you want. If the player iskicking from the right-hand side using her left foot, she will kick on theleft-hand side of the ball, propelling her foot through the kick. If she iskicking on the left side, she will use her right foot and kick right of cen-ter on the ball. By leaning back when she kicks, she will cause the ballto rise. Balancing the body over the ball keeps the ball low and on theground.
Defending the Corner KickDefending the corner kick is just a matter of covering all of the playerson the opposing team. This is like man-to-man positioning. Your play-ers must be in front of the other players to ensure they do not get theball. You also need to post a player at the edge of the penalty box to stopany kick that is on the ground, going toward the goal. If any of your play-ers get the ball, they need to clear the ball to the outside (outside thearc of concentration). They should try to put the ball into the area onFigure 18.4 that has hash marks. This is the safe area. Once the ball iscleared, your team can move to the ball in offense or regroup in for-
119Special Formations and Drills
P
P
P
P
P
PP
P
P
P
G
Figure 18.3 Corner Kick Formation
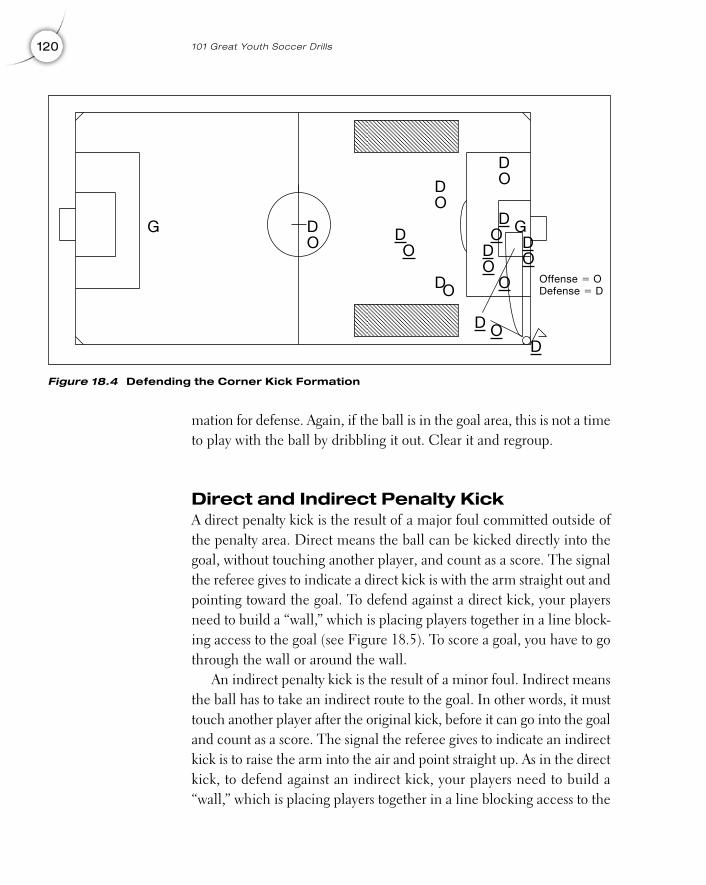
mation for defense. Again, if the ball is in the goal area, this is not a timeto play with the ball by dribbling it out. Clear it and regroup.
Direct and Indirect Penalty KickA direct penalty kick is the result of a major foul committed outside ofthe penalty area. Direct means the ball can be kicked directly into thegoal, without touching another player, and count as a score. The signalthe referee gives to indicate a direct kick is with the arm straight out andpointing toward the goal. To defend against a direct kick, your playersneed to build a “wall,” which is placing players together in a line block-ing access to the goal (see Figure 18.5). To score a goal, you have to gothrough the wall or around the wall.
An indirect penalty kick is the result of a minor foul. Indirect meansthe ball has to take an indirect route to the goal. In other words, it musttouch another player after the original kick, before it can go into the goaland count as a score. The signal the referee gives to indicate an indirectkick is to raise the arm into the air and point straight up. As in the directkick, to defend against an indirect kick, your players need to build a“wall,” which is placing players together in a line blocking access to the
120 101 Great Youth Soccer Dril ls
D
D
D
D
D
DD
D
D
D
G
O
O
O
O
O O
O
O
O
O
G
Figure 18.4 Defending the Corner Kick Formation
Offense � ODefense � D
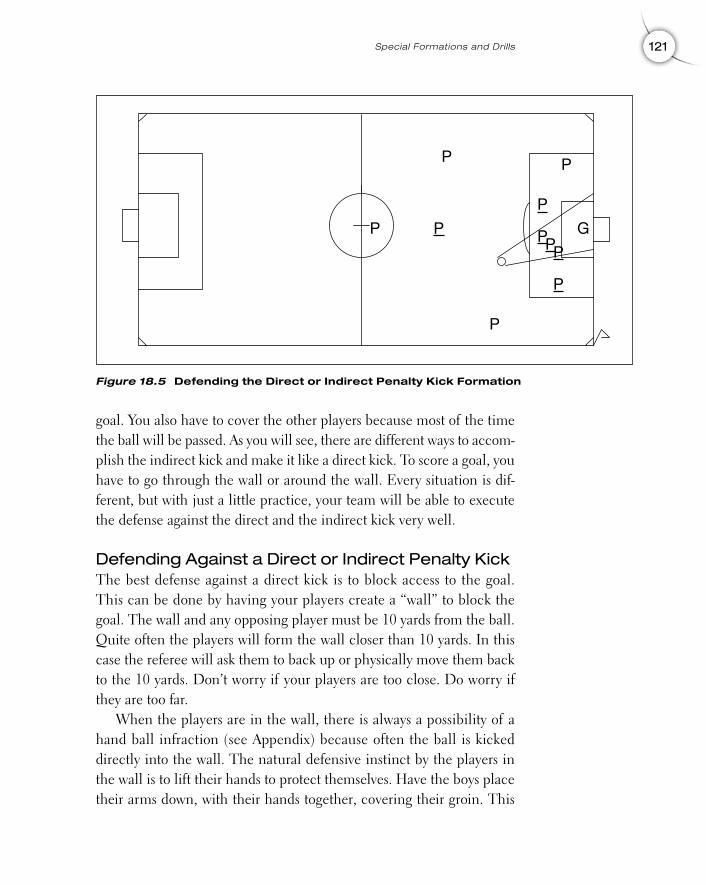
goal. You also have to cover the other players because most of the timethe ball will be passed. As you will see, there are different ways to accom-plish the indirect kick and make it like a direct kick. To score a goal, youhave to go through the wall or around the wall. Every situation is dif-ferent, but with just a little practice, your team will be able to executethe defense against the direct and the indirect kick very well.
Defending Against a Direct or Indirect Penalty KickThe best defense against a direct kick is to block access to the goal.This can be done by having your players create a “wall” to block thegoal. The wall and any opposing player must be 10 yards from the ball.Quite often the players will form the wall closer than 10 yards. In thiscase the referee will ask them to back up or physically move them backto the 10 yards. Don’t worry if your players are too close. Do worry ifthey are too far.
When the players are in the wall, there is always a possibility of ahand ball infraction (see Appendix) because often the ball is kickeddirectly into the wall. The natural defensive instinct by the players inthe wall is to lift their hands to protect themselves. Have the boys placetheir arms down, with their hands together, covering their groin. This
121Special Formations and Drills
P
P
P
P P
PPPP
P
G
Figure 18.5 Defending the Direct or Indirect Penalty Kick Formation
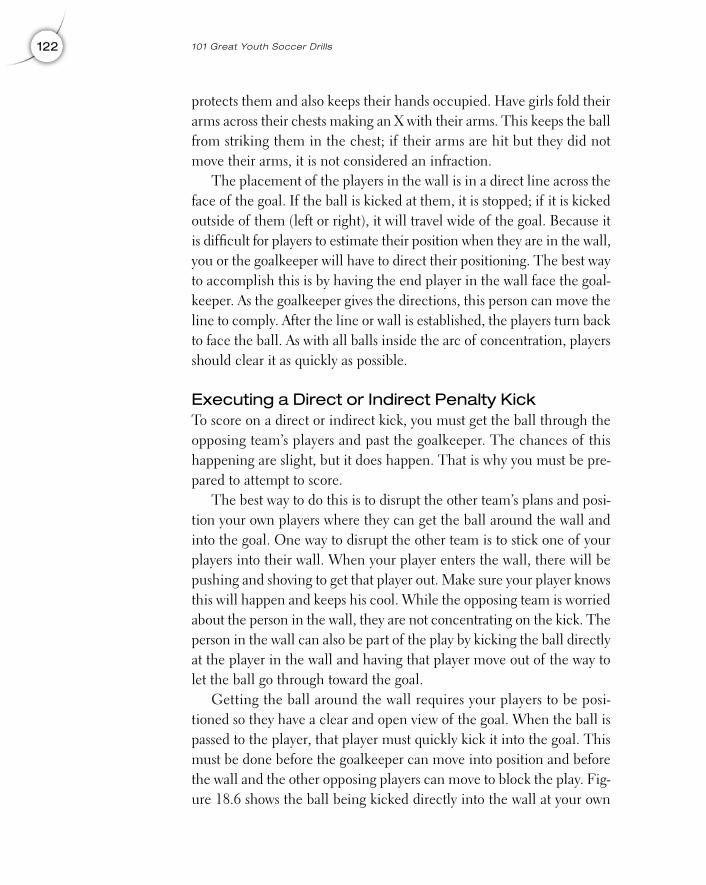
protects them and also keeps their hands occupied. Have girls fold theirarms across their chests making an X with their arms. This keeps the ballfrom striking them in the chest; if their arms are hit but they did notmove their arms, it is not considered an infraction.
The placement of the players in the wall is in a direct line across theface of the goal. If the ball is kicked at them, it is stopped; if it is kickedoutside of them (left or right), it will travel wide of the goal. Because itis difficult for players to estimate their position when they are in the wall,you or the goalkeeper will have to direct their positioning. The best wayto accomplish this is by having the end player in the wall face the goal-keeper. As the goalkeeper gives the directions, this person can move theline to comply. After the line or wall is established, the players turn backto face the ball. As with all balls inside the arc of concentration, playersshould clear it as quickly as possible.
Executing a Direct or Indirect Penalty KickTo score on a direct or indirect kick, you must get the ball through theopposing team’s players and past the goalkeeper. The chances of thishappening are slight, but it does happen. That is why you must be pre-pared to attempt to score.
The best way to do this is to disrupt the other team’s plans and posi-tion your own players where they can get the ball around the wall andinto the goal. One way to disrupt the other team is to stick one of yourplayers into their wall. When your player enters the wall, there will bepushing and shoving to get that player out. Make sure your player knowsthis will happen and keeps his cool. While the opposing team is worriedabout the person in the wall, they are not concentrating on the kick. Theperson in the wall can also be part of the play by kicking the ball directlyat the player in the wall and having that player move out of the way tolet the ball go through toward the goal.
Getting the ball around the wall requires your players to be posi-tioned so they have a clear and open view of the goal. When the ball ispassed to the player, that player must quickly kick it into the goal. Thismust be done before the goalkeeper can move into position and beforethe wall and the other opposing players can move to block the play. Fig-ure 18.6 shows the ball being kicked directly into the wall at your own
122 101 Great Youth Soccer Dril ls
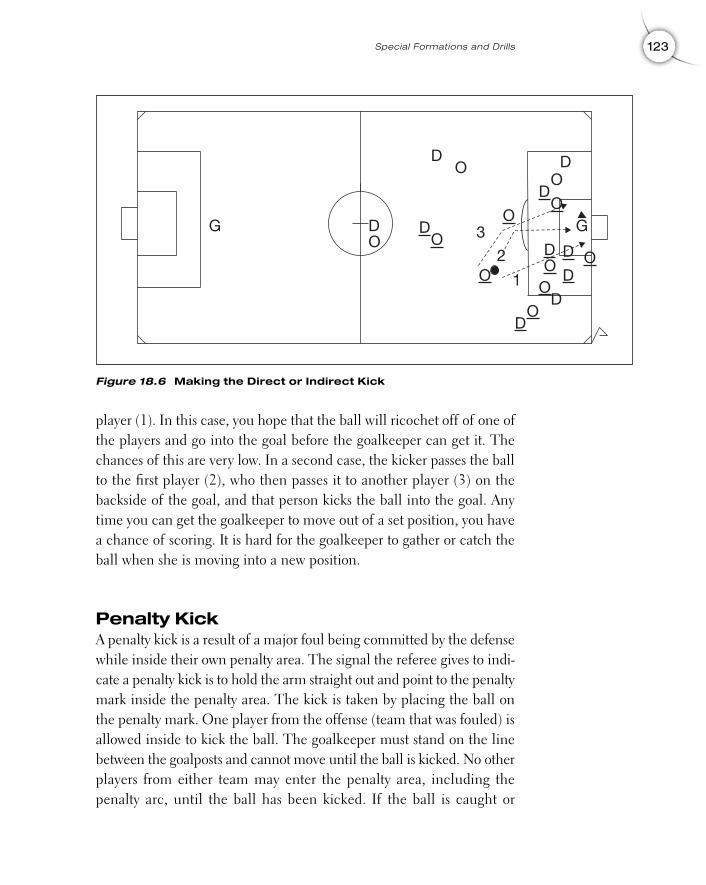
player (1). In this case, you hope that the ball will ricochet off of one ofthe players and go into the goal before the goalkeeper can get it. Thechances of this are very low. In a second case, the kicker passes the ballto the first player (2), who then passes it to another player (3) on thebackside of the goal, and that person kicks the ball into the goal. Anytime you can get the goalkeeper to move out of a set position, you havea chance of scoring. It is hard for the goalkeeper to gather or catch theball when she is moving into a new position.
Penalty KickA penalty kick is a result of a major foul being committed by the defensewhile inside their own penalty area. The signal the referee gives to indi-cate a penalty kick is to hold the arm straight out and point to the penaltymark inside the penalty area. The kick is taken by placing the ball onthe penalty mark. One player from the offense (team that was fouled) isallowed inside to kick the ball. The goalkeeper must stand on the linebetween the goalposts and cannot move until the ball is kicked. No otherplayers from either team may enter the penalty area, including thepenalty arc, until the ball has been kicked. If the ball is caught or
123Special Formations and Drills
D
D
D D
DD
D
D
D
GO
O
O
O
O O
O
O
O
G
DO 1
O3
2
Figure 18.6 Making the Direct or Indirect Kick
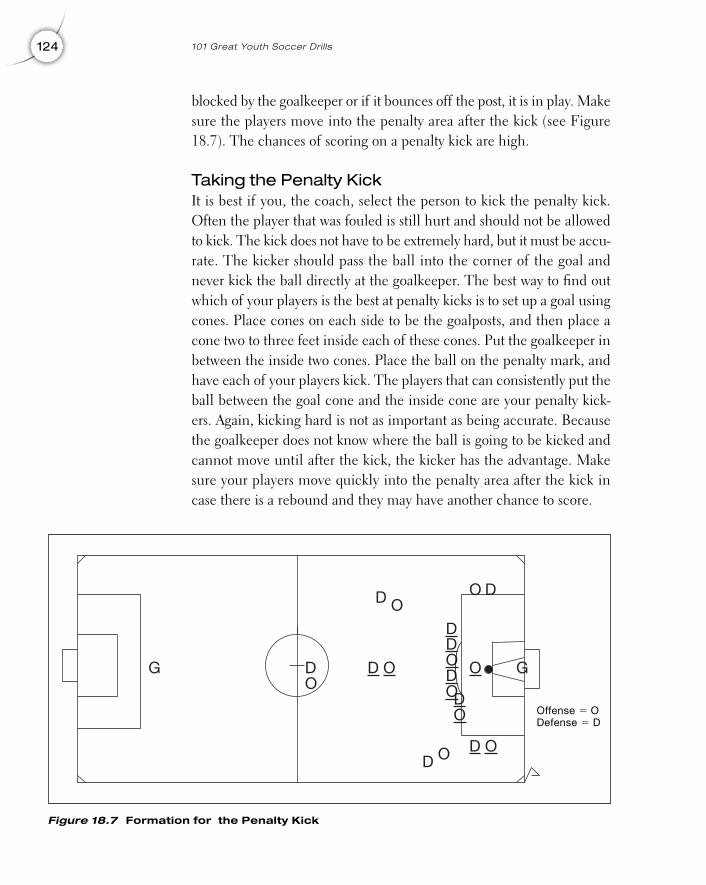
blocked by the goalkeeper or if it bounces off the post, it is in play. Makesure the players move into the penalty area after the kick (see Figure18.7). The chances of scoring on a penalty kick are high.
Taking the Penalty KickIt is best if you, the coach, select the person to kick the penalty kick.Often the player that was fouled is still hurt and should not be allowedto kick. The kick does not have to be extremely hard, but it must be accu-rate. The kicker should pass the ball into the corner of the goal andnever kick the ball directly at the goalkeeper. The best way to find outwhich of your players is the best at penalty kicks is to set up a goal usingcones. Place cones on each side to be the goalposts, and then place acone two to three feet inside each of these cones. Put the goalkeeper inbetween the inside two cones. Place the ball on the penalty mark, andhave each of your players kick. The players that can consistently put theball between the goal cone and the inside cone are your penalty kick-ers. Again, kicking hard is not as important as being accurate. Becausethe goalkeeper does not know where the ball is going to be kicked andcannot move until after the kick, the kicker has the advantage. Makesure your players move quickly into the penalty area after the kick incase there is a rebound and they may have another chance to score.
124 101 Great Youth Soccer Dril ls
D
D
D
D D
D D
D
D
D
GOOO
O
O
O
O
O
O
O
G
Figure 18.7 Formation for the Penalty Kick
Offense � ODefense � D
Defending the Penalty KickThere is very little defense against the penalty kick. If the kicker doesnot score, it is normally because he missed the goal completely. Thegoalkeeper will occasionally block a penalty kick, but that won’t happenoften. To prepare your goalkeeper for penalty kicks, make sure the goal-keeper watches the ball. The goalkeeper is given the time to set up inthe goal; only when the goalkeeper tells the referee she is ready will theopposing team be allowed to kick. You can have your goalkeeper do oneof two things to defend against the penalty kick. One is to just pick a sideand dive in that direction when the ball is kicked. She has a 50-50chance this way. The other possibility is to wait until the ball is kickedand then move in that direction. I prefer the second option, just in casethe ball is kicked straight at the goalkeeper and can be blocked. Again,make sure your players are on the line and ready to go get the ball andclear it from the goal area if it is blocked or bounces off of the goalpost.
Goalkeeper Kick or ThrowWhen the goalkeeper makes a save and has the ball, he must put it backinto play. The goalkeeper can either kick or throw the ball to his ownteammates. Until the goalkeeper is strong enough to ensure the ballclears the penalty box, it is best to just get the ball outside of the arc ofconcentration.
Kicking or ThrowingWhen the goalkeeper gets the ball, she needs to slow down and let herown teammates move into position. Too often, the goalkeeper will getthe ball and kick it as quickly as possible. That is not good. The goal-keeper needs to hold the ball and tell or motion to (or both) the playersto move out to their positions. When they are in position, the goalkeepercan kick or throw the ball. The advantage of the kick is it normally goesmuch farther than a throw, but the disadvantage is that sometimes it isnot very accurate. The advantage of a throw is that it can be very accu-rate for short distances. If the other team is not covering one of the full-backs, the goalkeeper can throw the ball to that fullback, who can startmoving the ball on offense. Remember that the goalkeeper can take
125Special Formations and Drills
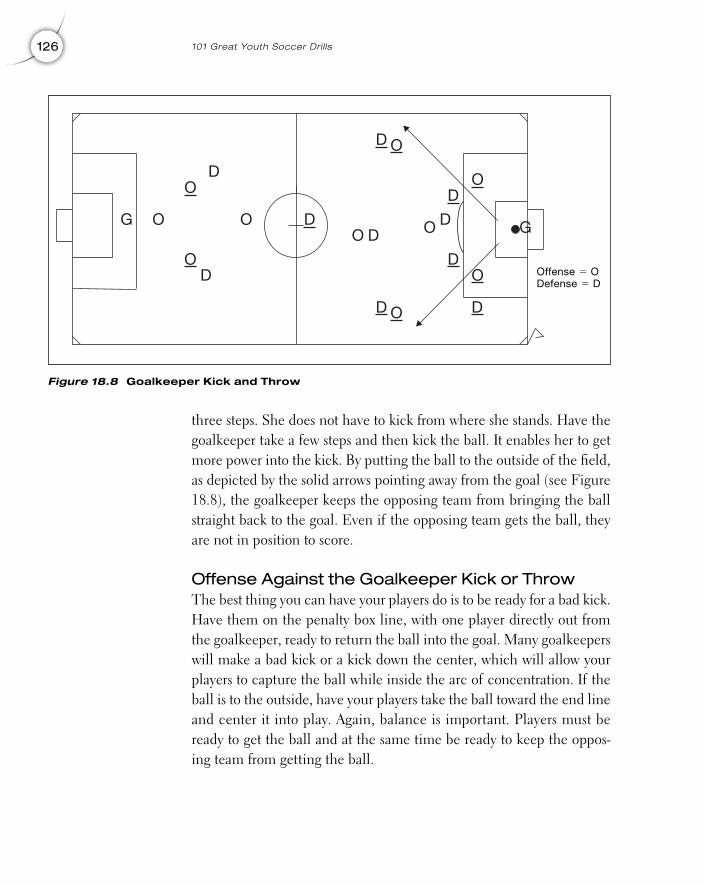
three steps. She does not have to kick from where she stands. Have thegoalkeeper take a few steps and then kick the ball. It enables her to getmore power into the kick. By putting the ball to the outside of the field,as depicted by the solid arrows pointing away from the goal (see Figure18.8), the goalkeeper keeps the opposing team from bringing the ballstraight back to the goal. Even if the opposing team gets the ball, theyare not in position to score.
Offense Against the Goalkeeper Kick or ThrowThe best thing you can have your players do is to be ready for a bad kick.Have them on the penalty box line, with one player directly out fromthe goalkeeper, ready to return the ball into the goal. Many goalkeeperswill make a bad kick or a kick down the center, which will allow yourplayers to capture the ball while inside the arc of concentration. If theball is to the outside, have your players take the ball toward the end lineand center it into play. Again, balance is important. Players must beready to get the ball and at the same time be ready to keep the oppos-ing team from getting the ball.
126 101 Great Youth Soccer Dril ls
D
D
D
D
D
D
D
D
D
D G
O
O
O
OO
O
O
O
O OG
Figure 18.8 Goalkeeper Kick and Throw
Offense � ODefense � D
127
AppendixGlossary of Soccer Terms
A ll of the terms used in this glossary are defined related to how theyapply to the game of soccer.
Advantage rule (law). A soccer law enabling a person or team to continueplay after a foul was committed by the opposing team. The foul is notcalled if doing so would take the advantage away from the person orteam in possession of the ball.
Alignment. How the players are arranged on the field. They must providebalance.
Arc of concentration. An area extending from the goalpost through thecorner of the goal box and penalty area box and extending out to thetouchline. This is the area where most goals are scored. The defense triesto keep the ball out of this area.
Assist. The action (usually a pass) that precedes the scoring of a goal. Theplayer that assisted the player that scored.
Copyright © 2005 by Robert Koger. Click here for terms of use.
Assistant referee (linesman/flagger). The person that assists the refereeby controlling the touchline and looking for offside infractions. Thisperson has a flag that is raised (and snapped, so as to be heard as well asseen) when an infraction occurs.
Attack. An attempt to score while having possession of the ball. This canbe by person or team.
Attacker. Any player on the team that has possession of the ball.
Back. A defensive player.
Balance. How the team addresses the other team’s players—in other words,how they play in relation to the person with the ball.
Ball. The soccer ball comes in three sizes: number 3, 4, and 5. Size of theball used is dependent upon the age of the player. Official balls are whiteand black pentagon-shaped patches sewn together.
Beat. Getting past a player.
Bicycle kick. A specialty kick done by advanced players. The player bringsthe feet into the air and has both feet off the ground. The kick is madeby bringing the feet forward, over the head, and striking the ball with thefoot while the player is upside down and in the air.
Blind side. The area behind a player.
Bounce. When the ball hits the ground and rebounds back into the air.
Boundary lines. The lines on the field that mark the outer perimeter ofthe playing area. The boundary lines are a maximum of five inches wide.
Breakaway (break). When a player moves on goal undefended, creating aone-on-one situation with the goalkeeper.
Bylaws. The rules and regulations used by the soccer leagues to establishlocal policy.
Center. To kick the ball from the side of the field to the center of the field.This is done while in the vicinity of the opponent’s goal. This gets theball into the arc of concentration, which increases the scoring potential.
128 Appendix
Center circle. The area in the center of the field used for starting play.This is done at the beginning of the game and at the beginning of thesecond half. It is also used to start play after a team scores. The opposingteam cannot enter the center circle until the ball has been played by thekickoff team. The maximum size of the center circle is 10 yards from thecenter to the outside of the circle.
Center pass. Passing the ball from the outside to the center of the field.
Center spot. A mark (circle or X) in the center of the center circle. This iswhere the ball is placed for kickoffs to start or restart play.
Charge. Rushing a player and hitting the other player by using your body.This is a foul.
Chest trap. When the ball bounces off the chest and falls to the player’sfeet so that player can play the ball.
Chip. When the ball is kicked into the air as a pass or shot just hard enoughto go over the head of the opponent.
Clear. Remove. To clear the ball means to get the ball and remove the ballfrom that area as quickly as possible.
Coach. The person in charge of training the players and conducting theplayers during games.
Cone. A plastic device that has a larger bottom than top and is used as anaid to mark specific areas. Often they are a bright color such as orange.
Corner arc. A quarter circle that is located on each corner of the field. Theball is placed in this area to restart play after the ball was kicked over theend line by the defending team.
Corner flag. A flag on a pole that is placed on the exact corner of the fieldto enable the players to see the maximum boundary of the field from adistance. It should be a minimum of five feet tall.
Corner kick. The method to restart play after the ball has crossed over theend line, going out of play, and was last touched by the defensive team
129Glossary of Soccer Terms
(team guarding the goal). The offensive team puts the ball into play bykicking it out of the quarter circle.
Cover. A defensive position where the player stays close to the opponent.
Cross. To send the ball from the outside of the field to directly in front ofthe goal.
Crossbar. The top post of the goal. It is always painted white.
Dangerous play. Any action on the field by a player, that could result ininjury to another player.
Defender. The person that has the primary role of defending the goal.
Defense. The act of protecting the goal and preventing the opposing teamfrom scoring.
Deflection. When the ball hits and bounces off of another player.
Depart. When a player leaves the field. No player may enter or depart thefield without official referee permission.
Depth. The placement of players while in formation. Good depth is whenthe players are evenly dispersed from one end of the field to the other.
Depth (field). The length of the field from end line to end line.
Direct kick. The type of kick used after a major foul is committed. This isindicated by the referee pointing the arm directly toward the goal. Theball can be kicked directly to the goal. If the ball enters the goal, itcounts as a score.
Draw. A game ending in a tied score.
Dribble. Moving the soccer ball, using your feet, while maintaining controlof the ball.
Drills. The practice necessary to become skillful in soccer.
Drop ball. Used to restart the game. The referee drops the ball betweentwo players. They cannot kick the ball until it has reached the ground.
Drop kick. When a goalkeeper drops the ball and kicks it after a bounce.
130 Appendix
End line. The line at each end of the field. The boundary of the fieldlength. It is also referred to as the goal line.
Enter. When a player comes onto the field. Must be during a restart (throw-in or goal kick) and must be with the permission of the referee. Noplayer may enter or depart the field without official referee permission.
Equipment. The items needed by the coach or player to practice or playthe game of soccer.
Far post. The goalpost that is the farthest from the ball.
Fast break. Advancing the ball down the field before the defense canrespond.
Field. The area marked to enable teams to play the game of soccer.International games are played on fields 110 to 120 yards by 70 to 80yards.
Field players. All players, except the goalkeeper.
Field the ball. To play the ball.
FIFA. Federation Internationale de Futbol Association. The officialgoverning body for international soccer play and law.
Flagger (linesman/assistant referee). The person that assists the refereeby controlling the touchline and looking for offside infractions. Thisperson has a flag that is raised (and snapped to make a sound that thereferee can hear) when an infraction occurs.
Flank. The outside of the field (wing) closest to the touchline.
Foot trap. Stopping the ball using your foot.
Formation. The placement of the players on the field. Formations arelabeled by where players are positioned on the field. They are alwayscounted starting with the fullbacks. The goalkeeper is not included inthe count, and the count will never exceed a maximum of 10. Forexample, a 4-3-3 formation means 4 fullbacks, 3 midfielders, and 3forwards for a total of 10 players.
131Glossary of Soccer Terms
Forward. The player that has the primary duty of scoring and in theformation is the closest to the opponent’s goal.
Forward pass. Passing the ball down the field toward the opponent’s goal.
Foul. An infraction of the rules. There are two types of fouls: major andminor.
Free kick. Any kick awarded to a team as the result of a foul.
Futbol. The official (and most-used) name for the game of soccer in everycountry except the United States and Canada.
Game clock. The official elapsed time of the game. The official time iskept by the referee.
Goal. The area at each end of the field that has a maximum width of eightyards, a maximum depth of six yards, and a maximum height of eightfeet. The front edge of the goal is directly on the end line (goal line).The back of the goal is covered by a net to stop the ball when it entersthe goal.
Goal box. The marked area directly in front of the goal. It is a maximumof 20 yards wide and 6 yards deep.
Goal kick. The method used to restart play after the ball has traveled overthe end line, out of play, and was last touched by the offensive team(team trying to score). The defensive team places the ball in the goal boxand kicks it out of the penalty box.
Goal line. The end line that marks the boundaries at each end of the field.
Goal scored. When the ball travels into the boundaries of the goal (mustbe completely over the goal line to be a goal). This means it is a score.Each score counts as one point.
Goal side. A term most commonly used by the defense, when their backsare to the goal. They want to keep themselves between the offensiveplayer and the goal. The proper defensive position is facing the offensiveplayer with the defensive player’s back to the goal. They are said to beplaying or staying goal side.
132 Appendix
Goalkeeper (goalie). The player that stops the ball from traveling into thegoal. This stop is called a save. The goalkeeper is able to use the handswhile inside the penalty area. The goalkeeper must wear a differentjersey to distinguish this player from the other players on the field.
Goalpost. The side bars on the goal. They are always painted white.
Half. The game is split into two halves of equal time. They are divided by aperiod called halftime.
Half line. The line that divides the field into two halves. The center circle ison this line.
Half volley. Kicking the ball after it has bounced on the ground but whileit is in the air. This is done by having the upper leg and knee straight outfrom the body and striking the ball with the foot pointing straight down.This causes the ball to spin forward and curl down.
Halfbacks. The players that are in a position between the fullbacks and theforwards. They are also called midfielders.
Halftime. The period between the first half and the second half of thegame. This period is used to allow the players to receive instructions,rest, and drink liquids. The halftime normally varies from 5 to 15minutes, depending upon the age of the players.
Hand ball. An infraction caused by touching the ball with the hands orarms while it is in the field of play.
Hat trick. A minimum of three goals scored in one game by a singleperson.
Header. When the ball is played (moved or hit) by using the player’s head.
Holding. Grabbing another player by the body or clothing, keeping thatplayer from moving freely.
In bounds. When the ball is inside the boundaries of the field.
In play. When the ball is inside the boundaries of the field and is beingplayed without being stopped by the referee.
133Glossary of Soccer Terms
Indirect kick. Used to denote the type of kick after a minor foul has beencommitted. This kick is denoted by the referee raising the arm straightup. The ball must take an indirect route to the goal. In other words, itmust be touched by another player, after the original kick, before goinginto the goal.
Injury time. When a player is hurt, the game clock is stopped. Time isadded to the game. This is at the discretion of the referee.
Instep. The portion of the foot where the soccer ball is passed. Normallythis is on the inside of each foot.
Jersey (shirt). The garment worn by the player. Each team will have shirtsthat are different colors. The goalkeeper will wear a shirt that is differentfrom the shirts of both teams on the field.
Juggling. The act of bouncing the ball using the feet, thighs, and head.The ball is moved from one point to the other while under control.
Keeper. A short name for the goalkeeper.
Kick. Striking the ball using the foot.
Kickoff. The method used to start a game or restart play after a goal.
Knock off the ball. A technique where the defensive player keeps his armsstraight along his sides and uses pressure to move the offensive player offthe ball. Elbows and arms that are sticking out, or pushes, cannot beused.
Laws. The rules that govern the play and conduct of the soccer game.
Linesman (flagger/assistant referee). The person that assists the refereeby controlling the touchline and looking for offside infractions. Thisperson has a flag that is raised (and snapped to make a sound that thereferee can hear) when an infraction occurs.
Major foul. An infraction of the rules that is dangerous to the players onthe field.
Manager. The person that assists the coach by making calls, doingpaperwork, arranging rides for players, etc.
134 Appendix
Marking. When a player is placed in a position to play one-on-one with anopposing player.
Match. The actual soccer game.
Midfielders. The players that are in a position between the fullbacks andthe forwards. They are also called halfbacks.
Minor foul. An infraction of the rules that does not fall in the dangerousplay category.
Near post. The goalpost closest to the ball.
Net. The covering on the back and sides of the goal. It can be seen throughbut will stop the ball when the ball enters the goal.
Nutmeg. A name used for the act of a player kicking the ball between thelegs of an opposing player. This is usually embarrassing to the personthat had the ball kicked through her legs.
Obstruction. When a player uses his body to get in the way of a personrather than playing the ball. This is a foul.
Offense. The act of moving the ball with the objective of scoring in theopposing team’s goal.
Official. The referee and assistant referees that have responsibility forcontrolling and governing the game.
Offside. When an offensive player does not have one defender (and thegoalkeeper) between her position and the goal, when the ball is kickedby her own teammate.
One touch. Striking the ball upon initial contact. Shooting or passingwithout dribbling.
Open space. Any area on the field where there is no other player.
Opponent. The team you are playing against.
Out of play. When the soccer ball or a person is outside the boundaries ofthe playing field.
135Glossary of Soccer Terms
Overlap. Running past another of your own teammates to advance downthe field and get in position for a pass or shot.
Pass. Moving the soccer ball from one player to another.
Penalty arc. A portion of a circle on the outside center of the penalty area.It is not part of the penalty area, but players must stay outside this areawhen a penalty kick is being made. The players must maintain 10 yardsfrom the kick. This line extends the penalty area line to ensure 10 yardsof spacing.
Penalty area. The area in front of the goal that serves as the boundary forthe goalie to be able to touch the soccer ball using his hands. The widthis a maximum of 44 yards with a maximum depth of 18 yards.
Penalty kick. The method of kick used when a major foul is committedinside of the penalty area by the team defending the goal. The ball isplaced on the penalty mark, and one player from the team fouled(offense) enters the penalty area to kick while only the goalkeeper fromthe defending team is allowed inside the goal area.
Penalty mark. A mark inside of the penalty area where the ball is placedfor a free kick after a direct foul has been committed inside the penaltyarea. It is a maximum of 12 yards from the goal line, placed directly inthe center of the goalposts.
Pitch. A British term used to denote the soccer playing field.
Play on. A term used by the referee to tell players to continue play. This isnormally used in conjunction with the advantage rule.
Player. A person engaged in the game of soccer.
Point. The measure used to denote a goal scored. There is one pointcounted per goal scored.
Possession. When your team or player has the ball.
Practice. The time used to condition the players and teach the players theaspects of the game.
136 Appendix
Quarter circle. The quarter circle mark that is on each corner of the field.The ball is placed in this area to restart play after the ball was kickedover the end line by the defending team.
Rainbow kick. A kick that is accomplished by putting the ball between thefeet, using one foot to roll the ball up the back of the leg and the heel ofthe other foot to kick the ball over the player’s head from behind. Theball travels from the rear of the player to the front, taking the arc madeby a rainbow.
Receiving. The action of gathering or collecting the ball.
Red card. A card, colored red and about the size of a playing card, used bythe referee to inform a player and team that the player is being ejectedfrom the game. This player cannot be replaced by the team, and theteam must play one person short. Two yellow cards for the sameinfraction of the rules equal a red card.
Referee. The person(s) on the field responsible for enforcing the laws ofthe game.
Restart. The term used to denote when the ball is put back into play aftera stoppage of the game.
Rules and regulations. The bylaws used by soccer leagues to establishlocal policy.
Run. A move made by a player, without the ball, to get into anotherposition.
Save. Any move made by the goalkeeper that stops the ball from going intothe goal.
Score. The points earned by each team. Each goal counts as one point.
Shielding. Protecting the ball to keep from losing it to a player on theopposing team. This is done by placing the body between the opposingplayer and the ball.
Shin guards. The protective device worn under the socks to protect theplayers when they are kicked in the shins.
137Glossary of Soccer Terms
Shirt ( jersey). The garment worn by the player. Each team will have shirtsthat are different colors. The goalkeeper will wear a shirt that is differentfrom those of both teams on the field.
Shoes. Soccer shoes are designed to give the player traction and allow theplayer to kick and dribble without the shoe snagging on the ground.There is no cleat underneath the toe of the shoe. The cleats start on thesole of the shoe, at the toe, on the right and left sides.
Shorts. The short pants worn by soccer players. Colors can either match orcontrast with the shirts worn by the players.
Shot. When the soccer ball is propelled toward the goal by the offensiveteam.
Shoulder charge. A legal play that allows a defender to press against theperson with the ball. The defender’s arm must be straight down alongher side, and the pressure must be constant.
Skills. The actions required to perform the game of soccer.
Slide tackle. When a player slides or moves into the ball to take it awayfrom the opponent.
Socks. Garments that cover the feet and the shin guards on the players.They are knee high. These can match or contrast with the uniform.
Square. Being directly to the right or left of the player with the ball.
Start. Denotes when the game begins in the first and second half.
Steal. To take the soccer ball away from an opponent.
Stopper. The defender that is in the front of the other defenders andclosest to the centerline. Normally used to mark a player from the otherteam.
Strategy. The approach used to formulate the game plan.
Striker. The forward that is in the center position.
Substitution. Replacing one player on the field with another player that isoff the field. This can be done only during certain restarts in the gameand with referee approval.
138 Appendix
Support. When players move into a position to assist and support theplayer with the ball.
Sweeper. The defender that is the last defender and plays in front of thegoalkeeper.
Tackle. When a player slides into the ball to take it away from hisopponent.
Techniques. The actions used to enable a player to understand andparticipate in the game.
Through pass. Passing the soccer ball so it goes beyond the defense intoopen space. This is used to put an offensive player behind the defensiveplayer.
Throw-in. The method used to restart the game when the ball has traveledout of bounds over the touchline. It is thrown in by the team that did notcause it to go off the field.
Time-out. When the game clock (kept by the referee) is stopped. This canbe called only by the referee and is normally used only for seriousinjuries.
Touch on ball. Denotes the proper foot movement and control on the ball.
Touchline. The line that runs on each side of the field. It is the boundaryfor the width of the field. It is also referred to as the sideline.
Trap. Stopping the ball to gain control. This can be done using the feet,chest, thighs, etc.
Tripping. A major, direct, foul.
Turnover. Losing the ball to the other team.
Under. Used in soccer to denote the age of the players. It is used inconjunction with a number. For example, U-6 means the players must beunder the age of six.
Uniform. The shirt, shorts, and socks worn by the players that match thoseof their teammates (except the goalkeeper).
139Glossary of Soccer Terms
Victory. Winning the game.
Volley. Kicking the ball while the ball is still in the air. This is done byhaving the upper leg and knee straight out from the body and striking theball with the foot pointing straight down. This causes the ball to spinforward and curl down.
Wall. A gathering of players, side by side, to block a kick from goingthrough them to the goal, and instead making the kick go to their rightor left.
Wall pass. A technique using two or more players to pass the ball aroundthe opponent. Often referred to as a give-and-go.
Width. Coverage of players, while in formation, from side to side on thefield. Good width is even spacing covering from touchline to touchline.
Width (field). The length of the field from touchline to touchline.
Wing. The outside of the field, closest to the touchline.
Winger. Normally refers to any forward that plays on the right- and left-hand side of the field. It can be used to describe any outside player.
Winning. Being the team that scores the most points.
World Cup. Soccer games played every four years by professional teamsfrom all participating countries in the world. This is the largest sportsevent in the world and is controlled by FIFA.
Yellow card. A card, colored yellow and about the size of a playing card,used by the referee to warn a player and team that the player is beingcautioned for an infraction of the rules. Two yellow cards for the sameinfraction in the same game are equal to a red card.
Zone play. When players are situated in a set area of the field that theymust defend.
140 Appendix
141
Index
Agility, 3Animal (stretching exercise), 11Arc of concentration, 94–95, 106
Back and Forth (G) drill, 84–85Beginning a practice
ingredients of a practice, 1–2practice objectives, 2–3slow running drills, 3–6stretching exercises, 6–9
Centering (G) drill, 79–80Centering the ball, 106–7Coordination, 3Corner kick, 118–20Crab Crawl (stretching exercise), 9Cut the angle, 72Cutthroat (G) drill, 86
Defense, 93–95Defensive and offensive drills
Back and Forth (G), 84–85Centering (G), 79–80Cutthroat (G), 86Keeping the Players in Formation
(G), 87–88One-on-One (G), 83–84Over the Goal (G), 82–83Penalty Kick Swap (G), 88–89Three vs. Three (G), 86, 87Throw and Shoot (G), 80–81
Throw into Box and Kick (G),81–82
Ultimate Challenge (G), 85Diamond (Triangle) Method, 97–98Direct and indirect penalty kick,
120–23Dive (Sitting, Kneeling, Standing)
(F/I/G) drill, 77, 78Donkey Tail (I) drill, 48–49Dribbling basics, 51–52Dribbling drills
Donkey Tail (I), 55–56F, I, G designations for, 13–14Follow the Leader (F), 52Hand in Air (I), 54Home Base (F), 52–53Moving Goal (G), 56Three Goal (G), 56–57Three-Player Keep-Away (I), 53Through the Cones (F), 54–55
Drills, general practice (U-6/U-8)F, I, G designations for, 13–14Leapfrog (F), 17Pass Through Goal (I), 17–18Snapping Turtle (F), 15–16Somersault (F), 16–17Tag (I), 18
Drills, goalkeeping Dive (Sitting, Kneeling, Standing)
(F/I/G), 77, 78Drop and Catch (F), 73
Copyright © 2005 by Robert Koger. Click here for terms of use.
F, I, G designations for, 13–14Figure Eight (F), 72–73Jump and Catch (G), 75Jump over Cones (I), 74Lie and Punch (F), 76Stand and Punch (F), 76, 77Throw and Catch (F), 74Trap and Scoop (G), 78
Drills, headingF, I, G designations for, 13–14Head Out of Hands (F), 34Heading on Goal (G), 37Heading While Standing (F),
34–35Heading with Four Players (G), 36Heading with Three Players (I),
35Lift and Head (I), 35–36Sitting and Knees (F), 34
Drills, jugglingF, I, G designations for, 13–14Single Juggling (F), 60Soccer Volleyball (I), 61Team Juggling (F), 60–61
Drills, offensive and defensiveBack and Forth (G), 84–85Centering (G), 79–80Cutthroat (G), 86Keeping the Players in Formation
(G), 87–88One-on-One (G), 83–84Over the Goal (G), 82–83Penalty Kick Swap (G), 88–89Three vs. Three (G), 86, 87Throw and Shoot (G), 80–81Throw into Box and Kick (G),
81–82Ultimate Challenge (G), 85
Drills, passing/kickingF, I, G designations for, 13–14Knock Down (F), 21–22Player Turn (I), 26Roll and Kick (G), 24Roll and Lift (I), 25–26Soccer Golf (F), 20–21
Through Goal (I), 22Through the Legs (I), 23Throw and Kick (I), 22–23Wall Pass (G), 28Water Balloon (F), 24–25Weave (I), 26–28
Drills, shieldingDonkey Tail (I), 48–49F, I, G designations for, 13–14Karaoke (F), 50Roll Over (F), 47–48Two-Player Keep-Away (G), 49
Drills, throw-inF, I, G designations for, 13–14Line Throw (F), 64–65Throw and Return (F), 65To the Spot (I/G), 65–66
Drills, trapping/receivingF, I, G designations for,
13–14Kick and Collect (I), 31Kick and Return (I/G), 31–32Throw-Receiving (F), 30Throw-Trapping (F), 30
Drills, volleyF, I, G designations for, 13–14Kick and Volley (F), 70Throw and Kick, Half Volley (F),
68Throw and Kick, Volley (F),
68–69Volley on Goal (I), 69Volley with Defense (G), 69–70
Drop and Catch (F) drill, 73
Endurance, 3
F (foundation) skill level, 13, 14F, I, G designations, 13–14Figure Eight (F) drill, 72–73Fitness
categories, 2outcome of, 3
Five-Ball Kick (F) drill, 40Follow-the-Leader (F) drill, 4–5, 52
142 Index
Formations and drillscentering the ball, 106–7defined, 101kickoff formations, 107–11play formations, 101–6special formations, 115–26
Foundation (F) skill level, 13, 144-4-2 formation, 104–54-3-3 formation, 102
G (Game) skill level, 14Game strategy and drills
defense, 93–95midfield play, 95–96offense, 96–97support, 97–100
General practice drills (U-6/U-8)F, I, G designations for, 13–14Leapfrog (F), 17Pass Through Goal (I), 17–18Snapping Turtle (F), 15–16Somersault (F), 16–17Tag (I), 18
Goal kick, 116–18Goalkeeper kick or throw,
125–26Goalkeeping basics, 71–72Goalkeeping drills
Dive (Sitting, Kneeling, Standing)(F/I/G), 77, 78
Drop and Catch (F), 73F, I, G designations for, 13–14Figure Eight (F), 72–73Jump and Catch (G), 75Jump over Cones (I), 74Lie and Punch (F), 76Stand and Punch (F), 76, 77Throw and Catch (F), 74Trap and Scoop (G), 78
Hand in Air (I) drill, 54Heading basics, 33Heading drills
F, I, G designations for, 13–14Head Out of Hands (F), 34
Heading on Goal (G), 37Heading While Standing (F),
34–35Heading with Four Players
(G), 36Heading with Three Players (I),
35Lift and Head (I), 35–36Sitting and Knees (F), 34
Home Base (F) drill, 52–53
I (intermediate) skill level, 13–14Individual practice, 91–92Intermediate (I) skill level, 13–14
Juggling as individual practice, 92Juggling basics, 59–60Juggling drills
F, I, G designations for, 13–14
Single Juggling (F), 60Soccer Volleyball (I), 61Team Juggling (F), 60–61
Jump and Catch (G) drill, 75Jump over Cones (I) drill, 74Jump Rope, 10
Karaoke (F) drill, 5–6, 50Keeping the Players in Formation
(G) drill, 87–88Kick and Collect (I) drill, 31Kick and Return (I/G) drill,
31–32Kick and Volley (F) drill, 70Kicking instruction
basics, 19–20passing/kicking drills, 20–28
Kickoff formations, 107–11Knock Down (F) drill, 21–22
Leapfrog (F), 17Lie and Punch (F) drill, 76Lift and Head (I) drill, 35–36Line Jump, 10–11Line Throw (F) drill, 64–65
143Index
Midfield play, 95–96Mind control, 3Moving Goal (G) drill, 56
Nine-Ball Kick (F) drill, 41–42
Offense, 96–97Offensive and defensive drills
Back and Forth (G), 84–85Centering (G), 79–80Cutthroat (G), 86Keeping the Players in Formation
(G), 87–88One-on-One (G), 83–84Over the Goal (G), 82–83Penalty Kick Swap (G), 88–89Three vs. Three (G), 86, 87Throw and Shoot (G), 80–81Throw into Box and Kick (G),
81–82Ultimate Challenge (G), 85
One-on-One (G) drill, 83–84Over the Goal (G) drill, 82–83Over-the-Head One vs. One (G)
drill, 45, 46
Pass and Shoot (I) drill, 43–44Pass Through Goal (I) drill, 17–18Passing and kicking basics, 19–20Passing/kicking drills
F, I, G designations and, 13–14Knock Down (F), 21–22Player Turn (I), 26Roll and Kick (G), 24Roll and Lift (I), 25–26Soccer Golf (F), 20–21Through Goal (I), 22Through the Legs (I), 23Throw and Kick (I), 22–23Wall Pass (G), 28Water Balloon (F), 24–25Weave (I), 26–28
Penalty Kick Swap (G) drill, 88–89Penalty kick, 123–25Plastic Bag drill, 91–92
Player Turn (I) drill, 26Practice drills (general drills for U-6
and U-8 players)Leapfrog (F), 17letters indicating skill level of,
13–14Pass Through Goal (I), 17–18Snapping Turtle (F), 15–16Somersault (F), 16–17Tag (I), 18
Practice objectives, 2–3
Quick reaction time, 3Quick Shot (G) drill, 46
Receiving formations, 107–8,111–13
Receiving the ballbasics, 29drills, 30–32
Roll and Kick (G) drill, 24Roll and Lift (I) drill, 25–26Roll Ball (I) drill, 43Roll Over (F) drill, 5, 47–48Running drills, slow
Follow the Leader, 4–5Karaoke, 5–6Roll Over, 5running in formation, 3–4
Shielding basics, 47Shielding drills
Donkey Tail (I), 48–49F, I, G designations for, 13–14Karaoke (F), 50Roll Over (F), 47–48Two-Player Keep-Away (G), 49
Shooting basics, 39Shooting drills
F, I, G designations for, 13–14Five-Ball Kick (F), 40Nine-Ball Kick (F), 41–42Over-the-Head One vs. One (G),
45, 46Pass and Shoot (I), 43–44
144 Index

Quick Shot (G), 46Roll Ball (I), 43Side-Ball Shoot (I), 44, 45Sit and Shoot (I), 42
Side-Ball Shoot (I) drill, 44, 45Single Juggling (F) drill, 60Sit and Shoot (I) drill, 42Sitting and Knees (F) drill, 346-2-2 formation, 105–6Slow running drills
Follow the Leader, 4–5Karaoke, 5–6Roll Over, 5running in formation, 3–4
Snapping Turtle (F), 15–16Soccer field, 2Soccer Golf (F) drill, 20–21Soccer Volleyball (I) drill, 61Somersault (F) drill, 16–17Special formations and drills
corner kick, 118–20direct and indirect penalty kick,
120–23goal kick, 116–18goalkeeper kick or throw,
125–26importance of, 115penalty kick, 123–25
Speed and quickness, 3Stand and Punch (F) drill, 76, 77Strategy and drills
defense, 93–95midfield play, 95–96offense, 96–97support, 97–100
Strength, 3Stretching exercises
after running drills, 6Animal, 11Back to Back, 9Crab Crawl, 9Jump over Ball, 8–9Jump Rope, 10Lean into Legs, 7Lift Legs Up Behind, 7
Line Jump, 10–11Reaching Out, 7Toe Taps, Alternating Feet, 8Touch Ball, 9–10Touch Ball with Knee, 8
Support, 97–100
Tag (I), 18Teaching soccer
demonstration-performancemethod, 14
three types of techniques, 13–14Team Juggling (F) drill, 60–61Technique training/drills
purpose of, 2three types of techniques, 13–14
Three Goal (G) drill, 56–573-2-1 formation, 103–4Three vs. Three (G) drill, 86, 87Three-Player Keep-Away (I) drill, 53Through Goal (I) drill, 22Through the Cones (F) drill,
54–55Through the Legs (I) drill, 23Throw and Catch (F) drill, 74Throw and Kick (I) drill, 22–23Throw and Kick, Half Volley (F)
drill, 68Throw and Return (F) drill, 65Throw and Shoot (G) drill, 80–81Throw into Box and Kick (G) drill,
81–82Throw-in basics, 63–64Throw-in drills
F, I, G designations for, 13–14
Line Throw (F), 64–65Throw and Return (F), 65To the Spot (I/G), 65–66
Throw-Receiving (F) drill, 30Throw-Trapping (F) drill, 30To the Spot (I/G) drill, 65–66Touch Ball drill, 9–10Trap and Scoop (G) drill, 78Trapping and receiving basics, 29
145Index
Trapping and receiving drillsF, I, G designations for, 13–14Kick and Collect (I), 31Kick and Return (I/G), 31–32Throw-Receiving (F), 30Throw-Trapping (F), 30
Two-Player Keep-Away (G) drill, 49
Ultimate Challenge (G) drill, 85
Volley basics, 67Volley drills
F, I, G designations for, 13–14Kick and Volley (F), 70Throw and Kick, Half Volley
(F), 68
Throw and Kick, Volley (F),68–69
Volley on Goal (I), 69Volley with Defense (G),
69–70
Wall Pass (G) drill, 28Warm-Up and stretch
purpose of, 1slow running drills, 3–6stretching exercises, 6–9
Warm-up for U-6 and U-8 players,9–11
Water Balloon (F) drill, 24–25
Weave (I) drill, 26–28
146 Index