1.0 SAMCO RIE-10NR · Northwestern University Micro/Nano Fabrication Facility (NUFAB) Page2 of 10...
10
Northwestern University Micro/Nano Fabrication Facility (NUFAB) Page1 of 10 1.0 SAMCO RIE-10NR Figure 1: Samco RIE-10NR 1.1 Introduction Samco RIE-10NR is a high precision reactive ion etching system which can anisotropically etch a wide variety of semiconductor, insulating, and other materials. Please contact staff for approved materials. Only trained and approved (qualified) users may use this tool. 1.2 Features and Specifications: a) Touch screen interface b) Automatic operation with manual option. c) Designed to accommodate wafers up to 6” in diameter. d) RF Power: 300 W (max), 13.56 MHz. e) 55 mm fixed gap between electrodes f) Upper electrode: Anode, aluminum 240 mm diameter g) Lower electrode: Cathode, aluminum, 240 mm diameter with ground shield and anti-sputter quartz cover with 8” recess. h) Capacitance manometer vacuum gauge. i) Turbo pump and dry roughing pump j) Six gas lines: SF6, CF4, CHF3, O 2 (20 sccm), O 2 (200 sccm), Ar/N 2 . k) Pressure gauges: FRG or full range gauge (Pirani/Cold-cathode) and DG or diaphragm gauge (capacitance manometer). 1.3 Applicable Documents Samco RIE-10NR installation, operation, and maintenance manuals are available. EMO Switch Touch Screen View port Nitrogen valve
Transcript of 1.0 SAMCO RIE-10NR · Northwestern University Micro/Nano Fabrication Facility (NUFAB) Page2 of 10...

Northwestern University Micro/Nano Fabrication Facility (NUFAB) Page1 of 10
1.0 SAMCO RIE-10NR
Figure 1: Samco RIE-10NR
1.1 Introduction Samco RIE-10NR is a high precision reactive ion etching system which can anisotropically etch a wide variety of semiconductor, insulating, and other materials. Please contact staff for approved materials. Only trained and approved (qualified) users may use this tool. 1.2 Features and Specifications:
a) Touch screen interface b) Automatic operation with manual option. c) Designed to accommodate wafers up to 6” in diameter. d) RF Power: 300 W (max), 13.56 MHz. e) 55 mm fixed gap between electrodes f) Upper electrode: Anode, aluminum 240 mm diameter g) Lower electrode: Cathode, aluminum, 240 mm diameter with ground shield and anti-sputter
quartz cover with 8” recess. h) Capacitance manometer vacuum gauge. i) Turbo pump and dry roughing pump j) Six gas lines: SF6, CF4, CHF3, O2 (20 sccm), O2 (200 sccm), Ar/N2. k) Pressure gauges: FRG or full range gauge (Pirani/Cold-cathode) and DG or diaphragm gauge
(capacitance manometer). 1.3 Applicable Documents
Samco RIE-10NR installation, operation, and maintenance manuals are available.
EMO Switch
Touch Screen
View port
Nitrogen valve
Northwestern University Micro/Nano Fabrication Facility (NUFAB) Page2 of 10
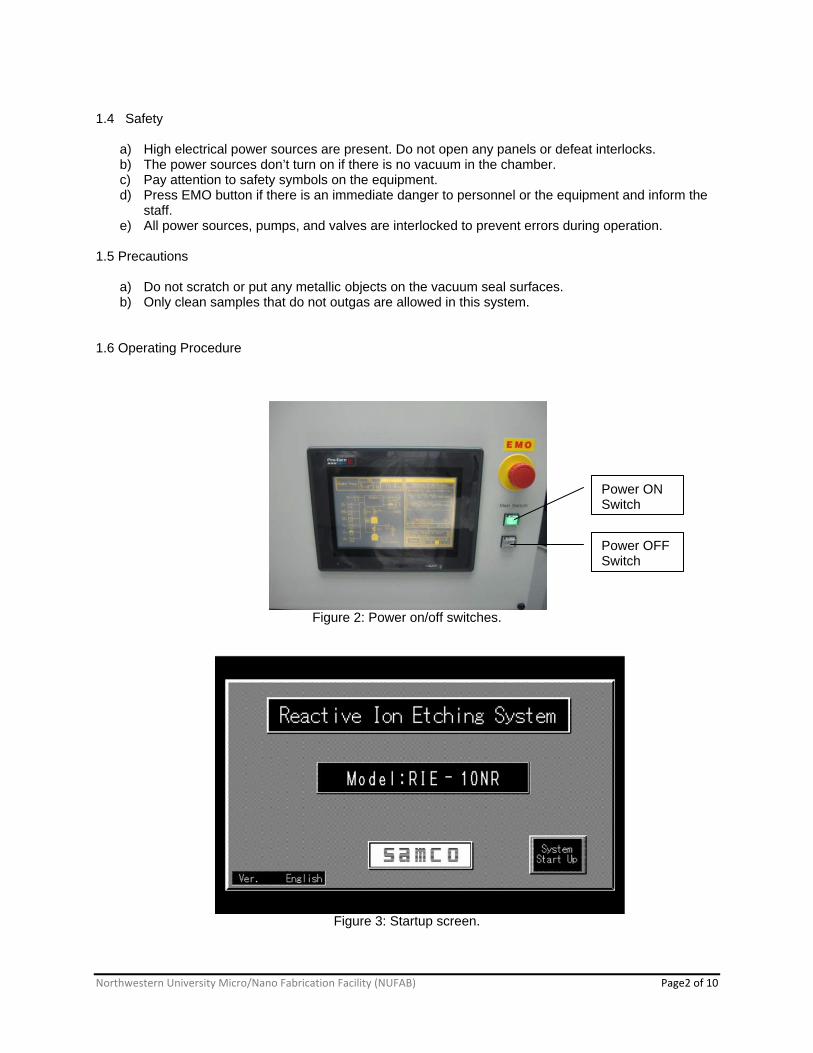
1.4 Safety
a) High electrical power sources are present. Do not open any panels or defeat interlocks. b) The power sources don’t turn on if there is no vacuum in the chamber. c) Pay attention to safety symbols on the equipment. d) Press EMO button if there is an immediate danger to personnel or the equipment and inform the
staff. e) All power sources, pumps, and valves are interlocked to prevent errors during operation.
1.5 Precautions
a) Do not scratch or put any metallic objects on the vacuum seal surfaces. b) Only clean samples that do not outgas are allowed in this system.
1.6 Operating Procedure
Figure 2: Power on/off switches.
Figure 3: Startup screen.
Power ON Switch
Power OFF Switch

Northwestern University Micro/Nano Fabrication Facility (NUFAB) Page3 of 10
1.6.1 System Start Up
a) Activate the equipment in FOM. b) Turn the red nitrogen valve on (Figure 1). c) Lift the cover and press the power ON switch (Figure 2). d) The screen shown in Figure 3 will be displayed. Touch System Start Up button. e) The screen shown in Figure 4 will be displayed. It will take about five minutes while roughing pump
turns on and then turbo pump accelerates to normal speed. f) The screen shown in Figure 5 will be displayed. Touch the Auto Mode button. Always use the
system in auto mode unless authorized by the staff to use Manual Mode. g) The screen shown in Figure 6 will be displayed. This screen can be used to: (i) select a recipe, (ii)
Modify a recipe, (iii) change a run time of a recipe, (iv) load a sample, and (v) run a recipe. Also, you can go back to Main Menu screen.
Figure 4: Startup screen – 2.
Northwestern University Micro/Nano Fabrication Facility (NUFAB) Page4 of 10
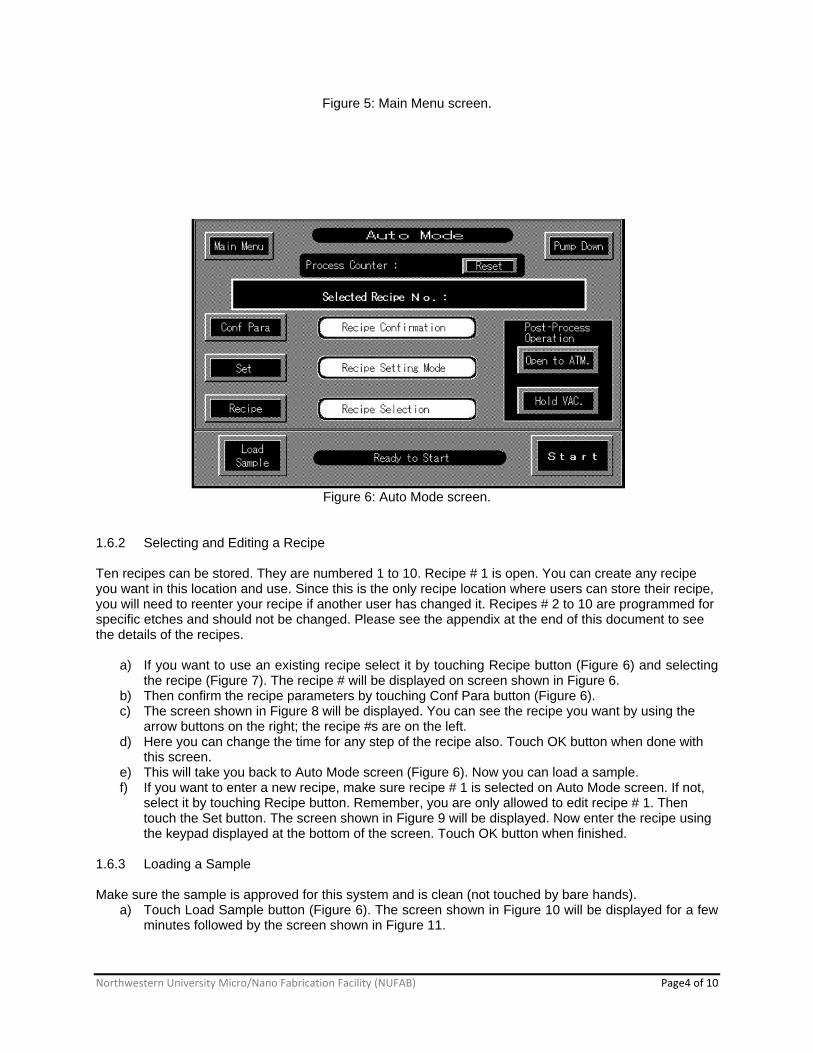
Figure 5: Main Menu screen.
Figure 6: Auto Mode screen.
1.6.2 Selecting and Editing a Recipe Ten recipes can be stored. They are numbered 1 to 10. Recipe # 1 is open. You can create any recipe you want in this location and use. Since this is the only recipe location where users can store their recipe, you will need to reenter your recipe if another user has changed it. Recipes # 2 to 10 are programmed for specific etches and should not be changed. Please see the appendix at the end of this document to see the details of the recipes.
a) If you want to use an existing recipe select it by touching Recipe button (Figure 6) and selecting the recipe (Figure 7). The recipe # will be displayed on screen shown in Figure 6.
b) Then confirm the recipe parameters by touching Conf Para button (Figure 6). c) The screen shown in Figure 8 will be displayed. You can see the recipe you want by using the
arrow buttons on the right; the recipe #s are on the left. d) Here you can change the time for any step of the recipe also. Touch OK button when done with
this screen. e) This will take you back to Auto Mode screen (Figure 6). Now you can load a sample. f) If you want to enter a new recipe, make sure recipe # 1 is selected on Auto Mode screen. If not,
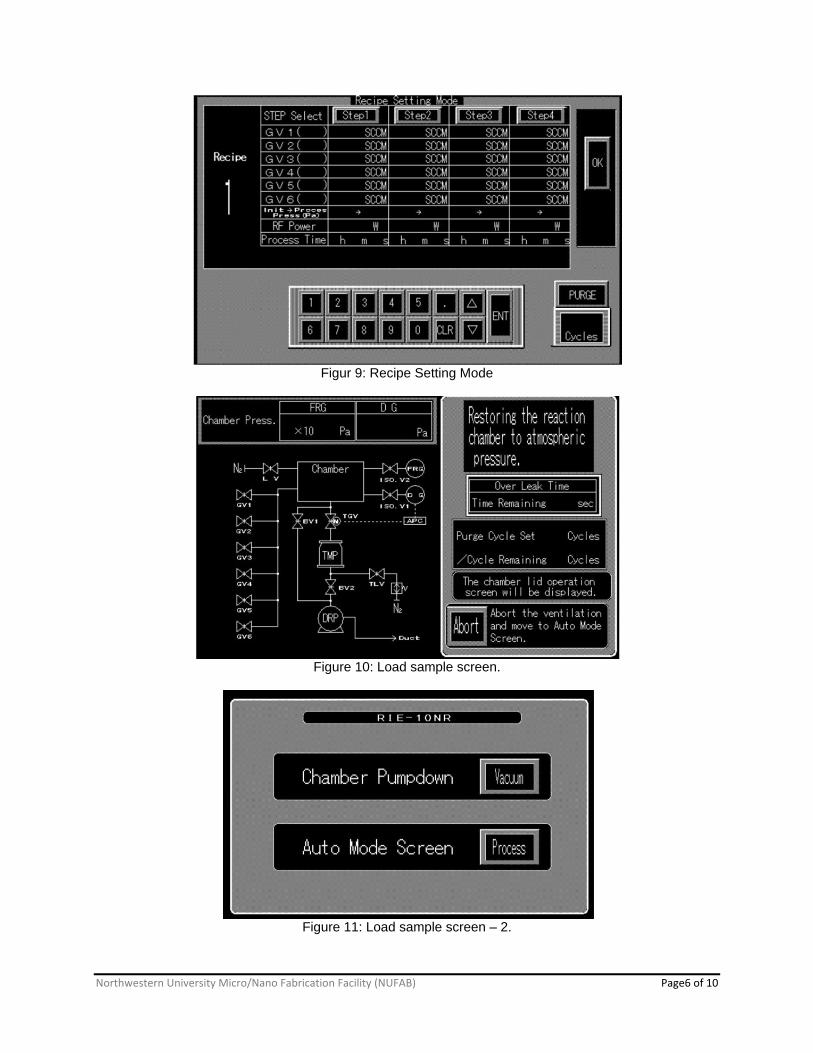
select it by touching Recipe button. Remember, you are only allowed to edit recipe # 1. Then touch the Set button. The screen shown in Figure 9 will be displayed. Now enter the recipe using the keypad displayed at the bottom of the screen. Touch OK button when finished.
1.6.3 Loading a Sample Make sure the sample is approved for this system and is clean (not touched by bare hands).
a) Touch Load Sample button (Figure 6). The screen shown in Figure 10 will be displayed for a few minutes followed by the screen shown in Figure 11.

Northwestern University Micro/Nano Fabrication Facility (NUFAB) Page5 of 10
b) Now the chamber has reached the atmospheric pressure and can be opened. Open plastic covers and press chamber open/close buttons together (you will need to use both hands) and release, the chamber will open (Figure 12).
c) Place the sample in the center of the quartz plate. More than one sample can be loaded as long as they fit on the quartz plate. The gap between top and bottom electrode is 55 mm (a little over 2”) and is optimized for wafers. Ask staff for permission if your sample is taller than ½”.
d) Press the chamber open/close switches together and keep depressed until chamber closes and you hear a beep (Figure 12). Now release the switches. Early release will reopen the lid.
e) Touch the Process button (Figure 11) to go to Auto Mode Screen.
Figure 7: Recipe select screen.
Figure 8: Conf Para screen.
Northwestern University Micro/Nano Fabrication Facility (NUFAB) Page6 of 10
Figur 9: Recipe Setting Mode
Figure 10: Load sample screen.
Figure 11: Load sample screen – 2.

Northwestern University Micro/Nano Fabrication Facility (NUFAB) Page7 of 10
Figure 12: Open chamber.
1.6.4 Running the Process
a) Touch the Start button on Auto Mode screen (Figure 6). b) It will go through pump down screen (Figure 13) to process screen (Figure 14). All the process
steps will be displayed as they happen on the process screen. c) The screen shown in Figure 15 will be displayed when process is complete.
1.6.5 Unloading the Sample and System Shutdown
a) Touch Purge button. The screen shown in Figure 11 will be displayed. Now the chamber can be opened and sample removed following same procedure as for loading the sample.
b) Touch Process button (Figure 11) to go to Auto Mode screen. If you a loaded another sample, you can run the process from Auto Mode screen. If you are finished and want to shut down the system, touch Main Menu button on Auto Mode screen (Figure 6). From Main Menu screen (Figure 5) touch System Shutdown button.
c) Confirm by touching the Shut Down button (Figure 16). The screen shown in Figure 17 will be displayed. It will take several minutes to complete shutdown sequence.
d) When Start Up screen (Figure 3) displays, press the Power Off switch (Figure 2). e) Turn the red nitrogen valve off (Figure 1). f) Enter the required information in FOM and deactivate the equipment.
Chamber open/close buttons
Place sample in the center of the quartz plate
Do not scratch the vacuum seal area.

Northwestern University Micro/Nano Fabrication Facility (NUFAB) Page8 of 10
Figure 13: Pump down screen.
Figure 14: Process screen.
Figure 15: Process Complete screen.

Northwestern University Micro/Nano Fabrication Facility (NUFAB) Page9 of 10
Figure 16: Confirm shutdown screen.
Figure 17: System shut down screen.

Northwestern University Micro/Nano Fabrication Facility (NUFAB) Page10 of 10
APPENDIX Recipe Number Description Etch Rate Mask Tray
1
2 P‐Si (Fine) #1 580 Å/min PR
3 P‐Si (Fine) #2 900 Å/min PR
4 Si Etch (Vertical Walls) 2950 Å/min SiO2
5 SiO2 Etch Mask Formation 210 Å/min PR SiO2
6 Polyimide 210 Å/min
7 SiN Etch (CF4) 1000 Å/min PR
8 SiN Etch 890 Å/min PR SiO2
9 SiO2 Etch (CF4) 270 Å/miin PR Carbon
10 Chamber Clean
Note: Recipe 10 Chamber Clean has 3 Steps. Step 1 is for Si residue. Step 2 is for removing polymer res
The times for these steps can be adjusted as needed. If step 1 is not needed, enter a time of 0.
All time for etch recipes need to be adjusted for desired etch depth with respect to above etch rates.