1 YOUR GUIDE TO Exercise After a Stroke Guide to...least one member suffering a stroke. ... Your...
51
MARGOT ANDREW MHSC (HONS), PG DIP REHAB, DIP PT MARGARET HOESSLY MHSC (HONS), INT DIP PT (BOSTON), QSM KATE HEDGES MHSC, DIP PT, ADVANCED BOBATH CLINICIAN Exercise After a Stroke A guide for people with stroke and their families YOUR GUIDE TO
Transcript of 1 YOUR GUIDE TO Exercise After a Stroke Guide to...least one member suffering a stroke. ... Your...

1
MARGOT ANDREW MHSC (HONS), PG DIP REHAB, DIP PT
MARGARET HOESSLY MHSC (HONS), INT DIP PT (BOSTON), QSM
KATE HEDGES MHSC, DIP PT, ADVANCED BOBATH CLINICIAN
Exercise After a StrokeA guide for people with stroke and their families
YOUR GUIDE TO


3
Copyright © 2017 Andrew, Hoessly, and Hedges. This is an open access article distributed under the terms of the Creative Commons Attribution Non-Commercial License (http://creativecommons. org/licenses/by-nc/3.0/), which permits unrestricted non-commercial use, distribution, and
reproduction in any medium, provided the original author and source are credited.
This book was funded with the help of the A.H. Somerville Foundation which was established by Archie Somerville after
his stroke. The authors would like to thank the Foundation and everyone whose helpful suggestions are included in the text. A special thank you to Hannah Blair for her original drawings,
Todd Wilson for graphic design, and Carmel Williams for editing.
We have had many years of physiotherapy experience and the content of the book has been reviewed not only by people who have had a stroke but also by a number of medical specialists. We hope that this book provides practical and useful information regarding
exercise after stroke. If you have specific queries please do not hesitate to contact your doctor, other health professionals or the
Stroke Foundation: www.stroke.org.nz
MARGOT ANDREW, MARGARET HOESSLY & KATE HEDGES May 2017

4
5
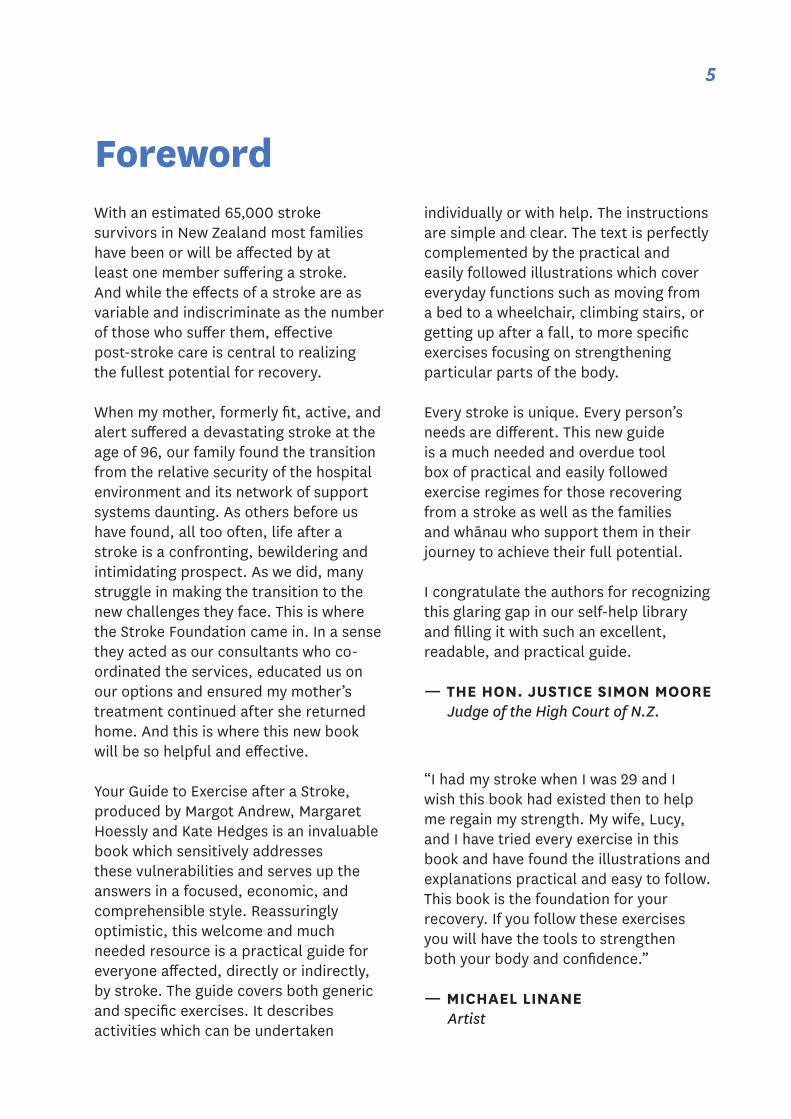
ForewordWith an estimated 65,000 stroke survivors in New Zealand most families have been or will be affected by at least one member suffering a stroke. And while the effects of a stroke are as variable and indiscriminate as the number of those who suffer them, effective post-stroke care is central to realizing the fullest potential for recovery.
When my mother, formerly fit, active, and alert suffered a devastating stroke at the age of 96, our family found the transition from the relative security of the hospital environment and its network of support systems daunting. As others before us have found, all too often, life after a stroke is a confronting, bewildering and intimidating prospect. As we did, many struggle in making the transition to the new challenges they face. This is where the Stroke Foundation came in. In a sense they acted as our consultants who co-ordinated the services, educated us on our options and ensured my mother’s treatment continued after she returned home. And this is where this new book will be so helpful and effective.
Your Guide to Exercise after a Stroke, produced by Margot Andrew, Margaret Hoessly and Kate Hedges is an invaluable book which sensitively addresses these vulnerabilities and serves up the answers in a focused, economic, and comprehensible style. Reassuringly optimistic, this welcome and much needed resource is a practical guide for everyone affected, directly or indirectly, by stroke. The guide covers both generic and specific exercises. It describes activities which can be undertaken
individually or with help. The instructions are simple and clear. The text is perfectly complemented by the practical and easily followed illustrations which cover everyday functions such as moving from a bed to a wheelchair, climbing stairs, or getting up after a fall, to more specific exercises focusing on strengthening particular parts of the body.
Every stroke is unique. Every person’s needs are different. This new guide is a much needed and overdue tool box of practical and easily followed exercise regimes for those recovering from a stroke as well as the families and whānau who support them in their journey to achieve their full potential.
I congratulate the authors for recognizing this glaring gap in our self-help library and filling it with such an excellent, readable, and practical guide.
— THE HON. JUSTICE SIMON MOORE Judge of the High Court of N.Z.
“I had my stroke when I was 29 and I wish this book had existed then to help me regain my strength. My wife, Lucy, and I have tried every exercise in this book and have found the illustrations and explanations practical and easy to follow. This book is the foundation for your recovery. If you follow these exercises you will have the tools to strengthen both your body and confidence.”
— MICHAEL LINANE Artist

6
7
ContentsINTRODUCTION: Gaining Confidence Starts at Home . . . . . . . . . . . . . . . . . 9
CHAPTER 1: Activities and Exercises at Home1. Effects of a Stroke . . . . . . . . . . . . . . . . . . . . . . . . . . . . . . . . . . . . . . . . . . 14
2. Activities and exercising at home . . . . . . . . . . . . . . . . . . . . . . . . . . . . . . . . . . 15
CHAPTER 2: Everyday Activities3. A Guide to the illustrations . . . . . . . . . . . . . . . . . . . . . . . . . . . . . . . . . . . . . 18
4. How to give support to your weak side . . . . . . . . . . . . . . . . . . . . . . . . . . . . . . . . 20 - In sitting - In lying
5. Lengthening your muscles . . . . . . . . . . . . . . . . . . . . . . . . . . . . . . . . . . . . . . 21
6. Rolling onto your side in bed . . . . . . . . . . . . . . . . . . . . . . . . . . . . . . . . . . . . . 23
7. Moving from lying to sitting on the side of the bed . . . . . . . . . . . . . . . . . . . . . . . . . 24
8. Moving from sitting on the side of the bed to lying down . . . . . . . . . . . . . . . . . . . . . . 25 - Without help - With help
9. How to balance while sitting . . . . . . . . . . . . . . . . . . . . . . . . . . . . . . . . . . . . . 26
10. Exercises while sitting . . . . . . . . . . . . . . . . . . . . . . . . . . . . . . . . . . . . . . . . 28
11. How to stand up from a bed or chair . . . . . . . . . . . . . . . . . . . . . . . . . . . . . . . . . 29 - Without help - With help
12. Moving from a bed to a wheelchair or commode . . . . . . . . . . . . . . . . . . . . . . . . . . 30
13. Transferring in and out of a car . . . . . . . . . . . . . . . . . . . . . . . . . . . . . . . . . . . . 30
14. Getting up from a fall . . . . . . . . . . . . . . . . . . . . . . . . . . . . . . . . . . . . . . . . 31
CHAPTER 3: Exercises for Strength and Control15. To help the return of movement in your arm and hand . . . . . . . . . . . . . . . . . . . . . . . . 36
16. To strengthen your back and stomach muscles . . . . . . . . . . . . . . . . . . . . . . . . . . . 41
17. To strengthen your hip . . . . . . . . . . . . . . . . . . . . . . . . . . . . . . . . . . . . . . . . 42
18. To strengthen your knee . . . . . . . . . . . . . . . . . . . . . . . . . . . . . . . . . . . . . . . 44
19. To strengthen your ankle . . . . . . . . . . . . . . . . . . . . . . . . . . . . . . . . . . . . . . . 45
CHAPTER 4: Exercises to Help with Standing and Walking20. Standing . . . . . . . . . . . . . . . . . . . . . . . . . . . . . . . . . . . . . . . . . . . . . . . 48
21. Walking . . . . . . . . . . . . . . . . . . . . . . . . . . . . . . . . . . . . . . . . . . . . . . . . 51
22. Stairs . . . . . . . . . . . . . . . . . . . . . . . . . . . . . . . . . . . . . . . . . . . . . . . . . 51
7

8
9
IntroductionGaining Confidence Starts at Home

10
Notes
10

11
Having a stroke is not only a devastating personal experience, but is also a highly emotional time for you, your family, and friends. This book is for everyone involved in your recovery. It was written to give you hope, encouragement, and strength.
These simple exercises will help strengthen and improve your movement. You will not need all of these exercises nor will all of them suit you; it is often a trial and error process.
As you gain an understanding of how your body works in the space around you, over time you will improve your everyday skills and strength.
A stroke damages nerve cells in the brain but don’t worry, your brain has the ability to open up new pathways and find new connections when correctly stimulated. The exercises in this book should be repeated and practiced as often as possible; this can help build new pathways in your brain.
After a stroke you will have to relearn correct movement again. Your brain processes sensory information through your eyes, ears, skin, joints, and muscles, helping you to move correctly. Movements you used to do easily will be more difficult. Your weak side must relearn what to do and how to do it.
Some people find it helpful to think about how their strong side does the movement, before trying that movement with their weak side.
Some of these exercises can be done alone while others will require some assistance. Feedback from a family member, friend, or carer can be very helpful when trying these movements/exercises. Feedback will give you confidence that you are moving correctly. Sometimes you will think your movements are correct and they may not be, so having someone help you will ensure they are done correctly. These exercises will help with strength and coordination.
The amount of recovery after a stroke varies from person to person. You may fully recover, or find some activities remain harder than before your stroke. Some may struggle with everyday tasks or activities. Occupational therapists can help you relearn everyday activities such as kitchen activities, showering, dressing, and writing.
It can be common for people to feel overwhelmed
and depressed after a stroke. If this happens
to you, please talk about it with someone
or visit your doctor.

1212
Notes
13
Chapter 1Activities and Exercises at Home
14
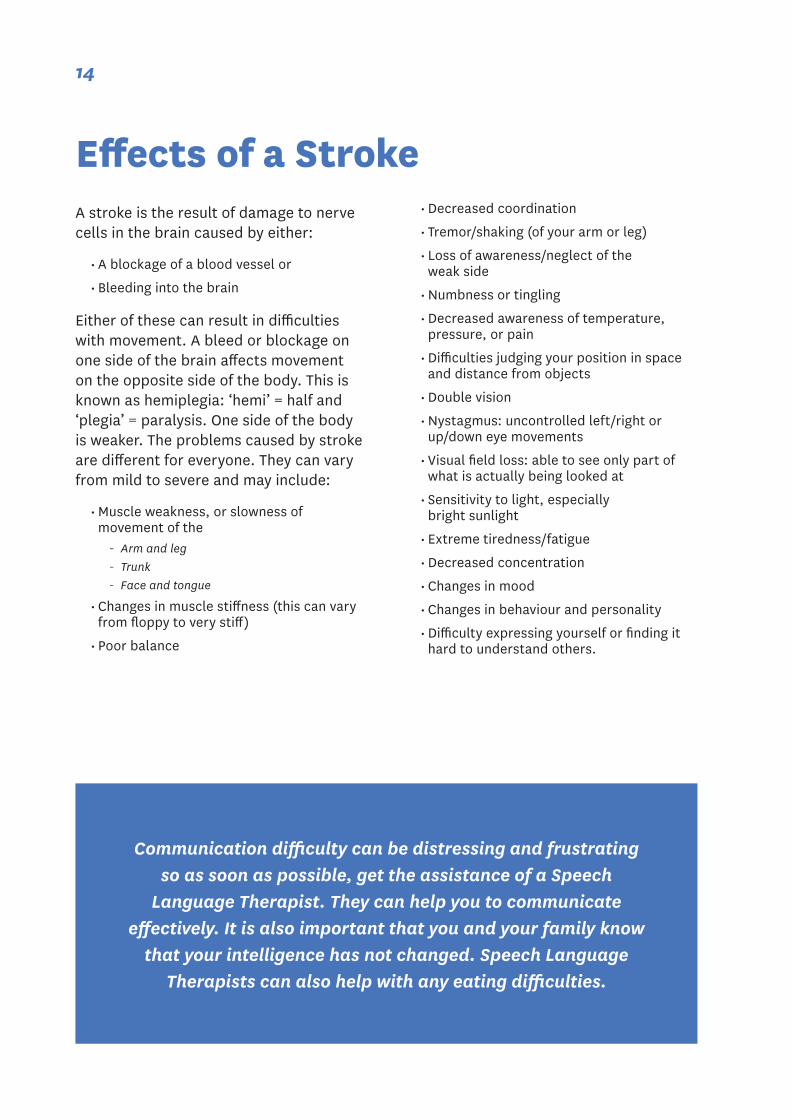
Communication difficulty can be distressing and frustrating so as soon as possible, get the assistance of a Speech
Language Therapist. They can help you to communicate effectively. It is also important that you and your family know
that your intelligence has not changed. Speech Language Therapists can also help with any eating difficulties.
Effects of a StrokeA stroke is the result of damage to nerve cells in the brain caused by either:
• A blockage of a blood vessel or
• Bleeding into the brain
Either of these can result in difficulties with movement. A bleed or blockage on one side of the brain affects movement on the opposite side of the body. This is known as hemiplegia: ‘hemi’ = half and ‘plegia’ = paralysis. One side of the body is weaker. The problems caused by stroke are different for everyone. They can vary from mild to severe and may include:
• Muscle weakness, or slowness of movement of the
- Arm and leg - Trunk - Face and tongue
• Changes in muscle stiffness (this can vary from floppy to very stiff)
• Poor balance
• Decreased coordination
• Tremor/shaking (of your arm or leg)
• Loss of awareness/neglect of the weak side
• Numbness or tingling
• Decreased awareness of temperature, pressure, or pain
• Difficulties judging your position in space and distance from objects
• Double vision
• Nystagmus: uncontrolled left/right or up/down eye movements
• Visual field loss: able to see only part of what is actually being looked at
• Sensitivity to light, especially bright sunlight
• Extreme tiredness/fatigue
• Decreased concentration
• Changes in mood
• Changes in behaviour and personality
• Difficulty expressing yourself or finding it hard to understand others.
15
Activities and Exercising at HomeRecovery of movement continues for a long time after stroke. Once you are home it is important to exercise and practice moving every day. Exercise following stroke has beneficial effects not only on movement and balance but on circulation and the health of the heart. With practice, movements that seem difficult at first become easier.
• It is best to exercise in loose comfortable clothing and no shoes
• Think about the activity before doing it. Planning a movement helps you to do it more easily
• Practice the movement - At first you may need to get the feel of the
movement by doing it with your strong side - When doing it with your weak side,
look at that side to make it easier - Your helper may need to help and
guide you to get a better movement
• Feedback will help you to know how well you are doing
• Find just the right level of effort in order to achieve the movement without strain
• Weak muscles easily become tired if worked too hard. At first don’t do more than a few minutes at a time to avoid muscle tiredness
• Frequently after stroke, too much effort causes the muscles on both sides of the joint to tighten so that very little movement actually occurs. Some muscles, especially those of the arm and hand, tend to become particularly tight and will need to be stretched on a daily basis
• Always picture in your mind both sides of your body working together
Correct muscle length is an important part of normal movement. If muscles on one side of a joint are too short those on the other side cannot work well against that resistance. Following a stroke, stiff muscles tend to become shorter and stiffer over time.
Maintaining muscle length as close to normal as possible is therefore essential. This can be done by slow, gentle stretching of tight muscles which allows the opposite muscle group to do its job and move the joint more easily.
If you are having any difficulties or are unsure of the exercises in this booklet please contact your local physiotherapist.
INFORMATION FOR YOUR CARER/HELPER
When helping with these exercises, if you are unsure about whether the movement is correct, try the exercise yourself first.
You will then be able to help the person move more normally. Telling the person when it looks correct can also be helpful.

1616
Notes

17
Chapter 2EverydayActivities
18
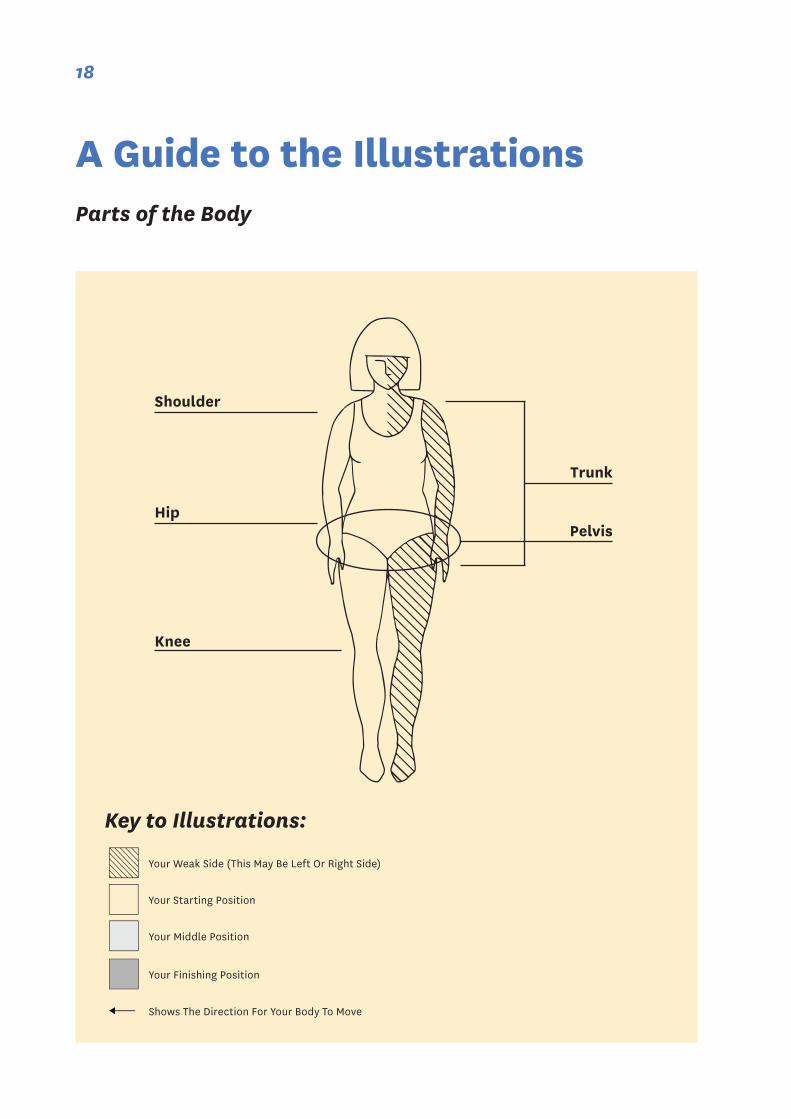
A Guide to the IllustrationsParts of the Body
Shoulder
PelvisHip
Knee
Trunk
Key to Illustrations:
Your Weak Side (This May Be Left Or Right Side)
Your Starting Position
Your Middle Position
Your Finishing Position
Shows The Direction For Your Body To Move

19
People who have had a stroke can have changes in muscles stiffness - this can vary. Often people are floppy at first and then become stiffer and tight. The aim is to have relaxed movement.
The following pages will show you how to support a weak and floppy side and how to lengthen tight muscles.
Daily Care of your Body
If there is tightness the muscles may pull as shown below:
• Neck muscles - pulling forward or to the side
• Shoulder muscles - dropping
• Arm - pulling in and across the body
• Elbow wrist and fingers - tightening
• Hip - pulling back (especially when standing and walking)
• Knee - locked back or difficult to straighten
• Heel - unable to touch the ground

20
Everyday ActivitiesYou will need only a bed, chair, and table for most of the exercises in this book. Please ensure the chair is stable. It may need to be against a wall.
Positioning: How to Give Support to your Weak Side
SITTING
• Back supported
• Weak arm supported
• Feet flat on floor
LYING ON YOUR STRONG SIDE
• Shoulder and hip forward
LYING IN BED
• Arm supported
LYING ON YOUR WEAK SIDE
• Arm resting on the bed palm up
21
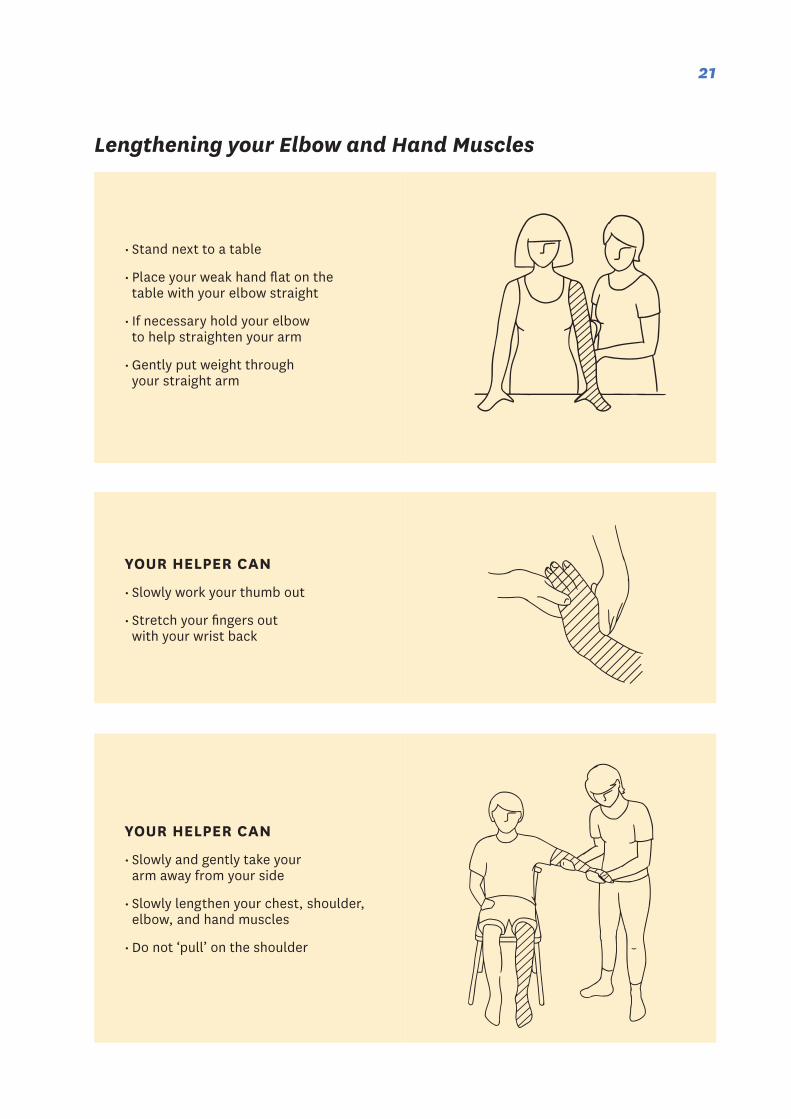
YOUR HELPER CAN
• Slowly and gently take your arm away from your side
• Slowly lengthen your chest, shoulder, elbow, and hand muscles
• Do not ‘pull’ on the shoulder
YOUR HELPER CAN
• Slowly work your thumb out
• Stretch your fingers out with your wrist back
• Stand next to a table
• Place your weak hand flat on the table with your elbow straight
• If necessary hold your elbow to help straighten your arm
• Gently put weight through your straight arm
Lengthening your Elbow and Hand Muscles
22
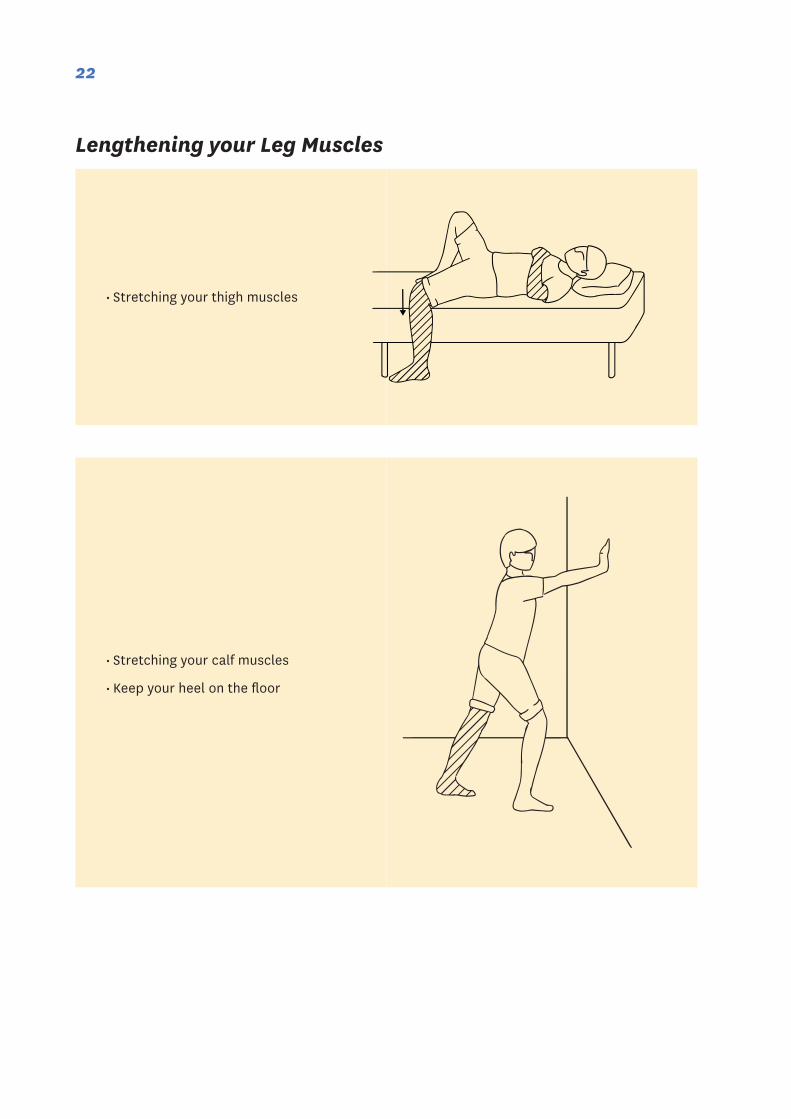
Lengthening your Leg Muscles
• Stretching your calf muscles
• Keep your heel on the floor
• Stretching your thigh muscles

23
Rolling onto your Side in Bed
LIE ON YOUR BACK
To roll onto your strong side
1. Turn your head towards your strong side
2. Clasp both hands in front of you or bring your weak arm across your body - do not lift your arm up above 90 degrees (shoulder level)
3. Bend your weak leg so that your foot is flat on bed or bend both legs up
4. Push down through your weak foot
5. Roll over
YOUR HELPER CAN
• Clasp your hands and move your arms across your body
• Lift your weak leg up and hold your foot flat on the bed
• Instruct you to “reach forward towards me and roll over”
To roll onto your weak side
1. Raise your head and turn towards your weak side
2. Clasp both hands in front of you
3. Bend your strong leg and keep your foot flat on the bed
4. Push off with your foot
5. Roll your hips and shoulder toward your weak side
24
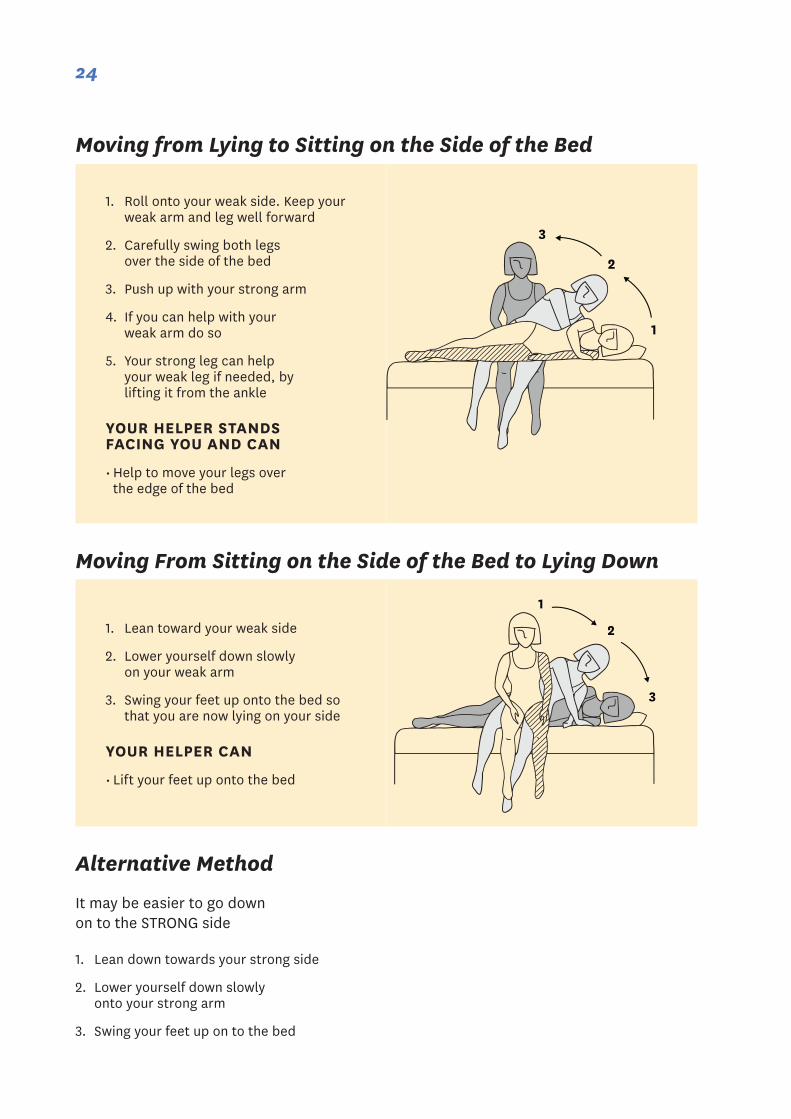
Moving from Lying to Sitting on the Side of the Bed
Moving From Sitting on the Side of the Bed to Lying Down
Alternative Method
It may be easier to go down on to the STRONG side
1. Lean down towards your strong side
2. Lower yourself down slowly onto your strong arm
3. Swing your feet up on to the bed
1. Roll onto your weak side. Keep your weak arm and leg well forward
2. Carefully swing both legs over the side of the bed
3. Push up with your strong arm
4. If you can help with your weak arm do so
5. Your strong leg can help your weak leg if needed, by lifting it from the ankle
YOUR HELPER STANDS FACING YOU AND CAN
• Help to move your legs over the edge of the bed
1. Lean toward your weak side
2. Lower yourself down slowly on your weak arm
3. Swing your feet up onto the bed so that you are now lying on your side
YOUR HELPER CAN
• Lift your feet up onto the bed

25
Lying Down with Help
YOUR HELPER
• Stands side on to the bed with their outside leg forward
• Places their arm across your chest to hold onto your far shoulder
YOU
• Hold onto the helper’s arm with two hands if possible or just use your strong hand
YOUR HELPER THEN
• Tips you slowly sideways towards the head of the bed and this will help your legs to start moving upwards
• Helps you swing your legs up onto the bed by using the back of their arm

26
How to Balance while Sitting
You may have difficulty sitting. You may fall towards your weak side, take too much weight on your strong side, or fall backwards. In order to sit up straight it is important to know where the mid-line of your body is. Try using a mirror (though some people find this confusing rather than helpful).
If it is still difficult to sit in the mid-line it could be due to:
• Being either too weak, too stiff, or fearful
• Left-sided neglect (when you “forget” about the weak side, cannot feel it, look away from it)
• Difficulty understanding where your body should be in space
1. Sit on the side of the bed with your feet on the floor or supported
- Find the mid-line, sit as straight as possible
- Move from one side of your bottom to the other so that you are slightly ‘off centre’
2. Lean forward and back
27
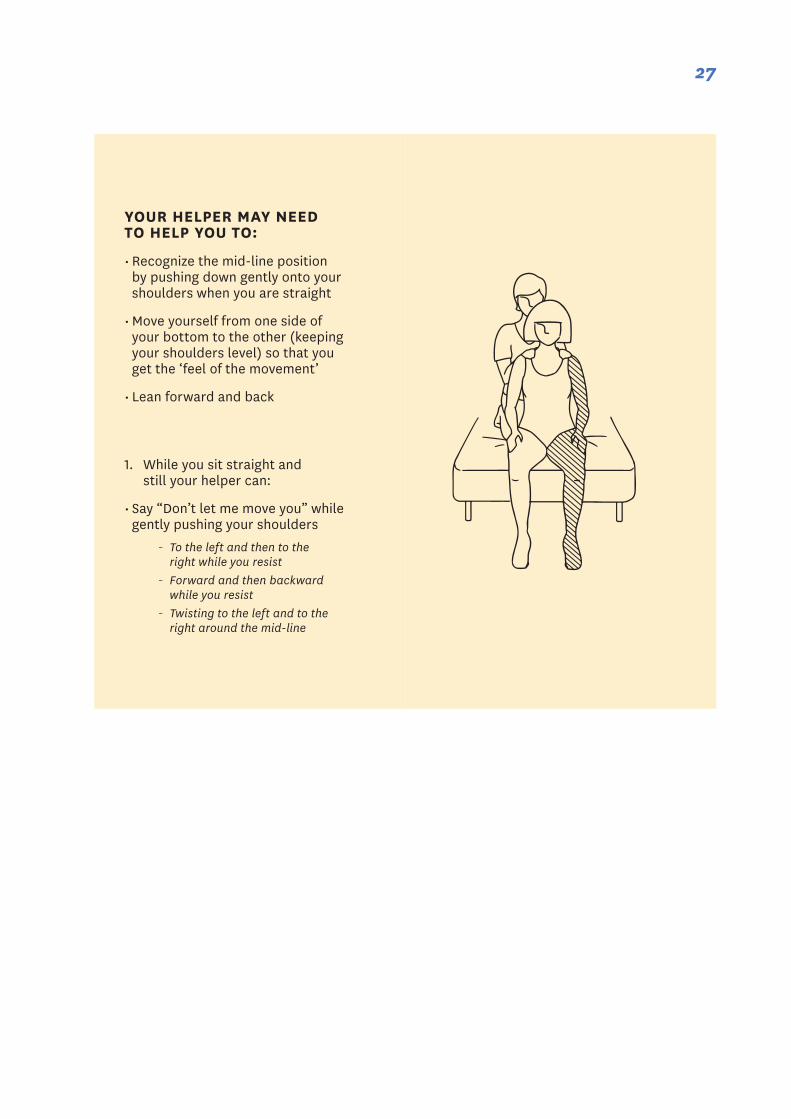
YOUR HELPER MAY NEED TO HELP YOU TO:
• Recognize the mid-line position by pushing down gently onto your shoulders when you are straight
• Move yourself from one side of your bottom to the other (keeping your shoulders level) so that you get the ‘feel of the movement’
• Lean forward and back
1. While you sit straight and still your helper can:
• Say “Don’t let me move you” while gently pushing your shoulders
- To the left and then to the right while you resist
- Forward and then backward while you resist
- Twisting to the left and to the right around the mid-line

28
Exercises while Sitting
1. Clasp your hands together and move your body and arms to
- Reach forward and back - Reach to the left and then to the right
- Reach towards the floor (to the middle, to the left, to the right)
- Reach around and up
2. Lean to the side (elbow onto two pillows) then push through your arm to sit up straight

29
How to Stand Up from a Bed or Chair
If you have a very floppy arm it will need to be supported with a sling. A higher chair is often easier to begin with.
WITHOUT HELP
1. Move forward to the front half of the bed (or chair) by shuffling forward
2. Link your hands together or use your strong arm to push up
3. Have your feet shoulder width apart, well back and flat on the floor
4. Bend forward at the hips (bring your nose over your toes)
5. Reach forward
6. Push through your legs to stand up (equal weight on both feet)
You may feel safer practising sitting to standing with a table in front of you
YOUR HELPER CAN
1. Help you to move forward in the chair
2. Put your arms around their waist
3. Steady your shoulders to help you stand up
4. Block your knees in front or stand in a ‘lunge position - one foot in front of the other’ and shift their weight back as they help you stand up
30
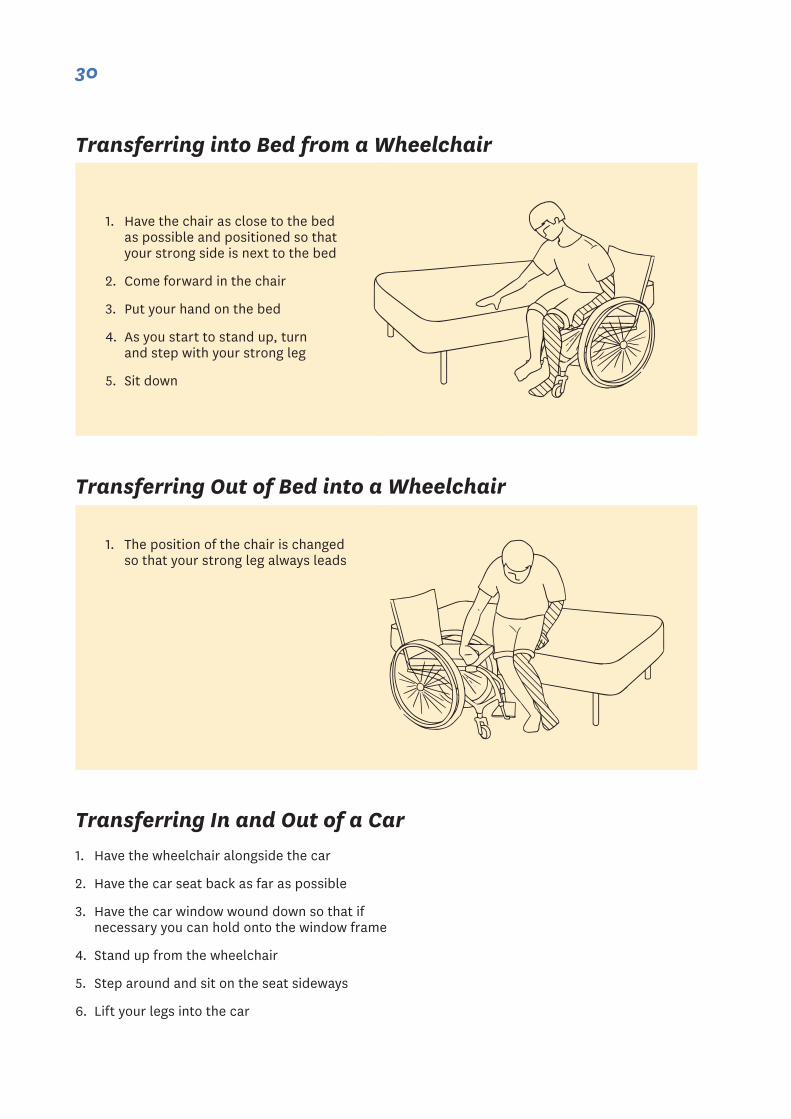
Transferring into Bed from a Wheelchair
Transferring Out of Bed into a Wheelchair
Transferring In and Out of a Car1. Have the wheelchair alongside the car
2. Have the car seat back as far as possible
3. Have the car window wound down so that if necessary you can hold onto the window frame
4. Stand up from the wheelchair
5. Step around and sit on the seat sideways
6. Lift your legs into the car
1. Have the chair as close to the bed as possible and positioned so that your strong side is next to the bed
2. Come forward in the chair
3. Put your hand on the bed
4. As you start to stand up, turn and step with your strong leg
5. Sit down
1. The position of the chair is changed so that your strong leg always leads
31
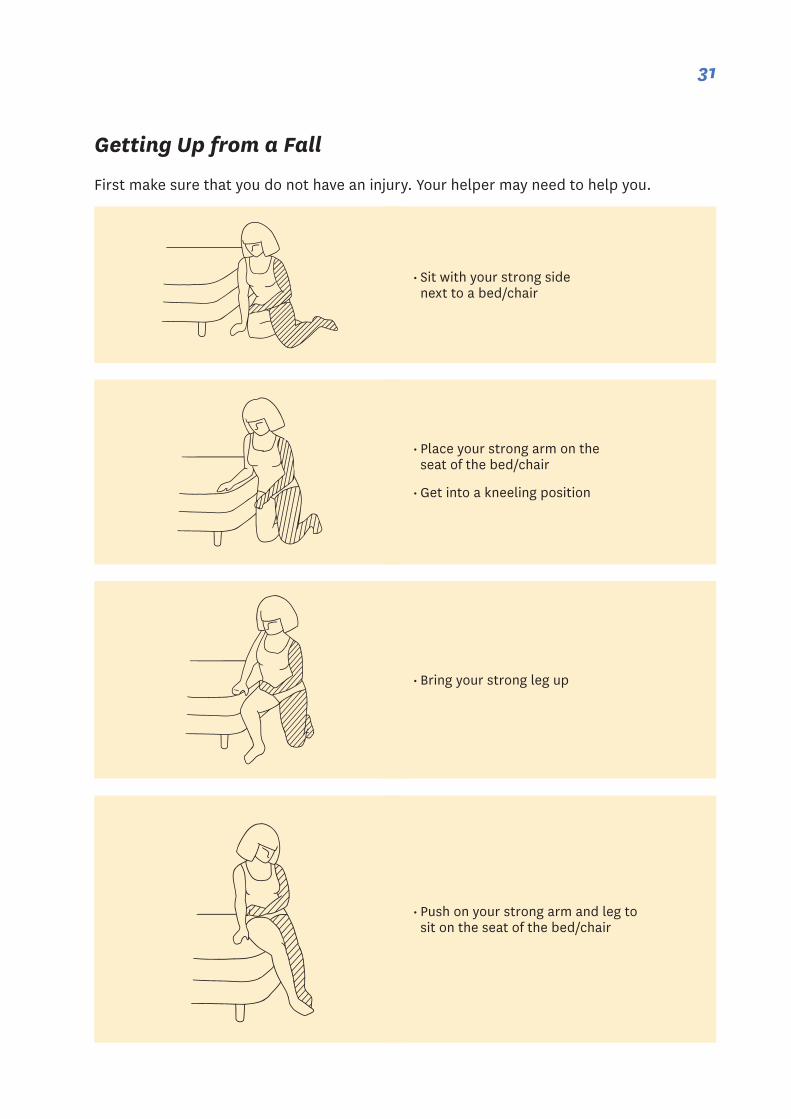
Getting Up from a Fall
First make sure that you do not have an injury. Your helper may need to help you.
• Push on your strong arm and leg to sit on the seat of the bed/chair
• Bring your strong leg up
• Place your strong arm on the seat of the bed/chair
• Get into a kneeling position
• Sit with your strong side next to a bed/chair

3232
Notes

33
Chapter 3Exercises for Strength and Control
34
Exercises for Strength and ControlIt is important to select the right exercise for your stage of recovery. If you have doubts about what you can do, stick to the simple basic exercises and work on them until you are confident that you are doing them correctly. Only then should you move on to the next level.
The number of times you can repeat an exercise depends on your ability at the time. Often at the beginning, 3 repetitions will be all you can do. Rest for 20 seconds and try again. Aim to increase to 10 repetitions. Avoid fatigue.
There are many ways to improve strength and awareness of your weak side. If you have good recovery of movement and can do most basic activities, strengthening can be done by using equipment such as weights. Some people like using gym equipment.
There is often a pattern of recovery which results in some muscles working quite well and others poorly or not at all. Exercise should be directed toward strengthening specific movements. An arm or leg that has increased muscle stiffness requires early stretching and positioning.
35
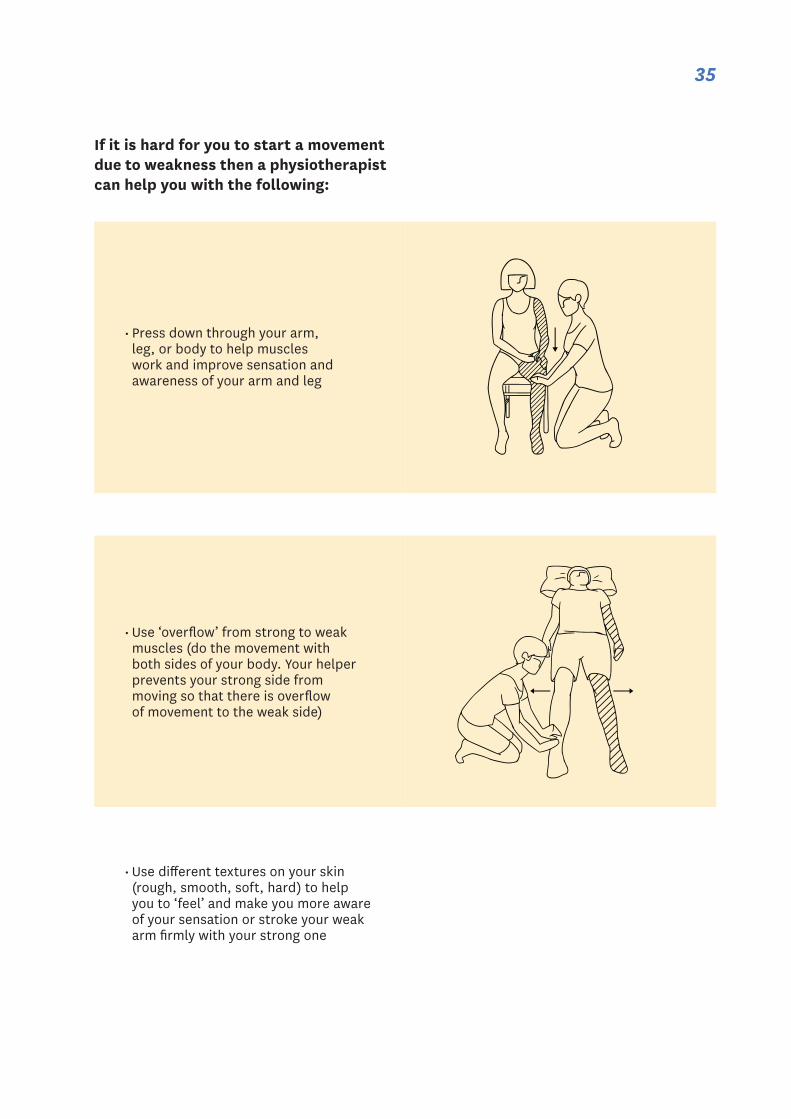
• Press down through your arm, leg, or body to help muscles work and improve sensation and awareness of your arm and leg
• Use ‘overflow’ from strong to weak muscles (do the movement with both sides of your body. Your helper prevents your strong side from moving so that there is overflow of movement to the weak side)
• Use different textures on your skin (rough, smooth, soft, hard) to help you to ‘feel’ and make you more aware of your sensation or stroke your weak arm firmly with your strong one
If it is hard for you to start a movement due to weakness then a physiotherapist can help you with the following:

36
Exercises to Help the Return of Movement in your Arm and HandDeveloping the full use of your arm and hand after a stroke is very challenging. In the early days it is easier to move your arm with help, either by holding it with your strong arm or having your helper assist. Working on your shoulder control is very important. It gives stability to your whole arm.
When exercising it may be easier to start by lying on your strong side (weak side uppermost) or back.
Think about using your arm and attempt to use it. Once you are getting movement back in your arm, try to use both arms in daily life (washing, dressing, and household tasks).
To use your hand there should be a balance between opening and closing. It is important to concentrate on opening the hand because the grasping muscles tend to become short and tight.
Be aware of the tension that might come into your arm when you attempt tasks that may be too hard. If your arm gets tighter, stop and stretch your muscles before you begin again.
The shoulder must be looked after and supported; pain easily occurs. If you have difficulty with the exercises below get advice from a Physiotherapist or Occupational Therapist.

37
Beginning Exercises
If needed, your strong hand can assist or your helper can support and guide your weak arm
LYING ON YOUR STRONG SIDE
1. Your helper supports your weak arm throughout
2. Reach forward
38
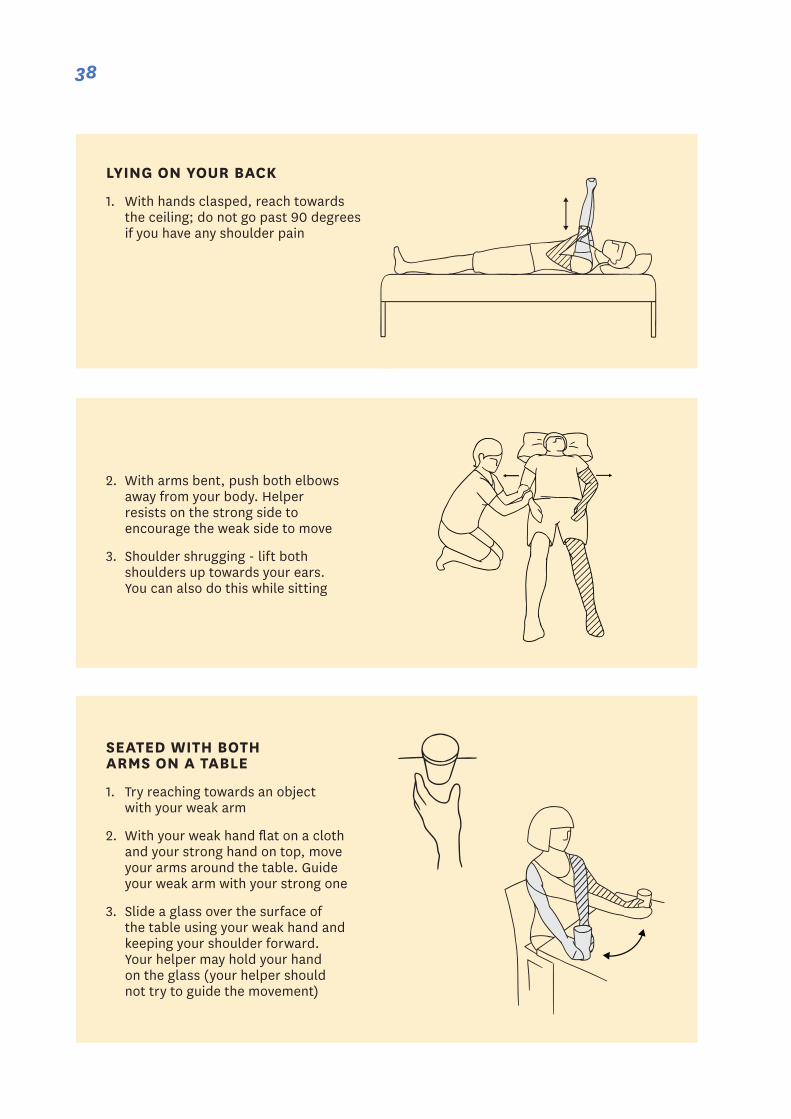
LYING ON YOUR BACK
1. With hands clasped, reach towards the ceiling; do not go past 90 degrees if you have any shoulder pain
2. With arms bent, push both elbows away from your body. Helper resists on the strong side to encourage the weak side to move
3. Shoulder shrugging - lift both shoulders up towards your ears. You can also do this while sitting
SEATED WITH BOTH ARMS ON A TABLE
1. Try reaching towards an object with your weak arm
2. With your weak hand flat on a cloth and your strong hand on top, move your arms around the table. Guide your weak arm with your strong one
3. Slide a glass over the surface of the table using your weak hand and keeping your shoulder forward. Your helper may hold your hand on the glass (your helper should not try to guide the movement)

39
STANDING
1. Place both your hands flat on a table
2. Lean onto your weak arm and hand with the elbow straight. Keeping your hand flat on the table, move your weight forward. Keep your thumb and fingers apart
This is a good exercise to prevent your hand becoming tight You or your helper may need to support your weak arm
LYING ON YOUR BACK
1. Reach towards the ceiling with your weak arm. When your arm is straight, move it a small distance in different directions e.g. up, down, out to the side
Make sure you have enough control to do the movement without your arm falling down, otherwise you will need help
2. Bend your elbow to touch your head with your hand. Straighten your arm and hold it straight
3. Move your hand onto the opposite shoulder. Straighten your arm
YOUR HELPER CAN
• Take your hand towards your face
• Steady your upper arm while you straighten your elbow
Advanced Exercises

40
Daily Activities to Practise for Strengthening your Arm and Hand• Bend and straighten your wrist joint
• Lift your hand while holding a light cup
• Place your hand around a cup. Do not lift it but hold it for 20 seconds. Relax (let go) and open your hand
• Progress to picking up the cup and putting it down
• This can also be practised with a variety of objects (e.g. blocks)
• Use both hands together to pick up a ball, a large cup, a small box
• Do activities with a towel (folding, rolling, drying)
• Use play dough... poke it, put it in the palm of your hand and move it round with your fingers. Use both hands to move it
• Do finger exercises; tapping, touch each finger with the thumb of your weak hand, bend and straighten your fingers
Functional Hand and Finger Activities• Pouring water from a jug into a large bowl
• Writing, drawing - start with a fat pen/marker or a grip on pen
• Rolling a ball on the table
• Scrunching up paper
• Holding and turning over cards
• Picking up small objects like buttons and coins
• Using pegs - open, close and peg onto cloth/paper with weak hand Use both hands to do the task
• Cutting - knife, scissors
• Picking up sticks/straws
• Use iPads, computers, and phones
SEATED AT A TABLE WITH YOUR WEAK ARM SUPPORTED
1. Bend and straighten the elbow of your weak arm
2. With your elbow bent, turn your palm up and down
3. With your forearm supported, keeping your fingers straight, try and make an arch with your hand
You will be able to add many other activities to the above - ‘ be creative’
41
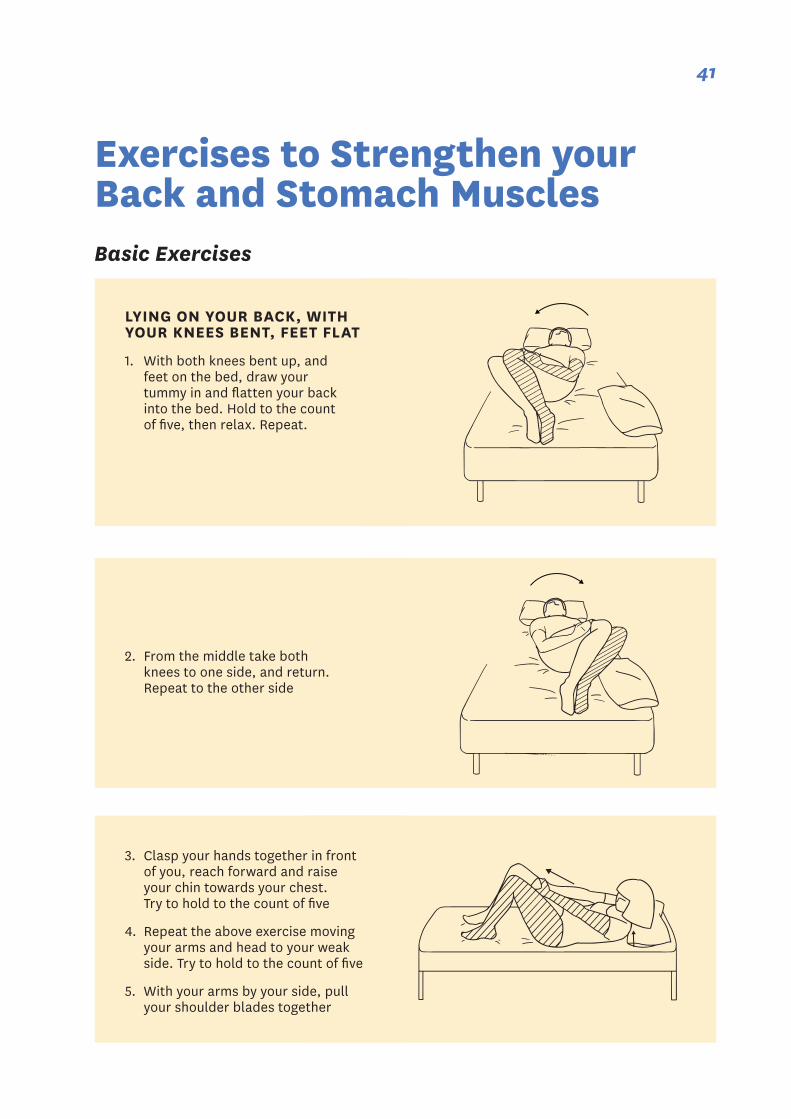
Exercises to Strengthen your Back and Stomach MusclesBasic Exercises
LYING ON YOUR BACK, WITH YOUR KNEES BENT, FEET FLAT
1. With both knees bent up, and feet on the bed, draw your tummy in and flatten your back into the bed. Hold to the count of five, then relax. Repeat.
2. From the middle take both knees to one side, and return. Repeat to the other side
3. Clasp your hands together in front of you, reach forward and raise your chin towards your chest. Try to hold to the count of five
4. Repeat the above exercise moving your arms and head to your weak side. Try to hold to the count of five
5. With your arms by your side, pull your shoulder blades together
42
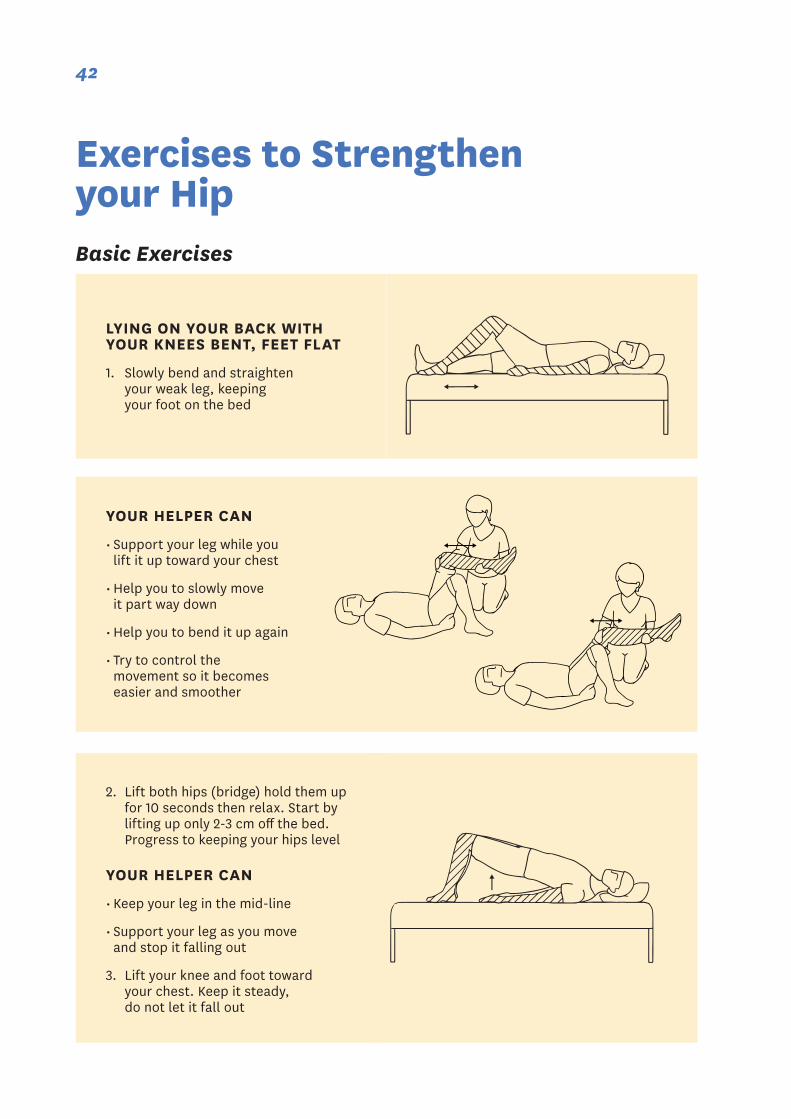
Exercises to Strengthen your HipBasic Exercises
LYING ON YOUR BACK WITH YOUR KNEES BENT, FEET FLAT
1. Slowly bend and straighten your weak leg, keeping your foot on the bed
YOUR HELPER CAN
• Support your leg while you lift it up toward your chest
• Help you to slowly move it part way down
• Help you to bend it up again
• Try to control the movement so it becomes easier and smoother
2. Lift both hips (bridge) hold them up for 10 seconds then relax. Start by lifting up only 2-3 cm off the bed. Progress to keeping your hips level
YOUR HELPER CAN
• Keep your leg in the mid-line
• Support your leg as you move and stop it falling out
3. Lift your knee and foot toward your chest. Keep it steady, do not let it fall out
43
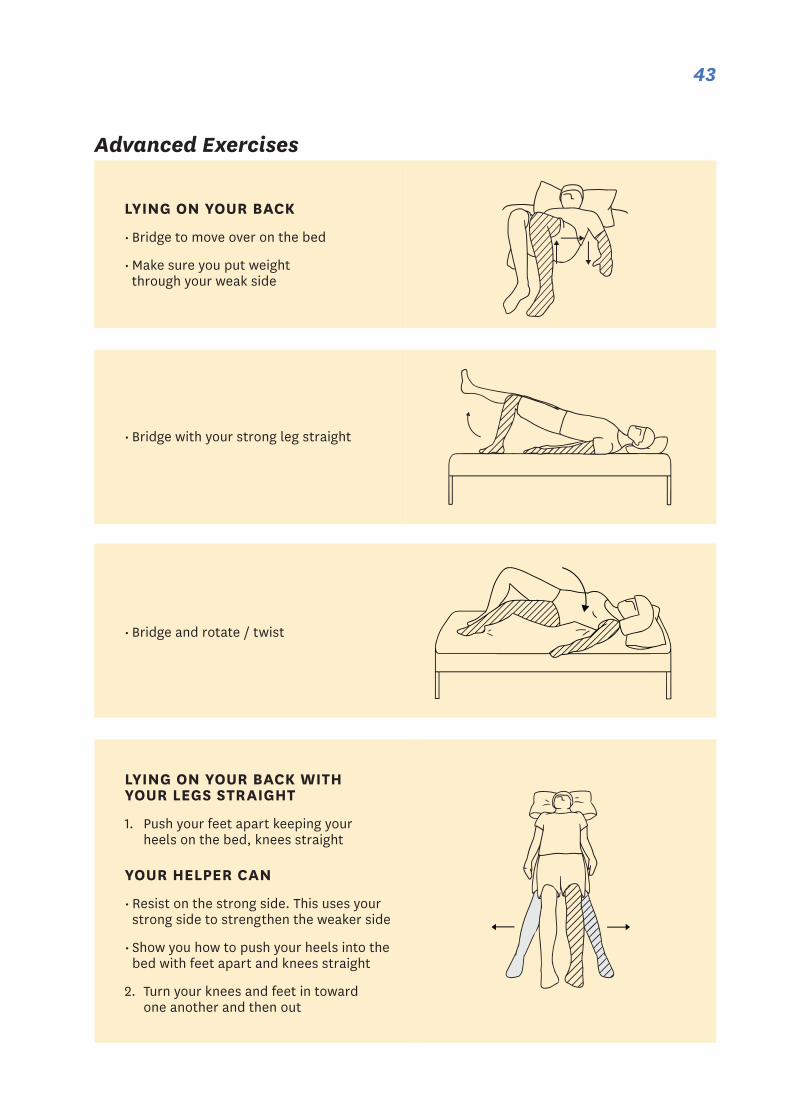
LYING ON YOUR BACK
• Bridge to move over on the bed
• Make sure you put weight through your weak side
• Bridge with your strong leg straight
• Bridge and rotate / twist
LYING ON YOUR BACK WITH YOUR LEGS STRAIGHT
1. Push your feet apart keeping your heels on the bed, knees straight
YOUR HELPER CAN
• Resist on the strong side. This uses your strong side to strengthen the weaker side
• Show you how to push your heels into the bed with feet apart and knees straight
2. Turn your knees and feet in toward one another and then out
Advanced Exercises
44
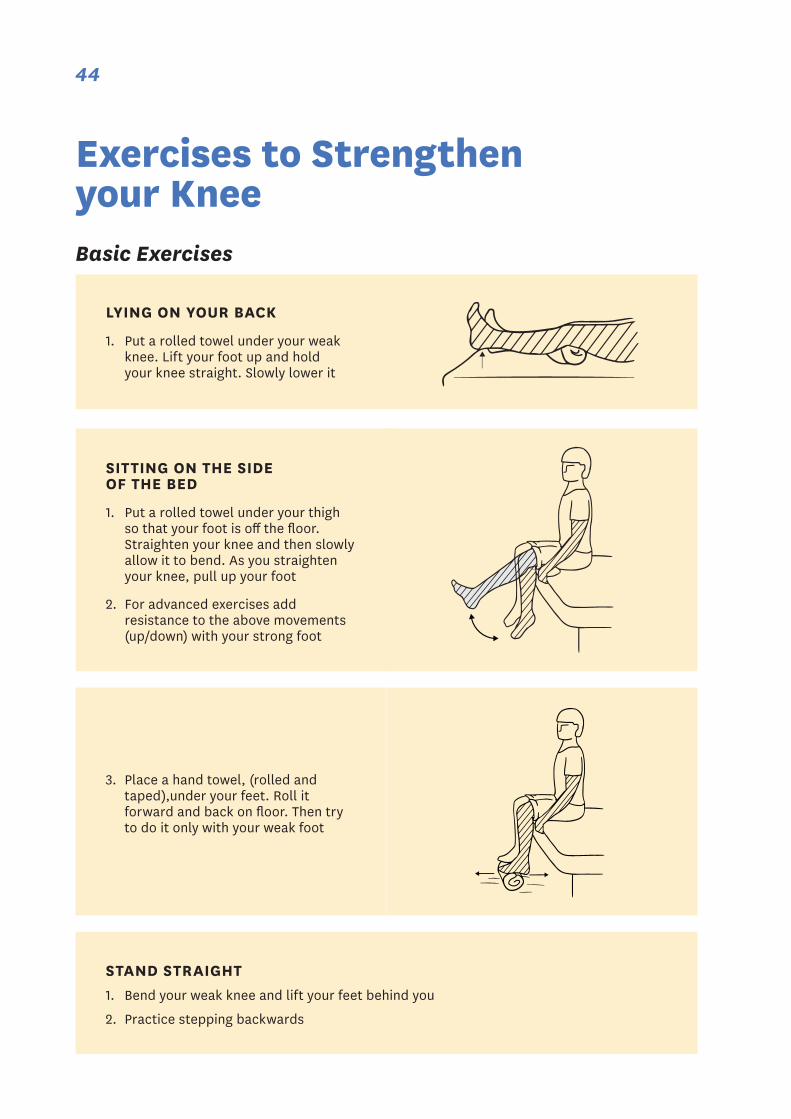
LYING ON YOUR BACK
1. Put a rolled towel under your weak knee. Lift your foot up and hold your knee straight. Slowly lower it
SITTING ON THE SIDE OF THE BED
1. Put a rolled towel under your thigh so that your foot is off the floor. Straighten your knee and then slowly allow it to bend. As you straighten your knee, pull up your foot
2. For advanced exercises add resistance to the above movements (up/down) with your strong foot
3. Place a hand towel, (rolled and taped),under your feet. Roll it forward and back on floor. Then try to do it only with your weak foot
STAND STRAIGHT1. Bend your weak knee and lift your feet behind you
2. Practice stepping backwards
Exercises to Strengthen your KneeBasic Exercises

45
LYING ON YOUR BACK
1. Start with your toes pointing down, try to pull them up. This will be easier with your knee slightly bent.
2. Place your weak leg bent over the side of the bed. Lift your hip and knee and pull up your foot
YOUR HELPER CAN
• Help you lift your weak leg up
3. Sitting with your feet flat on the floor
4. Pull all your toes up
5. Try to keep your foot in the midline
6. Progress to moving only your weak foot
Exercises to Strengthen your AnkleBasic Exercises

4646
Notes
47
Chapter 4Exercises to Help with Standing and Walking
48
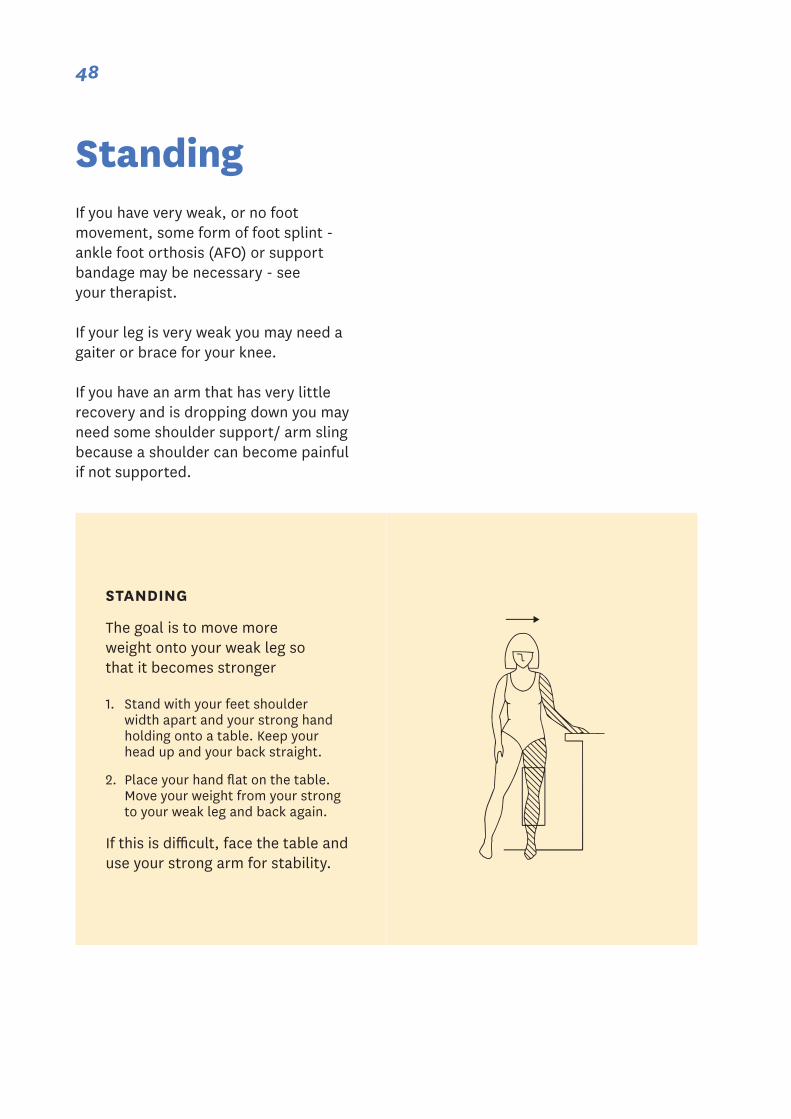
STANDING
The goal is to move more weight onto your weak leg so that it becomes stronger
1. Stand with your feet shoulder width apart and your strong hand holding onto a table. Keep your head up and your back straight.
2. Place your hand flat on the table. Move your weight from your strong to your weak leg and back again.
If this is difficult, face the table and use your strong arm for stability.
StandingIf you have very weak, or no foot movement, some form of foot splint - ankle foot orthosis (AFO) or support bandage may be necessary - see your therapist.
If your leg is very weak you may need a gaiter or brace for your knee.
If you have an arm that has very little recovery and is dropping down you may need some shoulder support/ arm sling because a shoulder can become painful if not supported.

49
Place your feet shoulder width apart
• Shift a small amount of weight from one leg to the other
• Stand on your weak leg, while holding onto a table. Try to lift your strong leg up (this should only be a small distance off the floor to start with)
• Avoid leaning on the table
• Avoid collapsing at the hip when standing on your weak leg. Tighten hip muscles
• Bend both knees together, as if to sit down, and then straighten them. Do not let your weak knee snap back.
• With one foot in front of the other, move your weight forwards and backwards. Keep your body straight. Repeat with the other leg in front
• Hold the table, stand up on your toes
• Hold the table, rock back on your heels
As your leg strengthens do these exercises without a knee support
Exercise for a very weak leg (wearing brace or gaiter)

5050
Notes

51
WalkingIt is important when walking to:
• Remember to straighten up before starting to walk
• As you step forward with your weak leg move your pelvis forward on that side
• Try not to let your weak knee snap back
• Make sure you are taking as much weight as possible through your weak side
• You may need support through your strong side (walking stick or helper). If using a stick, hold it in your strong hand. Move the stick, step with your weak leg and then with your strong leg. Try to make your steps the same length
• Walking an increasing distance is important to improve endurance and lessen fatigue
Further Exercises1. Stand on your weak leg and do
small stepping movements - Out to the side and back - Forward and back. As you practice
stepping, think of lifting your foot up and placing your heel on the floor
2. Stand on your strong leg and repeat
3. Facing the table, step sideways to the left and then to the right
4. Standing sideways to the table, hold on and walk around it
StairsFirst practice stepping onto a low step (8cm/3’’ step) – helper close by:
• Stand on your weak leg and put your strong leg up onto the step
• Keep your weak hip straight
• Put your foot down again
• Put your weak foot up onto the step
• Put your foot down again
• Advance to stepping up
GOING UPSTAIRS: Put your strong leg on the step first
COMING DOWNSTAIRS: Put your weak leg down first