1. TECHNICAL DRAWING: Sketch Up Exercise...
7
Technology 2 1. TECHNICAL DRAWING: "Sketch Up" Exercise 1
Transcript of 1. TECHNICAL DRAWING: Sketch Up Exercise...

Technology
2
1. TECHNICAL DRAWING: "Sketch Up"
Exercise 1

Technology
3
Exercise 2
Technology
4
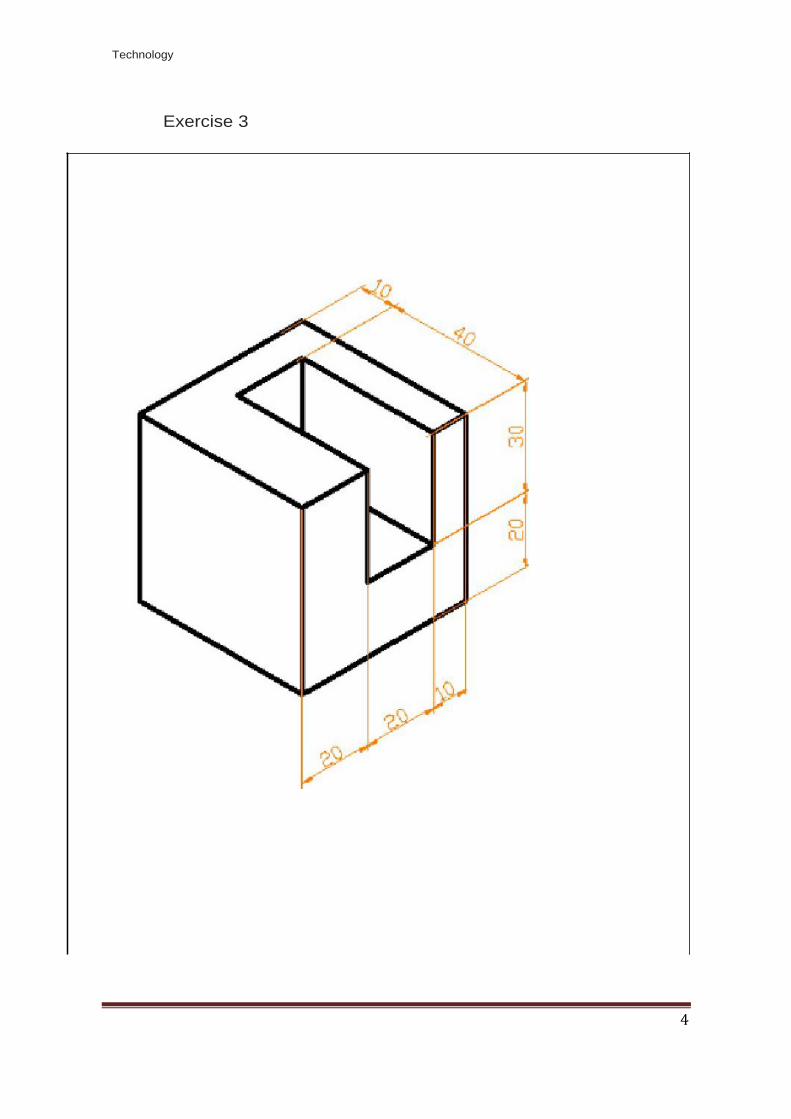
Exercise 3

5
mjb – January 6, 2013
Oregon State UniversityComputer Graphics
An outie or an innie :-)
mjb – January 6, 2013
Oregon State UniversityComputer Graphics
The difference between pushing a hole and cutting a hole
If you push the circle in, you get a tunnel with walls and a back face
If you erase the circle by clicking on the circle, then hitting Delete (notBackspace ), you get a window cut in the wall.
mjb – January 6, 2013
Oregon State UniversityComputer Graphics
Want to see it from a different view?
Click on the Orbit or Pan icon, then click in the scene, and while holding down the mouse, drag in some direction
You can also Orbit by pushing down on the middle button on the mouse. On many mice, the middle button is also the scroll wheel.
mjb – January 6, 2013
Oregon State UniversityComputer Graphics
Want to zoom in?
The Zoom extents icon will zoom in as much as possible without making any of your object disappear off the screen
The Zoom icon will allow you to zoom as much or as little as you want
You can also Zoom in and out with the scroll wheel on the mouse
mjb – January 6, 2013
Oregon State UniversityComputer Graphics
Controlling the SketchUp Camera with a 3D Input Device
The systems in the Oregon State University Computer Graphics Education Lab (CGEL) are each equipped with a 3D input device called a Space Navigator (from a company called 3DConnexion). They come with a SketchUp plug-in that allows them to be used to move the camera all around.
Try it! Gently push and twist the black rubber handle and see what happens. Do it slowly and gently.
mjb – January 6, 2013
Oregon State UniversityComputer Graphics
Let’s give it a roof
Click the Draw-a-Line icon to draw a line across the top of the solid. But, you want the line to go midpoint-to-midpoint, which is a good place to raise the roof line from.
So, before clicking to draw the line, slide the pencil back and forth until the cyan dot appears, indicating that you’ve found this edge’s midpoint,.
Exercise 4: Building a house

6
mjb – January 6, 2013
Oregon State UniversityComputer Graphics
Let’s give it a roof
Now click on the Move/copyicon, then click on the line you just drew, and drag upwards
mjb – January 6, 2013
Oregon State UniversityComputer Graphics
Want to bevel the edge of the roof?
1. Draw a line here
2. Move the point at the tipof the roof
mjb – January 6, 2013
Oregon State UniversityComputer Graphics
Want to make it look more interesting?
1. Click on a category
2. Click on a specific color or pattern
3. Click on the surface(s) you want to apply it to.
Click Window →Materials
mjb – January 6, 2013
Oregon State UniversityComputer Graphics
Pure colors are considered Materials too
1. Select Colors
2. Treat the color just likeyou did the material
Click Window →Materials
Scroll up and down to get more colors
mjb – January 6, 2013
Oregon State UniversityComputer Graphics
1. Click on thecircumference of a circle
2. Drag where you want thedimension to be drawn
Dimensions
1. Click on an edge
2. Drag where you want thedimension to be drawn
Click Tools→Dimensions
Dimensions are useful if you are giving your design to someone so that they can build it
mjb – January 6, 2013
Oregon State UniversityComputer Graphics
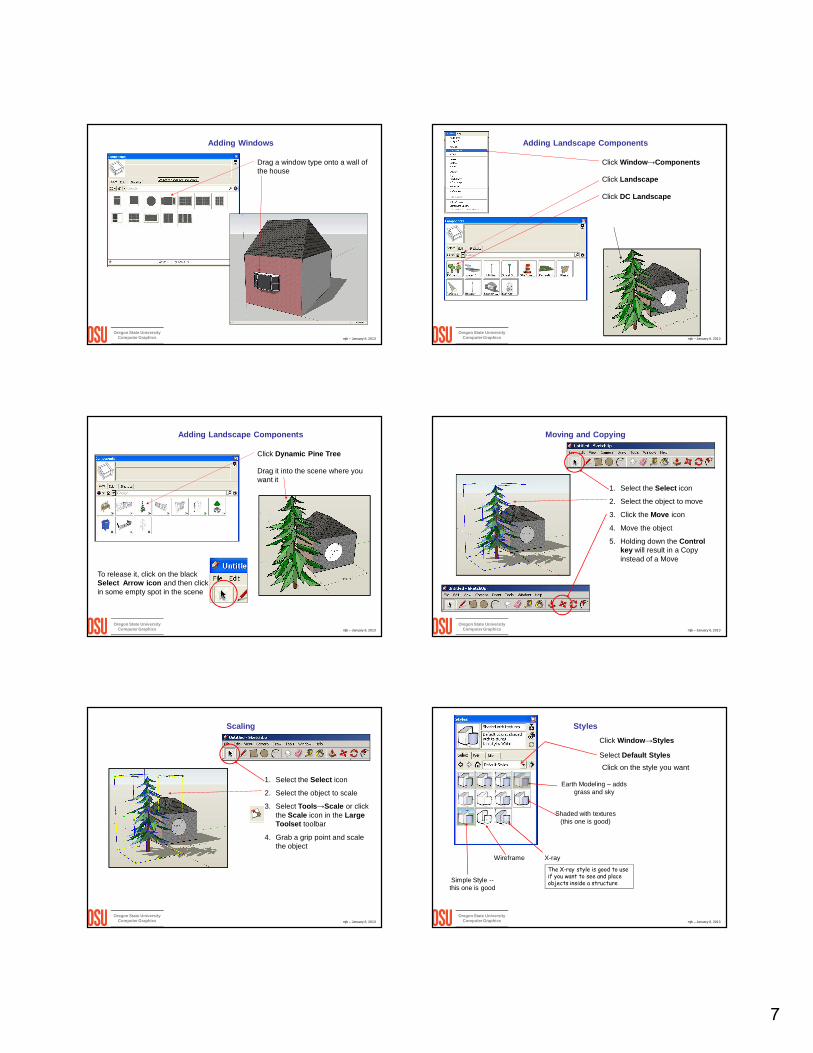
Adding Windows
Click Windows →Components
Click Large Thumbnails
Click Windows
Click Architecture
7
mjb – January 6, 2013
Oregon State UniversityComputer Graphics
Adding Windows
Drag a window type onto a wall of the house
mjb – January 6, 2013
Oregon State UniversityComputer Graphics
Adding Landscape Components
Click Window →Components
Click Landscape
Click DC Landscape
mjb – January 6, 2013
Oregon State UniversityComputer Graphics
Adding Landscape Components
Click Dynamic Pine Tree
Drag it into the scene where you want it
To release it, click on the black Select Arrow icon and then click in some empty spot in the scene
mjb – January 6, 2013
Oregon State UniversityComputer Graphics
Moving and Copying
1. Select the Select icon
2. Select the object to move
3. Click the Move icon
4. Move the object
5. Holding down the Control key will result in a Copyinstead of a Move
mjb – January 6, 2013
Oregon State UniversityComputer Graphics
Scaling
1. Select the Select icon
2. Select the object to scale
3. Select Tools→Scale or click the Scale icon in the Large Toolset toolbar
4. Grab a grip point and scalethe object
mjb – January 6, 2013
Oregon State UniversityComputer Graphics
Styles
Click Window →Styles
Select Default Styles
Simple Style --this one is good
Earth Modeling – adds grass and sky
Shaded with textures (this one is good)
Wireframe X-ray
Click on the style you want
The X-ray style is good to use if you want to see and place objects inside a structure

8
mjb – January 6, 2013
Oregon State UniversityComputer Graphics
Try Some of the Assorted Styles – They’re Fun!
mjb – January 6, 2013
Oregon State UniversityComputer Graphics
Tell SketchUp Where in the World you Are
You care about setting your latitude because SketchUp also lets you . . .
Wow! SketchUp even knows about Corvallis!
Click Window →Model Info →Location
This sets your latitude
mjb – January 6, 2013
Oregon State UniversityComputer Graphics
Setting Shadows in SketchUp
Click Window →Shadows
Set time of day and day of year
mjb – January 6, 2013
Oregon State UniversityComputer Graphics
Projections
Click Camera→Perspective
Click Camera→Parallel Projection
In perspective, things get smaller as they get farther away, which is more realistic. In parallel, they don’t. But parallel helps you see if front and back faces line up.
Perspective Parallel
“Vanishing Point”
mjb – January 6, 2013
Oregon State UniversityComputer Graphics
Exporting an Image File
Click File→Export →2D Graphic
Your image can be exported in one of 4 formats:
1. BMP
2. JPEG
3. TIF
4. PNG
You would do this, for example, to email someone an image of your scene, to import it into a document, or to put it on your website
You can also export the 3D scene, but in the free version, only to Google Earth format. For more 3D formats, you need the Pro version.
Web browsers all know about this format
mjb – January 6, 2013
Oregon State UniversityComputer Graphics
Other Cool Things you can do with SketchUp