


Languages
Pages
Legal


Windows Server 2012 R2The Essentials Experience
Part 3 of 7Installation and Migration

Agenda
Installation
Migration guidance
Getting started setup tasks
Server settings

Installation

System requirementsWindows Server 2012 R2 Essentials
Component Minimum Recommended Maximum
Processor/CPU socket
1.4 GHz (64-bit processor) or faster for single core, or1.3 GHz (64-bit processor) or faster for multi-core
3.1 GHz (64-bit processor) or faster multi-core
2 sockets
Memory (RAM) 2 GB (4 GB if installed as a virtual machine) 8 GB 64 GB
Hard drive 160 GB hard disk with a 60 GB system partition No limit
Additional Requirements
Component Description
Network adapter Gigabit Ethernet adapter (10/100/1000baseT PHY/MAC)
Internet Some functionality may require Internet access (fees may apply) or a Microsoft account
Supported Client operating systems
Windows 8.1, Windows 8, Windows 7, Macintosh OS X version 10.5 to 10.8(Some features require professional or higher editions)
Router A router or firewall that supports IPv4 NAT or IPv6
Add’l requirements • DVD-ROM drive
Supported networking configuration
• Your server must be connected via a network cable to a router• The router should be a UPnP-certified device, but it is not required• The router should be in the 192.168.x.x subnet, but it is not required
http://technet.microsoft.com/en-us/library/dn383626.aspx

OS installation phase• Windows Server 2012 R2
Essentials is often sold pre-installed on servers
• Windows Pre-Installation Environment phase
‐ Optionally install drivers
‐ Select system disk
‐ Prerequisites verified
• Windows Server installation phase
• Essentials Experience configuration
‐ Role-specific features & functionality

Install as a virtual machine• Select OEM vendors offer servers
with a wizard-driven option for installing Essentials as a virtual machine
• Volume license customers can also install Essentials as a virtual machine
‐ Only a single license is necessary‐ Essentials can be its own Hyper-V
host, complete with a full GUI and the Hyper-V Manager console
• When used with the Standard or Datacenter editions, the Windows Server Essentials Experience role is almost always installed in a virtual machine
Steps for creating a customized image: http://technet.microsoft.com/en-us/library/dn293253.aspx

Role configuration• Simplified install process:
‐ Verify time & date
‐ Company Information
‐ Administrator account & password
‐ Update settings

Install as a virtual machine with VL bitsPhase 1: Prep the parent partition• Complete OS installation phase on the physical server• Cancel the role configuration wizard
‐ To prevent it from restarting, from PowerShell enter:dism /online /disable-feature:Microsoft-Windows-ServerEssentials-ServerSetup
• Unpin Dashboard shortcut from the Taskbar• Start the Server Manager console and remove roles/features
‐ File and Storage Services: BranchCache, DFS‐ Web Server (IIS)‐ Windows Server Essentials Experience‐ .NET Framework 4.5 Features: ASP.NET 4.5‐ Group Policy Management‐ BranchCache‐ Ink and Handwriting Services‐ Media Foundation‐ Remote Server Administration Tools‐ Windows Process Activation Service

Install as a virtual machine with VL bitsPhase 2: Install Hyper-V role, create virtual machine• Start the Server Manager console
‐ Add the Hyper-V role• Create any desired Storage Spaces• Start the Hyper-V Manager console
‐ Optionally enable Hyper-V Replica and Live Migration‐ Create a virtual switch connected to a physical NIC‐ Create a new virtual machine
Create a “Generation 2” VM Configure at least 4GB of RAM Configure at least 2 virtual hard disks
‐ Start the VM and install Essentials normally

Essentials Experience in Windows Azure• Benefits of running as a virtual machine in
Windows Azure‐ Create your first server in minutes and easily adjust
the scale of your VM as your needs change
‐ With the pay-as-you-go approach, you only pay for what you use, and there are no up-front capital expenses
‐ Your server running Windows Server Essentials Experience is deployed into a multi-zone production environment that is commercially backed with an SLA
• Installation guidance is available at http://msdn.microsoft.com/en-us/library/dn520828.aspx

Migration guidance

Migration guidance
Transition from Windows Server 2012 R2 Essentials to Windows Server 2012 R2 Standardhttp://technet.microsoft.com/en-us/library/jj247582.aspx
TechNet migration documentationLearn more about migrating to Windows Server 2012 R2 Essentials athttp://technet.microsoft.com/library/dn408633.aspx
Step 1: Prepare your Source Server for Windows Server 2012 R2 Essentials migration
Step 2: Install Windows Server 2012 R2 Essentials as a new replica domain controller
Step 3: Join computers to the new Windows Server 2012 R2 Essentials server
Step 4: Move settings and data to the Destination Server
Step 5: Enable folder redirection on the Destination Server
Step 6: Demote and remove the Source Server from the network
Step 7: Perform post-migration tasks for the migration.
Step 8: Run the Windows Server 2012 R2 Essentials Best Practices Analyzer.

Getting started setup tasks

Essentials Dashboard• Dashboard
‐ Provides a centralized, simplified administration interface
‐ Can run on the server or from a client computer via RemoteApp
‐ Home page has been redesigned to be more functional
• Setup (Getting Started) Tasks‐ Recommended initial
configuration tasks collected into a “to-do” list
‐ Used to customize Essentials behavior for each customer environment

Add user accounts• Control access to resources by
creating an account for each user
• Simplified account creation process
‐ Basic information about the user
‐ Shared folder access
‐ Optional mailbox setup when using Office 365, Exchange Server, or a Hosted Exchange service
‐ Remote Web Access permissions

Add server folders• Organize business information
and control who can access which documents by creating shared folders
• Simplified shared folder wizard
‐ Enter folder name
‐ Assign user and group permissions
‐ Include in server backup
• Shared folders can be access remotely
‐ Remote Web Access
‐ My Server 2012 R2 app for Windows and Windows Phone
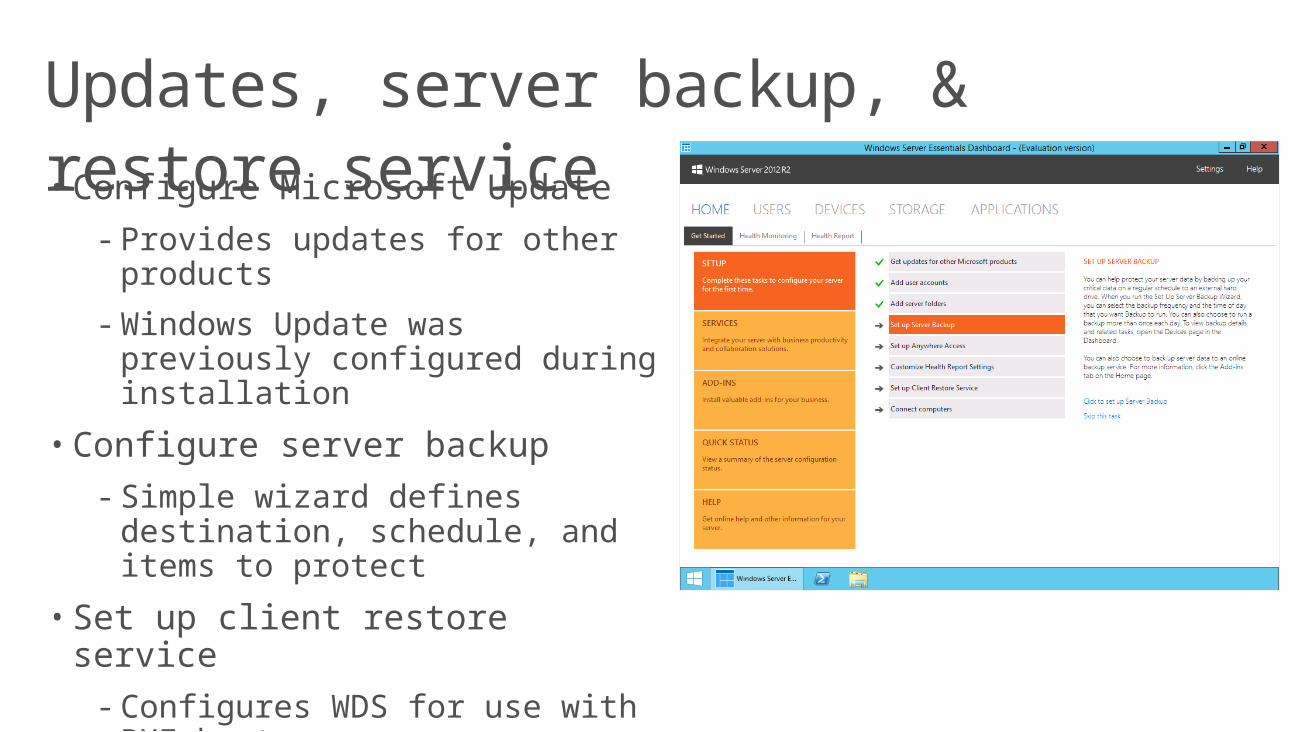
Updates, server backup, & restore service• Configure Microsoft Update
‐ Provides updates for other products
‐ Windows Update was previously configured during installation
• Configure server backup‐ Simple wizard defines destination,
schedule, and items to protect
• Set up client restore service‐ Configures WDS for use with PXE
boot
‐ Use to easily perform full bare metal restores of client PCs without needing a bootable DVD or USB drive

Set up Anywhere Access• Comprehensive wizards guide
you through the process‐ Router configuration
‐ Internet domain name
‐ SSL certificate
‐ Enable Remote Web Access and/or VPN
• Remote Web Access portal can be customized
• VPN connections can be used to remotely join client computers to the Essentials environment

Health reporting• Proactive health status
monitoring provides rich set of alerts
• Can be sent as email notifications
‐ Need to configure mail server settings
‐ SMTP server settings
‐ Sender and recipient addresses
• Alerts are shown on the Health Monitoring tab of the Home page
• Alerts provide description of issue and proscriptive guidance
• Many alerts include a link to an appropriate tool

Connect client computers• Launch from a web page
‐ http://servername/connect‐ https://remote.domainname/
connect• Connect Computer wizard
‐ Verifies and installs prerequisites‐ User provides their credentials‐ Select whether or not to move
settings and data*‐ Enter a computer description‐ Wake client computer to perform
backups to the server?‐ Participate in customer
experience improvement program?* Requires supported business client SKU
Supported operating systems for client computers
http://technet.microsoft.com/en-us/library/jj713528.aspx

Server settings

General settings• General settings include:
‐ Modify date & time
‐ Modify locale
‐ Modify update settings/Install updates
‐ Windows System and Security settings control updates for the server
‐ Windows activation
• Modify feedback options‐ Customer Experience
‐ Automatically report errors
• Power button: Restart, Shutdown

Media settings• Optionally download and install
media streaming functionality‐ Windows Server Essentials Media
Packhttp://www.microsoft.com/en-us/download/details.aspx?id=40837
‐ Easily share pictures
‐ Stream video and music from the server, with support for:
DLNA-compliant devices
Remote Web Access
My Server 2012 R2 app for Windows and Windows Phone

Anywhere Access settings• Remote Web Access must be
turned on and configured before use
‐ Many routers can be configured via universal plug & play (UPnP)
‐ Can use a new or existing Internet domain name (e.g., contoso.com)
‐ Can use a new or existing SSL certificate
‐ Easily customize: Title, background image, and logo
Homepage links
Remote administration usingthe Dashboard or full Remote Desktop
Top Related
