


Languages
Pages
Legal

Start
Oraclereg Insurance Policy Administration
WebSphere 7 Deployment
Installation Instructions ndash Step 2
Version 9710
Documentation Part Number E51561-01
December 2013
9710 OIPA WebSphere Installation and Configuration 2 of 25 Revised 12242013
Copyright copy 2009 2013 Oracle andor its affiliates All rights reserved
Trademark Notice
Oracle and Java are registered trademarks of Oracle andor its affiliates Other names may be trademarks of their respective owners
License Restrictions
WarrantyConsequential Damages Disclaimer
This software and related documentation are provided under a license agreement containing restrictions on use and disclosure and are protected by intellectual property laws Except as expressly permitted in your license agreement or allowed by law you may not use copy reproduce translate broadcast modify license transmit distribute exhibit perform publish or display any part in any form or by any means Reverse engineering disassembly or decompilation of this software unless required by law for interoperability is prohibited
Warranty Disclaimer
The information contained herein is subject to change without notice and is not warranted to be error-free If you find any errors please report them to us in writing
Restricted Rights Notice
If this is software or related documentation that is delivered to the US Government or anyone licensing it on behalf of the US Government the following notice is applicable
US GOVERNMENT END USERS Oracle programs including any operating system integrated software any programs installed on the hardware andor documentation delivered to US Government end users are ldquocommercial computer softwarerdquo pursuant to the applicable Federal Acquisition Regulation and agency-specific supplemental regulations As such use duplication disclosure modification and adaptation of the programs including any operating system integrated software any programs installed on the hardware andor documentation shall be subject to license terms and license restrictions applicable to the programs No other rights are granted to the US Government
Hazardous Applications Notice
This software or hardware is developed for general use in a variety of information management applications It is not developed or intended for use in any inherently dangerous applications including applications that may create a risk of personal injury If you use this software or hardware in dangerous applications then you shall be responsible to take all appropriate failsafe backup redundancy and other measures to ensure its safe use Oracle Corporation and its affiliates disclaim any liability for any damages caused by use of this software or hardware in dangerous applications
Third Party Content Products and Services Disclaimer
This software or hardware and documentation may provide access to or information on content products and services from third parties Oracle Corporation and its affiliates are not responsible for and expressly disclaim all warranties of any kind with respect to third-party content products and services Oracle Corporation and its affiliates will not be responsible for any loss costs or damages incurred due to your access to or use of third-party content products or services
9710 OIPA WebSphere Installation and Configuration 3 of 25 Revised 12242013
Table of Contents
INTRODUCTION 4
Customer Support 4
Prerequisites 4
INITIAL SYSTEM CONFIGURATION 5
Database Drivers 5
OIPA Setup 5
Web Application Utility Setup 8
CREATE AND CONFIGURE OIPA 9
Create the OIPA Application Server 9
Configure WebSphere Environment Variable for Database Driver 10
Configure the OIPA Application Server 11
JVM Settings 11
Configure the Listening Port 11
Configure the Virtual Host 12
Create Data Sources 12
Add the JDBC Provider 12
Create the Data Sources 13
Deploy the OIPA Application 15
Create a Shared Library for OIPA 18
Configure the OIPA Application 20
Start the OIPA Application 20
CREATE AND CONFIGURE THE WEB APPLICATION UTILITY 21
Create the Web Application Utility Server 21
Configure the Web Application Utility Server 21
JVM Settings 21
Configure the Listening Port 22
Configure the Virtual Host 22
Deploy the Web Application Utility 22
Create a Shared Library for Web Application Utility 23
Configure the Web Application Utility 24
Start the Web Application Utility 24
TEST THE DEPLOYMENTS 25
OIPA Deployment 25
Web Application Utility Deployment 25
9710 OIPA WebSphere Installation and Configuration 4 of 25 Revised 12242013
INTRODUCTION
The Oracle Insurance Policy Administration (OIPA) application and the Oracle Insurance Rules Palette form a
solution for configuring managing and processing policy data Both applications along with the Web
Application Utility must be installed and then configured to work together
This install guide will cover step two of the installation process in which the OIPA application and Web
Application Utility are configured using IBM WebSphere Version 7 Please refer to the OIPA Database
Installation Instructions provided in the documentation library to ensure the database is set up correctly
Customer Support
If you have any questions about the installation or use of our products please visit the My Oracle Support
website httpssupportoraclecom or call (800) 223-1711
Oracle customers have access to electronic support through My Oracle Support For information visit
httpwwworaclecomplstopiclookupctx=accampid=info or visit
httpwwworaclecomplstopiclookupctx=accampid=trs if you are hearing impaired
Prerequisites
Before beginning the installation steps you must have the following components
A server with a Windows or Linux operating system
WebSphere Application Server Version 70 Service Pack 25
Administrative rights to the server
Oracle Insurance Rules Palette V9710 Media Pack from the Oracle Software Delivery Cloud The
Web Application Utility files are included in this Media Pack
Oracle Insurance Policy Administration V9710 Media Pack from the Oracle Software Delivery Cloud
Deleted 0
Deleted 0
9710 OIPA WebSphere Installation and Configuration 5 of 25 Revised 12242013
INITIAL SYSTEM CONFIGURATION
Database Drivers
Create a directory for the database drivers for your database Copy the necessary driver jar files into this
directory
Example AIX or Linux optoracledb_drivers
Windows Coracleoipadb_drivers
Oracle 112 ndash The necessary driver ojdbc-11202jar is included in the libs directory of the OIPA
Media Pack
Microsoft SQL Server 2008 ndash download the latest jtdsjar file
a Download jtdsjar from the following site httpsourceforgenetprojectsjtds
b Click the green Download box on the right side of the screen A pop-up window will open
c Save the zip file
d Open the downloaded zip file and extract the file jtds-126jar from the root of the zip file
e Rename the file jtdsjar
IBM DB2 ndash The two necessary jar files (db2jcc and db2jcc_license_cu) are included with the
purchase of the DB2 software These files are not available for download Contact your IT
department if you need assistance locating these files
Note Each version of DB2 requires specific drivers The files above correspond with DB2 97
OIPA Setup
Note For a WebSphere 7 deployment the jar files need to be installed only once If OIPA Is reinstalled the existing files may be re-used
1 Copy the following files to the external jar file directory (eg optIBMWebSphereAppServerlibext)
eclipselink-230jar
javaxpersistence-203jar
2 Edit ammfilterproperties from optIBMWebSphereAppServerproperties
a Remove or comment out the lines listed below
Ignore-Scanning-Archives = antjar axisjar CICSjar db2javazip db2jccjar db2jcc_javaxjar dfjcicsjar
9710 OIPA WebSphere Installation and Configuration 6 of 25 Revised 12242013
ibmjndijar jaxrpcjar jakartaorojar ldapbpjar mailapijar msbasejar mssqlserverjar saajjar wsdl4jjar sqljdbcjar strutsjar struts-scaffoldjar
b Add the lines listed below
3 Ignore-Scanning-Archives antjar axisjar CICSjar db2javazip db2jccjar
db2jcc_javaxjar dfjcicsjar ibmjndijar jaxrpcjar jakartaorojar ldapbpjar
mailapijar msbasejar mssqlserverjar saajjar wsdl4jjar sqljdbcjar strutsjar
struts-scaffoldjar antisamy-143jaraopalliance-10jarape-9710jarbackport-util-
concurrent-22jarbatik-css-17jarbatik-ext-17jarbatik-util-17jarbcel-bcel-
51jarbll-9710jarcglib-nodep-222jarcoherence-371jarcoherencecommon-
211jarcoherencepatternsprocessing-142jarcommons-beanutils-core-170jarcommons-
codec-14jarcommons-configuration-15jarcommons-dbcp-14jarcommons-dbutils-
13jarcommons-digester-18jarcommons-fileupload-12jarcommons-httpclient-
31jarcommons-lang-23jarcommons-pool-156jarcycleagent-9710jarcycleinterface-
9710jardal-9710jardcl-9710jardom4j-161jarel-ri-12jaresapi-
20GAjarext-9710jarextensibility-9710jarFastInfoset-122jarfreemarker-
2316jarglobaldal-9710jarglobaldcl-9710jarglobalprocessing-
9710jarglobalutl-9710jaricefaces-comps-ee-EE-182GA_P04jaricefaces-ee-EE-
182GA_P04jaricefaces-facelets-ee-EE-182GA_P04jaricu4j-46jarjanino-
2516jarjaxen-113jarjep-240jarjibx-bind-122jarjibx-extras-122jarjibx-run-
122jarjsf-api-12_15-b01-FCSjarjsf-impl-12_15-b01-FCSjarkrysalis-jCharts-100-
alpha-1jarlisttxtlog4j-1216jarmail-14jarmath-9710jarmodel-
9710jarnekohtml-1912jaroraclepki-1111jarosdt_cert-1111jarosdt_core-
1111jarpasape-9710jarpasbll-9710jarpascycle-9710jarpasdal-
9710jarpasdcl-9710jarpashelper-9710jarpasmodel-9710jarpasoipa-
9710jarpasuip-9710jarresource-9710jarsaxon-9108jarsaxon-dom-
9108jarslf4j-api-161jarslf4j-log4j12-161jarspring-aop-306RELEASEjarspring-
asm-306RELEASEjarspring-beans-306RELEASEjarspring-context-
306RELEASEjarspring-core-306RELEASEjarspring-expression-306RELEASEjarspring-
jdbc-306RELEASEjarspring-orm-306RELEASEjarspring-tx-306RELEASEjarspring-web-
306RELEASEjarsre-9710jarsreinterface-9710jaruip-9710jarutl-
9710jarweb-9710jarxml-apis-ext-1304jarxmldsig-10jarxws-security-30jar
4 Create a directory on the WebSphere server to store various configuration files for OIPA (eg
optoracleoipa or Coracleoipa)
Deleted antjar axisjar CICSjar db2javazip db2jccjar db2jcc_javaxjar dfjcicsjar ibmjndijar jaxrpcjar jakartaorojar ldapbpjar mailapijar msbasejar mssqlserverjar saajjar wsdl4jjar sqljdbcjar strutsjar struts-scaffoldjar antisamy-143jar antlr-34jar aopalliance-10jar CICSjar ape-97000-SNAPSHOTjar aspectjrt-1611jar aspectjweaver-1611jar backport-util-concurrent-22jar batik-css-17jar batik-ext-17jar batik-util-17jar bcel-51jar bll-97000-SNAPSHOTjar cglib-nodep-222jar coherencecommon-211jar coherencepatternsprocessing-142jar coherence-371jar commons-beanutils-core-170jar commons-codec-14jar commons-collections-321jar commons-configuration-15jar commons-dbcp-14jar commons-dbutils-13jar commons-digester-18jar commons-fileupload-12jar commons-httpclient-31jar commons-lang-23jar commons-logging-111jar commons-pool-156jar cycleagent-97000-SNAPSHOTjar cycleinterface-97000-SNAPSHOTjar dal-97000-SNAPSHOTjar dcl-97000-SNAPSHOTjar dom4j-161jar ehcache-core-243jar el-ri-12jar esapi-20GAjar ext-97000-SNAPSHOTjar extensibility-97000-SNAPSHOTjar FastInfoset-122jar globaldal-97000-SNAPSHOTjar globaldcl-97000-SNAPSHOTjar globalprocessing-97000-SNAPSHOTjar globalutl-97000-SNAPSHOTjar icefaces-ee-EE-182GA_P04jar icefaces-comps-ee-EE-182GA_P04jar icefaces-facelets-ee-EE-182GA_P04jar icu4j-46jar janino-2516jar jaxen-113jar jep-240jar jibx-bind-122jar jibx-extras-122jar jibx-run-122jar jsf-api-12_15-b01-FCSjar jsf-impl-12_15-b01-FCSjar krysalis-jCharts-100-alpha-1jar log4j-1216jar mail-14jar math-97000-SNAPSHOTjar model-97000-SNAPSHOTjar nekohtml-1912jar oraclepki-1111jar osdt_cert-1111jar osdt_core-1111jar ojdbc-11202jar pasape-97000-SNAPSHOTjar pasbll-97000-SNAPSHOTjar pascycle-97000-SNAPSHOTjar pasdal-97000-SNAPSHOTjar pasdcl-97000-SNAPSHOTjar pashelper-97000-SNAPSHOTjar pasmodel-97000-SNAPSHOTjar pasuip-97000-SNAPSHOTjar resource-97000-SNAPSHOTjar saxon-9108jar saxon-dom-9108jar slf4j-api-161jar slf4j-log4j12-161jar spring-aop-
9710 OIPA WebSphere Installation and Configuration 7 of 25 Revised 12242013
5 Create sub-directories inside the directory from Step 1 called conf and libs
Note Make a note of the path to the libs directory It will be used later in the classpath for setting up the OIPA Shared Library
6 Copy the following files from the installation media into the conf sub-directory
coherence-cache-configxml
coherence-configxml
PASproperties
7 Copy the following files from the installation media to the libs sub-directory
antlr-34jar
commons-collections-321jar
commons-logging-111jar
el-api-22jar
log4j-1216jar
spring-instrument-306RELEASEjar
8 Download aspectj-1611jar from
httpwwweclipseorgdownloadsdownloadphpfile=toolsaspectjaspectj-1611jar
Open aspectj-1611jar with an unzipping software and copy aspectjrtjar and aspectjweaverjar
from the lib folder into the libs sub-directory
Note Delete aspectjrtjar from IBMWebSphereAppServerlib
9 Use a text editor to open the PASproperties file that you just copied to the server
The PASproperties file contains properties for Oracle SQL Server and DB2 database types with the
Oracle settings active by default The inactive settings are commented out with a lsquorsquo character at the
start of each line To change a setting remove the lsquorsquo from the required property setting and insert it at
the beginning of the setting you want to de-activate
10 The properties setting must match the type of database being used The two properties that are used
to do this are
applicationdatabaseType
jpadatabasePlatform
Note Refer to the System Properties document in the Oracle Insurance Policy Administration E39062_01 Documentation Library on the OTN for a complete list of all properties and allowed values
11 Identify the default locale in the PASproperties file The locale selected will determine the translation
that is loaded in the database for OIPA when it launches The default setting is English
applicationdefaultLocale
9710 OIPA WebSphere Installation and Configuration 8 of 25 Revised 12242013
12 If using an Oracle or Microsoft SQL Server database please skip this step If using a DB2 database
you will need to modify the PASproperties file to include configuration for case-insensitive searching
Modify the PASproperties file to change the following line from the default setting of ldquofalserdquo to
ldquotruerdquo
searchfieldtextcaseInsensitive=true
Web Application Utility Setup
1 Create a directory on the WebSphere server to store various configuration files for the Web Application
Utility (ie optoraclepaletteconfig or Coraclepaletteconfig)
2 Create sub-directories inside the directory from Step 1 called conf libs and uploads
3 Copy the PaletteWebApplicationproperties file into the conf sub-directory
4 Use a text editor to open the PaletteWebApplicationproperties file and edit the downloaddir property
to point to the uploads sub-directory created in Step 2
9710 OIPA WebSphere Installation and Configuration 9 of 25 Revised 12242013
CREATE AND CONFIGURE OIPA
Using a web browser connect to the Administrative Console using the appropriate server name and 9060 as
the default port (Ex httpserver_name9060admin)
Create the OIPA Application Server
1 Select ServersgtNew server
2 Select server type WebSphere application server
3 Enter OIPA for the name of the server
4 Click Next
5 Select the default server template
6 Click Next
7 Ensure Generate Unique Http Ports is checked
8 Confirm the new server by clicking Finish
9 After the application has been created review the messages at the top of the Application servers
screen to confirm that the new server has been created successfully
10 Navigate to the OIPA server by clicking on its name within the list of application servers
11 Click the Session management link in the Container Settings section
12 Verify that Enable Cookies is checked This is checked by default
13 Click the Enable Cookies link and verify that Restrict cookies to HTTPS sessions is unchecked
(This is unchecked by default)
14 Click OK
15 Click OK to save the configuration changes
Note These instructions assume that a fresh installation of the application server was performed All configuration settings must use the default settings unless otherwise noted If the application server has been used for previous deployments you may want to create a new application server specifically for the deployment of the OIPA environment
9710 OIPA WebSphere Installation and Configuration 10 of 25 Revised 12242013
Configure WebSphere Environment Variable for Database Driver
A variable must be used to define the location where the database driver is located The name of the variable
depends on the type of database
Oracle ORACLE_JDBC_DRIVER_PATH
IBM DB2 DB2UNIVERSAL_JDBC_DRIVER_PATH and
DB2UNIVERSAL_JDBC_DRIVER_NATIVEPATH
Microsoft SQL Server User-defined_JDBC_DRIVER_PATH
1 Select EnvironmentgtWebSphere Variables
2 Select the scope of the OIPA server from the drop-down list
3 Click New
4 Enter the name of the database driver variable as listed above
5 In the Value field enter the path to the directory where the database driver is located For example
optoracledb_drivers or Coracleoipadb_drivers
6 Click OK
9710 OIPA WebSphere Installation and Configuration 11 of 25 Revised 12242013
Configure the OIPA Application Server
JVM Settings
1 Navigate to ServersgtServer TypesgtWebSphere application servers
2 Select the OIPA application server
3 Expand Java and Process Management
4 Select Process Definition
5 Select Java Virtual Machine
6 In the Classpath text box enter the location of the OIPA property files
Example optoracleoipaconf or coracleoipaconf
Note Be sure to include the trailing slash ( or ) character
7 Set Initial Heap Size to 512
8 Set Maximum Heap Size to 2048
9 In the Generic JVM Arguments text box enter the following arguments replacing the location of each
file (highlighted) with the correct location for the configuration
Note You may find it easier to copy the text below to a text editor and make the necessary changes there then copy and paste it into the JVM Arguments text box
-Duserlanguage=en -Duserregion=US -DjavanetpreferIPv4Stack=true -DjavanetpreferPv6Addresses=false -javaagentoptoracleoipalibsspring-instrument-306RELEASEjar -Dtangosolcoherenceoverride=optoracleoipaconfcoherence-configxml -Dtangosolcoherencecacheconfig=optoracleoipaconfcoherence-cache-configxml -Dtangosolpofconfig=com-adminserver-pas-web-pof-configxml
10 Click OK
Configure the Listening Port
1 Select ServersgtServer TypesgtWebSphere application servers
2 Select the OIPA server
3 In the Communications section select Ports
4 Note the port listed for WC_defaulthost
a If the port number needs to be changed select the WC_defaulthost port
b Modify the Port text box as needed
c Click OK
9710 OIPA WebSphere Installation and Configuration 12 of 25 Revised 12242013
Configure the Virtual Host
1 Select Environment gt Virtual Hosts
2 Click default_host
3 Click Host Aliases
4 Click New
5 Enter the port assigned for WC_defaulthost in the previous listening port section
6 Click OK
Create Data Sources
Add the JDBC Provider
1 Select ResourcesgtJDBCgtJDBC providers
2 Select the scope of the server from the drop-down list (the drop-down list displays if the ldquoShow scope
selection drop-down listhelliprdquo is checked)
3 Click New
4 Select the Database type
For Oracle select Oracle
For DB2 select DB2
For Microsoft SQL Server select user-defined
5 Select the Provider type
For Oracle select Oracle JDBC Driver
For DB2 select DB2 Universal JDBC Driver Provider
6 Select Implementation type
For Oracle select XA data source
For DB2 select XA data source
For Microsoft SQL Server enter netsourceforgejtdsjdbcxJtdsDataSource for the
Implementation class name
7 Click Next
8 Enter the variable name used for the database driver
For Oracle enter $ORACLE_JDBC_DRIVER_PATH
For DB2 click Next
For Microsoft SQL Server enter $User-defined_JDBC_DRIVER_PATH
9 Click Finish
9710 OIPA WebSphere Installation and Configuration 13 of 25 Revised 12242013
Note For Oracle and Microsoft SQL Server skip steps 10 and 11 For DB2 continue at step 10
10 Click on the newly created JDBC provider
11 Confirm that the class path field is set to correctly reference the two DB2 drivers Refer to the examples
below Edit the field if needed
$DB2UNIVERSAL_JDBC_DRIVER_PATHdb2jccjar
$DB2UNIVERSAL_JDBC_DRIVER_PATHdb2jcc_license_cujar
$DB2UNIVERSAL_JDBC_DRIVER_PATHdb2jcc_license_cisuzjar
12 Click OK
Create the Data Sources
Four data sources must be created
ADMINSERVERDS
ADMINSERVERRESOURCEDS
ADMINSERVERSEARCHDS
ADMINSERVERREADONLYDS
A readonly database user should be used for ADMINSERVERRESOURCEDS ADMINSERVERSEARCHDS
and ADMINSERVERREADONLYDSRepeat the following steps for each data source replacing
ltDATASOURCE_NAMEgt with the specific data source being configured
1 Select ResourcesgtJDBCgtData sources
2 Click New
3 For the data source name enter ltDATASOURCE_NAMEgt
4 For the JNDI name enter ltDATASOURCE_NAMEgt
5 Click Next
6 Select the JDBC provider created in the last step
7 Click Next
8 Enter the database connection information
For Oracle enter the database information in the following format
jdbcoraclethinhostnameportSID
For DB2 enter the database name hostname and port
For Microsoft SQL Server skip to the next step
9 Uncheck the checkbox for Use this data source in container managed persistence
10 Click Next
11 On the Setup security aliases screen click Next
9710 OIPA WebSphere Installation and Configuration 14 of 25 Revised 12242013
12 Click Finish
13 Select ltDATASOURCE_NAMEgt from the list of data sources that appears
14 Select Custom Properties
15 Click New to create new variables for each property listed below
For Oracle
o Name user
Value database user name
o Name password
Value database password
For DB2
o Name user
Value database user name
o Name password
Value database password
o Name currentSchema
Value schema name (only needed for readonly data source)
For Microsoft SQL Server
o Name user
Value database user name
o Name password
Value database password
o Name databasename
Value name of database
o Name servername
Value hostname of database server
16 In the Messages area at the top of the screen click the link for Save to the master configuration
17 Once complete return to the Datasources screen and use the Test Connection button on the main
data source list to confirm that the settings were successful for each data source
9710 OIPA WebSphere Installation and Configuration 15 of 25 Revised 12242013
Deploy the OIPA Application
1 Select ApplicationsgtNew Application
2 Select New Enterprise Application
3 Use the Local file system or Remote file system browsing feature to locate the PASJava-
webspherewar file and rename to PASJavawar
4 Click Next
5 Confirm that Fast Path is selected and click Next
6 On the Select installation options screen click Next
9710 OIPA WebSphere Installation and Configuration 16 of 25 Revised 12242013
On the Map modules to servers screen
Select the server from the scrolling list
Check the box for PASJava-webspherewar and click Apply
Click Next
7 On the Map virtual hosts for Web modules screen check the box for PASJavawar and click Next
8 On the Map context roots for Web modules screen enter PASJava for the Context Root
9 Click Next
10 Confirm the settings on the following screen
9710 OIPA WebSphere Installation and Configuration 17 of 25 Revised 12242013
11 Click Finish
12 The system lists output from the installation with the final status at the end Look for ldquoApplication
PASJava_war installed successfullyrdquo
9710 OIPA WebSphere Installation and Configuration 18 of 25 Revised 12242013
13 Click the link to Save directly to the master configuration
Create a Shared Library for OIPA
1 Select Environment gt Shared Libraries
2 Select the OIPA application server from the selection box
3 Click New
4 For the Name field enter SharedLibs
5 For the Classpath field enter the full paths to the following jar files (using the directory that was
created in steps 4 and 5 in the OIPA Setup section)
antlr-34jar
aspectjrt-1611jar
aspectjweaver-1611jar
commons-collections-321jar
commons-logging-111jar
log4j-1216jar
spring-instrument-306RELEASEjar
6 For the Native Library Path field enter the full path for the following jar file
el-api-22jar
7 Click OK
8 Save the configuration changes
9 Select ApplicationsgtWebSphere enterprise applications
10 Click on the OIPA application
11 Under the References heading click the Shared library references link
12 Check the PASJavawar module and click the Reference shared libraries button
13 In the Available box click on SharedLibs and then click the gtgt button This will move SharedLibs to
the Selected box
14 Click OK
15 Click OK
9710 OIPA WebSphere Installation and Configuration 19 of 25 Revised 12242013
16 Save the configuration changes
9710 OIPA WebSphere Installation and Configuration 20 of 25 Revised 12242013
Configure the OIPA Application
1 Select ApplicationsgtApplication TypesgtWebSphere enterprise application
2 Select the PASJavawar application
3 Click Class loading and update detection
4 Check the radio button for Classes loaded with application class loader first (parent last)
5 Check the radio button for Single class loader for application
6 Click OK
7 Save the configuration
Start the OIPA Application
1 Select ServersgtServer TypesgtWebSphere application servers
2 Select the OIPA application
3 Click Start
4 Look for the message ldquoltserver namegt server started successfullyrdquo
9710 OIPA WebSphere Installation and Configuration 21 of 25 Revised 12242013
CREATE AND CONFIGURE THE WEB APPLICATION UTILITY
Using a web browser connect to the Administrative Console using the appropriate server_name and port (Ex
httpserver_nameportadmin)
Note The files that are used to set up the Web Application Utility are often named PaletteConfig Any files with the name PaletteConfig are part of the Web Application Utility
Create the Web Application Utility Server
1 Select ServersgtNew server
2 Select WebSphere application server for the server type and click Next
3 Enter PaletteConfig for the name of the server
4 Click Next
5 Select the default server template
6 Click Next
7 Ensure Generate Unique Ports is checked
8 Click Next
9 Confirm the server settings and click Finish
The system displays the Application servers screen
Configure the Web Application Utility Server
JVM Settings
1 Select the PaletteConfig server
2 Expand Java and Process Management
3 Select Process Definition
4 Select Java Virtual Machine
5 In the Classpath text box enter the location of the Web Application Utility property files
6 Example optoraclepaletteconfigconf or Coraclepaletteconfigconf
Note Be sure to include the trailing slash ( or ) character
7 Set Initial Heap Size to 256
9710 OIPA WebSphere Installation and Configuration 22 of 25 Revised 12242013
8 Set Maximum Heap Size to 512
9 Click OK
Configure the Listening Port
1 Select ServersgtServer TypesgtWebSphere application servers
2 Select the PaletteConfig server
3 In the Communications section select Ports
4 Note or change if needed the port listed for WC_defaulthost
5 Select Finish
Configure the Virtual Host
1 Select EnvironmentgtVirtual Hosts
2 Click default_host
3 Click Host Aliases
4 Click New
5 Enter the port selected for WC_defaulthost in the previous step
6 Click OK
Deploy the Web Application Utility
1 Locate the PaletteConfig-waswlwar file in the Oracle Insurance Rules Palette V970 Media Pack in
the Web Application Utility directory and rename to PaletteConfigwar
2 Select ApplicationsgtNew Application
3 Select New Enterprise Application
4 Use the Local file system and Remote file system browsing feature to locate and select the
PaletteConfigwar file
5 Click Next
6 Confirm that Fast Path is selected and click Next
7 On the Select installation options screen click Next to accept the default options
8 On the Map modules to servers screen
Select the server from the scrolling list
Check the box for PaletteConfigwar and click Apply
Click Next
9 On the Map virtual hosts for Web modules screen check the box for PaletteConfigwar and click
Next
Deleted -waswl
9710 OIPA WebSphere Installation and Configuration 23 of 25 Revised 12242013
10 On the Map context roots for Web modules screen enter PaletteConfig for the Context Root
11 Click Next
12 Confirm the settings on the next screen
13 Click Finish
14 The installation messages display on the screen Look for ldquoApplication PaletteConfigwar installed
successfullyrdquo at the end
15 Save the configuration changes
Create a Shared Library for Web Application Utility
1 Select EnvironmentgtShared Libraries
2 Select the Web Application Utility application server from the selection box
3 Click New
4 For the Name field enter SharedLibs
5 For the Classpath field enter the full paths to the database driver jar files (using the directory that was
created in the Database Drivers section on page 5) Be sure to supply the appropriate drivers for the
database type you are using
AIX or Linux example for Oracle
optoracledb_driversojdbc-11202jar
Windows example for Oracle
Coracledb_driversojdbc-11202jar
6 Click OK
7 Save the configuration changes
8 Select ApplicationsgtWebSphere enterprise applications
9 Click on the Web Application Utility application
9710 OIPA WebSphere Installation and Configuration 24 of 25 Revised 12242013
10 Under the References heading click the Shared library references link
11 Check the PaletteConfigwar module and click the Reference shared libraries button
12 In the Available box click on SharedLibs and then click the gtgt button This will move SharedLibs to
the Selected box
13 Click OK
14 Click OK
15 Save the configuration changes
Configure the Web Application Utility
1 If not already on this screen select ApplicationsgtApplication TypesgtWebSphere enterprise
applications
2 Select the PaletteConfig application
3 Click Class loading and update detection
4 Check the radio button for Classes loaded with application class loader first (parent last)
5 Check the radio button for Single class loader for application
6 Click OK
Start the Web Application Utility
1 Select ServersgtApplication TypesgtWebSphere application servers
2 Select the PaletteConfig application
3 Click Start
4 Look for the message ldquoltserver namegt server started successfullyrdquo
9710 OIPA WebSphere Installation and Configuration 25 of 25 Revised 12242013
TEST THE DEPLOYMENTS
The initial test of the deployment is to confirm that the application presents a login screen when the application
URL is opened Final testing of the OIPA deployment must wait until after the Web Application Utility is
configured and initial users have been set up
OIPA Deployment
1 Open a new Internet Explorer window
2 Navigate to httphostnameportPASJava
Note If you change the context name use that name in the URL instead of PASJava
3 Confirm that the login screen
4 appears
Web Application Utility Deployment
1 Open a new Internet Explorer window
2 Navigate to httphostnameportPaletteConfig
Note If you change the context name use that name in the URL instead of PaletteConfig
3 Confirm that the login screen
4 appears
Important When configuring the Rules Palette environment use the host name and port number of the PaletteConfig server The Web Application Utility must always be running in order for users to access the Rules Palette
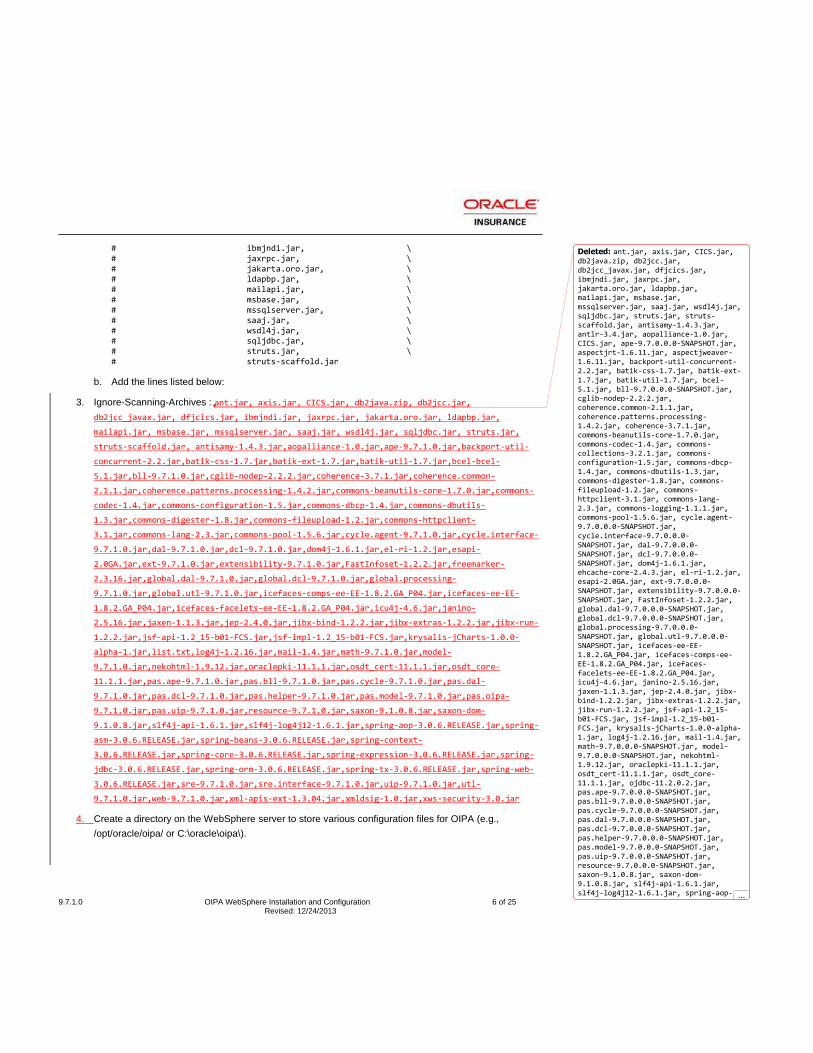
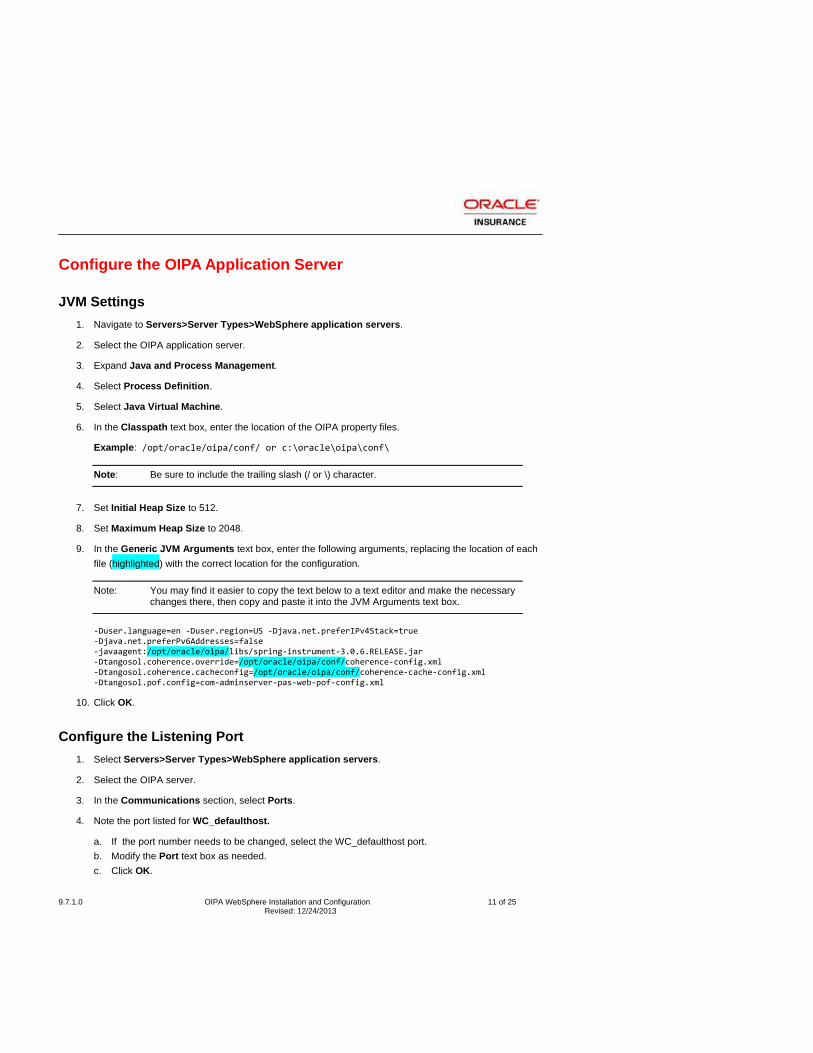
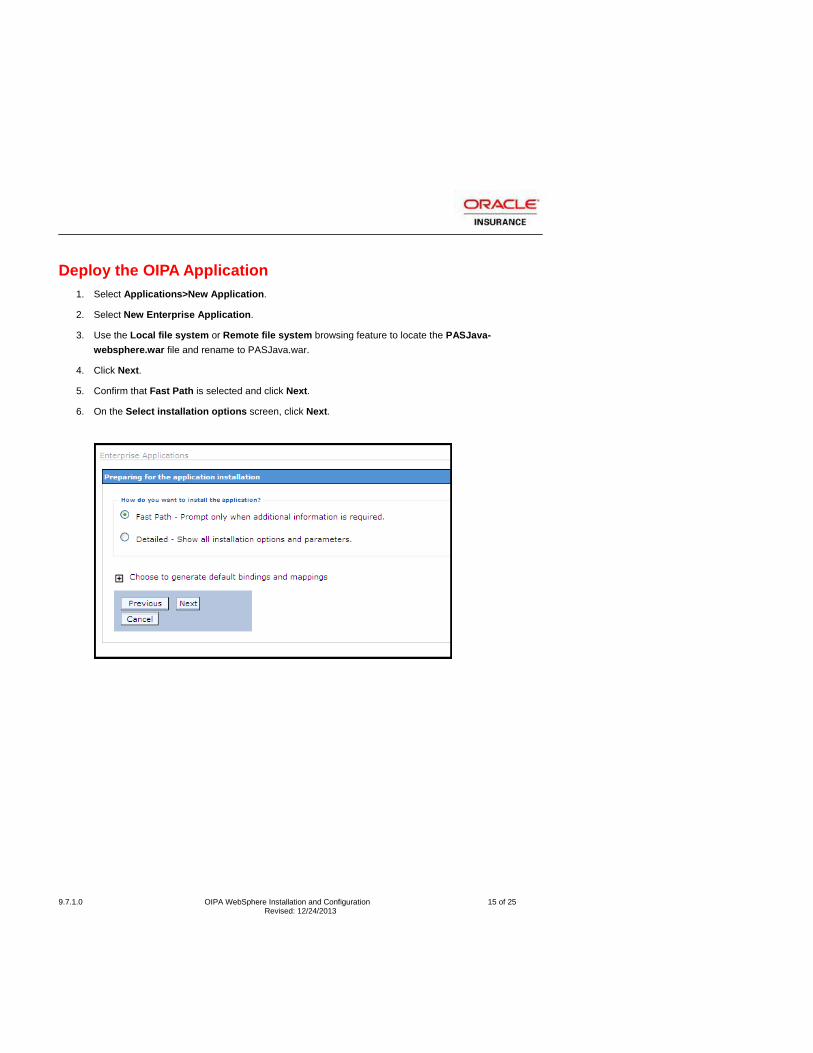
Top Related