


![SAP HowTo Guide - Unlocking User SAPStar [User Guide]](https://static.fdocuments.us/doc/165x107/544ac849b1af9f7c4f8b4bd1/sap-howto-guide-unlocking-user-sapstar-user-guide.jpg)


Languages
Pages
Legal


Origami Tulip
User Guide
Paper Craft Pack

Table of Contents
About the Pack
Phase 1: Check the pack
Phase 2: Prepare before start
Phase 3: Fold the Tulips
Phase 4: Make the stems
Phase 5: Make the leaves
Phase 6: Wrap into a bunch
Appendix — Meaning in Colours
Page
1
2
3
4-9
10-11
12-14
15-17
18

About the pack
With all materials ready
in the pack, you simply follow the
instructions and can create a bunch of Tulips
on your own. The Origami Tulip is easy to
fold but beginners may find inflating the
tulip bulbs challenging.
Tulips can be made in rainbow colours.
You can give your Origami Tulips as gifts to
your beloved family, friends, teachers, etc.
Just take your time and start folding!
1

Check the pack
This paper craft pack comes with the items as
shown in the list below. Check that all the items
have been included before starting off.
Coloured Folding Papers
(15cmx15cm)
Pink, Orange, Blue, Green
(5 pieces for each colour)
Phase
1
Ribbon
(around 50 cm)
Gold x 1 roll
Wrapping Paper
(25cmx25cm)
White x 1 piece
Wire Stems
(around 17 cm )
Green x 20 strips
Flower Tape
Green x 1 roll
2

Prepare before start
Get the tools ready before you start making
the Origami Tulips. In the process, you may need
to use:
Phase
2
Scissors Bamboo Sticks Pencils
1. Children should be under supervision of adults especially
when using sharp tools and materials.
2. Remove of any plastic bags safely before giving it to
children.
3

Steps
Fold the Tulips
If you are ready, let’s start folding the Tulips.
- Coloured Folding Papers
Phase
3
1. Fold the paper into half
(from left to right).
2. Fold the paper into half
(from bottom to top).
3. Unfold the paper.
(4 grids with 2 creases can be viewed)
What do you need?
4

4. Fold the paper into half (diagonally).
5. Unfold the paper.
6. Repeat steps 4 and 5 in the opposite
dimension.
7. Unfold the paper.
(4 creased lines can be viewed)
8. Push the paper from both sides
(as shown by the arrows).
5

9. Bring both sides together until
they meet in the centre, with a
triangle formed at the back.
10. Press the front part of the paper
down to form another triangle.
11. Fold the right bottom corner to
meet the crease at the centre.
12. Repeat step 11 for the
left-hand side.
13. Repeat steps 11-12 in the
opposite side to form a diamond.
6

14. Flip the paper over from right to
left (as shown in the picture).
15. Repeat step 14 on opposite side.
A crease is clearly seen in the centre.
16. Place the diamond with the
pockets facing downwards.
17. Move the flap from right to left.
Move across the central crease can
result in a better and firmer pocket.
7

18. Insert the tip to fit into the
pocket at the right.
19. Repeat Step 18 in the opposite side.
A kite shape is then formed.
20. Hold the overlapped pockets tightly
in each side.
21. Stretch slowly the sides apart and
push gently the top to inflate
the tulip as a bulb.
Blow in air through the hole or
use a bamboo stick can help
expanding the bulb better.
8

21. Invert the bulb and peel gently
the 4 petals of the tulip,
with your fingers holding the
corresponding corner of the base.
Peel with a pencil helps shaping the
petals more naturally.
9

Steps
Make the stems
- Green Wires - Green Flower Tape - Scissors
Phase
4
1. Wrap the upper half of the
wire with the green flower tape.
2. Cut the tape when finished wrapping.
What do you need?
Better effect can be achieved by stretching
the green flower tape as much as you can.
Be careful of the sharp
ends of the wires.
10
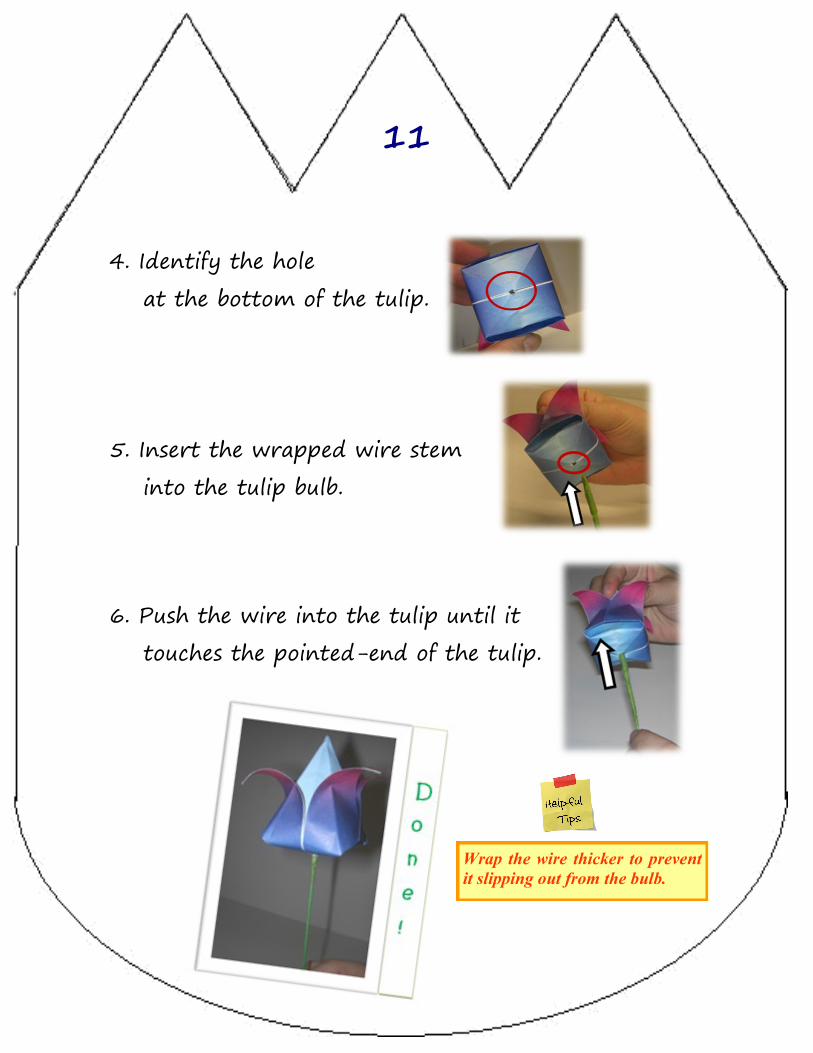
4. Identify the hole
at the bottom of the tulip.
5. Insert the wrapped wire stem
into the tulip bulb.
6. Push the wire into the tulip until it
touches the pointed-end of the tulip.
Wrap the wire thicker to prevent
it slipping out from the bulb.
11

1. Fold the paper into half.
2. Crease well and unfold it.
3. Fold the right side to
meet the centre crease.
4. Repeat step 3 for the left side.
Steps
Make the leaves
- Green Folding Papers - Green Flower Tape
- Green Wires - Scissors
Phase
5
What do you need?
12

5. Fold the bottom right side to
meet the central crease again.
6. Repeat step 5 for the
bottom left side.
7. Fold the bottom right side to meet the
centre crease again.
(The paper is quite thick now)
8. Repeat step 7 to the bottom left side.
9. Place a green wire onto the lower half of the leaf.
13

10. Fold the sides of the leaf
to enclose the wire
(as shown in the picture).
11. Wrap the green flower tape
tightly to fix the leaf
and the wire together.
If you want to make some
smaller leaves, you can
use other smaller pieces
of papers.
14

1. Hold the tulips and the leaves
together to form the shape that
you like.
2. Enclose the stems of the
tulips and leaves with the
green flower tape tightly
to form a bunch.
Steps
Wrap into a bunch
- Wrapping Paper - Green Flower Tape
- Green Wires - Scissors - Gold Ribbon
Phase
6
What do you need?
15

3. Place the wrapping paper
into a diamond shape and
put the bunch onto its centre.
4. Fold the bottom part of the
wrapping paper to cover the
bunch.
5. Wrap the bunch by overlapping the paper
from left and right sides.
16

6. Tie the bottom part of the wrapped bunch
with a gold ribbon.
Pull out the white
flower wrapping a little
bit if you want to show
more tulips.
Avoid packing too many
flowers at one time since they
would squeeze others out.
17

Appendix
Meaning in Colours
Tulip is a symbol of pure love, happiness, fame, and pride.
Different colours of tulips can reveal its unique messages.
I love you. Trust me.
Symbol of admiration, grace, joy and friendship.
Your smile is as bright as sunlight.
I fall in love with you at first sight. You are unique.
You have beautiful eyes.
18

AK Production House
2010 All Rights Reserved.
Not for Sale.
Top Related