


Languages
Pages
Legal


1
Ultimate Alaska X
User’s Guide

2
Ultimate Alaska X for Microsoft Flight Simulator
License Agreement – Flight One Software And Scenery Solutions ............................. 4
1. About The Source Data Used In Ultimate Alaska .................................... 6
2. Product Coverage Area ........................................................................... 6
3. Ultimate Alaska Product Features ........................................................... 7
3.1 Overview ...................................................................................................... 7 3.1.1 New Glacier Feature ................................................................................................ 8
3.2 Enhanced Terrain Mesh ................................................................................ 9
3.3 New Fully Modeled Urban Areas (Cities, Towns and Villages) ..................... 10
3.4 Airport Corrections ..................................................................................... 12
4. Product Support ................................................................................... 12
5. Ultimate Alaska X – Quick Startup ........................................................ 13
6. Ultimate Alaska X– Setup Tool (Main Window) ..................................... 14
6.1 Validation Process And Error Checking ....................................................... 14
6.2 The Main Setup Tool Interface .................................................................... 16 6.2.1 Frame Rates And Performance With Ultimate Alaska .................................................. 17 6.2.2 What Are Coordinates For ? .................................................................................... 18 6.2.3 Retrieving The Current Aircraft Location In FSX ......................................................... 19
6.3 Using Environmental Presets ...................................................................... 19 6.3.1 Preset Overview .................................................................................................... 19 6.3.2 Loading A New Preset ............................................................................................ 20
6.4 Fine-tuning Individual Scenery Areas ......................................................... 22 6.4.1. Overview ............................................................................................................. 22 6.4.2. Finding A Scenery Area Based On The Current FSX Location ...................................... 25 6.4.3. Tuning A Selected Scenery Area ............................................................................. 25
7. Ultimate Alaska X – Setup Tool (Terrain Menu) .................................... 30
7.1 Overview .................................................................................................... 30
7.2 Global Modifications ................................................................................... 31 7.2.1 Change Road Surface Colors ................................................................................... 31 7.2.2 Change FS9 Style Wave Effects ............................................................................... 32 7.2.3 Restore Ultimate Alaska X To Initial Settings ............................................................ 33
7.3 Local Modifications ..................................................................................... 34 7.3.1 Quick Ultimate Alaska Enable/Disable ...................................................................... 34 7.3.2 Modify Status Of Repositioned Airports .................................................................... 34
8. Ultimate Alaska X - Setup Tool (FSX Menu) .......................................... 36
Change FSX Location ........................................................................................ 36
9. Ultimate Alaska X - Setup Tool (Advanced Menu) ................................. 36
10. The FSX Scenery Library ..................................................................... 37
Overview .......................................................................................................... 37

3
10.1 Ordering Of Ultimate Alaska X Layers ....................................................... 38 10.1.1 UT Exclusions For Default Scenery ......................................................................... 38 10.1.2 Landclass ........................................................................................................... 38 10.1.3 Using Other Landclass Products ............................................................................. 39
10.2 How Will Other Add-on Products Affect The Layering Of Ultimate Alaska X ?
......................................................................................................................... 39 10.2.1 Photoscenery Products ......................................................................................... 39 10.2.2 Terrain Mesh Products .......................................................................................... 39 10.2.3 Products Containing 3D Objects ............................................................................ 40 10.2.4 Landclass Products .............................................................................................. 40 10.2.5 Products Containing Vector Graphics Features ......................................................... 40
11. FAQ – Frequently Asked Questions ..................................................... 41 I get little or no night lighting effects ......................................................................... 41 How do I use the “Advanced” menu features ? .......................................................... 41 The night lights flicker on occasion ............................................................................ 41 Will Ultimate Terrain X products be upgraded to use the same modeling technology ?
................................................................................................................................... 41
Appendix 1: Description Of Presets Shipped With Ultimate Alaska X ........ 43 Preset: AlaskaModels1 ................................................................................................... 43 Preset: AlaskaModels1Alt ................................................................................................ 45 Preset: AlaskaModels2 ................................................................................................... 48 Preset: AlaskaModels3 ................................................................................................... 50 Preset: AlaskaModels4 ................................................................................................... 53 Preset: AlaskaUTX ......................................................................................................... 55 Conclusion .................................................................................................................... 56
Appendix 2: List Of Modeled Ultimate Alaska Scenery Areas .................... 57
Appendix 3: Using Ultimate Alaska X with Tongass Fjords X .................... 59
Final Thoughts .......................................................................................... 61
Acknowledgements .................................................................................. 62
Credits ...................................................................................................... 62

4
License Agreement – Flight One Software And Scenery Solutions Flight One Software, Inc. and Scenery Solutions - Ultimate Alaska X for Microsoft Flight Simulator
IMPORTANT-READ CAREFULLY: This End-User License Agreement ("EULA") is a legal agreement between you (either an individual or a single entity) and Flight One Software, Inc. and Scenery Solutions. for the product identified above, which includes computer software and may include associated media, printed materials, and "online" or electronic documentation ("SOFTWARE PRODUCT"). By installing, copying, or otherwise using the SOFTWARE PRODUCT, you agree to be bound by the terms of this EULA. If you do not agree to the terms of this EULA, do not install or use the SOFTWARE PRODUCT; you may, however, return it to your place of purchase for a full refund.
SOFTWARE PRODUCT LICENSE
The SOFTWARE PRODUCT is protected by copyright laws and international copyright treaties, as well as other intellectual property laws and treaties. The SOFTWARE PRODUCT is licensed, not sold.
1. GRANT OF LICENSE. This EULA grants you the following rights:
Installation and Use. You may install and use one copy of the SOFTWARE PRODUCT
Reproduction and Distribution. You may NOT reproduce or distribute any number of copies of, or any part of, the SOFTWARE PRODUCT to any person, or make any part the SOFTWARE PRODUCT accessible to any party on the Internet.
2. DESCRIPTION OF OTHER RIGHTS AND LIMITATIONS.
Limitations on Reverse Engineering, Decompilation, and Disassembly. You may not reverse engineer, decompile, or disassemble the SOFTWARE PRODUCT, except and only to the extent that such activity is expressly permitted by applicable law notwithstanding this limitation.
Separation of Components. The SOFTWARE PRODUCT is licensed as a single product. Its component parts may not be separated for use on more than one computer.
Software Transfer. You may permanently transfer all of your rights under this EULA, provided the recipient agrees to the terms of this EULA.
Termination. Without prejudice to any other rights, Flight One Software, Inc. and Scenery Solutions may terminate this EULA if you fail to comply with the terms and conditions of this EULA. In such event, you must destroy all copies of the SOFTWARE PRODUCT and all of its component parts.
3. COPYRIGHT. All title and copyrights in and to the SOFTWARE PRODUCT (including but not limited to any images, photographs, animations, video, audio, music, text, and "applets" incorporated into the SOFTWARE PRODUCT), the accompanying printed materials, and any copies of the SOFTWARE PRODUCT are owned by Flight One Software, Inc. and Scenery Solutions or its suppliers. The SOFTWARE PRODUCT is protected by copyright laws and international treaty provisions. Therefore, you must treat the SOFTWARE PRODUCT like any other copyrighted material except that you may install the SOFTWARE PRODUCT on a single computer provided you keep the original solely for backup or archival purposes. 4. U.S. GOVERNMENT RESTRICTED RIGHTS. The SOFTWARE PRODUCT and documentation are provided with RESTRICTED RIGHTS. Use, duplication, or disclosure by the Government is subject to restrictions as set forth in subparagraph (c)(1)(ii) of the Rights in Technical Data and Computer Software clause at DFARS 252.227-7013 or subparagraphs (c)(1) and (2) of the Commercial Computer Software-Restricted Rights at 48 CFR 52.227-19, as applicable. Manufacturer is Flight One Software, Inc. and Scenery Solutions Atlanta, GA. MISCELLANEOUS If you acquired this product in the United States, this EULA is governed by the laws of the State of Georgia. If you acquired this product in Canada, this EULA is governed by the laws of the Province of Ontario, Canada. Each of the parties hereto irrevocably attorns to the jurisdiction of the courts of the Province of Ontario and further agrees to commence any litigation, which may arise hereunder in the courts located in the Judicial District of York, Province of Ontario. If this product was acquired outside the United States, then local law may apply. Should you have any questions concerning this EULA, or if you desire to contact Flight One Software, Inc. and Scenery Solutions, you may visit www.flight1.com LIMITED WARRANTY NO WARRANTIES. Flight One Software, Inc. and Scenery Solutions expressly disclaims any warranty for the SOFTWARE PRODUCT. The SOFTWARE PRODUCT and any related documentation is provided "as is" without warranty of any kind, either express or implied, including, without limitation, the implied warranties or merchantability, fitness for a particular purpose, or noninfringement. The entire risk arising out of use or performance of the SOFTWARE PRODUCT remains with you. NO LIABILITY FOR DAMAGES. In no event shall Flight One Software, Inc. and Scenery Solutions or its suppliers be liable for any damages whatsoever (including, without limitation, damages for loss of business profits, business interruption, loss of business information, or any other pecuniary loss) arising out of the use of or inability to use this Flight One Software, Inc. and Scenery Solutions product, even if Flight One Software, Inc. and Scenery Solutions has been advised of the possibility of such damages. Because some states/jurisdictions do not allow the exclusion or limitation of liability for consequential or incidental damages, the above limitation may not apply to you.

5
6
1. About The Source Data Used In Ultimate Alaska
Our goal at Scenery Solutions is to create superior scenery products for the Microsoft Flight
Simulator series. In order to do that, we use the absolute best source data in the industry. Because
of the lack of quality commercial source data in Alaska, this product contains no commercial source
data usage. Most of the data used was compiled from various freely available sources, plus a very
extensive amount of hand-digitizing which was done in-house.
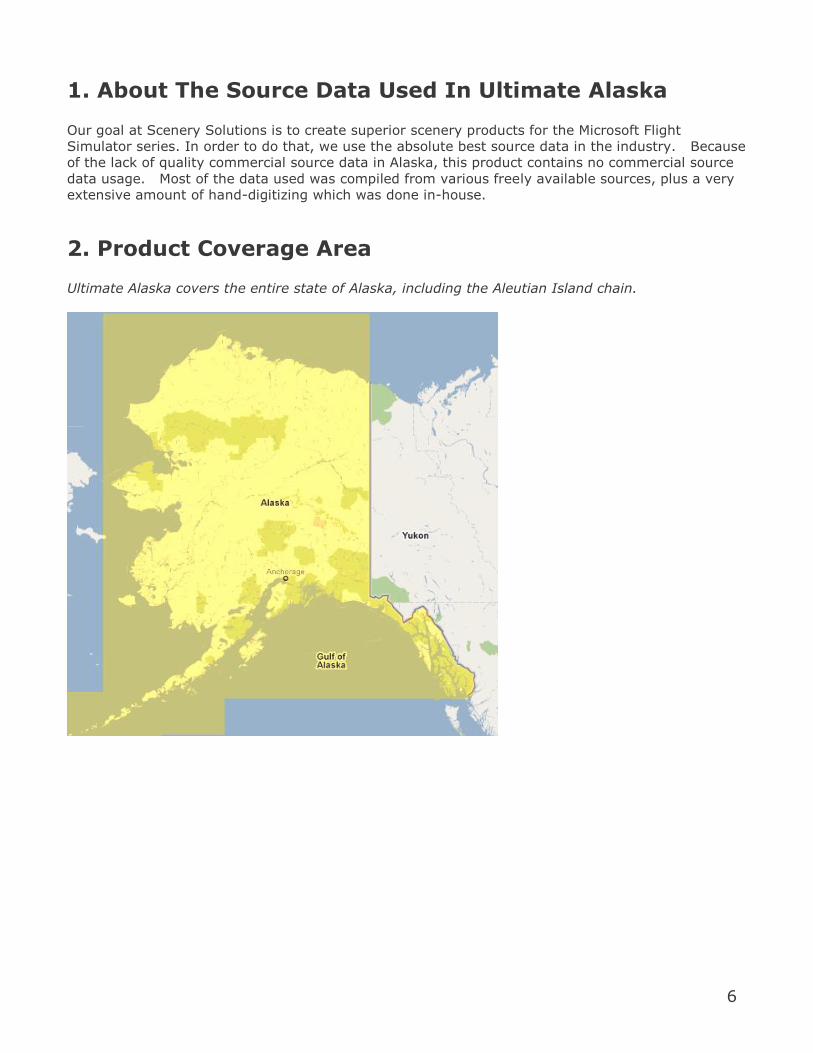
2. Product Coverage Area
Ultimate Alaska covers the entire state of Alaska, including the Aleutian Island chain.

7
3. Ultimate Alaska Product Features
3.1 Overview
Previous users of our Ultimate Terrain X products (Canada, USA and Europe) will be familiar with
many of the terrain enhancement features provided in this product. However, Ultimate Alaska X
contains some new terrain features, plus an extensive amount of accurately portrayed urban areas
using accurately placed 3D model objects.
Ultimate Alaska X Feature Set:
Accurate roads, with moving traffic on major roads. Accurate railroads.
Accurate water features and coastlines.
Detailed ground polygons (parking lots, parks, grassy areas, etc). Enhanced vegetation landclass, with optional urban landclass textures (urban
landclass not recommended with this product to retain accuracy). Accurately placed bridges for roads and railroads.
Night lighting using light point models. High resolution terrain Mesh.
Over 220 accurately modeled scenery areas (cities, towns and villages). Almost 200 airports corrected from a location and elevation standpoint.
New Glacier technology, with almost 400 hand-drawn glaciers included.
8
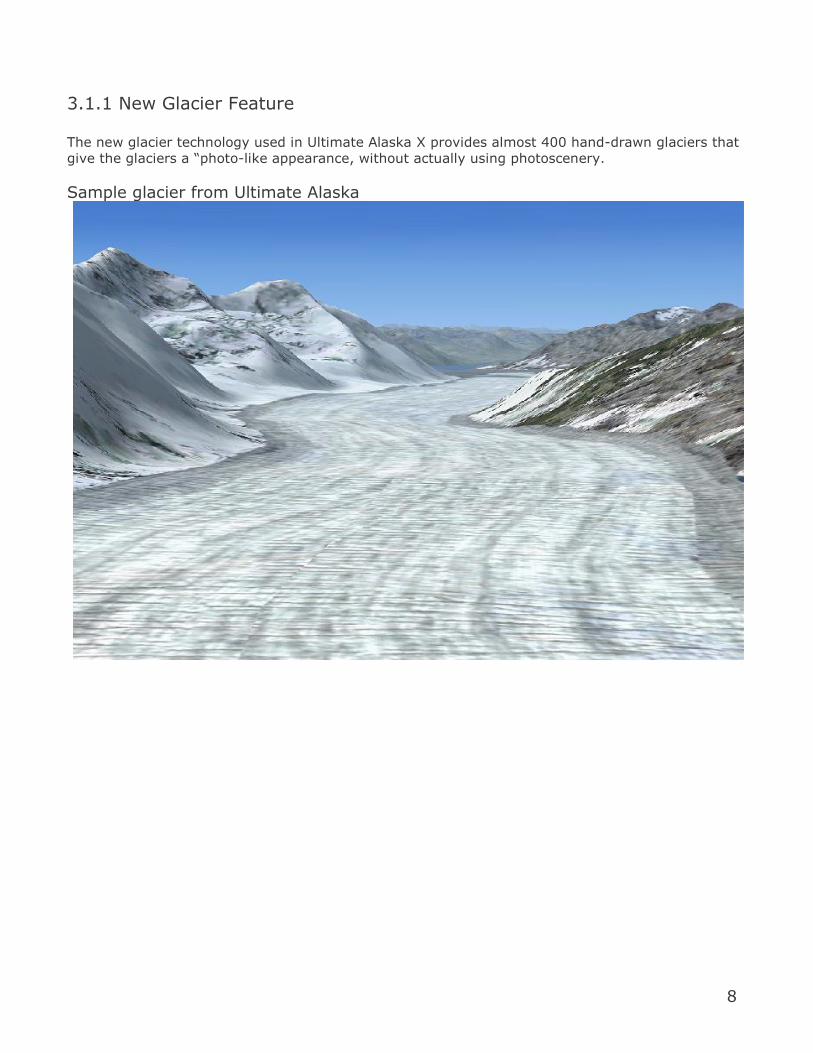
3.1.1 New Glacier Feature
The new glacier technology used in Ultimate Alaska X provides almost 400 hand-drawn glaciers that
give the glaciers a “photo-like appearance, without actually using photoscenery.
Sample glacier from Ultimate Alaska
9
3.2 Enhanced Terrain Mesh Ultimate Alaska X includes a preview high resolution Mesh, which was developed in a joint effort between Scenery Solutions and FSGenesis. This mesh preview is fully functional and very accurate. Mesh products are not developed in-house at Scenery Solutions. However, because of Alaska’s varied terrain, we felt a need to include a precise mesh with this product, so that our detailed water and land features would fit as well as possible with the surrounding terrain mesh. If any of our users desire future enhancements to the Alaska mesh, they should visit the FSGenesis site for their upcoming V2 Alaska mesh product. FSGenesis is one of the leaders in the Mesh development business for FSX and they will ensure that their mesh products remain compatible with Ultimate Alaska X.
What is Mesh ? Mesh is a flight simulation feature that provides global elevation changes across the world. Mesh is not a textured surface. But, it is the underlying framework that creates mountains and valleys. Without mesh, the surface of the entire world would be at sea-level elevation (flat). FSX provides a good mesh in itself. However, 3
rd party mesh developers can provide more accurate mesh that
adds more detail to the earth’s natural features. A higher resolution mesh can more accurately display a craggy mountain, where a lower resolution mesh would smooth out these detailed characteristics.
For those interested in future mesh enhancements to Alaska, or other parts of the world, you can visit FSGenesis at www.fsgenesis.com.
Is Ultimate Alaska X compatible with mesh products from other 3rd
party developers ? We realize that there are a lot of good mesh products for FSX available. However, at this time, Ultimate Alaska’s elevations have been set based on the same mesh to be used in the FSGenesis Alaska V2 product. Other mesh products might work well also. But, because the mesh included with this product matches the upcoming FSGenesis mesh, we recommend the FSGenesis Alaska V2 mesh (when available).

10
3.3 New Fully Modeled Urban Areas (Cities, Towns and Villages)
Scenery Solutions released its first terrain-based product in 1994 (USA Roads). Since then, we
have provided award winning terrain-based products for Canada, Europe and the USA.
Terrain-based features consist of things like roads, railroads, detailed water polygons, landclass and
various ground textures. Terrain based products do not normally provide accurately placed object
models (i.e Buildings, Boats, etc). Buildings in FSX are usually consist of autogen models, which
are semi-randomly placed on the terrain according to the underlying landclass. Autogen models do
not align with accurately placed roads that may be present. Instead, autogen buildings align with
randomly positioned “fake” roads that are embedded in urban landclass textures.
Autogen in FSX makes for a very nice looking, but not very accurate, environment. It is a great way
to fill open spaces with object models, in a very efficient manner. But, if you want accurately
placed object models, in real world locations, you normally have to buy detailed scenery packages
that cover very small scenery areas (like a single city). And, these types of packages usually do not
include houses that follow accurate roads.
We have put several years of work into developing a technology that gives a much more accurate
portrayal of urban areas. It would be nearly impossible (from a time standpoint) to place every
house by hand. So, we have developed a unique form of automation to place houses along roads
that should have houses on them. While the automation is not 100% accurate, especially when it
comes to the chosen building textures, it gives the impression of accurately placed residential areas
from the air.
Ultimate Alaska X is our first product to demonstrate this new technology. Over 200 scenery areas
have been modeled to provide the best balance of accuracy and performance. From the air, these
urban areas look very much like the real thing.
Our goal is not to create a perfect representation of each building, down the exact real-world
texture. It would take years to model a single city this way. And, the resulting product would be
not be flyable in FSX due the extensive custom texture use and high polygon counts necessary to
provide that kind of physical building accuracy.
What we want to do is give you a highly realistic and accurate impression of urban areas from the
air, while maintaining performance that is as efficient as you can get from a scenery package with
hundreds of thousands of objects models included.
Even though we have used every possible modeling efficiency, according to known (and unknown)
FSX development rules, the high numbers of object models in places like Anchorage will slow down
most low-to-mid range systems. However, we have provided several alternate configurations (see
the presets section), so that even lower-range systems can fly with good performance over
accurately portrayed urban areas.
To give an example of our accurate urban modeling, see the comparison in the next two actual
screenshots. The FSX version shows the city of Skagway as a sparsely spread out small city.
Compare the FSX version to the Ultimate Alaska X version. For reference, you can convert these
screenshots to a product with detailed satellite images (like Google Earth or Microsoft’s Bing Maps).

11

12
3.4 Airport Corrections
Major airports in FSX are usually positioned very accurately. As a result, 3rd party products that
improve the accuracy of features in FSX (i.e. water, roads, etc) will matched these airports very well.
Unfortunately, non-major airports are usually misplaced from their real-world coordinates. When
you put an accurate terrain around these airports, you can get runways that end up in the water or
even major roads that run through the airports.
The Alaskan airports in FSX seemed to be excessively misplaced, compared to other, more popular
areas (i.e. USA and Europe). Because Ultimate Alaska X provides a very accurate environment, we
needed to move these misplaced airports so that they fit our accurate features better.
Nearly 200 corrected airports have been provided with Ultimate Alaska X. The corrections include
moving of the physical airports and all the associated features, placing the airports at a more
appropriate elevation, and shrinking the massive airport grounds that normally make the airports
stand out unrealistically from the air in FSX.
What if I have airport corrections from another product ?
Airport corrections from another product will probably conflict with the Ultimate Alaska airports if
those airports include elevation change. However, you can easily disable our airport corrections
using the Ultimate Alaska Setup Tool. For more information on disabling these airport corrections,
see section 7.3.2.
4. Product Support
The flight simulator add-on market is unique in that the target audience for products like the
Ultimate Alaska X is much smaller than most commercial software products. As a result, developers
and publishers in this market cannot really afford to provide personal phone or email support.
However, forums are a terrific support venue. They allow all users to share information that would
normally be private with an email support base. Both Flight One and Scenery Solutions maintain a
presence in the Ultimate Alaska forum below, and would be happy to help you with any further
assistance you need at that location.
www.simforums.com/forums This site contains the “Ultimate Alaska” forum hosted by Flight
One Software. It is a very active forum and usually has the latest
bookmarked information regarding Ultimate Alaska.
www.scenerysolutions.com
Website maintained by Scenery Solutions, developer of Ultimate
Alaska and the Ultimate Terrain series of products.

13
5. Ultimate Alaska X – Quick Startup
1. After installation, the Ultimate Alaska X installer will immediately call the Ultimate Alaska
Setup Tool. The first time the setup tool is executed, it will automatically configure your
environment using the default settings. You don't need to do anything else at this point.
2. Since this product contains an extensive amount of 3D object modeling, performance could
be a concern in the large urban areas like Anchorage. The default installer will provide an
environment that is maximized for the best visual quality. However, the product is highly
configurable. So, you can always return to the setup tool later to tweak things to get a good
balance between performance and visual quality.
3. Start FSX. If you want to make sure that you see 100% of the object models that are
available with this product, then make sure that the FSX Scenery Complexity slider is set to
“Extremely Dense”. Moving the slider from “Extremely Dense” to “Normal” will reduce the
number of displayed objects at each step. The Scenery Complexity slider in FSX does not
allow for precise performance tuning, because changes to the slider affect the entire FSX
product area. Instead, we recommend putting the slider to “Extremely Dense” for this
product and then tuning individual scenery areas using the Ultimate Terrain Setup Tool if
performance tweaks are necessary.
4. Enjoy your new scenery environment! When you are ready, explore all the different
configuration options that are available through the Ultimate Alaska Setup Tool.
14
6. Ultimate Alaska X– Setup Tool (Main Window)
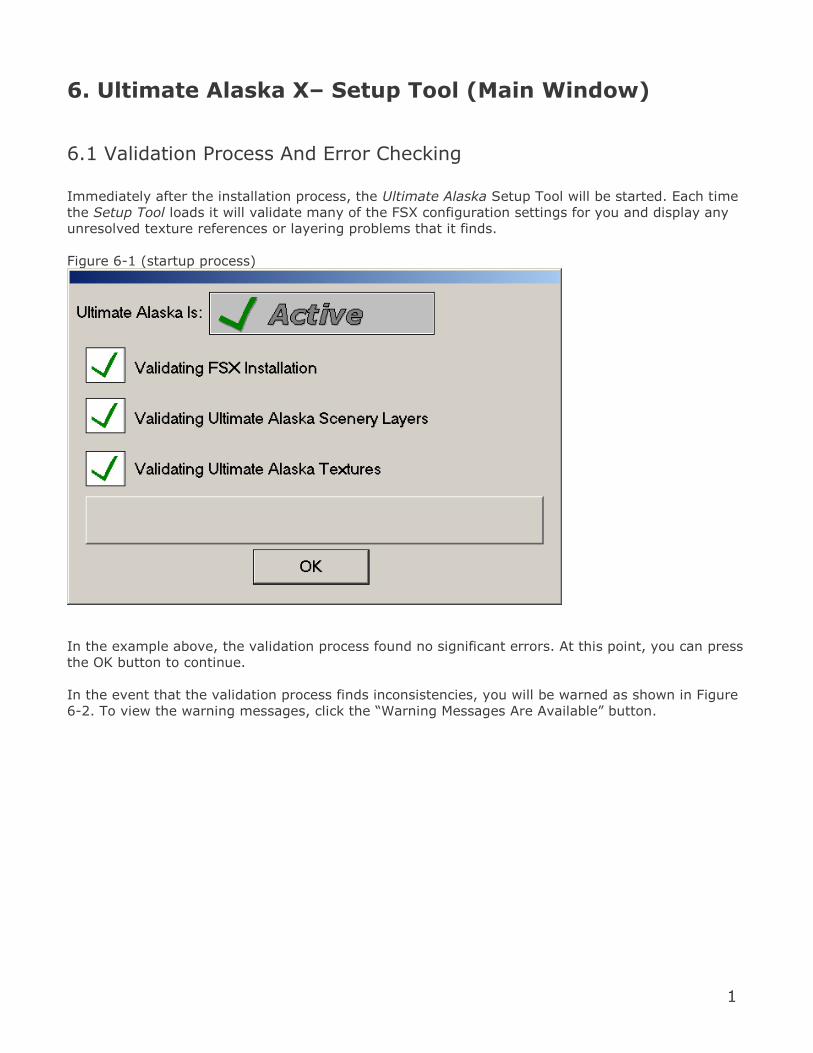
6.1 Validation Process And Error Checking
Immediately after the installation process, the Ultimate Alaska Setup Tool will be started. Each time
the Setup Tool loads it will validate many of the FSX configuration settings for you and display any
unresolved texture references or layering problems that it finds.
Figure 6-1 (startup process)
In the example above, the validation process found no significant errors. At this point, you can press
the OK button to continue.
In the event that the validation process finds inconsistencies, you will be warned as shown in Figure
6-2. To view the warning messages, click the “Warning Messages Are Available” button.

15
Figure 6-2 (validation errors found)
Figure 6-3 (warning message)
We have provided our users with this advanced error checking to help resolve any issues that may
come about as a result of the use of third-party products and/or manual tweaking that may have
corrupted your environment. We know third-party add-ons make this hobby great. But, those same
products can also lead to unstable environments when such products are not installed or removed
appropriately.
During the validation process, the Setup utility will always tell you whether or not Ultimate Alaska X
is currently active. If desired, you can quickly enable or disable all Ultimate Alaska X features using
the Setup Tool interface (see section 7.3.1 for more information on the quick disable process).
16
6.2 The Main Setup Tool Interface
The Ultimate Alaska X Setup Tool is our most powerful version to date. But, it is a bit different from
our usual Ultimate Alaska X setup tools. Ultimate Alaska contains accurately modeled cities that
add hundreds of thousands of object models to Alaska. Since lots of object models can severely
impact frame rates, we wanted to provide our users with an extremely powerful tool to tweak their
environments and achieve the best possible balance between visual quality and performance.
However, we have also simplified the setup tool as much as possible, so that novice users will not
feel intimidated by all the configuration options.
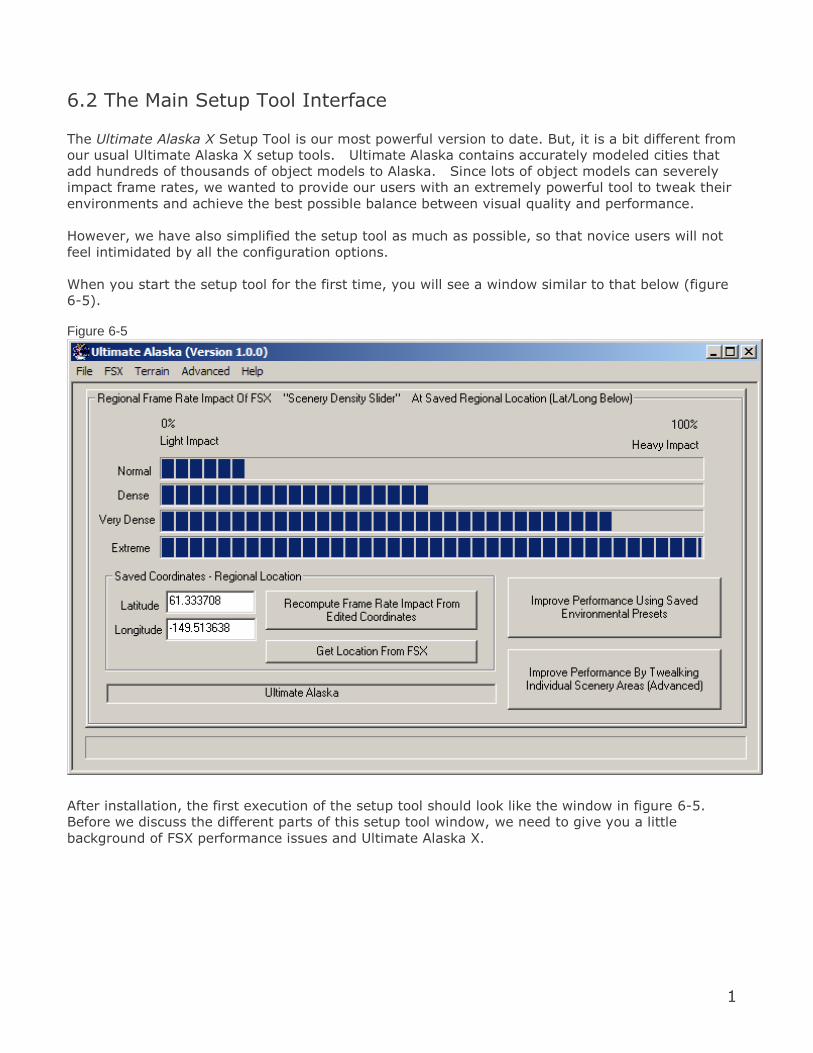
When you start the setup tool for the first time, you will see a window similar to that below (figure
6-5). Figure 6-5
After installation, the first execution of the setup tool should look like the window in figure 6-5.
Before we discuss the different parts of this setup tool window, we need to give you a little
background of FSX performance issues and Ultimate Alaska X.

17
6.2.1 Frame Rates And Performance With Ultimate Alaska
There are two things about flight simulators, FSX in particular, that drive users crazy.
1. Low frame rates and stuttering
2. Blurries
We won’t attempt to explain “The blurries” in FSX. If you search the internet for “FSX” and
“Blurries”, you will find lots of information on the subject.
Frame rates are something that can be measured more easily within FSX. And, nothing impacts
frame rates more than complex 3D models of buildings and other objects, or having a large amount
of these object displayed in the field-of-view at once.
In addition to autogen models, this product contains over 100,000 models placed at, or close to,
their real-world locations. If you were to spread those objects evenly over the entire state of
Alaska, frame rates would never be a problem, because most of the objects would be beyond visual
range at any one point. Unfortunately, the world is not built in that manner. Instead, most objects
appear in densely clustered urban areas, which can really provide a performance hit in Flight
Simulators.
Ultimate Alaska has been created with performance as a very high concern. Every object model is
optimized, according to rules unique to FSX, in a manner that allows huge numbers of these objects
to be displayed while maintaining maximum performance.
We have found that the top of the line current systems, such as those with I7 processors, should
have no problems running Ultimate Alaska X at the highest settings, even in dense urban areas.
However, other systems might need to be tweaked using the setup tool to achieve better
performance.
Also, the more regional 3rd party products that you add, like advance aircraft, the more strain you
are putting on the CPU in addition to Ultimate Alaska X.
The good news is that this product can allow you to configure each individual scenery area
separately from the others. So, if you are having problems in one particular area, you can scale
back the scenery detail only in that area.
For those users that don’t wish to tweak each scenery area to meet their own needs, we have
provided a feature called “Environmental Presets”. These “presets” are basically stored Ultimate
Alaska X environments, which have been tuned in a particular way to improve performance or visual
quality, depending on the user’s needs. The Preset topic will be covered later in this manual.
Now, with that out of the way, we can discuss the various parts of the window in figure 6-5.
18
6.2.2 What Are Coordinates For ?
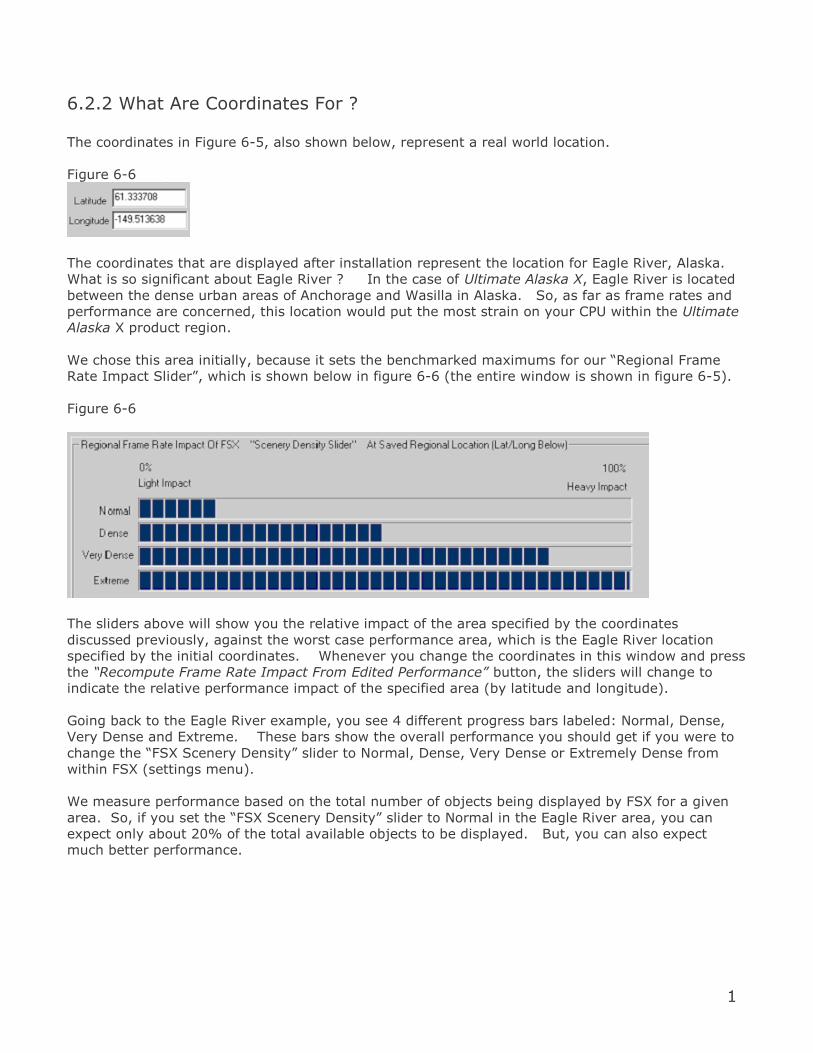
The coordinates in Figure 6-5, also shown below, represent a real world location.
Figure 6-6
The coordinates that are displayed after installation represent the location for Eagle River, Alaska.
What is so significant about Eagle River ? In the case of Ultimate Alaska X, Eagle River is located
between the dense urban areas of Anchorage and Wasilla in Alaska. So, as far as frame rates and
performance are concerned, this location would put the most strain on your CPU within the Ultimate
Alaska X product region.
We chose this area initially, because it sets the benchmarked maximums for our “Regional Frame
Rate Impact Slider”, which is shown below in figure 6-6 (the entire window is shown in figure 6-5).
Figure 6-6
The sliders above will show you the relative impact of the area specified by the coordinates
discussed previously, against the worst case performance area, which is the Eagle River location
specified by the initial coordinates. Whenever you change the coordinates in this window and press
the “Recompute Frame Rate Impact From Edited Performance” button, the sliders will change to
indicate the relative performance impact of the specified area (by latitude and longitude).
Going back to the Eagle River example, you see 4 different progress bars labeled: Normal, Dense,
Very Dense and Extreme. These bars show the overall performance you should get if you were to
change the “FSX Scenery Density” slider to Normal, Dense, Very Dense or Extremely Dense from
within FSX (settings menu).
We measure performance based on the total number of objects being displayed by FSX for a given
area. So, if you set the “FSX Scenery Density” slider to Normal in the Eagle River area, you can
expect only about 20% of the total available objects to be displayed. But, you can also expect
much better performance.

19
6.2.3 Retrieving The Current Aircraft Location In FSX
If you are having performance problems in a certain area within Alaska in FSX, you can press the
“Get Location From FSX” button. Assuming FSX is loaded, this button will update the coordinates
in the Ultimate Alaska X Setup Tool with the current FSX location. You can then press the
“Recompute Frame Rate Impact From Edited Performance” button to have the sliders display the
relative performance impact of the current area within FSX.
The Ultimate Alaska X Setup tool will not let you actually change the environment while FSX is
running, because you cannot manipulate FSX scenery files when FSX has locked them. But, you can
check the coordinates of the current location and view the performance impact such as we have
described.
6.3 Using Environmental Presets
6.3.1 Preset Overview
The Ultimate Alaska X Setup Tool allows you to configure each individual scenery area individually,
which gives you a lot of flexibility when it comes to performance tuning your system. We decided
during development, that not every user will want to take the time to learn and tweak their
individual systems to this precise level. So, we wanted an easier way for some users to configure
their environments at a higher level.
“Environmental Presets” are basically “snapshots” of an Ultimate Alaska X environment
configuration.
Initially, we have provided 6 preset environments for you to choose from. The goal of each of these
environments is to provide tradeoffs between performance and visual quality in the larger urban
areas of Alaska, where objects are dense.
If you wish, you can load any of our standard presets, tweak them to your liking and save them as
new preset environments.
Ultimate Alaska X comes preconfigured with a slant towards maximum visual quality over
performance. So, many users with mid-to-lower end systems will want to tweak their systems.
You can do this very quickly using the presets that we have already provided.

20
6.3.2 Loading A New Preset
To load a preset environment, press the “Improve Performance using Saved Environment Presets”
button as shown in figure 6-7.
Figure 6-7
After selecting the button, you will see the window as shown in Figure 6-8. This window will tell
you the name of the last loaded preset, which is “AlaskaModels1” in this case.
Figure 6-8
Since we are discussing the loading of presets, you would press the “Load Existing Preset
Environment Button” to load a preset. Pressing this button will not yet load any presets.
After pressing the button, you will see a window similar to that in Figure 6-9.
21
Figure 6-9
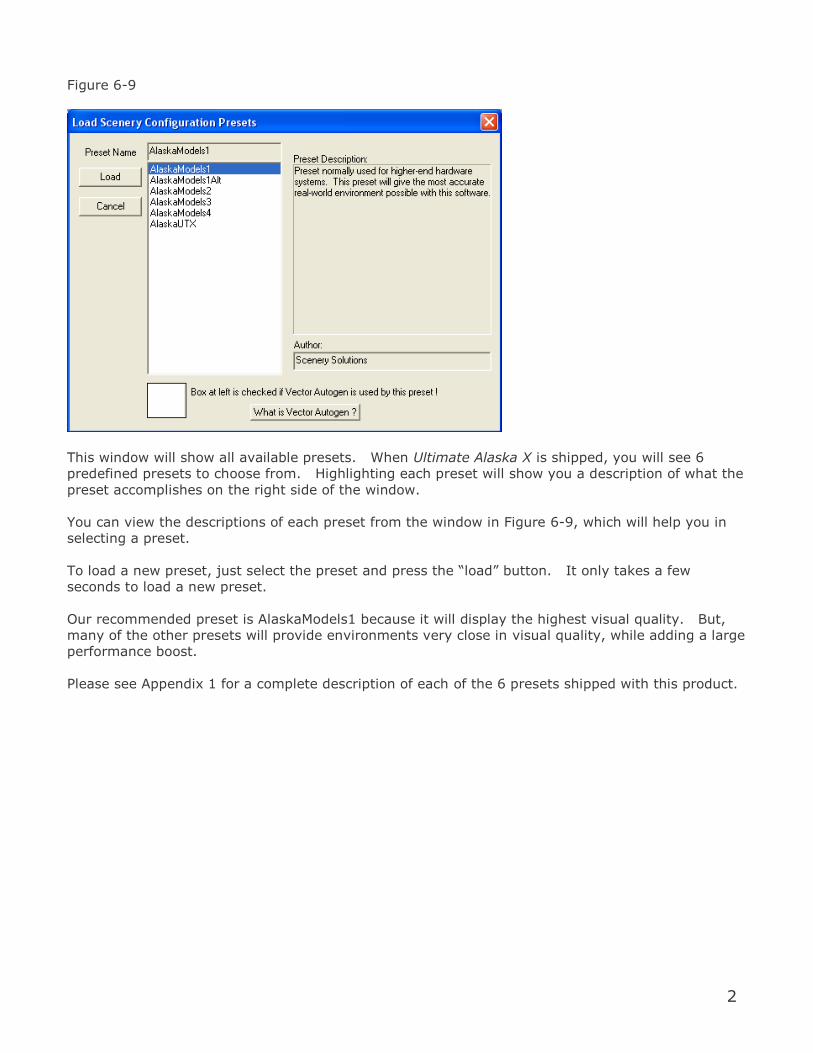
This window will show all available presets. When Ultimate Alaska X is shipped, you will see 6
predefined presets to choose from. Highlighting each preset will show you a description of what the
preset accomplishes on the right side of the window.
You can view the descriptions of each preset from the window in Figure 6-9, which will help you in
selecting a preset.
To load a new preset, just select the preset and press the “load” button. It only takes a few
seconds to load a new preset.
Our recommended preset is AlaskaModels1 because it will display the highest visual quality. But,
many of the other presets will provide environments very close in visual quality, while adding a large
performance boost.
Please see Appendix 1 for a complete description of each of the 6 presets shipped with this product.
22
6.4 Fine-tuning Individual Scenery Areas
6.4.1. Overview
Over 200 individual, hand-modeled scenery areas are provided in Ultimate Alaska X. We have
provided a way for users to tune each individual scenery area to achieve the best balance between
visual quality and performance.
This topic is a little more advanced than the “Environmental Presets” topic. We suggest that you try
our presets, before trying to tune individual scenery areas. But, for those that want more
configurability, we will now discuss the fine-tuning that can be done for each scenery area.
Most scenery areas are broken down by the city, town or village name. However, Anchorage is
broken down into 4 sections (north, south, east and west).
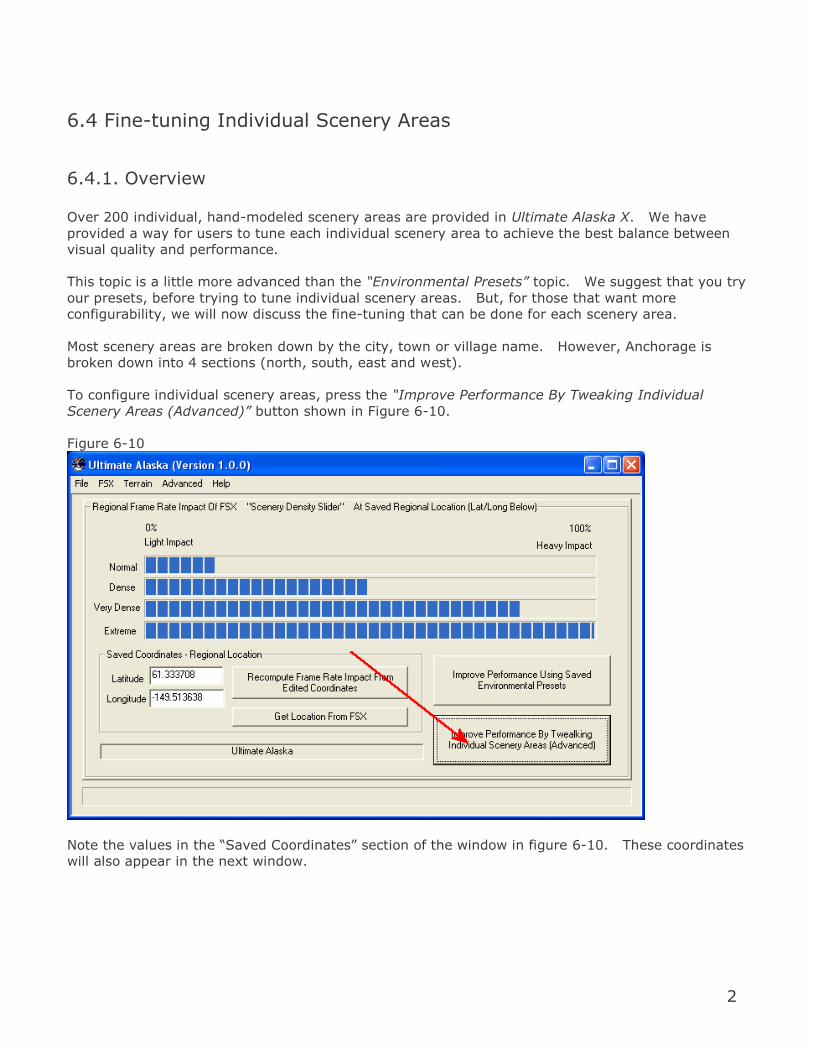
To configure individual scenery areas, press the “Improve Performance By Tweaking Individual
Scenery Areas (Advanced)” button shown in Figure 6-10.
Figure 6-10
Note the values in the “Saved Coordinates” section of the window in figure 6-10. These coordinates
will also appear in the next window.

23
Here is the window that allows you to find-tune each of the scenery areas.
Figure 6-10
The coordinates displayed in this window are the same as those shown in the previous window. A
list of all scenery areas in the product is displayed in a listbox on the left side of the window. If
your coordinates are the same as those above, you will see “Eagle River & Eklutna” highlighted. This
is the Ultimate Alaska X scenery area that is closest to the specified coordinates (the distance from
the selected scenery area is shown in km next to the coordinates).
If you were to change the coordinates manually and press the “Locate” button, the setup tool will
highlight the scenery area closest to the new coordinates.
24
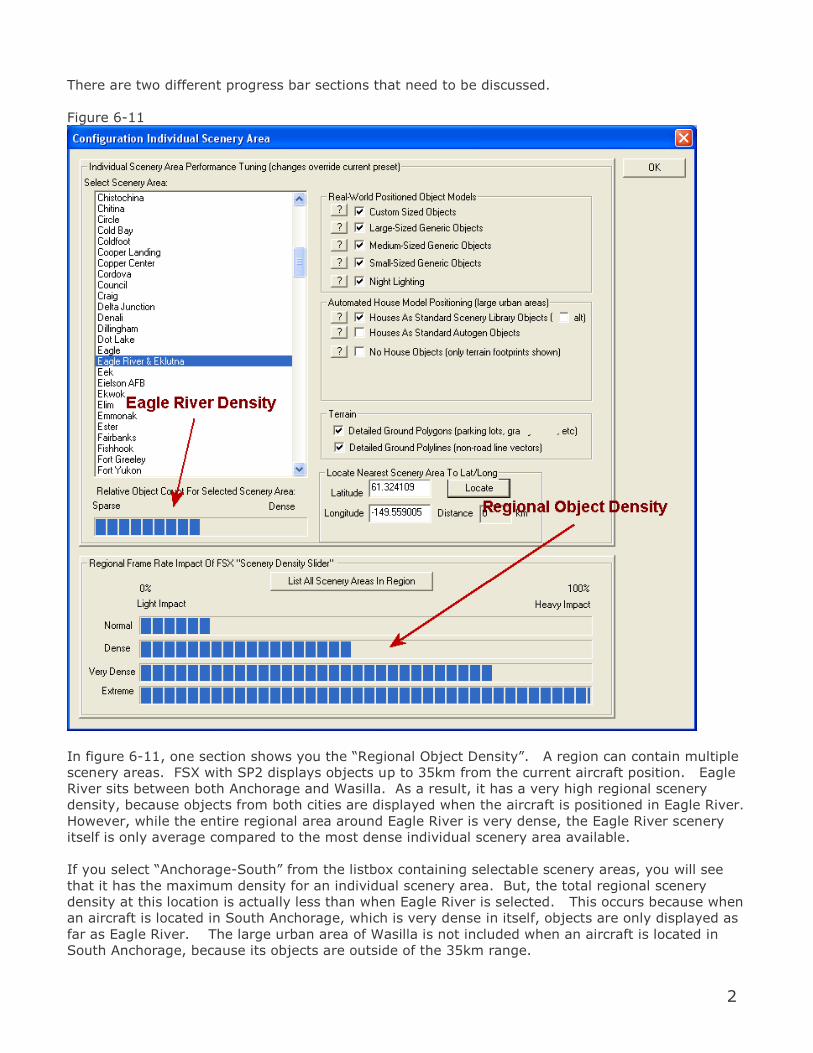
There are two different progress bar sections that need to be discussed.
Figure 6-11
In figure 6-11, one section shows you the “Regional Object Density”. A region can contain multiple
scenery areas. FSX with SP2 displays objects up to 35km from the current aircraft position. Eagle
River sits between both Anchorage and Wasilla. As a result, it has a very high regional scenery
density, because objects from both cities are displayed when the aircraft is positioned in Eagle River.
However, while the entire regional area around Eagle River is very dense, the Eagle River scenery
itself is only average compared to the most dense individual scenery area available.
If you select “Anchorage-South” from the listbox containing selectable scenery areas, you will see
that it has the maximum density for an individual scenery area. But, the total regional scenery
density at this location is actually less than when Eagle River is selected. This occurs because when
an aircraft is located in South Anchorage, which is very dense in itself, objects are only displayed as
far as Eagle River. The large urban area of Wasilla is not included when an aircraft is located in
South Anchorage, because its objects are outside of the 35km range.
25
6.4.2. Finding A Scenery Area Based On The Current FSX Location
To tune a scenery area, simply select it from the listbox of scenery area names within the Ultimate
Alaska X Setup Tool shown in Figure 6-11. If you are having FSX performance issues in Ultimate
Alaska X, here is how you can locate the current scenery area(s) while FSX is running.
Pause FSX.
Start the Ultimate Alaska X Setup Tool
Select the “Get Location From FSX” button.
Press the “Improve Performance By Tweaking Individual Scenery Areas” button.
Note: While you must have FSX running to retrieve the current location in FSX, you cannot have
FSX running and make the changes that will be described in this chapter. You don’t need to worry
though, because the setup tool will warn you if you attempt to make changes while FSX is running.
You should then see the nearest scenery area selected in the listbox. This would be a good place to
start your tweaking. Your goal is to reduce the overall regional impact. As we mentioned earlier,
the regional impact is shown using progress bars (see Figure 6-11).
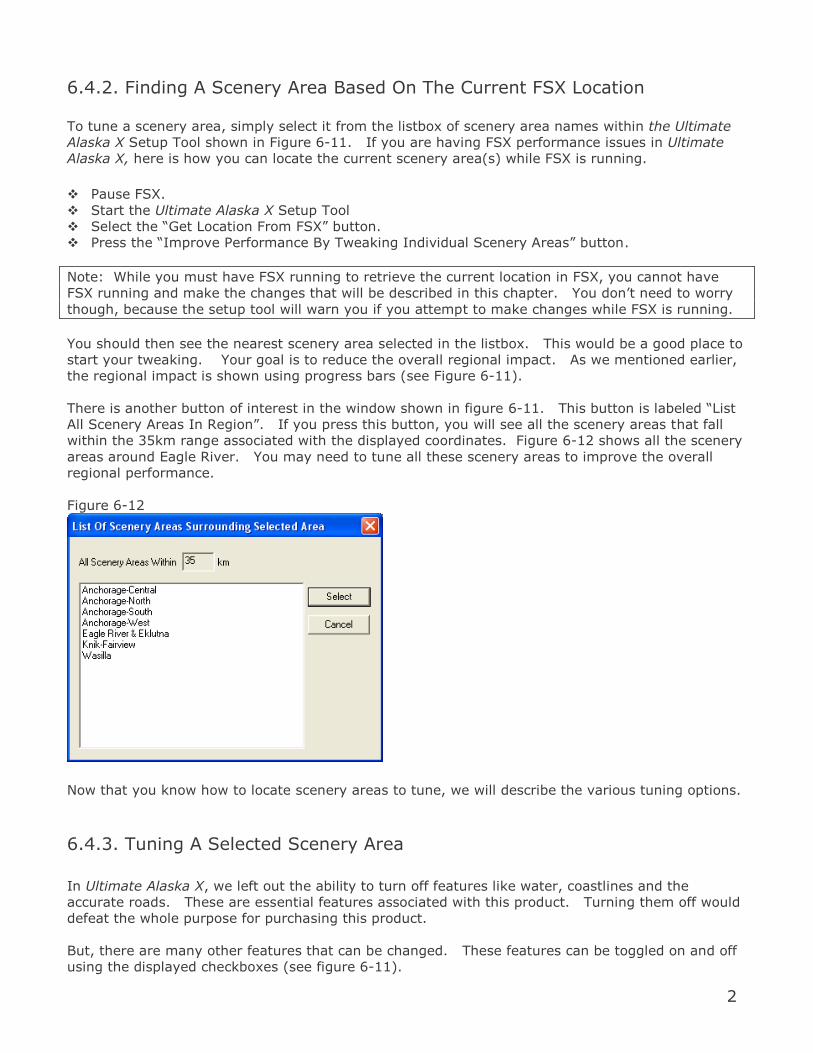
There is another button of interest in the window shown in figure 6-11. This button is labeled “List
All Scenery Areas In Region”. If you press this button, you will see all the scenery areas that fall
within the 35km range associated with the displayed coordinates. Figure 6-12 shows all the scenery
areas around Eagle River. You may need to tune all these scenery areas to improve the overall
regional performance.
Figure 6-12
Now that you know how to locate scenery areas to tune, we will describe the various tuning options.
6.4.3. Tuning A Selected Scenery Area
In Ultimate Alaska X, we left out the ability to turn off features like water, coastlines and the
accurate roads. These are essential features associated with this product. Turning them off would
defeat the whole purpose for purchasing this product.
But, there are many other features that can be changed. These features can be toggled on and off
using the displayed checkboxes (see figure 6-11).

26
If any of the checkboxes are grayed-out, then those types of features are not applicable for the
selected scenery area. Smaller villages will usually not contain all the different types of object
models that are available.
Turning Different Types Of Objects On/Off Within A Scenery Area
Within each scenery area, there are 5 different classifications of objects that can be edited. This
excludes houses, which are treated separately the next section.
The objects discussed in this section are real-world positioned object models. Some of these
models are the exact same dimensions and shape as their real world building. Other models may
be generic library objects that give a good representation of the type of object displayed in the real
world, even if their sizes are not exact.
Figure 6-13
Each object classification in figure 6-13 will be discussed.
“Custom Sized Objects” are important landmark buildings often used in VFR flight. This includes
things like large shopping malls/centers, warehouses, office buildings and other important
landmarks. These objects were hand drawn on top of photographic images of the actual buildings.
So, the location and building shapes/sizes should be exact. The textures used on the buildings are
fictional.
Normally, you would never want to turn this feature off, because these larger features are often
used in VFR flight.
“Large-Sized Generic Objects” are larger models that are predefined in an object library. The
objects are appropriate representations of the actual buildings and the positioning is accurate, but
the building dimensions are fictional. A good example would be hospitals. There are 2 very good
generic hospital objects in FSX. These models are used to represent hospital locations in Ultimate
Alaska X.
“Medium-Sized Generic Objects” are also library objects. They consist of objects like average-sized
office buildings, shops and larger boats.
“Small-Sized Generic Objects” consist of things like small boats, autos and small ground clutter.
Since none of these objects can be seen well from the air, they are strong candidates to be disabled
if a scenery area is giving you performance problems.

27
“Night Lighting” - Users that are familiar with our Ultimate Terrain X product lines will be very
familiar with the night lighting feature. These are floating light points that represent things like
street lights, intersection lights and vehicle lights. The night lighting will only show up on major
roads in Alaska. So, you won’t see any of them in the small villages. Overall, there is very little
night lighting in Alaska due to it’s rural nature.
Night Lighting won’t impact frame rates during the day. But, at night they will have a moderate
impact.
Different Methods Of Displaying Houses Within A Scenery Area
Since about 95% of the objects displayed in Alaska consist of residential houses, fine-tuning the
houses using the different methods can have a major impact on performance.
If you have read the section about regarding “Environtmental Presets” in Appendix 1, it will help
understand the different options in this section also. Basically, we have provided 4 different ways
to display houses in the large urban areas. You can only select 1 of the 4 options at a time for each
scenery area.
Figure 6-14
“Houses As Standard Scenery Library Objects” is the recommended selection for maximum visual
appearance. However, in the large urban areas it will have the greatest impact on performance.
With this option, each house is positioned as a unique object on the terrain. Because each house is
uniquely positioned, with the center of the house positioned at ground level, this option will give
houses the best terrain fit.
The “Alt” button is an alternate method of positioning house objects. This method improves
performance on most users system, because house objects are “clustered” together. This clustering
logic makes an entire block of houses appear as a single house object to FSX. With fewer overall
objects for FSX to manage, performance is usually increased. The drawback to this option is that
areas with changing elevation can cause more houses to sink into the terrain or float in the air a few
meters. This happens because the center of the cluster of houses is placed flat on the terrain. If
the terrain is hilly, houses near the ends of the cluster are more likely to sink or float a bit. Since
most of the large urban areas in Alaska are not very hilly, this option won’t have a serious impact.
This is probably the most popular option used by our testers during product development.
With both previous options, houses will be accurately positioned, facing the nearest road. Both of
these options provide the greatest visual accuracy of an area from the air. With these methods,
urban landclass textures are not needed. As a result, autogen houses are not needed either.
“House As Standard Autogen Objects” is the usual way houses are usually displayed in FSX. With
this option, urban landclass textures are displayed on the terrain. And, house positions are no
longer based on accurate road locations. Instead, houses and other buildings are positioned based
on the random “fake” road locations within the landclass textures. This option will give you better
performance then the previous options. But, you will have much less real-world accuracy.
“No House Objects” will not display any actual house models. Other accurately placed models for

28
things like shopping malls/centers, office buildings, warehouses and many other features will still be
displayed in their real-world location. But, house models are removed for performance reasons.
From the air, you will still get the appearance of houses along the roads. This occurs because flat
housing footprints are still drawn into the terrain along the roads. If you want to greatly improve
performance, without sacrificing visual accuracy of the urban area from the air, you should use this
option.
What about Vector-Autogen Housing Discussed In The Environmental Presets Section ?
If you read the section on the Environmental Presets in Appendix 1, you know that one of the preset
labeled “AlaskaObjects2” uses something called Vector Autogen to display houses in the larger urban
areas. Vector autogen housing cannot be implemented locally to each scenery area, because
changes are made to the FSX TERRAIN.CFG file which impacts all of Alaska. If you want to use the
vector autogen option, you have to use the preset we supplied as “AlaskaObjects2”.
Terrain Features Within A Scenery Area That Can Be Turned Off and On
The Terrain section shown in figure 6-15 can also be edited. But, we really don’t recommend it.
Figure 6-15
“Detailed ground polygons” are things like parking lots, gravel lots, school playgrounds, parks, etc.
These features are pretty important when it comes to giving an urban area its unique personality.
And, the features can be important during VFR flight.
“Detailed ground polylines” are features that are displayed using texture lines. Roads in FSX are
textured lines. But, this feature cannot be used to turn off roads. Instead, this feature will disable
things like driveways in certain areas, sports tracks and a few other unique items (Glaciers being
one of them). This feature does not have a major impact on performance. So, we don’t
recommend you disabling it.
6.5 General Comments About Performance In FSX
Achieving good performance (frame rates) in FSX really is a sum of all parts. As you start to add
more advanced products to your simulator, your need for a faster PC rises. Those that have been in
this hobby for a long time know that it is a constant struggle to maintain a higher-end PC to keep up
with all of the advanced products that are constantly released for FSX.
When it comes to achieving good performance in FSX, the speed of your computers CPU is generally
more important than your video card capabilities. The video card is important. But, upgrading the
process will have the largest impact by far.
Adding terrain enhancements that are more precise than FSX (roads, water, etc).
Adding more precise Mesh products.
Adding aircraft that is more sophisticated and detailed than those in FSX.
Fully modeled urban areas with larger numbers numbers of objects and/or polygons per object.
Fast aircraft (the faster the aircraft travels, the harder time the CPU has keeping up)>
Cockpit zoom

29
Detailed Clouds

30
7. Ultimate Alaska X – Setup Tool (Terrain Menu)
7.1 Overview
As mentioned earlier, the Ultimate Alaska X Setup Tool has been designed to accommodate the
variety of needs and abilities of our users. This section describes some interface features which will
be of interest to both the novice and advanced user.
The “Terrain” menu is split into 2 sections: “Global Modifications“ and “Local Modifications”.
Ultimate Alaska X contains many of the features in our Ultimate Terrain X product lines. As a result,
some of the textures are shared between products. With this in mind, “Global Modifications”
operations will affect Ultimate Alaska X as well as Ultimate Terrain X regions that share the same
features. “Local Modifications” operations will only affect the scenery areas covered by Ultimate
Alaska X.
Figure 7-1

31
7.2 Global Modifications
7.2.1 Change Road Surface Colors
Ultimate Alaska X provides 2 different types of configurable main road surface textures: Concrete
and Asphalt. You can change the type of road surface associated with different road types by
selecting “Change Road Surface Colors” from the “Terrain” menu. This will display the window shown
in Figure 7-2.
Figure 7-2
Note: In Alaska, some roads are gravel as in reality. These roads cannot be changed.
In addition to the road surface color, you can also specify whether or not you would like road
textures with auto imprints in them. Some users may prefer the textures without the embedded
auto imprints, especially if they are using the moving traffic option in FSX.
When the window is active, it will show which selections are currently being used by FSX for each
type of road. To make changes, simply make a selection for each road type from the “Concrete” or
“Asphalt” column. To remove or add the auto imprints, select the various checkboxes.
Press the “OK” button to save your changes.
Advanced Users: If you have provided your own road textures, the settings in this window may no
longer be valid. The setup tool will NOT recognize the custom textures and it will remove the
32
checkmarks from this window.
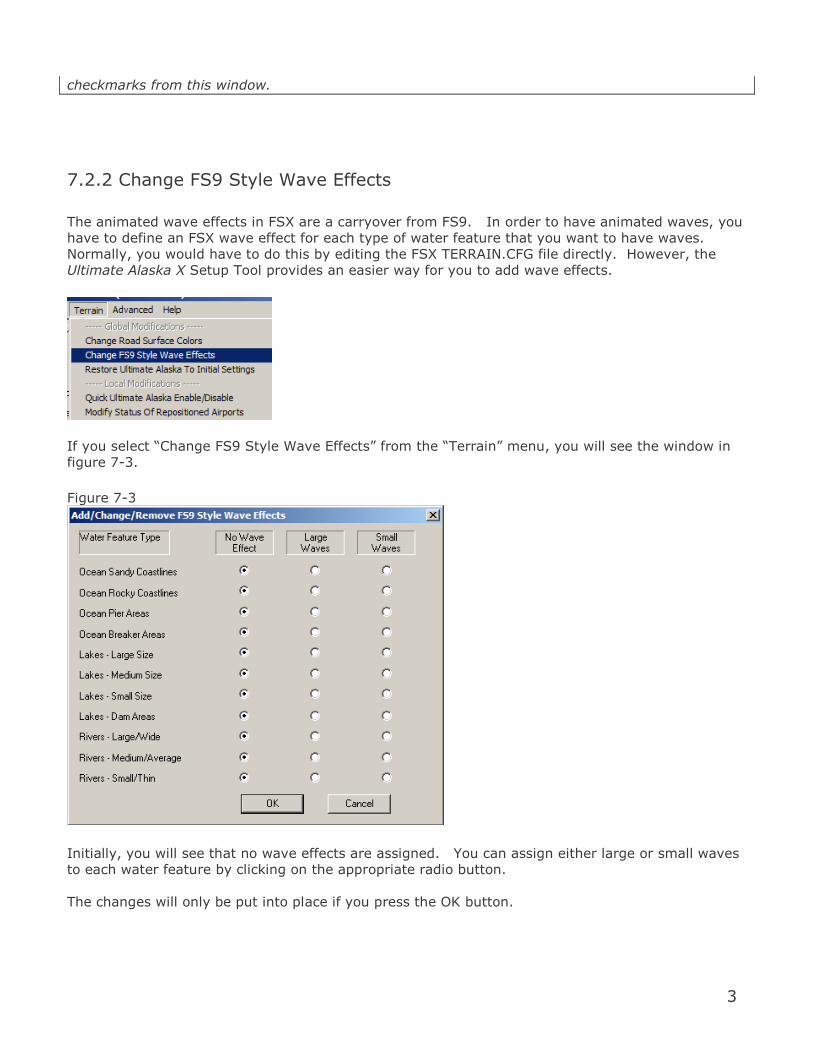
7.2.2 Change FS9 Style Wave Effects
The animated wave effects in FSX are a carryover from FS9. In order to have animated waves, you
have to define an FSX wave effect for each type of water feature that you want to have waves.
Normally, you would have to do this by editing the FSX TERRAIN.CFG file directly. However, the
Ultimate Alaska X Setup Tool provides an easier way for you to add wave effects.
If you select “Change FS9 Style Wave Effects” from the “Terrain” menu, you will see the window in
figure 7-3.
Figure 7-3
Initially, you will see that no wave effects are assigned. You can assign either large or small waves
to each water feature by clicking on the appropriate radio button.
The changes will only be put into place if you press the OK button.

33
7.2.3 Restore Ultimate Alaska X To Initial Settings
Users who tweak their Ultimate Alaska X environments (either manually or using the Ultimate Alaska
X Setup Tool) can restore Ultimate Alaska X to the initial settings by selecting “Restore Ultimate
Alaska To Initial Settings” from the “Terrain” menu. This restoration includes textures assignments
And, it includes the resetting of features to their default widths (such as road widths).
This is a global change, because Ultimate Alaska X does share textures with UltimateTerrain X
products.
This feature will not change the Ultimate Alaska X activation status (active or inactive) for any
features. It only changes feature characteristics.
Technical Info: Internally, this operation updates the FSX TERRAIN.CFG file with the Ultimate Alaska
X default values. If you have edited the Ultimate Alaska X features in TERRAIN.CFG file manually,
then this operation will overwrite your modifications.
34
7.3 Local Modifications
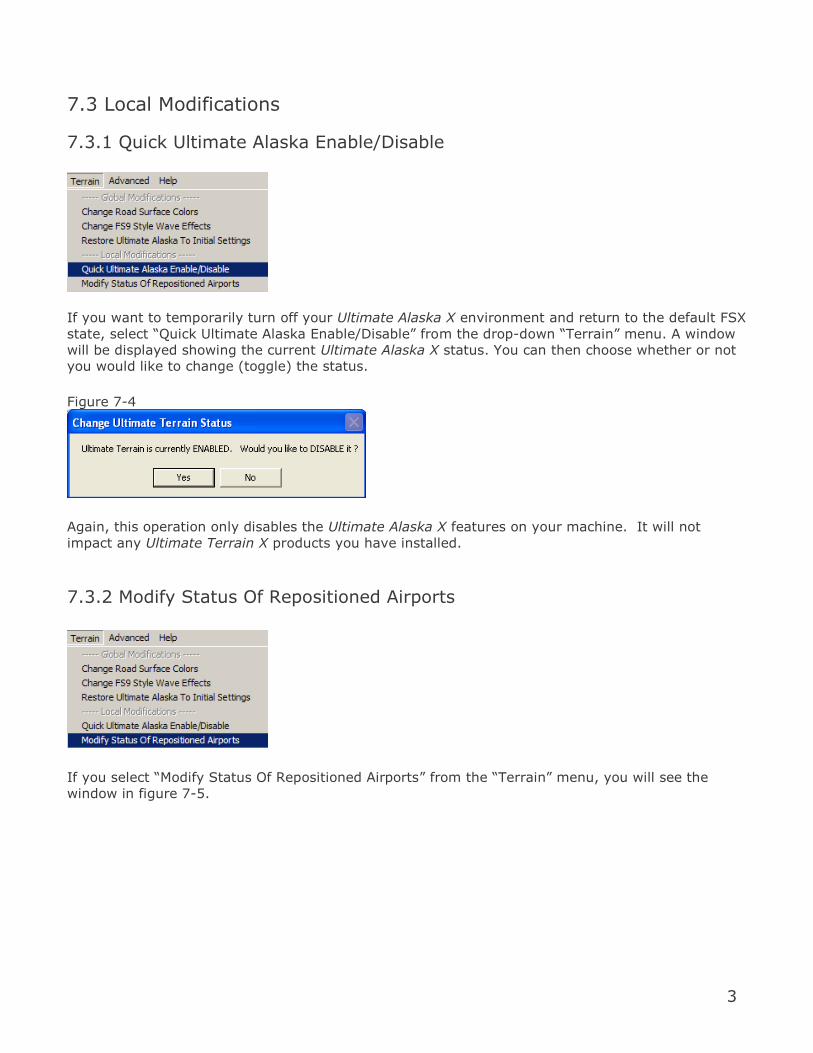
7.3.1 Quick Ultimate Alaska Enable/Disable
If you want to temporarily turn off your Ultimate Alaska X environment and return to the default FSX
state, select “Quick Ultimate Alaska Enable/Disable” from the drop-down “Terrain” menu. A window
will be displayed showing the current Ultimate Alaska X status. You can then choose whether or not
you would like to change (toggle) the status.
Figure 7-4
Again, this operation only disables the Ultimate Alaska X features on your machine. It will not
impact any Ultimate Terrain X products you have installed.
7.3.2 Modify Status Of Repositioned Airports
If you select “Modify Status Of Repositioned Airports” from the “Terrain” menu, you will see the
window in figure 7-5.
35
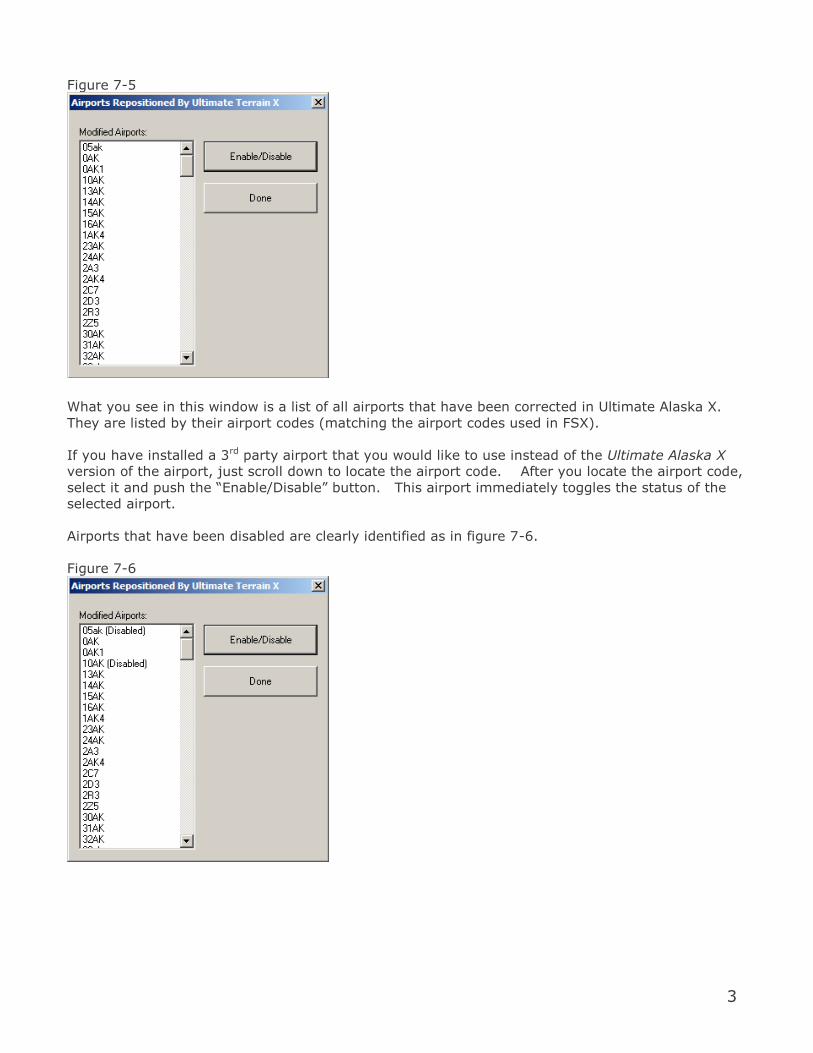
Figure 7-5
What you see in this window is a list of all airports that have been corrected in Ultimate Alaska X.
They are listed by their airport codes (matching the airport codes used in FSX).
If you have installed a 3rd party airport that you would like to use instead of the Ultimate Alaska X
version of the airport, just scroll down to locate the airport code. After you locate the airport code,
select it and push the “Enable/Disable” button. This airport immediately toggles the status of the
selected airport.
Airports that have been disabled are clearly identified as in figure 7-6.
Figure 7-6
36
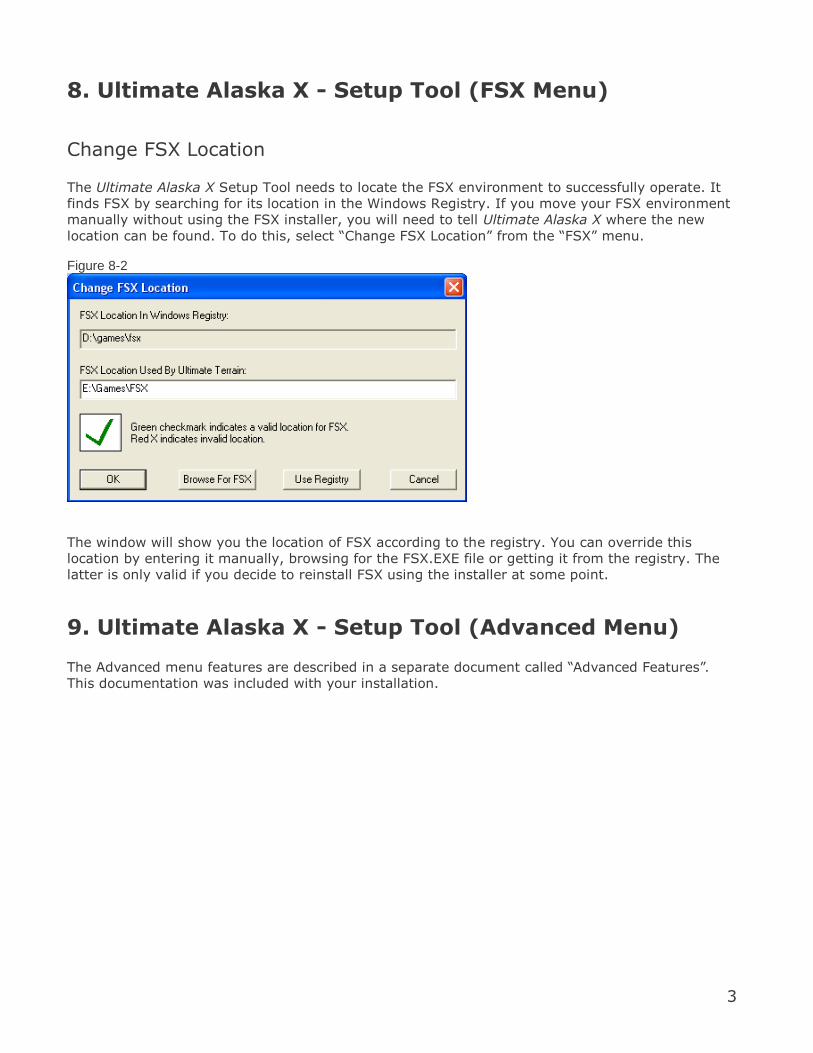
8. Ultimate Alaska X - Setup Tool (FSX Menu)
Change FSX Location
The Ultimate Alaska X Setup Tool needs to locate the FSX environment to successfully operate. It
finds FSX by searching for its location in the Windows Registry. If you move your FSX environment
manually without using the FSX installer, you will need to tell Ultimate Alaska X where the new
location can be found. To do this, select “Change FSX Location” from the “FSX” menu.
Figure 8-2
The window will show you the location of FSX according to the registry. You can override this
location by entering it manually, browsing for the FSX.EXE file or getting it from the registry. The
latter is only valid if you decide to reinstall FSX using the installer at some point.
9. Ultimate Alaska X - Setup Tool (Advanced Menu)
The Advanced menu features are described in a separate document called “Advanced Features”.
This documentation was included with your installation.

37
10. The FSX Scenery Library
Overview
FSX uses a priority-layering system to display scenery. The scenery layering can be changed using
the Scenery Library window while running FSX. To access the Scenery Library, select “Scenery
Library” from the settings menu in FSX.
Immediately after installing Ultimate Alaska X, you should see something similar to the image in
Figure 10-1.
Figure 10-1
The Ultimate Alaska X installation process will add new items to the FSX scenery library. There are
five entries unique to Ultimate Alaska X. Plus, there are 2 entries that may be shared with Ultimate
Terrain X products that may be installed. If you don’t have any Ultimate Terrain X products
installed, you should see things appear exactly as the window in Figure 10-1.
Every Ultimate Alaska X specific entry, or Ultimate Terrain X entry, in the list will begin with the
letters “UT”. Region specific entries will be labeled appropriately (i.e ‘UT Alaska’, ‘UT USA’, ‘UT
Europe’, ‘UT Canada’, ‘UT Alaska’). Ultimate Terrain X entries that are shared with all UT products
include the following:

38
UT Landclass – Vegetation
UT Exclusions For Default Scenery
Unique entries only associated with Ultimate Alaska X include:
UT Alaska Mesh
UT Alaska Cities
UT Alaska Water
UT Alaska Railroads
UT Alaska Roads
10.1 Ordering Of Ultimate Alaska X Layers
Only a couple of rules must be followed when layering the Ultimate Alaska X specific entries.
10.1.1 UT Exclusions For Default Scenery
The ‘UT Exclusions For Default Scenery’ layer is critical. This layer contains special scenery files that
will exclude the default FSX features that are being replaced by Ultimate Alaska X and any Ultimate
Terrain X products that may be installed. As a result, this layer must always be below every other
Ultimate Alaska X AND Ultimate Terrain X entry. However, it must be above the default FSX scenery
layers. Normally, the default FSX scenery layers include and appear after ‘Addon Scenery’ (as
shown in figure 10-1).
10.1.2 Landclass
Because of the detail modeling schemes used in Ultimate Alaska X urban areas in, urban landclass
layers are not needed by Ultimate Alaska X. However, Ultimate Alaska X does share the “UT
Landclass – Vegetation” layer with other Ultimate Terrain X products that may be installed.
The “UT Landclass – Vegetation” layer must be below the following Ultimate Alaska X layers.
UT Alaska Cities

39
10.1.3 Using Other Landclass Products
To use other landclass products in combination with Ultimate Alaska X, you would layer your library
in one of the following two possible methods:
Method 1: Replacing Only The Ultimate Alaska X Vegetation Landclass
--- top of scenery library ---
UT Landclass – Custom (if you have Ultimate Terrain X products installed)
UT Landclass – Urban (if you have Ultimate Terrain X products installed)
*** Other landclass product **
UT Landclass – Vegetation
--- bottom of scenery library ---
This is probably the most commonly used method. Ultimate Alaska X’s landclass improvements are
focused on the urban areas and other custom textures. We feel that our landclass in this area is
among the most accurate in the industry. However, if you have a product that also improves the
vegetation landclass in FSX, you might consider using this strategy.
Method 2: Completely Replacing Ultimate Alaska X Landclass
*** Other landclass product ***
UT Landclass – Custom (if you have Ultimate Terrain X products installed)
UT Landclass – Urban (if you have Ultimate Terrain X products installed)
UT Landclass – Vegetation
With this method, the UTX landclass will be completely covered by the other landclass product.
10.2 How Will Other Add-on Products Affect The Layering Of Ultimate Alaska X ?
Ultimate Alaska X covers a very large area. You may have other add-on products that will improve or
enhance smaller portions of the Ultimate Alaska X coverage. Different types of products will have a
different impact on compatibility with Ultimate Alaska X.
10.2.1 Photoscenery Products
Products that use photoscenery should work very well with Ultimate Terrian X, regardless of the
layering in the scenery library. Photoscenery will always override the Ultimate Alaska X vector-based
features such as: roads, railroads and water. The Ultimate Alaska X 3D features such as the modeled
objects, night lights and bridges will always be displayed on top of the photoscenery.
10.2.2 Terrain Mesh Products
At this moment, Ultimate Alaska X provides the most advanced mesh available for Alaska. If you
purchase a more advanced mesh in the future, you just need to layer it above the “UT Alaska Mesh”
layer in the FSX Scenery Library.

40
10.2.3 Products Containing 3D Objects
Unlike our Ultimate Terrain X products, Ultimate Alaska X will be impacted by any product that
provides 3D object model upgrades.
You should probably consult the developer of the addon product to find out how to layer their
products in conjunction with others. For Tongass Fjords X, we have provided instructions in
Appendix 3.
10.2.4 Landclass Products
Ultimate Alaska X can be used with other landclass methods, using the “sandwich” strategy
discussed previously. At this point, we don’t recommend other landclass products because urban
landclass is no longer needed with Ultimate Terrain X. Instead, the city layouts are presenting using
accurately placed models, roads and ground polygons. If you use another landclass product, it may
clash with this products intent.
10.2.5 Products Containing Vector Graphics Features
Most of the terrain scenery in FSX (and also Ultimate Alaska X) is drawn as vector graphics. Using
this technique, individual features are drawn on the terrain in their natural size, shape and location.
The vector features are always drawn on top of the generic base landclass textures. For example, to
draw a lake in a city, FSX will first draw the city using a generic landclass texture, and then it will
draw the lake in its natural shape on top of the landclass.
Most compatibility problems will occur when another product provides similar features to Ultimate
Alaska X, in a region that is already covered by Ultimate Alaska X.
Public support forums are the best place to inquire about compatibility issues between products. For
support on a specific product, make your inquiries at the support forum of that particular developer.
41
11. FAQ – Frequently Asked Questions
Is the product compatible with Tongass Fjords X.
Yes it is. You only need to layer Tongass Fjords X above the Ultimate Alaska X entries in the FSX
Scenery Library (see appendix 3).
I get little or no night lighting effects
The amount of Ultimate Alaska X night lighting is directly related to the Scenery Complexity Slider in
FSX (FSX settings menu). The higher the scenery complexity slider, the more lights will be visible.
How do I use the “Advanced” menu features ?
These features are described in the separate document labeled “Advanced Features”. They are not
recommended for the first time Flight Simulator user, however.
The night lights flicker on occasion
This effect can occur when you have lots of autogen along with the night lights. The flickering occurs
when lights are blocked and then unblocked by autogen objects. The effect is more obvious at lower
flight levels. You can improve the situation by reducing or disabling autogen during night flights.
Will Ultimate Terrain X products be upgraded to use the same modeling technology ?
No. The Ultimate Terrain X products will continue to be enhanced in the future. But, the urban
modeling will become part of a new product line called Ultimate Cityscapes X. Ultimate Cityscapes
X will further enhance the urban areas in Ultimate Terrain X, it will not replace it.

42

43
Appendix 1: Description Of Presets Shipped With
Ultimate Alaska X
This section will describe each of the presets that are shipped with the product. Screenshots of the
same areas will be used for comparative purposes to highlight the differences.
Preset: AlaskaModels1
Urban Accuracy Rating During Flight: High
Risk Of Visual Anomaly Rating : Low
Performance Impact : High
This is the default preset that is active when Ultimate Alaska is shipped. It provides the maximum
visual quality. However, Mid-to-lower range systems might have performance problems in the
denser urban areas of Alaska (i.e. Anchorage, Wasilla, Fairbanks).
Aerial Housing Screenshot (4000’)

44
Ground Screenshot
If you look at each of the houses in the ground screenshot above, each house is positioned
accurately along each road. And, each house lays flat on the ground. As we show all the different
preset screenshots, you will see the most change at ground level.

45
Preset: AlaskaModels1Alt
Urban Accuracy Rating During Flight: High
Risk Of Visual Anomaly Rating : Avg
Performance Impact : Avg to High (system dependant)
This preset is probably the most popular one among our beta-test team members. Normally, each
house that you see in Ultimate Alaska X is it’s own uniquely positioned object. This preset seeks to
increase performance in FSX by grouping all house objects on each individual street segment
together as a single object internally. Since there are fewer total numbers of “unique” objects for
FSX to process internally, performance usually improves on many systems, without reducing visual
quality from the air.
However, there is one small drawback. Because houses are grouped together, all houses in a block
are placed at the same elevation level. As a result, some houses may float or sink into the ground
when the terrain is hilly.
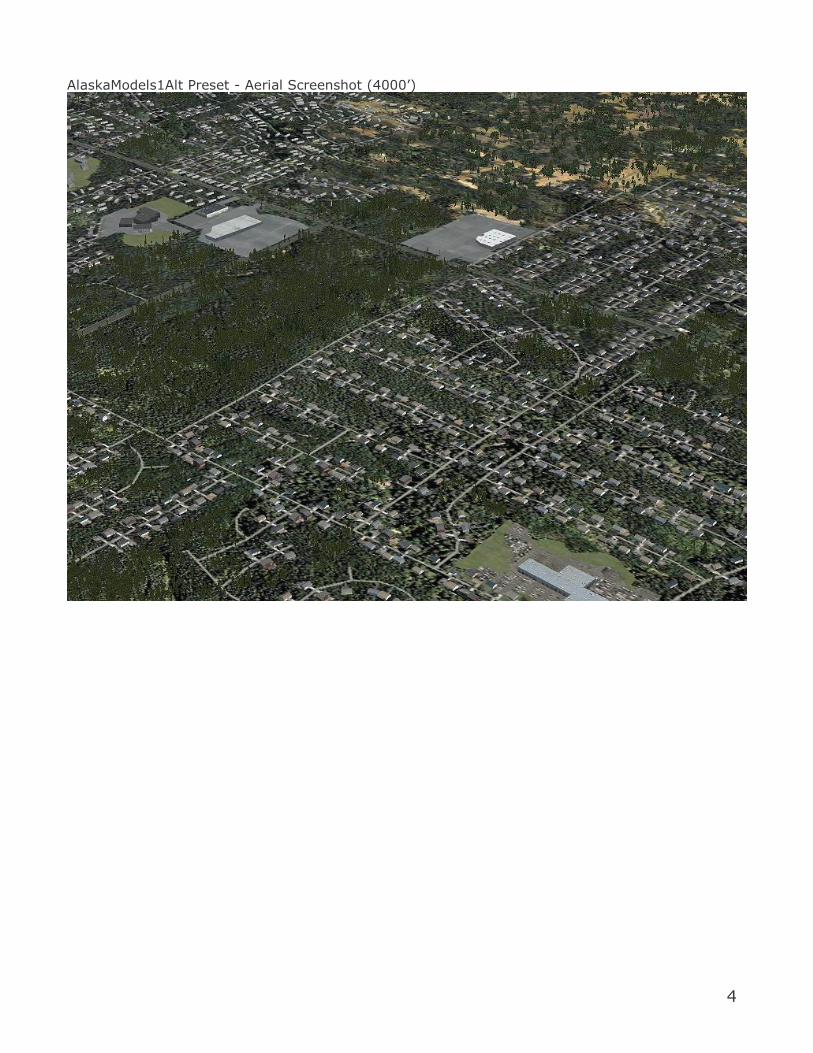
If you look at the following screenshots, you will see virtually no difference between the
“AlaskaModels1Alt” preset and the “AlaskaModels1” preset. But, if you look closely at the ground
screenshot for AlaskaModels1Alt, you will see some of the houses start to sink in the ground.
This visual anomaly is the performance tradeoff. Since this is a flight simulator and not a driving
simulator, most users won’t notice the difference. And, many of our users have found this preset
option to really improve their performance.
46
AlaskaModels1Alt Preset - Aerial Screenshot (4000’)

47
AlaskaModels1Alt Preset - Ground Screenshot (4000’)
48
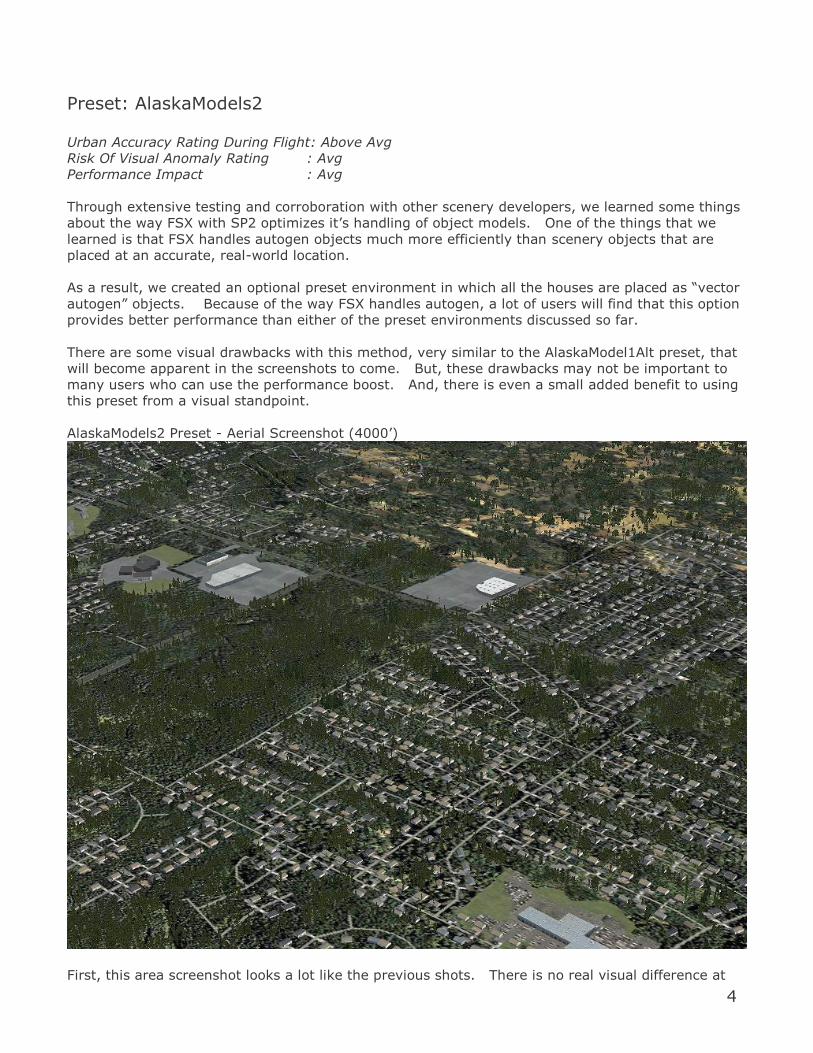
Preset: AlaskaModels2
Urban Accuracy Rating During Flight: Above Avg
Risk Of Visual Anomaly Rating : Avg
Performance Impact : Avg
Through extensive testing and corroboration with other scenery developers, we learned some things
about the way FSX with SP2 optimizes it’s handling of object models. One of the things that we
learned is that FSX handles autogen objects much more efficiently than scenery objects that are
placed at an accurate, real-world location.
As a result, we created an optional preset environment in which all the houses are placed as “vector
autogen” objects. Because of the way FSX handles autogen, a lot of users will find that this option
provides better performance than either of the preset environments discussed so far.
There are some visual drawbacks with this method, very similar to the AlaskaModel1Alt preset, that
will become apparent in the screenshots to come. But, these drawbacks may not be important to
many users who can use the performance boost. And, there is even a small added benefit to using
this preset from a visual standpoint.
AlaskaModels2 Preset - Aerial Screenshot (4000’)
First, this area screenshot looks a lot like the previous shots. There is no real visual difference at

49
all. The differences come about mainly at ground level.
AlaskaModels2 Preset - Ground Screenshot
The screenshot above shows things at ground level. The first positive thing that this preset has
over other methods is that there are more autogen trees displayed. This is because vector-
autogen can share the same close space as other autogen (i.e. trees).
There are two more negative anomalies that can be associated with this preset. As with the
AlaskaModel1Alt preset, all houses on a street segment are placed at the same elevation. As a
result, the same problem occurs with houses disappearing or floating on uneven terrain.
The other negative (for some) has to do with the style of houses. With vector autogen, the same
house texture is repeated throughout the street segment. So, there is a repetition of house textures
within a street. However, house textures will change from street segment to street segment to add
a more limited variety to the residential areas.
This may be another popular preset with users that want to improve performance and still have
houses that follow real world road locations.

50
Preset: AlaskaModels3
Urban Accuracy Rating During Flight: Below Avg
Risk Of Visual Anomaly Rating : Low
Performance Impact : Below Avg
If you have spent any time in this hobby, you probably know about landclass, autogen and how
houses/buildings do not normally follow accurate road products like Ultimate Alaska (USA, Europe
and Canada).
Urban landclass textures in FSX usually have “fake” roads drawn in them that have nothing to do
with their real world locations. These fake roads in the underlying landclass textures can clash with
more accurately placed roads that are provided by 3rd party products like Ultimate Alaska.
Ultimate Alaska X is a unique product in that we no longer use underlying urban landclass textures.
All objects in Ultimate Alaska X are aligned with real-world positioned roads. All of the presets
discussed so far use this method of positioning all the objects along real-world road locations.
FSX is very efficient when it comes to displaying environments with urban landclass textures and
autogen. But, accuracy is sacrificed.
The AlaskaModels3 preset attempts to combine the urban landclass/autogen way of doing things for
housing areas. But, non-house buildings like high-rises, schools, shopping malls/centers and office
buildings are still positioned accurately in their real world locations. And, major roads are still
displayed accurately.
With this option, you will see some major screenshot differences in both the aerial and ground
views.
51
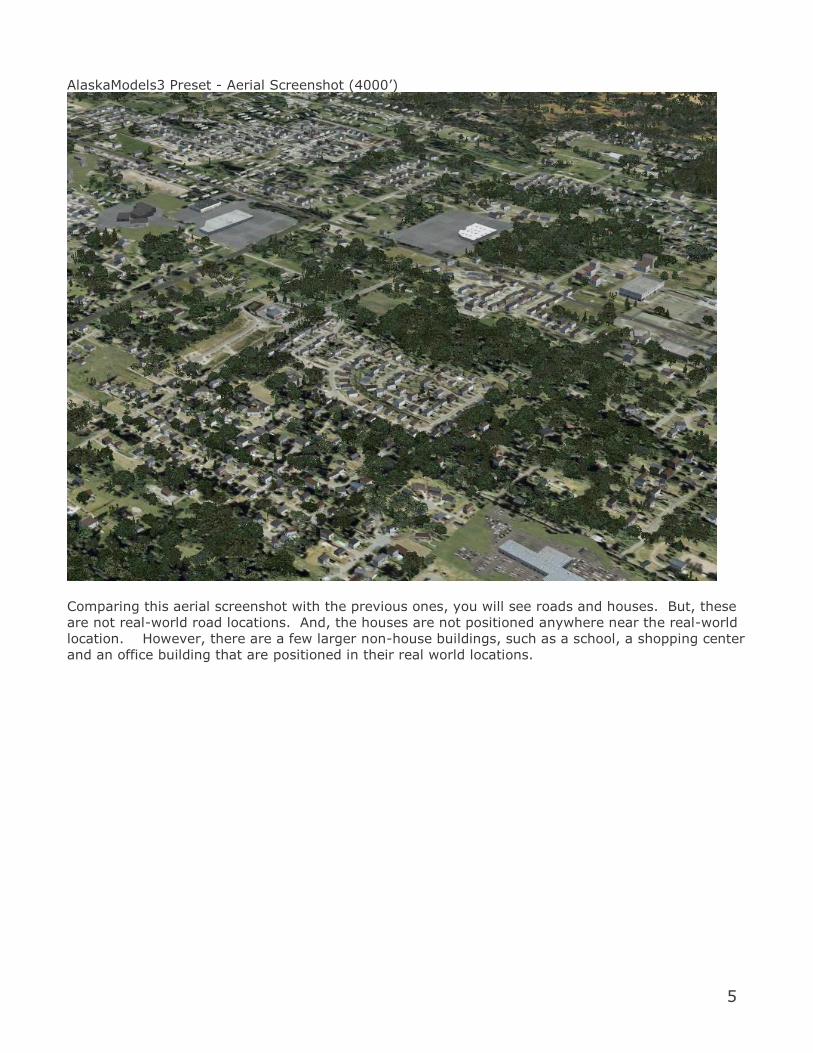
AlaskaModels3 Preset - Aerial Screenshot (4000’)
Comparing this aerial screenshot with the previous ones, you will see roads and houses. But, these
are not real-world road locations. And, the houses are not positioned anywhere near the real-world
location. However, there are a few larger non-house buildings, such as a school, a shopping center
and an office building that are positioned in their real world locations.

52
AlaskaModels3 Preset - Ground Screenshot
Here is the same neighborhood as the previous preset screenshots at ground level. It is very
pretty, but not accurate.
Because of the heavy use of autogen, this method is very efficient for FSX to render. So, many
users might be willing to sacrifice accuracy for performance

53
Preset: AlaskaModels4
Urban Accuracy Rating During Flight: Above Avg
Risk Of Visual Anomaly Rating : Low
Performance Impact : Low
If you are a user with a lower-to-mid end system and want visual accuracy from the air, then this
preset might work very well for you.
This preset provides a very real-world accurate environment. From the air, things will look very
much the same as even the AlaskaModels1 preset. But from the ground, you will see that all
houses are missing. All non-house models are drawn at the ground level. But, houses make up
about 95% of the object models in Ultimate Alaska X. So, they add the biggest performance hit.
From the air, you still get the appearance of house objects due to the fact that a flat housing
footprint is drawn on the terrain.
This may be the most performance friendly preset that is available.
AlaskaModels4 Preset - Aerial Screenshot (4000’)
From the air, you still have the appearance of houses. But, there really are not any house object
models displayed. However, those larger buildings are rendered as 3D objects, even though you

54
can not see them in the next ground level screenshot.
Everything you see with this preset is accurate from a real-world standpoint. There is no autogen
used, except for vegetation.
AlaskaModels4 Preset - Ground Screenshot (4000’)
At ground level, you can see the flat housing footprints. But, the house models are missing.
The lack of houses only impacts the large urban areas in Alaska. Smaller cities and towns
still show models for all objects, including houses.

55
Preset: AlaskaUTX
Urban Accuracy Rating During Flight: Low
Risk Of Visual Anomaly Rating : Low
Performance Impact : Low
Ultimate Alaska X is unique because it provides our new modeling technology, which adds accurately
placed object models, along with the accurate terrain features normally found in our Ultimate Alaska
X product lines.
If you want an environment that provides accurate terrain features, without any accurately placed
object models, you can use the AlaskaUTX preset. This preset gives you all the accurate terrain
features normally found in our Ultimate Terrain X products, along with autogen buildings and
landclass that are normally associated with most FSX scenery products.
This is another method that will yield high performance. But, you won’t see any object models
following the accurately positioned roads. And, only major roads and highways are displayed in
urban areas to prevent clashing with the “fake” roads in the landclass textures.
This environment will look a lot like the AlaskaModels3 environment, except that no custom buildings
are displayed at all. Instead, all building objects are autogen, whose locations are determined by
the building footprints in the underlying landclass.
We really don’t recommend using this preset. But, we put it in place for comparison purposes.

56
Conclusion
That concludes the discussion on the different environmental presets that are provided with this
product. You can use any of these presets as a base platform for creating your own custom
presets. To do that, simply load one of our presets, make your changes to the individual scenery
areas as needed and save the environment as a new preset.

57
Appendix 2: List Of Modeled Ultimate Alaska Scenery
Areas Here is a complete list of scenery areas that have been portrayed in Ultimate Alaska X, using
accurately placed 3D models. Most of these scenery areas are named according to the city, town
or village that is in the area. Some villages and towns that are not on the list may be included in
nearby scenery areas.
ADAK
AKHIOK AKIACHAK AKIAK
ALAKANUK ALATNA ALEKNAGIK
ALLAKAKET AMBLER ANCHORAGE
ANCHORPOINT ANDERSON ANGOON
ANIAK ANVIK ARCTICVILLAGE
ATKA ATQUSUK ATTUSTATION
BARROW BEAVER BETHEL
BETTLES BREVIGMISSION BUFFALOSOAPSTONE
BUTTE CANCHORAGE CANTWELL
CHATANIKA CHEVAK CHICKEN
CHIGNIK CHISTOCHINA CHITINA
CIRCLE COLDBAY COLDFOOT
COOPERLANDING COPPERCENTER CORDOVA
COUNCIL CRAIG DELTAJUNCION
DENALI DILLINGHAM DOTLAKE
EAGLE EAGLERIVER EEK
EGEGIK EIELSONAFB EKWOK
ELIM EMMONAK ESTER
FAIRBANKS FISHHOOK FORTGREELEY
FORTYUKON FOX FUNNYRIVER
GAKONA GALENA GAMBELL
GATEWAYKNOB GIRDWOOD GLACIERBAYEXCURSIONS
GLENNALLEN GOLOVIN GOODNEWSBAY
GRAYLING GUSTAVUS HAINES
HEALY HOLYCROSS HOMER
HOONAH HOOPERBAY HOUSTON
HUGHES HUSLIA HYDABURG
HYDER IGIUGIG ILIAMNA
JUNEAUEAST JUNEAUWEST KAKE
KAKTOVIK KALIFORNSKY KASILOF
KENAI KENNECOTT KETCHIKAN
KIANA KINGCOVE KINGSALMON
KIVALINA KLAWOCK KLUKWAN
KNIK-FAIRVIEW KOBUK KODIAK
KODIAKSTATION KOKHANOK KOLIGANEK
KONGGIGINAK KOTLIK KOYUK
KOYUKUK KOZEBUE KWETHLUK
KWIGILLINGOK LAKEMINCHUMINA LARSONBAY
LEVELOCK LOWERKALSKAG

58
MANLEYHOTSPR MANOKOTAK MARSHALL
MATANUSKAGLACIER MCCARTHY MCGRATH
MEKORYUK MENDENHALLGLACIERVIS METLAKATLA
MINTO MOUNTAINVILLAGE NAKNEK
NANCHORAGE NAPAKIAK NAPASKIAK
NELSONLAGOON NENENA NEWHALEN
NEWSTUYAHOK NIKISKI NIKOLAI
NIKOLSKI NINILCHIK NOATAK
NOME NONDALTON NOORVIK
NORTHPOLE NORTHWAYVILLAGE NUIQSUT
NULATO NUNAMIQUA OUZINKIE
PALMER PEDROBAY PETERSBURG
PILOTPOINT PILOTSTATION POINTHOPE
POINTLAY PORTAGECREEK PORTALEXANDER
PORTHEIDEN PORTLIONS PROSPECTCREEK
PRUDHOEBAY QUINHAGAK REDDEVIL
REDDOGMINE RUBY RUSSIANMISSION
SALAMATOF SALCHA SANCHORAGE
SANDPOINT SAVOONGA SCAMMONBAY
SELAWIK SELDOVIA SEWARD
SHAGELUK SHEMYAISLAND SHISHMAREF
SHUNGNAK SITKA SKAGWAY
SLANA SLEETMUTE SOLDOTNA
SOUTHNAKNEK STEBBINS STERLING
STGEORGE STMARYS STMICHAEL
STONYRIVER STPAUL SUTTON-ALPINE
TALKEETNA TANACROSS TANANA
TELLER TENAKEESPRINGS TOGIAK
TOK TOKSOOKBAY TRAPPERCREEK
TULUKSAK TUNTUTULIAK TUNUNAK
TWINHILLS UNALAKLEET UNALASKA
VALDEZ VALDEZE WAINWRIGHT
WALES WANCHORAGE WASILLA
WHITEMOUNTAIN WHITTIER WISEMAN
WOMANSBAY WRANGELL Y
YAKUTAT

59
Appendix 3: Using Ultimate Alaska X with Tongass
Fjords X Tongass Fjords X is an excellent scenery product and we highly recommend it for Alaska. The level
of hand-rendered detail in this smaller, more regional product exceeds even that of Ultimate Alaska
X.
Tongass Fjords X encompasses a large area in far S.E. Alaska and part of Canada (see the Yellow
area in the map below).
Figure A3-1
Tongass Fjords X is completely compatible with Ultimate Alaska X, as long as you put the Tongass
Fjords X entries in the FSX Scenery Library above the Ultimate Terrain X entries as shown in Figure
A3-2.
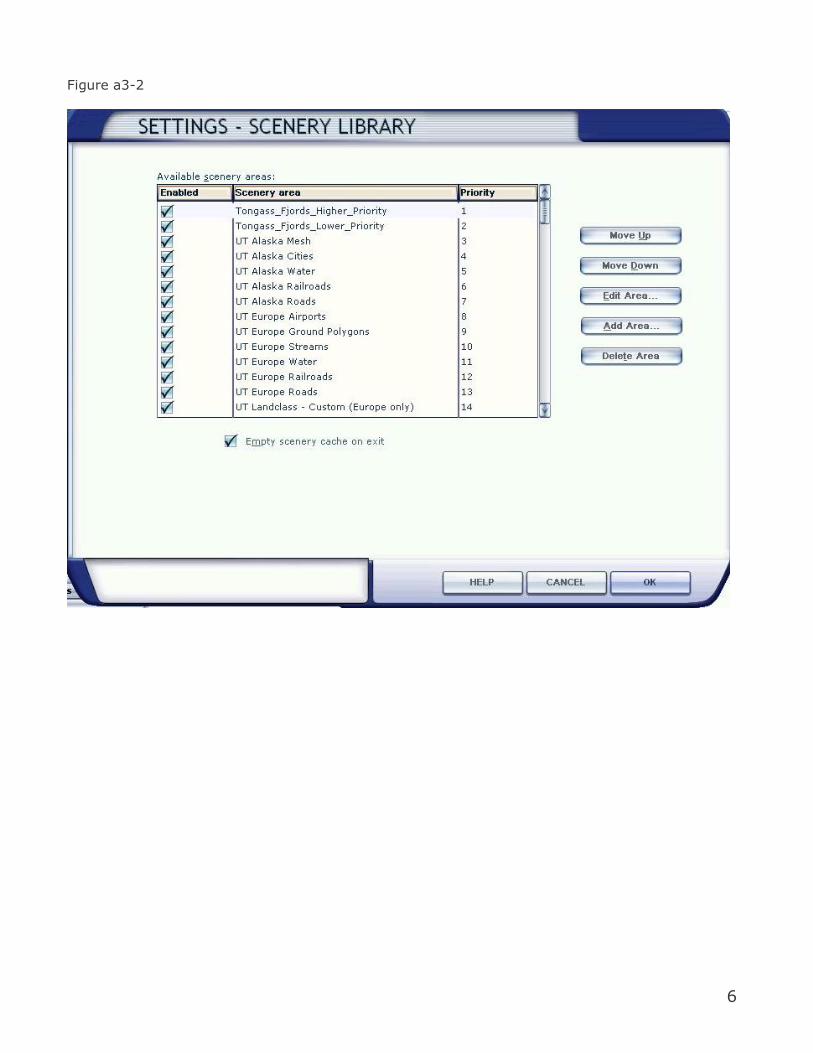
60
Figure a3-2

61
Final Thoughts
We hope our users get a lot of joy from this product. Alaska is a beautiful terrain with features
unique in all the world. Because of the unique opportunity that Alaska presents as a flight
simulation destination of choice, we wanted to make sure that we created a product worthy of
Alaska’s impressive terrain.
We think you will quickly notice the hard work and dedication that went into this product.
62
Acknowledgements
Scenery Solutions would like to thank the following groups and individuals for their assistance in
making this product the best it can be.
Flight One Software – Our publisher and one of the best in the Flight Simulator business.
They back their products 100% and offer terrific customer support.
All of the talented freeware developers that give their time to make the Flight Simulation
hobby what it is today.
Rhonda, Jake and Austin for putting up with a dad that was buried in his office for the last
year.
Our customers for their constructive feedback and understanding. We hope you continue to
find our products of great value.
Credits
Authors
Allen Kriesman (Scenery Solutions)
Holger Sandmann
MVP Of All Things At Scenery Solutions
Jeff Parker
Beta Testers And Other Contributors To This Product
Arno Gerretsen (technical advice)
Nick Needham
Jose Luis Galvan Perez
Marc Widi (Always a team member, even when his health won’t allow him to participate)
Thomas Perry
Lance Tucker
Dave Woodell
Justin Tyme
William M.
Top Related