


Languages
Pages
Legal

TULSA PRESERVATION COMMISSION
Unified Design Guidelines
RESIDENTIAL STRUCTURES
within
Historic Preservation Overlay Zoning Districts
ADOPTED: INSERT DATE
2
Tulsa Preservation Commission, 2017
Mike Craddock, Chair
Ted Reeds, II, TMAPC, Vice-Chair
David Schoell, Secretary
David Pounds
Peter Grant
John Snyder
Jim Turner
Robert Shears
Historian – Position Vacant
Historic Property Owner – Position Vacant
Michael Birkes, Arts Commission
Tulsa Metropolitan Area Planning Commission, 2017
Michael Covey, Chairman
John Dix, 1st Vice Chair
John Shivel, 2nd Vice Chair
Margaret Millikin, Secretary
Ryon Stirling
Gail Carnes
Ted Reeds, II
Joshua Walker
Mike Fretz
Mark Willis, ex-officio
Dwain Midget, ex-officio
Tulsa City Council, 2017
Anna America, Chair
David Patrick, Vice-Chair
Vanessa Hall-Harper
Jeannie Cue
Blake Ewing
Karen Gilbert
Connie Dodson
Phil Lakin, Jr.
Ben Kimbro
Mayor of the City of Tulsa
G.T. Bynum
This publication was printed with Federal funds from the National Park Service, U.S. Department of the Interior.
However, the contents and opinions do not necessarily reflect the views or policies of the Department of the
Interior. Under Title VI of the Civil Rights Act of 1964, Section 504 of the Rehabilitation Act of 1973, and the Age
Discrimination Act of 1975, as amended, the U.S. Department of the Interior prohibits discrimination on the basis
of race, color, national origin, disability, or age in its federally assisted programs. If you believe you have been
discriminated against in any program, activity, or facility as described above, or if you desire further information,
please write to Chief-Office of Equal Opportunity, U.S. Department of the Interior, National Park Service, 1201 Eye
St., NW (2740), Washington, D.C. 20005.

3
TABLE OF CONTENTS
Historic Preservation Zoning Overview ................................................................................ 4
Historic Preservation (HP) Permit
Certificate of Appropriateness (COA) Process Overview ................................................... 5
Section A – Guidelines for Rehabilitation of Existing Structures..................................... 8
Section B – Guidelines for Additions to Existing Structures ........................................... 16
Section C – Guidelines for New Construction ................................................................... 24
Section D – Guidelines for Relocated Structures ............................................................. 29
Section E – Guidelines for Non-Contributing Structures ................................................. 32
Section F – Guidelines for Demolition of Structures ........................................................ 33
Section G – Guidelines for Landscape Features, Paving and Signage .......................... 34

4
HISTORIC PRESERVATION ZONING OVERVIEW
Historic neighborhoods seek out historic preservation (HP) zoning to provide extra protection
from inappropriate alterations and unsympathetic new construction. Generally, the
neighborhoods that would qualify for HP zoning are those that would be eligible for the
National Register of Historic Places. For example, all of Tulsa’s HP-zoned districts are also
National Register-listed districts. However, listing in the National Register does not require
that the neighborhood pursue local HP zoning.
HP zoning requires that any exterior renovations or repairs (in some cases) are subject to
design review by the Tulsa Preservation Commission before work can be done.
Historic preservation zoning helps to:
1. Preserve and protect the distinctive characteristics and the context of the district, protecting property
owners’ investments.
2. Maintain and improve the streetscapes of those buildings and places.
3. Assure that new construction projects and additions to existing homes are architecturally compatible
with existing buildings in the district.
Historic preservation zoning is technically referred to by city planners as “overlay” zoning.
The historic preservation zoning is “overlaid” on top of the existing zoning. The existing
zoning restrictions are unchanged — instead they are supplemented by the conditions of
historic preservation zoning. The existing zoning requirements control such issues as land
use, building setbacks, parking requirements, lot coverage by structures, and building
heights. Historic preservation zoning overlay zoning does not prevent lot splits.
HP Zoning and the Tulsa Preservation Commission are governed by the City of Tulsa’s
Zoning Code. Download the ordinance Zoning Code at www.tulsapreservationcommission.
org/zoning.
Before and after photos of a recent success story in the Brady Heights Historic District.
5
HISTORIC PRESERVATION PERMIT CERTIFICATE OF APPROPRIATENESS
PROCESS OVERVIEW
The Historic Preservation (HP) Permit Certificate of Appropriateness (COA) is the official
document issued by the Tulsa Preservation Commission to approve proposed work to
historic properties.
The TPC reviews the proposed work to make sure it complies with the design guidelines, in
consideration of the needs and desires of the property owner. Once the TPC finds that the
proposed work meets the design guidelines, a Certificate of Appropriateness Historic
Preservation Permit is issued, and the property owner may begin the work or may apply for a
building permit if one is required.
Any exterior alterations or repair, new construction, or demolition within a historic
preservation zoned neighborhood must be approved first by the Tulsa Preservation
Commission or TPC Staff.
Under certain conditions, TPC Staff can issue a Certificate of Appropriateness Historic
Preservation Permit without requiring a review by the Commission. There are also some
exemptions to the COA HP Permit process, which Staff would be happy to discuss with you.
To start the process of obtaining a Certificate of Appropriateness Historic Preservation
Permit, contact TPC Staff at (918) 576-5687 or [email protected].
Going Through the COA HP Permit Process
The process of applying for and receiving a Certificate of Appropriateness Historic
Preservation Permit is very simple and straightforward with just a little advanced
preparation. Consult TPC Staff early to ensure a smooth, successful application process —
they are here to help!
Applicants complete a simple one-page form application and provide supporting
photographs, brochures, and drawings as necessary. There is no fee for a COA HP Permit
application.
Steps for Property Owners
1. Decide on what work you want to do on your property.
2. Refer to the district maps and confirm that your property is located in a historic preservation
zoned district.
3. If your property is located in a HP zoning district, review the design guidelines for your
neighborhood to determine the appropriate design and materials for the work you want to do.
This is an ideal time to contact TPC Staff, who would be happy to assist you.

6
4. Develop a plan to carry out your work, including drawings of what you want your property to
look like upon completion.
5. At this point, you are ready to submit a simple one-page application form describing the
proposed work.
6. Your application will go through the COA HP Permit review process as explained below.
The Certificate of Appropriateness Historic Preservation Permit process is administered
through public meetings. The TPC meets twice monthly to approve COA applications: on the
second Thursday of the month at 11:00 am and on the fourth Tuesday of the month at 4:30
pm. The TPC meeting schedule is available from TPC staff or at
www.tulsapreservationcommission.org/meetings. All meetings are held at City Hall.
Applicants and interested parties are encouraged to attend.
A typical COA HP Permit application is presented at one TPC meeting. However, applications
for new construction, and additions and complex projects are reviewed at two or more
meetings because of the complex nature of those projects. The application is first presented
to the COA HP Permit Subcommittee one week prior to the TPC meeting. New construction
projects (brand new buildings on cleared land) are reviewed twice at the COA HP Permit
Subcommittee level due to the complexity of the applications. After the COA HP Permit
Subcommittee makes a recommendation on the application, it is reviewed by the full Tulsa
Preservation Commission, at which time a decision to approve or deny the application is
made.
TPC Staff receives COA HP Permit Application along with supporting
plans, photographs and brochures from applicant.
(New construction, additions and complex projects) At the COA HP
Permit Subcommittee Meeting, TPC staff presents the application to the
Subcommittee.
(New construction, additions and complex projects) COA HP Permit
Subcommittee votes on a recommendation to the full Commission.
TPC staff presents the application to the full Tulsa Preservation
Commission (in the case of new construction, additions and complex
projects, the COA HP Permit Subcommittee Chair explains the
subcommittee’s recommendation).

7
The Tulsa Preservation Commission votes whether to approve or deny
the application for a Certificate of Appropriateness Historic Preservation
Permit.
If approved, a Historic Preservation Permit is issued to the applicant,
typically within a few business days. Applicants who are denied can
reapply with an alternate proposal.
8
SECTION A – GUIDELINES FOR REHABILITATION OF EXISTING STRUCTURES
A.1 General Requirements
Use the following guidelines as the basis for all exterior work:
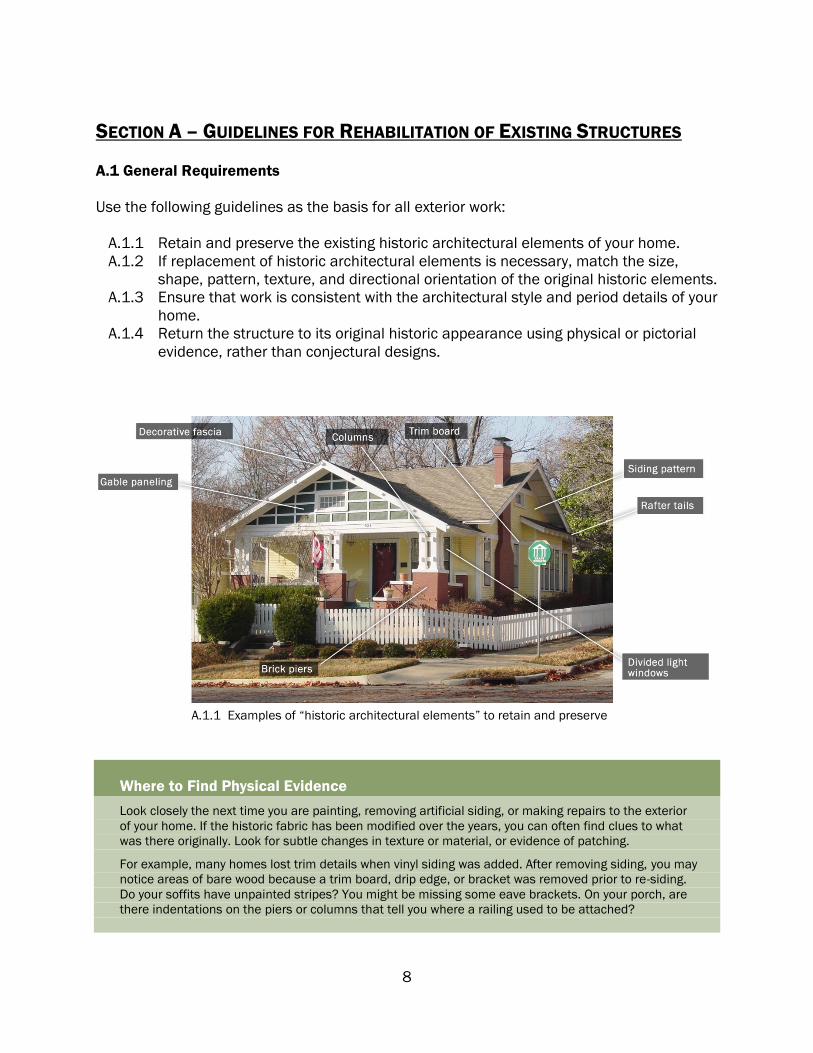
A.1.1 Retain and preserve the existing historic architectural elements of your home.
A.1.2 If replacement of historic architectural elements is necessary, match the size,
shape, pattern, texture, and directional orientation of the original historic elements.
A.1.3 Ensure that work is consistent with the architectural style and period details of your
home.
A.1.4 Return the structure to its original historic appearance using physical or pictorial
evidence, rather than conjectural designs.
A.1.1 Examples of “historic architectural elements” to retain and preserve
Where to Find Physical Evidence
Look closely the next time you are painting, removing artificial siding, or making repairs to the exterior
of your home. If the historic fabric has been modified over the years, you can often find clues to what
was there originally. Look for subtle changes in texture or material, or evidence of patching.
For example, many homes lost trim details when vinyl siding was added. After removing siding, you may
notice areas of bare wood because a trim board, drip edge, or bracket was removed prior to re-siding.
Do your soffits have unpainted stripes? You might be missing some eave brackets. On your porch, are
there indentations on the piers or columns that tell you where a railing used to be attached?

9
SECTION A – GUIDELINES FOR REHABILITATION OF EXISTING STRUCTURES
A.2 Exterior Walls
A.2.1 Retain and preserve the original historic wall materials and character-defining
details, including, but not limited to, window and door trim, eave brackets, and
embedded porch columns.
A.2.2 To return the home to its original historic appearance, remove non-historic siding
and trim. Repair and restore the underlying historic siding, trim, and details.
Removal of non-historic siding is encouraged (and may be staff approved).
A.2.3 If replacement of deteriorated wall materials is necessary, use matching materials
(wood, brick, etc.) that maintain the size, shape, pattern, texture, and directional
orientation of the original historic material.
A.2.4 When proposing to use materials different from the original historic wall materials,
replacement materials that maintain the character of the structure and the size,
shape, pattern, texture, and directional orientation of the original historic siding will
be considered on a case-by-case basis.
A.2.5 In order to maintain the historic appearance of the structure, do not apply paint to
unpainted brick or stone walls. Paint may be removed Staff can approve the
removal of paint from brick or stone surfaces to return the structure to its original
historic appearance. Repainting previously painted surfaces does not require COA
HP Permit review.
Common Types of Siding
4” lap siding 2” Novelty lap siding Shake shingles
How to Gently Remove Paint from Brick or Stone
NEVER sandblast or power-wash masonry! Firing heavy artillery at an old building usually has disastrous
results. Abrasive and acidic methods will remove the protective outer layer, causing brick to fail rapidly.
Some chemicals can change the color of your masonry or allow harmful water infiltration. Gel and paste
methods that gently dissolve paint are least likely to cause damage to your brick or the environment.
These systems often involve applying paper to the paste and peeling it off.
10
SECTION A – GUIDELINES FOR REHABILITATION OF EXISTING STRUCTURES
A.3 Doors and Door Surrounds
A.3.1 Retain and preserve original historic doors and door surrounds, including frames,
glazing, panels, sidelights, fanlights, and transoms.
A.3.2 Do not remove, cover, or move existing door, sidelight, fanlight, and transom
openings.
A.3.3 To return the home to its original historic appearance, remove non-historic doors
and replace them using physical or pictorial evidence of the originals. If no
evidence exists, select doors and surrounds which are consistent with the
architectural style of your home.
A.3.4 To gain thermal efficiency, storm doors which maintain the appearance and allow
maximum visibility of the original historic doors may be installed. Unfinished or
clear-finished metals are not allowed. (Storm doors can be staff approved)
A.3.5 If replacement of deteriorated doors is necessary, select doors and surrounds
which are consistent with the architectural style of your home.
A.3.6 If replacement of deteriorated trim is necessary, match the appearance, size,
shape, pattern, texture, and detailing of the original historic trim.
A.3.7 When adding new door openings, maintain the proportions of the façade. Match
the dimensions and trim details of other doors and surrounds on your home.
Select doors and surrounds which are consistent with the architectural style of your
home.
A.3.8 Use clear glass in new or replacement doors and sidelights.
A.3.9 Exterior security bars and grilles are discouraged.
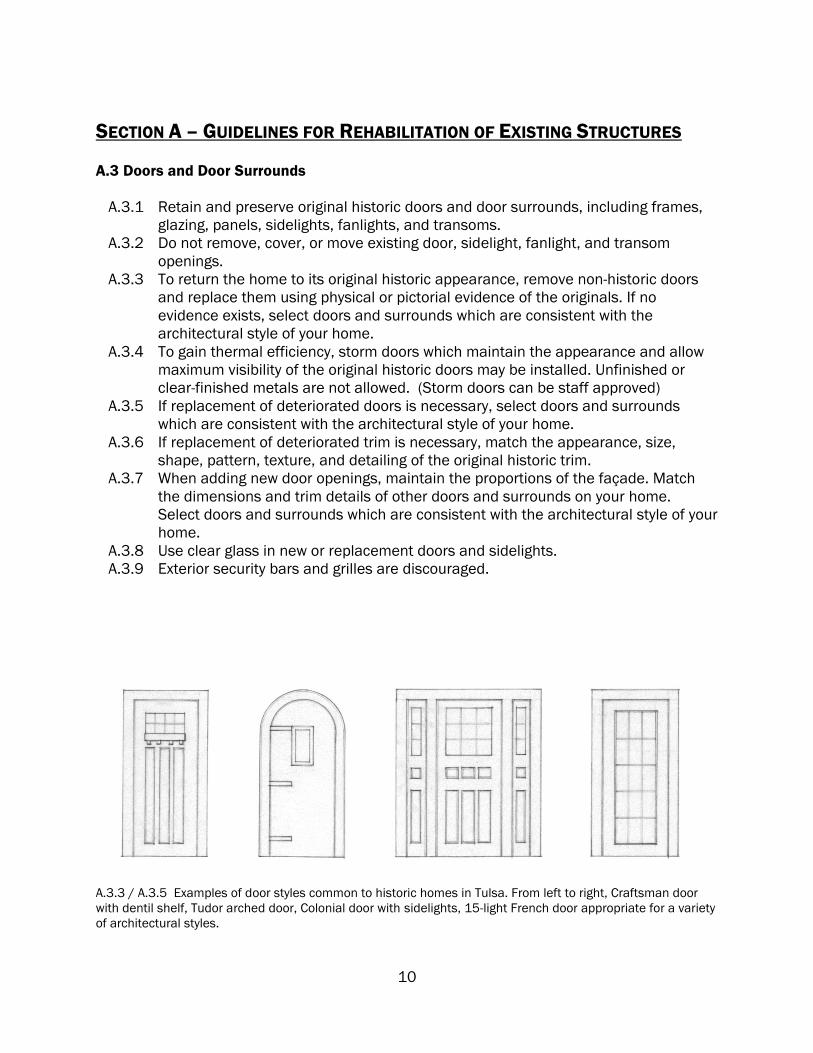
A.3.3 / A.3.5 Examples of door styles common to historic homes in Tulsa. From left to right, Craftsman door
with dentil shelf, Tudor arched door, Colonial door with sidelights, 15-light French door appropriate for a variety
of architectural styles.

11
SECTION A – GUIDELINES FOR REHABILITATION OF EXISTING STRUCTURES
A.4 Windows and Window Trim
A.4.1 Retain and preserve original historic windows, including glazing, trim, muntins, and
character-defining details.
A.4.2 Do not remove, cover, or move existing window openings.
A.4.3 To return the home to its original historic appearance, remove non-historic windows
and trim. When selecting replacements, use physical or pictorial evidence. If no
evidence exists, select windows which are consistent with the architectural style of
your home.
A.4.4 To gain thermal efficiency, storm windows which maintain the appearance and
allow maximum visibility of the original historic windows may be installed.
Unfinished and clear-finished metals are not allowed. (Storm windows can be staff
approved)
A.4.5 If replacement of deteriorated windows is necessary, match the original historic
windows in sash design, size, shape, muntin pattern, location, glazing area, and
tint. Insulated glass (double-pane) windows may be used. Exterior muntins are
required on simulated-divided-light windows.
.1 Brady Heights – Match the original historic window material.
.2 Elmwood – Match the original historic window material
A.4.6 If replacement of deteriorated trim is necessary, match the appearance, size,
shape, pattern, texture, and detailing of the original historic trim.
A.4.7 When adding new window openings, maintain the proportions of the façade.
Match the size, design, and pattern of the existing windows. Align the headers of
new windows with the existing windows.
A.4.8 Exterior security bars and grilles are discouraged.
A.4.1 Parts of the window. With nine panes of glass in the upper sash and one pane in the lower sash, these
windows are referred to as “nine over one”.
12
SECTION A – GUIDELINES FOR REHABILITATION OF EXISTING STRUCTURES
A.4 Windows and Window Trim
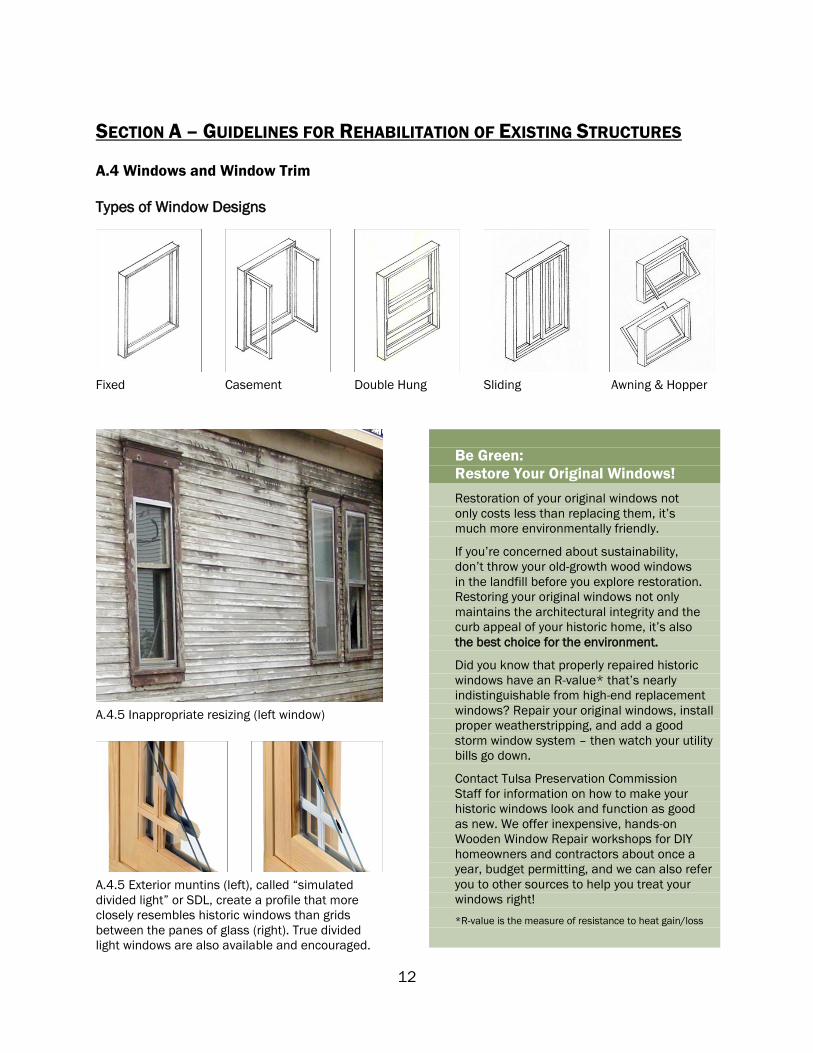
Types of Window Designs
Fixed Casement Double Hung Sliding Awning & Hopper
A.4.5 Inappropriate resizing (left window)
A.4.5 Exterior muntins (left), called “simulated
divided light” or SDL, create a profile that more
closely resembles historic windows than grids
between the panes of glass (right). True divided
light windows are also available and encouraged.
Be Green:
Restore Your Original Windows!
Restoration of your original windows not
only costs less than replacing them, it’s
much more environmentally friendly.
If you’re concerned about sustainability,
don’t throw your old-growth wood windows
in the landfill before you explore restoration.
Restoring your original windows not only
maintains the architectural integrity and the
curb appeal of your historic home, it’s also
the best choice for the environment.
Did you know that properly repaired historic
windows have an R-value* that’s nearly
indistinguishable from high-end replacement
windows? Repair your original windows, install
proper weatherstripping, and add a good
storm window system – then watch your utility
bills go down.
Contact Tulsa Preservation Commission
Staff for information on how to make your
historic windows look and function as good
as new. We offer inexpensive, hands-on
Wooden Window Repair workshops for DIY
homeowners and contractors about once a
year, budget permitting, and we can also refer
you to other sources to help you treat your
windows right!
*R-value is the measure of resistance to heat gain/loss
13
SECTION A – GUIDELINES FOR REHABILITATION OF EXISTING STRUCTURES
A.5 Roofs
A.5.1 Retain and preserve the original historic roof form (hipped, gabled, etc.) and pitch.
A.5.2 Do not remove character-defining architectural features of your roof, including, but
not limited to, dormers, chimneys, cupolas, eaves, soffits, fascia boards, and
decorative details, such as eave brackets, exposed rafter tails, or corbels.
A.5.3 If replacement of deteriorated architectural roof features is necessary, use
materials that maintain the character of the structure and the size, shape, pattern,
texture, dimensions, and directional orientation of the original historic roof
features.
.1 Elmwood – Match the original historic roof material
A.5.4 To return the home to its original historic appearance, use physical or pictorial
evidence. If no evidence exists, select architectural roof features which are
consistent with the architectural style of your home.
A.5.5 Replacement of existing roof covering—wood shingles, asphalt shingles, clay tile,
etc.—with the same material does not require COA HP Permit review (for example,
replacing an asphalt-shingled roof with asphalt shingles). Architectural shingles
are encouraged.
A.5.6 When proposing to change the materials of your roof covering, replacement
materials that maintain the character of the structure and the size, shape, pattern,
texture, and directional orientation of the original historic roof covering will be
considered on a case-by-case basis.
.1 Yorktown – Metal roofing is not allowed.
A.5.7 When replacing your roof covering, replace an entire roof section if it is visible from
the street.
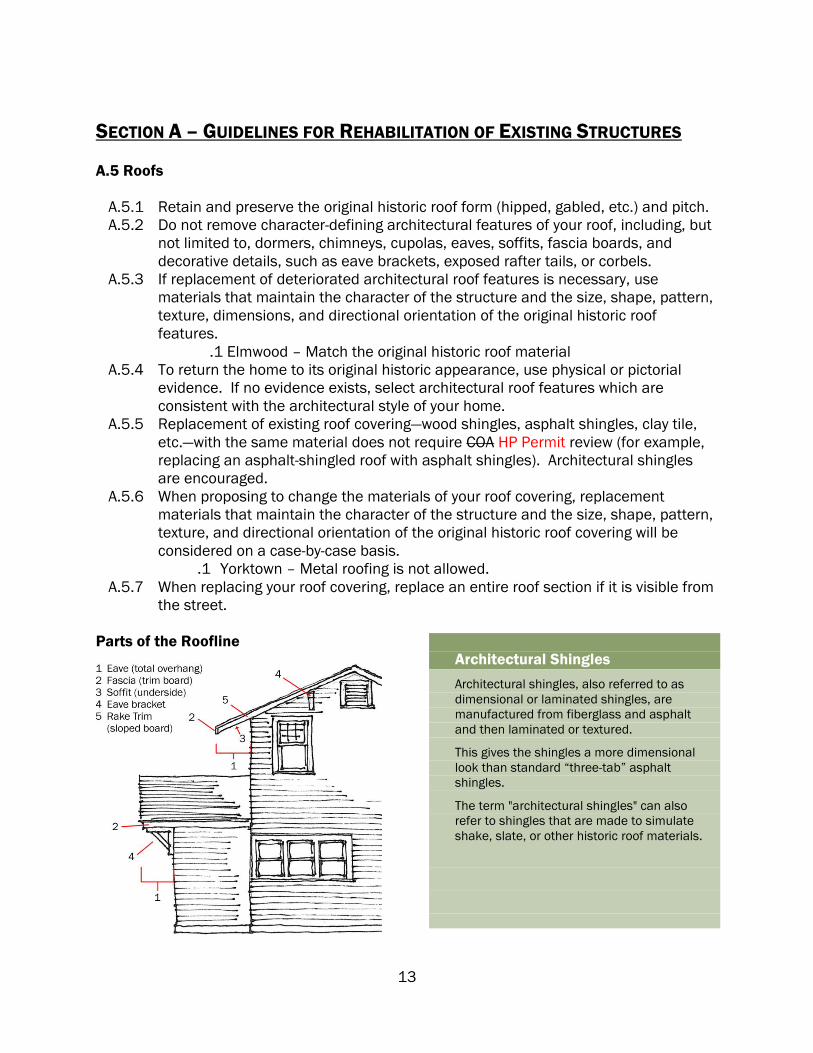
Parts of the Roofline
Architectural Shingles
Architectural shingles, also referred to as
dimensional or laminated shingles, are
manufactured from fiberglass and asphalt
and then laminated or textured.
This gives the shingles a more dimensional
look than standard “three-tab” asphalt
shingles.
The term "architectural shingles" can also
refer to shingles that are made to simulate
shake, slate, or other historic roof materials.
14
SECTION A – GUIDELINES FOR REHABILITATION OF EXISTING STRUCTURES
A.6 Porches
A.6.1 Retain and preserve the original historic porch and its character-defining
architectural features through repair.
A.6.2 Do not remove character-defining architectural features of your porch, including,
but not limited to, ceiling, floor, piers, columns, railings, handrails, steps,
bulkheads, skirt/stem wall, and decorative details, such as crown molding, trim,
eave brackets, and exposed rafter tails.
A.6.3 If replacement of deteriorated porch elements is necessary, use materials that
maintain the character of the structure and the size, shape, pattern, texture,
dimensions, and directional orientation of the original historic features.
A.6.4 To return the home to its original historic appearance, use physical or pictorial
evidence. If no evidence exists, select porch features which are consistent with the
architectural style of your home. Return enclosed porches to original historic open
design (which can be staff approved).
A.6.5 If adding a railing or other porch elements where none exists, select porch
elements (columns, railing design, trim, etc.) which are consistent with the
architectural style of your home.
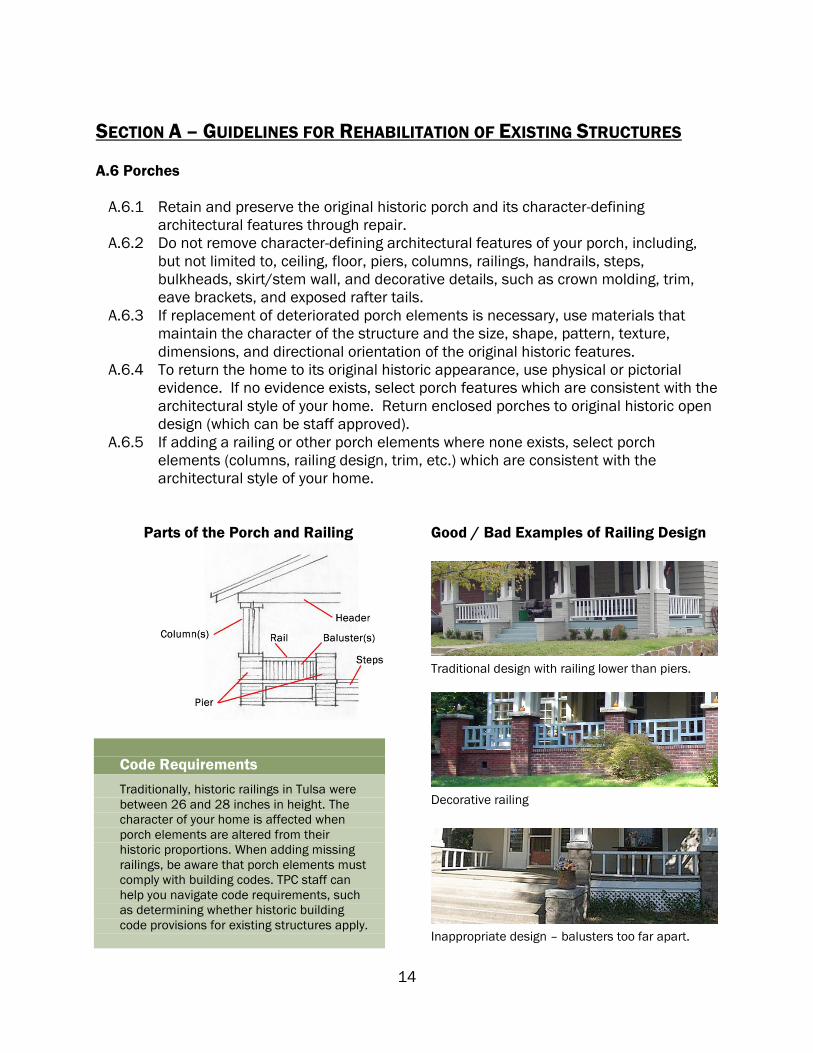
Parts of the Porch and Railing
Code Requirements
Traditionally, historic railings in Tulsa were
between 26 and 28 inches in height. The
character of your home is affected when
porch elements are altered from their
historic proportions. When adding missing
railings, be aware that porch elements must
comply with building codes. TPC staff can
help you navigate code requirements, such
as determining whether historic building
code provisions for existing structures apply.
Good / Bad Examples of Railing Design
Traditional design with railing lower than piers.
Decorative railing
Inappropriate design – balusters too far apart.

15
SECTION A – GUIDELINES FOR REHABILITATION OF EXISTING STRUCTURES
A.7 Awnings, Shutters, Mailboxes, Mechanical Systems, Etc.
A.7.1 Select awnings that are consistent with the architectural style of your home.
A.7.2 Select window shutters that are consistent with the architectural style of your
home. Plastic shutters and door shutters are not historically accurate and are not
allowed.
A.7.3 Attach mailboxes to the front of the porch or house.
A.7.4 Install engineering systems and their associated elements such as, but not limited
to, air conditioning and heating units, package units, flues, conduits, cables,
electrical boxes, ventilators, and louvers, on the side or rear façade of the
structure.
A.7.5 Install utility meters on the side or rear façade of the house, or underground in a
subterranean vault.
A.7.6 Install systems requiring exterior components, such as solar panels, on the side or
rear of your house or in the back yard. Installation of satellite dishes does not
require COA review. Install systems requiring exterior components, such as solar
panels or devices, where they will have minimal impact, preferably at the rear of
your house or yard or on an outbuilding. Install exterior components on a historic
building in a manner that does not damage the historic roofing material or
negatively impact the building’s historic character and is reversible. These
considerations will be made on a case-by-case basis.
A.7.7 Installation of radio or television antennas, including satellite dishes and similar
devices, not visible from abutting streets, as determined by staff, is exempt from
HP Permit review.
Getting Shutters Right
Colonial Revival homes often have paneled or
louvered shutters. Board-and-batten shutters
are common on Tudor Revival homes and on
some Minimal Traditional and Folk vernacular
style homes. The addition of shutters to
Craftsman, Prairie, or Foursquare style homes
is usually inappropriate as these styles rarely
had shutters. Wooden shutters are widely
available. Vinyl shutters are inappropriate.
A.7.2 This house style would not have originally had
shutters. The shutters are inappropriate since they
aren’t less than half the width of the window and so
they do not appear operable. Also, dDoor shutters
are also completely inappropriate for this house.
Even if your shutters are strictly decorative, they should
appear operable. Mount your shutters with hinges directly
on the window casing, never of the siding next to the
window. Each shutter should be half the width of the
window it surrounds.

16
SECTION B – GUIDELINES FOR ADDITIONS TO EXISTING STRUCTURES
B.1 General Requirements
Use the following guidelines as the basis for all additions:
B.1.1 Locate additions on the side or rear of your home where the character-defining
elements and visual appearance of the front façade will not be obscured,
damaged, or destroyed.
B.1.2 Ensure that additions do not detract from the historic appearance, character-
defining elements, historic patterns, scale and proportions of the existing structure.
B.1.3 Provide consistency and continuity between the addition and the historic portions
of your home by using similar materials, style, forms, massing and scale.
B.1.4 Do not exceed the established height of structures along the same street.
B.1.1 Locate additions on side or rear B.1.1 Where NOT to locate an addition
B.1.4 On the left, an example of an addition that doesn’t respect the height of structures on the same street.
On the right, an example of an addition that matches the rhythm and character-defining features of the original
structure. Offsetting or recessing additions behind the original building show the addition is newer than the
original structure.

17
SECTION B – GUIDELINES FOR ADDITIONS TO EXISTING STRUCTURES
B.2 Building Site
B.2.1 Match the front setback of the historic buildings along the same side of the street.
When the front setback pattern of the historic structures on the same side of the
street varies, locate the addition between the minimum and maximum of the
prevailing front setbacks.
B.2.2 Maintain the pattern and rhythm of the side yard setbacks of the other historic
structures on the same side of the street.
B.2.3 Limit paving within the front street yard to primary driveways and sidewalks. Curb
cuts and new driveways through the front street yard are strongly discouraged for
properties with alley access.
B.2.4 On interior lots, limit the surface area of driveways and sidewalks to no more than
50% of the front street yard lot area.
.1 Elmwood – no more than 25% of front street yard lot area
B.2.5 On corner lots, limit the surface area of driveways and sidewalks to no more than
30% of the combined front and side street yard lot area.
B.2.1 Match the front setback of the historic
buildings along the same side of the street.
B.2.3 – B.2.5 On the left, defining the
front street yard lot area (green) of on
interior lots. Above, defining the combined
front and side street yard lot area (green)
on corner lots. The surface area of paving
within these defined areas must not
exceed the percentages listed above.
18
SECTION B – GUIDELINES FOR ADDITIONS TO EXISTING STRUCTURES
B.3 Building Materials and Elements
B.3.1 Use building materials that are consistent with the historic materials found on the
existing structure.
B.3.2 The use of building materials different from historic materials will be considered on
a case-by-case basis, if the proposed materials maintain the character of the
structure and the historic size, shape, pattern, texture and directional orientation.
Unfinished or clear-finished metals are not allowed.
B.3.3 Create a visual consistency and continuity with the building elements of the
existing structure by replicating the height of windows and doors, window glazing
patterns, roof forms, eave lines and overhangs, and special detailing present on
the existing structure.
19
SECTION B – GUIDELINES FOR ADDITIONS TO EXISTING STRUCTURES
B.4 Roofs
B.4.1 New roof features, such as dormers or cupolas, may be added to the existing roof,
if the proposed elements maintain the scale, proportions, rhythms, and
architectural character of the structure.
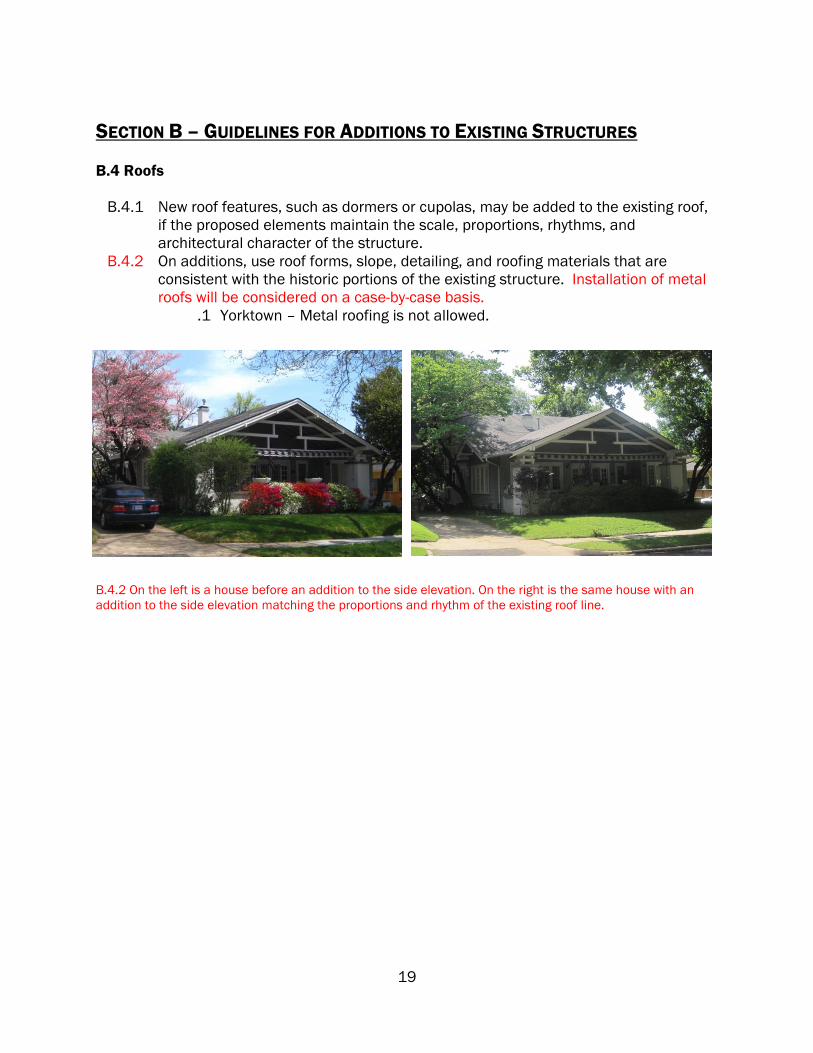
B.4.2 On additions, use roof forms, slope, detailing, and roofing materials that are
consistent with the historic portions of the existing structure. Installation of metal
roofs will be considered on a case-by-case basis.
.1 Yorktown – Metal roofing is not allowed.
B.4.2 On the left is a house before an addition to the side elevation. On the right is the same house with an
addition to the side elevation matching the proportions and rhythm of the existing roof line.
20
SECTION B – GUIDELINES FOR ADDITIONS TO EXISTING STRUCTURES
B.5 Porches
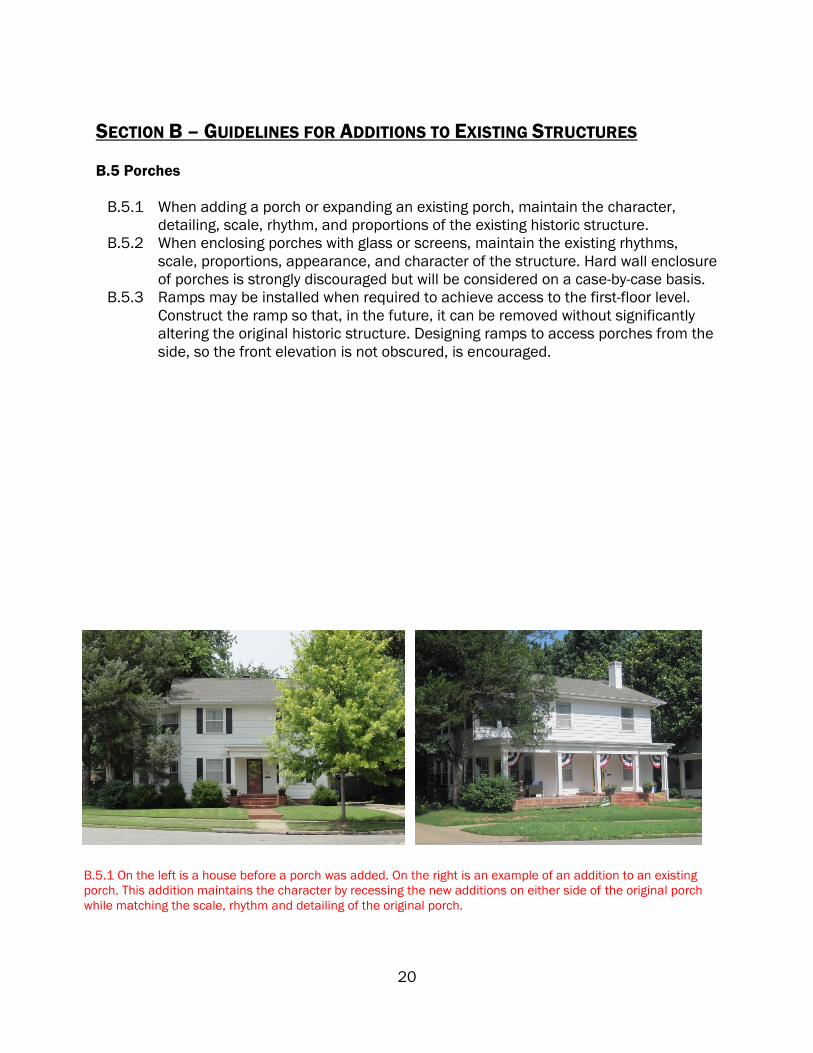
B.5.1 When adding a porch or expanding an existing porch, maintain the character,
detailing, scale, rhythm, and proportions of the existing historic structure.
B.5.2 When enclosing porches with glass or screens, maintain the existing rhythms,
scale, proportions, appearance, and character of the structure. Hard wall enclosure
of porches is strongly discouraged but will be considered on a case-by-case basis.
B.5.3 Ramps may be installed when required to achieve access to the first-floor level.
Construct the ramp so that, in the future, it can be removed without significantly
altering the original historic structure. Designing ramps to access porches from the
side, so the front elevation is not obscured, is encouraged.
B.5.1 On the left is a house before a porch was added. On the right is an example of an addition to an existing
porch. This addition maintains the character by recessing the new additions on either side of the original porch
while matching the scale, rhythm and detailing of the original porch.
21
SECTION B – GUIDELINES FOR ADDITIONS TO EXISTING STRUCTURES
B.5 Porches
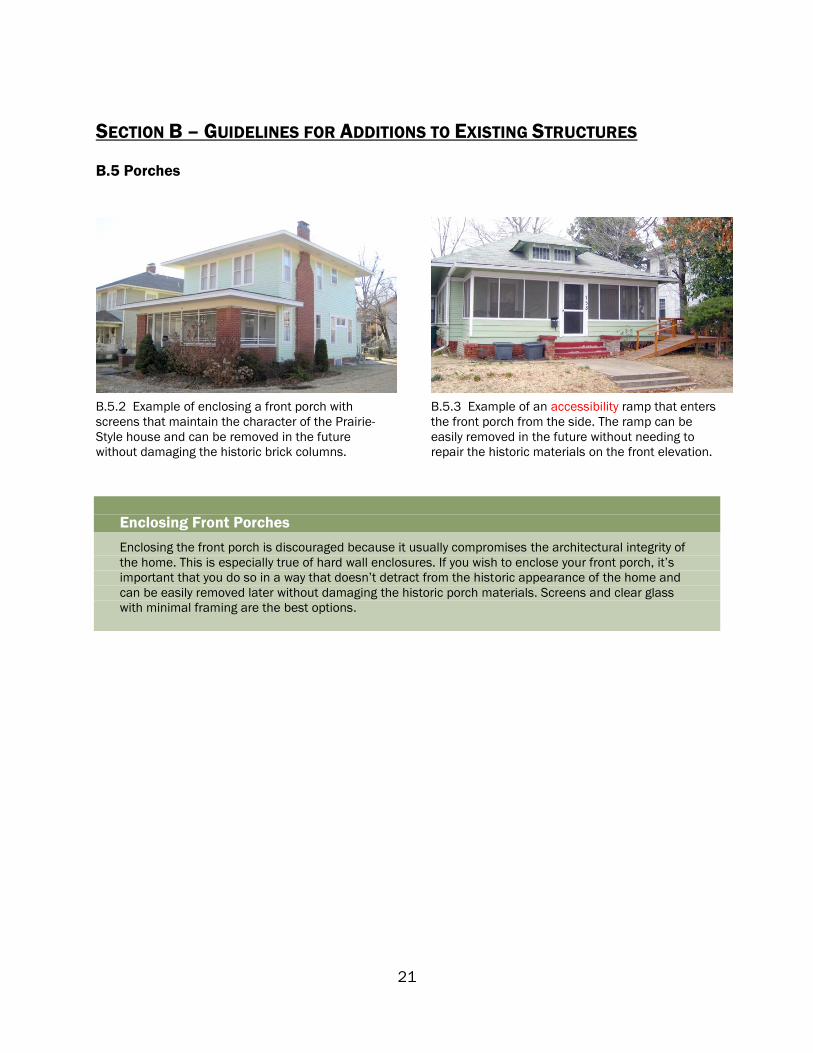
B.5.2 Example of enclosing a front porch with
screens that maintain the character of the Prairie-
Style house and can be removed in the future
without damaging the historic brick columns.
B.5.3 Example of an accessibility ramp that enters
the front porch from the side. The ramp can be
easily removed in the future without needing to
repair the historic materials on the front elevation.
Enclosing Front Porches
Enclosing the front porch is discouraged because it usually compromises the architectural integrity of
the home. This is especially true of hard wall enclosures. If you wish to enclose your front porch, it’s
important that you do so in a way that doesn’t detract from the historic appearance of the home and
can be easily removed later without damaging the historic porch materials. Screens and clear glass
with minimal framing are the best options.

22
SECTION B – GUIDELINES FOR ADDITIONS TO EXISTING STRUCTURES
B.6 Garages
B.6.1 Locate garages within the rear yard and detached from the primary residential
structure. Detached garages located in the rear yard are exempt from COA review.
Detached buildings or structures, such as garages and sheds, not located in the
street yard, as defined in the Zoning Code, are exempt from HP Permit review.
B.6.2 Adding a garage attached to the rear elevation of the primary residential structure
will be considered on a case-by-case basis. Locate attached garages so that the
front façade of the garage is not located forward of the rear wall of the primary
structure.
B.6.3 Historically appropriate garage doors, such as carriage house doors, are
encouraged.
B.6.2 Illustration of where an attached garage may be located (reviewed on a case-by-case basis).

23
SECTION B – GUIDELINES FOR ADDITIONS TO EXISTING STRUCTURES
B.7 Mechanical Systems, Etc.
B.7.1 Install engineering systems and their associated elements, such as, but not limited
to, air conditioning and heating units, flues, conduits, cables, electrical boxes,
ventilators, and louvers, on the side or rear façade of the structure.
B.7.2 Install utility meters on the side or rear façade of the house or underground in a
subterranean vault.
B.7.3 Install systems requiring exterior components, such as solar panels, on the side or
rear of your house or in the back yard. Installation of satellite dishes does not
require COA review. Install systems requiring exterior components, such as solar
panels or devices, where they will have minimal impact, preferably at the rear of
your house or yard or on an outbuilding. Install exterior components on a historic
building in a manner that does not damage the historic roofing material or
negatively impact the building’s historic character and is reversible. These
considerations will be made on a case-by-case basis.
B.7.4 Installation of radio or television antennas, including satellite dishes and similar
devices, not visible from abutting streets, as determined by staff, is exempt from
HP Permit review.

24
SECTION C – GUIDELINES FOR NEW CONSTRUCTION
C.1 General Requirements
C.1.1 Designs for new construction shall not duplicate existing structures within the
district. Ensure that each new structure is unique within the district.
C.1.2 When designing new structures, provide consistency and continuity by drawing
upon common characteristics of historic structures in the district, placing particular
emphasis on the historic structures on the same street. These include but are not
limited to porches, entries, roof pitch and form, and window and door styles.
C.1.3 Avoid mixing incongruous architectural styles: for example, Prairie-style windows on
a Colonial Revival-inspired house.
C.1.4 Respect the scale, proportions, historic patterns, and relationships of both principal
and accessory structures along the same street and within the district.
C.1.5 Maintain the established height of those structures along the same side of the
street.
C.1.6 Establish the height of the floor (finished floor elevation) between the minimum
and maximum finished floor elevation of those structures along the same side of
the street.
C.1.1 / C.1.2 While not a duplicate of existing houses, C.1.4 The detached garage (accessory structure)
this house draws upon common characteristics of the at right relates to the house (principal structure) in
district -- raised crawl space, porch design, multiple scale and pattern in similar fashion to the historic
front gables, siding patterns and grouped windows. houses in the district.
C.1.5 Example of infill that doesn’t respect the height of structures on the same street.
25
SECTION C – GUIDELINES FOR NEW CONSTRUCTION
C.2 Building Site
C.2.1 Match the front setback of the historic buildings along the same side of the street.
When the front setback pattern of the historic structures on the same side of the
street varies, locate the new structure between the minimum and maximum of the
prevailing front setbacks.
C.2.2 Maintain the pattern and rhythm of the side yard setbacks of the other historic
structures on the same side of the street.
C.2.3 Maintain the same orientation to the street as established by the historic
structures on the same street.
C.2.4 Limit paving within the front street yard to primary driveways and sidewalks. Curb
cuts and new driveways through the front street yard are strongly discouraged for
properties with alley access.
C.2.5 On interior lots, limit the surface area of driveways and sidewalks to no more than
50% of the front street yard lot area.
C.2.6 On corner lots, limit the surface area of driveways and sidewalks to no more than
30% of the combined front and side street yard lot area.
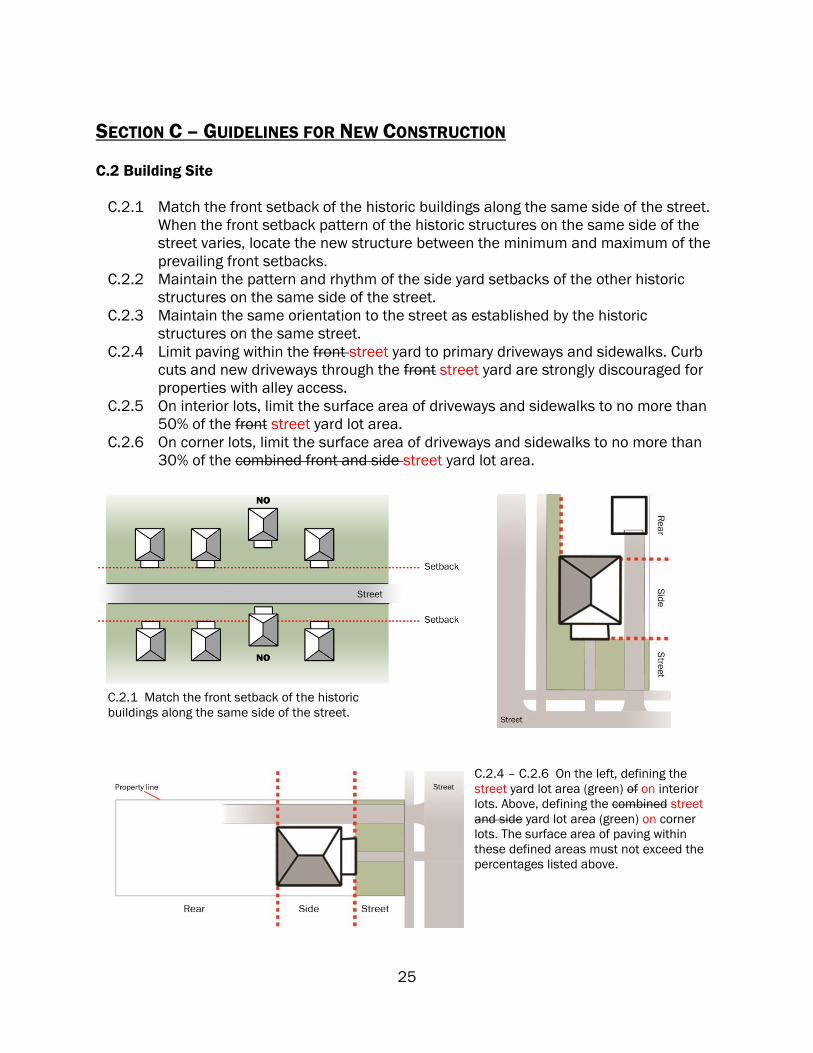
C.2.1 Match the front setback of the historic
buildings along the same side of the street.
C.2.4 – C.2.6 On the left, defining the
street yard lot area (green) of on interior
lots. Above, defining the combined street
and side yard lot area (green) on corner
lots. The surface area of paving within
these defined areas must not exceed the
percentages listed above.
26
SECTION C – GUIDELINES FOR NEW CONSTRUCTION
C.3 Building Materials
C.3.1 Maintain the visual characteristics, scale, proportions, directional orientation, and
rhythms that are created by the materials on existing historic structures in the
district, in order to maintain the overall appearance and character of the district.
Deviation from the materials on existing historic structures in the district will be
considered on a case-by-case basis. The use of Uunfinished or clear-finished
metals are not allowed will be considered on a case-by-case basis.

27
SECTION C – GUIDELINES FOR NEW CONSTRUCTION
C.4 Garages
C.4.1 Locate garages within the rear yard and detached from the primary residential
structure. Detached garages located in the rear yard are exempt from COA review.
Detached buildings or structures, such as garages and sheds, not located in the
street yard as defined in the Zoning Code are exempt from HP Permit review.
C.4.2 Adding a garage attached to the rear elevation of the primary residential structure
will be considered on a case-by-case basis. Locate attached garages so that the
front façade of the garage is not located forward of the rear wall of the primary
structure.
C.4.3 Permitted attached garages shall be located so that the front façade of the garage
is not located forward of the rear wall of the primary structure.
C.4.4 Historically appropriate garage doors, such as carriage house doors, are
encouraged.
C.4.2 Illustration of where an attached garage may be located.
28
SECTION C – GUIDELINES FOR NEW CONSTRUCTION
C.5 Mechanical Systems, Etc.
C.5.1 Install engineering systems and their associated elements, such as, but not limited
to, air conditioning and heating units, flues, conduits, cables, electrical boxes
equipment, ventilators, and louvers, on the side or rear façade of the structure.
C.5.2 Install utility meters on the side or rear façade of the house or underground in a
subterranean vault. Above-ground installation of utility systems, such as pedestals
and transformers, is prohibited in the street yard unless approved on a case-by-
case basis.
C.5.3 Install systems requiring exterior components, such as solar panels, on the side or
rear of your house or in the back yard. Installation of satellite dishes does not
require COA review. Install systems requiring exterior components, such as solar
panels or devices, where they will have minimal impact, preferably at the rear of
your house or yard or on an outbuilding. Install exterior components on a historic
building in a manner that does not damage the historic roofing material or
negatively impact the building’s historic character and is reversible. These
considerations will be made on a case-by-case basis.
C.5.4 Installation of radio or television antennas, including satellite dishes and similar
devices, not visible from abutting streets, as determined by staff, is exempt from
HP Permit review.

29
SECTION D – GUIDELINES FOR RELOCATED STRUCTURES
D.1 General Requirements
D.1.1 Maintain the architectural integrity of the district for the period of time when each
addition was originally platted when relocating a structure.
D.1.2 Respect the scale, proportions, historic patterns, and relationships of primary to
accessory structures within the district when relocating a structure.
D.1.3 Maintain the established height of structures along the same street when
relocating a structure into the district.
D.1.4 Maintain the established height of the exposed foundation system as structures
along the same street. Establish the height of the floor (finished floor elevation)
between the minimum and maximum finished floor elevation of those structures
along the same side of the street.
D.1.5 Upon placement of the structure on the new site, follow Section A (Rehabilitation)
and Section B (Additions) when replacing materials and elements that were
removed to facilitate relocation.
D.1.3 Example of infill that doesn’t respect the height of structures on the same street.
30
SECTION D – GUIDELINES FOR RELOCATED STRUCTURES
D.2 Building Site and Placement
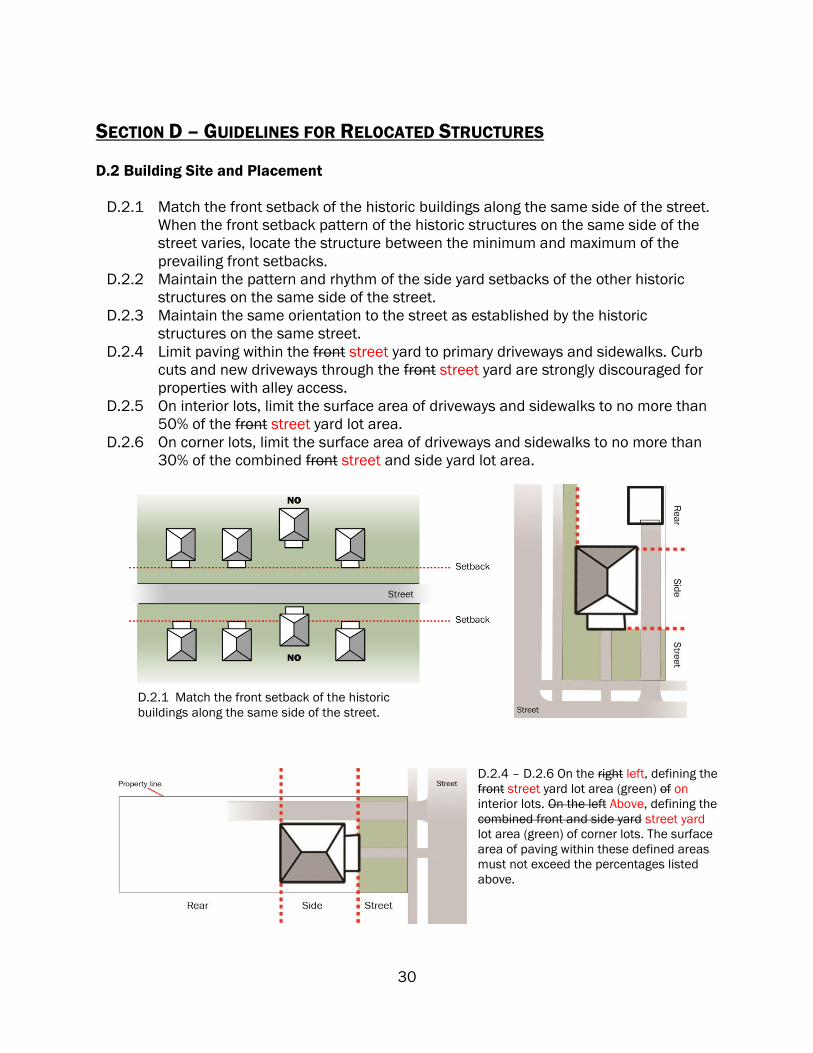
D.2.1 Match the front setback of the historic buildings along the same side of the street.
When the front setback pattern of the historic structures on the same side of the
street varies, locate the structure between the minimum and maximum of the
prevailing front setbacks.
D.2.2 Maintain the pattern and rhythm of the side yard setbacks of the other historic
structures on the same side of the street.
D.2.3 Maintain the same orientation to the street as established by the historic
structures on the same street.
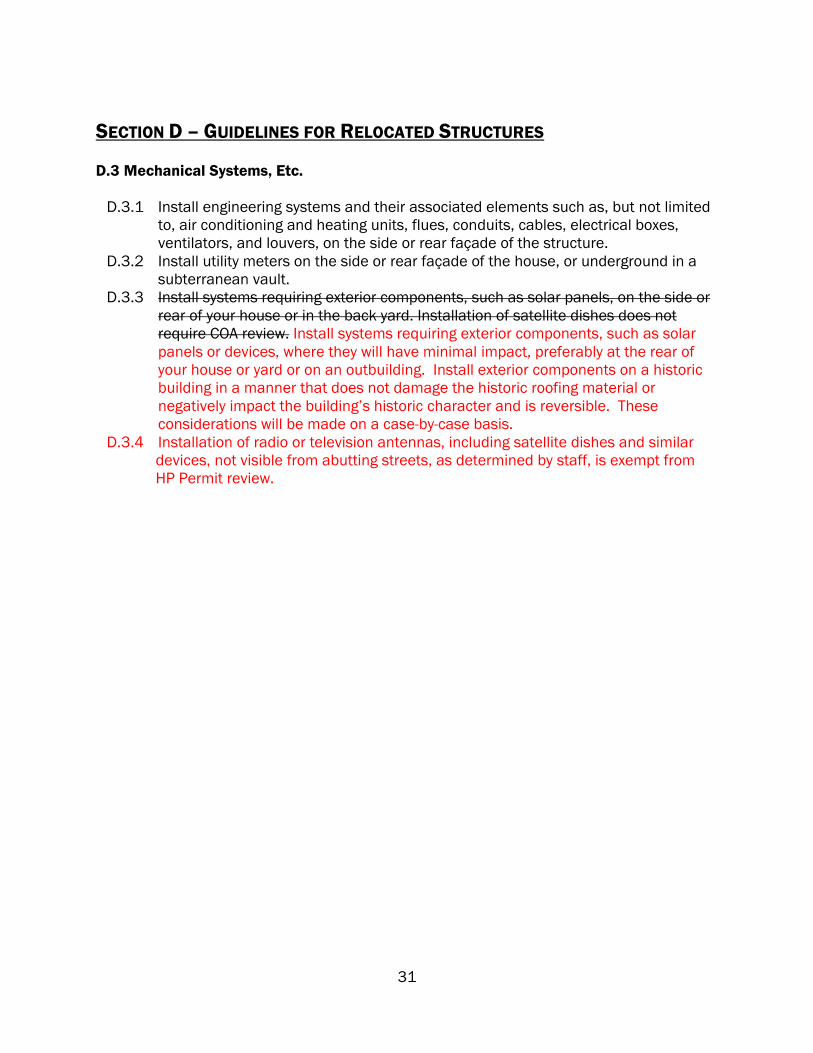
D.2.4 Limit paving within the front street yard to primary driveways and sidewalks. Curb
cuts and new driveways through the front street yard are strongly discouraged for
properties with alley access.
D.2.5 On interior lots, limit the surface area of driveways and sidewalks to no more than
50% of the front street yard lot area.
D.2.6 On corner lots, limit the surface area of driveways and sidewalks to no more than
30% of the combined front street and side yard lot area.
D.2.1 Match the front setback of the historic
buildings along the same side of the street.
D.2.4 – D.2.6 On the right left, defining the
front street yard lot area (green) of on
interior lots. On the left Above, defining the
combined front and side yard street yard
lot area (green) of corner lots. The surface
area of paving within these defined areas
must not exceed the percentages listed
above.
31
SECTION D – GUIDELINES FOR RELOCATED STRUCTURES
D.3 Mechanical Systems, Etc.
D.3.1 Install engineering systems and their associated elements such as, but not limited
to, air conditioning and heating units, flues, conduits, cables, electrical boxes,
ventilators, and louvers, on the side or rear façade of the structure.
D.3.2 Install utility meters on the side or rear façade of the house, or underground in a
subterranean vault.
D.3.3 Install systems requiring exterior components, such as solar panels, on the side or
rear of your house or in the back yard. Installation of satellite dishes does not
require COA review. Install systems requiring exterior components, such as solar
panels or devices, where they will have minimal impact, preferably at the rear of
your house or yard or on an outbuilding. Install exterior components on a historic
building in a manner that does not damage the historic roofing material or
negatively impact the building’s historic character and is reversible. These
considerations will be made on a case-by-case basis.
D.3.4 Installation of radio or television antennas, including satellite dishes and similar
devices, not visible from abutting streets, as determined by staff, is exempt from
HP Permit review.
32
SECTION E – GUIDELINES FOR NON-CONTRIBUTING STRUCTURES
E.1 General Requirements
E.1.1 For the purposes of this chapter, non-contributing structures are those listed as not
contributing to the historic character of the district due to age or architectural style
in the National Register Nomination for the district.
E.1.2 Non-contributing structures will be considered products of their own time. Do not
attempt to create a false appearance of the predominant character and
architectural style of the rest of the district.
E.1.3 Follow Section A (Rehabilitation) and Section B (Additions) as they relate to the
character-defining elements of the non-contributing structure.
E.1.4 Ensure that work on non-contributing structures does not detract from or diminish
the historic character of the overall district.

33
SECTION F – GUIDELINES FOR DEMOLITION OF STRUCTURES
F.1 General Requirements
F.1.1 Demolition of historic structures does not support the character of the district.
Demolitions are strongly discouraged, but will be considered on a case-by-case
basis provided that one or more of the following guidelines are met:
.1 The continued use of the property cannot be achieved through rehabilitation,
modification, or alteration, according to documented evidence.
.2 The structure is listed as non-contributing to the historic character of the
district in the National Register Nomination for the district.
.3 To remedy an emergency condition determined to be dangerous to life, health,
or property, or if the structure has been condemned by the City of Tulsa or
City-County Health Department.
Assessing Rehabilitation Feasibility
Professionals from the American Institute of Architects, Eastern Oklahoma Chapter, can help property
owners assess rehabilitation options on a pro bono or reduced fee basis. Ask TPC staff for more
information on these services.
34
SECTION G – GUIDELINES FOR LANDSCAPE FEATURES, PAVING, AND SIGNAGE
G.1 Landscape Features
G.1.1 Retain and preserve original historic walls, fencing, lighting, planters, and other
landscape features through repair.
G.1.2 Removal of historic landscape features will be considered on a case-by-case basis.
Removal of non-historic landscape features can be staff-approved.
G.1.3 Ensure that new landscape features are appropriate to the style of your home and
consistent with the historic elements found along the same street and within the
district.
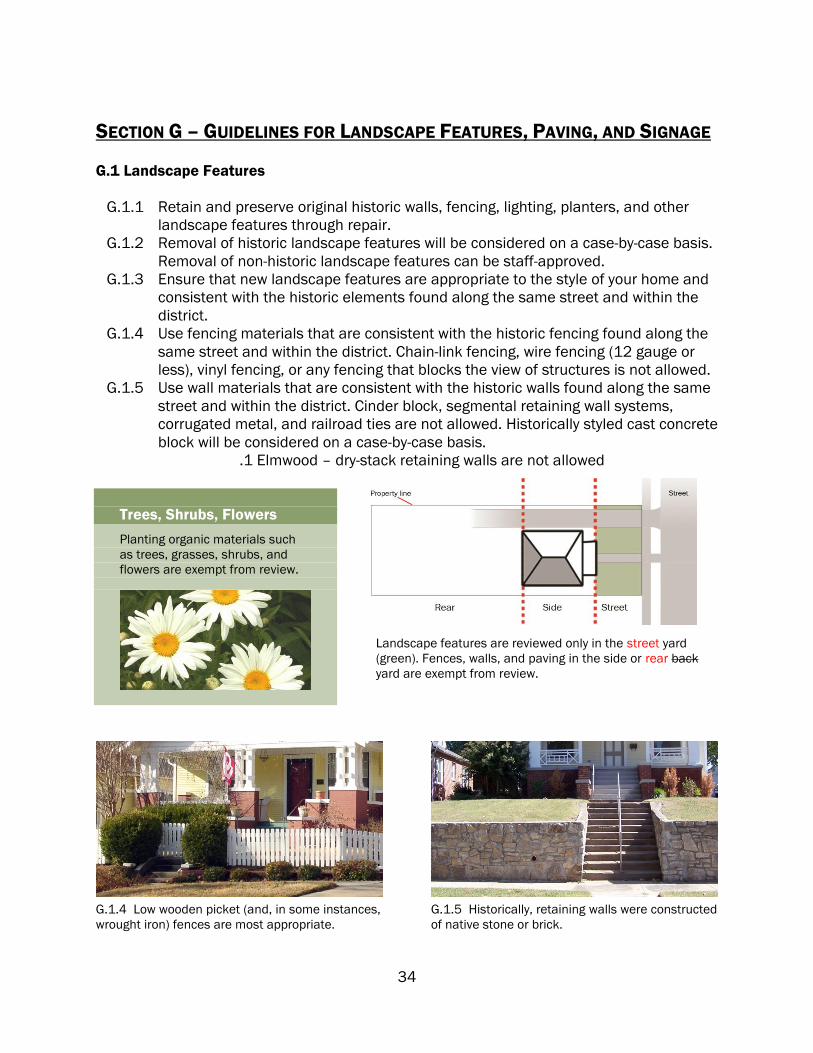
G.1.4 Use fencing materials that are consistent with the historic fencing found along the
same street and within the district. Chain-link fencing, wire fencing (12 gauge or
less), vinyl fencing, or any fencing that blocks the view of structures is not allowed.
G.1.5 Use wall materials that are consistent with the historic walls found along the same
street and within the district. Cinder block, segmental retaining wall systems,
corrugated metal, and railroad ties are not allowed. Historically styled cast concrete
block will be considered on a case-by-case basis.
.1 Elmwood – dry-stack retaining walls are not allowed
Trees, Shrubs, Flowers
Planting organic materials such
as trees, grasses, shrubs, and
flowers are exempt from review.
Landscape features are reviewed only in the street yard
(green). Fences, walls, and paving in the side or rear back
yard are exempt from review.
G.1.4 Low wooden picket (and, in some instances,
wrought iron) fences are most appropriate.
G.1.5 Historically, retaining walls were constructed
of native stone or brick.

35
SECTION G – GUIDELINES FOR LANDSCAPE FEATURES, PAVING, AND SIGNAGE
G.2 Paving
G.2.1 Retain and preserve original historic paving, steps, and bulkheads through repair.
G.2.2 Ensure that the design of new paving is consistent with historic elements found
along the same street and within the same neighborhood.
G.2.3 Use paving materials that are consistent with the historic paving found along the
same street and within the same neighborhood. Asphalt and stained concrete are
not allowed.
G.2.4 Surface parking lots do not support the historic character of the district.
Construction of parking lots is strongly discouraged, but will be considered on a
case-by-case basis provided that the following guidelines are met:
.1 Match the front setback pattern of the historic structures on the same
side of the street. On corner lots, match the setback pattern of the
historic structures on all adjoining streets. When the setback pattern of
the historic structures on the same side of the street varies, locate the
parking lot between the minimum and maximum of the prevailing
setbacks.
.2 The screening that is required by the Zoning Code shall meet the
conditions of G.1.4 and G.1.5. Ensure that screening is of sufficient
height and density to obscure the view of the parking lot from the street
and adjacent historic structures.
.3 When possible, provide vehicular access to the parking lot from an alley
or arterial street to minimize the traffic impact on residential streets.
G.2.1 Bulkheads are the sloped strips of paving
flanking the steps above. Note the width of the
paving and how the angle is flush with the
sidewalk, not raised above it.
G.2.2 Historically, driveways in Tulsa were plain
concrete slabs. A great alternative is the ribbon
driveway (above), which uses less concrete,
creates less runoff, and is historically appropriate.
SECTION G – GUIDELINES FOR LANDSCAPE FEATURES, PAVING, AND SIGNAGE
G.3 Signage
G.3.1 Ensure that signage is consistent in design with the historic character of the
neighborhood. Construct signs of materials similar to those used for existing
historic structures in the neighborhood, such as wood, stone or brick.
36
Top Related