


Languages
Pages
Legal


tidalautomation.com
Tidal Workload Automation z/OS Agent and Gateway Adapter Guide
Version 6.3.3First Published: January 2018
tidalautomation.com 2
THE SPECIFICATIONS AND INFORMATION REGARDING THE PRODUCTS IN THIS MANUAL ARE SUBJECT TO CHANGE WITHOUT NOTICE. ALL STATEMENTS, INFORMATION, AND RECOMMENDATIONS IN THIS MANUAL ARE BELIEVED TO BE ACCURATE BUT ARE PRESENTED WITHOUT WARRANTY OF ANY KIND, EXPRESS OR IMPLIED. USERS MUST TAKE FULL RESPONSIBILITY FOR THEIR APPLICATION OF ANY PRODUCTS. THE SOFTWARE LICENSE AND LIMITED WARRANTY FOR THE PRODUCTS IN THIS MANUAL ARE INCORPORATED HEREIN BY THIS REFERENCE. IF YOU ARE UNABLE TO LOCATE THE SOFTWARE LICENSE OR LIMITED WARRANTY, CONTACT YOUR STA GROUP REPRESENTATIVE FOR A COPY.
The implementation of TCP header compression is an adaptation of a program developed by the University of California, Berkeley (UCB) as part of UCB’s public domain version of the UNIX operating system. © 1981 Regents of the University of California. All rights reserved.
Any Internet Protocol (IP) addresses and phone numbers used in this document are not intended to be actual addresses and phone numbers. Any examples, command display output, network topology diagrams, and other figures included in the document are shown for illustrative purposes only. Any use of actual IP addresses or phone numbers in illustrative content is unintentional and coincidental.
All printed copies and duplicate soft copies are considered uncontrolled copies and the original online version should be referred to for latest version.
© 2018 STA Group LLC. All rights reserved.
Contents
Contents . . . . . . . . . . . . . . . . . . . . . . . . . . . . . . . . . . . . . . . . . . . . . . . . . . . . . . . . . . . . . . . . . . . . . . 3Preface . . . . . . . . . . . . . . . . . . . . . . . . . . . . . . . . . . . . . . . . . . . . . . . . . . . . . . . . . . . . . . . . . . . . . . . 7Audience . . . . . . . . . . . . . . . . . . . . . . . . . . . . . . . . . . . . . . . . . . . . . . . . . . . . . . . . . . . . . . . . . . . . . . . . . 7Related Documentation . . . . . . . . . . . . . . . . . . . . . . . . . . . . . . . . . . . . . . . . . . . . . . . . . . . . . . . . . . . . . . 7Obtaining Documentation and Submitting a Service Request . . . . . . . . . . . . . . . . . . . . . . . . . . . . . . . . 7Document Change History . . . . . . . . . . . . . . . . . . . . . . . . . . . . . . . . . . . . . . . . . . . . . . . . . . . . . . . . . . . 8
Introducing the z/OS Agent and Gateway Adapter . . . . . . . . . . . . . . . . . . . . . . . . . . . . . . . . . . . . . 9Overview . . . . . . . . . . . . . . . . . . . . . . . . . . . . . . . . . . . . . . . . . . . . . . . . . . . . . . . . . . . . . . . . . . . . . . . . . 9Evolution of the Platform . . . . . . . . . . . . . . . . . . . . . . . . . . . . . . . . . . . . . . . . . . . . . . . . . . . . . . . . . . . . 9Architecture of the Agent and Adapter for z/OS. . . . . . . . . . . . . . . . . . . . . . . . . . . . . . . . . . . . . . . . . . . 9Master/Agent Architecture . . . . . . . . . . . . . . . . . . . . . . . . . . . . . . . . . . . . . . . . . . . . . . . . . . . . . . . . . . 10Benefits of the Master/Agent Architecture . . . . . . . . . . . . . . . . . . . . . . . . . . . . . . . . . . . . . . . . . . . . . . 11z/OS Adapter Services. . . . . . . . . . . . . . . . . . . . . . . . . . . . . . . . . . . . . . . . . . . . . . . . . . . . . . . . . . . . . . 11
TWA Agent for z/OS Functions . . . . . . . . . . . . . . . . . . . . . . . . . . . . . . . . . . . . . . . . . . . . . . . . . . . 11Gateway Functions . . . . . . . . . . . . . . . . . . . . . . . . . . . . . . . . . . . . . . . . . . . . . . . . . . . . . . . . . . . . . 11
Installing the z/OS Agent . . . . . . . . . . . . . . . . . . . . . . . . . . . . . . . . . . . . . . . . . . . . . . . . . . . . . . . . 13Overview . . . . . . . . . . . . . . . . . . . . . . . . . . . . . . . . . . . . . . . . . . . . . . . . . . . . . . . . . . . . . . . . . . . . . . . . 13z/OS Agent Requirements . . . . . . . . . . . . . . . . . . . . . . . . . . . . . . . . . . . . . . . . . . . . . . . . . . . . . . . . . . . 13Prerequisites for Installation . . . . . . . . . . . . . . . . . . . . . . . . . . . . . . . . . . . . . . . . . . . . . . . . . . . . . . . . . 14
Create a USS Directory. . . . . . . . . . . . . . . . . . . . . . . . . . . . . . . . . . . . . . . . . . . . . . . . . . . . . . . . . . 15Verify that the Workload Manager Is in Goal Mode (Optional) . . . . . . . . . . . . . . . . . . . . . . . . . . 15
Installing the z/OS Agent . . . . . . . . . . . . . . . . . . . . . . . . . . . . . . . . . . . . . . . . . . . . . . . . . . . . . . . . . . . 16Getting Started with the z/OS Agent . . . . . . . . . . . . . . . . . . . . . . . . . . . . . . . . . . . . . . . . . . . . . . . . . . . 17
Requirements for Starting the Agent . . . . . . . . . . . . . . . . . . . . . . . . . . . . . . . . . . . . . . . . . . . . . . . 17OMVS . . . . . . . . . . . . . . . . . . . . . . . . . . . . . . . . . . . . . . . . . . . . . . . . . . . . . . . . . . . . . . . . . . . 17
Started Task Script . . . . . . . . . . . . . . . . . . . . . . . . . . . . . . . . . . . . . . . . . . . . . . . . . . . . . . . . . . 17
Authority Requirements . . . . . . . . . . . . . . . . . . . . . . . . . . . . . . . . . . . . . . . . . . . . . . . . . . . . . . . . . 17Assigning APF Authorization to TWA Agent Files . . . . . . . . . . . . . . . . . . . . . . . . . . . . . . . . 18
Viewing the Status of Agent Instances . . . . . . . . . . . . . . . . . . . . . . . . . . . . . . . . . . . . . . . . . . . . . . 18Starting and Stopping Agents . . . . . . . . . . . . . . . . . . . . . . . . . . . . . . . . . . . . . . . . . . . . . . . . . . . . . 19
Uninstalling the z/OS Agent . . . . . . . . . . . . . . . . . . . . . . . . . . . . . . . . . . . . . . . . . . . . . . . . . . . . . . . . . 19
Configuring the z/OS Agent. . . . . . . . . . . . . . . . . . . . . . . . . . . . . . . . . . . . . . . . . . . . . . . . . . . . . . 21Overview . . . . . . . . . . . . . . . . . . . . . . . . . . . . . . . . . . . . . . . . . . . . . . . . . . . . . . . . . . . . . . . . . . . . . . . . 21Defining a Connection. . . . . . . . . . . . . . . . . . . . . . . . . . . . . . . . . . . . . . . . . . . . . . . . . . . . . . . . . . . . . . 21
Verifying the Agent Connection Status . . . . . . . . . . . . . . . . . . . . . . . . . . . . . . . . . . . . . . . . . . . . . 22Configuring the z/OS Agent . . . . . . . . . . . . . . . . . . . . . . . . . . . . . . . . . . . . . . . . . . . . . . . . . . . . . . . . . 23
Preventing Unauthorized Users from Using an Agent . . . . . . . . . . . . . . . . . . . . . . . . . . . . . . . . . . 24Configuring Agent Settings . . . . . . . . . . . . . . . . . . . . . . . . . . . . . . . . . . . . . . . . . . . . . . . . . . . . . . 24
tidalautomation.com 3
Configuring Condition Code Exceptions by Step . . . . . . . . . . . . . . . . . . . . . . . . . . . . . . . . . . . . . . 28Condition Code Evaluation Examples. . . . . . . . . . . . . . . . . . . . . . . . . . . . . . . . . . . . . . . . . . . . 29
Configuring Step Level Condition Code Checking . . . . . . . . . . . . . . . . . . . . . . . . . . . . . . . . . . . . . 30
Working with the z/OS Agent. . . . . . . . . . . . . . . . . . . . . . . . . . . . . . . . . . . . . . . . . . . . . . . . . . . . . 33Overview. . . . . . . . . . . . . . . . . . . . . . . . . . . . . . . . . . . . . . . . . . . . . . . . . . . . . . . . . . . . . . . . . . . . . . . . . 33Started Task Script . . . . . . . . . . . . . . . . . . . . . . . . . . . . . . . . . . . . . . . . . . . . . . . . . . . . . . . . . . . . . . . . . 33How to Specify z/OS Data Sets in a Job Rule . . . . . . . . . . . . . . . . . . . . . . . . . . . . . . . . . . . . . . . . . . . . 34
Exit Code Tracking Method. . . . . . . . . . . . . . . . . . . . . . . . . . . . . . . . . . . . . . . . . . . . . . . . . . . . . . . 36File Dependencies . . . . . . . . . . . . . . . . . . . . . . . . . . . . . . . . . . . . . . . . . . . . . . . . . . . . . . . . . . . . . . 36
Shell Scripts vs z/OS JCL vs System Commands . . . . . . . . . . . . . . . . . . . . . . . . . . . . . . . . . . . . . . . . . 37Security for z/OS Jobs . . . . . . . . . . . . . . . . . . . . . . . . . . . . . . . . . . . . . . . . . . . . . . . . . . . . . . . . . . . . . . 37z/OS Job Number . . . . . . . . . . . . . . . . . . . . . . . . . . . . . . . . . . . . . . . . . . . . . . . . . . . . . . . . . . . . . . . . . . 38Runtime Arguments . . . . . . . . . . . . . . . . . . . . . . . . . . . . . . . . . . . . . . . . . . . . . . . . . . . . . . . . . . . . . . . . 38Parameter Substitution . . . . . . . . . . . . . . . . . . . . . . . . . . . . . . . . . . . . . . . . . . . . . . . . . . . . . . . . . . . . . . 38
Original JCL Line(s) . . . . . . . . . . . . . . . . . . . . . . . . . . . . . . . . . . . . . . . . . . . . . . . . . . . . . . . . . . . . 38Logical Line for Substitution . . . . . . . . . . . . . . . . . . . . . . . . . . . . . . . . . . . . . . . . . . . . . . . . . . . . . . 38
Modified JCL Line(s) . . . . . . . . . . . . . . . . . . . . . . . . . . . . . . . . . . . . . . . . . . . . . . . . . . . . . . . . 38
JCL Restart Capability . . . . . . . . . . . . . . . . . . . . . . . . . . . . . . . . . . . . . . . . . . . . . . . . . . . . . . . . . . . . . . 39RESTART=handling . . . . . . . . . . . . . . . . . . . . . . . . . . . . . . . . . . . . . . . . . . . . . . . . . . . . . . . . . . . . 39
Original JCL . . . . . . . . . . . . . . . . . . . . . . . . . . . . . . . . . . . . . . . . . . . . . . . . . . . . . . . . . . . . . . . 41
Modified JCL. . . . . . . . . . . . . . . . . . . . . . . . . . . . . . . . . . . . . . . . . . . . . . . . . . . . . . . . . . . . . . . 41
Return Codes and Job Output . . . . . . . . . . . . . . . . . . . . . . . . . . . . . . . . . . . . . . . . . . . . . . . . . . . . . . . . . 41Piping Job Output . . . . . . . . . . . . . . . . . . . . . . . . . . . . . . . . . . . . . . . . . . . . . . . . . . . . . . . . . . . . . . . . . . 41Workload Balancing . . . . . . . . . . . . . . . . . . . . . . . . . . . . . . . . . . . . . . . . . . . . . . . . . . . . . . . . . . . . . . . . 42Job Status Determination . . . . . . . . . . . . . . . . . . . . . . . . . . . . . . . . . . . . . . . . . . . . . . . . . . . . . . . . . . . . 42
Installing the z/OS Gateway . . . . . . . . . . . . . . . . . . . . . . . . . . . . . . . . . . . . . . . . . . . . . . . . . . . . . . 43Overview. . . . . . . . . . . . . . . . . . . . . . . . . . . . . . . . . . . . . . . . . . . . . . . . . . . . . . . . . . . . . . . . . . . . . . . . . 43Installation Procedure . . . . . . . . . . . . . . . . . . . . . . . . . . . . . . . . . . . . . . . . . . . . . . . . . . . . . . . . . . . . . . . 43
Configuring the z/OS Gateway . . . . . . . . . . . . . . . . . . . . . . . . . . . . . . . . . . . . . . . . . . . . . . . . . . . . 47Overview. . . . . . . . . . . . . . . . . . . . . . . . . . . . . . . . . . . . . . . . . . . . . . . . . . . . . . . . . . . . . . . . . . . . . . . . . 47Licensing the z/OS Gateway . . . . . . . . . . . . . . . . . . . . . . . . . . . . . . . . . . . . . . . . . . . . . . . . . . . . . . . . . 47Configuring Started Tasks . . . . . . . . . . . . . . . . . . . . . . . . . . . . . . . . . . . . . . . . . . . . . . . . . . . . . . . . . . . 48
Editing the hlq’s of Files . . . . . . . . . . . . . . . . . . . . . . . . . . . . . . . . . . . . . . . . . . . . . . . . . . . . . . . . . 48Defining a Connection . . . . . . . . . . . . . . . . . . . . . . . . . . . . . . . . . . . . . . . . . . . . . . . . . . . . . . . . . . . . . . 51
Determining the Connection Status of the Gateway . . . . . . . . . . . . . . . . . . . . . . . . . . . . . . . . . . . . 51
Working with the z/OS Gateway . . . . . . . . . . . . . . . . . . . . . . . . . . . . . . . . . . . . . . . . . . . . . . . . . . 53Overview. . . . . . . . . . . . . . . . . . . . . . . . . . . . . . . . . . . . . . . . . . . . . . . . . . . . . . . . . . . . . . . . . . . . . . . . . 53Starting the Gateway. . . . . . . . . . . . . . . . . . . . . . . . . . . . . . . . . . . . . . . . . . . . . . . . . . . . . . . . . . . . . . . . 53Stopping the Gateway. . . . . . . . . . . . . . . . . . . . . . . . . . . . . . . . . . . . . . . . . . . . . . . . . . . . . . . . . . . . . . . 53
tidalautomation.com 4
z/OS Job Dependencies . . . . . . . . . . . . . . . . . . . . . . . . . . . . . . . . . . . . . . . . . . . . . . . . . . . . . . . . . . . . . 53z/OS Job Dependency Definition . . . . . . . . . . . . . . . . . . . . . . . . . . . . . . . . . . . . . . . . . . . . . . . . . . 54
Monitoring Started Tasks as a Dependency . . . . . . . . . . . . . . . . . . . . . . . . . . . . . . . . . . . . . . . 55
Gateway Commands to Control the Started Tasks. . . . . . . . . . . . . . . . . . . . . . . . . . . . . . . . . . . . . 57Overview . . . . . . . . . . . . . . . . . . . . . . . . . . . . . . . . . . . . . . . . . . . . . . . . . . . . . . . . . . . . . . . . . . . . . . . . 57SET Commands for Defining Parameters . . . . . . . . . . . . . . . . . . . . . . . . . . . . . . . . . . . . . . . . . . . . . . . 57
AUTOCOMMAND(‘command operands’) . . . . . . . . . . . . . . . . . . . . . . . . . . . . . . . . . . . . . . . . . . 58AUTOTIME(hhmm). . . . . . . . . . . . . . . . . . . . . . . . . . . . . . . . . . . . . . . . . . . . . . . . . . . . . . . . . . . . 58BLOCKS(nnnnnn) . . . . . . . . . . . . . . . . . . . . . . . . . . . . . . . . . . . . . . . . . . . . . . . . . . . . . . . . . . . . . 58CBNAME(cbname) . . . . . . . . . . . . . . . . . . . . . . . . . . . . . . . . . . . . . . . . . . . . . . . . . . . . . . . . . . . . 58CTLLIB(dsname) . . . . . . . . . . . . . . . . . . . . . . . . . . . . . . . . . . . . . . . . . . . . . . . . . . . . . . . . . . . . . . 58DEBUG(yes/no) yes . . . . . . . . . . . . . . . . . . . . . . . . . . . . . . . . . . . . . . . . . . . . . . . . . . . . . . . . . . . . 58ENTRYNAME(epname) . . . . . . . . . . . . . . . . . . . . . . . . . . . . . . . . . . . . . . . . . . . . . . . . . . . . . . . . 59GROUPNAME(grpname). . . . . . . . . . . . . . . . . . . . . . . . . . . . . . . . . . . . . . . . . . . . . . . . . . . . . . . . 59INITIALCOMMAND(‘command operands’) . . . . . . . . . . . . . . . . . . . . . . . . . . . . . . . . . . . . . . . . 59JOBACTIVITY(yes/no) . . . . . . . . . . . . . . . . . . . . . . . . . . . . . . . . . . . . . . . . . . . . . . . . . . . . . . . . . 59JOBDDNAME(ddname). . . . . . . . . . . . . . . . . . . . . . . . . . . . . . . . . . . . . . . . . . . . . . . . . . . . . . . . . 59JOBDSNAME(dsname) . . . . . . . . . . . . . . . . . . . . . . . . . . . . . . . . . . . . . . . . . . . . . . . . . . . . . . . . . 60JOBNAMETABLE(member) . . . . . . . . . . . . . . . . . . . . . . . . . . . . . . . . . . . . . . . . . . . . . . . . . . . . . 60JSDEBUGLEVEL(n) . . . . . . . . . . . . . . . . . . . . . . . . . . . . . . . . . . . . . . . . . . . . . . . . . . . . . . . . . . . 60JSLISTENADDRESS(nnn,nnn,nnn,nnn) . . . . . . . . . . . . . . . . . . . . . . . . . . . . . . . . . . . . . . . . . . . . 60JSLISTENJOBNAME(jobname) . . . . . . . . . . . . . . . . . . . . . . . . . . . . . . . . . . . . . . . . . . . . . . . . . . 60JSLISTENPORT(nnnnn) . . . . . . . . . . . . . . . . . . . . . . . . . . . . . . . . . . . . . . . . . . . . . . . . . . . . . . . . 60JSLISTENPROCNAME(procname) . . . . . . . . . . . . . . . . . . . . . . . . . . . . . . . . . . . . . . . . . . . . . . . 60JSLISTENRETRIES(nn) . . . . . . . . . . . . . . . . . . . . . . . . . . . . . . . . . . . . . . . . . . . . . . . . . . . . . . . . 61JSLISTENTIMEOUT(nnn) . . . . . . . . . . . . . . . . . . . . . . . . . . . . . . . . . . . . . . . . . . . . . . . . . . . . . . 61JSSTARTOFDAY(+nnnnn) . . . . . . . . . . . . . . . . . . . . . . . . . . . . . . . . . . . . . . . . . . . . . . . . . . . . . . 61LSR(yes/no) . . . . . . . . . . . . . . . . . . . . . . . . . . . . . . . . . . . . . . . . . . . . . . . . . . . . . . . . . . . . . . . . . . 61MAXBLOCKS(nnnnnn). . . . . . . . . . . . . . . . . . . . . . . . . . . . . . . . . . . . . . . . . . . . . . . . . . . . . . . . . 61MEMBER(memname) . . . . . . . . . . . . . . . . . . . . . . . . . . . . . . . . . . . . . . . . . . . . . . . . . . . . . . . . . . 61MODULENAME(lmodname) . . . . . . . . . . . . . . . . . . . . . . . . . . . . . . . . . . . . . . . . . . . . . . . . . . . . 61MSGLEVEL(info/warn/severe) . . . . . . . . . . . . . . . . . . . . . . . . . . . . . . . . . . . . . . . . . . . . . . . . . . . 62NOSMFTYPE(nnn) . . . . . . . . . . . . . . . . . . . . . . . . . . . . . . . . . . . . . . . . . . . . . . . . . . . . . . . . . . . . 62OPNOTIFY(nnnnnn) . . . . . . . . . . . . . . . . . . . . . . . . . . . . . . . . . . . . . . . . . . . . . . . . . . . . . . . . . . . 62PRIMARY(sysname) . . . . . . . . . . . . . . . . . . . . . . . . . . . . . . . . . . . . . . . . . . . . . . . . . . . . . . . . . . . 62PUTLINE(yes/no). . . . . . . . . . . . . . . . . . . . . . . . . . . . . . . . . . . . . . . . . . . . . . . . . . . . . . . . . . . . . . 62QNAME(qname). . . . . . . . . . . . . . . . . . . . . . . . . . . . . . . . . . . . . . . . . . . . . . . . . . . . . . . . . . . . . . . 62REINITIALIZE(yes/no) . . . . . . . . . . . . . . . . . . . . . . . . . . . . . . . . . . . . . . . . . . . . . . . . . . . . . . . . . 62SMFTYPE(nnn) . . . . . . . . . . . . . . . . . . . . . . . . . . . . . . . . . . . . . . . . . . . . . . . . . . . . . . . . . . . . . . . 63SVCDUMP(yes/no) . . . . . . . . . . . . . . . . . . . . . . . . . . . . . . . . . . . . . . . . . . . . . . . . . . . . . . . . . . . . 63WTP(yes/no) . . . . . . . . . . . . . . . . . . . . . . . . . . . . . . . . . . . . . . . . . . . . . . . . . . . . . . . . . . . . . . . . . . 63
tidalautomation.com 5
Commands for TSIRECRD and TSISPACE . . . . . . . . . . . . . . . . . . . . . . . . . . . . . . . . . . . . . . . . . . . . . 63ABEND command . . . . . . . . . . . . . . . . . . . . . . . . . . . . . . . . . . . . . . . . . . . . . . . . . . . . . . . . . . . . . . 63ALLOCATE command . . . . . . . . . . . . . . . . . . . . . . . . . . . . . . . . . . . . . . . . . . . . . . . . . . . . . . . . . . 63DISPLAY command . . . . . . . . . . . . . . . . . . . . . . . . . . . . . . . . . . . . . . . . . . . . . . . . . . . . . . . . . . . . 64DUMP command . . . . . . . . . . . . . . . . . . . . . . . . . . . . . . . . . . . . . . . . . . . . . . . . . . . . . . . . . . . . . . . 64END command. . . . . . . . . . . . . . . . . . . . . . . . . . . . . . . . . . . . . . . . . . . . . . . . . . . . . . . . . . . . . . . . . 64EXTEND command . . . . . . . . . . . . . . . . . . . . . . . . . . . . . . . . . . . . . . . . . . . . . . . . . . . . . . . . . . . . . 64FREE command . . . . . . . . . . . . . . . . . . . . . . . . . . . . . . . . . . . . . . . . . . . . . . . . . . . . . . . . . . . . . . . . 64IDCAMS command . . . . . . . . . . . . . . . . . . . . . . . . . . . . . . . . . . . . . . . . . . . . . . . . . . . . . . . . . . . . . 64MAP command . . . . . . . . . . . . . . . . . . . . . . . . . . . . . . . . . . . . . . . . . . . . . . . . . . . . . . . . . . . . . . . . 65MVS command . . . . . . . . . . . . . . . . . . . . . . . . . . . . . . . . . . . . . . . . . . . . . . . . . . . . . . . . . . . . . . . . 65SMFINPUT command . . . . . . . . . . . . . . . . . . . . . . . . . . . . . . . . . . . . . . . . . . . . . . . . . . . . . . . . . . . 65STACK command . . . . . . . . . . . . . . . . . . . . . . . . . . . . . . . . . . . . . . . . . . . . . . . . . . . . . . . . . . . . . . 66STOP command . . . . . . . . . . . . . . . . . . . . . . . . . . . . . . . . . . . . . . . . . . . . . . . . . . . . . . . . . . . . . . . . 66SUBMIT command . . . . . . . . . . . . . . . . . . . . . . . . . . . . . . . . . . . . . . . . . . . . . . . . . . . . . . . . . . . . . 66USERS command. . . . . . . . . . . . . . . . . . . . . . . . . . . . . . . . . . . . . . . . . . . . . . . . . . . . . . . . . . . . . . . 67
Batch Commands for TSIRECRD & TSISPACE . . . . . . . . . . . . . . . . . . . . . . . . . . . . . . . . . . . . . . . . . 67
tidalautomation.com 6
PrefaceThis guide describes the installation, configuration, and usage of the z/OS Agent and Gateway Adapter with Tidal Workload Automation (TWA).
AudienceThis guide is for administrators who install and configure the z/OS Agent and Gateway Adapter for use with Tidal Workload Automation, and who troubleshoot TWA installation and requirements issues.
Related DocumentationFor a list of all Tidal Workload Automation guides, see the Tidal Workload Automation Documentation Overview of your release on tidalautomation.com at:
http://docs.tidalautomation.com/
Note: We sometimes update the documentation after original publication. Therefore, you should also review the documentation on tidalautomation.com for any updates.
Obtaining Documentation and Submitting a Service RequestFor information on obtaining documentation, submitting a service request, and gathering additional information, see What’s New in Tidal Product Documentation at:
https://docs.tidalautomation.com/rss
Subscribe to What’s New in Tidal Product Documentation, which lists all new and revised Tidal technical documentation, as an RSS feed and deliver content directly to your desktop using a reader application. The RSS feeds are a free service.
tidalautomation.com 7
Document Change HistoryThe table below provides the revision history for the Tidal Workload Automation z/OS Agent and Gateway Adapter guide.
Table 1
Version Number Issue Date Reason for Change
6.2.1 SP2 June 2015 Configuration provided in the Tidal Workload Automation Installation Guide; usage provided in online Help only.
6.2.1 SP3 May 2016 Consolidated all z/OS Agent and Gateway Adapter documentation into one document.
6.3 August 2016 Rebranded “Cisco Tidal Enterprise Scheduler (TES)” to “Cisco Workload Automation”.
Miscellaneous edits for the 6.3 release.
6.3.3 Jan 2018 Rebranded “Cisco Workload Automation (CWA)” to “Tidal Workload Automation (TWA)”.
tidalautomation.com 8
1Introducing the z/OS Agent and Gateway Adapter
This chapter provides an overview of the z/OS Agent and Gateway Adapter and its requirements:
Overview
Evolution of the Platform
Architecture of the Agent and Adapter for z/OS
Master/Agent Architecture
Benefits of the Master/Agent Architecture
z/OS Adapter Services
OverviewThe master/agent architecture has become increasingly popular in managing distributed systems. It offers many advantages to companies needing to provide centralized support and administration for workloads that span not only multiple machines and platforms, but often multiple locations. The TWA master/agent architecture consists of one (or more) machines that contain a master schedule, and one or more agent machines that execute workloads on behalf of the master schedule.
The master schedule comprises the scheduling criteria associated with jobs, JCL, shell scripts, programs and commands (workloads). The master schedule determines on which machines workloads will run. When you employ agent machines, the location of the machines to execute the workload can remain independent of the machine containing the master schedule. The only prerequisite for the master/agent relationship is that the machine acting as the master must be on the same TCP/IP network as the machines serving as agents.
Evolution of the PlatformAs an IBM mainframe platform, z/OS has been around for a long time even if the name itself is recent.
The original name that IBM gave its mainframe operating system in 1974 was MVS standing for Multiple Virtual Storage. In 1996, IBM added a set of utilities to the MVS program and renamed the operating system OS/390. The latest incarnation of IBM’s mainframe system was enhanced and renamed z/OS in 2001 and this is the name used throughout this manual.
Architecture of the Agent and Adapter for z/OSThere are two components of the Adapter for z/OS. Each component is an independent entity fulfilling different functions. Depending upon your needs, you do not necessarily need both components.
tidalautomation.com 9
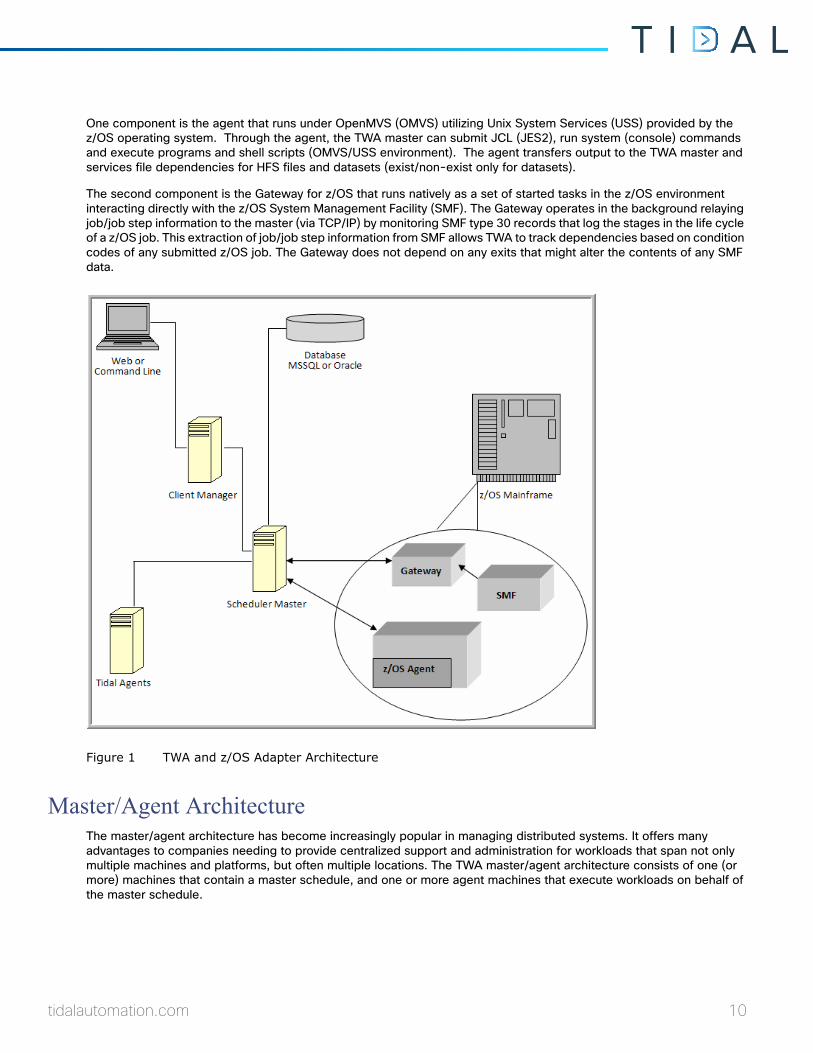
One component is the agent that runs under OpenMVS (OMVS) utilizing Unix System Services (USS) provided by the z/OS operating system. Through the agent, the TWA master can submit JCL (JES2), run system (console) commands and execute programs and shell scripts (OMVS/USS environment). The agent transfers output to the TWA master and services file dependencies for HFS files and datasets (exist/non-exist only for datasets).
The second component is the Gateway for z/OS that runs natively as a set of started tasks in the z/OS environment interacting directly with the z/OS System Management Facility (SMF). The Gateway operates in the background relaying job/job step information to the master (via TCP/IP) by monitoring SMF type 30 records that log the stages in the life cycle of a z/OS job. This extraction of job/job step information from SMF allows TWA to track dependencies based on condition codes of any submitted z/OS job. The Gateway does not depend on any exits that might alter the contents of any SMF data.
Figure 1 TWA and z/OS Adapter Architecture
Master/Agent ArchitectureThe master/agent architecture has become increasingly popular in managing distributed systems. It offers many advantages to companies needing to provide centralized support and administration for workloads that span not only multiple machines and platforms, but often multiple locations. The TWA master/agent architecture consists of one (or more) machines that contain a master schedule, and one or more agent machines that execute workloads on behalf of the master schedule.
tidalautomation.com 10
The master schedule comprises the scheduling criteria associated with jobs, JCL, shell scripts, programs and commands (workloads). The master schedule determines on which machines workloads will run. When you employ agent machines, the location of the machines to execute the workload can remain independent of the machine containing the master schedule. The only prerequisite for the master/agent relationship is that the machine acting as the master must be accessible via TCP/IP to the machines serving as agents, and vice versa.
Benefits of the Master/Agent ArchitectureThe master/agent architecture provides several benefits for customers who need to centrally manage their daily job scheduling operations.
You only need to maintain a single master schedule.
This reduces the effort of individual(s) performing the job scheduling role.
You can offload workloads to multiple machines.
This increases the efficiency of your company's computing power.
You can view and control all job scheduling operational activity from a single production status window.
This condenses the production schedule into a single image that you can manage from a single location, regardless of the number, type or location of the machines executing the workload.
One of the primary benefits of agent software is that workloads are not interrupted or aborted on the agent if the master schedule or the network shared between the master schedule and the agent becomes unavailable. The agent continues to process any job it is working on if a network connection fails.
z/OS Adapter ServicesThe two components of the z/OS adapter provide different functions.
TWA Agent for z/OS FunctionsThe TWA z/OS agent component of the z/OS adapter provides the following services to a master:
Submits JCL (JES2)
Executes USS (OMVS) scripts and programs
Executes system (console) commands
Tracks current state and status of TWA submitted jobs
Monitors file dependencies (HFS and exist/non-exist for datasets)
Transfers job output to the master
This agent is implemented using TWA Java agent technology and is stored along with configuration and logging files in the hierarchical file system (HFS) of USS.
The z/OS agent uses IBM’s implementation of TCP/IP to communicate with the TWA master.
Gateway FunctionsThe Gateway component of the z/OS adapter provides the following features:
tidalautomation.com 11
Installs without an IPL
Full sysplex support
Monitors SMF records
Modification of parameters and processes without restarting
SMF processing is independent of other concurrent SMF processes and prior to any process that may alter SMF data
Fault tolerance
Supports OS/390 and z/OS
The Gateway uses three Started Tasks:
TSISPACE
TSIRECRD
TSESCHED
tidalautomation.com 12
2Installing the z/OS Agent
This chapter discusses hardware and software requirements for the TWA agent, describes the installation procedure, and describes getting started with the z/OS Adapter:
Overview
z/OS Agent Requirements
Prerequisites for Installation
Installing the z/OS Agent
Getting Started with the z/OS Agent
Uninstalling the z/OS Agent
OverviewThe z/OS agent component of the z/OS adapter provides the following services to a Master:
Submits JCL (JES2)
Executes USS (OMVS) scripts and programs
Executes system (console) commands
Tracks current state and status of TWA submitted jobs
Monitors file dependencies (HFS and exist/non-exist for datasets)
Transfers job output to the Master
The z/OS agent is implemented using TWA Java agent technology and is stored along with configuration and logging files in the hierarchical file system (HFS) of USS. The z/OS agent uses IBM’s implementation of TCP/IP to communicate with the Master.
z/OS Agent RequirementsThe following is a list of minimum hardware and software requirements for using the z/OS agent:
Requirement
Hardware S/390 or compatible architecture.
Approximately 4MB of available disk space. At least 40MB for production (logs, working files, etc.) is recommended.
Network connectivity between the agent and Master machines.
tidalautomation.com 13
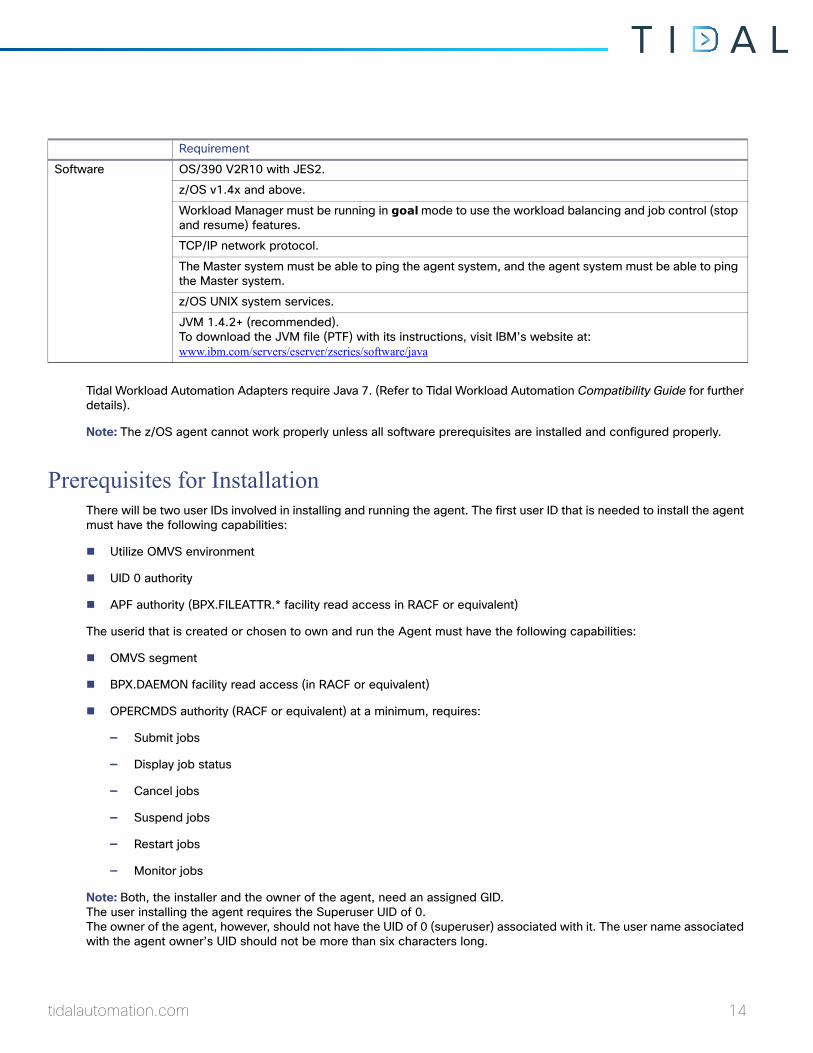
Tidal Workload Automation Adapters require Java 7. (Refer to Tidal Workload Automation Compatibility Guide for further details).
Note: The z/OS agent cannot work properly unless all software prerequisites are installed and configured properly.
Prerequisites for InstallationThere will be two user IDs involved in installing and running the agent. The first user ID that is needed to install the agent must have the following capabilities:
Utilize OMVS environment
UID 0 authority
APF authority (BPX.FILEATTR.* facility read access in RACF or equivalent)
The userid that is created or chosen to own and run the Agent must have the following capabilities:
OMVS segment
BPX.DAEMON facility read access (in RACF or equivalent)
OPERCMDS authority (RACF or equivalent) at a minimum, requires:
— Submit jobs
— Display job status
— Cancel jobs
— Suspend jobs
— Restart jobs
— Monitor jobs
Note: Both, the installer and the owner of the agent, need an assigned GID. The user installing the agent requires the Superuser UID of 0. The owner of the agent, however, should not have the UID of 0 (superuser) associated with it. The user name associated with the agent owner’s UID should not be more than six characters long.
Software OS/390 V2R10 with JES2.
z/OS v1.4x and above.
Workload Manager must be running in goal mode to use the workload balancing and job control (stop and resume) features.
TCP/IP network protocol.
The Master system must be able to ping the agent system, and the agent system must be able to ping the Master system.
z/OS UNIX system services.
JVM 1.4.2+ (recommended). To download the JVM file (PTF) with its instructions, visit IBM’s website at: www.ibm.com/servers/eserver/zseries/software/java
Requirement
tidalautomation.com 14
The z/OS agent requires APF authorization to issue JES2 and MVS operator commands to control and monitor an MVS job’s execution. These authorization rights for the agent must include:
submitting jobs
displaying job status
canceling jobs
suspending jobs
restarting jobs that execute in a known address space
monitoring jobs
Create a USS Directory Before installing the z/OS agent on a z/OS system, you must create a directory in the USS HFS that conforms to the following:
It is recommended that you use the directory /TIDAL/Agent when installing the agent. The agent installation will create multiple subdirectories under that directory.
The volume dedicated to the z/OS agent should be at least 20 MB in size but may need to be larger depending on the number of jobs running and the volume of their output.
The owner of the z/OS agent product files must have READ and EXECUTE access rights to the directory under which they were installed; otherwise, the installation will fail.
Note: Both, the installer and the owner of the agent, need an assigned GID. The user installing the agent requires the Superuser UID of 0. The owner of the agent, however, should not have the UID of 0 (superuser) associated with it. The user name associated with the agent owner’s UID should not be more than six characters long.
Verify that the Workload Manager Is in Goal Mode (Optional)
To verify that Workload Manager is in Goal mode:1. To display the current mode, enter the following from the system console:
D WLM,SYSTEMS
2. If the agent system is not running in goal mode, you can modify the mode from the console by entering the following command:
F WLM,MODE=GOAL
3. If you want your system to automatically run Workload Manager in goal mode, remove the IPS=xx parameter from the IEASYSxx member in PARMLIB.
During IPL, the absence of this parameter causes Workload Manager to run in goal mode.
4. If Workload Manager on your system runs in compatibility mode and you do not want your system to run in goal mode, the workload balancing feature and the stop/resume job control feature are not available. If you want to use the agent workload balancing feature and the stop and resume job control feature, Workload Manager must be running in goal mode.
tidalautomation.com 15
Installing the z/OS Agent
To install the z/OS agent, perform the following steps:1. Obtain the z/OS Agent files and copy or FTP (binary mode) the installation files, install.sh and install.tar, to the temp
directory you created for the installation in the HFS.
2. Change to the directory where you downloaded the installation files.
3. Log on to TSO or ISPF.
When you log on, be sure to allocate at least two MB of memory (SIZE=2048000) for your session. This amount of memory is required during installation and is needed anytime the agent is started.
4. Invoke the USS shell from TSO (do not use rlogin).
You must be a user with Superuser authority (UID=0) and change to the directory you created for the agent or the directory where the agent is already installed.
For example:
READYOMVSIBMLicensed Material - Property of IBM5647-A01 (C) Copyright IBM Corp. 1993, 2000(C) Copyright Mortice Kern Systems, Inc., 1985, 1996.(C) Copyright Software Development Group, University ofWaterloo, 1989.All Rights Reserved.U.S. Government users - RESTRICTED RIGHTS - Use,Duplication, or Disclosure restricted by GSA-ADP schedulecontract with IBM Corp.IBM is a registered trademark of the IBM Corp.=> cd /opt/<temp directory>
5. Change mode on install.sh so it can be executed.
chmod 755 install.*
6. Run the installation script by entering:
./install.sh
After starting the installation script, you may have to wait a few moments. Do not press ENTER.
7. You will see a banner and a message about making a current backup before installing new software. If you have not backed up your files before beginning the installation, quit the installation by typing n and back up your files. To proceed with the installation, type y.
Note: Throughout this installation, default responses to prompts are shown in brackets.
8. Enter the name of the user who will own the agent files (agent owner).
9. Enter the directory location where the files should be installed. It is recommended that default location (/TIDAL/Agent) be used. Entering y will begin installing the agent files.
Information on the files being installed is displayed. Once the files are installed, the Agent Configuration Menu is displayed with options for adding, editing and deleting agent instances.
Note: You must add at least one agent instance and configure it.
tidalautomation.com 16
10. After selecting the option to add an agent instance (1), you must enter a name for the agent, a port number and the directory path to the Java binaries directory.
11. It is recommended to use the default port number, 5912, if possible. If you have used the default locations when installing, you can just press the ENTER button.
12. Once you confirm the selections, you are returned to the Agent Configuration Menu. Quit the Agent Configuration Menu by typing Q and pressing ENTER.
Getting Started with the z/OS Agent
Requirements for Starting the Agent There are two ways to start the TWA Agent for z/OS, from OMVS or from a Started Task script. Each has its own prerequisite that must be configured to be successful.
OMVS
The TSO user starting the TWA Agent for z/OS from OMVS must be configured for a minimum of 1024000 of virtual storage. The user can configure the SIZE parameter by logging onto TSO and specifying the parameter on the TSO logon screen. For example, tso tidal size(1024000).
Note: If starting the agent from OMVS, ensure that the user account has an OMVS segment defined in their profile or that user cannot start the agent via OMVS.
Started Task Script
If starting the TWA Agent for z/OS from a Started Task script, the started procedure must have the parameter REGION=ØK specified on the EXEC statement. This parameter enables the Java Virtual Machine to start with the necessary virtual storage. Refer to the Started Task Script, page 17 in the Working with the z/OS Agent, page 33 chapter.
With either method, OMVS or Started Task script, the user starting the TWA agent must have Operator Level Authority because the agent inherits the user’s level of authority during startup and running of the agent.
Authority Requirements To run a job in z/OS, the TWA agent for z/OS must be started by a user with Operator Level Authority since the agent inherits the user’s level of authority during the startup and running of the agent. If any of the user rights listed below are missing, then the TWA agent cannot successfully launch, track and manage the completion of a job.
The Operator Level Authority must include the rights to run the following commands:
JES Commands
$DJ (JES Display Job command)
$CJ (JES Cancel Job command)
$TOJ,Q (Change MSGCLASS)
$OJ (Release Held output)
MVS Commands (In SYSPLEX, these commands may be ROUTED)
D J (MVS Display Job command)
tidalautomation.com 17
RESET job, A=<address space>, QUIESCE and RESET (Suspending/Resuming Jobs command)
SYSPLEX Operator Commands (routed from the TWA Agent to support SYSAFFINITY)
ROUTE sys, D J, job (MVS Display Job command)
ROUTE sys RESET job, A=asid, quiesce (Suspending Job command)
ROUTE, sys RESET job, A=asid, resume (Resuming Job command)
Note: The ROUTE command is used in conjunction with D J and the two RESET commands so that the command is executed on the appropriate subsystem or LPAR.
Assigning APF Authorization to TWA Agent Files
During the installation process, the TWA installation script automatically assigns APF authority attributes to specific TWA agent library files.
However, when a patch or an updated file replaces the original installation files, the APF authority is typically removed and needs to be reassigned to the agent files. Verify the APF authority attributes for the TWA agent files with the following procedure:
Note: The command to APF authorize libraries should be used with caution. It should only be used during installation and as advised by technical support.
To assign APF authorization:1. Log in and navigate into OMVS.
2. Go to the agent’s lib/ZOS directory.
3. In the command prompt, list the files by typing:
ls –E
The following files require APF authority:
— <agent dir>/lib/ZOS/mvslnk
— <agent dir>/lib/ZOS/tjb
Note: If you are using TWA version 6.1.0 or later, you do not need the tjb file.
If either of these two files do not display the “+ap” attribute, then you must reassign the APF authorization to that file. (You should also verify that the other permissions and the group are correct for these files). Reassign the APF authorization, by typing the following at the command prompt, replacing <filename> with the name of the file:
extattr +aps <filename>
If necessary, change the group for the file by entering the following at the command prompt, replacing <filename> with the name of the file:
chmod 6750 <filename>
chgrp <grp> <filename>
Viewing the Status of Agent Instances To view the status of an agent, go to the bin directory and enter:
./tagent <agent name> status
tidalautomation.com 18
Starting and Stopping Agents From the bin directory, you can start or stop an agent by entering at the command prompt:
./tagent <agent name> start
‐or‐
./tagent <agent name> stop
You can use a Started Task script to automate agent startup during IPL. Refer to “Started Task Script” of this manual for more information.
Caution: Stop the z/OS agent before rebooting the master. We recommend that you add the agent stop command to a system shutdown script to be used when restarting the system.
Uninstalling the z/OS Agent
The uninstallation procedure will not be successful if the agent is running. Stop the agent before removing the z/OS agent.
To uninstall the z/OS agent:1. Check the status of the agent to verify that it is not running by entering:
./tagent <agent name> status
2. If the status check shows the agent is not running, proceed to the next step. If the status check shows the agent is running, stop the agent by entering:
./tagent <agent name> stop
3. Once the agent is stopped, return to the /TIDAL directory. At the command prompt, enter:
cd /TIDAL
Have your system administrator remove the agent directory and its contents.
tidalautomation.com 19

tidalautomation.com 20
3Configuring the z/OS AgentOverview
This chapter describes configuration items that apply specifically to the agent for z/OS:
Defining a Connection, page 21
Configuring the z/OS Agent, page 23
Defining a ConnectionBefore the newly installed z/OS agent and the master can communicate, you must define a connection between them. The connection is defined from the Connection console of the TWA Web client.
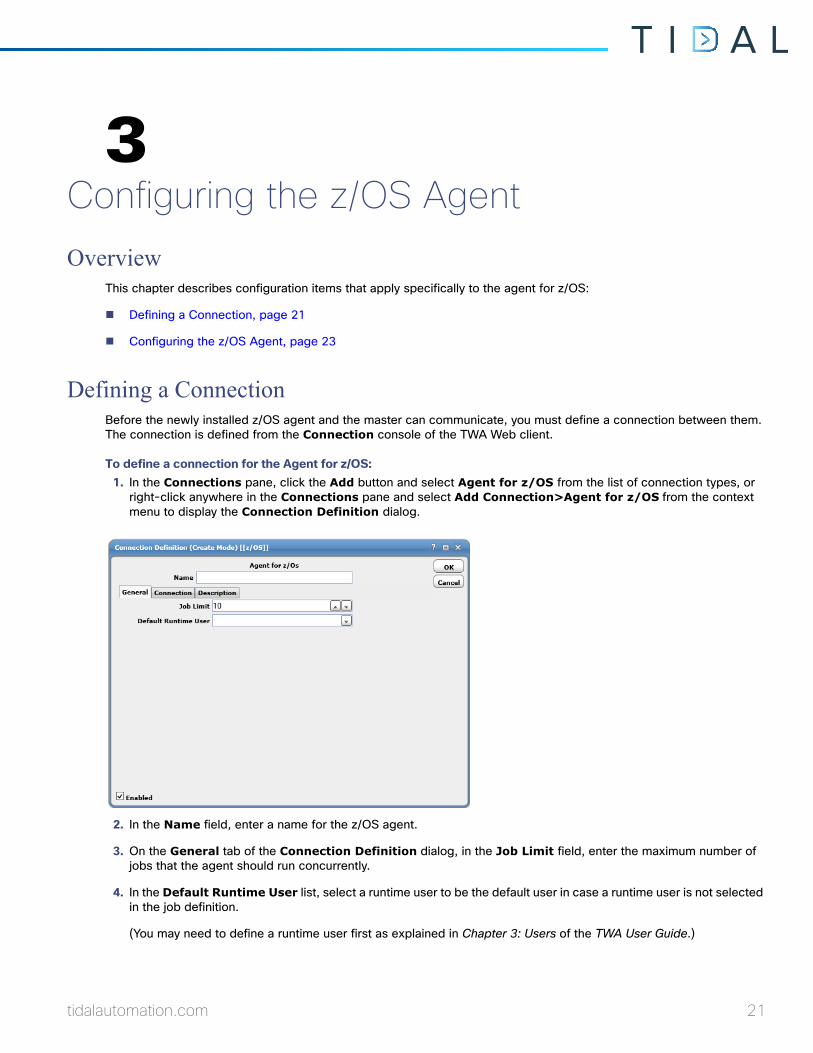
To define a connection for the Agent for z/OS:1. In the Connections pane, click the Add button and select Agent for z/OS from the list of connection types, or
right-click anywhere in the Connections pane and select Add Connection>Agent for z/OS from the context menu to display the Connection Definition dialog.
2. In the Name field, enter a name for the z/OS agent.
3. On the General tab of the Connection Definition dialog, in the Job Limit field, enter the maximum number of jobs that the agent should run concurrently.
4. In the Default Runtime User list, select a runtime user to be the default user in case a runtime user is not selected in the job definition.
(You may need to define a runtime user first as explained in Chapter 3: Users of the TWA User Guide.)
tidalautomation.com 21
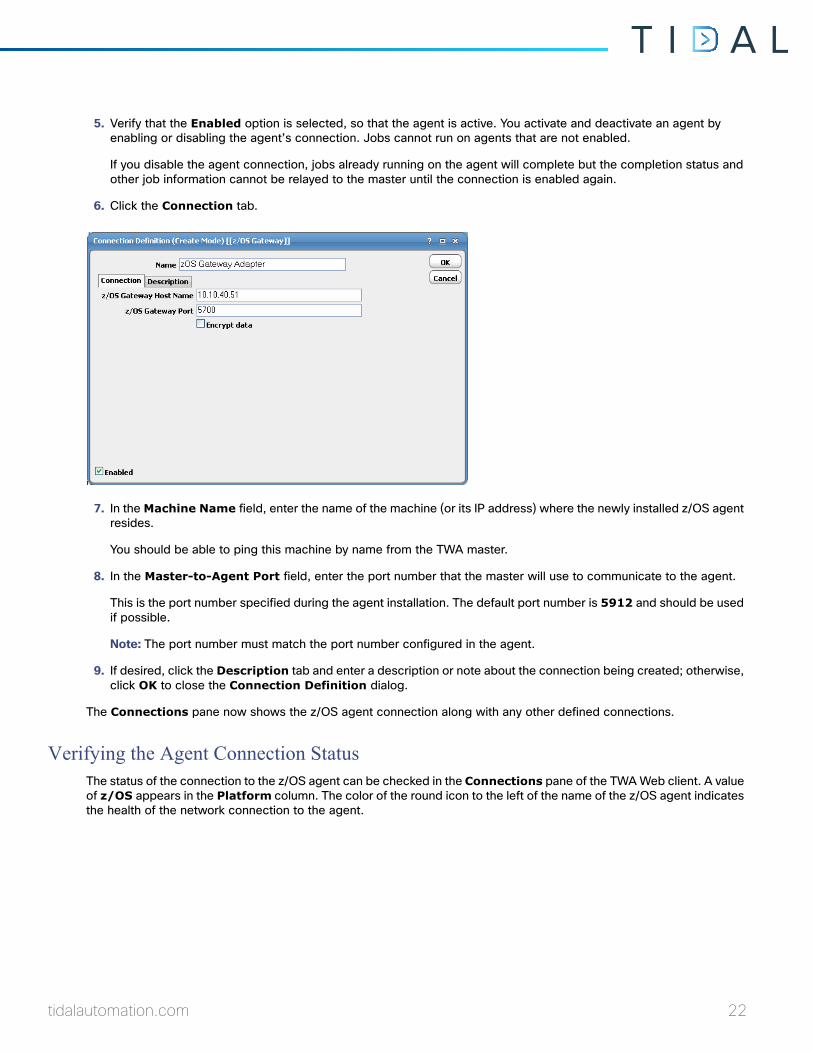
5. Verify that the Enabled option is selected, so that the agent is active. You activate and deactivate an agent by enabling or disabling the agent’s connection. Jobs cannot run on agents that are not enabled.
If you disable the agent connection, jobs already running on the agent will complete but the completion status and other job information cannot be relayed to the master until the connection is enabled again.
6. Click the Connection tab.
7. In the Machine Name field, enter the name of the machine (or its IP address) where the newly installed z/OS agent resides.
You should be able to ping this machine by name from the TWA master.
8. In the Master-to-Agent Port field, enter the port number that the master will use to communicate to the agent.
This is the port number specified during the agent installation. The default port number is 5912 and should be used if possible.
Note: The port number must match the port number configured in the agent.
9. If desired, click the Description tab and enter a description or note about the connection being created; otherwise, click OK to close the Connection Definition dialog.
The Connections pane now shows the z/OS agent connection along with any other defined connections.
Verifying the Agent Connection Status The status of the connection to the z/OS agent can be checked in the Connections pane of the TWA Web client. A value of z/OS appears in the Platform column. The color of the round icon to the left of the name of the z/OS agent indicates the health of the network connection to the agent.
tidalautomation.com 22
Note: Connections that are unavailable also display in the Unavailable Connections pane of the Master Status pane of the TWA Web client.
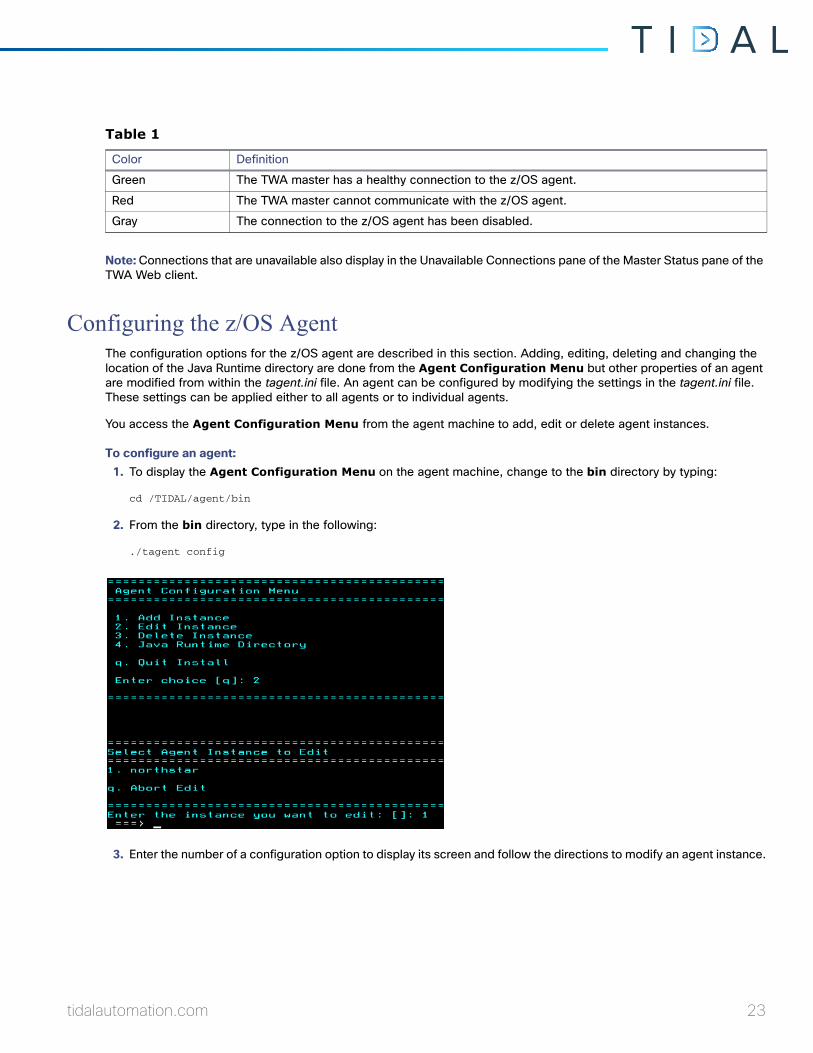
Configuring the z/OS Agent The configuration options for the z/OS agent are described in this section. Adding, editing, deleting and changing the location of the Java Runtime directory are done from the Agent Configuration Menu but other properties of an agent are modified from within the tagent.ini file. An agent can be configured by modifying the settings in the tagent.ini file. These settings can be applied either to all agents or to individual agents.
You access the Agent Configuration Menu from the agent machine to add, edit or delete agent instances.
To configure an agent:1. To display the Agent Configuration Menu on the agent machine, change to the bin directory by typing:
cd /TIDAL/agent/bin
2. From the bin directory, type in the following:
./tagent config
3. Enter the number of a configuration option to display its screen and follow the directions to modify an agent instance.
Table 1
Color Definition
Green The TWA master has a healthy connection to the z/OS agent.
Red The TWA master cannot communicate with the z/OS agent.
Gray The connection to the z/OS agent has been disabled.
tidalautomation.com 23
Preventing Unauthorized Users from Using an AgentThe z/OS agent can be configured to allow only specific users to run jobs on that agent. A list of users can be created to exclude or allow users access to the agent. If an unauthorized user tries to run a job on an agent that he is excluded from, the job will end with an Error Occurred status.
To exclude users from an agent:1. Login as the owner of the agent.
2. Create a file called Users.cfg in the agent’s root directory (If the defaults were used during installation, the root directory is at /TIDAL/Agent/<agentname>.
Note: The file name, Users.cfg, is case sensitive, so only the first letter should be capitalized and the rest of the name should be lower-case.
3. Change the Users.cfg file permissions to limit access to just the agent owner, by entering:
chmod 700 Users.cfg
4. In the Users.cfg file, enter:
EXCLUDE
5. List the users that you want to deny access to the agent.
An alternative method if the list of users to exclude is long, is to enter INCLUDE instead of EXCLUDE. Then you can list the users to give access to the agent if this is easier.
6. To ensure that the changes take effect, you should stop and restart the agent or if you do not want to stop the agent, you can disconnect and reconnect the Client Manager connection to the agent.
Note: While this procedure prevents unauthorized users from running system commands on an agent they are excluded from, FTP jobs can still be run from the agent because an user does not login to an agent to FTP.
Configuring Agent SettingsOther agent settings are available in the tagent.ini file located within the bin directory of the agent directory, e.g., /TIDAL/Agent/bin/tagent.ini These settings are normally left at the default values and do not appear in the file unless a setting is modified from the default. If the settings are modified, each setting must be on its own line. The configuration settings under the [config] heading of the tagent.ini file apply globally to all agent instances. Under the [config] heading, are subsections for each agent instance under that agent’s name. Each agent’s section duplicates the configuration settings under the [config] heading; however, the settings under the individual agent’s name always override the global settings under the [config] section.
tidalautomation.com 24
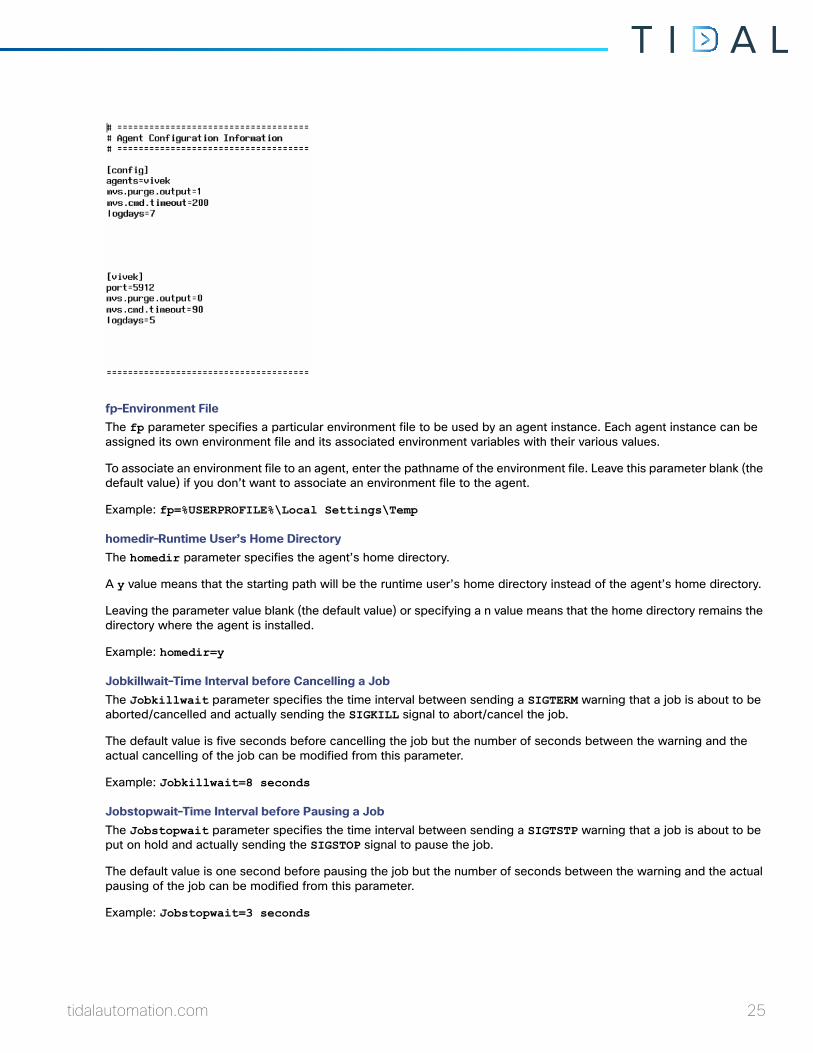
fp–Environment FileThe fp parameter specifies a particular environment file to be used by an agent instance. Each agent instance can be assigned its own environment file and its associated environment variables with their various values.
To associate an environment file to an agent, enter the pathname of the environment file. Leave this parameter blank (the default value) if you don’t want to associate an environment file to the agent.
Example: fp=%USERPROFILE%\Local Settings\Temp
homedir–Runtime User’s Home DirectoryThe homedir parameter specifies the agent’s home directory.
A y value means that the starting path will be the runtime user’s home directory instead of the agent’s home directory.
Leaving the parameter value blank (the default value) or specifying a n value means that the home directory remains the directory where the agent is installed.
Example: homedir=y
Jobkillwait–Time Interval before Cancelling a JobThe Jobkillwait parameter specifies the time interval between sending a SIGTERM warning that a job is about to be aborted/cancelled and actually sending the SIGKILL signal to abort/cancel the job.
The default value is five seconds before cancelling the job but the number of seconds between the warning and the actual cancelling of the job can be modified from this parameter.
Example: Jobkillwait=8 seconds
Jobstopwait–Time Interval before Pausing a JobThe Jobstopwait parameter specifies the time interval between sending a SIGTSTP warning that a job is about to be put on hold and actually sending the SIGSTOP signal to pause the job.
The default value is one second before pausing the job but the number of seconds between the warning and the actual pausing of the job can be modified from this parameter.
Example: Jobstopwait=3 seconds
tidalautomation.com 25
logdays–Log Retention IntervalThe number of days retained in the log can be adjusted. The amount of information recorded in the log can consume a large amount of disk space so the length of time that records are saved in the log should be adjusted as needed. The default value is seven days.
Example: logdays=7
maxmem–Maximum Memory ParameterThe maxmem parameter specifies that no more than the amount of RAM specified should be available for the agent processes. This memory parameter can be adjusted as individual needs warrant. Your system may need more or less than the default memory allotment. The default value is 256 MB of RAM.
Example: maxmem=256
minmem–Minimum Memory ParameterThe minmem parameter specifies that at least the amount of RAM designated should be available for the agent processes. This memory parameter can be adjusted as individual needs warrant. Your system may need more or less than the default memory allotments. The default value is 32 MB of RAM.
Example: minmem=32
mvs.ccfile–Condition Code FilenameA file that contains predefined maximum condition codes by job, proc and steps. Condition codes that are less than or equal to the specified maximum condition codes are considered normal completions. The condition code file specified in this agent’s setting will override any global condition code file specified in the [config] section. Wildcards can be used when specifying the condition codes in the file. Refer to the Configuring Condition Code Exceptions by Step, page 28 for more information.
Example: mvs.ccfile=/Tidal/agent/ccode.cfg
mvs.cmd.timeout–Command Timeout IntervalVarious factors can prevent an extended console command from completing. The z/OS agent continues to attempt to complete a command unless told to stop. You should set a time limit on how long the system waits for a command to complete. A timeout parameter prevents wasting system resources and helps identify an existing problem. Specify how long (in seconds) the system should attempt to complete the command before timing out.
Example: mvs.cmd.timeout=200
mvs.filepollint–Dataset Polling IntervalAt regular intervals, the z/OS agent polls datasets for dependencies. This option defines the maximum amount of time (in seconds) between when a dependency exists and when it is recognized by the z/OS agent. If polling is done too frequently, unnecessary CPU cycles are generated, wasting system resources. The polling of datasets can be adjusted to an optimal interval for individual systems. The default value for dataset polling is 15 seconds.
Example: mvs.filepollint=15
mvs.jobclass–Releasing held job outputThe job output from the z/OS jobs that are run by TWA must be stored in the held output queue as described earlier. Use the mvs.jobclass parameter to release the job output from the held queue. If not specified, the output remains in the held queue.
Example: mvs.jobclass=A
msv.pollint–JCL Polling IntervalOnce a job is launched from TWA , the z/OS agent monitors the progress of the JCL running in JES. The frequency of polling by the z/OS agent can be adjusted as needed by changing the polling interval. Polling more frequently than necessary generates excess CPU cycles and wastes system resources. The default value for JCL polling is 5 seconds.
tidalautomation.com 26
Example: mvs.pollint=5
mvs.primary–ISFOUT/TSIOUT Primary StorageYou can designate how much space should be allocated for temporary storage of the job output. If this storage space fills up, you can designate another storage space as a secondary storage area in tracks. The msvjob_primary item specifies the size of the primary storage area The primary default storage space is 0. The default of 0 indicates two cylinders.
Example: mvs.primary=0
mvs.purge–Held Output DispositionIf you want to automatically purge the output of a job from the held output queue after it has been sent to the master, set the mvs.purge_output option to 1.
The default, 0, is not to purge the output.
Example: mvs.purge.output=1
mvs.secondary–ISFOUT/TSIOUT Secondary StorageYou can designate how much space should be allocated for temporary storage of the job output if the output exceeds the primary storage area. The msvjob_secondary item specifies the size of the secondary storage area in tracks. The default secondary storage space is 0. The default of 0 is currently one cylinder.
Example: mvs.secondary=0
mvs.selclass–Processing Job Output Only from Specific ClassesThe agent can be configured to only retrieve job output from designated output classes. A maximum of 32 output classes can be designated. Multiple classes are listed without any separators (as in the example that lists four classes). If the mvs.jobclass parameter is also specified for the agent, any job output that is processed from the selected classes specified in this parameter is released and moved to the classes specified in mvs.jobclass.
Example: mvs.selclass=AH9L
mvs.sysaff–SYSAFFINITY UsageIf you are using SYSAFFINITY, you need to indicate this in the agent’s configuration. If this value is omitted or is any other value but y then it is considered to be n.
Example: mvs.sysaff=y
mvs.unit–ISFOUT/TSIOUT Storage UnitYou can designate the storage unit for temporary storage of the job output. The default storage unit is SYSALLDA.
Example: mvs.unit=SYSALLDA
profile–Source User’s ProfileThe profile parameter is used to have the agent permanently override the For UNIX, source user’s profile option on the Options tab of the Job Definition dialog.
Specifying the y value means that all jobs that run on this agent will source the specified runtime user profile. In effect, a y overrides any job that has the For UNIX, source user’s profile option selected and uses its own user profile. Use this option when existing jobs need to use a specific runtime profile that can be associated with a particular agent.
Leaving the parameter value blank (the default value) or specifying a n value means that any job with the For UNIX, source user’s profile option selected will source the user’s profile.
Example: profile=y
tidalautomation.com 27

Configuring Condition Code Exceptions by StepYou can create a file that specifies step level condition codes that TWA will use to determine the status of jobs that run under z/OS. You can designate specific jobs, steps and proc steps, use wildcard characters to create a mask of values or use both options. You can also stipulate an operator to specify that the returned condition code is greater than, less than, equal or not equal to a configured value.
To specify the criteria to use in evaluating condition codes to determine the completion status by job, proc or step:1. Create an HFS file with any name you wish: e.g., /TIDAL/Agent/ccode.cfg
2. Edit the ccode.cfg file with one or more entries for each JOB.STEP or JOB.<JOBSTEPNAME>.<PROCNAME> you wish to configure.
3. If you use wildcards (* or ?) in the job, proc name or job step, the agent performs a pattern match to determine if the condition code rule applies.
List each entry on its own line using one of the following two formats:
a. OB.STEP<op><ccode>
-or-
b. OB.STEPNAME.PROCNAME<op><ccode>
where op is the operator and ccode is the condition code value evaluated against the actual step condition code to determine whether it should be ignored (considered a normal completion).
Use format a for jobs that do not use JCL PROCs or use PROCs from unnamed job steps. For unnamed job steps that call procs, STEP refers to the proc step name.
Use format b for jobs if the JCL step is a PROC step called from a named job step.
The following table lists the operator values that are available:
Any step ending with a condition code that matches any of the criteria specified in the config file means that the step is considered to have completed normally. Multiple criteria may be specified for the same step by listing the step more than once with different values. For example, if you wanted a step to be considered normal if it completes with a condition code value of 0, 4, 8 and 16 (but not 12), you could add the following lines to the config file:
Table 2
Operand Meaning
= If the returned condition code equals the specified value, the step is considered to have completed normally.
< If the returned condition code is less than the specified value, the step is considered to have completed normally
> If the returned condition code is greater than the specified value, the step is considered to have completed normally
<= If the returned condition code is less than or equal to the specified value, the step is considered to have completed normally
>= If the returned condition code is greater than or equal to the specified value, the step is considered to have completed normally
<> f the returned condition code is not equal to the specified value, the step is considered to have completed normally
tidalautomation.com 28
JOB01.STEP01.PROC01=4 JOB01.STEP01.PROC01=8 JOB01.STEP01.PROC01=16
Keep in mind that the step will be evaluated as normal if any of the conditions are true. If you add the line JOB01.STEP01.PROC01>1000 then the step completes normally only if the condition code value is 0, 4, 8, 16 or greater than 1,000. Any other value that is returned is considered abnormal.
If you list multiple condition codes values, be sure to list specific step masks before any more generic masks. The values for job, procstepname, jobstepname and condition code are retrieved from each of the job log’s IEF142I messages during evaluation.
Condition Code Evaluation Examples
The following is an example for jobs that do not use a job PROC. In this case, the condition code value of 4 for (job) SETCC1. (job step) STEP1 means the job completed normally.
SETCC1.STEP1=4
You can specify more than one control card for a job step, in this case both condition codes 4 and 8 for SETCC1.STEP1 will be normal (ignored):
SETCC1.STEP1=4 SETCC1.STEP1=8
Refer to the table in Configuring Condition Code Exceptions by Step, page 28 for a list of the operands available for use when configuring condition codes.
Examples of control cards for jobsteps are provided here:
Control cards can take advantage of the use of wild cards in the definition of the jobname and /or jobstepname. Wildcards are defined with the use of an asterisk as part of the jobname or jobstepname and work with all logical operations as shown in the following examples:
Table 3
Control Card Meaning
SETCC2.STEP1<>8 Any return code less than 8 or greater than 8 from job SETCC2, job step STEP1 is ignored (considered normal). Only condition code 8 would be considered abnormal.
SETCC4.STEP2<=12 Any return code less than or equal to 12 from job SETCC4, job step STEP2 is ignored (considered normal). Any condition code above 12 would be abnormal.
SETCC4.STEP3>=16 Any return code greater than or equal to 16 from job SETCC4, job step STEP3 is ignored (considered normal). Any condition code lower than 16 would be abnormal.
SETCC4.STEP4<20 Any return code less than 20 from job SETCC4, job step STEP4 is ignored (considered normal). Any condition code 20 or above would be abnormal.
SETCC4.STEP5>24 Any return code greater than 24 from job SETCC4, job step STEP5 is ignored (considered normal). Any condition code less than 24 would be abnormal.
tidalautomation.com 29
Note: Whenever a control card is added, deleted or changed, you must stop and then restart the agent before the changes take effect.
The following table provides examples of control cards using procstepnames when evaluating condition codes. Wild cards can also be used with procstepnames.
Configuring Step Level Condition Code CheckingTo utilize step level condition code checking, the mvs.ccfile must be added to the agent configuration. Under OMVS, edit the tagent.ini file and under the appropriate section for the named agent, add the following parameter to the tagent.ini file:
mvs.ccfile=<ccode config file>
where <ccode config file> is the full HFS path to the configuration file, e.g.,/tidal/Agent/ccode.cfg
Note: The tagent.ini file is located in the TWA Agent bin directory. In a default installation, the file would be found at: /tidal/Agent/bin/tagent.ini.
Using the OMVS UNIX command OEDIT, it would appear as:
EDIT /tidal/Agent/bin/tagent.ini Columns 00001 00072Command ===> Scroll ===> CSR**********************Top of Data***********************
Table 4
Control Card Meaning
SET*.STEP1=4 Any return code equal to 4 from a job whose jobname begins with “SET” and contains the job step of “STEP1” is ignored (considered normal).
SETCC6.ST*<=12 Any return code less than or equal to 12 from job SETCC6 with a job step that begins with “ST” is ignored (considered normal) Any condition code above 12 would be invalid.
SETCC*.ST*>4 Any return greater than 4 from a job whose jobname begins with “SETCC” with a job step that begins with “ST” is ignored (considered normal).
Table 5
Control Card Meaning
SETCC2.STEP1.SETCC<>8 Any return code less than 8 or greater than 8 from job SETCC2, job step STEP1, proc step SETCC is ignored
(considered normal). Only condition code 8 would be considered abnormal.
SETCC4.STEP2.SETCC<=12 Any return code less than or equal to 12 from job SETCC4, job step STEP2, proc step SETCC is ignored (considered normal). Any condition code above 12 would be considered abnormal.
SETCC4.STEP3.SETCC>=16 Any return code greater than or equal to 16 from job SETCC4, job step STEP3, proc step SETCC is ignored (considered normal). Any condition code lower than 16 would be considered abnormal.
SETCC4.STEP4.SETCC<20 Any return code less than 20 from job SETCC4, job step STEP4, proc step SETCC is ignored (considered normal). Any condition code 20 or above would
be considered abnormal.
SETCC4.STEP5.SETCC>24 Any return code greater than 24 from job SETCC4, job step STEP5, proc step SETCC is ignored (considered normal). Any condition code less than 24 would be considered abnormal.
tidalautomation.com 30
000001 # =======================================================000002 # Agent Configuration Information 000003 # =======================================================000004 [config] 000005 agents=AGT5914,agt5915 000006 java=/V1R4W/usr/lpp/java/IBM/J1.4/bin 000007 [AGT5914] 000008 port=5914 000010 #stdout=y 000011 mvs.pollint=4 000012 mvs.filepollint=18 000013 mvs.ccfile=/tidal/Agent/ccode.cfg
In this example, the agent name is AGT5914 and the condition code configuration file will reside in the /tidal/Agent directory.
Step level condition code checking also works with one or more agents, you can use the same mvs.ccfile agent file name or specify a different file name and location as follows:
EDIT /tidal/Agent/bin/tagent.ini Columns 00001 00072Command ===> Scroll ===> CSR************************Top of Data ********************000001 # =======================================================000002 # Agent Configuration Information 000003 # =======================================================000004 [config] 000005 agents=AGT5914,AGT5915 000006 java=/V1R4W/usr/lpp/java/IBM/J1.4/bin 000007 [AGT5914] 000008 port=5914 000010 #stdout=y 000011 mvs.pollint=4 000012 mvs.filepollint=18 000013 mvs.ccfile=/tidal/Agent/agent1.cc 000014 mvs.jobclass=A 000015 [AGT5915] 000016 port=5915 000017 ovb=tidaldebug 000018 mvs.ccfile=/tidal/Agent/agent2.cc 000019 java=/V1R4W/usr/lpp/java/IBM/J1.4/bin
In this example there are two agents, AGT4914 and AGT5915. AGT5914 uses the control file of agent1 and agent AGT5915 uses the control file of agent2.
If you want to apply the step level condition code to all agents (instead of an individual agent), list the mvs.ccfile option under the general [config] section at the top of the tagent.ini file.
Note: The TWA agent will pick up these changes only after it is stopped and restarted. The use of step level condition code checking is separate from the Exit Code list configured in the Tracking section of the job definition in the TWA Web client. If you use step level condition code exceptions, verify that the exit code is set to Normal = 0 to 0 to avoid any confusion with conflicting criteria.
tidalautomation.com 31

tidalautomation.com 32
4Working with the z/OS Agent
This chapter covers the topics related to working with the z/OS Agent:
Overview, page 33
Started Task Script, page 33
How to Specify z/OS Data Sets in a Job Rule, page 34
Shell Scripts vs z/OS JCL vs System Commands, page 37
Security for z/OS Jobs, page 37
z/OS Job Number, page 38
Runtime Arguments, page 38
Parameter Substitution, page 38
JCL Restart Capability, page 39
Return Codes and Job Output, page 41
Piping Job Output, page 41
Workload Balancing, page 42
Job Status Determination, page 42
OverviewTo work with the TWA Agent for z/OS, you need to be running the USS shell (OMVS). In OMVS, you start and stop the agent, obtain agent status information, edit the configuration files, review and/or switch log files, run diagnostic utilities, etc.
Remember, all TWA agent processes must be running to properly launch jobs.
On the Connection screen in the TWA Web client, a green light displaying next to the connection verifies that the master is able to connect to the TWA agent and that the agent is available.
A red light next to the connection on the Connections section indicates that the agent is unavailable. After the agent polling interval passes, verify that the port numbers are correct.
Started Task ScriptUse the following console commands to start, stop and check the status of the agent:
Start: S TIDALSC,OPT=’Start’, AGT=’Agent1’
Stop: S TIDALSC,OPT=’Stop’, AGT=’Agent1’
tidalautomation.com 33
Status: S TIDALSC,OPT=’Status’, AGT=’Agent1’ or S TIDALSC, AGT=’Agent1’ (status is the default)
Here is an example of a Started Task script to start, stop and check the status of the agent. The script example is only a guideline and must be modified to reflect configuration for your agent. The following parameters must be edited so that values in italic type reflect your environment.
AGT=’<name of the agent instance>’
PARM=’sh cd <full path to the agent bin directory>;./tagent &AGT &OPT’
STDOUT DD PATH=’<temp path>/tidal&OPT..stdout’, STDERR: sub
STDERR DD PATH=’<temp path>/tidal&OPT..stderr’
//TIDALSC PROC AGT=’Agent1’,OPT='status' //* //* //* Where://* AGT is the agent instance identifier//* OPT is START, STOP or STATUS//*//TIDALSC EXEC PGM=BPXBATCH,REGION=0k,TIME=1440,// PARM='sh cd /tidal/Agent/bin;./tagent &AGT &OPT'//STDOUT DD PATH='/tmp/tidal&OPT..stdout',// PATHOPTS=(OWRONLY,OCREAT,OTRUNC),// PATHMODE=(SIRUSR,SIWUSR,SIRGRP,SIWGRP)//STDERR DD PATH='/tmp/tidal&OPT..stderr',// PATHOPTS=(OWRONLY,OCREAT,OTRUNC),// PATHMODE=(SIRUSR,SIWUSR,SIRGRP,SIWGRP)//*
How to Specify z/OS Data Sets in a Job RuleWhen you refer to Z/OS data sets or PDS members in the TWA graphical user interface, you must express all data set names with a prefix of //.
The first characters entered in the Command field identify what type of task is being scheduled:
// = JCL
/ = USS script or program (must have executable access)
$ = console command
The following is an example of defining a job to submit JCL in the Command field of the Job Definition dialog of the TWA Web client.
tidalautomation.com 34
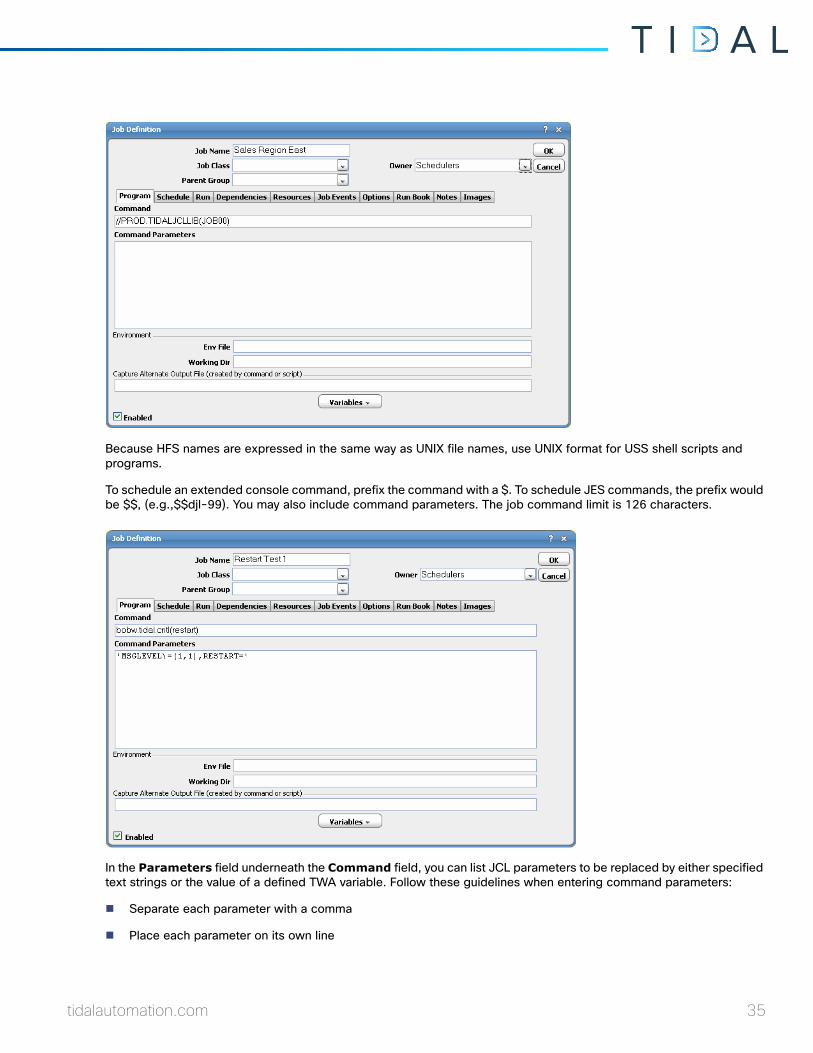
Because HFS names are expressed in the same way as UNIX file names, use UNIX format for USS shell scripts and programs.
To schedule an extended console command, prefix the command with a $. To schedule JES commands, the prefix would be $$, (e.g.,$$djl-99). You may also include command parameters. The job command limit is 126 characters.
In the Parameters field underneath the Command field, you can list JCL parameters to be replaced by either specified text strings or the value of a defined TWA variable. Follow these guidelines when entering command parameters:
Separate each parameter with a comma
Place each parameter on its own line
tidalautomation.com 35
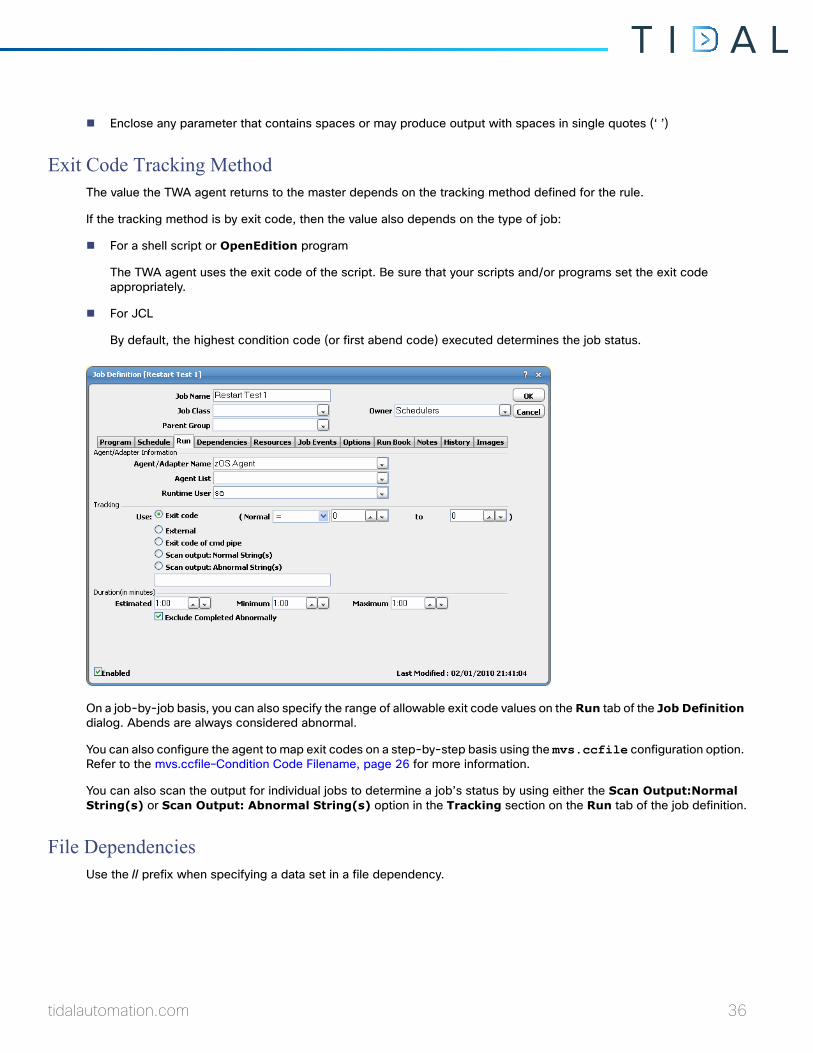
Enclose any parameter that contains spaces or may produce output with spaces in single quotes (‘ ’)
Exit Code Tracking MethodThe value the TWA agent returns to the master depends on the tracking method defined for the rule.
If the tracking method is by exit code, then the value also depends on the type of job:
For a shell script or OpenEdition program
The TWA agent uses the exit code of the script. Be sure that your scripts and/or programs set the exit code appropriately.
For JCL
By default, the highest condition code (or first abend code) executed determines the job status.
On a job-by-job basis, you can also specify the range of allowable exit code values on the Run tab of the Job Definition dialog. Abends are always considered abnormal.
You can also configure the agent to map exit codes on a step-by-step basis using the mvs.ccfile configuration option. Refer to the mvs.ccfile–Condition Code Filename, page 26 for more information.
You can also scan the output for individual jobs to determine a job’s status by using either the Scan Output:Normal String(s) or Scan Output: Abnormal String(s) option in the Tracking section on the Run tab of the job definition.
File DependenciesUse the // prefix when specifying a data set in a file dependency.
tidalautomation.com 36
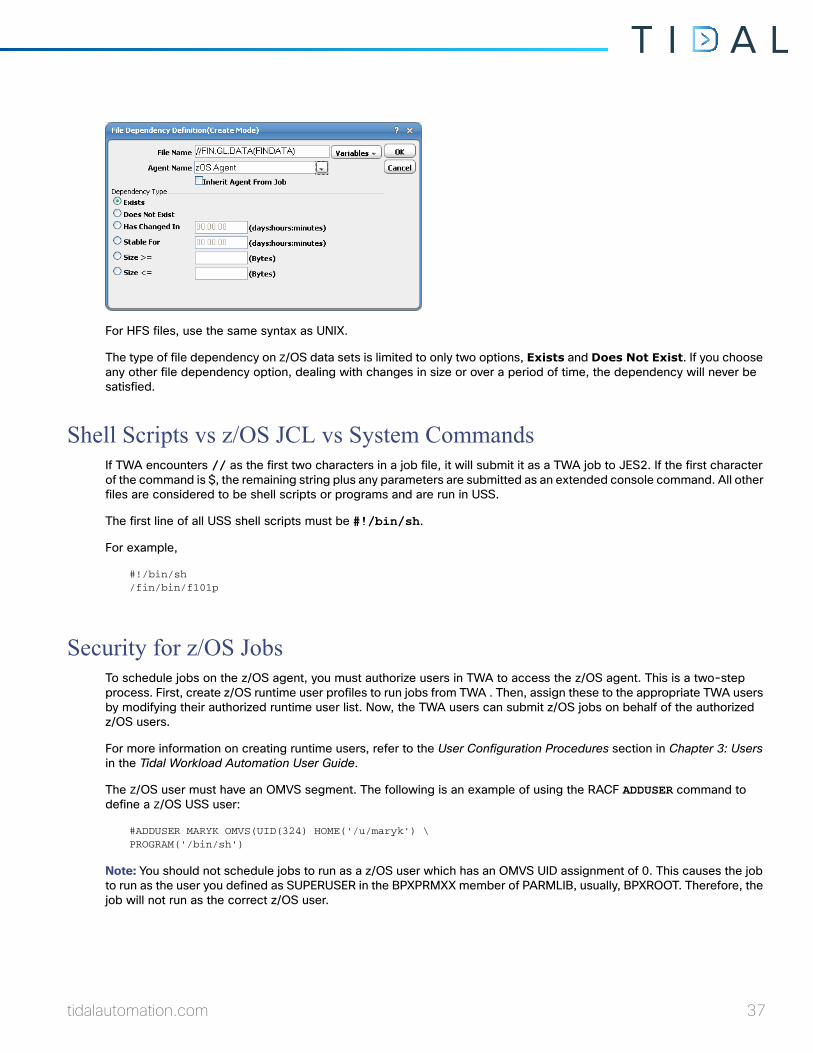
For HFS files, use the same syntax as UNIX.
The type of file dependency on Z/OS data sets is limited to only two options, Exists and Does Not Exist. If you choose any other file dependency option, dealing with changes in size or over a period of time, the dependency will never be satisfied.
Shell Scripts vs z/OS JCL vs System CommandsIf TWA encounters // as the first two characters in a job file, it will submit it as a TWA job to JES2. If the first character of the command is $, the remaining string plus any parameters are submitted as an extended console command. All other files are considered to be shell scripts or programs and are run in USS.
The first line of all USS shell scripts must be #!/bin/sh.
For example,
#!/bin/sh /fin/bin/f101p
Security for z/OS JobsTo schedule jobs on the z/OS agent, you must authorize users in TWA to access the z/OS agent. This is a two-step process. First, create z/OS runtime user profiles to run jobs from TWA . Then, assign these to the appropriate TWA users by modifying their authorized runtime user list. Now, the TWA users can submit z/OS jobs on behalf of the authorized z/OS users.
For more information on creating runtime users, refer to the User Configuration Procedures section in Chapter 3: Users in the Tidal Workload Automation User Guide.
The Z/OS user must have an OMVS segment. The following is an example of using the RACF ADDUSER command to define a Z/OS USS user:
#ADDUSER MARYK OMVS(UID(324) HOME('/u/maryk') \ PROGRAM('/bin/sh')
Note: You should not schedule jobs to run as a z/OS user which has an OMVS UID assignment of 0. This causes the job to run as the user you defined as SUPERUSER in the BPXPRMXX member of PARMLIB, usually, BPXROOT. Therefore, the job will not run as the correct z/OS user.
tidalautomation.com 37
z/OS Job NumberThe Job Activity pane and the Job Details dialog will display JES job numbers in the External ID column or field.
For USS programs and shell scripts, the process ID is shown in this External ID column.
Runtime ArgumentsYou can pass runtime arguments (parameters) to USS shell scripts and programs, as well as extended console commands.
Runtime arguments for Z/OS jobs are only used for parameter substitution.
Parameter SubstitutionParameter substitution fundamentally works as string replacement utilizing a ‘compare to’ string and a ‘replacement string’ separated by an equal sign (‘=’). When the ‘compare to’ string is found, it is replaced by the ‘replacement string’. You can add or delete parameters from a given JCL command statement.
Parameter substitution now works by stripping off the comments and creating a logical line of a JCL statement that may have spanned severeal physical lines through use of continuation. The substitution is then applied against the logical line allowing for more flexible and specifice substitution. The line is the re-broken into physical lines, following all the JCL syntax rules, and comments are re-inserted as it is written out oto the modified JCL file.
Original JCL Line(s)//sysut2 DD DSN=BOBW.RESTART.CNTL, // DISP=(NEW,CATLG,DELETE), // UNIT=SYSDA,VOL=SER=DB1410, // DCB=(RECFM=FB,LRECL=80,BLKSIZE=6640,DSORG=PO), // SPACE=(CYC,(45,15,90),RLSE)
Logical Line for Substitution//SYSUT2DD DSN=BOBW.RESTART.CNTL,DISP=(NEW,CATLG,DELETE),UNIT=SYSDA,VOL=SER=DB1410,DCB=(RECFM=FB,LRECL=80,BLKSIZE=6640,DSORG=PO),SPACE=(CYL,(45,15,90),RLSE)
Modified JCL Line(s)
//SYSUT2DD DSN=BOBW.RESTART.CNTL,DISP=(NEW,CATLG,DELETE),UNIT=SYSDA, // VOL=SER=DB1410,DCB=(RECFM=FB,LRECL=80,BLKSIZE=6640,DSORG=PO), // SPACE=(CYL,(45,15,90),RLSE)
By creating the logical line, the user can be very specific about where to substitute a particular parameter. If the same parameters are on mulitple steps, enough of the logical line can be included in the ‘compare to’ part of the substitution to make it unique to only one step, if that is needed.
The rules for parameter substitution are fairly straight forward:
Any equal signs on the left side (compart to) of the assignment must be escaped (\=).
MSGCLASS\=H=MSGCLASS=A
tidalautomation.com 38
If there are any spaces, commas or single quotes (ticks) on the left side of the assignment statement (before the first un-escaped=sign), then it must be enclosed in single qotes (ticks) with any single quotes within the statement escaped (/’).
‘MSGLEVEL\=(1,1),’=’MSGLEVEL=(1,1),RESTART=,’
If there are any spaces, commas or single quotes on the right side (replacement text) of the first un-escaped equal sign, it must be enclosed in single quotes with any single quotes within the replacement text escaped (\’).
‘MSGLEVEL\=(1,1),’=’MSGLEVEL=(1,1),BLAH=\’JUST A LONG COMMENT FOR NO PARTICULAR REASONBUT TO BE LONG\’,’
If the text string on the left of the first un-escaped equal sign is found, it will be replaced by the text string on the right side of the first un-escaped equal sign. Parameters can be removed by specifying nothing after the first un-escaped equal sign.
So, in the last example above,
MSGLEVEL=(1,1),
Will become:
MSGLEVEL=(1,1),BLAH=' JUST A LONG COMMENT FOR NO PARTICULAR REASON BUT TO BE LONG ',
Warning: If you cut and paste text from the mainframe, you must replace the mainframe NOT sign with the '^' (uppercase 6 on most keyboards). The mainframe NOT sign appears in the text, but is treated as a DELETE character and modifies the string before it is sent to the agent.
Note: You must match the case of the existing JCL, the case of the substitution strings is not modified or ignored for the purpose of the compares or substitutions.
Note: If any parameter substitutions fail to apply at least once in the target JCL, parameter substitution will fail and the job will not be run. Do not put in parameter substitution lines that will not apply to the target JCL.
JCL Restart CapabilityThis new functionality and methodology provides a basic job restart capability for the z/OS Agent. There were three distinct development pieces that comprise this functionality:
Recognition and special handling of "RESTART=" parameter in the parameter substitution logic.
A re-write of the parameter substitution logic to make it more robust and provide the special handling of the "RESTART=" parameter.
A new tagent.ini parameter - mvs.modjcl - that allows the customer to designate where to store the modified JCL if they want it preserved after job submission.
RESTART=handlingFor any JCL job that is defined in TWA you can now 'pre-specify' the "RESTART=" job parameter at the location in the JCL where it will need to be specified if a restart is required. If nothing is specified after the "=" sign (other than a comma (,)), then the parameter substitution logic will ignore the line for substitution purposes. If there are no other parameter substitution lines specified, then the original JCL will be used to submit the job. If there are other parameter substitutions (additional substitution lines) specified, then they will be applied and the modified JCL will be submitted.
tidalautomation.com 39
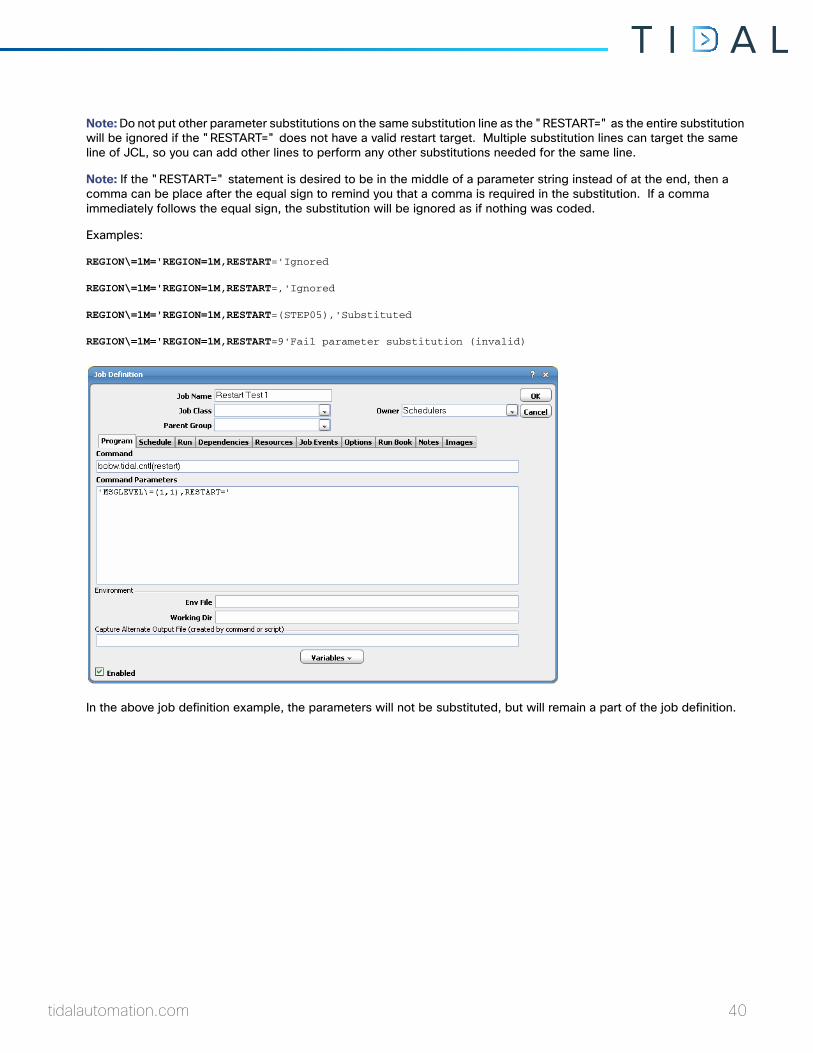
Note: Do not put other parameter substitutions on the same substitution line as the "RESTART=" as the entire substitution will be ignored if the "RESTART=" does not have a valid restart target. Multiple substitution lines can target the same line of JCL, so you can add other lines to perform any other substitutions needed for the same line.
Note: If the "RESTART=" statement is desired to be in the middle of a parameter string instead of at the end, then a comma can be place after the equal sign to remind you that a comma is required in the substitution. If a comma immediately follows the equal sign, the substitution will be ignored as if nothing was coded.
Examples:
REGION\=1M='REGION=1M,RESTART='Ignored
REGION\=1M='REGION=1M,RESTART=,'Ignored
REGION\=1M='REGION=1M,RESTART=(STEP05),'Substituted
REGION\=1M='REGION=1M,RESTART=9'Fail parameter substitution (invalid)
In the above job definition example, the parameters will not be substituted, but will remain a part of the job definition.
tidalautomation.com 40
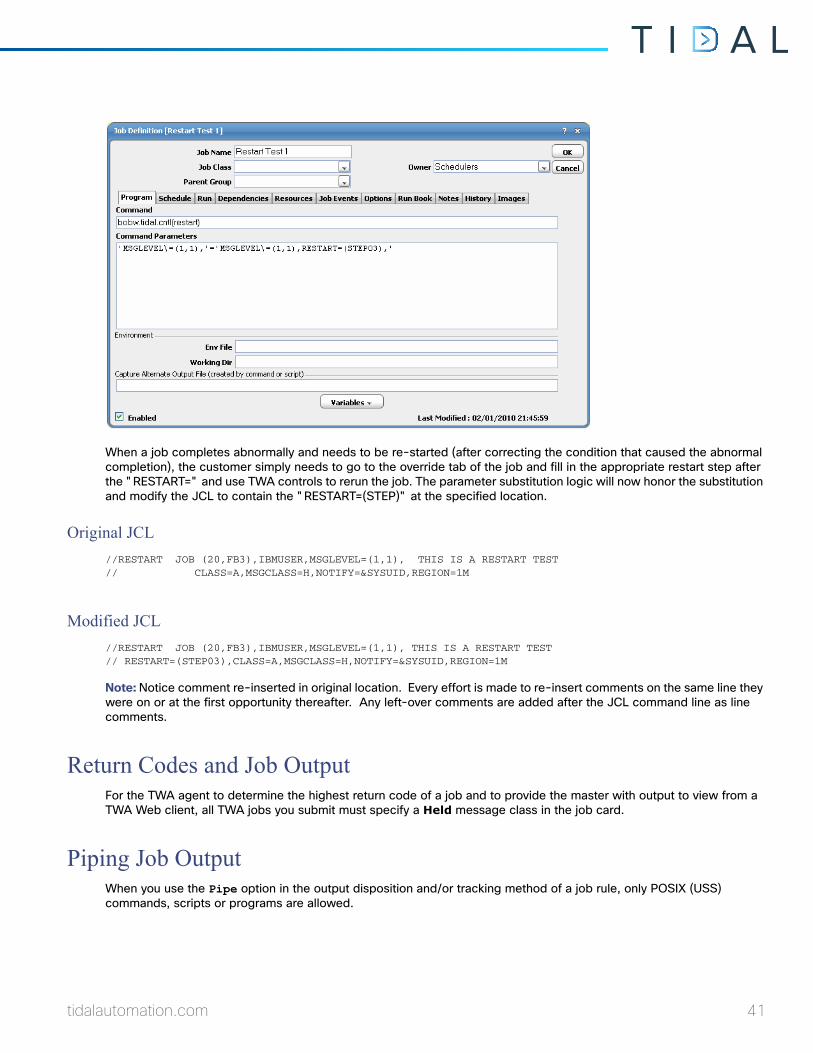
When a job completes abnormally and needs to be re-started (after correcting the condition that caused the abnormal completion), the customer simply needs to go to the override tab of the job and fill in the appropriate restart step after the "RESTART=" and use TWA controls to rerun the job. The parameter substitution logic will now honor the substitution and modify the JCL to contain the "RESTART=(STEP)" at the specified location.
Original JCL
//RESTART JOB (20,FB3),IBMUSER,MSGLEVEL=(1,1), THIS IS A RESTART TEST // CLASS=A,MSGCLASS=H,NOTIFY=&SYSUID,REGION=1M
Modified JCL
//RESTART JOB (20,FB3),IBMUSER,MSGLEVEL=(1,1), THIS IS A RESTART TEST // RESTART=(STEP03),CLASS=A,MSGCLASS=H,NOTIFY=&SYSUID,REGION=1M
Note: Notice comment re-inserted in original location. Every effort is made to re-insert comments on the same line they were on or at the first opportunity thereafter. Any left-over comments are added after the JCL command line as line comments.
Return Codes and Job OutputFor the TWA agent to determine the highest return code of a job and to provide the master with output to view from a TWA Web client, all TWA jobs you submit must specify a Held message class in the job card.
Piping Job OutputWhen you use the Pipe option in the output disposition and/or tracking method of a job rule, only POSIX (USS) commands, scripts or programs are allowed.
tidalautomation.com 41
Workload BalancingThe z/OS agent uses a number that reflects a ten minute rolling average (updated every minute) of the number of service units available for tasks that can run at the lowest Workload Manager importance level. Therefore, higher numbers correspond to lighter loads (greater capacity). For consistency in workload comparisons, the TWA agent uses the inverse of service units available, so that lower numbers correspond to lighter loads.
To use the workload balancing feature with TWA , Workload Manager must be in goal mode.
To put Workload Manager into goal mode, you must issue the following operator command from the TWA console:
F WLM,MODE=GOAL
It can take up to 10 minutes before Workload Manager can start providing meaningful capacity numbers.
Job Status DeterminationThe TWA agent returns the highest job exit code information to the TWA master so that it can determine the job termination status.
By default, a job exit code of zero indicates NORMAL job completion and a non-zero value indicates ABNORMAL job termination.
The TWA master uses the job status to trigger alerts and control job dependencies; that is, to allow or prevent subsequent jobs from running.
tidalautomation.com 42
5Installing the z/OS Gateway
This chapter describes how to install the z/OS Adapter:
Overview, page 43
Installation Procedure, page 43
OverviewThe Gateway sits between the TWA master and the Systems Management Facilities (SMF) component on z/OS. The Gateway component tracks job dependencies on batch jobs that execute on z/OS. These job dependencies can be tracked not only by job but by individual job steps that comprise a job. The Gateway can run without the SDSF component of z/OS.
If the network connection between TWA and the Gateway is broken, the Gateway continues to process the SMF job data and archive all job information so that it can be relayed to the master whenever the connection is restored.
The Gateway component of the z/OS adapter provides the following features:
Installs without an IPL
Full sysplex support
Monitors SMF records
Modification of parameters and processes without restarting
SMF processing is independent of other concurrent SMF processes and prior to any process that may alter SMF data
Fault tolerance
Supports OS/390 and z/OS
The Gateway uses three Started Tasks:
TSISPACE
TSIRECRD
TSESCHED
Installation Procedure
To install the z/OS Gateway:1. Download and extract the installation package on a Client Manager machine.
2. In the installation directory, locate the following three files in the zOS Agent\zOS Gateway directory:
unlcntl.bin (JCL library)
tidalautomation.com 43
unload.bin (authorized load)
unlparm.bin (parameter control)
This will look like the following screen:
Directory of <DVD-ROM>:\zOSAgent\zos Gateway05/09/2002 07:39p 5,553,600 unload.bin 04/01/2002 11:15a 5,600 unlcntl.bin 04/01/2002 11:15a 4,320 unlparm.bin3 File(s) 5,563,520 bytes 0 Dir(s) 396,230,656 bytes free
Preallocate the size of these three data sets or ensure your site's defaults are large enough that you do not receive a B37 abend when FTPing the files. (All three data sets are FB-80-3120.)
For example:
hlq.UNLOAD.BIN 120 tracks hlq.UNLCNTL.BIN 1 track hlq.UNLPARM.BIN 1 track
3. Select the three files and FTP them to the z/OS server and desired HLQ directory, using the binary transfer mode. (By default, this directory is usually the same as the user name you connect with.)
The following is an example of FTPing the files:
ftp <host name> Connected to <host name>. 220-FTPD1 IBM FTP CS V2R10 at STRONG.COM, 17:41:44 on 2002-05-10. 220 Connection will close if idle for more than 5 minutes. User <host name>: <user name> 331 Send password please. Password: 230 <user name> is logged on. Working directory is <"directory">. ftp> bin 200 Representation type is Image ftp> put unload.bin 200 Port request OK. 125 Storing data set IBMUSER.UNLOAD.BIN 250 Transfer completed successfully. ftp: 1599840 bytes sent in 2.26Seconds 706.96Kbytes/sec. ftp> put unlcntl.bin 200 Port request OK. 125 Storing data set IBMUSER.UNLCNTL.BIN 250 Transfer completed successfully. ftp: 473200 bytes sent in 0.45Seconds 1049.22Kbytes/sec. ftp> put unlparm.bin 200 Port request OK. 125 Storing data set IBMUSER.UNLPARM.BIN 250 Transfer completed successfully. ftp: 27200 bytes sent in 0.00Seconds 27200000.00Kbytes/sec. ftp> quit 221 Quit command received. Goodbye.D:\TIDAL>d:
4. Once the files have been FTPed to data sets, you must unload and create the library files. Use the TSO RECEIVE command on each data set to create partitioned data sets (PDS). These three files will create the following libraries:
hlq.LOADLIB
hlq.CNTL
hlq.PARMLIB
tidalautomation.com 44
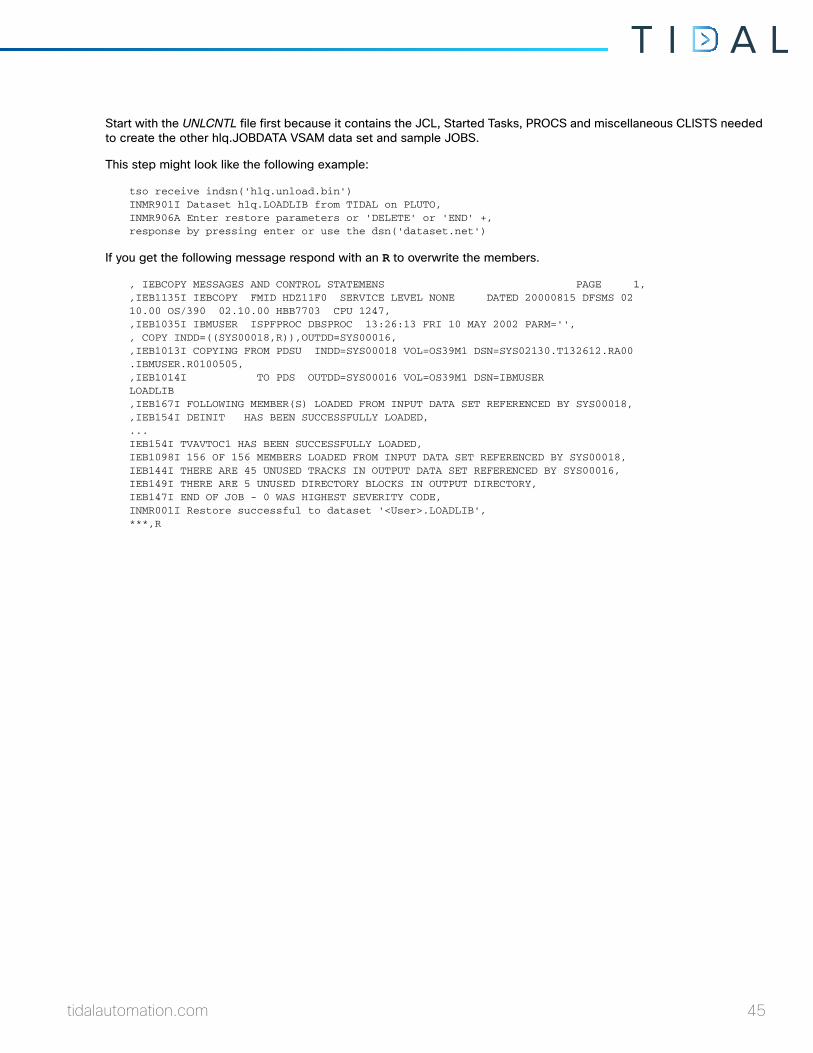
Start with the UNLCNTL file first because it contains the JCL, Started Tasks, PROCS and miscellaneous CLISTS needed to create the other hlq.JOBDATA VSAM data set and sample JOBS.
This step might look like the following example:
tso receive indsn('hlq.unload.bin') INMR901I Dataset hlq.LOADLIB from TIDAL on PLUTO, INMR906A Enter restore parameters or 'DELETE' or 'END' +,response by pressing enter or use the dsn('dataset.net')
If you get the following message respond with an R to overwrite the members.
, IEBCOPY MESSAGES AND CONTROL STATEMENS PAGE 1, ,IEB1135I IEBCOPY FMID HDZ11F0 SERVICE LEVEL NONE DATED 20000815 DFSMS 02 10.00 OS/390 02.10.00 HBB7703 CPU 1247, ,IEB1035I IBMUSER ISPFPROC DBSPROC 13:26:13 FRI 10 MAY 2002 PARM='', , COPY INDD=((SYS00018,R)),OUTDD=SYS00016, ,IEB1013I COPYING FROM PDSU INDD=SYS00018 VOL=OS39M1 DSN=SYS02130.T132612.RA00 .IBMUSER.R0100505, ,IEB1014I TO PDS OUTDD=SYS00016 VOL=OS39M1 DSN=IBMUSER LOADLIB ,IEB167I FOLLOWING MEMBER(S) LOADED FROM INPUT DATA SET REFERENCED BY SYS00018, ,IEB154I DEINIT HAS BEEN SUCCESSFULLY LOADED, ... IEB154I TVAVTOC1 HAS BEEN SUCCESSFULLY LOADED, IEB1098I 156 OF 156 MEMBERS LOADED FROM INPUT DATA SET REFERENCED BY SYS00018, IEB144I THERE ARE 45 UNUSED TRACKS IN OUTPUT DATA SET REFERENCED BY SYS00016, IEB149I THERE ARE 5 UNUSED DIRECTORY BLOCKS IN OUTPUT DIRECTORY, IEB147I END OF JOB - 0 WAS HIGHEST SEVERITY CODE, INMR001I Restore successful to dataset '<User>.LOADLIB', ***,R
tidalautomation.com 45

tidalautomation.com 46
6Configuring the z/OS GatewayOverview
This chapter covers the configuration tasks you need to perform to configure the z/OS Gateway:
Licensing the z/OS Gateway, page 47
Configuring Started Tasks, page 48
Defining a Connection, page 51
Licensing the z/OS GatewayInformation about the machine’s CPU that is required for licensing can be gathered by entering the following console command:
D M=CPU
This command generates output similar to the following:
RESPONSE=PLUTOIEE174i 14.00.00 DISPLAY M 153PROCESSOR STATUSID CPUSERIAL0+ 00000A1247+ ONLINE - OFFLINEDOES NOT EXISTW W.M-MANAGED
Once this information is gathered, relay it to Support and Support will generate a permanent license for the z/OS adapter.
License keys for the Gateway are administered via the TSIKEY00 member of the provided PARMLIB PDS. All license protected components of the product use one of several methods to reference the license authorization code. The components look for either a JCL DD statement called CHECK or PASSWORD, or a PDS allocated to TSICNTL or SYSTSIN with a member name of TSIKEY00. If none of these DD names are found, the routine will allocate the “system” PARMLIB (SYS1.PARMLIB) concatenation and look for a member called TSIKEY00.
The user has the option of using their system’s PARMLIB library as a source for the license keys. If the user does not wish to maintain these keys in the system PARMLIB library, they may be maintained in the TSIKEY00 member of the shipped PARMLIB dataset as shown below.
The required parameters for the KEY statement in TSIKEY00 are listed below:
EXPIRATION DATE(mmddyyyy) where mmddyyyy is the eight-digit month, day and year of the product expiration.
FEATURE(ccccccc) where cccccc is the one to eight character product feature name previously defined. For the Gateway, this is always TSESCHED.
MANUFACTURER(ccc) where ccc is the one to three character manufacturer.
MODEL(ccc) where ccc is the one to three character system model number.
SERIAL(xxxxxx) where xxxxxs is the six hex digit system serial number.
tidalautomation.com 47
TYPE(xxxx) where xxxx is the four hex digit system ID.
PASSWORD(xxxxxxxxxxxxxxxx) where xxxxxxxxxxxxxxxx is the 16 hex digit password provided by Support.
Configuring Started TasksThe Gateway Adapter uses three Started Tasks for the bulk of its processing:
TSISPACE – Allocates dataspace for processes that run
TSIRECRD – Processes the SMF data generated by the running jobs
TSESCHED – Communicates SMF data to TWA
Note: The TSIRECRD Started Task depends on the TSISPACE Started Task. TSISPACE must first create space for the data before the data can be recorded. This means that TSISPACE must be started before starting TSIRECRD so that space is first created for data records. Conversely, TSIRECRD must be stopped before stopping the TSISPACE Started Task so that data recording is halted before running out of data space.
The TSISPACE and TSIRECRD Started Tasks must be copied to a system (PROCLIB) procedure library that is configured for Started Tasks. TSESCHED can also be copied if your site requires the Started Task output be saved.
The SYS1.PARMLIB member, SCHEDxx, must have an entry added for TSESCHED so that the memory for SCHEDxx is not allocated in CSA and is protected from overwriting.
The PPT entry in SCHEDxx of the system parmlib is:
EDIT,SYS1.ADCD10.PARMLIB(SCHED00)-01.00 ,Columns,00001,00072, Command ===>, ,Scroll ===>,CSR , 011700,PPT PGMNAME(TSISMF01) /* TSI (TIDAL) TSIRECRD */ 011800, KEY(4) /* PROTECTS CSA ALLOCATED MEM */
Editing the hlq’s of FilesCertain key files need to be edited so that their “hlq” points to the APF authorized library and to PARMLIB. Additional editing may be required to accommodate the volume based on SMS requirements for your site. These key files are:
JOBDATA
TSESCHED
TSISPACE
TSIRECRD
TSICOMND
Edit these files as shown in the following examples:
JOBDATA//P390JOB1 JOB 1,'P390',MSGCLASS=H,REGION=0M,NOTIFY=&SYSUID //* * //* //ALLOC EXEC PGM=IDCAMS,REGION=4M //* //SYSPRINT DD SYSOUT=* //SYSIN DD * DELETE TIDAL.GATEWAY1.JOBDATA DEFINE CLUSTER(NAME(TIDAL.GATEWAY1.JOBDATA) +
tidalautomation.com 48
VOLUME(W4WAS1) + INDEXED + KEYS(18 0) + RECORDSIZE(200 720676) + SPANNED + SHR(2 3)) + DATA( + CYLINDERS(60 20)) + INDEX( + CYLINDERS(5 1)) REPRO INFILE(INDD1) -OUTDATASET(TIDAL.GATEWAY1.JOBDATA)//*//* THE FOLLOWING INDD1 INPUT MIGHT LOOK LIKE A BLANK RECORD //* HOWEVER IT ACTUALLY CONTAINS HEX FF'S TO INITIALIZE JOBDATA //INDD1 DD *ŸŸŸŸŸŸŸŸŸŸŸŸŸŸŸŸŸŸŸŸŸŸŸŸŸŸŸŸŸŸŸŸŸŸŸŸŸŸŸŸŸŸŸŸŸŸŸŸŸŸŸŸŸŸŸŸŸŸŸŸŸŸŸŸŸŸŸŸŸŸ/*
TSESCHEDEDIT ,TIDAL.CNTL(TSESCHED) - 01.00 ,Columns,00001,00072,Command ===>, ,Scroll ===>,CSR ,******,********************* Top of Data ******************* 000001,//**************************************************// 000002,//** **// 000003,//** OPTIONAL MEMBER **// 000004,//** **// 000005,//**************************************************// 000006,//TSESCHED PROC LOADLIB='hlq.LOADLIB', 000007,// PRMLIB='hlq.PARMLIB',PROG='TSITCPLS' 000008,//IEFPROC EXEC PGM=&PROG, 000009,// REGION=4M, 000010,// TIME=NOLIMIT 000011,//STEPLIB DD DISP=SHR,DSN=&LOADLIB 000012,//SYSTSIN DD DISP=SHR,DSN=&PRMLIB(TSIPARMS) 000013,//SYSTSPRT DD SYSOUT=* ******,****************** Bottom of Data ********************
TSICOMNDEDIT ,TIDAL.CNTL(TSICOMND) - 01.01 ,Columns,00001,00072,Command ===>,,Scroll ===>,CSR ,******,*************** Top of Data ********************* 000001,//COMMAND JOBMSGLEVEL=(1,1) 000002,//* 000003,//IEFPROC EXEC PGM=IKJEFT01 000004,//SYSTSPRT DD SYSOUT=* 000005,//SYSTSIN DD * 000006,CONSOLE 000007,S TSISPACE 000008,END 000009,CONSOLE DEACTIVATE ******,******************** Bottom of Data ******************
TSIRECRDEDIT ,TIDAL.CNTL(TSIRECRD) - 01.02 ,Columns,00001,00072, Command ===>, ,Scroll ===>,CSR, ******,******************* Top of Data ********************* 000001,//TSIRECRD PROC LOADLIB='hlq.LOADLIB', 000002,// PRMLIB='hlq.PARMLIB' 000003,//IEFPROC EXEC PGM=TSISMF01,
tidalautomation.com 49
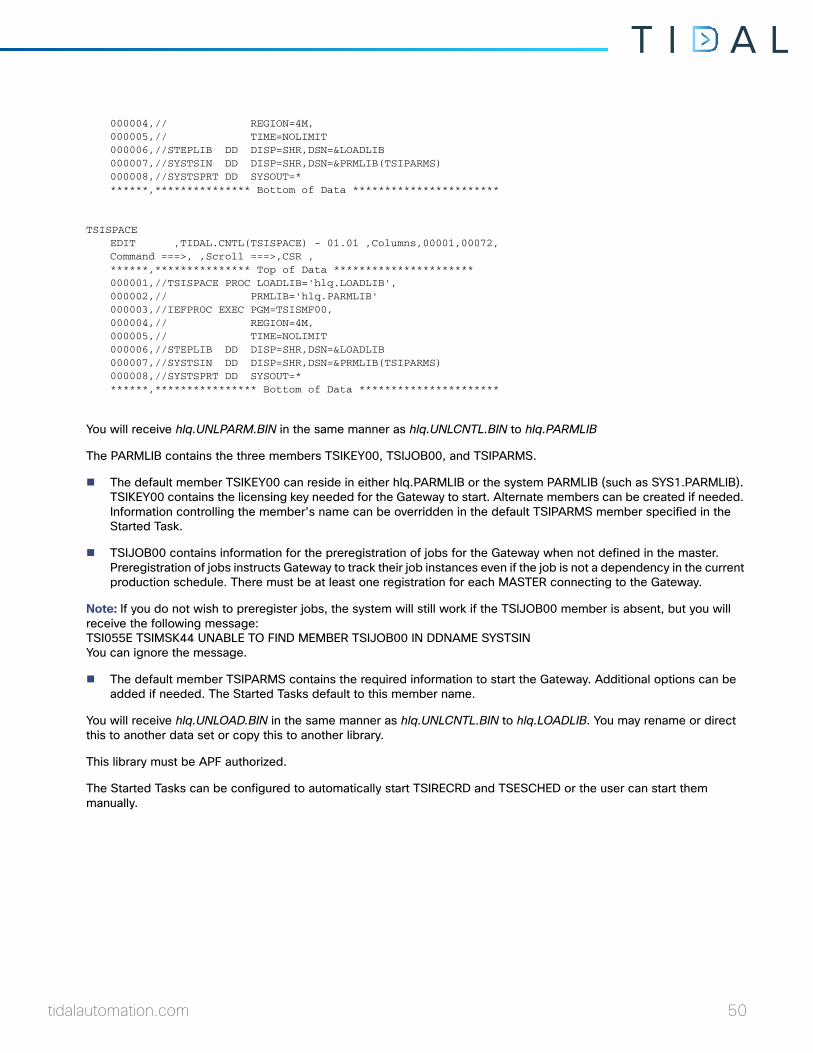
000004,// REGION=4M, 000005,// TIME=NOLIMIT 000006,//STEPLIB DD DISP=SHR,DSN=&LOADLIB 000007,//SYSTSIN DD DISP=SHR,DSN=&PRMLIB(TSIPARMS) 000008,//SYSTSPRT DD SYSOUT=* ******,*************** Bottom of Data ***********************
TSISPACEEDIT ,TIDAL.CNTL(TSISPACE) - 01.01 ,Columns,00001,00072, Command ===>, ,Scroll ===>,CSR , ******,*************** Top of Data ********************** 000001,//TSISPACE PROC LOADLIB='hlq.LOADLIB', 000002,// PRMLIB='hlq.PARMLIB' 000003,//IEFPROC EXEC PGM=TSISMF00, 000004,// REGION=4M, 000005,// TIME=NOLIMIT 000006,//STEPLIB DD DISP=SHR,DSN=&LOADLIB 000007,//SYSTSIN DD DISP=SHR,DSN=&PRMLIB(TSIPARMS) 000008,//SYSTSPRT DD SYSOUT=* ******,**************** Bottom of Data **********************
You will receive hlq.UNLPARM.BIN in the same manner as hlq.UNLCNTL.BIN to hlq.PARMLIB
The PARMLIB contains the three members TSIKEY00, TSIJOB00, and TSIPARMS.
The default member TSIKEY00 can reside in either hlq.PARMLIB or the system PARMLIB (such as SYS1.PARMLIB). TSIKEY00 contains the licensing key needed for the Gateway to start. Alternate members can be created if needed. Information controlling the member’s name can be overridden in the default TSIPARMS member specified in the Started Task.
TSIJOB00 contains information for the preregistration of jobs for the Gateway when not defined in the master. Preregistration of jobs instructs Gateway to track their job instances even if the job is not a dependency in the current production schedule. There must be at least one registration for each MASTER connecting to the Gateway.
Note: If you do not wish to preregister jobs, the system will still work if the TSIJOB00 member is absent, but you will receive the following message: TSI055E TSIMSK44 UNABLE TO FIND MEMBER TSIJOB00 IN DDNAME SYSTSIN You can ignore the message.
The default member TSIPARMS contains the required information to start the Gateway. Additional options can be added if needed. The Started Tasks default to this member name.
You will receive hlq.UNLOAD.BIN in the same manner as hlq.UNLCNTL.BIN to hlq.LOADLIB. You may rename or direct this to another data set or copy this to another library.
This library must be APF authorized.
The Started Tasks can be configured to automatically start TSIRECRD and TSESCHED or the user can start them manually.
tidalautomation.com 50
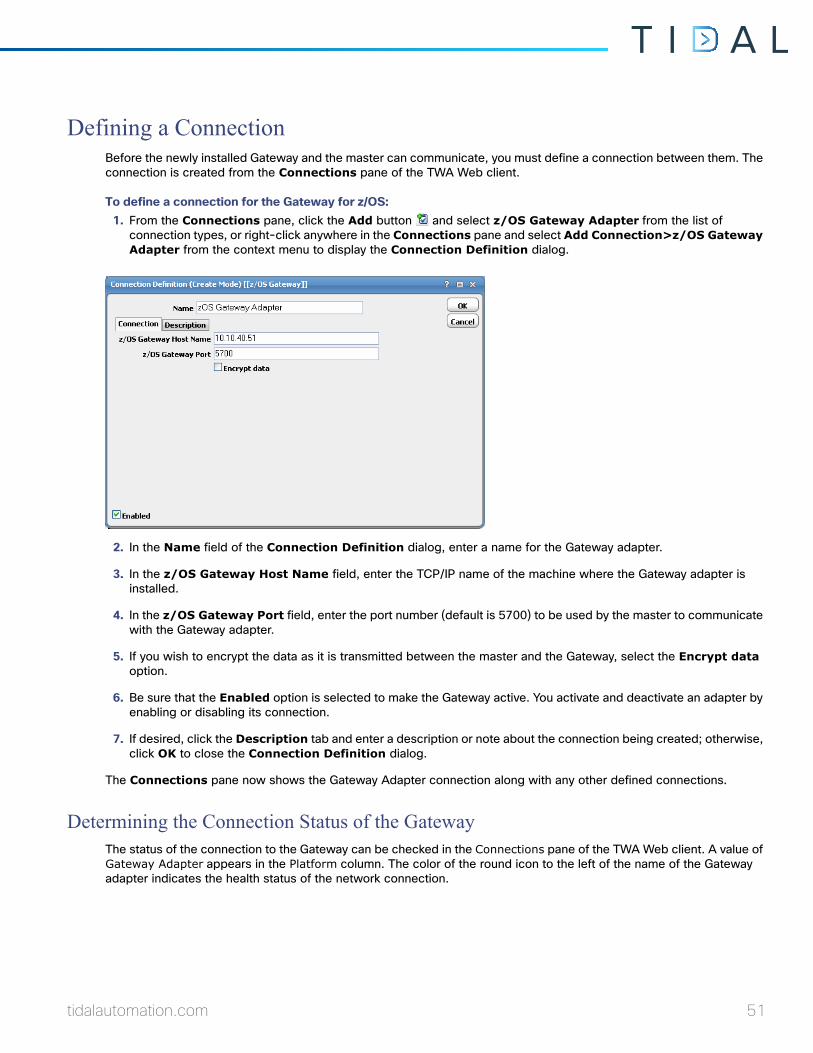
Defining a ConnectionBefore the newly installed Gateway and the master can communicate, you must define a connection between them. The connection is created from the Connections pane of the TWA Web client.
To define a connection for the Gateway for z/OS:1. From the Connections pane, click the Add button and select z/OS Gateway Adapter from the list of
connection types, or right-click anywhere in the Connections pane and select Add Connection>z/OS Gateway Adapter from the context menu to display the Connection Definition dialog.
2. In the Name field of the Connection Definition dialog, enter a name for the Gateway adapter.
3. In the z/OS Gateway Host Name field, enter the TCP/IP name of the machine where the Gateway adapter is installed.
4. In the z/OS Gateway Port field, enter the port number (default is 5700) to be used by the master to communicate with the Gateway adapter.
5. If you wish to encrypt the data as it is transmitted between the master and the Gateway, select the Encrypt data option.
6. Be sure that the Enabled option is selected to make the Gateway active. You activate and deactivate an adapter by enabling or disabling its connection.
7. If desired, click the Description tab and enter a description or note about the connection being created; otherwise, click OK to close the Connection Definition dialog.
The Connections pane now shows the Gateway Adapter connection along with any other defined connections.
Determining the Connection Status of the GatewayThe status of the connection to the Gateway can be checked in the Connections pane of the TWA Web client. A value of Gateway Adapter appears in the Platform column. The color of the round icon to the left of the name of the Gateway adapter indicates the health status of the network connection.
tidalautomation.com 51
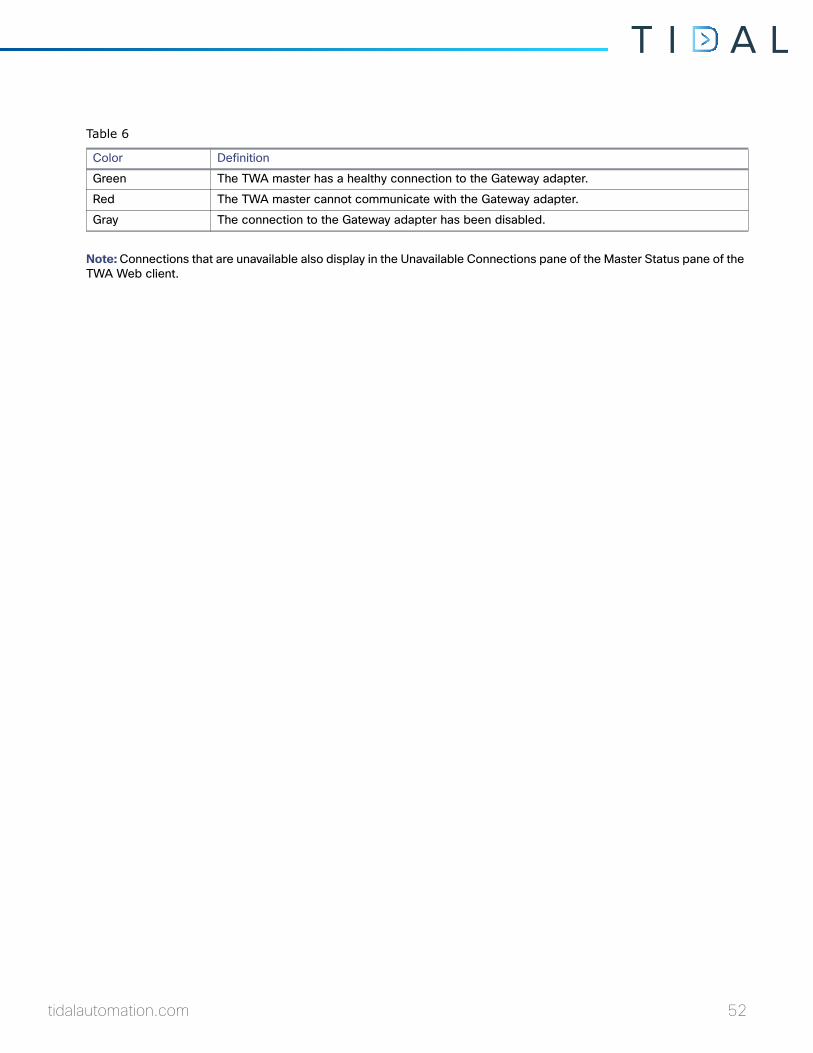
Note: Connections that are unavailable also display in the Unavailable Connections pane of the Master Status pane of the TWA Web client.
Table 6
Color Definition
Green The TWA master has a healthy connection to the Gateway adapter.
Red The TWA master cannot communicate with the Gateway adapter.
Gray The connection to the Gateway adapter has been disabled.
tidalautomation.com 52
7Working with the z/OS GatewayOverview
This chapter covers the configuration tasks you need to perform to configure the z/OS Gateway:
Starting the Gateway, page 53
Stopping the Gateway, page 53
z/OS Job Dependencies, page 53
Starting the GatewayThe Gateway is started through the Started Tasks. Started Tasks can be configured to start automatically or the user can start them manually.
To start the Started Tasks manually, enter:
S TSISPACES TSIRECRD (If not started automatically by TSISPACE.)S TSESCHED (If not started automatically by TSIRECRD.)
Whenever new load modules are added, it is recommended to start TSISPACE with the following command:
S TSISPACE,,,REINIT
Stopping the GatewayYou also stop the Gateway through the Started Tasks. The Started Tasks should be stopped in the following order:
TSESCHEDTSIRECRDTSISPACE
To stop the Gateway or just a component, enter:
P TSESCHEDP TSIRECRDP TSISPACE
z/OS Job DependenciesAny job in TWA can depend upon a z/OS job. If you have licensed the z/OS adapter and have installed the z/OS software, you can add a z/OS JES dependency to a job defined in TWA .
tidalautomation.com 53

z/OS Job Dependency DefinitionThe z/OS JES Dependency Definition dialog is displayed from the Dependencies tab of the job’s definition in TWA by clicking on the Add button and selecting the Add z/OS JES Dependency option from the displayed menu.
To create a z/OS JES dependency:1. In the z/OS Gateway Adapter field, select the appropriate Gateway adapter that is connected to the z/OS
mainframe machine that is running the z/OS job you are interested in.
Each z/OS machine requires its own Gateway adapter so you must select the machine you are interested in.
2. In the JES Job Name field, enter the name of the job running on the selected z/OS machine that you wish to use as a dependency.
3. In the Job Occurrence section, specify a job occurrence.
Since the JES job you select could run multiple times during the day, you must specify which job occurrence you are interested in.
— First – Select this option if the first instance of the job in the production day should be used to satisfy the job dependency.
— Latest – Select this option if the most recent occurrence of the job should be used to satisfy the job dependency.
— Match – Select this option if both jobs (predecessor and successor) repeat within a day, and the instance of the job dependency should match the instance of the job depending on it. If the job does not repeat, the first instance of the job dependency is used.
— Specific – Select this option to use a specific job instance. Enter a number or use the arrow buttons to denote which instance of the repeating job instances should be used.
— Offset – Select this option to specify the number of job instances to offset from the instance of the dependent job. Enter a number or use the arrow buttons to enter how many job instances to offset. A positive number adds the specified number from the dependent jobs’s instance number. A negative number subtracts the specified number of job occurrences from the dependent jobs’s instance number.
4. Select the Ignore if questionable option if any instance number of a job that the Gateway did not track from the start of the production day is considered questionable because the Gateway cannot verify that the job did not run before the Gateway started tracking it. This might occur if the Gateway is not running at some point during the production day or if the job is not registered with the Gateway at the start of the production day.
Select this option if the dependency is critical to a specific instance of the job and there is any uncertainty about the exact instance number. The dependency cannot be met during the day if the z/OS job instance number is questionable.
tidalautomation.com 54
5. In the Dependency Condition list, specify the condition of the JES job or one of the job steps that comprise the job that will signal that the dependency is satisfied.
The condition is based on the state or status of the JES job or job step. A variety of conditions can denote a satisfied dependency. The following options are available:
— Job (or Step) Completed – The dependency is satisfied when the job completes or a specified job step has completed with the a condition code within the range of condition codes specified in the Condition Code Range field.
— Highest Condition Code – The dependency is satisfied only when the job completes with the highest code within the range of condition codes specified in the Condition Code Range field.
— Any Step Condition Code – This dependency is satisfied whenever any job step within the z/OS job completes with a condition code within the specified range in the Condition Code Range field.
— Job Started – The dependency is satisfied if the job or job step starts.
— Job (or Step) Abended – The dependency is satisfied if the job or job step results in a system or user abend.
— Job Flushed (JCL/Alloc Errors) – The dependency is satisfied whenever the job fails to start.
— Job (or Step) Canceled (by SMF Exit) – The dependency is satisfied whenever a job or job step is cancelled.
— Job Abended due to Condition Code – The dependency is satisfied whenever the job completes with an abend condition based on condition code handling.
6. In the Optional (PROC.) Step field, enter the name of the job step if you wish to specify a particular step within the job.
The dependency that was specified in the Dependency Condition field will apply only to the job step you specify here. The condition of any other job steps or the overall job is irrelevant once this field is used. (You can include a PROC prefix, if necessary.)
7. In the Condition Code Range section, set the condition code that signals that the dependency is true.
You can use a specific number or enter a range of numbers so that anything within the given range means that the dependency is satisfied. The condition code can range from 0 to 4095. This text field only applies if you selected the following dependency condition options:
— Job (or step completed)
— Highest Condition Code
— Any Step Condition Code
— Job Abended due to Condition Code
8. Select the Include Abend option to Abend status to the specified condition code options. If a job or job step either completes inside the specified range of condition codes or completes with an Abend status then the job dependency is satisfied.
Monitoring Started Tasks as a Dependency
Normally, only JES jobs can be designated as z/OS dependencies but a special procedure allows Started Tasks to also act as a job dependency. To monitor Started Tasks as a job dependency, specify the Started Task name in the JES Job Name field in the z/OS JES Dependency Definition dialog.
The job names that are to be monitored as Started Tasks must be listed in the master.props file in a parameter called GWStartedTaskPrefix.
tidalautomation.com 55
To designate Started Tasks for dependency consideration:1. Open the master.props file that is located in the config directory in the master files installed on the master machine.
2. On a new line, type:
GWStartedTaskPrefix=
3. After the equals sign, list either the complete name or just a prefix of a Started Task name. The prefix, which can be from one to eight characters in length, will work like a job mask so that multiple jobs will match the criteria.
4. After the equals sign, list the beginning characters that would uniquely identify the job names that should be monitored as Started Tasks. These character strings can be from one to eight characters in length (prefix or entire job name) and are separated by commas. If the characters specified in the list match the beginning characters of the job name specified in the z/OS JES dependency, it will be monitored as a Started Task (except as specified below).
5. To make it easier to specify common prefixes which apply to most Started Task names, another parameter provides the ability to exclude some job names which may meet the criteria defined in the GWStartedTaskPrefix parameter but are not Started Tasks. To exclude these jobs that are not Started Tasks, list the exception names (or enough beginning characters to uniquely identify the exception names) in a different parameter, GWStartedTaskExclude. Follow the same procedure to create the GWStartedTaskExclude parameter as described in steps 1-3 except name the parameter GWStartedTaskExclude.
tidalautomation.com 56
8Gateway Commands to Control the Started Tasks
This chapter covers these Gateway commands and parameters used to maintain and operate the started tasks:
Overview, page 57
SET Commands for Defining Parameters, page 57
Commands for TSIRECRD and TSISPACE, page 63
Batch Commands for TSIRECRD & TSISPACE, page 67
OverviewThe information in this chapter describes commands and parameters available to the user in order to maintain and operate the TSIRECRD, TSISPACE and TSESCHED started tasks.
Gateway commands can be issued via the Start or Modify console command or can be set in the TSIPARMS members of the Gateway file. The default parameters distributed with the product should be sufficient if the user just wants to collect Type 30 SMF records on one system. In a sysplex environment, where TSISPACE and TSIRECRD need to run on multiple systems, the following additional parameters are needed and are described in more detail on the pages that follow:
DSNAME
GROUPNAME
PRIMARY
SET Commands for Defining ParametersSET commands are used to define various parameters for TSISPACE and TSIRECRD. A detailed description of parameters that may be used with the SET command in TSISPACE and TSIRECRD are listed below. The SET command may be used in either the Start address space via the Start command, a Set statement in TSIPARMS of the PARMLIB file, or the Modify address space command. The following are examples of using SET in the modify(F) command and the start(S) command.
The TSIPARMS member of 'hlq.PARMLIB' can also be used to define these parameters.
F stcname,set debug(yes) S stcname,,,(debug(yes),opnotify(30))
tidalautomation.com 57
AUTOCOMMAND(‘command operands’)Where ‘command operands’ is a TSIRECRD command of any length with optional operands enclosed in quotes. This command will be automatically issued by the primary system everyday at the time specified in the AUTOTIME parameter defined below. The alias AUTOCMD can also be used in place of AUTOCOMMAND. There is no default for this parameter. An example of using this parameter would be to issue a STACK command. See the STACK command in the Commands for TSIRECRD, TSISPACE and TSESCHED section later in this chapter.
AUTOTIME(hhmm)Where hhmm is the local time, in hours and minutes between 0000 and 2400, at which the command specified in the AUTOCOMMAND parameter is to be issued on a daily basis. The default is 0000. If the user is using this parameter to initiate purge activity, it should not be set during the Daily Space Management window or other periods of heavy HSM activity.
BLOCKS(nnnnnn)Where nnnnnn is the decimal number ranging from one to six digits representing the initial size in 4K blocks of the dataspace obtained and initialized by the Started Task TSISPACE. The default is 400 blocks. This parameter is only used by TSISPACE and not TSIRECRD. Although this parameter can be changed later, it is only effective at TSISPACE initialization time. The maximum usable value is 524288 which gives two gigabytes of dataspace.
Note: Do not set this parameter larger than 524288 since the parameter is not currently checked for validity and unpredictable results will occur.
CBNAME(cbname)Where cbname is the one to eight character name of a 256-byte control block built in common storage by TSISPACE. The default name is TSISMFVT. This name is stored as an eye-catcher at the beginning of the control block. Also, this name is used as the minor name of an exclusive enqueue to prevent multiple TSISPACE address spaces from being started using the same control block structure. This parameter must be the same for both TSISPACE and TSIRECRD to function properly. This parameter is provided for future use when it may be necessary to start multiple TSISPACE and TSIRECRD started tasks to support multiple products. Do not change this parameter unless directed by Support.
CTLLIB(dsname)Where dsname is the one to forty-four character data set name of the partitioned data set that contains the CNTL members used as input to TSISPACE and TSIRECRD functions. The alias CNTLLIB or PARMLIB can also be used in place of CTLLIB. The default data set name is the name of the data set allocated to DDNAME SYSTSIN if the DDNAME is specified in the started task JCL. If DDNAME SYSTSIN is not specified and DDNAME TSICNTL is, then the default data set name is the data set allocated to DDNAME TSICNTL. If neither DDNAME is specified and this parameter is not specified in the EXEC statement PARM field or the START command parameters, then the logical Parmlib is dynamically allocated and used to find CNTL members.
DEBUG(yes/no) yesYes indicates that a message will be issued each time a Type 30 SMF record is processed and each time a dynamic allocation occurs, depending on the MSGLEVEL parameter.
The default is NO indicating no such messages will occur.
tidalautomation.com 58
ENTRYNAME(epname)Where epname is the one to eight character alias name of an entry point in the load module referenced in the MODULENAME parameter that is loaded in common storage the first time TSISPACE is initialized or is initialized with the REINITIALIZE(YES) parameter in effect. The default name is TSISMFVA. This entry point references an area in the load module that will contain the address of the 256-byte control block referenced in the CBNAME parameter after TSISPACE initializes and loads the load module into common storage.
This parameter is provided for future use when it may be necessary to run multiple exits. Do not change this parameter unless directed to do so by Support.
GROUPNAME(grpname)Where grpname is the one to eight character SYSPLEX group name to be used for SYSPLEX definition purposes. There is no default for this parameter. If this parameter is not specified during TSIRECRD initialization, SYSPLEX mode will not be established and each system running TSIRECRD must use its own VSAM database. Also, this name is used as the minor name of an exclusive enqueue to serialize updates to the SYSPLEX group member status. If SYSPLEX mode is to be used, all participating systems must use the same SYSPLEX group name. Also, all participating systems should specify the same database name with the DSNAME parameter and the database should not be included in the TSIRECRD started task JCL.
INITIALCOMMAND(‘command operands’)Where ‘command operands’ is a TSISPACE command of any length with optional operands enclosed in quotes. This command is automatically issued after TSISPACE initializes. The alias INITCMD can also be used in place of INITIALCOMMAND. There is no default for this parameter. The task, TSISPACE, may have to be authorized in certain environments, to issue an MVS command.
The default is INITIALCOMMAND(‘MVS START TSERECRD’) so the TSIRECRD is automatically started after TSISPACE initialization.
JOBACTIVITY(yes/no)The default parameter for JOBACTIVITY is yes. If this parameter is not specified, then job activity is collected. The following parameters are set unless overridden elsewhere:
SMFTYPE(30)
SUBROUTINE(TSIJOBPR)
JOBDDNAME(JOBDATA)
JOBDSNAME(TSI.JOBDATA)
The job activity database named in the JOBDDNAME and/or JOBDSNAME parameters is opened for processing. No other parameter is normally necessary to process job activity. JOBACTIVITY(YES) is the default when TSIRECRD is initialized if the TSESCHED feature is authorized in the TSIKEY00 member of the Parmlib file or system Parmlib file; otherwise, the default is JOBACTIVITY(NO).
JOBDDNAME(ddname)Where ddname is ddname referencing the job activity database.
The default is JOBDATA. The alias JOBFILE can also be used in place of JOBDDNAME.
tidalautomation.com 59

JOBDSNAME(dsname)Where dsname is the dataset name of the job activity database.
The default is TSI.JOBDATA. The alias JOBDATASET or JOBDATABASE can also be used in place of JOBDSNAME.
JOBNAMETABLE(member)Where member is the name of a member in the CNTL library that contains the table of job names that are pre-registered as being monitored by specific TWA masters.
The default is TSIJOB00. The information in this member is only used to initialize the job activity database when the database is opened prior to any TWA masters registering jobs to be monitored.
JSDEBUGLEVEL(n)Where n is a number between zero and four inclusive that indicates the maximum level of messages to be issued by the TWA interface. The message levels are:
0–Error messages 1–Audit messages 2–Log messages 3–Information messages 4–Debug messages
The default is one indicating error and audit level messages will be issued. Specifying JSDEBUGLEVEL(4) produces Error, Audit, Log, Information and Debug messages.
JSLISTENADDRESS(nnn,nnn,nnn,nnn)Where nnn is a number between 0-255 and the four digits represent the IP address of the network interface where the TWA listener address space accepts connections.
JSLISTENADDRESS(0,0,0,0) is the default, indicating that it accepts a connection from any interface.
JSLISTENJOBNAME(jobname)Where jobname is the jobname of the TWA listener address space. This address space is a started task automatically started at initialization.
The default jobname is TSESCHED. The alias JSJOB or JSSTC can also be used in place of JSLISTENJOBNAME.
JSLISTENPORT(nnnnn)Where nnnnn is an IP port number that the TWA listener address space uses to listen for connections. This value must match the port configured on the TWA master.
The default is 5700.
JSLISTENPROCNAME(procname)Where procname is the started task procedure name to be used to start the TWA listener address space.
The default is IEESYSAS and does not need to be added to the installation procedure library as it is provided by IBM and is also used by other system tasks. The alias JSPROC can also be used in place of JSLISTENPROCNAME.
tidalautomation.com 60
JSLISTENRETRIES(nn)Where nn is the number of times that the TWA listener address space attempts to send a message that requires an acknowledgement. If no acknowledgement is received after nn attempts then the connection with the master is closed.
The default is three attempts.
JSLISTENTIMEOUT(nnn)Where nnn is the time in seconds that the TWA listener address space waits before attempting to resend a message that wasn’t acknowledged.
The default is 30 seconds.
JSSTARTOFDAY(+nnnnn)Where +nnnnn is the time in seconds before or after midnight that the production job scheduling day starts. Job instance numbers are reset at this time.
The default is zero.
LSR(yes/no)Indicates if local shared resources are to be used.
The default is yes.
MAXBLOCKS(nnnnnn)Where nnnnnn is the one to six digit decimal number representing the maximum size in 4K blocks of the dataspace obtained and initialized by the Started Task TSISPACE. The default is 524288 blocks. This parameter is only used by TSISPACE and not TSIRECRD. Although this parameter can be changed later, it is only effective at TSISPACE initialization time. The maximum usable value is 524288 which gives a maximum of two gigabytes of dataspace. Currently the dataspace cannot be expanded beyond the initial size specified in the BLOCKS parameter.
Note: Do not set this parameter larger than 524288 since the parameter is not currently checked for validity and unpredictable results will occur. Do not change this parameter from its default.
MEMBER(memname)Where memname is the one to eight character member name.
MODULENAME(lmodname)Where lmodname is the one to eight character load module name of a program that front-ends the IBM IEEMB838 load module. The default name is TSIMB838. This load module contains an entry point, specified in the ENTRYNAME parameter, referencing an area that will contain the address of the 256-byte control block referenced in the CBNAME parameter after TSISPACE initializes and loads the load module into common storage. This parameter is provided for future use when it may be necessary to run multiple exits. This parameter should not be changed unless directed by Support.
tidalautomation.com 61
MSGLEVEL(info/warn/severe)Indicates the minimum dynamic allocation message level to be issued when a dynamic allocation occurs if the DEBUG(YES) parameter is in effect. No messages are issued if the DEBUG(NO) parameter is in effect.
The default is WARN.
NOSMFTYPE(nnn)Where nnn is a one to three digit decimal number between 0-255 representing SMF record types that should be excluded from processing by TSIRECRD.
This parameter has no default. This parameter can be a list of record types separated by blanks or commas, a range of record types separated by a colon (:) or a list of record types and ranges.
OPNOTIFY(nnnnnn)Where nnnnnn is the number of seconds to wait after a failed attempt to send the primary member of the SYSPLEX a message before considering the primary member as failed and to attempt reassigning the primary to the next member in priority order.
The default comes from the parameter of the same name in the COUPLExx member of ‘SYS1.PARMLIB’ that was used at IPL time to establish the SYSPLEX configuration.
PRIMARY(sysname)Where sysname is the one to eight character system name or a list of system names separated by commas in preference order (highest preference first) which act as the primary system in a SYSPLEX while running in SYSPLEX mode.
The primary system in a SYSPLEX running in SYSPLEX mode is the only system that opens the VSAM database and processes the records from all of the other systems in the SYSPLEX. If the primary system goes down or TSIRECRD on that system is shut down, the next system in the list will allocate and open the VSAM database. When TSIRECRD on the primary system comes back up, the VSAM database is closed and unallocated on the system where the database is currently open and it is reallocated and opened on the primary system.
The default for this parameter is the order in which TSIRECRD is started on the participating systems in the SYSPLEX.
PUTLINE(yes/no)Yes indicates that messages issued by the started task are sent to SYSTSPRT file in the started task instead of the system log as a write-to-programmer.
The default is yes. No sends messages to the system log as a write-to-programmer. PUTLINE and WTP are mutually exclusive.
QNAME(qname)Where qname is the one to eight character name used as the major name on all enqueues used by TSISPACE and TSIRECRD. The default name is @TCLOUD@. This name is stored as an eye-catcher in the second eight bytes of the dataspace. This name is also used as the minor name of an exclusive enqueue
REINITIALIZE(yes/no)Yes indicates that a new 256 byte control block, whose name is specified in the CBNAME parameter will be created and that the entry point specified in the ENTRYNAME parameter will be loaded into common storage.
tidalautomation.com 62
No indicates that the existing control block and load module will be used if they already exist. This parameter should be used at the request of Support only. This parameter effects the TSISPACE address space only.
The default is no.
SMFTYPE(nnn)Where nnn is a one to three digit decimal number between 0-255, representing SMF record types that should be processed by TSIRECRD.
The default is the pair of SMF record types specified in the HSMSMFTYPE parameter or is obtained from the DFSMShsm when TSISPACE and TSIRECRD are initialized. This parameter can be a list of record types separated by blanks or commas, a range of record types separated by a colon (:) or a list of record types and ranges.
SVCDUMP(yes/no)Yes indicates that an SVC dump is taken if an abend occurs in the address space.
The default is No, indicating no SVC dump is taken by our code if an abend occurs.
WTP(yes/no)Yes indicates that most messages issued by the started task are sent to the system log as a write-to-programmer.
The default is no, which sends a message to SYSTSPRT file in the started task. WTP and PUTLINE are mutually exclusive.
Commands for TSIRECRD and TSISPACEAll of the following commands can be sent to TSIRECRD for execution by either:
issuing an MVS modify command against the TSIRECRD address space
issuing the TSO command processor TSITSOCE
executing TSITSOCE as a batch program.
Some of the following commands can also be sent to TSISPACE for execution but this can only be done by issuing an MVS modify command against the TSISPACE address space.
ABEND commandThe ABEND command is used to cause the TSIRECRD address space to abend with an “S0C1” immediately. This command is used for problem diagnosis and should only be used at the request of Support. Example: F TSIRECRD,ABEND
ALLOCATE commandThe ALLOCATE command, alias ALLOC, is used to dynamically allocate a dataset for use by TSIRECRD. Example: F TSRECRD, ALLOC,DSNAME(your.dataset),OLD,KEEP
The parameters available for use with this command are:
DDNAME(ddname) – Can also be specified as FILE(ddname), where ddname is the one (1) to eight (8) character ddname.
tidalautomation.com 63
DSNAME(dsname)– Can be specified as DATASET(dsname), where dsname is the one to forty-four character name of an existing dataset, a relative generation of a generation dataset group may be specified by adding the relative generation number preceded by a plus (+) or minus (-) sign in parentheses following the dsname. The dsname may also have symbols used in it (i.e. &SYSNAME, &SYSPLEX etc.)
OLD/MOD/SHR)– Indicates the requested allocation status.
CATALOG/UNCATLOG/DELETE/KEEP) – Indicates the requested normal disposition.
DISPLAY commandThe DISPLAY command is used to display certain configuration information and the current value of parameters in TSISPACE and TSIRECRD, by issuing: F TSISPACE,DISPLAY, or F TSIRECRD,DISPLAY console commands. The configuration information and current values of parameters are displayed.
DUMP commandThe DUMP command is used to cause an SVC dump of the TSISPACE or TSIRECRD and TSISPACE address spaces. If a F TSISPACE,DUMP console command is issued, an SVC dump of TSISPACE address space and the data space owned by TSISPACE is taken. If a F TSIRECRD,DUMP console command is issued, an SVC dump of the TSIRECRD address space is taken.
END commandThe END command is used to separate the SET commands from action commands in the initial TSIRECRD input in the SYSTSIN file. This is primarily used in the TSIPARMS member of the “PARMLIB” file.
EXTEND commandThe EXTEND command is used to extend the data space owned by TSISPACE and used as a buffer for information coming into TSIRECRD. The only parameter available for this command is: BLOCKS(n), where n is the number of 4096 blocks to extend the data space by. The maximum size of the data space is two gigabytes, or the installation defined maximum. Example: F TSISPACE,EXTEND,BLOCKS(n)
FREE commandThe FREE command is used to unallocate datasets allocated through the ALLOCATE command. Example: F TSIRECRD,FREE, DSNAME(your.dataset)
The parameters available for this command are:
DDNAME(ddname) ) parameter, which can also be specified as FILE(ddname), where ddname is the one to eight character ddname.
DSNAME(dsname) parameter, which can be specified as DATASET(dsname), where dsname is the one to forty-four character name of an existing dataset, a relative generation of a generation dataset group may be specified by adding the relative generation number preceded by a plus (+) or minus (-) sign in parentheses following the dsname.
IDCAMS commandThe IDCAMS command performs predefined IDCAMS functions. The IDCAMS command causes the VSAM database to be dynamically unallocated before IDCAMS is called to process the IDCAMS input statements from the dataset referenced in the command parameters. After IDCAMS completes, the VSAM database is dynamically unallocated again to insure any exclusive enqueue is released prior to dynamically allocating the VSAM database with a disposition of SHR.
tidalautomation.com 64
ALLOCATE commands are not currently supported in the IDCAMS input processed by this command. This command is provided for users to reorganize the database without taking TSIRECRD down.
In SYSPLEX mode, this would require bringing TSIRECRD down on all participating systems. In SYSPLEX mode, this command is routed to the primary system for execution, regardless of where the command was issued.
This command should normally be issued after the PURGE command to recover excess DASD space used by the VSAM database. This command has four parameters, any or all of which may be used to specify the predefined dataset containing the input statements to the program.
Example:
F TSIRECRD,IDCAMS DSNAME(hlq.sfwb.cntl),MEMBER(TSIREORG)
DDNAME(ddname) parameter, which can also be specified as FILE(ddname), where ddname is the one to eight character ddname. Typically DDNAME would be used to reference a ddname in the TSIRECRD started task JCL. The default operand is DDNAME(AMSREORG). If the ddname does not exist, no message is issued and no data is processed for this command.
DSNAME(dsname) parameter, which can be specified as DATASET(dsname), where dsname is the one to forty-four character name of an existing dataset, a member of a partitioned dataset may be specified by adding the member name in parentheses following the dsname. The DSNAME parameter would be used to reference a dataset that is to be dynamically allocated when the command is issued. The referenced dataset is dynamically unallocated after the data is processed.
If the dsname can not be dynamically allocated, messages are issued and processing continues. The default dataset name is the name of the partitioned dataset allocated to ddname SYSTSIN at TSIRECRD initialization.
MEMBER(member) parameter, where member is the one to eight character name of an existing member of an existing partitioned dataset. The default is MEMBER(TSIREORG).
DATABASE/JOBDATABASE parameter which indicates which VSAM database is to be unallocated before IDCAMS processing and reallocated after completion of IDCAMS processing. The default is DATABASE. JOBDATABASE is the VSAM database used for JOBACTIVITY(YES).
MAP commandThe MAP command is used by systems support to identify maintenance level. Example: F TSIRECRD,MAP
MVS commandThe MVS command issues a system command from the TSISPACE or TSIRECRD address spaces. The issued system command starts with the first non-blank character following the MVS command name and consists of the remainder of the input record. For example, a user may want to issue an MVS Start command within the INITCOMMAND parameter to start TSIRECRD after TSISPACE initializes.
The following command would accomplish this: SET INITIALCOMMAND(‘MVS START TSIRECRD’)
SMFINPUT commandThe SMFINPUT command is used to load SMF data from a sequential data set. This command has two parameters, which are mutually exclusive:
DDNAME(ddname), which can also be specified as FILE(ddname), where ddname is the one to eight character name of a JCL DD statement
tidalautomation.com 65
DSNAME(dsname), which can be specified as DATASET(dsname), where dsname is the one to forty-four character name of an existing data set.
Members of a PDS are not supported. Typically the DDNAME parameter would be used to reference a ddname in the TSIRECRD started tasks JCL and the DSNAME parameter would be used to reference a dataset that is to be dynamically allocated when the command is issued. Although this command can be issued at any time via the MODIFY TSIRECRD,SMFINPUT or F TSIRECRD,SMFINPUT console command, this command is always executed internally at TSIRECRD initialization time with an operand of DDNAME(SMFINPUT).
If the ddname does not exist, no message is issued and no data is processed for this command. If the dsname can not be dynamically allocated, messages are issued and processing continues. In SYSPLEX mode, this command is routed to the primary system for execution, regardless of where the command was issued.
STACK commandThe STACK, alias BATCH, command causes a previously defined set of commands to be issued to TSIRECRD from a dataset. For example, to execute a set of commands defined in member TSIPURGE in the PARMLIB file, issue:
FTSIRECRD,STACK,DSNAME(hlq.sfwb.parmlib),MEMBER(TSIPURGE)
The parameters are as follows:
DDNAME(ddname) parameter, which can also be specified as FILE(ddname), where ddname is the one to eight character ddname. Typically the DDNAME parameter would be used to reference a ddname in the TSIRECRD started task JCL.
DSNAME(dsname) parameter, which can be specified as DATASET(dsname), where dsname is the one to forty-four character name of an existing dataset, a member of a partitioned dataset may be specified by adding the member name in parentheses following the dsname. The DSNAME parameter would be used to reference a dataset that is to be dynamically allocated when the command is issued. The referenced dataset is dynamically unallocated after the data is processed.
If the dsname can not be dynamically allocated, messages are issued and processing continues. The default dataset name is the name of the partitioned dataset allocated to ddname SYSTSIN at TSIRECRD initialization.
MEMBER(member) parameter, where member is the one to eight character name of an existing member of an existing partitioned dataset.
STOP commandThe STOP command is used to shutdown TSISPACE or TSIRECRD. Any of the following console commands can be used to shutdown TSISPACE or TSIRECRD started tasks. Please note that TSIRECRD must be stopped before TSISPACE is stopped.
MODIFY TSIRECRD,STOP\ (F TSIRECRD,STOP) MODIFY TSISPACE,STOP (F TSISPACE,STOP) STOP TSIRECRD (P TSIRECRD) STOP TSISPACE (P TSISPACE)
SUBMIT commandThe SUBMIT, alias SUB, command submits a batch job in a dataset or member of a partitioned dataset from the TSIRECRD address space to the system. For example, to submit a batch job in the cntl file called “sfbldmst”, issue:
F TSIRECRD,SUBMIT,DSNAME(hlq.sfwb.cntl),MEMBER(sfbldmst)
The parameters are as follows:
tidalautomation.com 66
DDNAME(ddname) parameter, which can also be specified as FILE(ddname), where ddname is the one to eight character ddname. Typically the DDNAME parameter would be used to reference a ddname in the TSIRECRD started task JCL.
DSNAME(dsname) parameter, which can be specified as DATASET(dsname), where dsname is the one to forty-four character name of an existing dataset, a member of a partitioned dataset may be specified by adding the member name in parentheses following the dsname. The DSNAME parameter would be used to reference a dataset that is to be dynamically allocated when the command is issued. The referenced dataset is dynamically unallocated after the data is processed. If the dsname can not be dynamically allocated, messages are issued and processing continues. The default dataset name is the name of the partitioned dataset allocated to ddname SYSTSIN at TSIRECRD initialization.
MEMBER(member) parameter, where member is the one to eight character name of an existing member of an existing partitioned dataset.
USERS commandThe USERS, alias WHO, command is used to display all users in the GRS complex having an enqueue on the TSIRECRD database. This command can be helpful in determining IDCAMS command failures. Example:
F TSIRECRD,USER
Batch Commands for TSIRECRD & TSISPACEJCL can also be used in lieu of issuing commands at normal start up of TSISPACE and TSIRECRD.Typically commands are placed in a member or members in the PARMLIB library. For example, some of the default start up parameters are specified in member TSIPARMS located in the PARMLIB library. An example of TSIPARMS is shown below.
SET AUTOCOMMAND('STACK MEMBER(TSIPURGE)') /* xxx is user defined SET AUTOTIME(xxxx) /* where xxxx is the time of day to exec the command END
Typically commands are used to purge records and reorganize the TSI database. It is recommended that the purge process be automated to run each day by using the AUTOCOMMAND and AUTOTIME parameters. However, should the user desire to reorganize the database, purge records or issue other commands, through batch, additional batch members are available in the CNTL file.
The following members in the CNTL file allow the user to execute commands to TSIRECRD in a batch job.
TSICOMNDThis batch job purges unwanted detail data from your database. Note that the reorg must be run in order to reclaim space with the database.
TSICOMN1This batch job represents purging records by using TSO commands that are issued in batch.
TSICOMN2This job represents purging records by using batch. This job executes a program which calls TSIRECRD to perform the actual purge
TSIHMERGThis job will merge previously recorded DFSMShsm logs from other systems into your database. This can be used if DFSMShsm is not generating SMF records.
tidalautomation.com 67

TSISMERGThis job will merge previously recorded DFSMShsm SMF data from other systems into the Total Recall database.
tidalautomation.com 68
Top Related