


Languages
Pages
Legal


HOL-PRT-1464

Table of ContentsHOL-PRT-1464 - Applying Data Center Security with Symantec & VMware NSX............................... 3
Lab Overview ............................................................................................................................ 4Configuring policies, Test Virtual Machine and NSX Security Group ................................................... 5
Introduction ............................................................................................................................... 6Prepare Test Virtual Machine.................................................................................................... 7Deploy Virtual Machine Threat Protection Policy .................................................................... 10Create a NSX Security Group ................................................................................................. 17
Module 1 - Demonstrate Symantec's Virtual Machine Threat Protection and Quarantine Features .. 21Introduction ............................................................................................................................. 22Threat Detection and Quarantine............................................................................................ 23Purging.................................................................................................................................... 37Rescan and Whitelisting.......................................................................................................... 41
Module 2 - Demonstrate Symantec's Virtual Machine Network Security Introspection ..................... 58Introduction ............................................................................................................................. 59Create New NSX Security Policy with Network Introspection Services .................................. 60Simulate Inbound Network Threat in Log Only Mode ............................................................ 68Simulate Inbound Network Threat and Block It ....................................................................... 71
HOL-PRT-1464
Page 2HOL-PRT-1464

HOL-PRT-1464 - Applying DataCenter Security with Symantec
& VMware NSX
HOL-PRT-1464
Page 3HOL-PRT-1464
Lab OverviewWith SDDC, there is even more demand for application to be made available at the speed ofbusiness leading to automation in orchestration and deployment. This has enabled IT organization tobe agile and lower their time to market. However we continue to see security as a bottleneck.
Symantec Datacenter Secuity:Server removes this bottle neck by lowering security tax by providingthreat protection with best in class AV scan engine of Symantec. It leverages VMware NSX ServiceComposer to automate and orchestrate security policies i.e. mapped to security groups. It follows thebest practices of VMware NSX to deliver agentless malware protection for workloads on SoftwareDefined Data Center.
HOL-PRT-1464
Page 4HOL-PRT-1464

Configuring policies, TestVirtual Machine and NSX
Security Group
HOL-PRT-1464
Page 5HOL-PRT-1464

IntroductionIn this section you will do the prep work that is required for the both the module. As part of this youwill:
• Prepare the Test Guest Virtual Machine• Access Symantec Data Center: Server management console to create threat protection
policy and publish them to VMware NSX.• Use VMware NSX Service Composer to create security groups, add virtual machines to this
group.
HOL-PRT-1464
Page 6HOL-PRT-1464

Prepare Test Virtual MachineTo begin with these steps ,make sure you are in the Controlcenter VM.
Access the Test Virtual Machine via RDP
Double-click on the "TestGvm.RDP" shortcut on the Desktop.
Unzip the Eicar text file
Double-click on the eicar.zip on the Desktop. Notice that inside this zip file there is a text file called"eicar.txt". Eicar files are used to test threat protection engines. While real malware could dodamage, this test file allows you to test anti-virus software without having to use a real virus file.Eicar files are set as verified virus file.
For this test, the Eicar test file will be used to test threat protection features of Symantec Data CenterSecurity:Server scan engine. This file will be copy to several locations in the next steps. Leave thewindow up.
HOL-PRT-1464
Page 7HOL-PRT-1464

Create first demo folder
Go to the C:\ drive and create a folder called "TP_Demo1".
Add Eicar text file to first demo folder
Drag and drop the eicar.txt inside the archive to the "TP_Demo1" folder.
Create second demo folder
Go back to the C:\ drive and create another folder called "TP_Demo2".
HOL-PRT-1464
Page 8HOL-PRT-1464

Add Eicar text file to second demo folder
Drag and drop the eicar.txt inside the archive to the "TP_Demo2" folder.
Clean up all of the remaining Eicar files
There are several other locations where the Eicar test file(s) are located. Removing these files willallow for less false positives.
Delete EICAR zip file from Desktop
Right-click on the eicar.zip on the Desktop and select Delete.
Close all folder and files
To prevent the On-Access Scan on test files close all folder and files opened.
Minimize the Test Virtual Machine RDP session
The preparation for the Test Virtual Machine is now completed. Minimize the TestGvm RDP session.
HOL-PRT-1464
Page 9HOL-PRT-1464

Deploy Virtual Machine Threat ProtectionPolicyTo begin with this steps return to the Controlcenter VM.
Access the Symantec Data Center Security: Server ManagementServer
Double-click on the "Symantec DCS.RDP" shortcut on the Desktop of the Controlcenter.
Symantec Data Center Security: Server Management Console
Click on the "Management Console" shortcut on the Desktop of the Symantec DCS RDP session.
HOL-PRT-1464
Page 10HOL-PRT-1464

Log into the Management Console
Credentials to access the Management Console are:
• User name: symadmin• Password: VMware1!
Click on the "Log On" button
Access the Virtual Machine Threat Protection policies
Go to Policies > Virtual Machine Threat Protection.
HOL-PRT-1464
Page 11HOL-PRT-1464

Access the Symantec default policies workspace folder
Click on Policies > Workspace > Symantec folder on the the left panel.
Edit the existing Virtual Machine Threat Protection Policy
Right-click on the "Virtual Machine Threat Protection Policy" and select "Edit".
HOL-PRT-1464
Page 12HOL-PRT-1464

Disable the Rescan policy option
On the Policy's General Settings, uncheck the box next to "Rescan Quarantine fileswhen On-Demand scans runs" option. This feature will be enabled in a later step.
HOL-PRT-1464
Page 13HOL-PRT-1464

Verify proper Network Security Settings
Verify that the checkbox next to "Block connection when threats are found..." option isunchecked. Notice that this setting will allow the policy to only log threats. In a latermodule this feature will be enabled to test Symantec's Network Threat ProtectionServices.
Save Policy Settings
Click the "OK" button to save policy settings.
HOL-PRT-1464
Page 14HOL-PRT-1464

Submit policy changes
1. Type "1" as the new Revision number2. Click on the "submit" button to finalize and submit policy changes
Publish Policy
Right-Click on the "Virtual Machine Threat Protection Policy" and select "Publish Policy".
HOL-PRT-1464
Page 15HOL-PRT-1464

Accept Threat Protection Policy overwrite warning
A pop-up informing you that the new changes to the policy will overwrite the existingpublished policy will appear. Click the "Ok" button. The same policy will be usedthrough out the lab so overwriting the policy is part of the normal process.
Accept Threat Protection policy published successfully pop-up
After allowing the policy to be overwritten you will receive a pop-up informing you thatthe Threat Protection Policy was successfully published. Click on the "Ok" button toconfirm. You will now see a green dot next to the "Virtual Machine Threat ProtectionPolicy" reaffirming the action.
Minimize the Symantec DCS RDP session
The configuration changes and deployment of the Threat Protection Policy are now completed.Minimize the Symantec DCS RDP session.
HOL-PRT-1464
Page 16HOL-PRT-1464

Create a NSX Security GroupIn this section you will :
• Create security group which will contain the Test virtual machine. This NSX security group(s)will be used for the upcoming modules.
To begin with this steps make sure are in the Controlcenter VM.
Acces Google Chrome Web Browser
On the ControlCenter VM, click on the Google Chrome web browser shortcut on the Desktop. Feelfree to select another browser if desire.
Access the vSphere Web Client homepage
Click on the Google Chrome's link shortcut displayed below.
HOL-PRT-1464
Page 17HOL-PRT-1464
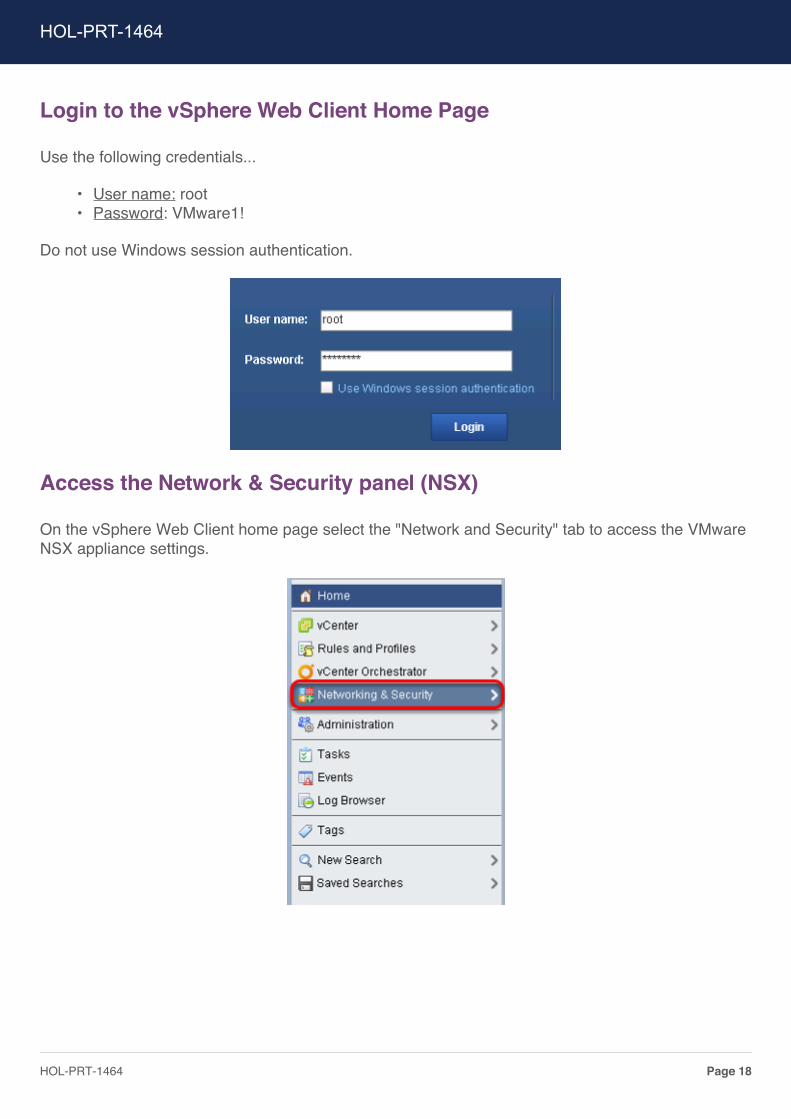
Login to the vSphere Web Client Home Page
Use the following credentials...
• User name: root• Password: VMware1!
Do not use Windows session authentication.
Access the Network & Security panel (NSX)
On the vSphere Web Client home page select the "Network and Security" tab to access the VMwareNSX appliance settings.
HOL-PRT-1464
Page 18HOL-PRT-1464

Access the Service Composer
On the "Network and Security" home page select the "Service Composer" tab.
Access the Security Groups tab
Click on the "Security Groups" tab.
Create a new Security Group
Click on the "New Security Group" icon.
HOL-PRT-1464
Page 19HOL-PRT-1464

Name the Security Group
Name the security group "Symantec Protected Group". No need to add a description.
Include Test Virtual Machine to new Security Group
1. Select the 3rd option "Select objects to include".2. Scroll through the filters until you find "Virtual Machine" and click on it.3. Select the Test Virtual Machine (Win7-DCS-TestGvm)4. Click the "Finish" button.
HOL-PRT-1464
Page 20HOL-PRT-1464

Module 1 - DemonstrateSymantec's Virtual Machine
Threat Protection andQuarantine Features
HOL-PRT-1464
Page 21HOL-PRT-1464

IntroductionIn this module you will learn how to :
• Create security policies using VMware NSX Service Composer.• Add endpoint service for Anti-Virus• Use VMware NSX Service Composer to consume policy created by Symantec Data Center
Security:Server• Map this policy to a security group thats used to protect a Guest Virtual Machine (GVM)• Use Data Center Security:Server manger console to verify the GVM's that are monitored and
protected• Evaluate the flexibility of Data Center Security:Server by creating targeted scan• Review quarantined files and their event description.
HOL-PRT-1464
Page 22HOL-PRT-1464

Threat Detection and QuarantineTo begin this module access the vSphere Web Client and go to the "Network and Security" homepage.
Access the Service Composer
On the "Network and Security" home page select the "Service Composer" tab.
Access the Security Policies tab
Click on the "Security Policies" tab.
HOL-PRT-1464
Page 23HOL-PRT-1464

Create new Security Policy
Click on the "Create Security Policy" icon.
Name the Security Policy
Name the Security Policy "DCS AV Security Policy". Leave all the defaults. Click onthe "Next" button.
HOL-PRT-1464
Page 24HOL-PRT-1464

Add an Endpoint Service
Click on the "Add endpoint service" icon.
HOL-PRT-1464
Page 25HOL-PRT-1464

Provide appropriate entries and selections for new Endpoint Service
1. Name: "DCS AV Policy"2. Action: "Apply"3. Service Type: "Anti Virus"4. Service Name: "Symantec DataCenter Security for VMware NSX5. Service Configuration: "Virtual Machine Threat Protection Policy"6. State: "Enabled"7. Enforce: "Yes"8. Click the "OK" button
HOL-PRT-1464
Page 26HOL-PRT-1464

Complete the new Security Policy
Click on the "Finish" Button to complete the policy.
Apply new Security Policy to existing Security Group
Right-click on the new "DCS AV Security Policy" and select "Apply Policy".
HOL-PRT-1464
Page 27HOL-PRT-1464
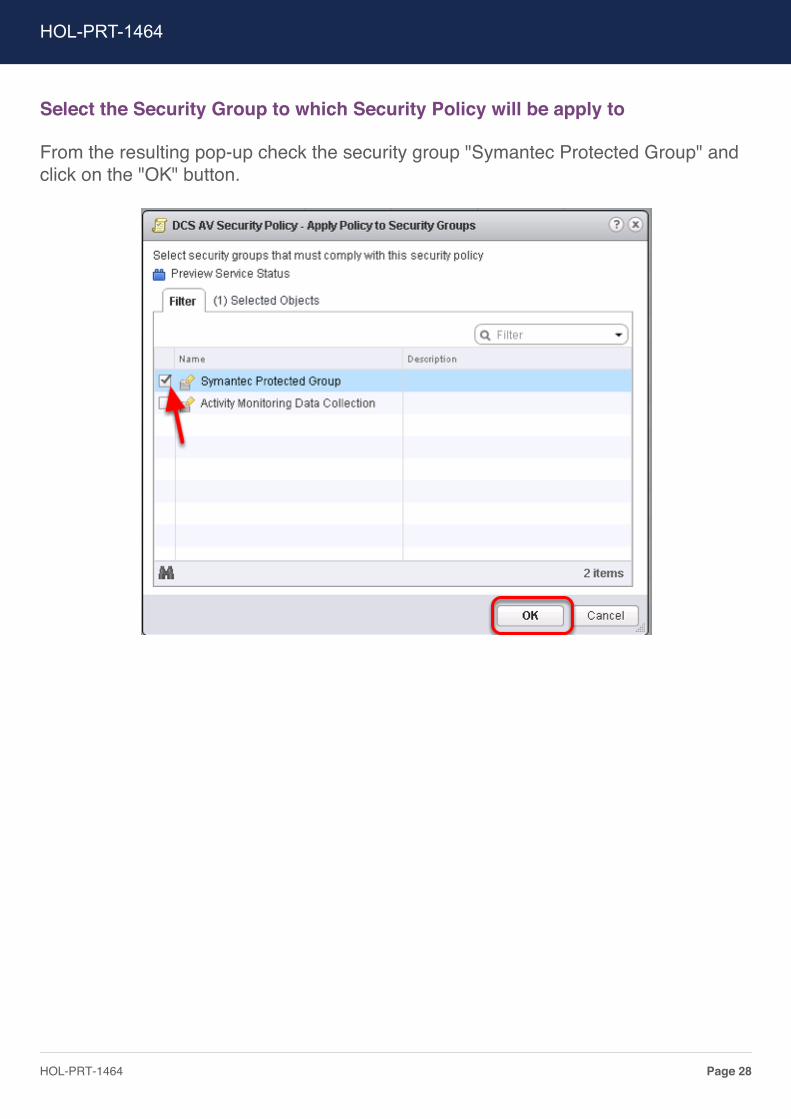
Select the Security Group to which Security Policy will be apply to
From the resulting pop-up check the security group "Symantec Protected Group" andclick on the "OK" button.
HOL-PRT-1464
Page 28HOL-PRT-1464

Check Security Groups in the Symantec Data Center Security: ServerManagement Console
1. Go back to your Symantec DCS RDP session by maximizing the Window2. Go to Assets > Virtual Machine Threat Protection > Guest VM View > Security Groups3. Click "Refresh"4. Once the refresh completes the "Symantec Protected Group" should appear in the list of
Security Groups
Verify that Test Virtual Machine is protected
Double-click on the "Symantec Protected Group" to check if the test virtual machine is under theProtected Guest VMs.
HOL-PRT-1464
Page 29HOL-PRT-1464

Activate a scan on the Test Virtual Machine
Right-click on the Test Virtual Machine "Win7-DCS-TestGvm" and select "Scan Now".
HOL-PRT-1464
Page 30HOL-PRT-1464

Select scan type option
In the resulting pop-up, select "Scan Targeted Paths".
HOL-PRT-1464
Page 31HOL-PRT-1464

Add folder Path
Click on the "Add" button and enter the path "C:\TP_Demo1". Click on the "OK"button.
Start Scan
Click on the "Scan Now" to trigger the threat protection scan. Click "Ok" on thesuccess pop-up.
HOL-PRT-1464
Page 32HOL-PRT-1464

Verify path on Test Virtual Machine to see if EICAR test was detected
Return to the TestGvm RDP session (Test Virtual Machine), go to C:\TP_Demo1 and verify theeicar.txt file is missing.
HOL-PRT-1464
Page 33HOL-PRT-1464

Find the quarantined file
Go to "C:\VirtualAgent\Quarantine" and verify a file exists. This is the quarantined Eicar test file.
Note: Several other files could be present in this folder. Make sure you check the date of themodified date of the file(s) present. The name of the file in this quarantine folder will also differ.
Verify data inside quarantine file is obfuscated
Open this file in notepad. Verify the data is obfuscated (i.e. Eicar string is not readable).
HOL-PRT-1464
Page 34HOL-PRT-1464

Verify that "Endpoint malware threat detected" event exist in theSymantec Data Center Security: Server Management Console
1. Minimize the current TestGvm RDP session and return back to the Symantec DCS RDPsession
2. Go to Monitors > Events tab > Monitor Types > Virtual Machine Threat Protection Events3. Refresh and verify a "Endpoint malware threat detected" event exists.
HOL-PRT-1464
Page 35HOL-PRT-1464
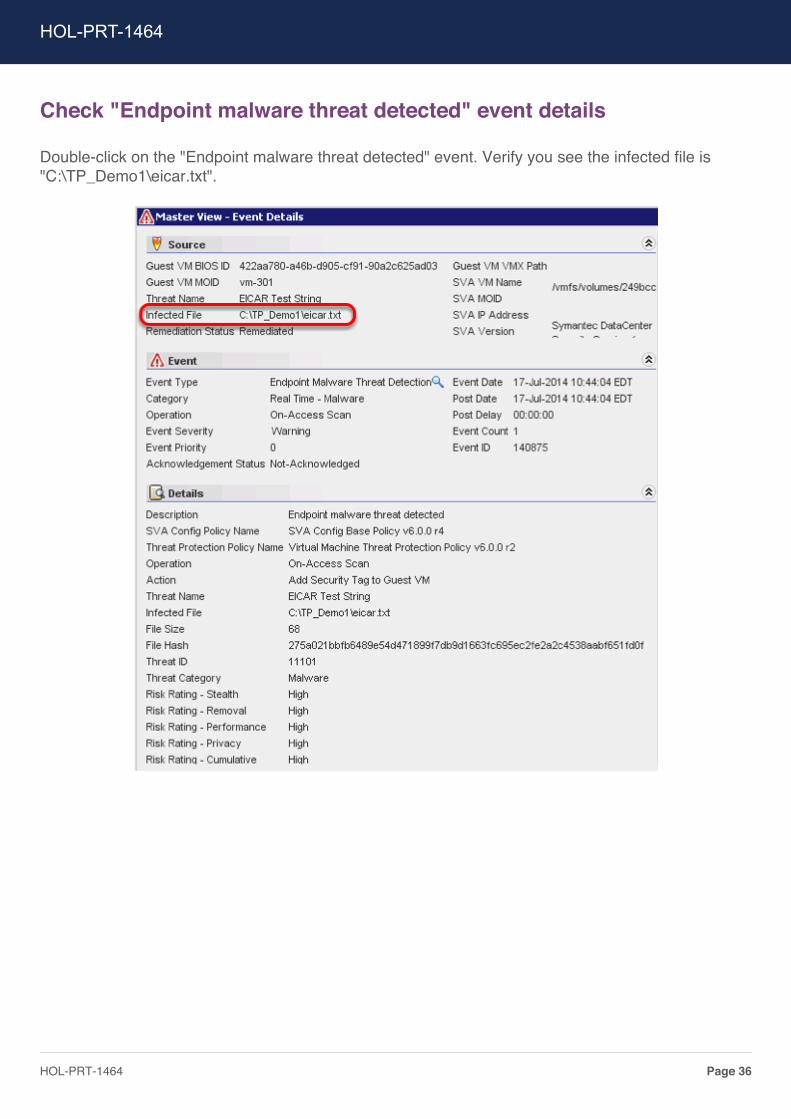
Check "Endpoint malware threat detected" event details
Double-click on the "Endpoint malware threat detected" event. Verify you see the infected file is"C:\TP_Demo1\eicar.txt".
HOL-PRT-1464
Page 36HOL-PRT-1464

PurgingIn the previous section a eicar.txt file was quarantined. In this section, you will see how Data CenterSecurity: Server can be configured to purge quarantined files after a specific time.
Confirm purge quarantine files time interval
Per the "Virtual Machine Threat Protection Policy", the quarantine file feature was enabled and thedefault for purging quarantine files was left to purge files older than 30 days. In the next set of stepsthe Test Virtual Machine's time and date will be modify to make sure that the quarantined file(C:\TP_Demo1\eicar.txt) is successfully purged from the system after the set time interval.
Note the date on the Test Virtual Machine
Open the date/time pop-up on the bottom right of the screen. Note the date (i.e. July 16, 2014).
HOL-PRT-1464
Page 37HOL-PRT-1464

Advance date on Test Virtual Machine 30 days forward
1. Click on the start menu and type "PowerShell"2. Right-click on the first result and select "Run as administrator"3. Run the following command in PowerShell:
Set-Date -Date (Get-Date).AddDays(30)
HOL-PRT-1464
Page 38HOL-PRT-1464
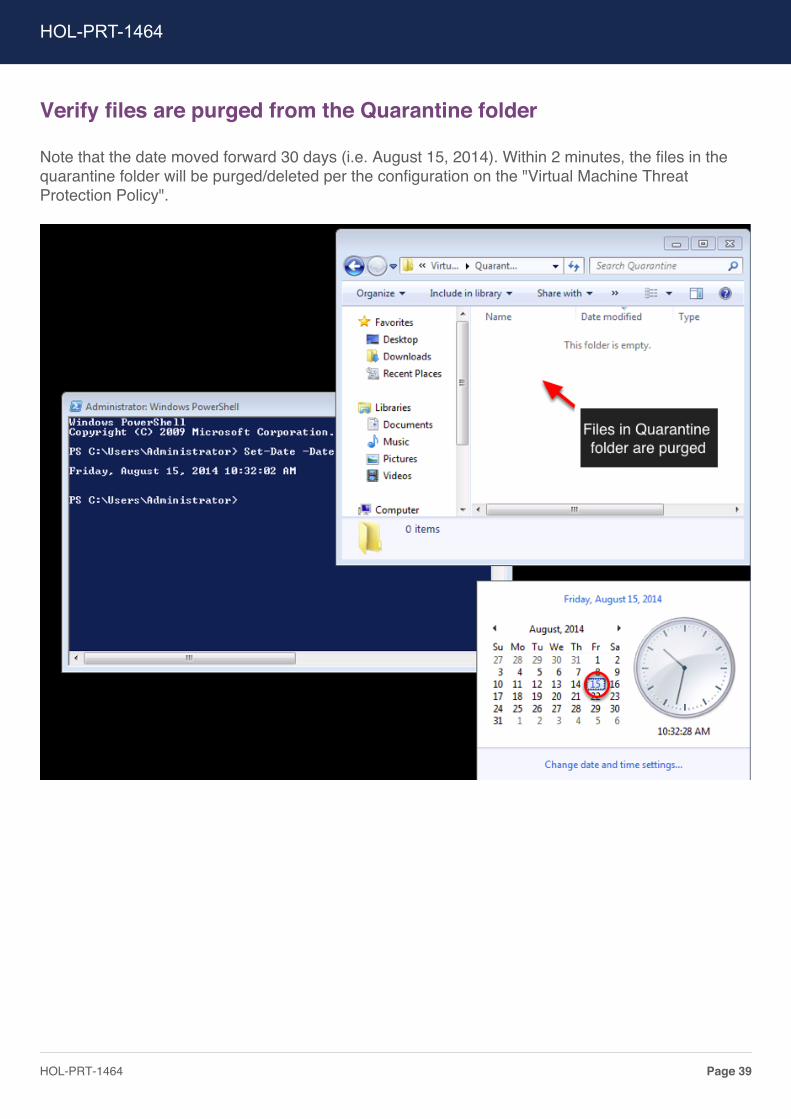
Verify files are purged from the Quarantine folder
Note that the date moved forward 30 days (i.e. August 15, 2014). Within 2 minutes, the files in thequarantine folder will be purged/deleted per the configuration on the "Virtual Machine ThreatProtection Policy".
HOL-PRT-1464
Page 39HOL-PRT-1464

Reset time on the Test Virtual Machine
Run the following command in PowerShell:
Set-Date -Date (Get-Date).AddDays(-30)
Confirm that machine is back to original date (i.e. July 16, 2014).
HOL-PRT-1464
Page 40HOL-PRT-1464

Rescan and WhitelistingThe rescan option in the Threat Protection Policy’s Quarantine settings rescans the quarantined fileswhen On-Demand Scans are run. Quarantined files are released/restored to original location if theyare no longer classified as threats either based on the new definitions or if they are exclusivelywhitelisted in the Scan Settings of the Security Virtual Appliance configuration base policy(SVA_Config_Base_Policy). In this section you will Rescan after Whitelisting the Eicar test file.
Activate a second scan on the Test Virtual Machine
1. Go back to your Symantec DCS RDP session by maximizing the Window2. Go to Assets > Virtual Machine Threat Protection > Guest VM View > Security Groups >
Symantec Protected Group3. Right-click on the Test Virtual Machine "Win7-DCS-TestGvm" and select "Scan Now"
HOL-PRT-1464
Page 41HOL-PRT-1464

Select scan type option
In the resulting pop-up, select "Scan Targeted Paths".
HOL-PRT-1464
Page 42HOL-PRT-1464
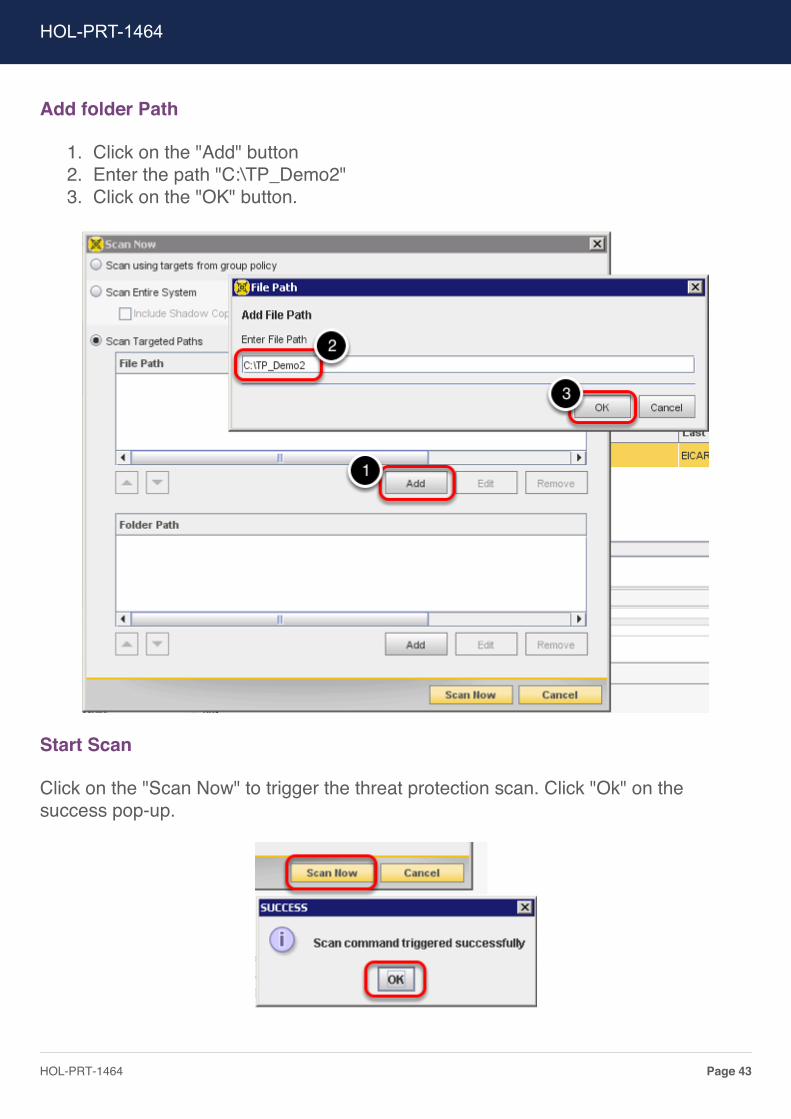
Add folder Path
1. Click on the "Add" button2. Enter the path "C:\TP_Demo2"3. Click on the "OK" button.
Start Scan
Click on the "Scan Now" to trigger the threat protection scan. Click "Ok" on thesuccess pop-up.
HOL-PRT-1464
Page 43HOL-PRT-1464

Verify path on Test Virtual Machine to see if Eicar test was detected
Return to the TestGvm RDP session (Test Virtual Machine), go to C:\TP_Demo2 and verify theeicar.txt file is missing.
Verify Eicar test file is in quarantine folder
Go to "C:\VirtualAgent\Quarantine" and verify the the eicar.txt quarantined file exists.
HOL-PRT-1464
Page 44HOL-PRT-1464

Edit Virtual Machine Threat Protection Policy
1. Return to your Symantec DCS RDP session2. Go to Policies > Virtual Threat Machine Protection > Workspace >Symantec folder3. Right-click on the "Virtual Machine Threat Protection Policy" and select "Edit"
HOL-PRT-1464
Page 45HOL-PRT-1464
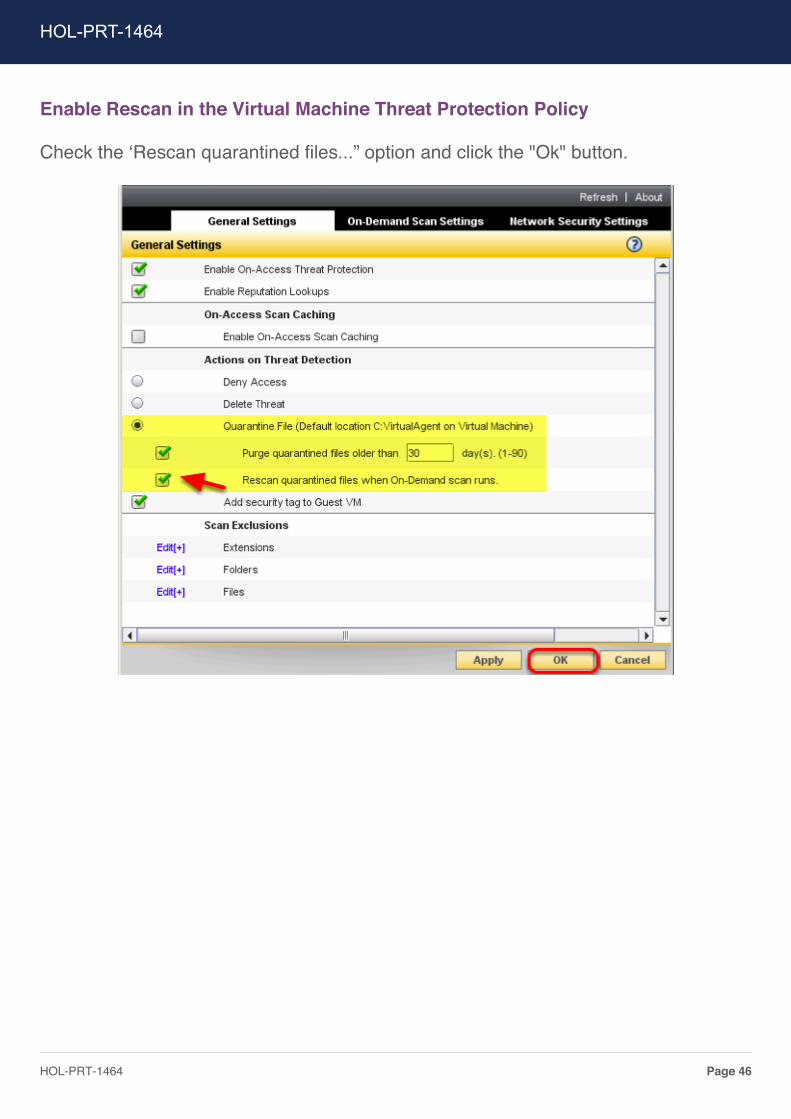
Enable Rescan in the Virtual Machine Threat Protection Policy
Check the ‘Rescan quarantined files...” option and click the "Ok" button.
HOL-PRT-1464
Page 46HOL-PRT-1464
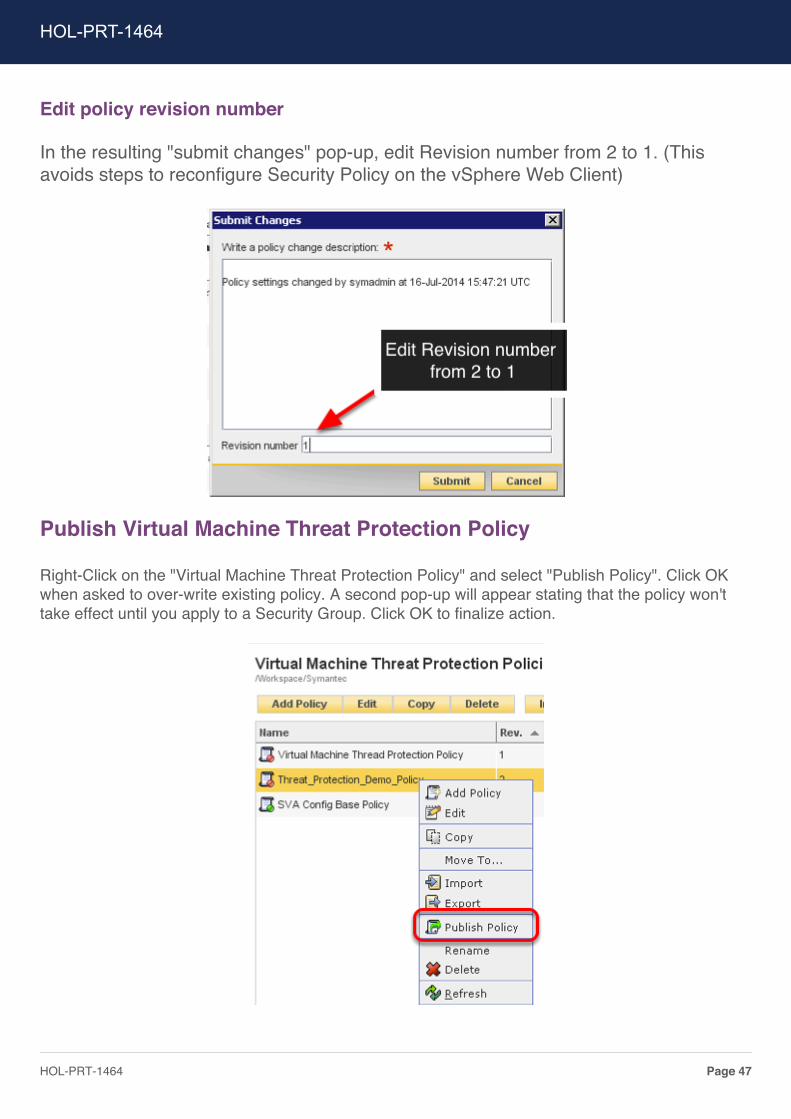
Edit policy revision number
In the resulting "submit changes" pop-up, edit Revision number from 2 to 1. (Thisavoids steps to reconfigure Security Policy on the vSphere Web Client)
Publish Virtual Machine Threat Protection Policy
Right-Click on the "Virtual Machine Threat Protection Policy" and select "Publish Policy". Click OKwhen asked to over-write existing policy. A second pop-up will appear stating that the policy won'ttake effect until you apply to a Security Group. Click OK to finalize action.
HOL-PRT-1464
Page 47HOL-PRT-1464

Find latest "Endpoint threat malware threat detected" event
1. Go to Monitors > Events > Monitor Types > Virtual Machine Threat Protection Events2. Notice the latest "Endpoint threat malware threat detected" event. Double-click on the event
to see event details
HOL-PRT-1464
Page 48HOL-PRT-1464

Copy the Eicar test file hash
1. Copy the file hash value by double-clicking on it to highlight it and using keyboard shortcutCTRL + c
2. Close the event detail window
HOL-PRT-1464
Page 49HOL-PRT-1464

Edit Security Virtual Appliance Configuration Base Policy
1. Go back to Policies > Virtual Threat Machine Protection > Workspace >Symantec folder2. Right-click on the "SVA_Config_Base_Policy" and select "Edit"
HOL-PRT-1464
Page 50HOL-PRT-1464
Whitelist the Eicar test file
1. Go to the "Scan Settings" tab2. Click on "Edit[+]" to see the list of whitelisted files3. Click on the "Add" button4. In "SHA-256 Digest" field, paste the file has copied using the keyboard shortcut
CTRL + v5. In the "Description" field, type "EICAR Test Demo File"6. Click "OK" to enter the new entry into the list7. Click on the "OK" button on the policy to save the change8. Click on the "Submit" button to submit changes (Note: no need to modify
Revision number here)
HOL-PRT-1464
Page 51HOL-PRT-1464

HOL-PRT-1464
Page 52HOL-PRT-1464

Publish Security Virtual Appliance Configuration Base Policy
Right-click on the "SVA_Config_Based_Policy" and select "Publish". Click OK on the success pop-up.
HOL-PRT-1464
Page 53HOL-PRT-1464
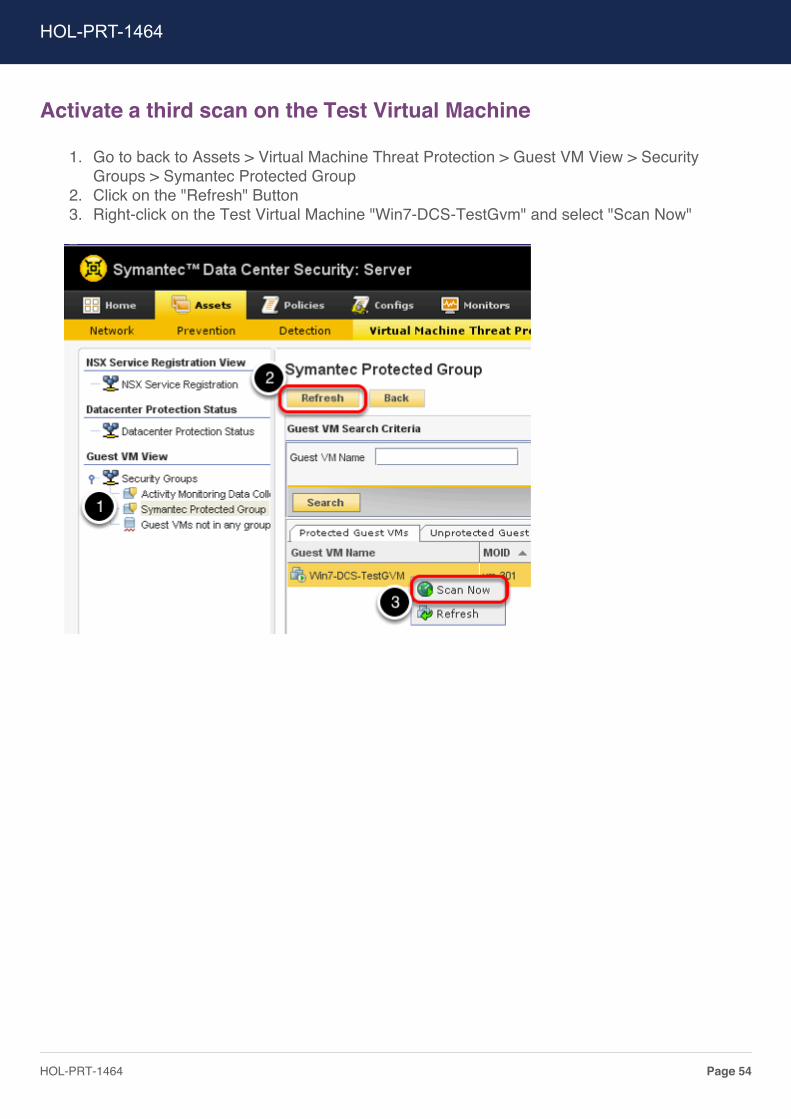
Activate a third scan on the Test Virtual Machine
1. Go to back to Assets > Virtual Machine Threat Protection > Guest VM View > SecurityGroups > Symantec Protected Group
2. Click on the "Refresh" Button3. Right-click on the Test Virtual Machine "Win7-DCS-TestGvm" and select "Scan Now"
HOL-PRT-1464
Page 54HOL-PRT-1464

Select scan type option
In the resulting pop-up, select "Scan Targeted Paths".
HOL-PRT-1464
Page 55HOL-PRT-1464

Add folder Path
1. Click on the "Add" button2. Enter the path "C:\TP_Demo2"3. Click on the "OK" button.
Start Scan
Click on the "Scan Now" to trigger the threat protection scan. Click "Ok" on thesuccess pop-up.
HOL-PRT-1464
Page 56HOL-PRT-1464
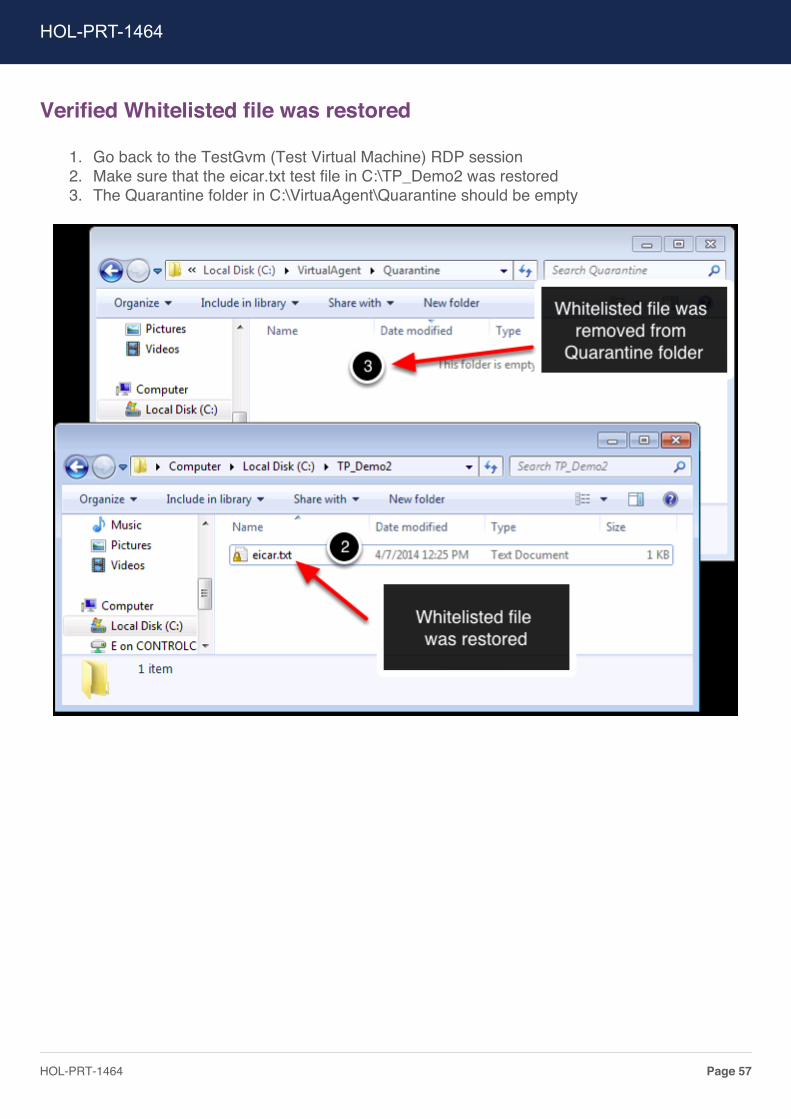
Verified Whitelisted file was restored
1. Go back to the TestGvm (Test Virtual Machine) RDP session2. Make sure that the eicar.txt test file in C:\TP_Demo2 was restored3. The Quarantine folder in C:\VirtuaAgent\Quarantine should be empty
HOL-PRT-1464
Page 57HOL-PRT-1464
Module 2 - DemonstrateSymantec's Virtual Machine
Network Security Introspection
HOL-PRT-1464
Page 58HOL-PRT-1464

IntroductionThis module discusses:
• Registering DCS: Server 6.0 with vCenter and NSX• Register SVA with NSX• Configure Auto-Deployment of vCenter Endpoint Service• Configure Auto-Deployment of Symantec Anti-malware Service• Verify Status of Service Deployment
HOL-PRT-1464
Page 59HOL-PRT-1464

Create New NSX Security Policy with NetworkIntrospection ServicesTo begin this module access the vSphere Web Client and go to the "Network and Security" homepage.
Access the Service Composer
On the "Network and Security" home page select the "Service Composer" tab.
Access the Security Policies tab
Click on the "Security Policies" tab.
HOL-PRT-1464
Page 60HOL-PRT-1464

Create new Security Policy
Click on the "Create Security Policy" icon.
Name the new Security Policy
Name the Security Policy "DCS Network Threat Protection".
HOL-PRT-1464
Page 61HOL-PRT-1464

Add a new Network Introspection Service option
1. Click on the 4th option on the left side panel named "Network IntrospectionServices"
2. Click on the green plus (+) icon to add a new Network Introspection Service
HOL-PRT-1464
Page 62HOL-PRT-1464

Provide appropriate entries and selections for new Network IntrospectionService
1. Name: "DCS Network Threat"2. Service Name: "Symantec DataCenter Security Service for VMware NSX"3. Profile: "Virtual Machine Threat Protection Policy profile"4. Source: Click on "Change...", on the source pop-up select "Any"5. Destination: Leave as "Policy's Security Groups"6. Click the "OK" button
• The "Source" and "Destination" selection will apply to “Incoming” traffic from"Any" to the security group where this policy gets applied.
• Leave the remaining default settings.
HOL-PRT-1464
Page 63HOL-PRT-1464

HOL-PRT-1464
Page 64HOL-PRT-1464

Finalize changes to the existing Security Policy
Click on the "Finish" Button to save and finalize the new "DCS Network Threat"security policy.
HOL-PRT-1464
Page 65HOL-PRT-1464

Apply new Security Policy to existing Security Group
Right-click on the new "DCS Network Threat Protection" and select "Apply Policy".
HOL-PRT-1464
Page 66HOL-PRT-1464

Select the Security Group to which Security Policy will be apply to
From the resulting pop-up check the security group "Symantec Protected Group" andclick on the "OK" button.
HOL-PRT-1464
Page 67HOL-PRT-1464

Simulate Inbound Network Threat in Log OnlyModeIn this section you will perform the simulation of a network threat, specifically a SQL Injection, to anSQL web front end. The test virtual Machine (TestGvm) is hosting an implementation of PHP forWindows running on an Internet Information Services (IIS) server. The victim website hosted in theTest Virtual machine contains a table with dummy personal identifiable information (PII). A URL witha crafted SQL injection query will be used to test whether the attack is allowed or denied.
In this step, the SQL injection simulation will be succesful since the Virtual Machine Threat DetectionPolicy is set to log only mode.
Refresher of Network Security Settings in Virtual Machine ThreatProtection policy
In an earlier step it was verified that the "Block connection when threats are found (Threats will onlybe logged when left unchecked)" option was uncheck. There is no need to modify the "VirtualMachine Threat Protection Policy" for this steps since the policy is already modified to only log whenthe threat is found.
Type the URL with a crafted SQL injection query and explore results
• From the Controlcenter access the Google Chrome web browser• Click on the "Access PHP File from..." bookmark in the bookmarks bar• or type the URL directly:
http://192.168.120.30/ax/gettprojectnodes.php?test=1&root_node=selectfromwhere
HOL-PRT-1464
Page 68HOL-PRT-1464

Notice how the URL is structured and the results you get in the web browser. The PII data is nowexposed.
Verify that "Guest network threat detected" event exist in theSymantec Data Center Security: Server Management Console
1. Return back to the Symantec DCS RDP session2. Go to Monitors> Events tab > Monitor Types > Virtual Machine Threat Protection Events3. Refresh and verify a ‘Guest network threat detected’ event exists.
HOL-PRT-1464
Page 69HOL-PRT-1464

Check "Guest network threat detected" event details
The remediation status is “Guest network threat logged” since the Virtual Machine Threat ProtectionPolicy is configured to only log when the threat is found. Some of the information logged in the eventinclude: threat name, source and destination IP address and port of the network traffic, amongothers.
HOL-PRT-1464
Page 70HOL-PRT-1464
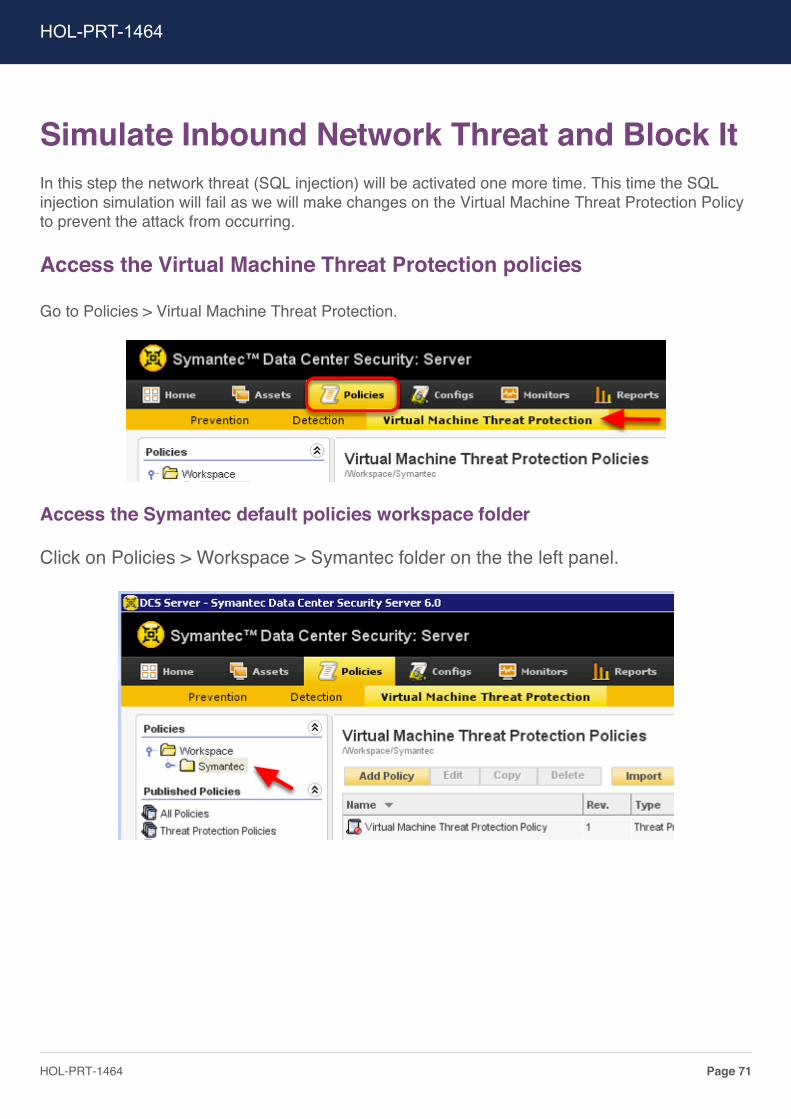
Simulate Inbound Network Threat and Block ItIn this step the network threat (SQL injection) will be activated one more time. This time the SQLinjection simulation will fail as we will make changes on the Virtual Machine Threat Protection Policyto prevent the attack from occurring.
Access the Virtual Machine Threat Protection policies
Go to Policies > Virtual Machine Threat Protection.
Access the Symantec default policies workspace folder
Click on Policies > Workspace > Symantec folder on the the left panel.
HOL-PRT-1464
Page 71HOL-PRT-1464

Edit the Virtual Machine Threat Protection Policy
Right-click on the "Virtual Machine Threat Protection Policy" and select "Edit".
HOL-PRT-1464
Page 72HOL-PRT-1464

Modify Network Security Settings to enable the blockage of threats
1. Check the box next to "Block connection when threats are found..." option.2. Click on the "Ok" button
Submit policy changes
1. Type "1" as the new Revision number2. Click on the "submit" button to finalize and submit policy changes.
HOL-PRT-1464
Page 73HOL-PRT-1464

Publish Policy
Right-Click on the "Virtual Machine Threat Protection Policy" and select "Publish Policy".
Accept Threat Protection policy overwrite warning
A pop-up informing you that the new changes to the policy will overwrite the existingpublish policy will appear. Click the "Ok" button.
HOL-PRT-1464
Page 74HOL-PRT-1464

Accept Threat Protection Policy published successfully pop-up
After allowing the policy to be overwritten you will receive a pop-up informing you thatthe Threat Protection was successfully published. Click on the "Ok" button to confirm.You will now see a green dot next to the "Virtual Machine Threat Protection Policy"reaffirming the action.
HOL-PRT-1464
Page 75HOL-PRT-1464

Type the URL with a crafted SQL injection query and explore results
• From the Controlcenter access the Google Chrome web browser• Click on the "Access PHP File from..." bookmark in the bookmarks bar• or type the URL directly:
http://192.168.120.30/ax/gettprojectnodes.php?test=1&root_node=selectfromwhere
Notice how the URL is now blocked. The Virtual Machine Threat Protection Policy is now activelyblocking network threats.
HOL-PRT-1464
Page 76HOL-PRT-1464

Verify that "Guest network threat detected" event exist in theSymantec Data Center Security: Server Management Console
1. Return back to the Symantec DCS RDP session2. Go to Monitors> Events tab > Monitor Types > Virtual Machine Threat Protection Events3. Refresh and verify a ‘Guest network threat detected’ event exists.
HOL-PRT-1464
Page 77HOL-PRT-1464

Check "Guest network threat detected" event details
The remediation status this time is “Guest network threat blocked” since the Virtual Machine ThreatProtection Policy is configured to block the connection when threat is found.
HOL-PRT-1464
Page 78HOL-PRT-1464
Top Related