


Languages
Pages
Legal

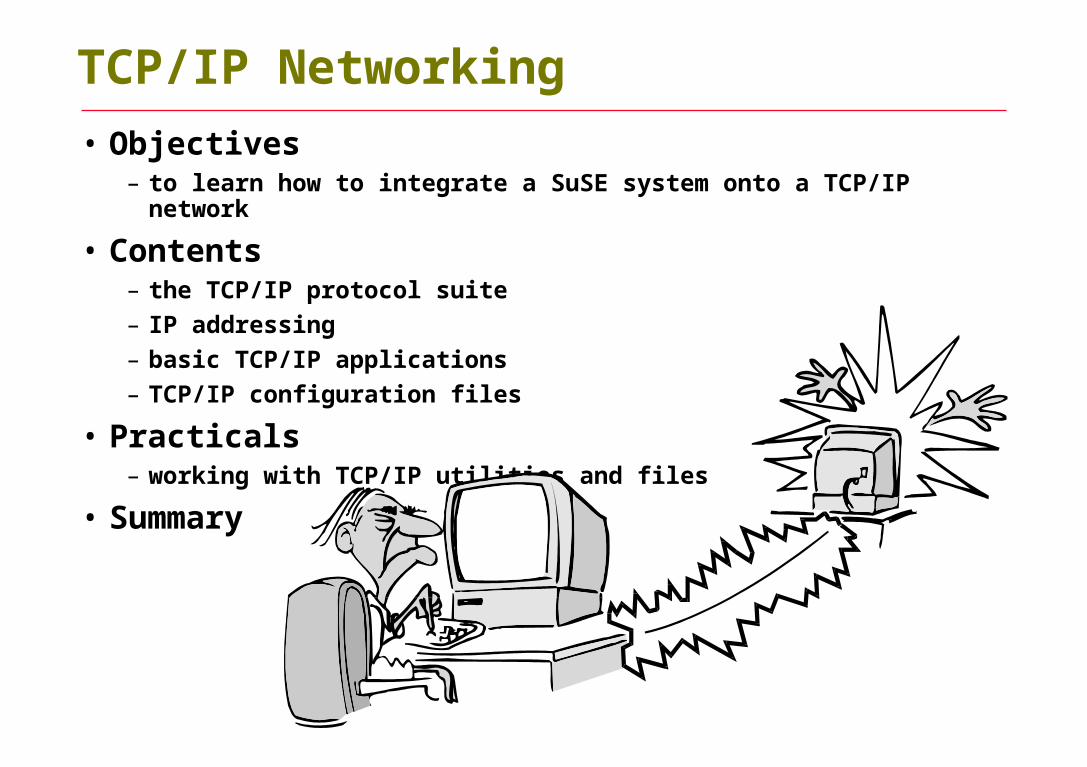
TCP/IP Networking
• Objectives– to learn how to integrate a SuSE system onto a TCP/IP network
• Contents– the TCP/IP protocol suite
– IP addressing
– basic TCP/IP applications
– TCP/IP configuration files
• Practicals– working with TCP/IP utilities and files
• Summary

Overview of TCP/IP
• US DoD funded experimental network– supports inter-networks, inter-host communication
– most popular UNIX networking protocols
• Three basic protocolsTCP - a reliable session protocol: telnet, ftp
UDP - low overhead sessionless: NFS, NIS, DNS, routing
IP - Network layer protocol, sessionless, base of TCP and UDP
gatewaynetwork
hosts
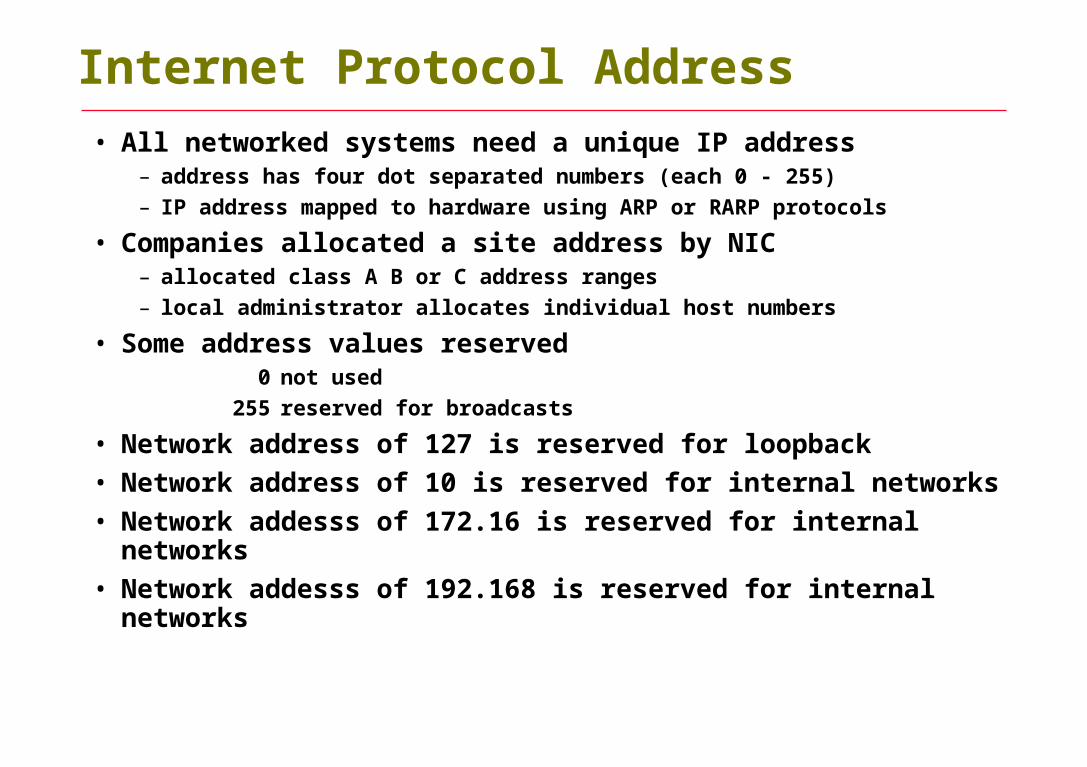
• All networked systems need a unique IP address– address has four dot separated numbers (each 0 - 255)
– IP address mapped to hardware using ARP or RARP protocols
• Companies allocated a site address by NIC– allocated class A B or C address ranges
– local administrator allocates individual host numbers
• Some address values reserved0 not used
255 reserved for broadcasts
• Network address of 127 is reserved for loopback
• Network address of 10 is reserved for internal networks
• Network addesss of 172.16 is reserved for internal networks
• Network addesss of 192.168 is reserved for internal networks
Internet Protocol Address

7 bits 0 8 bits 24 bits
24 bit host address network
1
16 bit host address 16 bit network
0
network addresses in range 0 - 126
network addresses in range 128.0 - 191.254
1
8 bit host24 bit network
0
network addresses in range 192.0.0 - 223.254.254
1
14 bits 16 bits
21 bits 8 bits
Class AAddresses
Class BAddresses
Class CAddresses
IP Address Format
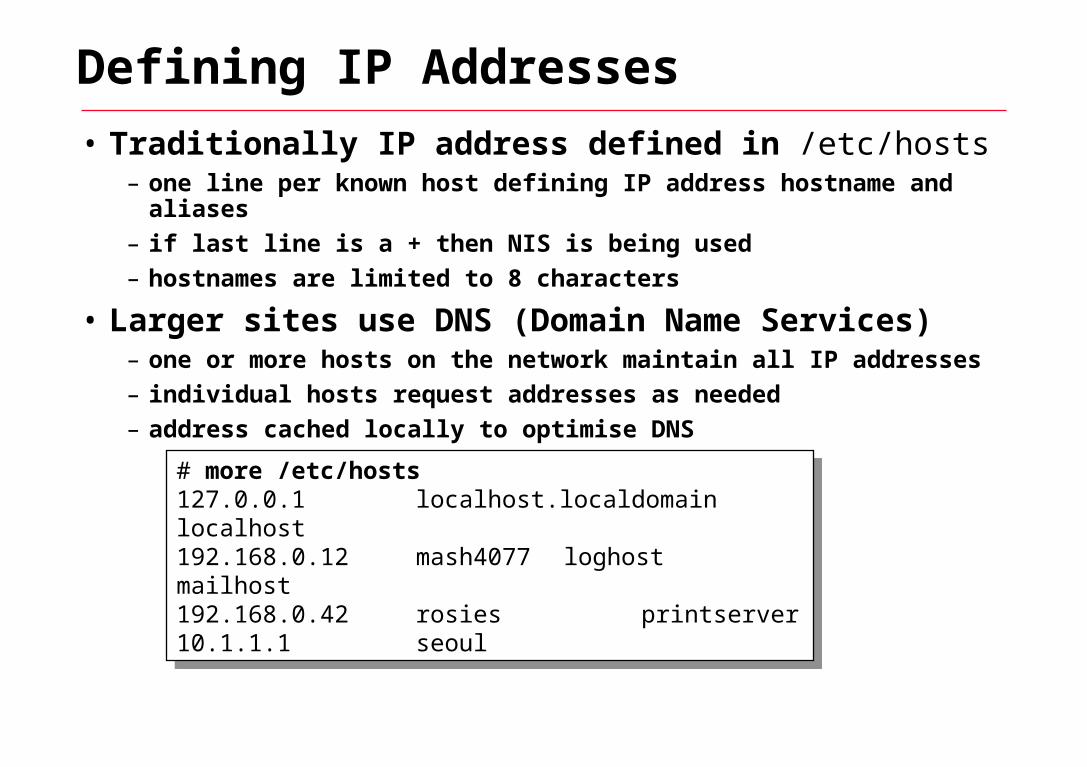
Defining IP Addresses
• Traditionally IP address defined in /etc/hosts– one line per known host defining IP address hostname and aliases
– if last line is a + then NIS is being used
– hostnames are limited to 8 characters
• Larger sites use DNS (Domain Name Services)– one or more hosts on the network maintain all IP addresses
– individual hosts request addresses as needed
– address cached locally to optimise DNS
# more /etc/hosts127.0.0.1 localhost.localdomainlocalhost192.168.0.12 mash4077 loghostmailhost192.168.0.42 rosies printserver 10.1.1.1 seoul
# more /etc/hosts127.0.0.1 localhost.localdomainlocalhost192.168.0.12 mash4077 loghostmailhost192.168.0.42 rosies printserver 10.1.1.1 seoul

Analyze Network Interface Configuration
• Use ifconfig to view network interfaces– use the -a option to list all configured interfaces
# ifconfig -aeth0 Link encap:Ethernet HWaddr 00:50:04:50:61:98 inet addr:192.168.1.100 Bcast:192.168.1.255 Mask:255.255.255.0
UP BROADCAST RUNNING MULTICAST MTU:1500 Metric:1 RX packets:59078481 errors:0 dropped:0 overruns:84 frame:0 TX packets:53902612 errors:0 dropped:0 overruns:0 carrier:0 collisions:0
lo Link encap:Local Loopback inet addr:127.0.0.1 Mask:255.0.0.0
UP LOOPBACK RUNNING MTU:16436 Metric:1 RX packets:22596609 errors:0 dropped:0 overruns:0 frame:0 TX packets:22596609 errors:0 dropped:0 overruns:0 carrier:0 collisions:0
# ifconfig eth0 down# ifconfig eth0 up

Network Interface Configuration• Use ifconfig to configure the network interface
• Permanent changes in /etc/sysconfig/networkFiles named like: ifcfg-eth-id-<MAC> STATIC settings:
DHCP settings:
• Alias interfaces
Permanent changes in /etc/sysconfig/network-scripts/ifcfg-eth-id-<MAC>
• Releasing/Renewing IP adressesifdown eth0 / ifup eth0
# ifconfig eth0 192.168.0.1 netmask 255.255.255.0 up# ifconfig eth0 192.168.0.1 netmask 255.255.255.0 up
STARTMODE=autoBOOTPROTO=staticBROADCAST=192.168.0.255NETWORK=192.168.0.0NETMASK=255.255.255.0IPADDR=192.168.0.1
STARTMODE=autoBOOTPROTO=staticBROADCAST=192.168.0.255NETWORK=192.168.0.0NETMASK=255.255.255.0IPADDR=192.168.0.1
DEVICE=eth0BOOTPROTO=dhcpSTARTMODE=auto
DEVICE=eth0BOOTPROTO=dhcpSTARTMODE=auto
# Ifconfig eth0:0 192.168.1.12# Ifconfig eth0:0 192.168.1.12
IPADDR_0='192.168.1.99'NETMASK_0='255.255.255.0'LABEL_0='0'
IPADDR_0='192.168.1.99'NETMASK_0='255.255.255.0'LABEL_0='0'

Routing information• Use route to get/manipulate network routing
– Route table netstat –r(n) or route
– Routes to all directly connected networks are created automatic
– To add a net-route: route add –net 192.168.7.0 gw 192.168.1.254
– To delete a net-route: route del –net 192.168.7.0 gw 192.168.1.254
• SuSE can hande RIP/OSPF + traffic shapingMetric value for priority if different value or round robin if same:
route add –net 192.168.3.0 netmask 255.255.255.0 gw 192.168.1.253 metric 10
route add –net 192.168.3.0 netmask 255.255.255.0 gw 192.168.1.254 metric 10
Detete the route:
route del –net 192.168.3.0 netmask 255.255.255.0
# routeKernel IP routing tableDestination Gateway Genmask Flags Metric Ref Use Iface80.84.37.0 * 255.255.255.240 U 0 0 0 eth3172.16.0.0 * 255.255.255.0 U 0 0 0 eth2192.168.1.0 * 255.255.255.0 U 0 0 0 eth0192.168.0.0 * 255.255.255.0 U 0 0 0 eth1127.0.0.0 * 255.0.0.0 U 0 0 0 lodefault router.ing-stee 0.0.0.0 UG 0 0 0 eth3
# routeKernel IP routing tableDestination Gateway Genmask Flags Metric Ref Use Iface80.84.37.0 * 255.255.255.240 U 0 0 0 eth3172.16.0.0 * 255.255.255.0 U 0 0 0 eth2192.168.1.0 * 255.255.255.0 U 0 0 0 eth0192.168.0.0 * 255.255.255.0 U 0 0 0 eth1127.0.0.0 * 255.0.0.0 U 0 0 0 lodefault router.ing-stee 0.0.0.0 UG 0 0 0 eth3
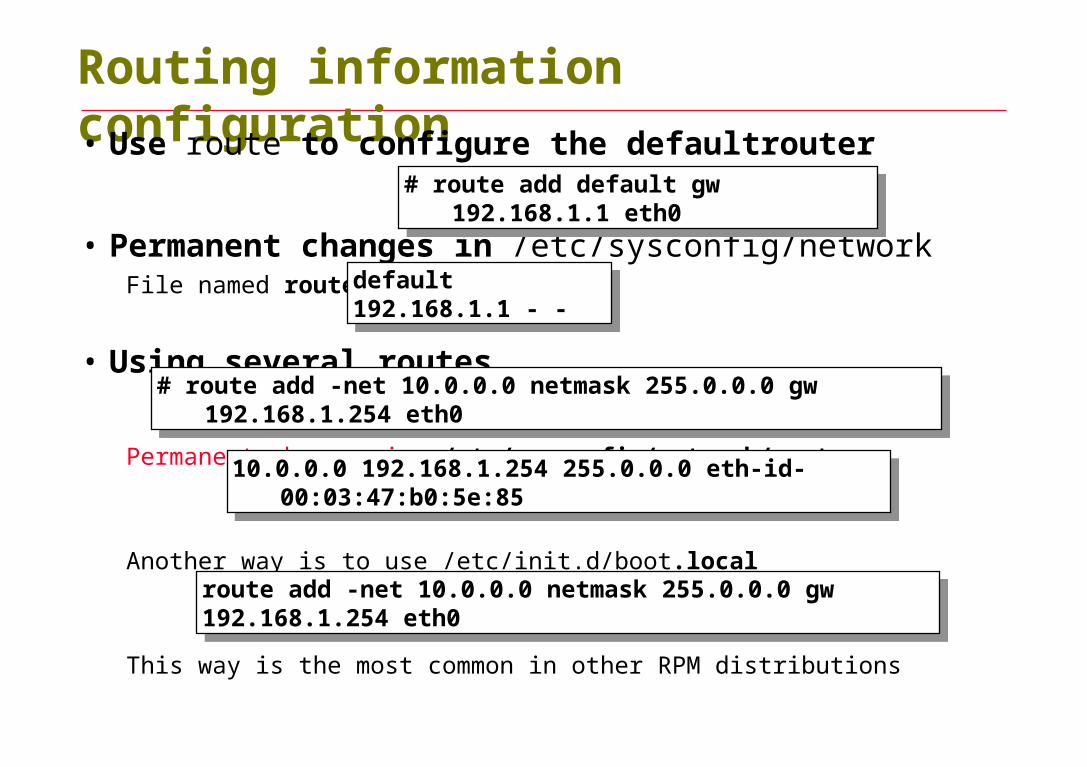
Routing information configuration
• Use route to configure the defaultrouter
• Permanent changes in /etc/sysconfig/networkFile named routes:
• Using several routes
Permanent changes in /etc/sysconfig/network/routes
Another way is to use /etc/init.d/boot.local
This way is the most common in other RPM distributions
# route add default gw 192.168.1.1 eth0
# route add default gw 192.168.1.1 eth0
default 192.168.1.1 - -default 192.168.1.1 - -
# route add -net 10.0.0.0 netmask 255.0.0.0 gw 192.168.1.254 eth0
# route add -net 10.0.0.0 netmask 255.0.0.0 gw 192.168.1.254 eth0
route add -net 10.0.0.0 netmask 255.0.0.0 gw 192.168.1.254 eth0
route add -net 10.0.0.0 netmask 255.0.0.0 gw 192.168.1.254 eth0
10.0.0.0 192.168.1.254 255.0.0.0 eth-id-00:03:47:b0:5e:8510.0.0.0 192.168.1.254 255.0.0.0 eth-id-00:03:47:b0:5e:85

Adding/Removing NIC’s
• Adding NIC1. Before going further, find out current NIC-order
a) By physical inspection, pinging and moving cables.
b) Look in /etc/modprobe.conf or find NIC modules with lsmod, lsdev, hwinfo, lspci and ksymoops Kernel key symbol is exported like [3c59x] for 3c905 boards.
c) Modify /etc/modprobe.conf to reflect your wished NIC order.
2. Look if new NIC needs to be added in kernel or kernel need patch. If that is the case, recompile kernel and do step 1 again!
3. Power off the host
4. Insert the new NIC
5. If you are lucky, hwinfo and hald will find the new NIC and add it for you, you will be asked configuration parameters.
6. If everything goes well you can now goto step 1 once again to check out your NIC order. If you are satisfied it is time to do NIC configuration permanent.
Removing NIC, you basically do the same steps but you now remove support, hald will detect NIC removal and you can remember its configuration.

Changing NIC parameters
• Use ethtool to view NIC settings
• Using mii-tool to force 100MBit/s Full Duplex
• Making changes permanent /etc/init.d/boot.local
# ethtool eth0 Supported ports: [ TP MII ] Supported link modes: 10baseT/Half 10baseT/Full 100baseT/Half 100baseT/Full Supports auto-negotiation: Yes Advertised link modes: 10baseT/Half 10baseT/Full 100baseT/Half 100baseT/Full Advertised auto-negotiation: Yes Speed: 100Mb/s Duplex: Full Port: MII PHYAD: 1 Transceiver: internal Auto-negotiation: on Supports Wake-on: g Wake-on: d Current message level: 0x00000007 (7) Link detected: yes
# ethtool eth0 Supported ports: [ TP MII ] Supported link modes: 10baseT/Half 10baseT/Full 100baseT/Half 100baseT/Full Supports auto-negotiation: Yes Advertised link modes: 10baseT/Half 10baseT/Full 100baseT/Half 100baseT/Full Advertised auto-negotiation: Yes Speed: 100Mb/s Duplex: Full Port: MII PHYAD: 1 Transceiver: internal Auto-negotiation: on Supports Wake-on: g Wake-on: d Current message level: 0x00000007 (7) Link detected: yes
# ethtool -s eth0 speed 100 duplex full# ethtool -s eth0 speed 100 duplex full

Nameservers for non nameserver hosts
• Nameservers are stored in /etc/resolv.confGeneral format:
Nameserver The nameservers to query for names
Domain My domain, my host is added to this domain.
Search A space delimited list of max six key domains to add hostnames to in the query if domain is missing.
Options rotate round robin Nameserver list
timeout:n default is 30 seconds
attempts:n default is 3 or 4
• Searchorder for finding hosts are stored in /etc/host.conf
• Name Service Switch config file /etc/nsswitch.conf
domain my-site.comsearch my-site.comnameserver ip 2nameserver ip 1nameserver ip 3
domain my-site.comsearch my-site.comnameserver ip 2nameserver ip 1nameserver ip 3
order hosts,bindorder hosts,bind
Hosts: files lwres dnsHosts: files lwres dns

Looking at Network Statistics
• Use netstat to get network status information– use -a to view all sockets
– use -i to view interfaces
– use -rn to view routing statistics
• MRTG Multi Router Traffic Grapher – Is common to make graphs over network traffic
– Usally togeather with SNMP
Simple Network
Management Protocol
– Apache is common for presentation of plots
# netstat -iKernel Interface tableIface MTU Met RX-OK RX-ERR RX-DRP RX-OVR TX-OK TX-ERR TX-DRP TX-OVR Flgeth0 1500 0 59098394 0 0 84 53924429 0 0 0 BRUlo 16436 0 22598046 0 0 0 22598046 0 0 0 LRU
# netstat -iKernel Interface tableIface MTU Met RX-OK RX-ERR RX-DRP RX-OVR TX-OK TX-ERR TX-DRP TX-OVR Flgeth0 1500 0 59098394 0 0 84 53924429 0 0 0 BRUlo 16436 0 22598046 0 0 0 22598046 0 0 0 LRU
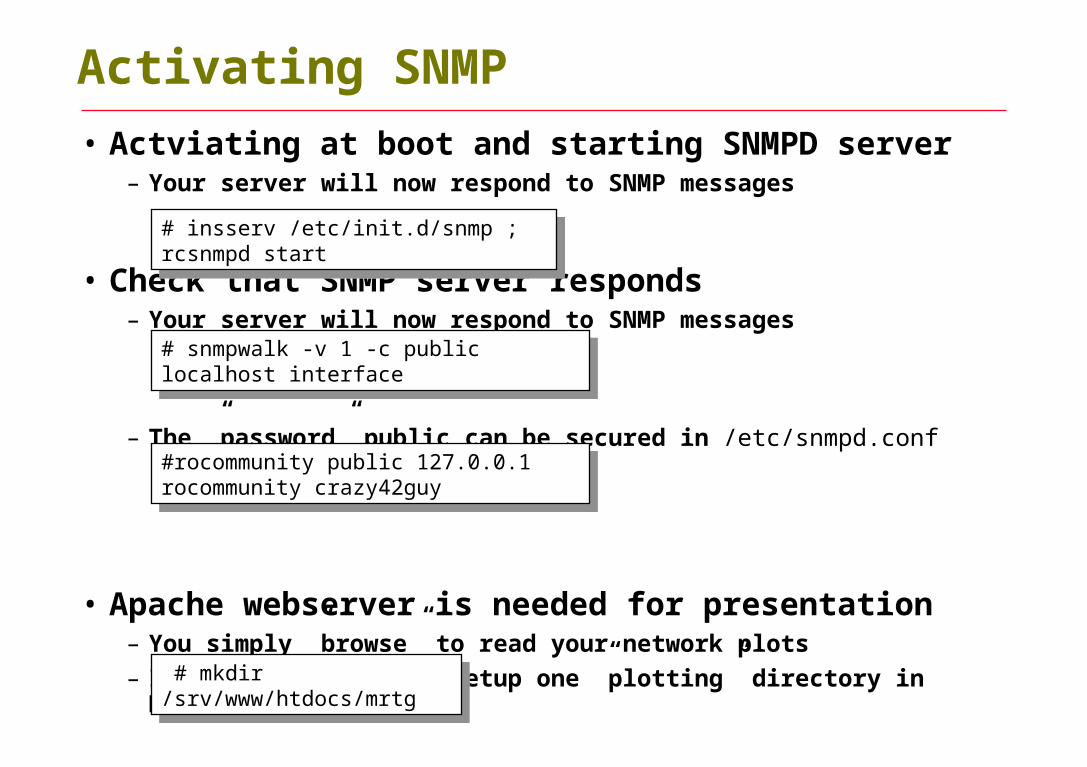
Activating SNMP
• Actviating at boot and starting SNMPD server– Your server will now respond to SNMP messages
• Check that SNMP server responds– Your server will now respond to SNMP messages
– The ”password” public can be secured in /etc/snmpd.conf
• Apache webserver is needed for presentation– You simply ”browse” to read your network plots
– It is most simple to setup one ”plotting” directory in DocumentRoot
# insserv /etc/init.d/snmp ; rcsnmpd start# insserv /etc/init.d/snmp ; rcsnmpd start
# snmpwalk -v 1 -c public localhost interface# snmpwalk -v 1 -c public localhost interface
#rocommunity public 127.0.0.1rocommunity crazy42guy
#rocommunity public 127.0.0.1rocommunity crazy42guy
# mkdir /srv/www/htdocs/mrtg # mkdir /srv/www/htdocs/mrtg

Activating MRTG
• Autoconfigure MRTG with cfgmaker– First create config directory
– Then execute the autoconfig
– All must be in one row!
• Test run MRTG 3 times– MRTG will now make three test plots, the warnings will go away
• Use MRTG's indexmaker command to create a Web index page
• Add a CRON job to run MRTG every 5 minute– Enter with crontab –e
• Check the plots with web-browser
# mkdir /etc/mrtg/# cfgmaker --output=/etc/mrtg/mrtg.cfg \--global "workdir: /srv/www/htdocs/mrtg" -ifref=ip \--global 'options[_]: growright,bits' \crazy42guy@localhost
# mkdir /etc/mrtg/# cfgmaker --output=/etc/mrtg/mrtg.cfg \--global "workdir: /srv/www/htdocs/mrtg" -ifref=ip \--global 'options[_]: growright,bits' \crazy42guy@localhost
# env LANG=C /usr/bin/mrtg /etc/mrtg/mrtg.cfg # env LANG=C /usr/bin/mrtg /etc/mrtg/mrtg.cfg
# indexmaker --output=/srv/www/htdocs/mrtg/index.html \ /etc/mrtg/mrtg.cfg
# indexmaker --output=/srv/www/htdocs/mrtg/index.html \ /etc/mrtg/mrtg.cfg
0-59/5 * * * * env LANG=C /usr/bin/mrtg /etc/mrtg/mrtg.cfg 0-59/5 * * * * env LANG=C /usr/bin/mrtg /etc/mrtg/mrtg.cfg
http://<your server ip>/mrtg/index.htmlhttp://<your server ip>/mrtg/index.html
Looking for a System
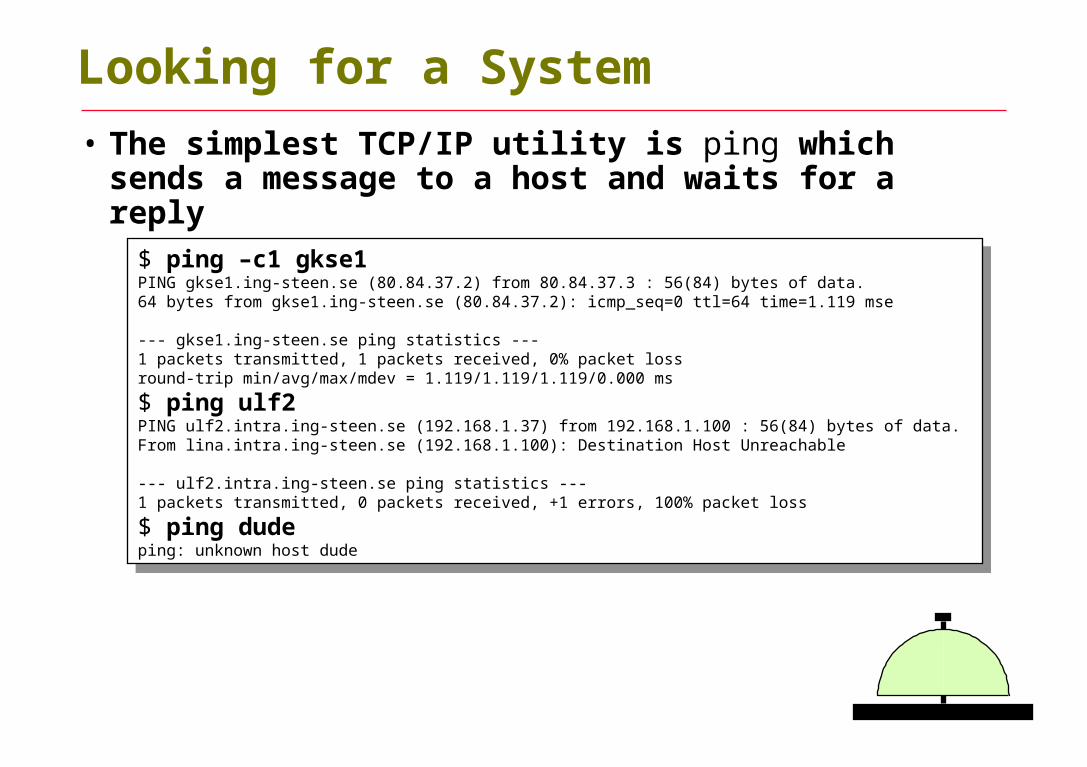
• The simplest TCP/IP utility is ping which sends a message to a host and waits for a reply
– the host can be specified as a name or an IP address
$ ping –c1 gkse1PING gkse1.ing-steen.se (80.84.37.2) from 80.84.37.3 : 56(84) bytes of data.64 bytes from gkse1.ing-steen.se (80.84.37.2): icmp_seq=0 ttl=64 time=1.119 mse
--- gkse1.ing-steen.se ping statistics ---1 packets transmitted, 1 packets received, 0% packet lossround-trip min/avg/max/mdev = 1.119/1.119/1.119/0.000 ms
$ ping ulf2PING ulf2.intra.ing-steen.se (192.168.1.37) from 192.168.1.100 : 56(84) bytes of data.From lina.intra.ing-steen.se (192.168.1.100): Destination Host Unreachable
--- ulf2.intra.ing-steen.se ping statistics ---1 packets transmitted, 0 packets received, +1 errors, 100% packet loss
$ ping dudeping: unknown host dude
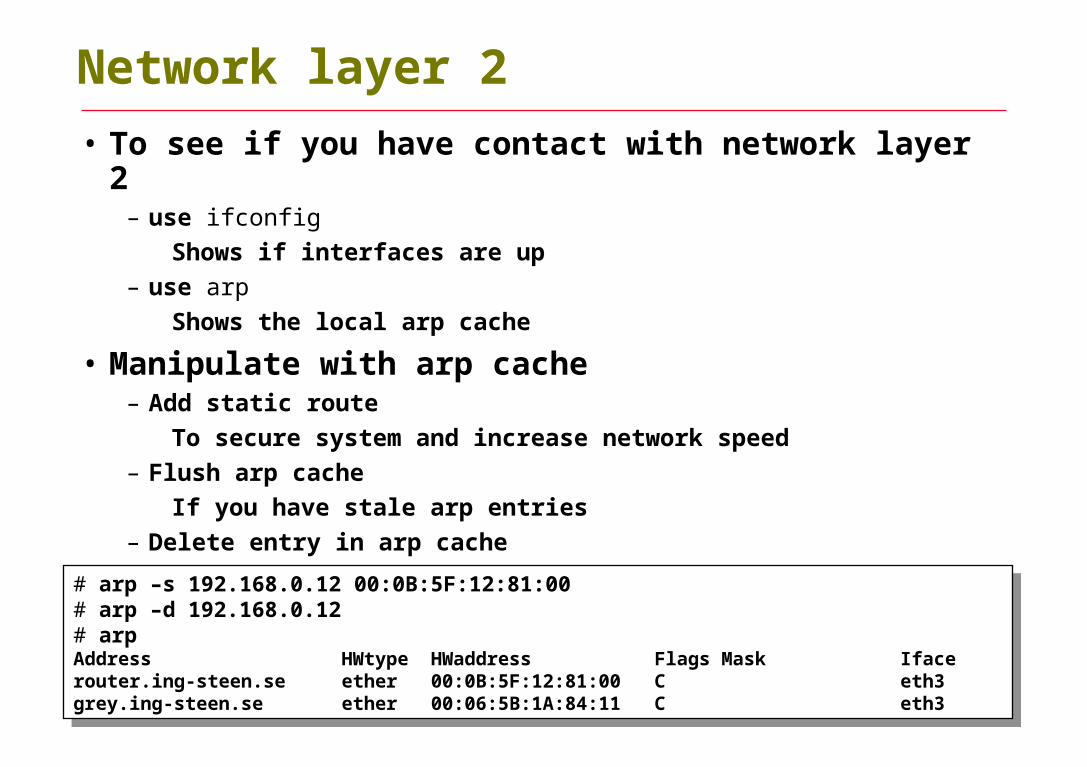
Network layer 2
• To see if you have contact with network layer 2– use ifconfig
Shows if interfaces are up
– use arp
Shows the local arp cache
• Manipulate with arp cache– Add static route
To secure system and increase network speed
– Flush arp cache
If you have stale arp entries
– Delete entry in arp cache
Remove faulty entries
# arp –s 192.168.0.12 00:0B:5F:12:81:00# arp –d 192.168.0.12# arpAddress HWtype HWaddress Flags Mask Ifacerouter.ing-steen.se ether 00:0B:5F:12:81:00 C eth3grey.ing-steen.se ether 00:06:5B:1A:84:11 C eth3
# arp –s 192.168.0.12 00:0B:5F:12:81:00# arp –d 192.168.0.12# arpAddress HWtype HWaddress Flags Mask Ifacerouter.ing-steen.se ether 00:0B:5F:12:81:00 C eth3grey.ing-steen.se ether 00:06:5B:1A:84:11 C eth3
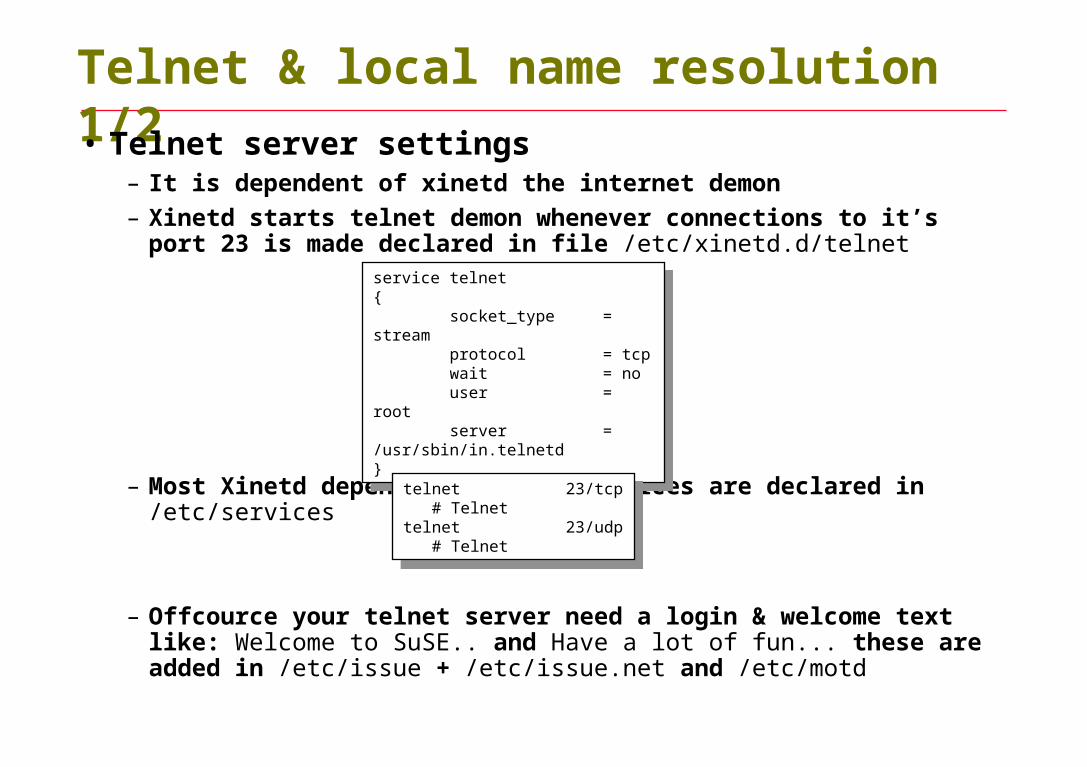
Telnet & local name resolution 1/2
• Telnet server settings– It is dependent of xinetd the internet demon
– Xinetd starts telnet demon whenever connections to it’s port 23 is made declared in file /etc/xinetd.d/telnet
– Most Xinetd dependent TCP/UDP services are declared in /etc/services
– Offcource your telnet server need a login & welcome text like: Welcome to SuSE.. and Have a lot of fun... these are added in /etc/issue + /etc/issue.net and /etc/motd
service telnet{ socket_type = stream protocol = tcp wait = no user = root server = /usr/sbin/in.telnetd}
service telnet{ socket_type = stream protocol = tcp wait = no user = root server = /usr/sbin/in.telnetd}
telnet 23/tcp # Telnettelnet 23/udp # Telnet
telnet 23/tcp # Telnettelnet 23/udp # Telnet

Telnet & local name resolution 2/2
• To activate telnet
• Telnet is used to access most network gears (routers) and many servers sitting in trusted networks
• The local name resolution should allways be setup to cover the most important hosts and servers.
$ uname -n a01$ telnet a02My SuSE linux server!login: hawkeyepassword: Welcome to Uncle Sam's wonderful world of UnixRemember the bar never closes!$ uname -n a02
$ uname -n a01$ telnet a02My SuSE linux server!login: hawkeyepassword: Welcome to Uncle Sam's wonderful world of UnixRemember the bar never closes!$ uname -n a02
# cat /etc/hosts127.0.0.1 localhost.localdomain localhost a01192.168.0.1 a01.my-site.com a01 # This host IP address!192.168.0.2 a02.my-site.com a02 # Other important hosts192.168.0.3 a03.my-site.com a03192.168.0.4 a04.my-site.com a04
# cat /etc/hosts127.0.0.1 localhost.localdomain localhost a01192.168.0.1 a01.my-site.com a01 # This host IP address!192.168.0.2 a02.my-site.com a02 # Other important hosts192.168.0.3 a03.my-site.com a03192.168.0.4 a04.my-site.com a04
# chkconfig telnet on ; rcxinetd restart# chkconfig telnet on ; rcxinetd restart
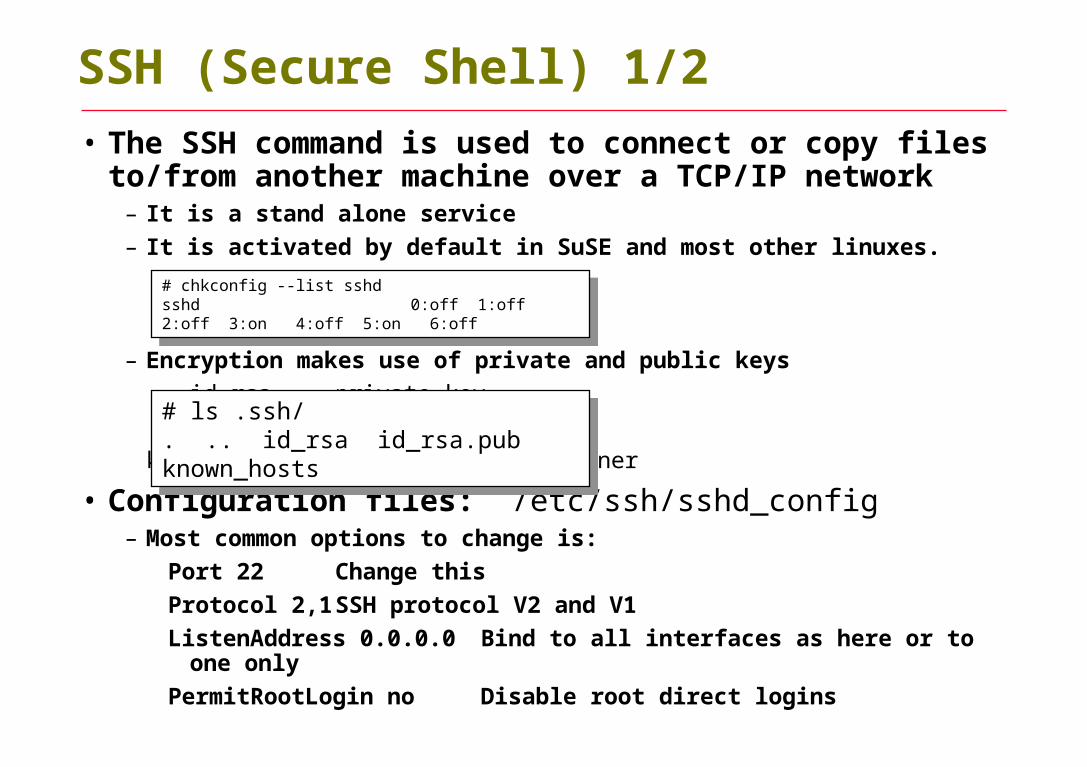
SSH (Secure Shell) 1/2
• The SSH command is used to connect or copy files to/from another machine over a TCP/IP network
– It is a stand alone service
– It is activated by default in SuSE and most other linuxes.
– Encryption makes use of private and public keys
id_rsa private key
id_rsa.pub public key
known_hosts public key container
• Configuration files: /etc/ssh/sshd_config– Most common options to change is:
Port 22 Change this
Protocol 2,1 SSH protocol V2 and V1
ListenAddress 0.0.0.0 Bind to all interfaces as here or to one only
PermitRootLogin no Disable root direct logins
# chkconfig --list sshdsshd 0:off 1:off 2:off 3:on 4:off 5:on 6:off
# chkconfig --list sshdsshd 0:off 1:off 2:off 3:on 4:off 5:on 6:off
# ls .ssh/. .. id_rsa id_rsa.pub known_hosts
# ls .ssh/. .. id_rsa id_rsa.pub known_hosts

SSH (Secure Shell) 2/2
• SSH login– a connection is established and the user logs on as normal
First time you login to a new server a public key must eventually
be generated and stored in known_hosts, Second time login will eventually prompt you for password.
• SSH copy– From current host to any other host running sshd
– From any other host to current host
– Between two remote hosts
• FileZilla & Putty– Login & Copy tools for use with Windows to administer your unix servers
$ hostnamea02$ ssh peter@a01password: $ hostnamea01
$ hostnamea02$ ssh peter@a01password: $ hostnamea01
# scp filename.txt [email protected]:~ungk4/.Welcome to Linux (i586)Password:filename.txt 100% 1166 1.1KB/s 00:00
# scp filename.txt [email protected]:~ungk4/.Welcome to Linux (i586)Password:filename.txt 100% 1166 1.1KB/s 00:00

• FTP is an interactive utility for network file transfer– login to remote host supplying username and password
– FTP can be run as xinetd or stand alone service
• Anonymous FTP server– Allows only user anonymous or ftp to login
• Non Anonymous FTPserver– Allows also local registered users (passwd users) to login
• As standard it is Anonymous server– Only file download is allowed
• VSFTP has to be opened in order to do more
VSFTP Very Secure FTP
$ ftp a01Connected to a01Name (a01:hawkeye): Password:ftp> get file2...data about the transfer...ftp> put /etc/hosts /tmp/mash.hosts...data about the transfer...ftp> bye
$ ftp a01Connected to a01Name (a01:hawkeye): Password:ftp> get file2...data about the transfer...ftp> put /etc/hosts /tmp/mash.hosts...data about the transfer...ftp> bye

• The file is in clear textand somewhat selfexplained, basicaly we have– General settings– Anonymous FTP settings– Transfer settings
anonymous_enable=Yes/No Allow anon users at allanon_upload_enable=Yes/No Allow anon users to uploadfilesanon_mkdir_write_enable=Yes/No Allow anon users to make dirsanon_root=<path> FTP root settings
userlist_enable vs.ftpd.user_list contain allowed usersuserlist_deny vs.ftpd.user_list contain denied users
local_enable=Yes/No Allow non anonymous local users to loginwrite_enable=Yes/No To be allowed to write at all
ftpd_banner= My FTP Server Welcome messagexferlog_enable=YES/No Log filetransfersxferlog_file=<path> Logfile
• Restrict FTP access using /etc/vsftpd.ftpusers file• Chroot Jail users: /etc/vsftpd.chroot_list • Ftp userlist: /etc/vsftpd.user_list
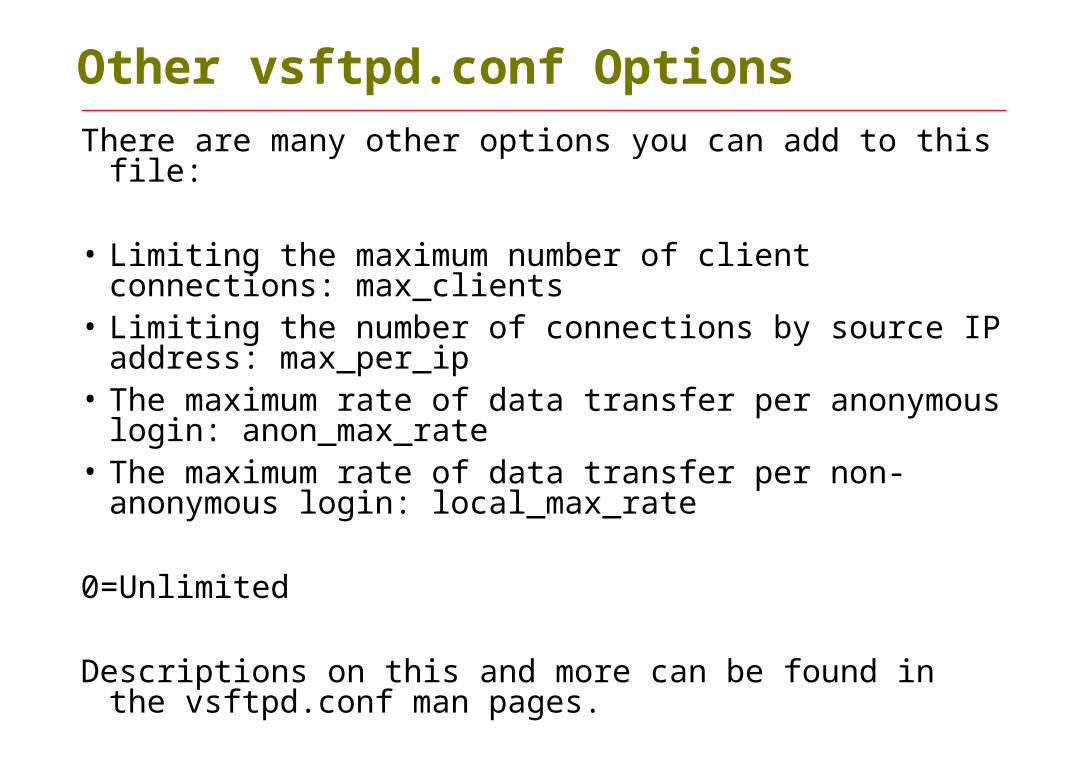
VSFTPD setup: /etc/vsftpd.conf

There are many other options you can add to this file:
• Limiting the maximum number of client connections: max_clients
• Limiting the number of connections by source IP address: max_per_ip
• The maximum rate of data transfer per anonymous login: anon_max_rate
• The maximum rate of data transfer per non-anonymous login: local_max_rate
0=Unlimited
Descriptions on this and more can be found in the vsftpd.conf man pages.
Other vsftpd.conf Options

File Transfer Protocol
There are many other options you can add to this file:
• Limiting the maximum number of client connections: max_clients
• Limiting the number of connections by source IP address: max_per_ip
• The maximum rate of data transfer per anonymous login: anon_max_rate
• The maximum rate of data transfer per non-anonymous login: local_max_rate
0=Unlimited
Descriptions on this and more can be found in the vsftpd.conf man pages.
Other vsftpd.conf Options
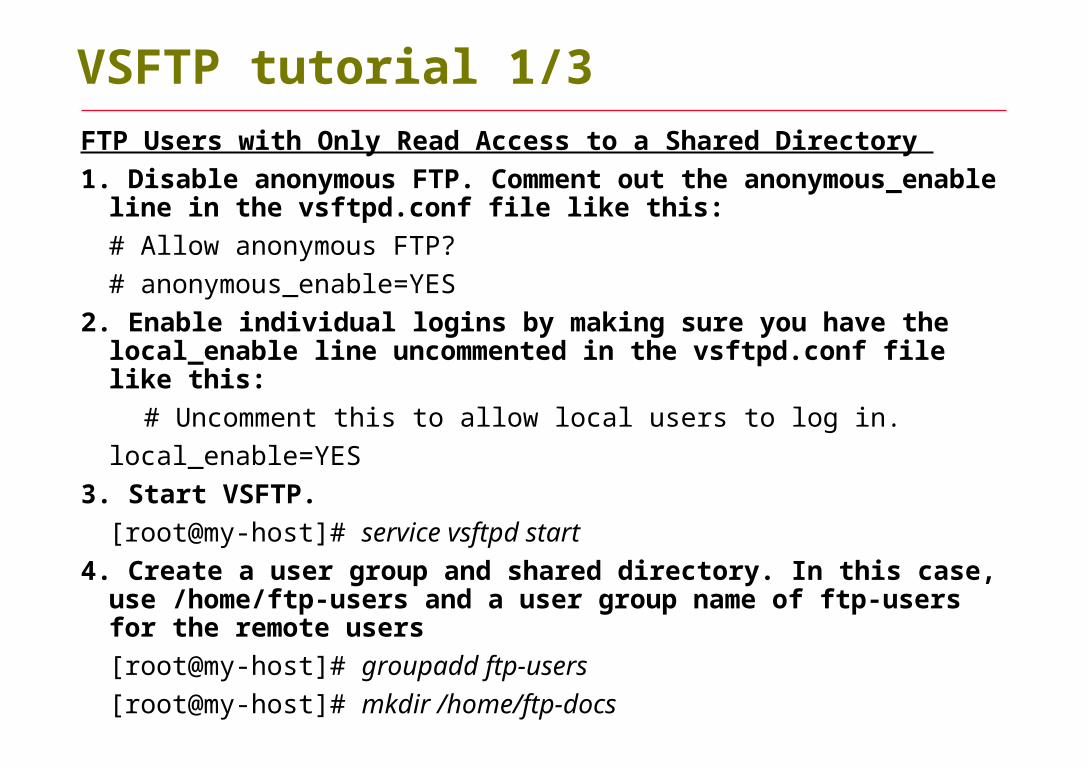
FTP Users with Only Read Access to a Shared Directory
1. Disable anonymous FTP. Comment out the anonymous_enable line in the vsftpd.conf file like this:
# Allow anonymous FTP?
# anonymous_enable=YES
2. Enable individual logins by making sure you have the local_enable line uncommented in the vsftpd.conf file like this:
# Uncomment this to allow local users to log in.
local_enable=YES
3. Start VSFTP.
[root@my-host]# service vsftpd start
4. Create a user group and shared directory. In this case, use /home/ftp-users and a user group name of ftp-users for the remote users
[root@my-host]# groupadd ftp-users
[root@my-host]# mkdir /home/ftp-docs
VSFTP tutorial 1/3
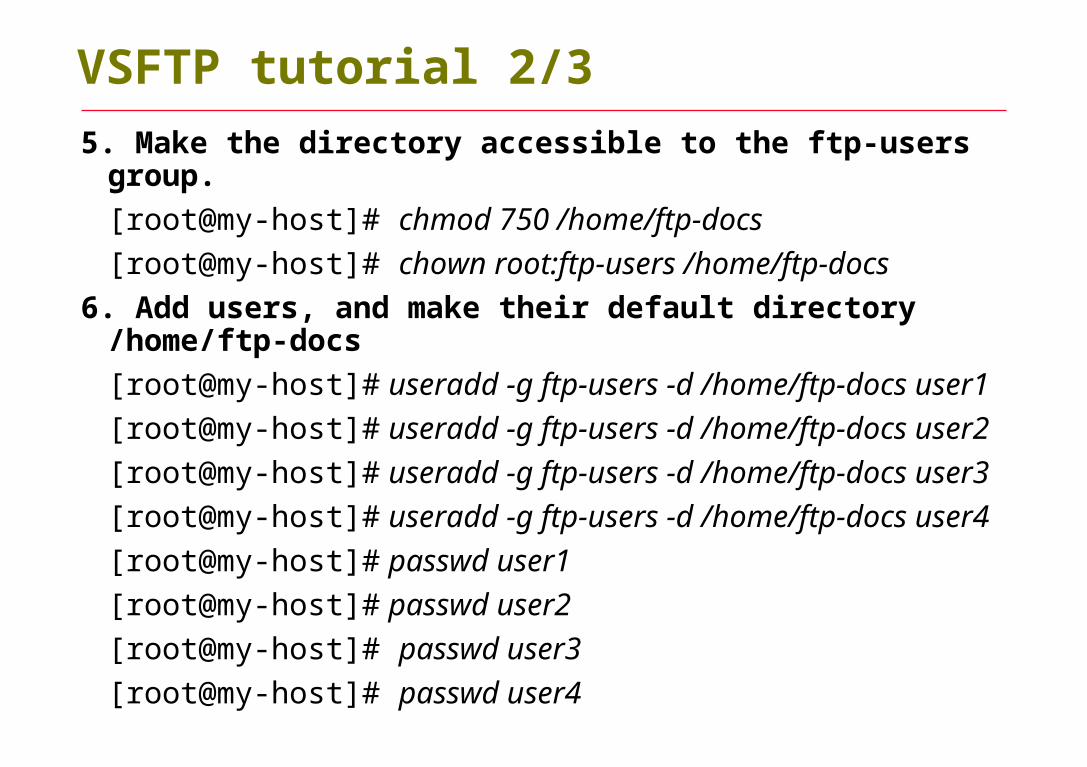
5. Make the directory accessible to the ftp-users group.
[root@my-host]# chmod 750 /home/ftp-docs
[root@my-host]# chown root:ftp-users /home/ftp-docs
6. Add users, and make their default directory /home/ftp-docs
[root@my-host]# useradd -g ftp-users -d /home/ftp-docs user1
[root@my-host]# useradd -g ftp-users -d /home/ftp-docs user2
[root@my-host]# useradd -g ftp-users -d /home/ftp-docs user3
[root@my-host]# useradd -g ftp-users -d /home/ftp-docs user4
[root@my-host]# passwd user1
[root@my-host]# passwd user2
[root@my-host]# passwd user3
[root@my-host]# passwd user4
VSFTP tutorial 2/3

7. Copy files to be downloaded by your users into the /home/ftp-docs directory
8. Change the permissions of the files in the /home/ftp-docs directory for read only access by the group
[root@my-host]# chown root:ftp-users /home/ftp-docs/*
[root@my-host]# chmod 740 /home/ftp-docs/*
Users should now be able to log in via FTP to the server using their new usernames and passwords. If you absolutely don't want any FTP users to be able to write to any directory, then you should set the write_enable line in your vsftpd.conf file to no:
write_enable = NO
Remember, you must restart VSFTPD, if it is run as stand alone, for the configuration file changes to take effect.
VSFTP tutorial 3/3
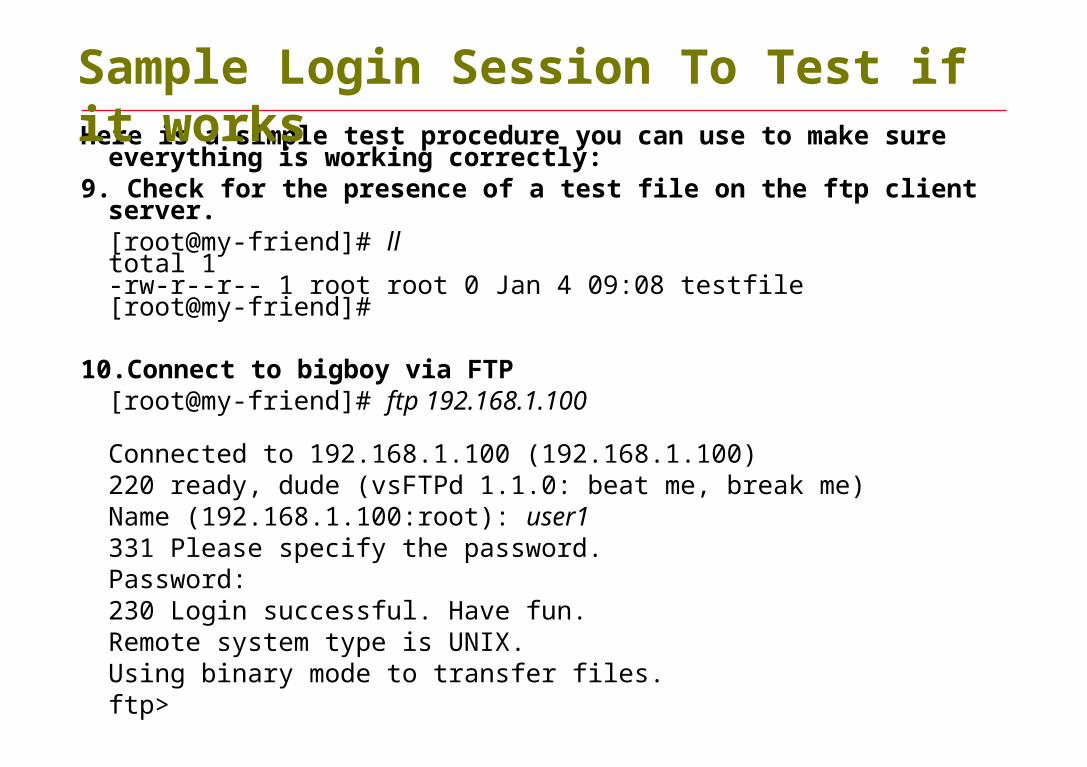
Here is a simple test procedure you can use to make sure everything is working correctly:
9. Check for the presence of a test file on the ftp client server.[root@my-friend]# lltotal 1-rw-r--r-- 1 root root 0 Jan 4 09:08 testfile[root@my-friend]#
10.Connect to bigboy via FTP
[root@my-friend]# ftp 192.168.1.100
Connected to 192.168.1.100 (192.168.1.100)220 ready, dude (vsFTPd 1.1.0: beat me, break me)Name (192.168.1.100:root): user1331 Please specify the password.Password:230 Login successful. Have fun.Remote system type is UNIX.Using binary mode to transfer files.ftp>
Sample Login Session To Test if it works

As expected, we can't do an upload transfer of testfile to my-host.ftp> put testfilelocal: testfile remote: testfile227 Entering Passive Mode (192,168,1,100,181,210)
553 Could not create file.ftp> But we can view and download a copy of the VSFTPD RPM located on the FTP server my-
host. ftp> ls227 Entering Passive Mode (192,168,1,100,35,173)150 Here comes the directory listing.-rwxr----- 1 0 502 76288 Jan 04 17:06 vsftpd-1.1.0-1.i386.rpm226 Directory send OK.ftp> get vsftpd-1.1.0-1.i386.rpm vsftpd-1.1.0-1.i386.rpm.tmplocal: vsftpd-1.1.0-1.i386.rpm.tmp remote: vsftpd-1.1.0-1.i386.rpm227 Entering Passive Mode (192,168,1,100,44,156)150 Opening BINARY mode data connection for vsftpd-1.1.0-1.i386.rpm (76288 bytes).226 File send OK.76288 bytes received in 0.499 secs (1.5e+02 Kbytes/sec)ftp> exit221 Goodbye.[root@my-friend]#
Sample Login Session To Test if it works

As expected, anonymous FTP fails. [root@my-friend]# ftp 192.168.1.100Connected to 192.168.1.100 (192.168.1.100)220 ready, dude (vsFTPd 1.1.0: beat me, break me)Name (192.168.1.100:root): anonymous331 Please specify the password.Password:530 Login incorrect.Login failed.ftp> quit221 Goodbye.[root@my-friend]# Now that testing is complete, you can make this a regular part of your
FTP server's operation.
Sample Login Session To Test if it works

Summary
• Unix systems use TCP/IP for networking
• Every host on the network must have a unique IP address
• The file /etc/hosts maps names into IP addresses for network utilities
• Systems using DNS don't keep local host files
• Unix supports standard TCP/IP programs such as ping, telnet and ftp
• Unix uses snmpd network analysis
• MRTG is nice to make graph over netstat
• Unix uses several TCP/IP configuration files in /etc (xinetd.conf, services, etc.)
Top Related