


Languages
Pages
Legal


2 Modeling and Design of Lens Systems
Why is a lens so important?
It may have the property of refracting the light-rays originating from a certain point in a way that
they again meet in a common point.
this property is called: Imaging
- sketch Point-to-Point imaging
Imaging is one of the most important applications of optical systems!
that’s why we will have a closer look on it in the next lectures.
What is a lens? we already know from previous lessons.
Lens: a rotational symmetric optical element composed of a transparent material with refractive
index n with two spherical or conical surfaces.
- sketch Lens
x
y
z
surface 1 surface 2
d
n
O O‘
spherical wave spherical wave

Sag formula (local coordinate system):
𝑧1/2 =
𝑐1/2 ∙ 𝑟2
1 + √1 − (1 + 𝑘1/2)𝑐1/22 𝑟2
+ 𝑎2𝑟2 + 𝑎4𝑟
4 +⋯ (2.1)
with: radius 𝑟2 = 𝑥2 + 𝑦2
curvature 𝑐1/2 =1
𝑅1/2
R … Radius of curvature
k … conic constant describes a conic section (Kegelschnitt)
k < -1 hyperbola
k = -1 parabola
-1 < k < 0 ellipse
k = 0 sphere
k > 0 oblate ellipse
1/c = R = ± b2/a
k = -2 = -(1 – b2/a2) ( … eccentricity)
d … lens thickness, distance of vertex points
As the exact consideration of the ray-path at a real lens may become quickly very complicated we
will start with the so called paraxial approximation.
Field of Gaussian Optics

2.1 Paraxial Approximation / Gaussian Optics
Law of refraction:
𝑛 ∙ sin𝛼 = 𝑛′ ∙ sin 𝛼′ (2.2)
Paraxial approximation: α , α’ small
𝑛 ∙ 𝛼 = 𝑛′ ∙ 𝛼′ (2.3)
and cos 1.
If this simplification is used in:
- law of refraction
- corresponding ray angles
- equations describing optical surfaces
Then all equations describing the rays become linear!
No aberrations of the system occur during imaging.
(as monochromatic aberrations are principally caused by the non-linearity of Snell’s Law and
the surface equations of order >2)
2.2 Ideal Lens transforming a spherical wave into another spherical wave
Let us assume that the optical effect can be imagined as taking place in the plane of the lens.
sketch Positive Lens
Sign convention in optics:
Distances along the optical axis are positive if they are oriented in the sense of a vector in positive z-
direction.
The same applies for the x- and y-coordinate.
Attention: For radii the direction is oriented from the surface towards the center of curvature!
in the above example: f < 0
f’ > 0
z
positive lens
FF‘
f f ‘

Simple image formation:
sketch Image formation with a positive lens.
y … object height (>0)
y’ … image height (<0)
s … object distance
s’ … image distance (both measured from the vertex of the lens)
We introduce one additional quantity:
𝐿 = 𝑠 − 𝑠′ (2.4)
L … object – image distance
Image formation with a negative lens f’ < 0
sketch Image formation with a negative lens.
virtual image!
Magnification:
𝑚 =
𝑦′
𝑦 (2.5)
y‘ F
F‘
f
y
s
f ‘
s‘
zFF‘
s
y‘y
s‘

With aperture angles u, u’
𝑚 =
𝑛 ∙ sin 𝑢
𝑛′ ∙ sin𝑢′≈𝑛 ∙ 𝑢
𝑛′ ∙ 𝑢′ (2.6)
Sketch: Magnification with aperture angles
𝑚 =
𝑛 ∙ 𝑠′
𝑛′ ∙ 𝑠 (2.7)
Special case: object and image are at infinity (afocal system) Telescope
y, y’ are not defined
definition of the angular magnification by the chief ray angles w, w’.
Γ =
𝑤′
𝑤 (2.8)
Sketch: Angular magnification
Lens Equation:
From the above sketches the following equation can easily be derived combining the focal length and
object / image distances:
𝑓′
𝑠′+𝑓
𝑠= 1 (2.9)
classical image equation
image
u u‘
object
z
s s‘
y
y‘
n n‘
ww‘

In general
𝑓′
𝑛′= −
𝑓
𝑛 (2.10)
holds.
With n=n’ Eq. (2.9) becomes
1
𝑠′−1
𝑠=1
𝑓′ (2.11)
“lens makers formula”
𝑠′ =
𝑠 ∙ 𝑓′
𝑠 + 𝑓′ (2.12)
𝑚 =
𝑓′ − 𝑠′
𝑓′ (2.13)
With these quantities a set of 30 equations for the calculation of one of the other interesting
parameters can be derived.
see Slide (S)
2.3 ABCD-Matrix Formalism
This formalism is based on a geometrical optics consideration of field propagation.
Thus, in a first attempt it seems to be restricted to the cases where the ray-model is valid and
diffraction effects are not included.
However, we will see that the ABCD-matrices which are the core of this formalism are much
more powerful and can be used also for studying (paraxial) diffraction phenomena.
First of all the formalism is a simple method for the treatment of complex optical systems
2.3.1 Derivation of the Formalism
Let’s consider the free-space propagation of a ray between planes z1 and z2=z1+z.
a) Free-Space Propagation:
α1
x
x1
x2
α2
zz1 z2
Δz
Δx
Sketch: Ray between two planes
Parameters of the ray: x … ray-coordinate
α … ray-angle given in plane z1
Calculating the ray parameters in plane z2 :
𝑥2 = 𝑥1 + Δ𝑧 ∙ tan𝛼1 (2.14)
𝛼2 = 𝛼1 (2.15)
Paraxial approximation: tan α α replace in Eq. (2.15)
Note: It is not really necessary to use the paraxial approximation. All following equations
are valid as well if one is using the ray-slope tan α = x’= dx/dz instead of α alone in Eq.
(2.15).
We can rewrite Eqs. (2.14) and (2.15) as one equation for the vector (x α)
(𝑥2𝛼2) = (
1 Δ𝑧0 1
) (𝑥1𝛼1) = 𝑀Δ𝑧 ∙ (
𝑥1𝛼1) (2.16)
ABCD-matrix for free-space propagation within a homogeneous medium.
𝑀Δ𝑧 = (𝐴 𝐵𝐶 𝐷
) = (1 Δ𝑧0 1
) (2.17)
In general: One can find such a matrix for almost every optical element, but typically
then A = f(x)
B = f(x) … are functions of the coordinate x (or r).
There are a number of (important) optical elements for which the matrix
elements are constants and do not depend on the coordinate x!
“well behaved” elements
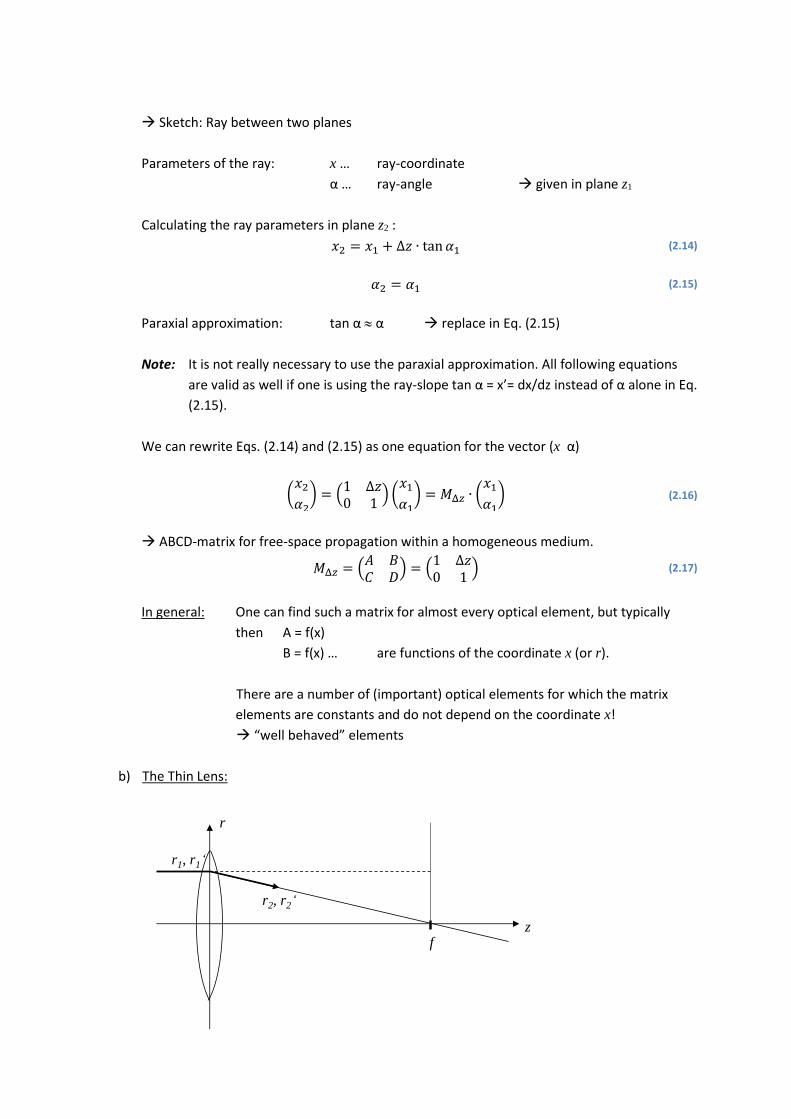
b) The Thin Lens:
r1, r1‘
r
r2, r2‘
fz

Sketch: Thin Lens for ABCD
We see r2 = r1
α2 = -r1/f + α1 (paraxial)
𝑀f = (
1 0
−1
𝑓1) (2.18)
components are not a function of r !
Other Examples:
c) transition at a plane interface n1 n2
𝑀ref = (1 0
0𝑛1𝑛2
)
Sketch: refraction at an interface
d) Curved mirror, radius R = 2f
𝑀M = (1 0
−2
𝑅1)
Sketch: curved mirror
e) Magnification change:
𝑀m = (
𝑚 0
01
𝑚
)
A number of other matrices for other elements can be found in the literature.
These matrices are descriptions for elementary units of complex optical systems.
The overall ABCD-matrix of a complex system can be found by multiplication (non-commutative) of
the matrices of the single elements the system is composed of.
(2.19)
(2.20)
z
n1 n2
zR

Sketch: System composed of multiple matrices.
𝑀sys = 𝑀𝑗 ∙ … ∙ 𝑀3 ∙ 𝑀2 ∙ 𝑀1 (2.21)
Example System: Microscope
Sketch: Telescope
𝑀sys = (
1 0
−1
𝑓21) (
1 ∆𝑧20 1
)(
1 0
−1
𝑓11) (
1 ∆𝑧10 1
)
=
(
1 −∆𝑧2𝑓1
∆𝑧1 + ∆𝑧2 −∆𝑧1∆𝑧2𝑓1
∆𝑧2𝑓1𝑓2
−1
𝑓1−1
𝑓2(1 −
∆𝑧2𝑓2) (1 −
∆𝑧1𝑓1) −
∆𝑧1𝑓2 )
(2.22)
2.3.2 General Properties of ABCD-Matrices
1) Mathematical property:
Determinant of M:
|𝑀| = 𝐴𝐷 − 𝐵𝐶 =𝑛1𝑛2
(2.23)
n1 … refractive index in start-region
n2 … refractive index in end-region
A simple rule for checking the matrix!
Only 3 independent variables possible.
r0 , r0‘
M1 M2 M3Mj
…
rj , rj‘
z
z0 z1 z2z
Δz1 Δz2f1
f2

2) Equivalent optical System:
Systems having the same ABCD-matrix!
showing the same optical behavior
We can use this to decompose a given matrix into a “fixed” series of basic operations
constructing an equivalent optical system:
Four elementary operations for the equivalent ABCD-matrix:
magnification change m
change of index n1 n2
thin lens of optical power =1/f
propagation of distance z
equivalent matrix:
𝑀𝑒𝑞 = (
𝐴 𝐵𝐶 𝐷
) = (1 ∆𝑧0 1
)(
1 0
−1
𝑓 ∙ 𝑛21)(
1 0
0𝑛1𝑛2
)(𝑚 0
01
𝑚
) (2.24)
(lens embedded in a medium of refr. index n2)
4 free variables describing the operations in terms of the given ABCD-matrix:
𝑛1𝑛2= 𝐴𝐷 − 𝐵𝐶 (2.25)
𝑚 =
𝐴𝐷 − 𝐵𝐶
𝐷 (2.26)
1
𝑓 ∙ 𝑛2= −
𝐶𝐷
𝐴𝐷 − 𝐵𝐶= −
𝐶
𝑚 (2.27)
∆𝑧 =
𝐵
𝐷 (2.28)
these operations can easily be applied also on arbitrary fields �⃗�
not only a ray-based consideration!
Thus, if one can find an ABCD-matrix (coordinate independent components) for a given
optical system, it is easy to propagate a field through the system!
Another use of this property is the Collins-Integral.
Note: If D=0 an other arrangement of the above sequence of four operations is useful
propagation to the exact focus point.
3) Transformation of a spherical wave:
Consider the illumination of the system with a spherical wave with radius of curvature R1

Sketch: Spherical wave and ABCD-system
Question: R2 = ?
Sketch: Ray-angle and R
small angles: tan α α x/R
x1 = R1 α1
x2 = R2 α2
Together with the definition of the ABCD-matrix from Eq. (2.16) and a bit algebra we get
𝑅2 =
𝐴𝑅1 + 𝐵
𝐶𝑅1 + 𝐷 (2.29)
Example: lens with focal length f
1
𝑅2=
1
𝑅1−1
𝑓
z
R1 R2
α
x
x‘
x
R

2.4 Real Lens
Again: let’s sketch a lens
Sketch: Real lens and quantities
Refraction at 2 surfaces. How to define the focal length?
Introduction of the principle planes:
Incident ray parallel to axis intersects with the refracted ray in the principle plane P’
(and vice versa for principle plane P)
“Back focal length” f’BFL
Refractive power of the lens is given by
Φ = −𝑛1𝑓=𝑛2𝑓′
(2.30)
A lens is called “thin” if the radii of curvature of the lens are relatively large compared with the
thickness.
“Thin Lens”:
|𝑐1/2 ∙ 𝑑| ≪ 1 (2.31)
Then the principle planes coincide
and f’ = f’BFL
If n1 = n2 =1 (lens in air)
1
𝑓′= (𝑛 − 1) ∙ (
1
𝑅1−1
𝑅2) (2.32)
A simple formula for making a first rough estimation of the required R1/2 for a given focal length f’.
more general (in air): if d is not negligible
Φ =
1
𝑓′= (𝑛 − 1) ∙ (
1
𝑅1−1
𝑅2) +
(𝑛 − 1)2 ∙ 𝑑
𝑛 ∙ 𝑅1 ∙ 𝑅2 (2.33)
y
O
O‘
y‘
n n2n1
PS P‘F F‘
dsp
f
fBFL
f ‘
f ‘BFLs‘p‘
S‘

Position of the principle planes w.r.t. the vertices:
𝑠𝑃 = −
𝑅1 ∙ 𝑑
(𝑛 − 1) ∙ 𝑑 + 𝑛 ∙ (𝑅2 − 𝑅1)
𝑠′𝑃′ = −𝑅2 ∙ 𝑑
(𝑛 − 1) ∙ 𝑑 + 𝑛 ∙ (𝑅2 − 𝑅1)
(2.34)
We have now the most necessary information required if we like to make
- a first rough estimation of important system parameters
- do a rough sketch of the ray path at a real lens
- or (most important) understand the image formation and the relevant parameters given in
connection with a lens in a catalogue or in a lens-makers shop.
Doing more in a pure analytical way would require a huge amount of trigonometry and algebra and
would not really bring us much further.
Therefore, we will have a more detailed view onto the important effects by using the optical design
program ZEMAX instead.
Program Experiments: (P)
a) short introduction of the program philosophy
b) a spherical lens (bi- / plano-convex) EPD: 50mm
spherical aberrations R1= - R2=100
distortion diagram, spot diagram d=20
c) lens shape for ideal on-axis focusing
aspherical lens
behavior if illuminated off-axis
d) illumination with multiple wavelengths
chromatic aberrations
2.5 Optical Materials
We will restrict ourselves here to (isotropic) dielectric materials transparent materials which
interact with the light.
In general optical materials can be:
Glasses
Crystals
Plastics
Liquids
Gases
Glues and Cements
For the optical design the most important parameter is the refractive index n(λ).
Sometimes also the absorption α is of interest not here
In data sheets of glasses, the values for n(λ) are typically given relative to air at normal conditions:
T = 293K p = 1013mbar
Other (sometimes) interesting properties are

dn / dT … thermooptic coefficient
… thermal expansion
2.5.1 Treatment of dispersion in the optical design
Dispersion: dependence of n = f(λ)
For transparent materials / transmissive spectral region
𝑑𝑛
𝑑𝜆< 0 (2.35)
normal dispersion
Sketch: typical dispersion curve
In the optical design the dispersion is often characterized by only three wavelengths:
primary / main wavelength λo in the center of the used spectral region
two secondary colors λ1, λ2
VIS: I) λe = 546.07 nm
λF’ = 480.0 nm Microscopy
λC’ = 643.8 nm
II) λd = 587.56 nm
λF = 486.1 nm Photography
λC = 656.3 nm
However, there is a larger number of other wavelengths used, depending on the particular
application.
see Slide (spectroscopic wavelengths) (S)
Characterization of the dispersion by a single number:
n
λ
Absorption
typical behaviour of optical glasses in the VIS

𝜈 =
𝑛𝜆𝑜 − 1
𝑛𝜆1 − 𝑛𝜆2 (2.36)
Abbe - number
or in particular
𝜈𝑒 =
𝑛𝑒 − 1
𝑛𝐹′ − 𝑛𝐶′ ; 𝜈𝑑 =
𝑛𝑑 − 1
𝑛𝐹 − 𝑛𝐶 (2.37)
Optical glasses: e = 20 … 120
small large dispersion
large small dispersion
Other coefficient: dispersion number
𝑚𝑒 =
1
𝜈𝑒 (2.38)
One can now visualize the dispersion characteristics of different types of optical glasses by the so
called glass-diagram.
This diagram shows each glass as a position in a diagram of the refractive index n and the Abbe-
number.
Sketch: Abbe diagram
see Slide (Abbe diagram) (S)
Rough classification:
n < 1.6 e > 55 crown glasses
e < 55 flint glasses
n > 1.6 e > 50 crown glasses
e < 50 flint glasses
historical distinction
see Slide (Crown / Flint glasses) (S)

2.5.2 Design of an achromatic lens
example of using different materials in an optical design
We will now try to calculate a lens / doublet, which is showing a considerable less chromatic
aberration.
First, we recall the lens formula (thin lenses) Eq. (2.32)
Φ =1
𝑓′= (𝑛 − 1) ∙ (
1
𝑅1−1
𝑅2)
⏟
- only geometrical parameters
- do not change with λ
Φ = (𝑛 − 1) ∙ 𝐴 (2.39)
For a combination of two lenses:
Φsum = Φ1 +Φ2 = (𝑛1 − 1) ∙ 𝐴1 + (𝑛2 − 1) ∙ 𝐴2 (2.40)
Sketch: Doublet
Central wavelength: λe
Φ̅1 = (𝑛1𝑒 − 1) ∙ 𝐴1 Φ̅2 = (𝑛2𝑒 − 1) ∙ 𝐴2
(2.41)
Φsum(𝜆) = [𝑛1(𝜆) − 1] ∙ 𝐴1 + [𝑛2(𝜆) − 1] ∙ 𝐴2 (2.42)
Design goal: same refractive power for 2 wavelengths near the border of the spectral region:
Φsum(𝜆𝐹′) ! = Φsum(𝜆𝐶′) (2.43)
With Eq. (2.42) we get for the doublet the condition:
(𝑛1𝐹′ − 1) ∙ 𝐴1 + (𝑛2𝐹′ − 1) ∙ 𝐴2 ! = (𝑛1𝐶′ − 1) ∙ 𝐴1 + (𝑛2𝐶′ − 1) ∙ 𝐴2 (2.44)
Replacing A1 and A2 with the average refractive power from Eq. (2.41) and rearranging the terms
gives
𝑛1𝐹′ − 𝑛1𝐶′𝑛1𝑒 − 1
Φ̅1⏟
1ν1Φ̅1
= −𝑛2𝐹′ − 𝑛2𝐶′𝑛2𝑒 − 1
Φ̅2⏟
1ν2Φ̅2
(2.45)

Φ̅1ν1+Φ̅2ν2= 0 (2.46)
Condition of achromasie
Together with Eq. (2.40) we have now a system of two linear equations for calculating the refractive
powers of Φ̅1 and Φ̅2 out of sum , 1 and 2:
Φ̅1 =𝜈1
𝜈1 − 𝜈2Φ𝑠𝑢𝑚
Φ̅2 =𝜈2
𝜈2 − 𝜈1Φ𝑠𝑢𝑚
(2.47)
An achromatic doublet is always composed of a positive and a negative lens.
Example: We need two glasses with considerably distinct Abbe-numbers
out of the glass diagram (S)
eg. BK7 ne = 1.518
e = 63.9
SF6 ne = 1.805
e = 25.4
The lens combination should have a focal length of f ’ = 200 mm
with Eq. (2.47): f1’ = 120.5 mm f2’ = -303.1 mm
Lens 1: assume a symmetric positive lens with R1 = - R2
R1 = 124.8 mm
Lens 2: R1 = - 124.8 mm
R2 = - 255.5 mm
Program Experiment: (P)
EPD: 50 mm
d1= 10 mm
d2= 5 mm d3= 194.9 mm
1 2

2.6 Imaging Systems
We already know the basic imaging set-up consisting of a single lens:
Sketch: Simple 1-lens imaging
magnified image Microscope
inverse arrangement: de-magnified image Camera
However, real imaging is more complex than considering only one object point:
Program Experiment: set-up in Zemax (P)
- different field points
Sketch: Image with different field points -> field curvature
Field curvature is a special aberration which always occurs if only a single lens is used for the imaging.
We will consider this later together with other aberrations.
Before we will stick to another important element of each imaging system which has a very
important influence on the image quality: the stop / aperture / diaphragm
In the above image the ray-cones are only limited by the aperture of the lens.
One can of curse also add a separate stop which limits the ray–cone.
One special example: we locate the stop in the back focal plane of the imaging lens.
O‘
O
FF‘
3
2
11‘
2‘
3‘

Sketch: Imaging with a stop at F’
symmetrical cone around the ray parallel to the optical axis!
this is true for each object point!
Property: object side telecentric
This property of the optical system is useful e.g. for measurement tasks:
if the image plane is fixed at the position O’ a change of the object distance would only lead
to a defocus but the lateral magnification of the image remains constant!
Placing the stop in the front focal plane F would give an image side telecentric system.
If one uses a 4f-set-up for the imaging and places the stop at the common intermediate focus the
system becomes both side telecentric.
Sketch: 4f-set-up with intermediate stop
good for systems with constant magnification in case of changing image and object
distances
We can see that the aperture can have an important influence on the imaging properties of the
system. But we did not yet see all!
The impact is much stronger as the stop may also have a huge impact on the aberrations(!) and other
important parameters like the resolution.
Therefore, we will introduce some general terms connected with the aperture.
O
O‘
F F‘
symmetrical cone around the ray parallel to the optical
axis!
F1
F2‘
stop
F1‘ = F2

Let’s consider a “general” two-lens imaging system.
Sketch: general two-lens imaging system with stop
chief ray: ray from an object point which goes through the center of the stop
With the help of the chief ray one can construct the position where the image of the stop will be
located as seen either from the object or the image position.
simply extend the chief ray to the point where it crosses the optical axis
entrance pupil: stop, as seen from the object (EN)
exit pupil: stop, as seen from the image (EX)
both are images of the same limiting aperture !
Attention: Except for a 1-lens “system” the size and shape of the pupil depend on the field
point. On-axis field points typically have a different pupil shape than field points near
the border of the FOV
Program Example: Zemax: “Cooke 40 degree field_Stop Size” (P)
this fact needs to be considered in calculations like
- transmission
- resolution (-limit)
- MTF, etc.
What is the main feature of the entrance – exit pupil concept?
It provides an easy way to connect the computational elegance of the ray-based propagation through
(arbitrarily) complex imaging systems with a wave optical analysis of the imaging properties of the
system!
We know: Imaging:
transformation of a spherical wave from an object point into an other spherical wave
generating the corresponding image point
u‘
O‘
O
u
aperture
angle
stop
entrance pupilexit pupil

Sketch: Spherical wave imaging with EN, EX reference sphere
Reference sphere: located in the exit pupil
represents the spherical wave for ideal imaging, center: ideal image point
lateral extension gives resolution limit
Sketch: Reference sphere in exit pupil
Real wave-front: can be calculated by tracing rays from the EN to the EX and plot the actual
optical path length for each pupil position
(without the chief ray path length)
Sketch: OPD-plot
OPD: gives the difference between the ideal reference sphere and the real wave-front
represents the aberrations introduced by the optical system
O
O‘
reference sphere
EN EX
r
wavefront
r
reference
py
OPD

The field in the focus of the optics can not be calculated by ray-tracing!
wave-optical propagation methods need to be applied.
As we defined the OPD on a sphere (not a plane!) in the exit pupil the propagation into the focus can
easily computed by
�⃗� (𝜔; 𝑥, 𝑦, 𝑧𝑓) =
𝜔
i2𝜋𝑐𝑓ei𝑘𝑓 ∙ e
i𝑘√𝑥2+𝑦2
2𝑓 ∙ FT{�⃗� (𝜔; 𝑝𝑥 , 𝑝𝑦, 𝑧𝐸𝑋)} (2.48)
f … focal length (distance from EX to zf)
Fourier transformation (evaluated at (2𝜋
𝜆𝑓𝑝𝑥 ,
2𝜋
𝜆𝑓𝑝𝑦) ) + spherical phase factor
also valid for high NA optics (only very weak approximations small off-axis distance
from ideal focal point)
discussion of resolution, introduction of NA
2.7 Aberrations
Aberrations are image imperfections.
Ideal imaging: All image points are generated by a perfect spherical wave.
Then the resolution of the image is only determined by the angular extend / NA of
this wave.
“diffraction limited imaging”
Sketch: “perfect” spherical wave
In real lens systems the wave-front deviates from this condition.
Lens design = aberration balancing
Design goals:
high resolution
O‘
EX
„perfect“ spherical wave

high image contrast
homogenous illumination
similarity to object
Chromatic aberrations we already know from previous discussion
caused by different focusing powers for different wavelengths,
“chromatic defocusing”
balancing with different lens materials
Here: monochromatic aberrations
caused by the higher terms in the description of the law of refraction and the surface
profiles (deviation from the paraxial region)
Visualization of aberrations:
“wave-front deformation”, OPD
can also be considered as ray aberrations ray stays perpendicular on the wave-front
rays do not meet in a single point but spread out.
ray fan plot & spot diagram
Let us consider again the wave-front in the exit pupil:
Sketch: Wave-front in exit pupil, wave-front/ray aberration
𝜀𝑦~𝜕𝑊
𝜕𝑦 ; 𝜀𝑥~
𝜕𝑊
𝜕𝑥
(2.49)
Diagram:
Sketch: wave-front aberration function
ray
aberration Ɛ
Gaussian
image point
actual
wavefront
reference
wavefront
wavefront
aberration W
(OPD)
EX
y
W

W … wave-front aberration function
𝑊 = 𝑊(𝛽, 𝑟, 𝜓)
… normalized field height
r … normalized pupil height (of point P)
… azimuth of point P
Sketch: pupil plane / image plane
Expansion of W with respect to orders of , r, cos :
𝑊(𝛽, 𝑟, 𝜓) = 𝑊000 Piston Error
+ 𝑊200 ∙ 𝛽2 + 𝑊020 ∙ 𝑟
2 +𝑊111 ∙ 𝛽 ∙ 𝑟 ∙ cos𝜓 Piston error Defocus Lateral Magnification Error
+ 𝑊400 ∙ 𝛽
4 + 𝑊040 ∙ 𝑟4 +𝑊131 ∙ 𝛽 ∙ 𝑟
3 ∙ cos𝜓 + 𝑊222 ∙ 𝛽2 ∙ 𝑟2 ∙ cos2𝜓
Piston Error SA Coma Astigmatism
+ 𝑊220 ∙ 𝛽2 ∙ 𝑟2 + 𝑊311 ∙ 𝛽
3 ∙ 𝑟 ∙ cos𝜓 Field Curvature Distortion
+ … aberrations of higher order
(2.50)
5 classical Seidel Aberrations
Philipp Ludwig Ritter von Seidel (1821 – 1896)
First order aberrations: - Defocus (S)
- Lateral Magnification Error
2.7.1 Spherical aberration r4
Occurs when rays passing the aperture far from the optical axis have focal lengths different
from the paraxial rays
f = f(r)
z
y‘
x‘
rψ
P x
y
pupil plane image plane
β

Slide: spherical aberration (S)
Spherical aberration in the OPD-diagram:
Sketch: OPD for spherical aberrations
Getting rid of spherical aberrations:
balancing with defocus (S)
bending the lens (S)
splitting the lens
increasing the refractive index
aspheric lens
2.7.2 Coma r3cos
Occurs for ray bundles whose chief ray is not symmetric with respect to the optical axis.
“non-symmetry error”
Slide: coma (S)
different bending of rays in upper and lower part of the ray bundle
stronger bending results in larger influence of higher order terms in the law of refraction
Getting rid of coma:
Sketch: tilted ray-bundle through lens
y
OPD
place stop in position where
the ray normal to the surface
crosses the optical axis

place the stop in the position where the ray which is normal to the surface crosses
the optical axis.
move stop
make the ray bundle symmetric to this surface-perpendicular ray
Coma figure:
Sketch: Coma figure
2.7.3 Astigmatism 2r2cos2
Occurs for off-axis field points
Ray bundle passes the lens asymmetrical and the sagittal and tangential rays do experience
different radii of curvature of the lens surface
Sketch: View along the optical axis
x‘
y‘
circles correspond
to rings on the
lens
lens
sagittal
plane
off-axis field
pointtangential
plane

Sketch: side view / top view
ft < fs
Slide: Astigmatism (S)
2.7.4 Field Curvature 2r2
Occurs as the natural image surface is spherical, not planar
“Petzval curvature” Hungarian Mathematician
Josef Max Petzval (1807 – 1891)
A spherical object is imaged by a spherical lens onto a spherical surface:
Sketch: Field curvature
ft
tangential plane
fs
sagittal plane
side view: top view:
o
o’
p
Q
i
y
object sphere
around Q
image sphere
aound Q
common center of
curvature of the
object and image
shells
equal length for each
point on i
image
plane
x

If we now flatten o to o’ the corresponding image points move towards the lens onto the so
called Petzval surface p
(*) Distance of image point from image plane:
Δ𝑥 = 𝑦
2∙ ∑
1
𝑛𝑗 ∙ 𝑓𝑗
𝑚
𝑗=1⏟ Petzval−sum
nj , fj … focal length and refractive index of lens j in a system
For a positive lens: negative radius of the Petzval surface
negative lens: positive radius ----“----
Sketch: Petzval curvature for pos./neg. lens
A proper combination of positive and negative lenses in a system can be used to compensate the
field curvature.
Example: Cooke Triplet
2.7.5 Distortion 3rcos
Deformation of the image scale due to different transversal magnifications for each field point.
Reason: spherical aberration of the chief ray
Slide: Distortion (S)
Distortion is a function of the stop position!
positive lens negative lens
Image plane
Top Related