


Languages
Pages
Legal


Strength Training: Overcoming Grip Weakness for Better
Glute and Hamstring Training by Meghan Callaway, creator of the Ultimate Pull-Up Program

When it comes to women’s fitness, hamstring and glute training is a hugely popular
trend, and I don’t see this changing any time soon. Aside from the obvious
physique-oriented goals that many females are looking to achieve, having a strong
backside is extremely important for improving overall performance in the gym, sports,
and in daily life. Unfortunately, an abundance of people are being held back from
strengthening and developing their posterior chain to their full potential, and for a
reason that is overlooked by many: A weak grip.
While most people train their grip strength muscles for aesthetic reasons as they want to
increase the size and muscular definition of their forearms, having a strong grip is
hugely beneficial for many other reasons, including dramatically improving your ability
to strengthen and develop your backside because you can hold onto bigger weights, for
longer. While I don’t like to speak in black and white terms, most females do neglect
their grip strength, and this weak link is preventing them from achieving their full glute
and hamstring strengthening and building potential.
If your grip is weak, you will not be able to lift as much weight, perform as many reps,
and you might be more prone to breakdowns in form. In this article, I am going to
provide some different solutions that will help you improve your grip strength. In
addition to this, until your grip strength is up to par, I’m going to provide many different
lower body exercise options that will help you strengthen and develop your hamstrings
and glutes while working-around around your grip. I’ll also talk about how you can
program your training and organize your workouts so your grip training does not
interfere with your performance during the rest of your exercises.
Grip Strength Some of my favorite techniques for improving grip strength are inspired by Stu McGill’s
latest book, The Gift Of Injury. Here are some of my go-to exercises for improving grip
strength, and how I like to coach them.
1

PLATE PINCHES
Plate pinches develop grip strength, and also shoulder and scapular stability (your
shoulders and scapulae remain in a fixed position). If this exercise is being performed
unilaterally, plate pinches also develop anti-lateral flexion core stability as your muscles
must work to prevent the lateral flexion of your spine.
https://www.youtube.com/watch?v=fwZMwwVwBMA
Coaching Notes:
● Get into an athletic stance. Your feet should be hip to shoulder width apart, and
you should have a slight bend in your knees.
● Form a tripod base by keeping the weight on the mid to back of your feet, and
keeping your toes down, particularly your big and baby toes. These parts of your
feet should remain in contact with the floor for the duration of the exercise.
Pretend that you are suctioning or screwing your feet to the ground.
● Grab onto one or more weight plates. Obviously the thicker the plates, and the
more resistance you are using, the more challenging the exercise will be.
● Also, engage your lats, muscles in your arms, and even your lower body.
Remember, gripping is a full body movement.
● Now “pinch” this weight for the duration of the set.
● For the duration of the exercise, your head, torso and hips should remain in a
2

stacked position. Do not allow your lower back to hyperextend, ribcage to flare,
torso or hips to rotate, or body to lean to one side (will usually be on the side that
the resistance is being held).
● For the duration of the exercise, maintain regular breathing.
Prescription:
3-5 sets of a 10-30 second hold (can be performed bilaterally or unilaterally)
BOTTOMS-UP KETTLEBELL EXERCISES Bottoms-up kettlebell variations are a very underrated approach for improving forearm
and grip strength, and can be done with vertical and horizontal pressing movements,
loaded carries, and even some lower body exercises. You can be creative. Bottoms-up
kettlebell variations also improve upper body strength, shoulder and scapular controlled
mobility (or stability if the shoulders and scapulae remain in a fixed position), and are
often a great option for people who are dealing with shoulder issues.
SINGLE ARM BOTTOMS-UP FLOOR PRESS
Single arm bottoms-up floor presses develop forearm and grip strength, upper body
strength, shoulder and scapular controlled mobility, and lumbo-pelvic stability. Single
arm bottoms-up floor presses are also a terrific core stability exercise as your muscles
must work to prevent your spine from rotating and hyperextending.
3

https://www.youtube.com/watch?v=tmML035xxvI
Coaching Notes:
● Lie on your back on a mat, and bend your knees. Place your feet so they are
approximately hip to shoulder width apart. Your shins should be in a relatively
vertical position.
● Grab onto a kettlebell by the horns.
● Now extend your elbow and press the kettlebell in a vertical path over your
armpit/chest.
● Lower the weight with control. Pretend that you are “rowing” the weight down. In
the bottom position, your elbow should remain at approximately a 45 degree
angle with your torso.
● You can either stop right before your upper arm touches the floor, or you can
touch your upper arm to the floor at the end of each rep.
● As for the non-working arm, keep it in an extended position as this prevents you
from “cheating” and using your non-working arm in place of all of your core
muscles to stabilize your pelvis and spine.
● For the duration of the exercise, your head, torso and hips should remain in a
stacked position. Do not allow your lower back to hyperextend, ribs to flare, or
torso or hips to rotate.
Prescription:
3 sets of 8-12 reps. Do a warm-up set using 50% of your working weight.
TALL KNEELING BOTTOMS UP OVERHEAD PRESS
This exercise develops forearm and grip strength, upper body strength, shoulder and
scapular controlled mobility, and lumbo-pelvic stability.
4

https://www.youtube.com/watch?v=WtwLlWqdJZc
Coaching Notes:
● Get into a tall kneeling stance. Your head, torso, hips and knees should be in a
stacked position, and your knees roughly hip width apart, or slightly wider. Your
body should remain in this position for the duration of the exercise.
● Grab onto a kettlebell, and hold it by the horns.
● Now extend your elbow and press the kettlebell overhead. When you extend your
arm, do so by engaging your delts and extending your elbow, not by shrugging
your shoulder, hyperextending your lower back, flaring your ribcage, or leaning
to the side.
● Lower the weight with control. Pretend that you are “rowing” it down. In the
bottom position, your elbow should remain at approximately a 45 degree angle
with your torso.
Prescription:
3 sets of 8-12 reps. Do a warm-up set using 50% of your working weight.
LOADED CARRIES Loaded carries are a great tool for developing grip strength. Most loaded carry variations
are not overly technically demanding so they can be performed by people of most fitness
levels and abilities. Loaded carries also mimic many everyday activities, so they are,
5

pardon the term, functional.
TRAP BAR LOADED CARRIES
Trap bar carries are great as you will likely be able to use significantly more weight than
during most other loaded carry variations. In addition to improving grip strength, trap
bar carries also develop shoulder and scapular stability (both remain in a fixed position),
and lumbo-pelvic stability. If you do not have access to a trap bar, you can perform this
exercise using dumbbells, kettlebells, or even milk/water jugs.
https://www.youtube.com/watch?v=rgaP0KuNbd4
Coaching Notes:
● Set up a trap bar. Select a resistance that allows you to maintain proper form. This
includes picking up the weight. In short, you need to deadlift the weight into the
starting position. If you cannot do so from the floor without your form
deteriorating, elevate the weight on blocks/bumper plates. No matter where you
are starting from, be sure to pick up the weight properly.
● Keep your arms rigid, and drive them into your sides. Pretend that you are trying
to crush something in your armpits. All of the above will help stabilize your upper
body and will keep the weight from swinging.
● While maintaining this full body position, walk 25-50 meters. If you are required
to turn around, this will be the most challenging component of the exercise as the
6

weights will be more prone to swinging.
● For the duration of the exercise, your head, torso, and hips should remain in a
stacked position, and your hips should remain level. Do not allow your lower back
to hyperextend, or ribs to flare, and do not allow your body to lean to the side.
● For the duration of the exercise, maintain regular breathing.
Prescription:
3-5 sets of a 25-50m carry. Do 1-2 warm-up sets using 50% of your working weight.
PULL-UP REGRESSIONS
Pull-up regressions are very beneficial for improving grip strength. These exercises also
develop pull-up specific technique, shoulder and scapular controlled mobility, and
lumbo-pelvic stability.
BASIC HANGS
This pull-up regression will help you learn how to support your bodyweight from the
bottom position of a pull-up.
7

https://www.youtube.com/watch?v=tAMYLkXU7MI
Coaching Notes:
● Set your grip so your palms are facing away from you (pronated), and are slightly
greater than shoulder width apart. You can also use a neutral grip where your
palms are facing one another.
● Initiate the movement by using the muscles in your mid and upper back, and
bring each shoulder blade in towards the spine and down towards the opposite
hip. Do not initiate the movement with your arms. Hold this position.
● Your elbows should be close to fully extended, but not hyperextended.
● For the duration of the exercise, your head, torso, and hips should remain in a
stacked position. Do not allow your lower back to hyperextend, or ribs to flare.
● For the duration of the exercise, maintain regular breathing.
Prescription:
3-5 sets of a 5-30 second hold.
SCAPULA PULL-UPS
This pull-up regression strengthens the muscles that are responsible for the controlled
mobility of the scapulae, and teaches you how to initiate the pulling movement of
pull-ups.
8

https://www.youtube.com/watch?v=YLePe9KP7fg
Coaching Notes:
● Set your grip so your palms are facing away from you (pronated), and are slightly
greater than shoulder width apart. You may also use a neutral grip where your
palms are facing one another.
● Without bending your elbows or initiating the movement with your arms, use the
muscles in your shoulder blade area and draw your shoulder blades in towards
the spine and down towards the opposite hip, and lift your body a few inches.
Pause in the top position, really contract these muscles, and then lower yourself to
the starting position with control.
● On the lowering portion of this movement, your shoulder blades will perform the
reverse movements as they did on the way up.
● In the bottom position, your elbows should be close to fully extended, but not
hyperextended.
● For the duration of the exercise, your head, torso, and hips should remain in a
stacked position. Do not allow your lower back to hyperextend, or ribs to flare.
FAT GRIPZ
Fat Gripz are a very basic, and relatively inexpensive piece of equipment that are great
for improving grip strength. You can add Fat Gripz to a pull-up bar and can perform
9

pull-up regressions or actual pull-ups, and they can be added to many exercises that are
performed with dumbbells, barbells, and on occasion, kettlebells.
https://www.youtube.com/watch?v=Vnr6w_sAWmo
https://www.youtube.com/watch?v=9b2LEcAJiyI
10

https://www.youtube.com/watch?v=MxCbQi933Lw
Lower-Body Grip-Friendly Exercises Make no mistake, while you are working to improve your grip strength, you can still
focus on enhancing the strength and development of your hamstrings and glutes. Here
are some awesome exercises you can perform. These exercises are extremely effective,
and demand less grip strength than many other lower body variations. Even after your
grip strength has improved, I still highly recommend performing these exercises, but you
may opt to make them your accessory movements, and not your main exercises.
Here are some of my favorite hip hinging variations:
SINGLE LEG RDL’S
Single leg deadlifts are one of my favorite hip hinging movements as they strengthen and
develop the hamstrings and glutes, develop lumbo-pelvic stability, and improve balance.
While your grip muscles will be in play, due to the unilateral nature of the exercise, you
will not be holding onto as much weight per hand.
https://www.youtube.com/watch?v=qd_vF1pr21Q
11

https://www.youtube.com/watch?v=p1EH_jdM6HA
https://www.youtube.com/watch?v=wcX8cCWy2Bw
NEGATIVE RDL’S
Negative deadlifts strengthen and develop the hamstrings and glutes, and can be
performed with a barbell, trap bar, dumbbells, one or two kettlebells, or even a band.
The intentionally slow eccentric component of the movement makes this exercise more
challenging, thus less resistance is required.
12

https://www.youtube.com/watch?v=Xc0zKcXxbao
https://www.youtube.com/watch?v=6uhAt-KoDkQ
TRAP BAR DEADLIFTS
While trap bar deadlifts are taxing on the grip muscles, particularly as the resistance
and/or rep range increases, many people find that the thinner width and neutral grip
positioning of the handles makes holding the weight significantly easier than the
traditional barbell, or dumbbells.
13
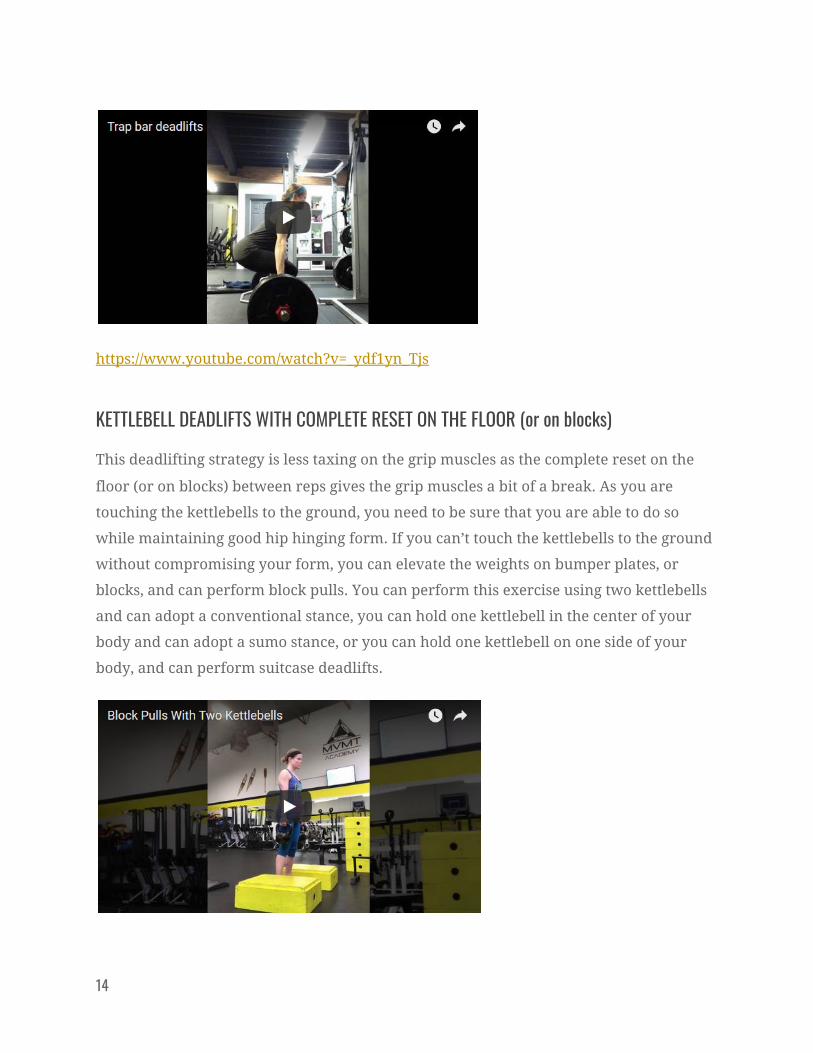
https://www.youtube.com/watch?v=_ydf1yn_Tjs
KETTLEBELL DEADLIFTS WITH COMPLETE RESET ON THE FLOOR (or on blocks)
This deadlifting strategy is less taxing on the grip muscles as the complete reset on the
floor (or on blocks) between reps gives the grip muscles a bit of a break. As you are
touching the kettlebells to the ground, you need to be sure that you are able to do so
while maintaining good hip hinging form. If you can’t touch the kettlebells to the ground
without compromising your form, you can elevate the weights on bumper plates, or
blocks, and can perform block pulls. You can perform this exercise using two kettlebells
and can adopt a conventional stance, you can hold one kettlebell in the center of your
body and can adopt a sumo stance, or you can hold one kettlebell on one side of your
body, and can perform suitcase deadlifts.
14

https://www.youtube.com/watch?v=q59_NlTDFrs
BAND/CABLE PULL-THROUGHS
This hip hinging variation is highly underrated for strengthening and developing the
posterior chain muscles. You have the option of performing this exercise using a band or
cable, and you can opt for whatever attachment allows you to have the best grip.
https://www.youtube.com/watch?v=YZN94Ziqyfk
SINGLE LEG DEFICIT HIP THRUSTS
While heavy barbell hip thrusts seem to be getting most of the accolades, I often prefer to
perform single leg hip thrust variations. In this variation, you will elevate your shoulders
on a box or bench, and your feet on another box or bench. Doing so will allow you to
move through a greater range of motion. However, it’s extremely important that you use
a range of motion where you can maintain proper form. Make sure that you do not allow
your lower back to hyperextend or ribs to flare.
15

https://www.youtube.com/watch?v=179jHUwZCNk
Here are some exercises that involve more knee flexion than the exercises I described
above.
BOSU GLUTE HAMSTRING RAISES
While I am not a huge fan of how most people use the Bosu, this piece of equipment is a
fantastic anchor for performing glute hamstring raises, and I find this variation to be
even more taxing than the glute hamstring raise machine. Make sure that you do not
allow your lower back to hyperextend or ribs to flare.
https://www.youtube.com/watch?v=Acqpv-dnOoI
16

TRX ALTERNATING HAMSTRING CURLS
This challenging TRX exercise strengthens the hamstrings, and glutes. Make sure that
you do not allow your lower back to hyperextend or ribs to flare. Extend your knee to a
range where you can maintain proper form, and really be sure to control the eccentric
movement. Position your full arms and hands on your torso, not on the ground.
https://www.youtube.com/watch?v=zZBLwbtYnKs
SINGLE LEG HIP LIFT WITH BOTTOMS-UP PRESS, AND LEG LOWERING
This single leg isometric glute bridge variation strengthens the glutes, develops
anti-extension and anti-rotational core stability, and improves upper body and grip
strength. Your glutes must work isometrically to prevent your hips from collapsing, your
anterior core muscles must work to prevent your spine from overextending and rotating,
and your forearms and grip muscles must work to keep the kettlebell in the bottoms-up
position. Make sure that you do not allow your lower back to hyperextend or ribs to
flare. Extend your leg to a range where you can maintain proper form. “Row” the weight
down.
17

https://www.youtube.com/watch?v=2IUjS7YRWfA
Programming Considerations If you are serious about achieving your peak potential, both in terms of strengthening
and developing your hamstrings and glutes, and improving your grip strength, proper
program design and implementation are essential. In order to maximize the
effectiveness of your lower body exercises, you should strive to use as much weight as
possible for your chosen rep range (leave 1-2 reps in the tank after each set), and you
must use extremely good form.
If you perform exercises that tax your grip before you train your lower body, while your
grip strength will improve, it will come at the expense of your lower body strength and
development. Conversely, if you tire out your gripping muscles by performing lower
body exercises before you tackle the grip specific muscles, you might not reach your grip
specific goals.
In order to avoid these pitfalls, here are several programming options you can use:
– Train your lower body and grip exercises on separate days – Your grip muscles
should be fresh when you are performing any lower body exercises that are particularly
18

taxing on your grip muscles. If you are going to be performing lower body exercises that
demand a significant amount of grip strength, for instance, barbell or trap bar deadlift
variations, or exercises where you are holding onto heavy dumbbells, train these
exercises on a separate day from your grip work. Ideally, train your lower body on day 1,
and your grip muscles one or two days later. So for example, you might train your legs
on a Monday and Thursday, and grip strength on a Tuesday and Friday.
– Train your lower body first and do your grip exercises after – If you want to train
your lower body and grip muscles on the same day, perform your lower body exercises
first and your grip specific exercises after. If you only train 2-3 days per week, this might
be a good option for you.
– Train your upper body first and grip exercises after – While the focus of this article
is on the lower body, in order to maximize the effectiveness of your upper body training,
your grip muscles should be fresh. If you plan on training your upper body and grip
strength muscles in the same workout, perform your upper body exercises first and grip
specific exercises after. Keep in mind that some of your upper body exercises will also
improve your grip strength. For instance, pull-ups/pull-up regressions strengthen the
upper body and improve grip strength. The same can be said for bottoms-up kettlebell
variations.
It is important to note that while I am providing you with some general guidelines, you
definitely need to figure out what works best for you. Take your schedule, training goals,
how well your body recovers, into consideration, and devise a plan that works best for
you. This will likely take some trial and error.
--
Author Bio:
Meghan Callaway is a strength coach in Vancouver, Canada with over 15 years of
experience coaching a wide array of clients from elite athletes, to post-physical therapy
rehabilitative strength training, as well as everyday people who want to feel, perform,
and function at a higher level.
Meghan is the creator of the Ultimate Pull-Up Program, and believes that working out
19

should be fun, mentally and physically rewarding, and empowering. Her pull-up
program is currently being followed by over 1000 women and men from over 45
countries worldwide.
When Meghan was 28, she was in a bad car accident, and this led to over 5 years of
severe discomfort, full body issues, and a significant amount of mental, physical, and
financial stress. She never thought she’d be able to work out again, or even move
properly, and she spent these 5 years going from doctor to doctor until she finally found
somebody who could tell her what was causing all of her symptoms and injuries. Despite
many low points and moments of doubt, Meghan persevered until she found a solution,
and learned a tremendous amount about herself, and lessons, in the process. This was
Meghan’s turning point, and truly made her appreciate her health and simply the ability
to feel good more than ever.
Meghan has an extensive athletic background and has played competitive soccer for 27
years, and also grew up playing ice hockey and baseball on boys teams.
Connect with Meghan on her website, Facebook, Instagram, and YouTube.
20
Top Related