


Languages
Pages
Legal


Standard Online Quilt Magazine – Vol. 5 No. 4
© Online Quilt Magazine.com All Rights Reserved P a g e | 1
Online Quilt Magazine.com
Standard Issue Vol.5 No.4 – April 2014
PROJECT –
Pieced
Tulip
Placemats
Recipe Corner
Old Fashioned
Hot Cross
Buns
4,5 and 9-
Patch
Blocks
Explained
Make The
Rolling Squares
Block

Standard Online Quilt Magazine – Vol. 5 No. 4
© Online Quilt Magazine.com All Rights Reserved P a g e | 2
Online Quilt Magazine Table of Contents
4,5, and 9 Patch Blocks Explained ……………………….………………………………………………………………………………………………………………….. Page 4
PROJECT – Pieced Tulip Placemats ……………………….….…………………………..………….……………..……….………………………..……..………….. Page 7
What’s New From The Fat Quarter Shop …………………………………………………………………………………………………………………………………
Book Reviews …………………….…………………..……..………………………………………………………………………………………………………………………..
Recipe Corner – Old Fashioned Hot Cross Buns ……………………………………………………………………………………………………………………..
Page 18
Page 20
Page 24
Reader “Show and Tell” ………………………………………………………………………………………………………………………………….…….…………...…..
BLOCK OF THE MONTH – Rolling Squares Block ………….…………….……..……………............................................................................
Page 27
Page 31
Today's Tips.................................................................................................................................................................................. Page 34
YES – We Want To hear From You............................................................................................................................................... Page 35
Cover – “Pieced Tulip Placemats”
Upgrade Today to our Premium Online Quilt Magazine for Only $10 for the
Year – that’s less than $1 per issue!
This Month’s Premium Issue has Nearly 60 Pages Packed Full of More Great Articles and Projects for You
to Make. To Upgrade, go to www.OnlineQuiltMagazine.com , Register in the Right-Hand Box and Don’t
Miss Another Issue!

Standard Online Quilt Magazine – Vol. 5 No. 4
© Online Quilt Magazine.com All Rights Reserved P a g e | 3
Letter from the Editor
Jody Anderson
Hi!
You’ve got to love April! It’s always feels like a month of change – half the world is embracing spring (and
the other half is cooling down!) and kids are on school holidays (yes, again) to change up my working
days… And best of all, I can finally stop resisting the lure of Hot Cross Buns. I’ve been holding out since
they first appeared in the shops in January (!), but I figure with Easter only a couple of weeks away, that
now is the time to indulge. Speaking of which – what’s not to love about the fact that for this month, I
need no justification at all for eating lots of chocolate!!! Helps the creative process they say…
As usual, we’ve got a jam-packed bumper issue for you this month too. You can make our featured
Pieced Tulip Placemats, and a take a look at 4, 5 and 9 –patch blocks explained, by Penny.
There’s plenty of hints and tips, and some ‘how to’s’, new fabrics and more. Oh yes – there’s also a
recipe for Old Fashioned Hot Cross Buns if you’re inclined to make your own too!
Happy Easter, and Have a Great Month!
Jody

Standard Online Quilt Magazine – Vol. 5 No. 4
© Online Quilt Magazine.com All Rights Reserved P a g e | 4
You've no doubt heard quilt blocks being labelled
as 4 patch, 9 patch, or maybe even 5 patch
blocks. But, what does that mean, and why
should it matter - after all we just want to sew
the pieces together, don't we?
It's easy to tell which is which in some blocks - 5
patch blocks usually are divided into 5 squares
across and 5 squares up and down, for a total of
25 patches.
It gets a little complicated when each patch is
made up of half-square triangles or quarter
square triangles, or any other shapes. But 5 by 5
is the basic division.
Things change a little when you look at a 9 patch
or a 4 patch quilt block.
Nine patch blocks start out by having 3 patches
across and 3 patches up and down, for a total of 9
patches in the block.
Four patch blocks start out with 2 patches across
and 2 patches up and down - for a total of 4
patches in the block.
4,5, and 9 Patch Blocks Explained
By Penny Halgren from www.How-To-Quilt.com

Standard Online Quilt Magazine – Vol. 5 No. 4
© Online Quilt Magazine.com All Rights Reserved P a g e | 5
But, you say - you've seen 4 patch blocks with 4
patches across and 4 patches up and down.
And that's what happens. You start out with the
basic grid (2x2, 3x3, 5x5, or something else) and
then each patch can be divided into its own little
grid.
Each patch in the 4 patch gets divided into a 2x2
grid, resulting in 4 patches by 4 patches, making
16 patches in the block. And all blocks follow
along.
But, really, what difference should it make?
For years, I just merrily sewed my quilt blocks
together, making the patches and sometimes
noticing whether it was a 4 patch, 5 patch or 9
patch. But I really didn't pay much attention.
3DollarBOM.com
Imagine Downloading An Exclusive
Quilt Pattern For Only $3 Per Month!
That’s Right – for Less than the Cost of a Cup of
Coffee per Month, You will Receive the Pattern for
One of Three Original Block of the Month Quilts,
emailed Directly to Your Inbox Each Month.
Check out the New Quilts Available
Now!!!
Register Now at www.3DollarBOM.com
Standard Online Quilt Magazine – Vol. 5 No. 4
© Online Quilt Magazine.com All Rights Reserved P a g e | 6
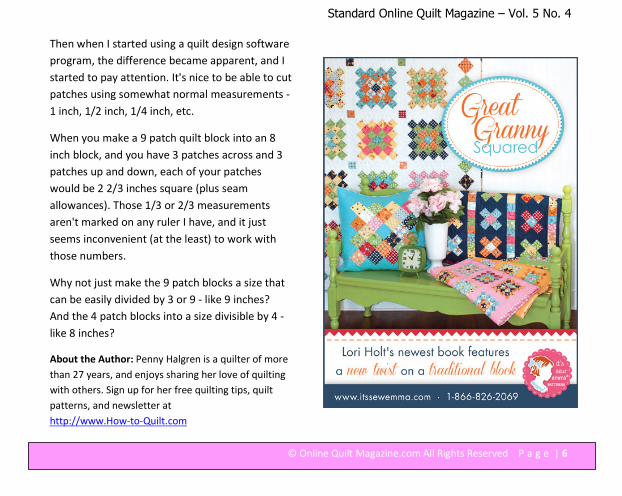
Then when I started using a quilt design software
program, the difference became apparent, and I
started to pay attention. It's nice to be able to cut
patches using somewhat normal measurements -
1 inch, 1/2 inch, 1/4 inch, etc.
When you make a 9 patch quilt block into an 8
inch block, and you have 3 patches across and 3
patches up and down, each of your patches
would be 2 2/3 inches square (plus seam
allowances). Those 1/3 or 2/3 measurements
aren't marked on any ruler I have, and it just
seems inconvenient (at the least) to work with
those numbers.
Why not just make the 9 patch blocks a size that
can be easily divided by 3 or 9 - like 9 inches?
And the 4 patch blocks into a size divisible by 4 -
like 8 inches?
About the Author: Penny Halgren is a quilter of more
than 27 years, and enjoys sharing her love of quilting
with others. Sign up for her free quilting tips, quilt
patterns, and newsletter at
http://www.How-to-Quilt.com

Standard Online Quilt Magazine – Vol. 5 No. 4
© Online Quilt Magazine.com All Rights Reserved P a g e | 7
Project – Pieced Tulip Placemats
By Jody Anderson from www.QuiltBlockoftheMonthClub.com
These pretty pieced tulip placemats bring a breath of fresh air into your home. Made from a solid colour
and a handful of batik 5 inch charm squares, these modern drunkard’s path blocks are fairly quick and
easy to make. They could be great too for a non-traditional Easter!
Placemat 1
Placemat 2
These placemats measure 12 inches wide x 16 inches long.

Standard Online Quilt Magazine – Vol. 5 No. 4
© Online Quilt Magazine.com All Rights Reserved P a g e | 8
You Will Need:
Placemat 1: (Grey tulip on coloured background)
½ metre (½ yard) plain grey fabric (this is a generous fabric allowance)
10, 5-inch charm squares. (You will need two of the same fabric for 2 square sets)
Piece batting at least 14 inches x 18 inches
Placemat 2: (Bright tulips on grey background)
½ metre (½ yard) plain grey fabric
8, 5-inch charm squares
Piece batting at least 14 inches x 18 inches
Spray starch - recommended
Construction:
First, piece the Drunkard’s path blocks. Piecing these is exactly the same for both placemats – just the
colour placement changes.

Standard Online Quilt Magazine – Vol. 5 No. 4
© Online Quilt Magazine.com All Rights Reserved P a g e | 9
Use the attached templates to cut the pieces
for your Drunkard’s Path blocks.
For Placemat 1, cut 4 different charm square
fabrics.
For Placemat 2, cut 8 of these pieces in the
plain grey fabric.
We found it easier to piece these using Linda
Hahn’s method in her fabulous “New York
Beauty Simplified” book. Keep the curve of the
template, but allow extra fabric at each end as
shown.
Using the other template, cut the quarter circle
pieces.
For Placemat 1, cut 4 plain grey fabric pieces.
For Placemat 2, cut 8 from different charm
square fabrics.
Again, follow the curve, and allow extra fabric
at the sides.

Standard Online Quilt Magazine – Vol. 5 No. 4
© Online Quilt Magazine.com All Rights Reserved P a g e | 10
Before sewing, press each piece well. Using spray
starch helps a lot with sewing these curves, and
avoids any unnecessary stretching of the fabric.
As shown, lay the convex curved piece (with the
curve sticking outwards) on top of the concave
piece (curve going inwards). Start at the top and
line up your ¼ inch foot with the raw edges.
Sew a few stitches, then lift the foot (keep the
needle down) and move the top piece over
slightly, so that the edges line up again.
Work your way around the curve, stopping every
few stitches to adjust the edges and line them up
again with your ¼ inch foot.
It will curl up a bit behind you as you sew, but
this is perfectly normal.
Sew around until you reach the other end of the
curve.

Standard Online Quilt Magazine – Vol. 5 No. 4
© Online Quilt Magazine.com All Rights Reserved P a g e | 11
Open out and press.
Your block is wonky, but the curve is
perfect!
Now trim the blocks.
Line up your ruler so that the 3 inch mark
on either side just meets the curved piece
as shown.
The block needs to be trimmed to 4½
inches, so you need to make sure that
measurement fits on the block too, but the
angle doesn’t matter, as long as you stick to
the 3 inch points on the curve.

Standard Online Quilt Magazine – Vol. 5 No. 4
© Online Quilt Magazine.com All Rights Reserved P a g e | 12
Trim the top and right side.
Turn the block around 180 degrees and
square your block up to 4½ inches.

Standard Online Quilt Magazine – Vol. 5 No. 4
© Online Quilt Magazine.com All Rights Reserved P a g e | 13
Ta Dah! One finished perfect Drunkard’s
Path block.
Finish all blocks in this way.
To make the top of the tulip, you need to
trim one side and add a strip to the other.
For Placemat 1, you need to trim 2 blocks.
For Placemat 2, you need to trim 4.
Position the block as pictured, and cut a
strip measuring 1¼ inches from the right
hand side. The remaining part (with the
curve) should be 3¼ inches wide.

Standard Online Quilt Magazine – Vol. 5 No. 4
© Online Quilt Magazine.com All Rights Reserved P a g e | 14
For Placemat 1, cut 2 strips measuring 4½
inches x 1¾ inches – one from each of the
second of the charm square fabric pairs, so
that the background is the same fabric.
For Placemat 2, cut 4 strips 4½ x 1¾ inches
from the plain grey fabric.
Sew the strips to the left hand side of the
block as pictured.
Press well.
Finishing - Placemat 1:
Trim the remaining 4 charm squares of batik fabric to each measure 4½ inches x 4½ inches. Refer to
the photo above, and arrange and piece the top, with the tulip block in the centre and a pair of plain
charm squares to either side.
From the plain grey fabric, cut two strips measuring 2½ inches x 16½ inches, and sew one across the
top of the pieced placemat centre, and the other across the bottom.
Press well.

Standard Online Quilt Magazine – Vol. 5 No. 4
© Online Quilt Magazine.com All Rights Reserved P a g e | 15
From the plain grey fabric, cut a backing piece, approximately 14 x 18 inches. Also cut sufficient 2¼
inch strips for the binding.
Lay the backing face down on a flat surface. Smooth the batting on top, and then lay your pieced
placemat top on top of that, facing up. Smooth all layers and pin or thread baste.
We echo quilted a couple of rows inside the grey tulip, and then filled in the batik background with a
medium sized stippling. Quilt in the ditch along the top and bottom strips. Quilt yours as you wish.
Trim to square it up.
Join the binding strips with 45 degree seams. Press the ¼ inch seams open, then fold the strip in half,
right sides out and press.
Join the binding to the right side of the quilt edge with a quarter inch seam, mitring each corner as you
go. Turn the folded edge of the binding to the back and slip stitch it in place with thread that matches
the binding to finish.
Finishing - Placemat 2:
Refer to the photo above and arrange your two tulip blocks as you like. Sew the pieces together and
press well.
From the plain grey fabric, cut two strips measuring 2½ inches x 16½ inches, and sew one across the
top of the pieced placemat centre, and the other across the bottom. Press well.
Also from the plain grey fabric, cut a backing piece, approximately 14 x 18 inches. Cut sufficient 2¼
inch strips for the binding too.

Standard Online Quilt Magazine – Vol. 5 No. 4
© Online Quilt Magazine.com All Rights Reserved P a g e | 16
Lay the backing face down on a flat surface. Smooth the batting on top, and then lay your pieced
placemat top on top of that, facing up. Smooth all layers and pin or thread baste.
We echo quilted a couple of rows outside each of the batik tulips, and then filled in each tulip shape
with a fairly fine loopy design. Quilt in the ditch along the top and bottom strips. Quilt yours as you
wish. Trim to square it up.
Join the binding strips with 45 degree seams. Press the ¼ inch seams open, then fold the strip in half,
right sides out and press.
Join the binding to the right side of the quilt edge with a quarter inch seam, mitring each corner as you
go. Turn the folded edge of the binding to the back and slip stitch it in place with thread that matches
the binding to finish.
For more Block of the Month Quilt Projects, go to www.OnlineQuiltMagazine.com
~~~~~~~~~~~~~~~~~~~~~~~~~~~~~~~~~~~~~~~~~~~~~~~~~~~~~~~~~~~~~~~~~~~~~~~~~~~~~~~
Don't keep this Online Quilt Magazine all
to yourself –share it with your Quilting
Guilds and Friends!
Don't wait - Invite them to
www.OnlineQuiltMagazine.com to
Subscribe and receive each New Issue as
soon as it's Published!
LUDLOW QUILT AND SEW
Discover new and exciting projects to quilt and sew
each month with clear and easy to follow
instructions.
Visit our website and subscribe to Ludlow Quilt and
Sew’s free monthly newsletter now.
www.ludlowquiltandsew.co.uk

Standard Online Quilt Magazine – Vol. 5 No. 4
© Online Quilt Magazine.com All Rights Reserved P a g e | 17
"Achieve Machine Quilting Perfection
on Every Quilt You Make . . .
While Learning How
How to Make the Most of Fat Quarters,
Fabric Scraps, and Fabric From the
Bolt"
Machine quilting made easy!
Your friends and family will be amazed to see what
you can do with small bits of fabric, whether they
come from brand new fat quarters or cut up
shirts from the thrift shop.
http://www.how-to-
quilt.com/machinequiltingperfection.php

Standard Online Quilt Magazine – Vol. 5 No. 4
© Online Quilt Magazine.com All Rights Reserved P a g e | 18
We're pleased to be able to bring you a selection
each month of the Newest Fabric Releases and
the new season fabric "must haves".
30s Playtime 2 by Chloe’s Closet for Moda
Fabrics
It’s time for some vintage fun! Pop back into the
1930s with bright colors and playful prints!
The new 30s Playtime 2 collection by Chloe’s
Closet for Moda Fabrics will look adorable in
vintage-inspired quilts!
Check it out at:
http://www.fatquartershop.com/moda-fabric/30s-
playtime-chloes-closet-moda-fabrics
Keep up to Date with What’s Happening on our
Facebook Page – Do You Love Quilting Too?
Bonus blocks, hints and tips added all the time!!
http://www.facebook.com/#!/pages/Do-
You-Love-Quilting-Too/271888039492644
What's New from The Fat Quarter Shop
From Kimberly Jolly at www.FatQuarterShop.com

Standard Online Quilt Magazine – Vol. 5 No. 4
© Online Quilt Magazine.com All Rights Reserved P a g e | 19
Jelly Bean by Laundry Basket Quilts for Moda
Fabrics
Stunning prints and batiks to inspire your next
quilting masterpiece. Jelly Bean by Laundry
Basket Quilts for Moda Fabrics elegantly mixes
color and prints for a stunning new collection.
See the Range at:
http://www.fatquartershop.com//moda-fabric/jelly-
bean-laundry-basket-quilts-moda-fabrics
Winter Wonderland by Bunny Hill Designs for
Moda Fabrics
It’s never too early for Christmas sewing! Winter
Wonderland by Bunny Hill Designs for Moda
Fabrics is perfect for cheerful Holiday projects.
Fill your home with red and white elegance
during these holidays!
View this Collection at:
http://www.fatquartershop.com/moda-fabric/winter-
wonderland-bunny-hill-designs-moda-fabrics
Standard Online Quilt Magazine – Vol. 5 No. 4
© Online Quilt Magazine.com All Rights Reserved P a g e | 20
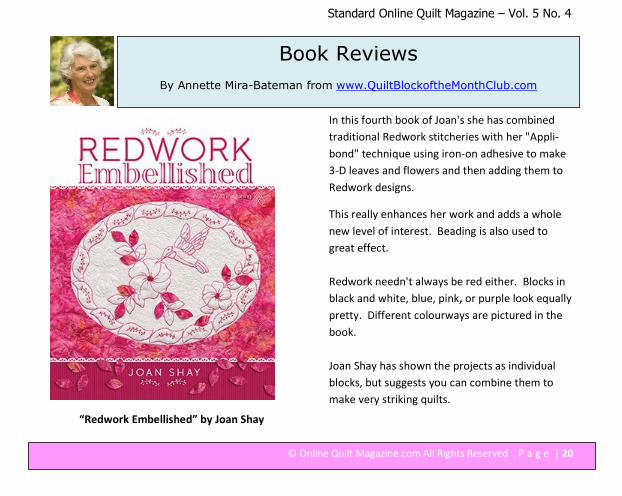
“Redwork Embellished” by Joan Shay
In this fourth book of Joan's she has combined
traditional Redwork stitcheries with her "Appli-
bond" technique using iron-on adhesive to make
3-D leaves and flowers and then adding them to
Redwork designs.
This really enhances her work and adds a whole
new level of interest. Beading is also used to
great effect.
Redwork needn't always be red either. Blocks in
black and white, blue, pink, or purple look equally
pretty. Different colourways are pictured in the
book.
Joan Shay has shown the projects as individual
blocks, but suggests you can combine them to
make very striking quilts.
Book Reviews
By Annette Mira-Bateman from www.QuiltBlockoftheMonthClub.com

Standard Online Quilt Magazine – Vol. 5 No. 4
© Online Quilt Magazine.com All Rights Reserved P a g e | 21
A history of Redwork embroidery is included in
this book and also full explanations of the fabrics,
supplies, threads and stitches, beads, glue and
equipment needed.
Her "Appli-bond" applique technique is explained
in full. Detailed photos show the quilting designs
used.
These embellishments and additions to Redwork
designs will really provide the "wow" factor for
your next quilt.
"Redwork Embellished" by Joan Shay is
published by AQS, P.O. 3290, Paducah, KY 42002-
3290 USA and is available through your local
craft book shop or online from:
~~~~~~~~~~~~~~~~~~~~~~~~~~~~~~~~~~~~~~~~~~
“Strip Savvy – 2½” Strip Quilting Designs” by
Kate Henderson
Standard Online Quilt Magazine – Vol. 5 No. 4
© Online Quilt Magazine.com All Rights Reserved P a g e | 22
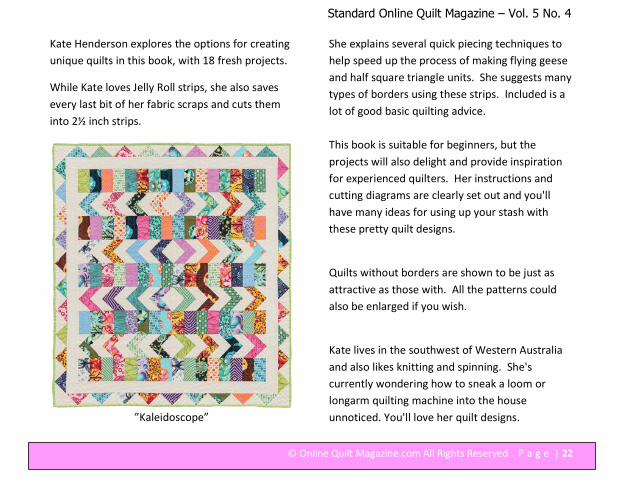
Kate Henderson explores the options for creating
unique quilts in this book, with 18 fresh projects.
While Kate loves Jelly Roll strips, she also saves
every last bit of her fabric scraps and cuts them
into 2½ inch strips.
”Kaleidoscope”
She explains several quick piecing techniques to
help speed up the process of making flying geese
and half square triangle units. She suggests many
types of borders using these strips. Included is a
lot of good basic quilting advice.
This book is suitable for beginners, but the
projects will also delight and provide inspiration
for experienced quilters. Her instructions and
cutting diagrams are clearly set out and you'll
have many ideas for using up your stash with
these pretty quilt designs.
Quilts without borders are shown to be just as
attractive as those with. All the patterns could
also be enlarged if you wish.
Kate lives in the southwest of Western Australia
and also likes knitting and spinning. She's
currently wondering how to sneak a loom or
longarm quilting machine into the house
unnoticed. You'll love her quilt designs.

Standard Online Quilt Magazine – Vol. 5 No. 4
© Online Quilt Magazine.com All Rights Reserved P a g e | 23
"Strip Savvy" is available from Martingale,
19021-120th Ave. NE, Ste.102, Bothell, WA
98011-9511, USA and is available through your
local craft book shop or online from:
www.ShopMartingale.com
”Butterflies”
Standard Online Quilt Magazine – Vol. 5 No. 4
© Online Quilt Magazine.com All Rights Reserved P a g e | 24
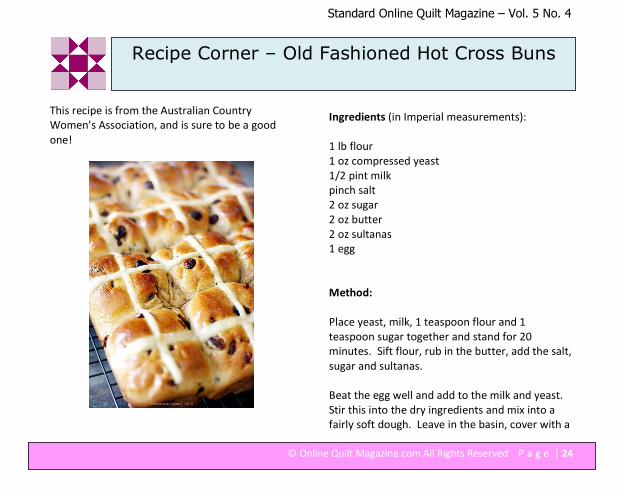
This recipe is from the Australian Country
Women's Association, and is sure to be a good
one!
Ingredients (in Imperial measurements):
1 lb flour
1 oz compressed yeast
1/2 pint milk
pinch salt
2 oz sugar
2 oz butter
2 oz sultanas
1 egg
Method:
Place yeast, milk, 1 teaspoon flour and 1
teaspoon sugar together and stand for 20
minutes. Sift flour, rub in the butter, add the salt,
sugar and sultanas.
Beat the egg well and add to the milk and yeast.
Stir this into the dry ingredients and mix into a
fairly soft dough. Leave in the basin, cover with a
Recipe Corner – Old Fashioned Hot Cross Buns

Standard Online Quilt Magazine – Vol. 5 No. 4
© Online Quilt Magazine.com All Rights Reserved P a g e | 25
clean cloth and place in a warm place to rise from
35 to 40 minutes.
Turn onto a floured board and knead well. Cut
into about 16 - 18 pieces of equal size. Form each
into a bun and place on a slightly greased tin,
evenly spaced and rather close together. Cover
and place again in a warm place to rise for 10
minutes.
Mark a cross on top with a knife. Make a glaze by
mixing 1 heaped teaspoon icing sugar and 1
tablespoon boiling water. Brush over the buns
and bake in a hot oven for about 15 minutes.
** You may like to add some spices to your buns
too - try cinnamon, ground cloves and mixed
spice.
Happy Easter!!
Join The Club!

Standard Online Quilt Magazine – Vol. 5 No. 4
© Online Quilt Magazine.com All Rights Reserved P a g e | 26
We Made the Paper – a Quick Breast Cancer Bags Appeal
Update: (Northern Star, March 2014)
Bags are still coming in, and going out to Hospitals around Australia,
and other individuals and groups of dedicated sewers are keeping
their local areas supplied with these much needed and greatly
appreciated bags, in various destinations around the world. We would
like to recognise your efforts and thank you so much for helping out.
There’s been some fantastic personal efforts, and this includes Miriam
(above right) who’s up to more than 600 bags made personally!

Standard Online Quilt Magazine – Vol. 5 No. 4
© Online Quilt Magazine.com All Rights Reserved P a g e | 27
This month we continue our regular segment of
“Show and Tell” quilts made by our Online Quilt
Magazine Readers. It’s been another busy month
too!
We will include them as long as you can send
them to us, and that way we can all share in the
wealth of creativity and inspiration abundant
within our quilting community.
~~~~~~~~~~~~~~~~~~~~~~~~~~~~~~~~~~~~~~~~~~
“I just wanted to send you a picture of a quilt that
I have just finished for the ‘Undies for Better
Understanding – Gynae Cancer Awareness’. The
individual blocks were made by the Ladies of the
Herald Ave, Willetton WA, Quilters Group and I
pieced and quilted the Quilt together. We
presented the Quilt to Kath Mazella, OAM,
founder of the International GYN Awareness Day
on the 28 February 2014.
As a group we are now working on a ‘Corset’
Quilt. As a group we are enjoying the challenge
and wonder if some other quilting groups would
love to make a quilt as well? - Monika
W., Australia
Reader “Show and Tell”

Standard Online Quilt Magazine – Vol. 5 No. 4
© Online Quilt Magazine.com All Rights Reserved P a g e | 28
“I have just made a new bag in shell motifs and a
Km-quilt. The “Km-quilt” is a technique to utilize
your scraps and it is very nice to do.”
- Jacqueline B., Belgium
~~~~~~~~~~~~~~~~~~~~~~~~~~~~~~~~~~~~~~~~~~~~
Standard Online Quilt Magazine – Vol. 5 No. 4
© Online Quilt Magazine.com All Rights Reserved P a g e | 29
“I just thought I would send you a photo of my
completed "Fire & Ice" quilt which I think should
be renamed "Two Worlds Collide"!
I didn't like the idea of using solid colours, so I
opted for batiks, which was a bit of a headache,
however I do like a challenge!
Also, I changed some of the blocks and created
some of my own. I also put it together as a quilt
as you go, but in three sections, with no binding
strips on the back.
I quilted it myself, using different threads for the
different sections - a mammoth task, but it really
turned out well and I am very proud of the end
result.
As you can see, I didn't use any sashings between
the blocks, which made it "flow".”
- Helen W., Australia

Standard Online Quilt Magazine – Vol. 5 No. 4
© Online Quilt Magazine.com All Rights Reserved P a g e | 30
”I Wish….”- Annette
Annette and I went on a weekend quilt retreat
last month, and we’d had a discussion about the
next quilt we were going to make. As usual, we
both pictured it differently, so we decided to
each make our own as a small retreat challenge.
The idea behind the design was the same
(random blocks falling through a funnel to make a
9-patch quilt), and we agreed on the ground-rules
– quilt size, blocks to be used, and that pieces
could be cut, but nothing sewn before the
retreat.
We had heaps of fun making these, and they
turned out quite differently after all!
”I Wish…” - Jody

Standard Online Quilt Magazine – Vol. 5 No. 4
© Online Quilt Magazine.com All Rights Reserved P a g e | 31
This month’s block is a star block with a
difference. It makes a lovely big border block, or
try arranging more spaced out for a simpler look.
To make this 12 inch block as shown, you will
need 5 different fabrics, and once you have
rotary cut the pieces according to the Cutting
Diagram, you can piece them together as shown.
Block of the Month

Standard Online Quilt Magazine – Vol. 5 No. 4
© Online Quilt Magazine.com All Rights Reserved P a g e | 32

Standard Online Quilt Magazine – Vol. 5 No. 4
© Online Quilt Magazine.com All Rights Reserved P a g e | 33

Standard Online Quilt Magazine – Vol. 5 No. 4
© Online Quilt Magazine.com All Rights Reserved P a g e | 34
Today’s Tips:
* To reduce seam allowance bulk when machine
piecing, seam allowances that meet should be
pressed in opposite directions whenever possible.
* When doing stitch-in-the-ditch machine
quilting, stitch as close to the seam as possible,
on the lower side of the seam (the side of the
seam opposite the seam allowance bulk).
* To keep bobbin thread from tangling on the
back when machine quilting, always bring the
bobbin thread to the top of the quilt before
beginning to sew.
* Before adding binding, stitch near the edge of
the quilt to stabilize the layers so that the binding
goes on smoothly.
* When designing quilting patterns, don't forget
these items to draw around: cups, saucers,
plates, cookie cutters, baking plans, jelly moulds,
knick-knacks.
The annual Australasian Quilt Convention (AQC) is
set to celebrate its 10th birthday as the biggest,
most celebrated quilting event in the southern
hemisphere!
Returning to Melbourne from April 10-13, at the
Royal Exhibition Building, AQC will provide a
spectacular array of international tutors leading
seminars and workshops for every skill level,
together with stunning displays of the unrivalled
talent of quilters from both Australia and around
the world. The event also presents a unique
shopping opportunity with an exceptional array
of quilting products including many at bargain
prices.
Dates: April 10-13, 2014 from 10am – 4.30pm
Royal Exhibition Building Melbourne, Carlton
Gardens. www.aqc.com.au
Keep the tips coming! Send them
all to

Standard Online Quilt Magazine – Vol. 5 No. 4
© Online Quilt Magazine.com All Rights Reserved P a g e | 35
YES, We Want to Hear From
You!
As our Online Magazine continues to grow each
month, we need your feedback in order for us to
continue to improve our publication for you.
• We want to know how you liked it.
• We want to know the topics you're
interested in.
• We want to know if you have any
suggestions, Hints or Tips of your own that
you'd like included, or if you know anyone
we should include a story on!
Please send me an email with your Testimonial,
Tip, Suggestion, “Show and Tell” Quilt or
Enhancement – I'd love to hear from you!
Send all emails to:
If you'd like to submit an Article, or a Project for
Publication, or take advantage of our Very Very
Reasonable Advertising Rates, please email details
or queries to Jody at
To subscribe to our Monthly Online Quilt
Magazine, please go to
www.OnlineQuiltMagazine.com and
register so you don’t miss another issue!
"Quilt-y" Quotes…
* A messy house is the sign of a happy
quilter
* I love sewing and have plenty of material
witnesses.
* God put me on this earth to sew and finish
a certain number of things. I am so far
behind now I will never die!
Top Related