


Languages
Pages
Legal


SOUND CONTROLLER CP800
Thank you for purchasing your new Brimal Sound Controller. We recommend you spend some time reading this instruction
manual in order that you fully understand all the operational features. You will also find some tips to help
issues.
Unpack the unit
The following items are included:
1) Sound Controller
2) Micro SD card
3) 6 mono jack plugs 3.5 mm
4) 6 Magnets 6x2mm
5) 6 Reed switches
6) 1 DC plug 2.5mm pin
Connection of the controllerMicro SD card.
First insert the Micro SD card into the reader. The card will only go in one way,
so make sure that the card has the notches on the left. The card will go into the
reader and click when locked in place.
To release and remove the card press the card
The Power supply
There are two power sockets on the rear panel, both require a DC power socket with a 2.5mm pin. Please ensure that the
power supplied is between 9v & 12v DC. This can
from the main layout system. You must ensure that the positive power is on the pin as the drawing below.
The two examples above are as follows.
Left image shows the 9 to 12v DC coming from the auxiliary power
Right image shows the power being supplied by a standalone power pack and the second power socket being used to power
other equipment.
SOUND CONTROLLER CP800
Thank you for purchasing your new Brimal Sound Controller. We recommend you spend some time reading this instruction
manual in order that you fully understand all the operational features. You will also find some tips to help
Connection of the controller
First insert the Micro SD card into the reader. The card will only go in one way,
so make sure that the card has the notches on the left. The card will go into the
To release and remove the card press the card down and then lift out.
There are two power sockets on the rear panel, both require a DC power socket with a 2.5mm pin. Please ensure that the
power supplied is between 9v & 12v DC. This can be either from an additional power supply, or
You must ensure that the positive power is on the pin as the drawing below.
The two examples above are as follows.
Left image shows the 9 to 12v DC coming from the auxiliary power output on your layout.
Right image shows the power being supplied by a standalone power pack and the second power socket being used to power
SOUND CONTROLLER CP800
Thank you for purchasing your new Brimal Sound Controller. We recommend you spend some time reading this instruction
manual in order that you fully understand all the operational features. You will also find some tips to help you resolve any
There are two power sockets on the rear panel, both require a DC power socket with a 2.5mm pin. Please ensure that the
from an additional power supply, or from the auxiliary output
You must ensure that the positive power is on the pin as the drawing below.
Right image shows the power being supplied by a standalone power pack and the second power socket being used to power

Initial Switch On
Once you have connected the power supply and inserted the SD card, switch the p
to ten seconds, Switch OFF. (you have rebooted the microprocessor
switch on, you can test the sounds by pulling any of the mini toggle switches down, and r
twenty to forty five seconds. All sounds can be reset by pulling the RESET switch down for a second.
External Amplifier & Speaker
The controller has a switch on the front panel to give sound to the internal speaker, or a
output is via a 3.5mm jack socket with the following polarity connection.
Please ensure the jack plug is wired as the drawing below.
Sound Trigger System
On the front panel each sound has a mini toggle s
toggle switch is left in the UP position, the sound will be triggered by the sensor connected to the corresponding input sock
on the rear. The input circuit must be a normally open contact. There are numerous contact types, the most common will be
the reed switch which is activated by a magnet(fixed to the underside of the locomotive. These are shown in the image below
on the left side.
Once you have connected the power supply and inserted the SD card, switch the power to the unit ON, and leave on for five
to ten seconds, Switch OFF. (you have rebooted the microprocessor - you will not need to do this
switch on, you can test the sounds by pulling any of the mini toggle switches down, and releasing. Each sound will last from
twenty to forty five seconds. All sounds can be reset by pulling the RESET switch down for a second.
The controller has a switch on the front panel to give sound to the internal speaker, or an external speaker system. The
output is via a 3.5mm jack socket with the following polarity connection.
Please ensure the jack plug is wired as the drawing below.
On the front panel each sound has a mini toggle switch associated to it, and the input socket on the rear panel. When the
toggle switch is left in the UP position, the sound will be triggered by the sensor connected to the corresponding input sock
rear. The input circuit must be a normally open contact. There are numerous contact types, the most common will be
the reed switch which is activated by a magnet(fixed to the underside of the locomotive. These are shown in the image below
ower to the unit ON, and leave on for five
you will not need to do this again). The next time you
eleasing. Each sound will last from
twenty to forty five seconds. All sounds can be reset by pulling the RESET switch down for a second.
n external speaker system. The
input socket on the rear panel. When the
toggle switch is left in the UP position, the sound will be triggered by the sensor connected to the corresponding input socket
rear. The input circuit must be a normally open contact. There are numerous contact types, the most common will be
the reed switch which is activated by a magnet(fixed to the underside of the locomotive. These are shown in the image below

There is no polarity with these inputs so it is not important which way around the jack plug or the sensor switch is wired. The
important part is that the circuit is NORMALLY OPEN, otherwise the sound will be triggered continuously.
Example Set Up
Where you position the Trigger Sensors is a personal choice and will depend a lot on the size of your layout.
The following is an example of a sequence to create the atmosphere.
CP800 DIESEL SOUND CARD 1 DMU Passing with Horn
2 Deltic Starting off
3 Diesel Starting up
4 Slow Deltic Approach
5 DMU Horn & Start up
6 Short Diesel Horn
7 Diesel Freight + Horn at Speed
8 Slow Moving Deltic
9 Coach Doors Closing
10 Station Noise Atmosphere
11 Level Crossing
12 'Next Train not Stopping'
13 Road Traffic & Pelican Crossing
14 Wagons & Couplings
15 Clickity Clack
16 RESET
This is just a small example of how the sensors can be used on a simple layout.
You can use the same sound on different tracks and different situations by wiring the sensors in parallel before they go back
to the control panel as shown below
Parallel Sensors
This drawing shows how you would use 2 (or more) sensors to activate one particular sound.
Example: Using the layout above, Sensor on the left of the station is connected to sound 15 which is the Clickity Clack sound.
Depending on the size of your layout you may want this sound continuous, this means you will need to place another sensor
in the position where the Clickity Clack is about to stop. This will then reactivate the sound. The circuit below is how you do
this, you can add as many sensors to the left of this circuit as you wish.
Reset.
You can connect the RESET to a sensor if you wish. This is socket 16 on the rear. This will reset all sounds that are active at
the time.
Example: You may have a tunnel on your layout, while the train is in the tunnel you may want there to be no sounds. Fitting
a sensor at the entrance will reset all sounds to OFF as the train enters the tunnel.
or
The sounds last too long as the train arrives in the Station, A reset sensor can be placed where you normally stop the train.
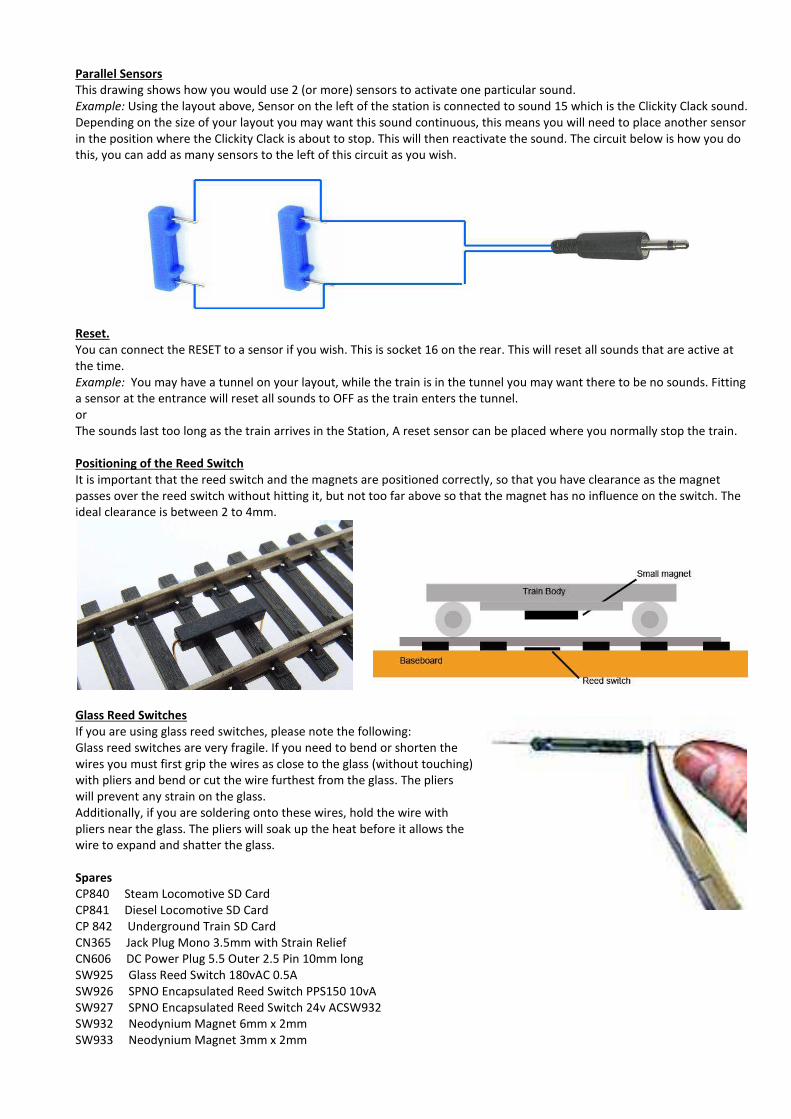
Positioning of the Reed Switch
It is important that the reed switch and the magnets are positioned correctly, so that you have clearance as the magnet
passes over the reed switch without hitting it, but not too far above so that the magnet has no influence on the switch. The
ideal clearance is between 2 to 4mm.
Glass Reed Switches
If you are using glass reed switches, please note the following:
Glass reed switches are very fragile. If you need to bend or shorten the
wires you must first grip the wires as close to the glass (without touching)
with pliers and bend or cut the wire furthest from the glass. The pliers
will prevent any strain on the glass.
Additionally, if you are soldering onto these wires, hold the wire with
pliers near the glass. The pliers will soak up the heat before it allows the
wire to expand and shatter the glass.
Spares
CP840 Steam Locomotive SD Card
CP841 Diesel Locomotive SD Card
CP 842 Underground Train SD Card
CN365 Jack Plug Mono 3.5mm with Strain Relief
CN606 DC Power Plug 5.5 Outer 2.5 Pin 10mm long
SW925 Glass Reed Switch 180vAC 0.5A
SW926 SPNO Encapsulated Reed Switch PPS150 10vA
SW927 SPNO Encapsulated Reed Switch 24v ACSW932
SW932 Neodynium Magnet 6mm x 2mm
SW933 Neodynium Magnet 3mm x 2mm

SW052 Microswitch V4 Ultra Mini Lever PCB Mtg
SW053 Sub Miniature Button Microswitch
SWP100 Leaf Switch
This unit is guaranteed for 12 months from the date of purchase. If you have any problems with the unit, please contact us on
Tel; 01429297277 or email us at [email protected]
For further information and ideas have a look at the CP800 page on thehobbyshed.co.uk
Top Related