


Languages
Pages
Legal


Sea Eagle Motormount BoatsSE-8 & SE-9
Instruction & Owner’s ManualFor video instructions visit SeaEagle.com/Instructions
Sea Eagle Boats Inc.
19 N. Columbia Street, Suite 1
Port Jefferson, NY 11777
1-800-748-8066
September 2012
VIDEOINSTRUCTIONS
scan this code
or visit
http://sea.gl/vimm

Sea Eagle GuaranteeCongratulations on purchasing a Sea Eagle! With over 40 years of experience in designing, selling and using these quality
inflatables, we’re confident that you are going to love your Sea Eagle and we’re ready to proudly stand behind them.
Sea Eagle Warranty
All Sea Eagle products come standard with a 3 year warranty against any manufacturing defect that begins the date that
your product is delivered. Sea Eagle will refuse delivery on all packages without a valid return authorization number and
will not be responsible for the shipping or handling charges. To obtain a return authorization number, please contact
Sea Eagle directly unless you purchased from an authorized dealer/reseller in which case you should contact them for
more information.
Sea Eagle must inspect equipment in order to determine if there is a defect. In the event that an item must be shipped
back to us for inspection, Sea Eagle will only reimburse the standard return shipping charge through FedEx, UPS or the
U.S. Post Office at published shipping rates. Retail shipping outlets like The UPS Store will not be reimbursed and you will
be responsible for handling and packing charges.
The Sea Eagle warranty does not apply to products that are manufactured by Minn Kota or Torqeedo. These products are
covered by their own, respective warranties. Please refer to the manufacturer’s warranty of each product for details.
If you received an item damaged, please call the shipping carrier to report damaged merchandise. Do not return damaged
merchandise until it has been inspected by the carrier. Sea Eagle will be notified by the carrier when they have completed
their inspection and if necessary, Sea Eagle will arrange for the repair or replacement of damaged merchandise.
Decals, Stickers & RegistrationAlways contact your state boating authorities for information on boating registration and regulations. Most states require
you to register your boat if you are using a motor.*
Upon registration it may be required to provide the Manufacturer’s Statement of Origin.
Purchases made through an authorized dealer or reseller may require for you to contact them directly in order to obtain
this. You may be charged your own state sales tax if you were not charged sales tax at the time of purchase.
Registered boats generally require for the registration number to be applied to the boat. We do not recommend the use of
decals or stickers as they tend to crack and peel over time with the repeated inflation and deflation of your Sea Eagle.
Instead we suggest applying these numbers to a small piece of hard plastic or marine plywood and hanging it from your
boat like a license plate if permitted by your state. Another method is to apply the numbers to the hull using either PVC
based paint or permanent marker.
* Please note that our Sea Eagle Explorer Kayaks, FastTrack Kayaks, Sport Kayaks and LB-11 LongBoard are not
rated for use with a motor.
Contact UsUnlike many other companies today we pride ourselves on answering the phone and helping you with any concerns,
questions or special ordering needs that you may have!
Feel free to give us a call at 1-800-748-8066 and we will be happy to talk with you!
Our business hours are Monday to Friday from 9-5 (EST).
Sea Eagle Boats Inc.19 N. Columbia Street, Suite 1
Port Jefferson NY 11777
1-800-748-8066
1
Operating Your Sea EagleFishing
Motormount Boats are ideal for fishing because you can launch them just about anywhere there are fish! Often the best
fishing spots are the ones that are the most difficult to reach that do not have a ramp or roadway leading all the way down
to the water. Because Sea Eagle Motormount Boats are so lightweight you can launch it from just about anywhere.
Motoring
Your Sea Eagle Motormount Boat is rated for use with either a small electric or gas motor with the use of a motor mount.
Since your Motormount Boat is designed for use with small engines, you won’t always be able to motor past every current.
These boats are rated by the National Marine Manufacturer’s Association for a motors maximum capacity for both dry
weight and horsepower. Under no circumstance should you equip a motor that exceeds these capacities (whether they be
for the dry weight or the horsepower or both). Please also note that you should never tow your Sea Eagle above 3 M.P.H.
in calm waters and DO NOT ATTEMPT TO TOW PEOPLE! Not only can these things result in damaging your Sea Eagle
Motormount Boat, it will also void your Sea Eagle warranty.
Gas motors are measured in units of horsepower and are generally built with power and speed in mind. To get the best
performance out of your Motormount Boat we recommend using a 15” short shaft, although a longer shaft can be used in
greater depths of water.
Traditional electric motors are measured in units of thrust (the pulling or pushing power of a motor) and are slower and
quieter on the water than gas motors. There is no direct correlation of thrust to horsepower although most will consider
traditional electric motors to be about a 1HP (which is more of a guess than an approximation).
Advantages of having an electric motor over a gas is that they are lighter to transport and easier to maintain. In order to
operate an electric motor you will need a 12V deep cycle marine battery. Other suggested accessories are a battery
charger and a battery power center to house the battery itself.
The Torqeedo Travel 1003s electric motor is unlike any other electric motor on the market today. Powered by a waterproof
lithium ion battery (battery charger included), the Travel 1003s delivers the true 3HP performance of a gas motor!
Features include on board computer display, GPS and an audible alarm when the battery reaches 30%.
Torqeedo electric motors are lighter to transport than gas motors and do not require a heavy 12V battery like traditional
electric motors. You can also power your Torqeedo Travel 1003s using the Sea Eagle/PowerFilm Solar Panel.
Minn Kota, PowerFilm & Torqeedo products come with a manufacture warranty and are not covered by the
Sea Eagle warranty. All warranty work is handled directly by the respective manufacturer and all sales on these
products are final.
Rowing
You will be surprised how easy it is to row your boat. It is best to sit in the bow on the blue inflatable SED seat for a low
rowing position with back support provided by the bow of the boat. Place the oars through the blue carry handles on the
sides of the boat which double as oarlocks.
You may be surprised at how easy it is to row your Sea Eagle. We recommend rowing your Sea Eagle Motormount boat
using the blue inflatable SED seat in the bow of the boat. When you row forwards, you face backwards.This means you
will have a great view of where you have been, but almost no view of where you are going. Be sure to check over your
shoulder frequently to avoid any obstacles or obstructions. Be aware of the conditions of the water you are rowing in.
You should be aware of any and all obstacles and dangers that you might encounter (i.e. buoys, docks, moored boats,
motor boats, sail boats, waves, weather, lightning, rain, etc). Please note to give way to both motor boats and sail boats
as they have the right of way.
If you are new to rowing, we suggest that you practice rowing for several hours near the shore before venturing out further
onto open waters. Practice only makes perfect and ensures that you are comfortable in your boat in almost any weather
conditions you may come across. Continually practice your rowing strokes, trying to make them as fluid and smooth as
possible.
When pulling your oars through the water you should try to keep the blades fully immersed in the water, but as close to
the surface as possible. This will give you greater rowing leverage. Even if you are motoring your Sea Eagle, we always
2

SafetyIn a manual of this type it is impossible to give adequate space to the topic of water safety. For further information on
boating safety, visit USCGBoating.org or enroll in one of the excellent water safety courses provided.
It is your responsibility to be aware of and comply with all relevant safety regulations. For all water recreation or sport you
should have a reasonable swimming ability. Just as swimmers have a cardinal rule about not swimming alone, it is
strongly advised that you should never go boating alone.
Boating Safety Tips
• Always wear a USCG approved PFD (life vest) at all times while on the water.
• Be aware of your local boating rules and regulations and abide by them accordingly.
• Check inflation levels each time before you go out and inflate your boat for a full 24 hours before undertaking long trips.
• DO NOT allow children to use Sea Eagle unsupervised.
• DO NOT consume alcohol while boating or operating a boat while under the influence of alcohol or drugs.
• DO NOT drag your Sea Eagle over rocks or gravel if it can be avoided.
• DO NOT exceed the certified maximum capacities of this boat under any circumstance.
• DO NOT go boating alone.
• DO NOT use compressors, co2 or compressed air for inflation, only use Sea Eagle recommended pumps.
• DO NOT use your Sea Eagle Boat as a personal flotation device as they are designed for leisure/recreation in mind.
• DO NOT sleep inside of your Sea Eagle while on the water.
Safety Equipment
The type of water conditions you are on should determine the type of safety equipment that you should have on board.
For all types of boating we strongly recommend that every passenger wear a USCG approved PFD (personal flotation de-
vice) like a life vest. In most places this is a requirement by law, but from our point of view it is also an exercise of good
judgment to have a PFD for all passengers. Other important items to consider for all types of boating…
Drinking Water & Snacks: Kayaking is a physical activity that can work up both a thirst and a sweat and especially on a
hot or warm day it is a good idea to have drinking water readily available to you to prevent dehydration. Bring a good
amount of water for all passengers as you want to avoid drinking the water you’re kayaking in which may be full of con-
taminants.
Extra Clothes/Layers: You never know when the weather can change and it’s a good idea to come prepared with extra
clothing. If you have a dry (waterproof) bag than we recommend storing them inside so they’re not damp in case of emer-
gency.
First Aid-Kit: The contents of the kit may vary depending upon your preferences, but make sure to carry a kit that reflects
the possible dangers for the conditions you are in.
Foot Pump/Repair Kit: Although our boats are both durable and rugged, it may be possible that you need to make a repair
while on the water in which case you’ll need the repair kit and the foot pump to re-inflate the boat. If this is your first repair,
you may also want to bring this instruction manual with you.
Sun/Rain Protection: A hat can protect both your face and head from the rain or sun. You may also want to carry sun-
screen with you as both the sun and the sun’s reflection from the water can do serious damage to your skin. If you are out
for prolonged periods of time you may need to reapply sunscreen as needed.
Whistle: Having a whistle readily available to you in case of emergency is a great way to attract the attention of others if
assistance is needed.
3

Inflation Valves & PumpsOne-Way Air Valves
Place the retainer ring
over the valve base and
screw the valve into the
base. Unscrew the
outer cap on the valve
to reveal the inflation
port.
Pipe Valves
These simple, compact
valves are used on both
the inflatable FHS &
SED seats and the floor
chambers of your boat.
Foot Pump
The foot pump is a high
capacity pump made of
durable ABS plastic. To
use simply press the
two halves of the foot
pump together and con-
nect the hose to the in-
flation port marked
OUT.
The triple nozzle
adapter comes with the
foot pump and is
needed to inflate both
the one-way air valve
and the pipe valves.
Insert the ribbed end of
the large rounded
adapter piece into the
hose of your foot pump.
Inflation Valves & PumpsTo inflate a one-way
valve, simply place the
adapter into the valve
and begin pumping with
your foot pump. When
you’re finished, screw
the outer cap of the
valve closed.
To inflate a pipe valve,
first attach one of the
cone shaped nozzles
into the large rounded
adapter and insert it into
the pipe valve and
begin pumping with
your foot pump.
To close, tightly pinch
the middle of the valve
with your forefinger and
thumb while removing
the pump nozzle from
the valve. Squeeze
tightly, and hold the
valve at the very bottom
to prevent the air from
seeping out while you
plug the valve at the
top.
MB-80 Electric Pump
(OPTIONAL)
This electric pump
works using the 12V
power outlet in your car.
Please note that the
star shaped valve
adapters and deflation
cap are not necessary
for Sea Eagle boats.
4
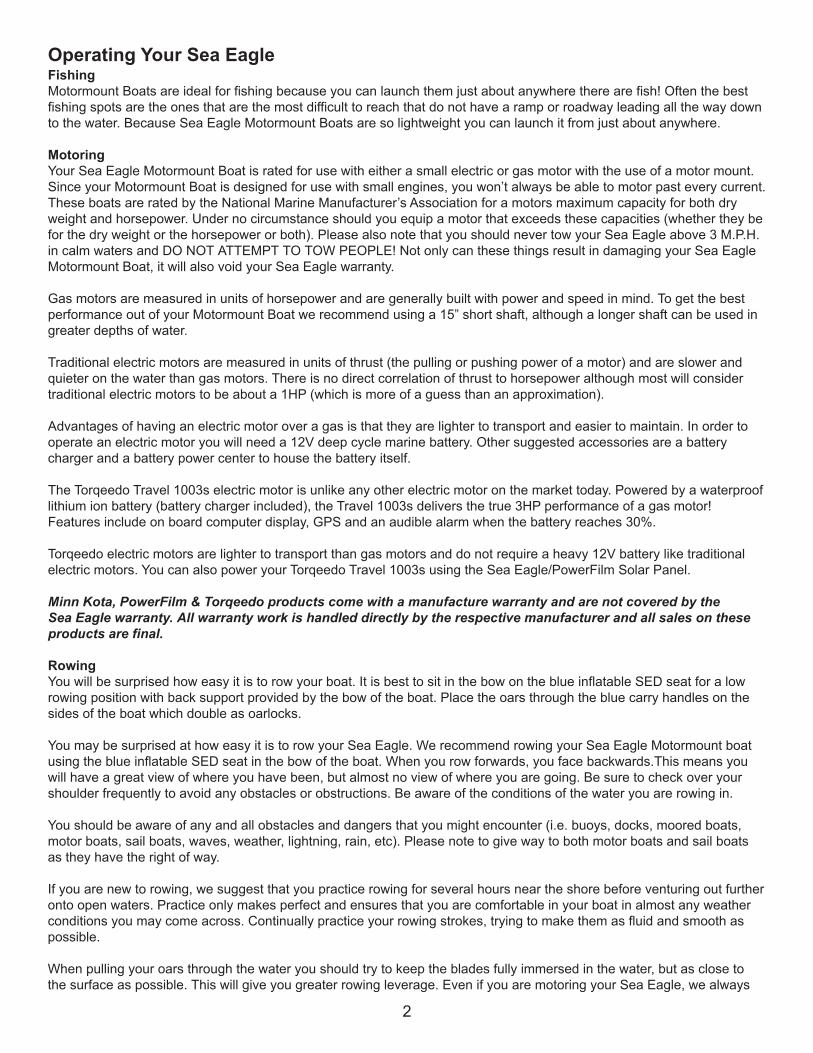
Assembly & InflationFirst, make sure your
pump is switched OFF
and then insert the
power adapter into the
power outlet. If you
have a weak battery
you may want to keep
your engine running
while you’re using the
pump.
No extra nozzles are
needed to inflate the
main air chambers of
your boat, just insert the
pump into the valve and
switch it on. Do not drop
or suddenly move the
pump while it is
To inflate the floor
chambers using the
MB-80 you will need to
attach the tube extender
and large cone nozzle
to the end of the pump.
Air compressors that
are designed for other
uses like tire inflation
(usually around 50 PSI)
can easily harm your
Sea Eagle which works
at a much lower pres-
sure of 1.1 PSI. For this
reason we recommend
only using Sea Eagle
pumps.
Assembly & InflationTo begin unroll your
boat on a clean, flat
surface. Locate the
three main air chambers
(they are numbered 1-3)
and screw the deluxe
one-way air valves to
them. Make sure not to
cross the threads when
screwing the valve into
the base or when tight-
ening the outer cap.
Chambers #1 & #3
feature a diagram of the
plastic inflation monitor
that is included with this
boat. As you begin to
inflate, the hull material
will stretch so that the
diagram matches the
clear plastic inflation
monitor.
Begin by inflating the
two pipe valves on the
floor and then proceed
to the main chambers
beginning with chamber
#1 which is the upper
safety chamber. This
guarantees that its fully
inflated which is vital in
the unlikely event that
another chamber loses
air.
Next inflate chambers
#2 & #3 and use the
printed diagram on
chambers #1 & #3 to
match the pattern with
the clear plastic inflation
monitor. Note that
chamber #1 will not be
an exact match until #3
is fully inflated.
5

You can safely inflate
one centimeter beyond
the diagram. Once fully
inflated you should be
able to indent your
thumb into the boat
about ½ to ¾ of an
inch. If you are using
floorboards, only inflate
the main chambers 75%
full until they’re installed
and then finish inflation.
AB25-3 Oar Set
The AB25-3 Oar is 56”
long and easily rows
your Sea Eagle 8 or 9.
Each oar includes an
ABS blade, aluminum
shaft and drip ring.
Assemble the AB25-3
by sliding the drip ring
over the shaft and then
connect the shaft to the
blade. Tighten the ring
at the bottom of the
blade so that its secure
on the shaft. We always
recommend testing the
connection of the blade
and shaft on dry land
rather than in the water.
To row your boat using
the AB-253 oar set, use
the blue carry handles
as oar locks. Although
the handle is a snug fit
for the shaft of the oar,
you can keep the drip
ring on the inside of the
boat to act as a stopper
and keeping the shaft in
place.
Floorboards
(OPTIONAL)
The floorboards for our
Motormount Boats are
comprised of marine
plywood (two pieces)
and an aluminum three
piece floorboard strut
that form an “H” when
installed.
Place both the bow and
stern (identified by the
cut out hole) floorboard
pieces inside the boat
so that they overlap in
the middle. Next, lift the
floorboard pieces at the
center and insert the
middle section of the
“H” strut.
With the strut connected
to both floorboard
pieces force the boards
down into the boat until
they are secure.
Once the floorboards
are flattened, continue
to install the side struts
on each side of the
floorboards.
6
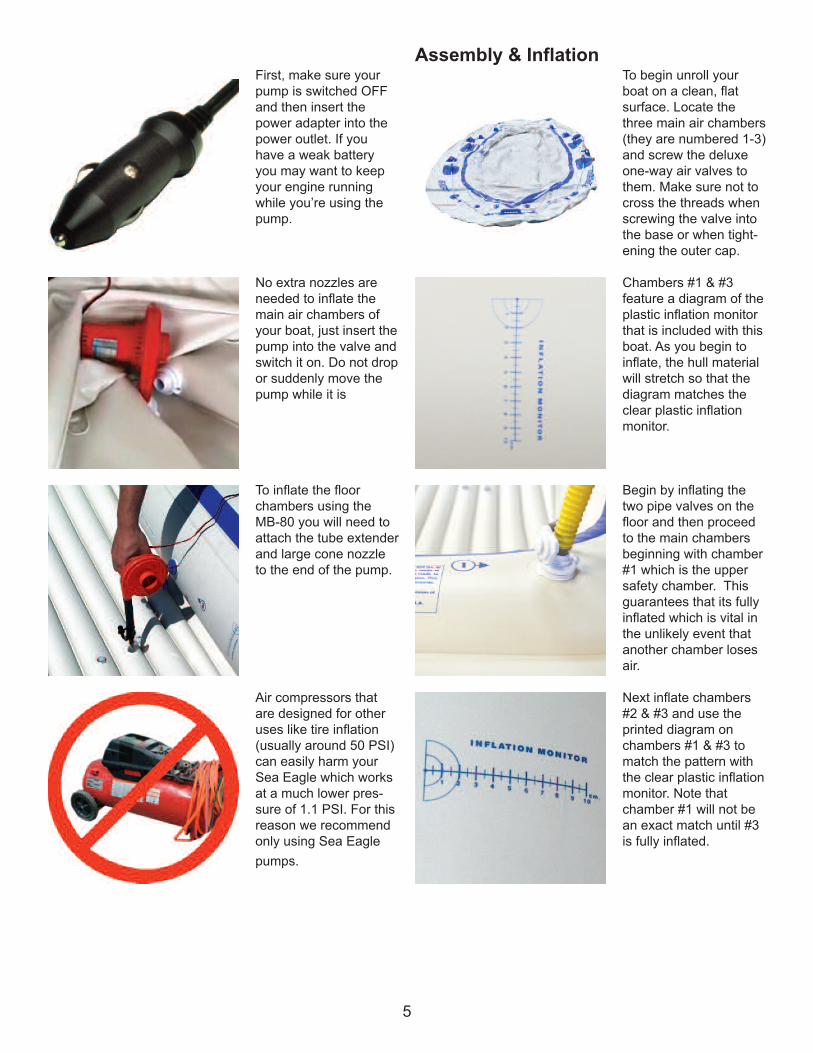
Make sure the side
struts meet up with the
middle strut. After both
floorboards are in place
you can install your
motor mount. If you’re
not installing a motor
mount, proceed to finish
the inflation on the main
chambers as instructed
in this manual.
MSB
(OPTIONAL)
Place the Motormount
Support Bench in the
stern of the boat before
the motormount is
installed. The velcro
straps should be on the
top side and the pre-
drilled hole in the seat
should be placed di-
rectly over chamber #1.
Motormount
(OPTIONAL)
Your boat should be
around 75% inflated
which gives the boat
some structure but still
keeps it pliable for an
easy install. We highly
recommend using both
the MSB and floorboard
set if you plan on using
the motormount.
Begin by inserting the
closur caps into both
ends of each of the two
aluminum rods. These
rods are bent inward to
transfer pressure from
the motormount.
Insert the long, straight
end of the rods through
the grommets at the
stern of your boat (over
the MSB). Secure them
using the velcro straps
on the MSB and by
inserting the included
clevis pin through the
pre-drilled hole at the
end of the rod.
Insert the shorter, bent
end of the rods through
the grommets at the
stern which are located
underneath the boat.
Push the rods in far
enough so that the push
pins secure the rod into
place.
To attach the wooden
motormount block, hold
it to the back of the two
aluminum rods and
place the “U” shaped
clamps between the
rods and the boat and
then secure them using
the bolts and knurled
nuts.
Make sure that the
mount is at the highest
possible position when
installed on your boat
for the best results
when using a motor.
7

Inflatable Rowing Seat
(OPTIONAL)
A comfortable inflatable
seat to row from, place
this seat in the bow of
the boat so that you can
row forwards (meaning
you’re facing the back
of the boat).
Inflatable High Seat
(OPTIONAL)
The Fisherman’s High
Seat is a comfortable,
inflatable seat that can
be used to either motor
or fish from the boat.
SPW Wooden Bench
(OPTIONAL)
Made of a ¾” 15 ply
marine plywood. Secure
the seat to the boat by
untying the rope around
your Sea Eagle and
running it through the
pre-drilled holes on
each side of the seat.
Once done, re-tie the
rope.
Swivel Seat
(OPTIONAL)
Swivels 360º and offers
great back support.
Seat can be used with
either the stand (sold
separately) or mounted
to the MSB. We do not
recommend using the
seat w/stand while the
boat is in motion and we
recommend against
mounting it to the SPW.
Rod Holder
(OPTIONAL)
The open design of this
rod holder accepts all
types of rod and reel
systems. Includes side
mount and top flush
mount adapters and
hardware. Can be
mounted to either the
MSB or SPW wooden
bench seat.
Carry Bag
(OPTIONAL)
This 440 Denier Nylon
carry bag measures
26”x48” and is great for
the transportation of
your Sea Eagle. Comes
with convenient carry
strap and drawstring.
Mushroom Anchor Kit
(OPTIONAL)
This anchor kit includes
a 8 lb. PVC coated
mushroom anchor, 25’
of 5/16” rope. The kit
also includes an anchor
grip to hold the rope in
place, this grip can be
mounted to any of the
wooden bench seats.
EZ Cart (S)
(OPTIONAL)
This easy to assemble
cart wheel system fits
under your Sea Eagle,
making transport even
easier. Allows you to roll
your Sea Eagle to &
from your launching
point. Breaks down for
easy storage.
8
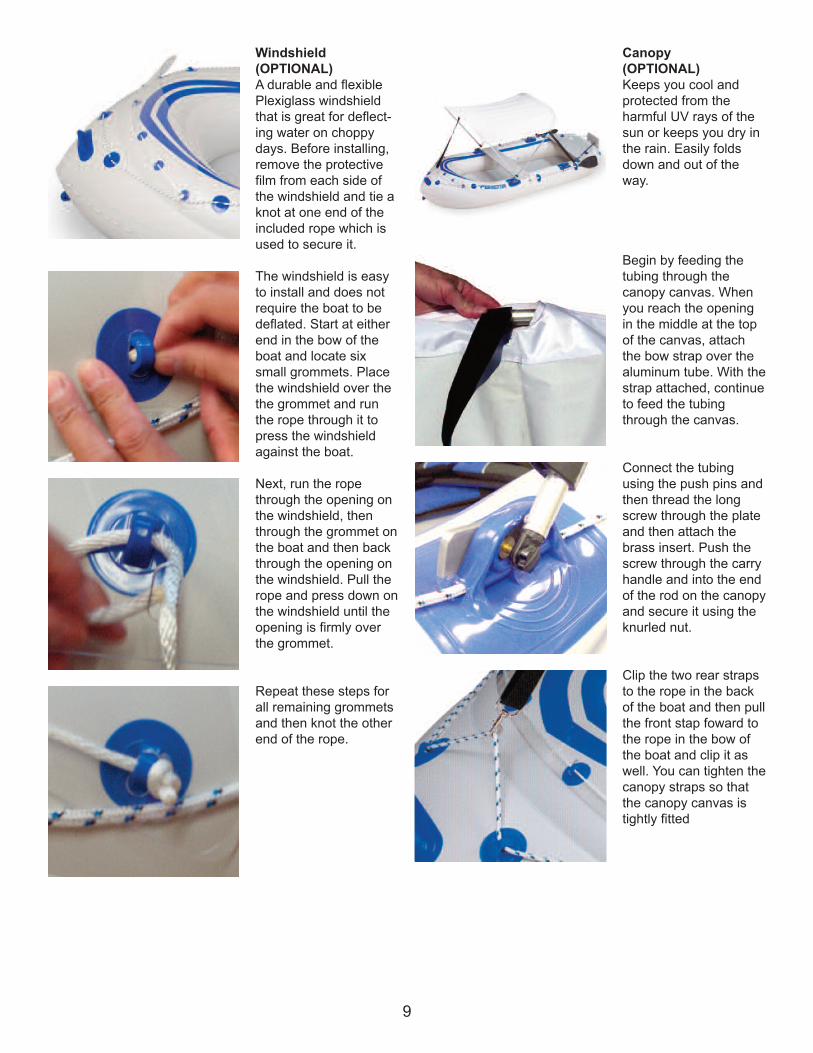
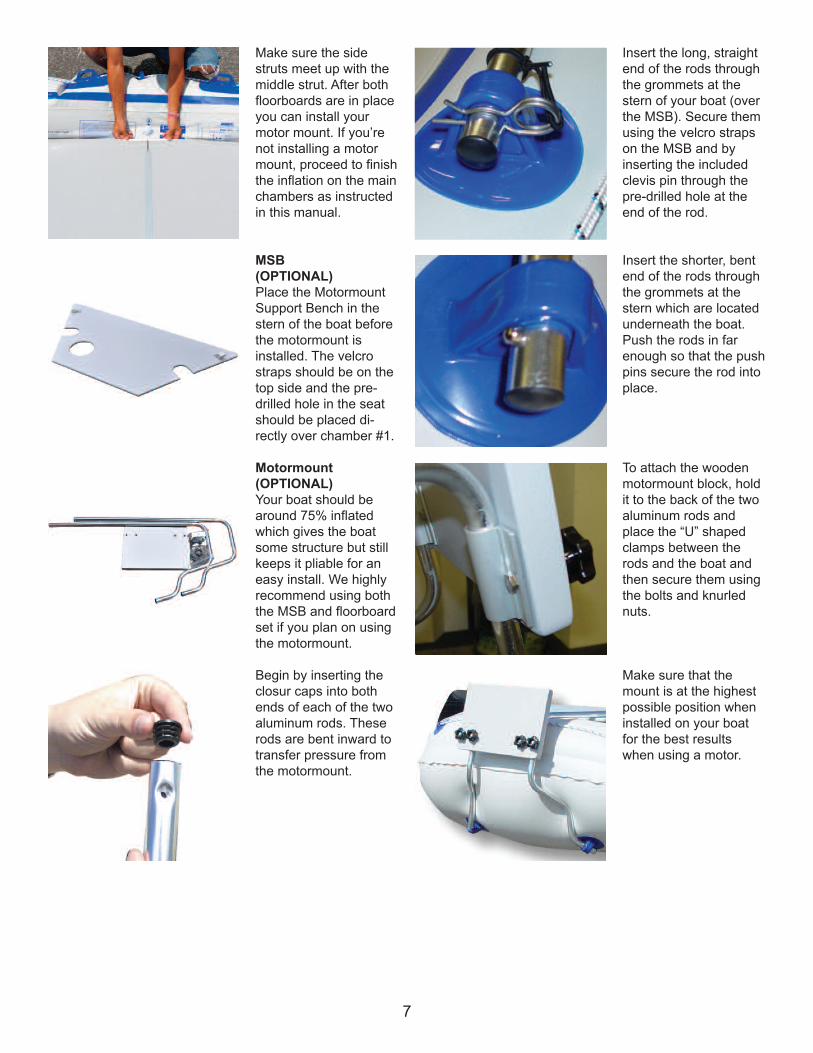
Windshield
(OPTIONAL)
A durable and flexible
Plexiglass windshield
that is great for deflect-
ing water on choppy
days. Before installing,
remove the protective
film from each side of
the windshield and tie a
knot at one end of the
included rope which is
used to secure it.
The windshield is easy
to install and does not
require the boat to be
deflated. Start at either
end in the bow of the
boat and locate six
small grommets. Place
the windshield over the
the grommet and run
the rope through it to
press the windshield
against the boat.
Next, run the rope
through the opening on
the windshield, then
through the grommet on
the boat and then back
through the opening on
the windshield. Pull the
rope and press down on
the windshield until the
opening is firmly over
the grommet.
Repeat these steps for
all remaining grommets
and then knot the other
end of the rope.
Canopy
(OPTIONAL)
Keeps you cool and
protected from the
harmful UV rays of the
sun or keeps you dry in
the rain. Easily folds
down and out of the
way.
Begin by feeding the
tubing through the
canopy canvas. When
you reach the opening
in the middle at the top
of the canvas, attach
the bow strap over the
aluminum tube. With the
strap attached, continue
to feed the tubing
through the canvas.
Connect the tubing
using the push pins and
then thread the long
screw through the plate
and then attach the
brass insert. Push the
screw through the carry
handle and into the end
of the rod on the canopy
and secure it using the
knurled nut.
Clip the two rear straps
to the rope in the back
of the boat and then pull
the front stap foward to
the rope in the bow of
the boat and clip it as
well. You can tighten the
canopy straps so that
the canopy canvas is
tightly fitted
9
3M Marine Cleaner
(OPTIONAL)
Cleans, shines, condi-
tions and protects vinyl,
rubber and plastic sur-
faces. Deep cleans dirt
and grime, enhances
appearance. Restores
natural sheen, protects
surfaces. Fresh lemon
scent.
303 Protectant
(OPTIONAL)
We all try to keep our
boats clean, but their
are some stains you just
can't avoid. 3M Marine
Cleaner & Restorer can
remove the toughest
stains from mud, bird
droppings, oil, and
many others.
Paddling Life Vest
(OPTIONAL)
U.S.C.G approved! This
type III PFD is great for
all boating needs and
gives you plenty of arm
room in case you feel
like rowing. Comes in
various sizes with three
adjustable buckles and
adjustable nylon straps
for a tight secure fit.
Torqeedo 1003s
(OPTIONAL)
Weighing just 29.5 lbs
with a short shaft of 23”,
the Torqeedo Travel
1003s delivers the
performance of a 3HP
gas motor and develops
4-5 times the power of
traditional electric
motors.
Minn Kota Motors
(OPTIONAL)
Minn Kota Motors are
the most reliable electric
trolling motors on the
market. These motors
run off a 12v deep cycle
marine battery (which is
not included or sold by
Sea Eagle).
Portable Charger
(OPTIONAL)
Protect and preserve
your battery life with this
portable 10 AMP, Minn
Kota battery charger.
Features fully automatic
3-stage charging.
Weighs 17 lbs.
Input: 120V AC
Output: DC 12V
Battery Power Center
(OPTIONAL)
Allows trolling motor
leads and charger leads
to be connected without
opening the box. Built-in
battery meter includes
two 12-volt accessory
plugs and three manual
reset circuit breakers.
Fits group 24 and 27
size batteries.
TIP: Never connect the
(+) and the (-) terminals
of the battery together.
Take care that no metal
object can fall onto the
battery and short the
terminals. This would
immediately lead to a
short and utmost fire
danger.
10
Deflation & StorageAlthough PVC material can become brittle in extremely cold
temperatures, you can still safely store your Sea Eagle in
them so long as you avoid dropping it and do not subject it
to any sudden impacts.
If you’re planning to leave your Sea Eagle outside, be sure
to keep it raised up off of the ground. Its also a good idea to
keep it covered so that it is not directly exposed to berries,
leaves, rain, sunlight and other elements. Sea Eagles that
are left in water will most likely have to be emptied from
time to time.
Make sure that your boat is dry before storing your kayak
for more than a few days, to remove any excess moisture
that could cause unsightly mildew. Choose a cool, dry spot
when storing in an enclosed area like basement, closet or
garage.
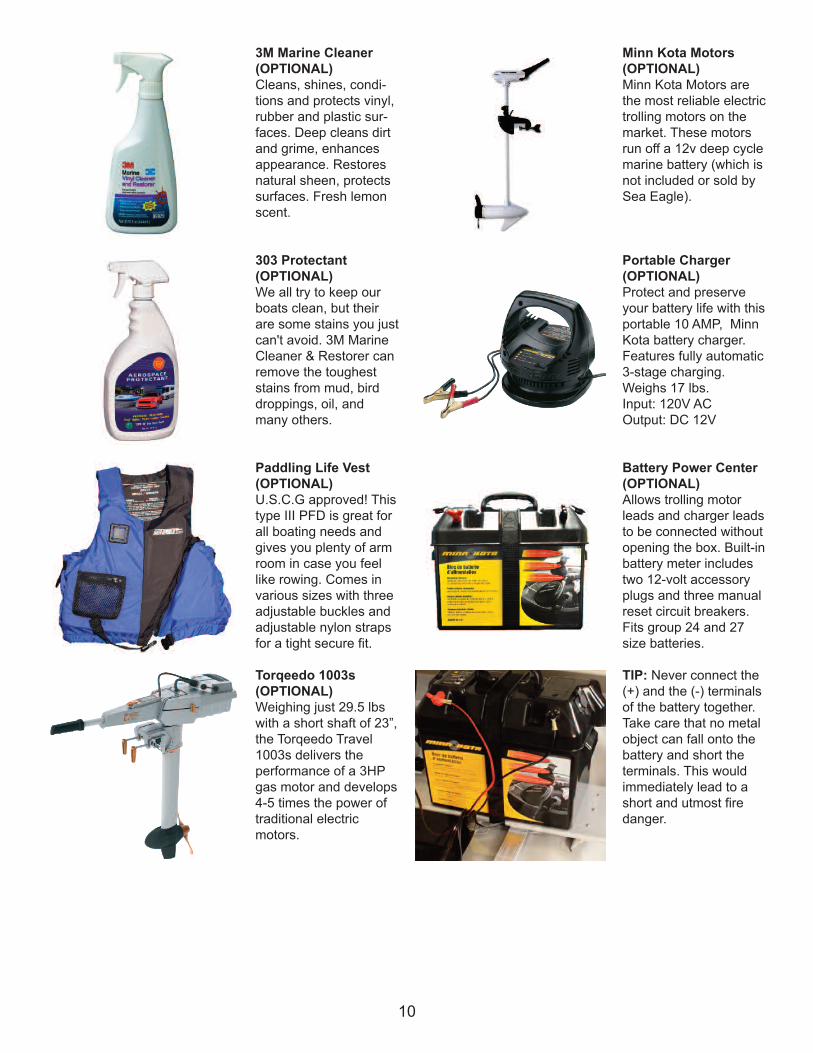
Begin by deflating your
Sea Eagle. To deflate,
unscrew the valves from
the base. Most of the air
is immediately released.
Flip the boat over and
fold the left side of the
boat towards the middle
and then fold the right
side of the boat over the
left side. Starting from
the bow, roll up your
Sea Eagle as tight as
possible, pushing any
excess air out the
valves in the stern.
Continue to roll your
Sea Eagle until it is nice
and compact.
TroubleshootingIf your boat is losing air it doesn’t necessarily mean that
its leaking. For instance a boat that is inflated late in the
day with 90° air may cool 20° overnight. The cooler air will
exert less pressure on the hull and the boat will appear
softer the next morning. When there has been no variation
in temperature and your boat is losing air then it is time to
start looking for the leak.
The first thing you should do when looking for a leak is to
actually look at the boat. Visually inspect the boat from a
few feet away and if necessary, flip it over and closely
check the outside. Any large leaks when your boat looses a
considerable amount of air should be clearly visible.
Be sure to check the tightness of the one-way recessed
valves as well and if necessary, tighten them with the valve
wrench included in the orange repair kit canister.
If you have a rough idea of where your leak is but can’t see
it, you may want to try listening for it as you may be able to
hear the air escaping and pinpoint the leak.
Other troubleshooting techniques you can try to locate the
leak is to dowse/spray a mix of dishwashing liquid over
suspicious areas. The leak may produce bubbles that will
pinpoint the location of the leak.
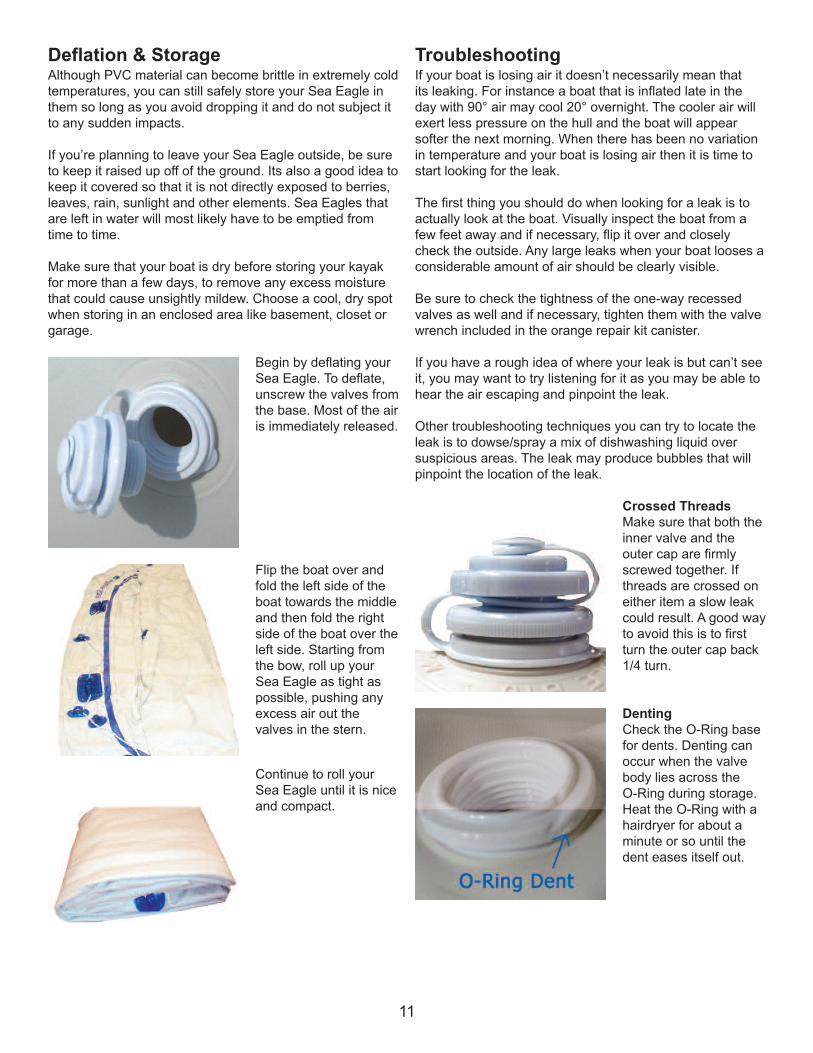
Crossed Threads
Make sure that both the
inner valve and the
outer cap are firmly
screwed together. If
threads are crossed on
either item a slow leak
could result. A good way
to avoid this is to first
turn the outer cap back
1/4 turn.
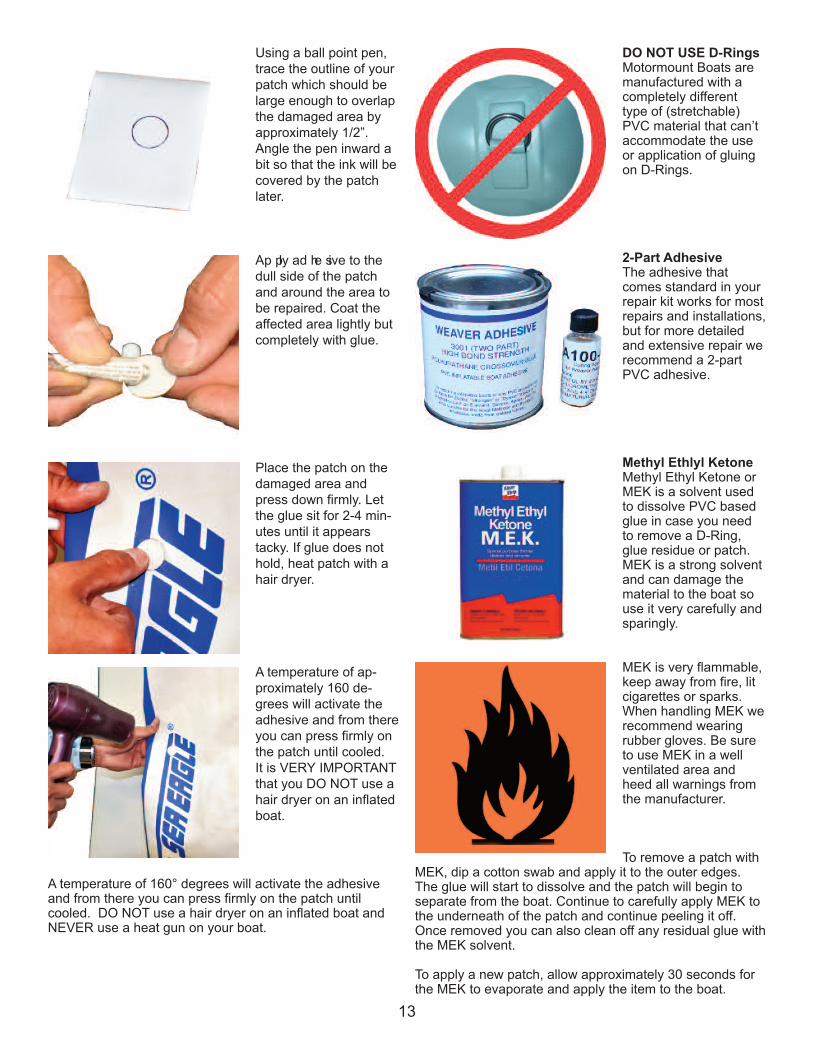
Denting
Check the O-Ring base
for dents. Denting can
occur when the valve
body lies across the
O-Ring during storage.
Heat the O-Ring with a
hairdryer for about a
minute or so until the
dent eases itself out.
11

Diaphragm Check
Check the black di-
aphragm at the bottom
of the inner valve for
grains between the di-
aphragm and the inner
valve. Also check the
threads on the inner
valve, boat hull, and
outer cap for any dirt or
sand which might break
the seal.
RepairsAlthough our Sea Eagles are very rugged and tough, you
may still experience the occasional puncture through use of
your boat. Fortunately most repairs are fairly easy and only
take a few minutes.
For an extensive repair please contact us directly for assis-
tance or a quote to have it sent back and repaired at our
facility. Repair fees start at $75.00 and do not include return
shipping charges.
Repair Kit
All Sea Eagles come
standard with a repair
kit which includes two
material patches and
tubes of PVC based
glue.
PVC Based Glue
For repairs on our boats
you will need to use a
PVC based glue. We
suggest this 12 oz. can
of Vyna Bond if you
need more glue than
what comes standard in
the repair kit.
Repair: Pinholes
Deflate your boat and
thoroughly clean and
dry the area that is to be
repaired. For small
punctures less than 1/8”
apply a small drop of
glue and allow 12 hours
to dry.
For immediate use
allow 30 minutes to dry
and then inflate the
compartment with the
repair only 3/4 full and
be sure to make a more
permanent repair later.
Repair: Patching
Leaks that are larger
than a pinhole can be
patched. Most patches
can be done in a few
minutes, but we do offer
a repair service for
more complex jobs out
of warranty.
Once you have located
the leak make sure you
thoroughly clean the
area surrounding the
leak of any dirt or grime.
After the area is clean
and dry you can circle
the area to make locat-
ing the leak easier
throughout the repair
process.
12
Using a ball point pen,
trace the outline of your
patch which should be
large enough to overlap
the damaged area by
approximately 1/2”.
Angle the pen inward a
bit so that the ink will be
covered by the patch
later.
Ap ply ad he sive to the
dull side of the patch
and around the area to
be repaired. Coat the
affected area lightly but
completely with glue.
Place the patch on the
damaged area and
press down firmly. Let
the glue sit for 2-4 min-
utes until it appears
tacky. If glue does not
hold, heat patch with a
hair dryer.
A temperature of ap-
proximately 160 de-
grees will activate the
adhesive and from there
you can press firmly on
the patch until cooled.
It is VERY IMPORTANT
that you DO NOT use a
hair dryer on an inflated
boat.
A temperature of 160° degrees will activate the adhesiveand from there you can press firmly on the patch untilcooled. DO NOT use a hair dryer on an inflated boat andNEVER use a heat gun on your boat.
DO NOT USE D-Rings Motormount Boats aremanufactured with acompletely differenttype of (stretchable)PVC material that can’taccommodate the useor application of gluingon D-Rings.
2-Part AdhesiveThe adhesive thatcomes standard in yourrepair kit works for mostrepairs and installations,but for more detailedand extensive repair werecommend a 2-partPVC adhesive.
Methyl Ethlyl KetoneMethyl Ethyl Ketone orMEK is a solvent usedto dissolve PVC basedglue in case you needto remove a D-Ring,glue residue or patch.MEK is a strong solventand can damage thematerial to the boat souse it very carefully andsparingly.
MEK is very flammable,keep away from fire, litcigarettes or sparks.When handling MEK werecommend wearingrubber gloves. Be sureto use MEK in a wellventilated area andheed all warnings fromthe manufacturer.
To remove a patch withMEK, dip a cotton swab and apply it to the outer edges.The glue will start to dissolve and the patch will begin toseparate from the boat. Continue to carefully apply MEK tothe underneath of the patch and continue peeling it off.Once removed you can also clean off any residual glue withthe MEK solvent.
To apply a new patch, allow approximately 30 seconds forthe MEK to evaporate and apply the item to the boat.
13
Top Related