


Languages
Pages
Legal

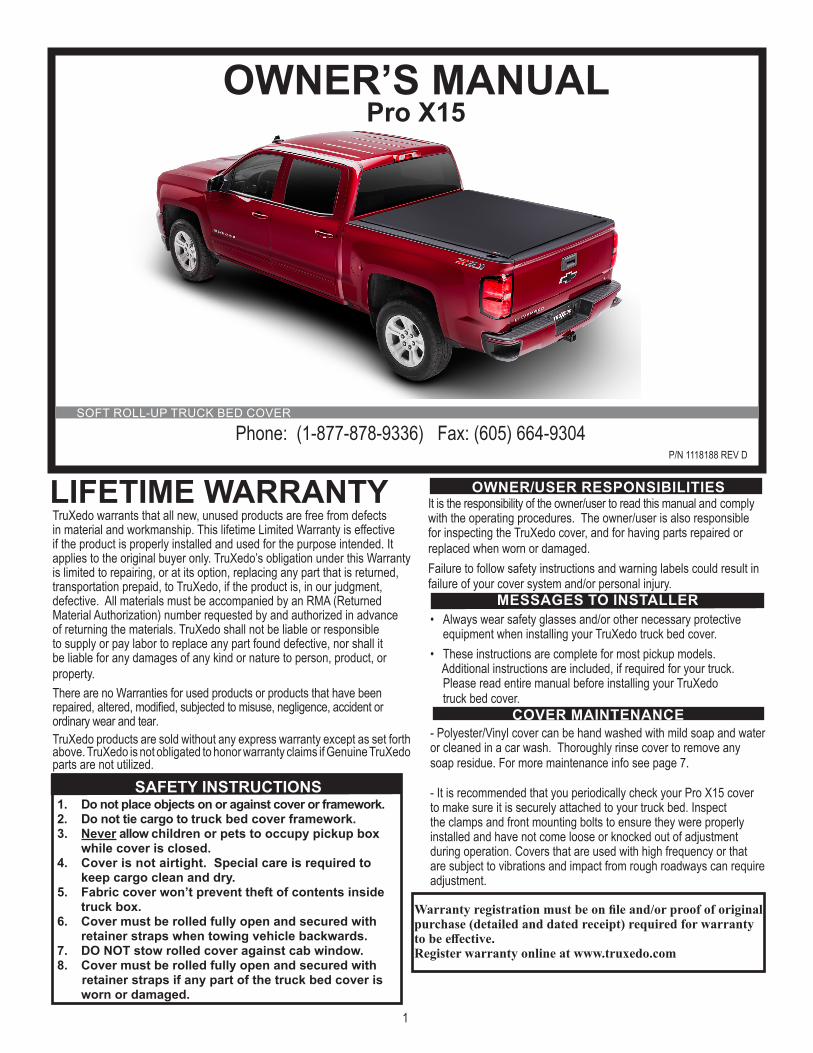
Phone: (1-877-878-9336) Fax: (605) 664-9304
It is the responsibility of the owner/user to read this manual and comply with the operating procedures. The owner/user is also responsible for inspecting the TruXedo cover, and for having parts repaired or replaced when worn or damaged. Failure to follow safety instructions and warning labels could result in failure of your cover system and/or personal injury.
• Always wear safety glasses and/or other necessary protective equipment when installing your TruXedo truck bed cover.• These instructions are complete for most pickup models. Additional instructions are included, if required for your truck. Please read entire manual before installing your TruXedo truck bed cover.
- Polyester/Vinyl cover can be hand washed with mild soap and water or cleaned in a car wash. Thoroughly rinse cover to remove any soap residue. For more maintenance info see page 7.
- It is recommended that you periodically check your Pro X15 cover to make sure it is securely attached to your truck bed. Inspect the clamps and front mounting bolts to ensure they were properly installed and have not come loose or knocked out of adjustment during operation. Covers that are used with high frequency or that are subject to vibrations and impact from rough roadways can require adjustment.
OWNER/USER RESPONSIBILITIES
MESSAGES TO INSTALLER
1. Do not place objects on or against cover or framework.2. Do not tie cargo to truck bed cover framework.3. Never allow children or pets to occupy pickup box while cover is closed.4. Cover is not airtight. Special care is required to keep cargo clean and dry.5. Fabric cover won’t prevent theft of contents inside truck box.6. Cover must be rolled fully open and secured with retainer straps when towing vehicle backwards.7. DO NOT stow rolled cover against cab window.8. Cover must be rolled fully open and secured with retainer straps if any part of the truck bed cover is worn or damaged.
SAFETY INSTRUCTIONS
COVER MAINTENANCE
SOFT ROLL-UP TRUCK BED COVER
OWNER’S MANUALPro X15
P/N 1118188 REV D
TruXedo warrants that all new, unused products are free from defects in material and workmanship. This lifetime Limited Warranty is effective if the product is properly installed and used for the purpose intended. It applies to the original buyer only. TruXedo’s obligation under this Warranty is limited to repairing, or at its option, replacing any part that is returned, transportation prepaid, to TruXedo, if the product is, in our judgment, defective. All materials must be accompanied by an RMA (Returned Material Authorization) number requested by and authorized in advance of returning the materials. TruXedo shall not be liable or responsible to supply or pay labor to replace any part found defective, nor shall it be liable for any damages of any kind or nature to person, product, or property.There are no Warranties for used products or products that have been repaired, altered, modified, subjected to misuse, negligence, accident or ordinary wear and tear. TruXedo products are sold without any express warranty except as set forth above. TruXedo is not obligated to honor warranty claims if Genuine TruXedo parts are not utilized.
LIFETIME WARRANTY
1
Warranty registration must be on file and/or proof of original purchase (detailed and dated receipt) required for warranty to be effective. Register warranty online at www.truxedo.com
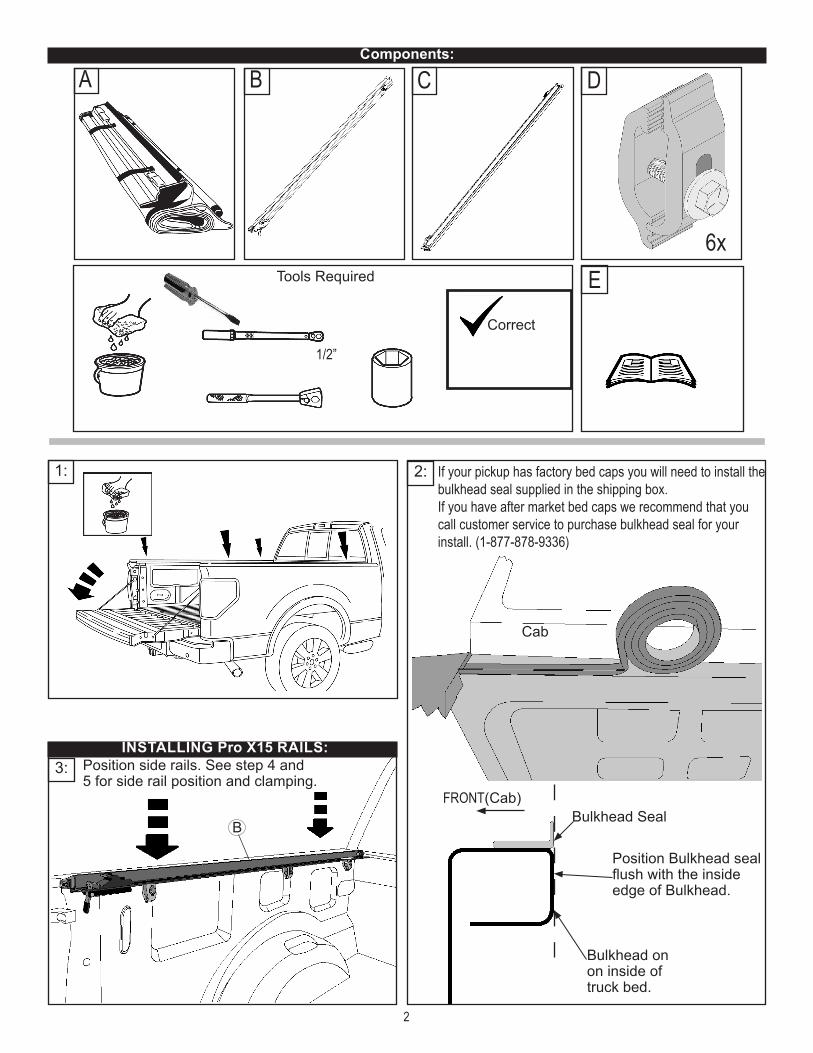
Components:
A B C D
E Tools Required
1/2”
6x
3:
Correct
1:
B
2: If your pickup has factory bed caps you will need to install thebulkhead seal supplied in the shipping box.If you have after market bed caps we recommend that youcall customer service to purchase bulkhead seal for yourinstall. (1-877-878-9336)
Bulkhead Seal
Bulkhead on on inside oftruck bed.
Position Bulkhead sealflush with the insideedge of Bulkhead.
INSTALLING Pro X15 RAILS:
2
Cab
Position side rails. See step 4 and5 for side rail position and clamping.
FRONT(Cab)
B B
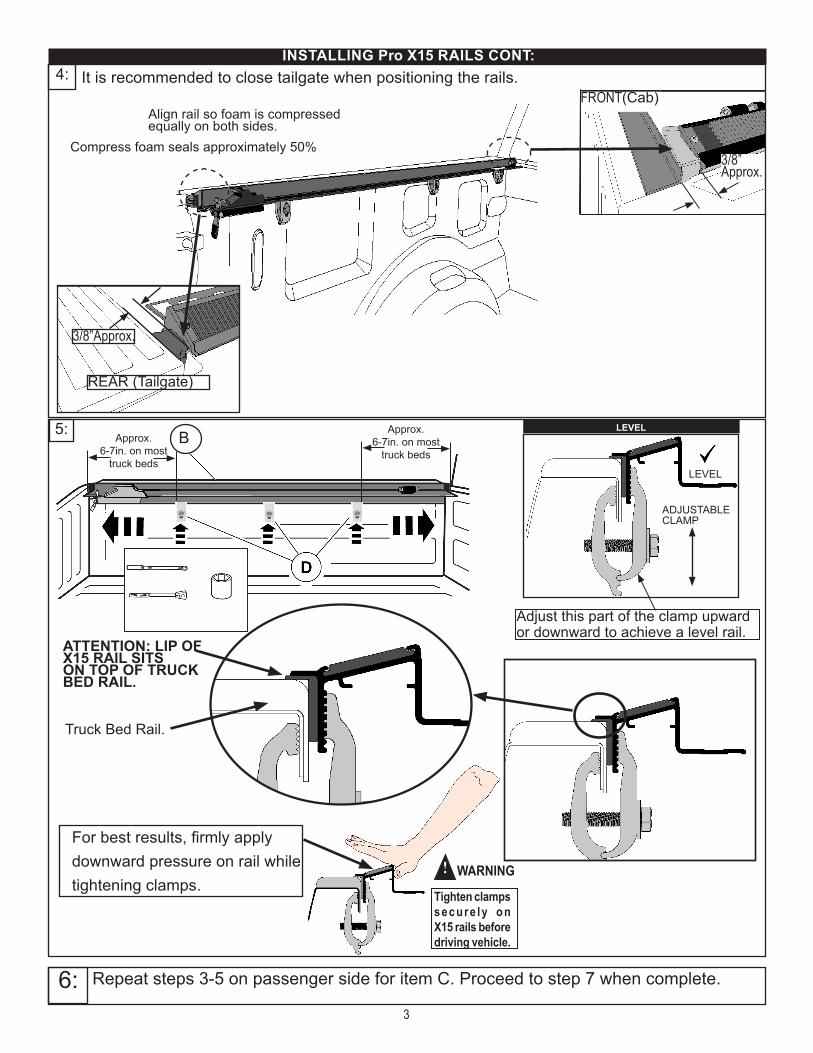
ATTENTION: LIP OFX15 RAIL SITSON TOP OF TRUCKBED RAIL.
Truck Bed Rail.
4:
REAR (Tailgate)
FRONT(Cab)
3/8”Approx.
3/8”Approx.
Compress foam seals approximately 50%
Align rail so foam is compressedequally on both sides.
B
Tighten clamps secure ly on X15 rails before driving vehicle.
WARNING!
LEVEL5:
ADJUSTABLECLAMP
6: Repeat steps 3-5 on passenger side for item C. Proceed to step 7 when complete.
Approx.6-7in. on most
truck beds
It is recommended to close tailgate when positioning the rails.INSTALLING Pro X15 RAILS CONT:
Approx.6-7in. on most
truck beds
3
Adjust this part of the clamp upwardor downward to achieve a level rail.
LEVEL
For best results, firmly apply downward pressure on rail while tightening clamps.
7:
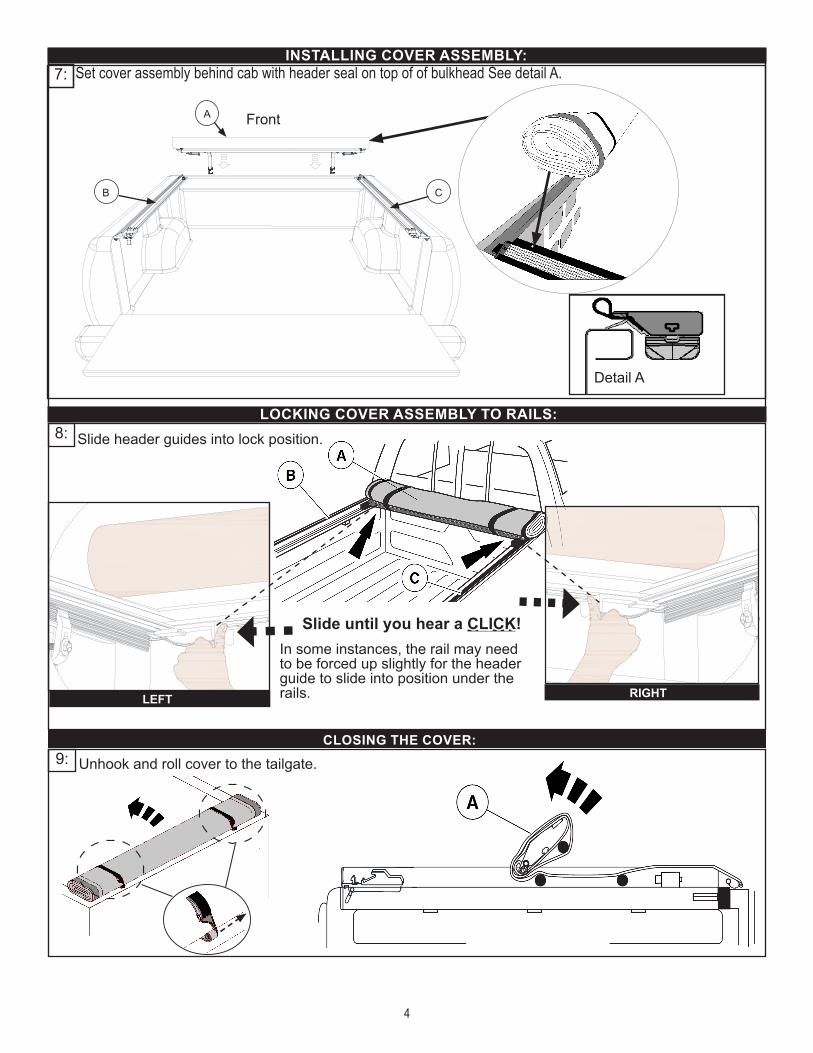
8: Slide header guides into lock position.
LEFT RIGHT
B Unhook and roll cover to the tailgate. 9:CLOSING THE COVER:
INSTALLING COVER ASSEMBLY:
LOCKING COVER ASSEMBLY TO RAILS:
In some instances, the rail may need to be forced up slightly for the headerguide to slide into position under the rails.
4
Slide until you hear a CLICK!
Set cover assembly behind cab with header seal on top of of bulkhead See detail A.
Detail A
7:
Front A
B C
B
B B
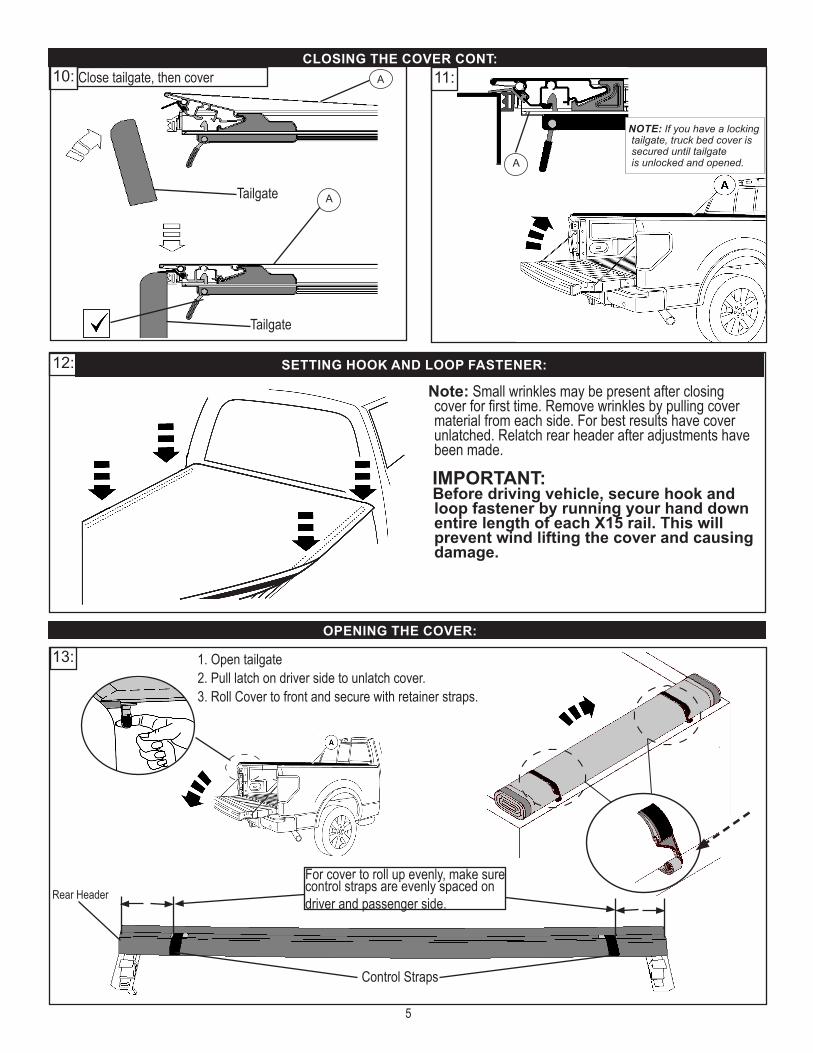
NOTE: If you have a locking tailgate, truck bed cover is secured until tailgate
is unlocked and opened.
11:10: A
A
A
B
1. Open tailgate2. Pull latch on driver side to unlatch cover. 3. Roll Cover to front and secure with retainer straps.
13:
12:
CLOSING THE COVER CONT:
OPENING THE COVER:
Close tailgate, then cover
Tailgate
Note: Small wrinkles may be present after closing cover for first time. Remove wrinkles by pulling cover material from each side. For best results have cover unlatched. Relatch rear header after adjustments have been made.
IMPORTANT: Before driving vehicle, secure hook and loop fastener by running your hand down entire length of each X15 rail. This will prevent wind lifting the cover and causing damage.
SETTING HOOK AND LOOP FASTENER:
5
For cover to roll up evenly, make sure control straps are evenly spaced on driver and passenger side.
Control Straps
Rear Header
Tailgate
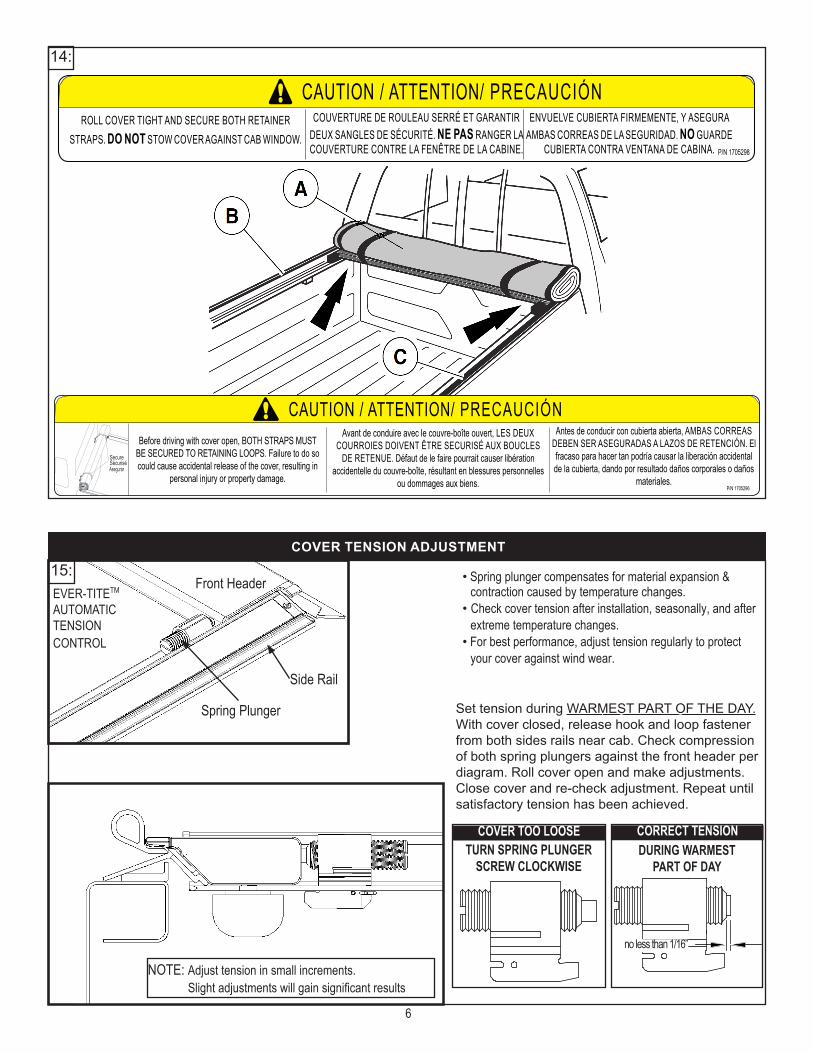
BEVER-TITETM
AUTOMATICTENSIONCONTROL
Front Header
Side Rail
Spring Plunger
COVER TENSION ADJUSTMENT
15:
B
!
14:
SecureSécurisé
CAUTION / ATTENTION/ PRECAUCIÓNBefore driving with cover open, BOTH STRAPS MUST
BE SECURED TO RETAINING LOOPS. Failure to do so could cause accidental release of the cover, resulting in
personal injury or property damage.P/N 1705296
Avant de conduire avec le couvre-boîte ouvert, LES DEUX COURROIES DOIVENT ÊTRE SECURISÉ AUX BOUCLES
DE RETENUE. Défaut de le faire pourrait causer libération accidentelle du couvre-boîte, résultant en blessures personnelles
ou dommages aux biens.
Antes de conducir con cubierta abierta, AMBAS CORREAS DEBEN SER ASEGURADAS A LAZOS DE RETENCIÓN. El fracaso para hacer tan podría causar la liberación accidental de la cubierta, dando por resultado daños corporales o daños
materiales.Asegurar
CAUTION / ATTENTION/ PRECAUCIÓNROLL COVER TIGHT AND SECURE BOTH RETAINER
STRAPS. DO NOT STOW COVER AGAINST CAB WINDOW.
COUVERTURE DE ROULEAU SERRÉ ET GARANTIR DEUX SANGLES DE SÉCURITÉ. NE PAS RANGER LA COUVERTURE CONTRE LA FENÊTRE DE LA CABINE.
ENVUELVE CUBIERTA FIRMEMENTE, Y ASEGURA AMBAS CORREAS DE LA SEGURIDAD. NO GUARDE
CUBIERTA CONTRA VENTANA DE CABINA. P/N 1705298
6
• Spring plunger compensates for material expansion & contraction caused by temperature changes.• Check cover tension after installation, seasonally, and after extreme temperature changes.• For best performance, adjust tension regularly to protect your cover against wind wear.
Set tension during WARMEST PART OF THE DAY. With cover closed, release hook and loop fastener from both sides rails near cab. Check compression of both spring plungers against the front header per diagram. Roll cover open and make adjustments. Close cover and re-check adjustment. Repeat until satisfactory tension has been achieved.
COVER TOO LOOSETURN SPRING PLUNGER
SCREW CLOCKWISEDURING WARMEST
PART OF DAY
no less than 1/16”
CORRECT TENSION
NOTE: Adjust tension in small increments. Slight adjustments will gain significant results
HEADER WILL NOT LATCH: Check Pro X15 rails to make sure they are level. See Step 5.Make sure the rear header seal is not caught between side rail & rear header.Check position of side rails on truck bed, they may be positioned incorrectly. See Step 4.Make sure cover has proper tension. See Step 15.
THE COVER IS TOO TIGHT OR TOO LOOSE: See Step 12 and 15.SIDE RAILS TIP DOWNWARD OR UPWARD: - Reposition clamp up or down, refer to step 5. - In some cases, a small shim can be used to tip rails upward. Contact customer service for shim pack (1118036).COVER LEAKS WATER: - Cover is not designed to be fully water tight. - Make sure clamps are tight and rails are positioned correctly. - Extra seal can be added to help block water intrusions.TOP OF COVER POOLS WATER: - Certain amount of water pooling is normal with fabric covers. - The cross tubes are not arched, therefore some water pooling may occur and is normal. This will not affect perfrom-ace or the water management properties in this fabric. - Make sure cover is pulled tight on each side and automatic tension control is properly adjusted.COVER ROLLS UP CROOKED: - Make sure control straps are evenly set. See Step 13.
TROUBLESHOOTING
Questions?Call our friendly customer service staff
Toll Free at:
1-877-878-9336Mon - Fri 8 am - 5 pm CST
TROUBLESHOOTING FABRIC/ FABRIC CARE
1. Fabric top surface has wrinkles after rolling cover closed. - Pull fabric taut from each side. For best results, the help of a second person pulling on the opposite side is preferable.
2. Fabric top surface sags between cross tubes. - Adjustment to automatic tension control may be required, refer to Step 15. 3. Wind lifts up edge of fabric. - Make sure to engage hook and loop on driver and passenger side after closing the cover. This may need to be done periodically when taking long trips.
4. Excessive fabric flutter while driving. - Check fabric tension, refer to Step 15. - Make sure hook and loop fasteners are set, see step 12. 5. Snow and Ice accumulation on top surface. - Use broom or brush to remove loose snow and ice. Do not use sharp or pointed tools to remove snow and ice . - Direct sunlight will help melt snow and ice from top surface. 6. How to Clean Fabric. - Soap, water, and soft fine bristle brush.
7
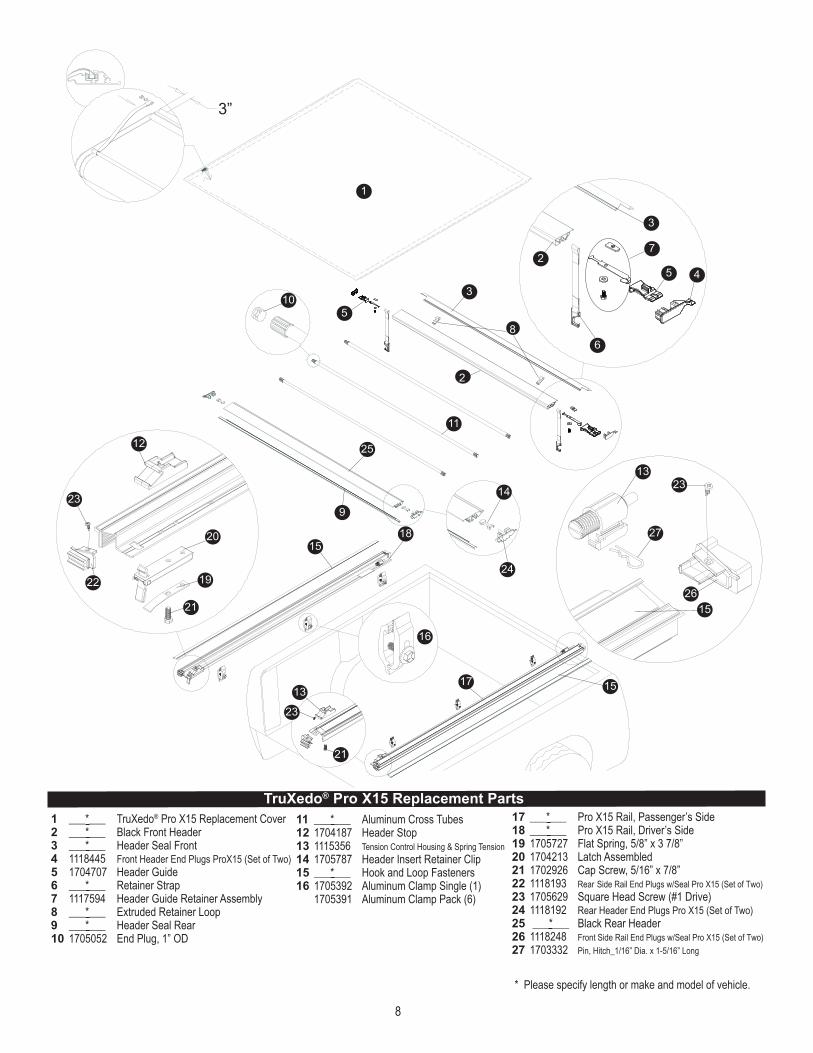
TruXedo® Pro X15 Replacement Parts
1
105
3”
2
25
11
9
24
14
18
3
2
6
7
5 4
8
15
15
15
16
17
19
20
22
23
12
13
21
13
21
26
23
11 ___*___ Aluminum Cross Tubes 12 1704187 Header Stop 13 1115356 Tension Control Housing & Spring Tension 14 1705787 Header Insert Retainer Clip15 ___*___ Hook and Loop Fasteners16 1705392 Aluminum Clamp Single (1) 1705391 Aluminum Clamp Pack (6)
17 ___*___ Pro X15 Rail, Passenger’s Side18 ___*___ Pro X15 Rail, Driver’s Side19 1705727 Flat Spring, 5/8” x 3 7/8”20 1704213 Latch Assembled 21 1702926 Cap Screw, 5/16” x 7/8” 22 1118193 Rear Side Rail End Plugs w/Seal Pro X15 (Set of Two)23 1705629 Square Head Screw (#1 Drive)24 1118192 Rear Header End Plugs Pro X15 (Set of Two)25 ___*___ Black Rear Header 26 1118248 Front Side Rail End Plugs w/Seal Pro X15 (Set of Two) 27 1703332 Pin, Hitch_1/16” Dia. x 1-5/16” Long
1 ___*___ TruXedo® Pro X15 Replacement Cover2 ___*___ Black Front Header3 ___*___ Header Seal Front4 1118445 Front Header End Plugs ProX15 (Set of Two)5 1704707 Header Guide6 ___*___ Retainer Strap7 1117594 Header Guide Retainer Assembly 8 ___*___ Extruded Retainer Loop9 ___*___ Header Seal Rear 10 1705052 End Plug, 1” OD
* Please specify length or make and model of vehicle.
3
8
27
23
Top Related