


Languages
Pages
Legal


OPERATORS MANUAL FOR THE
MV-1000 DPM
Single Operator
For Further assistance, call, write, or fax
Aftek Inc.
2109 Lafayette Rd.
Fort Oglethorpe, GA 30742
Phone: (706) 861-9396
Toll FREE: (888)254-3835
Fax: (706) 866-4400
MV 1000 DPM NOT FINISHEDTABLE OF CONTENTS

2
SECTION TITLE PAGE
I. SAFETY PRECAUTIONS 3 - 5
II. GENERAL DESCRIPTION 6
II.A. INSTALLATION 6
II.B. ELECTRICAL CONNECTIONS 7 - 8
II.C. CONTROL LOCATIONS AND DESCRIPTION 9 - 11
III. GENERAL OPERATING INSTRUCTIONS 11
III.A. ENERGIZING THE UNIT 11 - 12
III.B. SECONDARY CABLE CONNECTIONS 12
III.C. AUXILIARY AND WIRE FEEDER HOOK UP 12
III.D. GENERAL WELD SETTINGS 13 - 15
III.E. WELDING HINTS: DO'S AND DO NOT'S 15
IV. TECHNICAL INFORMATION 16
V. TROUBLESHOOTING GUIDE 17 - 18
VI. PARTS BREAKDOWN 19
VII. SCHEMATIC 20

3
I. SAFETY PRECAUTIONS
WARNING: These safety precautions are for your protection. Before performing any installation or
operating procedures, be sure to read and follow the safety precautions listed below. Failure to observe these
safety precautions can result in personal injury or death.
1. PERSONAL PROTECTION: Skin and eye burns from exposure to rays from an electric arc or hot
metal can be more severe than sunburn. Therefore:
a. Use a face shield fitted with the correct filter and cover plates to protect your eyes, face, neck,
and ears from sparks and rays of the arc when operating or observing operations. WARN
bystanders not to watch the arc and not expose themselves to the rays of the electric arc or hot
metal.
b. Wear flameproof gauntlet-type gloves, heavy long- sleeve shirts, cuffless trousers, high-topped
shoes, and a welding helmet or cap for hair protection, to protect against arc rays and sparks of
hot metal. A flameproof apron may be desirable as protection against radiated heat and sparks.
c. Hot sparks or metal can lodge in rolled up sleeves, trouser cuffs, or pockets. Sleeves and
collars should be kept buttoned and pockets eliminated from the front of clothing.
d. Protect other nearby personnel from arc rays and hot sparks with a suitable non-flammable
partition.
e. Always wear safety glasses or goggles when in a work area. Use safety glasses with side
shields or goggles when chipping slag or grinding. Chipped slag may be hot and can travel
considerable distances. Bystanders should also wear safety glasses or goggles.
f. Some gouging and cutting processes produce excessively high noise levels and require ear
protection.
2. FIRE PREVENTION: Hot slag or sparks can cause serious fires when in contact with combustible
solids, liquids, or gases. Therefore:
a. Remove all combustible materials well away from the work area or completely cover the
materials with a protective non-flammable covering. Such combustible materials include
wood, clothing, sawdust, gasoline kerosene, paints, solvents, natural gas, acetylene, propane,
and other similar materials.
b. Hot sparks or hot metals can fall into cracks in floors or wall openings and cause a hidden
smoldering fire. Make certain that such openings are protected from hot sparks and metal.
c. Do not weld, cut or perform other hot work until the workplace has been completely cleaned so
that there are not substances on the workplace which might produce flammable or toxic vapors.
d. For fire protection, have fire extinguishing equipment (such as a garden hose, water pail, sand
bucket, or portable fire extinguisher) handy for instant use.
e. After completing operations, inspect the work area to make certain there are no hot sparks or
hot metal which could cause a later fire.

4
f. For additional information, refer to NFPA Standard 51B, "Fire Prevention in Use of
Cutting and Welding Processes", which is available from the National Fire Protection
Association, 470 Atlantic Avenue, Boston MA 02210.
3. ELECTRICAL SHOCK: Contact with live electrical parts can cause severe burns to the body or
fatal shock. Severity of electrical shock is determined by the path and amount of current through the
body. Therefore:
a. Never allow live metal parts to touch bare skin or any wet clothing. Be sure gloves are dry.
b. When standing on metal or operating in a damp area, make certain that you are well insulated.
Wear dry gloves and rubber soled shoes and stand on a dry board or platform.
c. Always ground the power supply by connecting a ground wire between the power supply and
an approved electrical ground.
d. Do not use worn or damaged cables. Do not overload the cable. Use well-maintained
equipment.
e. When not operating, turn off the equipment. Accidental grounding can cause overheating and
create a fire hazard. Do not coil or loop cable around parts of the body.
f. Be sure the proper size ground cable is connected to the workpiece as close to the work area as
possible. Grounds connected to building framework or other remote locations from the work
area increase the possibility of output current passing through lifting chains, crane cables, or
various electrical paths.
g. Keep everything dry, including clothing, work area, cables, electrode holder, and power
supply. Fix water leaks immediately.
h. Refer to American National Standard Z49.1 in Item 6 below for specific grounding
recommendations. Do not mistake the work lead for a ground cable.
4. VENTILATION: Fumes, particularly in confined spaces, can cause discomfort and physical harm.
Do not breath fumes. Therefore:
a. At all times provide adequate ventilation in the work area by natural or mechanical ventilation
means. Do not weld, cut or gouge on materials such as galvanized zinc, lead, beryllium, or
cadmium unless positive mechanical ventilation is provided. Do not breath fumes from these
materials.
b. Do not operate in locations close to chlorinated hydrocarbon vapors coming from degreasing or
spraying solvent vapors to form phosgene, a highly toxic gas, or other irritant gases.
c. If you develop momentary eye, nose, or throat irritation while operating, this is an indication
that ventilation is not adequate. Stop work and take necessary steps to improve ventilation in
the work area. Do not continue to operate if physical discomfort persists.
d. Refer to American National Standard Z49.1 (ANSI) in Item 6 below for specific ventilation
recommendations.

5
5. EQUIPMENT MAINTENANCE: Faulty or improperly maintained equipment can result in poor
work, but most importantly it can cause physical injury or death through fires or electrical shock.
Therefore:
a. Always have qualified personnel perform the installation, troubleshooting, and maintenance
work. Do not perform any electrical work unless you are qualified to perform such work.
b. Before performing any maintenance work inside a power supply, disconnect the power supply
from the electrical power source.
c. Maintain cables, grounding wire, connections, power cord and power supply in safe working
order. Do not operate any equipment in faulty conditions.
d. Do not abuse any equipment or accessories. Keep equipment away from heat sources such as
furnaces, wet conditions such as water puddles, oil or grease, corrosive atmospheres and
inclement weather.
e. Keep safety devices and cabinet covers in position and in good repair.
f. Use equipment for its intended purpose. Do not modify it in any manner.
6. ADDITIONAL SAFETY INFORMATION: For more information on safe practices for setting up
and operating electrical welding and cutting equipment, and on good working habits, the following
publications are available from the American Welding Society, 2501 N.W. 7th Street, Miami, Florida
32125:
a. "Safety in Welding and Cutting" AWS Z49.1 (ANSI)
b. "Recommended Safe Practices for Gas-Shielded Arc Welding" AWS A.6.1.
c. "Recommended Safe Practices for the Preparation for Welding and Cutting of Containers and
Piping that have held Hazardous Substances" AWS F4.1.
d. "Recommended Safe Practices for Plasma Arc Cutting" AWS A6.3.
e. "Recommended Safe Practices for Plasma Arc Welding" AWS C5.1.
f. "Recommended Safe Practices for Air Carbon Arc Gouging and Cutting" AWS C5.3.
g. "Arc Welding Safely" booklet.

6
II. GENERAL DESCRIPTION
The MV1000-DPM is a constant current pulsed power source which offers the end user ease of
operation, set up and weld setting, accurate control of amperage output and "ON DEMAND" arc
control based on patented, reliable solid state circuitry. SEE TABLE 1 for specifications.
TABLE 1. SPECIFICATIONS
MODEL: MV1000DPM
RATED WELDING CURRENT AT 45 ARC VOLTS: 1000 AMPERES
ARC VOLTAGE RANGE: 5A @ 30 ARC VOLTS 1245A @ 43 ARC VOLTS
WELDING CURRENT RANGE: 5A - 1245A
OPEN CIRCUIT VOLTAGE: 60 VDC
3 PHASE INPUT AT 1000A RATED OUTPUT
60 HZ. 50 HZ. 50 HZ.
VOLTS AMPS VOLTS AMPS VOLTS AMPS
230 173 220 181 380 105
460 87 380 105 400 99
575 70 440 91 415 96
DIMENSIONS: HEIGHT: 45 IN. WIDTH : 24 IN.
DEPTH: 38 IN.
WEIGHT: NET: 750 LB. SHIP: 770 LB.
A. INSTALLATION
WELDER LOCATION - The welder should be located so that the passage of air through the front and
rear is not obstructed. Allow at least 6 to 8 inches between intake louvers and any wall or obstruction.
NOTE: In outdoor installation equipment life will be prolonged if the welder is protected from
severe weather conditions. A semi-enclosed shelter located against the sheltered side of a
building with a canopy over the welder is recommended.
NEVER OPERATE THE POWER SOURCE WITH ANY OF THE COVERS (sides,
doors, and roof) REMOVED OR OPEN. Not only is this a safety hazard, but, since the
welder is air cooled, the cooling air flow is directed by the covers in place.

7
B. ELECTRICAL CONNECTIONS
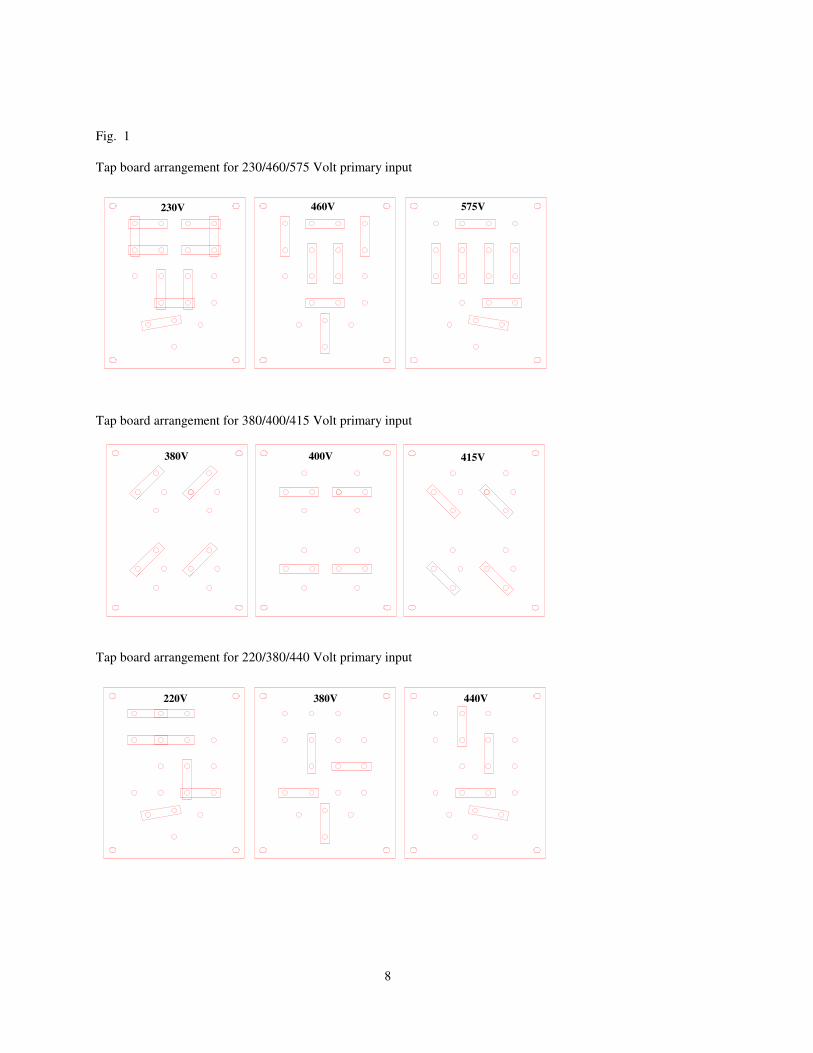
The first thing that is required for the electrical installation of this power source is to know the primary
three phase line voltage to which it is to be connected The MV1000-DPM is wired for either
230/460/575-60HZ, 380/400/415-50HZ OR 220/380/440-50HZ. Therefore, it is necessary to connect
the copper links on the tap board located behind the access door on the right hand side of the power
source for the proper voltage. All AFTEK power sources are shipped with the tap board connected for
the highest line voltage possible (575V-60HZ, 415V-50HZ or 440V-50HZ). The tap board voltage
connections are shown in FIGURE 1 and on a decal on the inside of the access door.
Electrical protection of the primary input source is the responsibility of the user. Primary line
connection to the power source is also the user's responsibility and subject to the national, state,
county, city and company electrical codes. Therefore, it is very important that the proper fuses (circuit
breakers) and wire sizes be used in the primary line connections to the power source. TABLE 1 lists
the recommended primary four conductor wire and fuse sizes for the operating line voltage.
TABLE 1. RECOMMENDED PRIMARY WIRING AND FUSING
LINE VOLTAGE FUSE SIZE AWG WIRE
220 - 50 HZ. 200A 4/0
230 - 60 HZ. 175A 4/0
380 - 50 HZ. 110A 1/0
400 - 50 HZ. 100A 1/0
415 - 50 HZ. 100A 1/0
440 - 50 HZ. 100A 1/0
460 - 60 HZ. 90A #1
575 - 60 HZ. 75A #1
WARNING: AFTER UNCRATING THIS POWER SOURCE AND BEFORE WELDING,
REMOVE ALL THE EXTERIOR PANELS AND CHECK THE UNIT FOR LOOSE WIRES,
NUTS AND BOLTS. IT IS SOMETIMES POSSIBLE FOR WIRING AND FASTENERS TO
LOOSEN DURING SHIPMENT.
1. Open access door and connect the copper links on the tap board for the proper operating line
voltage.
2. Provide primary leads of the proper size and adequate protection (see TABLE 1) and in
accordance with all national and local electrical codes.
3. Provide suitable strain relief for the primary power leads to the power source.
4. Connect the three (3) "hot" leads to the bottom side of the main contactor and the ground lead
to the ground bolt mounted next to the contactor. Both primary contactor and ground bolt are
located on the mounting tray in the front of the power source on top of the main power
transformer. (NOTE: It is recommended that the roof be removed to easier facilitate this wiring
process.
5. When complete, secure the roof and the access door.
8
Fig. 1
Tap board arrangement for 230/460/575 Volt primary input
230V 460V 575V
Tap board arrangement for 380/400/415 Volt primary input
380V 400V 415V
Tap board arrangement for 220/380/440 Volt primary input
220V 380V 440V

9
C. CONTROL LOCATIONS AND DESCRIPTIONS (SEE FIGURE 2)
1. VOLTMETER (Item 1)
Indicates the arc voltage at the output terminals during welding, and the open circuit voltage at
the output terminals when the power source is energized but not welding. Meter is calibrated to
+/- 2% accuracy.
2. AMMETER (Item 2)
Indicates welding and gouging amperage. Meter is calibrated to +/- 2% accuracy.
3. POWER AVAILABLE (Amber Light) (Item 3)
This light indicates that the primary power lines are active in the power source. NEVER open
access doors or attempt to service the unit when this light is on.
4. ON-OFF Toggle Switch (Item 4)
In the OFF position (switch down), and the POWER AVAILABLE light on, the cooling fan is
off an the primary contactor is disabled. In the ON position (switch up) the green POWER ON
light is on, the fan is on, and the power source is operational by placing the PANEL / REMOTE
switch in the PANEL position or contact closure to pins C & D of the WIRE FEEDER
Amphenol connector in the REMOTE position.
5. POWER ON (Green Light) (Item 5)
This light indicates that fan is on, and the power source can be made operational by placing the
PANEL/REMOTE switch in the PANEL position or by making contact closure between
contactor pins of the WIRE FEEDER amphenol connector while in the REMOTE position.
6. FAN RESET (Item 6)
This is a 5 amp resettable circuit breaker that will open if for any reason the main cooling fan
short circuits.
7. PANEL - REMOTE Toggle Switch (Item 7)
This switch selects the operation of the main contactor in the power supply. In the PANEL
position (switch up), the main contactor is energized with the internal 115VAC and the output
welding terminals are "hot" all the time as required for SMAW (stick electrode), GTAW (TIG)
welding and air arc gouging. In the remote position, contact closure must be supplied between
pins A & B (for 24 volt systems) or pins I & J (for 115 volt systems) of the WIRE FEEDER
Amphenol connector to operate the main contactor (Standard configuration).
8. 115VAC RESET (Item 8)
This is a 10 amp resettable fuse breaker that will open if for any reason the 115VAC supplied to
the wire feeder amphenol short circuits or the accessory (wire feeder, etc.) being used draws
amperage above the capacity of the auxiliary transformer.
9. TO WIRE FEEDER Amphenol Connector (Item 9)

10
This 14 pin connector is used to supply power to the wire feeder and a contactor control signal
from the feeder (contact closure). Both 115 volt and 24 volt systems are supported.
Standard configuration (Miller)
Pin Use
A 24 VAC
B Contact closure to A
G Circuit common
I 115 VAC
J Contact closure to I
K Chassis ground
10. COARSE AND FINE CURRENT CONTROLS (Items 10 & 11)
Output current on this power source is adjustable in 50 amp increments via the Coarse Control
Switch (Item 12) and in 5 amp increments via the Fine Control Switch (Item 13). Note that the
Coarse Control Switch adjusts current in both the high, medium and low ranges.
11. DEMAND PULSE CONTROL (Item 12)
This one turn potentiometer allows the operator to select the instantaneous arc voltage at which
the additional current "kick" turns on. This function is explained in detail in the next section.
12. R1 AND R2 LED'S (Items 13 and 14)
These light emitting diodes indicate the operation of the two RAM circuits. Each time the LED
is on indicates that the circuit is "kicking" the arc.
13. TIG ONLY / ALL OTHER PROCESSES Toggle Switch (Item 15)
In the TIG ONLY position (switch up) the 2 DEMAND PULSE circuits are disabled to assure a
smooth constant current for this welding process. In the ALL OTHER PROCESSES position
(switch down) the DEMAND PULSE circuits are fully operational to provide the characteristics
required by the welding arc. (13)
14. WELDING OUTPUT TERMINAL PANEL
This panel provides the necessary output terminals for a welding lead and ground cable. The
copper links paralleling the putputs must remain in place for the unit to deliver the full output
amperage.
15. LOW, MEDIUM, HIGH SWITCH
This switch enables you to change amperage ranges, LOW 5-445, MEDIUM 400-845, HIGH
800-1245, by selecting the desired position.

11
Figure 2
REMOTE
0
15
5
10
20
2530
35
40
45
OFF50
100
150
200
250
300
350
LOHI
25
50
75
400
400
800
450
850
500900
550
600
650
700
750
800
950
1000
1050
1100
1150
1200
HIGH
MED
LOW
45A REMOTE
REMOTE
TO
WIRE FEEDER
CONTACTOR
PANEL
R1 R2LOW
MEDIUM
HIGH
GTAW, SMAW
SMAW DP PULSE
FCAW, GMAW
DEMAND PULSE CONTROL
CURRENT (AMPS) ARC VOLTS
ON
OFF
115VAC
RESET
POWER
AVAILABLE
POWER
ON
View of the instrument panel
III. GENERAL OPERATING INSTRUCTIONS
A. ENERGIZING THE UNIT
When the operator's primary line circuit breaker is switched on, the amber (yellow) POWER
AVAILABLE light comes on. This light is a safety feature and only shows that primary power is
available to energize the unit.

12
NO power source access panels should be opened while this light is on. If failure of the light is
suspected the operator should check all incoming primary lines with a volt-ohmmeter to ensure
whether the primary circuit breaker is on or off.
The unit is energized by switching the ON / OFF toggle switch up to the ON position. A green
POWER ON light will come on. This means that the machine is capable of welding and auxiliary
output power is available. The cooling fan will also come on. Push the toggle switch down to the
OFF position to turn the unit off.
Turn all power off before making secondary connections.
B. SECONDARY CABLE (OUTPUT) CONNECTIONS
The welder output terminals are located behind an access door on the lower front panel. There are
four (4) output terminals. The two terminals on the far right are the NEGATIVE terminals, the two
terminals on the left are the POSITIVE terminals (its output is controlled by the 50 and 5 amp step
switches and the LOW, MEDIUM, AND HIGH switch). Both links should be left as they are for all
operating conditions.
TABLE 2. WELDING AND GROUND CABLE SELECTION
CONDUCTOR CURRENT VOLTAGE**
SIZE CAPACITY DROP PER
AWG AMPS* 100'/62 M
2 225 3.75
1 280 3.50
1/0 340 3.37 *Based on a 40 degree C ambient temperature.
2/0 420 3.29 **Length is total of the weld circuit (electrode and
3/0 505 3.17 ground cables)
4/0 605 3.13
250 MCM 730 3.12
500 MCM 1050 2.11
750 MCM 1500 2.54
It is important that properly sized cables be used for both the electrode and work (ground). Table 2
may be used as a guide for the selection of the welding cables electrode and work (ground). It is to
be noted that in Table 2 the "voltage drop" value is for the weld circuit, that is, for the length of the
electrode plus the work (ground) cables.
C. AUXILIARY AND WIRE FEEDER HOOK-UP
Auxiliary 115 VAC - 1.0 KVA is provided on pins I and G (24 volt A and G) in the WIRE
FEEDER amphenol connector, and is fused with a 10 amp, reset circuit breaker (K is the ground).
This will run most, if not all, present day wire feeders. It is not intended to operate heavy duty
grinders. For those feeders requiring a ground cable, connect the ground wire to the case of the
amphenol.
Provide contact closure between pins I and J on 115 volt systems to energize the main contactor,
between A and B on 24 volt systems.

13
If a feeder is to be used that does not provide contact closure only for the contactor operation, a
"slave" relay must be added between the appropriate pins for that voltage system. In other words,
if the feeder to be used supplies only 115 VAC for the contactor operation, connect the coil of a
115 VAC relay to it and connect a set of normally open contacts to pins I and J.
A 14 pin male amphenol cable plug is provided with the power source for customer convenience in
connecting to the wire feeder.
D. GENERAL WELD SETTINGS
SMAW - STICK ELECTRODE
1. Connect the electrode (LEAD) to the desired polarity: (+) terminal for reverse polarity, (-)
terminal for straight polarity, and the work (GROUND) to the other.
2. Set the 5 amp and 50 amp and the high, medium and low switches to the desired outputs,
taking into account that the R1 and R2 circuits will instantaneously add more current to the
welding arc. Normally if a welding electrode runs at 95 amps, setting the output for 75
amps will give equal or better arc characteristics because of the R1-R2 automatic
DEMAND PULSE.
3. Be sure the work (GROUND) cable is connected to either the work piece or at some point
that is electrically equivalent to the piece being welded. Remember that the ground cable
size must be as big or bigger than the electrode cable.
4. Set the DEMAND PULSE CONTROL knob to the setting (from 0-100) that results in the
arc characteristic you feel is best. Remember that the arc voltage at which R1 turns on is 6
arc volts at setting 0, and 15 arc volts at setting 100. R2 is fixed at the factory to turn on at
12 arc volts.
GMAW - Mig Welding
1. Since this welding process is based on sensing the true instantaneous arc voltage, certain
adjustments to a regular "MIG" welding system must be made.
First is the stick out distance between the gun's contact tip and the work piece. See Figure
3.
2. Be sure the work (GROUND) cable is connected to either the work piece or at some point
that is electrically equivalent to the piece being welded. Remember that the ground cable
size must be as big or bigger than the electrode cable.
Figure 3 RECOMMENDED POSITION OF CONTACT TIP

14
Gas cup
Contact tip
Sensed
Arc voltage
Workpiece
SensedArc voltage
Contact tip
Extended
1/16" to 1/4"
Beyond gas cup
3. Determine the welding current required, taking into account the wire size, chemistry of
wire, the piece being welded, bead appearance, etc., and the additional DEMAND PULSE
from R1 and R2.
4. Set the desired current on the power source. Since this welding process "pulses" in
additional current as the arc demands to prevent short circuits, you will find that the current
set on the power source will be considerably less than in conventional GMAW with CV
power sources.
For example, on a conventional GMAW Constant Voltage system, with 0.035, E70S-6
(mild steel wire), for out of position welding, a current of 90 to 120 amps is usually used.
However, with the DEMAND PULSE process, because of R1 and R2, it will be found that
a setting of only 70 to 95 amps will result in extremely suitable arc for out of position
welding. The lower base current results in less distortion, a smaller heat effected zone and
a much more manageable weld puddle without cold lap or lack of fusion defects.
In the DEMAND PULSE welding process, the arc voltage is sensed as being the voltage
between the end of the contact tip and the work piece. Consequently, having too much stick
out, as shown in FIGURE 3, will give the system an erroneous reading, whereas a correct
extension of the tip will result in a truer sense of the real arc voltage and, at the same time,
provide more operator visibility of the arc and lessen the effects of wire cast and helix.
5. Select the desired shielding gas and adjust the flow rate for 20 to 30 CFH. Excessive flow
rates (40 CFH and over for the common shielding gases) will not only waste gas, but will
effect the weld bead (it would be like welding in a hurricane).
6. Wire Feed Setting - in the DEMAND PULSE welding process, the arc voltage (length of
arc) is determined entirely by the speed of the wire being fed. If the wire is being fed too
fast, wire stubbing will occur. If the wire is fed too slow, the arc will have a tendency to
burn back into the contact tip. You will find that there is a "window" of wire feed speeds
where a desirable arc will be produced. The fast end of the window will result in stubbing
if the welding gun is suddenly moved into a "wall". The slow side of the "window" will be
found to be a very long, unmanageable arc. It has been found that in welding with mild steel
wire that the best wire feed for overhead and vertical welding is on the fast side of the

15
"window". If wire speed is on the slow side of the "window" it may result in "balling" of
the wire in the overhead position. If beaded shape is a prime concern, adjust the wire feed
speed to give the bead profile desired. For a very flat bead wire feed must be slowed down
to where the arc sounds like a cross between globular and spray.
7. Set the DEMAND PULSE CONTROL knob to the setting resulting in the welding arc you
feel is best. Remember that the arc voltage at which R1 turns on is 6 volts at 0 and 15 volts
at 100. R2 is factory fixed at 12 arc volts.
FCAW - Flux Cored
1. In welding with flux cored wire it has been found that welding at the fast end of the wire
feed will cause stubbing if the operator dramatically shortens the stick out. The surest way
to set the wire feed speed properly is to adjust the wire speed to the proper voltage required
by the wire being used.
2. Because flux cored wires usually are designed for higher arc voltages (21 - 30V), the R1
and R2 turn on arc voltages may be lower than desired, so the DEMAND PULSE
CONTROL knob should be set between 75 and 100. If flux core is the only wire to be run,
the factory should be consulted to determine what "turn on" voltages are recommended.
The "turn on" voltages are adjustable at the factory.
E. WELDING HINTS: DO'S AND DO NOT'S
DO'S
1. Connect the ground cable at a point where it is electrically the same as the work piece.
2. Position the contact tip so that it extends 1/16" to 1/4" beyond the end of the gun
nozzle
3. Set the welding current (heat) at the power source in GMAW-- do not adjust the wire feed
speed for arc "heat".
4. Allow for the R1 and R2 circuits additional current "PULSES" in setting the current on the
power source.
5. Be sure that the wire feeds smoothly and consistently. Variations in wire feed speeds will
cause a very erratic arc.
DO NOT'S
1. Increase the wire feed speed if more "heat" is wanted. If more heat is wanted, increase the
current setting at the power source. Increasing wire feed speed will only result in lowering
arc voltage and will cause stubbing.
2. Position the contact tip inside the end of the gas nozzle - this results in a false arc voltage to
the system and, because of cast and helix in the wire, makes the operator work a lot harder
to keep a good looking bead.
16
3. Set gas flow too high or too low. The gas is used to shield the weld puddle only. If there is
too much gas, it will agitate the weld puddle, causing spatter and ropy welds. Too little gas
will result in porosity and "dirty" weld.
4. Overlook the ground (work) connection--be sure it is connected at a point where it is
electrically the same as the work piece.
5. Assume that the shield gas is proper because the label on the bottle says so. Contaminated
gas bottles do exist.
6. Overlook leaks in the gas system - loose connection of fitting or holes in the gas hoses will
result in defective welds.
IV. TECHNICAL INFORMATION
A. DEMAND PULSE WELDING PROCESS
The MV1000DPM is not only unique in design, but also in method of metal transfer in the
SMAW (Stick), GMAW (Mig), and FCAW (Flux Core) processes.
Welding operations differ greatly in the weld supply requirements. For example, the weld
supply characteristic will vary as a function of the materials to be welded, the joint designs,
the electrodes used, the particular welding process, the welding position and even according
to the preferences of the individual welding operator. The MV1000 automatically adapts
itself for these varied requirements with the only adjustment being the desired weld current
for SMAW (Stick), GTAW (Tig) and the desired weld current and the wire feed speed for
GMAW (Mig) and FCAW (Flux Core).
The MV1000DPM operates on the simple basis of Ohms Law. This electrical law states
that voltage (V) divided by resistance (Ohms) equals current (Amps). Based on this law it
can easily be calculated that with a 60 volt source and a 25 volt arc, the difference is 60V-
25V = 35V. Therefore, if a 0.7 ohm resister is added to the circuit the difference between
the 60V source and the 25V arc of 35V is absorbed by the 0.7 ohm resister. Namely, 35V
divided by 0.7 ohms (35/.7 ) is 50 amps.
On the MV1000, the low range of 400A and the 45A switch are based and calibrated for a
30 volt arc.
Two patented electronic circuits are used in this welding process. The two circuits are
identical except for the arc voltage at which they turn on. They are referred to as R1 and
R2.
The arc voltage at which R1 is turned on is adjustable by a one turn potentiometer on the
front panel which allows the "turn on" arc voltage to be adjusted from 6V (LO on the pot)
to 15V (HI on the pot) in infinite steps. The arc voltage at which R2 turns on is factory
fixed at 12 volts. The instantaneous arc voltage is sensed within the power source and the
electronic circuits are automatically turned on whenever the arc voltage demands it.

17
For example, with the potentiometer set at HI, equating to a 15V arc and, for whatever
reason, the arc voltage reaches 15 volts, the R1 circuit turns on, adding about 100 amps to
the arc. If this additional arc current did not transfer the weld metal causing the arc voltage
to decrease to below 15 volts and the arc voltage reaches 12V the second circuit, R2, will
automatically add another 100 amps or so to the arc and cause metal transfer without short
circuiting. The additions of the added 100A currents are turned on and off as fast as a
billionth of a second. These two circuits are only on for as long as the arc demands them.
The constant current DEMAND PULSE process, with its unique method of only pulsing
"on demand" as the welding arc tries to short circuit, virtually eliminates the problems
inherent in the SHORT CIRCUITING MIG process, the fixed PULSE ARC process, and
CONVENTIONAL CONSTANT CURRENT stick electrode welding, including cold laps,
lack of fusion, and "fisheyes".
V. TROUBLESHOOTING GUIDE
Problem Possible Cause Solution
No power available No power to unit Turn on disconnect box
light
Faulty light Replace light
Line fuse blown Replace fuse
Fuse to control trans- Replace fuse
former blown
Tapboard set for wrong Set to proper voltage
voltage
Unit will not turn on to Thermostat in transformer Wait for thermostat
weld but the power on or rectifier is tripped to reset
light comes on
Faulty contactor coil Replace contactor
Power available light Breaker on conrol panel Reset breaker
on but on light will tripped
not come on and neither
will the contactor.
Line fuses blow when Shorted diode Replace diode
the machine is turned on
Improper connections Refer to installation
instructions
Shorted transformer coil Check for shorted or grounded windings,
replace if necessary

18
Erratic arc "single Blown diode Replace diode
phasing"
Blown line fuse Replace fuse
Circuit Breaker on Worn or faulty motor Replace motor
control panel trips
Faulty contactor coil Replace contactor
Improper wire feeder Refer to hookup
connections instructions
Problem Possible cause Solution
Line fuse blows after a Fuses too small Replace with proper
short time size
Problem Possible Cause Solution
No welding output Ground cable not connected Connect ground
Transformer or rectifier Wait for them to cool
overheated
When selector is move Defective selector switch Replace switch
to medium or high, the
output doesn't change
Defective contactor Replace contactor
Current does not in- Faulty switch Replace switch
crease for each step of
the switch Faulty resistor coil Replace resistor
Ram module light does Faulty light Replace light
not come on
Faulty Ram module Replace module
Potentiometer turned to Turn the knob up "0"
Tig Only/All Other Proc. Turn the switch to the
switch in the Tig All Other Processes
position position

19
V. PARTS BREAKDOWN
PART NO. DESCRIPTION
112536 Rear panel
112516 Roof
112533 Fan mount
112527 Base
112544 Yoke assy
112545 Lifting support
112537 Instrument panel
112538 Lower front panel
220250 Diode positive
220251 Diode negative
122001 Rectifier heatsink, octogon
260007 On/Off switch
232001 Circuit breaker 10A
260600 Selector switch Hi, Med, Low 3P3T
264000 Rotary switch 45A
264008 Rotary switch 400A
228001 Power on light (green)
228000 Power available light (amber)
259951 Voltmeter
259902 1200 Amp meter
239012 Shunt 1200A
802427 Instrument panel harness
802428 Main wiring harness
250202 Control transformer 1.0 KVA 230/460/575 60 Hz
250206 Control transformer 1.0 KVA 380/400/415 50/60 Hz
250210 Control transformer 1.0 KVA 220/380/440 50/60 Hz
600220 Transformer 1300A 100 % 230/460/575 60 Hz
600222 Transformer 1300A 100 % 220/380/440 50/60 Hz
600221 Transformer 1300A 100 % 380/400/415 50/60 Hz
801000 Tap board 230/460/575
801002 Tap board 220/380/440
801003 Tap board 380/400/415
250008 Contactor 90 A ,3 Ph. 115V coil (main contactor)

20
250100 Contactor Secondary (Med, High range)
240004 Fan motor 1/15 hp. 115V 50/60 Hz
246000 Fan blade 12"
186028 Fuse KTK-15
500502 Inductor MV-91
500118 Resistor 0.98 ohm
500117 Resistor 0.46 ohm
500114 Resistor 9.0 ohm
500115 Resistor 4.0 ohm
400300 Demand Pulse module

M
230
460
575
A
B
CD E
F
G
H
L1
L2
L3
1
2
3
4
5
6
7
8
9
10
11
12
13
14
15
16
18
17
REMOTE
LOW SIDE
NEGATIVE
OUTPUT
E A
BC
D
ON/OFFCB1
WIRE FEEDER
REMOTE
PANEL/REMOTE
GTAW/GMAW
R2
R1
TRANSFORMER
RECTIFIER
(THERMAL SWITCHES)
MV 1000 DPM 230/460/575 60 hz.
F1 F2
POWER AVAIL.
60 VDC
M
A V
MEDIUM
HIGH
S1
S2
2 4 6 8 10 12 14 16
2 4 6 8
2
4
6
0 5
X
10
X
15
X
X
20
X
X
25
X
X
30
X
35
X
X
40
X
X
45
X
X
X
8 X X X X
SWITCHING CONFIGURATION FOR S145 AMP SWITCH
AMPERAGE
CONTACTS
2
4
6
8
10
12
14
16
0 50
X
100
X
X
150
X
X
X
200
X
X
X
X
250
X
X
X
X
X
300
X
X
X
X
X
X
350
X
X
X
X
X
X
X
400
X
X
X
X
X
X
X
X
SWITCHING CONFIGURATION FOR S2400 AMP SWITCH
CONTACTS
AMPERAGE
POWER ON
L
MHL
M
H
S3
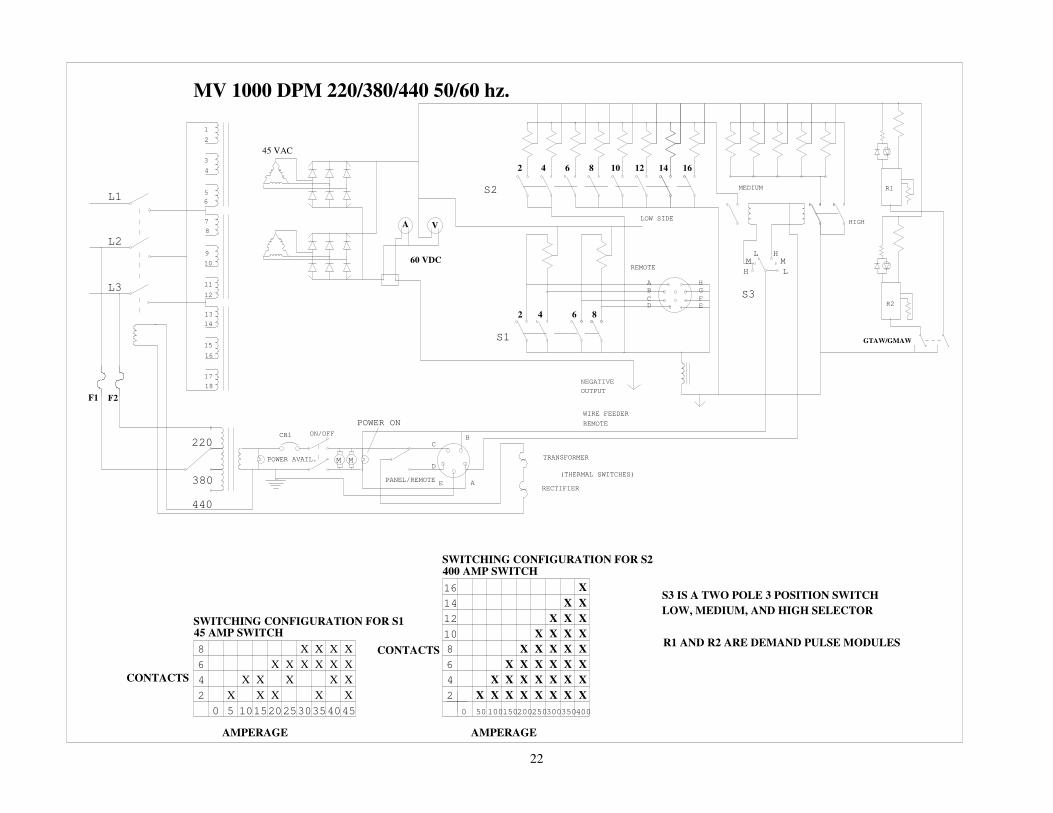
S3 IS A TWO POLE 3 POSITION SWITCH
LOW, MEDIUM, AND HIGH SELECTOR
R1 AND R2 ARE DEMAND PULSE MODULES
45 VAC
22
M
220
380
440
A
B
CD E
F
G
H
L1
L2
L3
1
2
3
4
5
6
7
8
9
10
11
12
13
14
15
16
18
17
REMOTE
LOW SIDE
NEGATIVE
OUTPUT
E A
BC
D
ON/OFFCB1
WIRE FEEDER
REMOTE
PANEL/REMOTE
GTAW/GMAW
R2
R1
TRANSFORMER
RECTIFIER
(THERMAL SWITCHES)
MV 1000 DPM 220/380/440 50/60 hz.
F1 F2
POWER AVAIL.
60 VDC
M
A V
MEDIUM
HIGH
S1
S2
2 4 6 8 10 12 14 16
2 4 6 8
2
4
6
0 5
X
10
X
15
X
X
20
X
X
25
X
X
30
X
35
X
X
40
X
X
45
X
X
X
8 X X X X
SWITCHING CONFIGURATION FOR S145 AMP SWITCH
AMPERAGE
CONTACTS
2
4
6
8
10
12
14
16
0 50
X
100
X
X
150
X
X
X
200
X
X
X
X
250
X
X
X
X
X
300
X
X
X
X
X
X
350
X
X
X
X
X
X
X
400
X
X
X
X
X
X
X
X
SWITCHING CONFIGURATION FOR S2400 AMP SWITCH
CONTACTS
AMPERAGE
POWER ON
L
MHL
M
H
S3
S3 IS A TWO POLE 3 POSITION SWITCH
LOW, MEDIUM, AND HIGH SELECTOR
R1 AND R2 ARE DEMAND PULSE MODULES
45 VAC
Top Related