


Languages
Pages
Legal


Multi-gas Monitor
Part Number: 17152355-1
Version 6 www.indsci.com
Reference Guide A companion resource for the
Ventis MX4 Product Manual

Ventis™ MX4 Reference Guide
© 2015 Industrial Scientific Corporation 2
Table of Contents Ventis MX4 Resources .................................................................................... 3 Warnings and Cautionary Statements ............................................................. 4 Process Overview .......................................................................................... 6
Operation/Start-up (Figure 1) ........................................................... 7 Configuration (Figure 2) .................................................................... 8 Calibration (Figure 3) ...................................................................... 13 Bump Testing (Figure 4) .................................................................. 15
NOTE: The information contained herein is believed to be accurate and reliable. Industrial Scientific Corporation accepts no responsibility for its use by any means or in any way whatsoever Industrial Scientific Corporation shall not be liable for any expenses, costs by damage that may result from the use of the information contained within this document. Although every effort is made to ensure accuracy, the specifications of this product and the content herein are subject to change without notice.
WARNING: this is NOT a Product Manual. Prior to unpacking and
using the monitor, all Ventis MX4 users should download, read, and understand the Product Manual available online at the Ventis MX4 Resource Center at
www.indsci.com/VentisMX4. WARNING: The use of leather cases can produce inaccurate readings with diffusion (non-aspirated) gas detection instruments for specific monitoring applications. Leather cases should be used ONLY as carrying cases, and NOT for continuous monitoring, with diffusion instruments configured to measure gases other than O2, CO, CO2, H2S, and combustible gases (LEL/CH4).

Ventis™ MX4 Reference Guide
© 2015Industrial Scientific Corporation 3
Ventis MX4 Resources
The Ventis MX4 Product Manual is the primary resource, within a full suite of
learning tools, developed for the monitor user. Its step-by-step “walk through” format covers everything from unpacking to set-up, operation, and service. Available online at the Ventis MX4 Resource Center, all Ventis MX4 users should download, read, and understand the Product Manual prior to
unpacking and using the monitor. A companion to the manual, the Ventis MX4 Reference Guide ships with the
monitor. It serves to announce all warnings and cautionary statements relevant to general monitor use. The guide also features process charts that provide an overview of four fundamental tasks: operation/start-up, configuration, calibration, and functional “bump” testing. These charts are tools for the user who is both familiar with the manual and proficient in the performance of the given task. A collection of audio-visual learning tools is also available online at the Ventis
MX4 Resource Center. Here the user can watch fully narrated step-by-step demonstrations of instruction sets outlined in the manual. These training modules allow the user to view the full presentation of a process, such as calibration, or to access a particular segment within that process. These Ventis MX4 product-specific resources are part of the organization’s broader training line-up,
featuring face-to-face classroom programs for technicians, operators, first responders, trainers, and distributors. Courses combine theory with hands-on learning, and can be tailored to the customer’s unique requirements and gas monitoring applications. The organization’s customer and technical support call centers provide
product and order information, how-to product assistance, and guidance for in-depth technical applications. Its service centers offer comprehensive factory
repair and maintenance services. Industrial Scientific Corp. provides a full suite of resources to aid customers in the competent and safe use of its products and services. With 19 manufacturing, support, and service centers and hundreds of distributors worldwide, Industrial Scientific serves the globe’s gas detection needs.
►Ventis MX4 Resource Center
Product documentation. Online training. And more! www.indsci.com/VentisMX4

Ventis™ MX4 Reference Guide
© 2015 Industrial Scientific Corporation 4
Warnings and Cautionary Statements
Resources
IMPORTANT Failure to perform certain procedures or note certain conditions may impair the performance of this product. For maximum safety and optimal performance, please download, read, and understand the Product Manual available online at the Ventis MX4 Resource Center at www.indsci.com/VentisMX4.
Personnel
CAUTION: For safety reasons, this equipment must be operated and serviced by qualified personnel only. Read and understand the instruction manual completely before operating or servicing. ATTENTION: Pour des raisons de sécurité, cet équipment doit étre utilesé entretenu et réparé uniquement par un personnel qualifié. Étudier le manuel d'instructions en entier avant d'utiliser, d'entretenir ou de réparer l'équipement.
Hazardous Conditions, Poisons, and Contaminants
WARNING: Servicing the unit, replacing or charging battery packs, or using the communications port must only be done in an area known to be nonhazardous. Not for use in oxygen-enriched atmospheres.
WARNING: Power-off the monitor before servicing the unit or replacing the battery.
WARNING: Substitution of components may impair intrinsic safety and may cause an unsafe condition. AVERTISSEMENT: La substitution de composants peut compomettre la securite intrinseque.
CAUTION: High off-scale readings may indicate explosive gas concentration(s). ATTENTION: Des lectrures supérieures a l'échelle peuvent indiquer des concentrations explosives.
CAUTION: Any rapid up-scale reading followed by a declining or erratic reading may indicate gas concentration(s) beyond the upper scale limit which may be hazardous.
Silicone compound vapors or other known contaminants may affect the combustible gas sensor and cause readings of combustible gas to be lower than actual gas concentrations. If the monitor has been used in an area where silicone vapors were present, always calibrate the monitor before next use to ensure accurate measurements.

Ventis™ MX4 Reference Guide
© 2015Industrial Scientific Corporation 5
Factors that Affect Instrument Performance
Oxygen-deficient atmospheres may cause combustible gas readings to be lower than actual concentrations.
Oxygen-enriched atmospheres may cause combustible gas readings to be higher than actual concentrations.
Sudden changes in atmospheric pressure may cause temporary fluctuations in the oxygen reading.
Verify the calibration of the combustible gas sensor after any incident where the combustible gas content has caused the monitor to display an over-range condition.
Sensor openings, water barriers, and the pump inlet must be kept clean. Obstruction of the sensor openings or pump inlet, and/or contamination of the water barriers may cause readings to be lower than actual gas concentrations.
To avoid the potential of liquid being pulled into the sample tubing and pump assembly, it is recommended that Industrial Scientific filter (P/N 17027152) be used on the sample tubing when drawing samples using the aspirated monitor.
WARNING: INSERT THE ALKALINE BATTERIES WITH THE CORRECT POSITIVE “+” AND NEGATIVE “-“ ORIENTATION. FAILURE TO FOLLOW PROPER BATTERY ORIENTATION WILL RESULT IN DAMAGE TO THE INSTRUMENT.
WARNING: The Ventis MX4 is only approved for use with AAA battery types Energizer EN92 and Duracell MN2400. Do NOT mix battery types.
Recommended Practices
Industrial Scientific recommends the monitor be charged (when equipped with a rechargeable battery pack), configured, and calibrated before first time use.
Industrial Scientific recommends a full instrument calibration be performed monthly with a certified concentration(s) of Industrial Scientific calibration gas(es) to help ensure monitor accuracy.
Industrial Scientific recommends the monitor be bump tested before each use with a certified concentration(s) of Industrial Scientific calibration gas(es).

Ventis™ MX4 Reference Guide
© 2015 Industrial Scientific Corporation 6
Battery contacts are exposed on battery packs when they are removed from the monitor. Do not touch the battery contacts and do not stack battery packs on top of one another.
Process Overview
The following process charts provide an overview of four fundamental tasks: operation/startup, configuration, calibration, and functional “bump” testing. As noted previously, these charts are tools for the user who is both familiar with the manual and proficient in the performance of the given task. The button symbols for ON/OFF/MODE and ENTER (as shown below) appear in the following charts. Where a button symbol appears, a press on that button will result in the next process step as indicated by the arrow symbol. When an arrow appears without a button symbol, no button presses are required to get to the next step.
ON/OFF/MODE
ENTER

Ventis™ MX4 Reference Guide
© 2015Industrial Scientific Corporation 7
Operation/Start-up Figure 1
Press and hold ON/OFF/MODE
for three seconds, then release, to power-on.
--
Visual Test Screen Followed by brief displays of Pump Set-up Screen Software Version Screens
--
Countdown Screen
Simultaneously press and hold ON/OFF/MODE and ENTER buttons for 3 seconds, and release, to enter configuration
mode. ►Refer to Figure 2, Configuration.
Gas Monitoring Screen
--
Calibration Days Screen ▲= days before next calibration due ▼= days since last calibration occurred
--
Zero Initiate Screen (if enabled)
Press ON/OFF/MODE to bypass zero.
Press ENTER to begin the zero
process. ►Refer to Figure 3, Quick
Calibration.
Days Since Last Calibration Screen
Ventis™ MX4 Reference Guide
© 2015 Industrial Scientific Corporation 8
Bump Test Initiate Screen
(if enabled)
Press ON/OFF/MODE to bypass bump test.
Press ENTER to begin the bump test Process.
►Refer to Figure 4, Quick Bump Testing.
Peak Readings Screen Press ENTER to clear the peak values, if desired.
--
TWA Readings Screen Press ENTER to clear the readings, if desired.
--
STEL Readings Screen Press ENTER to clear the readings, if desired.
--
Days Since Last Calibration Screen
Initiate Zero Screen (if enabled)
Press ON/OFF/MODE to bypass zero
Initiate Bump Test Screen (if enabled)
Press ON/OFF/MODE to bypass bump test.
Countdown Screen
Peak Readings Press ENTER to clear the peak values, if desired.
Gas Monitoring Screen
Press ENTER to begin the zero process. Refer to
Figure 3, Calibration
Press ENTER to begin the bump test Process. Refer to Figure 4, Bump Test.
Countdown Screen
Peak Readings Press ENTER to clear the peak values, if desired.
Gas Monitoring Screen
Press ENTER to begin the zero process. Refer to
Figure 3, Calibration
Countdown Screen
Peak Readings Press ENTER to clear the peak values, if desired.
TWA Readings Press ENTER to clear the readings, if desired.
Gas Monitoring Screen

Ventis™ MX4 Reference Guide
© 2015Industrial Scientific Corporation 9
Configuration Figure 2
Press and hold ON/OFF/MODE for
three seconds, then release, to power-on.
--
Visual Test Screen Followed by brief displays of Pump Set-up Screen Software Version Screens
NOTE: if using an aspirated monitor, be sure the pump inlet is not blocked.
Countdown Screen Simultaneously press and hold ON/OFF/MODE and ENTER buttons for 3 seconds, and release, to enter configuration mode.
--
Enter Security Code Screen If value is 000, screen will NOT show. If shown, press ENTER to edit value if needed.
--
LEL Type Set Screen Press ENTER to edit, if needed. NOTE: If the LEL is changed, a calibration fail event will occur; refer to Figure 3, Calibration.
Zero Initiate Screen Press ON/OFF/MODE to bypass zero and calibration process.
Press ENTER to begin the zero and calibration process. ► Refer to Figure 3, Quick Calibration.
Calibration Mode Selection Screen Press ENTER to edit value, if needed. 0 = standard calibration 1 = quick calibration
--

Ventis™ MX4 Reference Guide
© 2015 Industrial Scientific Corporation 10
Low Alarm Set-point Screen Press ENTER to begin. For each flashing value: press ENTER to edit value, if needed; press ON/OFF/MODE to set.
--
High Alarm Set-point Screen Press ENTER to begin. For each flashing value: press ENTER to edit value, if needed; press ON/OFF/MODE to set.
--
TWA Alarm Set-point Screen Displays if toxic sensors installed.
Press ENTER to begin. For each flashing value: press ENTER to edit value, if needed; press ON/OFF/MODE to set.
--
TWA Time Interval Press ENTER to edit value, if needed. Value range: 1-40 hours
--
STEL Alarm Set-point Screen Displays if toxic sensors installed.
Press ENTER to begin. For each flashing value: press ENTER to edit value, if needed; press ON/OFF/MODE to set.
--
Calibration Gas Set Screen Press ENTER to begin. For each flashing value: press ENTER to edit value, if needed; press ON/OFF/MODE to set.
--

Ventis™ MX4 Reference Guide
© 2015Industrial Scientific Corporation 11
Clock Set Screen Press ENTER to begin. For each flashing value: press ENTER to edit value, if needed; press ON/OFF/MODE to set.
--
Date Set Screen Press ENTER to begin. For each flashing value: press ENTER to edit value, if needed; press ON/OFF/MODE to set.
--
Display Mode Set Screen Press ENTER to edit, if needed. 0 = Numeric Mode 1 = Text Mode
--
Confidence Indicator On-Off Screen Press ENTER to edit, if needed. 0 = disable/off 1 = enabled /on
--
Confidence Indicator Type Set Screen Options
1 = audible chirp
2 = LED flash
3 = combination audible chirp and LED flash
--
Bump Test In-field Option Screen Press ENTER to edit, if needed. 0 = disable/off 1 = enable/on If enabled, screens for the following settings will appear in the order listed. Valid value settings are noted. Bump Due Warning (0=disable/off ; 1=enable/on) Bump Test Time (.5-7.0 days) Bump Test Percentage (50-99%) Bump Test Response time (30-300 seconds)
--
Ventis™ MX4 Reference Guide
© 2015 Industrial Scientific Corporation 12
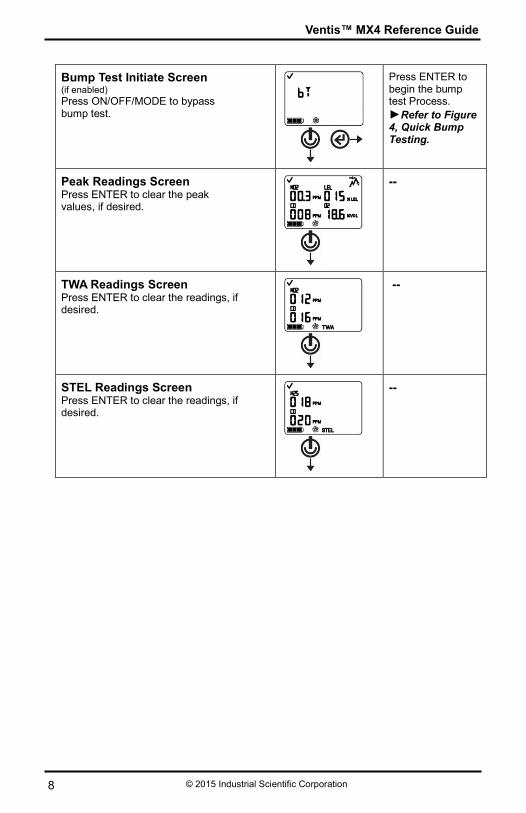
Alarm Latch Set Screen Press ENTER to edit, if needed. 0 = Normal 1 = Latching
--
Zero In-field Option Screen Press ENTER to edit, if needed. 0 = disable/off 1 = enable/on
--
Calibration In-field Option Screen Press ENTER to edit, if needed. 0 = disable/off 1 = enable/on
--
Calibration Due Alarm Press ENTER to edit, if needed. 0 = disable/off 1 = enable/on
--
Calibration Due Set-point Screen Press ENTER to edit, if needed. Value range: 1-365 days
--
Calibration Days Set Screen 0 = display days since last calibration (▼) 1 = display days until next calibration ( ▲)
--

Ventis™ MX4 Reference Guide
© 2015Industrial Scientific Corporation 13
Security Code Set Screen Press ENTER to edit, if needed. Value range: 000-999
--
Language Selection Screen Press ENTER to edit, if needed. E = English F=French d = German
--
Always-on Set Screen 0 = Disable/off 1 = Enable/on
--
Shutdown In Alarm Screen
0 = Disallows shutdown 1 = Allows shutdown
--
Alarm on Dock Screen
0 = Disable/off 1 = Enable/on
--

Ventis™ MX4 Reference Guide
© 2015 Industrial Scientific Corporation 14
Quick Calibration Figure 3
Gas Monitoring Screen From the Gas Monitoring Screen (or from the configuration mode), a series of presses on the ON/OFF/MODE button advance the user to the Zero Initiate Screen.
--
Zero Initiate Screen Press ON/OFF/MODE to terminate the zero process. If in-field bump test is enabled, refer to Figure 4,Quick Bump Testing. If disabled, ► Refer to Figure 1, Operation/Start-up.
Press ENTER to begin the zero process.
Zero In Process Screen Sensors zero; O2 sensor calibrates and span reserve value displays. Press ON/OFF/MODE to terminate the zero process and return to the Gas Monitoring Screen.
Zero Results (Fail) Screen
Zero Results (Pass) Screen Press On/OFF/MODE to calibrate.
Press ENTER (or wait ten seconds) to repeat the zero process.
Press ENTER to repeat zero process.
Calibration Apply Gas Screen* Displays expected gas concentrations for toxic and LEL sensors installed; waits five minutes for gas. Press ON/OFF/MODE** to terminate calibration and return to the Gas Monitoring Screen. ►Refer to Figure 1, Operation/Start-up.
--

Ventis™ MX4 Reference Guide
© 2015Industrial Scientific Corporation 15
Calibration in Progress Screen* As toxic and LEL sensors calibrate, gas readings increase. ► After a manual calibration, be sure to STOP THE FLOW OF GAS.
NOTE: After calibration, one of two sensor results screen display (pass or fail as shown in the next two rows).
Sensor Results (Pass) Screens* Displays alternately final span values and pass status.
►Refer to Figure 1, Operation/Start-up.
--
Sensor Results (Fail) Screen* Displays alternately final span values and fail/pass status.
--
Calibration Failed Screen A system level alarm turns on. Any failed sensor stays in alarm/fail status until it passes calibration or is replaced. Press ON/OFF/MODE to reach Zero Initiate Screen and repeat the zero and calibration process.
--
*For a standard calibration, this series of display screens cycle for each toxic and LEL sensor as it calibrates: apply gas, in-progress, and results screens. **For a standard calibration, press ON/OFF/MODE as each sensor flashes.

Ventis™ MX4 Reference Guide
© 2015 Industrial Scientific Corporation 16
Bump Testing Figure 4
Gas Monitoring Screen From the Gas Monitoring Screen, a series of presses on the ON/OFF/MODE button advance the user to the Bump Test Initiate Screen.
Bump Test Initiate Screen Press ENTER to begin the bump test process. Press ON/OFF/MODE to bypass the bump test process. ►Refer to Figure 1, Operation/Start-up.
Bump Test Apply Gas Screen Displays expected gas concentrations; waits five minutes for gas. Press ON/OFF/MODE to terminate the bump test process**. ►Refer to Figure 1, Operation/Start-up.
Bump Test In-progress Screen LEL and toxic sensor readings increase; O2 reading decreases.
Bump Test Results (Pass) Screen Alternately displays final sensor reading and pass status screens.
►Refer to Figure 1, Operation/Start-up.
Ventis™ MX4 Reference Guide
© 2015Industrial Scientific Corporation 17
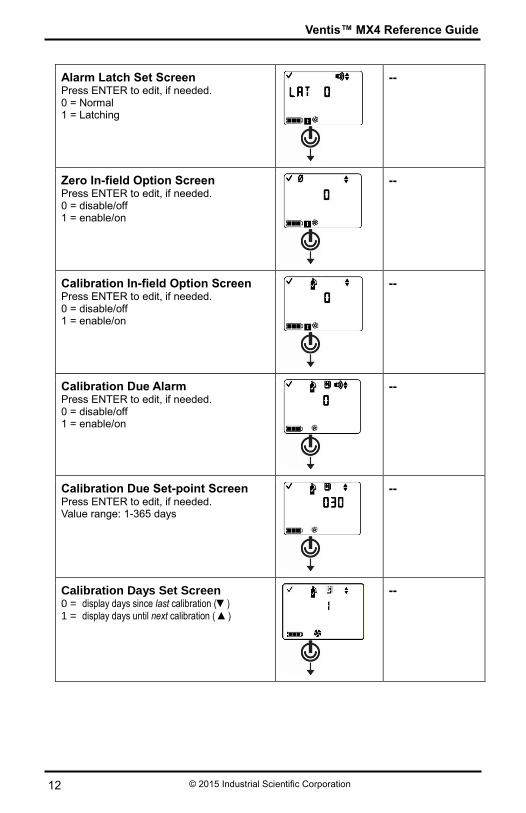
Bump Test Results (Fail) Screen Alternately displays final sensor reading and fail status screens.
Bump Test Fail Screen The monitor must pass a calibration after a failed bump test ►Refer to Figure 3, Quick Calibration.


Ventis™ MX4 Reference Guide
►Ventis MX4 Resource Center
Product documentation. Online training. And more! www.indsci.com
Industrial Scientific Corporation 1 Life Way Pittsburgh, PA 15205-7500 USA Web: www.indsci.com Phone: +1 412-788-4353 or 1-800-DETECTS (338-3287) E-mail: [email protected] Fax: +1 412-788-8353
Industrial Scientific France S.A.S. 5 Rue Frédéric Degeorge, CS 80097 62002 Arras Cedex, France Web: www.indsci.com Téléphone : +33 (0)1 57 32 92 61 E-mail: [email protected] Fax: +33 (0)1 57 32 92 67
英思科传感仪器(上海)有限公司
地址:中国上海市浦东金桥出口加工区桂桥路290号
邮编:201206
电话:+86 21 5899 3279
传真:+86 21 5899 3280
E-mail: [email protected]
网址: www.indsci.com
服务热线:+86 400 820 2515
To locate a nearby distributor of our products or an Industrial Scientific service center or business office, visit us at www.indsci.com. Rendez-vous sur notre site Web www.indsci.com, si vous voulez trouver un distributeur de nos produits près de chez vous, ou, si vous recherchez un centre de service ou un bureau Industrial Scientific. Besuchen Sie uns unter www.indsci.com, um einen Vertriebshändler unserer Produkte oder ein Servicecenter bzw. eine Niederlassung von Industrial Scientific zu finden. Para buscar un distribuidor local de nuestros productos o un centro de servicio u oficina comercial de Industrial Scientific, visite www.indsci.com.
如需查找就近的产品经销商或 Industrial Scientific 服务中心或业务办事处,请访问我们的网
站 www.indsci.com。
Top Related