Languages
Pages
Legal

Microsoft Cloud
Workshop
Serverless architecture
Hands-on lab step-by-step
January 2018

Information in this document, including URL and other Internet Web site references, is subject to change without notice.
Unless otherwise noted, the example companies, organizations, products, domain names, e-mail addresses, logos, people,
places, and events depicted herein are fictitious, and no association with any real company, organization, product, domain
name, e-mail address, logo, person, place or event is intended or should be inferred. Complying with all applicable
copyright laws is the responsibility of the user. Without limiting the rights under copyright, no part of this document may
be reproduced, stored in or introduced into a retrieval system, or transmitted in any form or by any means (electronic,
mechanical, photocopying, recording, or otherwise), or for any purpose, without the express written permission of
Microsoft Corporation.
Microsoft may have patents, patent applications, trademarks, copyrights, or other intellectual property rights covering
subject matter in this document. Except as expressly provided in any written license agreement from Microsoft, the
furnishing of this document does not give you any license to these patents, trademarks, copyrights, or other intellectual
property.
The names of manufacturers, products, or URLs are provided for informational purposes only and Microsoft makes no
representations and warranties, either expressed, implied, or statutory, regarding these manufacturers or the use of the
products with any Microsoft technologies. The inclusion of a manufacturer or product does not imply endorsement of
Microsoft of the manufacturer or product. Links may be provided to third party sites. Such sites are not under the control
of Microsoft and Microsoft is not responsible for the contents of any linked site or any link contained in a linked site, or
any changes or updates to such sites. Microsoft is not responsible for webcasting or any other form of transmission
received from any linked site. Microsoft is providing these links to you only as a convenience, and the inclusion of any link
does not imply endorsement of Microsoft of the site or the products contained therein.
© 2018 Microsoft Corporation. All rights reserved.
Microsoft and the trademarks listed at https://www.microsoft.com/en-us/legal/intellectualproperty/Trademarks/Usage/General.aspx are
trademarks of the Microsoft group of companies. All other trademarks are property of their respective owners.
Contents Serverless architecture hands-on lab step-by-step ...................................................................................................... 1
Abstract and learning objectives ......................................................................................................................................................... 1
Overview ....................................................................................................................................................................................................... 1
Solution Architecture ............................................................................................................................................................................... 2
Requirements ............................................................................................................................................................................................. 3
Before the hands-on lab......................................................................................................................................................................... 4
Task 1: Set up a development environment ................................................................................................................................................. 4
Task 2: Disable IE Enhanced Security............................................................................................................................................................... 4
Task 3: Validate connectivity to Azure ............................................................................................................................................................ 5
Task 4: Download and explore the TollBooth starter solution .............................................................................................................. 5
Task 5: Create a new Azure Resource group ................................................................................................................................................ 6
Exercise 1: Azure data, storage, and serverless environment setup ...................................................................................... 7
Help references ........................................................................................................................................................................................................ 7
Task 1: Provision the storage account ............................................................................................................................................................ 7
Task 2: Provision the Function Apps .............................................................................................................................................................. 10
Task 3: Provision the Event Grid topic .......................................................................................................................................................... 11
Task 4: Provision the Azure Cosmos DB account ..................................................................................................................................... 13
Task 5: Provision the Computer Vision API service .................................................................................................................................. 18
Exercise 2: Develop and publish the photo processing and data export functions ..................................................... 21
Help references ...................................................................................................................................................................................................... 21
Task 1: Configure application settings .......................................................................................................................................................... 21
Task 2: Finish the ProcessImage function .................................................................................................................................................... 23
Task 3: Publish the Function App from Visual Studio ............................................................................................................................. 25
Exercise 3: Create functions in the portal ..................................................................................................................................... 29
Help references ...................................................................................................................................................................................................... 29
Task 1: Create function to save license plate data to Azure Cosmos DB ........................................................................................ 29
Task 2: Add an Event Grid subscription to the SavePlateData function .......................................................................................... 32
Task 3: Add an Azure Cosmos DB output to the SavePlateData function ...................................................................................... 33
Task 4: Create function to save manual verification info to Azure Cosmos DB ........................................................................... 35
Task 5: Add an Event Grid subscription to the QueuePlateForManualCheckup function ........................................................ 37
Task 6: Add an Azure Cosmos DB output to the QueuePlateForManualCheckup function.................................................... 38
Task 7: Configure custom event types for the new Event Grid subscriptions ............................................................................... 39
Exercise 4: Monitor your functions with Application Insights ............................................................................................... 44
Help references ...................................................................................................................................................................................................... 44
Task 1: Provision an Application Insights instance .................................................................................................................................. 44
Task 2: Enable Application Insights integration in your Function Apps .......................................................................................... 45
Task 3: Use the Live Metrics Stream to monitor functions in real time ........................................................................................... 46

Task 4: Observe your functions dynamically scaling when resource-constrained ...................................................................... 52
Exercise 5: Explore your data in Azure Cosmos DB ................................................................................................................... 56
Help references ...................................................................................................................................................................................................... 56
Task 1: Use the Azure Cosmos DB Data Explorer ..................................................................................................................................... 56
Exercise 6: Create the data export workflow ............................................................................................................................... 59
Help references ...................................................................................................................................................................................................... 59
Task 1: Create the Logic App ............................................................................................................................................................................ 59
Exercise 7: Configure continuous deployment for your Function App .............................................................................. 68
Help references ...................................................................................................................................................................................................... 68
Task 1: Create a GitHub repository ................................................................................................................................................................ 68
Task 2: Add GitHub repository to your Visual Studio solution ........................................................................................................... 69
Task 3: Configure your Function App to use your GitHub repository for continuous deployment ..................................... 72
Task 4: Finish your ExportLicensePlates function code and push changes to GitHub to trigger deployment ................ 75
Exercise 8: Rerun the workflow and verify data export ........................................................................................................... 79
Task 1: Run the Logic App ................................................................................................................................................................................. 79
Task 2: View the exported CSV file ................................................................................................................................................................. 80
After the hands-on lab ......................................................................................................................................................................... 83
Task 1: Delete the Resource group in which you placed your Azure resources. ......................................................................... 83
Microsoft Cloud Workshop Serverless architecture
1 | P a g e ©2018 Microsoft Corporation
Serverless architecture
hands-on lab step-by-step Abstract and learning objectives
Setup and configure a serverless architecture within Azure using a combination of Azure Functions, Logic Apps, Event Grid,
Cosmos DB, and Azure Storage. The focus is on removing server management from the equation, breaking down the
solution into smaller components that are individually scalable, and allowing the customer to only pay for what they use.
Learning Objectives:
• Use a series of Azure Functions that independently scale and break down business logic to discrete components.
• Use computer vision algorithms within an Azure Function to accurately detect license plates in car images at scale.
• Provision and use Cosmos DB as a highly available NoSQL data store for processed data.
• Create a Logic App that contains a workflow to export processed license plates and conditionally send alerts
based on successful or unsuccessful operation.
• Use App Insights to monitor the serverless topology, observing how well the solution scales when under load.
• Implement a Continuous Deployment DevOps process to automatically publish changes to Function Apps.
Overview
The Serverless architecture hands-on lab is an exercise that will challenge you to implement an end-to-end scenario using
a supplied sample that is based on Microsoft Azure Functions, Azure Cosmos DB, Event Grid, and related services. The
scenario will include implementing compute, storage, workflows, and monitoring, using various components of Microsoft
Azure. The hands-on lab can be implemented on your own, but it is highly recommended to pair up with other members
at the lab to model a real-world experience and to allow each member to share their expertise for the overall solution.
Microsoft Cloud Workshop Serverless architecture
©2018 Microsoft Corporation 2 | P a g e
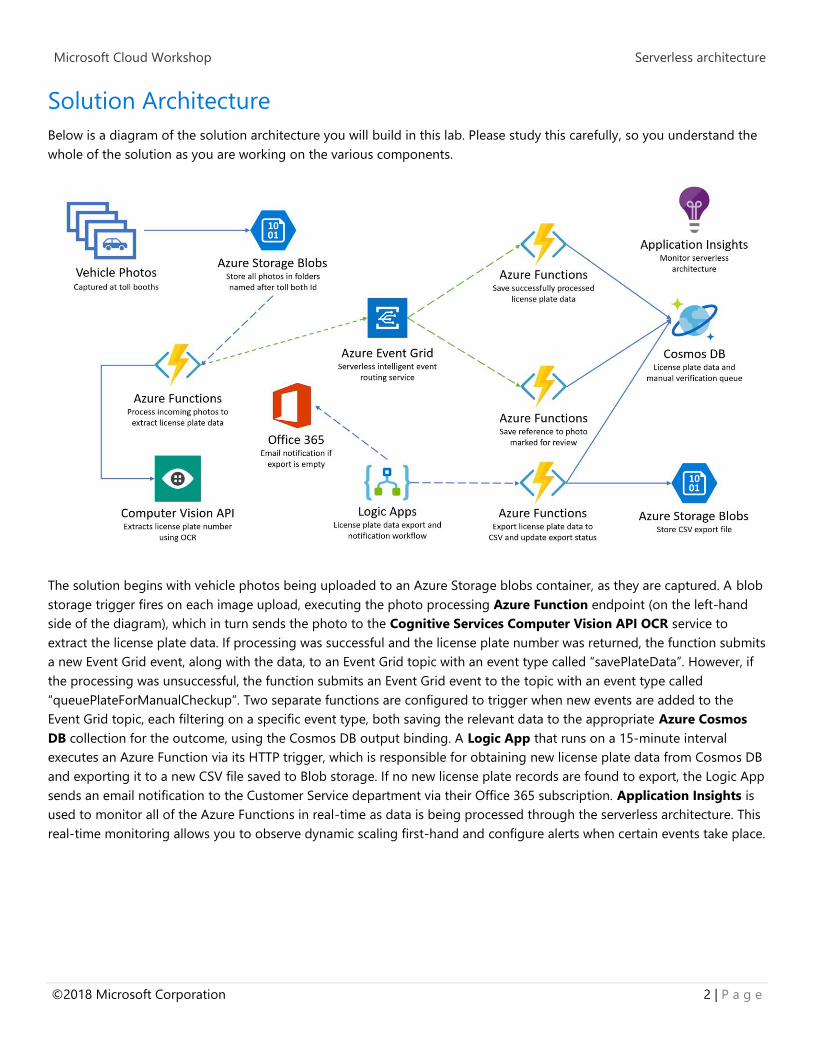
Solution Architecture
Below is a diagram of the solution architecture you will build in this lab. Please study this carefully, so you understand the
whole of the solution as you are working on the various components.
The solution begins with vehicle photos being uploaded to an Azure Storage blobs container, as they are captured. A blob
storage trigger fires on each image upload, executing the photo processing Azure Function endpoint (on the left-hand
side of the diagram), which in turn sends the photo to the Cognitive Services Computer Vision API OCR service to
extract the license plate data. If processing was successful and the license plate number was returned, the function submits
a new Event Grid event, along with the data, to an Event Grid topic with an event type called “savePlateData”. However, if
the processing was unsuccessful, the function submits an Event Grid event to the topic with an event type called
“queuePlateForManualCheckup”. Two separate functions are configured to trigger when new events are added to the
Event Grid topic, each filtering on a specific event type, both saving the relevant data to the appropriate Azure Cosmos
DB collection for the outcome, using the Cosmos DB output binding. A Logic App that runs on a 15-minute interval
executes an Azure Function via its HTTP trigger, which is responsible for obtaining new license plate data from Cosmos DB
and exporting it to a new CSV file saved to Blob storage. If no new license plate records are found to export, the Logic App
sends an email notification to the Customer Service department via their Office 365 subscription. Application Insights is
used to monitor all of the Azure Functions in real-time as data is being processed through the serverless architecture. This
real-time monitoring allows you to observe dynamic scaling first-hand and configure alerts when certain events take place.
Microsoft Cloud Workshop Serverless architecture
3 | P a g e ©2018 Microsoft Corporation
Requirements
• Microsoft Azure subscription (non-Microsoft subscription)
• Local machine or a virtual machine configured with (complete the day before the lab!):
o Visual Studio Community 2017 or greater, version 15.4 or later
▪ https://www.visualstudio.com/vs/
o Azure development workload for Visual Studio 2017
▪ https://docs.microsoft.com/azure/azure-functions/functions-develop-vs#prerequisites
o .NET Framework 4.7 runtime (or higher)
▪ https://www.microsoft.com/net/download/windows
• Office 365 account. If required, you can sign up for an Office 365 trial at:
o https://portal.office.com/Signup/MainSignup15.aspx?Dap=False&QuoteId=79a957e9-ad59-4d82-b787-
a46955934171&ali=1
• GitHub account. You can create a free account at https://github.com.

Microsoft Cloud Workshop Serverless architecture
©2018 Microsoft Corporation 4 | P a g e
Before the hands-on lab
Duration: 10 minutes
In this exercise, you will set up your environment you will use for the rest of the exercises. This will involve downloading
the sample application and creating your Azure resource group for the lab.
Task 1: Set up a development environment
If you do not have a machine with Visual Studio Community 2017 (or greater) and the Azure development workload,
complete this task.
• Create a virtual machine (VM) in Azure using the Visual Studio Community 2017 on Windows Server 2016 (x64)
image. A Windows 10 image will work as well.
Note: It is highly recommended to use a DS2 or D2 instance size for this VM.
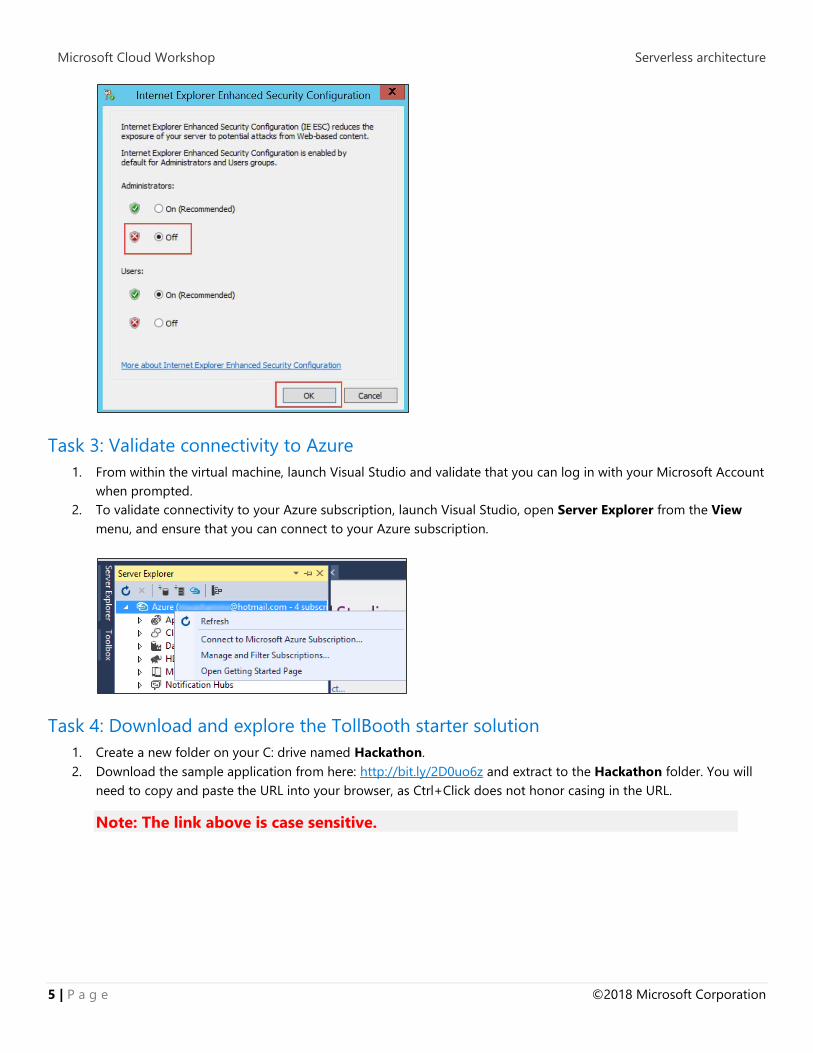
Task 2: Disable IE Enhanced Security
Note: Sometimes this image has IE ESC disabled. Sometimes it does not.
1. On the new VM you just created, select the Server Manager icon.
2. Select Local Server.
3. On the right side of the pane, select On by IE Enhanced Security Configuration.
4. Change to Off for Administrators and select OK.
Microsoft Cloud Workshop Serverless architecture
5 | P a g e ©2018 Microsoft Corporation
Task 3: Validate connectivity to Azure
1. From within the virtual machine, launch Visual Studio and validate that you can log in with your Microsoft Account
when prompted.
2. To validate connectivity to your Azure subscription, launch Visual Studio, open Server Explorer from the View
menu, and ensure that you can connect to your Azure subscription.
Task 4: Download and explore the TollBooth starter solution
1. Create a new folder on your C: drive named Hackathon.
2. Download the sample application from here: http://bit.ly/2D0uo6z and extract to the Hackathon folder. You will
need to copy and paste the URL into your browser, as Ctrl+Click does not honor casing in the URL.
Note: The link above is case sensitive.

Microsoft Cloud Workshop Serverless architecture
©2018 Microsoft Corporation 6 | P a g e
3. From the TollBooth folder under Hackathon, open the Visual Studio Solution file: TollBooth.sln.
The solution contains the following projects:
TollBooth The TollBooth Azure Function App project
UploadImages Local console project for uploading either a
handful of car photos, or 1,000 for testing
scalability of the serverless architecture
4. Go back to the Hackathon folder and open the license plates subfolder. It contains sample license plate photos
used for testing out the solution. One of the photos is guaranteed to fail OCR processing, which is meant to show
how the workload is designed to handle such failures. The copyfrom folder is used by the UploadImages project
as a basis for the 1,000 photo upload for testing scalability.
Task 5: Create a new Azure Resource group
1. Within the Azure Management Portal, open the Resource groups tile and
select Add.
2. Specify the name of the resource group as ServerlessArchitecture, and choose the Azure region to which you
want to deploy the lab. This resource group will be used throughout the rest of the lab. Select Create to create the
resource group.
Microsoft Cloud Workshop Serverless architecture
7 | P a g e ©2018 Microsoft Corporation
Exercise 1: Azure data, storage, and serverless environment setup
Duration: 30 minutes
You must provision a few resources in Azure before you start developing the solution. Ensure all resources use the same
resource group for easier cleanup.
In this exercise, you will provision a blob storage account using the Hot tier, and create two containers within to store
uploaded photos and exported CSV files. You will then provision two Function Apps instances, one you will deploy from
Visual Studio, and the other you will manage using the Azure portal. Next, you will create a new Event Grid topic. After
that, you will create an Azure Cosmos DB account with two collections. Finally, you will provision a new Cognitive Services
Computer Vision API service for applying object character recognition (OCR) on the license plates.
Help references
Creating a storage
account (blob hot tier)
https://docs.microsoft.com/en-us/azure/storage/common/storage-create-
storage-account?toc=%2fazure%2fstorage%2fblobs%2ftoc.json#create-a-
storage-account
Creating a function app https://docs.microsoft.com/en-us/azure/azure-functions/functions-create-
first-azure-function#create-a-function-app
Concepts in Event Grid https://docs.microsoft.com/en-us/azure/event-grid/concepts
Creating an Azure
Cosmos DB account
https://docs.microsoft.com/en-us/azure/cosmos-db/tutorial-develop-sql-
api-dotnet#create-an-azure-cosmos-db-account
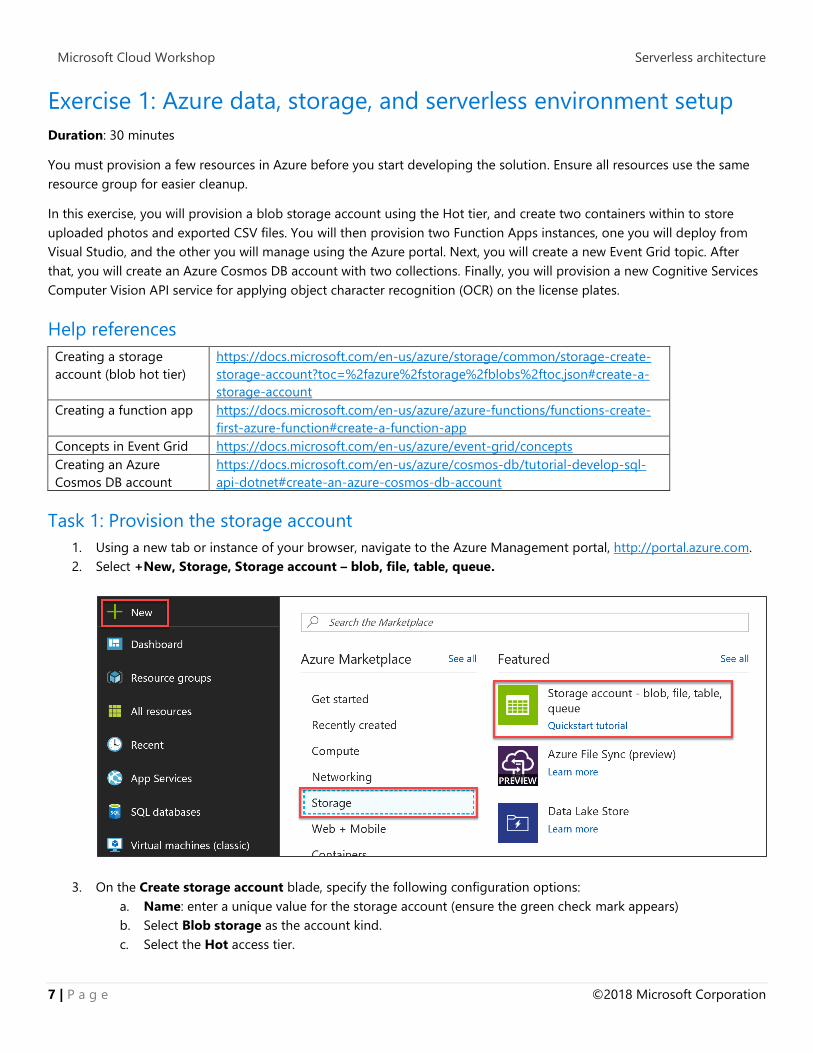
Task 1: Provision the storage account
1. Using a new tab or instance of your browser, navigate to the Azure Management portal, http://portal.azure.com.
2. Select +New, Storage, Storage account – blob, file, table, queue.
3. On the Create storage account blade, specify the following configuration options:
a. Name: enter a unique value for the storage account (ensure the green check mark appears)
b. Select Blob storage as the account kind.
c. Select the Hot access tier.

Microsoft Cloud Workshop Serverless architecture
©2018 Microsoft Corporation 8 | P a g e
d. For Resource group, select the Use existing radio button, and specify the ServerlessArchitecture
resource group.
e. Ensure the Location is the same region as the resource group.
4. Select Create.
Microsoft Cloud Workshop Serverless architecture
9 | P a g e ©2018 Microsoft Corporation
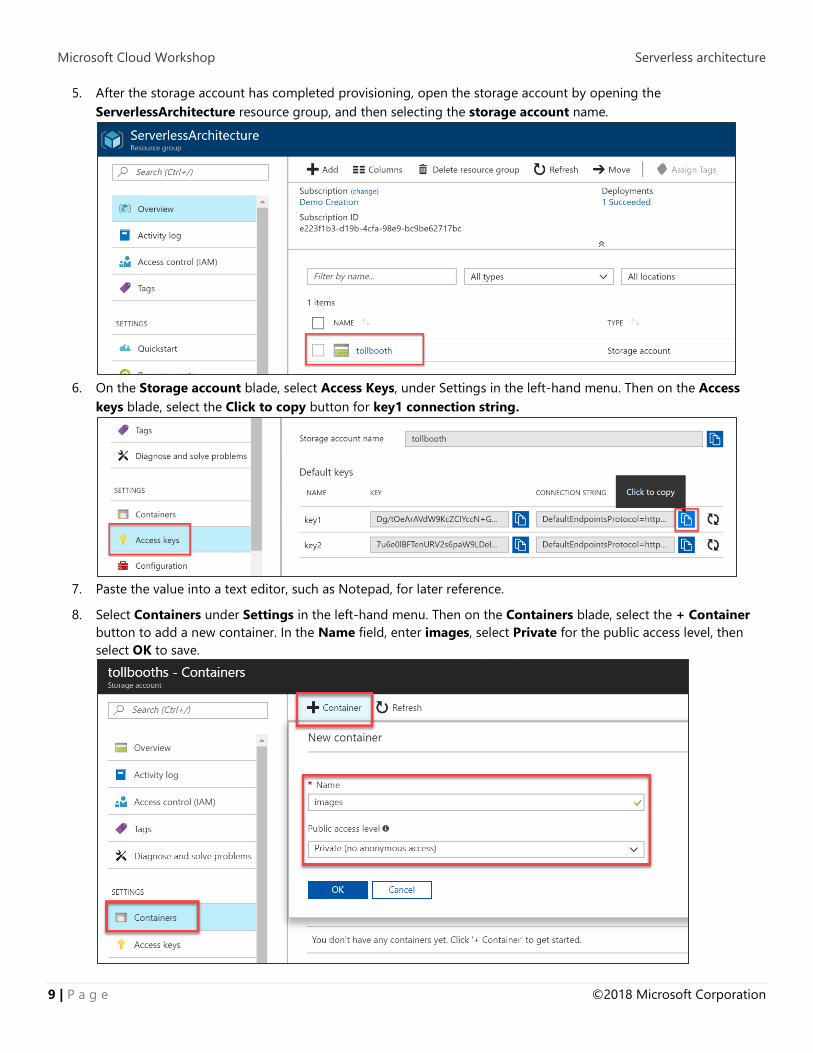
5. After the storage account has completed provisioning, open the storage account by opening the
ServerlessArchitecture resource group, and then selecting the storage account name.
6. On the Storage account blade, select Access Keys, under Settings in the left-hand menu. Then on the Access
keys blade, select the Click to copy button for key1 connection string.
7. Paste the value into a text editor, such as Notepad, for later reference.
8. Select Containers under Settings in the left-hand menu. Then on the Containers blade, select the + Container
button to add a new container. In the Name field, enter images, select Private for the public access level, then
select OK to save.

Microsoft Cloud Workshop Serverless architecture
©2018 Microsoft Corporation 10 | P a g e
9. Repeat these steps to create a container named export.
Task 2: Provision the Function Apps
1. Navigate to the Azure Management portal, http://portal.azure.com.
2. Select + New, then enter function into the search box on top. Select Function App from the results.
3. Select the Create button on the Function App overview blade.
4. On the Create Function App blade, specify the following configuration options:
a. Name: unique value for the App name (ensure the green check mark appears). Provide a name similar to
TollBoothEvents.
b. Specify the Resource Group ServerlessArchitecture.
c. Select the Consumption Plan Hosting Plan.
d. Select the same location as your Resource Group.
e. Leave the storage option as create new.
f. Ensure Off is selected for Application Insights (we’ll add this later).

Microsoft Cloud Workshop Serverless architecture
11 | P a g e ©2018 Microsoft Corporation
5. Select Create.
6. Repeat steps 1-5 to create a second Function App, named TollBoothFunctionApp or similar.
Task 3: Provision the Event Grid topic
1. Navigate to the Azure Management portal, http://portal.azure.com.
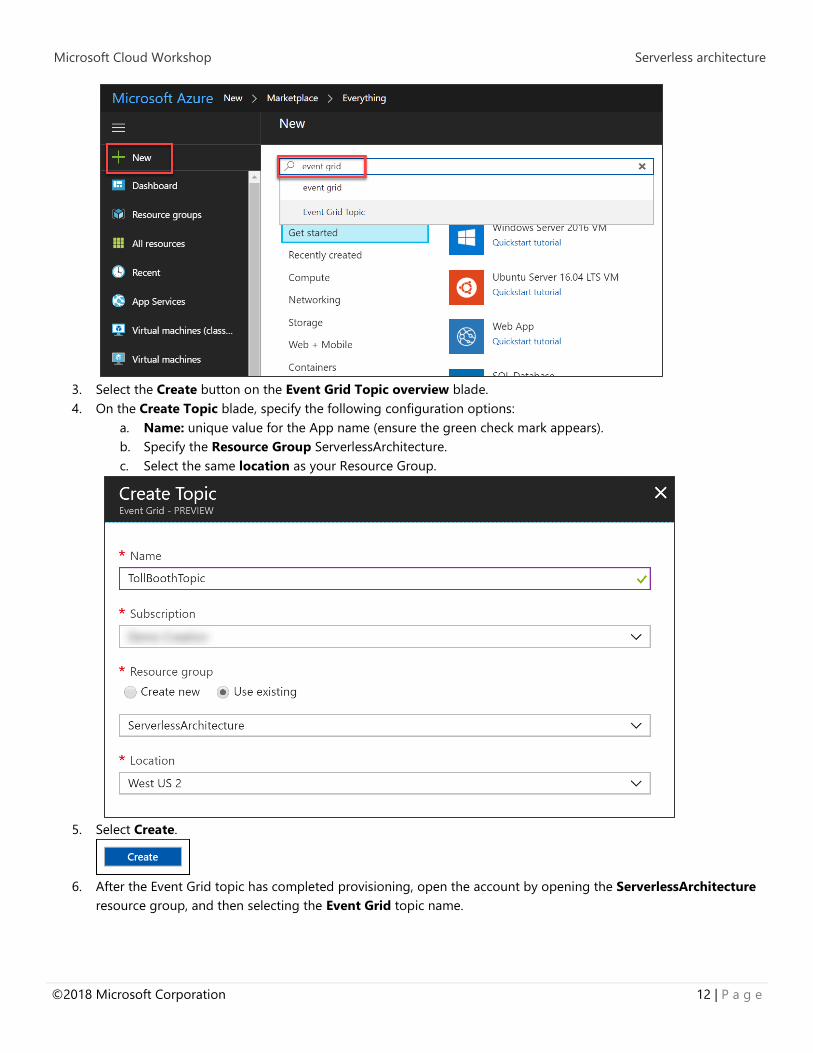
2. Select + New, then enter event grid into the search box on top. Select Event Grid Topic from the results.
Microsoft Cloud Workshop Serverless architecture
©2018 Microsoft Corporation 12 | P a g e
3. Select the Create button on the Event Grid Topic overview blade.
4. On the Create Topic blade, specify the following configuration options:
a. Name: unique value for the App name (ensure the green check mark appears).
b. Specify the Resource Group ServerlessArchitecture.
c. Select the same location as your Resource Group.
5. Select Create.
6. After the Event Grid topic has completed provisioning, open the account by opening the ServerlessArchitecture
resource group, and then selecting the Event Grid topic name.

Microsoft Cloud Workshop Serverless architecture
13 | P a g e ©2018 Microsoft Corporation
7. Select Overview in the left-hand menu, and then copy the Topic Endpoint value.
8. Select Access Keys under Settings in the left-hand menu.
9. Within the Access Keys blade, copy the Key 1 value.
10. Paste the values into a text editor, such as Notepad, for later reference.
Task 4: Provision the Azure Cosmos DB account
1. Navigate to the Azure Management portal, http://portal.azure.com.
2. Select + New, Databases, Azure Cosmos DB.

Microsoft Cloud Workshop Serverless architecture
©2018 Microsoft Corporation 14 | P a g e
3. On the Create new Azure Cosmos DB account blade, specify the following configuration options:
a. Name: unique value for the App name (ensure the green check mark appears).
b. Select the SQL API.
c. Specify the Resource Group ServerlessArchitecture.
d. Select the same location as your Resource Group if available. Otherwise, select the next closest region.

Microsoft Cloud Workshop Serverless architecture
15 | P a g e ©2018 Microsoft Corporation
e. Check geo-redundancy.
4. Select Create.
5. After the Azure Cosmos DB account has completed provisioning, open the account by opening the
ServerlessArchitecture resource group, and then selecting the Azure Cosmos DB account name.
6. On the Cosmos DB overview blade, select + Add Collection.
7. On the Add Collection blade, specify the following configuration options:
a. Enter LicensePlates for the database id.
b. Enter Processed for the collection id.
c. Storage capacity: Fixed.

Microsoft Cloud Workshop Serverless architecture
©2018 Microsoft Corporation 16 | P a g e
d. Throughput: 5000.
8. Select OK.
9. Select New Collection to add another collection.
10. On the Add Collection blade, specify the following configuration options:
a. Enter LicensePlates for the database id.
b. Enter NeedsManualReview for the collection id.
c. Storage capacity: Fixed.

Microsoft Cloud Workshop Serverless architecture
17 | P a g e ©2018 Microsoft Corporation
d. Throughput: 5000.
11. Select OK.
12. Select Keys under Settings in the left-hand menu.
Microsoft Cloud Workshop Serverless architecture
©2018 Microsoft Corporation 18 | P a g e
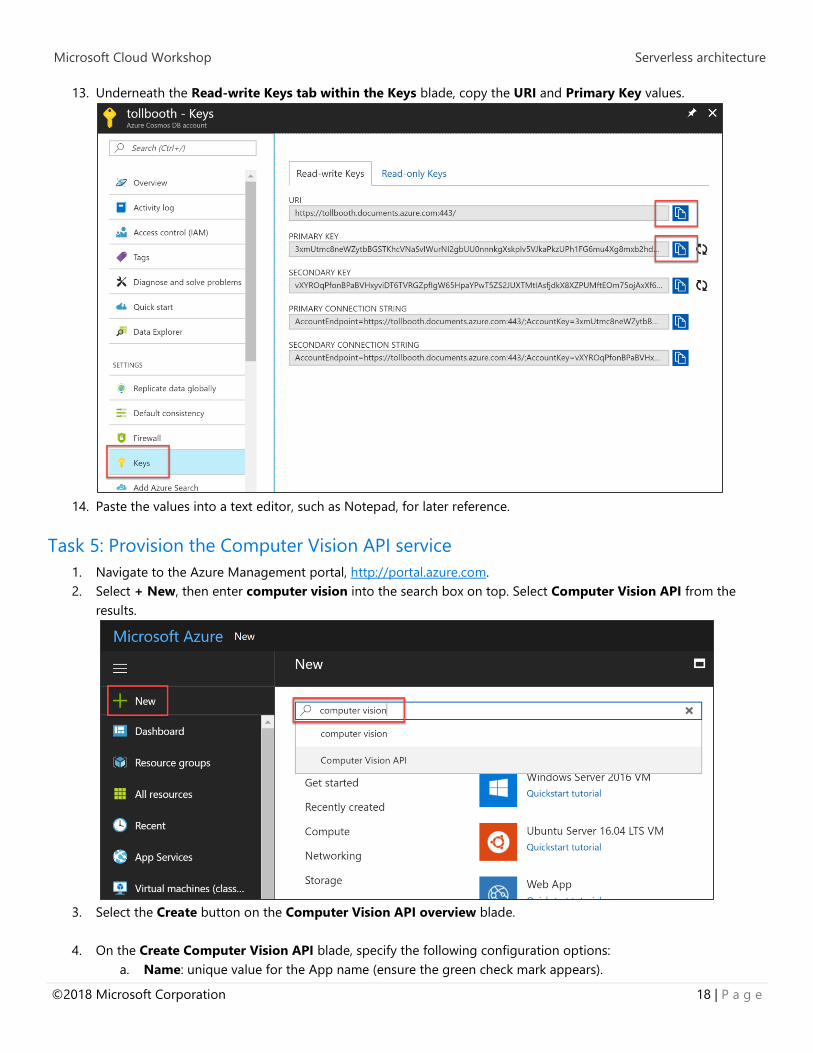
13. Underneath the Read-write Keys tab within the Keys blade, copy the URI and Primary Key values.
14. Paste the values into a text editor, such as Notepad, for later reference.
Task 5: Provision the Computer Vision API service
1. Navigate to the Azure Management portal, http://portal.azure.com.
2. Select + New, then enter computer vision into the search box on top. Select Computer Vision API from the
results.
3. Select the Create button on the Computer Vision API overview blade.
4. On the Create Computer Vision API blade, specify the following configuration options:
a. Name: unique value for the App name (ensure the green check mark appears).

Microsoft Cloud Workshop Serverless architecture
19 | P a g e ©2018 Microsoft Corporation
b. Specify the Resource Group ServerlessArchitecture.
c. Select the same location as your Resource Group.
d. Select the S1 pricing tier.
5. Select Create.
6. After the Computer Vision API has completed provisioning, open the service by opening the
ServerlessArchitecture resource group, and then selecting the Computer Vision API service name.

Microsoft Cloud Workshop Serverless architecture
©2018 Microsoft Corporation 20 | P a g e
7. Select Overview in the left-hand menu, and then copy the Endpoint value.
8. Select Keys under Resource Management in the left-hand menu.
9. Within the Keys blade, copy the Key 1 value.
10. Paste the values into a text editor, such as Notepad, for later reference.

Microsoft Cloud Workshop Serverless architecture
21 | P a g e ©2018 Microsoft Corporation
Exercise 2: Develop and publish the photo processing and data
export functions
Duration: 45 minutes
Use Visual Studio 2017 and its integrated Azure Functions tooling to develop and debug the functions locally, and then
publish them to Azure. The starter project solution, TollBooths, contains most of the code needed. You will add in the
missing code before deploying to Azure.
Help references
Code and test Azure
Functions locally
https://docs.microsoft.com/en-us/azure/azure-functions/functions-run-local
Task 1: Configure application settings
In this task, you will apply application settings using the Microsoft Azure Portal. You will then add the application settings
to the TollBooth Starter Project.
1. Using a new tab or instance of your browser navigate to the Azure Management portal, http://portal.azure.com.
2. Open the ServerlessArchitecture resource group, and then select the Azure Function App you created whose
name ends with FunctionApp. If you did not use this naming convention, that’s fine. Just be sure to make note of
the name so you can distinguish it from the Function App you will be developing using the portal later on.

Microsoft Cloud Workshop Serverless architecture
©2018 Microsoft Corporation 22 | P a g e
3. Select on Application settings on the Overview pane.
4. Scroll down to the Application settings section. Use the + Add new setting link to create the following
additional Key / Value pairs (the key names must exactly match those found in the table below):
Application Key Value
computerVisionApiUrl Computer Vision API endpoint you copied earlier. Append /ocr to the
end. Example: https://westus2.api.cognitive.microsoft.com/vision/v1.0/ocr
computerVisionApiKey Computer Vision API key
eventGridTopicEndpoint Event Grid Topic endpoint
eventGridTopicKey Event Grid Topic access key
cosmosDBEndPointUrl Cosmos DB URI
cosmosDBAuthorizationKey Cosmos DB Primary Key
cosmosDBDatabaseId Cosmos DB database id (LicensePlates)
cosmosDBCollectionId Cosmos DB processed collection id (Processed)
exportCsvContainerName Blob storage CSV export container name (export)
blobStorageConnection Blob storage connection string

Microsoft Cloud Workshop Serverless architecture
23 | P a g e ©2018 Microsoft Corporation
5. Select Save.
6. Optional steps, only if you wish to debug the functions locally on your development machine:
a. Update the local.settings.json file with the same values.
b. Update the AzureWebJobsStorage and AzureWebJobsDashboard values in local.settings.json with those
found under Application settings for the Function App. Save your changes.
Task 2: Finish the ProcessImage function
There are a few components within the starter project that must be completed, marked as TODO in the code. The first set
of TODO items we will address are in the ProcessImage function, the FindLicensePlateText class that calls the Computer
Vision API, and finally the SendToEventGrid.cs class, which is responsible for sending processing results to the Event Grid
topic you created earlier.
Important Note: Do not update the version of any NuGet package. This solution is built to function with the NuGet
package versions currently defined within. Updating these packages to newer versions could cause unexpected results.
1. Navigate to the TollBooth project using the Solution Explorer of Visual Studio.

Microsoft Cloud Workshop Serverless architecture
©2018 Microsoft Corporation 24 | P a g e
2. From the Visual Studio View menu, select Task List.
3. There you will see a list of TODO tasks, where each task represents one line of code that needs to be completed.
4. Open ProcessImage.cs. Notice that the Run method is decorated with the FunctionName attribute, which sets the
name of the Azure Function to “ProcessImage”. This has a BlobTrigger that watches for new blobs being added to
the images container of the storage account that was created in Exercise 1.
5. The following code represents the completed task in ProcessImage.cs:
// TODO 1: Set the licensePlateText value by awaiting a new FindLicensePlateText.GetLicensePlate method. licensePlateText = await new FindLicensePlateText(log,
_client).GetLicensePlate(licensePlateImage);
6. Open FindLicensePlateText.cs. This class is responsible for contacting the Computer Vision API to find and
extract the license plate text from the photo, using OCR. Notice that this class also shows how you can implement
a resiliency pattern using Polly. This is useful for ensuring that you do not overload downstream services, in this
case, the Computer Vision API. This will be demonstrated later on when visualizing the Function’s scalability.

Microsoft Cloud Workshop Serverless architecture
25 | P a g e ©2018 Microsoft Corporation
7. The following code represents the completed task in FindLicensePlateText.cs:
// TODO 2: Populate the below two variables with the correct AppSettings properties. var uriBase = ConfigurationManager.AppSettings["computerVisionApiUrl"]; var apiKey = ConfigurationManager.AppSettings["computerVisionApiKey"];
8. Open SendToEventGrid.cs. This class is responsible for sending an Event to the Event Grid topic, including the
event type and license plate data. Event listeners will use the event type to filter and act on the events they need
to process. Make note of the event types defined here (the first parameter passed into the Send method), as they
will be used later on when creating new functions in the second Function App you provisioned earlier.
9. The following code represents the completed tasks in SendToEventGrid.cs:
// TODO 3: Modify send method to include the proper eventType name value for saving plate data. await Send("savePlateData", "TollBooth/CustomerService", data); // TODO 4: Modify send method to include the proper eventType name value for queuing plate for manual review. await Send("queuePlateForManualCheckup", "TollBooth/CustomerService", data);
Task 3: Publish the Function App from Visual Studio
In this task, you will publish the Function App from the starter project in Visual Studio to the existing Function App you
provisioned in Azure.
1. Navigate to the TollBooth project using the Solution Explorer of Visual Studio.
2. Right-click the TollBooth project and select Publish… from the context menu.

Microsoft Cloud Workshop Serverless architecture
©2018 Microsoft Corporation 26 | P a g e
3. In the Publish window that appears, make sure Azure Function App is selected, choose the Select Existing radio
button, then select Publish.
4. In the App Service form, select your Subscription, select Resource Group under View, then expand your
ServerlessArchitecture resource group and select the Function App whose name ends with FunctionApp.
Whatever you named the Function App when you provisioned it is fine. Just make sure it is the same one to which
you applied the Application Settings in Task 1 of this exercise.

Microsoft Cloud Workshop Serverless architecture
27 | P a g e ©2018 Microsoft Corporation
5. After you select the Function App, select OK.
6. Watch the Output window in Visual Studio as the Function App publishes. When it is finished, you should see a
message that says, “Publish Succeeded.”
7. Using a new tab or instance of your browser navigate to the Azure Management portal, http://portal.azure.com.
8. Open the ServerlessArchitecture resource group, then select the Azure Function App to which you just
published.

Microsoft Cloud Workshop Serverless architecture
©2018 Microsoft Corporation 28 | P a g e
9. Expand the functions underneath your Function App in the left-hand menu. You should see both functions you
just published from the Visual Studio solution listed.

Microsoft Cloud Workshop Serverless architecture
29 | P a g e ©2018 Microsoft Corporation
Exercise 3: Create functions in the portal
Duration: 45 minutes
Create two new Azure Functions written in Node.js, using the Azure portal. These will be triggered by Event Grid and
output to Azure Cosmos DB to save the results of license plate processing done by the ProcessImage function.
Help references
Create your first function
in the Azure portal
https://docs.microsoft.com/en-us/azure/azure-functions/functions-create-
first-azure-function
Store unstructured data
using Azure Functions
and Azure Cosmos DB
https://docs.microsoft.com/en-us/azure/azure-functions/functions-
integrate-store-unstructured-data-cosmosdb
Task 1: Create function to save license plate data to Azure Cosmos DB
In this task, you will create a new Node.js function triggered by Event Grid and that outputs successfully processed license
plate data to Azure Cosmos DB.
1. Using a new tab or instance of your browser navigate to the Azure Management portal, http://portal.azure.com.
2. Open the ServerlessArchitecture resource group, then select the Azure Function App you created whose name
ends with Events. If you did not use this naming convention, make sure you select the Function App that you did
not deploy to in the previous exercise.
3. Select Functions in the left-hand menu. In the Functions blade, select + New Function.
Microsoft Cloud Workshop Serverless architecture
©2018 Microsoft Corporation 30 | P a g e
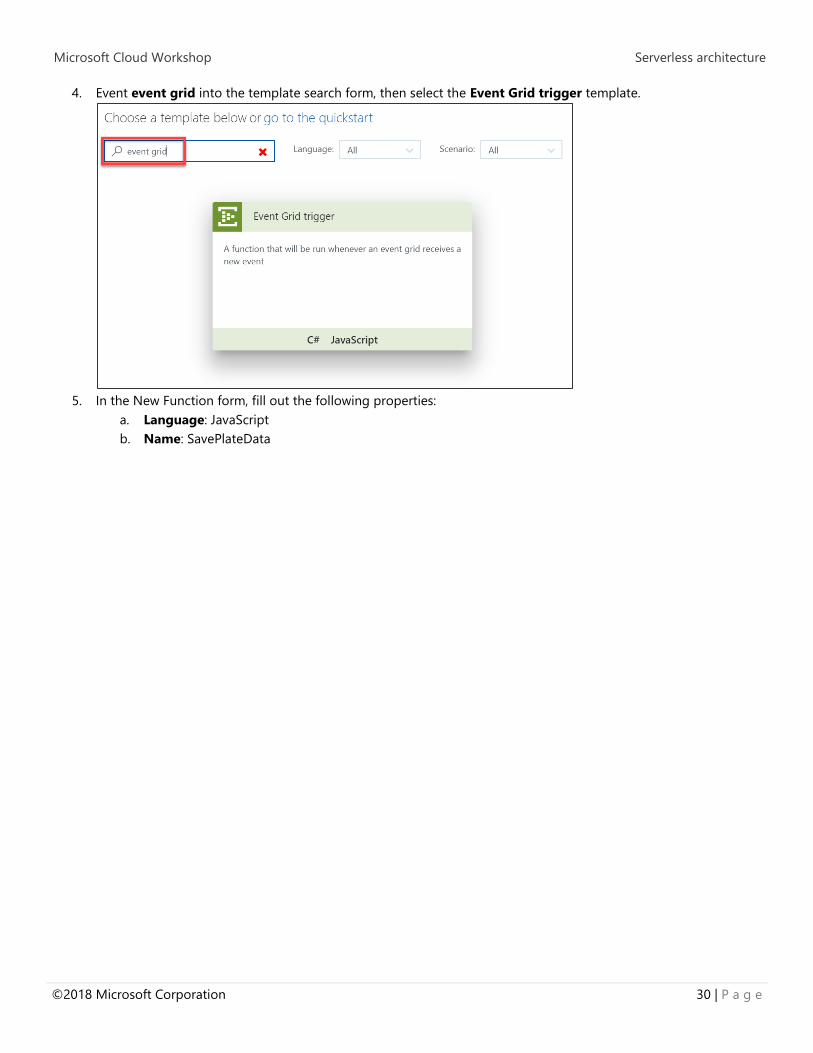
4. Event event grid into the template search form, then select the Event Grid trigger template.
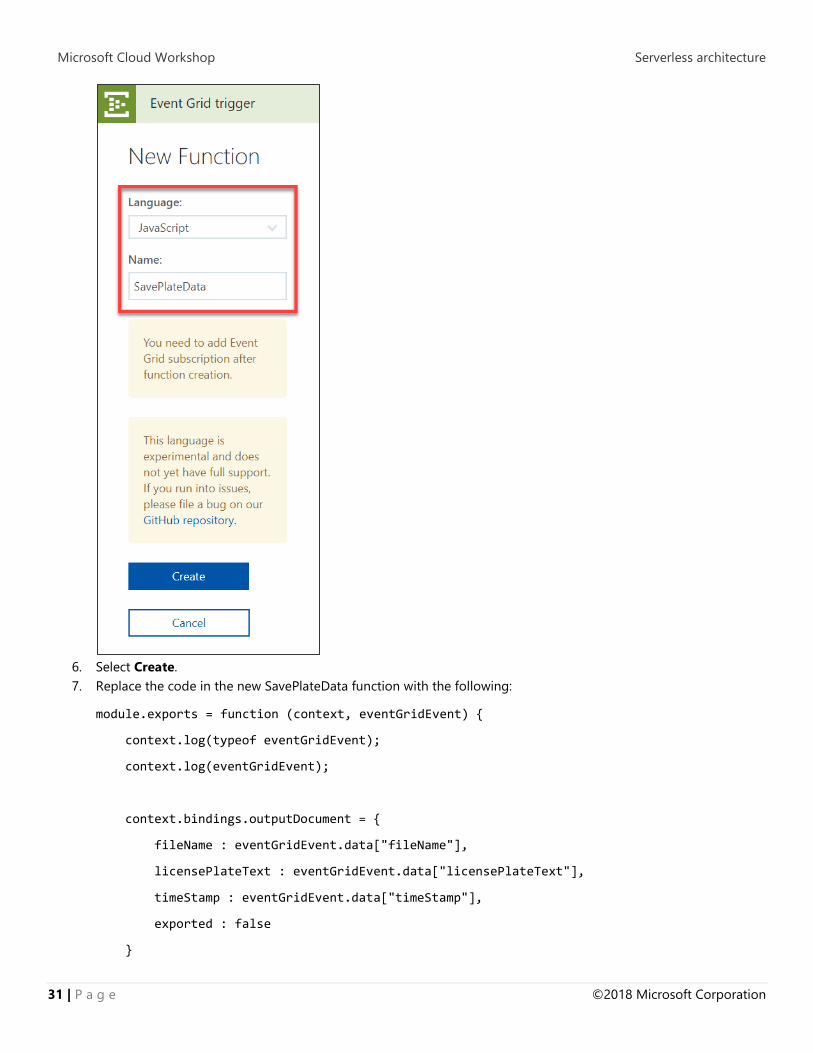
5. In the New Function form, fill out the following properties:
a. Language: JavaScript
b. Name: SavePlateData
Microsoft Cloud Workshop Serverless architecture
31 | P a g e ©2018 Microsoft Corporation
6. Select Create.
7. Replace the code in the new SavePlateData function with the following:
module.exports = function (context, eventGridEvent) {
context.log(typeof eventGridEvent);
context.log(eventGridEvent);
context.bindings.outputDocument = {
fileName : eventGridEvent.data["fileName"],
licensePlateText : eventGridEvent.data["licensePlateText"],
timeStamp : eventGridEvent.data["timeStamp"],
exported : false
}

Microsoft Cloud Workshop Serverless architecture
©2018 Microsoft Corporation 32 | P a g e
context.done();
};
8. Select Save.
Task 2: Add an Event Grid subscription to the SavePlateData function
In this task, you will add an Event Grid subscription to the SavePlateData function. This will ensure that the events sent to
the Event Grid topic containing the savePlateData event type are routed to this function.
1. With the SavePlateData function open, select Add Event Grid subscription.
2. On the Create Event Subscription blade, specify the following configuration options:
a. Name: unique value for the App name (ensure the green check mark appears). Provide a name similar to
saveplatedatasub.
b. Select Event Grid Topics under Topic Type.
c. Select your subscription and ServerlessArchitecture resource group.
d. Select your Event Grid topic under Instance.
e. Check Subscribe to all event types. You will enter a custom event type later.

Microsoft Cloud Workshop Serverless architecture
33 | P a g e ©2018 Microsoft Corporation
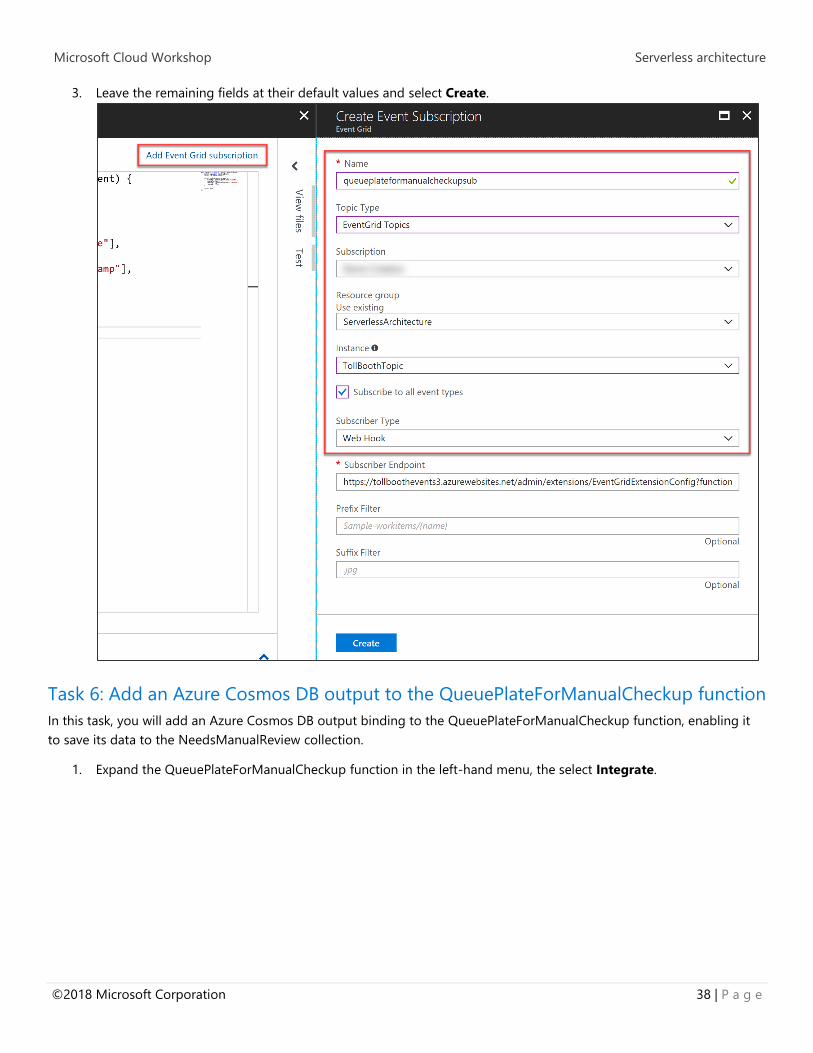
3. Leave the remaining fields at their default values and select Create.
Task 3: Add an Azure Cosmos DB output to the SavePlateData function
In this task, you will add an Azure Cosmos DB output binding to the SavePlateData function, enabling it to save its data to
the Processed collection.
1. Expand the SavePlateData function in the left-hand menu, the select Integrate.
Microsoft Cloud Workshop Serverless architecture
©2018 Microsoft Corporation 34 | P a g e
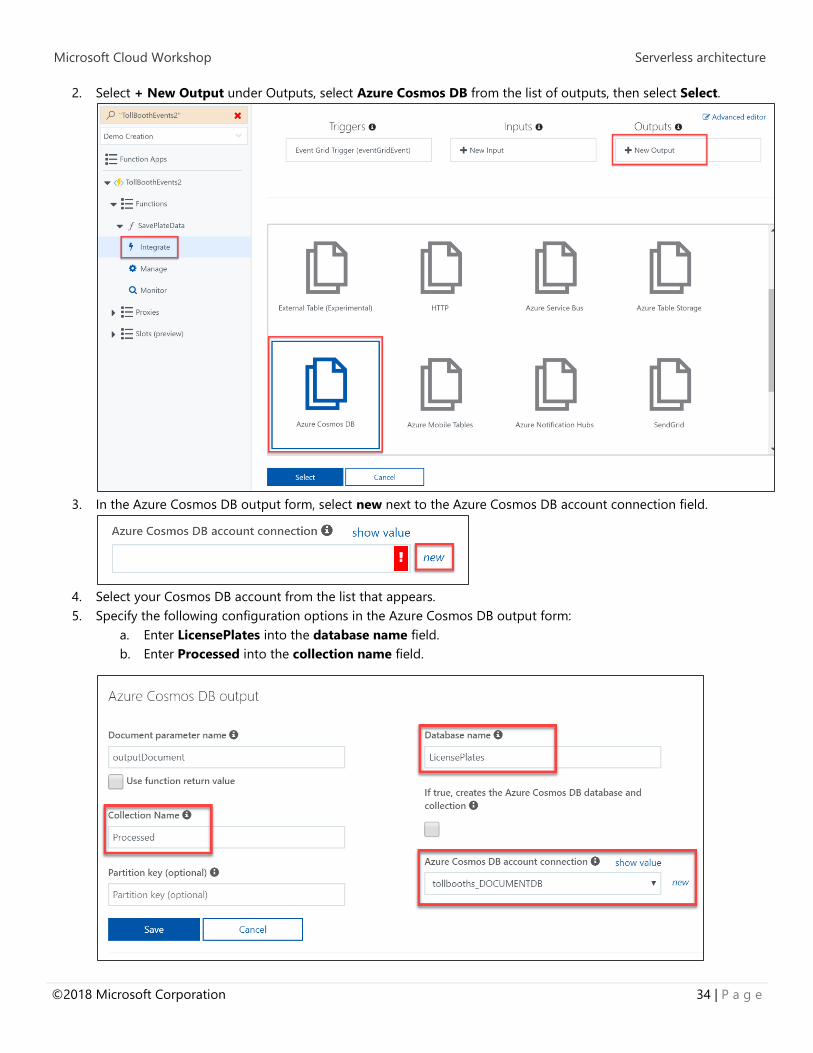
2. Select + New Output under Outputs, select Azure Cosmos DB from the list of outputs, then select Select.
3. In the Azure Cosmos DB output form, select new next to the Azure Cosmos DB account connection field.
4. Select your Cosmos DB account from the list that appears.
5. Specify the following configuration options in the Azure Cosmos DB output form:
a. Enter LicensePlates into the database name field.
b. Enter Processed into the collection name field.

Microsoft Cloud Workshop Serverless architecture
35 | P a g e ©2018 Microsoft Corporation
6. Select Save.
Task 4: Create function to save manual verification info to Azure Cosmos DB
In this task, you will create a new Node.js function triggered by Event Grid and outputs information about photos that
need to be manually verified to Azure Cosmos DB.
1. Using a new tab or instance of your browser navigate to the Azure Management portal, http://portal.azure.com.
2. Open the ServerlessArchitecture resource group, then select the Azure Function App you created whose name
ends with Events. If you did not use this naming convention, make sure you select the Function App that you did
not deploy to in the previous exercise.
3. Select Functions in the left-hand menu. In the Functions blade, select + New Function.
4. Enter event grid into the template search form, then select the Event Grid trigger template.
5. In the New Function form, fill out the following properties:
a. Language: JavaScript
b. Name: QueuePlateForManualCheckup

Microsoft Cloud Workshop Serverless architecture
©2018 Microsoft Corporation 36 | P a g e
6. Select Create.
7. Replace the code in the new QueuePlateForManualCheckup function with the following:
module.exports = function (context, eventGridEvent) {
context.log(typeof eventGridEvent);
context.log(eventGridEvent);
context.bindings.outputDocument = {
fileName : eventGridEvent.data["fileName"],
licensePlateText : "",
timeStamp : eventGridEvent.data["timeStamp"],
resolved : false
}

Microsoft Cloud Workshop Serverless architecture
37 | P a g e ©2018 Microsoft Corporation
context.done();
};
8. Select Save.
Task 5: Add an Event Grid subscription to the QueuePlateForManualCheckup function
In this task, you will add an Event Grid subscription to the QueuePlateForManualCheckup function. This will ensure that the
events sent to the Event Grid topic containing the queuePlateForManualCheckup event type are routed to this function.
1. With the QueuePlateForManualCheckup function open, select Add Event Grid subscription.
2. On the Create Event Subscription blade, specify the following configuration options:
a. Name: unique value for the App name (ensure the green check mark appears). Provide a name similar to
queueplateformanualcheckupsub.
b. Select Event Grid Topics under Topic Type.
c. Select your subscription and ServerlessArchitecture resource group.
d. Select your Event Grid topic under Instance.
e. Check Subscribe to all event types. You will enter a custom event type later.
Microsoft Cloud Workshop Serverless architecture
©2018 Microsoft Corporation 38 | P a g e
3. Leave the remaining fields at their default values and select Create.
Task 6: Add an Azure Cosmos DB output to the QueuePlateForManualCheckup function
In this task, you will add an Azure Cosmos DB output binding to the QueuePlateForManualCheckup function, enabling it
to save its data to the NeedsManualReview collection.
1. Expand the QueuePlateForManualCheckup function in the left-hand menu, the select Integrate.
Microsoft Cloud Workshop Serverless architecture
39 | P a g e ©2018 Microsoft Corporation
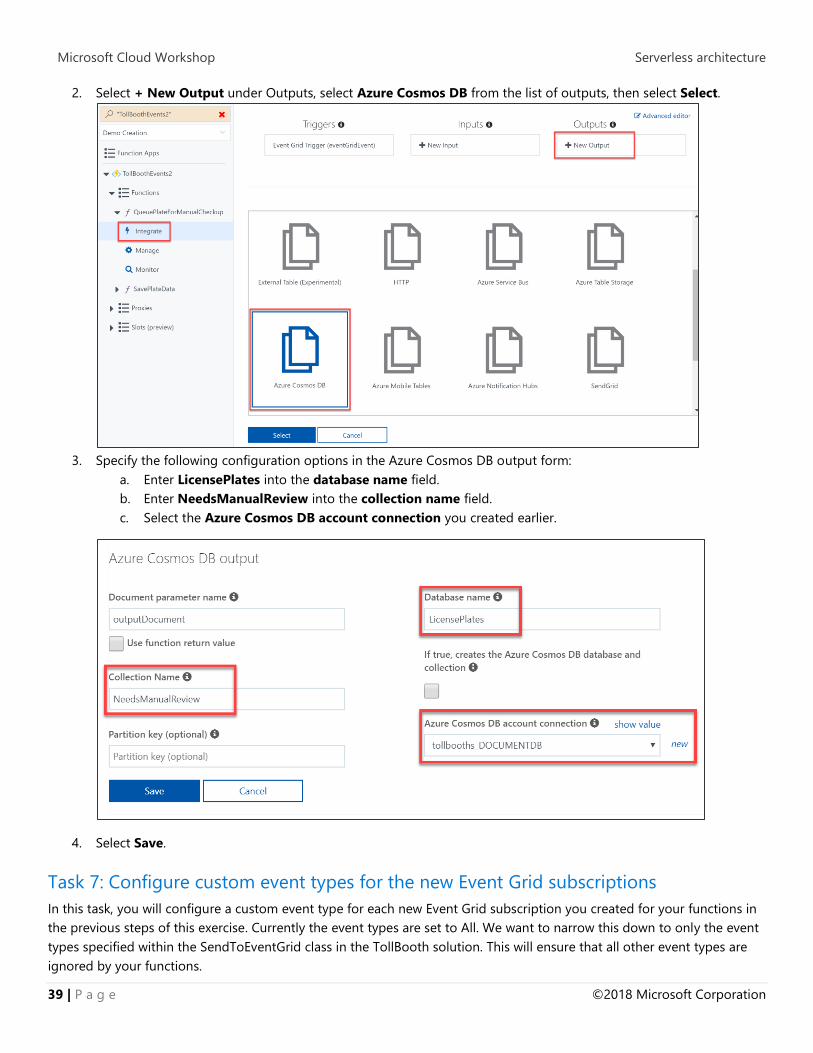
2. Select + New Output under Outputs, select Azure Cosmos DB from the list of outputs, then select Select.
3. Specify the following configuration options in the Azure Cosmos DB output form:
a. Enter LicensePlates into the database name field.
b. Enter NeedsManualReview into the collection name field.
c. Select the Azure Cosmos DB account connection you created earlier.
4. Select Save.
Task 7: Configure custom event types for the new Event Grid subscriptions
In this task, you will configure a custom event type for each new Event Grid subscription you created for your functions in
the previous steps of this exercise. Currently the event types are set to All. We want to narrow this down to only the event
types specified within the SendToEventGrid class in the TollBooth solution. This will ensure that all other event types are
ignored by your functions.
Microsoft Cloud Workshop Serverless architecture
©2018 Microsoft Corporation 40 | P a g e
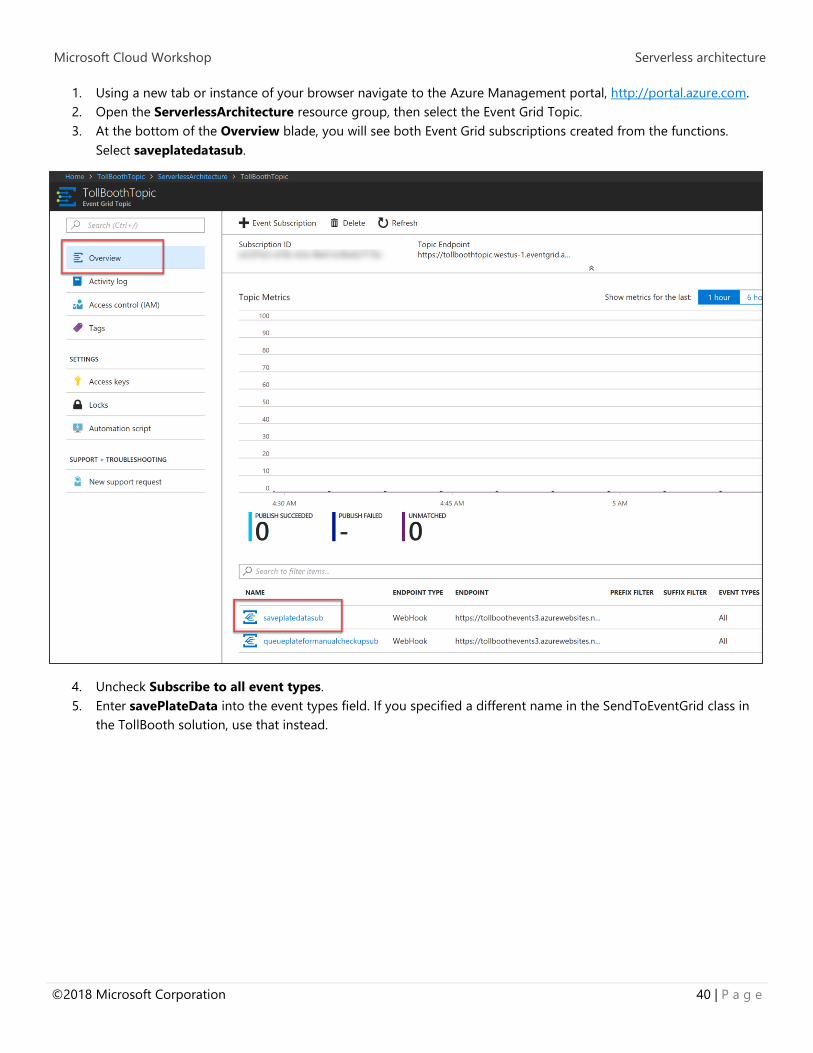
1. Using a new tab or instance of your browser navigate to the Azure Management portal, http://portal.azure.com.
2. Open the ServerlessArchitecture resource group, then select the Event Grid Topic.
3. At the bottom of the Overview blade, you will see both Event Grid subscriptions created from the functions.
Select saveplatedatasub.
4. Uncheck Subscribe to all event types.
5. Enter savePlateData into the event types field. If you specified a different name in the SendToEventGrid class in
the TollBooth solution, use that instead.

Microsoft Cloud Workshop Serverless architecture
41 | P a g e ©2018 Microsoft Corporation
6. Select Save Changes.
7. Select the queueplateformanualcheckupsub Event Grid subscription at the bottom of the Overview blade.

Microsoft Cloud Workshop Serverless architecture
©2018 Microsoft Corporation 42 | P a g e
8. Uncheck Subscribe to all event types.
9. Enter queuePlateForManualCheckup into the event types field. If you specified a different name in the
SendToEventGrid class in the TollBooth solution, use that instead.

Microsoft Cloud Workshop Serverless architecture
43 | P a g e ©2018 Microsoft Corporation
10. Select Save Changes.

Microsoft Cloud Workshop Serverless architecture
©2018 Microsoft Corporation 44 | P a g e
Exercise 4: Monitor your functions with Application Insights
Duration: 45 minutes
Application Insights can be integrated with Azure Function Apps to provide robust monitoring for your functions. In this
exercise, you will provision a new Application Insights account and configure your Function Apps to send telemetry to it.
Help references
Monitor Azure Functions
using Application
Insights
https://docs.microsoft.com/en-us/azure/azure-functions/functions-
monitoring
Live Metrics Stream:
Monitor & Diagnose
with 1-second latency
https://docs.microsoft.com/en-us/azure/application-insights/app-insights-
live-stream
Task 1: Provision an Application Insights instance
1. Navigate to the Azure Management portal, http://portal.azure.com.
2. Select + New, then type application insights into the search box on top. Select Application Insights from the
results.
3. Select the Create button on the Application Insights overview blade.
4. On the Create Function App blade, specify the following configuration options:
a. Name: unique value for the App name (ensure the green check mark appears).
b. Select ASP.NET web application for the Application Type.
c. Specify the Resource Group ServerlessArchitecture.
d. Select the same location as your Resource Group.

Microsoft Cloud Workshop Serverless architecture
45 | P a g e ©2018 Microsoft Corporation
5. Select Create.
Task 2: Enable Application Insights integration in your Function Apps
Both of the Function Apps need to be updated with the Application Insights instrumentation key so they can start sending
telemetry to your new instance.
1. After the Application Insights account has completed provisioning, open the instance by opening the
ServerlessArchitecture resource group, and then selecting the Application Insights instance name.
2. Copy the instrumentation key from the Essentials section of the Overview blade.
3. Open the Azure Function App you created whose name ends with FunctionApp, or the name you specified for
the Function App containing the ProcessImage function.

Microsoft Cloud Workshop Serverless architecture
©2018 Microsoft Corporation 46 | P a g e
4. Select on Application settings on the Overview pane.
5. Scroll down to the Application settings section. Use the + Add new setting link and name the new setting
APPINSIGHTS_INSTRUMENTATIONKEY. Paste the copied instrumentation key into its value field.
6. Select Save.
7. Follow the steps above to add the APPINSIGHTS_INSTRUMENTATIONKEY setting to the other Function App.
Task 3: Use the Live Metrics Stream to monitor functions in real time
Now that Application Insights has been integrated into your Function Apps, you can use the Live Metrics Stream to see the
functions’ telemetry in real time.

Microsoft Cloud Workshop Serverless architecture
47 | P a g e ©2018 Microsoft Corporation
1. Open the Azure Function App you created whose name ends with FunctionApp, or the name you specified for
the Function App containing the ProcessImage function.
2. Select Application Insights on the Overview pane.
Microsoft Cloud Workshop Serverless architecture
©2018 Microsoft Corporation 48 | P a g e
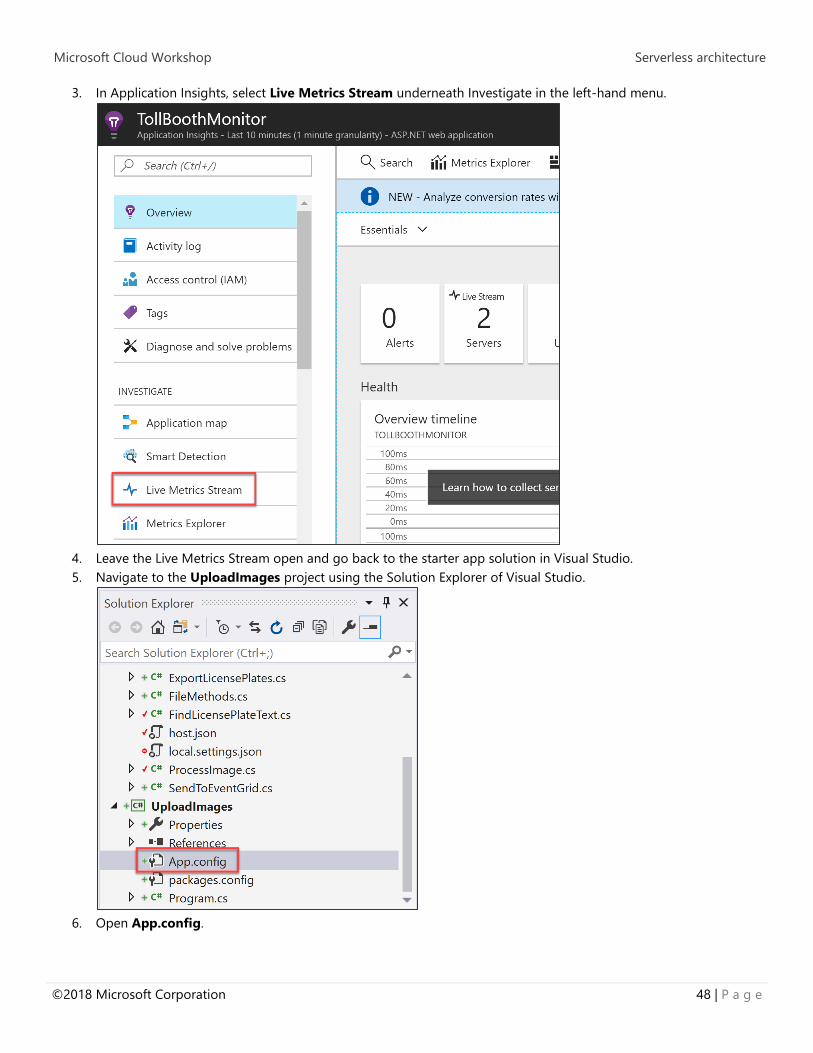
3. In Application Insights, select Live Metrics Stream underneath Investigate in the left-hand menu.
4. Leave the Live Metrics Stream open and go back to the starter app solution in Visual Studio.
5. Navigate to the UploadImages project using the Solution Explorer of Visual Studio.
6. Open App.config.

Microsoft Cloud Workshop Serverless architecture
49 | P a g e ©2018 Microsoft Corporation
7. In App.config, update the blobStorageConnection appSetting value to the connection string for your Blob
storage account.
8. Save your changes to the file.
9. Right-click the UploadImages project in the Solution Explorer, then select Start new instance under the Debug
menu.
10. When the console window appears, enter 1 and press ENTER. This uploads a handful of car photos to the images
container of your Blob storage account.
Microsoft Cloud Workshop Serverless architecture
©2018 Microsoft Corporation 50 | P a g e
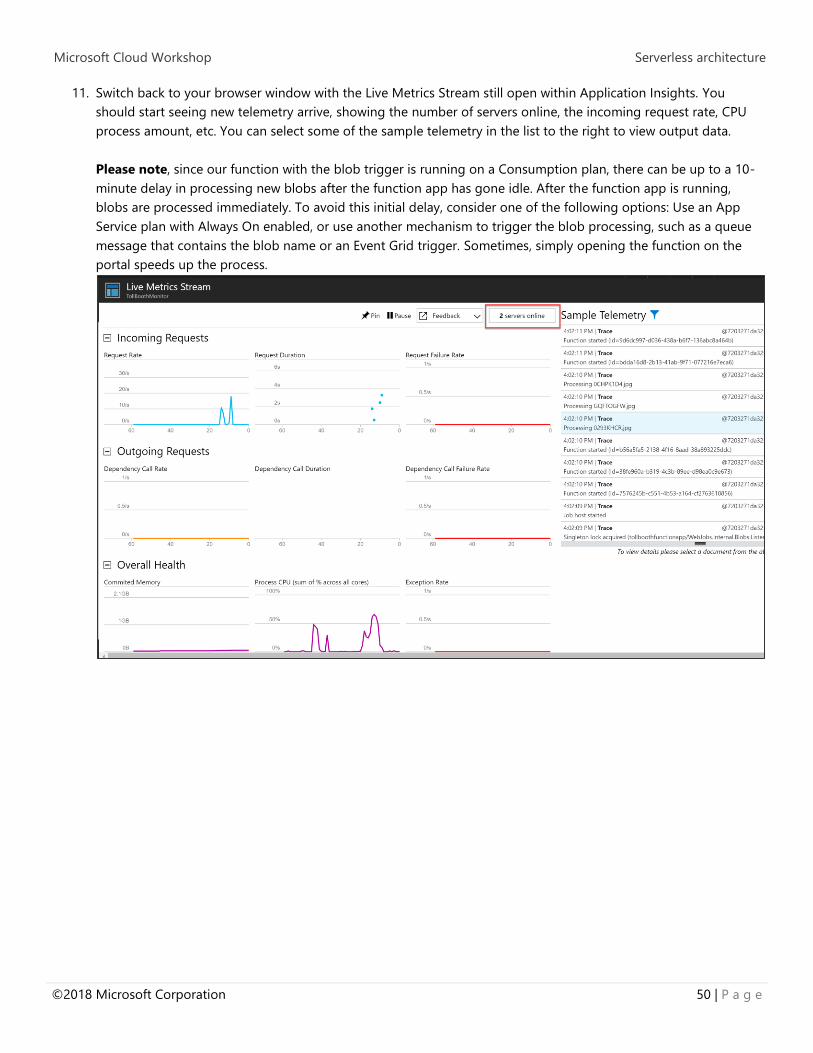
11. Switch back to your browser window with the Live Metrics Stream still open within Application Insights. You
should start seeing new telemetry arrive, showing the number of servers online, the incoming request rate, CPU
process amount, etc. You can select some of the sample telemetry in the list to the right to view output data.
Please note, since our function with the blob trigger is running on a Consumption plan, there can be up to a 10-
minute delay in processing new blobs after the function app has gone idle. After the function app is running,
blobs are processed immediately. To avoid this initial delay, consider one of the following options: Use an App
Service plan with Always On enabled, or use another mechanism to trigger the blob processing, such as a queue
message that contains the blob name or an Event Grid trigger. Sometimes, simply opening the function on the
portal speeds up the process.

Microsoft Cloud Workshop Serverless architecture
51 | P a g e ©2018 Microsoft Corporation
12. Leave the Live Metrics Stream window open once again, and close the console window for the image upload.
Debug the UploadImages project again, then enter 2 and press ENTER. This will upload 1,000 new photos.
13. Switch back to the Live Metrics Stream window and observe the activity as the photos are uploaded. It is possible
that the process will run so efficiently that no more than two servers will be allocated at a time. You should also
notice things such as a steady cadence for the Request Rate monitor, the Request Duration hovering below
~500ms second, and the Process CPU percentage roughly matching the Request Rate.

Microsoft Cloud Workshop Serverless architecture
©2018 Microsoft Corporation 52 | P a g e
14. After this has run for a while, close the image uploader console window once again, but leave the Live Metrics
Stream window open.
Task 4: Observe your functions dynamically scaling when resource-constrained
In this task, you will change the Computer Vision API to the Free tier. This will limit the number of requests to the OCR
service to 10 per minute. Once changed, run the UploadImages console app to upload 1,000 images again. The resiliency
policy programmed into the FindLicensePlateText.MakeOCRRequest method of the ProcessImage function will begin
exponentially backing off requests to the Computer Vision API, allowing it to recover and lift the rate limit. This intentional
delay will greatly increase the function’s response time, thus causing the Consumption plan’s dynamic scaling to kick in,
allocating several more servers. You will watch all of this happen in real time using the Live Metrics Stream view.
1. Open your Computer Vision API service by opening the ServerlessArchitecture resource group, and then
selecting the Computer Vision API service name.

Microsoft Cloud Workshop Serverless architecture
53 | P a g e ©2018 Microsoft Corporation
2. Select Pricing tier under Resource Management in the left-hand menu. Select the F0 Free pricing tier, then select
Select.
Microsoft Cloud Workshop Serverless architecture
©2018 Microsoft Corporation 54 | P a g e
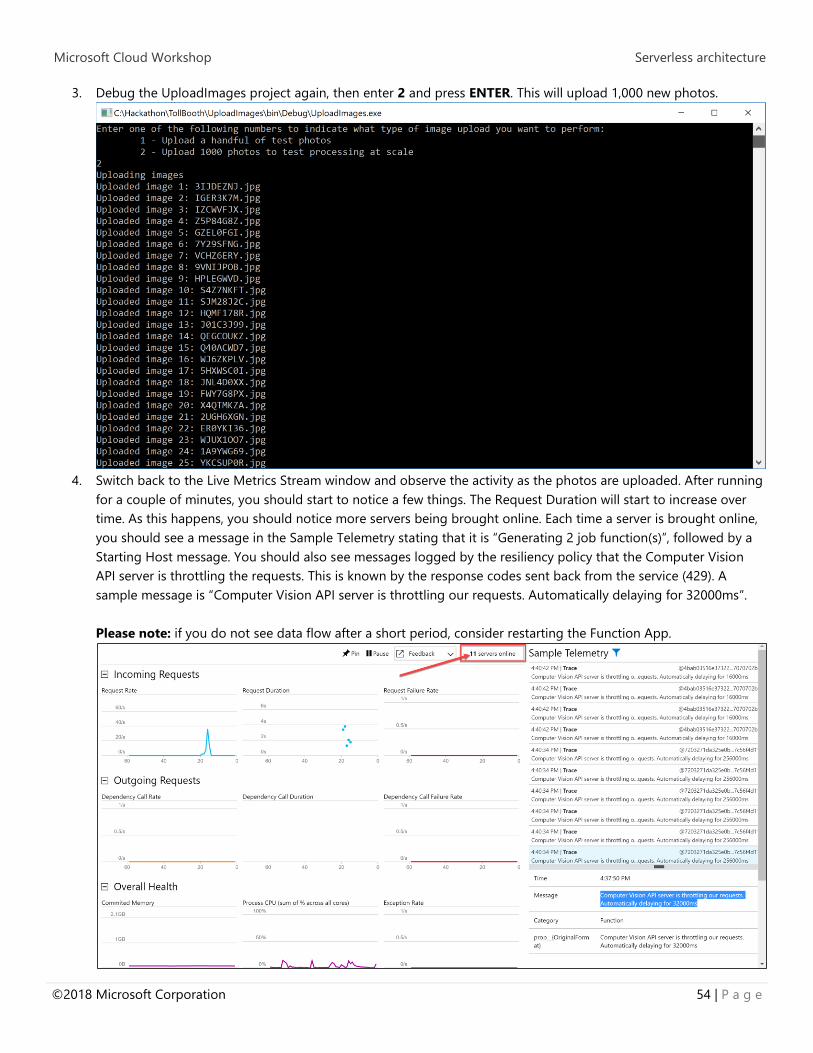
3. Debug the UploadImages project again, then enter 2 and press ENTER. This will upload 1,000 new photos.
4. Switch back to the Live Metrics Stream window and observe the activity as the photos are uploaded. After running
for a couple of minutes, you should start to notice a few things. The Request Duration will start to increase over
time. As this happens, you should notice more servers being brought online. Each time a server is brought online,
you should see a message in the Sample Telemetry stating that it is “Generating 2 job function(s)”, followed by a
Starting Host message. You should also see messages logged by the resiliency policy that the Computer Vision
API server is throttling the requests. This is known by the response codes sent back from the service (429). A
sample message is “Computer Vision API server is throttling our requests. Automatically delaying for 32000ms”.
Please note: if you do not see data flow after a short period, consider restarting the Function App.
Microsoft Cloud Workshop Serverless architecture
55 | P a g e ©2018 Microsoft Corporation
5. After this has run for some time, close the UploadImages console to stop uploading photos.
6. Navigate back to the Computer Vision API and set the pricing tier back to S1 Standard.
Microsoft Cloud Workshop Serverless architecture
©2018 Microsoft Corporation 56 | P a g e
Exercise 5: Explore your data in Azure Cosmos DB
Duration: 15 minutes
In this exercise, you will use the Azure Cosmos DB Data Explorer in the portal to view saved license plate data.
Help references
About Azure Cosmos DB https://docs.microsoft.com/en-us/azure/cosmos-db/introduction
Task 1: Use the Azure Cosmos DB Data Explorer
1. Open your Azure Cosmos DB account by opening the ServerlessArchitecture resource group, and then selecting
the Azure Cosmos DB account name.
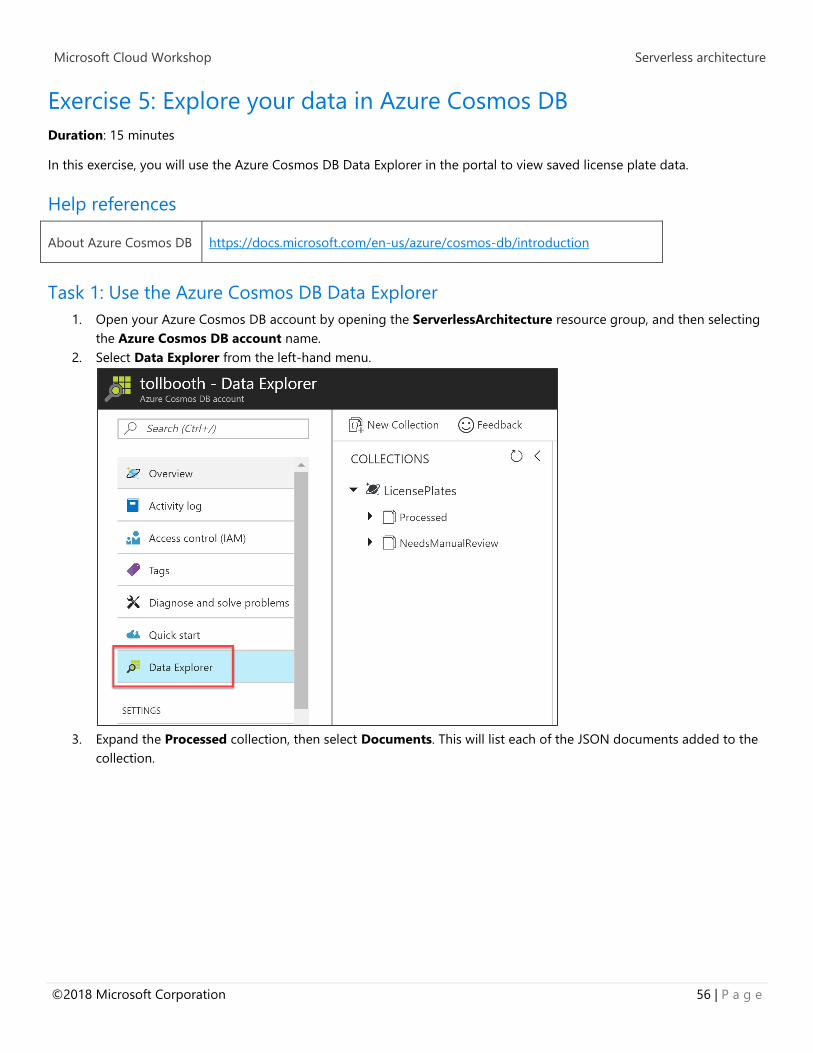
2. Select Data Explorer from the left-hand menu.
3. Expand the Processed collection, then select Documents. This will list each of the JSON documents added to the
collection.

Microsoft Cloud Workshop Serverless architecture
57 | P a g e ©2018 Microsoft Corporation
4. Select one of the documents to view its contents. The first four properties are ones that were added by your
functions. The remaining properties are standard and are assigned by Cosmos DB.
5. Expand the NeedsManualReview collection, then select Documents.
6. Select one of the documents to view its contents. Notice that the filename is provided, as well as a property
named “resolved”. While this is out of scope for this lab, those properties can be used together to provide a
manual process for viewing the photo and entering the license plate.
Microsoft Cloud Workshop Serverless architecture
©2018 Microsoft Corporation 58 | P a g e
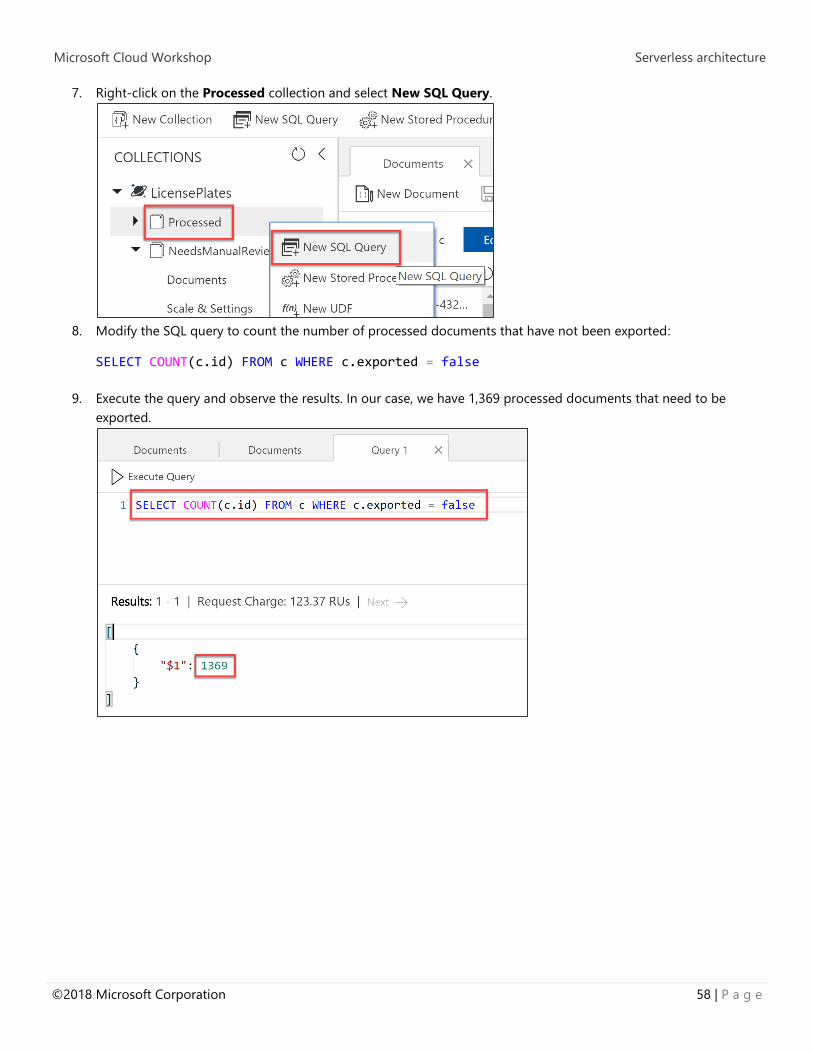
7. Right-click on the Processed collection and select New SQL Query.
8. Modify the SQL query to count the number of processed documents that have not been exported:
SELECT COUNT(c.id) FROM c WHERE c.exported = false
9. Execute the query and observe the results. In our case, we have 1,369 processed documents that need to be
exported.

Microsoft Cloud Workshop Serverless architecture
59 | P a g e ©2018 Microsoft Corporation
Exercise 6: Create the data export workflow
Duration: 30 minutes
In this exercise, you create a new Logic App for your data export workflow. This Logic App will execute periodically and call
your ExportLicensePlates function, then conditionally send an email if there were no records to export.
Help references
What are Logic Apps? https://docs.microsoft.com/en-us/azure/logic-apps/logic-apps-what-are-
logic-apps
Call Azure Functions
from logic apps
https://docs.microsoft.com/en-us/azure/logic-apps/logic-apps-azure-
functions#call-azure-functions-from-logic-apps
Task 1: Create the Logic App
1. Navigate to the Azure Management portal, http://portal.azure.com.
2. Select + New, then enter logic app into the search box on top. Select Logic App from the results.
3. Select the Create button on the Logic App overview blade.
4. On the Create Logic App blade, specify the following configuration options:
a. Name: unique value for the App name (ensure the green check mark appears).
b. Specify the Resource Group ServerlessArchitecture.
c. Select the same location as your Resource Group.

Microsoft Cloud Workshop Serverless architecture
©2018 Microsoft Corporation 60 | P a g e
5. Open the Logic App once it has been provisioned.
6. In the Logic App Designer, scroll through the page until you located the Start with a common trigger section.
Select the Recurrence trigger.
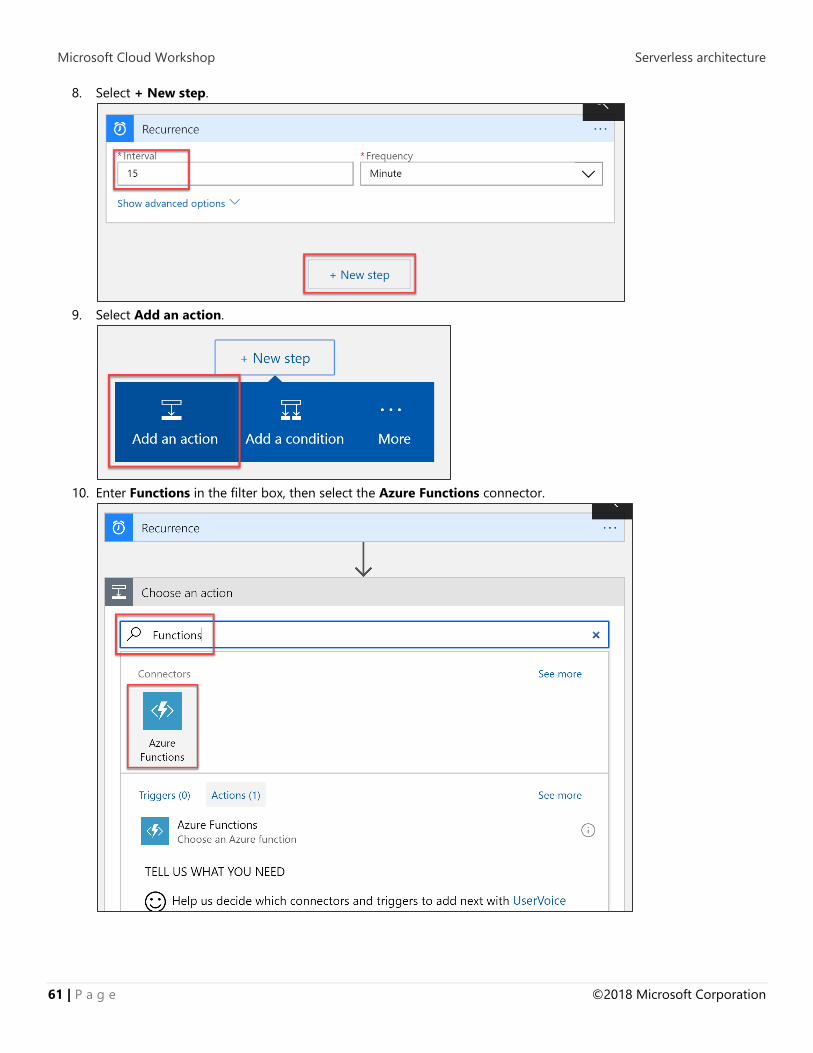
7. Enter 15 into the Interval box, and make sure Frequency is set to Minute. This can be set to an hour or some
other interval, depending on business requirements.
Microsoft Cloud Workshop Serverless architecture
61 | P a g e ©2018 Microsoft Corporation
8. Select + New step.
9. Select Add an action.
10. Enter Functions in the filter box, then select the Azure Functions connector.

Microsoft Cloud Workshop Serverless architecture
©2018 Microsoft Corporation 62 | P a g e
11. Select your Function App whose name ends in FunctionApp, or contains the ExportLicensePlates function.
12. Select the ExportLicensePlates function from the list.

Microsoft Cloud Workshop Serverless architecture
63 | P a g e ©2018 Microsoft Corporation
13. This function does not require any parameters that need to be sent when it gets called. Select + New step, then
Add a condition.
14. Select the Status code parameter in the first field. Make sure is equal to is selected in the second field, then enter
200 in the third field. This evaluates the status code returned from the ExportLicensePlates function, which will
return a 200 code when license plates are found and exported. Otherwise, it sends a 204 (NoContent) status code
when no license plates were discovered that need to be exported. We will conditionally send an email if any
response other than 200 is returned.
Microsoft Cloud Workshop Serverless architecture
©2018 Microsoft Corporation 64 | P a g e
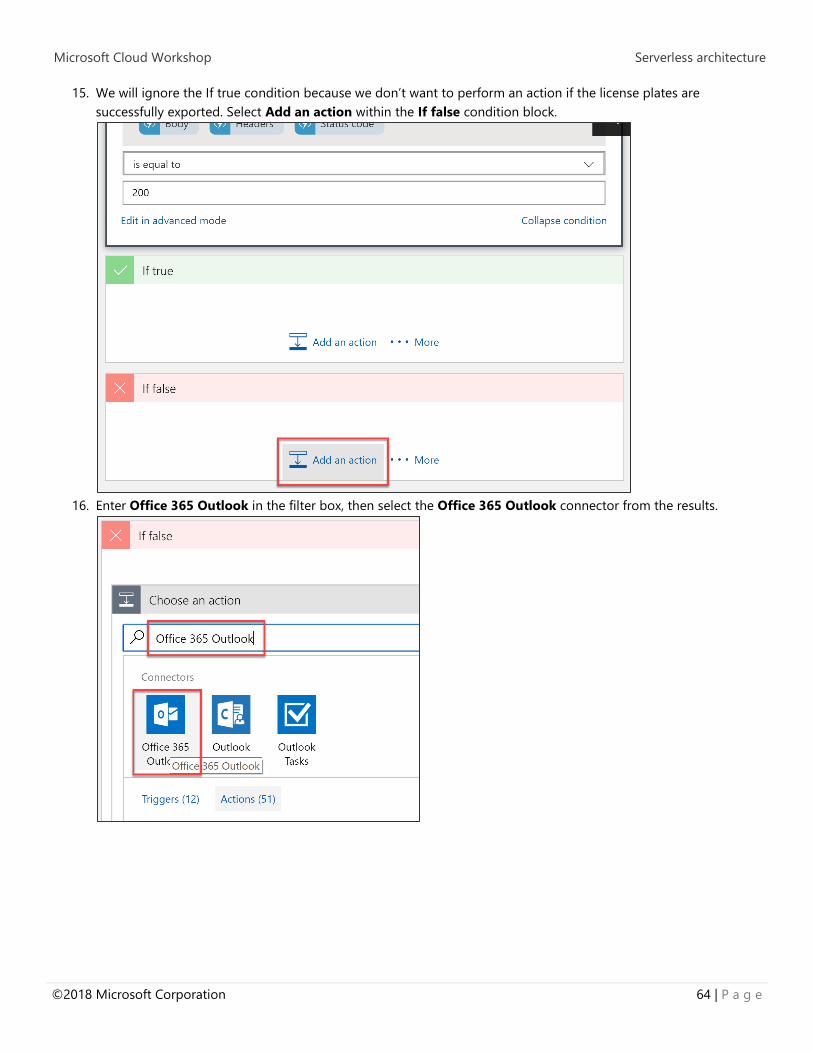
15. We will ignore the If true condition because we don’t want to perform an action if the license plates are
successfully exported. Select Add an action within the If false condition block.
16. Enter Office 365 Outlook in the filter box, then select the Office 365 Outlook connector from the results.
Microsoft Cloud Workshop Serverless architecture
65 | P a g e ©2018 Microsoft Corporation
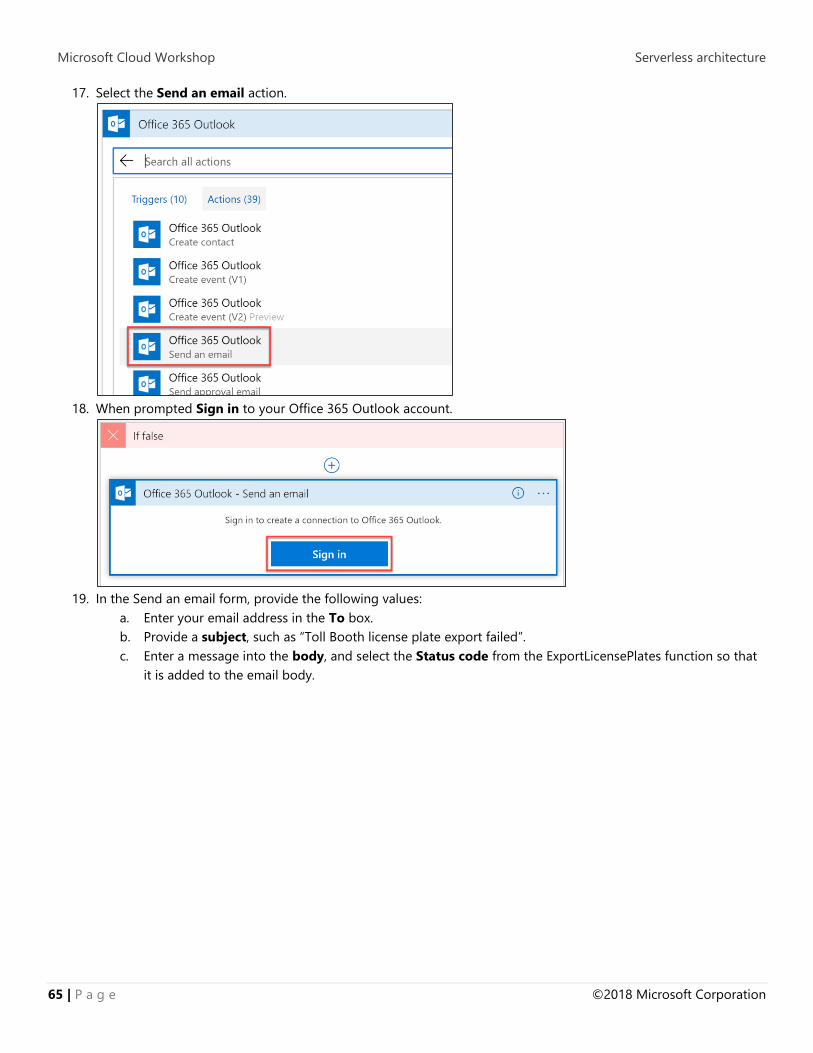
17. Select the Send an email action.
18. When prompted Sign in to your Office 365 Outlook account.
19. In the Send an email form, provide the following values:
a. Enter your email address in the To box.
b. Provide a subject, such as “Toll Booth license plate export failed”.
c. Enter a message into the body, and select the Status code from the ExportLicensePlates function so that
it is added to the email body.

Microsoft Cloud Workshop Serverless architecture
©2018 Microsoft Corporation 66 | P a g e
20. Select Save in the tool bar to save your Logic App.
21. Select Run to execute the Logic App. You should start receiving email alerts because the license plate data is not
being exported. This is because we need to finish making changes to the ExportLicensePlates function so that it
can extract the license plate data from Azure Cosmos DB, generate the CSV file, and upload it to Blob storage.
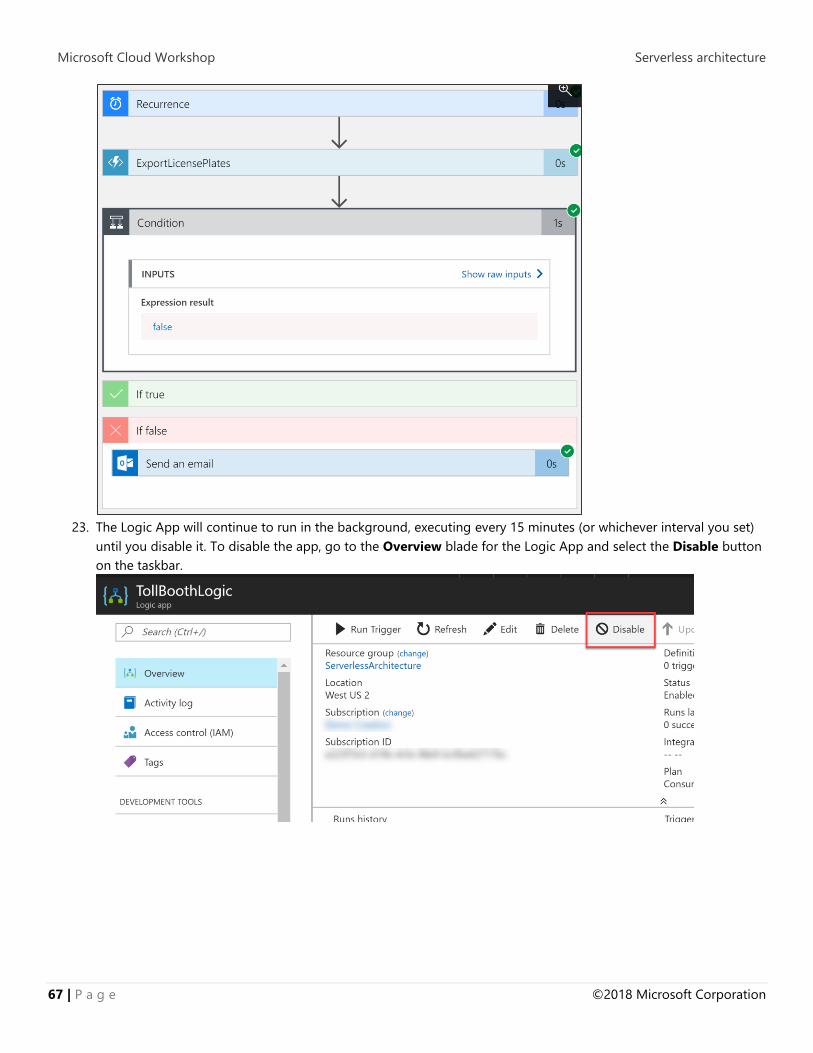
22. While in the Logic Apps Designer, you will see the run result of each step of your workflow. A green checkmark is
placed next to each step that successfully executed, showing the execution time to complete. This can be used to
see how each step is working, and you can click on the executed step and see the raw output.
Microsoft Cloud Workshop Serverless architecture
67 | P a g e ©2018 Microsoft Corporation
23. The Logic App will continue to run in the background, executing every 15 minutes (or whichever interval you set)
until you disable it. To disable the app, go to the Overview blade for the Logic App and select the Disable button
on the taskbar.

Microsoft Cloud Workshop Serverless architecture
©2018 Microsoft Corporation 68 | P a g e
Exercise 7: Configure continuous deployment for your Function App
Duration: 40 minutes
In this exercise, configure your Function App that contains the ProcessImage function for continuous deployment. You will
first set up a GitHub source code repository, then set that as the deployment source for the Function App.
Help references
Creating a new GitHub
repository
https://help.github.com/articles/creating-a-new-repository/
Continuous deployment
for Azure Functions
https://docs.microsoft.com/en-us/azure/azure-functions/functions-
continuous-deployment
Task 1: Create a GitHub repository
1. Navigate to https://github.com and sign in.
2. From the top-right corner of any page (once signed in), select the + menu item, then select New repository.

Microsoft Cloud Workshop Serverless architecture
69 | P a g e ©2018 Microsoft Corporation
3. Select your owner account, enter a unique repository name, make sure it is set to Public, and then select Create
repository.
4. On your new repository page, copy the HTTPS git path to your clipboard, using the button provided on the
right.
Task 2: Add GitHub repository to your Visual Studio solution
1. Open the TollBooth project in Visual Studio.

Microsoft Cloud Workshop Serverless architecture
©2018 Microsoft Corporation 70 | P a g e
2. Right-click the TollBooth project in Solution Explorer, then select Commit… under the Source Control menu
item.
3. Enter a commit message, then select Commit All.

Microsoft Cloud Workshop Serverless architecture
71 | P a g e ©2018 Microsoft Corporation
4. After committing, select the Sync link. This will allow us to add the remote GitHub repository.
5. Select the Publish Git Repo button, then paste the git URL for your new repository you copied from GitHub.
Finally, select Publish.
6. Refresh your GitHub repository page in your browser. You should see that the project files have been added.
Navigate to the TollBooth folder of your repo. Notice that the local.settings.json file has not been uploaded.
That’s because the .gitignore file of the TollBooth project explicitly excludes that file from the repository, making

Microsoft Cloud Workshop Serverless architecture
©2018 Microsoft Corporation 72 | P a g e
sure you don’t accidentally share your application secrets.
Task 3: Configure your Function App to use your GitHub repository for continuous
deployment
1. Open the Azure Function App you created whose name ends with FunctionApp, or the name you specified for
the Function App containing the ProcessImage function.

Microsoft Cloud Workshop Serverless architecture
73 | P a g e ©2018 Microsoft Corporation
2. Select Deployment options underneath the Platform features tab.
3. Select Setup in the Deployments blade.

Microsoft Cloud Workshop Serverless architecture
©2018 Microsoft Corporation 74 | P a g e
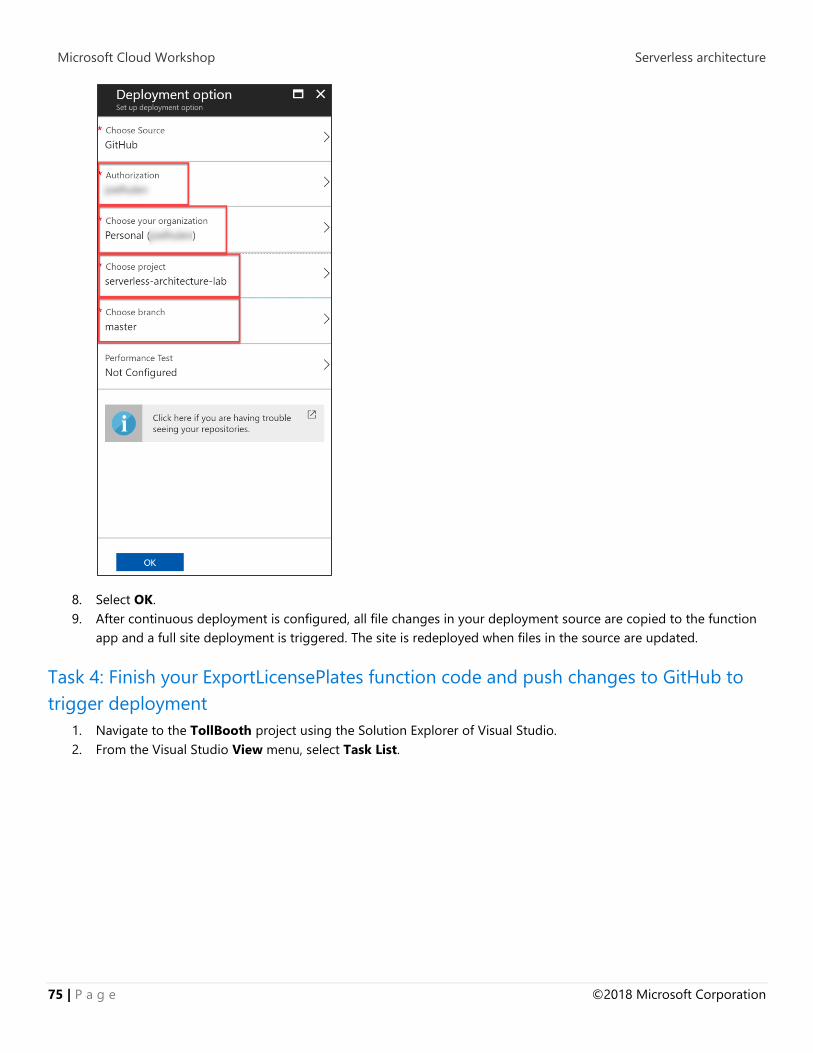
4. Select Choose Source, then GitHub in the list of sources.
5. Select Authorization, then enter your GitHub credentials when prompted.
6. Choose your organization.
7. Choose your new repository under Choose project. Make sure the master branch is selected.
Microsoft Cloud Workshop Serverless architecture
75 | P a g e ©2018 Microsoft Corporation
8. Select OK.
9. After continuous deployment is configured, all file changes in your deployment source are copied to the function
app and a full site deployment is triggered. The site is redeployed when files in the source are updated.
Task 4: Finish your ExportLicensePlates function code and push changes to GitHub to
trigger deployment
1. Navigate to the TollBooth project using the Solution Explorer of Visual Studio.
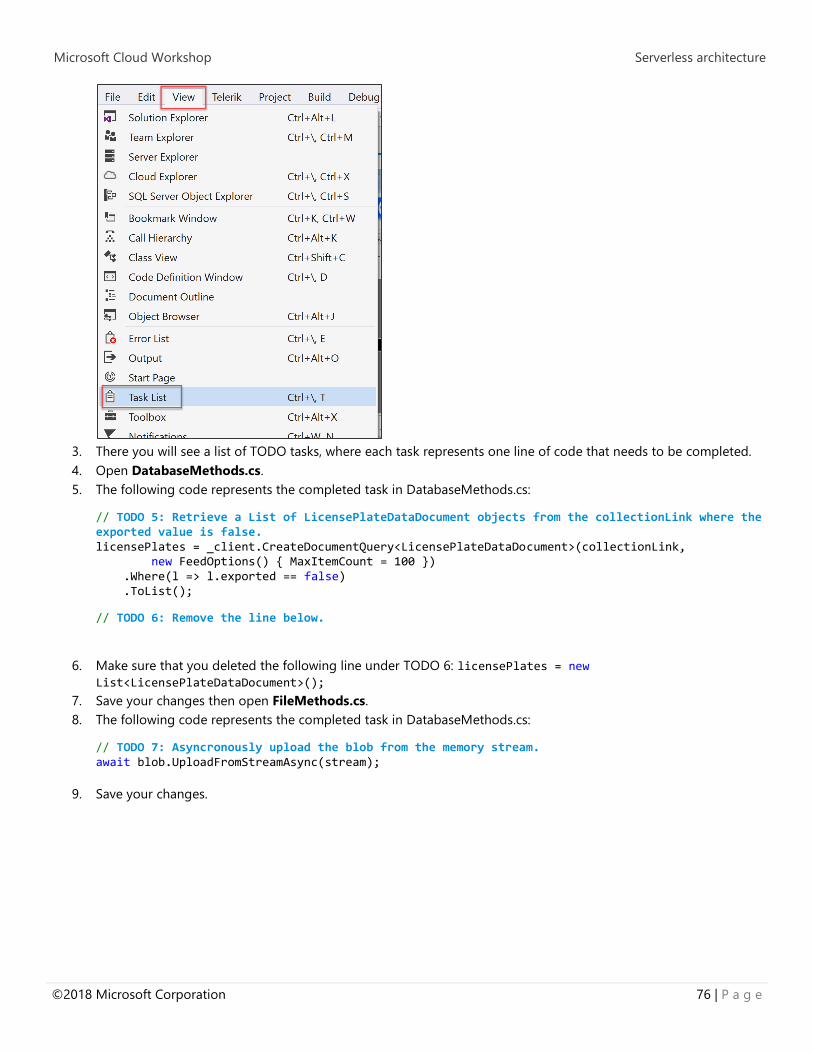
2. From the Visual Studio View menu, select Task List.
Microsoft Cloud Workshop Serverless architecture
©2018 Microsoft Corporation 76 | P a g e
3. There you will see a list of TODO tasks, where each task represents one line of code that needs to be completed.
4. Open DatabaseMethods.cs.
5. The following code represents the completed task in DatabaseMethods.cs:
// TODO 5: Retrieve a List of LicensePlateDataDocument objects from the collectionLink where the exported value is false. licensePlates = _client.CreateDocumentQuery<LicensePlateDataDocument>(collectionLink, new FeedOptions() { MaxItemCount = 100 }) .Where(l => l.exported == false) .ToList();
// TODO 6: Remove the line below.
6. Make sure that you deleted the following line under TODO 6: licensePlates = new
List<LicensePlateDataDocument>();
7. Save your changes then open FileMethods.cs.
8. The following code represents the completed task in DatabaseMethods.cs:
// TODO 7: Asyncronously upload the blob from the memory stream. await blob.UploadFromStreamAsync(stream);
9. Save your changes.
Microsoft Cloud Workshop Serverless architecture
77 | P a g e ©2018 Microsoft Corporation
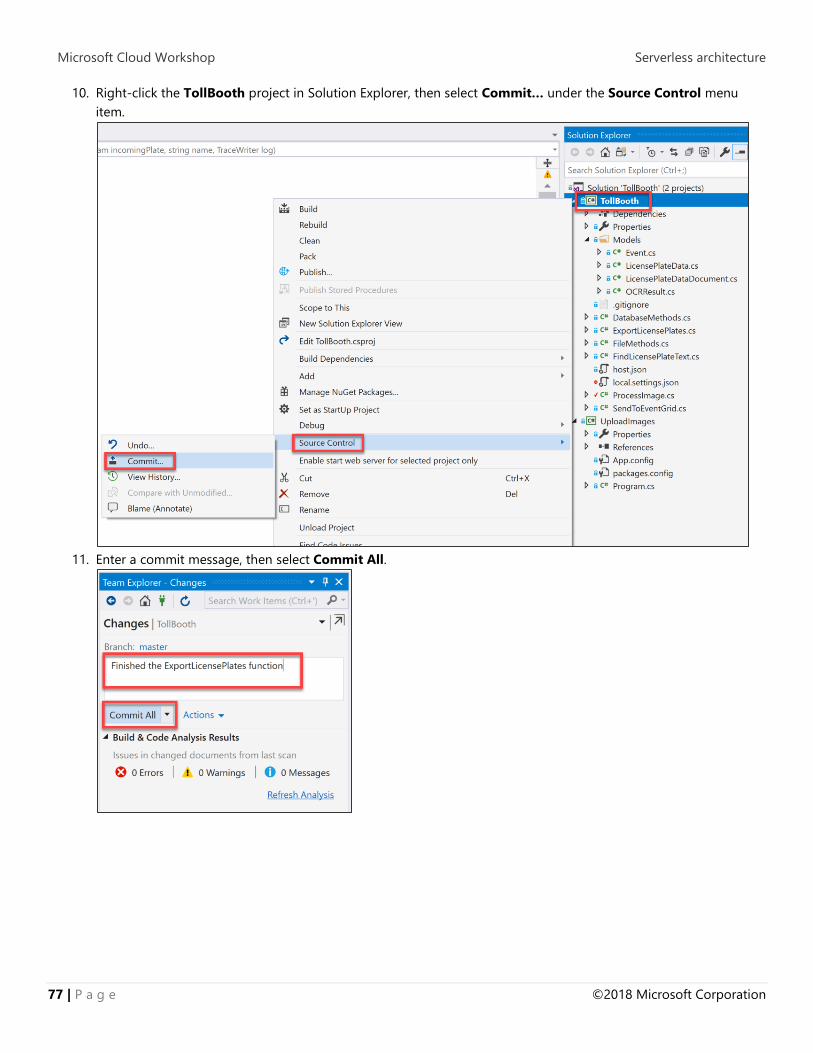
10. Right-click the TollBooth project in Solution Explorer, then select Commit… under the Source Control menu
item.
11. Enter a commit message, then select Commit All.

Microsoft Cloud Workshop Serverless architecture
©2018 Microsoft Corporation 78 | P a g e
12. After committing, select the Sync link. This will allow us to add the remote GitHub repository.
13. Select the Sync button on the Synchronization step.
Afterward, you should see a message stating that the incoming and outgoing commits were successfully
synchronized.
14. Go back to Deployments for your Function App in the portal. You should see an entry for the deployment kicked
off by this last commit. Check the timestamp on the message to verify that you are looking at the latest one.

Microsoft Cloud Workshop Serverless architecture
79 | P a g e ©2018 Microsoft Corporation
Exercise 8: Rerun the workflow and verify data export
Duration: 10 minutes
With the latest code changes in place, run your Logic App and verify that the files are successfully exported.
Task 1: Run the Logic App
1. Open your ServerlessArchitecture resource group in the Azure portal, then select your Logic App.
2. From the Overview blade, select Enable.
3. Now select Run Trigger, then select Recurrence to immediately execute your workflow.
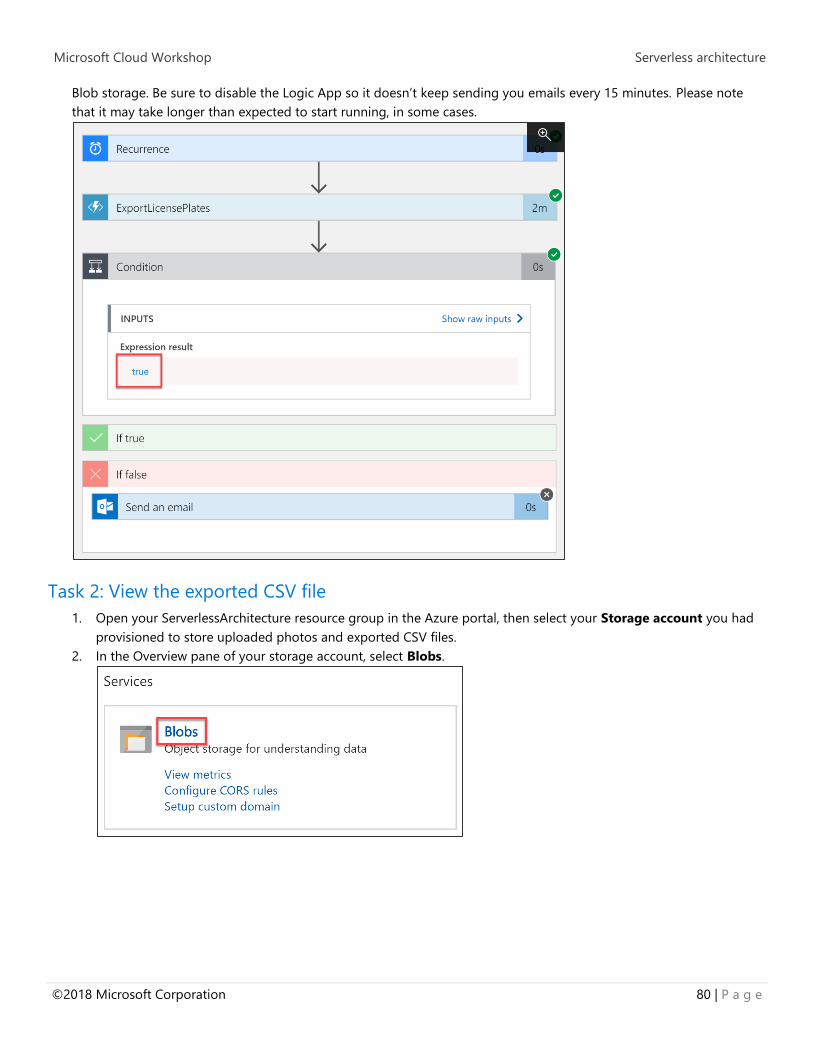
4. Select the Refresh button next to the Run Trigger button to refresh your run history. Select the latest run history
item. If the expression result for the condition is true, then that means the CSV file should’ve been exported to
Microsoft Cloud Workshop Serverless architecture
©2018 Microsoft Corporation 80 | P a g e
Blob storage. Be sure to disable the Logic App so it doesn’t keep sending you emails every 15 minutes. Please note
that it may take longer than expected to start running, in some cases.
Task 2: View the exported CSV file
1. Open your ServerlessArchitecture resource group in the Azure portal, then select your Storage account you had
provisioned to store uploaded photos and exported CSV files.
2. In the Overview pane of your storage account, select Blobs.

Microsoft Cloud Workshop Serverless architecture
81 | P a g e ©2018 Microsoft Corporation
3. Select the export container.
4. You should see at least one recently uploaded CSV file. Click on the filename to view its properties.
5. Select Download in the blob properties window.

Microsoft Cloud Workshop Serverless architecture
©2018 Microsoft Corporation 82 | P a g e
The CSV file should look similar to the following:
6. The ExportLicensePlates function updates all of the records it exported by setting the exported value to true. This
makes sure that only new records since the last export are included in the next one. Verify this by re-executing the
script in Azure Cosmos DB that counts the number of documents in the Processed collection where exported is
false. It should return 0 unless you’ve subsequently uploaded new photos.

Microsoft Cloud Workshop Serverless architecture
83 | P a g e ©2018 Microsoft Corporation
After the hands-on lab
Duration: 10 minutes
In this exercise, attendees will deprovision any Azure resources that were created in support of the lab.
Task 1: Delete the Resource group in which you placed your Azure resources.
1. From the Portal, navigate to the blade of your Resource Group and select Delete in the command bar at the top.
2. Confirm the deletion by re-typing the resource group name and selecting Delete.
You should follow all steps provided after attending the hands-on lab.
Top Related