


Languages
Pages
Legal


Chaufournier & Wood CSCI 2541
Lab 2Introduction to Web Development: Back End Development

Front End vs Back EndWhats the difference?
Front EndThe art and design of websites and web applications that render on the client side. Everything from the look and feel to the way you interact with a website.

Back EndThe server side logic for an application controlling what happens with the data, how the client side rendering changes in response and how the data gets stored.

Front End vs Back End

Front End vs Back End
Front End

Front End vs Back End
Front End
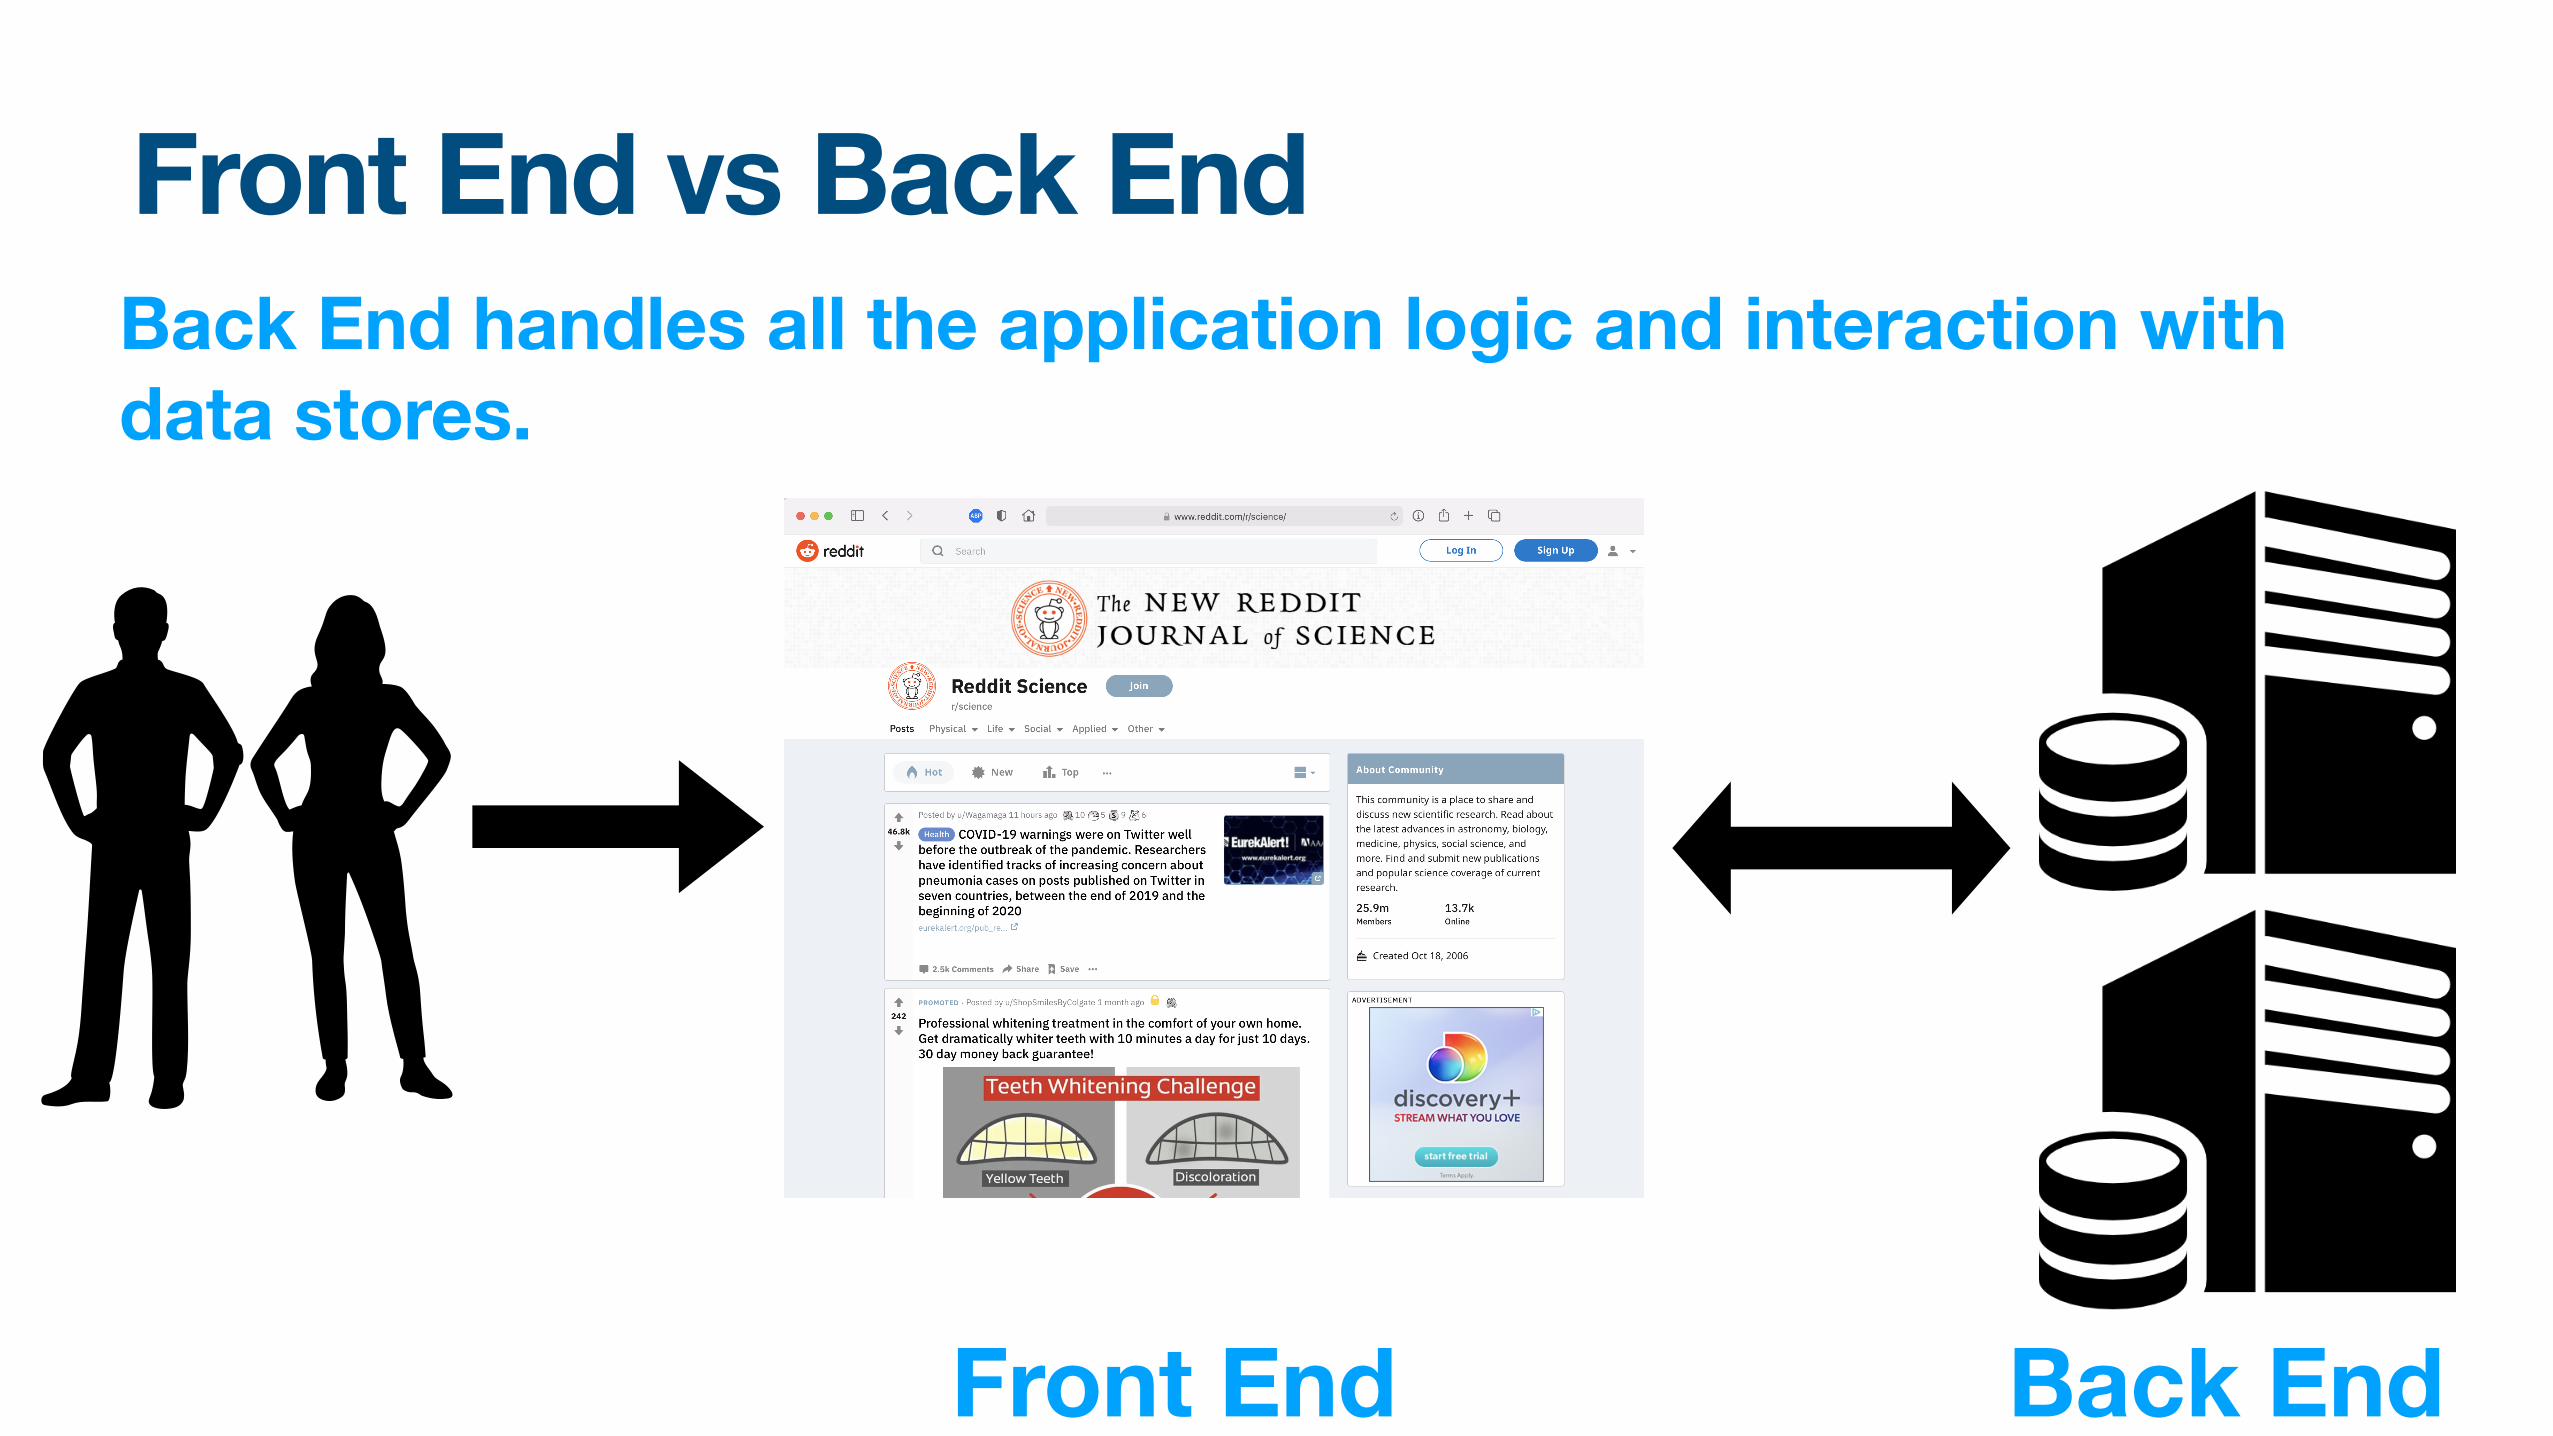
Front End handles displaying all the content and interactions for the user

Front End vs Back End
Front End Back End
Front End vs Back End
Back End
Back End handles all the application logic and interaction with data stores.
Front End

Front End vs Back End Separation of Duties
Back EndFront EndDesigners
UI Developers UX researchers
DevopsAPI Developers
DB Admins

How do you Build Back Ends?Python Flask!

Python Flask
• A Python library that provides an api for creating a backend
• Developers define endpoints that serve content to users such as websites and static files
• Developers can also take in data from websites and perform actions based on the input received

How Do I get Flask?
$ pip install Flask

How do I serve a website using Flask?from flask import Flask from flask import render_template, request
app = Flask('app')
@app.route('/', methods=['GET', 'POST']) def hello_world(): return """ <html> <head> <title>My Website</title> </head> <body> Hello World </body> </html> """ app.run(host='0.0.0.0', port=8080)
1. Import the Flask Library
2. Define a Flask App Variable
3. Define a new Route on app with the accepted methods. This is where you define
the location of the webpage.4. Return back a string with data for the browser to interpret. This is where your
HTML goes.
5. Run your server on an address and a given port

How can I take in user input?from flask import Flask from flask import render_template, request
app = Flask('app')
@app.route('/', methods=['GET', 'POST']) def hello_world(): if request.method == 'POST': print(request.form["field1"])
return """ <html> <head> <title>My Website</title> </head> <body> <form action="/" method="POST"> <input type="text" name="field1"><br> <input type="submit" name="submit"> </form> </body> </html> """
Data is exchanged from client side to the server side using post requests.
Data elements can be accessed by accessing variables sent from a form.
Here we access field1 which was defined as a named input on the html page
This will print out the value of field1 every time the form is submitted
Returning data to a userfrom flask import Flask from flask import render_template, request
app = Flask('app')
@app.route('/', methods=['GET', 'POST']) def hello_world(): if request.method == 'POST': return request.form["field1"]
return """ <html> <head> <title>My Website</title> </head> <body> <form action="/" method="POST"> <input type="text" name="field1"><br> <input type="submit" name="submit"> </form> </body> </html> """
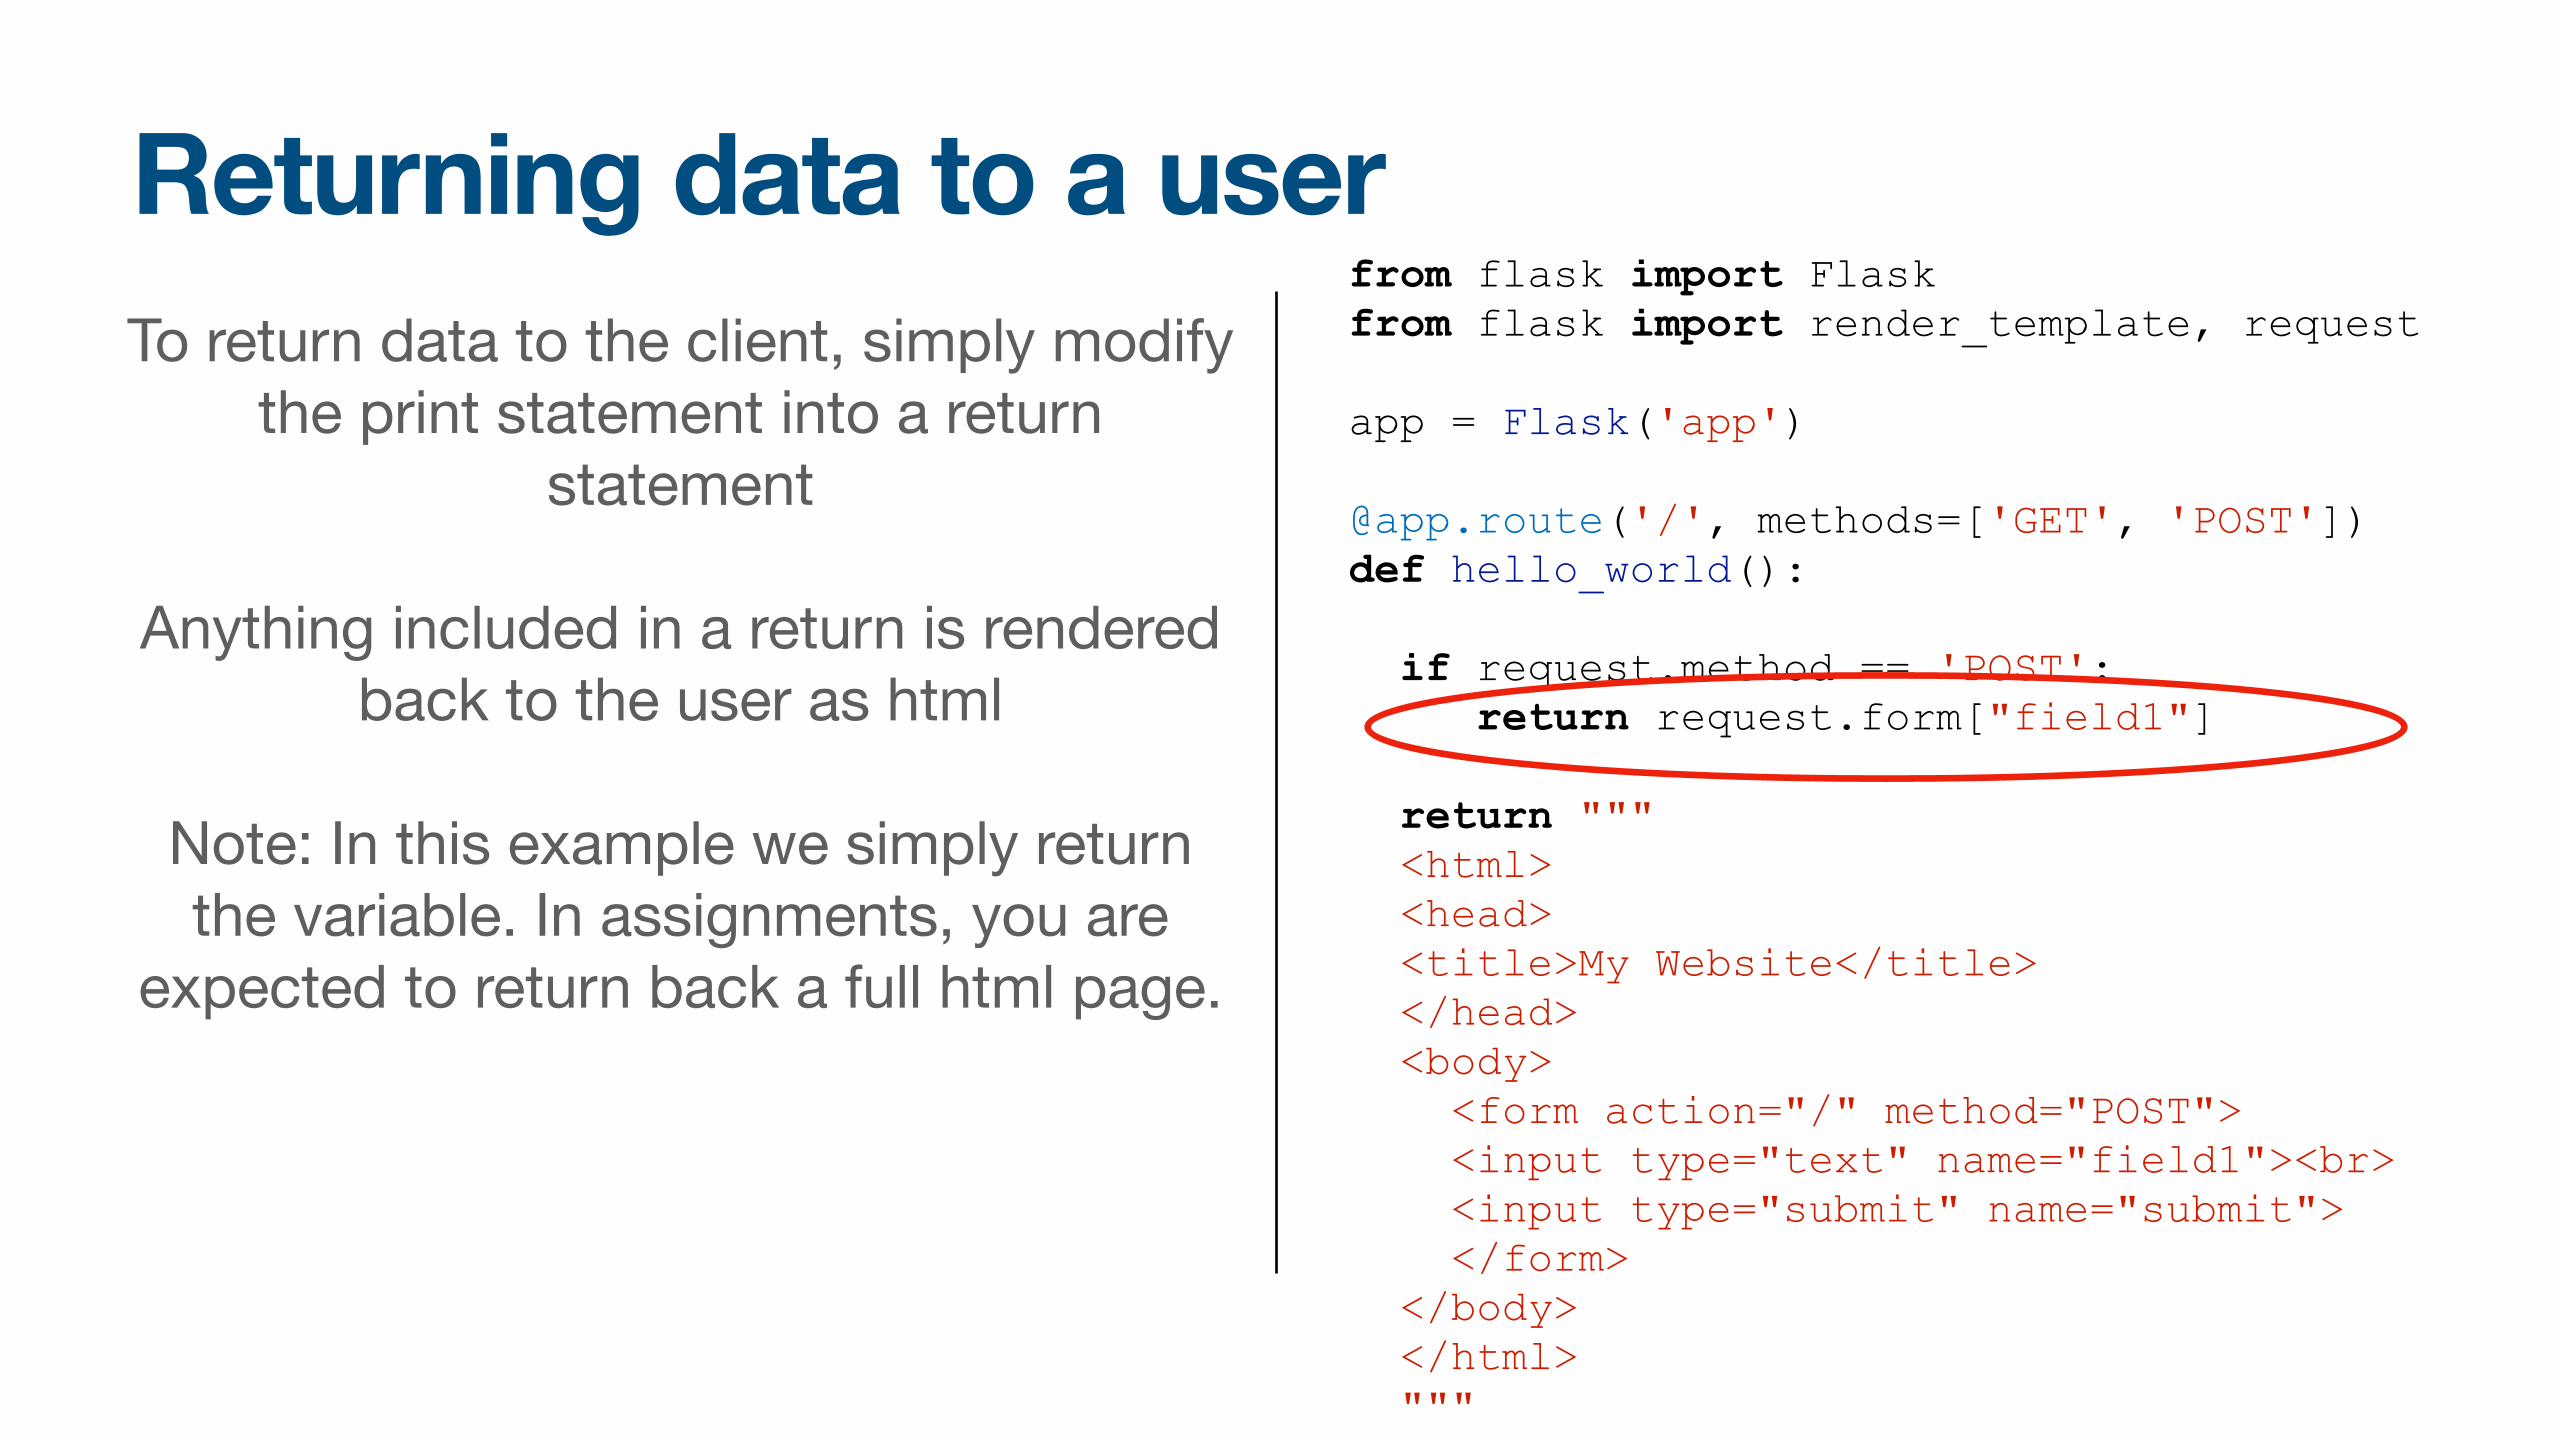
To return data to the client, simply modify the print statement into a return
statement
Anything included in a return is rendered back to the user as html
Note: In this example we simply return the variable. In assignments, you are
expected to return back a full html page.

Lab activity 1
• Use the sample code to build an interactive form
• Ask for Player 1 and Player 2’s moves
• Return back to the user what each player picked.
• Must define an endpoint that:
• Presents the input form.
• Receives the data from a post request and returns the moves chosen to the user
https://repl.it/@thelimeburner/Lab2

But wait what if I have a really large web page with lots of data?

Flask Templates to the Rescue

Flask Templating
• Flask Templates allow you to take static pages and sub in dynamic content.
• Flask Templates are made up of html alongside a new syntax that allows you to use logic to determine whats rendered.
• Flask Templating happens at the server side before content is sent to the client side.
• All templates live at the /templates directory in your repo.
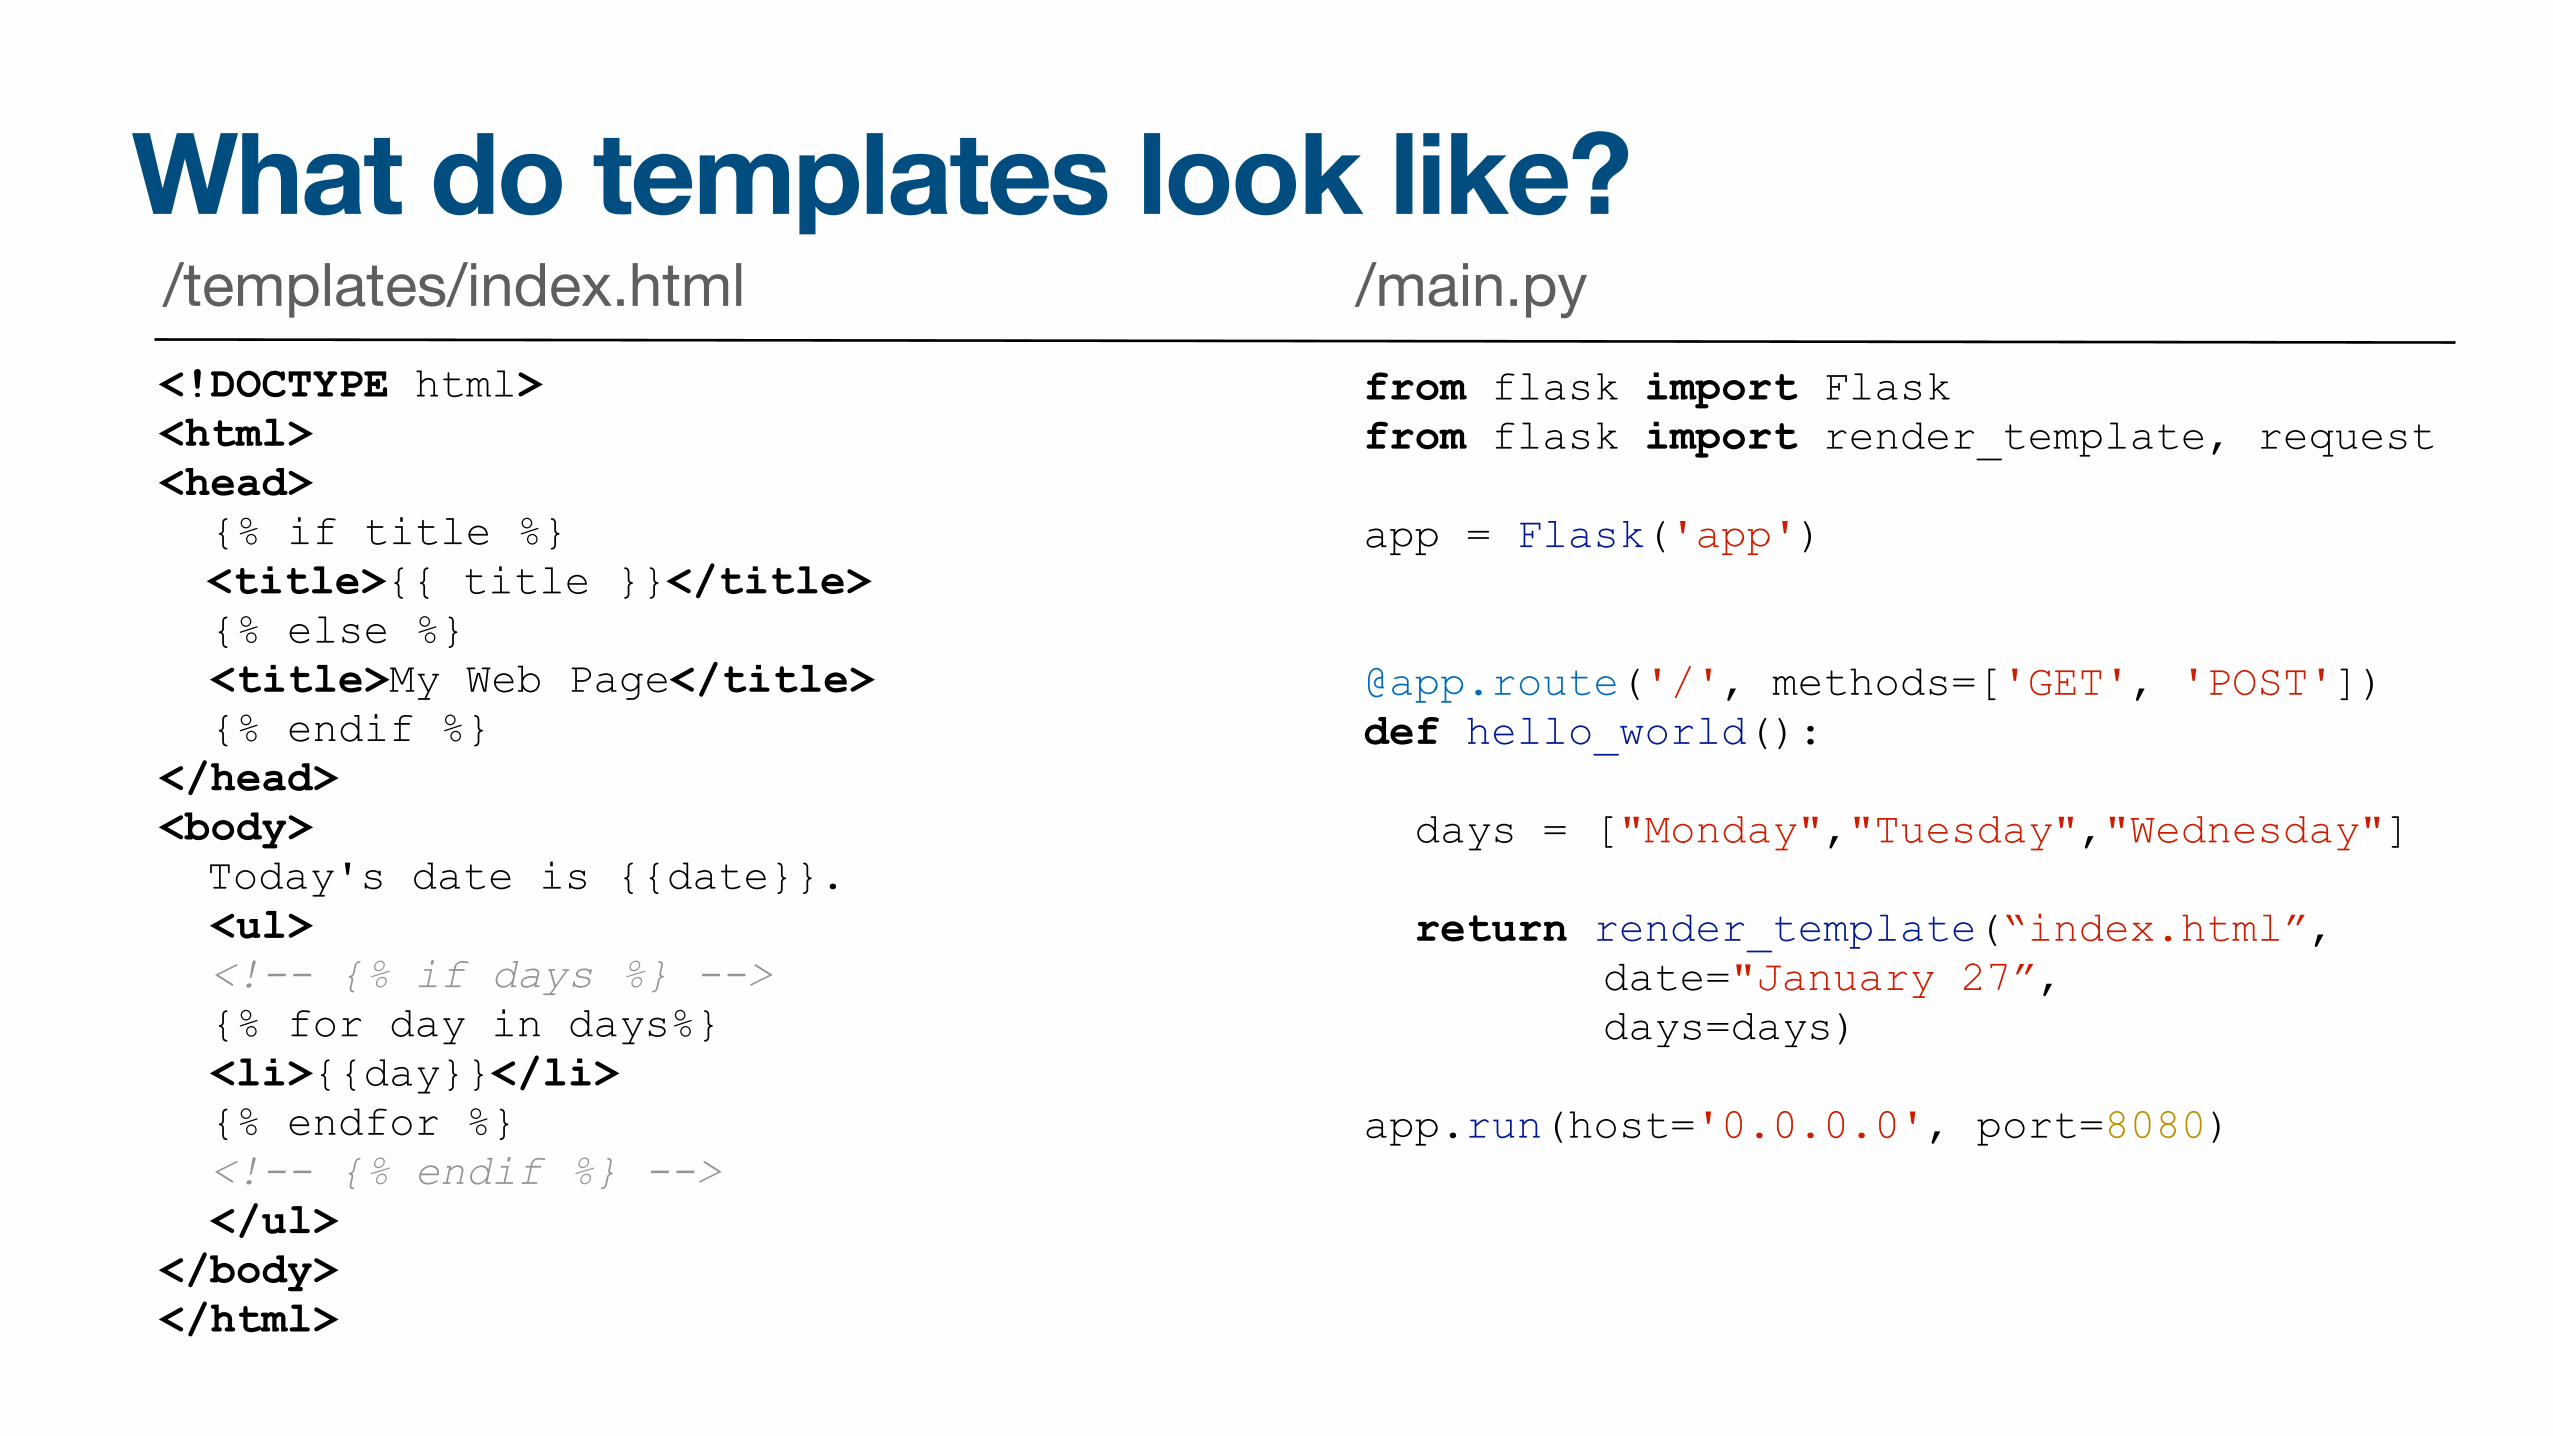
What do templates look like?from flask import Flask from flask import render_template, request
app = Flask('app')
@app.route('/', methods=['GET', 'POST']) def hello_world(): days = ["Monday","Tuesday","Wednesday"] return render_template(“index.html”,
date="January 27”, days=days)
app.run(host='0.0.0.0', port=8080)
<!DOCTYPE html> <html> <head> {% if title %} <title>{{ title }}</title> {% else %} <title>My Web Page</title> {% endif %} </head> <body> Today's date is {{date}}. <ul> <!-- {% if days %} --> {% for day in days%} <li>{{day}}</li> {% endfor %} <!-- {% endif %} --> </ul> </body> </html>
/templates/index.html /main.py

What do templates look like?from flask import Flask from flask import render_template, request
app = Flask('app')
@app.route('/', methods=['GET', 'POST']) def hello_world(): days = ["Monday","Tuesday","Wednesday"] return render_template(“index.html”,
date="January 27”, days=days)
app.run(host='0.0.0.0', port=8080)
<!DOCTYPE html> <html> <head> {% if title %} <title>{{ title }}</title> {% else %} <title>My Web Page</title> {% endif %} </head> <body> Today's date is {{date}}. <ul> <!-- {% if days %} --> {% for day in days%} <li>{{day}}</li> {% endfor %} <!-- {% endif %} --> </ul> </body> </html>
/templates/index.html

Flask Routes
• Websites in actuality are made out of many routes (“endpoints”)
• Web pages send data between routes to render content and accomplish business logic.
• You can serve a page from / and have the data processed in /route2
from flask import Flask from flask import render_template, request
app = Flask('app')
@app.route('/', methods=['GET', 'POST']) def route1(): days = ["Monday","Tuesday","Wednesday"] return render_template("index.html")
@app.route('/route2', methods=['GET', 'POST']) def route2(): return "This is my Second Route"
app.run(host='0.0.0.0', port=8080)
Lab activity 2
• Let’s continue your abduction web form from lab 1.
• Previously we asked you to design the form, now you must process the data and return it to the user in a pretty way.
• Using templates you must:
• Present your form to the user.
• Use 2 separate routes.
• Return a page to the user display the input data received.
Homework
• Finish activities one and two
• Extend activity one to print out the winner of RPS
• (Hint: Use the logic from your week 2 homework)
• You should work in your pairs to complete this.
• Due Tuesday Feb 2nd 11:59pm.
• Submit here: http://bit.ly/DB21-3
Async students can work individually or form their own
teams (max size 2) - use #async to find a partner