


Languages
Pages
Legal


Lab 10: Workflow customization: Self Registration Approval
Contents Lab 10: Workflow customization: Self Registration Approval .......................................................................... 1
1. Introduction ............................................................................................................................................. 1
2. Contents.................................................................................................................................................... 3
2.1. Create Composite Project using Ant ............................................................................................... 5 2.2. Customize Composite Using JDeveloper ....................................................................................... 9 2.3. Deploy Custom Composite to SOA Server ................................................................................... 24 2.4. Registering Custom Composite with OIM Server ....................................................................... 38 2.5. Creating Approval Policies in OIM ............................................................................................... 42 2.6. Testing of custom approval process .............................................................................................. 45
3. Conclusion ............................................................................................................................................. 48
Appendix A – User, Roles and Organization creation ............................................................................. 50 Appendix B – Store credentials in CSF ....................................................................................................... 51 Appendix C – Download and install SOA extension for JDeveloper .................................................... 52
1. Introduction
Note: The content of this lab was taken from Oracle by Example material and adapted to this workshop. To access original content,
access http://otn.oracle.com/obe.
Note: All users, roles and organization are already created. For all tasks related to this, check Appendix A at the end of this
document for more information

OIM 11g Workshop - Lab 4.a
2
In this lab, we will cover how to create custom SOA workflows (composites) using a helper utility and JDeveloper tool. These
workflows will be developed in JDeveloper and then deployed to OIM SOA Server. To use the custom workflows, they will also be
need to registered in OIM Server.
The high level activities involved to create, deploy and register a custom composite can be broken up into 4 areas:
Create a project for the custom workflow using Ant tool
Open the custom workflow project in JDeveloper tool for customization
Deploy the custom workflow to OIM SOA Server
Register the custom workflow with OIM Server
SelfRegistrationApproval
This sample illustrates Self-Register User approval scenario. The task at request level of approval should be assigned to SYSTEM
ADMINISTRATORS role. The task at operation level of approval should be assigned to Organization administrators depending on
the organization value provided at Request level of approval.
Who should be the approver?
At operation level of approval, the approvers need to be the administrators of the organization to which the user is registered.
Where this approval process should be used?
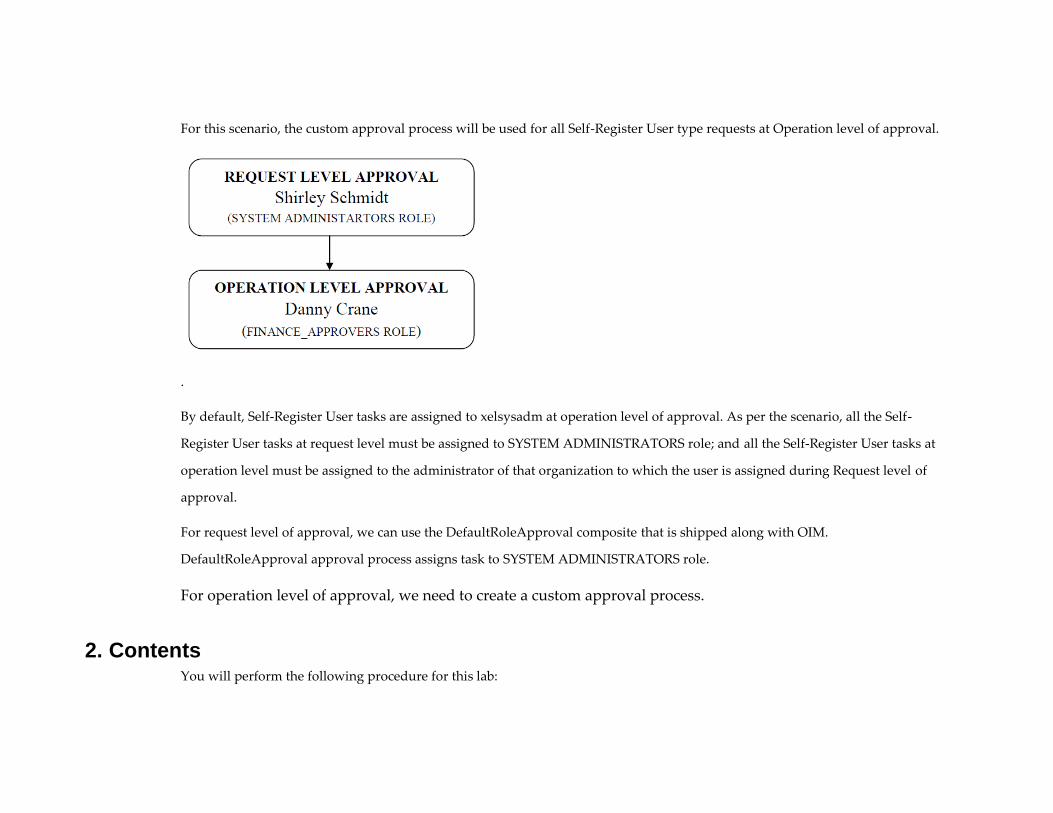
For this scenario, the custom approval process will be used for all Self-Register User type requests at Operation level of approval.
.
By default, Self-Register User tasks are assigned to xelsysadm at operation level of approval. As per the scenario, all the Self-
Register User tasks at request level must be assigned to SYSTEM ADMINISTRATORS role; and all the Self-Register User tasks at
operation level must be assigned to the administrator of that organization to which the user is assigned during Request level of
approval.
For request level of approval, we can use the DefaultRoleApproval composite that is shipped along with OIM.
DefaultRoleApproval approval process assigns task to SYSTEM ADMINISTRATORS role.
For operation level of approval, we need to create a custom approval process.
2. Contents You will perform the following procedure for this lab:
OIM 11g Workshop - Lab 4.a
4
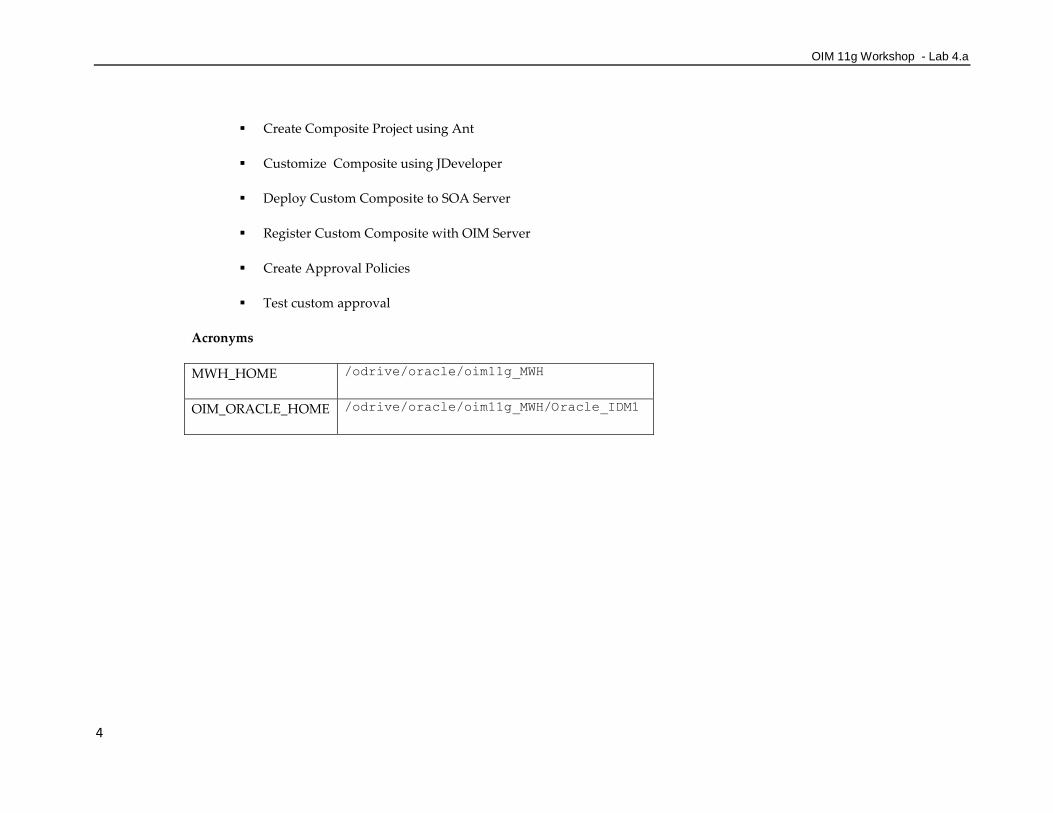
Create Composite Project using Ant
Customize Composite using JDeveloper
Deploy Custom Composite to SOA Server
Register Custom Composite with OIM Server
Create Approval Policies
Test custom approval
Acronyms
MWH_HOME /odrive/oracle/oim11g_MWH
OIM_ORACLE_HOME /odrive/oracle/oim11g_MWH/Oracle_IDM1
2.1.Create Composite Project using Ant
Purpose
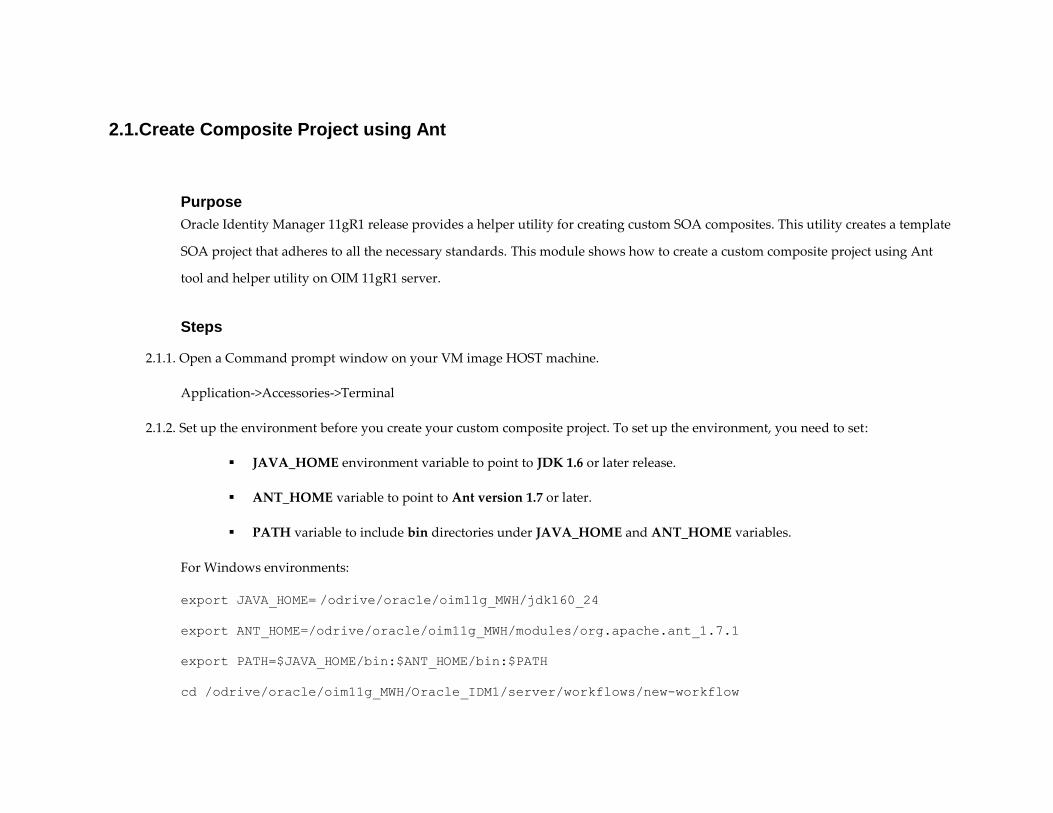
Oracle Identity Manager 11gR1 release provides a helper utility for creating custom SOA composites. This utility creates a template
SOA project that adheres to all the necessary standards. This module shows how to create a custom composite project using Ant
tool and helper utility on OIM 11gR1 server.
Steps
2.1.1. Open a Command prompt window on your VM image HOST machine.
Application->Accessories->Terminal
2.1.2. Set up the environment before you create your custom composite project. To set up the environment, you need to set:
JAVA_HOME environment variable to point to JDK 1.6 or later release.
ANT_HOME variable to point to Ant version 1.7 or later.
PATH variable to include bin directories under JAVA_HOME and ANT_HOME variables.
For Windows environments:
export JAVA_HOME= /odrive/oracle/oim11g_MWH/jdk160_24
export ANT_HOME=/odrive/oracle/oim11g_MWH/modules/org.apache.ant_1.7.1
export PATH=$JAVA_HOME/bin:$ANT_HOME/bin:$PATH
cd /odrive/oracle/oim11g_MWH/Oracle_IDM1/server/workflows/new-workflow

OIM 11g Workshop - Lab 4.a
6
Prepare the libs directory as follows:
cd /odrive/oracle/oim11g_MWH/Oracle_IDM1/server/workflows/new-workflow
mkdir libs
cp /odrive/oracle/oim11g_MWH/Oracle_IDM1/server/client/oimclient.jar ./libs
cp /odrive/oracle/oim11g_MWH/oracle_common/modules/oracle.jps_11.1.1/jps-api.jar ./libs
2.1.3. Be sure you are in /odrive/oracle/oim11g_MWH/Oracle_IDM1/server\workflows\new-workflow directory. To build your SOA
composite project, run the following ant command from this directory - "ant -f new_project.xml"
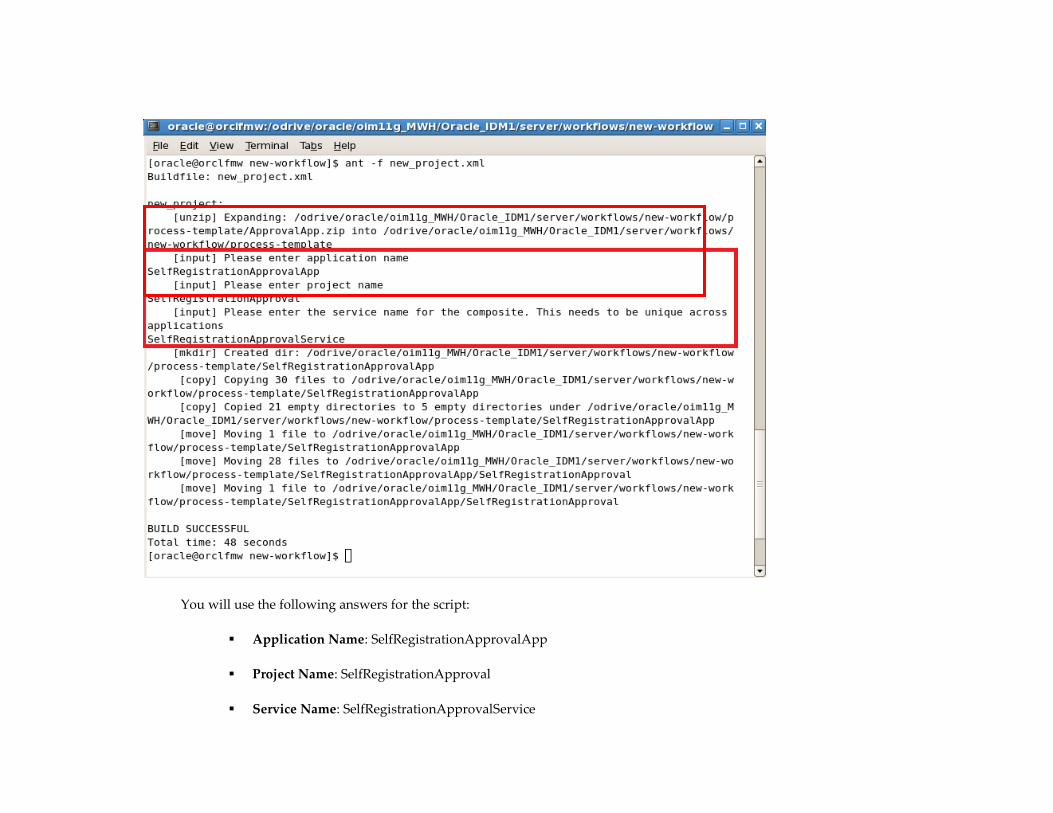
You will use the following answers for the script:
Application Name: SelfRegistrationApprovalApp
Project Name: SelfRegistrationApproval
Service Name: SelfRegistrationApprovalService

OIM 11g Workshop - Lab 4.a
8
Once the script has executed, it creates the composite project directories for you to proceed with customization. The application
home for the "SelfRegistrationApprovalApp" composite is under the
"/odrive/oracle/oim11g_MWH/Oracle_IDM1/server\workflows\new-workflow\process-template” directory. Verify this project
directory has been created and contains project files.
2.1.4. For this "SelfRegistrationApprovalApp" custom composite, we will need to use the "oimclient.jar" and ‚jps-api.jar‛ files to be
included in our project. These jar files will be used to invoke OIM API and CSF (Credential Store Framework) API calls from our
custom composite. The "oimclient.jar" file is available on server side, under "$OIM_ORACLE_HOME/server/client" directory,
while ‚jps-api.jar‛ is under ‚$MWH_HOME/oracle_common/modules/oracle.jps_11.1.1‛; in our enviroment,
‚/odrive/oracle/oim11g_MWH /oracle_common/modules/oracle.jps_11.1.1‛.
You’ll copy "oimclient.jar" and ‚jps-api.jar‛ files to under the composite project's SCA-INF/lib directory. In our case, these jar files
are copied into "/odrive/oracle/oim11g_MWH/Oracle_IDM1/server\workflows\new-workflow\process-
template\SelfRegistrationApprovalApp\SelfRegistrationApproval\SCA-INF\lib" directory.
Note: In this workshop, we have changed the ‚new_project.xml‛ file, at
‚/odrive/oracle/oim11g_MWH/Oracle_IDM1/server\workflows\new-workflow‛ so you don’t need to copy these libraries. The
following code was added to ‚new_project.xml‛, before </target> tag:
<copy todir="process-template/${application.name}/${project.name}/SCA-INF/lib">
<fileset file="libs/*.jar" />
</copy>
2.1.5. The composite project created in previous step can now be opened in JDeveloper installed locally on the VM host machine.

Checkpoint
This completes the creation of custom composite project using Ant tool. The project is now ready to be customized in JDeveloper.
2.2.Customize Composite Using JDeveloper
Purpose
This module shows how to open the custom composite project created in previous step using JDeveloper and then customizing the
composite.
Steps
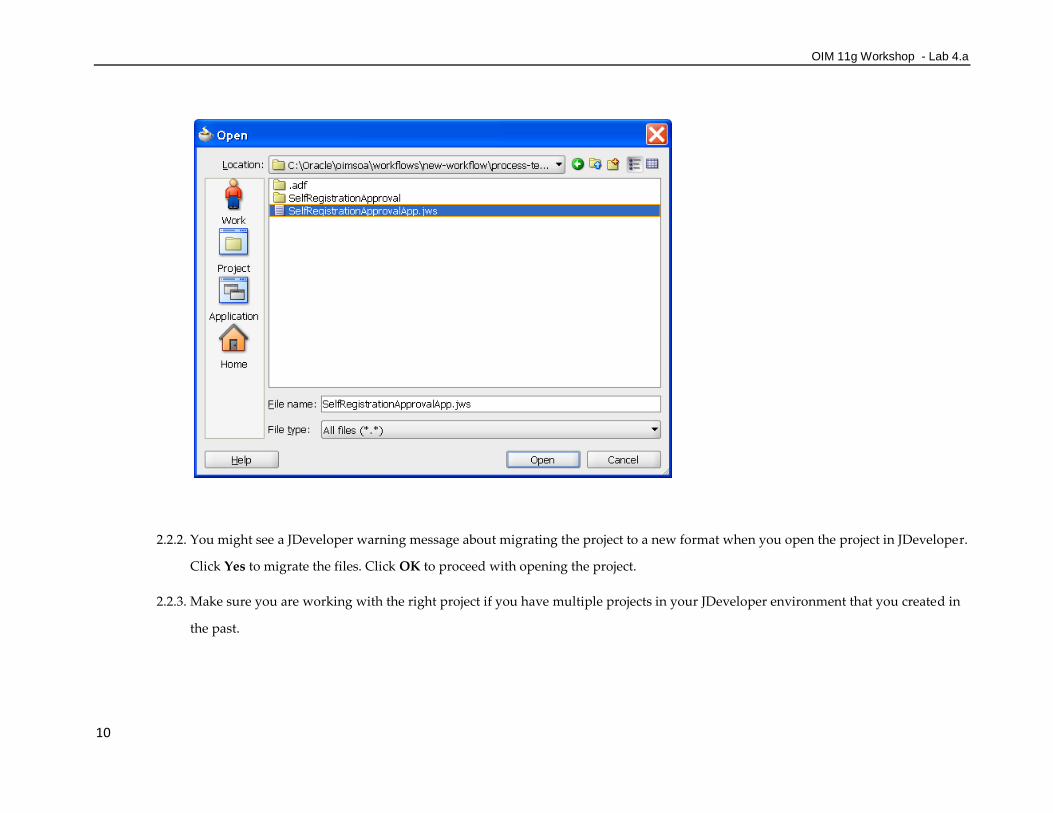
2.2.1. "Click on File > Open and select the file /odrive/oracle/oim11g_MWH/Oracle_IDM1/server/workflows/new-workflow/process-
template/SelfRegistrationApprovalApp/SelfRegistrationApprovalApp.jws".
OIM 11g Workshop - Lab 4.a
10
2.2.2. You might see a JDeveloper warning message about migrating the project to a new format when you open the project in JDeveloper.
Click Yes to migrate the files. Click OK to proceed with opening the project.
2.2.3. Make sure you are working with the right project if you have multiple projects in your JDeveloper environment that you created in
the past.

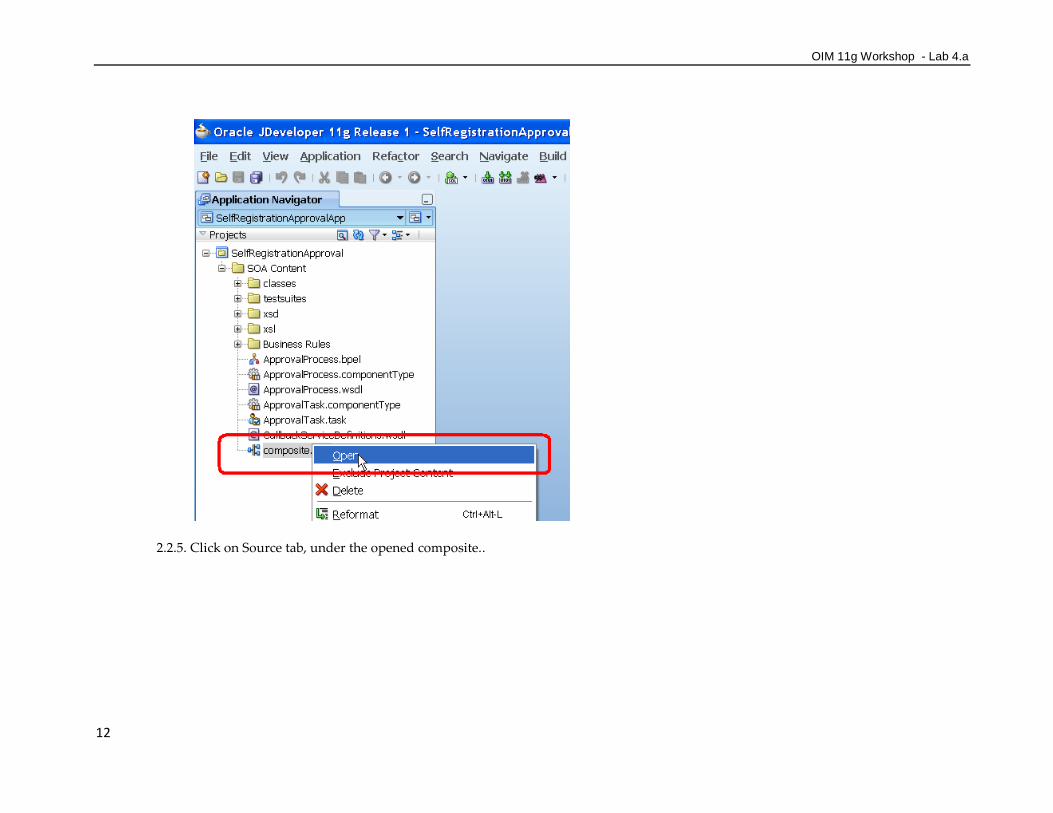
2.2.4. Under the "SelfRegistrationApproval", you will see folder structure as shown in the above image file. Open the "composite.xml"
file by selecting it and using right click of mouse button to open it.
OIM 11g Workshop - Lab 4.a
12
2.2.5. Click on Source tab, under the opened composite..
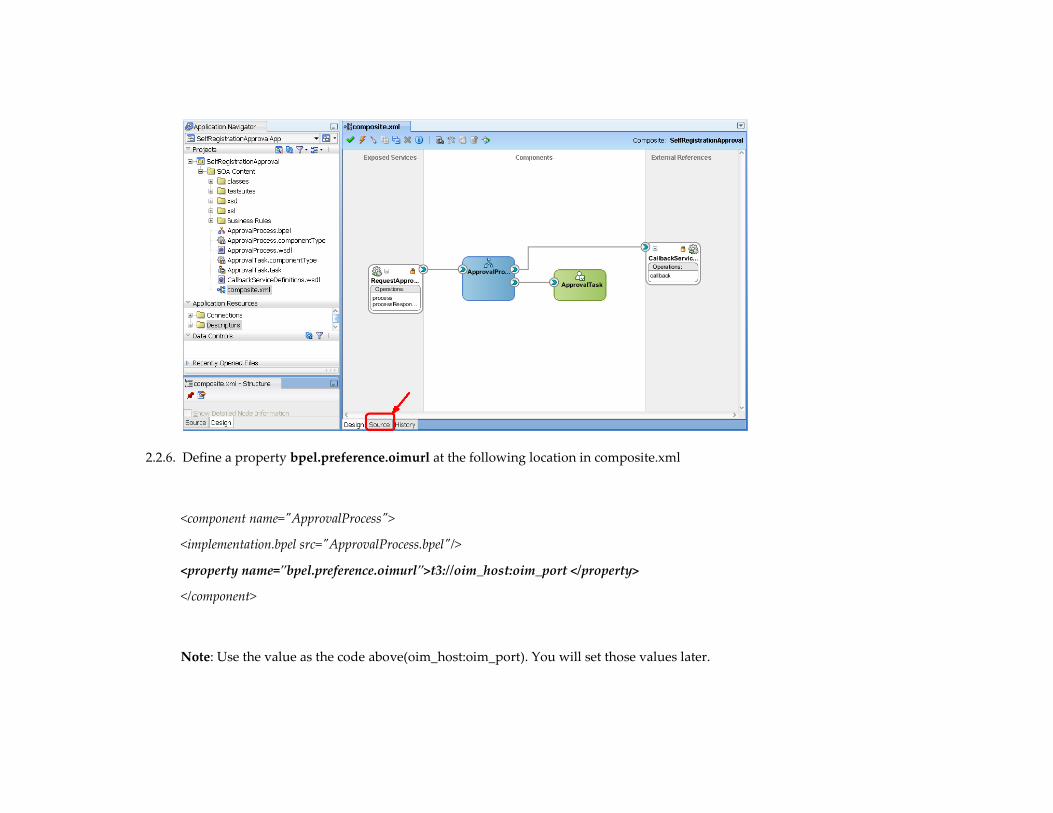
2.2.6. Define a property bpel.preference.oimurl at the following location in composite.xml
<component name="ApprovalProcess">
<implementation.bpel src="ApprovalProcess.bpel"/>
<property name="bpel.preference.oimurl">t3://oim_host:oim_port </property>
</component>
Note: Use the value as the code above(oim_host:oim_port). You will set those values later.

OIM 11g Workshop - Lab 4.a
14
This property will store OIM‟s url which will be used later in Java Embedding activity in the composite to login to OIM using
OIMClient. Adding this property in composite.xml will allow us to change its value at runtime (from EM console) rather than hard
coding it. For this sample we will set the actual value of oimurl at the time of testing the composite.
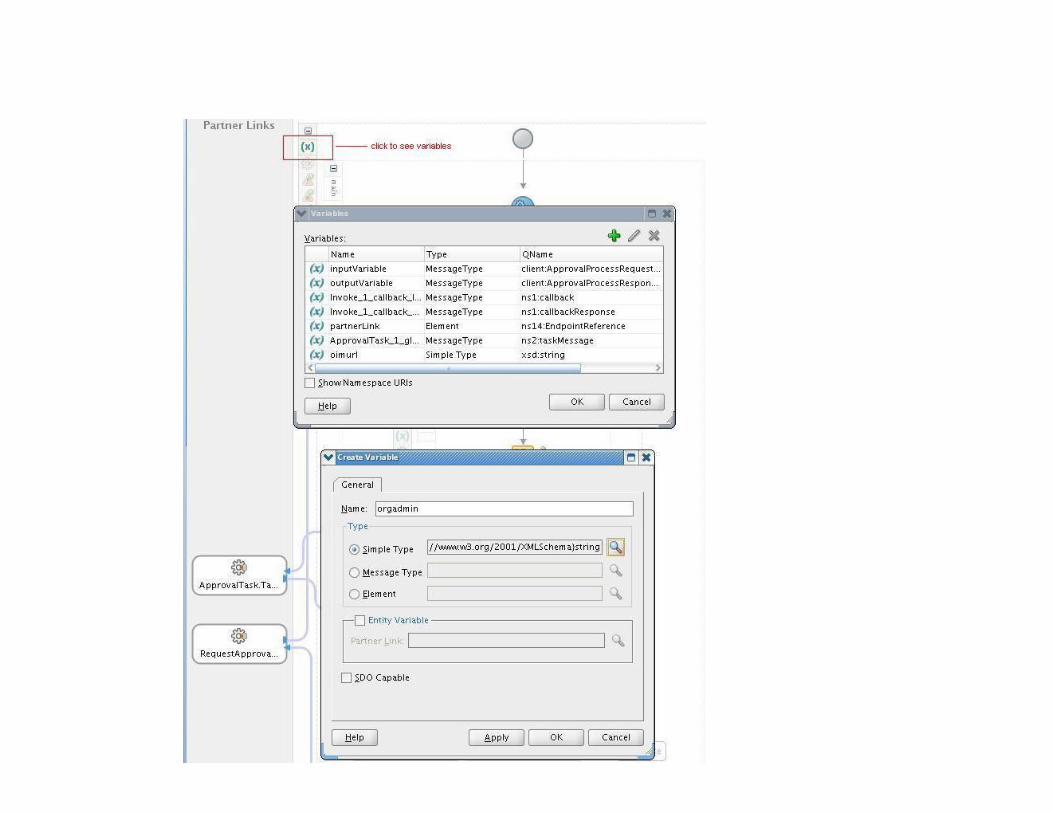
2.2.7. Open ApprovalProcess.bpel. Switch to design view. Click on ‚(x)‛ inside the approval process to see variables in this approval
process.
2.2.8. Click on ‚+‛ to add a variable. Give name as oimurl, choose type as ‚Simple Type‛ and set it to String. This variable will read OIM
url from the property mentioned in step above (2.2.6) and it can be used in Java code.
2.2.9. Add another variable orgadmin, choose type as ‚Simple Type‛ and set it to String. This variable will be used in Java Embedding
Activity to store the Organization Administrators, the value for which can be obtained using OIM APIs.

OIM 11g Workshop - Lab 4.a
16
2.2.10.From the components palette -> BPEL 1.1 -> BPEL Constructs, drag and drop Assign activity after receive input activity (see Figure
3). Rename this activity to Assign_oimurl
2.2.11.Double click on Assign_oimurl activity. Click on ‚+‛ sign and select Copy Operation. Create Copy Operation dialog will open

2.2.12.Click on Expression icon and drag it to the oimurl variable in the right part of the window. Expression builder dialog will open.
Under Functions header, select ‘BPEL XPath Extension Function’ from the drop down. Select ‘getPreference’ and click on Insert
Into Expression. Pass ‘oimurl’ as argument to this function and click OK. This will read the value of ‘bpel.preference.oimurl’
property that is defined in composite.xml.

OIM 11g Workshop - Lab 4.a
18
2.2.13.Click OK in the Edit Assign window.
2.2.14.From the components palette -> BPEL 1.1 -> Oracle Extensions, drag and drop Java Embedding activity after Assign_oimurl
activity. Rename this activity to GetOrgAdmin.

2.2.15.Double click on GetOrgAdmin activity. Write java code here to get Organization Admin using OIM APIs. The java code can be
found at ‚/odrive/dummydata/Lab 10/SelfRegistrationApproval.java‛.
2.2.16.Click OK.
2.2.17.Open ApprovalTask.task file under SelfRegistrationApprovalSOA Content

OIM 11g Workshop - Lab 4.a
20
2.2.18.Select Data from left pane. Click ‚+‛ sign and select ‚Add string parameter‛. Give parameter name as OrganizationAdmin. The
organization administrators obtained using OIM APIs in step 2.2.15 will be passed as string payload to the human task.
Go back to ApprovalProcess.bpel. Double click on the Approval_Task1 human task node. You will see the following window:
Click on the … button next to OrganizationAdmin.

Select orgadmin variable in the Task Parameters window and click OK.
Click OK in a Human Task window.
2.2.19.Go to ApprovalTask.task. Click on Assignment from left pane.
2.2.20. Double click on Stage1.Participant1. Edit Participant Type dialog will appear.. Provide the following values:
Identification Type: Group,
Data Type: By Expression.

OIM 11g Workshop - Lab 4.a
22
Value: Click on Expression builder (‚…‛) button in value column. Select task:task
task:payloadtask:OrganizationAdmin.

2.2.21.Save your work.

OIM 11g Workshop - Lab 4.a
24
Checkpoint
This completes the customization of custom composite project "SelfRegistrationApproval". From this point, you can proceed to
deploy this composite.
2.3.Deploy Custom Composite to SOA Server
Purpose
This module shows how to compile and deploy the custom composite to the OIM SOA Server. We will use JDeveloper to compile
and deploy the "SelfRegistrationApproval" custom composite in our training environment.
There are 2 way to deploy a composite to Weblogic Server: Using command line or wizard. In this section you will:
Set Weblogic Server properties
Deploy composite using Command line
Deploy composite using Wizard
Steps
Set Weblogic Server properties prior to deploy composites
Before deploying the SOA composite, we need to set the BpelcClasspath property in the System MBean Browser of Oracle
Enterprise Manager Fusion Middleware Control (EM) Console:
2.3.1. Go to EM console (http://orclfmw.example.com:7001/em). Login as weblogic/abcd1234.

2.3.2. Expand Weblogic Domain from the left pane. Right click on oim11g_domain System MBeans Browser
2.3.3. Go to Application Defined MBeans oracle.as.soainfra.configServer:AdminServerBPELConfig bpel
2.3.4. Under Attributes column click on BpelcClasspath. Provide full path for oimclient.jar and jps-api.jar. These files are located at
following location in a shiphome:
<OIM_ORACLE_HOME>/server/client/oimclient.jar
<MWH_HOME>/oracle_common/modules/oracle.jps_11.1.1/jps-api.jar

OIM 11g Workshop - Lab 4.a
26
In our environment:
/odrive/oracle/oim11g_MWH/Oracle_IDM1/server/client/oimclient.jar:/odrive/oracle/oim11g_MWH/oracl
e_common/modules/oracle.jps_11.1.1/jps-api.jar
Note: Replace OIM_ORACLE_HOME and MWH_HOME with corresponding full paths. The paths should be separated by a colon
(:) on UNIX and semicolon (;) on Windows.
Deploy composite using command line
2.3.5. Create a deployable jar file for the workflow by right click on the project. A popup wizard will appear which will guide you
through the deployment of composite.

2.3.6. Select Deploy to SAR , then click Next.

OIM 11g Workshop - Lab 4.a
28


OIM 11g Workshop - Lab 4.a
30
2.3.7. Create directory (mkdir) /odrive/dummydata/wflow. Copy the final output SCA jar file from <project directory>/deploy , at VM
host image, to /odrive/dummydata/wflow, where OIM is installed. Use WinSCP for this operation.
2.3.8. Open a session to OIM Server using Putty. Login as oracle user.
2.3.9. Go to ‚/odrive/oracle/oim11g_MWH/Oracle_SOA1/bin‛ directory:
[oracle@orclfmw~]$cd /odrive/oracle/oim11g_MWH/Oracle_SOA1/bin
2.3.10.Set environment variables
source /odrive/oracle/oim11g_MWH/wlserver_10.3/server/bin/setWLSEnv.sh
2.3.11.Run the following command:
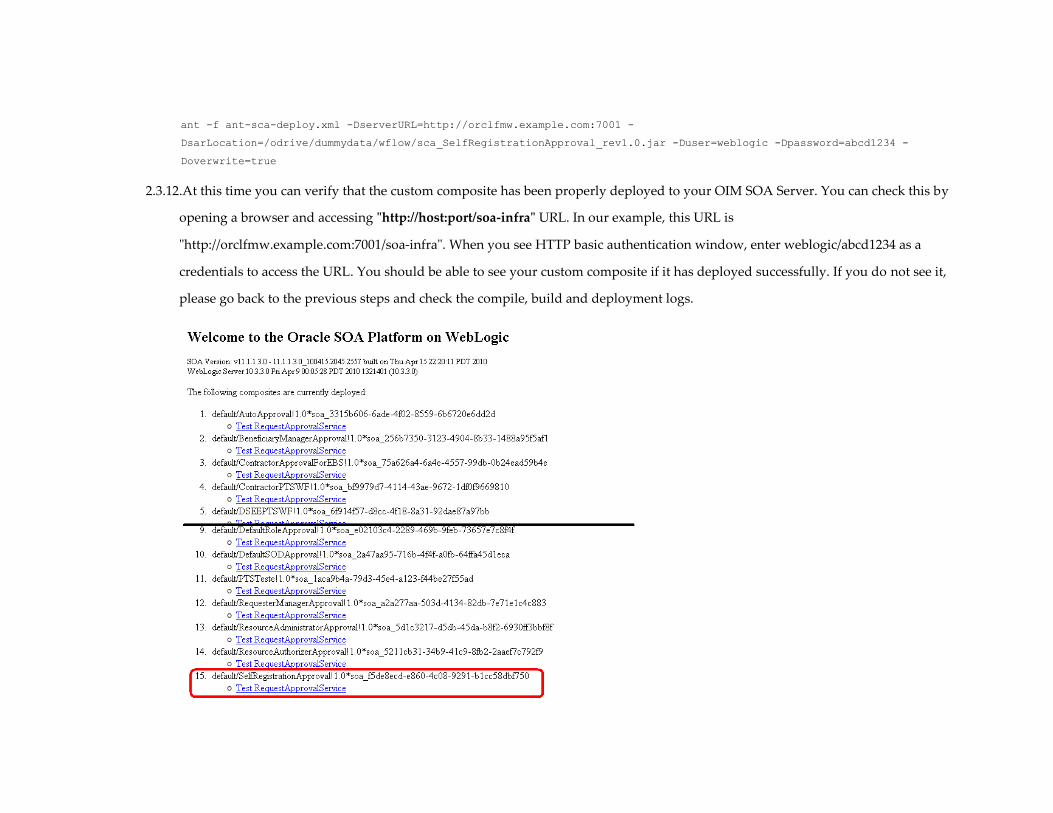
ant -f ant-sca-deploy.xml -DserverURL=http://orclfmw.example.com:7001 -
DsarLocation=/odrive/dummydata/wflow/sca_SelfRegistrationApproval_rev1.0.jar -Duser=weblogic -Dpassword=abcd1234 -
Doverwrite=true
2.3.12.At this time you can verify that the custom composite has been properly deployed to your OIM SOA Server. You can check this by
opening a browser and accessing "http://host:port/soa-infra" URL. In our example, this URL is
"http://orclfmw.example.com:7001/soa-infra". When you see HTTP basic authentication window, enter weblogic/abcd1234 as a
credentials to access the URL. You should be able to see your custom composite if it has deployed successfully. If you do not see it,
please go back to the previous steps and check the compile, build and deployment logs.

OIM 11g Workshop - Lab 4.a
32
Deploy composite using wizard
2.3.13.Right click on SelfRegistrationApproval project and click Deploy SelfRegistrationApproval. A popup wizard will appear which
will guide you through the deployment of composite to Oracle SOA server.
2.3.14.In Deployment Action step, select Deploy to Application Server. Click Next
2.3.15.In Deployment Configuration step, check ‚Overwrite any existing composite with same revision ID‛ option. Click Next.
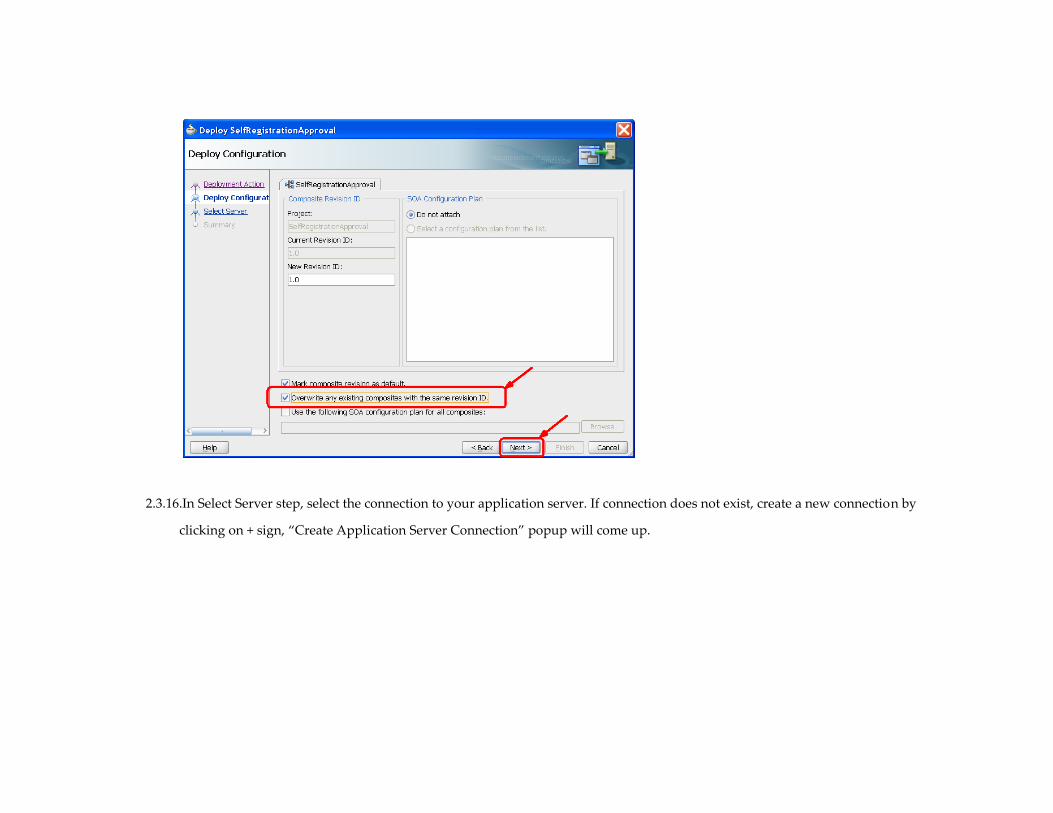
2.3.16.In Select Server step, select the connection to your application server. If connection does not exist, create a new connection by
clicking on + sign, ‚Create Application Server Connection‛ popup will come up.

OIM 11g Workshop - Lab 4.a
34
2.3.17. In ‚Create Application Server Connection‛ popup, provide a name for connection and click Next.
2.3.18.Provide password for weblogic user in Authentication step. Click Next.
2.3.19.Give hostname and port for Admin server and also enter weblogic domain in Configuration step. Click Next.
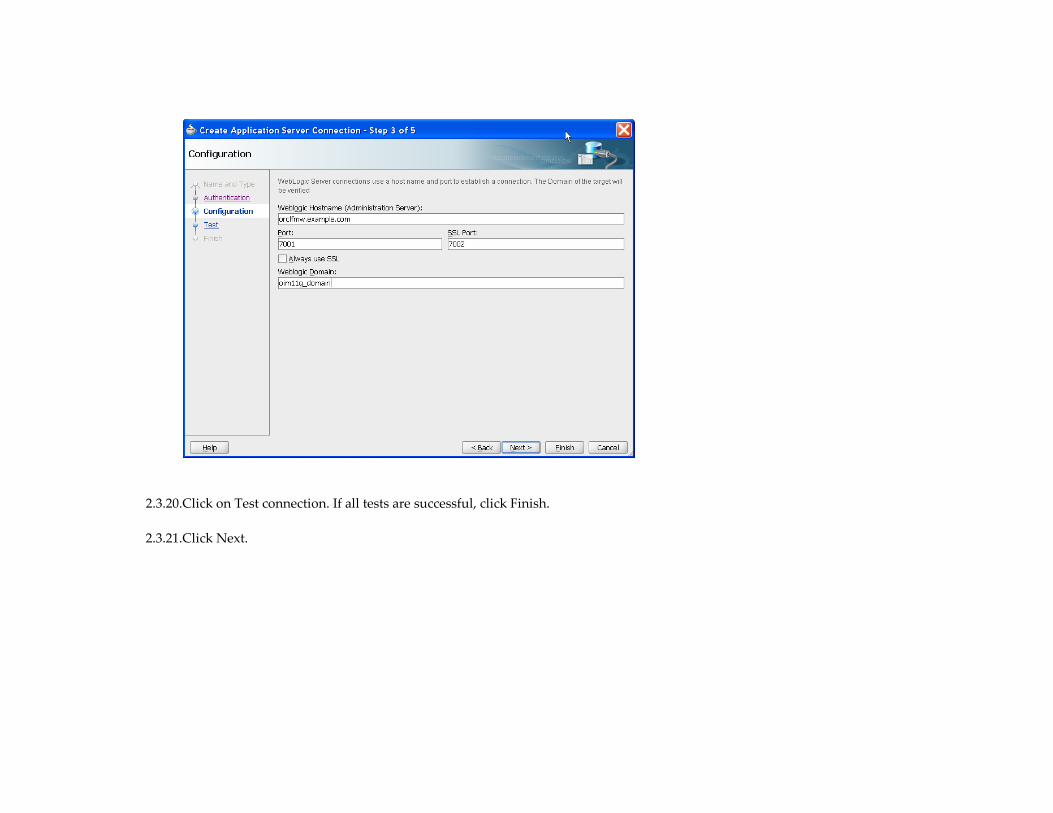
2.3.20.Click on Test connection. If all tests are successful, click Finish.
2.3.21.Click Next.
OIM 11g Workshop - Lab 4.a
36
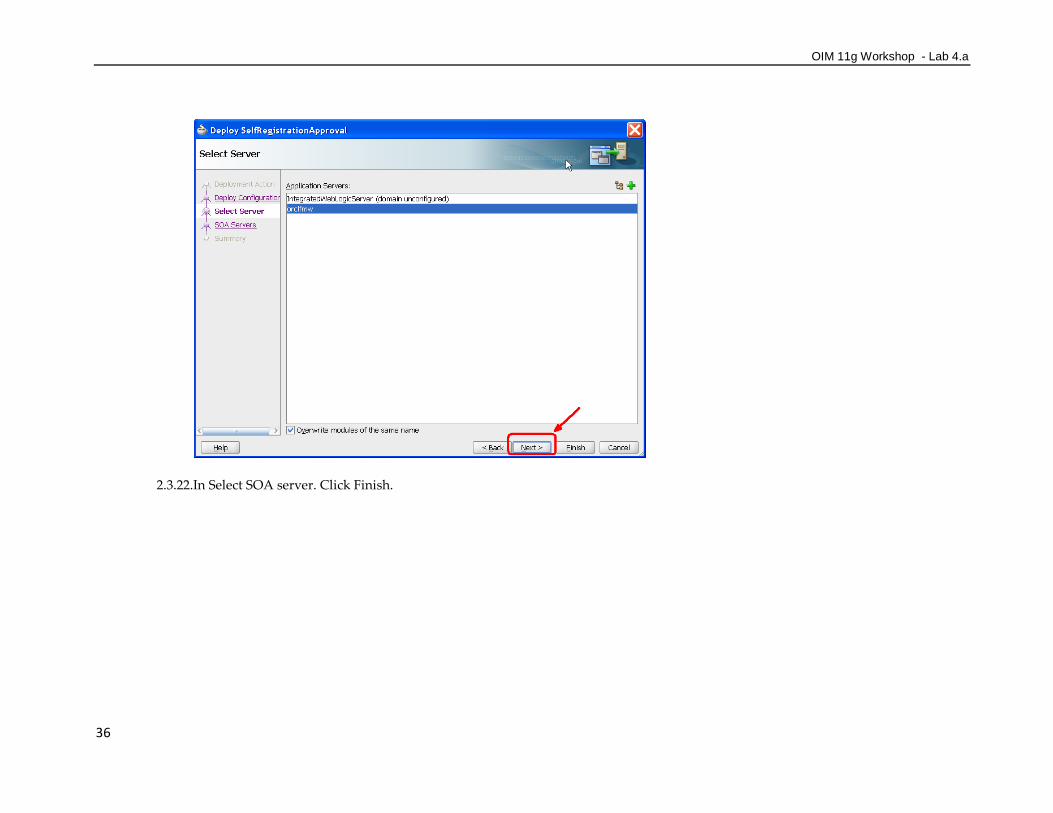
2.3.22.In Select SOA server. Click Finish.

2.3.23.Check compiler and deployment logs in JDeveloper for any errors.
2.3.24.Open http://orclfmw.example.com:7001/soa-infra so you can check for the deployed composite.
OIM 11g Workshop - Lab 4.a
38
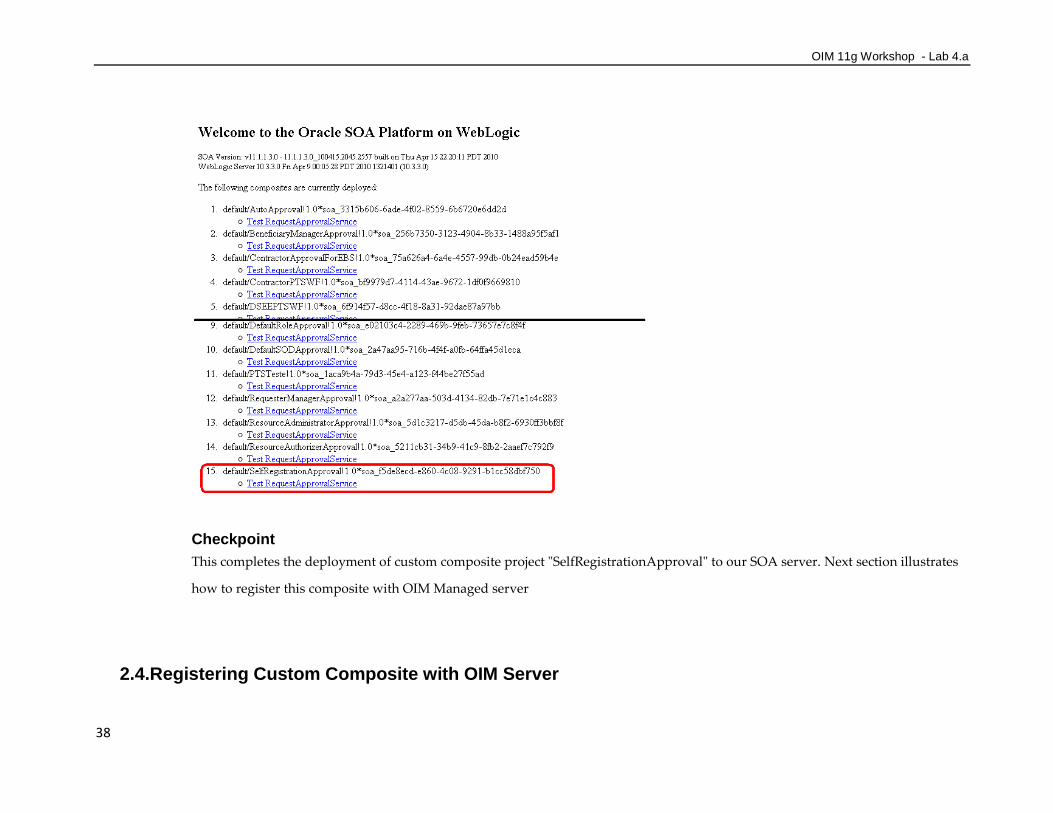
Checkpoint
This completes the deployment of custom composite project "SelfRegistrationApproval" to our SOA server. Next section illustrates
how to register this composite with OIM Managed server
2.4.Registering Custom Composite with OIM Server

Purpose
This module shows how to register the custom composite with OIM Server. We will register the "SelfRegistrationApproval" custom
composite with our OIM server. The composite cannot be invoked from OIM till the time it is registered in OIM Server and hence
we need to perform this step before we can use our composite.
Steps
2.4.1. Open a Terminal window on your Oracle Identity Manager server machine. You can use Putty or access VM image (guest). All steps
below will be performed on your OIM Server machine.
2.4.2. Set environment variables:
source /odrive/oracle/oim11g_MWH/wlserver_10.3/server/bin/setWLSEnv.sh
2.4.3. Go to /odrive/oracle/oim11g_MWH/Oracle_IDM1/server/workflows/registration directory.
cd /odrive/oracle/oim11g_MWH/Oracle_IDM1/server/workflows/registration
2.4.4. The first step is to create a composite properties file. We will create this file under the
$OIM_ORACLE_HOME/server/workflows/registration/ directory. In our case, the directory name is
"/odrive/oracle/oim11g_MWH/Oracle_IDM1/server/workflows/registration". You may review the other properties file that are
available in this directory for the default workflows that ship with the product.
2.4.5. Create the COMPOSITE_NAME.props property file in the $OIM_ORACLE_HOME/server/workflows/registration/ directory. In
our example, we create the "SelfRegistrationApproval.props" file as shown in the screen shot below. Enter the "name" and

OIM 11g Workshop - Lab 4.a
40
"version" correctly as shown below. The "name" represents the name of the SOA composite that we created. The "version" of the
composite should be the version of the composite that you deployed previously and are now registering.
[orclfmw@oracle registration]$ vi SelfRegistrationApproval.props
Use the following information in SelfRegistrationApproval.props file
name = SelfRegistrationApproval
category = Approval
providerType = BPEL
serviceName = RequestApprovalService
domainName = default
version = 1.0
payLoadID = payload
operationID = process
listOfTasks = ApprovalTask
2.4.6. To register the composite, we will use the helper utility provided with OIM. We will register by running the ant command as
follows:
ant -f registerworkflows-mp.xml register
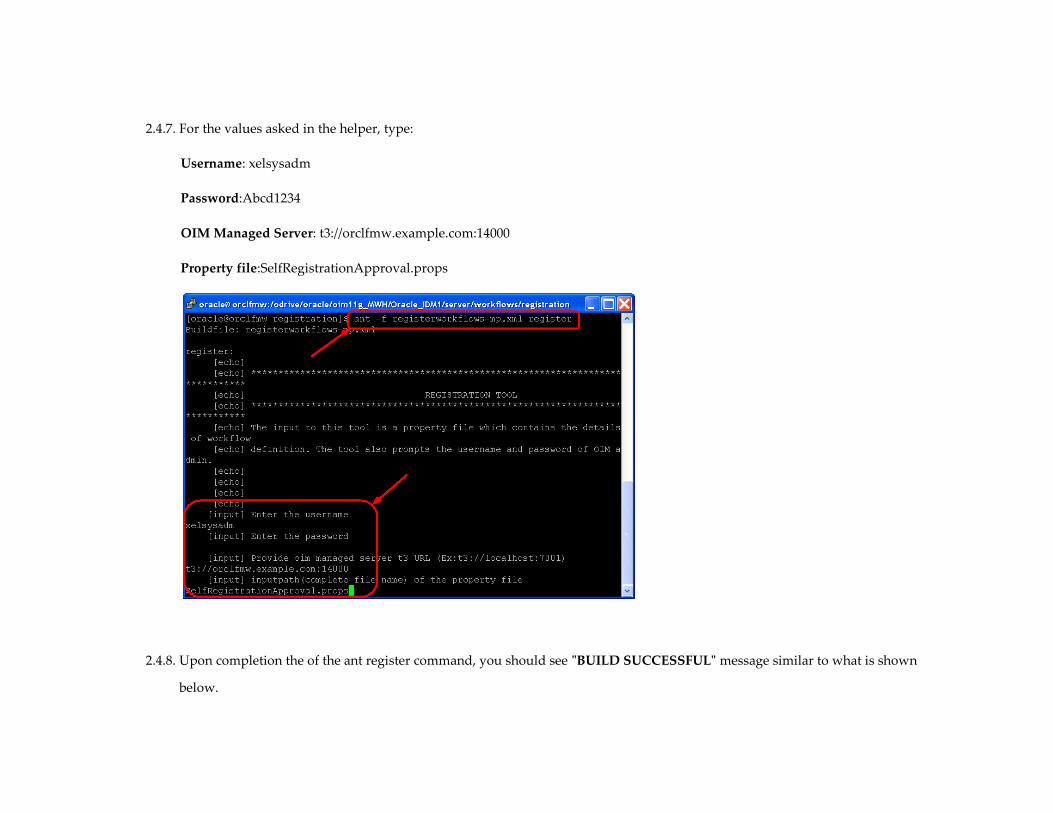
2.4.7. For the values asked in the helper, type:
Username: xelsysadm
Password:Abcd1234
OIM Managed Server: t3://orclfmw.example.com:14000
Property file:SelfRegistrationApproval.props
2.4.8. Upon completion the of the ant register command, you should see "BUILD SUCCESSFUL" message similar to what is shown
below.

OIM 11g Workshop - Lab 4.a
42
The custom workflow is now available and ready for use in your OIM server. If there is a need to change the custom composite and
re-deploy it, first disable the composite in OIM Server using the ant tool. Change your custom composite and re-deploy the new
version of composite. Re-enable the composite using the ant tool. This completes the first workflow of this lab.
2.5.Creating Approval Policies in OIM

Purpose
This section will create all necessary approval policies to test the approval workflow we have create for Self Registration activity.
We will need two approval policies. One approval policy to assign Self-Register User tasks at request level to SYSTEM
ADMINISTRATORS role and another approval policy to assign tasks at operation level to Organization Administrators.
Steps
Create Approval Policy for Request Level
Login to OIM as xelsysadm
2.5.1. Go to Advanced Admin console and click on Policies tab.
2.5.2. Click on Create button in left pane.
2.5.3. Provide Policy name (SelfRegisterPolicyRL)
2.5.4. Select Request type as Self-Register User.
2.5.5. Choose Request Level of approval from the drop down
2.5.6. Select ‘default/DefaultRoleApproval!1.0’ as Approval Process. Click Next
2.5.7. Provide a Rule name (SelfRegistrationRuleRL)
2.5.8. Click on Add Simple Rule. A popup will appear.
2.5.9. Provide following values for the rule:
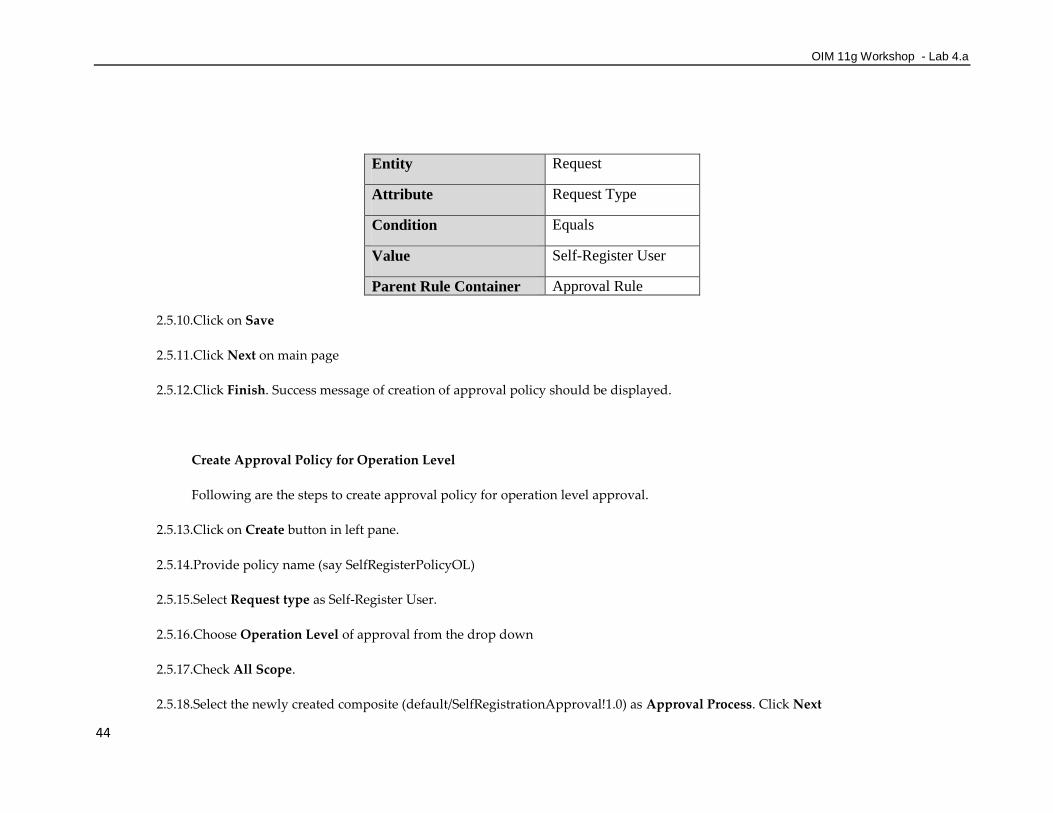
OIM 11g Workshop - Lab 4.a
44
Entity Request
Attribute Request Type
Condition Equals
Value Self-Register User
Parent Rule Container Approval Rule
2.5.10.Click on Save
2.5.11.Click Next on main page
2.5.12.Click Finish. Success message of creation of approval policy should be displayed.
Create Approval Policy for Operation Level
Following are the steps to create approval policy for operation level approval.
2.5.13.Click on Create button in left pane.
2.5.14.Provide policy name (say SelfRegisterPolicyOL)
2.5.15.Select Request type as Self-Register User.
2.5.16.Choose Operation Level of approval from the drop down
2.5.17.Check All Scope.
2.5.18.Select the newly created composite (default/SelfRegistrationApproval!1.0) as Approval Process. Click Next
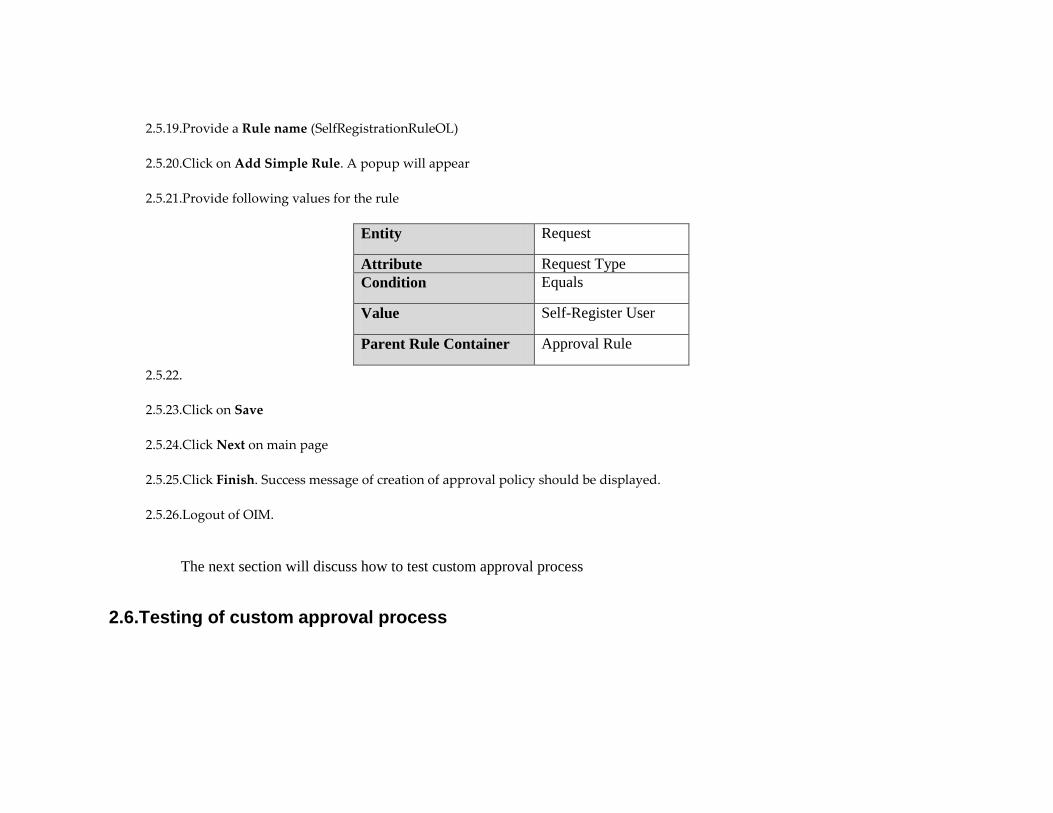
2.5.19.Provide a Rule name (SelfRegistrationRuleOL)
2.5.20.Click on Add Simple Rule. A popup will appear
2.5.21.Provide following values for the rule
Entity Request
Attribute Request Type
Condition Equals
Value Self-Register User
Parent Rule Container Approval Rule
2.5.22.
2.5.23.Click on Save
2.5.24.Click Next on main page
2.5.25.Click Finish. Success message of creation of approval policy should be displayed.
2.5.26.Logout of OIM.
The next section will discuss how to test custom approval process
2.6.Testing of custom approval process
OIM 11g Workshop - Lab 4.a
46
Purpose
In this section you will execute a Self Request activity so we can test the created composite. We will provide a valid OIM url for
bpel.preference.oimurl property, the one we created in step 2.2.6.
Steps
Before invoking the SOA composite, we need to provide a valid OIM url for the property set in composite.xml of SOA composite.
We can set this value from EM console. Follow the steps below to achieve this.
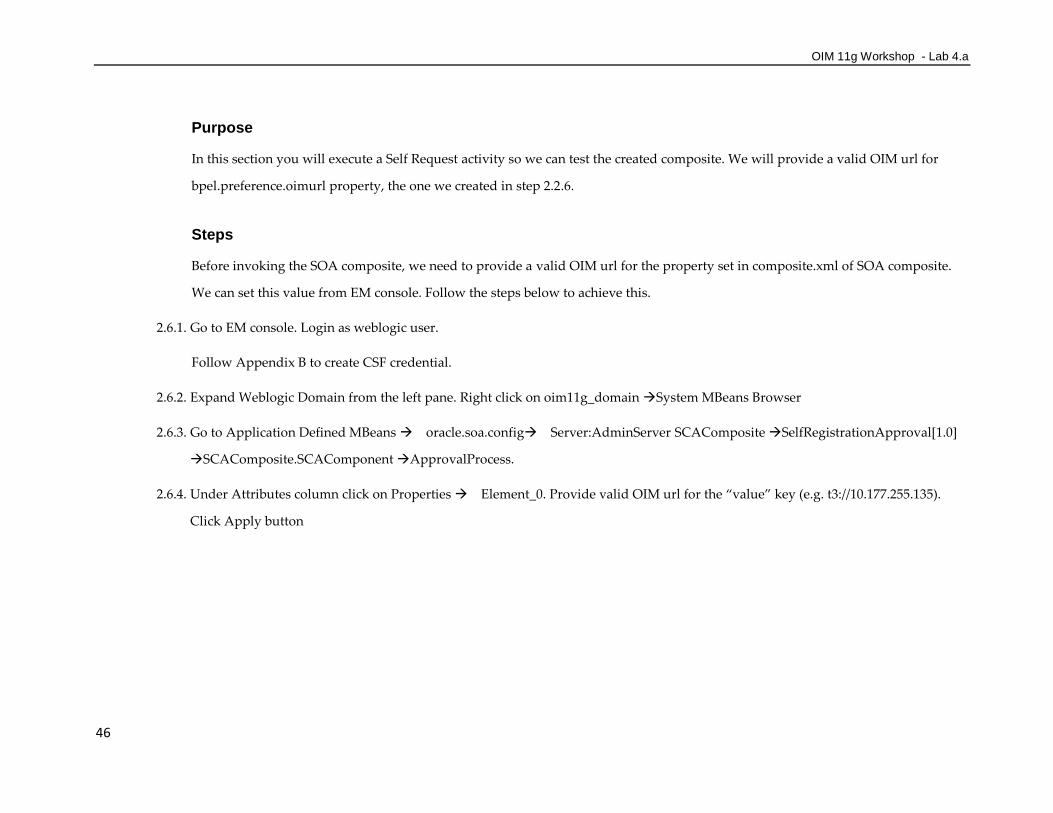
2.6.1. Go to EM console. Login as weblogic user.
Follow Appendix B to create CSF credential.
2.6.2. Expand Weblogic Domain from the left pane. Right click on oim11g_domain System MBeans Browser
2.6.3. Go to Application Defined MBeans oracle.soa.configServer:AdminServer SCAComposite SelfRegistrationApproval[1.0]
SCAComposite.SCAComponent ApprovalProcess.
2.6.4. Under Attributes column click on Properties Element_0. Provide valid OIM url for the ‚value‛ key (e.g. t3://10.177.255.135).
Click Apply button

Now follow these steps for testing the approval process:
2.6.5. Go to the login page of OIM.
2.6.6. Create the objects (user/roles/orgs) as mentioned in Appendix A.
2.6.7. Click on Register link
2.6.8. Provide user details in Basic Information step. Click Next
2.6.9. Fill challenge questions. Click Register
2.6.10.Make a note of registration tracking request number. Click on Back to login.
2.6.11.Login as Shirley Schmidt (SSCHMIDT/Abcd1234).

OIM 11g Workshop - Lab 4.a
48
2.6.12.Click on Search Approval Tasks. Make sure you are able to see Self-Registration task with the same request ID.
2.6.13.Select the task row with the request number matching registration tracking request number and click Open task details.
2.6.14.Provide Organization as ‘FINANCE’
2.6.15.Click Approve. The task will move to Operation level of approval
2.6.16.Logout of OIM.
2.6.17. Login as Danny Crane (DCRANE/Abcd1234) - This user is a member of FINANCE_APPROVERS group. So he should be able to
see the task.
2.6.18.Click on Search Approval Tasks. Make sure you are able to see Self-Registration task with the same request ID.
2.6.19.Click on Approve. The task should have been approved successfully and the user created in OIM.
2.6.20.Logout of OIM.
2.6.21.Click on Track Registration. Provide tracking id and click Submit. Verify that registration request status is completed.
3. Conclusion
In this lab, you accomplished the following:
Learnt how to create a custom composite using ant tool and JDeveloper tool
Learnt how to deploy a custom composite from JDeveloper to SOA Server
Learnt how to register a custom composite with OIM Server

Product Features that you have learnt
Helper utility to create custom composite
Helper utility to register custom composite

OIM 11g Workshop - Lab 4.a
50
Appendix A – User, Roles and Organization creation
You will also need to perform the following tasks from OIM Admin console:
1. Create an organization FINANCE.
2. Create a role FINANCE_APPROVERS.
3. Create an end-user Danny Crane.
4. Assign FINANCE_APPROVERS role to Danny Crane.
5. Assign FINANCE_APPROVERS role to Administrative roles for FINANCE organization
6. Create a user Shirley Schmidt.
7. Assign SYSTEM ADMINISTRATORS role to Shirley Schmidt.

Appendix B – Store credentials in CSF
Follow the steps mentioned below to store credential in CSF:
1. Go to EM console. Login as weblogic.
2. Expand Weblogic Domain in left pane.
3. Right click on <WLS_DOMAIN>. Select Security Credentials.
4. Click on Create Map button. Provide name for map as ‚oracle.oim.sysadminMap‛. Click OK.
5. Click on Create Key button. Provide following details:
Select Map oracle.oim.sysadminMap
Key sysadmin
Type Password
Username SSCHMIDT
Password Abcd1234
6.Click OK.
OIM 11g Workshop - Lab 4.a
52
Appendix C – Download and install SOA extension for JDeveloper
Download SOA extension
1. Go to JDeveloper Home Page at Oracle Technology Network.
http://www.oracle.com/technetwork/developer-tools/jdev/overview/index.html
2. Click Downloads tab
3. Click JDeveloper Extensions
4. And then Oracle Fusion Middleware Extensions

5. Find Oracle SOA Composite Editor, and choose build 11.1.1.3.0.25.57.
Install SOA extension
1. Open JDeveloper tool
2. In Help menu, click Check for updates. The Check for updates appears. Click Next
3. Choose Install from file and select the downloaded software from previous section(
Top Related