


Languages
Pages
Legal


3-Dec-15
JUnit
2
Test suites
Obviously you have to test your code to get it working in the first place You can do ad hoc testing (testing whatever occurs to you at the
moment), or
You can build a test suite (a thorough set of tests that can be run at any time)
Disadvantages of writing a test suite It’s a lot of extra programming
True—but use of a good test framework can help quite a bit
You don’t have time to do all that extra work
False—Experiments repeatedly show that test suites reduce debugging time more than the amount spent building the test suite
Advantages of having a test suite Your program will have many fewer bugs
It will be a lot easier to maintain and modify your program
This is a huge win for programs that, unlike class assignments, get actual use!
3
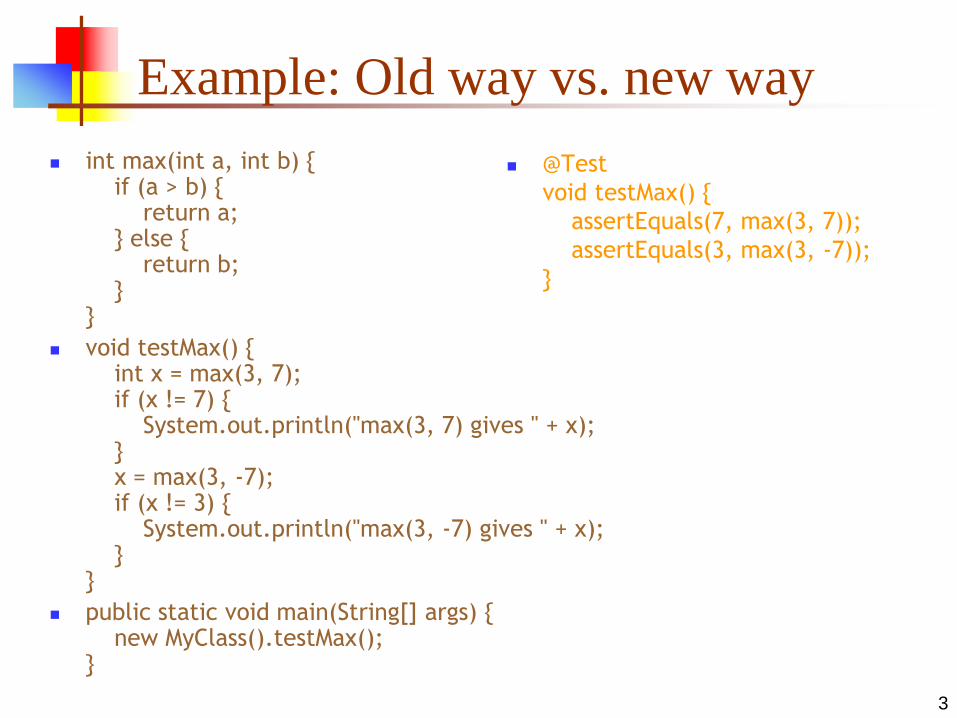
Example: Old way vs. new way
int max(int a, int b) { if (a > b) { return a; } else { return b; } }
void testMax() { int x = max(3, 7); if (x != 7) { System.out.println("max(3, 7) gives " + x); } x = max(3, -7); if (x != 3) { System.out.println("max(3, -7) gives " + x); } }
public static void main(String[] args) { new MyClass().testMax(); }
@Test
void testMax() {
assertEquals(7, max(3, 7));
assertEquals(3, max(3, -7));
}

4
Usual approach to testing
In usual approach,
Tests are written before the code itself
If code has no automated test case, it is assumed not to work
A test framework is used so that automated testing can be done after
every small change to the code
This may be as often as every 5 or 10 minutes
If a bug is found after development, a test is created to keep the bug from
coming back
Consequences
Fewer bugs
More maintainable code
Continuous integration—During development, the program always
works—it may not do everything required, but what it does, it does right
5
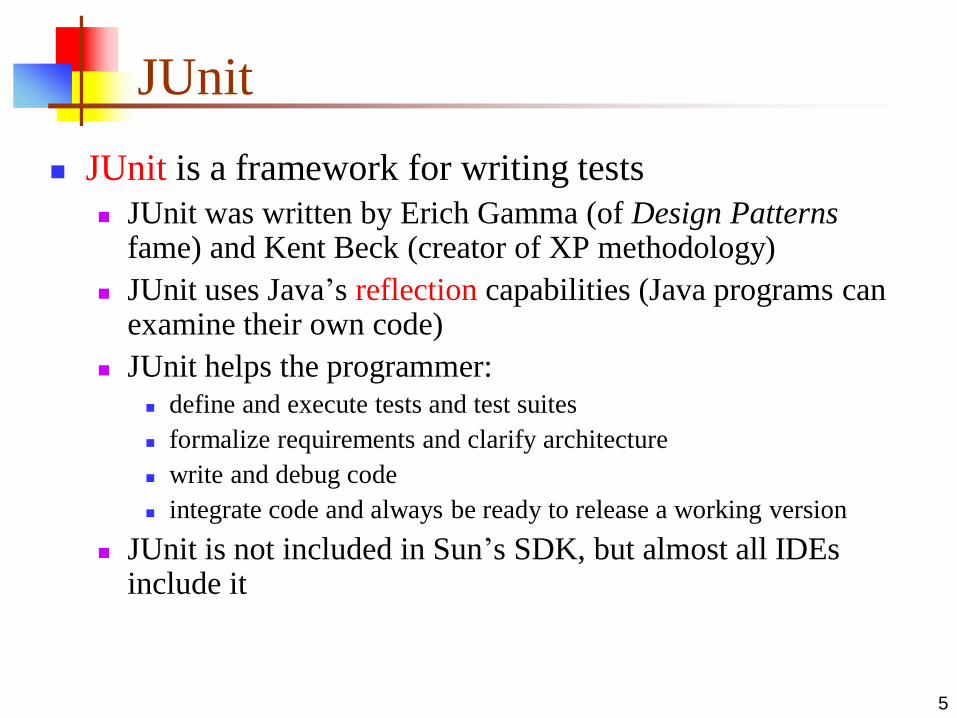
JUnit
JUnit is a framework for writing tests
JUnit was written by Erich Gamma (of Design Patterns fame) and Kent Beck (creator of XP methodology)
JUnit uses Java’s reflection capabilities (Java programs can examine their own code)
JUnit helps the programmer: define and execute tests and test suites
formalize requirements and clarify architecture
write and debug code
integrate code and always be ready to release a working version
JUnit is not included in Sun’s SDK, but almost all IDEs include it

Features
JUnit is an open source framework which is used for writing & running tests.
Provides Annotation to identify the test methods.
Provides Assertions for testing expected results.
Provides Test runners for running tests.
JUnit tests allow you to write code faster which increasing quality
JUnit is elegantly simple. It is less complex & takes less time.
JUnit tests can be run automatically and they check their own results and
provide immediate feedback. There's no need to manually comb through a
report of test results.
JUnit tests can be organized into test suites containing test cases and even
other test suites.
Junit shows test progress in a bar that is green if test is going fine and it turns
red when a test fails.
6
7
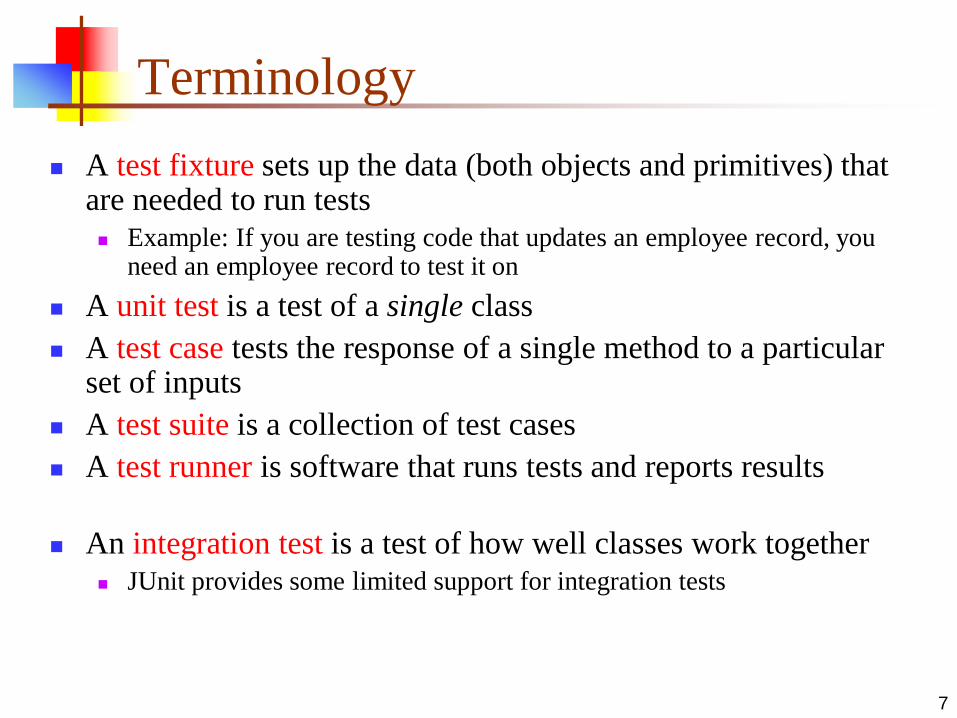
Terminology
A test fixture sets up the data (both objects and primitives) that are needed to run tests Example: If you are testing code that updates an employee record, you
need an employee record to test it on
A unit test is a test of a single class
A test case tests the response of a single method to a particular set of inputs
A test suite is a collection of test cases
A test runner is software that runs tests and reports results
An integration test is a test of how well classes work together JUnit provides some limited support for integration tests
8
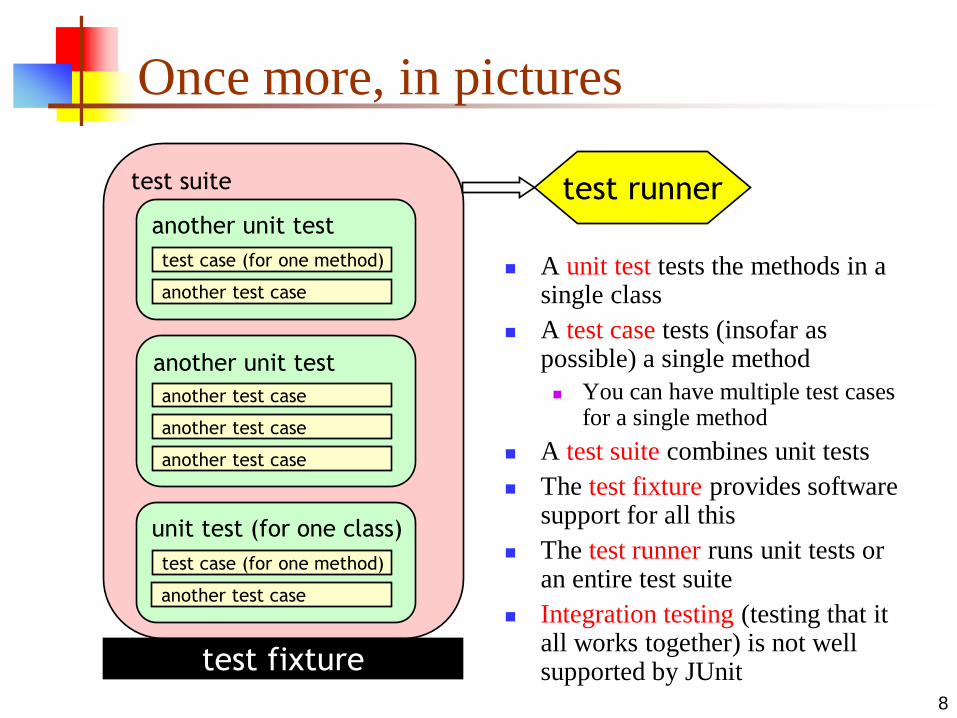
test suite
Once more, in pictures
A unit test tests the methods in a single class
A test case tests (insofar as possible) a single method
You can have multiple test cases for a single method
A test suite combines unit tests
The test fixture provides software support for all this
The test runner runs unit tests or an entire test suite
Integration testing (testing that it all works together) is not well supported by JUnit
unit test (for one class)
another unit test
test case (for one method)
another test case
test case (for one method)
another unit test
another test case
another test case
another test case
test fixture
test runner
another test case

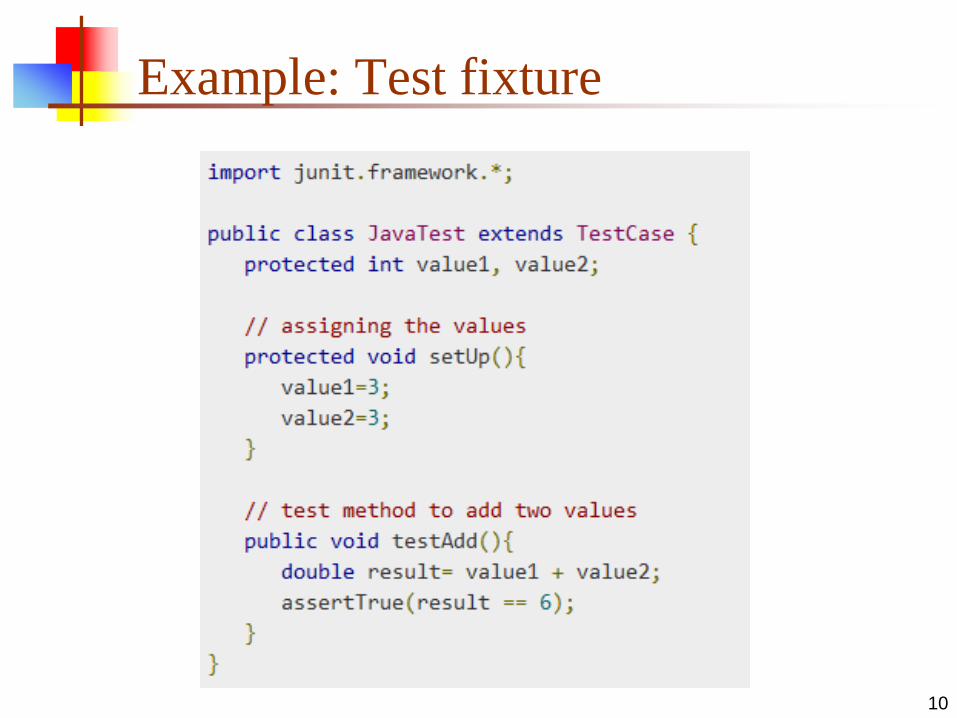
Test fixture
Fixtures is a fixed state of a set of objects used as a
baseline for running tests. The purpose of a test fixture
is to ensure that there is a well known and fixed
environment in which tests are run so that results are
repeatable. It includes
setUp() method which runs before every test invocation.
tearDown() method which runs after every test method.
9
Example: Test fixture
10

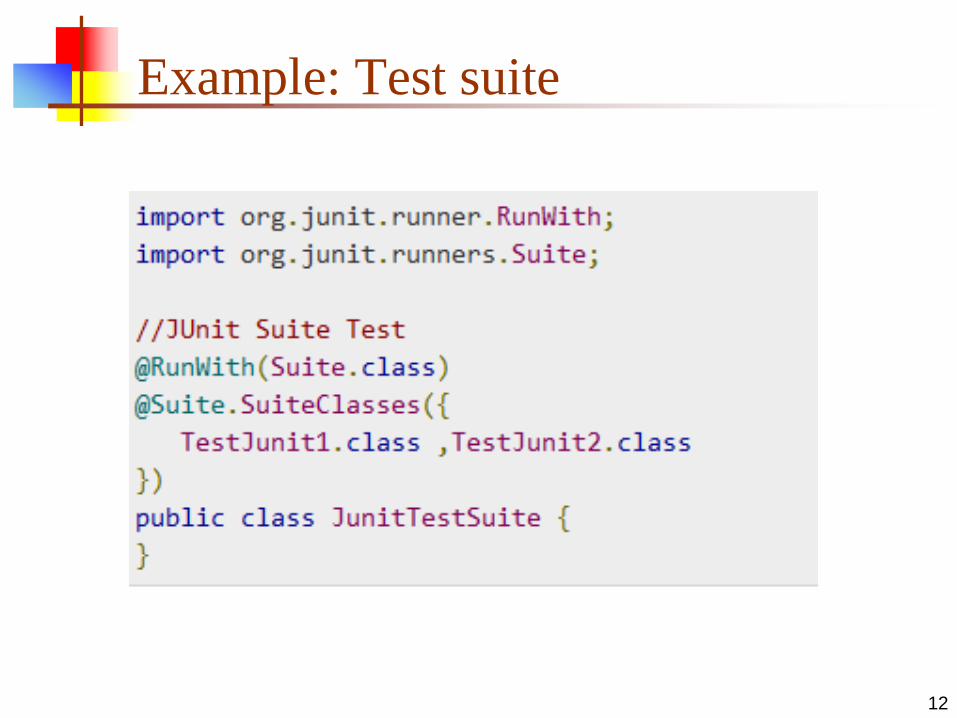
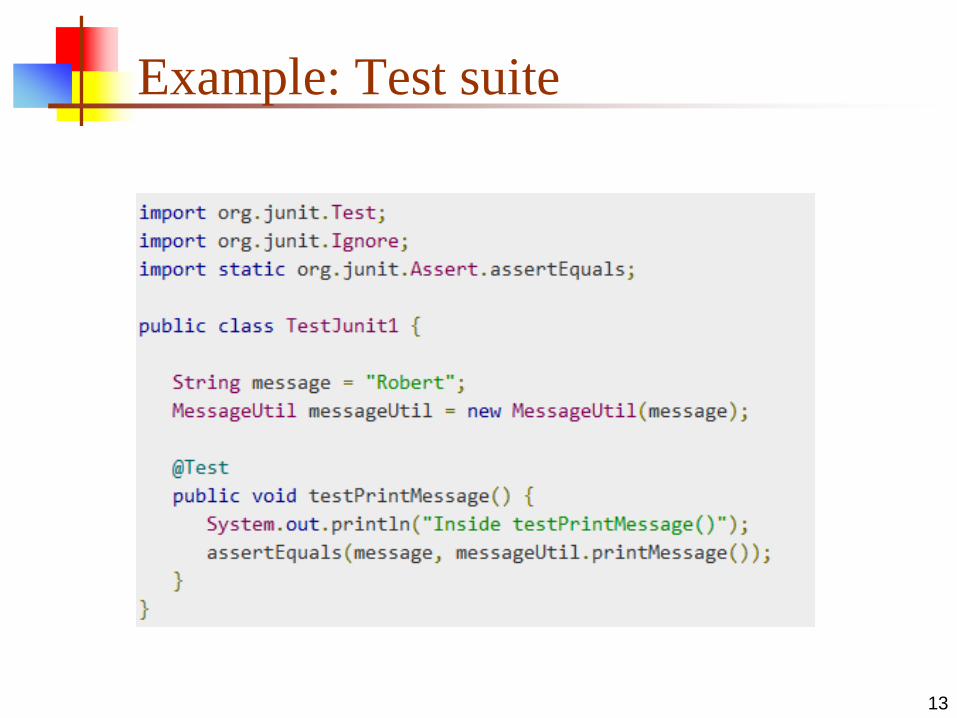
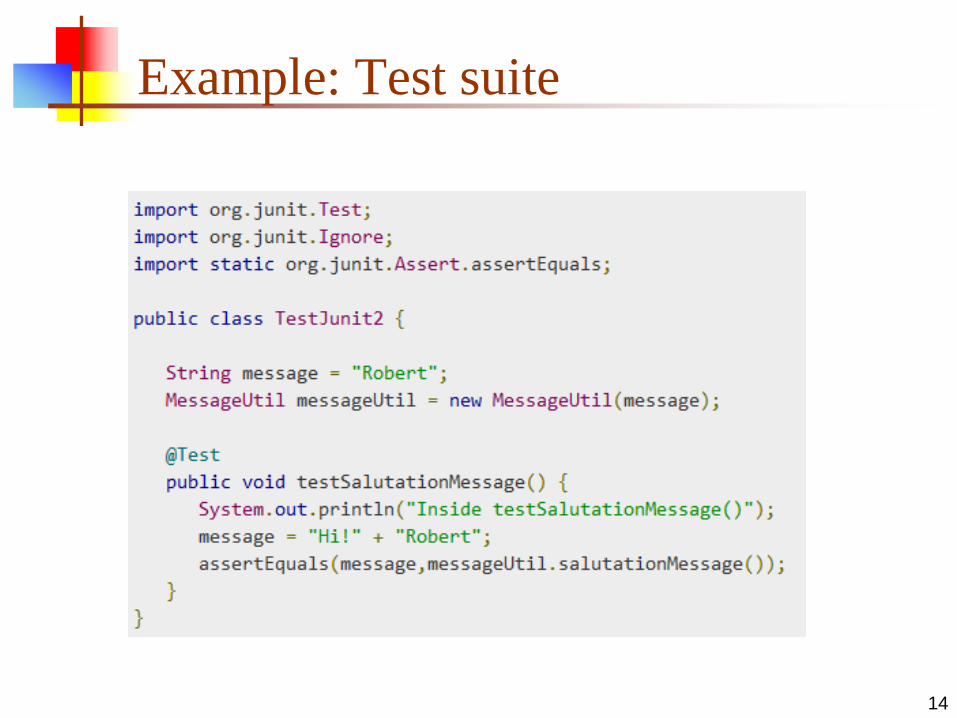
Test suite
Test suite means bundle a few unit test cases and run it
together. In JUnit, both @RunWith and @Suite
annotation are used to run the suite test. Here is an
example which uses TestJunit1 & TestJunit2 test
classes.
11
Example: Test suite
12
Example: Test suite
13
Example: Test suite
14

JUnit classes
JUnit classes are important classes which is used in
writing and testing JUnits. Some of the important
classes are
Assert which contain a set of assert methods.
TestCase which contain a test case defines the fixture to run
multiple tests.
TestResult which contain methods to collect the results of
executing a test case.
15
16
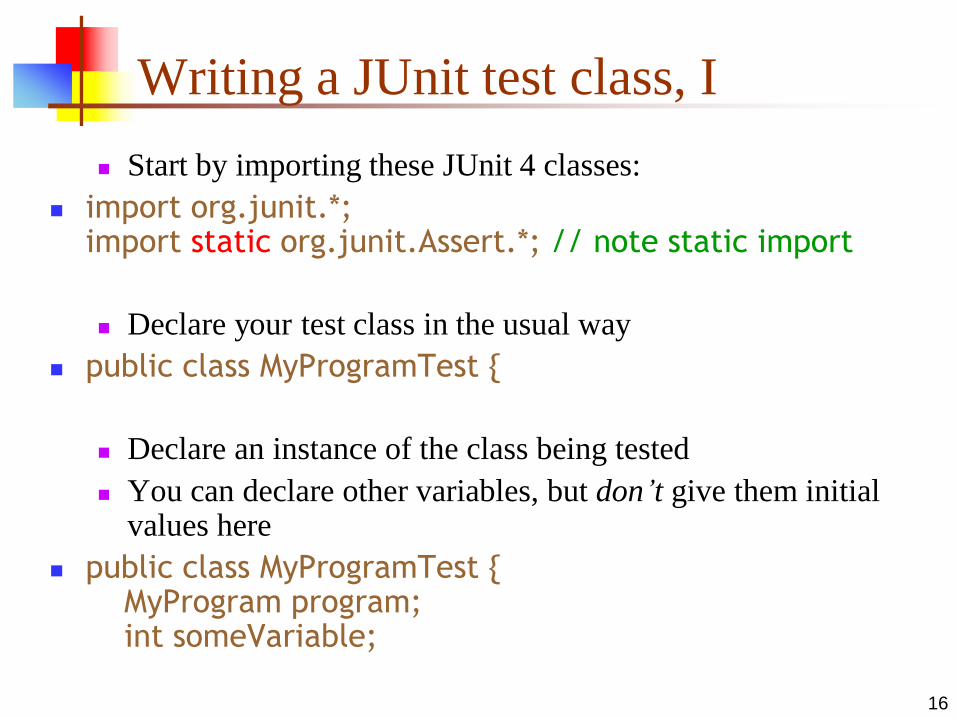
Writing a JUnit test class, I
Start by importing these JUnit 4 classes:
import org.junit.*; import static org.junit.Assert.*; // note static import
Declare your test class in the usual way
public class MyProgramTest {
Declare an instance of the class being tested
You can declare other variables, but don’t give them initial values here
public class MyProgramTest { MyProgram program; int someVariable;
17
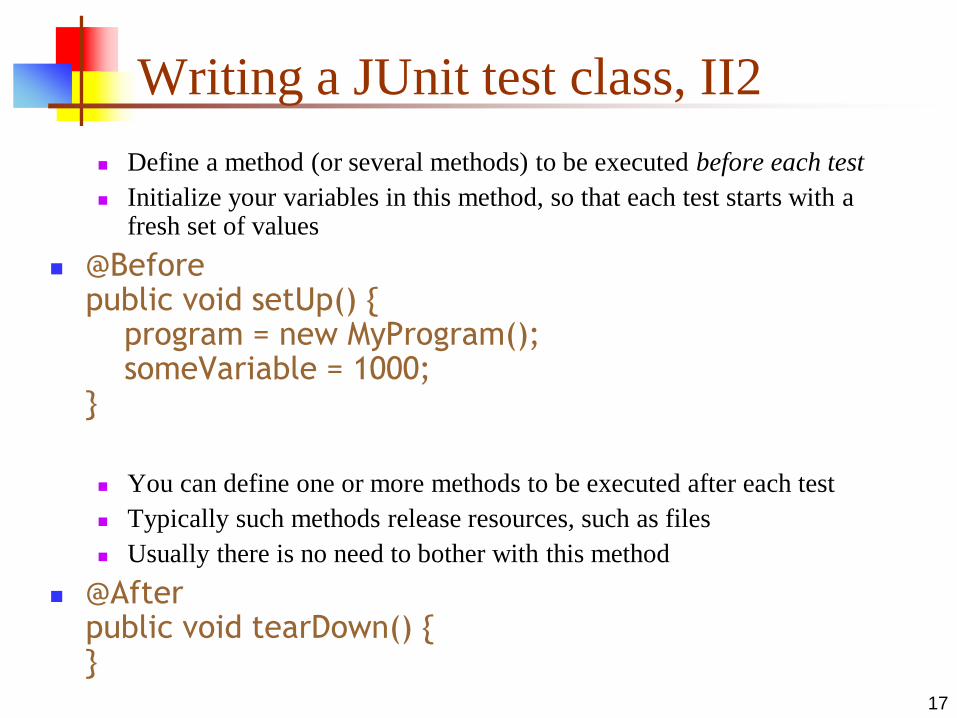
Writing a JUnit test class, II2
Define a method (or several methods) to be executed before each test
Initialize your variables in this method, so that each test starts with a fresh set of values
@Before public void setUp() { program = new MyProgram(); someVariable = 1000; }
You can define one or more methods to be executed after each test
Typically such methods release resources, such as files
Usually there is no need to bother with this method
@After public void tearDown() { }
18
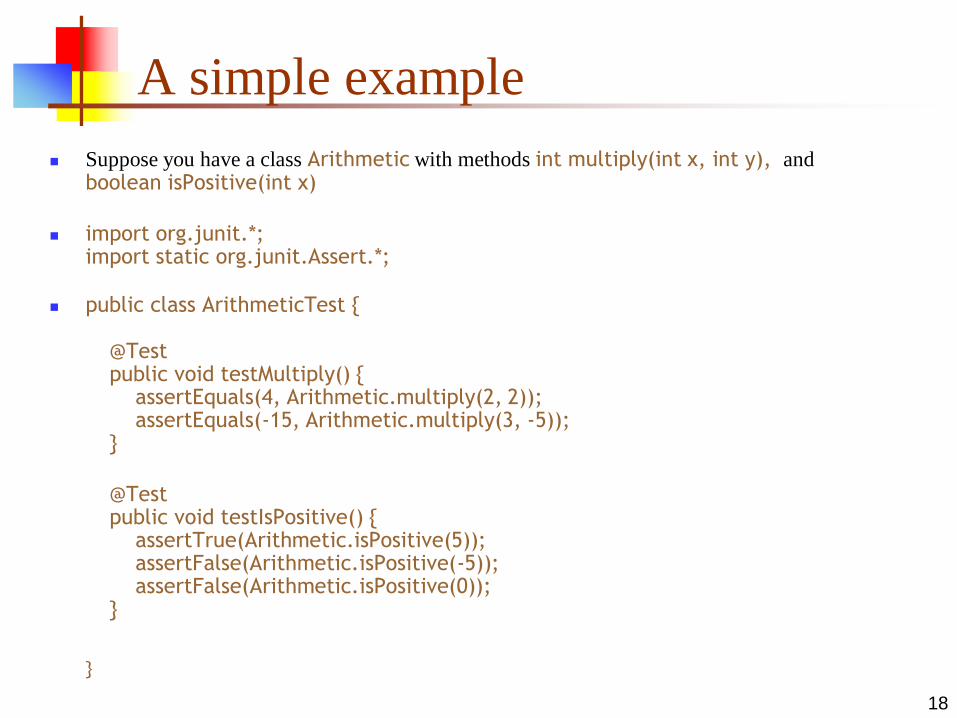
A simple example
Suppose you have a class Arithmetic with methods int multiply(int x, int y), and boolean isPositive(int x)
import org.junit.*; import static org.junit.Assert.*;
public class ArithmeticTest { }
@Test public void testMultiply() { assertEquals(4, Arithmetic.multiply(2, 2)); assertEquals(-15, Arithmetic.multiply(3, -5)); }
@Test public void testIsPositive() { assertTrue(Arithmetic.isPositive(5)); assertFalse(Arithmetic.isPositive(-5)); assertFalse(Arithmetic.isPositive(0)); }

19
Assert methods I
Within a test,
Call the method being tested and get the actual result
Assert what the correct result should be with one of the assert methods
These steps can be repeated as many times as necessary
An assert method is a JUnit method that performs a test, and throws an AssertionError if the test fails
JUnit catches these Errors and shows you the result
static void assertTrue(boolean test) static void assertTrue(String message, boolean test)
Throws an AssertionErrorif the test fails
The optional message is included in the Error
static void assertFalse(boolean test) static void assertFalse(String message, boolean test)
Throws an AssertionErrorif the test fails
20
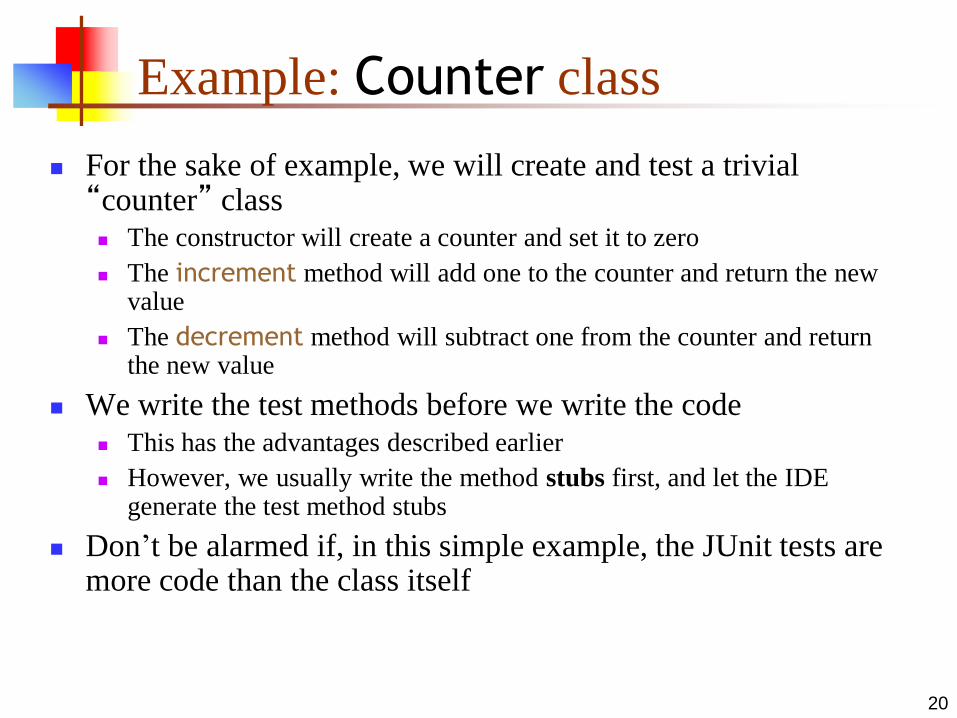
Example: Counter class
For the sake of example, we will create and test a trivial “counter” class The constructor will create a counter and set it to zero
The increment method will add one to the counter and return the new value
The decrement method will subtract one from the counter and return the new value
We write the test methods before we write the code This has the advantages described earlier
However, we usually write the method stubs first, and let the IDE generate the test method stubs
Don’t be alarmed if, in this simple example, the JUnit tests are more code than the class itself
21
JUnit tests for Counter
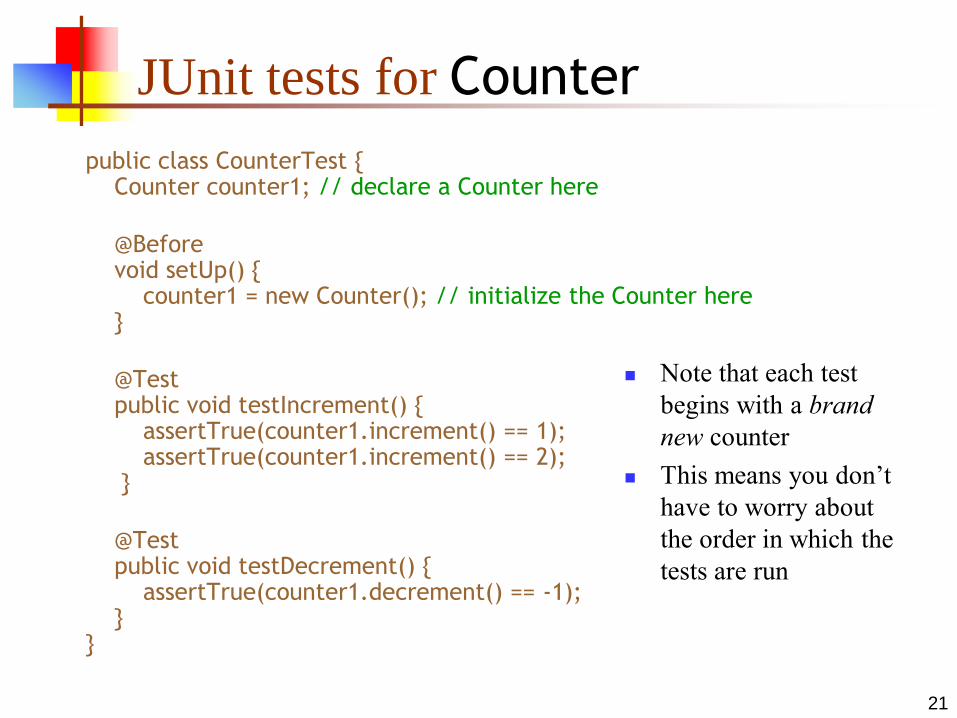
public class CounterTest { Counter counter1; // declare a Counter here
@Before void setUp() { counter1 = new Counter(); // initialize the Counter here }
@Test public void testIncrement() { assertTrue(counter1.increment() == 1); assertTrue(counter1.increment() == 2); }
@Test public void testDecrement() { assertTrue(counter1.decrement() == -1); } }
Note that each test
begins with a brand
new counter
This means you don’t
have to worry about
the order in which the
tests are run
22
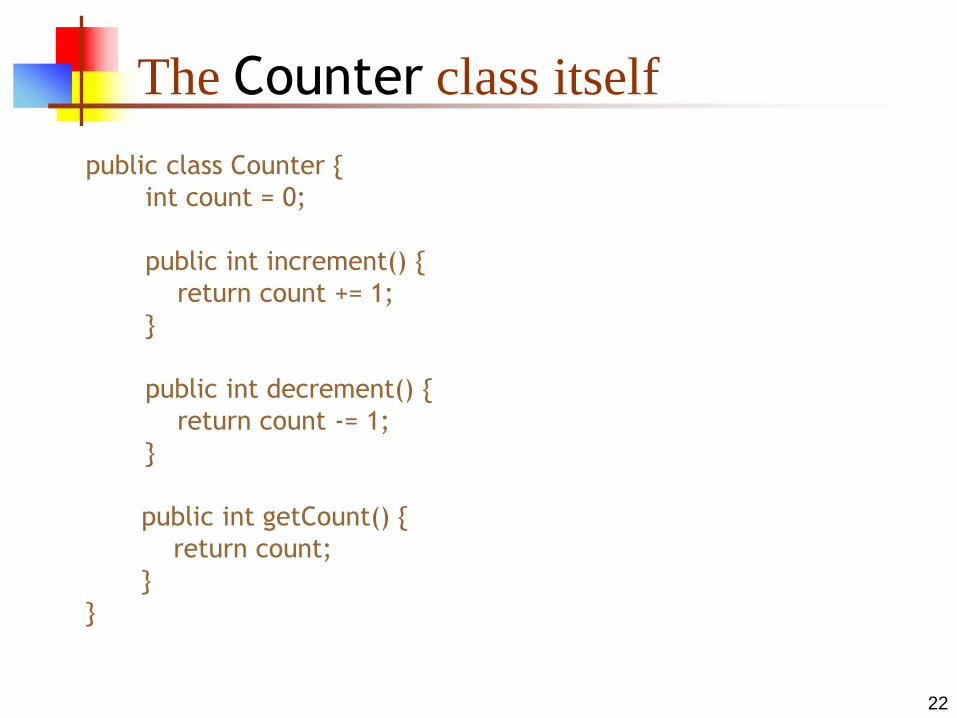
The Counter class itself
public class Counter {
int count = 0;
public int increment() {
return count += 1;
}
public int decrement() {
return count -= 1;
}
public int getCount() {
return count;
}
}
23
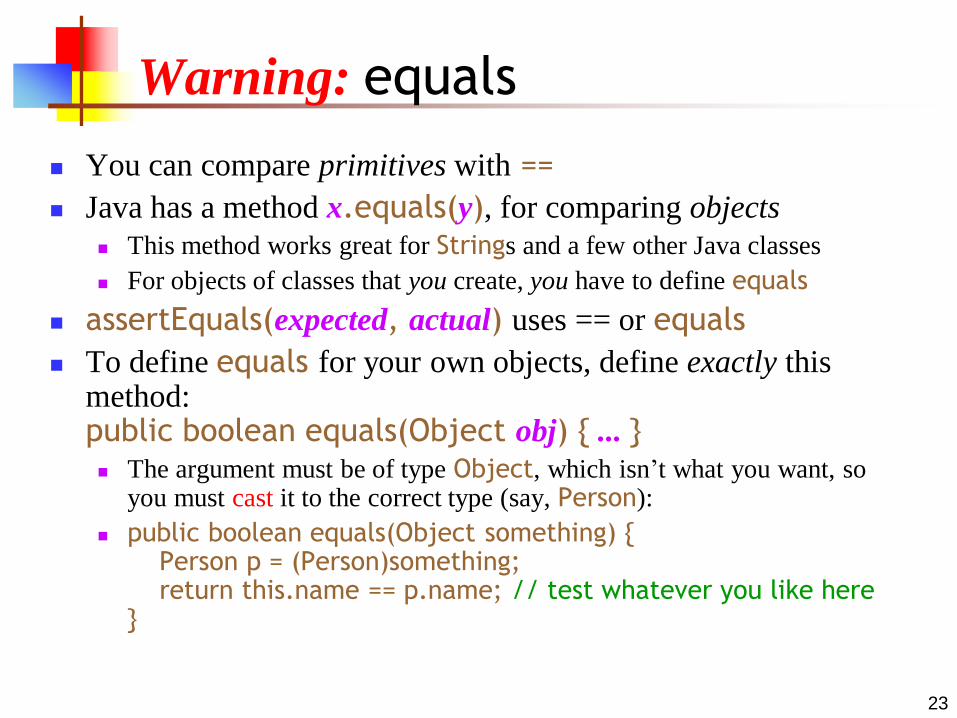
Warning: equals
You can compare primitives with ==
Java has a method x.equals(y), for comparing objects
This method works great for Strings and a few other Java classes
For objects of classes that you create, you have to define equals
assertEquals(expected, actual) uses == or equals
To define equals for your own objects, define exactly this method: public boolean equals(Object obj) { ... } The argument must be of type Object, which isn’t what you want, so
you must cast it to the correct type (say, Person):
public boolean equals(Object something) { Person p = (Person)something; return this.name == p.name; // test whatever you like here }
24
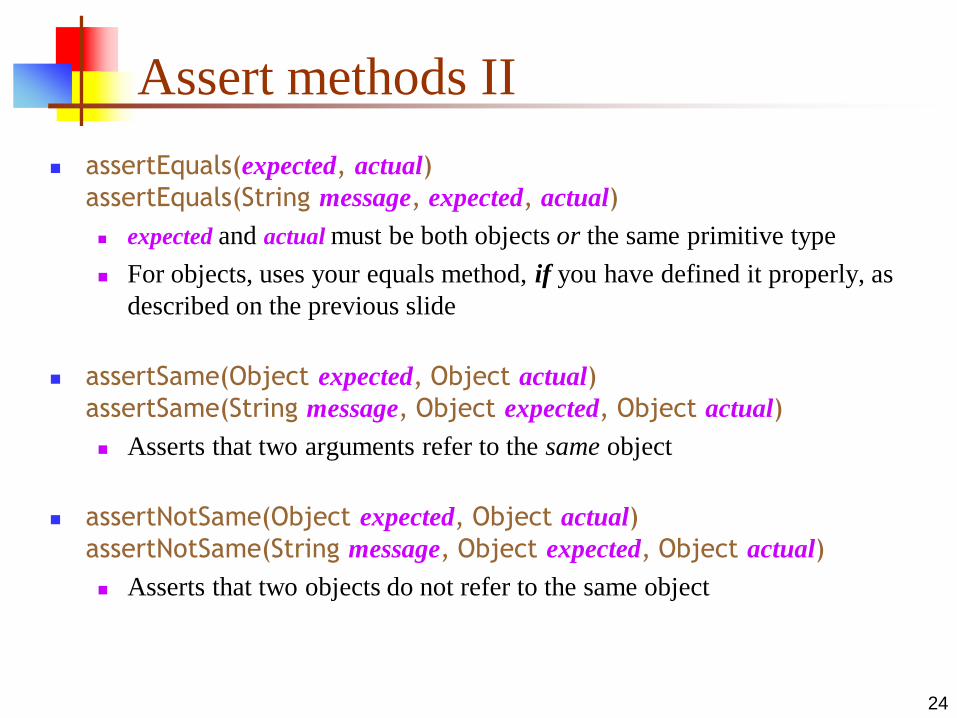
Assert methods II
assertEquals(expected, actual)
assertEquals(String message, expected, actual)
expected and actual must be both objects or the same primitive type
For objects, uses your equals method, if you have defined it properly, as
described on the previous slide
assertSame(Object expected, Object actual)
assertSame(String message, Object expected, Object actual)
Asserts that two arguments refer to the same object
assertNotSame(Object expected, Object actual)
assertNotSame(String message, Object expected, Object actual)
Asserts that two objects do not refer to the same object
25
Assert methods III
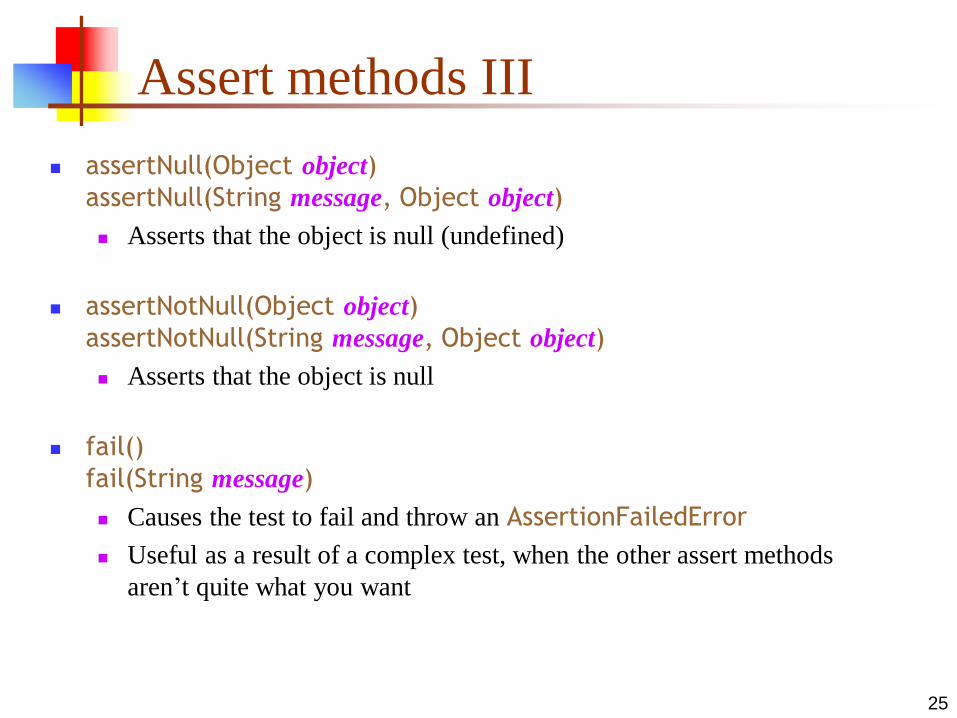
assertNull(Object object)
assertNull(String message, Object object)
Asserts that the object is null (undefined)
assertNotNull(Object object)
assertNotNull(String message, Object object)
Asserts that the object is null
fail()
fail(String message)
Causes the test to fail and throw an AssertionFailedError
Useful as a result of a complex test, when the other assert methods
aren’t quite what you want

26
Writing a JUnit test class, III
This page is really only for expensive setup, such as when you need to connect to a database to do your testing
If you wish, you can declare one method to be executed just once, when the class is first loaded
@BeforeClass public static void setUpClass() throws Exception { // one-time initialization code }
If you wish, you can declare one method to be executed just once, to do cleanup after all the tests have been completed
@AfterClass public static void tearDownClass() throws Exception { // one-time cleanup code }
27
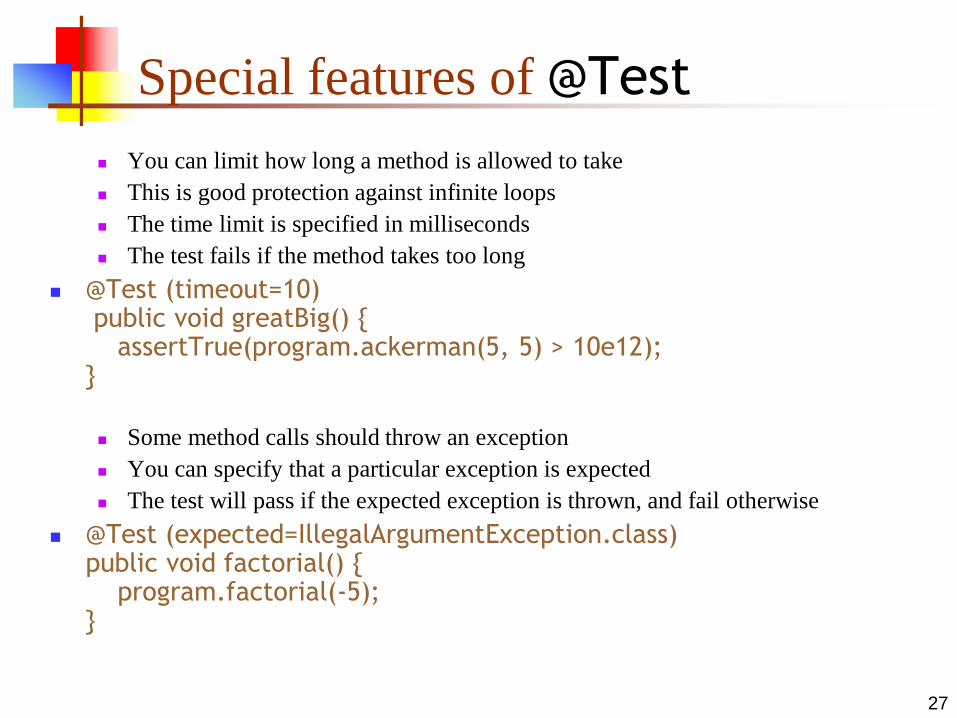
Special features of @Test
You can limit how long a method is allowed to take
This is good protection against infinite loops
The time limit is specified in milliseconds
The test fails if the method takes too long
@Test (timeout=10) public void greatBig() { assertTrue(program.ackerman(5, 5) > 10e12); }
Some method calls should throw an exception
You can specify that a particular exception is expected
The test will pass if the expected exception is thrown, and fail otherwise
@Test (expected=IllegalArgumentException.class) public void factorial() { program.factorial(-5); }
28
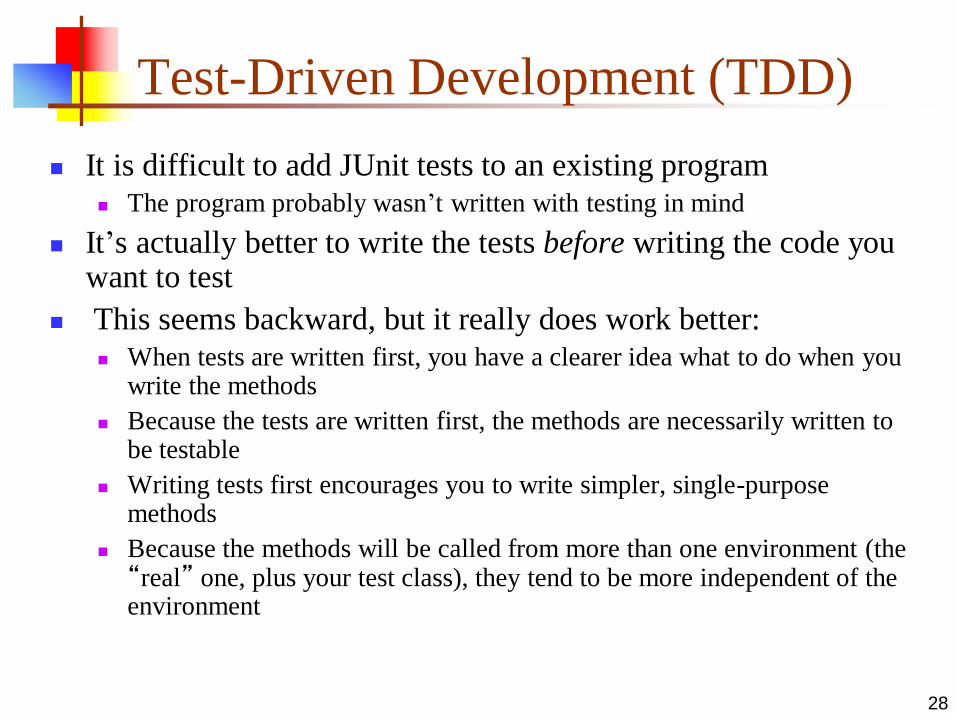
Test-Driven Development (TDD)
It is difficult to add JUnit tests to an existing program The program probably wasn’t written with testing in mind
It’s actually better to write the tests before writing the code you want to test
This seems backward, but it really does work better: When tests are written first, you have a clearer idea what to do when you
write the methods
Because the tests are written first, the methods are necessarily written to be testable
Writing tests first encourages you to write simpler, single-purpose methods
Because the methods will be called from more than one environment (the “real” one, plus your test class), they tend to be more independent of the environment
29
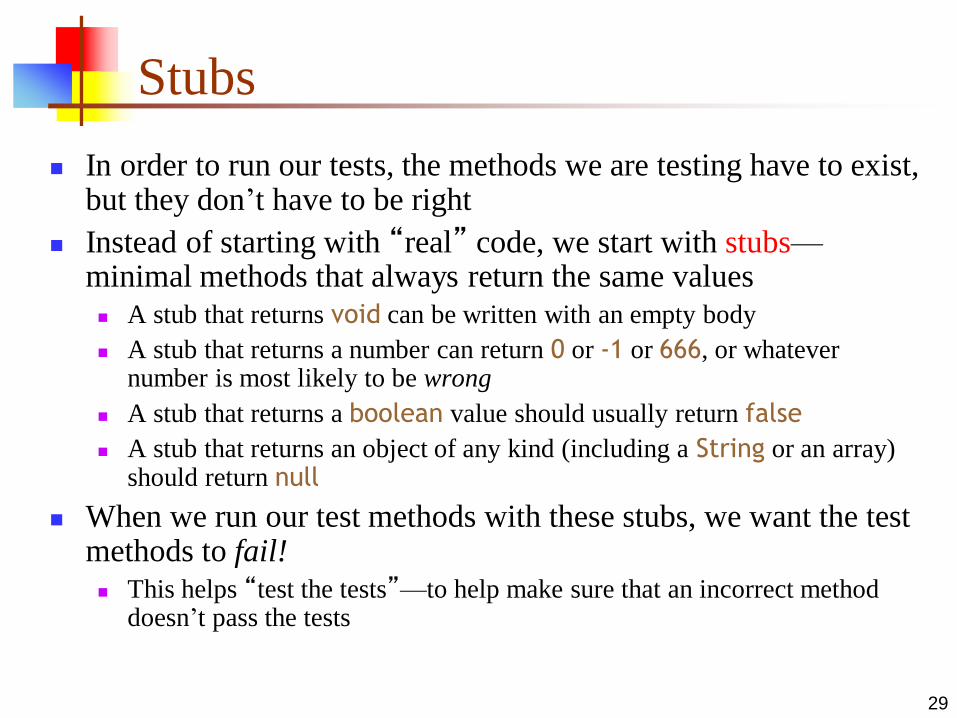
Stubs
In order to run our tests, the methods we are testing have to exist, but they don’t have to be right
Instead of starting with “real” code, we start with stubs—minimal methods that always return the same values
A stub that returns void can be written with an empty body
A stub that returns a number can return 0 or -1 or 666, or whatever number is most likely to be wrong
A stub that returns a boolean value should usually return false
A stub that returns an object of any kind (including a String or an array) should return null
When we run our test methods with these stubs, we want the test methods to fail!
This helps “test the tests”—to help make sure that an incorrect method doesn’t pass the tests
30
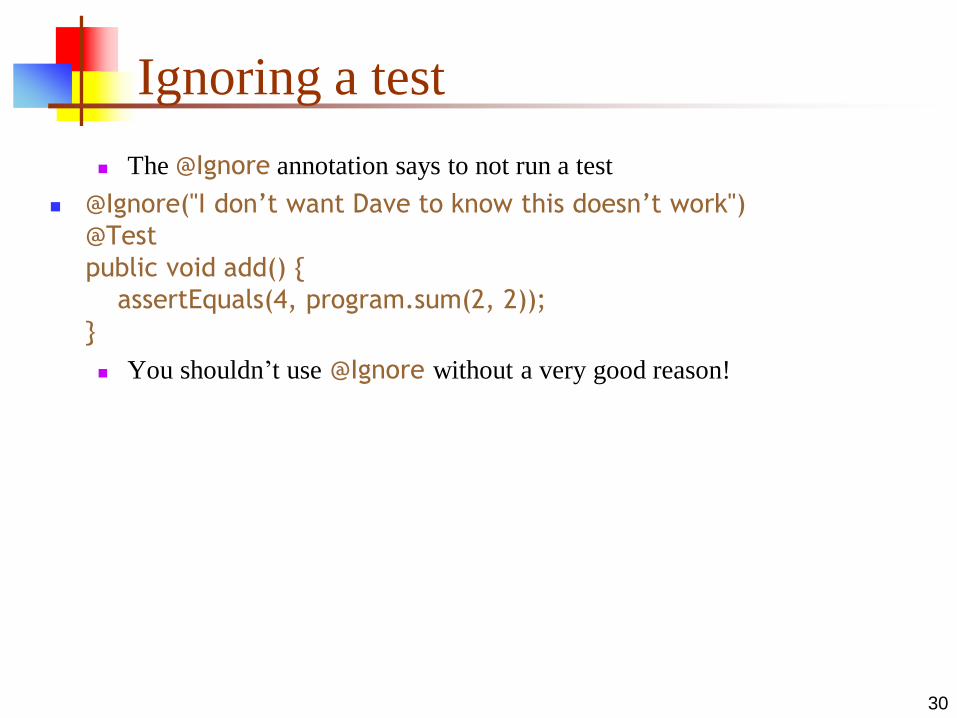
Ignoring a test
The @Ignore annotation says to not run a test
@Ignore("I don’t want Dave to know this doesn’t work")
@Test
public void add() {
assertEquals(4, program.sum(2, 2));
}
You shouldn’t use @Ignore without a very good reason!
31
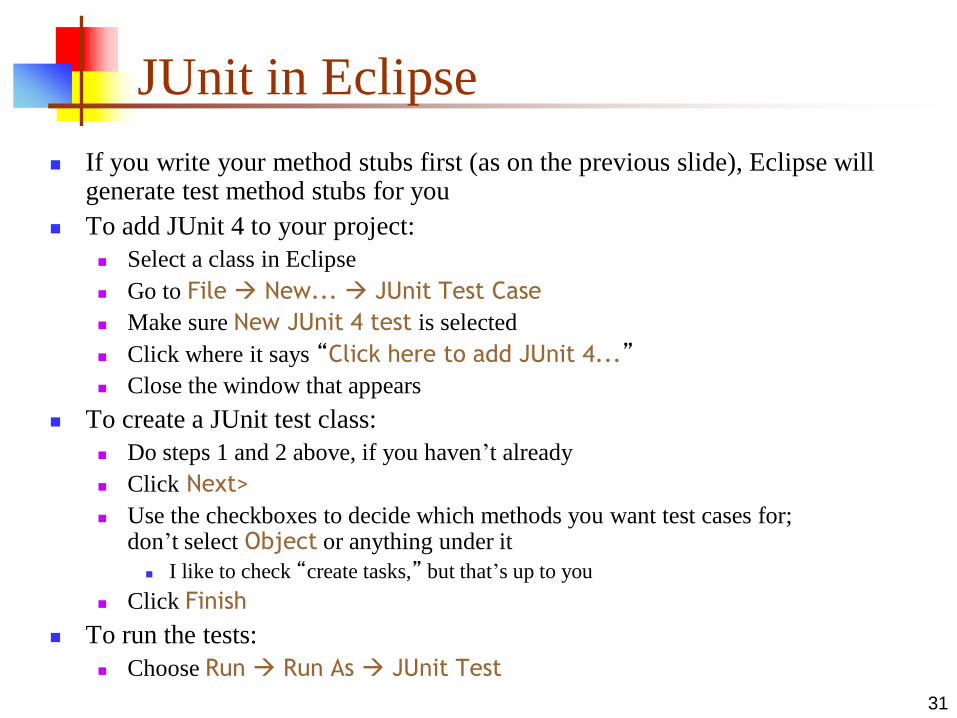
JUnit in Eclipse
If you write your method stubs first (as on the previous slide), Eclipse will generate test method stubs for you
To add JUnit 4 to your project:
Select a class in Eclipse
Go to File New... JUnit Test Case
Make sure New JUnit 4 test is selected
Click where it says “Click here to add JUnit 4...”
Close the window that appears
To create a JUnit test class:
Do steps 1 and 2 above, if you haven’t already
Click Next>
Use the checkboxes to decide which methods you want test cases for; don’t select Object or anything under it
I like to check “create tasks,” but that’s up to you
Click Finish
To run the tests:
Choose Run Run As JUnit Test
32
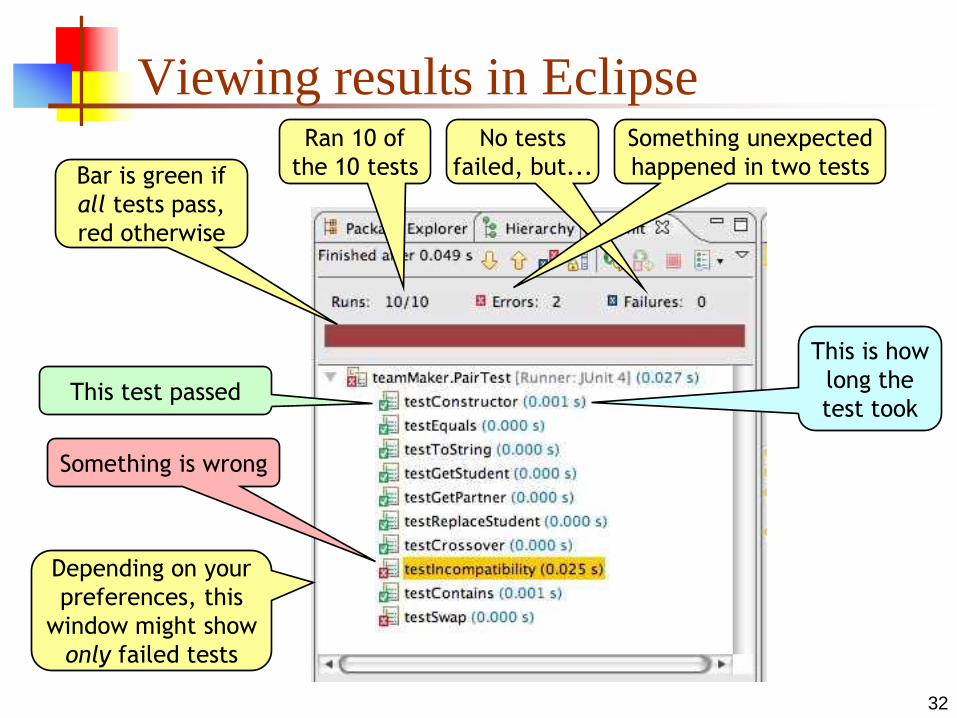
Viewing results in Eclipse
Bar is green if
all tests pass,
red otherwise
Ran 10 of
the 10 tests
No tests
failed, but...
Something unexpected
happened in two tests
This test passed
Something is wrong
Depending on your
preferences, this
window might show
only failed tests
This is how
long the
test took
33
Recommended approach
Write a test for some method you intend to write
If the method is fairly complex, test only the simplest case
Write a stub for the method
Run the test and make sure it fails
Replace the stub with code
Write just enough code to pass the tests
Run the test
If it fails, debug the method (or maybe debug the test); repeat until the test
passes
If the method needs to do more, or handle more complex
situations, add the tests for these first, and go back to step 3
Getting started with JUnit
Go to http://www.junit.org/ and click on the
downloads link
Select download source in zip format.
Extract the zip folder, you can see the
documentation, and jar files for source and
execution.
Creating Sample JUnit project in Eclipse /
MyEclipse
Create a Java Project (Project Name : JUnitTest)
34

Getting started with JUnit
If you are using MyEclipse, JUnit.jar will be available
with IDE itself, Right click on the project—
>Properties—>Java Build Path—>Libraries—>Add
Libraries—>JUnit—>Next—>Finish—>OK
If you are Eclipse, then you need to manually add
library to the buildpath. , Right click on the project—
>Properties—>Java Build Path—>Libraries—>Add
External Libraries—>JUnit—>Next—>Finish—>OK
Right click on the project –>New—>Source Folder—
>test
Right click in the test –>New—>JUnit Test Case
35
36
The End
If you don’t unit test then you aren’t a software engineer, you are a
typist who understands a programming language.
--Moses Jones
1. Never underestimate the power of one little test.
2. There is no such thing as a dumb test.
3. Your tests can often find problems where you’re not expecting them.
4. Test that everything you say happens actually does happen.
5. If it’s worth documenting, it’s worth testing.
--Andy Lester
Top Related