


Languages
Pages
Legal


iWay Integration Tools TransformerUser’s GuideVersion 7.0.x and Higher
August 16, 2018

Active Technologies, EDA, EDA/SQL, FIDEL, FOCUS, Information Builders, the Information Builders logo, iWay, iWaySoftware, Parlay, PC/FOCUS, RStat, Table Talk, Web390, WebFOCUS, WebFOCUS Active Technologies, and WebFOCUSMagnify are registered trademarks, and DataMigrator and Hyperstage are trademarks of Information Builders, Inc.
Adobe, the Adobe logo, Acrobat, Adobe Reader, Flash, Adobe Flash Builder, Flex, and PostScript are either registeredtrademarks or trademarks of Adobe Systems Incorporated in the United States and/or other countries.
Due to the nature of this material, this document refers to numerous hardware and software products by theirtrademarks. In most, if not all cases, these designations are claimed as trademarks or registered trademarks by theirrespective companies. It is not this publisher's intent to use any of these names generically. The reader is thereforecautioned to investigate all claimed trademark rights before using any of these names other than to refer to the productdescribed.
Copyright © 2018, by Information Builders, Inc. and iWay Software. All rights reserved. Patent Pending. This manual, orparts thereof, may not be reproduced in any form without the written permission of Information Builders, Inc.
Contents
Preface . . . . . . . . . . . . . . . . . . . . . . . . . . . . . . . . . . . . . . . . . . . . . . . . . . . . . . . . . . . . . . . . . . . . . . . . 11
Documentation Conventions . . . . . . . . . . . . . . . . . . . . . . . . . . . . . . . . . . . . . . . . . . . . . . . . . . . . . . . . . . 11
Related Publications . . . . . . . . . . . . . . . . . . . . . . . . . . . . . . . . . . . . . . . . . . . . . . . . . . . . . . . . . . . . . . . . . 12
Customer Support . . . . . . . . . . . . . . . . . . . . . . . . . . . . . . . . . . . . . . . . . . . . . . . . . . . . . . . . . . . . . . . . . . . 12
Help Us to Serve You Better . . . . . . . . . . . . . . . . . . . . . . . . . . . . . . . . . . . . . . . . . . . . . . . . . . . . . . . . . . 13
User Feedback . . . . . . . . . . . . . . . . . . . . . . . . . . . . . . . . . . . . . . . . . . . . . . . . . . . . . . . . . . . . . . . . . . . . . . 15
Information Builders Consulting and Training . . . . . . . . . . . . . . . . . . . . . . . . . . . . . . . . . . . . . . . . . . . . 15
1. iWay Transformer Overview . . . . . . . . . . . . . . . . . . . . . . . . . . . . . . . . . . . . . . . . . . . . . . . . . . . 17
About iWay Transformer . . . . . . . . . . . . . . . . . . . . . . . . . . . . . . . . . . . . . . . . . . . . . . . . . . . . . . . . . . . . . . 17
Mapping Builder. . . . . . . . . . . . . . . . . . . . . . . . . . . . . . . . . . . . . . . . . . . . . . . . . . . . . . . . . . . . . . . . 17
Dictionary Builder. . . . . . . . . . . . . . . . . . . . . . . . . . . . . . . . . . . . . . . . . . . . . . . . . . . . . . . . . . . . . . . 18
Template Viewer. . . . . . . . . . . . . . . . . . . . . . . . . . . . . . . . . . . . . . . . . . . . . . . . . . . . . . . . . . . . . . . . 21
Test Results. . . . . . . . . . . . . . . . . . . . . . . . . . . . . . . . . . . . . . . . . . . . . . . . . . . . . . . . . . . . . . . . . . . 22
2. Getting Started With iWay Transformer . . . . . . . . . . . . . . . . . . . . . . . . . . . . . . . . . . . . . . . . 23
iWay Transformer Basic Tutorial . . . . . . . . . . . . . . . . . . . . . . . . . . . . . . . . . . . . . . . . . . . . . . . . . . . . . . . 23
Transformer Workbench Basics. . . . . . . . . . . . . . . . . . . . . . . . . . . . . . . . . . . . . . . . . . . . . . . . . . . 23
About the Transformer Workbench. . . . . . . . . . . . . . . . . . . . . . . . . . . . . . . . . . . . . . . . . . . 23
About iWay Transformer Editors. . . . . . . . . . . . . . . . . . . . . . . . . . . . . . . . . . . . . . . . . . . . . .24
Setting iWay Transformer Preferences. . . . . . . . . . . . . . . . . . . . . . . . . . . . . . . . . . . . . . . . 24
Transformer Workbench Toolbar and Shortcuts. . . . . . . . . . . . . . . . . . . . . . . . . . . . . . . . 28
Navigating the Transformer Workbench Toolbar. . . . . . . . . . . . . . . . . . . . . . . . . . . 29
Navigating the Mapping Builder. . . . . . . . . . . . . . . . . . . . . . . . . . . . . . . . . . . . . . . . .30
Mappings Tab. . . . . . . . . . . . . . . . . . . . . . . . . . . . . . . . . . . . . . . . . . . . . . . . . . 30
View Template Tab. . . . . . . . . . . . . . . . . . . . . . . . . . . . . . . . . . . . . . . . . . . . . . 31
Test Results Tab. . . . . . . . . . . . . . . . . . . . . . . . . . . . . . . . . . . . . . . . . . . . . . . . 32
Using Keyboard Shortcuts. . . . . . . . . . . . . . . . . . . . . . . . . . . . . . . . . . . . . . . . . . . . . 33
Preparing iWay Integration Tools Suite. . . . . . . . . . . . . . . . . . . . . . . . . . . . . . . . . . . . . . . . . . . . . 33
Creating a Transform Component. . . . . . . . . . . . . . . . . . . . . . . . . . . . . . . . . . . . . . . . . . . . . . . . . 34
Navigating Resources. . . . . . . . . . . . . . . . . . . . . . . . . . . . . . . . . . . . . . . . . . . . . . . . . . . . . . . . . . . 40
Browsing Mappings. . . . . . . . . . . . . . . . . . . . . . . . . . . . . . . . . . . . . . . . . . . . . . . . . . . . . . . . . . . . . 40
Editing Mappings. . . . . . . . . . . . . . . . . . . . . . . . . . . . . . . . . . . . . . . . . . . . . . . . . . . . . . . . . . . . . . . 42
iWay Integration Tools Transformer User’s Guide 3
Using the Mapping Builder. . . . . . . . . . . . . . . . . . . . . . . . . . . . . . . . . . . . . . . . . . . . . . . . . . 51
Renaming Mappings. . . . . . . . . . . . . . . . . . . . . . . . . . . . . . . . . . . . . . . . . . . . . . . . . . . . . . . 53
Copying and Moving Mappings. . . . . . . . . . . . . . . . . . . . . . . . . . . . . . . . . . . . . . . . . . . . . . .55
Running a Transform Component. . . . . . . . . . . . . . . . . . . . . . . . . . . . . . . . . . . . . . . . . . . . . . . . . .58
Debugging a Transform Component. . . . . . . . . . . . . . . . . . . . . . . . . . . . . . . . . . . . . . . . . . . . . . . .62
Working With Other Editors . . . . . . . . . . . . . . . . . . . . . . . . . . . . . . . . . . . . . . . . . . . . . . . . . . . . . . 62
Project Configuration Tutorial . . . . . . . . . . . . . . . . . . . . . . . . . . . . . . . . . . . . . . . . . . . . . . . . . . . . . . . . . .62
Configuring a New Transform Component. . . . . . . . . . . . . . . . . . . . . . . . . . . . . . . . . . . . . . . . . . .62
Configuring Transform Component Properties. . . . . . . . . . . . . . . . . . . . . . . . . . . . . . . . . . . . . . . 68
Resource. . . . . . . . . . . . . . . . . . . . . . . . . . . . . . . . . . . . . . . . . . . . . . . . . . . . . . . . . . . . . . . . . 71
Run/Debug Settings. . . . . . . . . . . . . . . . . . . . . . . . . . . . . . . . . . . . . . . . . . . . . . . . . . . . . . . 72
Transform Properties. . . . . . . . . . . . . . . . . . . . . . . . . . . . . . . . . . . . . . . . . . . . . . . . . . . . . . . 72
@REPLACE Function. . . . . . . . . . . . . . . . . . . . . . . . . . . . . . . . . . . . . . . . . . . . . . . . . . . . . . . .73
Custom Functions. . . . . . . . . . . . . . . . . . . . . . . . . . . . . . . . . . . . . . . . . . . . . . . . . . . . . . . . . 74
Input. . . . . . . . . . . . . . . . . . . . . . . . . . . . . . . . . . . . . . . . . . . . . . . . . . . . . . . . . . . . . . . . . . . . .75
JDBC Data Source. . . . . . . . . . . . . . . . . . . . . . . . . . . . . . . . . . . . . . . . . . . . . . . . . . . . . . . . . 76
Output. . . . . . . . . . . . . . . . . . . . . . . . . . . . . . . . . . . . . . . . . . . . . . . . . . . . . . . . . . . . . . . . . . . 77
Variables. . . . . . . . . . . . . . . . . . . . . . . . . . . . . . . . . . . . . . . . . . . . . . . . . . . . . . . . . . . . . . . . . 78
XML Namespaces. . . . . . . . . . . . . . . . . . . . . . . . . . . . . . . . . . . . . . . . . . . . . . . . . . . . . . . . . 79
Dictionary Builder Tutorial . . . . . . . . . . . . . . . . . . . . . . . . . . . . . . . . . . . . . . . . . . . . . . . . . . . . . . . . . . . . .80
Overview. . . . . . . . . . . . . . . . . . . . . . . . . . . . . . . . . . . . . . . . . . . . . . . . . . . . . . . . . . . . . . . . . . . . . . .80
Metadata Management Facility. . . . . . . . . . . . . . . . . . . . . . . . . . . . . . . . . . . . . . . . . . . . . . 82
Ebix Management Facility. . . . . . . . . . . . . . . . . . . . . . . . . . . . . . . . . . . . . . . . . . . . . . . . . . . 83
Navigating Dictionary Builder. . . . . . . . . . . . . . . . . . . . . . . . . . . . . . . . . . . . . . . . . . . . . . . . . . . . . 83
3. iWay Transformer Concepts . . . . . . . . . . . . . . . . . . . . . . . . . . . . . . . . . . . . . . . . . . . . . . . . . . 93
Transformation Process . . . . . . . . . . . . . . . . . . . . . . . . . . . . . . . . . . . . . . . . . . . . . . . . . . . . . . . . . . . . . . 94
Transform Component. . . . . . . . . . . . . . . . . . . . . . . . . . . . . . . . . . . . . . . . . . . . . . . . . . . . . . . . . . . 94
Transform Template. . . . . . . . . . . . . . . . . . . . . . . . . . . . . . . . . . . . . . . . . . . . . . . . . . . . . . . . . . . . . 94
Configuration of a Transform Component. . . . . . . . . . . . . . . . . . . . . . . . . . . . . . . . . . . . . . . . . . . 95
Dictionary. . . . . . . . . . . . . . . . . . . . . . . . . . . . . . . . . . . . . . . . . . . . . . . . . . . . . . . . . . . . . . . . .95
iWay Transformer Mappings . . . . . . . . . . . . . . . . . . . . . . . . . . . . . . . . . . . . . . . . . . . . . . . . . . . . . . . . . . .96
Mapping Rules. . . . . . . . . . . . . . . . . . . . . . . . . . . . . . . . . . . . . . . . . . . . . . . . . . . . . . . . . . . . . . . . . 96
Contents
4 Information Builders
Mapping Structure. . . . . . . . . . . . . . . . . . . . . . . . . . . . . . . . . . . . . . . . . . . . . . . . . . . . . . . . . . . . . . 97
iWay Transformer Supported Data Formats . . . . . . . . . . . . . . . . . . . . . . . . . . . . . . . . . . . . . . . . . . . . . .97
Transform Component Dependencies . . . . . . . . . . . . . . . . . . . . . . . . . . . . . . . . . . . . . . . . . . . . . . . . . . 98
Using Namespaces in iWay Transformer . . . . . . . . . . . . . . . . . . . . . . . . . . . . . . . . . . . . . . . . . . . . . . . . 99
Transform Functions . . . . . . . . . . . . . . . . . . . . . . . . . . . . . . . . . . . . . . . . . . . . . . . . . . . . . . . . . . . . . . . . 101
Predefined Functions. . . . . . . . . . . . . . . . . . . . . . . . . . . . . . . . . . . . . . . . . . . . . . . . . . . . . . . . . . . 102
EDI Functions. . . . . . . . . . . . . . . . . . . . . . . . . . . . . . . . . . . . . . . . . . . . . . . . . . . . . . . . . . . . 102
Numerical Functions. . . . . . . . . . . . . . . . . . . . . . . . . . . . . . . . . . . . . . . . . . . . . . . . . . . . . . 103
Processing Functions. . . . . . . . . . . . . . . . . . . . . . . . . . . . . . . . . . . . . . . . . . . . . . . . . . . . . 112
Run-Time Functions. . . . . . . . . . . . . . . . . . . . . . . . . . . . . . . . . . . . . . . . . . . . . . . . . . . . . . . 118
Security Functions. . . . . . . . . . . . . . . . . . . . . . . . . . . . . . . . . . . . . . . . . . . . . . . . . . . . . . . . 120
String Functions. . . . . . . . . . . . . . . . . . . . . . . . . . . . . . . . . . . . . . . . . . . . . . . . . . . . . . . . . . 121
Time Functions. . . . . . . . . . . . . . . . . . . . . . . . . . . . . . . . . . . . . . . . . . . . . . . . . . . . . . . . . . .134
Numeric Pictures. . . . . . . . . . . . . . . . . . . . . . . . . . . . . . . . . . . . . . . . . . . . . . . . . . . . . . . . . 140
Date Pictures. . . . . . . . . . . . . . . . . . . . . . . . . . . . . . . . . . . . . . . . . . . . . . . . . . . . . . . . . . . . 142
Time Pictures. . . . . . . . . . . . . . . . . . . . . . . . . . . . . . . . . . . . . . . . . . . . . . . . . . . . . . . . . . . . 143
Custom Functions. . . . . . . . . . . . . . . . . . . . . . . . . . . . . . . . . . . . . . . . . . . . . . . . . . . . . . . . . . . . . 144
Invisible Group . . . . . . . . . . . . . . . . . . . . . . . . . . . . . . . . . . . . . . . . . . . . . . . . . . . . . . . . . . . . . . . . . . . . . 144
What Is It?. . . . . . . . . . . . . . . . . . . . . . . . . . . . . . . . . . . . . . . . . . . . . . . . . . . . . . . . . . . . . . . . . . . .144
Where Is It Used?. . . . . . . . . . . . . . . . . . . . . . . . . . . . . . . . . . . . . . . . . . . . . . . . . . . . . . . . . . . . . .144
What Is It Used for?. . . . . . . . . . . . . . . . . . . . . . . . . . . . . . . . . . . . . . . . . . . . . . . . . . . . . . . . . . . .145
Where Is the Visible Property Located?. . . . . . . . . . . . . . . . . . . . . . . . . . . . . . . . . . . . . . . . . . . 145
4. iWay Transformer Tasks . . . . . . . . . . . . . . . . . . . . . . . . . . . . . . . . . . . . . . . . . . . . . . . . . . . . . 147
Creating a Transform Component . . . . . . . . . . . . . . . . . . . . . . . . . . . . . . . . . . . . . . . . . . . . . . . . . . . . . 147
Configuring a Transform Component . . . . . . . . . . . . . . . . . . . . . . . . . . . . . . . . . . . . . . . . . . . . . . . . . . 164
Resource. . . . . . . . . . . . . . . . . . . . . . . . . . . . . . . . . . . . . . . . . . . . . . . . . . . . . . . . . . . . . . . . . . . . . 167
Run/Debug Settings. . . . . . . . . . . . . . . . . . . . . . . . . . . . . . . . . . . . . . . . . . . . . . . . . . . . . . . . . . . 168
Transform Properties. . . . . . . . . . . . . . . . . . . . . . . . . . . . . . . . . . . . . . . . . . . . . . . . . . . . . . . . . . . 169
@REPLACE Function. . . . . . . . . . . . . . . . . . . . . . . . . . . . . . . . . . . . . . . . . . . . . . . . . . . . . . . . . . . .170
Custom Functions. . . . . . . . . . . . . . . . . . . . . . . . . . . . . . . . . . . . . . . . . . . . . . . . . . . . . . . . . . . . . 171
Input. . . . . . . . . . . . . . . . . . . . . . . . . . . . . . . . . . . . . . . . . . . . . . . . . . . . . . . . . . . . . . . . . . . . . . . . .172
Input Structure. . . . . . . . . . . . . . . . . . . . . . . . . . . . . . . . . . . . . . . . . . . . . . . . . . . . . . . . . . . 173
Contents
iWay Integration Tools Transformer User’s Guide 5

Configuring the Input Structure. . . . . . . . . . . . . . . . . . . . . . . . . . . . . . . . . . . . . . . . 173
Viewing the Input Structure. . . . . . . . . . . . . . . . . . . . . . . . . . . . . . . . . . . . . . . . . . . 175
Input Data. . . . . . . . . . . . . . . . . . . . . . . . . . . . . . . . . . . . . . . . . . . . . . . . . . . . . . . . . . . . . . . 175
Configuring the Input Data. . . . . . . . . . . . . . . . . . . . . . . . . . . . . . . . . . . . . . . . . . . . 176
Viewing the Input Data. . . . . . . . . . . . . . . . . . . . . . . . . . . . . . . . . . . . . . . . . . . . . . . 177
Input Validation. . . . . . . . . . . . . . . . . . . . . . . . . . . . . . . . . . . . . . . . . . . . . . . . . . . . . . . . . . 177
Input Format Reference. . . . . . . . . . . . . . . . . . . . . . . . . . . . . . . . . . . . . . . . . . . . . . . . . . . 179
CDF Input Properties. . . . . . . . . . . . . . . . . . . . . . . . . . . . . . . . . . . . . . . . . . . . . . . . .182
CSV Input Properties. . . . . . . . . . . . . . . . . . . . . . . . . . . . . . . . . . . . . . . . . . . . . . . . .183
EDI Input Properties. . . . . . . . . . . . . . . . . . . . . . . . . . . . . . . . . . . . . . . . . . . . . . . . . 184
Fixed Width Input Properties. . . . . . . . . . . . . . . . . . . . . . . . . . . . . . . . . . . . . . . . . . 187
IDOC Input Properties. . . . . . . . . . . . . . . . . . . . . . . . . . . . . . . . . . . . . . . . . . . . . . . . 189
SWIFT Input Properties. . . . . . . . . . . . . . . . . . . . . . . . . . . . . . . . . . . . . . . . . . . . . . . 190
XML and iWay XML Response Input Properties. . . . . . . . . . . . . . . . . . . . . . . . . . 191
JDBC Data Source. . . . . . . . . . . . . . . . . . . . . . . . . . . . . . . . . . . . . . . . . . . . . . . . . . . . . . . . . . . . . 193
Output. . . . . . . . . . . . . . . . . . . . . . . . . . . . . . . . . . . . . . . . . . . . . . . . . . . . . . . . . . . . . . . . . . . . . . . 193
Output Structure. . . . . . . . . . . . . . . . . . . . . . . . . . . . . . . . . . . . . . . . . . . . . . . . . . . . . . . . . 194
Configuring the Output Structure. . . . . . . . . . . . . . . . . . . . . . . . . . . . . . . . . . . . . . .194
Viewing the Output Structure. . . . . . . . . . . . . . . . . . . . . . . . . . . . . . . . . . . . . . . . . .195
Output Data. . . . . . . . . . . . . . . . . . . . . . . . . . . . . . . . . . . . . . . . . . . . . . . . . . . . . . . . . . . . . 196
Configuring the Output Data. . . . . . . . . . . . . . . . . . . . . . . . . . . . . . . . . . . . . . . . . . 196
Output Validation. . . . . . . . . . . . . . . . . . . . . . . . . . . . . . . . . . . . . . . . . . . . . . . . . . . . . . . . . 196
Output Format Reference. . . . . . . . . . . . . . . . . . . . . . . . . . . . . . . . . . . . . . . . . . . . . . . . . . 197
CDF Output Properties. . . . . . . . . . . . . . . . . . . . . . . . . . . . . . . . . . . . . . . . . . . . . . . 197
CSV Output Properties. . . . . . . . . . . . . . . . . . . . . . . . . . . . . . . . . . . . . . . . . . . . . . . 199
EDI Output Properties. . . . . . . . . . . . . . . . . . . . . . . . . . . . . . . . . . . . . . . . . . . . . . . . 200
Fixed Width Output Properties. . . . . . . . . . . . . . . . . . . . . . . . . . . . . . . . . . . . . . . . . 203
HTML Output Properties. . . . . . . . . . . . . . . . . . . . . . . . . . . . . . . . . . . . . . . . . . . . . . 205
IDOC Output Properties. . . . . . . . . . . . . . . . . . . . . . . . . . . . . . . . . . . . . . . . . . . . . . 206
SWIFT Output Properties. . . . . . . . . . . . . . . . . . . . . . . . . . . . . . . . . . . . . . . . . . . . . 207
XML, iWay XML Embedded Request, and iWay XML Request Output
Properties. . . . . . . . . . . . . . . . . . . . . . . . . . . . . . . . . . . . . . . . . . . . . . . . . . . . . . . 207
Variables. . . . . . . . . . . . . . . . . . . . . . . . . . . . . . . . . . . . . . . . . . . . . . . . . . . . . . . . . . . . . . . . . . . . . 210
Contents
6 Information Builders
XML Namespaces. . . . . . . . . . . . . . . . . . . . . . . . . . . . . . . . . . . . . . . . . . . . . . . . . . . . . . . . . . . . . 219
Testing a Transform Component . . . . . . . . . . . . . . . . . . . . . . . . . . . . . . . . . . . . . . . . . . . . . . . . . . . . . .219
Working With a Transform Component . . . . . . . . . . . . . . . . . . . . . . . . . . . . . . . . . . . . . . . . . . . . . . . . .220
Design-Time Mode (Transform Test Run). . . . . . . . . . . . . . . . . . . . . . . . . . . . . . . . . . . . . . . . . . 220
Run-Time Mode (Run on Server). . . . . . . . . . . . . . . . . . . . . . . . . . . . . . . . . . . . . . . . . . . . . . . . . 221
Opening a Transform Component. . . . . . . . . . . . . . . . . . . . . . . . . . . . . . . . . . . . . . . . . . . . . . . . 221
Saving a Transform Component. . . . . . . . . . . . . . . . . . . . . . . . . . . . . . . . . . . . . . . . . . . . . . . . . .221
Publishing a Transform Component. . . . . . . . . . . . . . . . . . . . . . . . . . . . . . . . . . . . . . . . . . . . . . .223
Working With the Mapping Builder . . . . . . . . . . . . . . . . . . . . . . . . . . . . . . . . . . . . . . . . . . . . . . . . . . . . 224
Mappings Tab. . . . . . . . . . . . . . . . . . . . . . . . . . . . . . . . . . . . . . . . . . . . . . . . . . . . . . . . . . . . . . . . . 224
Input Node Workspace Menu. . . . . . . . . . . . . . . . . . . . . . . . . . . . . . . . . . . . . . . . . . . . . . .226
Output Node Workspace Menu. . . . . . . . . . . . . . . . . . . . . . . . . . . . . . . . . . . . . . . . . . . . . 228
Input Structure. . . . . . . . . . . . . . . . . . . . . . . . . . . . . . . . . . . . . . . . . . . . . . . . . . . . . . . . . . . 231
Output Structure. . . . . . . . . . . . . . . . . . . . . . . . . . . . . . . . . . . . . . . . . . . . . . . . . . . . . . . . . 235
Mapping Types. . . . . . . . . . . . . . . . . . . . . . . . . . . . . . . . . . . . . . . . . . . . . . . . . . . . . . . . . . . . . . . . 236
Adding New Output Nodes. . . . . . . . . . . . . . . . . . . . . . . . . . . . . . . . . . . . . . . . . . . . . . . . . 237
Group. . . . . . . . . . . . . . . . . . . . . . . . . . . . . . . . . . . . . . . . . . . . . . . . . . . . . . . . . . . . . . . . . . .238
Group Properties. . . . . . . . . . . . . . . . . . . . . . . . . . . . . . . . . . . . . . . . . . . . . . . . . . . . 241
General Tab. . . . . . . . . . . . . . . . . . . . . . . . . . . . . . . . . . . . . . . . . . . . . . . . . . . . . . . . 242
Looping. . . . . . . . . . . . . . . . . . . . . . . . . . . . . . . . . . . . . . . . . . . . . . . . . . . . . . .242
Context. . . . . . . . . . . . . . . . . . . . . . . . . . . . . . . . . . . . . . . . . . . . . . . . . . . . . . . 244
Filter Tab. . . . . . . . . . . . . . . . . . . . . . . . . . . . . . . . . . . . . . . . . . . . . . . . . . . . . . . . . . .245
Unique Keys Tab. . . . . . . . . . . . . . . . . . . . . . . . . . . . . . . . . . . . . . . . . . . . . . . . . . . . 248
Sorting Tab. . . . . . . . . . . . . . . . . . . . . . . . . . . . . . . . . . . . . . . . . . . . . . . . . . . . . . . . . 249
XML Namespace Tab. . . . . . . . . . . . . . . . . . . . . . . . . . . . . . . . . . . . . . . . . . . . . . . . 249
Element. . . . . . . . . . . . . . . . . . . . . . . . . . . . . . . . . . . . . . . . . . . . . . . . . . . . . . . . . . . . . . . . . 250
Element Properties. . . . . . . . . . . . . . . . . . . . . . . . . . . . . . . . . . . . . . . . . . . . . . . . . . 250
General Tab. . . . . . . . . . . . . . . . . . . . . . . . . . . . . . . . . . . . . . . . . . . . . . . . . . . . . . . . 250
Filter Tab. . . . . . . . . . . . . . . . . . . . . . . . . . . . . . . . . . . . . . . . . . . . . . . . . . . . . . . . . . .251
XML Namespace Tab. . . . . . . . . . . . . . . . . . . . . . . . . . . . . . . . . . . . . . . . . . . . . . . . 252
Attribute. . . . . . . . . . . . . . . . . . . . . . . . . . . . . . . . . . . . . . . . . . . . . . . . . . . . . . . . . . . . . . . . .252
Attribute Properties. . . . . . . . . . . . . . . . . . . . . . . . . . . . . . . . . . . . . . . . . . . . . . . . . . 252
General Tab. . . . . . . . . . . . . . . . . . . . . . . . . . . . . . . . . . . . . . . . . . . . . . . . . . . . . . . . 253
Contents
iWay Integration Tools Transformer User’s Guide 7

Filter Tab. . . . . . . . . . . . . . . . . . . . . . . . . . . . . . . . . . . . . . . . . . . . . . . . . . . . . . . . . . .253
XML Namespace Tab. . . . . . . . . . . . . . . . . . . . . . . . . . . . . . . . . . . . . . . . . . . . . . . . 254
Comment. . . . . . . . . . . . . . . . . . . . . . . . . . . . . . . . . . . . . . . . . . . . . . . . . . . . . . . . . . . . . . . . . . . . .255
Content. . . . . . . . . . . . . . . . . . . . . . . . . . . . . . . . . . . . . . . . . . . . . . . . . . . . . . . . . . . . . . . . . . . . . . 255
CDATA. . . . . . . . . . . . . . . . . . . . . . . . . . . . . . . . . . . . . . . . . . . . . . . . . . . . . . . . . . . . . . . . . . . . . . . 255
Variable. . . . . . . . . . . . . . . . . . . . . . . . . . . . . . . . . . . . . . . . . . . . . . . . . . . . . . . . . . . . . . . . . . . . . . 255
Additional Key Terms. . . . . . . . . . . . . . . . . . . . . . . . . . . . . . . . . . . . . . . . . . . . . . . . . . . . . . . . . . .256
Mapping Values. . . . . . . . . . . . . . . . . . . . . . . . . . . . . . . . . . . . . . . . . . . . . . . . . . . . . . . . . . . . . . . 256
Input Node (Context). . . . . . . . . . . . . . . . . . . . . . . . . . . . . . . . . . . . . . . . . . . . . . . . . . . . . . 259
Function. . . . . . . . . . . . . . . . . . . . . . . . . . . . . . . . . . . . . . . . . . . . . . . . . . . . . . . . . . . . . . . . .261
Constant. . . . . . . . . . . . . . . . . . . . . . . . . . . . . . . . . . . . . . . . . . . . . . . . . . . . . . . . . . . . . . . . 262
Expression. . . . . . . . . . . . . . . . . . . . . . . . . . . . . . . . . . . . . . . . . . . . . . . . . . . . . . . . . . . . . . 262
Building and Altering Output Structures. . . . . . . . . . . . . . . . . . . . . . . . . . . . . . . . . . . . . . . . . . . 265
Working With Namespaces . . . . . . . . . . . . . . . . . . . . . . . . . . . . . . . . . . . . . . . . . . . . . . . . . . . . . . . . . . 265
Working With Functions . . . . . . . . . . . . . . . . . . . . . . . . . . . . . . . . . . . . . . . . . . . . . . . . . . . . . . . . . . . . . 269
Using the Mapping Builder. . . . . . . . . . . . . . . . . . . . . . . . . . . . . . . . . . . . . . . . . . . . . . . . . . . . . . 269
Setting Function Parameters. . . . . . . . . . . . . . . . . . . . . . . . . . . . . . . . . . . . . . . . . . . . . . . 270
Predefined Functions. . . . . . . . . . . . . . . . . . . . . . . . . . . . . . . . . . . . . . . . . . . . . . . . . . . . . .271
Customizing @CONCAT Functions. . . . . . . . . . . . . . . . . . . . . . . . . . . . . . . . . . . . . . . . . . . 280
Configuring Properties for JDBC. . . . . . . . . . . . . . . . . . . . . . . . . . . . . . . . . . . . . . . . . . . . . . . . . .281
JDBC Replace Functions as Input Data Sources. . . . . . . . . . . . . . . . . . . . . . . . . . . . . . .282
Using the @JDBCLOOKUP Function. . . . . . . . . . . . . . . . . . . . . . . . . . . . . . . . . . . . . . . . . .286
Configuring Properties for Replace. . . . . . . . . . . . . . . . . . . . . . . . . . . . . . . . . . . . . . . . . . . . . . . 292
Custom Functions. . . . . . . . . . . . . . . . . . . . . . . . . . . . . . . . . . . . . . . . . . . . . . . . . . . . . . . . . . . . . 297
Writing Custom Functions. . . . . . . . . . . . . . . . . . . . . . . . . . . . . . . . . . . . . . . . . . . . . . . . . .297
Import Statement. . . . . . . . . . . . . . . . . . . . . . . . . . . . . . . . . . . . . . . . . . . . . . . . . . . 298
Class Declaration. . . . . . . . . . . . . . . . . . . . . . . . . . . . . . . . . . . . . . . . . . . . . . . . . . . 299
Constructor. . . . . . . . . . . . . . . . . . . . . . . . . . . . . . . . . . . . . . . . . . . . . . . . . . . . . . . . .299
execute(). . . . . . . . . . . . . . . . . . . . . . . . . . . . . . . . . . . . . . . . . . . . . . . . . . . . . . . . . . .299
Getting Arguments. . . . . . . . . . . . . . . . . . . . . . . . . . . . . . . . . . . . . . . . . . . . . . . . . . .300
getReturnType(). . . . . . . . . . . . . . . . . . . . . . . . . . . . . . . . . . . . . . . . . . . . . . . . . . . . . 300
Associated Object Map. . . . . . . . . . . . . . . . . . . . . . . . . . . . . . . . . . . . . . . . . . . . . . .301
Sample Custom Function. . . . . . . . . . . . . . . . . . . . . . . . . . . . . . . . . . . . . . . . . . . . . 301
Contents
8 Information Builders

Defining Custom Functions. . . . . . . . . . . . . . . . . . . . . . . . . . . . . . . . . . . . . . . . . . . . . . . . 303
Compiling Your .java File. . . . . . . . . . . . . . . . . . . . . . . . . . . . . . . . . . . . . . . . . . . . . 309
Migrating Custom Functions. . . . . . . . . . . . . . . . . . . . . . . . . . . . . . . . . . . . . . . . . . 310
Using Custom Functions at Run Time. . . . . . . . . . . . . . . . . . . . . . . . . . . . . . . . . . 311
5. iWay Transformer Tips and Tricks . . . . . . . . . . . . . . . . . . . . . . . . . . . . . . . . . . . . . . . . . . . . .313
XSLT Runtime Processing . . . . . . . . . . . . . . . . . . . . . . . . . . . . . . . . . . . . . . . . . . . . . . . . . . . . . . . . . . . 313
Option 1: Running iWay Service Manager as a Service. . . . . . . . . . . . . . . . . . . . . . . . . . . . . . 315
Option 2: Running iWay Service Manager as an Application. . . . . . . . . . . . . . . . . . . . . . . . . . 316
Contents
iWay Integration Tools Transformer User’s Guide 9

Contents
10 Information Builders
Preface
This document is written for system integrators who require data transformations and have theneed to define and edit the structure of metadata. It describes how to use iWay IntegrationTools (iIT) Transformer.
Note: This Release 7.0.x content is currently being updated to support iWay Release 8.0.xsoftware. In the meantime, it can serve as a reference for your use of iWay Release 8. If youhave any questions, please contact [email protected].
How This Manual Is Organized
This manual includes the following chapters:
Chapter/Appendix Contents
1 iWay Transformer Overview Provides an overview of the major facilities, tools,and data formats supported by iWay Transformer.
2 Getting Started With iWayTransformer
Provides getting started information for iWayTransformer, including three tutorials.
3 iWay Transformer Concepts Describes concepts related to iWay Transformer,such as transformation and mappings.
4 iWay Transformer Tasks Describes the basic menus and options available iniWay Transformer.
5 iWay Transformer Tips andTricks
Provides useful tips and tricks that are related toiWay Transformer.
Documentation Conventions
The following table describes the documentation conventions that are used in this manual.
Convention Description
THIS TYPEFACE orthis typeface
Denotes syntax that you must enter exactly as shown.
this typeface Represents a placeholder (or variable), a cross-reference, or animportant term. It may also indicate a button, menu item, or dialogbox option that you can click or select.
iWay Integration Tools Transformer User’s Guide 11
Convention Description
underscore Indicates a default setting.
Key + Key Indicates keys that you must press simultaneously.
{ } Indicates two or three choices. Type one of them, not the braces.
| Separates mutually exclusive choices in syntax. Type one of them,not the symbol.
... Indicates that you can enter a parameter multiple times. Type onlythe parameter, not the ellipsis (...).
.
.
.
Indicates that there are (or could be) intervening or additionalcommands.
Related Publications
Visit our Technical Documentation Library at http://documentation.informationbuilders.com. Youcan also contact the Publications Order Department at (800) 969-4636.
Customer Support
Do you have any questions about this product?
Join the Focal Point community. Focal Point is our online developer center and more than amessage board. It is an interactive network of more than 3,000 developers from almost everyprofession and industry, collaborating on solutions and sharing tips and techniques. AccessFocal Point at http://forums.informationbuilders.com/eve/forums.
You can also access support services electronically, 24 hours a day, with InfoResponseOnline. InfoResponse Online is accessible through our website, http://www.informationbuilders.com. It connects you to the tracking system and known-problemdatabase at the Information Builders support center. Registered users can open, update, andview the status of cases in the tracking system and read descriptions of reported softwareissues. New users can register immediately for this service. The technical support section of http://www.informationbuilders.com also provides usage techniques, diagnostic tips, andanswers to frequently asked questions.
Related Publications
12 Information Builders

Call Information Builders Customer Support Services (CSS) at (800) 736-6130 or (212)736-6130. Customer Support Consultants are available Monday through Friday between 8:00a.m. and 8:00 p.m. EST to address all your questions. Information Builders consultants canalso give you general guidance regarding product capabilities and documentation. Please beready to provide your six-digit site code number (xxxx.xx) when you call.
To learn about the full range of available support services, ask your Information Buildersrepresentative about InfoResponse Online, or call (800) 969-INFO.
Help Us to Serve You Better
To help our consultants answer your questions effectively, be prepared to providespecifications and sample files and to answer questions about errors and problems.
The following tables list the environment information our consultants require.
Platform
Operating System
OS Version
JVM Vendor
JVM Version
The following table lists the deployment information our consultants require.
Adapter Deployment For example, JCA, Business Services Provider, iWayService Manager
Container For example, WebSphere
Version
Enterprise Information System(EIS) - if any
EIS Release Level
EIS Service Pack
EIS Platform
Preface
iWay Integration Tools Transformer User’s Guide 13
The following table lists iWay-related information needed by our consultants.
iWay Adapter
iWay Release Level
iWay Patch
The following table lists additional questions to help us serve you better.
Request/Question Error/Problem Details or Information
Did the problem arise througha service or event?
Provide usage scenarios orsummarize the application thatproduces the problem.
When did the problem start?
Can you reproduce thisproblem consistently?
Describe the problem.
Describe the steps toreproduce the problem.
Specify the error message(s).
Any change in the applicationenvironment: softwareconfiguration, EIS/databaseconfiguration, application, andso forth?
Under what circumstance doesthe problem not occur?
Help Us to Serve You Better
14 Information Builders

The following is a list of error/problem files that might be applicable.
Input documents (XML instance, XML schema, non-XML documents)
Transformation files
Error screen shots
Error output files
Trace files
Service Manager package to reproduce problem
Custom functions and agents in use
Diagnostic Zip
Transaction log
For information on tracing, see the iWay Service Manager User's Guide.
User Feedback
In an effort to produce effective documentation, the Technical Content Management staffwelcomes your opinions regarding this document. Please use the Reader Comments form atthe end of this document to communicate your feedback to us or to suggest changes that willsupport improvements to our documentation. You can also contact us through our website, http://documentation.informationbuilders.com/connections.asp.
Thank you, in advance, for your comments.
Information Builders Consulting and Training
Interested in training? Information Builders Education Department offers a wide variety oftraining courses for this and other Information Builders products.
For information on course descriptions, locations, and dates, or to register for classes, visitour website (http://education.informationbuilders.com) or call (800) 969-INFO to speak to anEducation Representative.
Preface
iWay Integration Tools Transformer User’s Guide 15

Information Builders Consulting and Training
16 Information Builders

Chapter1iWay Transformer Overview
This section provides an overview of the major facilities, tools, and data formatssupported by iWay Transformer.
In this chapter:
About iWay Transformer
About iWay Transformer
iWay Transformer offers integrated data transformation services within iWay Service Manager.It provides support for creating, modifying, and publishing Transform components.
A graphical tool called Mapping Builder provides design services for specifying and definingtransformations. It establishes mapping rules and relationships within your output document,based on the input structure if required. You can test the Transform by executing it with anactual input document to see the results. When you confirm that the Transform is stable, youcan publish it, making it available to iWay Service Manager.
The main facilities within iWay Transformer are Mapping Builder, Dictionary Builder, TemplateViewer, and Test Results.
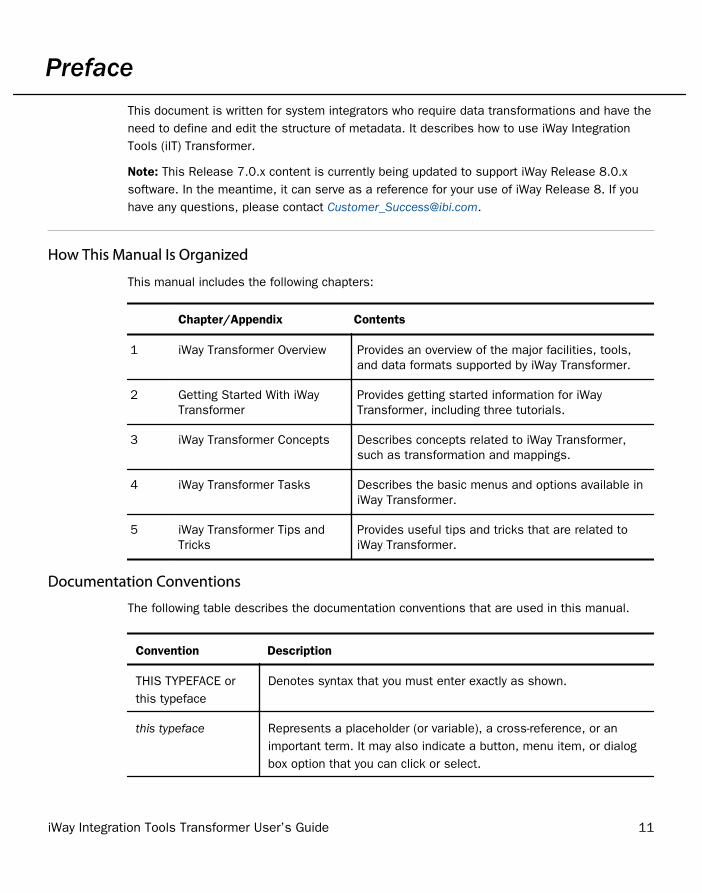
Mapping Builder
Mapping Builder is a graphical editor that enables you to manage the rules or mappings of yourtransformations. It is identified by the Mappings tab and allows you to navigate through theinput and output side of a transformation, and design mapping rules for it using an extensiveset of customizable tools.
You can quickly and easily accomplish mappings between individual structure nodes of theinput (incoming) document and the output (outgoing) document using drag and dropoperations. The Mapping Builder interface supports one-to-one, one-to-many, and many-to-onemapping relationships, referring to the fields in the input and output documents, respectively.It also supports a set of functions that enable various forms of data manipulation.
iWay Integration Tools Transformer User’s Guide 17
The following image shows the Mapping Builder.
For more information, see Working With the Mapping Builder on page 224.
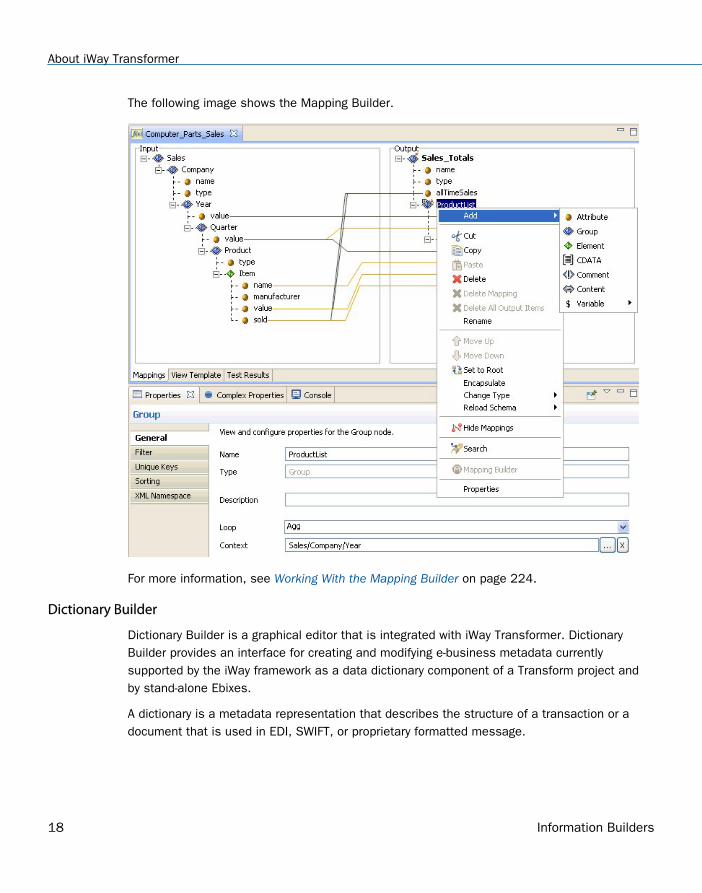
Dictionary Builder
Dictionary Builder is a graphical editor that is integrated with iWay Transformer. DictionaryBuilder provides an interface for creating and modifying e-business metadata currentlysupported by the iWay framework as a data dictionary component of a Transform project andby stand-alone Ebixes.
A dictionary is a metadata representation that describes the structure of a transaction or adocument that is used in EDI, SWIFT, or proprietary formatted message.
About iWay Transformer
18 Information Builders
Dictionary Builder is an efficient interface that you can use in EDI, SWIFT, or proprietary formatmessage solutions for composing, editing, and distributing e-business metadata in the form ofEbixes or Transform data dictionary components. Dictionary Builder in iWay Transformercontains the following management facilities:
Data Dictionaries (Metadata Management Facility)
Ebixes or Ebix Entry Projects (Ebix Management Facility)
You can use the Dictionary Builder interface to browse, in a structured way, all the componentsof e-business data dictionaries. You can access the Dictionary Builder interface in iWayTransformer, as follows.
Procedure: How to Access Dictionary Builder
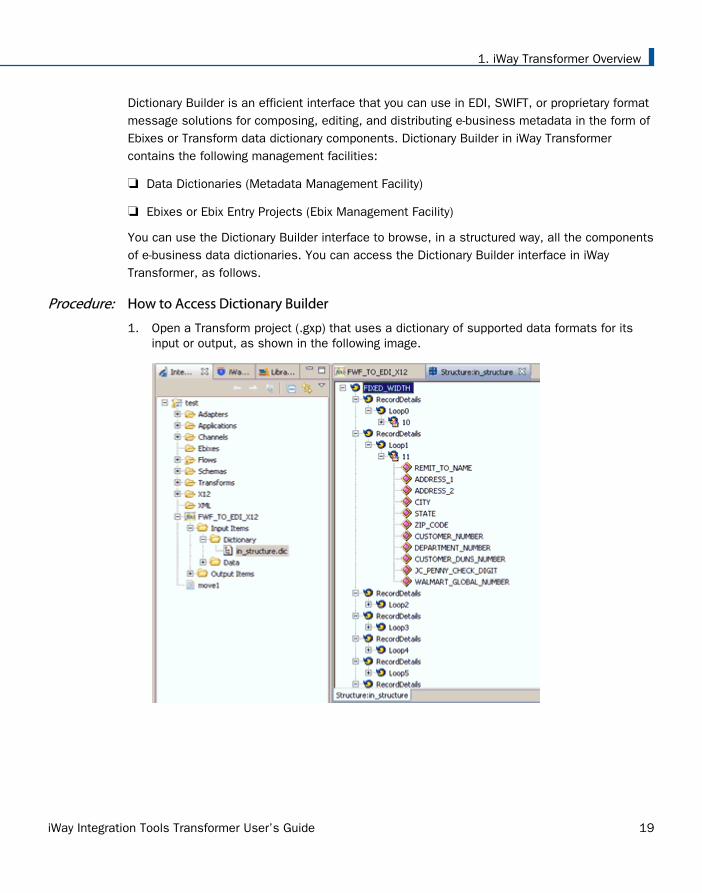
1. Open a Transform project (.gxp) that uses a dictionary of supported data formats for itsinput or output, as shown in the following image.
1. iWay Transformer Overview
iWay Integration Tools Transformer User’s Guide 19
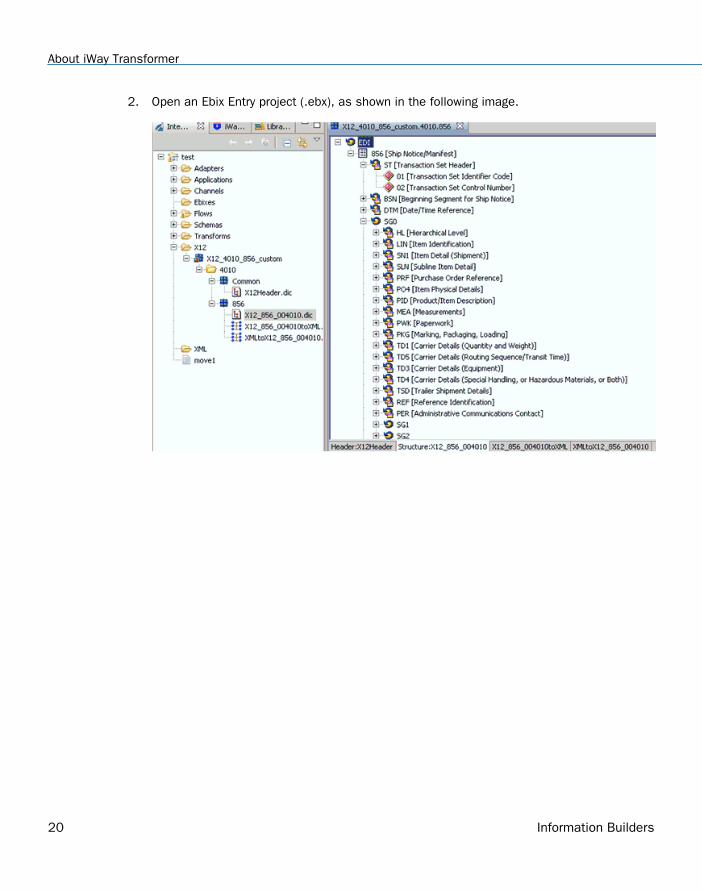
2. Open an Ebix Entry project (.ebx), as shown in the following image.
About iWay Transformer
20 Information Builders

Template Viewer
Template Viewer provides a read-only view of a Transform template, as an XML representationof a Transform component. It is identified by the View Template tab, as shown in the followingimage.
1. iWay Transformer Overview
iWay Integration Tools Transformer User’s Guide 21
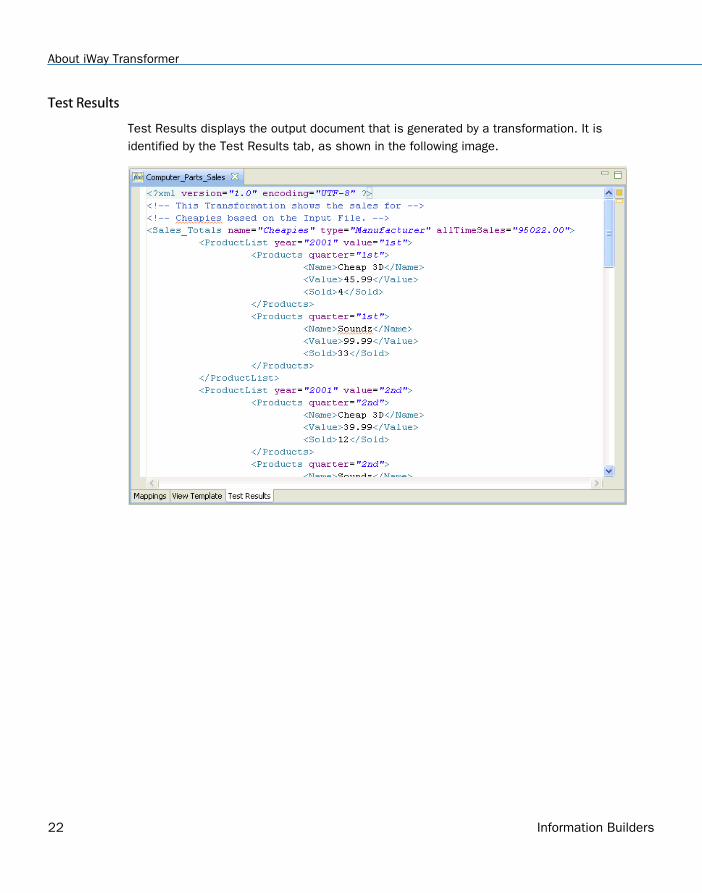
Test Results
Test Results displays the output document that is generated by a transformation. It isidentified by the Test Results tab, as shown in the following image.
About iWay Transformer
22 Information Builders

Chapter2Getting Started With iWay Transformer
This section provides getting started information for iWay Transformer, including threetutorials.
In this chapter:
iWay Transformer Basic Tutorial
Project Configuration Tutorial
Dictionary Builder Tutorial
iWay Transformer Basic Tutorial
This topic provides a basic tutorial for iWay Transformer.
Transformer Workbench Basics
The Transformer workbench is an Eclipse-based, end-to-end, integrated developmentenvironment (IDE) for data transformation design, testing, and management within iWayService Manager (iSM). It uses a collection of visual layout, build, and debugging tools. Someof the basic functionality of the Transformer IDE comes from Eclipse. For example, managing,searching, and navigating resources are inherited from the core features.
About the Transformer Workbench
The Transformer workbench is a full-featured environment that is tailored to assist you indeveloping data transformations for iSM.
Unless you are using other Eclipse plug-ins, you do not need to be concerned with theunderlying Eclipse framework.
Workbench. The workbench refers to the iWay Transformer development environment, whichcontains three primary facilities:
Perspective. A perspective is a group of views and editors in the workbench. Essentially, itis a special work environment that helps you accomplish a specific type of task. TheTransformer workbench is located within the Integration Explorer perspective of iWayIntegration Tools (iIT).
Editor. An editor allows you to edit various file types. iWay Transformer contains editors forcreating transform (.gxp) and dictionary (structure) files.
iWay Integration Tools Transformer User’s Guide 23
View. A view typically supports an editor. For example, when you are editing a Transformcomponent, Output, Input, Mapping Builder, Mapping Properties, and Template views arealso displayed in the Transform editor.
You use all three facilities in various combinations and at various points during thetransformation development process. The workbench is the container of all the tools that areused to develop transformations, which are also called Transform components in iSM.
About iWay Transformer Editors
iWay Transformer contains editors that allow you to edit Transform project (.gxp) files, as wellas its metadata, such as structure (dictionary) files. Editors are associated with resourcetypes. As resources are opened in the workbench, the appropriate editor is opened:
Transform Editor. The Transform editor is used to edit transformations. It has two modes:Mappings and Template. You use Mappings mode to visually design and structure yourtransformation. Template mode allows you to view an XML representation of yourtransformation. The two modes are synchronized, and changes in one mode areimmediately reflected in the other.
Dictionary Builder. The Dictionary Builder is used to edit dictionary (structure) files or ebixmetadata for e-business and proprietary data formats (for example, FWF, CDF, and X12).
Setting iWay Transformer Preferences
When you start iWay Transformer for the first time, the iWay home directory must be set. Wealso recommend that you verify the iWay Transformer preferences that are in use. For moreinformation on how to set the iWay home directory, see the iWay Integration Tools Suite User'sGuide.
iWay Transformer Basic Tutorial
24 Information Builders
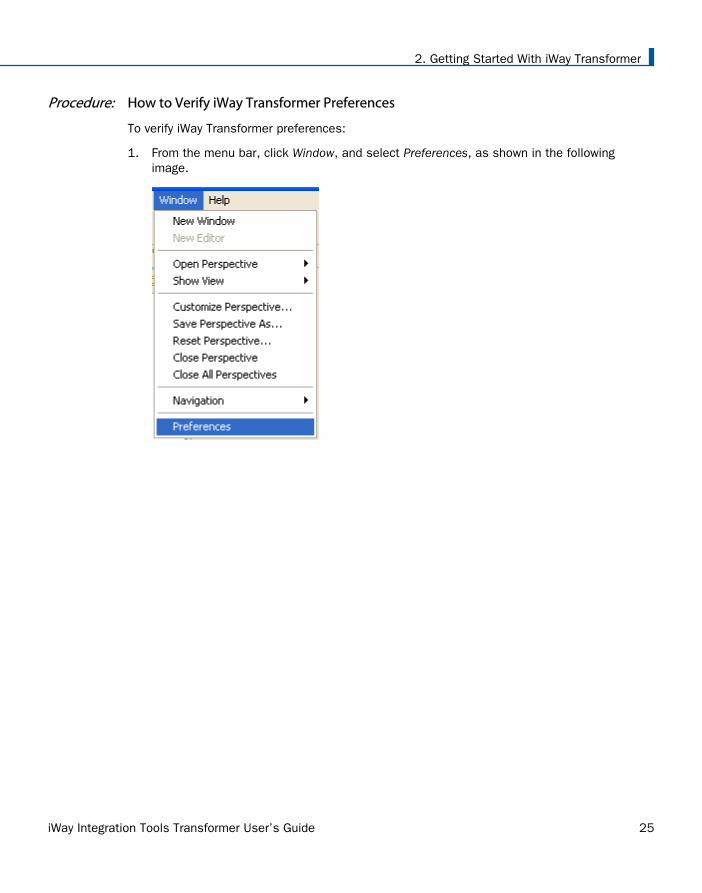
Procedure: How to Verify iWay Transformer Preferences
To verify iWay Transformer preferences:
1. From the menu bar, click Window, and select Preferences, as shown in the followingimage.
2. Getting Started With iWay Transformer
iWay Integration Tools Transformer User’s Guide 25
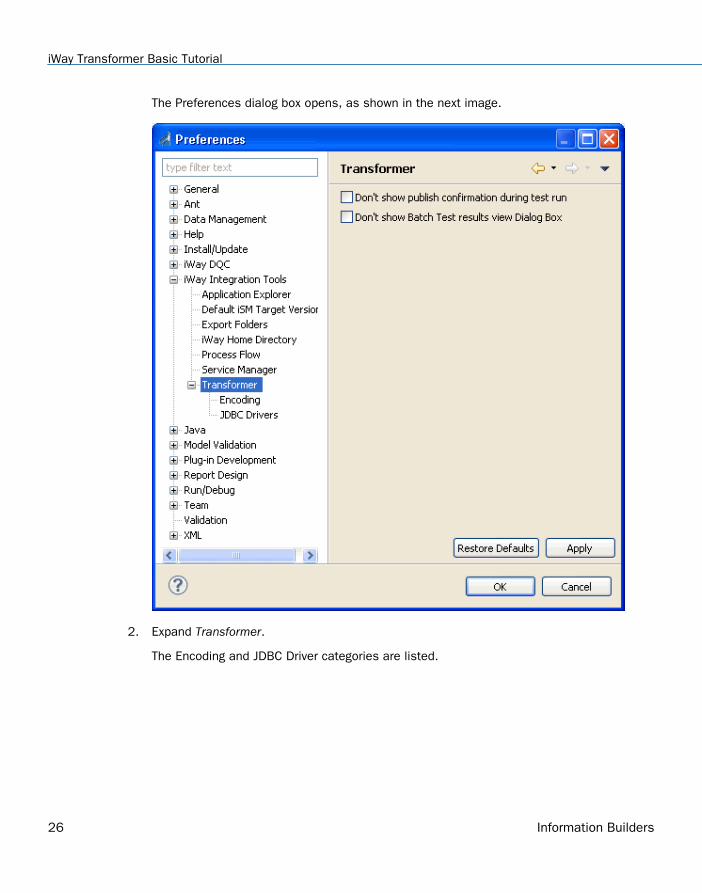
The Preferences dialog box opens, as shown in the next image.
2. Expand Transformer.
The Encoding and JDBC Driver categories are listed.
iWay Transformer Basic Tutorial
26 Information Builders

The following image shows the Encoding preference options that are currently set for iWayTransformer.
The Encoding category provides the option of customizing project and template encoding.The following options are available:
Character encoding. You can select the type of encoding to use for the characters in afile. By default, the character encoding in iWay Transformer is set to UTF-8.
File encoding. You can select the type of file encoding to use when saving or deployingproject and template files to a system that uses a different language format. Bydefault, the file encoding is set to the same value that is used by your operatingsystem.
2. Getting Started With iWay Transformer
iWay Integration Tools Transformer User’s Guide 27
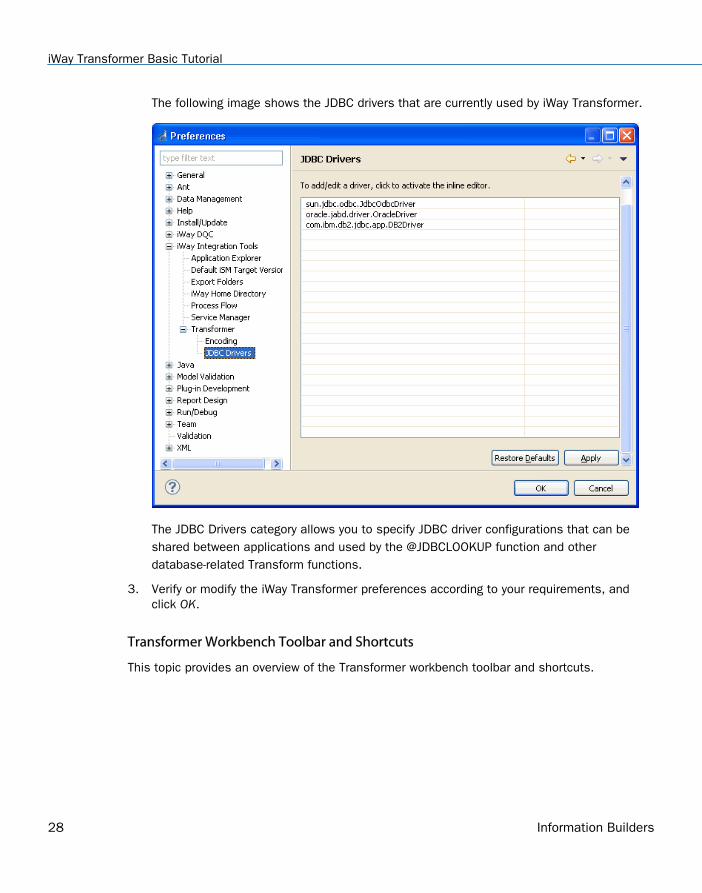
The following image shows the JDBC drivers that are currently used by iWay Transformer.
The JDBC Drivers category allows you to specify JDBC driver configurations that can beshared between applications and used by the @JDBCLOOKUP function and otherdatabase-related Transform functions.
3. Verify or modify the iWay Transformer preferences according to your requirements, andclick OK.
Transformer Workbench Toolbar and Shortcuts
This topic provides an overview of the Transformer workbench toolbar and shortcuts.
iWay Transformer Basic Tutorial
28 Information Builders
Navigating the Transformer Workbench Toolbar
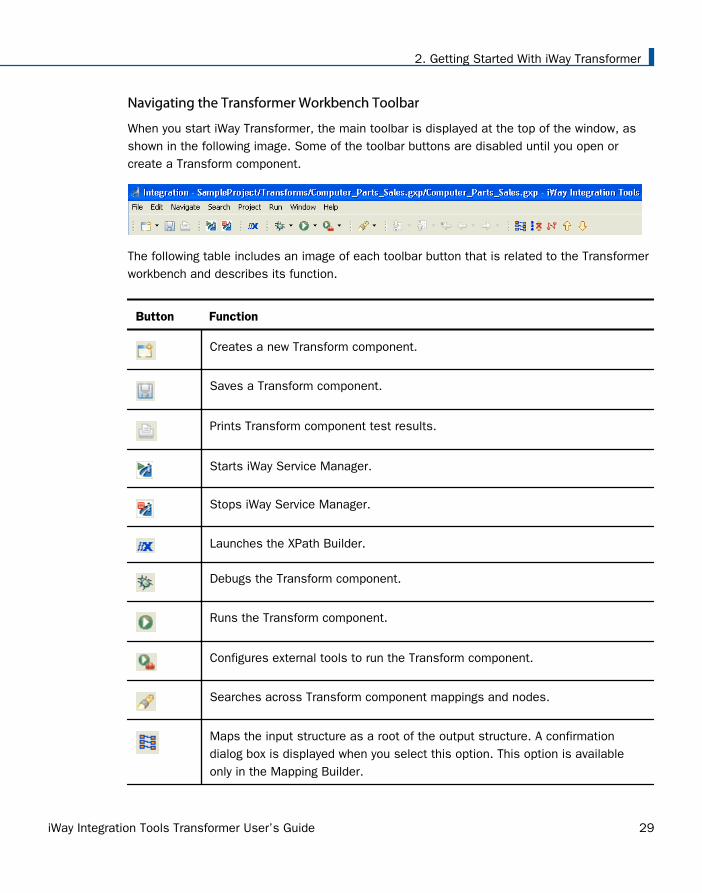
When you start iWay Transformer, the main toolbar is displayed at the top of the window, asshown in the following image. Some of the toolbar buttons are disabled until you open orcreate a Transform component.
The following table includes an image of each toolbar button that is related to the Transformerworkbench and describes its function.
Button Function
Creates a new Transform component.
Saves a Transform component.
Prints Transform component test results.
Starts iWay Service Manager.
Stops iWay Service Manager.
Launches the XPath Builder.
Debugs the Transform component.
Runs the Transform component.
Configures external tools to run the Transform component.
Searches across Transform component mappings and nodes.
Maps the input structure as a root of the output structure. A confirmationdialog box is displayed when you select this option. This option is availableonly in the Mapping Builder.
2. Getting Started With iWay Transformer
iWay Integration Tools Transformer User’s Guide 29

Button Function
Optimizes mappings by removing all unmapped output nodes including groupswith unmapped children. This option is available only in the Mapping Builder.
Toggles between showing and hiding the mapping lines between the input andoutput nodes. The mappings signify the relationships between the input andoutput nodes, where the particular input value is used to construct the valueof the output node.
Moves the selected node up the output structure tree, under the same parentnode.
Moves the selected node down the output structure tree, under the sameparent node.
Navigating the Mapping Builder
The Mapping Builder uses mapping types to specify how records and fields of one documentstructure relate to another.
Mappings Tab
The Mappings tab allows you to design mapping rules for Transform components. You canquickly and easily accomplish mappings between individual nodes contained in structures ofincoming and outgoing data, using drag and drop operations. The Mapping Builder interfacesupports one-to-one, one-to-many, and many-to-one mapping relationships, referring to thefields in the input and output documents, respectively.
iWay Transformer Basic Tutorial
30 Information Builders

The following image shows sample input and output structures on the Mappings tab.
For more information on how to define mappings for Transform components using theMappings tab, see Working With the Mapping Builder on page 224.
View Template Tab
The View Template tab provides a read-only view of a Transform template, as an XMLrepresentation, or a serialized view of a Transform component.
2. Getting Started With iWay Transformer
iWay Integration Tools Transformer User’s Guide 31

The following image shows a read-only view of a Transform template on the View Template tab.
Test Results Tab
The Test Results tab displays the output document that is generated by your Transformcomponent, as shown in the following image.
iWay Transformer Basic Tutorial
32 Information Builders

Using Keyboard Shortcuts
This following table lists keyboard shortcuts for commonly used tasks and functions.
Task or Function Keyboard Shortcut
New Alt+Shift+N
Close Ctrl+W
Close All Ctrl+Shift+W
Save Ctrl+S
Save All Ctrl+Shift+S
Undo Ctrl+Z
Redo Ctrl+Y
Cut Ctrl+X
Copy Ctrl+C
Paste Ctrl+V
Delete Delete
Select All Ctrl+A
Find and Replace Ctrl+F
Search Ctrl+H
Run Ctrl+F11
Debug F11
Help F1
Preparing iWay Integration Tools Suite
For more information on installing, configuring, and starting iWay Integration Tools (iIT) Suite,see the iWay Integration Tools Suite User's Guide.
2. Getting Started With iWay Transformer
iWay Integration Tools Transformer User’s Guide 33
Creating a Transform Component
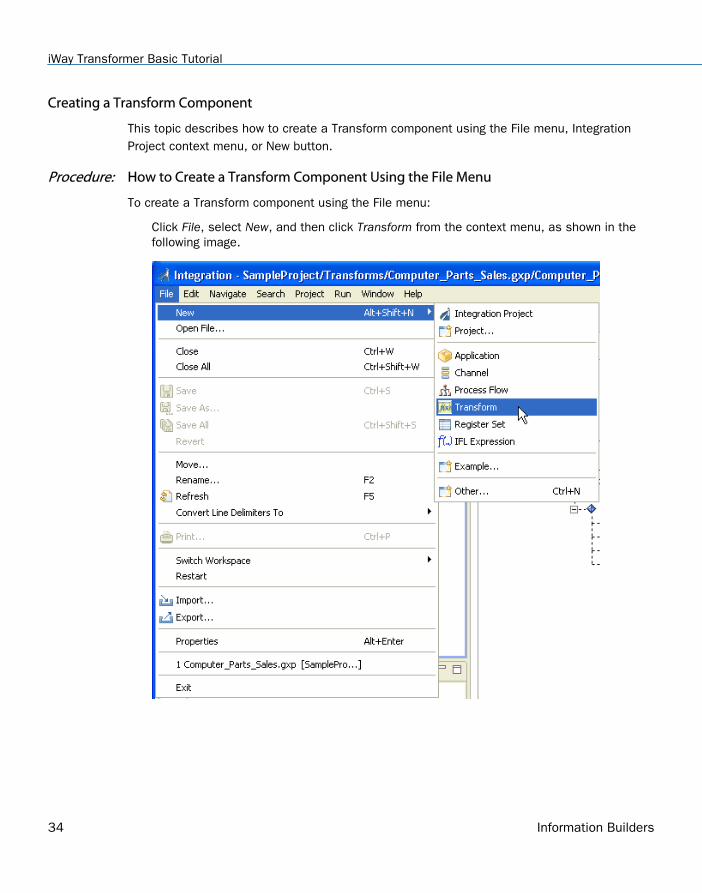
This topic describes how to create a Transform component using the File menu, IntegrationProject context menu, or New button.
Procedure: How to Create a Transform Component Using the File Menu
To create a Transform component using the File menu:
Click File, select New, and then click Transform from the context menu, as shown in thefollowing image.
iWay Transformer Basic Tutorial
34 Information Builders

The New iWay Transform wizard opens, as shown in the next image.
For more information on creating a Transform component using the New iWay Transformwizard, see Configuring a New Transform Component on page 62.
2. Getting Started With iWay Transformer
iWay Integration Tools Transformer User’s Guide 35
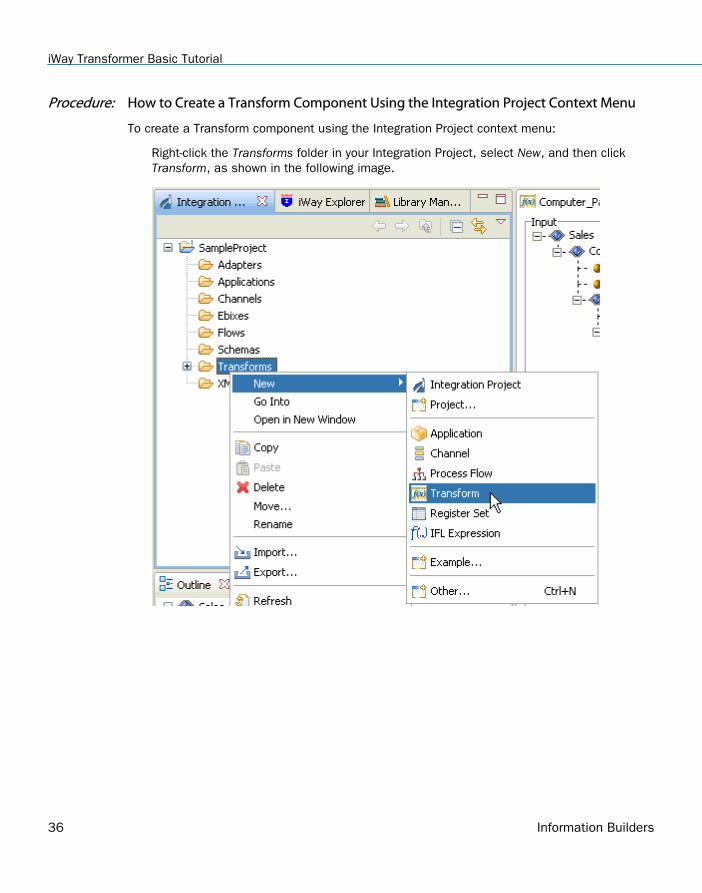
Procedure: How to Create a Transform Component Using the Integration Project Context Menu
To create a Transform component using the Integration Project context menu:
Right-click the Transforms folder in your Integration Project, select New, and then clickTransform, as shown in the following image.
iWay Transformer Basic Tutorial
36 Information Builders

The New iWay Transform wizard opens, as shown in the next image.
For more information on creating a Transform component using the New iWay Transformwizard, see Configuring a New Transform Component on page 62.
Procedure: How to Create a Transform Component Using the New Button
To create a Transform component using the New button:
1. Click the New button in the toolbar, as shown in the following image.
2. Getting Started With iWay Transformer
iWay Integration Tools Transformer User’s Guide 37

The New dialog box opens, as shown in the following image.
2. Expand iWay Integration, and then select Transform.
iWay Transformer Basic Tutorial
38 Information Builders

The New iWay Transform wizard opens, as shown in the next image.
You can skip the New iWay Transform wizard steps by clicking the Finish button once it isenabled. You can then manually alter the Transform project properties at yourconvenience.
For more information on creating a Transform component using the New iWay Transformwizard, see Configuring a New Transform Component on page 62.
2. Getting Started With iWay Transformer
iWay Integration Tools Transformer User’s Guide 39

Navigating Resources
You can navigate Transform project resources in the Integration Explorer tab, as shown in thefollowing image.
Browsing Mappings
This topic describes how to browse the mappings for a Transform project.
iWay Transformer Basic Tutorial
40 Information Builders
Procedure: How to Browse Mappings
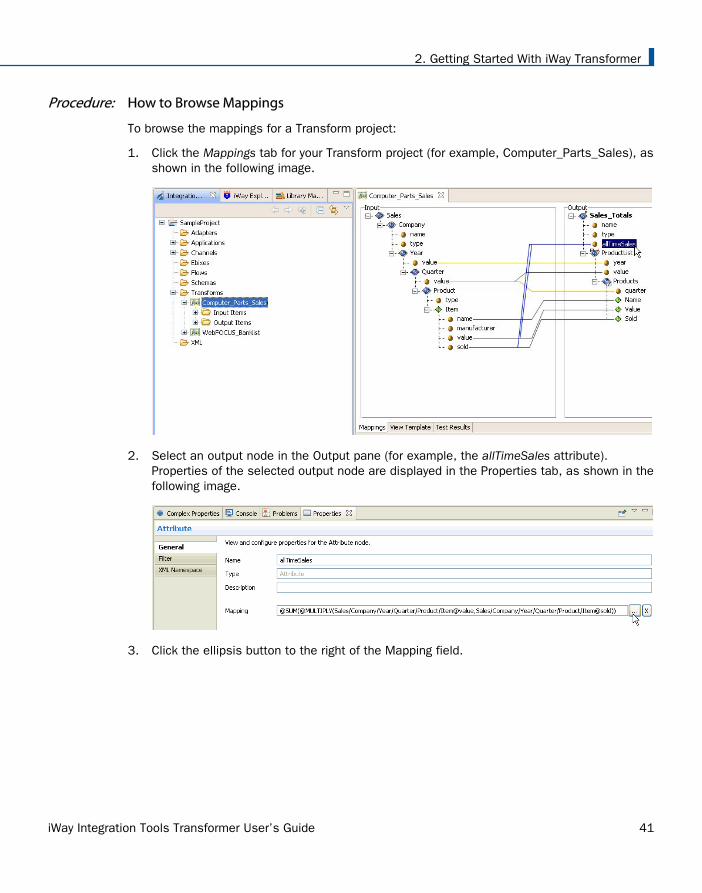
To browse the mappings for a Transform project:
1. Click the Mappings tab for your Transform project (for example, Computer_Parts_Sales), asshown in the following image.
2. Select an output node in the Output pane (for example, the allTimeSales attribute).Properties of the selected output node are displayed in the Properties tab, as shown in thefollowing image.
3. Click the ellipsis button to the right of the Mapping field.
2. Getting Started With iWay Transformer
iWay Integration Tools Transformer User’s Guide 41
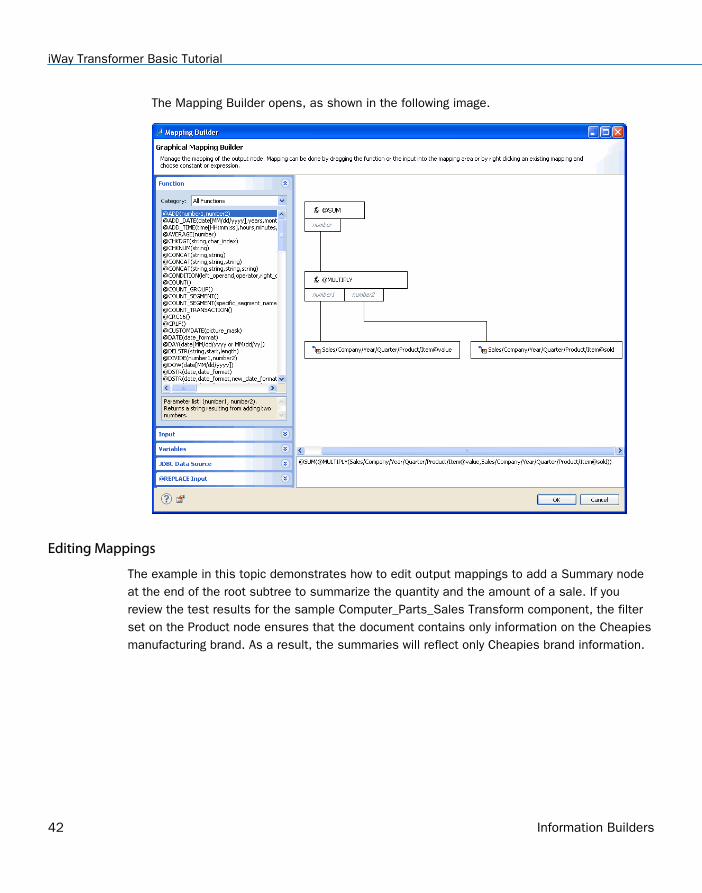
The Mapping Builder opens, as shown in the following image.
Editing Mappings
The example in this topic demonstrates how to edit output mappings to add a Summary nodeat the end of the root subtree to summarize the quantity and the amount of a sale. If youreview the test results for the sample Computer_Parts_Sales Transform component, the filterset on the Product node ensures that the document contains only information on the Cheapiesmanufacturing brand. As a result, the summaries will reflect only Cheapies brand information.
iWay Transformer Basic Tutorial
42 Information Builders
The following image shows the filter that is set.
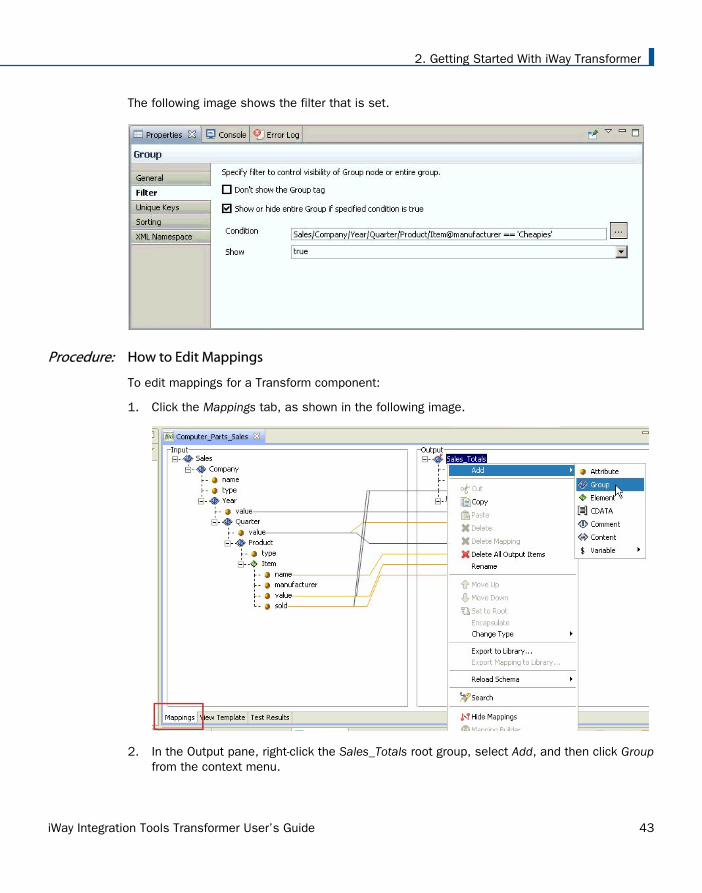
Procedure: How to Edit Mappings
To edit mappings for a Transform component:
1. Click the Mappings tab, as shown in the following image.
2. In the Output pane, right-click the Sales_Totals root group, select Add, and then click Groupfrom the context menu.
2. Getting Started With iWay Transformer
iWay Integration Tools Transformer User’s Guide 43

A new group node is added to the output structure, as shown in the following image.
3. Change the default name for the group node to Summary, as shown in the following image.
4. Add two elements to the Summary group, using the following names:
Cheapies_Total_Units
Cheapies_Total_Amount
The following image shows how the Summary group will look.
iWay Transformer Basic Tutorial
44 Information Builders

Now that the new output structure is configured, you need to configure variables tocalculate the total values of the new elements (Cheapies_Total_Units andCheapies_Total_Amount).
5. Right-click the Computer_Parts_Sales Transform component in the Integration Explorer tab,and select Properties, as shown in the following image.
2. Getting Started With iWay Transformer
iWay Integration Tools Transformer User’s Guide 45
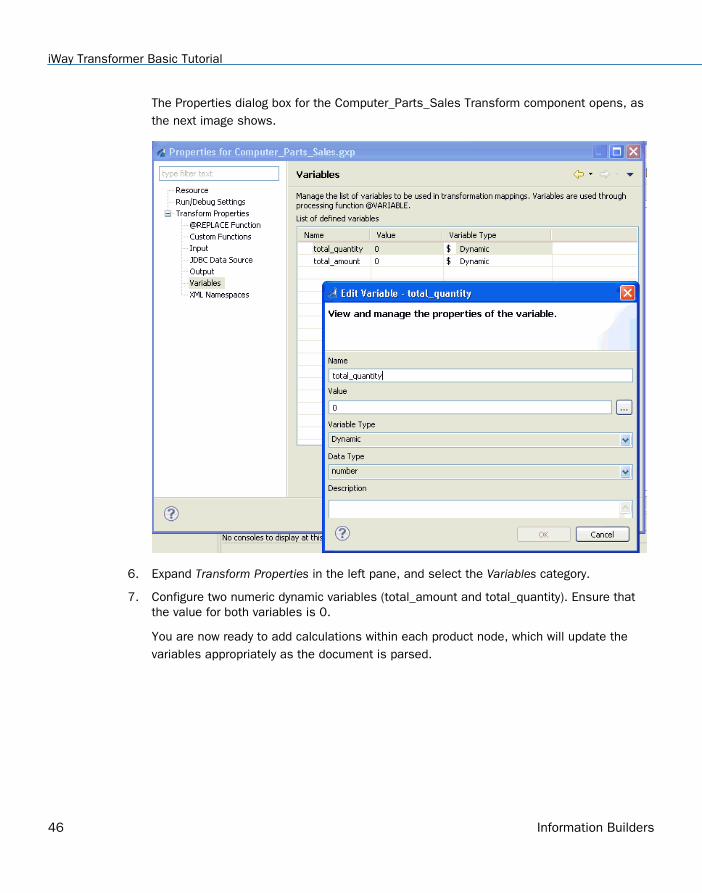
The Properties dialog box for the Computer_Parts_Sales Transform component opens, asthe next image shows.
6. Expand Transform Properties in the left pane, and select the Variables category.
7. Configure two numeric dynamic variables (total_amount and total_quantity). Ensure thatthe value for both variables is 0.
You are now ready to add calculations within each product node, which will update thevariables appropriately as the document is parsed.
iWay Transformer Basic Tutorial
46 Information Builders

8. In the Output pane, right-click the Products group node, select Add, Variable, and then clicktotal_quantity, as shown in the following image.
The total_quantity variable is added to the Products group node, as shown in the nextimage.
2. Getting Started With iWay Transformer
iWay Integration Tools Transformer User’s Guide 47
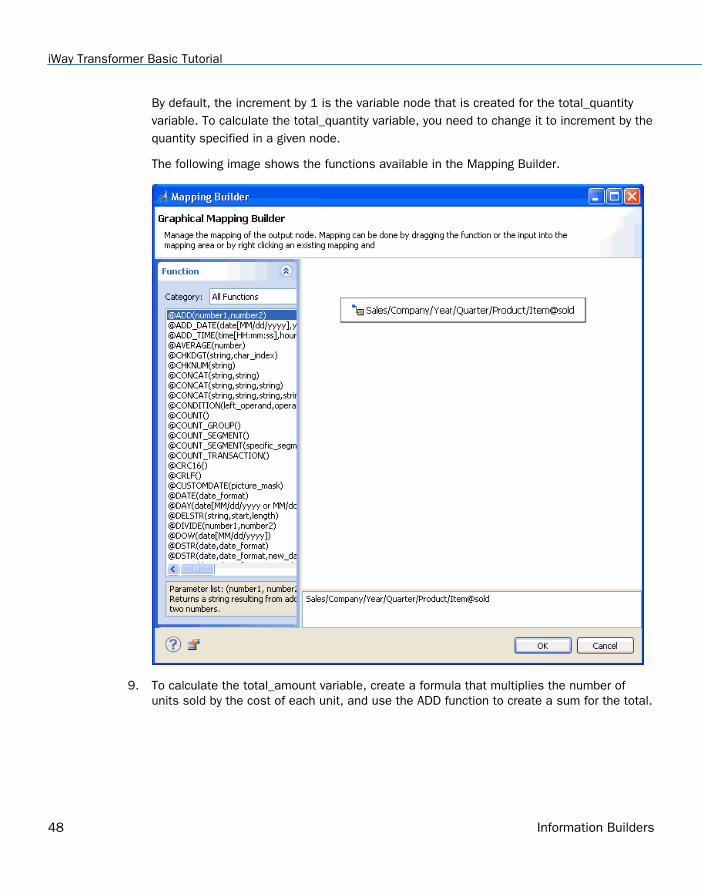
By default, the increment by 1 is the variable node that is created for the total_quantityvariable. To calculate the total_quantity variable, you need to change it to increment by thequantity specified in a given node.
The following image shows the functions available in the Mapping Builder.
9. To calculate the total_amount variable, create a formula that multiplies the number ofunits sold by the cost of each unit, and use the ADD function to create a sum for the total.
iWay Transformer Basic Tutorial
48 Information Builders
In the following image, the formula is shown, and the ADD function is selected from thelist of functions on the left.
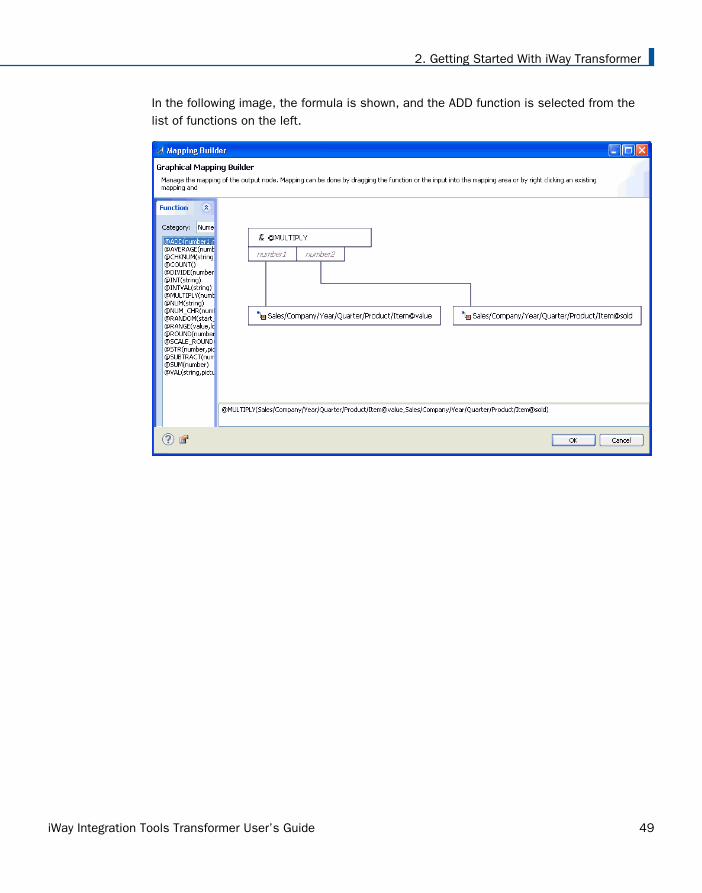
2. Getting Started With iWay Transformer
iWay Integration Tools Transformer User’s Guide 49
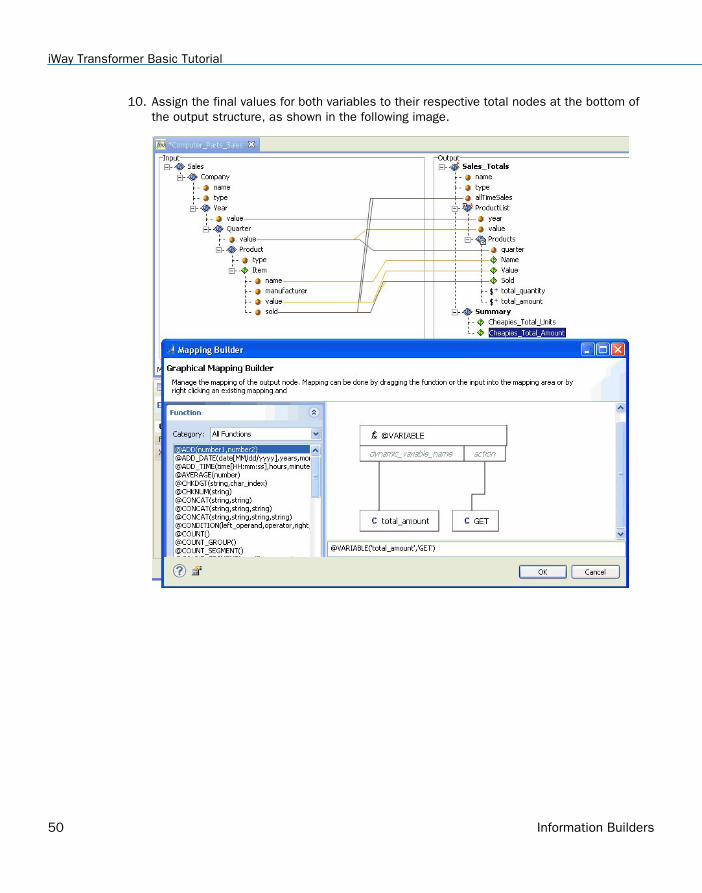
10. Assign the final values for both variables to their respective total nodes at the bottom ofthe output structure, as shown in the following image.
iWay Transformer Basic Tutorial
50 Information Builders

11. Test the updated Computer_Parts_Sales Transform component, and review the results,which are shown in the following image.
Using the Mapping Builder
The Mapping Builder is a tool available in iWay Transformer as part of the Mapping Builderfacility. It allows you to construct an output node using various methods and formulasimplemented in iWay Transformer as functions. You can access the predefined functions andthe custom functions that you define, or build a statement containing several functions, ifneeded.
2. Getting Started With iWay Transformer
iWay Integration Tools Transformer User’s Guide 51

Procedure: How to Open the Mapping Builder
To open the Mapping Builder:
1. In the Output pane of the Mappings tab, select an output node, as shown in the followingimage.
2. Click the ellipsis button on the Properties tab.
iWay Transformer Basic Tutorial
52 Information Builders

The Mapping Builder opens, as shown in the following image.
For more information, see Using the Mapping Builder on page 269.
Renaming Mappings
To customize the output of your transform, you can rename an output structure node in yourTransform component, if required.
2. Getting Started With iWay Transformer
iWay Integration Tools Transformer User’s Guide 53

Procedure: How to Rename Mappings
To rename mappings:
1. Right-click an output structure node in the Output pane of the Mapping Builder, and selectRename from the context menu, as shown in the following image.
iWay Transformer Basic Tutorial
54 Information Builders

2. Type a new name for the output structure node, as shown in the next image.
Tip: The rename operation is also available if you double-click the name of the outputstructure node.
Copying and Moving Mappings
To modify the output structure of your transform, you can copy and move structure nodes inyour Transform component, if required.
2. Getting Started With iWay Transformer
iWay Integration Tools Transformer User’s Guide 55

Procedure: How to Copy Mappings
Perform the following steps to copy an input structure node and paste it to the outputstructure:
1. Right-click an input structure node (for example, the Item element) in the Input pane of theMapping Builder, and select Copy from the context menu, as shown in the following image.
2. In the Output pane of the Mapping Builder, right-click an output structure node (forexample, the Products group node) to which you want to add the copied input, and selectPaste from the context menu, as shown in the following image.
iWay Transformer Basic Tutorial
56 Information Builders
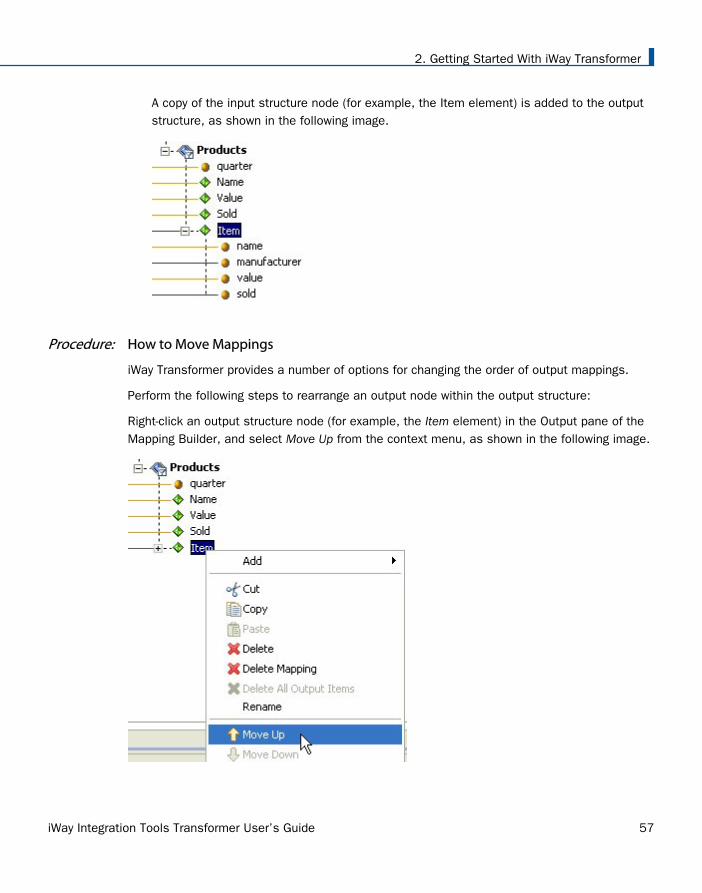
A copy of the input structure node (for example, the Item element) is added to the outputstructure, as shown in the following image.
Procedure: How to Move Mappings
iWay Transformer provides a number of options for changing the order of output mappings.
Perform the following steps to rearrange an output node within the output structure:
Right-click an output structure node (for example, the Item element) in the Output pane of theMapping Builder, and select Move Up from the context menu, as shown in the following image.
2. Getting Started With iWay Transformer
iWay Integration Tools Transformer User’s Guide 57
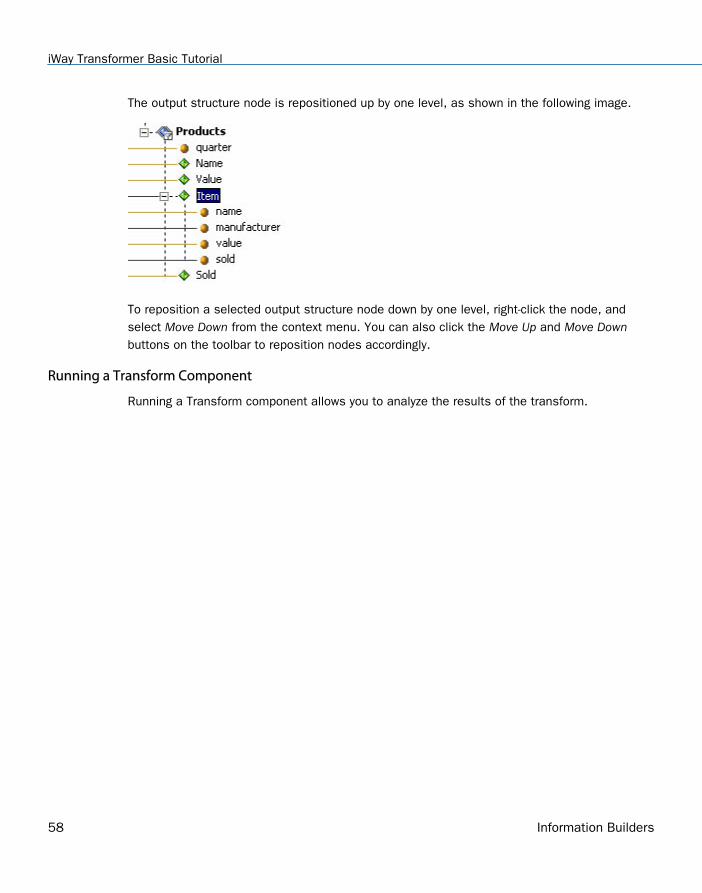
The output structure node is repositioned up by one level, as shown in the following image.
To reposition a selected output structure node down by one level, right-click the node, andselect Move Down from the context menu. You can also click the Move Up and Move Downbuttons on the toolbar to reposition nodes accordingly.
Running a Transform Component
Running a Transform component allows you to analyze the results of the transform.
iWay Transformer Basic Tutorial
58 Information Builders
Procedure: How to Run a Transform Component
To run a Transform component:
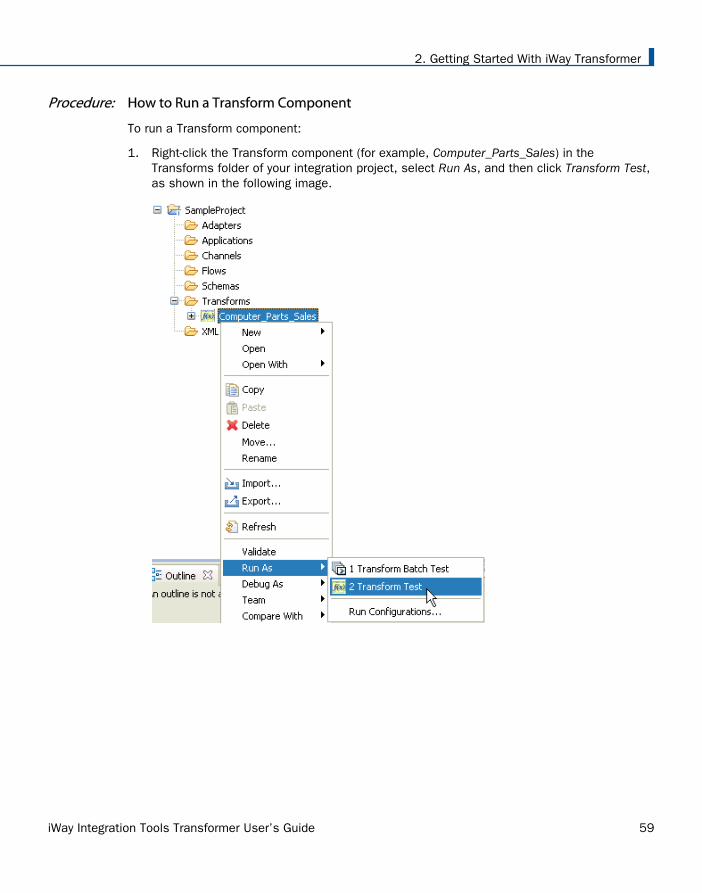
1. Right-click the Transform component (for example, Computer_Parts_Sales) in theTransforms folder of your integration project, select Run As, and then click Transform Test,as shown in the following image.
2. Getting Started With iWay Transformer
iWay Integration Tools Transformer User’s Guide 59
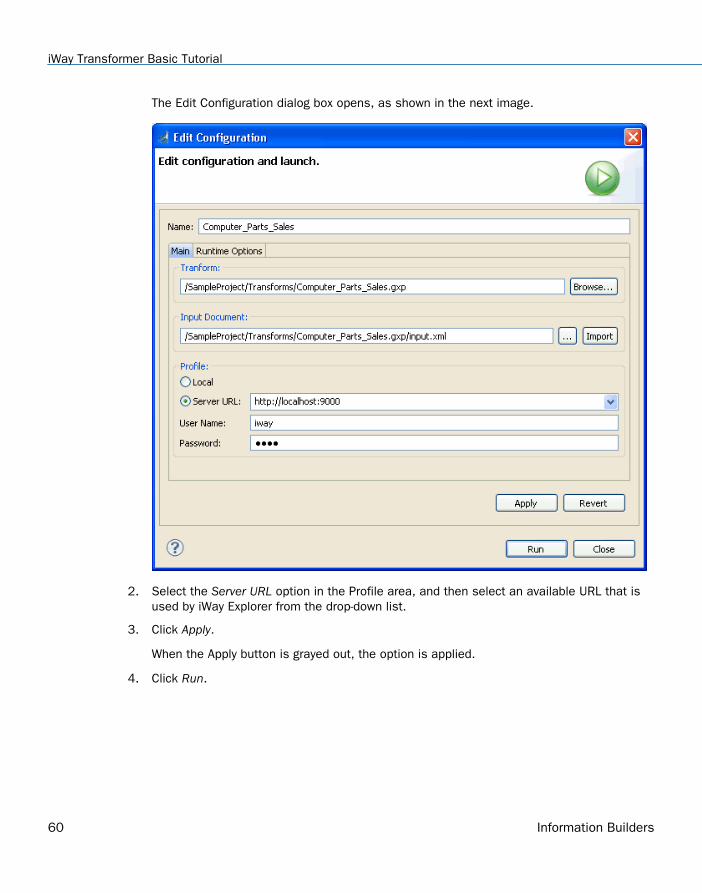
The Edit Configuration dialog box opens, as shown in the next image.
2. Select the Server URL option in the Profile area, and then select an available URL that isused by iWay Explorer from the drop-down list.
3. Click Apply.
When the Apply button is grayed out, the option is applied.
4. Click Run.
iWay Transformer Basic Tutorial
60 Information Builders
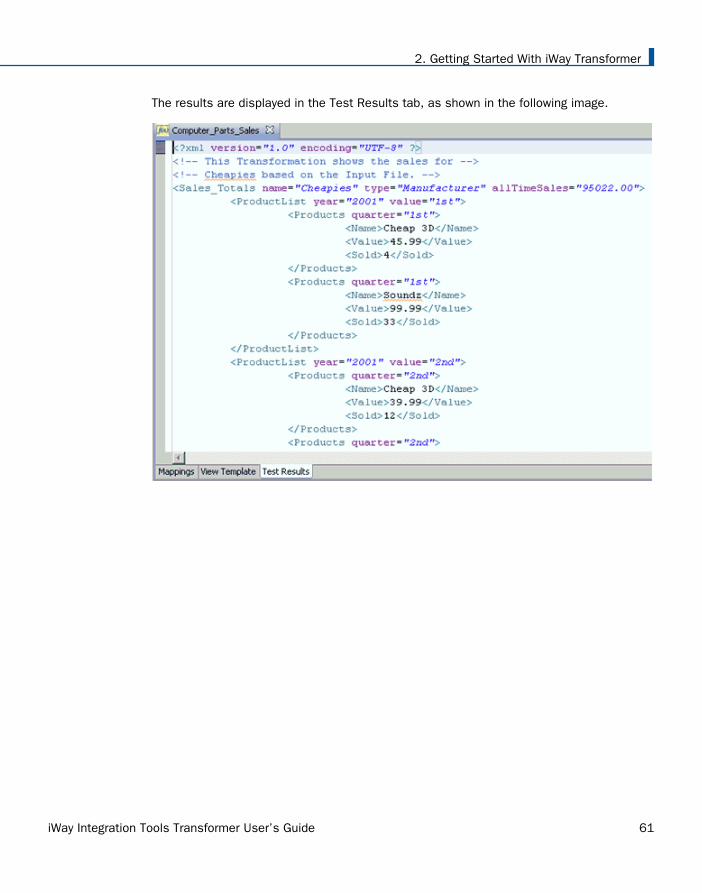
The results are displayed in the Test Results tab, as shown in the following image.
2. Getting Started With iWay Transformer
iWay Integration Tools Transformer User’s Guide 61

Debugging a Transform Component
The Runtime Options tab allows you to debug a Transform component, as shown in thefollowing image.
Working With Other Editors
For more information, see Dictionary Builder Tutorial on page 80.
Project Configuration Tutorial
This topic provides a project configuration tutorial for iWay Transformer.
Configuring a New Transform Component
This topic describes how to configure a new Transform component.
Project Configuration Tutorial
62 Information Builders
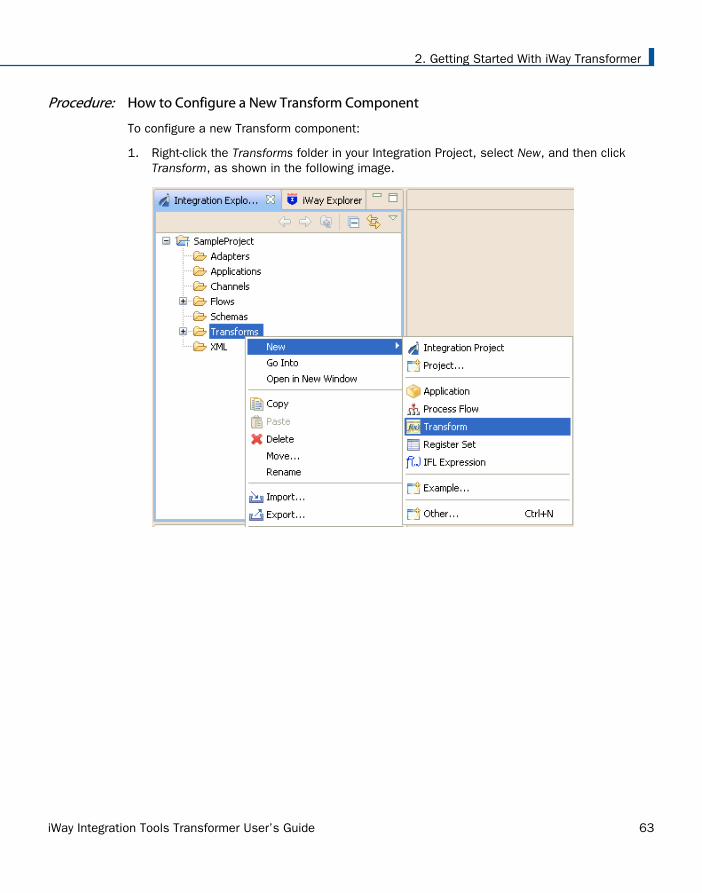
Procedure: How to Configure a New Transform Component
To configure a new Transform component:
1. Right-click the Transforms folder in your Integration Project, select New, and then clickTransform, as shown in the following image.
2. Getting Started With iWay Transformer
iWay Integration Tools Transformer User’s Guide 63
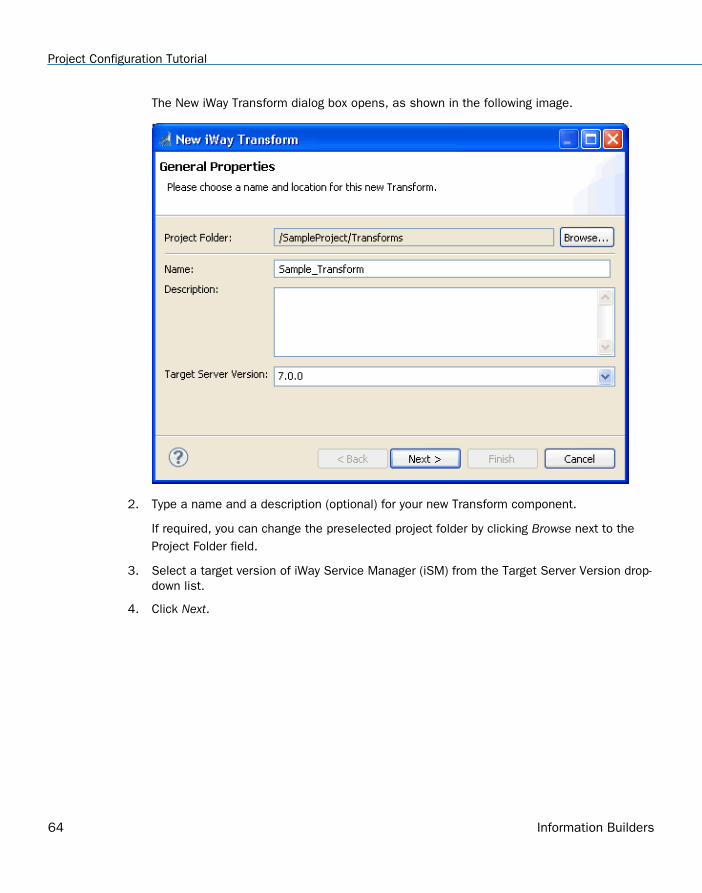
The New iWay Transform dialog box opens, as shown in the following image.
2. Type a name and a description (optional) for your new Transform component.
If required, you can change the preselected project folder by clicking Browse next to theProject Folder field.
3. Select a target version of iWay Service Manager (iSM) from the Target Server Version drop-down list.
4. Click Next.
Project Configuration Tutorial
64 Information Builders
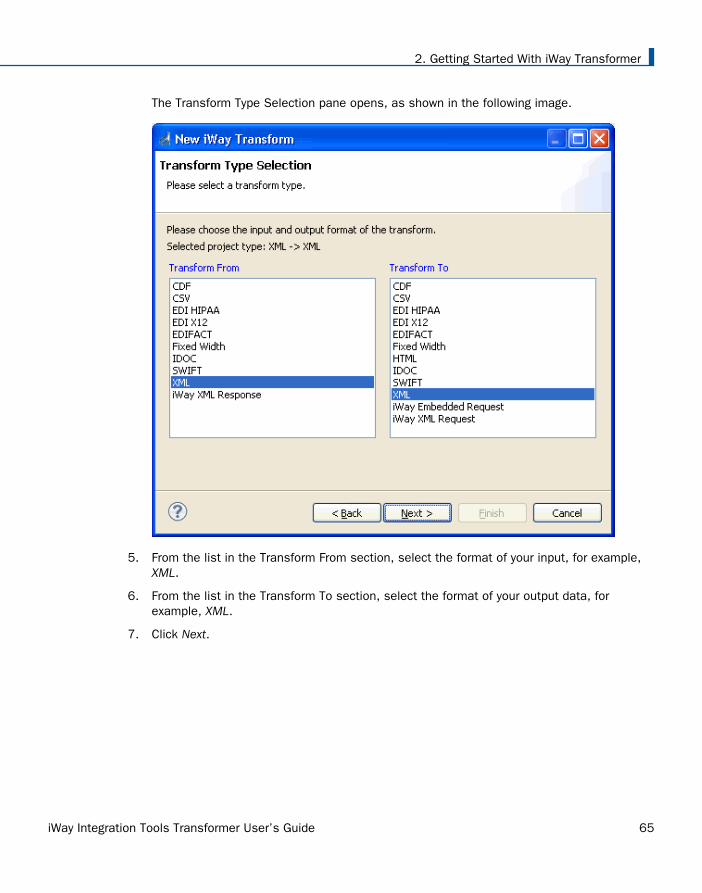
The Transform Type Selection pane opens, as shown in the following image.
5. From the list in the Transform From section, select the format of your input, for example,XML.
6. From the list in the Transform To section, select the format of your output data, forexample, XML.
7. Click Next.
2. Getting Started With iWay Transformer
iWay Integration Tools Transformer User’s Guide 65
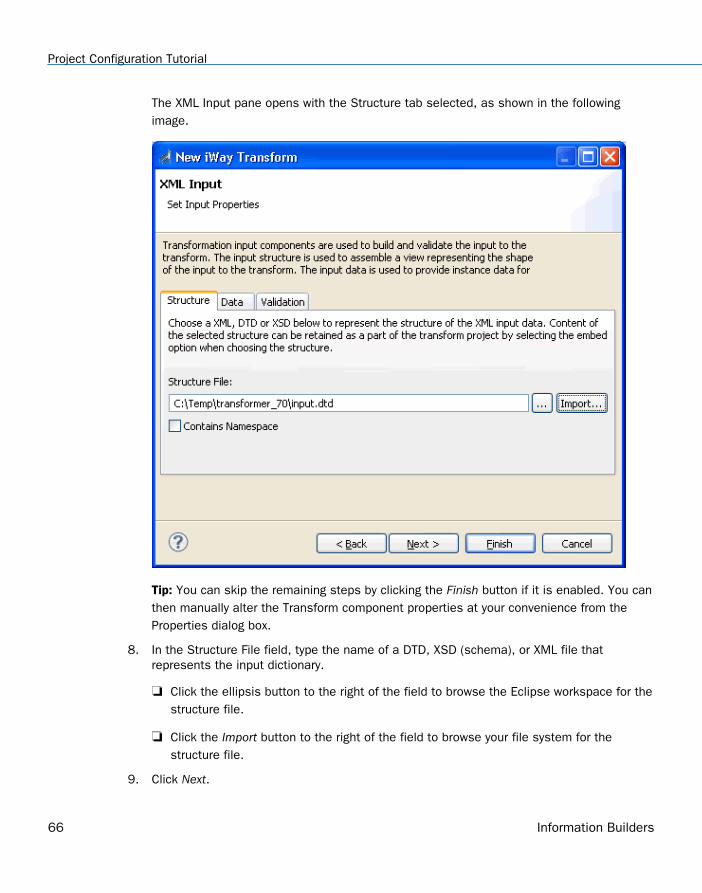
The XML Input pane opens with the Structure tab selected, as shown in the followingimage.
Tip: You can skip the remaining steps by clicking the Finish button if it is enabled. You canthen manually alter the Transform component properties at your convenience from theProperties dialog box.
8. In the Structure File field, type the name of a DTD, XSD (schema), or XML file thatrepresents the input dictionary.
Click the ellipsis button to the right of the field to browse the Eclipse workspace for thestructure file.
Click the Import button to the right of the field to browse your file system for thestructure file.
9. Click Next.
Project Configuration Tutorial
66 Information Builders
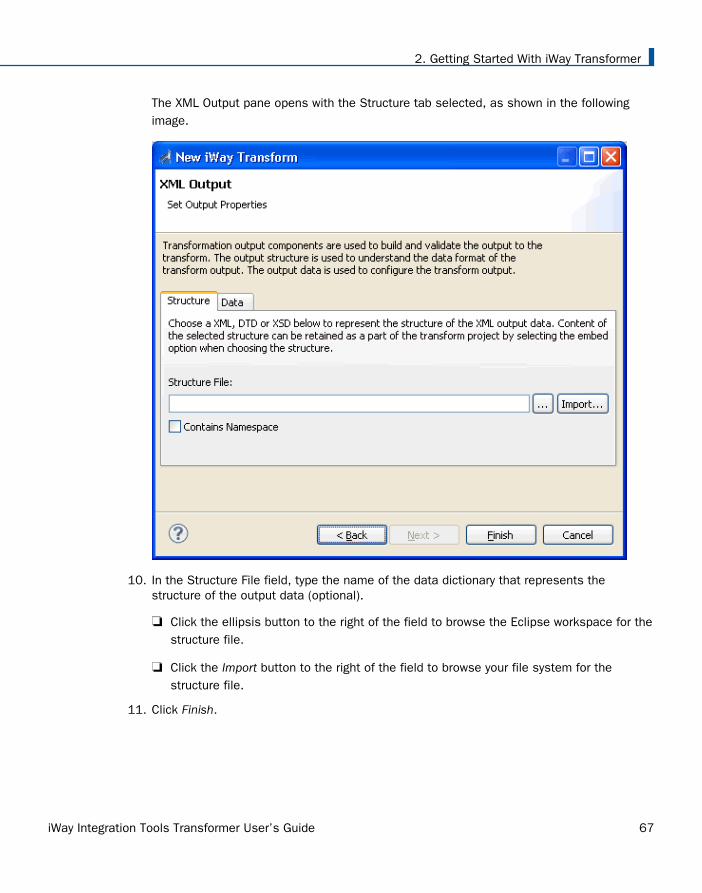
The XML Output pane opens with the Structure tab selected, as shown in the followingimage.
10. In the Structure File field, type the name of the data dictionary that represents thestructure of the output data (optional).
Click the ellipsis button to the right of the field to browse the Eclipse workspace for thestructure file.
Click the Import button to the right of the field to browse your file system for thestructure file.
11. Click Finish.
2. Getting Started With iWay Transformer
iWay Integration Tools Transformer User’s Guide 67

Your new Transform component is displayed in the iIT Eclipse workspace, as shown in thefollowing image.
The Transform component and any related resources (for example, structure files andinput data) exist in the workspace subdirectory that you named during the creationprocess. For example:
iIT_Home\workspace\SampleProject\Transforms\Sample_Transform.gxp
Configuring Transform Component Properties
The Transform component Properties dialog box enables you to view or modify the set ofproperties defined for a Transform component, such as project creation date and customfunctions.
Project Configuration Tutorial
68 Information Builders

To access the Transform component Properties dialog box, right-click a Transform componentproject name in the Integration Explorer pane, and select Properties from the context menu, asshown in the following image.
2. Getting Started With iWay Transformer
iWay Integration Tools Transformer User’s Guide 69
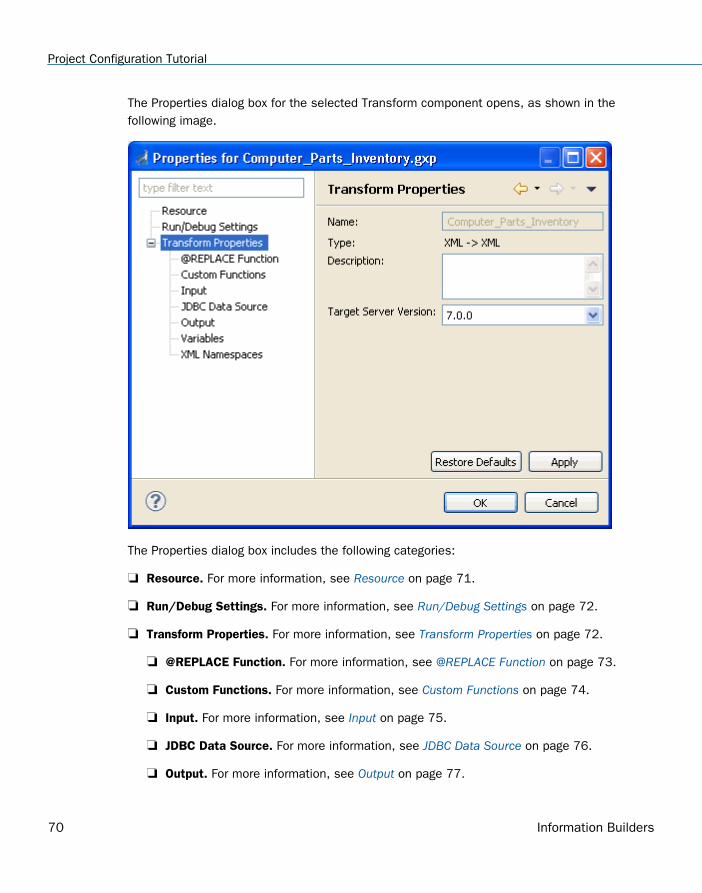
The Properties dialog box for the selected Transform component opens, as shown in thefollowing image.
The Properties dialog box includes the following categories:
Resource. For more information, see Resource on page 71.
Run/Debug Settings. For more information, see Run/Debug Settings on page 72.
Transform Properties. For more information, see Transform Properties on page 72.
@REPLACE Function. For more information, see @REPLACE Function on page 73.
Custom Functions. For more information, see Custom Functions on page 74.
Input. For more information, see Input on page 75.
JDBC Data Source. For more information, see JDBC Data Source on page 76.
Output. For more information, see Output on page 77.
Project Configuration Tutorial
70 Information Builders
Variables. For more information, see Variables on page 78.
XML Namespaces. For more information, see XML Namespaces on page 79.
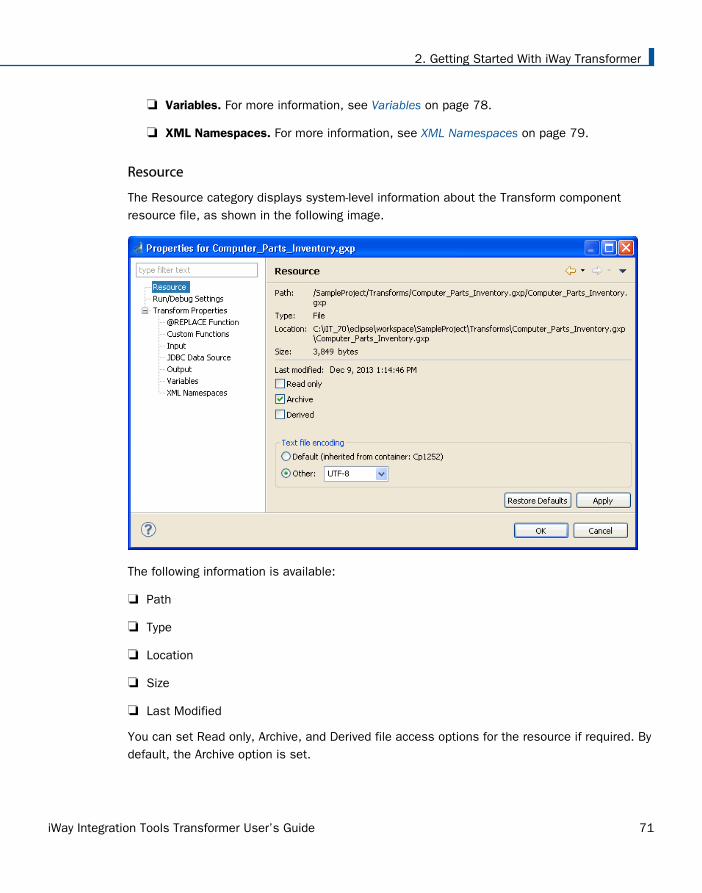
Resource
The Resource category displays system-level information about the Transform componentresource file, as shown in the following image.
The following information is available:
Path
Type
Location
Size
Last Modified
You can set Read only, Archive, and Derived file access options for the resource if required. Bydefault, the Archive option is set.
2. Getting Started With iWay Transformer
iWay Integration Tools Transformer User’s Guide 71

The Text file encoding section allows you to specify the type of encoding that is used for thecharacters in a file. By default, the character encoding is set to UTF-8.
Run/Debug Settings
The Run/Debug Settings category allows you to manage launch configurations that areassociated with the resource that is currently selected.
The following image shows the Run/Debug Settings pane.
Transform Properties
The Transform Properties category includes basic information about the Transform component.
Project Configuration Tutorial
72 Information Builders

The following image shows the Transform Properties pane.
The following properties are listed:
Name. Name of your Transform component.
Type. Input and output format of your Transform component. If the format of the input oroutput is changed, the Type property will reflect those changes.
Description. Custom description for your Transform component.
Target Server Version. The target version of iWay Service Manager (iSM) that is selectedfor this Transform component.
@REPLACE Function
The @REPLACE Function category provides a way to instantaneously match and replace certaininput data values. Each individually configured replace function works similarly to customfunctions, in that you must first define the function and then apply it in the output nodemapping value definition that you want to affect.
2. Getting Started With iWay Transformer
iWay Integration Tools Transformer User’s Guide 73

The following image shows the @REPLACE Function pane.
Custom Functions
The Custom Functions category enables you to manage the list of custom functions that youcan build on-demand, when a predefined iWay Transformer function does not exist to performthe task that you require. You must write custom functions in Java and store them on yoursystem so that they are available for use with iWay Transformer during design time. You mustconfigure custom functions differently for use at run time.
Project Configuration Tutorial
74 Information Builders

The following image shows the Custom Functions pane.
Input
The Input category allows you to configure the input properties for the Transform component.
2. Getting Started With iWay Transformer
iWay Integration Tools Transformer User’s Guide 75

The following image shows the Input pane.
JDBC Data Source
The JDBC Data Source category enables you to manage the list of JDBC lookups used by the@JDBCLOOKUP function during transformation mappings. You can define multiple JDBCconnections or add a connection from an existing project. In addition, you can specify anypredefined function (for example, @SREG) as the URL.
Project Configuration Tutorial
76 Information Builders

The following image shows the JDBC Data Source pane.
Output
The Output category allows you to configure the output properties for the Transformcomponent.
2. Getting Started With iWay Transformer
iWay Integration Tools Transformer User’s Guide 77
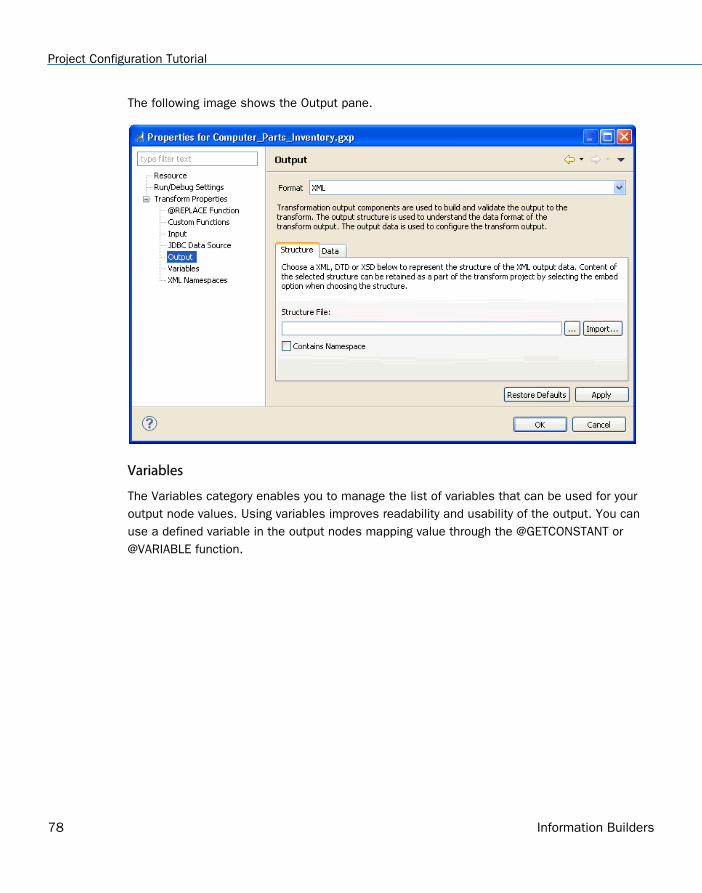
The following image shows the Output pane.
Variables
The Variables category enables you to manage the list of variables that can be used for youroutput node values. Using variables improves readability and usability of the output. You canuse a defined variable in the output nodes mapping value through the @GETCONSTANT or@VARIABLE function.
Project Configuration Tutorial
78 Information Builders

The following image shows the Variables pane.
XML Namespaces
The XML Namespaces category enables you to load XML namespaces from other projects or tocreate your own.
2. Getting Started With iWay Transformer
iWay Integration Tools Transformer User’s Guide 79
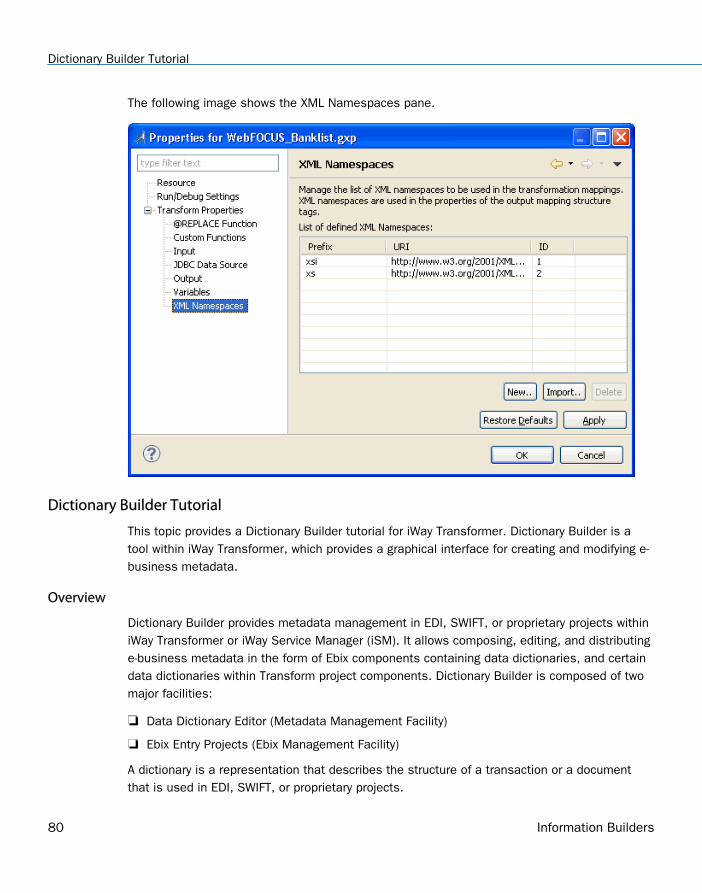
The following image shows the XML Namespaces pane.
Dictionary Builder Tutorial
This topic provides a Dictionary Builder tutorial for iWay Transformer. Dictionary Builder is atool within iWay Transformer, which provides a graphical interface for creating and modifying e-business metadata.
Overview
Dictionary Builder provides metadata management in EDI, SWIFT, or proprietary projects withiniWay Transformer or iWay Service Manager (iSM). It allows composing, editing, and distributinge-business metadata in the form of Ebix components containing data dictionaries, and certaindata dictionaries within Transform project components. Dictionary Builder is composed of twomajor facilities:
Data Dictionary Editor (Metadata Management Facility)
Ebix Entry Projects (Ebix Management Facility)
A dictionary is a representation that describes the structure of a transaction or a documentthat is used in EDI, SWIFT, or proprietary projects.
Dictionary Builder Tutorial
80 Information Builders

You can use the Dictionary Builder interface to visualize and browse, in an orderly way, all thecomponents of e-business data dictionaries. You can access the Dictionary Builder interface iniWay Transformer in either of two ways:
Open a Transform project (.gxp) that uses a dictionary of supported data formats for itsinput or output, as shown in the following image.
2. Getting Started With iWay Transformer
iWay Integration Tools Transformer User’s Guide 81
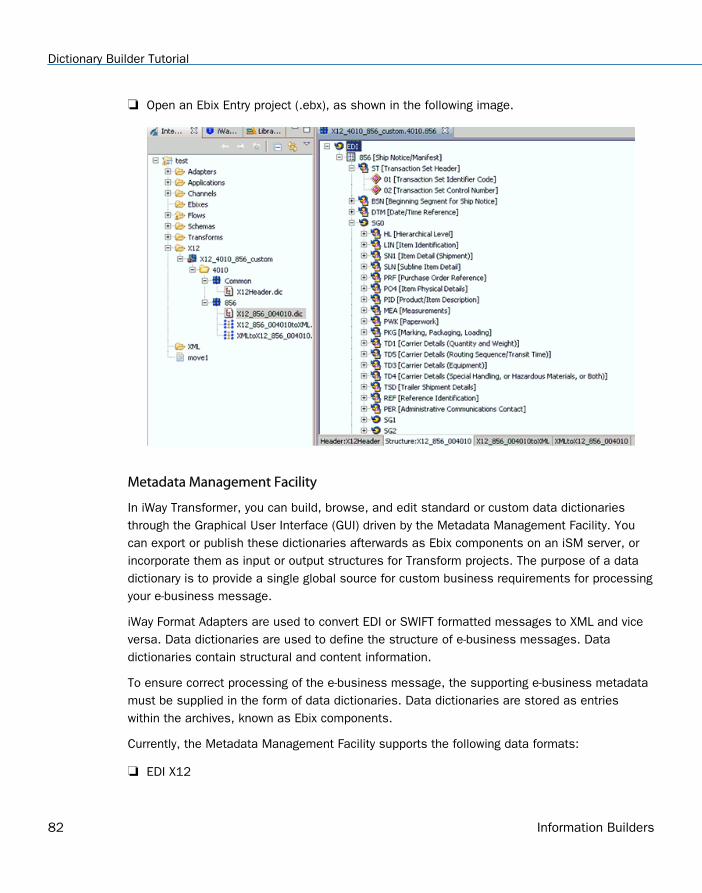
Open an Ebix Entry project (.ebx), as shown in the following image.
Metadata Management Facility
In iWay Transformer, you can build, browse, and edit standard or custom data dictionariesthrough the Graphical User Interface (GUI) driven by the Metadata Management Facility. Youcan export or publish these dictionaries afterwards as Ebix components on an iSM server, orincorporate them as input or output structures for Transform projects. The purpose of a datadictionary is to provide a single global source for custom business requirements for processingyour e-business message.
iWay Format Adapters are used to convert EDI or SWIFT formatted messages to XML and viceversa. Data dictionaries are used to define the structure of e-business messages. Datadictionaries contain structural and content information.
To ensure correct processing of the e-business message, the supporting e-business metadatamust be supplied in the form of data dictionaries. Data dictionaries are stored as entrieswithin the archives, known as Ebix components.
Currently, the Metadata Management Facility supports the following data formats:
EDI X12
Dictionary Builder Tutorial
82 Information Builders
EDIFACT
Fixed Width
SWIFT
Ebix Management Facility
The Ebix Management Facility enables you to create, update, and browse multiple Ebix entriesor export them to Ebix archives. Ebix archives provide a way to efficiently store multipledictionary components and other related metadata as one executable file. These archive fileshave an extension of .ebx. In this guide, they are referred to as Ebix archives. The design ofEbix archives advances the concept of iWay packages by providing seamless integration withiSM components.
In design time, you can import each of the data dictionaries and its related metadatacomponents in iWay Transformer as one unit, called an Ebix Entry. An Ebix Entry is managed iniWay Transformer through an Ebix Entry project, a type of project that supports DictionaryBuilder views. You can then export single or multiple Ebix Entry projects opened in iWayTransformer as Ebix archives or publish them on the server as Ebix components.
The Ebix Management Facility supports the following data formats:
EDI HIPAA
EDI X12
EDIFACT
HL7
SWIFT
Navigating Dictionary Builder
This topic provides an overview of the supported iSM dictionary components and describeshow to navigate these components in Dictionary Builder.
Overview
A data dictionary is an iWay representation of e-business metadata that describes the layoutand grammar of a transaction or a document. The layout and grammar are stored in one ormore files that contain dictionary components, such as headers or structures.
2. Getting Started With iWay Transformer
iWay Integration Tools Transformer User’s Guide 83
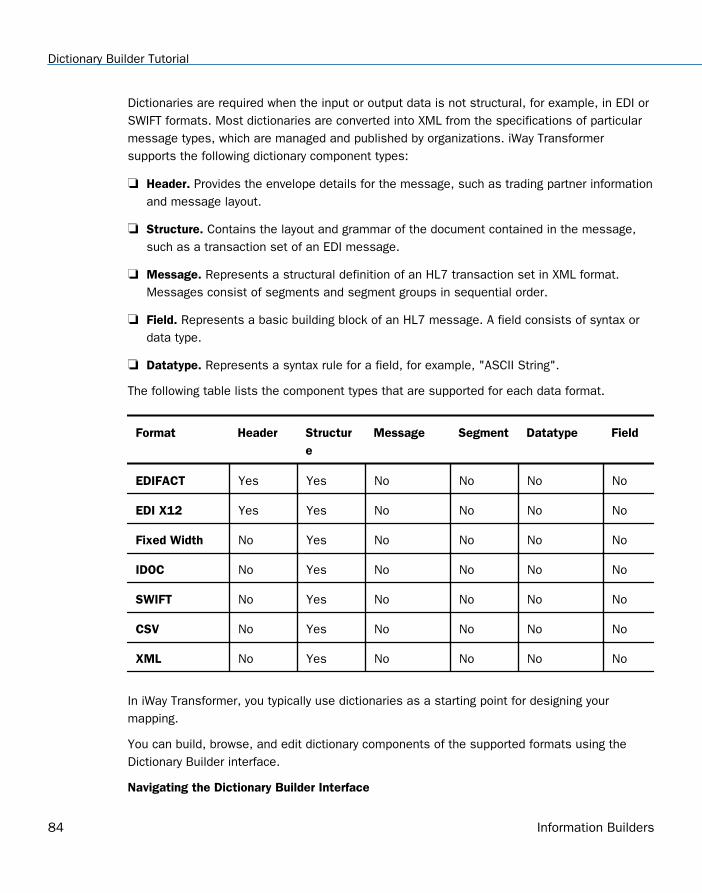
Dictionaries are required when the input or output data is not structural, for example, in EDI orSWIFT formats. Most dictionaries are converted into XML from the specifications of particularmessage types, which are managed and published by organizations. iWay Transformersupports the following dictionary component types:
Header. Provides the envelope details for the message, such as trading partner informationand message layout.
Structure. Contains the layout and grammar of the document contained in the message,such as a transaction set of an EDI message.
Message. Represents a structural definition of an HL7 transaction set in XML format.Messages consist of segments and segment groups in sequential order.
Field. Represents a basic building block of an HL7 message. A field consists of syntax ordata type.
Datatype. Represents a syntax rule for a field, for example, "ASCII String".
The following table lists the component types that are supported for each data format.
Format Header Structure
Message Segment Datatype Field
EDIFACT Yes Yes No No No No
EDI X12 Yes Yes No No No No
Fixed Width No Yes No No No No
IDOC No Yes No No No No
SWIFT No Yes No No No No
CSV No Yes No No No No
XML No Yes No No No No
In iWay Transformer, you typically use dictionaries as a starting point for designing yourmapping.
You can build, browse, and edit dictionary components of the supported formats using theDictionary Builder interface.
Navigating the Dictionary Builder Interface
Dictionary Builder Tutorial
84 Information Builders

You can access the workspace environment of the Dictionary Builder interface in three differentways:
Select an Ebix Entry project name or any of its components in the Project Navigator pane,as shown in the following image on the left.
Select the input or output dictionary of a Transform project, or any of the componentsinside (for example, header or structure), in the Project Navigator pane, as shown in thefollowing image on the right.
The data format of the dictionary must be supported by the Metadata Management Facility.
Located on the left side of the iWay Transformer window in the default view, the ProjectNavigator pane displays the references to Ebix Entry and Transform projects that arecurrently open. Transform projects that are currently open can be found in the Transformscategory. When an Ebix Entry project is open, an Ebix Entry category is created per eachdata format. For example, in the preceding image, all open EDI X12 Ebix Entry projects arelocated in the X12 Ebix Entries subfolder.
However, if you open a SWIFT Ebix Entry, the new project category (SWIFT Ebix Entries) willappear in the Project Navigator, containing the references to your SWIFT Ebix Entry project.
The Ebix Entry project name is displayed as a compilation of the data name format beingused, the format version it belongs to, and the message name that it describes. Thisnotation provides quick and easy resource organization, which is especially useful when youare working with multiple Ebix Entry projects at once.
For example, the EDI X12 Ebix Entry project referred to in the preceding image is displayedby the Dictionary Builder interface as
X12_4010.4010.850
2. Getting Started With iWay Transformer
iWay Integration Tools Transformer User’s Guide 85

where:
X12_4010
Is the naming convention for a standard Ebix that begins with DataFormatName_Version.
4010
Is the name for a standard version within that data format.
850
Is the message type (Purchase Order) represented by the dictionary.
Navigate to the Dictionary tab for the project in the project workspace pane, as shown inthe following image.
The Dictionary Builder view consists of two panes:
Layout pane
Item Properties pane
Dictionary Builder Tutorial
86 Information Builders
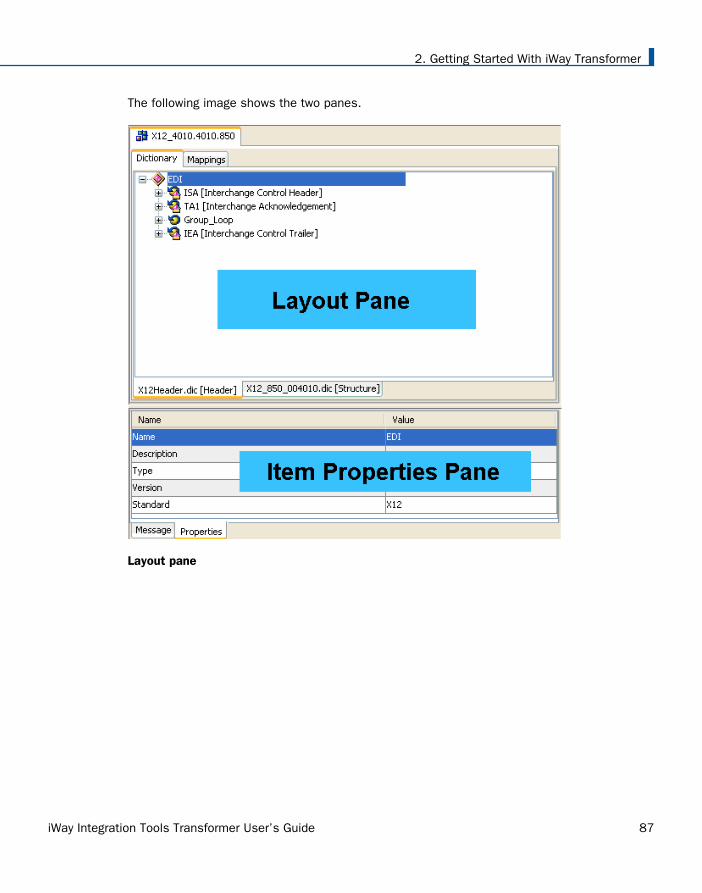
The following image shows the two panes.
Layout pane
2. Getting Started With iWay Transformer
iWay Integration Tools Transformer User’s Guide 87

The following image shows the Layout pane.
The Layout pane is the core working area used by the Dictionary Builder interface. Eachdictionary component is displayed on its own tab, such as the Header or Structure. Dictionarycomponents are graphically presented in iWay Transformer as tree structures of the lesserstructure units that make up the dictionary, such as segments and loops.
Item descriptions are provided in square brackets next to each EDI dictionary structuresegment. For example, the ISA segment node in the preceding image (EDI X12 Version 2001Message Type 830) includes the following description:
[Interchange Control Header]
Dictionary Builder Tutorial
88 Information Builders
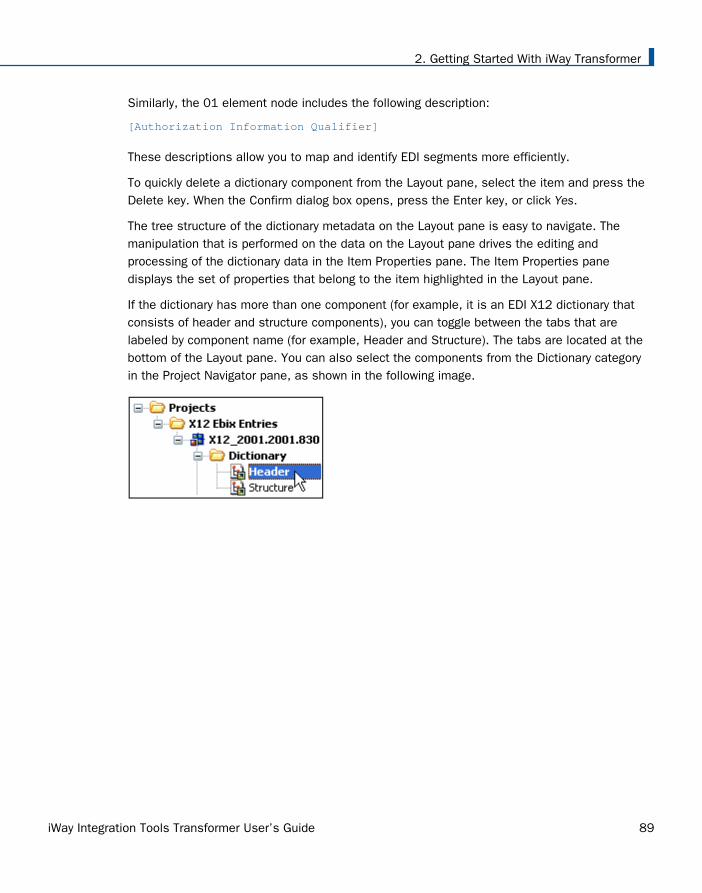
Similarly, the 01 element node includes the following description:
[Authorization Information Qualifier]
These descriptions allow you to map and identify EDI segments more efficiently.
To quickly delete a dictionary component from the Layout pane, select the item and press theDelete key. When the Confirm dialog box opens, press the Enter key, or click Yes.
The tree structure of the dictionary metadata on the Layout pane is easy to navigate. Themanipulation that is performed on the data on the Layout pane drives the editing andprocessing of the dictionary data in the Item Properties pane. The Item Properties panedisplays the set of properties that belong to the item highlighted in the Layout pane.
If the dictionary has more than one component (for example, it is an EDI X12 dictionary thatconsists of header and structure components), you can toggle between the tabs that arelabeled by component name (for example, Header and Structure). The tabs are located at thebottom of the Layout pane. You can also select the components from the Dictionary categoryin the Project Navigator pane, as shown in the following image.
2. Getting Started With iWay Transformer
iWay Integration Tools Transformer User’s Guide 89

The data format type, such as EDI, typically serves as the root of the component structure. Youcan use this feature to look up the standard properties for this project from the Item Propertiespane when the root element of the dictionary component tree is highlighted on the Layoutpane, as shown in the following image.
Item Properties pane
Dictionary Builder Tutorial
90 Information Builders

The following image shows the Item Properties pane.
The default location of the Item Properties pane is at the bottom of the Dictionary Builderworkspace. It displays the set of properties for the structural item that is currently highlightedin the Layout pane. You can edit item properties by double-clicking the value of the property, asshown in the preceding image.
2. Getting Started With iWay Transformer
iWay Integration Tools Transformer User’s Guide 91

Dictionary Builder Tutorial
92 Information Builders
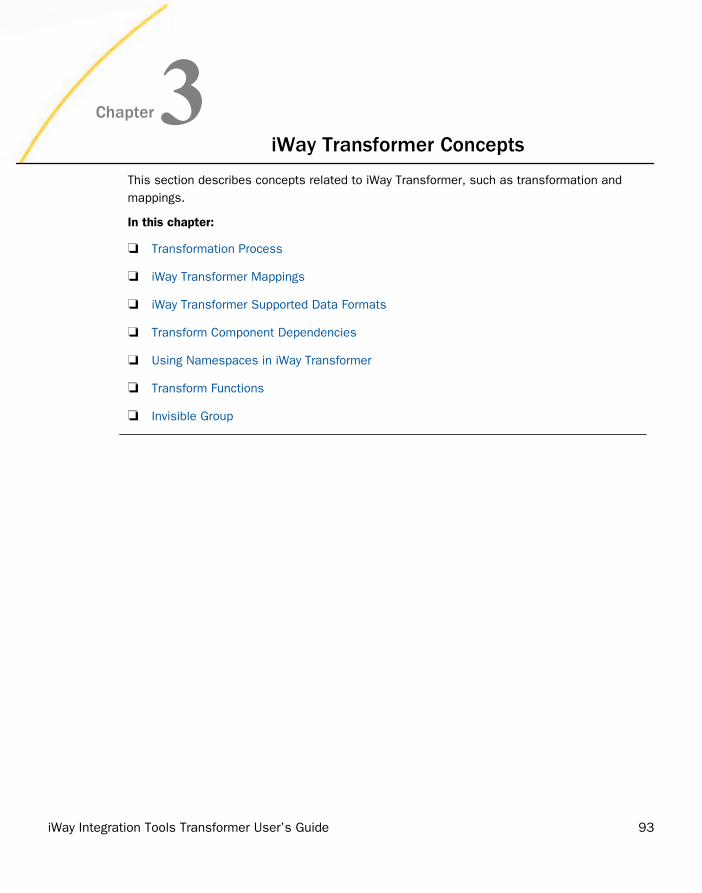
Chapter3iWay Transformer Concepts
This section describes concepts related to iWay Transformer, such as transformation andmappings.
In this chapter:
Transformation Process
iWay Transformer Mappings
iWay Transformer Supported Data Formats
Transform Component Dependencies
Using Namespaces in iWay Transformer
Transform Functions
Invisible Group
iWay Integration Tools Transformer User’s Guide 93

Transformation Process
Transformation is the means by which an incoming document is converted from one dataformat or structure to another.
Transform Component
A Transform component represents one configured transformation. It contains information onthe dependencies and the rules of a particular transform. The iWay Transformation Engineprocesses input data and builds the output data according to these rules. The serialized formof a Transform component is called a Transform template.
Transform Template
A Transform template contains a blueprint of a transformation. It provides an XMLrepresentation of a Transform component, referencing its various parameters and rules. It istypically distinguished by a .gxp extension file format.
Transformation Process
94 Information Builders

Configuration of a Transform Component
The main modules within a Transform component are Dictionary and Mapping rules.
Dictionary
A data dictionary is an iWay representation of e-business metadata that describes the layoutand grammar of a transaction or a document. The layout and grammar are stored in one ormore files that contain dictionary components, such as headers or structures.
Dictionaries are required when the input or output data is not structural, for example, in EDI orSWIFT formats. Most dictionaries are converted to XML from the specifications of particularmessage types, which are managed and published by organizations. iWay Transformersupports the following dictionary component types:
Header. Provides the envelope details for the message, such as trading partner informationand message layout.
Structure. Contains the layout and grammar of the document contained in the message,such as a transaction set of an EDI message.
Message. Represents a structural definition of an HL7 transaction set in XML format.Messages consist of segments and segment groups in sequential order.
Segment. Represents a business entity, for example, Patient Identifier, in an HL7message. Segments consist of fields in sequential order, and are contained within themessage component.
Field. Represents a basic building block of an HL7 message. A field consists of syntax ordata type.
Datatype. Represents a syntax rule for a field, for example, "ASCII String".
The following table lists the component types that are supported for each data format.
Format Header Structure
Message Segment Datatype Field
EDIFACT Yes Yes No No No No
EDI HIPAA Yes Yes No No No No
EDI X12 Yes Yes No No No No
Fixed Width No Yes No No No No
3. iWay Transformer Concepts
iWay Integration Tools Transformer User’s Guide 95

Format Header Structure
Message Segment Datatype Field
IDOC No Yes No No No No
SWIFT No Yes No No No No
HL7 No No Yes Yes Yes Yes
CSV No Yes No No No No
XML No Yes No No No No
You can edit the majority of non-XML Transformer dictionaries using the Dictionary Builder.
In iWay Transformer, dictionaries are typically used as a starting point for designing yourmappings.
iWay Transformer Mappings
Mappings consist of rules that define how a transformation is performed for a project, basedon an input and output configuration. They are managed using Mapping Builder.
Mapping Rules
Mapping rules define a set of requirements performed in the course of a transformation, basedon particular input and output configurations. A mapping rule specifies how records and fieldsof an output document structure are calculated in relation to the input structure. Each mappingrule:
Points to a single node of an output structure.
Contains a formula for obtaining data for a value of an output node.
Can map one or more of the input structure items to an output structure item, dependingon the type of the mapping value used.
iWay Transformer Mappings
96 Information Builders
The following diagram shows the mapping rule process.
Mapping Structure
A mapping structure represents a structure (layout) of a document. It consists ofinterconnected nodes. Each mapping node has:
A mapping type. For more information, see Mapping Types on page 236.
A mapping value. For more information, see Mapping Values on page 256.
A specific place in the structure that defines its mapping relationships.
For more information, see Working With the Mapping Builder on page 224.
iWay Transformer Supported Data Formats
Transform components support the following data formats:
CSV (Comma-separated Values).
EDI (Electronic Data Interchange).
EDI HIPAA.
EDI X12.
EDIFACT.
Fixed Width.
HTML.
3. iWay Transformer Concepts
iWay Integration Tools Transformer User’s Guide 97
IDOC (SAP Intermediate Document).
SWIFT (International Financial).
XML.
iWay XML Response.
iWay XML Embedded Request.
iWay XML Request.
CDF (Column-defined Format). CDF is deprecated. iWay Software recommends that you useFixed Width.
Transform Component Dependencies
There are a number of optional and required dependencies that you must define for aTransform component to function properly. You can view and browse a project dependenciesusing Integration Explorer.
A Transform component resides under the Transforms folder. It is identified by its name andyellow f(x) icon. Typically, it contains a folder for Input Items and a folder for Output Items,each containing respective dependencies.
The Input Structure file is required for the initiation of your project. The Output Structure file isoptional, depending on the specific requirements of the transformation. The Input Data file isrequired when you wish to test the Transform component. You need a valid input document toundergo the transformation.
Transform Component Dependencies
98 Information Builders

After you execute the test run, the Test Results folder containing the test data is displayedwith the dependencies, as shown in the following image.
Using Namespaces in iWay Transformer
An XML namespace is a collection of element types and attribute names. XML namespacesprovide a way to distinguish between duplicate element types and attribute names. Aduplication may occur, for example, in an XSLT stylesheet or in a document that containselement types and attributes from two different Document Type Definitions (DTDs). In an XMLnamespace, an element type or attribute name is uniquely identified by a two-part nameproperty: the name of its XML namespace and its local name.
You can configure XML namespaces globally or separately for each node. An individual XMLnamespace configuration enables you to accomplish more advanced goals based on yourrequirements.
Default namespaces are supported through the overwrite Default Namespace option.
iWay Transformer also supports the mapping of multiple namespaces to the same URI and theapplication of a namespace prefix to a subtree.
The following example presents XML namespaces as a convenient solution to distinguishbetween two different XML element types named Address.
3. iWay Transformer Concepts
iWay Integration Tools Transformer User’s Guide 99
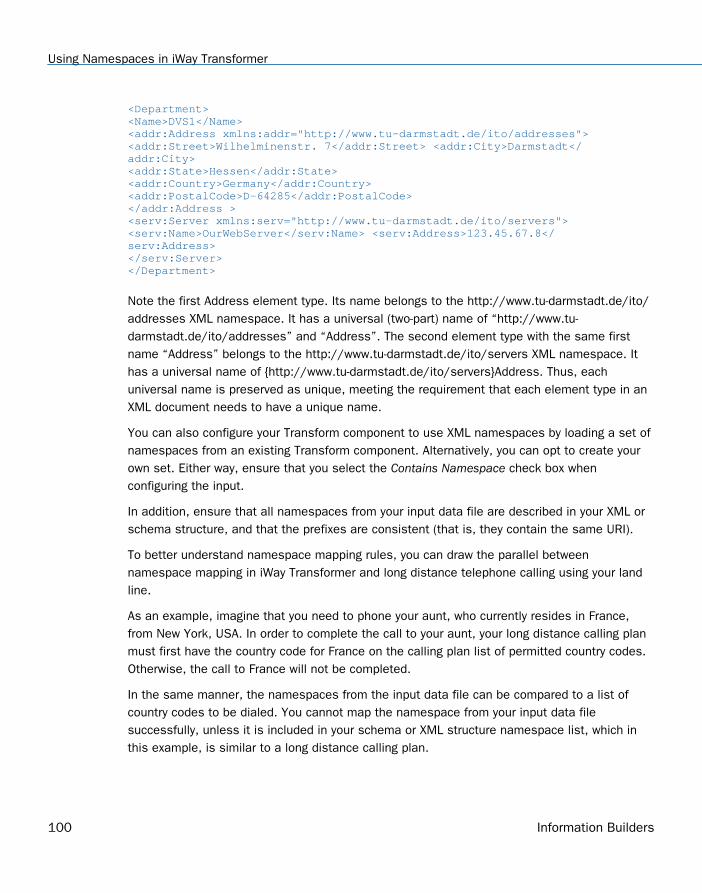
<Department><Name>DVS1</Name><addr:Address xmlns:addr="http://www.tu-darmstadt.de/ito/addresses"><addr:Street>Wilhelminenstr. 7</addr:Street> <addr:City>Darmstadt</addr:City> <addr:State>Hessen</addr:State> <addr:Country>Germany</addr:Country><addr:PostalCode>D-64285</addr:PostalCode> </addr:Address > <serv:Server xmlns:serv="http://www.tu-darmstadt.de/ito/servers"> <serv:Name>OurWebServer</serv:Name> <serv:Address>123.45.67.8</serv:Address></serv:Server> </Department>
Note the first Address element type. Its name belongs to the http://www.tu-darmstadt.de/ito/addresses XML namespace. It has a universal (two-part) name of “http://www.tu-darmstadt.de/ito/addresses” and “Address”. The second element type with the same firstname “Address” belongs to the http://www.tu-darmstadt.de/ito/servers XML namespace. Ithas a universal name of {http://www.tu-darmstadt.de/ito/servers}Address. Thus, eachuniversal name is preserved as unique, meeting the requirement that each element type in anXML document needs to have a unique name.
You can also configure your Transform component to use XML namespaces by loading a set ofnamespaces from an existing Transform component. Alternatively, you can opt to create yourown set. Either way, ensure that you select the Contains Namespace check box whenconfiguring the input.
In addition, ensure that all namespaces from your input data file are described in your XML orschema structure, and that the prefixes are consistent (that is, they contain the same URI).
To better understand namespace mapping rules, you can draw the parallel betweennamespace mapping in iWay Transformer and long distance telephone calling using your landline.
As an example, imagine that you need to phone your aunt, who currently resides in France,from New York, USA. In order to complete the call to your aunt, your long distance calling planmust first have the country code for France on the calling plan list of permitted country codes.Otherwise, the call to France will not be completed.
In the same manner, the namespaces from the input data file can be compared to a list ofcountry codes to be dialed. You cannot map the namespace from your input data filesuccessfully, unless it is included in your schema or XML structure namespace list, which inthis example, is similar to a long distance calling plan.
Using Namespaces in iWay Transformer
100 Information Builders
While designing projects with namespaces, check the schema and input data for consistency.Your mapping values will not appear in the output if the same namespace prefix from theincoming data has a different URI in your structure file.
The namespaces with different prefixes that have the same URI are treated as the samenamespace, according to the rules outlined in XML Namespace Specifications.
For example, the following namespaces are described in your dictionary:
<a1:getMessages xmlns:a1="uri:wsdl:org.iway.sp2.customer.v1" xmlns:internal="uri:wsdl:org.iway.sp2.internal.v1">...
In addition, your input data has the following namespaces:
<customer:getMessages xmlns:customer="uri:wsdl:org.iway.sp2.customer.v1" xmlns:internal="uri:wsdl:org.iway.sp2.internal.v1">...
The namespaces customer and a1 are treated as the same namespace while mapping theoutput values.
If you are dealing with dynamic namespaces for incoming data, for which their URIs cannot bedetermined during design time, we recommend that you deselect the Contains Namespacecheck box. This will ensure that incoming data values appear in the output. For moreinformation, see Working With Namespaces on page 265.
Transform Functions
Functions provide various algorithms that calculate output mapping values in iWayTransformer.
iWay Transformer provides numerous predefined functions in the following major categories:
EDI Functions. For more information, see EDI Functions on page 102.
Numerical Functions. For more information, see Numerical Functions on page 103.
Processing Functions. For more information, see Processing Functions on page 112.
Run-Time Functions. For more information, see Run-Time Functions on page 118.
Security Functions. For more information, see Security Functions on page 120.
String Functions. For more information, see String Functions on page 121.
3. iWay Transformer Concepts
iWay Integration Tools Transformer User’s Guide 101

Time Functions. For more information, see Time Functions on page 134.
Predefined Functions
To find more information about a function or its parameters, navigate to an appropriatefunction category within this topic. Functions and categories are arranged in alphabetical order.
EDI Functions
The EDI functions available in iWay Transformer are described in the following table.
Format-specific functions, such as EDI, do not appear in the Functions pane of the MappingBuilder unless the output is using the exact format.
EDI Function Description
@COUNT_GROUP() Returns the occurrences of the group within an EDImessage.
Parameters: None.
@COUNT_SEGMENT() Returns the occurrences of the segment within atransaction set.
Parameters: None.
@COUNT_SEGMENT(param1)
Returns the occurrences of the specified segment withina transaction set.
Parameter: param1. Name of the segment. It must be aconstant.
@COUNT_TRANSACTION() Returns the occurrences of the transaction within agroup.
Parameters: None.
@CRC16() Is specific to the UCS 4010 894 document. It is used onthe 866 element (CRC 16 checksum) of the G8501segment. The value of this function is generated using aCyclic Redundancy Code (CRC) algorithm. It has a fixedlength of four characters with no zero suppression. Itapplies to the contents of the entire transaction that isconfigured for segments ST through G86, inclusive.
Transform Functions
102 Information Builders
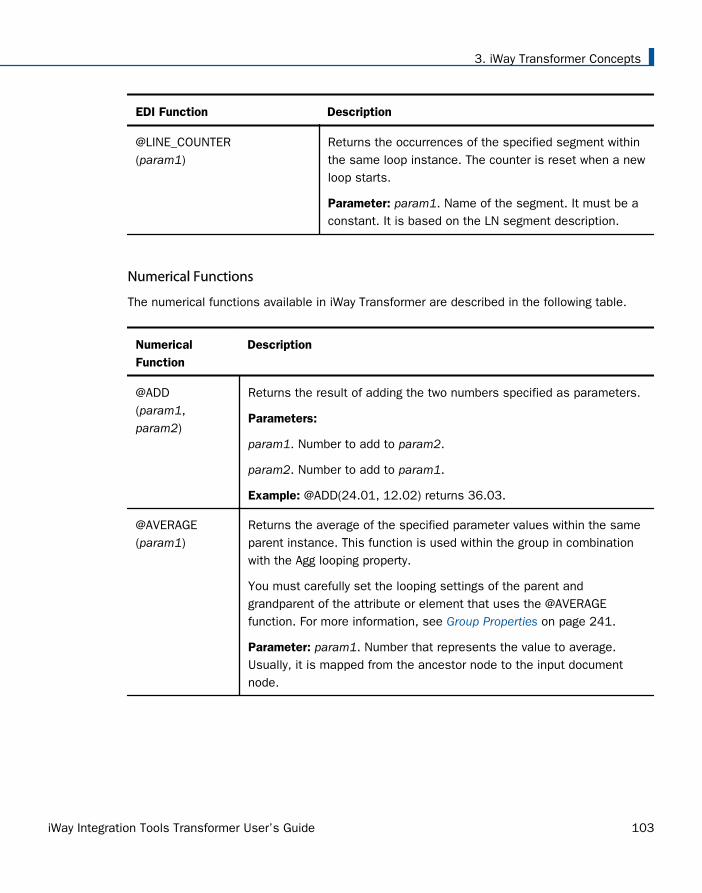
EDI Function Description
@LINE_COUNTER(param1)
Returns the occurrences of the specified segment withinthe same loop instance. The counter is reset when a newloop starts.
Parameter: param1. Name of the segment. It must be aconstant. It is based on the LN segment description.
Numerical Functions
The numerical functions available in iWay Transformer are described in the following table.
NumericalFunction
Description
@ADD(param1,param2)
Returns the result of adding the two numbers specified as parameters.
Parameters:
param1. Number to add to param2.
param2. Number to add to param1.
Example: @ADD(24.01, 12.02) returns 36.03.
@AVERAGE(param1)
Returns the average of the specified parameter values within the sameparent instance. This function is used within the group in combinationwith the Agg looping property.
You must carefully set the looping settings of the parent andgrandparent of the attribute or element that uses the @AVERAGEfunction. For more information, see Group Properties on page 241.
Parameter: param1. Number that represents the value to average.Usually, it is mapped from the ancestor node to the input documentnode.
3. iWay Transformer Concepts
iWay Integration Tools Transformer User’s Guide 103

NumericalFunction
Description
Example:
In the following example, the output node ValueAverage has the value@AVERAGE(Sales/Company/Year/Quarter/Product/Item@value), wherethe output obtained is:
<Sales_Totals> <companyName>Video and Sound Card Express</companyName> <Statistics> <itemValueAverage>139.7407</itemValueAverage> <allTimeSales>95022.02</allTimeSales> </Statistics></Sales_Totals>
In this XML-to-XML transformation example, the Sales_Totals outputgroup has the looping property set to False. The Statistics group hasthe looping property set to Agg. The desired output value is alsoobtained with the Sales_Totals looping property set to Agg, but notwhen it is set to True.
@CHKNUM(param1)
Returns the string true if the specified parameter is a valid number. Usethis function to determine if the parameter is a number (either integeror decimal). Returns true or false.
Parameter: param1. Number to validate.
Examples:
@CHKNUM('1.1') returns true.
@CHKNUM('abcd') or @CHKNUM('1,234.55') returns false.
@COUNT Counts the input items processed and returns the next sequentialvalue. The first loop through @COUNT initializes the counter to 1.Subsequent passes increment the counter to the next integer number.
Parameters: None.
Transform Functions
104 Information Builders

NumericalFunction
Description
@DIVIDE(param1,param2)
Returns the decimal result of dividing two numbers specified asparameters.
Parameters:
param1. Number that represents the dividend.
param2. Number that represents the divisor.
Example: @DIVIDE('24.02', '12.01') returns 2.0.
@INT(param1)
Returns the first occurrence of the integer value found in the specifiedparameter. If the integer value cannot be found, the number 0 (zero) isreturned.
Parameter: param1. String to be checked.
Examples:
@INT('45.60 or 65.60') returns 45.
@INT('in the summer of 1998 and 1999') returns 1998.
@INT('time is 23:11:56') returns 23.
@INT('last year') returns 0.
@INTVAL(param1)
Returns the specified parameter value if it is a valid integer. Otherwise,it returns the number 0 (zero).
Parameter: param1. String to be checked.
Examples:
@INTVAL('45') returns 45.
@INTVAL('45.12') or @INTVAL('dollars 1.23') returns 0.
3. iWay Transformer Concepts
iWay Integration Tools Transformer User’s Guide 105
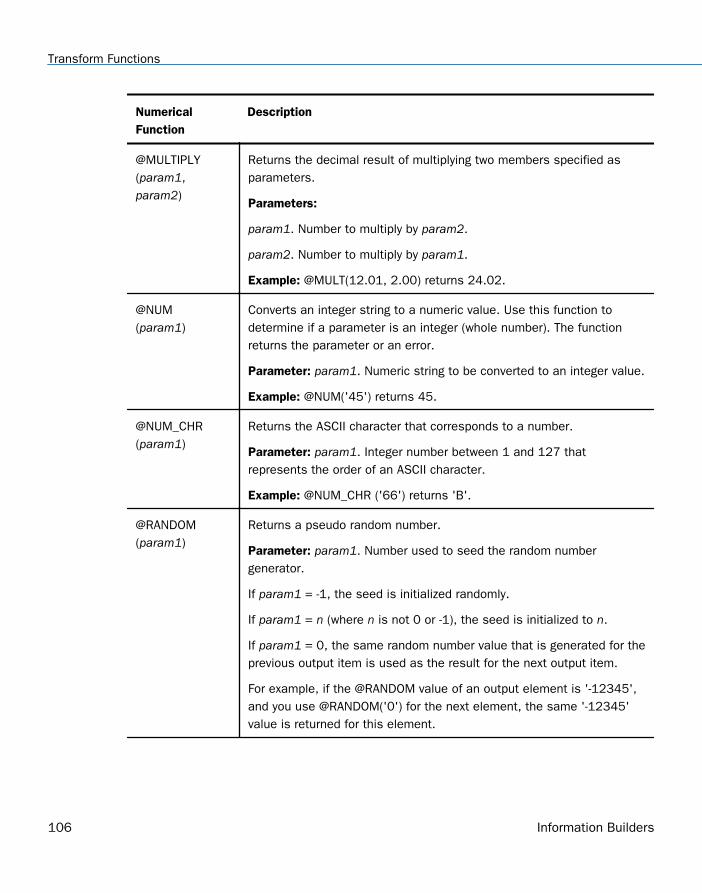
NumericalFunction
Description
@MULTIPLY(param1,param2)
Returns the decimal result of multiplying two members specified asparameters.
Parameters:
param1. Number to multiply by param2.
param2. Number to multiply by param1.
Example: @MULT(12.01, 2.00) returns 24.02.
@NUM(param1)
Converts an integer string to a numeric value. Use this function todetermine if a parameter is an integer (whole number). The functionreturns the parameter or an error.
Parameter: param1. Numeric string to be converted to an integer value.
Example: @NUM('45') returns 45.
@NUM_CHR(param1)
Returns the ASCII character that corresponds to a number.
Parameter: param1. Integer number between 1 and 127 thatrepresents the order of an ASCII character.
Example: @NUM_CHR ('66') returns 'B'.
@RANDOM(param1)
Returns a pseudo random number.
Parameter: param1. Number used to seed the random numbergenerator.
If param1 = -1, the seed is initialized randomly.
If param1 = n (where n is not 0 or -1), the seed is initialized to n.
If param1 = 0, the same random number value that is generated for theprevious output item is used as the result for the next output item.
For example, if the @RANDOM value of an output element is '-12345',and you use @RANDOM('0') for the next element, the same '-12345'value is returned for this element.
Transform Functions
106 Information Builders

NumericalFunction
Description
@RANGE(param1,param2,param3)
Determines if a number falls within a range, and returns the stringvalue "true" or "false". The range is given by param2 to param3,inclusive.
Parameters:
param1. Value that is checked.
param2. Value that represents the lower limit of the range.
param3. Value that represents the upper limit of the range.
Example: @RANGE('10', '5', '15') evaluates to true.
@ROUND(param1,param2,param3)
Extracts a specified part of a number and rounds the result to aninteger.
Parameters:
param1. Number subjected to the operation.
param2. Number of digits to be extracted from the integer part ofparam1. Digits are counted from the left of the decimal separator.
param3. Number of digits to be extracted from the decimal part ofparam1. Digits are counted from the right of the decimal separator.
Example: @ROUND(345.995, 2, 2) returns 46.00.
3. iWay Transformer Concepts
iWay Integration Tools Transformer User’s Guide 107

NumericalFunction
Description
@SCALE_ROUND(param1,param2,param3)
Returns the specified parameter rounded in a specified fashion.Enables you to scale a number and specify the way that it is roundedduring scaling.
Parameters:
param1. Number subjected to the operation.
param2. Number of digits to the right of the decimal place to keep. Thevalue must be a non-negative integer.
param3. Type of rounding required.
The following are possible values:
ROUND_CEILING: Round towards positive infinity.
ROUND_DOWN: Round towards zero.
ROUND_FLOOR: Round towards negative infinity.
ROUND_HALF_DOWN: Round towards nearest number. If equidistant totwo numbers, round down.
ROUND_HALF_EVEN: Round towards nearest number. If equidistant totwo numbers, round towards even number.
ROUND_HALF_UP: Round towards nearest number. If equidistant to twonumbers, round up.
ROUND_UNNECESSARY: No rounding is necessary. Use this roundingmode to make sure that the output value has the exact number ofdecimals specified in param2. If the number of decimals is different, anerror is returned.
ROUND_UP: Round away from zero.
Example: @SCALE_ROUND(5.111, 2, ROUND_UP) returns 5.12.
Transform Functions
108 Information Builders

NumericalFunction
Description
@STR(param1,param2)
Converts a number to an alpha string according to a picture mask. Usethis function to format numbers.
Parameters:
param1. Number to be converted into an alpha string.
param2. Picture mask format for the string. For more information, see Numeric Pictures on page 140.
Examples: @STR('45.12', '##.#') returns '45.1'.
@STR('75','#.00') returns 75.00.
@STR('567.1', '#.00') returns 567.10.
Since a picture mask is used, the function may cause rounding. Forexample, @STR(39.999,'#.00') returns '40.00'.
@SUBTRACT(param1,param2)
Returns the result of subtracting two numbers specified as parameters.
Parameters:
param1. Float number from which to subtract param2.
param2. Float number to subtract from param1.
Example: @SUBTRACT(24.02, 11.01) returns 13.01.
3. iWay Transformer Concepts
iWay Integration Tools Transformer User’s Guide 109

NumericalFunction
Description
@SUM(param1)
Returns the sum of the numeric values of a specified input node.
You must carefully set the looping settings of the parent andgrandparent of the node that uses the @SUM function. For moreinformation, see Group Properties on page 241.
Parameter: param1. Input node that has a numeric value.
Example: In the following example, the output node allTimeSales hasthe value @SUM(@MULTIPLY(Sales/Company/Year/Quarter/Product/Item @value, Sales/Company/Year/Quarter/Product/Item@sold)),where the output obtained is:
<Sales_Totals><companyName>Video and Sound Card Express</companyName> <Statistics> <itemValueAverage>139.7407</itemValueAverage> <allTimeSales>95022.02</allTimeSales> </Statistics></Sales_Totals>
In this XML-to-XML transformation example, the Sales_Totals outputgroup has the looping property set to False. The Statistics group hasthe looping property set to Agg. The desired output value is alsoobtained with the Sales_Totals looping property set to Agg, but notwhen it is set to True.
Transform Functions
110 Information Builders

NumericalFunction
Description
@VAL(param1,param2)
Returns the number that matches the specified picture mask. Thisfunction returns a value only if the picture mask matches the inputformat. For example, if the picture mask is # and the input is 7.3, thefunction returns an error, not 7 as might be expected.
Use this function to retrieve the numeric value from a string.
Do not use this function to format a number. To format a number, usethe @STR function.
Parameters:
param1. String that contains the number to be retrieved.
param2. Format in which the number is stored in the string. Must bespecified as a constant in the Mapping Builder. For more information,see Numeric Pictures on page 140.
Examples:
@VAL('30.11 dollars plus a fee of 40 dollars','##') returns 40.
@VAL('30.11 dollars plus a fee of 40 dollars','##.##') returns 30.11.
To format a number with commas, such as <X>123,456,789</X>, youcan remove the commas by using the @CONCAT and @SUBSTRfunctions. For example:
@CONCAT(@SUBSTR(X,'1','3'),@SUBSTR(X,'5','3'),@SUBSTR(X,'9','3'))
3. iWay Transformer Concepts
iWay Integration Tools Transformer User’s Guide 111

Processing Functions
The processing functions available in iWay Transformer are described in the following table.
Processing Function Description
@CONDITION
(param1)
The @CONDITION function is a new processing function thatsupports embedded conditions. This function also includessupport for AND / OR operators.
Note: The @CONDITION function is designed to be used withinthe @IF function to support a more refined handling of multipleconditions instead of a series of nested @IF statements.
Parameters:
Param1: A boolean expression of a defined syntax(<left_operand><operator><right_operand>). The left_operandand right_operand can be any supported mapped values.Supported arguments for the operator include all arguments ofthe current @IF processing function (for example: ==, !=, <, >,<=, >=, AND, OR). By default, the operator is set to AND in theOutput Node Mapping Builder.
For AND or OR operators, if the left or right operands aremapped to an input context, it will be assumed that the@EXISTS function is used. For example:
@CONDITION(a/b/c AND a/b/e)@IF(a/b/c AND a/b/e,'true','false')
Will be the same as:
@CONDITION(@EXISTS(a/b/c) AND @EXISTS(a/b/e))@IF (@EXISTS(a/b/c) AND @EXISTS(a/b/e) ,'true','false')
The @CONDITION function returns a string:
true - If condition results to true, Boolean.TRUE is returned.
false - If condition results to false, Boolean.FALSE isreturned.
Transform Functions
112 Information Builders

Processing Function Description
@EDIT(param1, param2,param3)
Returns a value formatted using the specified picture mask andformatter class name. For more information, see NumericPictures on page 140.
Parameters:
param1. String representing the formatter class name. Supportsthe DecimalFormat class.
param2. String representing the picture mask to be applied toparam3.
param3. Number to be formatted.
Examples:
@EDIT('DecimalFormat','#,###.##','123456.78) returns123,456.78.
@EDIT('DecimalFormat','000','12') returns 012.
3. iWay Transformer Concepts
iWay Integration Tools Transformer User’s Guide 113

Processing Function Description
@EXISTS(context_to_be_checked)
Returns a string with a Boolean value that indicates whether ornot the context is null.
Use this processing function to distinguish between an elementthat is missing from a document structure from an element thatis present, but has a value of an empty string.
Examples:
<Statistics> <itemValueAverage>139.7407</itemValueAverage> <allTimeSales>95022.02</allTimeSales></Statistics>
@EXISTS (Statistics/ itemValueAverage) returns true.
<Statistics> <itemValueAverage></itemValueAverage> <allTimeSales>95022.02</allTimeSales></Statistics>
@EXISTS (Statistics/ itemValueAverage) returns true.
<Statistics> <allTimeSales>95022.02</allTimeSales></Statistics>
@EXISTS(Statistics/ itemValueAverage) returns false.
@GETCONSTANT(param1)
Returns the value of the global constant specified by name inthe parameter.
Parameter: param1. Global constant defined in the GlobalConstant section of the Project Properties pane.
Example: Assume that you defined the following global constantin project properties:
Name: COMPANY_ADDRESS Value: 1234 1st Avenue
As a result, @GETCONSTANT('COMPANY_ADDRESS') returns'1234 1st Avenue'.
Transform Functions
114 Information Builders

Processing Function Description
@IF(param1, param2,param3, param4,param5)
Allows for a conditional selection statement defined by the firstthree parameters. If the condition evaluates to true, it returnsthe contents of the fourth parameter. Otherwise, it returns thecontents of the fifth parameter.
Parameters:
param1. Left operand of the condition statement.
param2. Conditional operator. The possible arguments are:
= = equal to
!= not equal to
>= equal to or greater than
<= equal to or less than
> greater than
< less than
param3. Right operand of the condition statement.
param4 (true_option). The string to be returned if the conditionstatement is true.
param5 (false_option). The string to be returned if the conditionstatement is false.
Example: The variable X has a value that fluctuates between 4and 8. @IF(X<'10', 'ABC', 'DEF') always returns 'ABC'.
@INPUT_CONTENT Returns the contents of the entire input data file as a string.
Parameters: None.
3. iWay Transformer Concepts
iWay Integration Tools Transformer User’s Guide 115
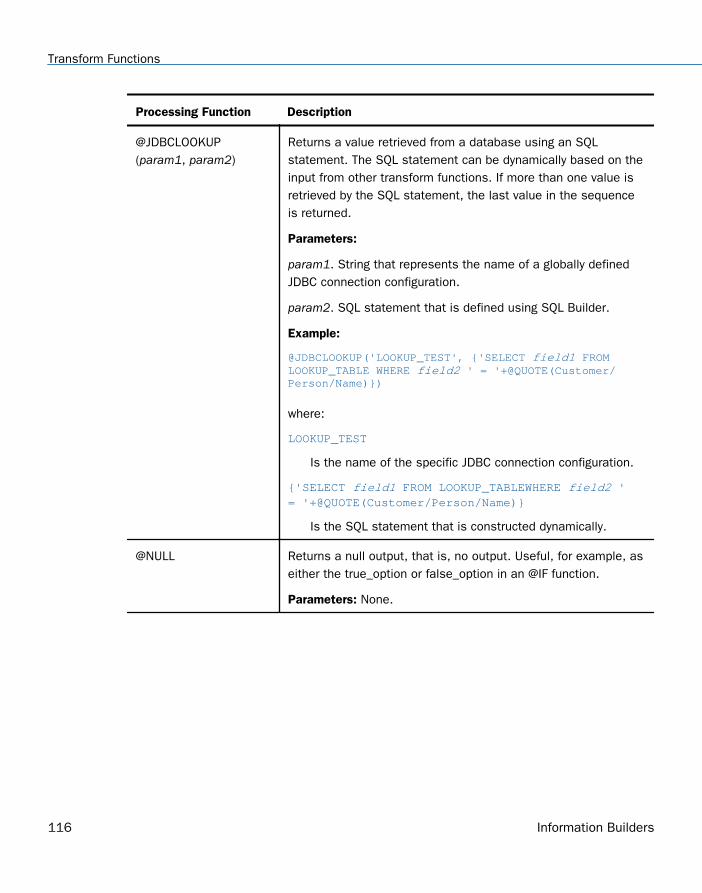
Processing Function Description
@JDBCLOOKUP(param1, param2)
Returns a value retrieved from a database using an SQLstatement. The SQL statement can be dynamically based on theinput from other transform functions. If more than one value isretrieved by the SQL statement, the last value in the sequenceis returned.
Parameters:
param1. String that represents the name of a globally definedJDBC connection configuration.
param2. SQL statement that is defined using SQL Builder.
Example:
@JDBCLOOKUP('LOOKUP_TEST', {'SELECT field1 FROM LOOKUP_TABLE WHERE field2 ' = '+@QUOTE(Customer/Person/Name)})
where:
LOOKUP_TEST
Is the name of the specific JDBC connection configuration.
{'SELECT field1 FROM LOOKUP_TABLEWHERE field2 ' = '+@QUOTE(Customer/Person/Name)}
Is the SQL statement that is constructed dynamically.
@NULL Returns a null output, that is, no output. Useful, for example, aseither the true_option or false_option in an @IF function.
Parameters: None.
Transform Functions
116 Information Builders

Processing Function Description
@REPLACE(param1, param2)
Calls the predefined replace function specified by name in thesecond parameter of @REPLACE, which replaces every matchedstring specified in the first parameter. If the match is not found,the first parameter is returned. For more information on how todefine replace functions, see Using the Mapping Builder on page269.
Parameters:
param1. Input node, value, or constant in which to makechanges.
param2. Replace function name as defined.
The @REPLACE processing function supports spaces andunprintable characters (for example, \t, \r, or \n) as parametervalues.
Example: @REPLACE('11009333009','REPLACE_009_WITH_Add') returns 11Add333Add.
@SIMPLE_REPLACE(param1, param2)
Calls the predefined replace function, which replaces the firststring that matches the value of the first parameter of thisfunction. If a match is not found, the first parameter is returned.
Parameters:
param1. Input node value in which to make changes.
param2. Replace function name as defined.
Example: @SIMPLE_REPLACE('009','REPLACE_009_WITH_Add') returns Add.
3. iWay Transformer Concepts
iWay Integration Tools Transformer User’s Guide 117
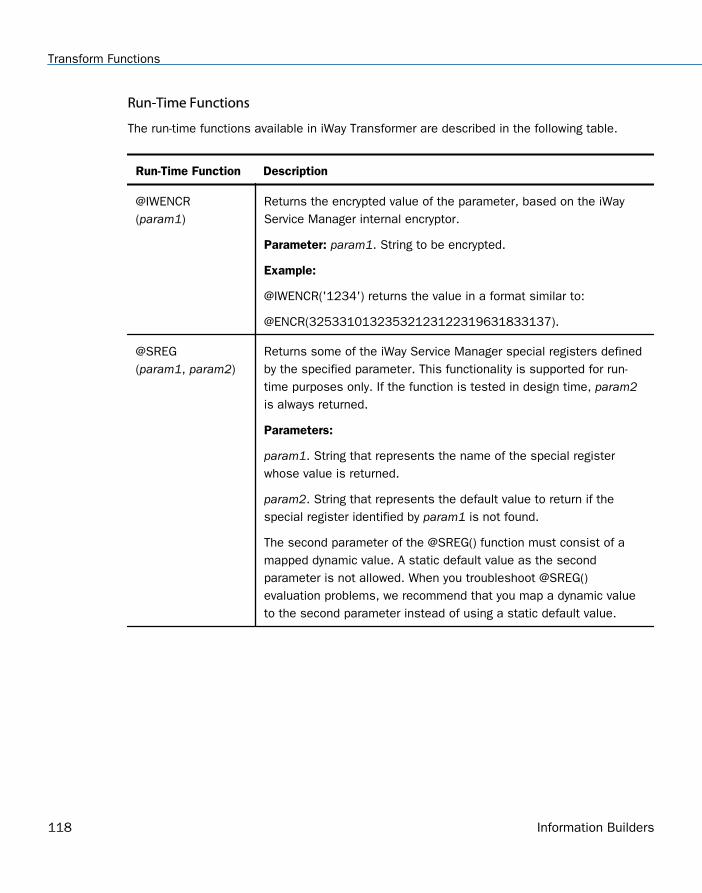
Run-Time Functions
The run-time functions available in iWay Transformer are described in the following table.
Run-Time Function Description
@IWENCR(param1)
Returns the encrypted value of the parameter, based on the iWayService Manager internal encryptor.
Parameter: param1. String to be encrypted.
Example:
@IWENCR('1234') returns the value in a format similar to:
@ENCR(32533101323532123122319631833137).
@SREG(param1, param2)
Returns some of the iWay Service Manager special registers definedby the specified parameter. This functionality is supported for run-time purposes only. If the function is tested in design time, param2is always returned.
Parameters:
param1. String that represents the name of the special registerwhose value is returned.
param2. String that represents the default value to return if thespecial register identified by param1 is not found.
The second parameter of the @SREG() function must consist of amapped dynamic value. A static default value as the secondparameter is not allowed. When you troubleshoot @SREG()evaluation problems, we recommend that you map a dynamic valueto the second parameter instead of using a static default value.
Transform Functions
118 Information Builders

Run-Time Function Description
@SET_SREG(param1, param2,param3, param4)
Sets the specified iWay Service Manager special register to thespecified value, and returns param4. This functionality is supportedfor run-time purposes only.
The special register name is specified in param1. The value to beassigned is specified in param2. The type of the special register isspecified in param3. The last parameter, param4, contains the valueto be returned upon successful execution.
Parameters:
param1. String that represents the name of the special register.
param2. String that represents the new value of the special register.
param3. Number that represents the type of the special register.Possible values include:
2: user-defined variable
3: user-defined emit header
param4. String that represents the expected return value of thisfunction.
Example: @SET_SREG ('custom_functions_location', 'tools/transformer/custom_functions','2','custom functions location isset') returns 'custom function location is set'.
@SREG_EXISTS(param1)
Determines if an iWay Service Manager special register with thename specified in the parameter is already defined, and returns atrue or false response. This functionality is supported for run-timepurposes only.
Parameters:
param1. String that represents the name of the special register.
Example: @SREG_EXISTS('custom_functions_location') returns trueif the register is already defined. Returns false if the register is notdefined.
3. iWay Transformer Concepts
iWay Integration Tools Transformer User’s Guide 119
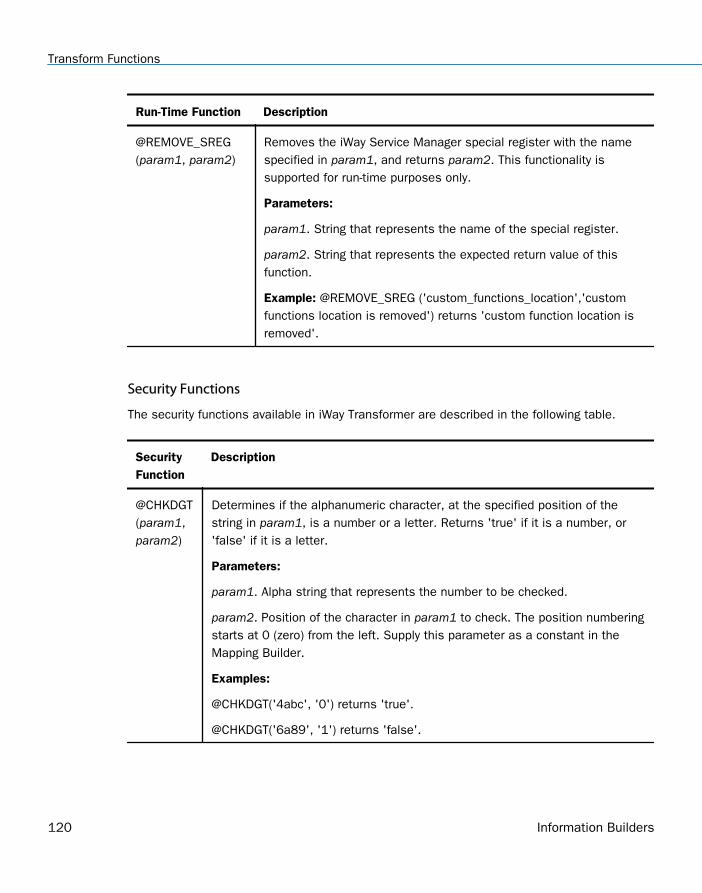
Run-Time Function Description
@REMOVE_SREG(param1, param2)
Removes the iWay Service Manager special register with the namespecified in param1, and returns param2. This functionality issupported for run-time purposes only.
Parameters:
param1. String that represents the name of the special register.
param2. String that represents the expected return value of thisfunction.
Example: @REMOVE_SREG ('custom_functions_location','customfunctions location is removed') returns 'custom function location isremoved'.
Security Functions
The security functions available in iWay Transformer are described in the following table.
SecurityFunction
Description
@CHKDGT(param1,param2)
Determines if the alphanumeric character, at the specified position of thestring in param1, is a number or a letter. Returns 'true' if it is a number, or'false' if it is a letter.
Parameters:
param1. Alpha string that represents the number to be checked.
param2. Position of the character in param1 to check. The position numberingstarts at 0 (zero) from the left. Supply this parameter as a constant in theMapping Builder.
Examples:
@CHKDGT('4abc', '0') returns 'true'.
@CHKDGT('6a89', '1') returns 'false'.
Transform Functions
120 Information Builders

String Functions
The string functions available in iWay Transformer are described in the following table.
String Function Description
@CONCAT(param1, param2,param3, param4)
Returns the string of concatenations of the specified parameters.
If required, you can add or remove parameters for the @CONCATfunction using the Mapping Builder. For more information, see Customizing @CONCAT Functions on page 280.
The following signatures of the @CONCAT function are available:
@CONCAT(param1, param2)
@CONCAT(param1, param2, param3)
@CONCAT(param1, param2, param3, param4)
Parameters:
param1. String to be concatenated.
param2. String to be concatenated.
param3. String to be concatenated.
param4. String to be concatenated.
Example: @CONCAT('The cow ', 'jumped ', ' over ', ' the moon')returns 'The cow jumped over the moon'.
@CRLF Returns the combination of the Carriage Return and new Line Feedcharacters.
Parameters: None.
Example: @CONCAT('First line',@CRLF(),'Second line') returns 'Firstline Second line'.
3. iWay Transformer Concepts
iWay Integration Tools Transformer User’s Guide 121
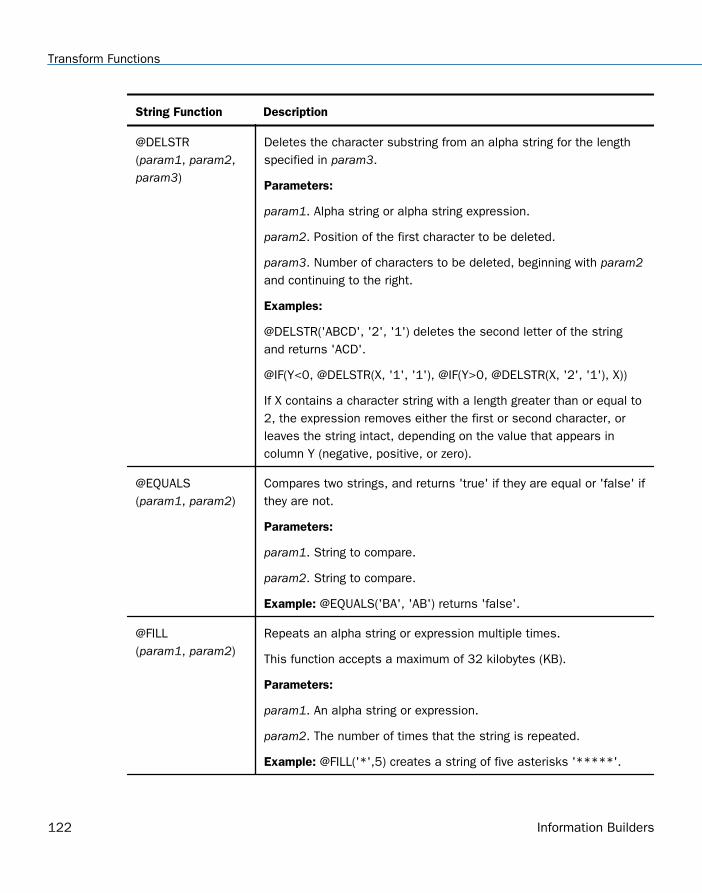
String Function Description
@DELSTR(param1, param2,param3)
Deletes the character substring from an alpha string for the lengthspecified in param3.
Parameters:
param1. Alpha string or alpha string expression.
param2. Position of the first character to be deleted.
param3. Number of characters to be deleted, beginning with param2and continuing to the right.
Examples:
@DELSTR('ABCD', '2', '1') deletes the second letter of the stringand returns 'ACD'.
@IF(Y<0, @DELSTR(X, '1', '1'), @IF(Y>0, @DELSTR(X, '2', '1'), X))
If X contains a character string with a length greater than or equal to2, the expression removes either the first or second character, orleaves the string intact, depending on the value that appears incolumn Y (negative, positive, or zero).
@EQUALS(param1, param2)
Compares two strings, and returns 'true' if they are equal or 'false' ifthey are not.
Parameters:
param1. String to compare.
param2. String to compare.
Example: @EQUALS('BA', 'AB') returns 'false'.
@FILL(param1, param2)
Repeats an alpha string or expression multiple times.
This function accepts a maximum of 32 kilobytes (KB).
Parameters:
param1. An alpha string or expression.
param2. The number of times that the string is repeated.
Example: @FILL('*',5) creates a string of five asterisks '*****'.
Transform Functions
122 Information Builders
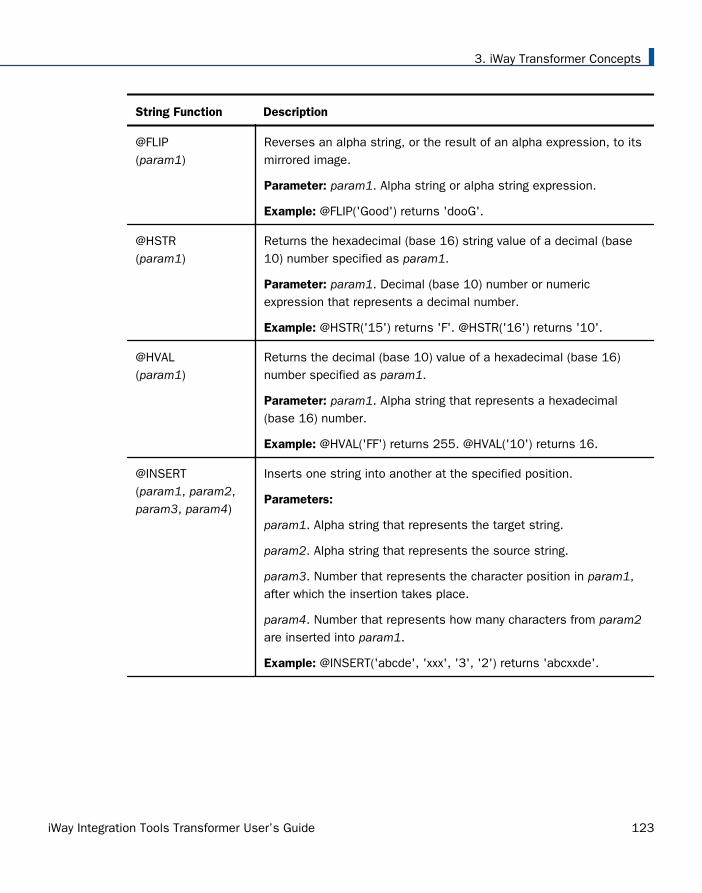
String Function Description
@FLIP(param1)
Reverses an alpha string, or the result of an alpha expression, to itsmirrored image.
Parameter: param1. Alpha string or alpha string expression.
Example: @FLIP('Good') returns 'dooG'.
@HSTR(param1)
Returns the hexadecimal (base 16) string value of a decimal (base10) number specified as param1.
Parameter: param1. Decimal (base 10) number or numericexpression that represents a decimal number.
Example: @HSTR('15') returns 'F'. @HSTR('16') returns '10'.
@HVAL(param1)
Returns the decimal (base 10) value of a hexadecimal (base 16)number specified as param1.
Parameter: param1. Alpha string that represents a hexadecimal(base 16) number.
Example: @HVAL('FF') returns 255. @HVAL('10') returns 16.
@INSERT(param1, param2,param3, param4)
Inserts one string into another at the specified position.
Parameters:
param1. Alpha string that represents the target string.
param2. Alpha string that represents the source string.
param3. Number that represents the character position in param1,after which the insertion takes place.
param4. Number that represents how many characters from param2are inserted into param1.
Example: @INSERT('abcde', 'xxx', '3', '2') returns 'abcxxde'.
3. iWay Transformer Concepts
iWay Integration Tools Transformer User’s Guide 123

String Function Description
@INSTR(param1, param2)
Returns an integer that represents the first position of a substringwithin an alpha string or alpha expression.
If the search argument is not found, the function returns 0 (zero).
Parameters:
param1. Input string or alpha expression string.
param2. Alpha string that is searched for in the input string.
Examples:
@INSTR('abcd', 'b') returns 2.
@INSTR('ABCDEF', 'DE') returns 4.
@LEFT(param1, param2)
Returns a substring of an alpha string, starting from the left, with itslength specified in param2.
Parameters:
param1. Input string.
param2. Number of characters to be returned, starting from the left.
Example: @LEFT('abcdefg', '3') returns 'abc'.
@LEN(param1)
Returns an integer number that equals the length of an alpha string.
The string is right-justified (for example, trailing blanks are removed)before starting.
Parameter: param1. Input string.
Example: @LEN ('abcdefg') returns 7.
@LOWER(param1)
Returns a string converted to all lowercase letters.
Parameter: param1. Input string.
Example: @LOWER('Who said THAT?') returns 'who said that?'
Transform Functions
124 Information Builders

String Function Description
@LPAD(param1, param2)
Returns the specified input string padded to the left, using the stringspecified in param1. The padding is inserted to the left of the stringinput until the length specified in param2 is reached. If padding isnot performed (for example, if there is an invalid parameter or thedesired length is smaller than the length of the input string), param1is returned.
Parameters:
param1. String input to be padded.
param2. Number that represents the desired length of the returnedstring.
Examples:
Single quotation marks are not part of the data. They are used tovisually mark the length of the padded string.
@LPAD('constant','12') returns ' constant'.
@LPAD('constant','3') returns ' constant'.
3. iWay Transformer Concepts
iWay Integration Tools Transformer User’s Guide 125
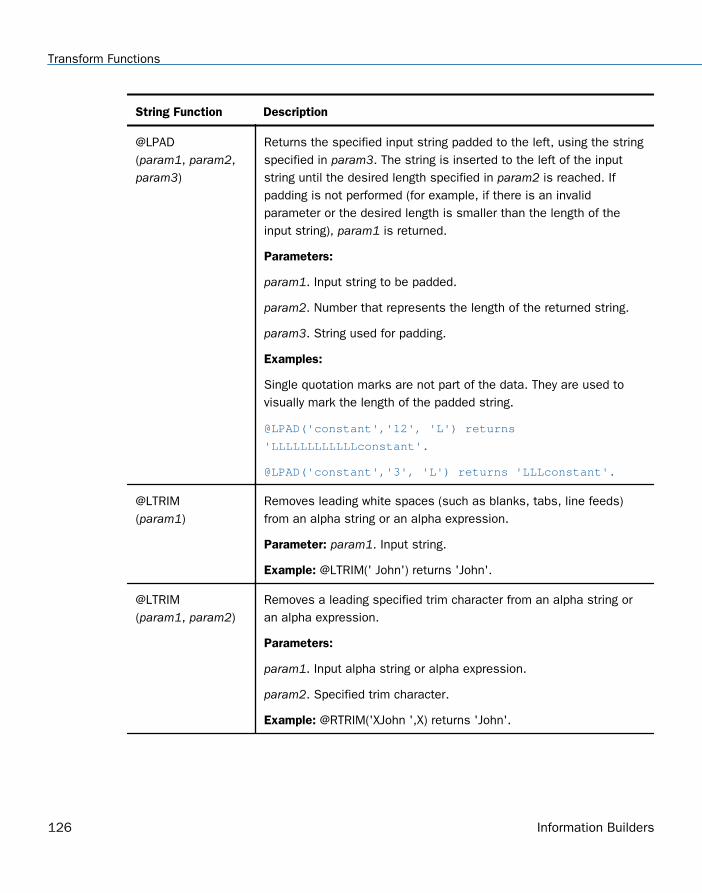
String Function Description
@LPAD(param1, param2,param3)
Returns the specified input string padded to the left, using the stringspecified in param3. The string is inserted to the left of the inputstring until the desired length specified in param2 is reached. Ifpadding is not performed (for example, if there is an invalidparameter or the desired length is smaller than the length of theinput string), param1 is returned.
Parameters:
param1. Input string to be padded.
param2. Number that represents the length of the returned string.
param3. String used for padding.
Examples:
Single quotation marks are not part of the data. They are used tovisually mark the length of the padded string.
@LPAD('constant','12', 'L') returns
'LLLLLLLLLLLLconstant'.
@LPAD('constant','3', 'L') returns 'LLLconstant'.
@LTRIM(param1)
Removes leading white spaces (such as blanks, tabs, line feeds)from an alpha string or an alpha expression.
Parameter: param1. Input string.
Example: @LTRIM(' John') returns 'John'.
@LTRIM(param1, param2)
Removes a leading specified trim character from an alpha string oran alpha expression.
Parameters:
param1. Input alpha string or alpha expression.
param2. Specified trim character.
Example: @RTRIM('XJohn ',X) returns 'John'.
Transform Functions
126 Information Builders
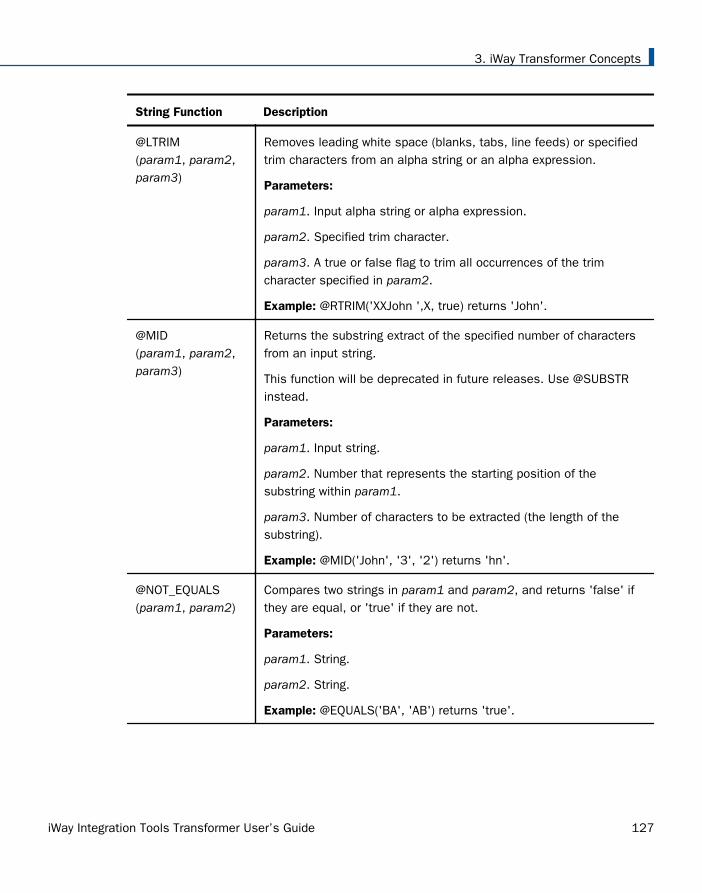
String Function Description
@LTRIM(param1, param2,param3)
Removes leading white space (blanks, tabs, line feeds) or specifiedtrim characters from an alpha string or an alpha expression.
Parameters:
param1. Input alpha string or alpha expression.
param2. Specified trim character.
param3. A true or false flag to trim all occurrences of the trimcharacter specified in param2.
Example: @RTRIM('XXJohn ',X, true) returns 'John'.
@MID(param1, param2,param3)
Returns the substring extract of the specified number of charactersfrom an input string.
This function will be deprecated in future releases. Use @SUBSTRinstead.
Parameters:
param1. Input string.
param2. Number that represents the starting position of thesubstring within param1.
param3. Number of characters to be extracted (the length of thesubstring).
Example: @MID('John', '3', '2') returns 'hn'.
@NOT_EQUALS(param1, param2)
Compares two strings in param1 and param2, and returns 'false' ifthey are equal, or 'true' if they are not.
Parameters:
param1. String.
param2. String.
Example: @EQUALS('BA', 'AB') returns 'true'.
3. iWay Transformer Concepts
iWay Integration Tools Transformer User’s Guide 127

String Function Description
@QUOTE(param1)
Returns the specified parameter in param1, delineated by the singlequotation marks.
Parameter:
param1. String to be quoted.
Examples:
@QUOTE('quote me') returns 'quote me'.
@QUOTE('23') returns '23'.
@QUOTEGEN(param1)
Generates a WHERE clause in an SQL statement. Generates singlequotation marks around an alpha string, but not if the input is aninteger or a number.
Parameter:
param1. String. It can be an input node value, a constant, or theresult of another function.
Examples:
@QUOTEGEN('HELLO') returns 'HELLO'.
@QUOTEGEN('1234') returns 1234.
@CONCAT('SELECT column1 from table where column2 = ',@QUOTEGEN(parent/child/value))
returns:
“SELECT column1 from table where column2 = 'value', IF parent/child/value type is an alpha string.”
“SELECT column1 from table where column2 = value, IF parent/child/value type is integer or number.”
Transform Functions
128 Information Builders
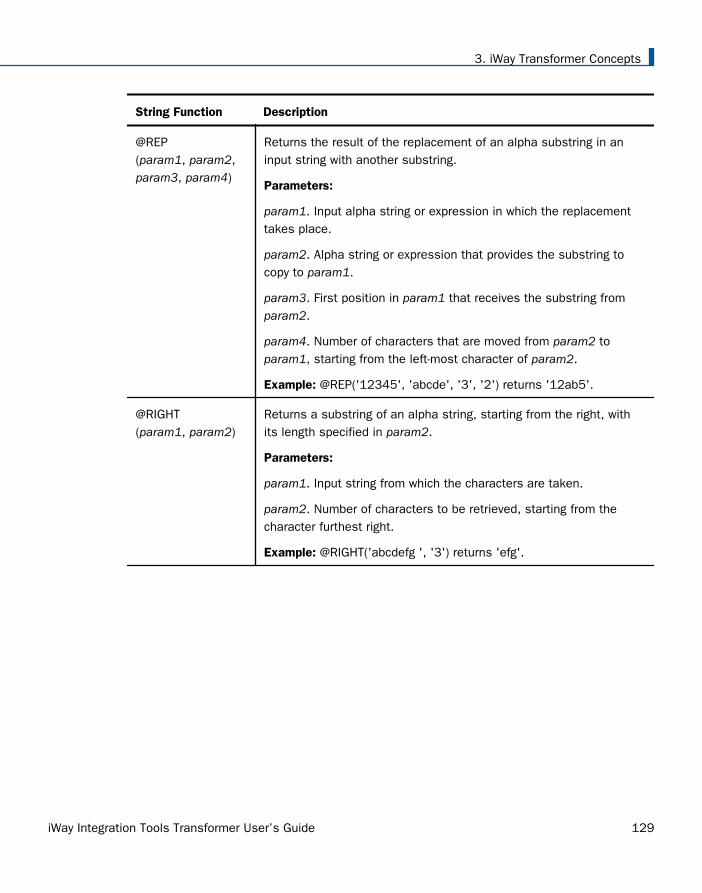
String Function Description
@REP(param1, param2,param3, param4)
Returns the result of the replacement of an alpha substring in aninput string with another substring.
Parameters:
param1. Input alpha string or expression in which the replacementtakes place.
param2. Alpha string or expression that provides the substring tocopy to param1.
param3. First position in param1 that receives the substring fromparam2.
param4. Number of characters that are moved from param2 toparam1, starting from the left-most character of param2.
Example: @REP('12345', 'abcde', '3', '2') returns '12ab5'.
@RIGHT(param1, param2)
Returns a substring of an alpha string, starting from the right, withits length specified in param2.
Parameters:
param1. Input string from which the characters are taken.
param2. Number of characters to be retrieved, starting from thecharacter furthest right.
Example: @RIGHT('abcdefg ', '3') returns 'efg'.
3. iWay Transformer Concepts
iWay Integration Tools Transformer User’s Guide 129
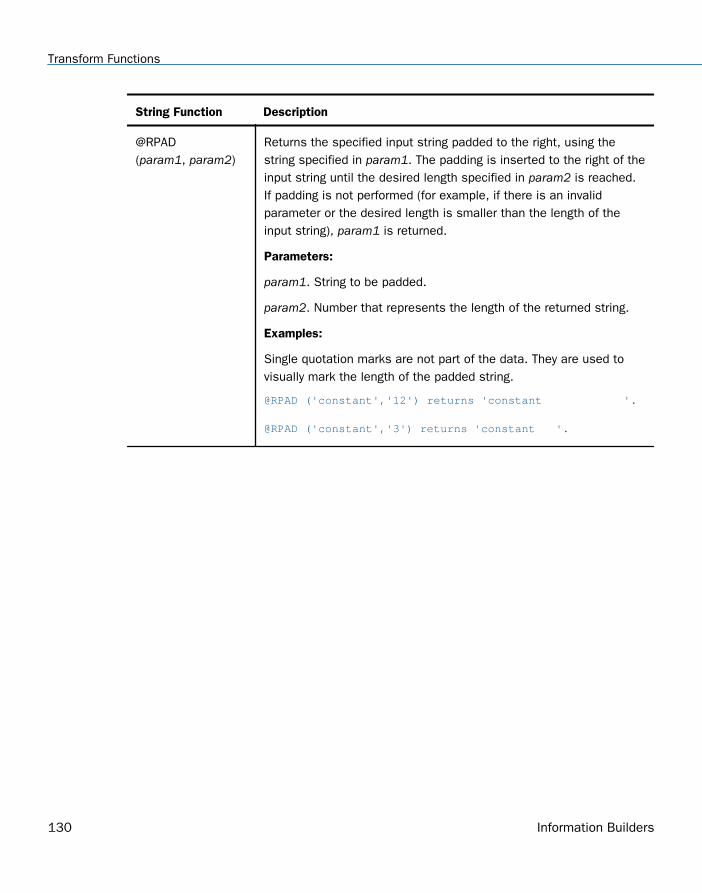
String Function Description
@RPAD(param1, param2)
Returns the specified input string padded to the right, using thestring specified in param1. The padding is inserted to the right of theinput string until the desired length specified in param2 is reached.If padding is not performed (for example, if there is an invalidparameter or the desired length is smaller than the length of theinput string), param1 is returned.
Parameters:
param1. String to be padded.
param2. Number that represents the length of the returned string.
Examples:
Single quotation marks are not part of the data. They are used tovisually mark the length of the padded string.
@RPAD ('constant','12') returns 'constant '.
@RPAD ('constant','3') returns 'constant '.
Transform Functions
130 Information Builders

String Function Description
@RPAD(param1, param2,param3)
Returns the specified input string padded to the right, using thestring specified in param3. The padding string is inserted to the rightof the input string until the desired length specified in param2 isreached. If padding is not performed (for example, if there is aninvalid parameter or the desired length is smaller than the length ofthe input string), the first parameter is returned.
Parameters:
param1. String to be padded.
param2. Number that represents the length of the returned string.
param3. String used for padding.
Examples:
Single quotation marks are not part of the data. They are used tovisually mark the length of the padded string.
@RPAD ('constant','12', 'R') returns
'constantRRRRRRRRRRRR'.
@RPAD ('constant','3', 'R')returns 'constantRRR'.
@RTRIM(param1)
Removes trailing white spaces (such as blanks, tabs, line feeds)from an alpha string or an alpha expression.
Parameter: param1. Input alpha string or alpha expression.
Example: @RTRIM('John ') returns 'John'.
@RTRIM(param1, param2)
Removes a trailing specified trim character from an alpha string oran alpha expression.
Parameters:
param1. Input alpha string or alpha expression.
param2. Specified trim character.
Example: @RTRIM('JohnX ',X) returns 'John'.
3. iWay Transformer Concepts
iWay Integration Tools Transformer User’s Guide 131
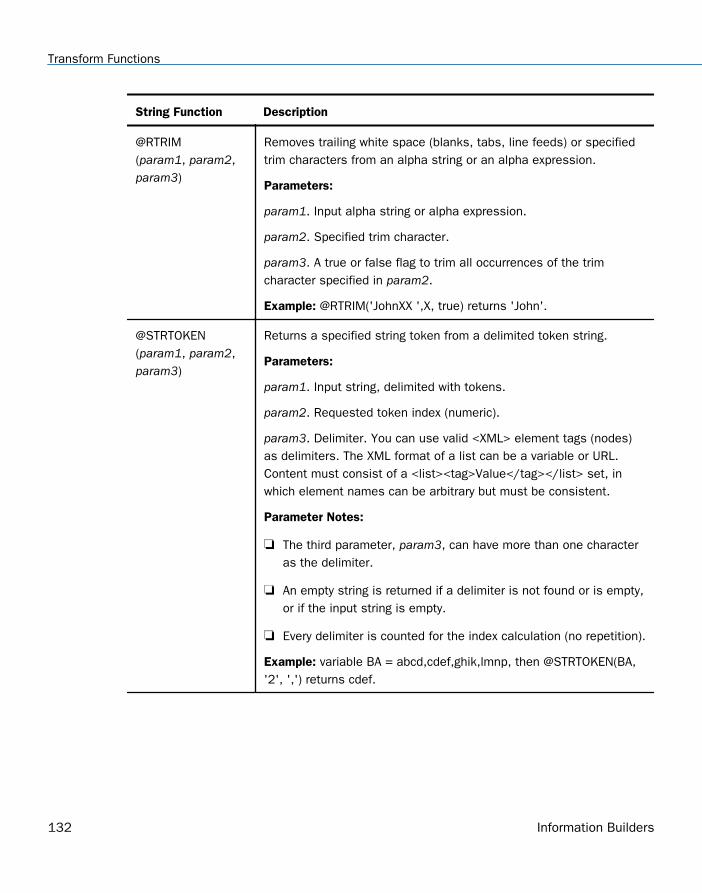
String Function Description
@RTRIM(param1, param2,param3)
Removes trailing white space (blanks, tabs, line feeds) or specifiedtrim characters from an alpha string or an alpha expression.
Parameters:
param1. Input alpha string or alpha expression.
param2. Specified trim character.
param3. A true or false flag to trim all occurrences of the trimcharacter specified in param2.
Example: @RTRIM('JohnXX ',X, true) returns 'John'.
@STRTOKEN(param1, param2,param3)
Returns a specified string token from a delimited token string.
Parameters:
param1. Input string, delimited with tokens.
param2. Requested token index (numeric).
param3. Delimiter. You can use valid <XML> element tags (nodes)as delimiters. The XML format of a list can be a variable or URL.Content must consist of a <list><tag>Value</tag></list> set, inwhich element names can be arbitrary but must be consistent.
Parameter Notes:
The third parameter, param3, can have more than one characteras the delimiter.
An empty string is returned if a delimiter is not found or is empty,or if the input string is empty.
Every delimiter is counted for the index calculation (no repetition).
Example: variable BA = abcd,cdef,ghik,lmnp, then @STRTOKEN(BA,'2', ',') returns cdef.
Transform Functions
132 Information Builders

String Function Description
@SUBSTR(param1, param2,param3)
Returns the substring representing the extracts of a specifiednumber of characters from an alpha string.
Parameters:
param1. Input alpha string.
param2. Number that represents the starting position of thesubstring within param1.
param3. Number of characters to be extracted (the length of thesubstring).
Example: @SUBSTR('John', '3', '2') returns 'hn'.
@TRIM(param1)
Removes white space characters (such as blanks, tabs, and linefeeds) from the left and right sides of an alpha string or an alphaexpression.
Parameter: param1. Input alpha string.
Example: @TRIM(' John ') returns 'John'.
@TRIM(param1, param2)
Removes a specified trim character from the left and right sides ofan alpha string or an alpha expression.
Parameters:
param1. Input alpha string or alpha expression.
param2. Specified trim character.
Example: @RTRIM('XJohnX ',X) returns 'John'.
3. iWay Transformer Concepts
iWay Integration Tools Transformer User’s Guide 133

String Function Description
@TRIM(param1, param2,param3)
Removes white space characters (such as blanks, tabs, and linefeeds) or specified trim characters from the left and right sides of analpha string or an alpha expression.
Parameters:
param1. Input alpha string or alpha expression.
param2. Specified trim character.
param3. A true or false flag to trim all occurrences of the trimcharacter specified in param2.
Example: @RTRIM('XXJohnXX ',X, true) returns 'John'.
@UPPER(param1)
Returns a string converted to all uppercase letters.
Parameter: param1. Alpha string.
Example: @UPPER('Pablo Picasso') returns 'PABLO PICASSO'.
Time Functions
The time functions available in iWay Transformer are described in the following table.
Transform Functions
134 Information Builders
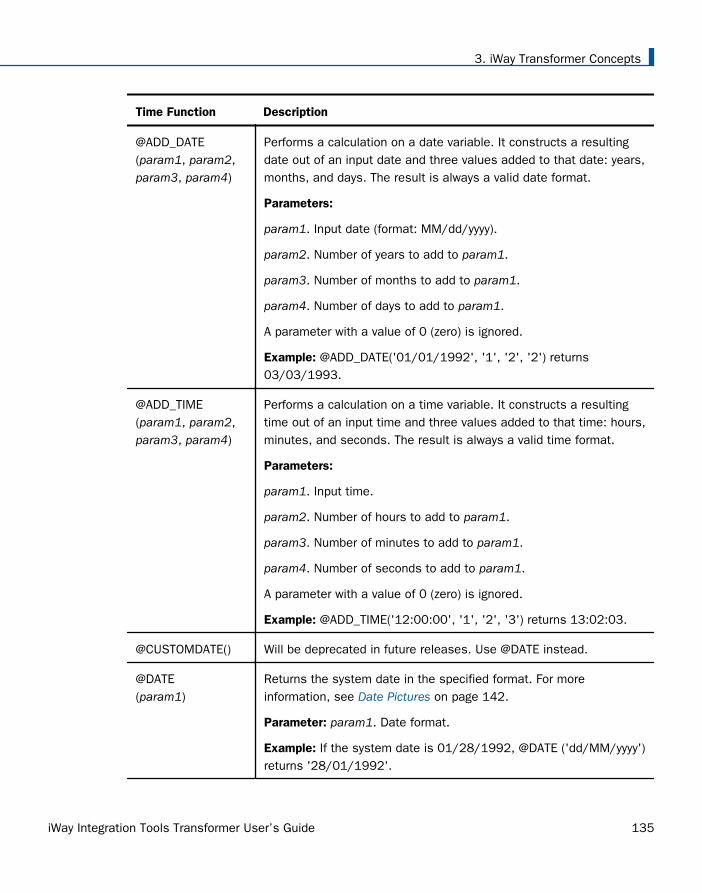
Time Function Description
@ADD_DATE(param1, param2,param3, param4)
Performs a calculation on a date variable. It constructs a resultingdate out of an input date and three values added to that date: years,months, and days. The result is always a valid date format.
Parameters:
param1. Input date (format: MM/dd/yyyy).
param2. Number of years to add to param1.
param3. Number of months to add to param1.
param4. Number of days to add to param1.
A parameter with a value of 0 (zero) is ignored.
Example: @ADD_DATE('01/01/1992', '1', '2', '2') returns03/03/1993.
@ADD_TIME(param1, param2,param3, param4)
Performs a calculation on a time variable. It constructs a resultingtime out of an input time and three values added to that time: hours,minutes, and seconds. The result is always a valid time format.
Parameters:
param1. Input time.
param2. Number of hours to add to param1.
param3. Number of minutes to add to param1.
param4. Number of seconds to add to param1.
A parameter with a value of 0 (zero) is ignored.
Example: @ADD_TIME('12:00:00', '1', '2', '3') returns 13:02:03.
@CUSTOMDATE() Will be deprecated in future releases. Use @DATE instead.
@DATE(param1)
Returns the system date in the specified format. For moreinformation, see Date Pictures on page 142.
Parameter: param1. Date format.
Example: If the system date is 01/28/1992, @DATE ('dd/MM/yyyy')returns '28/01/1992'.
3. iWay Transformer Concepts
iWay Integration Tools Transformer User’s Guide 135

Time Function Description
@DAY(param1)
Returns the day of the specified date as a number between 1 and31.
Parameter: param1. Input date. It is a date or date expression.
Example: @DAY('01/28/1992') returns '28'.
@DOW(param1)
Returns the number of the day of the week for the specified date.For example, Sunday is 1 and Monday is 2.
Parameter: param1. Input date (format MM/dd/yyyy).
Example: @DOW('01/29/1992'), representing a Wednesday,returns '4'.
@DSTR(param1, param2)
Returns the specified date in the format specified by the secondparameter. The original input must be in the format 'MM/dd/yyyy'.For more information, see Date Pictures on page 142.
Parameters:
param1. Input date (format MM/dd/yyyy).
param2. Picture mask (format) of the returned date string.
Example: @DSTR('2/12/1998','MMMM dd, yyyy') returns 'February12, 1998'.
@DSTR(param1, param2,param3)
Returns an input date in the format specified by the third parameter.The input date must conform to the format specified by the secondparameter. For more information, see Date Pictures on page 142.
Parameters:
param1. Input date.
param2. Picture mask of the input date.
param3. Picture mask (format) of the returned date string.
Example: @DSTR('2/12/1998','dd/MM/yyyy','MMMM dd, yyyy')returns 'December 02, 1998'.
Transform Functions
136 Information Builders

Time Function Description
@DSTR(param1, param2,param3, param4)
Returns an input date format according to the fourth parameter,which accepts a Boolean value (true or false).
Parameters:
param1. Input date.
param2. Picture mask of the input date.
param3. Picture mask (format) of the returned date string.
param4. Determines whether or not the input date complies withstandard formatting requirements.
@DVAL(param1, param2)
Converts an input date to a numeric value. The numeric valuerepresents the number of days elapsed since the day before the firstday of the first century (01/01/01) until the input date. For moreinformation, see Date Pictures on page 142.
Parameters:
param1. Input date string that can be interpreted as a date (forexample, '01/01/92', 'Jan 1, 1992').
param2. Format of the input date. This parameter is required for thesystem to read and interpret param1.
Example: @DVAL('01/01/92', 'MM/dd/yy') and @DVAL('Jan 1,1992', 'MMM dd, yyyy') each return 727198.
@EOM(param1)
Returns the date of the end of the month specified in the parameter.
Parameter: param1. Input date.
Example: @EOM ('05/05/93') returns 05/31/93.
@EOY(param1)
Returns the date of the end of the year specified in the parameter.
Parameter: param1. Input date.
Example: @EOY ('10/05/93') returns '12/31/93'.
3. iWay Transformer Concepts
iWay Integration Tools Transformer User’s Guide 137

Time Function Description
@GD2JD(param1, param2)
Converts a date in Gregorian format to Julian format.
The Gregorian date format, which is based on the Gregorian solarcalendar, is the most widely used date format in the world. AGregorian date is specified by the Year, the Month (identified byname or number), and the Day of the Month (numbered sequentiallystarting at 1). For example, 2008-03-25 is the Gregorian daterepresentation for March 25, 2008.
In J.D. Edwards systems, Julian dates (JD) are identified by the yearfirst, followed by the number of days into the year at which this dateappears. For example, Jan 15, 1999 is represented as 99015.March 15 is 99074. March 15, 2001 is 101074, since dates in thecurrent century start with 100 (2000), 101 (2001), and so on.
Parameters:
param1. Gregorian date.
param2. Gregorian date picture mask.
@HOUR(param1)
Returns a number that represents the hour portion of the input time.
Parameter: param1. Input time.
Example: @HOUR('2:00:00') returns 2.
Transform Functions
138 Information Builders

Time Function Description
@JD2GD(param1, param2)
Converts a date in Julian format to Gregorian format.
In J.D. Edwards systems, Julian dates (JD) are identified by the yearfirst, followed by the number of days into the year at which this dateappears. For example, Jan 15, 1999 is represented as 99015.March 15 is 99074. March 15, 2001 is 101074, since dates in thecurrent century start with 100 (2000), 101 (2001), and so on.
The Gregorian date format, which is based on the Gregorian solarcalendar, is the most widely used date format in the world. AGregorian date is specified by the Year, the Month (identified byname or number), and the Day of the Month (numbered sequentiallystarting at 1). For example, 2008-03-25 is the Gregorian daterepresentation for March 25, 2008.
Parameters:
param1. Julian date.
param2. Gregorian date picture mask.
@MINUTE(param1)
Returns a number that represents the minutes portion of the inputtime.
Parameter: param1. Input time.
Example: @MINUTE('2:35:00') returns 35.
@MONTH(param1)
Returns a number that represents the month portion of the inputtime.
Parameter: param1. Input time.
Example: @MONTH('01/28/1992') returns 1.
@SECOND(param1)
Returns a number that represents the seconds portion of the inputtime.
Parameter: param1. Input time.
Example: @SECOND('12:02:05') returns 5.
3. iWay Transformer Concepts
iWay Integration Tools Transformer User’s Guide 139
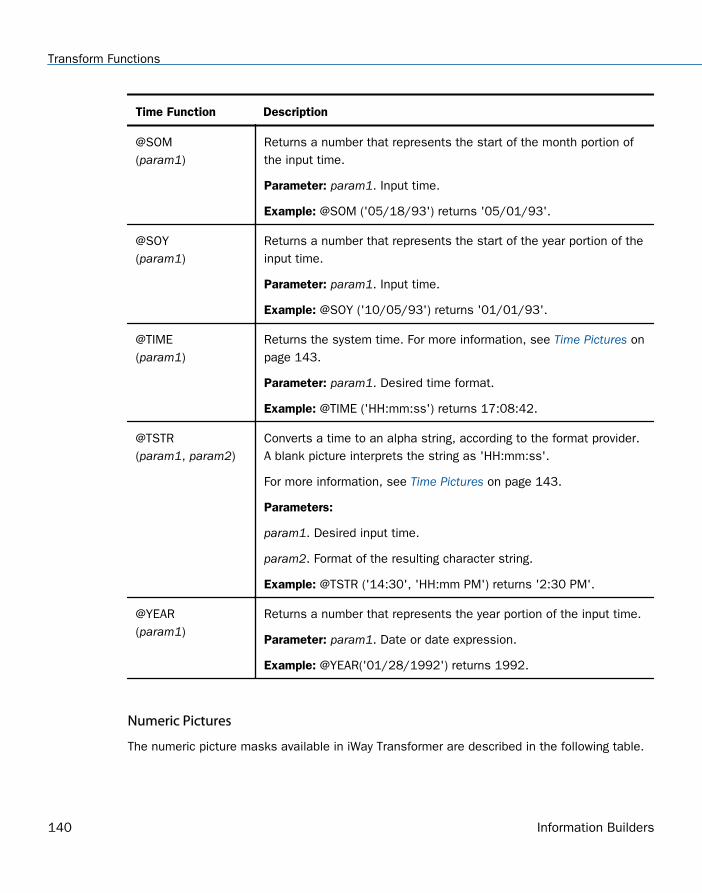
Time Function Description
@SOM(param1)
Returns a number that represents the start of the month portion ofthe input time.
Parameter: param1. Input time.
Example: @SOM ('05/18/93') returns '05/01/93'.
@SOY(param1)
Returns a number that represents the start of the year portion of theinput time.
Parameter: param1. Input time.
Example: @SOY ('10/05/93') returns '01/01/93'.
@TIME(param1)
Returns the system time. For more information, see Time Pictures onpage 143.
Parameter: param1. Desired time format.
Example: @TIME ('HH:mm:ss') returns 17:08:42.
@TSTR(param1, param2)
Converts a time to an alpha string, according to the format provider.A blank picture interprets the string as 'HH:mm:ss'.
For more information, see Time Pictures on page 143.
Parameters:
param1. Desired input time.
param2. Format of the resulting character string.
Example: @TSTR ('14:30', 'HH:mm PM') returns '2:30 PM'.
@YEAR(param1)
Returns a number that represents the year portion of the input time.
Parameter: param1. Date or date expression.
Example: @YEAR('01/28/1992') returns 1992.
Numeric Pictures
The numeric picture masks available in iWay Transformer are described in the following table.
Transform Functions
140 Information Builders
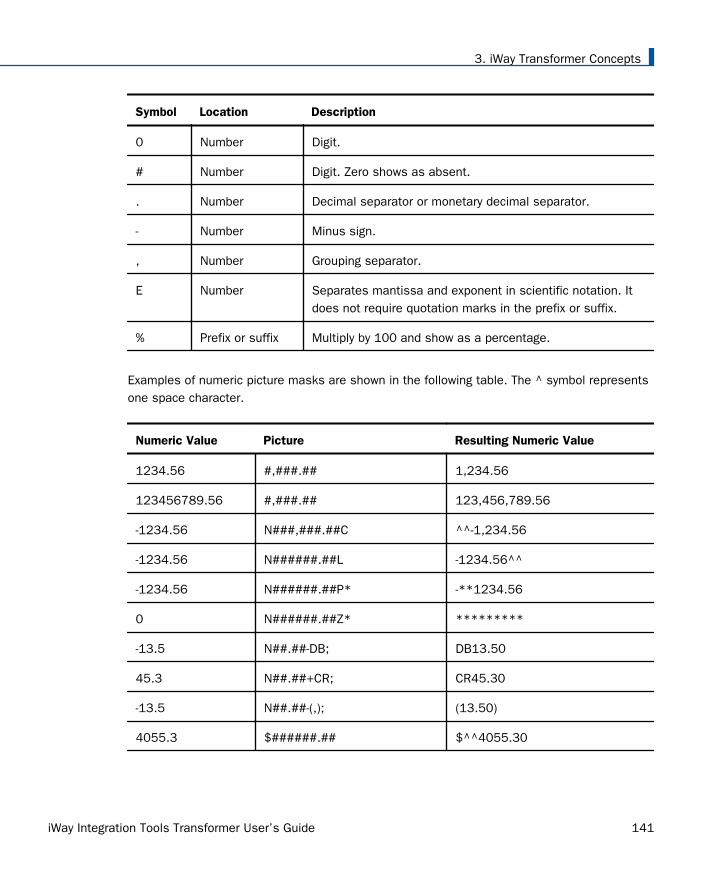
Symbol Location Description
0 Number Digit.
# Number Digit. Zero shows as absent.
. Number Decimal separator or monetary decimal separator.
- Number Minus sign.
, Number Grouping separator.
E Number Separates mantissa and exponent in scientific notation. Itdoes not require quotation marks in the prefix or suffix.
% Prefix or suffix Multiply by 100 and show as a percentage.
Examples of numeric picture masks are shown in the following table. The ^ symbol representsone space character.
Numeric Value Picture Resulting Numeric Value
1234.56 #,###.## 1,234.56
123456789.56 #,###.## 123,456,789.56
-1234.56 N###,###.##C ^^-1,234.56
-1234.56 N######.##L -1234.56^^
-1234.56 N######.##P* -**1234.56
0 N######.##Z* *********
-13.5 N##.##-DB; DB13.50
45.3 N##.##+CR; CR45.30
-13.5 N##.##-(,); (13.50)
4055.3 $######.## $^^4055.30
3. iWay Transformer Concepts
iWay Integration Tools Transformer User’s Guide 141

Date Pictures
The following table describes the date symbols and shows an example of each.
Symbol Description Example Presentation
G Era designator. AD Text
y Year. 1996 Number
M Month in year. July & 07 Text &Number
d Day in month. 10 Number
E Day in week. Tuesday Text
D Day in year. 189 Number
F Day of week in month. 2 (second Wed. inJuly)
Number
w Week in year. 27 Number
W Week in month. 2 Number
' Escape for text. ' Delimiter
' ' Single quotation mark. ' Literal
- Separates month, day, and year. 12-24-86 Delimiter
/ Separates month, day, and year. 12/24/86 Delimiter
The typical date formats are 'dd/MM/yyyy' (European), 'MM/dd/yyyy' (American), and'yyyy/MM/dd' (Scandinavian). When you define the attribute Date for the parameter in one ofthe functions, you must also select the format for the date item, as described in the followingtable. You can change the default format and place in it any positional directives and maskingcharacters that you require.
The following table provides examples of the date format (picture), using the date of 21 March1992. The ^ symbol represents one space character.
Transform Functions
142 Information Builders
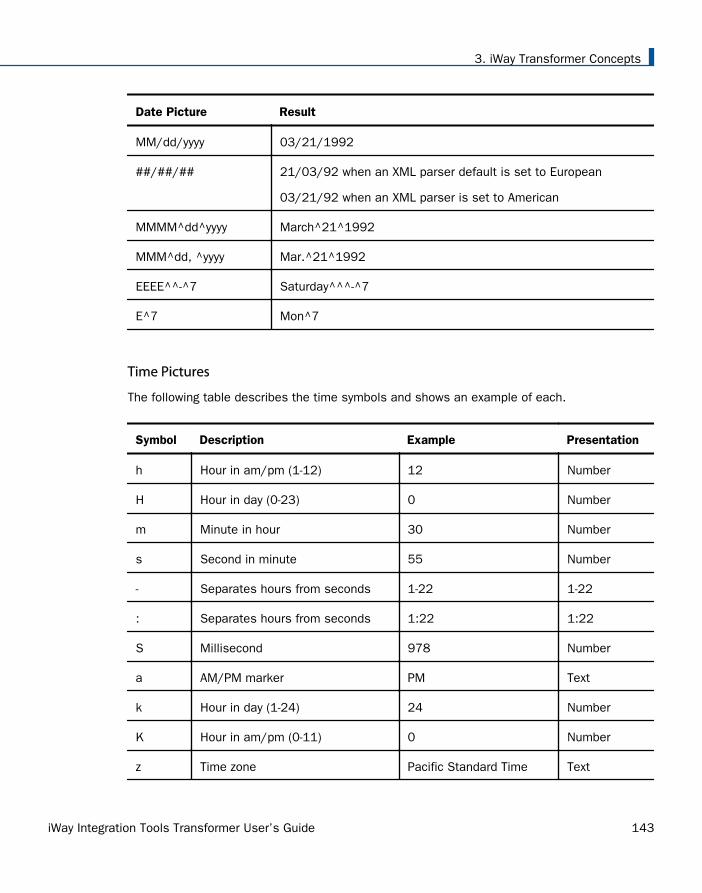
Date Picture Result
MM/dd/yyyy 03/21/1992
##/##/## 21/03/92 when an XML parser default is set to European
03/21/92 when an XML parser is set to American
MMMM^dd^yyyy March^21^1992
MMM^dd, ^yyyy Mar.^21^1992
EEEE^^-^7 Saturday^^^-^7
E^7 Mon^7
Time Pictures
The following table describes the time symbols and shows an example of each.
Symbol Description Example Presentation
h Hour in am/pm (1-12) 12 Number
H Hour in day (0-23) 0 Number
m Minute in hour 30 Number
s Second in minute 55 Number
- Separates hours from seconds 1-22 1-22
: Separates hours from seconds 1:22 1:22
S Millisecond 978 Number
a AM/PM marker PM Text
k Hour in day (1-24) 24 Number
K Hour in am/pm (0-11) 0 Number
z Time zone Pacific Standard Time Text
3. iWay Transformer Concepts
iWay Integration Tools Transformer User’s Guide 143

The following table shows examples of time pictures and results.
Time Picture Result Description
HH:mm:SS 08:20:00 Time displayed on 24-hour clock.
HH:mm:SS 16:40:00 Time displayed on 24-hour clock.
HH:mm PM 8:20 pm Time displayed on 12-hour clock.
HH:mm PM 4:40 pm Time displayed on 12-hour clock.
HH-mm-SS 16-40-00 Example of the minus sign (-) as the timeseparator.
Custom Functions
A function is a procedure that is built within the iWay Transformer graphical user interface. Itproduces the required output based on calculation upon, or manipulation of, input data. Youcan apply a function to produce the output value for a specific node using the Mapping Builder.
In addition to the set of predefined functions discussed in Predefined Functions on page 102,iWay Transformer enables you to implement your own custom functions in Java, according tothe format specified in this chapter.
You can integrate custom functions into iWay Transformer and make them available for use inyour transformations at run time or design time.
Invisible Group
Invisible Group mapping techniques can help you perform complex looping tasks whendesigning mappings of the Transform component.
What Is It?
Invisible Group is a group node with the Visible property set to false. It is identified by the
grayed out group icon .
Where Is It Used?
You use Invisible Group in the Mapping Builder when designing the Output structure of themappings. For more information, see Mapping Builder.
Invisible Group
144 Information Builders

What Is It Used for?
Use Invisible Group to manipulate the Output structure of the mappings by wrapping thestructure nodes with the invisible group nodes.
Where Is the Visible Property Located?
You can find the Visible property of the Group node in the Filter properties. For moreinformation, see Filter Tab on page 245.
3. iWay Transformer Concepts
iWay Integration Tools Transformer User’s Guide 145

Invisible Group
146 Information Builders

Chapter4iWay Transformer Tasks
The user interface of iWay Transformer provides you with the tools required to create andmanage Transform components. It enables you to maintain high-level and detailedaspects of a project in a customizable environment.
This section describes the basic menus and options available in iWay Transformer.
In this chapter:
Creating a Transform Component
Configuring a Transform Component
Testing a Transform Component
Working With a Transform Component
Working With the Mapping Builder
Working With Namespaces
Working With Functions
Creating a Transform Component
iWay Transformer provides a quick way to create a Transform component. It guides you throughthe major steps of building the component. After you create the component, you canmanipulate it using the editing and configuration tools provided with iWay Transformer. Thefollowing procedure shows you how to create a Transform component using iWay Transformer.
iWay Integration Tools Transformer User’s Guide 147
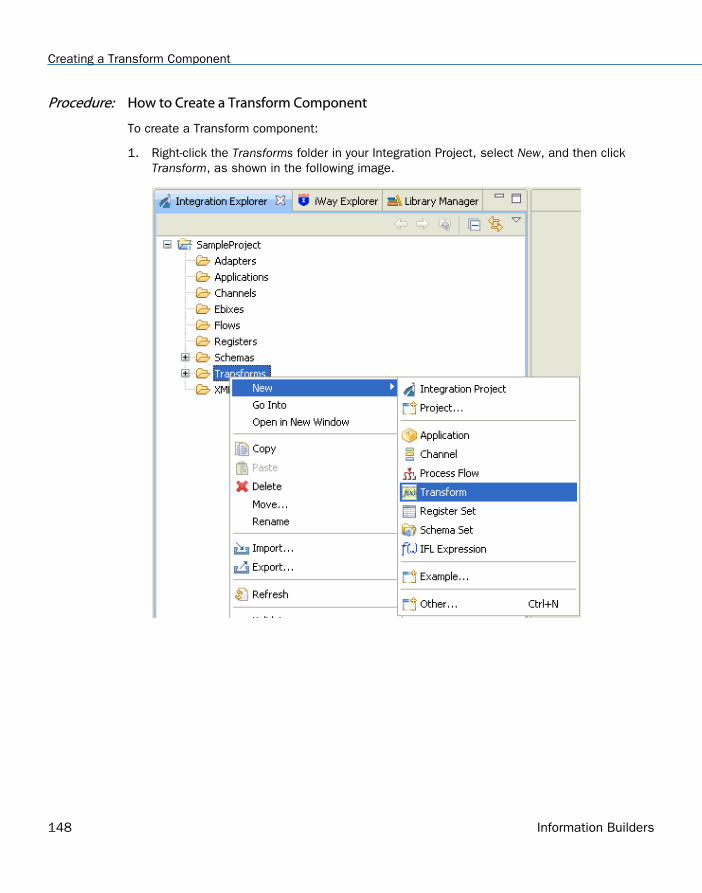
Procedure: How to Create a Transform Component
To create a Transform component:
1. Right-click the Transforms folder in your Integration Project, select New, and then clickTransform, as shown in the following image.
Creating a Transform Component
148 Information Builders

The New iWay Transform dialog box opens, as shown in the next image.
2. Type a name and a description (optional) for the new Transform component.
Tip: If required, you can change the preselected project folder by clicking Browse next tothe Project Folder field.
3. Select a target version of iWay Service Manager (iSM) from the Target Server Version drop-down list.
4. Click Next.
4. iWay Transformer Tasks
iWay Integration Tools Transformer User’s Guide 149

The Transform Type Selection pane opens, as shown in the following image.
5. From the list in the Transform From section, select the format of the input data, forexample, XML.
6. From the list in the Transform To section, select the format of the output data, forexample, XML.
7. Click Next.
Creating a Transform Component
150 Information Builders

The XML Input pane opens with the Structure tab selected, as shown in the followingimage.
Tip: You can skip the remaining steps by clicking the Finish button if it is enabled. You canthen manually alter the Transform component properties at your convenience from theProperties dialog box.
8. In the Structure File field, type the name of a DTD, XSD (schema), or XML file thatrepresents the input dictionary.
Click the ellipsis button to the right of the field to browse the workspace for thestructure file.
Click the Import button to the right of the field to browse your file system for thestructure file.
4. iWay Transformer Tasks
iWay Integration Tools Transformer User’s Guide 151

9. Click Next.
The XML Output pane opens with the Structure tab selected, as shown in the followingimage.
10. In the Structure File field, type the name of the data dictionary that represents thestructure of the output data (optional).
Click the ellipsis button to the right of the field to browse the workspace for thestructure file.
Click the Import button to the right of the field to browse your file system for thestructure file.
11. Click Finish.
Creating a Transform Component
152 Information Builders
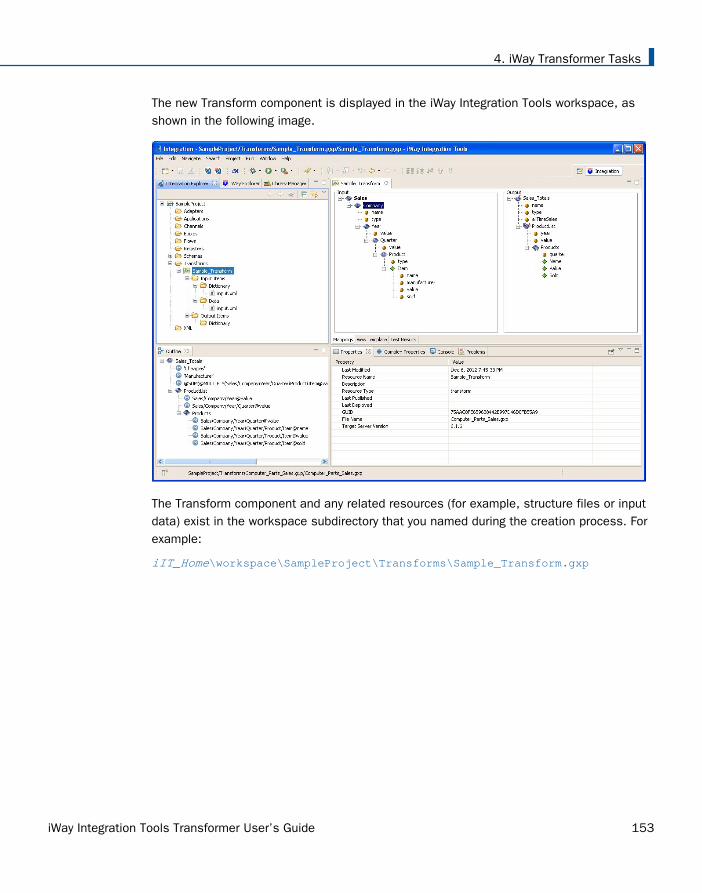
The new Transform component is displayed in the iWay Integration Tools workspace, asshown in the following image.
The Transform component and any related resources (for example, structure files or inputdata) exist in the workspace subdirectory that you named during the creation process. Forexample:
iIT_Home\workspace\SampleProject\Transforms\Sample_Transform.gxp
4. iWay Transformer Tasks
iWay Integration Tools Transformer User’s Guide 153

Procedure: How to Add a Transform Component From the iWay Registry
You can load a Transform component from the iWay registry into your Integration Project byexporting it using iWay Explorer.
1. Click the iWay Explorer tab.
2. Right-click Registry Explorer, and select Connect from the context menu.
Creating a Transform Component
154 Information Builders
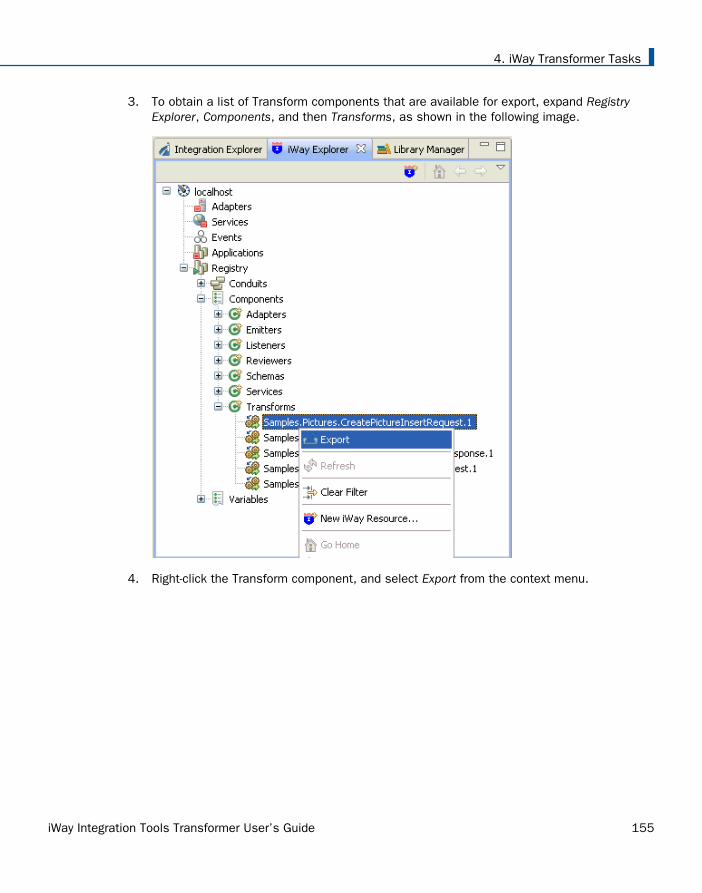
3. To obtain a list of Transform components that are available for export, expand RegistryExplorer, Components, and then Transforms, as shown in the following image.
4. Right-click the Transform component, and select Export from the context menu.
4. iWay Transformer Tasks
iWay Integration Tools Transformer User’s Guide 155
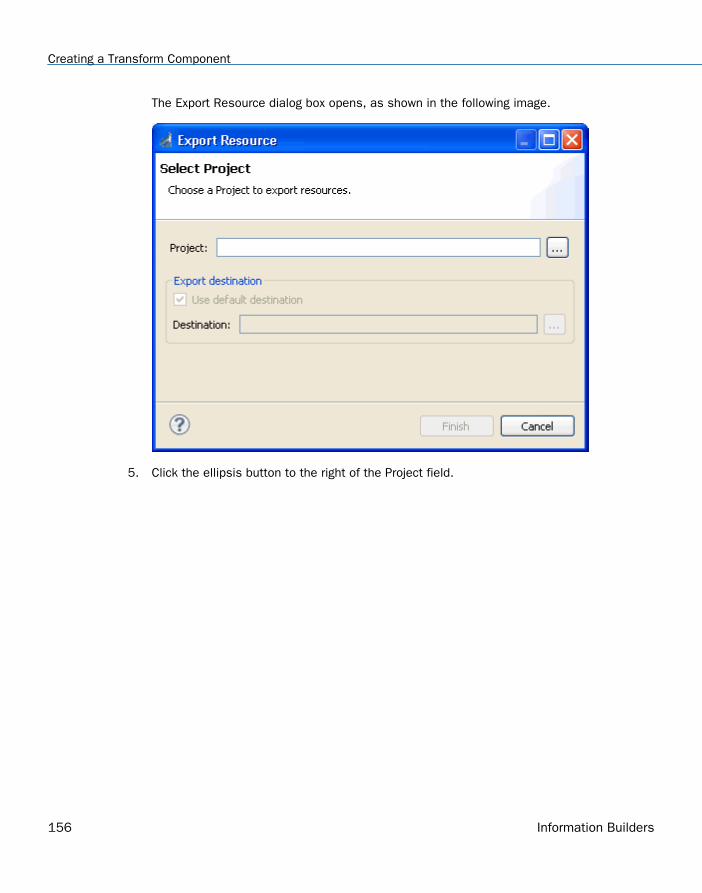
The Export Resource dialog box opens, as shown in the following image.
5. Click the ellipsis button to the right of the Project field.
Creating a Transform Component
156 Information Builders
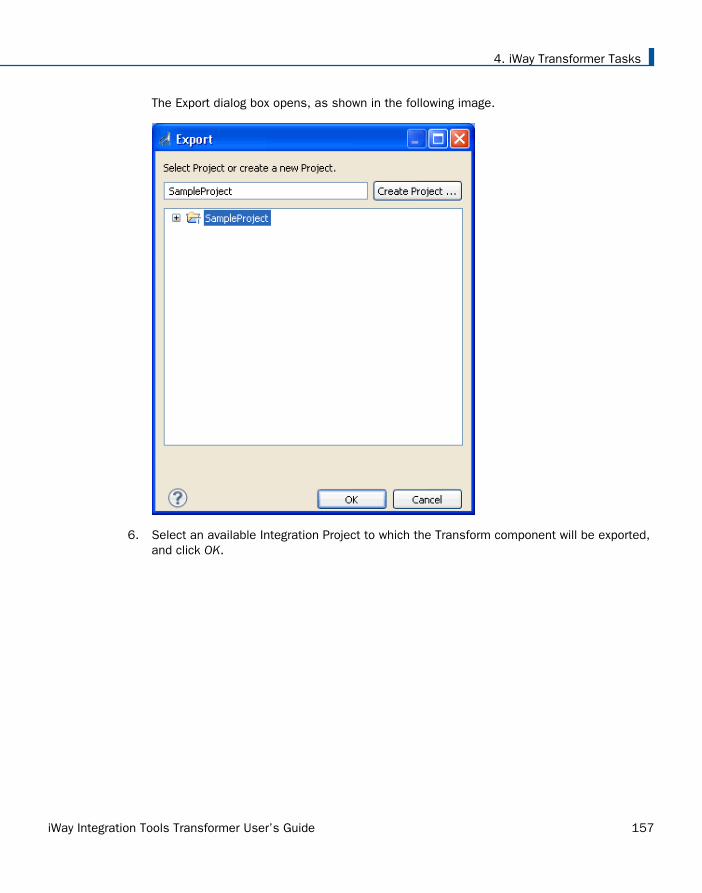
The Export dialog box opens, as shown in the following image.
6. Select an available Integration Project to which the Transform component will be exported,and click OK.
4. iWay Transformer Tasks
iWay Integration Tools Transformer User’s Guide 157
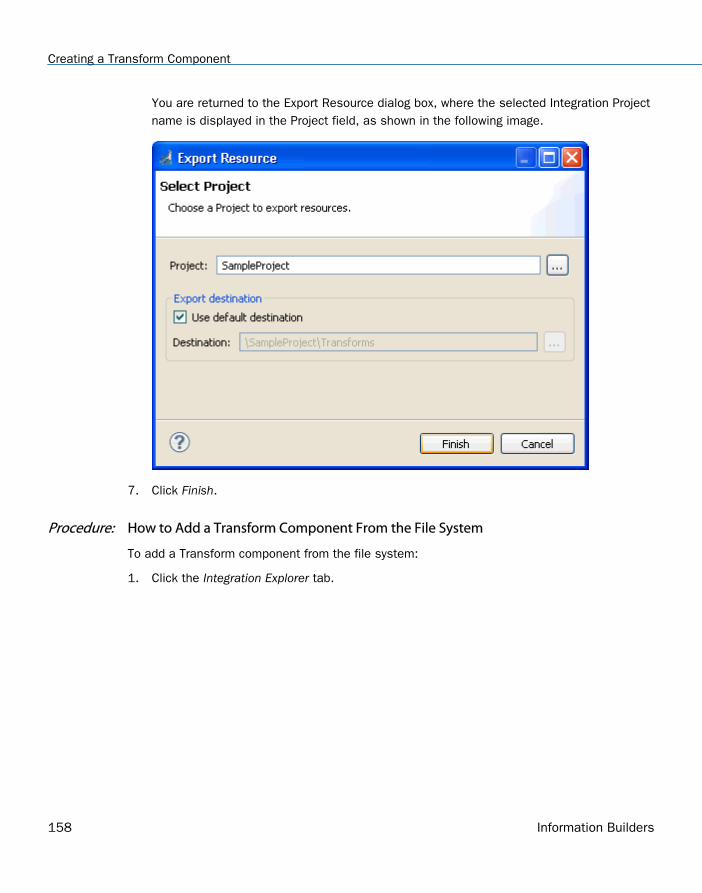
You are returned to the Export Resource dialog box, where the selected Integration Projectname is displayed in the Project field, as shown in the following image.
7. Click Finish.
Procedure: How to Add a Transform Component From the File System
To add a Transform component from the file system:
1. Click the Integration Explorer tab.
Creating a Transform Component
158 Information Builders
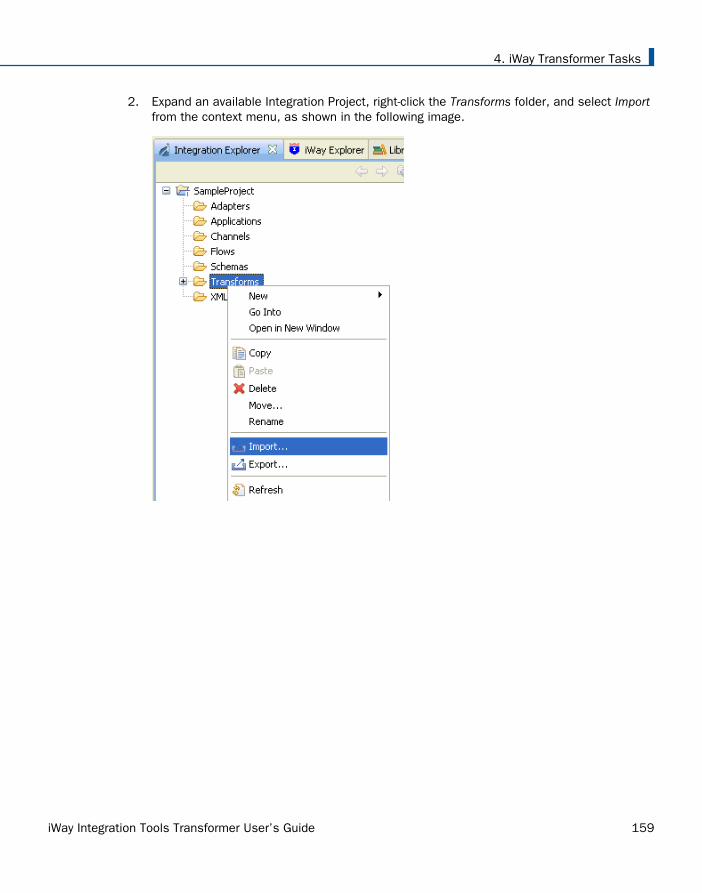
2. Expand an available Integration Project, right-click the Transforms folder, and select Importfrom the context menu, as shown in the following image.
4. iWay Transformer Tasks
iWay Integration Tools Transformer User’s Guide 159
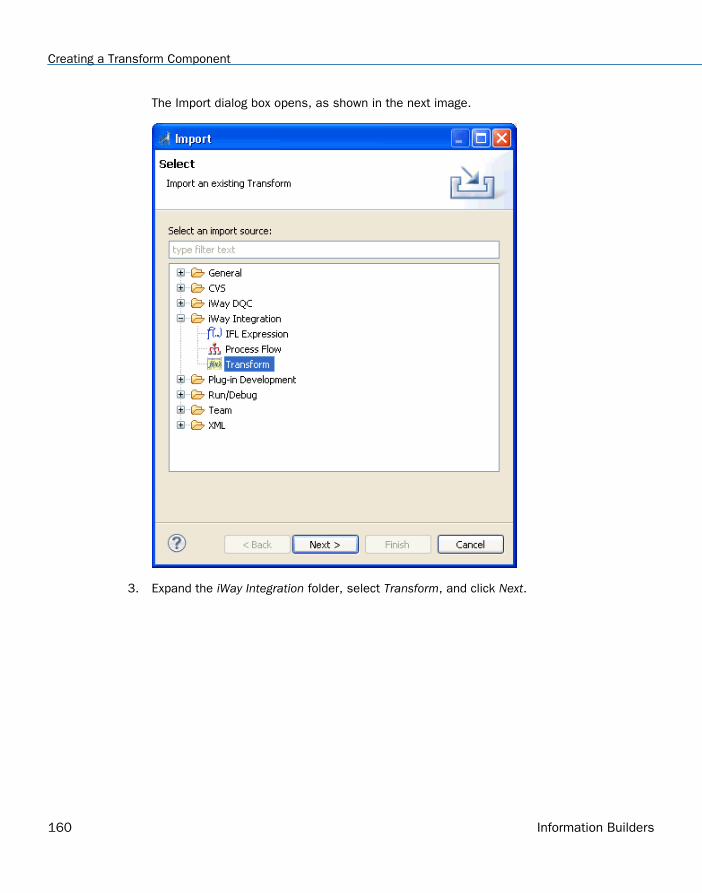
The Import dialog box opens, as shown in the next image.
3. Expand the iWay Integration folder, select Transform, and click Next.
Creating a Transform Component
160 Information Builders
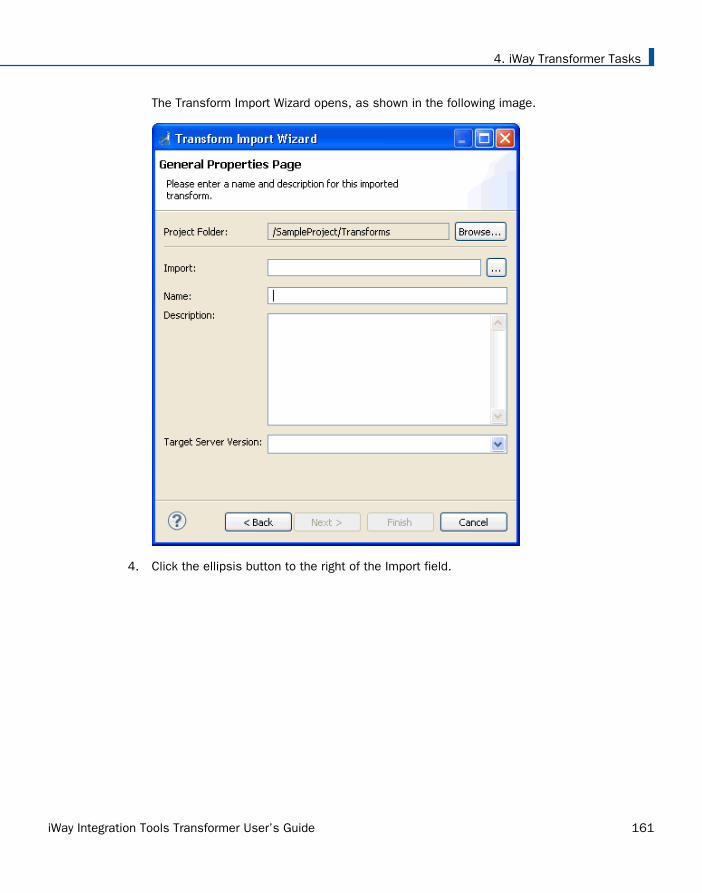
The Transform Import Wizard opens, as shown in the following image.
4. Click the ellipsis button to the right of the Import field.
4. iWay Transformer Tasks
iWay Integration Tools Transformer User’s Guide 161

The Open dialog box is displayed, as shown in the following image.
5. Browse to the location of the Transform component (.gxp file extension) on your filesystem, and click Open.
Creating a Transform Component
162 Information Builders

You are returned to the Transform Import Wizard, as shown in the following image.
If required, you can change preselected values for the imported Transform component.Verify that the values specified in the following fields are accurate:
Project Folder. The location to which the Transform component will be imported.
Import. The location of the existing Transform component.
Name. The name of the Transform component, as it will appear in the IntegrationProject.
Description. The description of the Transform component, as it will appear in theIntegration Project.
4. iWay Transformer Tasks
iWay Integration Tools Transformer User’s Guide 163
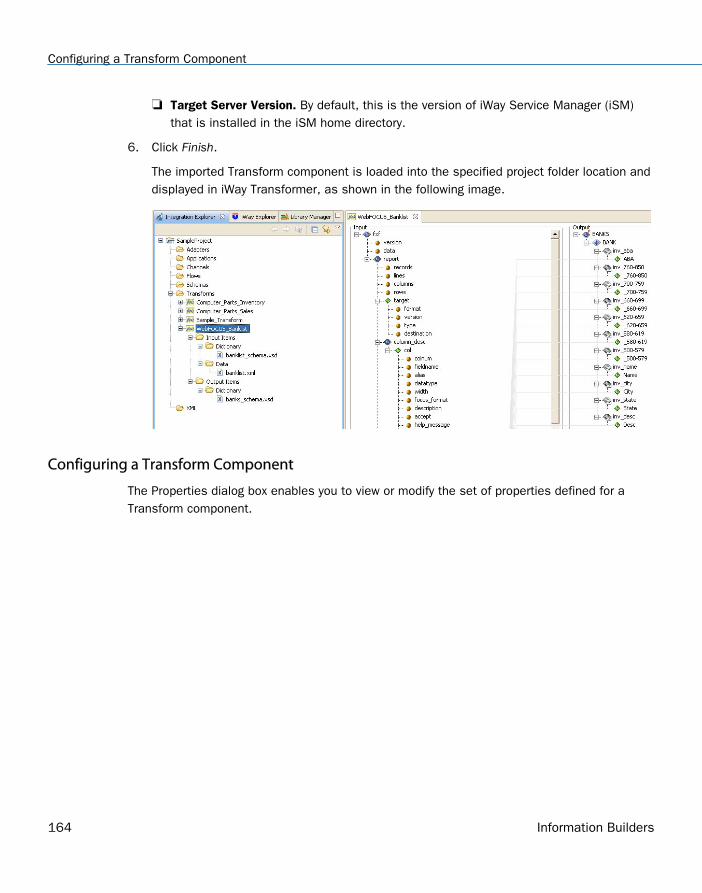
Target Server Version. By default, this is the version of iWay Service Manager (iSM)that is installed in the iSM home directory.
6. Click Finish.
The imported Transform component is loaded into the specified project folder location anddisplayed in iWay Transformer, as shown in the following image.
Configuring a Transform Component
The Properties dialog box enables you to view or modify the set of properties defined for aTransform component.
Configuring a Transform Component
164 Information Builders
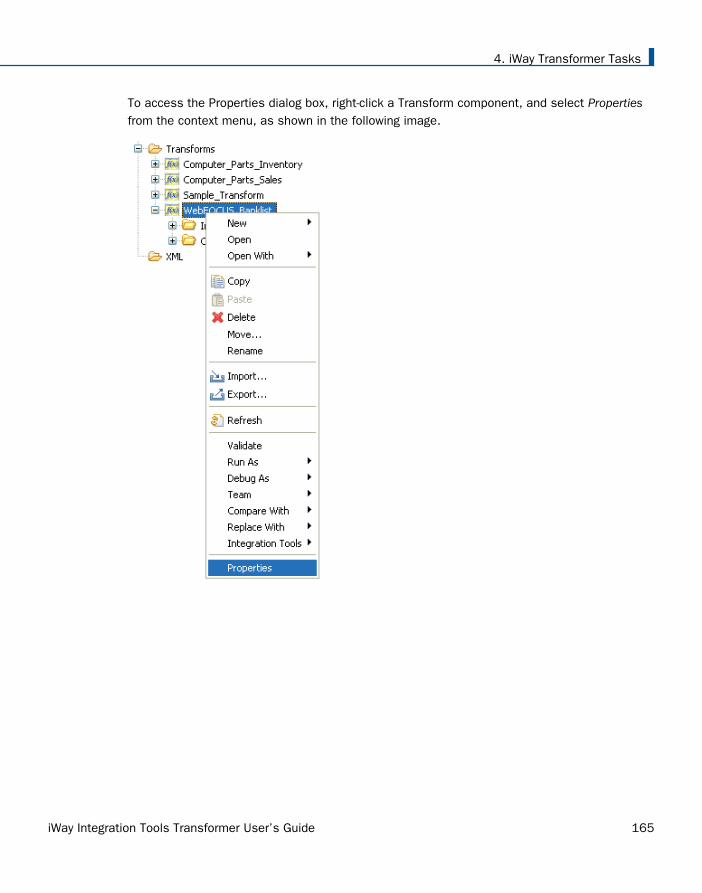
To access the Properties dialog box, right-click a Transform component, and select Propertiesfrom the context menu, as shown in the following image.
4. iWay Transformer Tasks
iWay Integration Tools Transformer User’s Guide 165
The Properties dialog box opens, as shown in the next image.
The Properties dialog box includes the following categories:
Resource. For more information, see Resource on page 167.
Run/Debug Settings. For more information, see Run/Debug Settings on page 168.
Transform Properties. For more information, see Transform Properties on page 169.
@REPLACE Function. For more information, see @REPLACE Function on page 170.
Custom Functions. For more information, see Custom Functions on page 171.
Input. For more information, see Input on page 172.
JDBC Data Source. For more information, see JDBC Data Source on page 193.
Output. For more information, see Output on page 193.
Variables. For more information, see Variables on page 210.
XML Namespaces. For more information, see XML Namespaces on page 219.
Configuring a Transform Component
166 Information Builders
Resource
The Resource category displays system-level information about the Transform componentresource file, as shown in the following image.
The following information is available:
Path
Type
Location
Size
Last Modified
You can set Read only, Archive, and Derived file access options for the resource if required. Bydefault, the Archive option is set.
The Text file encoding section allows you to specify the type of encoding that is used for thecharacters in a file. By default, the character encoding is set to UTF-8.
4. iWay Transformer Tasks
iWay Integration Tools Transformer User’s Guide 167
Run/Debug Settings
The Run/Debug Settings category allows you to manage launch configurations that areassociated with the resource that is currently selected. The Run/Debug Settings pane isshown in the following image.
Configuring a Transform Component
168 Information Builders
Transform Properties
The Transform Properties category includes basic information about the Transform component,as shown in the following image.
The following properties are listed:
Name. Name of your Transform component.
Type. Input and output format of your Transform component. If the format of the input oroutput is changed, the Type property will reflect that change.
Description. Custom description for your Transform component.
Target Server Version. Target version of iWay Service Manager (iSM) that is selected forthis Transform component.
4. iWay Transformer Tasks
iWay Integration Tools Transformer User’s Guide 169

@REPLACE Function
The @REPLACE Function category provides a way to instantaneously match and replace certaininput data values. Each individually configured replace function works similarly to a customfunction in that you must first define the function, and then apply it in the output node mappingvalue definition that you want to affect.
The following image shows the @REPLACE Function pane.
Configuring a Transform Component
170 Information Builders
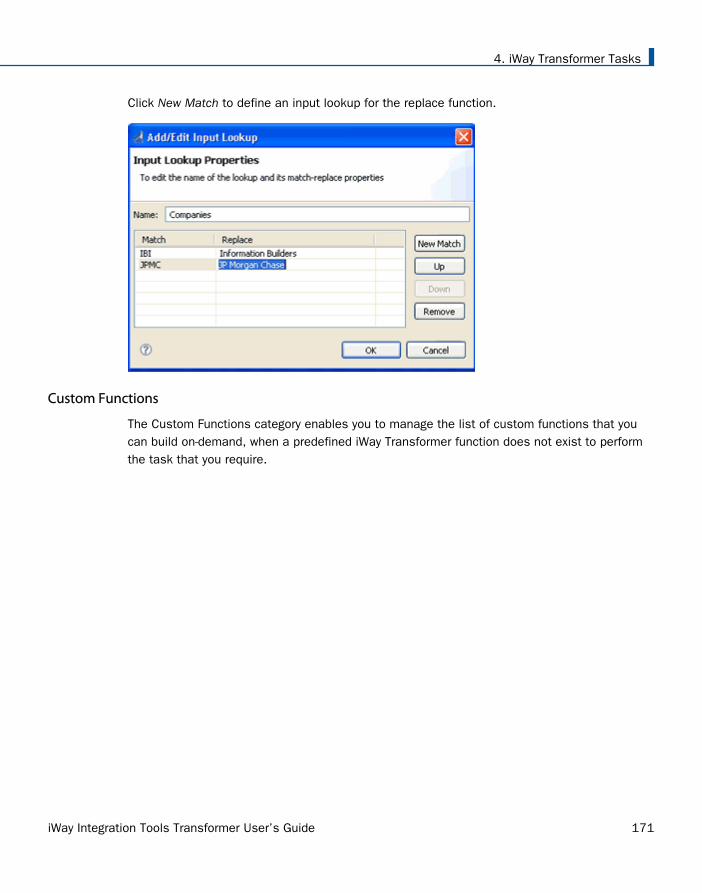
Click New Match to define an input lookup for the replace function.
Custom Functions
The Custom Functions category enables you to manage the list of custom functions that youcan build on-demand, when a predefined iWay Transformer function does not exist to performthe task that you require.
4. iWay Transformer Tasks
iWay Integration Tools Transformer User’s Guide 171
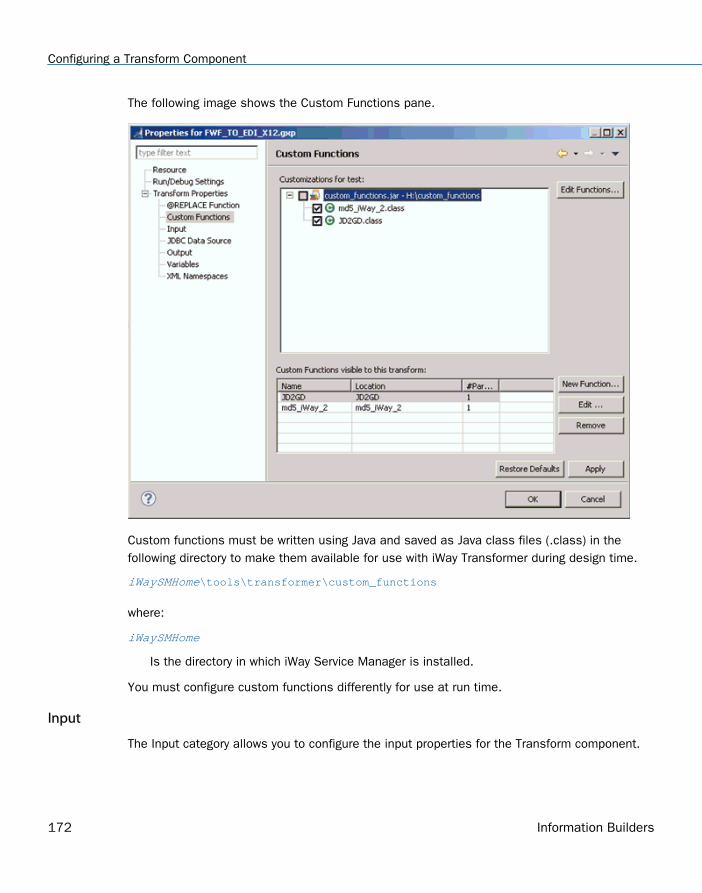
The following image shows the Custom Functions pane.
Custom functions must be written using Java and saved as Java class files (.class) in thefollowing directory to make them available for use with iWay Transformer during design time.
iWaySMHome\tools\transformer\custom_functions
where:
iWaySMHome
Is the directory in which iWay Service Manager is installed.
You must configure custom functions differently for use at run time.
Input
The Input category allows you to configure the input properties for the Transform component.
Configuring a Transform Component
172 Information Builders
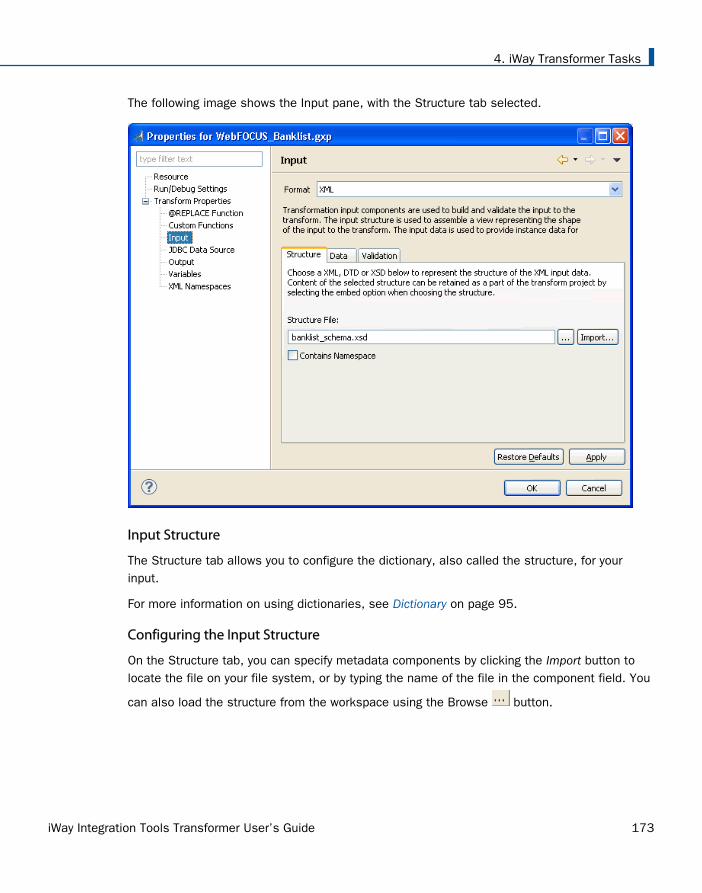
The following image shows the Input pane, with the Structure tab selected.
Input Structure
The Structure tab allows you to configure the dictionary, also called the structure, for yourinput.
For more information on using dictionaries, see Dictionary on page 95.
Configuring the Input Structure
On the Structure tab, you can specify metadata components by clicking the Import button tolocate the file on your file system, or by typing the name of the file in the component field. You
can also load the structure from the workspace using the Browse button.
4. iWay Transformer Tasks
iWay Integration Tools Transformer User’s Guide 173

The following image shows the Open dialog box that is displayed when you click the Importbutton next to a dictionary component field.
Configuring a Transform Component
174 Information Builders
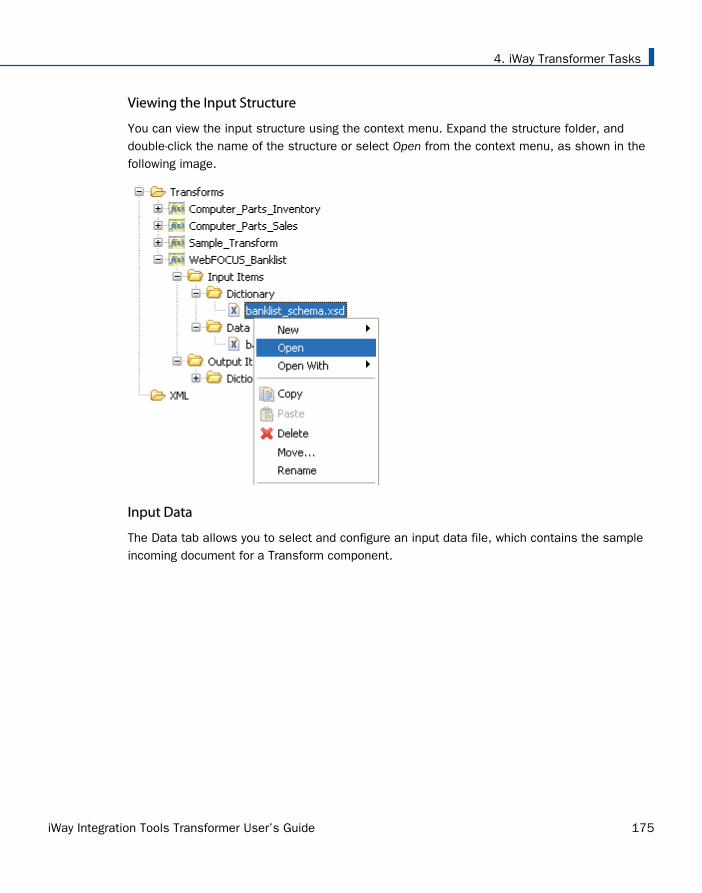
Viewing the Input Structure
You can view the input structure using the context menu. Expand the structure folder, anddouble-click the name of the structure or select Open from the context menu, as shown in thefollowing image.
Input Data
The Data tab allows you to select and configure an input data file, which contains the sampleincoming document for a Transform component.
4. iWay Transformer Tasks
iWay Integration Tools Transformer User’s Guide 175
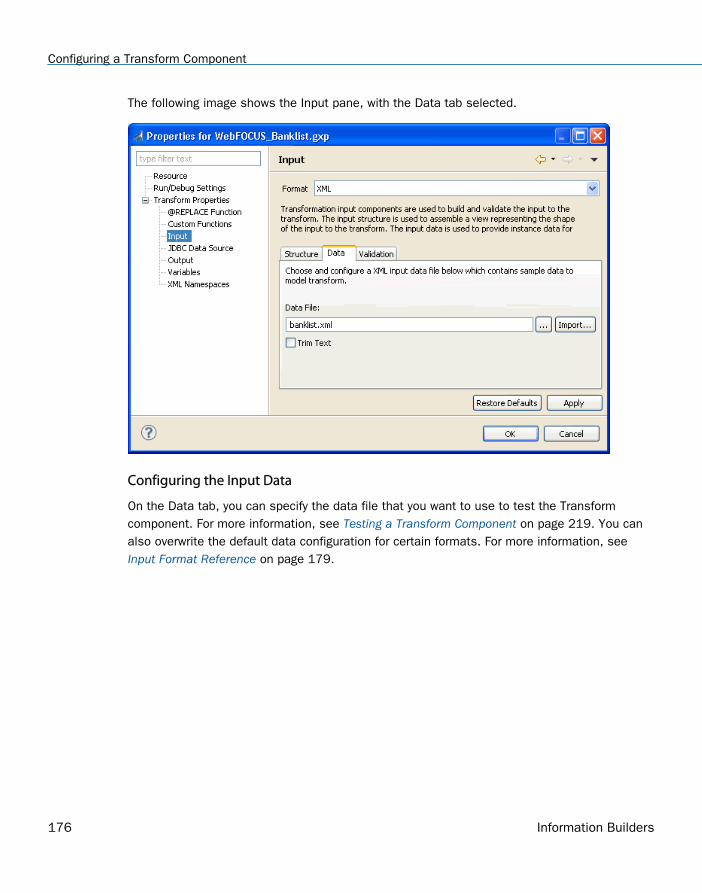
The following image shows the Input pane, with the Data tab selected.
Configuring the Input Data
On the Data tab, you can specify the data file that you want to use to test the Transformcomponent. For more information, see Testing a Transform Component on page 219. You canalso overwrite the default data configuration for certain formats. For more information, see Input Format Reference on page 179.
Configuring a Transform Component
176 Information Builders

Viewing the Input Data
To view the input data, double-click the data file, or right-click the data file and select Openfrom the context menu, as shown in the following image.
Input Validation
The Validation tab allows you to specify options for validating an incoming document at runtime against a specific XML schema or a DTD file. You can also validate the document againstthe rules contained in a Transform dictionary. We recommend that you use a schema forvalidation, rather than a DTD file.
4. iWay Transformer Tasks
iWay Integration Tools Transformer User’s Guide 177
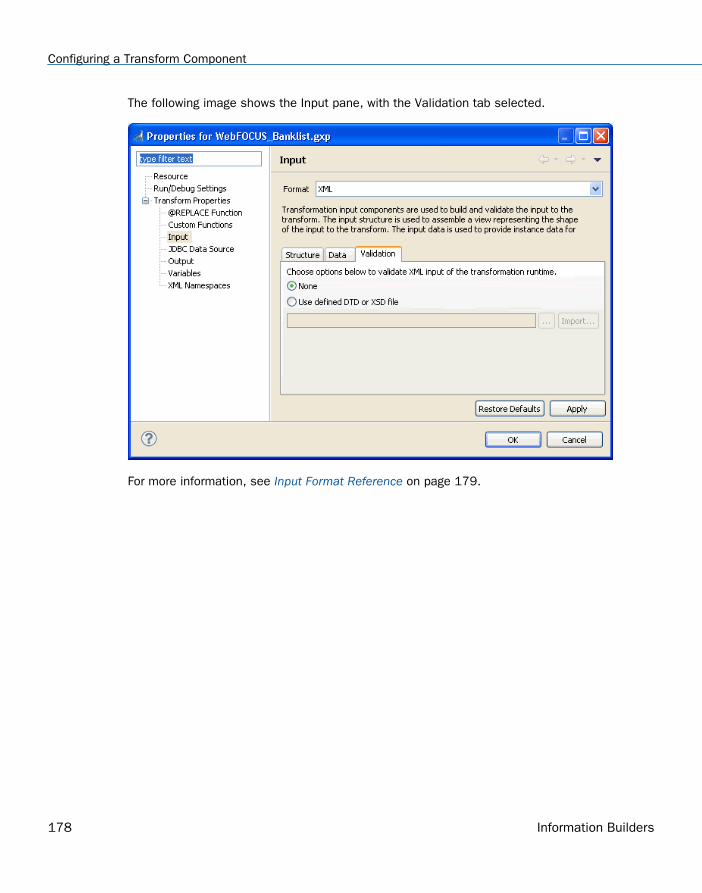
The following image shows the Input pane, with the Validation tab selected.
For more information, see Input Format Reference on page 179.
Configuring a Transform Component
178 Information Builders

Input Format Reference
The following table describes the major concepts and node types used to represent inputitems.
Input Document
This is the incoming document or message to which a transformation applies. The followingformats are supported:
CSV. For more information, see CSV Input Properties on page 183.
EDI HIPAA. For more information, see EDI Input Properties on page 184.
EDI X12. For more information, see EDI Input Properties on page 184.
EDIFACT. For more information, see EDI Input Properties on page 184.
Fixed Width. For more information, see Fixed Width Input Properties on page 187.
IDOC. For more information, see IDOC Input Properties on page 189.
SWIFT. For more information, see SWIFT Input Properties on page 190.
XML. For more information, see XML and iWay XML Response Input Properties on page191.
iWay XML Response. For more information, see XML and iWay XML Response InputProperties on page 191.
CDF. For more information, see CDF Input Properties on page 182. Note: CDF format isdeprecated. iWay Software recommends that you use Fixed Width format instead.
The input document is displayed on the Input pane as a logical tree of component items,such as groups or elements. For more information, see the Input Document Tree descriptionthat follows. Each input item contains a name that identifies the type of item, optionally anumber of attributes, or content.
4. iWay Transformer Tasks
iWay Integration Tools Transformer User’s Guide 179

Input Document Tree
This is a sample tree of groups, elements, and attributes encoded in the input document.Each item in this tree has exactly one parent, and can have more than one child.
The following is a section of an XML input document:
The following is a tree structure representation of the preceding code:
In iWay Transformer, the resulting input document tree is as follows:
Configuring a Transform Component
180 Information Builders
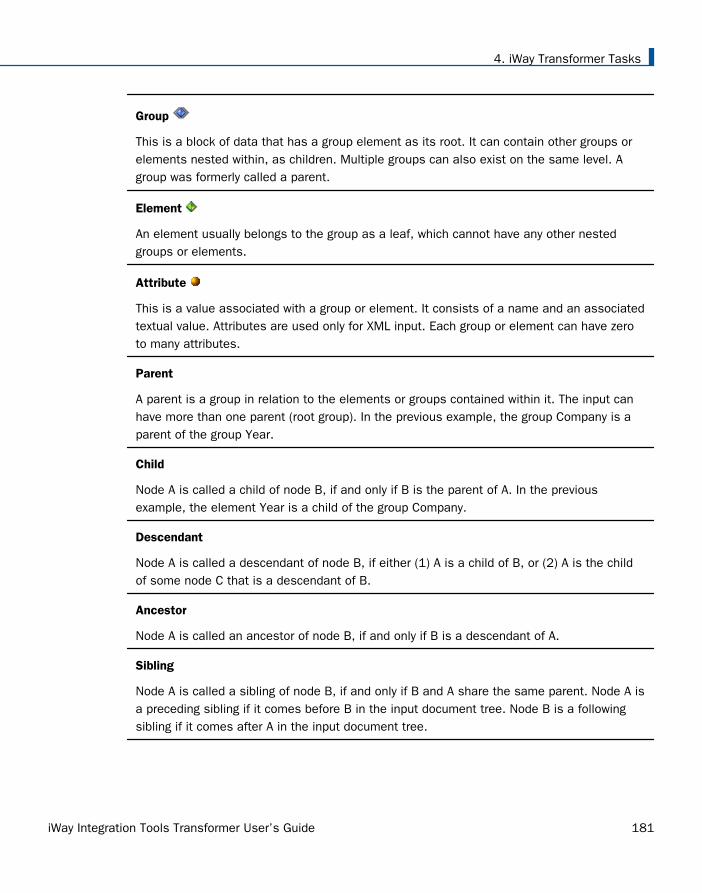
Group
This is a block of data that has a group element as its root. It can contain other groups orelements nested within, as children. Multiple groups can also exist on the same level. Agroup was formerly called a parent.
Element
An element usually belongs to the group as a leaf, which cannot have any other nestedgroups or elements.
Attribute
This is a value associated with a group or element. It consists of a name and an associatedtextual value. Attributes are used only for XML input. Each group or element can have zeroto many attributes.
Parent
A parent is a group in relation to the elements or groups contained within it. The input canhave more than one parent (root group). In the previous example, the group Company is aparent of the group Year.
Child
Node A is called a child of node B, if and only if B is the parent of A. In the previousexample, the element Year is a child of the group Company.
Descendant
Node A is called a descendant of node B, if either (1) A is a child of B, or (2) A is the childof some node C that is a descendant of B.
Ancestor
Node A is called an ancestor of node B, if and only if B is a descendant of A.
Sibling
Node A is called a sibling of node B, if and only if B and A share the same parent. Node A isa preceding sibling if it comes before B in the input document tree. Node B is a followingsibling if it comes after A in the input document tree.
4. iWay Transformer Tasks
iWay Integration Tools Transformer User’s Guide 181
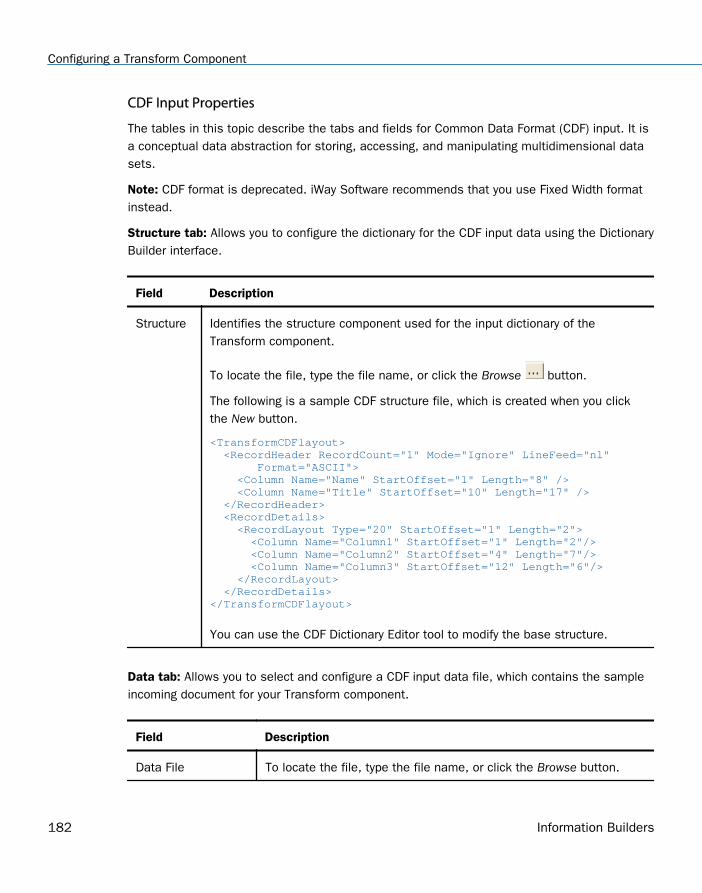
CDF Input Properties
The tables in this topic describe the tabs and fields for Common Data Format (CDF) input. It isa conceptual data abstraction for storing, accessing, and manipulating multidimensional datasets.
Note: CDF format is deprecated. iWay Software recommends that you use Fixed Width formatinstead.
Structure tab: Allows you to configure the dictionary for the CDF input data using the DictionaryBuilder interface.
Field Description
Structure Identifies the structure component used for the input dictionary of theTransform component.
To locate the file, type the file name, or click the Browse button.
The following is a sample CDF structure file, which is created when you clickthe New button.
<TransformCDFlayout> <RecordHeader RecordCount="1" Mode="Ignore" LineFeed="nl" Format="ASCII"> <Column Name="Name" StartOffset="1" Length="8" /> <Column Name="Title" StartOffset="10" Length="17" /> </RecordHeader> <RecordDetails> <RecordLayout Type="20" StartOffset="1" Length="2"> <Column Name="Column1" StartOffset="1" Length="2"/> <Column Name="Column2" StartOffset="4" Length="7"/> <Column Name="Column3" StartOffset="12" Length="6"/> </RecordLayout> </RecordDetails></TransformCDFlayout>
You can use the CDF Dictionary Editor tool to modify the base structure.
Data tab: Allows you to select and configure a CDF input data file, which contains the sampleincoming document for your Transform component.
Field Description
Data File To locate the file, type the file name, or click the Browse button.
Configuring a Transform Component
182 Information Builders

Field Description
Decode datacontent
To decode data content from EBCDIC format, select this check box.This check box is not selected by default.
content This check box is not selected by default.
CSV Input Properties
The tables in this topic describe the tabs and fields for the Comma-Separated Values (CSV)input format. In a CSV file, each block of data is separated by a comma. However, iWayTransformer allows for other delimiters. For more information, see the following description ofthe Delimiter field on the Data tab.
Structure tab: Allows you to configure the dictionary for the CSV input data.
Field Description
Structure Identifies the structure component used for the input dictionary ofthe Transform component.
Typically, this is either the input data file itself, or a CSV file that hasan identical structure to the intended input data file.
To locate the file, type the file name, or click the Browse button.
Restore Defaults Clears the Structure field.
Data tab: Allows you to select and configure a CSV input data file, which contains the sampleincoming document for your Transform component.
Field Description
Data File To locate the file, type the file name, or click the Browse button.
Delimiter Specifies the delimiter character, which separates the elements ofthe CSV data. The default value is a comma (,).
iWay Transformer can also process files that use other delimitercharacters. The files must correspond to the CSV format.
4. iWay Transformer Tasks
iWay Integration Tools Transformer User’s Guide 183
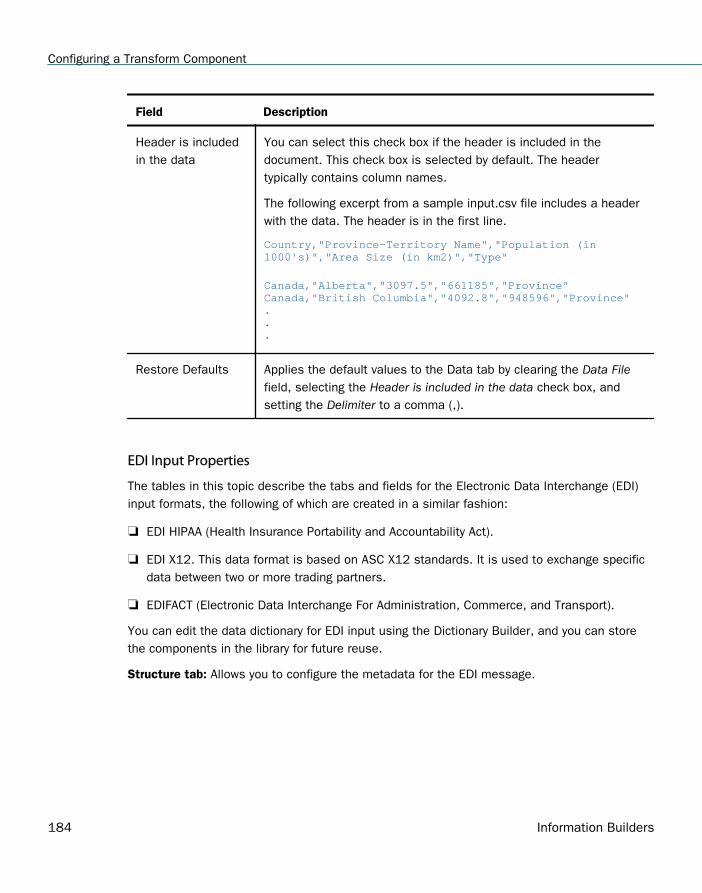
Field Description
Header is includedin the data
You can select this check box if the header is included in thedocument. This check box is selected by default. The headertypically contains column names.
The following excerpt from a sample input.csv file includes a headerwith the data. The header is in the first line.
Country,"Province-Territory Name","Population (in 1000's)","Area Size (in km2)","Type"
Canada,"Alberta","3097.5","661185","Province"Canada,"British Columbia","4092.8","948596","Province"...
Restore Defaults Applies the default values to the Data tab by clearing the Data Filefield, selecting the Header is included in the data check box, andsetting the Delimiter to a comma (,).
EDI Input Properties
The tables in this topic describe the tabs and fields for the Electronic Data Interchange (EDI)input formats, the following of which are created in a similar fashion:
EDI HIPAA (Health Insurance Portability and Accountability Act).
EDI X12. This data format is based on ASC X12 standards. It is used to exchange specificdata between two or more trading partners.
EDIFACT (Electronic Data Interchange For Administration, Commerce, and Transport).
You can edit the data dictionary for EDI input using the Dictionary Builder, and you can storethe components in the library for future reuse.
Structure tab: Allows you to configure the metadata for the EDI message.
Configuring a Transform Component
184 Information Builders

Field Description
Header Identifies the header component used for the input dictionary of theTransform component. The header contains envelope details thatinclude trading partner information and message layout.
To locate the file, type the file name, or click the Browse button.
Structure Identifies the structure component used for the input dictionary ofthe Transform component. The structure contains the layout andgrammar of the document (or transaction of the EDI message).
To locate the file, type the file name, or click the Browse button.
Data tab: Allows you to select and configure an EDI input data file, which contains a sampleincoming document for your Transform component.
Field Description
Segment Delimiter Specifies the character that indicates the end of a segment.
The default values are:
7E ~ Tilde for EDI HIPAA and EDI X12 formats.
None for EDIFACT format.
Segment Suffix Used in combination with a segment delimiter, the segment suffixindicates the end of a segment. You can select a predefinedsegment suffix from the drop-down list.
The default values are:
None for EDI HIPAA and EDI X12 formats.
0A LF Line Feed for EDIFACT format.
4. iWay Transformer Tasks
iWay Integration Tools Transformer User’s Guide 185
Element Delimiter Specifies the character that indicates the end of an element. Youcan select a predefined element delimiter character from the drop-down list.
The default values are:
2A * Asterisk for EDI HIPAA and EDI X12 formats.
2B + Plus for EDIFACT format.
ComponentElement Delimiter
Specifies the character that indicates the end of a componentelement. You can select a predefined component element delimitercharacter from the drop-down list.
By default, 3A : Colon is used for EDI HIPAA, EDI X12, and EDIFACTformats.
Escape Character Specifies the escape character that is used when reading the inputdata. You can select a predefined escape character from the drop-down list.
The default values are:
5C \ Backslash for EDI HIPAA and EDI X12 formats.
3F ? Question Mark for EDIFACT format.
Restore Defaults Applies default values to the Data tab.
Validation tab: Allows you to specify options that validate EDI input for the transformation runtime.
Field Description
None To skip validation, select this option. This option is selected bydefault.
Use validation ruledefined by theproject's inputstructure
To validate the incoming document using the rule defined by theTransform component input dictionary, select this option. This optionis not selected by default.
For EDI HIPAA and EDI X12, selecting this option activates the IgnoreNTE Segment check box.
Configuring a Transform Component
186 Information Builders

Field Description
Ignore NTESegment
For EDI HIPAA and EDI X12, select this check box if you do not wantto validate mapping rules specific to NTE. This check box is notselected by default.
This option allows NTE segment translations to appear in the XMLdocument in the same sequence as that of the input document.However, if this option is not checked, specific rules can be appliedin the dictionary to position NTE segment translations accordingly.
NTE is a floating segment that can occur in any place within adocument. It is applicable to versions prior to EDI X12 version 4010.
This option is not available for EDIFACT.
Restore Defaults Applies the default values to the Validation tab by selecting the Noneoption.
Fixed Width Input Properties
The tables in this topic describe the tabs and fields for the Fixed Width input format, alsocalled FWF. Fixed Width files are flat files that contain fixed width data fields that constituterecords. Records are commonly separated by new line characters. Fixed Width format is verysimilar to the deprecated CDF format, except for features that are applicable to Fixed Widthonly, such as looping.
Structure tab: Allows you to select an XML file that represents the data dictionary for the FixedWidth input data.
4. iWay Transformer Tasks
iWay Integration Tools Transformer User’s Guide 187

Field Description
Structure Identifies the metadata component used for the input data dictionary ofthe Transform component.
To locate the file, type the file name, or click the Browse button.
The following is a sample Fixed Width structure file, which is createdwhen you click the New button.
<FIXED_WIDTH> <RecordHeader> <Column Name="DESCRIPTION" StartOffset="1" Length="10" /> </RecordHeader> <RecordDetails> <Loop ID="Loop" Req="M" Min="1" Max="1"> <RecordLayout Type="10" StartOffset="1" Length="2"> <Column Name="Column1" StartOffset="3" Length="5" /> <Column Name="Column2" StartOffset="8" Length="5" /> </RecordLayout> </Loop> </RecordDetails></FIXED_WIDTH>
Data tab: Allows you to select and configure a Fixed Width input data file, which contains asample incoming document for your Transform component.
Field Description
Data File To locate the file, type the file name, or click the Browse button.
Record Delimiter Specifies delimiter options for the input data file. The record delimiteris a character that defines the boundary between records. The defaultvalue is a carriage return.
Trim Columns Selected by default, this option is used to trim columns from the inputdata file.
Restore Defaults Clears all fields on the Data tab, and selects the Trim Columns checkbox.
Configuring a Transform Component
188 Information Builders
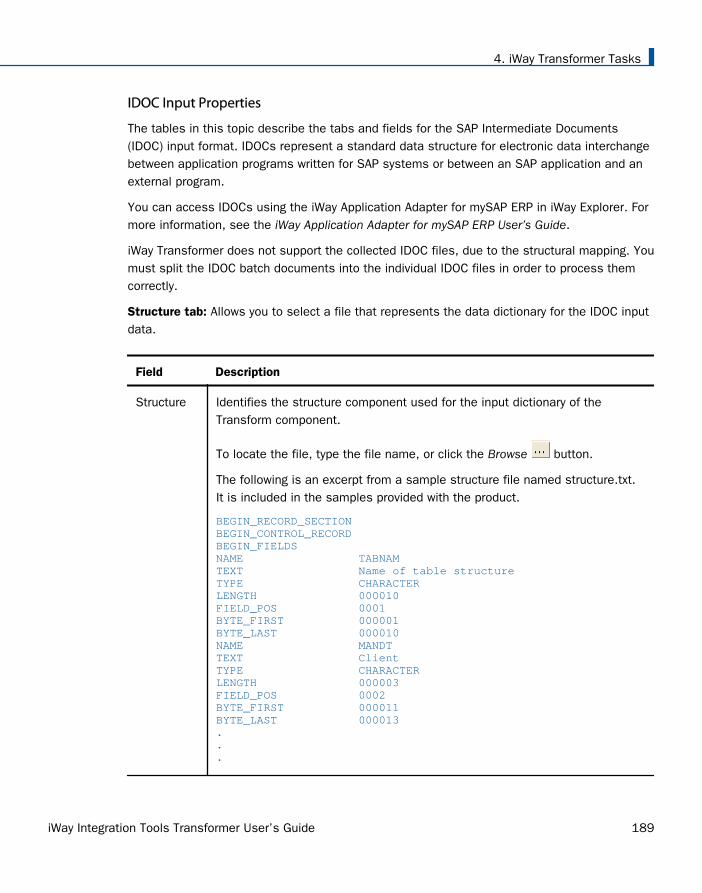
IDOC Input Properties
The tables in this topic describe the tabs and fields for the SAP Intermediate Documents(IDOC) input format. IDOCs represent a standard data structure for electronic data interchangebetween application programs written for SAP systems or between an SAP application and anexternal program.
You can access IDOCs using the iWay Application Adapter for mySAP ERP in iWay Explorer. Formore information, see the iWay Application Adapter for mySAP ERP User’s Guide.
iWay Transformer does not support the collected IDOC files, due to the structural mapping. Youmust split the IDOC batch documents into the individual IDOC files in order to process themcorrectly.
Structure tab: Allows you to select a file that represents the data dictionary for the IDOC inputdata.
Field Description
Structure Identifies the structure component used for the input dictionary of theTransform component.
To locate the file, type the file name, or click the Browse button.
The following is an excerpt from a sample structure file named structure.txt.It is included in the samples provided with the product.
BEGIN_RECORD_SECTIONBEGIN_CONTROL_RECORDBEGIN_FIELDSNAME TABNAMTEXT Name of table structureTYPE CHARACTERLENGTH 000010FIELD_POS 0001BYTE_FIRST 000001BYTE_LAST 000010NAME MANDTTEXT ClientTYPE CHARACTERLENGTH 000003FIELD_POS 0002BYTE_FIRST 000011BYTE_LAST 000013...
4. iWay Transformer Tasks
iWay Integration Tools Transformer User’s Guide 189
Field Description
RestoreDefaults
Clears the Structure field.
Data tab: Allows you to select and configure an IDOC input data file, which contains a sampleincoming document for your Transform component.
Field Description
Data File To locate the file, type the file name, or click the Browse button.
Restore Defaults Clears the Data File field.
SWIFT Input Properties
The tables in this topic describe the tabs and fields for the Society for Worldwide InterbankFinancial Telecommunication (SWIFT) input format. SWIFT is a messaging and transactionprocessing format used by worldwide financial organizations.
Structure tab: Allows you to select a data dictionary that represents the SWIFT input data.
Field Description
Structure Identifies the structure component used for the input dictionary ofthe Transform component.
To locate the file, type the file name, or click the Browse button.
Data tab: Allows you to select and configure a SWIFT input data file, which contains a sampleincoming document for your Transform component.
Field Description
Data File To locate the file, type the file name, or click the Import button. Youcan also load the file from your workspace using the Browse button.
Restore Defaults Clears the Data File field.
Configuring a Transform Component
190 Information Builders
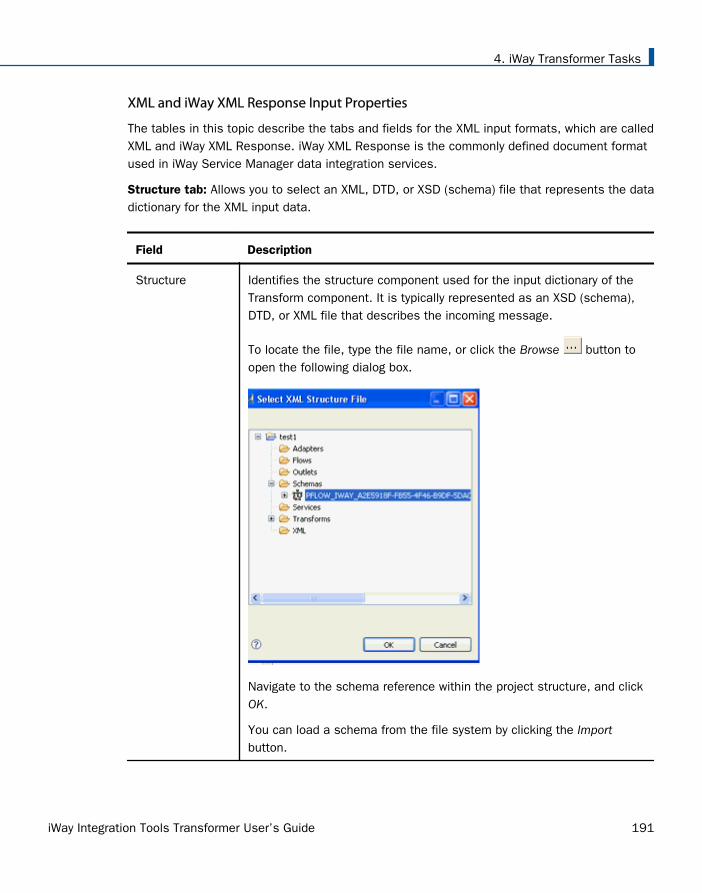
XML and iWay XML Response Input Properties
The tables in this topic describe the tabs and fields for the XML input formats, which are calledXML and iWay XML Response. iWay XML Response is the commonly defined document formatused in iWay Service Manager data integration services.
Structure tab: Allows you to select an XML, DTD, or XSD (schema) file that represents the datadictionary for the XML input data.
Field Description
Structure Identifies the structure component used for the input dictionary of theTransform component. It is typically represented as an XSD (schema),DTD, or XML file that describes the incoming message.
To locate the file, type the file name, or click the Browse button toopen the following dialog box.
Navigate to the schema reference within the project structure, and clickOK.
You can load a schema from the file system by clicking the Importbutton.
4. iWay Transformer Tasks
iWay Integration Tools Transformer User’s Guide 191
Field Description
ContainsNamespace
Select this check box if the input contains a namespace. This checkbox is not selected by default. For more information, see Working WithNamespaces on page 265.
Data tab: Allows you to select and configure an XML input data file, which contains a sampleincoming document for your Transform component.
Field Description
Data File To locate the file, type the file name, or click the Browse button.
Trim Text Removes all leading and trailing white space characters from the XMLinput data file.
Validation tab: Allows you to specify options that validate the XML input against schemas orDTDs during transformation run time.
Field Description
None To skip validation, select this option. This option is selected bydefault.
Use validation ruledefined in the input data
To perform validation using the dictionary defined in the inputdata, select this option. This option is not selected by default.
Use user-defined DTD orXSD file
To validate the incoming document using an externaldictionary, select this option.
To locate the dictionary component, XSD (schema), or DTD,type the file name, or click the Browse button.
For a dictionary component, we recommend that you useschemas instead of DTDs, because an updated parser isavailable.
Restore Defaults Applies the default values to the Validation tab by selecting theNone option.
Configuring a Transform Component
192 Information Builders
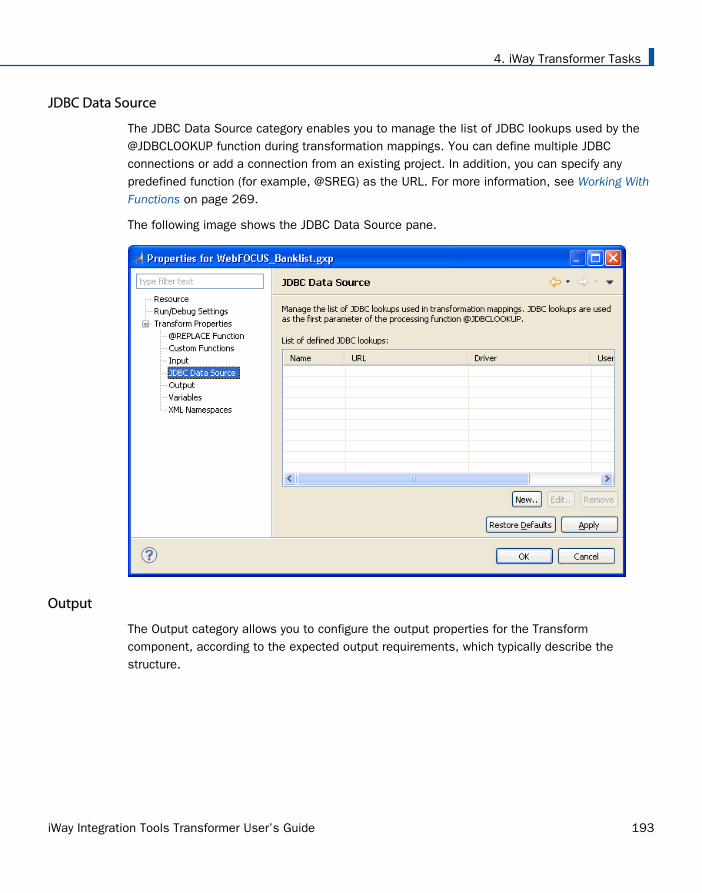
JDBC Data Source
The JDBC Data Source category enables you to manage the list of JDBC lookups used by the@JDBCLOOKUP function during transformation mappings. You can define multiple JDBCconnections or add a connection from an existing project. In addition, you can specify anypredefined function (for example, @SREG) as the URL. For more information, see Working WithFunctions on page 269.
The following image shows the JDBC Data Source pane.
Output
The Output category allows you to configure the output properties for the Transformcomponent, according to the expected output requirements, which typically describe thestructure.
4. iWay Transformer Tasks
iWay Integration Tools Transformer User’s Guide 193
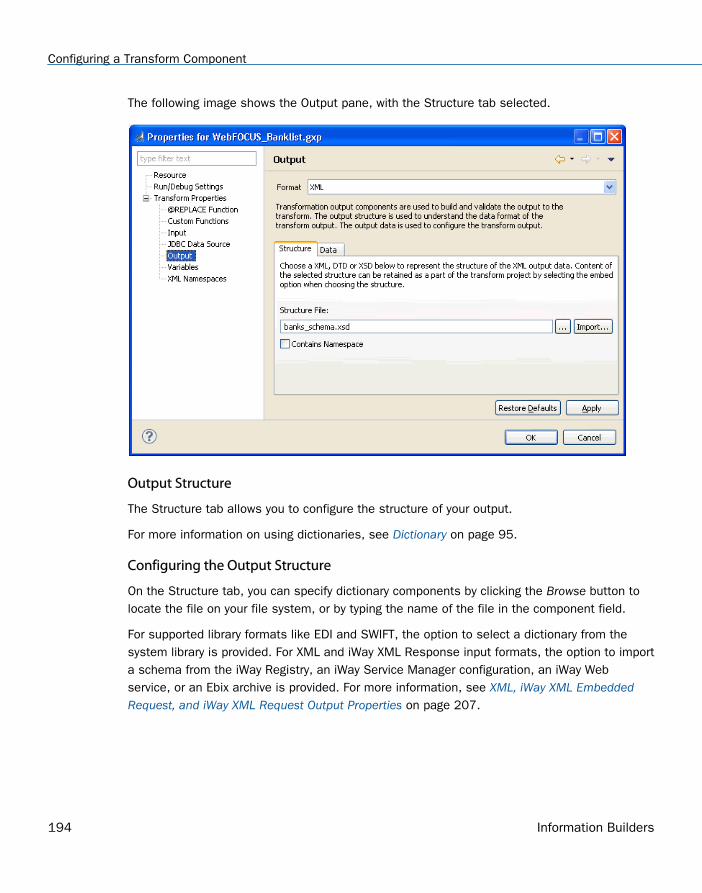
The following image shows the Output pane, with the Structure tab selected.
Output Structure
The Structure tab allows you to configure the structure of your output.
For more information on using dictionaries, see Dictionary on page 95.
Configuring the Output Structure
On the Structure tab, you can specify dictionary components by clicking the Browse button tolocate the file on your file system, or by typing the name of the file in the component field.
For supported library formats like EDI and SWIFT, the option to select a dictionary from thesystem library is provided. For XML and iWay XML Response input formats, the option to importa schema from the iWay Registry, an iWay Service Manager configuration, an iWay Webservice, or an Ebix archive is provided. For more information, see XML, iWay XML EmbeddedRequest, and iWay XML Request Output Properties on page 207.
Configuring a Transform Component
194 Information Builders

The following image shows the Open dialog box that is displayed when you click the Importbutton next to a dictionary component field, for example, Structure.
Viewing the Output Structure
To view the output dictionary, double-click the data file, or right-click the data file and selectOpen from the context menu, as shown in the following image.
4. iWay Transformer Tasks
iWay Integration Tools Transformer User’s Guide 195
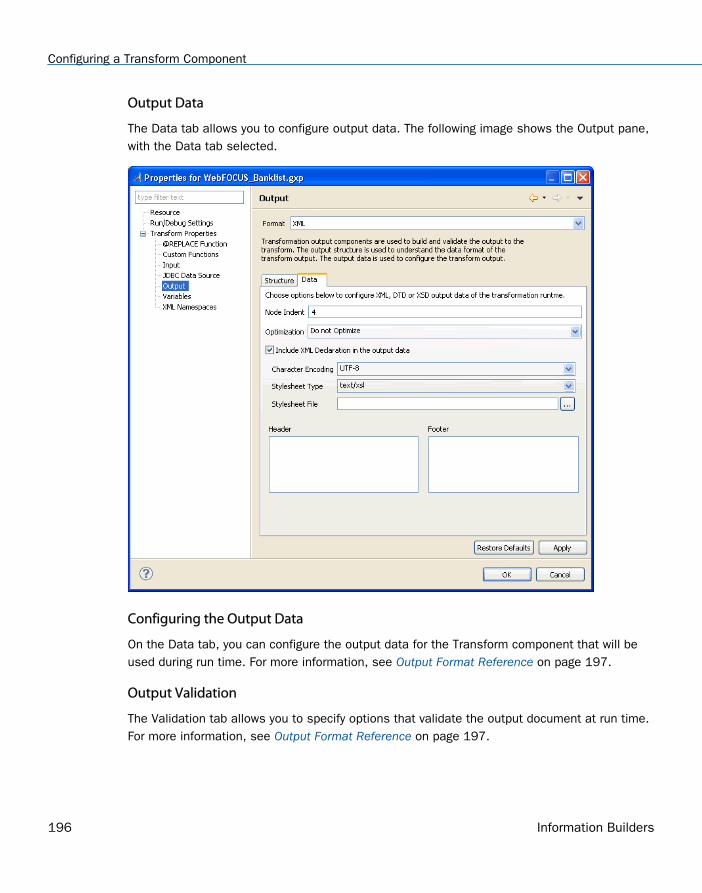
Output Data
The Data tab allows you to configure output data. The following image shows the Output pane,with the Data tab selected.
Configuring the Output Data
On the Data tab, you can configure the output data for the Transform component that will beused during run time. For more information, see Output Format Reference on page 197.
Output Validation
The Validation tab allows you to specify options that validate the output document at run time.For more information, see Output Format Reference on page 197.
Configuring a Transform Component
196 Information Builders
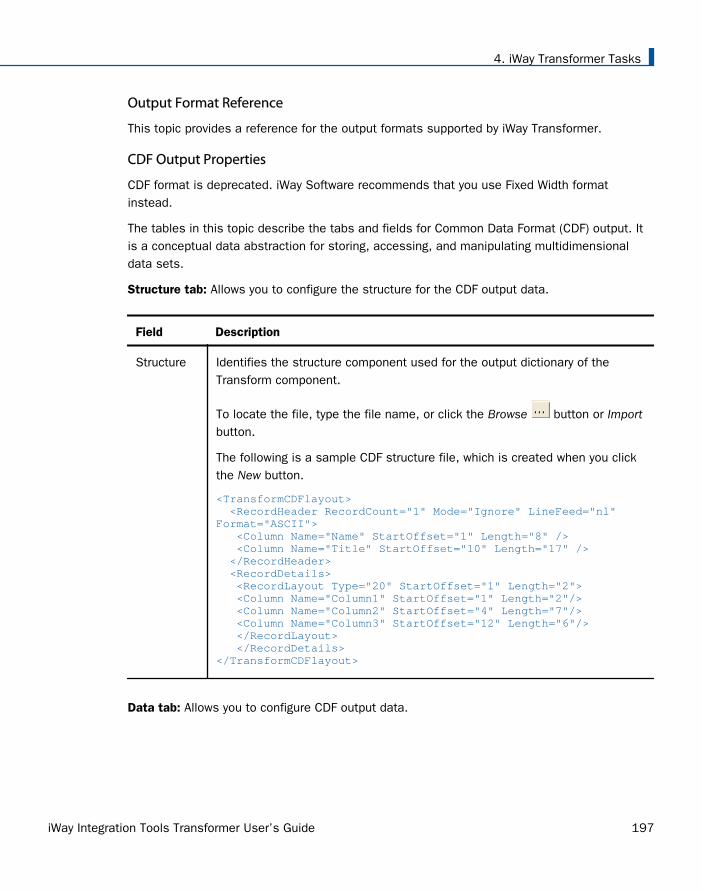
Output Format Reference
This topic provides a reference for the output formats supported by iWay Transformer.
CDF Output Properties
CDF format is deprecated. iWay Software recommends that you use Fixed Width formatinstead.
The tables in this topic describe the tabs and fields for Common Data Format (CDF) output. Itis a conceptual data abstraction for storing, accessing, and manipulating multidimensionaldata sets.
Structure tab: Allows you to configure the structure for the CDF output data.
Field Description
Structure Identifies the structure component used for the output dictionary of theTransform component.
To locate the file, type the file name, or click the Browse button or Importbutton.
The following is a sample CDF structure file, which is created when you clickthe New button.
<TransformCDFlayout> <RecordHeader RecordCount="1" Mode="Ignore" LineFeed="nl" Format="ASCII"> <Column Name="Name" StartOffset="1" Length="8" /> <Column Name="Title" StartOffset="10" Length="17" /> </RecordHeader> <RecordDetails> <RecordLayout Type="20" StartOffset="1" Length="2"> <Column Name="Column1" StartOffset="1" Length="2"/> <Column Name="Column2" StartOffset="4" Length="7"/> <Column Name="Column3" StartOffset="12" Length="6"/> </RecordLayout> </RecordDetails></TransformCDFlayout>
Data tab: Allows you to configure CDF output data.
4. iWay Transformer Tasks
iWay Integration Tools Transformer User’s Guide 197

Field Description
Padding Specifies the character used for padding empty spaces.
If you leave this field blank, iWay Transformer uses a blank space forpadding.
Align Specifies the alignment of the output. Left-justified text (the defaultvalue) is aligned to the left side of each field. Right-justified text isaligned to the right side.
For example, consider the following dictionary file:
<TransformCDFlayout><RecordHeader RecordCount="1" Mode="Ignore" LineFeed="nl" Format="ASCII"> <Column Name="ReportTitle" StartOffset="1" Length="2"/></RecordHeader> <RecordDetails> <RecordLayout Type="NA" StartOffset="1" Length="2"> <Column Name="MSG_ID " StartOffset="1" Length="8"/> <Column Name="ITEM_UNIQUE_ID " StartOffset="9" Length="20"/> <Column Name="ITEM_CASE_NUM " StartOffset="30" Length="18"/> <Column Name="ORIGIN " StartOffset="49" Length="8"/>...
Left-aligned data is displayed as:
ABC 55 777 XXX
Right-aligned data is displayed as:
ABC 55 777 XXX
Encode To encode the data in EBCDIC format, select this check box. By default,this check box is not selected.
Restore Defaults Applies the default values to the Data tab, by clearing the Padding field,selecting Left from the Align field drop-down list, and deselecting theEncode check box.
Configuring a Transform Component
198 Information Builders

CSV Output Properties
The tables in this topic describe the tabs and fields for the Comma-Separated Values (CSV)output format. In a CSV file, each piece of data is separated by a comma. However, iWayTransformer allows for other delimiters. For more information, see the following description ofthe Delimiter field on the Data tab.
Structure tab: Allows you to configure the dictionary for the CSV output data.
Field Description
Structure Identifies the structure component used for the output dictionary ofthe Transform component (optional).
To locate the file, type the file name, or click the Browse button.
Data tab: Allows you to configure CSV output data.
Field Description
Delimiter Sequence of one or more characters specifying the border betweencolumn fields. The default value is a comma (,).
Although CSV stands for comma-separated values, iWay Transformercan process files that use other delimiter characters. The files mustcorrespond to the CSV format.
Header isincluded in thedata
You can select this check box if the header is included in the document.This check box is selected by default. The header typically containscolumn names.
The following excerpt from a sample input.csv file includes a headerwith the data. The header is in the first line.
Country,"Province-Territory Name","Population (in 1000's)","Area Size (in km2)","Type" Canada,"Alberta","3097.5","661185","Province" Canada,"British Columbia","4092.8","948596","Province" . . .
4. iWay Transformer Tasks
iWay Integration Tools Transformer User’s Guide 199

Field Description
Always AddQuotes
To add quotation marks around the output values, select this checkbox. This check box is not selected by default.
Restore Defaults Applies the default values to the Data tab, by setting the Delimiter to acomma (,), selecting the Header is included in the data check box, anddeselecting the Always Add Quotes check box.
EDI Output Properties
The tables in this topic describe the tabs and fields for the Electronic Data Interchange (EDI)output formats, the following of which are created in a similar fashion:
EDI HIPAA (Health Insurance Portability and Accountability Act).
EDI X12. This is a data format based on ASC X12 standards. It is used to exchangespecific data between two or more trading partners.
EDIFACT (Electronic Data Interchange For Administration, Commerce, and Transport).
Structure tab: Allows you to configure the metadata for the EDI output message.
Field Description
Header Identifies the header component used for the output structure of theTransform component. The header contains envelope details thatinclude trading partner information and message layout.
To locate the file, type the file name, or click the Browse button.
Structure Identifies the structure component used for the output dictionary ofthe Transform component. The structure contains the layout andgrammar of the document (or transaction of the EDI message).
To locate the file, type the file name, or click the Browse button.
Data tab: Allows you to configure an EDI output data file.
Configuring a Transform Component
200 Information Builders
Field Description
Segment Delimiter Specifies the character that indicates the end of a segment.
The default values are:
7E ~ Tilde for EDI HIPAA and EDI X12 formats.
None for EDIFACT format.
Segment Suffix Used in combination with a segment delimiter, the segment suffixindicates the end of a segment. You can select a predefinedsegment suffix from the drop-down list.
The default values are:
None for EDI HIPAA and EDI X12 formats.
0A LF Line Feed for EDIFACT format.
Element Delimiter Specifies the character that indicates the end of an element. Youcan select a predefined element delimiter character from the drop-down list.
The default values are:
2A * Asterisk for EDI HIPAA and EDI X12 formats.
2B + Plus for EDIFACT format.
ComponentElement Delimiter
Specifies the character that indicates the end of a componentelement. You can select a predefined component element delimitercharacter from the drop-down list.
By default, 3A : Colon is used for EDI HIPAA, EDI X12, and EDIFACTformats.
4. iWay Transformer Tasks
iWay Integration Tools Transformer User’s Guide 201
Field Description
Escape Character Specifies the escape character that is used when reading the outputdata. You can select a predefined escape character from the drop-down list.
The default values are:
5C \ Backslash for EDI HIPAA and EDI X12 formats.
3F ? Question Mark for EDIFACT format.
Validation tab: Allows you to specify options that validate EDI output of the transformation runtime.
Field Description
None To skip validation, select this option. This option is selected bydefault.
Use validation ruledefined by theproject's outputstructure
To validate the transform using the rule defined by the Transformcomponent output structure, select this option. This option is notselected by default.
For EDI HIPAA and EDI X12, selecting this option activates the IgnoreNTE Segment check box.
Ignore NTESegment
For EDI HIPAA and EDI X12, select this check box if you do not wantto validate mapping rules specific to NTE. This check box is notselected by default.
This option allows NTE segment translations to appear in the XMLdocument in the same sequence as that of the output document.However, if this option is not checked, specific rules can be appliedin the dictionary to position NTE segment translations accordingly.
NTE is a floating segment that can occur in any place within adocument. It is applicable to versions prior to EDI X12 version 4010.
This check box is not available for EDIFACT.
Configuring a Transform Component
202 Information Builders

Field Description
Restore Defaults Applies the default values to the Validation tab by selecting the Noneoption.
Fixed Width Output Properties
The tables in this topic describe the tabs and fields for the Fixed Width output format, alsocalled FWF. Fixed Width files are flat files that contain fixed width data fields that constituterecords. Records are commonly separated by carriage return (new line) characters.
Structure tab: Allows you to select an XML file that represents the data dictionary for the FixedWidth output data. The data dictionary describes the structure of the output message.
Field Description
Structure Identifies the structure component used for the output dictionary of theTransform component.
To locate the file, type the file name, or click the Browse button.
The following is a sample Fixed Width structure file, which is created whenyou click the New button.
<FIXED_WIDTH> <RecordHeader> <Column Name="DESCRIPTION" StartOffset="1" Length="10" /> </RecordHeader> <RecordDetails> <Loop ID="Loop" Req="M" Min="1" Max="1"> <RecordLayout Type="10" StartOffset="1" Length="2"> <Column Name="Column1" StartOffset="3" Length="5" /> <Column Name="Column2" StartOffset="8" Length="5" /> </RecordLayout> </Loop> </RecordDetails></FIXED_WIDTH>
RestoreDefaults
Clears the Structure field.
Data tab: Allows you to configure a Fixed Width output data file.
4. iWay Transformer Tasks
iWay Integration Tools Transformer User’s Guide 203
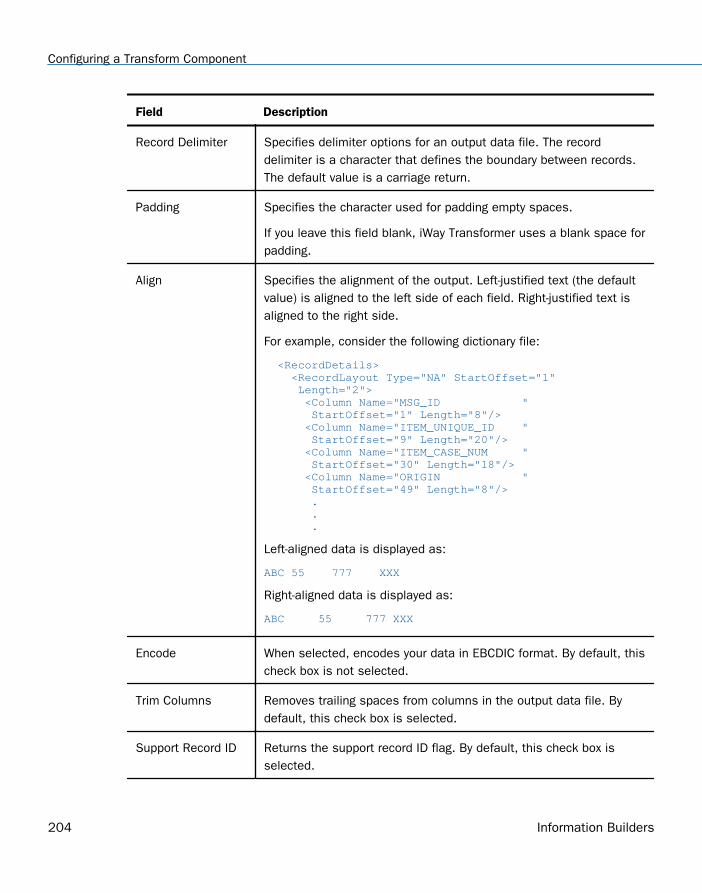
Field Description
Record Delimiter Specifies delimiter options for an output data file. The recorddelimiter is a character that defines the boundary between records.The default value is a carriage return.
Padding Specifies the character used for padding empty spaces.
If you leave this field blank, iWay Transformer uses a blank space forpadding.
Align Specifies the alignment of the output. Left-justified text (the defaultvalue) is aligned to the left side of each field. Right-justified text isaligned to the right side.
For example, consider the following dictionary file:
<RecordDetails> <RecordLayout Type="NA" StartOffset="1" Length="2"> <Column Name="MSG_ID " StartOffset="1" Length="8"/> <Column Name="ITEM_UNIQUE_ID " StartOffset="9" Length="20"/> <Column Name="ITEM_CASE_NUM " StartOffset="30" Length="18"/> <Column Name="ORIGIN " StartOffset="49" Length="8"/> . . .
Left-aligned data is displayed as:
ABC 55 777 XXX
Right-aligned data is displayed as:
ABC 55 777 XXX
Encode When selected, encodes your data in EBCDIC format. By default, thischeck box is not selected.
Trim Columns Removes trailing spaces from columns in the output data file. Bydefault, this check box is selected.
Support Record ID Returns the support record ID flag. By default, this check box isselected.
Configuring a Transform Component
204 Information Builders
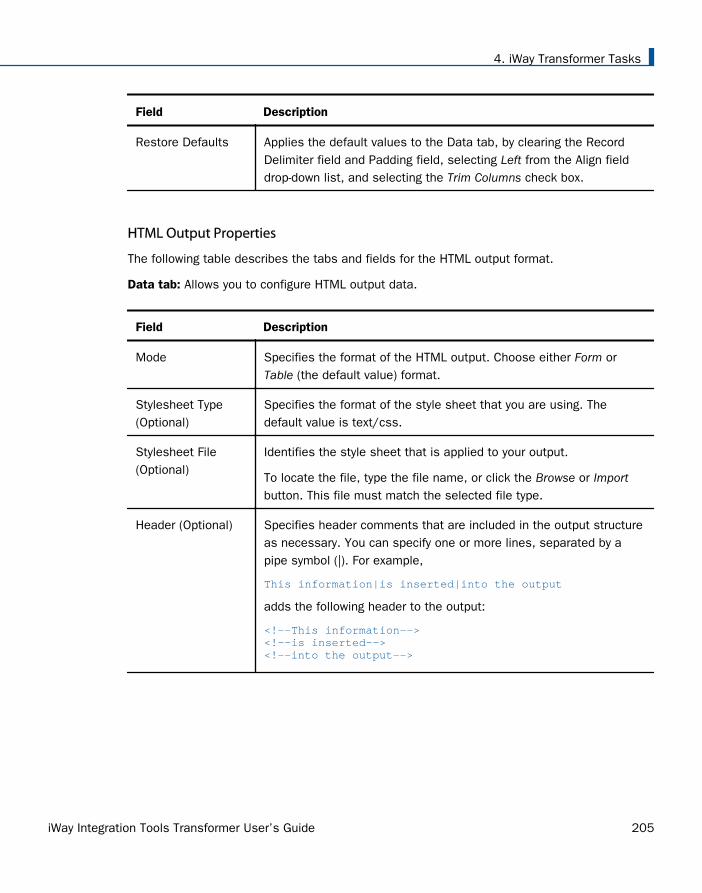
Field Description
Restore Defaults Applies the default values to the Data tab, by clearing the RecordDelimiter field and Padding field, selecting Left from the Align fielddrop-down list, and selecting the Trim Columns check box.
HTML Output Properties
The following table describes the tabs and fields for the HTML output format.
Data tab: Allows you to configure HTML output data.
Field Description
Mode Specifies the format of the HTML output. Choose either Form orTable (the default value) format.
Stylesheet Type(Optional)
Specifies the format of the style sheet that you are using. Thedefault value is text/css.
Stylesheet File(Optional)
Identifies the style sheet that is applied to your output.
To locate the file, type the file name, or click the Browse or Importbutton. This file must match the selected file type.
Header (Optional) Specifies header comments that are included in the output structureas necessary. You can specify one or more lines, separated by apipe symbol (|). For example,
This information|is inserted|into the output
adds the following header to the output:
<!--This information--><!--is inserted--><!--into the output-->
4. iWay Transformer Tasks
iWay Integration Tools Transformer User’s Guide 205
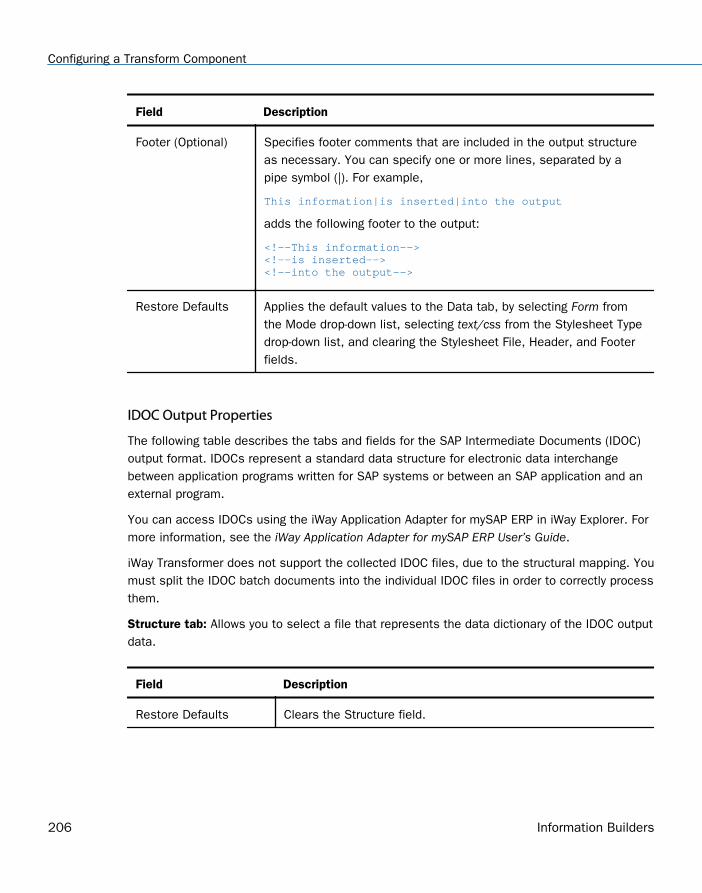
Field Description
Footer (Optional) Specifies footer comments that are included in the output structureas necessary. You can specify one or more lines, separated by apipe symbol (|). For example,
This information|is inserted|into the output
adds the following footer to the output:
<!--This information--><!--is inserted--><!--into the output-->
Restore Defaults Applies the default values to the Data tab, by selecting Form fromthe Mode drop-down list, selecting text/css from the Stylesheet Typedrop-down list, and clearing the Stylesheet File, Header, and Footerfields.
IDOC Output Properties
The following table describes the tabs and fields for the SAP Intermediate Documents (IDOC)output format. IDOCs represent a standard data structure for electronic data interchangebetween application programs written for SAP systems or between an SAP application and anexternal program.
You can access IDOCs using the iWay Application Adapter for mySAP ERP in iWay Explorer. Formore information, see the iWay Application Adapter for mySAP ERP User’s Guide.
iWay Transformer does not support the collected IDOC files, due to the structural mapping. Youmust split the IDOC batch documents into the individual IDOC files in order to correctly processthem.
Structure tab: Allows you to select a file that represents the data dictionary of the IDOC outputdata.
Field Description
Restore Defaults Clears the Structure field.
Configuring a Transform Component
206 Information Builders

SWIFT Output Properties
The following table describes the tabs and fields for the Society for Worldwide InterbankFinancial Telecommunication (SWIFT) output format. SWIFT is a messaging and transactionprocessing format used by worldwide financial organizations.
Structure tab: Allows you to select a data dictionary that represents the SWIFT output data.
Field Description
Structure Identifies the structure component used for the output dictionary ofthe Transform component.
To locate the file, type the file name, or click the Browse button.
Import Dictionaryfrom System Library
Allows you to add a data dictionary from a system library.
XML, iWay XML Embedded Request, and iWay XML Request Output Properties
The tables in this topic describe the tabs and fields for the XML, iWay XML EmbeddedRequest, and iWay XML Request output formats.
Structure tab: Allows you to select an XML, DTD, or XSD (schema) file that represents the datadictionary for the XML output data.
4. iWay Transformer Tasks
iWay Integration Tools Transformer User’s Guide 207
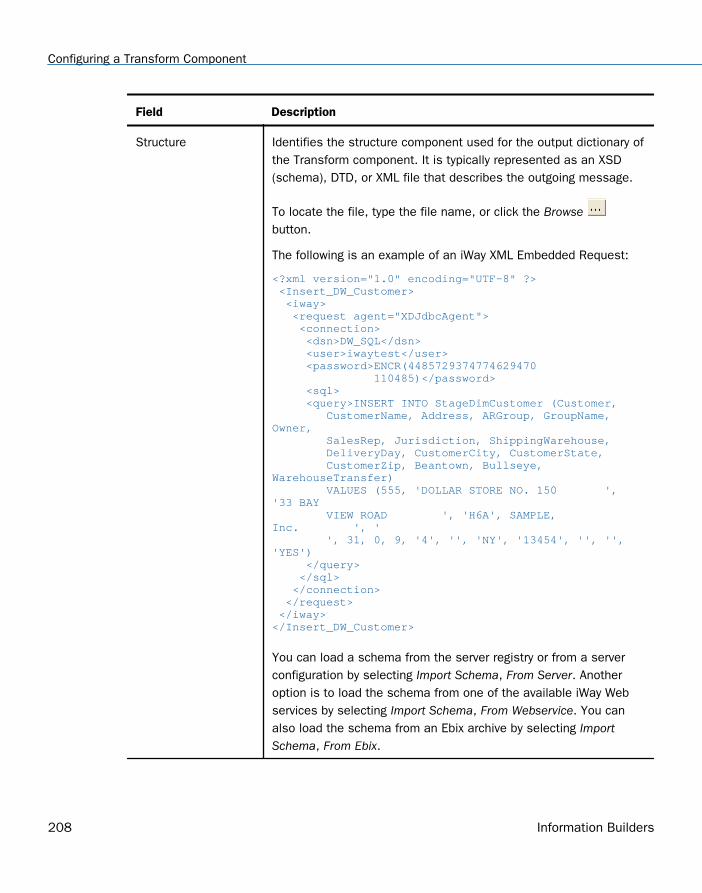
Field Description
Structure Identifies the structure component used for the output dictionary ofthe Transform component. It is typically represented as an XSD(schema), DTD, or XML file that describes the outgoing message.
To locate the file, type the file name, or click the Browse button.
The following is an example of an iWay XML Embedded Request:
<?xml version="1.0" encoding="UTF-8" ?> <Insert_DW_Customer> <iway> <request agent="XDJdbcAgent"> <connection> <dsn>DW_SQL</dsn> <user>iwaytest</user> <password>ENCR(4485729374774629470 110485)</password> <sql> <query>INSERT INTO StageDimCustomer (Customer, CustomerName, Address, ARGroup, GroupName, Owner, SalesRep, Jurisdiction, ShippingWarehouse, DeliveryDay, CustomerCity, CustomerState, CustomerZip, Beantown, Bullseye, WarehouseTransfer) VALUES (555, 'DOLLAR STORE NO. 150 ', '33 BAY VIEW ROAD ', 'H6A', SAMPLE, Inc. ', ' ', 31, 0, 9, '4', '', 'NY', '13454', '', '', 'YES') </query> </sql> </connection> </request> </iway></Insert_DW_Customer>
You can load a schema from the server registry or from a serverconfiguration by selecting Import Schema, From Server. Anotheroption is to load the schema from one of the available iWay Webservices by selecting Import Schema, From Webservice. You canalso load the schema from an Ebix archive by selecting ImportSchema, From Ebix.
Configuring a Transform Component
208 Information Builders
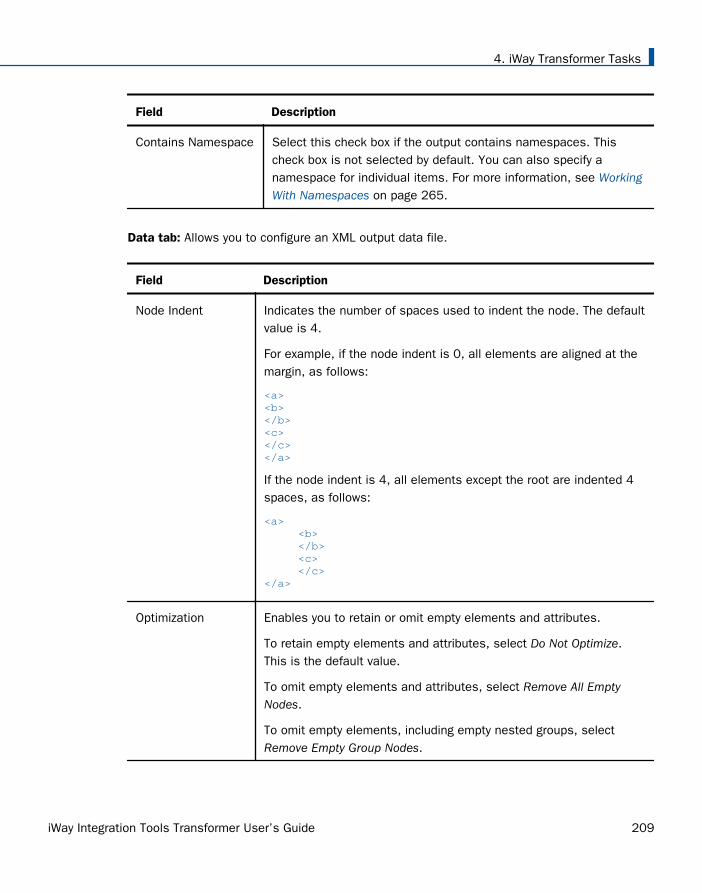
Field Description
Contains Namespace Select this check box if the output contains namespaces. Thischeck box is not selected by default. You can also specify anamespace for individual items. For more information, see WorkingWith Namespaces on page 265.
Data tab: Allows you to configure an XML output data file.
Field Description
Node Indent Indicates the number of spaces used to indent the node. The defaultvalue is 4.
For example, if the node indent is 0, all elements are aligned at themargin, as follows:
<a><b></b><c></c></a>
If the node indent is 4, all elements except the root are indented 4spaces, as follows:
<a> <b> </b> <c> </c></a>
Optimization Enables you to retain or omit empty elements and attributes.
To retain empty elements and attributes, select Do Not Optimize.This is the default value.
To omit empty elements and attributes, select Remove All EmptyNodes.
To omit empty elements, including empty nested groups, selectRemove Empty Group Nodes.
4. iWay Transformer Tasks
iWay Integration Tools Transformer User’s Guide 209
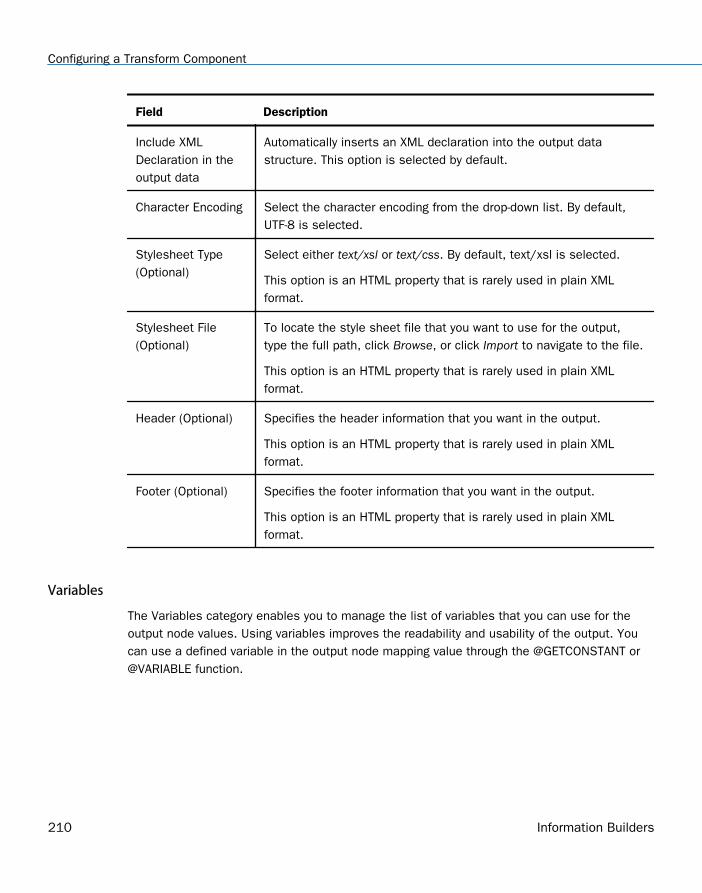
Field Description
Include XMLDeclaration in theoutput data
Automatically inserts an XML declaration into the output datastructure. This option is selected by default.
Character Encoding Select the character encoding from the drop-down list. By default,UTF-8 is selected.
Stylesheet Type(Optional)
Select either text/xsl or text/css. By default, text/xsl is selected.
This option is an HTML property that is rarely used in plain XMLformat.
Stylesheet File(Optional)
To locate the style sheet file that you want to use for the output,type the full path, click Browse, or click Import to navigate to the file.
This option is an HTML property that is rarely used in plain XMLformat.
Header (Optional) Specifies the header information that you want in the output.
This option is an HTML property that is rarely used in plain XMLformat.
Footer (Optional) Specifies the footer information that you want in the output.
This option is an HTML property that is rarely used in plain XMLformat.
Variables
The Variables category enables you to manage the list of variables that you can use for theoutput node values. Using variables improves the readability and usability of the output. Youcan use a defined variable in the output node mapping value through the @GETCONSTANT or@VARIABLE function.
Configuring a Transform Component
210 Information Builders
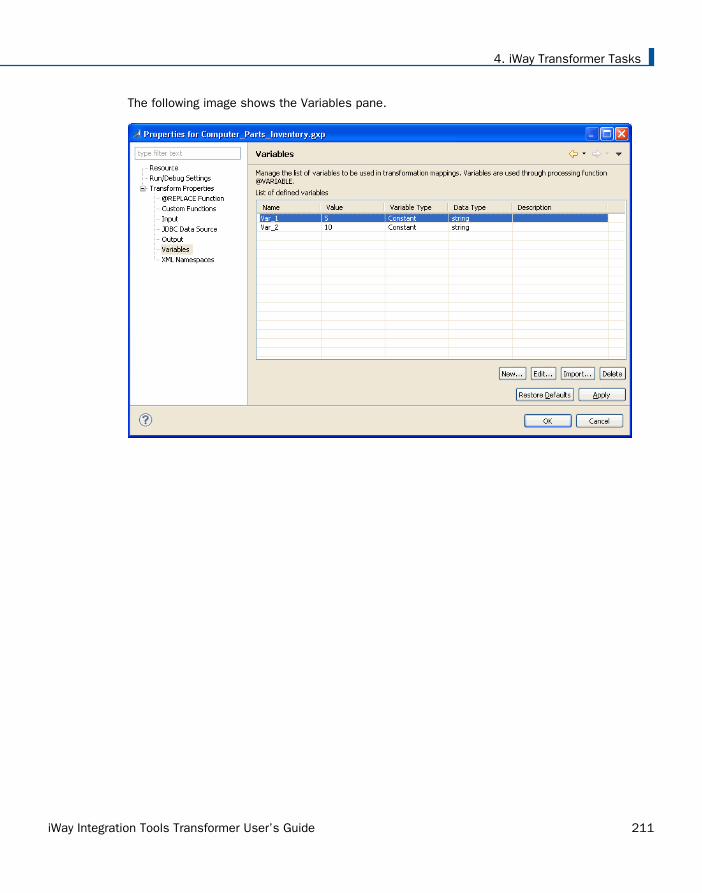
The following image shows the Variables pane.
4. iWay Transformer Tasks
iWay Integration Tools Transformer User’s Guide 211

The Variables category is not upward compatible. Transform components with defined variablesdo not function properly in earlier versions of iWay Transformer. Projects must use globalconstants in earlier versions of iWay Transformer, as shown in the following image.
Variable is a new mapping value type. It represents an intermediate value used globally duringthe life of a transformation. You can define two types of variables, dynamic and constant:
The value of a dynamic variable can change during the course of a transformation (runtime). As a result, a dynamic variable is an ideal candidate for supporting elements of thetransformation, such as loop counters or global data storage. The use of variables is muchless resource-expensive, and more efficient, than that of Special Registers (SREGs).Consequently, we recommend that you use variables for any values that you do not need tomake available after the execution of the transformation.
Constant variables (formerly known as global constants) represent a subset of the scope ofa variable. As a result, you can now define a constant value as a variable of type constant.This feature is backward compatible with the implementation of global constants fromprevious releases of iWay Transformer.
You must define the following parameters for a new variable:
Name. The name of the variable.
Value. The value of the variable.
Configuring a Transform Component
212 Information Builders

Variable Type. The type of the variable, Dynamic or Constant.
Data Type. The data type for the value of the variable. For example, the data type for acounter is Number.
Description (optional). A brief description of the variable and its functionality according toyour design.
The following image shows the Add New Variable dialog box.
After you define and initialize the variable in the Variables category, you can use it within theworkspace of a project. The full list of available variables is added to the type of nodes to add,under the Variable option on the context menu of the mapping workspace. That way, it can beadded within your output mappings and assigned values.
4. iWay Transformer Tasks
iWay Integration Tools Transformer User’s Guide 213

The following image shows the Variable option on the context menu.
You can also import variables from other Transform components. Variables in the iWayTransformer workspace are identified by the dollar sign ($) icon.
You can use two predefined processing functions in iWay Transformer to manipulate variables.They support two different signatures, depending on the action (ADD, GET, or SET) that needsto be performed over the referenced variable:
@VARIABLE(name, action, value). Returns the value of the specified variable.
@VARIABLE(name, action). Returns the action of the specified variable.
The following table describes the arguments for each function.
Configuring a Transform Component
214 Information Builders
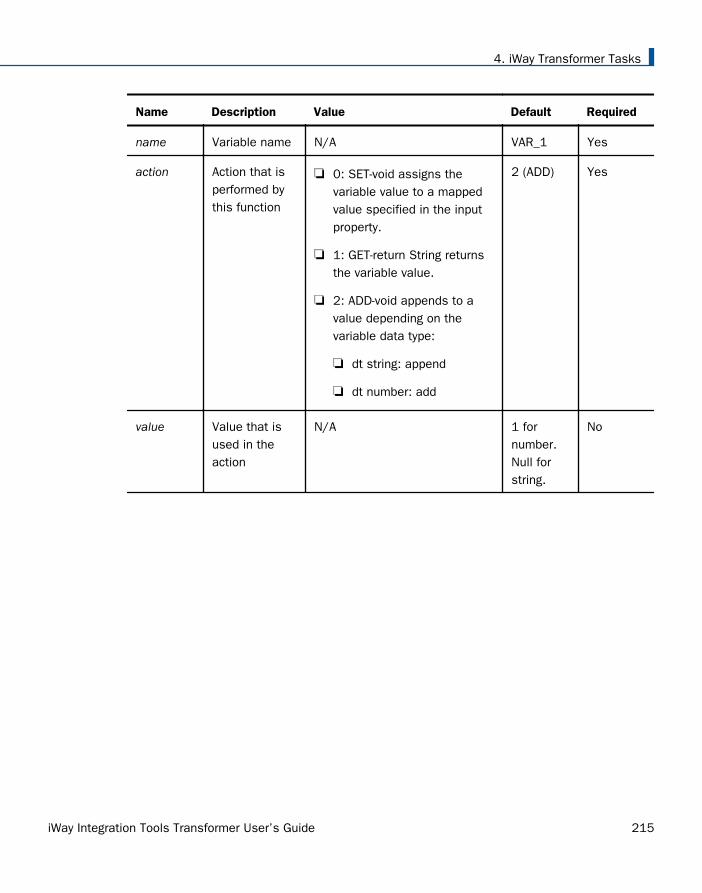
Name Description Value Default Required
name Variable name N/A VAR_1 Yes
action Action that isperformed bythis function
0: SET-void assigns thevariable value to a mappedvalue specified in the inputproperty.
1: GET-return String returnsthe variable value.
2: ADD-void appends to avalue depending on thevariable data type:
dt string: append
dt number: add
2 (ADD) Yes
value Value that isused in theaction
N/A 1 fornumber.Null forstring.
No
4. iWay Transformer Tasks
iWay Integration Tools Transformer User’s Guide 215
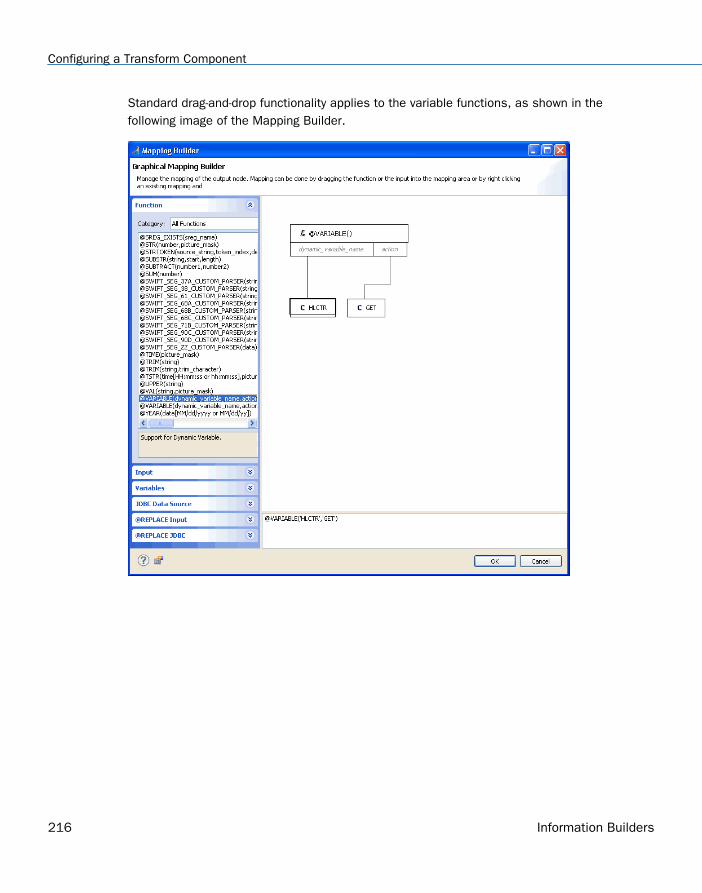
Standard drag-and-drop functionality applies to the variable functions, as shown in thefollowing image of the Mapping Builder.
Configuring a Transform Component
216 Information Builders
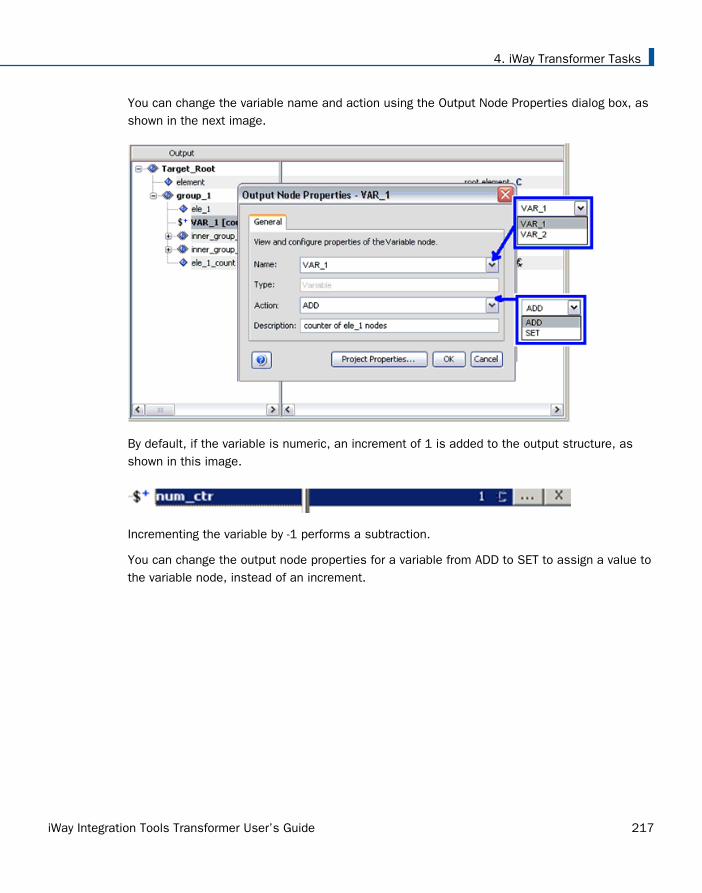
You can change the variable name and action using the Output Node Properties dialog box, asshown in the next image.
By default, if the variable is numeric, an increment of 1 is added to the output structure, asshown in this image.
Incrementing the variable by -1 performs a subtraction.
You can change the output node properties for a variable from ADD to SET to assign a value tothe variable node, instead of an increment.
4. iWay Transformer Tasks
iWay Integration Tools Transformer User’s Guide 217
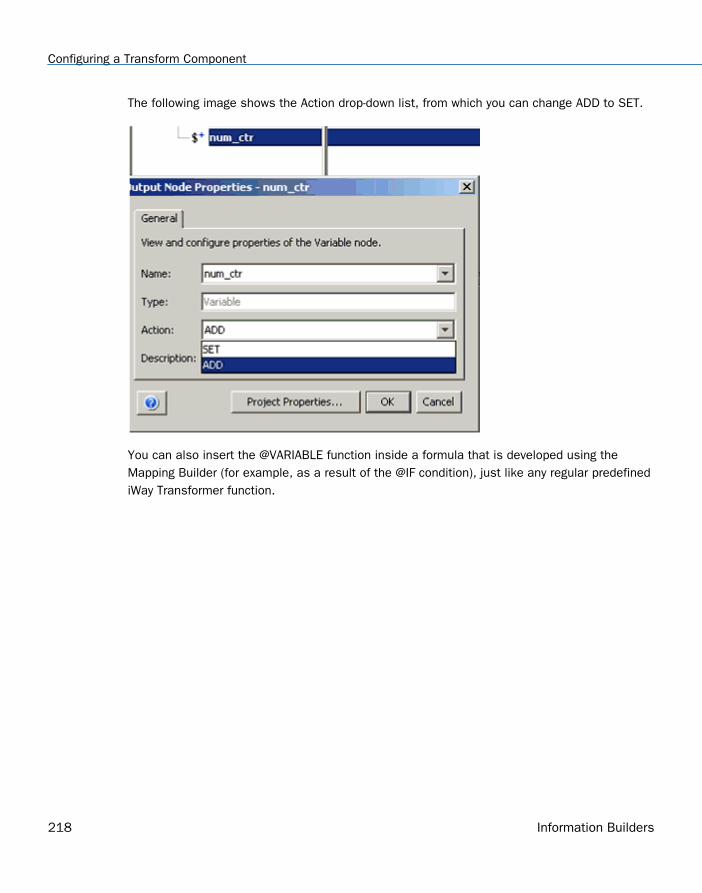
The following image shows the Action drop-down list, from which you can change ADD to SET.
You can also insert the @VARIABLE function inside a formula that is developed using theMapping Builder (for example, as a result of the @IF condition), just like any regular predefinediWay Transformer function.
Configuring a Transform Component
218 Information Builders
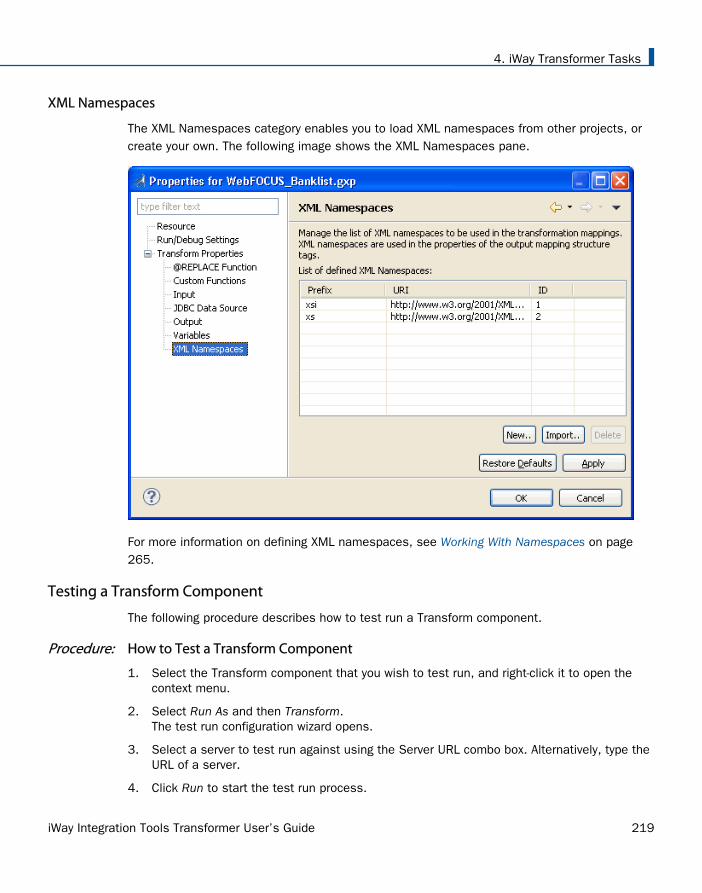
XML Namespaces
The XML Namespaces category enables you to load XML namespaces from other projects, orcreate your own. The following image shows the XML Namespaces pane.
For more information on defining XML namespaces, see Working With Namespaces on page265.
Testing a Transform Component
The following procedure describes how to test run a Transform component.
Procedure: How to Test a Transform Component
1. Select the Transform component that you wish to test run, and right-click it to open thecontext menu.
2. Select Run As and then Transform.The test run configuration wizard opens.
3. Select a server to test run against using the Server URL combo box. Alternatively, type theURL of a server.
4. Click Run to start the test run process.
4. iWay Transformer Tasks
iWay Integration Tools Transformer User’s Guide 219
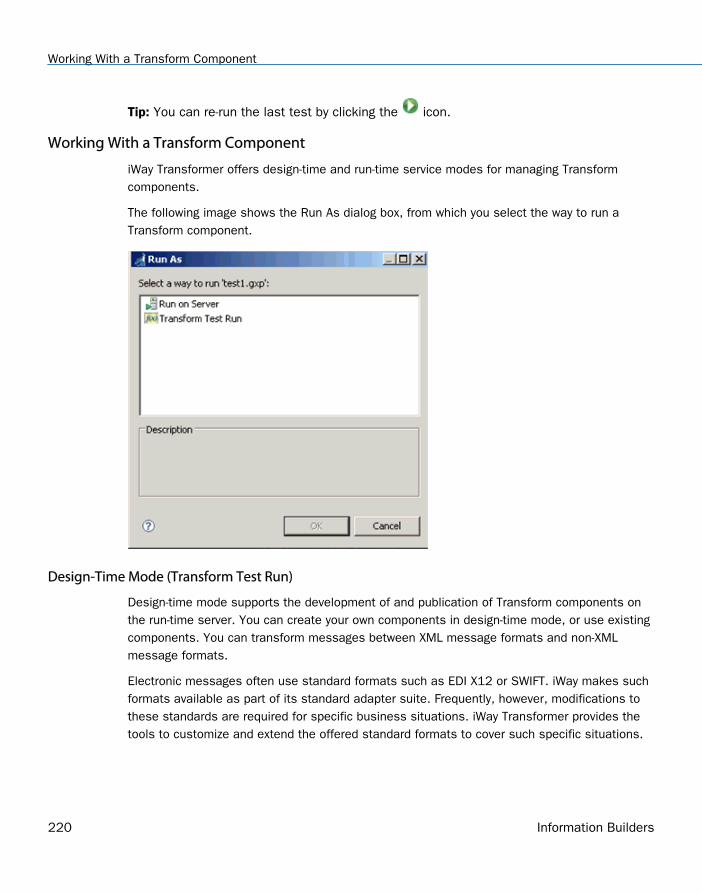
Tip: You can re-run the last test by clicking the icon.
Working With a Transform Component
iWay Transformer offers design-time and run-time service modes for managing Transformcomponents.
The following image shows the Run As dialog box, from which you select the way to run aTransform component.
Design-Time Mode (Transform Test Run)
Design-time mode supports the development of and publication of Transform components onthe run-time server. You can create your own components in design-time mode, or use existingcomponents. You can transform messages between XML message formats and non-XMLmessage formats.
Electronic messages often use standard formats such as EDI X12 or SWIFT. iWay makes suchformats available as part of its standard adapter suite. Frequently, however, modifications tothese standards are required for specific business situations. iWay Transformer provides thetools to customize and extend the offered standard formats to cover such specific situations.
Working With a Transform Component
220 Information Builders
Once you have defined a Transform component, the design-time tool enables you to test it andvalidate it against test profiles. Once you have validated the Transform component, you canpublish it to one or more run-time servers.
Ensure that the iWay home folder is set in Preferences.
Run-Time Mode (Run on Server)
Run-time mode uses a published Transform component as an integral part of iWay ServiceManager. You can also use this component at various points within a message processing lifecycle, as required.
Opening a Transform Component
You can import a Transform component from your local drive, or an iWay server. Once aTransform component is part of your Integration Project, open it by double-clicking its name, orselecting Open from the context menu.
Saving a Transform Component
You can export a Transform component from your Integration Project to your file system orother destination.
4. iWay Transformer Tasks
iWay Integration Tools Transformer User’s Guide 221
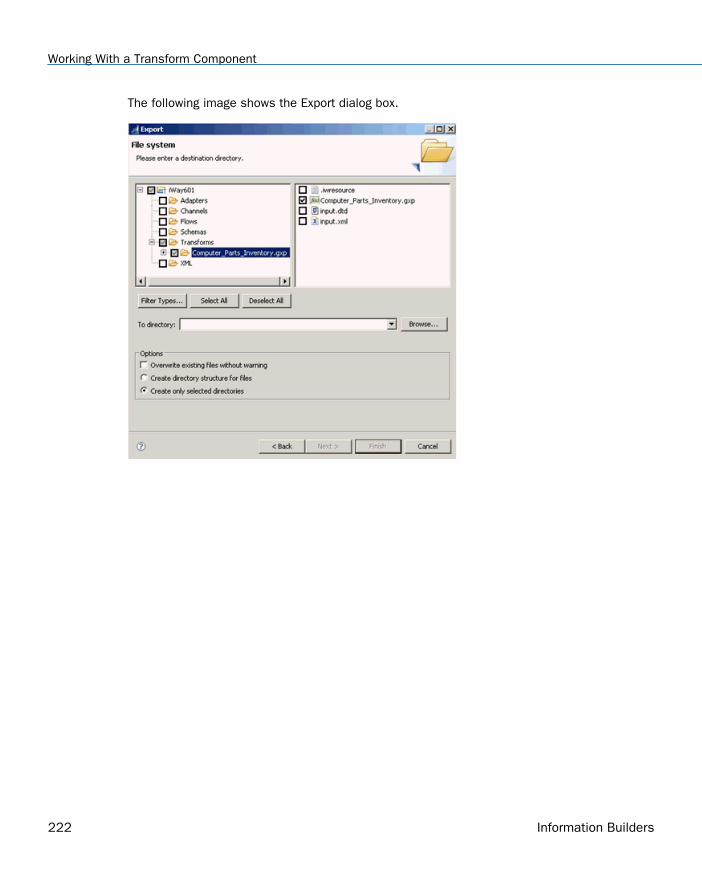
The following image shows the Export dialog box.
Working With a Transform Component
222 Information Builders
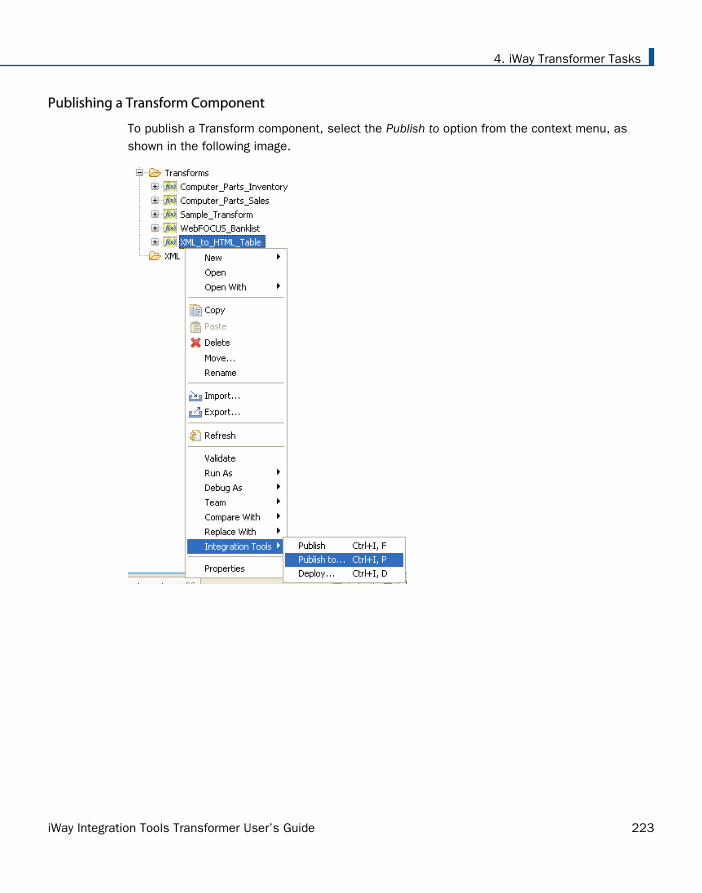
Publishing a Transform Component
To publish a Transform component, select the Publish to option from the context menu, asshown in the following image.
4. iWay Transformer Tasks
iWay Integration Tools Transformer User’s Guide 223
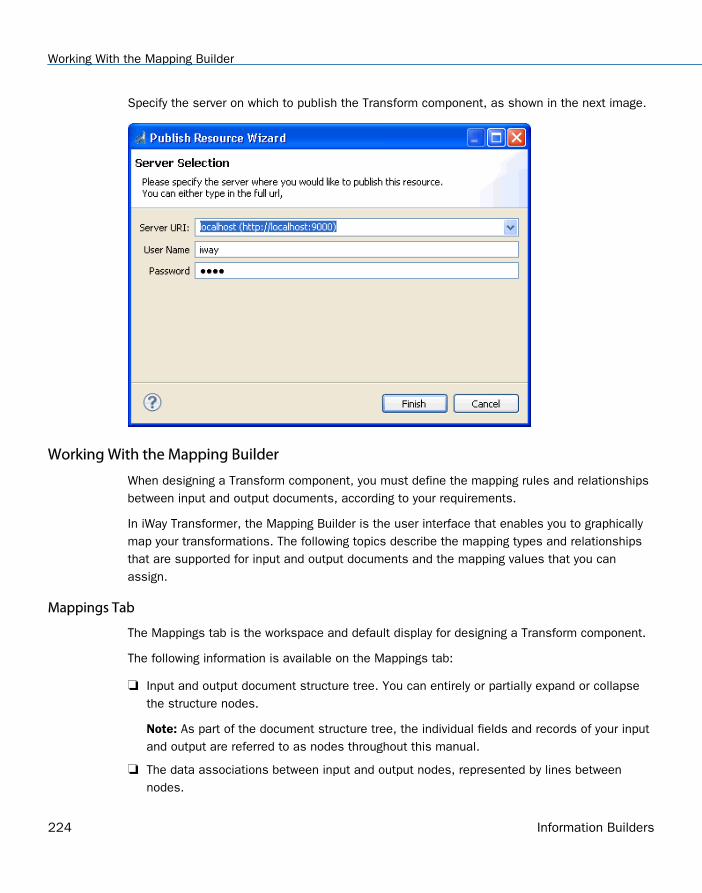
Specify the server on which to publish the Transform component, as shown in the next image.
Working With the Mapping Builder
When designing a Transform component, you must define the mapping rules and relationshipsbetween input and output documents, according to your requirements.
In iWay Transformer, the Mapping Builder is the user interface that enables you to graphicallymap your transformations. The following topics describe the mapping types and relationshipsthat are supported for input and output documents and the mapping values that you canassign.
Mappings Tab
The Mappings tab is the workspace and default display for designing a Transform component.
The following information is available on the Mappings tab:
Input and output document structure tree. You can entirely or partially expand or collapsethe structure nodes.
Note: As part of the document structure tree, the individual fields and records of your inputand output are referred to as nodes throughout this manual.
The data associations between input and output nodes, represented by lines betweennodes.
Working With the Mapping Builder
224 Information Builders
If you do not want to display the mapping lines, click the Hide Mappings button to disablethis option.
Details of a particular structure node.
You can right-click the node and select Properties.
The Mappings tab includes the following panes, which systematically display mapping-relatedinformation:
Input. This pane is displayed on the left. It contains the visual representation of thedocument tree of the structure of the input data (incoming document). The input structureis read only on the Mappings tab.
Output. This pane is displayed to the right of the Input pane. It is your workspace fordesigning the structural layout of the output document, building its visual representationand specifying its properties.
When working with structures, you can perform the following tasks:
Load and configure input or output structure nodes. Input configuration is limited.
For more information on loading the input and output documents, see Configuring aTransform Component on page 164.
Drag and drop nodes from the Input pane to the Output pane in order to copy parts of theinput document tree to the output.
Add or delete a structure node.
The following menus let you easily perform various mapping-related tasks:
The Input Node menu provides the available options for manipulating the nodes in the inputstructure, which is displayed in the Input pane. For more information, see Input NodeWorkspace Menu on page 226.
The Output Node menu provides the available options for manipulating the nodes in theoutput structure, which is displayed in the Output pane. For more information, see OutputNode Workspace Menu on page 228.
The Mapping Values menu provides the available options for assigning values to the nodesin the output structure, which is displayed in the Mapping pane. For more information, see Mapping Values on page 256.
4. iWay Transformer Tasks
iWay Integration Tools Transformer User’s Guide 225

Input Node Workspace Menu
Right-click an input node in the workspace to display the menu options that are available forthe nodes in the Input pane. You can expand or collapse various nodes within the structuretree, copy a node, and show or hide mappings between input and output nodes.
The following image shows the options available on the Input Node menu.
The following table describes the Input Node menu options.
Option Description
Copy Copies the selected input node and enables you to paste it in the output.
Working With the Mapping Builder
226 Information Builders
Option Description
ReloadSchema
Reloads the schema for the Input or Output structure pane.
Search Opens the Search dialog box, enabling you to search for text or to search forand map input and output nodes.
HideMappings
Toggles between showing and hiding the mapping lines between the inputand output structures.
Properties Displays the properties of the selected input node.
4. iWay Transformer Tasks
iWay Integration Tools Transformer User’s Guide 227
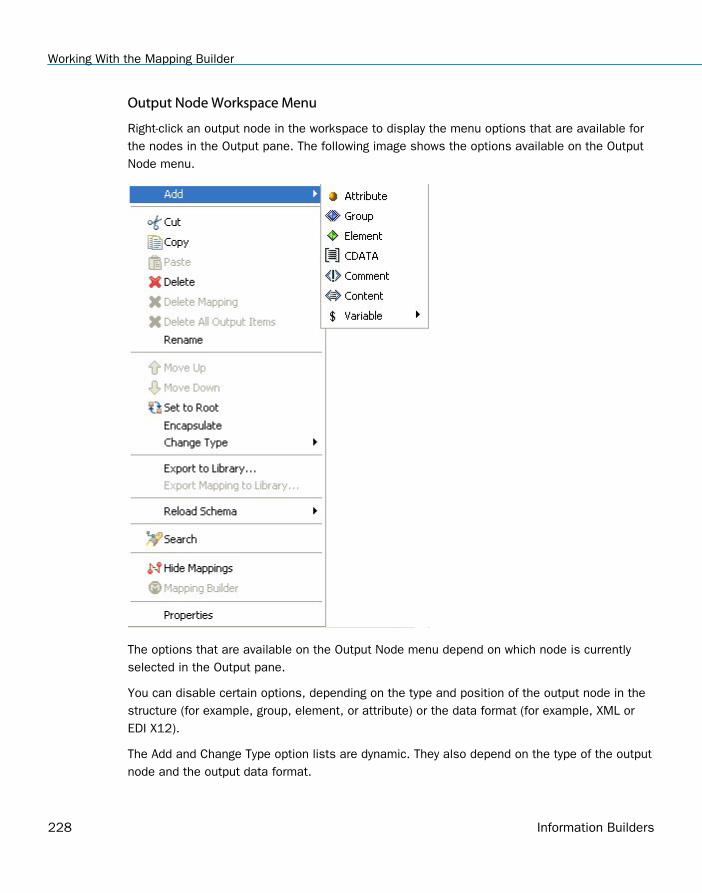
Output Node Workspace Menu
Right-click an output node in the workspace to display the menu options that are available forthe nodes in the Output pane. The following image shows the options available on the OutputNode menu.
The options that are available on the Output Node menu depend on which node is currentlyselected in the Output pane.
You can disable certain options, depending on the type and position of the output node in thestructure (for example, group, element, or attribute) or the data format (for example, XML orEDI X12).
The Add and Change Type option lists are dynamic. They also depend on the type of the outputnode and the output data format.
Working With the Mapping Builder
228 Information Builders
The following table describes the options available on the Output Node menu.
Option Description
Add Enables you to alter the existing output structure by inserting a newstructure node of a specific type. The following types of structure nodesare supported:
Attribute (for XML format only)
Group
Element
CDATA (for XML format only)
Comment (for XML format only)
Content (for XML format only)
Variable
iWay XML Request
(Available only when the output type is iWay XML Request.)
iWay Embedded XML Request
(Available only when the output type is iWay Embedded XML Request.)
Refer to the Add submenu of a particular node for the list of enabled nodetypes that you are permitted to add. The values of the available nodetypes are enabled or disabled according to the mapping rules for theoutput data format. For example, if the XML data format is used, the onlyavailable types of nodes that you can add to an element type of node is anattribute node or a CDATA node.
Cut Cuts the selected output node, making it available for the paste outputoperation.
Copy Copies the selected node to a location that you determine.
Paste Pastes the cut or copied node.
Delete Removes a node from the Output structure. A confirmation dialog box isdisplayed for this option.
4. iWay Transformer Tasks
iWay Integration Tools Transformer User’s Guide 229
Option Description
DeleteMapping
Deletes the selected mapping.
Delete AllOutput Items
Deletes all output items.
Rename Renames the selected output structure node. This option is also availableif you double-click the name of the node.
Move Up Moves the selected node up the output structure tree, under the sameparent node.
Move Down Moves the selected node down the output structure tree, under the sameparent node.
Set to Root Enables you to represent the root of the document structure tree. Thisoption is not available for record-based data formats, such as CSV. Thisoption is available only for the nodes of type Group, because this is theonly type of node that is permitted to perform the root functionality.
Encapsulate Creates an invisible parent group wrapped around the output node thatyou choose to encapsulate. The encapsulating feature is useful when youare resolving complex looping or mapping issues. For an example, explorethe WebFOCUS_Banklist sample transform project that is packaged withiWay Transformer.
Change Type Changes the type of the node to one of the following:
Attribute
Group
Element
CDATA
Comment
Content
For more information, see Output Structure on page 235.
Working With the Mapping Builder
230 Information Builders

Option Description
Export toLibrary
Exports the selected component to the library.
ExportMapping toLibrary
Exports the selected mapping to the library.
ReloadSchema
Reloads the schema for the Input or Output structure pane.
Search Opens the Search dialog box, enabling you to search for text or to searchfor and map input and output nodes.
HideMappings
Toggles between showing and hiding the mapping lines between the inputand output nodes. The mappings signify the relationships between theinput and output nodes, where the particular input value is used toconstruct the value of the output node.
MappingBuilder
Opens the Mapping Builder window, which enables you to modify themapping value by changing the input node that it maps to. Alternatively,you can add a function, constant, or expression to the existing mapping.
For more information on how to use the Mapping Builder, see Working WithFunctions on page 269.
Properties Displays the Properties tab, which shows the layout and structuralinformation pertaining to the selected output node. For more information,see Group Properties on page 241.
Input Structure
The input structure contains the input, which represents the groups, elements, and attributesencoded in the input document. Each node in this tree has exactly one parent, and can havemore than one child.
The following table describes the various components provided in iWay Transformer torepresent input nodes. Definitions of basic terms commonly used for nodes within an inputdocument tree are also provided.
4. iWay Transformer Tasks
iWay Integration Tools Transformer User’s Guide 231

Input Document
The incoming document or message to which transformations apply. The following formatsare supported:
CSV. For more information, see CSV Input Properties on page 183.
EDI HIPAA. For more information, see EDI Input Properties on page 184.
EDI X12. For more information, see EDI Input Properties on page 184.
EDIFACT. For more information, see EDI Input Properties on page 184.
Fixed Width. For more information, see Fixed Width Input Properties on page 187.
IDOC. For more information, see IDOC Input Properties on page 189.
SWIFT. For more information, see SWIFT Input Properties on page 190.
XML. For more information, see XML and iWay XML Response Input Properties on page191.
iWay XML Response. For more information, see XML and iWay XML Response InputProperties on page 191.
CDF. For more information, see CDF Input Properties on page 182. Note: CDF format isdeprecated. iWay Software recommends that you use Fixed Width format instead.
The input document is displayed on the input pane as a visual representation of the inputdocument tree. It maintains a logical order of component nodes, such as groups orelements, in relation to the underlying document, wrapping the nodes that are containedwithin other nodes. For more information, see the Input Document Tree Example thatfollows. Each input node contains a name that identifies the type of the node, optionally anumber of attributes, or content.
Group
Block of data that has a group element as its root. It can contain other groups or elementsnested within, as children. Multiple groups can also exist on the same level. A group wasformerly called a parent.
iWay Transformer does not support mixed content group nodes containing data values.However, the group node for XML and HTML data formats can have any number of attributenodes inside, if applicable.
Working With the Mapping Builder
232 Information Builders

Element
Usually belongs to the group as a leaf, which cannot have any other nested groups orelements. It typically stores a data value. In XML and HTML data formats, it can containattribute nodes or CDATA.
Attribute
Value associated with a group or element, consisting of a name, and an associated textualvalue. Attributes are used for XML and HTML data formats only. Each group or element canhave zero to many attributes.
4. iWay Transformer Tasks
iWay Integration Tools Transformer User’s Guide 233

Example of Input Document Tree
Sample document tree of groups, elements, and attributes encoded in the input message.Each node in this tree has exactly one parent, and may have more than one child.
The following is a section of an XML input document:
The following is a tree structure representation of the preceding XML:
In iWay Transformer, the resulting input document tree is as follows:
You can collapse or expand the document tree from the given node to its deepestdescendant. iWay Transformer supports a set of different relationships that link nodestogether.
The common types of document tree relationships are described in the following table.
Working With the Mapping Builder
234 Information Builders

Parent
The input can have more than one parent (root group). Parent is a group in relation to theelements or groups contained within it. In the preceding example, the group, Company, is aparent of two elements, Year and Quarter.
Child
Node A is called the child of node B, if and only if B is the parent of A. In the precedingexample, the element Year is a child of the Company group.
Descendant
Node A is called a descendant of node B, if either (1) A is a child of B, or (2) A is the childof node C, which is a descendant of B.
Ancestor
Node A is called an ancestor of node B, if and only if B is a descendant of A.
Sibling
Node A is called a sibling of node B, if and only if B and A share the same parent. Node A isa preceding sibling if it comes before B in the input document tree. Node B is a followingsibling if it comes after A in the input document tree.
Output Structure
The output structure contains the output document tree, which represents the completedstructure of groups, elements, and other supported node types, such as attributes or CDATA,encoded in the output document.
Each node in this tree has exactly one parent group. It can have one or more sibling nodes,unless it is the root node in the tree, which has to be unique according to the mapping rules iniWay Transformer. You can adjust the properties of the given node, such as visibility ornamespace, to affect its appearance in the actual output document.
This topic examines the output document tree in the XML to HTML table example, which isincluded as a sample Transform component.
4. iWay Transformer Tasks
iWay Integration Tools Transformer User’s Guide 235

The output structure is represented as follows:
In iWay Transformer, the output document tree is visualized as follows in the Output pane ofthe Mappings tab:
Mapping Types
The output document tree or hierarchy provides a graphical representation of how the outputdata will be organized. The output hierarchy defines output nodes line-by-line and uses adocument tree structure to produce the desired output according to your requirements.
Nodes of type group and element typically serve as the primary building blocks for the outputdocument tree, with the group type node at the root of the document tree, from which the restof the structure is derived. Groups can have children and can be nested, which means thatgroup nodes can be children and parents in relation to other group nodes.
Element nodes cannot have children, except in XML format, in which elements can containXML-specific type nodes, such as attributes or CDATA items. Element nodes are always derivedfrom the group node parent, which means that they are acting as leaves of the groupbranches.
Note: You can change the visibility of groups and elements or use predefined loopingmechanisms to present your output data in the format specific to your requirements.
The following node types are supported in the Mapping Builder:
Group
Element
Attribute (for XML format only)
Working With the Mapping Builder
236 Information Builders

Comment (for XML format only)
Content (for XML format only)
CDATA (for XML format only)
Variables (for XML format only)
Adding New Output Nodes
One of the efficient methods for adding new output nodes is structure mapping. For moreinformation about structure mapping, see Group on page 238. Another method of adding newoutput nodes is by building your document output tree from scratch, which is achieved by right-clicking an existing output node and selecting Add followed by the type of node you wish toadd.
The supported types of the output nodes you may insert will depend on the type of the parentnode to which you want to add your data nodes and can be driven by the context menu. Forexample, if you right-click an XML element node in your output structure, you may discover thatthe only possible type of nodes which can be added to that element node is an attribute node.By following these restrictions, the integrity of the output structure is maintained.
You can review the available options for the output node type by right-clicking the parent nodeand selecting the Add submenu.
4. iWay Transformer Tasks
iWay Integration Tools Transformer User’s Guide 237
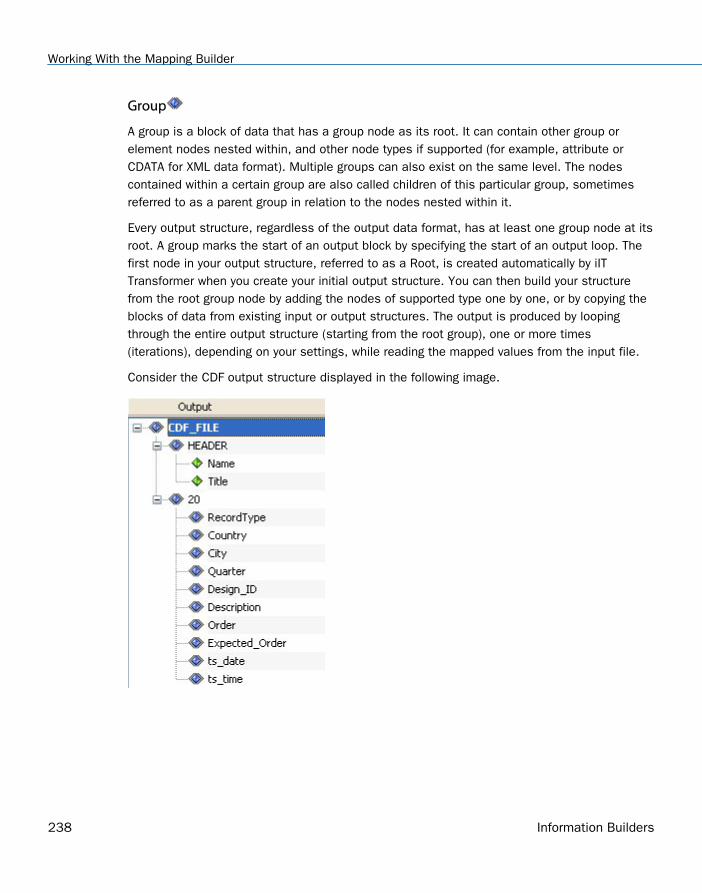
Group
A group is a block of data that has a group node as its root. It can contain other group orelement nodes nested within, and other node types if supported (for example, attribute orCDATA for XML data format). Multiple groups can also exist on the same level. The nodescontained within a certain group are also called children of this particular group, sometimesreferred to as a parent group in relation to the nodes nested within it.
Every output structure, regardless of the output data format, has at least one group node at itsroot. A group marks the start of an output block by specifying the start of an output loop. Thefirst node in your output structure, referred to as a Root, is created automatically by iITTransformer when you create your initial output structure. You can then build your structurefrom the root group node by adding the nodes of supported type one by one, or by copying theblocks of data from existing input or output structures. The output is produced by loopingthrough the entire output structure (starting from the root group), one or more times(iterations), depending on your settings, while reading the mapped values from the input file.
Consider the CDF output structure displayed in the following image.
Working With the Mapping Builder
238 Information Builders
The first output node, CDF_FILE, is the first group node and is also called the Root. Thepresence of the Root node ensures that iIT Transformer loops over the entire output structureif needed. The next node in the output tree is a HEADER node, which is also a group type ofnode. Appearance of the HEADER node marks an output block of data, which includes the childelement nodes Name and Title. The node, 20, is also a group node, which contains an outputblock of data to include the next ten child element nodes (RecordType to ts_time). Groupnodes are distinguished by the Group icon, which has a blue diamond shape with a doubleborder. Element nodes are distinguished by the Element icon, which has a blue diamondshape.
The following list contains the visual variations of the group node when a specific property isconfigured for it.
Invisible
A group node that has its visible property set to false. This means that even though thegroup node is present in the output structure during design time, the invisible node’s valueor the whole block of its children nodes will not be displayed in the run-time outputproduced by the project. For more information on hiding a group, see Filter Tab on page251.
Context
A group that has a context applied. The context property is the explicitly defined referenceof the output group node to the particular input group node. It helps to control looping, andto resolve challenges and opportunities in the area of data structure searching. It isespecially useful for nested multi-level repeated structures. It operates on the logicalstructure of the message (similar to XPath). It is available for use by any data formatsupported by iIT Transformer.
To set the context property, right-click the group node b in the Output pane and selectProperties. The Properties tab opens and displays the General tab by default.
In the Context field, specify the path value for the looping node on the input side. Click the
ellipses button, which opens the Input Fields pane. Select an input node to be mappedfrom the hierarchy tree and click OK.
For more information on setting a context for a group, see General Tab on page 250.
Filter
4. iWay Transformer Tasks
iWay Integration Tools Transformer User’s Guide 239
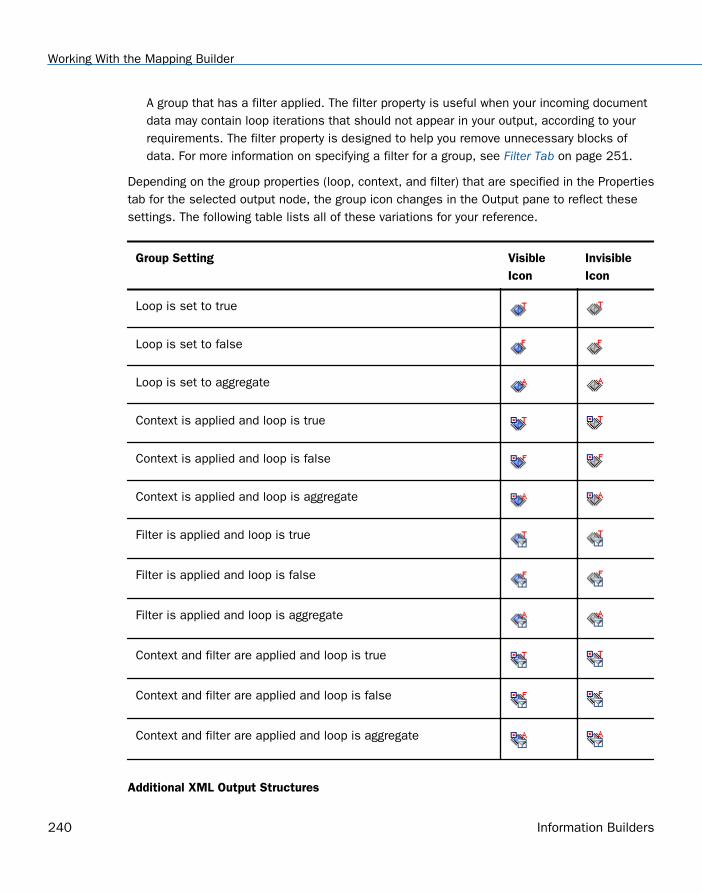
A group that has a filter applied. The filter property is useful when your incoming documentdata may contain loop iterations that should not appear in your output, according to yourrequirements. The filter property is designed to help you remove unnecessary blocks ofdata. For more information on specifying a filter for a group, see Filter Tab on page 251.
Depending on the group properties (loop, context, and filter) that are specified in the Propertiestab for the selected output node, the group icon changes in the Output pane to reflect thesesettings. The following table lists all of these variations for your reference.
Group Setting VisibleIcon
InvisibleIcon
Loop is set to true
Loop is set to false
Loop is set to aggregate
Context is applied and loop is true
Context is applied and loop is false
Context is applied and loop is aggregate
Filter is applied and loop is true
Filter is applied and loop is false
Filter is applied and loop is aggregate
Context and filter are applied and loop is true
Context and filter are applied and loop is false
Context and filter are applied and loop is aggregate
Additional XML Output Structures
Working With the Mapping Builder
240 Information Builders
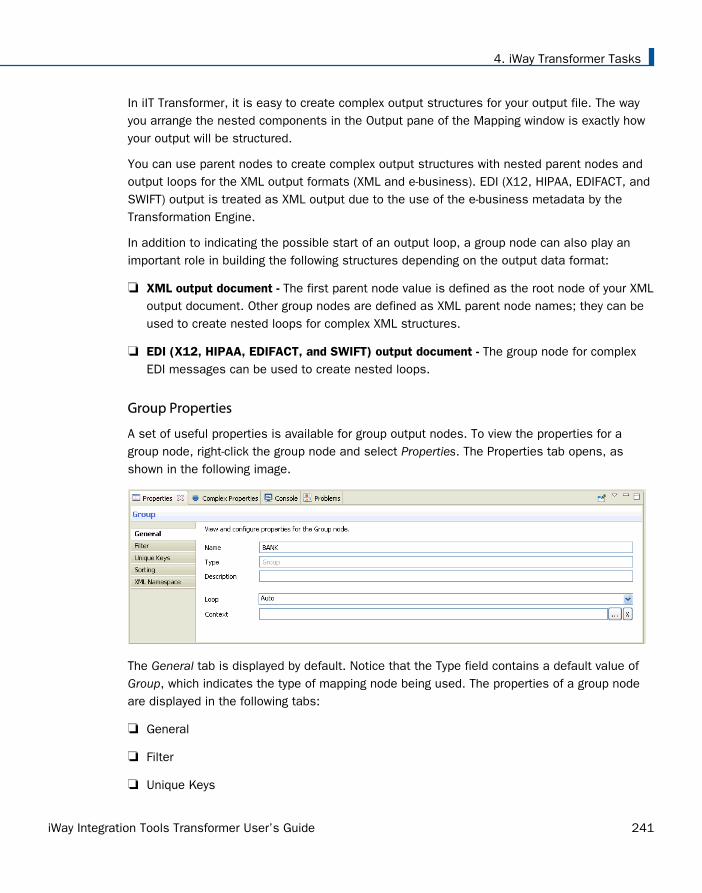
In iIT Transformer, it is easy to create complex output structures for your output file. The wayyou arrange the nested components in the Output pane of the Mapping window is exactly howyour output will be structured.
You can use parent nodes to create complex output structures with nested parent nodes andoutput loops for the XML output formats (XML and e-business). EDI (X12, HIPAA, EDIFACT, andSWIFT) output is treated as XML output due to the use of the e-business metadata by theTransformation Engine.
In addition to indicating the possible start of an output loop, a group node can also play animportant role in building the following structures depending on the output data format:
XML output document - The first parent node value is defined as the root node of your XMLoutput document. Other group nodes are defined as XML parent node names; they can beused to create nested loops for complex XML structures.
EDI (X12, HIPAA, EDIFACT, and SWIFT) output document - The group node for complexEDI messages can be used to create nested loops.
Group Properties
A set of useful properties is available for group output nodes. To view the properties for agroup node, right-click the group node and select Properties. The Properties tab opens, asshown in the following image.
The General tab is displayed by default. Notice that the Type field contains a default value ofGroup, which indicates the type of mapping node being used. The properties of a group nodeare displayed in the following tabs:
General
Filter
Unique Keys
4. iWay Transformer Tasks
iWay Integration Tools Transformer User’s Guide 241
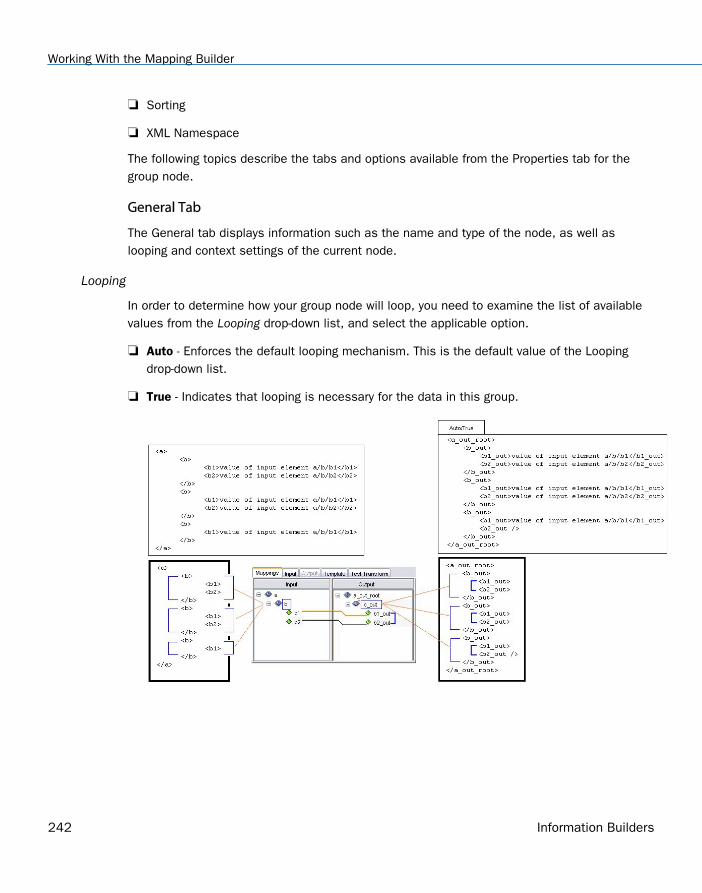
Sorting
XML Namespace
The following topics describe the tabs and options available from the Properties tab for thegroup node.
General Tab
The General tab displays information such as the name and type of the node, as well aslooping and context settings of the current node.
Looping
In order to determine how your group node will loop, you need to examine the list of availablevalues from the Looping drop-down list, and select the applicable option.
Auto - Enforces the default looping mechanism. This is the default value of the Loopingdrop-down list.
True - Indicates that looping is necessary for the data in this group.
Working With the Mapping Builder
242 Information Builders

False - Indicates that the group node should not loop.
Agg - Indicates that looping should be aggregate.
If aggregate looping is selected for the particular group, it means that all instances of thisgroup node which have the same attribute values are combined into one unique groupnode. Any nodes that are children of these elements are also gathered and madesubordinate to the new parent node.
4. iWay Transformer Tasks
iWay Integration Tools Transformer User’s Guide 243

Context
The Context field in the General tab is an advanced feature designed to help control locallooping. Applying a context to a group node in your output structure can solve loopingcomplexity issues. It is especially useful in projects, which require you to make references toinput nodes located in different places within the hierarchy of a structure. The Contextspecifies the location of the node where the block of input that is being used for loopingbegins. Generally, this should be set to the innermost group block from your input structure,which encapsulates all of the input data that must be used within this output group node.
To better understand how the Context feature works, you can examine one of the iWay sampleXML projects, located in the following directory:
<iWaySMHome>\tools\transformer\samples\transform_projects\xml\XML_to_XML\Context\Context.gxp
where:
<iWaySMHome>
Is the directory where iWay Service Manager was installed.
The input to output structure mapping is shown in the following image.
The input is an XML file that lists the details for the sales of a company item. The inputinformation is organized by the year, quarter, product type, and the individual (brand). Theoutput is an XML file containing the sales only for items from the specific manufacturer, forexample, Cheapies. The output sales are arranged by year, quarter, and item.
Working With the Mapping Builder
244 Information Builders
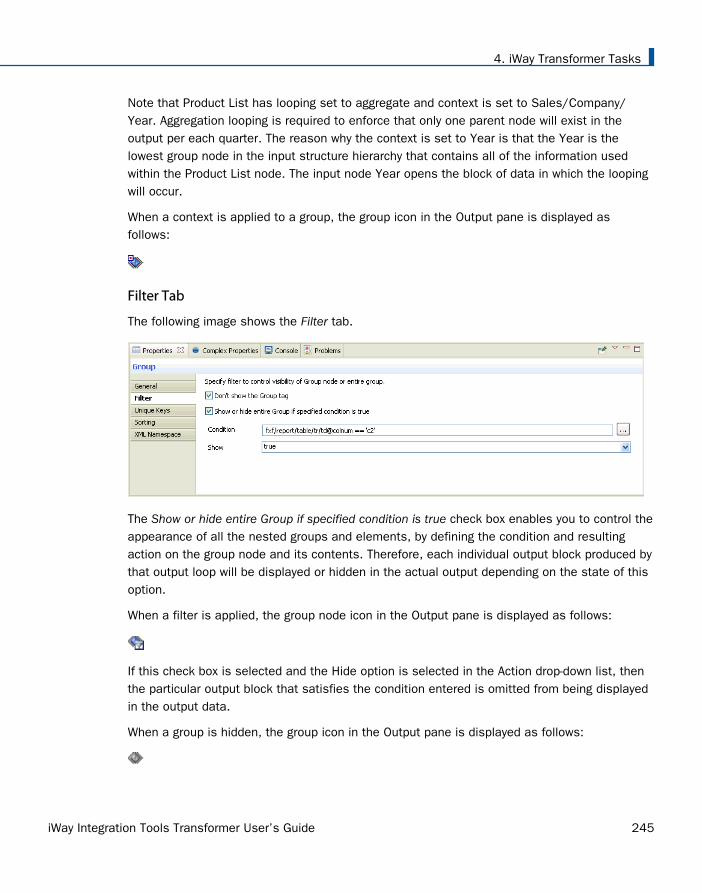
Note that Product List has looping set to aggregate and context is set to Sales/Company/Year. Aggregation looping is required to enforce that only one parent node will exist in theoutput per each quarter. The reason why the context is set to Year is that the Year is thelowest group node in the input structure hierarchy that contains all of the information usedwithin the Product List node. The input node Year opens the block of data in which the loopingwill occur.
When a context is applied to a group, the group icon in the Output pane is displayed asfollows:
Filter Tab
The following image shows the Filter tab.
The Show or hide entire Group if specified condition is true check box enables you to control theappearance of all the nested groups and elements, by defining the condition and resultingaction on the group node and its contents. Therefore, each individual output block produced bythat output loop will be displayed or hidden in the actual output depending on the state of thisoption.
When a filter is applied, the group node icon in the Output pane is displayed as follows:
If this check box is selected and the Hide option is selected in the Action drop-down list, thenthe particular output block that satisfies the condition entered is omitted from being displayedin the output data.
When a group is hidden, the group icon in the Output pane is displayed as follows:
4. iWay Transformer Tasks
iWay Integration Tools Transformer User’s Guide 245
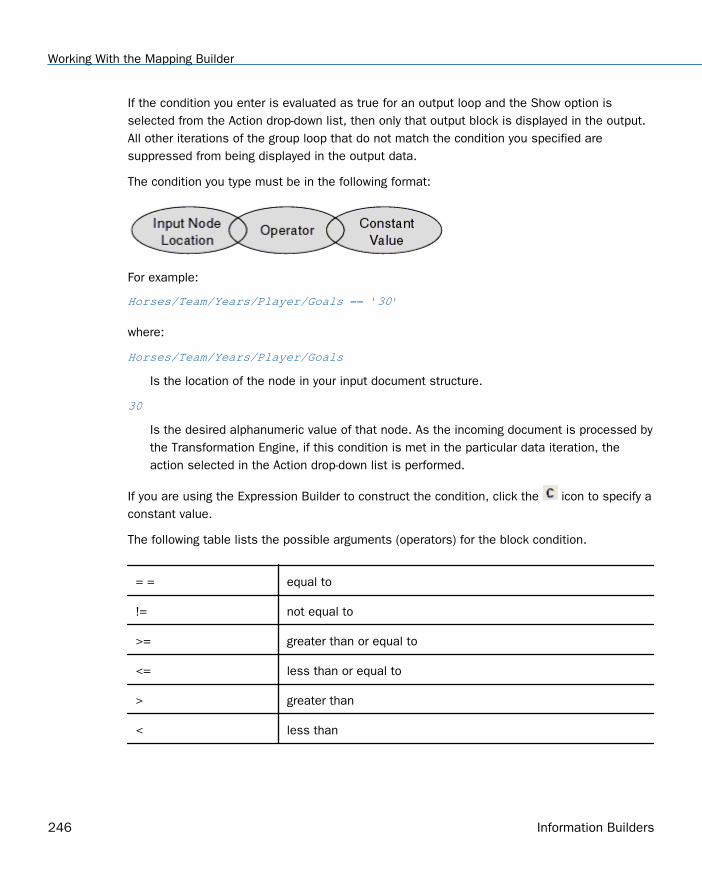
If the condition you enter is evaluated as true for an output loop and the Show option isselected from the Action drop-down list, then only that output block is displayed in the output.All other iterations of the group loop that do not match the condition you specified aresuppressed from being displayed in the output data.
The condition you type must be in the following format:
For example:
Horses/Team/Years/Player/Goals == '30'
where:
Horses/Team/Years/Player/Goals
Is the location of the node in your input document structure.
30
Is the desired alphanumeric value of that node. As the incoming document is processed bythe Transformation Engine, if this condition is met in the particular data iteration, theaction selected in the Action drop-down list is performed.
If you are using the Expression Builder to construct the condition, click the icon to specify aconstant value.
The following table lists the possible arguments (operators) for the block condition.
= = equal to
!= not equal to
>= greater than or equal to
<= less than or equal to
> greater than
< less than
Working With the Mapping Builder
246 Information Builders
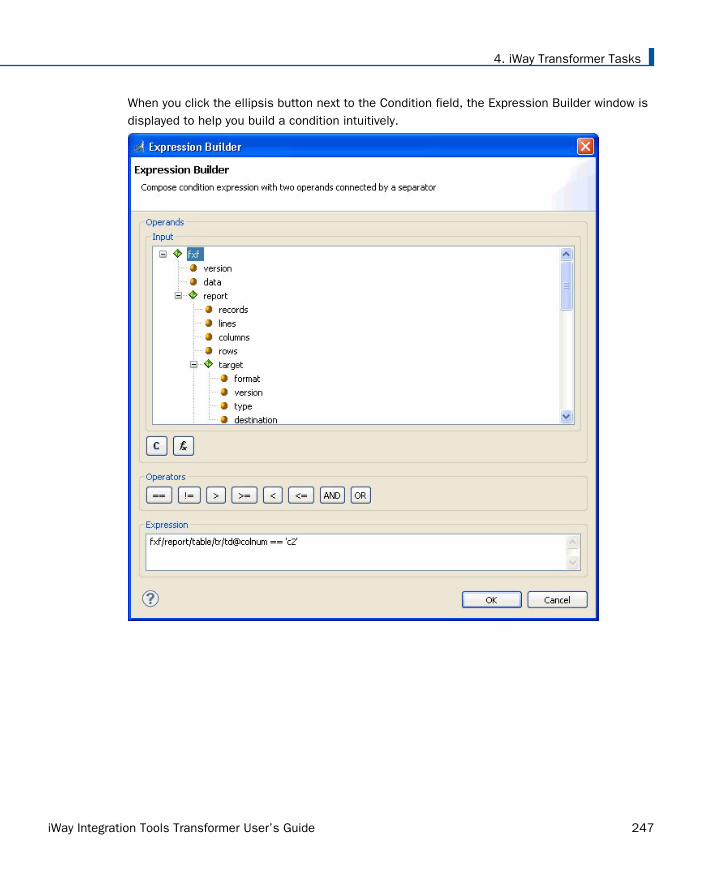
When you click the ellipsis button next to the Condition field, the Expression Builder window isdisplayed to help you build a condition intuitively.
4. iWay Transformer Tasks
iWay Integration Tools Transformer User’s Guide 247

Unique Keys Tab
The following image shows the Unique Keys tab.
You can control the appearance of a group's output child nodes by defining nodes as unique inthe Unique Keys tab. This will remove unnecessary data repetitions from your output groupnode. The child node you specify as the node will determine which loop repetitions will besuppressed. The output will display only the first unique occurrences of the key node. Forexample, assume that you generate the following non-unique XML output data:
<Product> <ProductID>XR281</ProductID> <Name>Green Rocket Vehicle</Name></Product><Product> <ProductID>SR71</ProductID> <Name>SR-71 Blackbird</Name></Product><Product> <ProductID>XR281</ProductID> <Name>Green Rocket Vehicle Again</Name></Product>
If you choose to make the output group node Product unique by specifying the output childnode, ProductID, in the Unique Keys parent property, then your final output is the following:
<Product> <ProductID>SR71</ProductID> <Name>SR-71 Blackbird</Name></Product><Product> <ProductID>XR281</ProductID> <Name>Green Rocket Vehicle</Name></Product>
Note: You can specify multiple unique keys if required.
Working With the Mapping Builder
248 Information Builders

The second instance of the XR281 product was removed because it was not unique to theoutput item ProductID.
Sorting Tab
The following image shows the Sorting tab.
The Sorting tab provides you with the option to enable the sorting of the loop iterations in theblocks of data represented by the particular group node. You can choose a child node withinthe current group, by which to sort your output. The output can be sorted in ascending ordescending alphanumeric order by the node or nodes you choose in the Sorting Order section.The Sorting Type option specifies how the output is sorted. Possible values are None, Asc(Ascending), or Des (Descending). Sorting Type defaults to None.
XML Namespace Tab
The following image shows the XML Namespace tab. This tab provides options to specify XMLnamespaces for the individual group node. It is similar to the XML Namespaces category foundin the Project Properties dialog box.
For more information on defining XML Namespaces, see Working With Namespaces on page265.
4. iWay Transformer Tasks
iWay Integration Tools Transformer User’s Guide 249

Element
An element node is used to represent a basic data item in iIT Transformer. Element nodesare typically found inside the group node. Sometimes it is referred to as a leaf of the outputtree because it cannot have any other child nodes, such as the nested groups or elementswithin it, except for the attribute nodes (for XML data format only).
Element Properties
The set of element node properties is defined for an element output node. To view theproperties of the element node in the Output pane, you must right-click an element node andthen, select Properties. The Properties tab opens.
The following topics describe the tabs that are available from the Properties tab for theelement node.
General Tab
The following image shows the Properties tab for the element node, which provides thefollowing tabs:
General
Filter
XML Namespace
The Properties tab for the element node defaults to the General tab. Notice that the Type fieldcontains a default value of Element, which indicates the type of mapping for which theproperties are displayed.
Working With the Mapping Builder
250 Information Builders
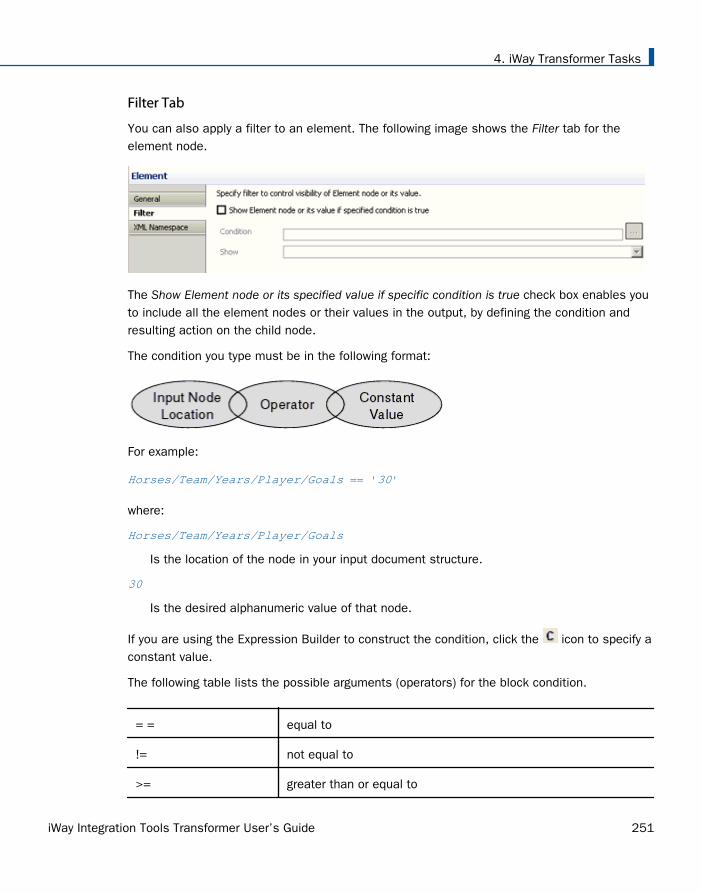
Filter Tab
You can also apply a filter to an element. The following image shows the Filter tab for theelement node.
The Show Element node or its specified value if specific condition is true check box enables youto include all the element nodes or their values in the output, by defining the condition andresulting action on the child node.
The condition you type must be in the following format:
For example:
Horses/Team/Years/Player/Goals == '30'
where:
Horses/Team/Years/Player/Goals
Is the location of the node in your input document structure.
30
Is the desired alphanumeric value of that node.
If you are using the Expression Builder to construct the condition, click the icon to specify aconstant value.
The following table lists the possible arguments (operators) for the block condition.
= = equal to
!= not equal to
>= greater than or equal to
4. iWay Transformer Tasks
iWay Integration Tools Transformer User’s Guide 251

<= less than or equal to
> greater than
< less than
When a filter condition is applied to an element node, the element icon in the Output pane isdisplayed as follows:
XML Namespace Tab
The following image shows the XML Namespace tab for the element node.
For more information on defining XML Namespaces, see Working With Namespaces on page265.
Attribute
An attribute node contains a value associated with a specific group or element. It consistsof a name, and an associated (textual) value. Attribute nodes are supported for XML formatdata only.
In the following example, name and type are attributes for the Company element:
<Company name="Video and Sound Card Express" type="Computer Parts">
Attribute Properties
The set of various attribute properties is available for an attribute output node. To view ormodify the properties of the attribute in the Output pane of the iIT Transformer workspace, youmust right-click an attribute node and then, select Properties. The Properties tab opens.
Working With the Mapping Builder
252 Information Builders

The following topics describe the tabs available from the Properties tab for the attribute node.
General Tab
The following image shows the Properties tab for the attribute node, which provides thefollowing tabs:
General
Filter
XML Namespace
The Properties tab for the attribute node defaults to the General tab. Notice that the Type fieldcontains a default value of Attribute, which indicates the type of mapping for which theproperties are displayed.
Filter Tab
You can also apply a filter to an attribute. The following image shows the Filter tab for theattribute node.
The Show Attribute node if specific condition is true check box enables you to alter the visibilityof the attribute nodes or their values in the output, by defining the condition and resultingaction on the child node. The condition you type must be in the following format:
For example:
4. iWay Transformer Tasks
iWay Integration Tools Transformer User’s Guide 253

Horses/Team/Years/Player/Goals == '30'
where:
Horses/Team/Years/Player/Goals
Is the location of the node in your input document structure.
30
Is the desired alphanumeric value of that node.
If you are using the Expression Builder to construct the condition, click the icon to specify aconstant value.
The following table lists the possible arguments (operators) for the block condition.
= = equal to
!= not equal to
>= greater than or equal to
<= less than or equal to
> greater than
< less than
When a filter condition is applied to an attribute node, the attribute icon in the Output pane is
displayed as follows:
XML Namespace Tab
The following image shows the XML Namespace tab for the attribute node.
For more information on defining XML Namespaces, see Working With Namespaces on page265.
Working With the Mapping Builder
254 Information Builders
Comment
A comment node can be used to embed comments into the output structure. Commentnodes are supported for XML output data only.
In the following example, the phrase This is an XML Output sample is a comment.
<?xml version="1.0" encoding="UTF-8"?><!--This is an XML Output sample-->
Content
A content node is associated with a group node in the output document. Some groupshave no content, in which case they are called empty. The content of a group node may includetext, and it may include a number of sub-elements, in which case the node is called the parentof those subelements. Content nodes are supported for XML output data only.
CDATA
A CDATA node is used to indicate sections of data that you want the XML parser to ignoreduring validation. CDATA sections can include special characters that will not be parsed.CDATA nodes are supported for XML output data only.
In the following example, the CDATA tag (node) is wrapped around the compare(a,b) function,which contains special characters that are not allowed in XML syntax. As a result, thesecharacters will not be parsed.
<![CDATA[function compare(a,b){ if (a > b) then { return 1 }}}]]>
Variable
A Variable node (for XML format only) is used as a mapping value type, which represents anintermediate value used globally during the life of a transformation. Two types of variables canbe defined, dynamic and constant.
4. iWay Transformer Tasks
iWay Integration Tools Transformer User’s Guide 255

Additional Key Terms
Additional key terms used to describe mapping relationships within the output document treeare:
Parent
A node A is the parent of a node B if node B is contained within the structure of node A,and belongs to the block of data that node A represents. The output has at least oneparent group, which is referred to as the root group.
Child
A node A is called the child of a node B if and only if B is the parent of A.
Descendant
A node A is called a descendant of a node B, if either (1) A is a child of B, or (2) A is thechild of some node C that is a descendant of B
Ancestor
A node A is called an ancestor of a node B, if and only if B is a descendant of A.
Sibling
A node A is called a sibling of a node B, if and only if B and A share the same parent. NodeA is a preceding sibling if it comes before B in the output document tree. Node B is afollowing sibling if it comes after A in the output document tree.
Mapping Values
Creating an output structure is usually not sufficient to perform a transformation. You typicallymust also specify the mapping values for each output node using the interface of the MappingValues pane.
The following mapping values are supported.
Input Node: Value of a node from an input structure.
Function: Predefined or custom algorithm of calculation.
Constant: Fixed value.
Expression: Logical statement.
Working With the Mapping Builder
256 Information Builders
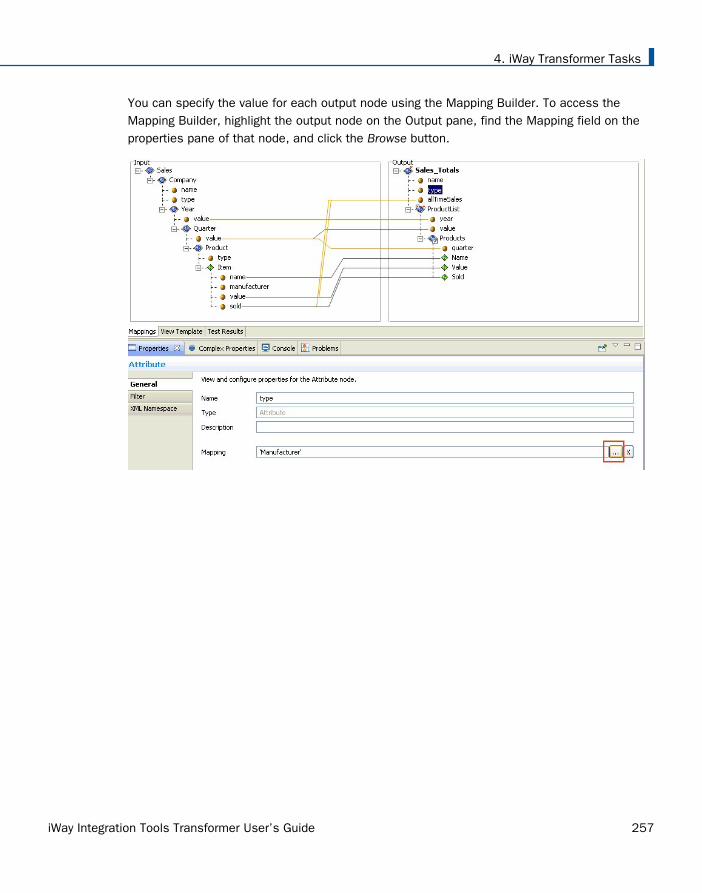
You can specify the value for each output node using the Mapping Builder. To access theMapping Builder, highlight the output node on the Output pane, find the Mapping field on theproperties pane of that node, and click the Browse button.
4. iWay Transformer Tasks
iWay Integration Tools Transformer User’s Guide 257
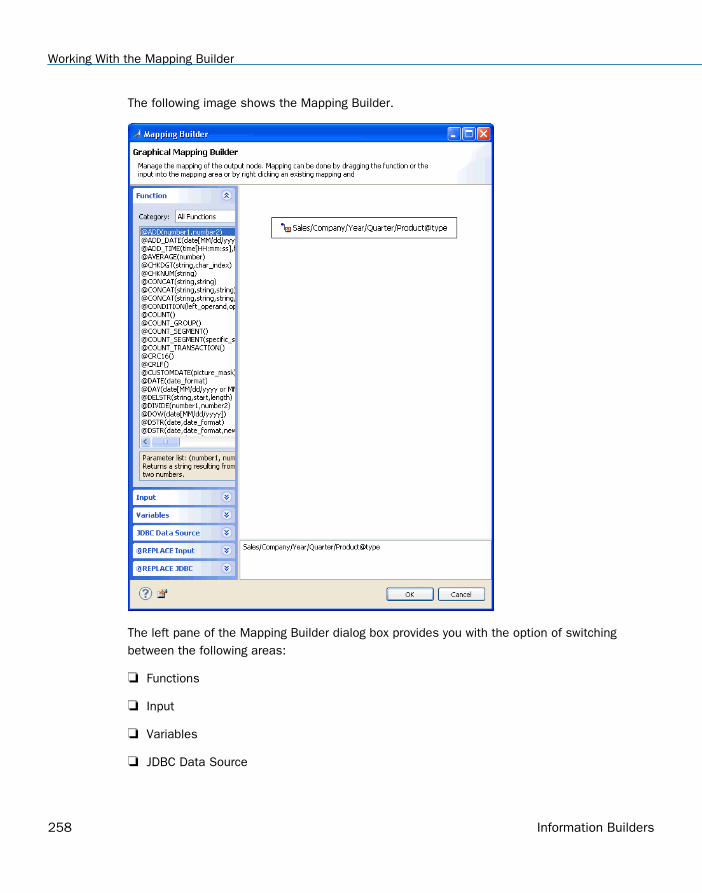
The following image shows the Mapping Builder.
The left pane of the Mapping Builder dialog box provides you with the option of switchingbetween the following areas:
Functions
Input
Variables
JDBC Data Source
Working With the Mapping Builder
258 Information Builders
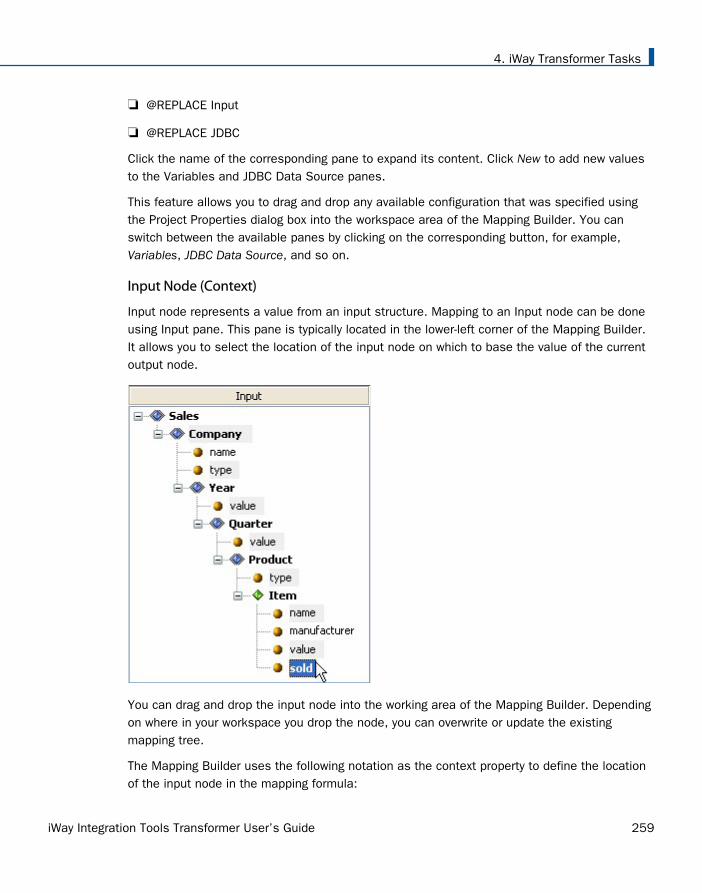
@REPLACE Input
@REPLACE JDBC
Click the name of the corresponding pane to expand its content. Click New to add new valuesto the Variables and JDBC Data Source panes.
This feature allows you to drag and drop any available configuration that was specified usingthe Project Properties dialog box into the workspace area of the Mapping Builder. You canswitch between the available panes by clicking on the corresponding button, for example,Variables, JDBC Data Source, and so on.
Input Node (Context)
Input node represents a value from an input structure. Mapping to an Input node can be doneusing Input pane. This pane is typically located in the lower-left corner of the Mapping Builder.It allows you to select the location of the input node on which to base the value of the currentoutput node.
You can drag and drop the input node into the working area of the Mapping Builder. Dependingon where in your workspace you drop the node, you can overwrite or update the existingmapping tree.
The Mapping Builder uses the following notation as the context property to define the locationof the input node in the mapping formula:
4. iWay Transformer Tasks
iWay Integration Tools Transformer User’s Guide 259
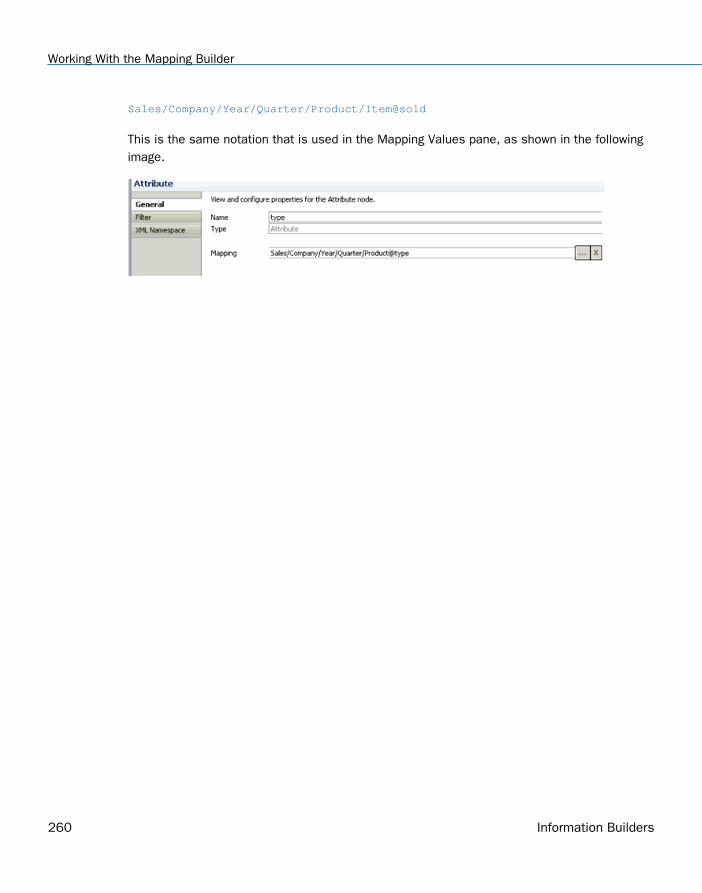
Sales/Company/Year/Quarter/Product/Item@sold
This is the same notation that is used in the Mapping Values pane, as shown in the followingimage.
Working With the Mapping Builder
260 Information Builders

Function
Function value can be from predefined or custom algorithm of calculation. Mapping to aFunction can be done using Function pane. This pane is typically located in the upper-leftcorner of the Mapping Builder. It allows you to select predefined functions or custom functionsthat you defined to associate with an output node.
You can drag and drop the function into the working area of the Mapping Builder.
Note: In this version of iIT Transformer, you have an option to insert functions below thecurrent function in the existing mapping tree or replace the current function.
4. iWay Transformer Tasks
iWay Integration Tools Transformer User’s Guide 261

Constant
Allows you to type in a fixed value for a function or input node, by right-clicking the node andselecting Set Constant or double-clicking the node.
Make sure the Set Constant option is selected.
The Constant Builder dialog box opens, as shown in the following image.
Type your value in the Constant field and click OK.
Expression
An expression is a logical statement where two or more input node values are combined intoone output value using the basic operators and functions. In Mapping Builder, expressions aretypically used for concatenation where input fields are joined by a plus sign "+" operator.
Working With the Mapping Builder
262 Information Builders
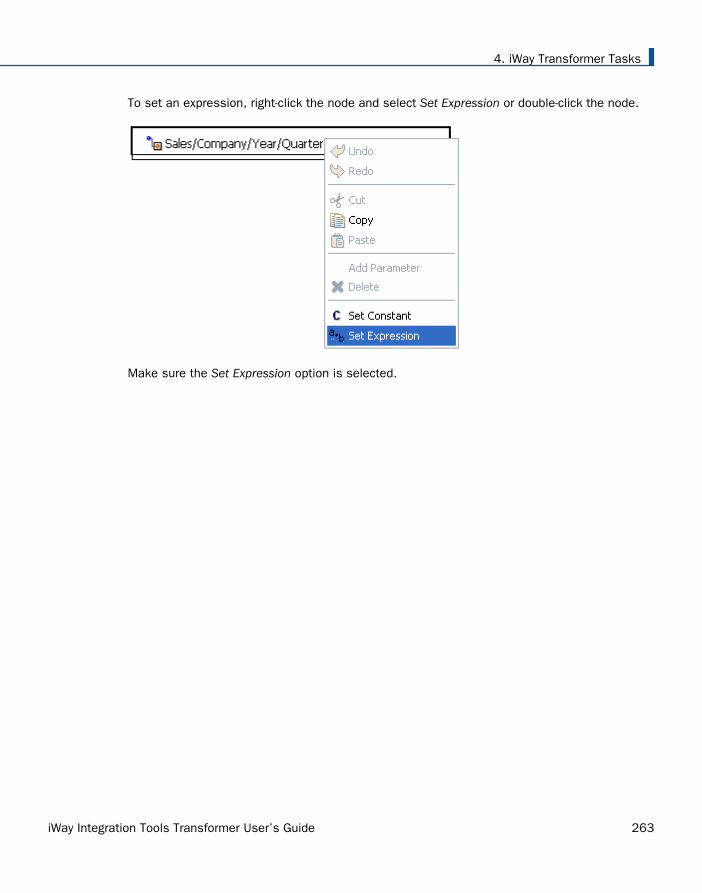
To set an expression, right-click the node and select Set Expression or double-click the node.
Make sure the Set Expression option is selected.
4. iWay Transformer Tasks
iWay Integration Tools Transformer User’s Guide 263
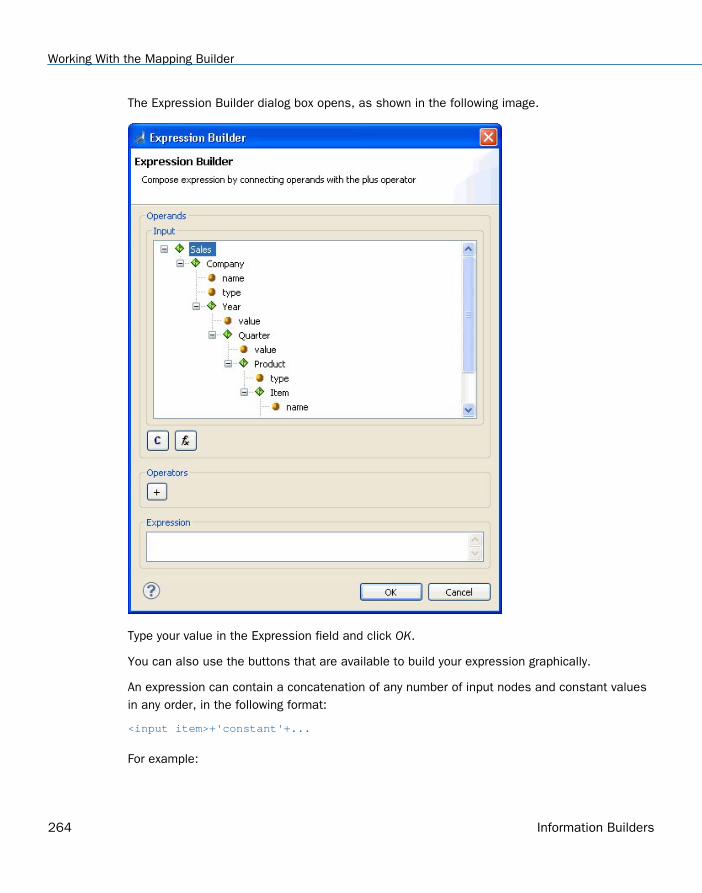
The Expression Builder dialog box opens, as shown in the following image.
Type your value in the Expression field and click OK.
You can also use the buttons that are available to build your expression graphically.
An expression can contain a concatenation of any number of input nodes and constant valuesin any order, in the following format:
<input item>+'constant'+...
For example:
Working With the Mapping Builder
264 Information Builders
'For '+tree/fruit+tree/fruit/year+': '+tree/fruit/apple/yield+' bushels, '+tree/fruit/apple/avgweight+' grams avg.'
Note: It is strongly encouraged to use the @CONCAT function instead of an expression toconcatenate strings. For more information on using the @CONCAT function and its properties,see Working With Functions on page 269.
For more information on how to use the Mapping Builder, see Using the Mapping Builder onpage 269.
Building and Altering Output Structures
For most output data formats, you can load an existing output structure from the metadataconfiguration of your project. The output structure will appear in the Output pane. Also, outputstructures typically can be altered once in the Output pane, but there are some that shouldnever be altered.
It is not recommended to alter the output structure in the Output pane for the followingformats:
EDI HIPAA
EDI X12
EDIFACT
IDOC
These output data formats require a mandatory metadata structure to be provided for themessage. If you alter the output structure in the Output pane of the Mappings tab for any ofthese outputs, even by one character, the resulting transformation will not work properly.
Working With Namespaces
Procedure: How to Load XML Namespaces From Another Transform Component
To load XML namespaces from another Transform component:
1. In the Project Properties dialog box, select the XML Namespaces category in the left pane.
4. iWay Transformer Tasks
iWay Integration Tools Transformer User’s Guide 265
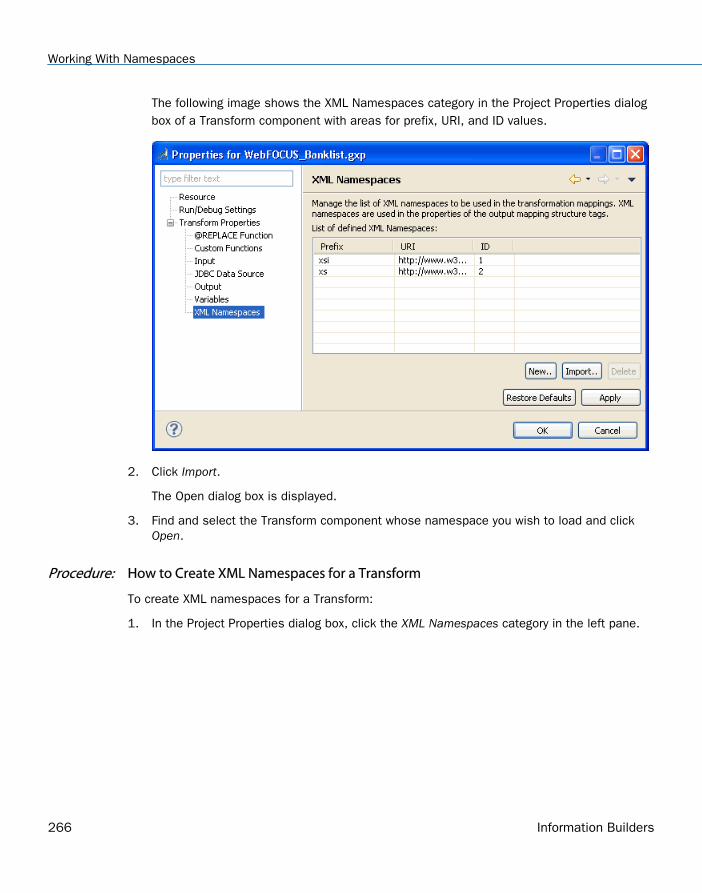
The following image shows the XML Namespaces category in the Project Properties dialogbox of a Transform component with areas for prefix, URI, and ID values.
2. Click Import.
The Open dialog box is displayed.
3. Find and select the Transform component whose namespace you wish to load and clickOpen.
Procedure: How to Create XML Namespaces for a Transform
To create XML namespaces for a Transform:
1. In the Project Properties dialog box, click the XML Namespaces category in the left pane.
Working With Namespaces
266 Information Builders

The following image shows the XML Namespaces category with columns for prefix, URI,and ID values.
2. Click New.
The Add New XML Namespace dialog box opens.
3. In the Prefix field, type the prefix to be associated with the XML namespace.
4. In the URI field, type the URI associated with the prefix and use the URI to represent thestylesheet, reference, or value for the XML namespace.
For example, a prefix value of addr with the following URI:
http://www.tu-darmstadt.de/ito/addresses
4. iWay Transformer Tasks
iWay Integration Tools Transformer User’s Guide 267

is the equivalent of including the following in your actual data:
xmlns:addr="http://www.tu-darmstadt.de/ito/addresses"
5. Click OK.
The new XML namespace is added to the list.
An identification number for each XML namespace appears automatically set in the IDcolumn. Identification numbers are unique identifiers used by iIT Transformer to manageyour XML namespaces within the workspace.
6. Click OK.
Note: To attach XML namespaces, left-click the appropriate node in the Output pane andselect Properties. When the Output Node Properties dialog box opens, click the XMLNamespace tab (if it is not already active) and then, select the Apply Namespace URI checkbox.
Working With Namespaces
268 Information Builders
Working With Functions
The iIT Transformer interface offers an integrated set of useful functions, which are used toperform a variety of operations, such as calculation and manipulation of input data, orretrieving data from a database. You may use functions to modify the output node value tomatch your requirements. You can build complex expressions for output values using thecombinations of functions via the Mapping Builder.
In addition, iIT Transformer enables you to implement your own algorithms for producing outputvalues by adding custom functions according to the specific format. For more information, see Custom Functions on page 297.
Using the Mapping Builder
The Mapping Builder is a tool available in iIT Transformer as part of the Mapping Builderfacility. It allows you to construct an output node using various methods and formulasimplemented in iIT Transformer as functions. You can access the predefined functions and thecustom functions that you defined, or build the statement containing several functions ifneeded.
In iIT Transformer, the predefined functions are subdivided into the following categories:
All Functions
Custom Functions
EDI Functions
Miscellaneous Functions
Numeric Functions
Processing Functions
Runtime Functions
SWIFT Functions
Security Functions
String Functions
Time Functions
4. iWay Transformer Tasks
iWay Integration Tools Transformer User’s Guide 269

Setting Function Parameters
After selecting a specific function, typically you will need to define the set of parametersassociated with it. The number and the names of the parameters for the particular functioncan be determined in either of the following ways:
The function expression in the list of functions.
@SUBTRACT (number1, number2)
The function description area located below the list of functions.
The right pane of the Mapping Builder. For example, the @CONCAT function shown in thefollowing image accepts three parameters of type string.
For more details on the parameters to specify for each particular function, see PredefinedFunctions on page 102 for a complete reference. If dealing with custom functions, you mayconsult the author of the function.
Generally, the functions can take four types of values as their parameters:
Input nodes
Nested functions
Constant values
Expressions
A function of a parameter can take the value of a specified input node. For information on howto set an input node, see How to Set an Input Node on page 275.
You can nest functions within functions, which means the output result of a certain functioncan serve as the input parameter for another function. For more details, see How to NestFunctions on page 276.
You can also set a specific invariable value as a constant function parameter. For informationon how to set a constant value, see How to Set a Constant Value for a Function on page 277.
Another option for a function parameter type is an expression which is a basic combination ofoperators, input nodes, and/or constants. For information on how to set an expression, see How to Set an Expression for a Function on page 277.
Working With Functions
270 Information Builders
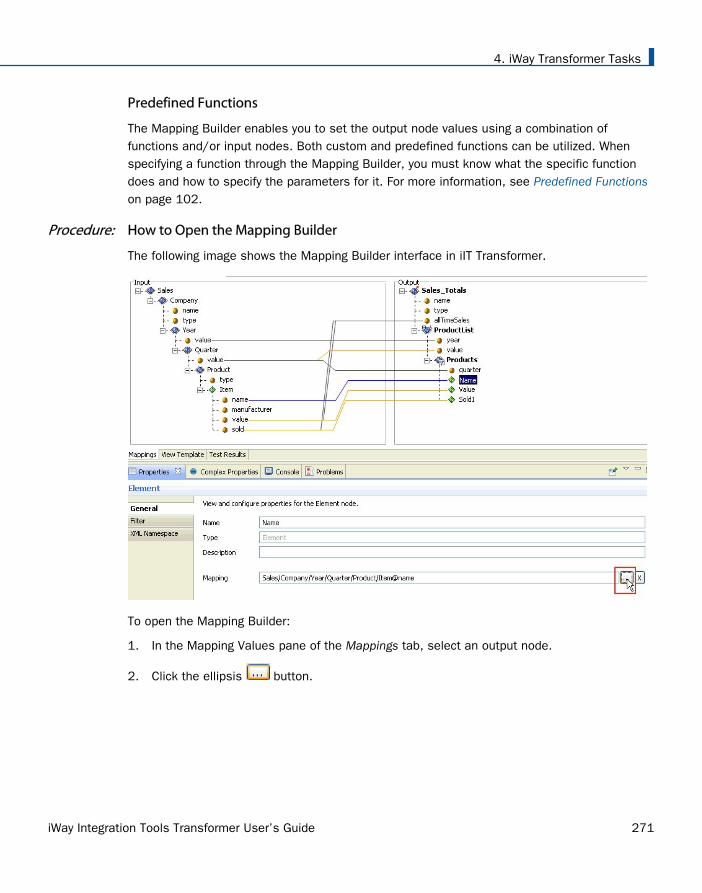
Predefined Functions
The Mapping Builder enables you to set the output node values using a combination offunctions and/or input nodes. Both custom and predefined functions can be utilized. Whenspecifying a function through the Mapping Builder, you must know what the specific functiondoes and how to specify the parameters for it. For more information, see Predefined Functionson page 102.
Procedure: How to Open the Mapping Builder
The following image shows the Mapping Builder interface in iIT Transformer.
To open the Mapping Builder:
1. In the Mapping Values pane of the Mappings tab, select an output node.
2. Click the ellipsis button.
4. iWay Transformer Tasks
iWay Integration Tools Transformer User’s Guide 271
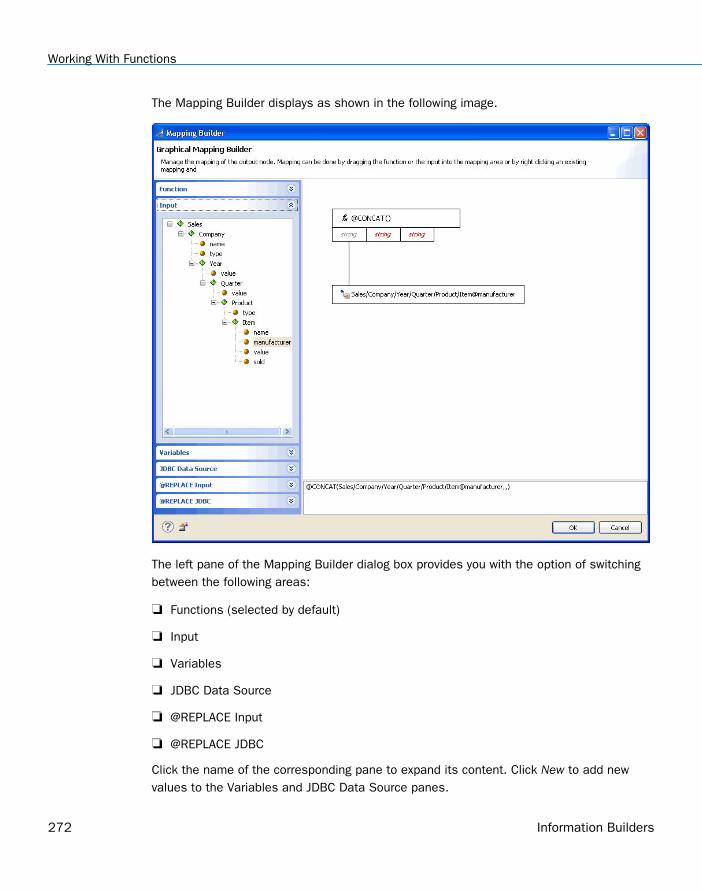
The Mapping Builder displays as shown in the following image.
The left pane of the Mapping Builder dialog box provides you with the option of switchingbetween the following areas:
Functions (selected by default)
Input
Variables
JDBC Data Source
@REPLACE Input
@REPLACE JDBC
Click the name of the corresponding pane to expand its content. Click New to add newvalues to the Variables and JDBC Data Source panes.
Working With Functions
272 Information Builders
This feature allows you to drag and drop any available configuration that was specifiedusing the Project Properties dialog box into the workspace area of the Mapping Builder.You can switch between the available panes by clicking on the corresponding button, forexample, Variables, JDBC Data Source, and so on.
Procedure: How to Select a Function
To select a function:
1. From the Category drop-down list in the Functions pane of the Mapping Builder, select thefunction category you want to use, for example, String.
For a list of function categories, see Using the Mapping Builder on page 269.
The following image shows String Functions selected in the Category drop-down list, whichis located in the Functions pane.
Optionally, you can skip to step 2 and select your function from the whole list of availablefunctions.
4. iWay Transformer Tasks
iWay Integration Tools Transformer User’s Guide 273
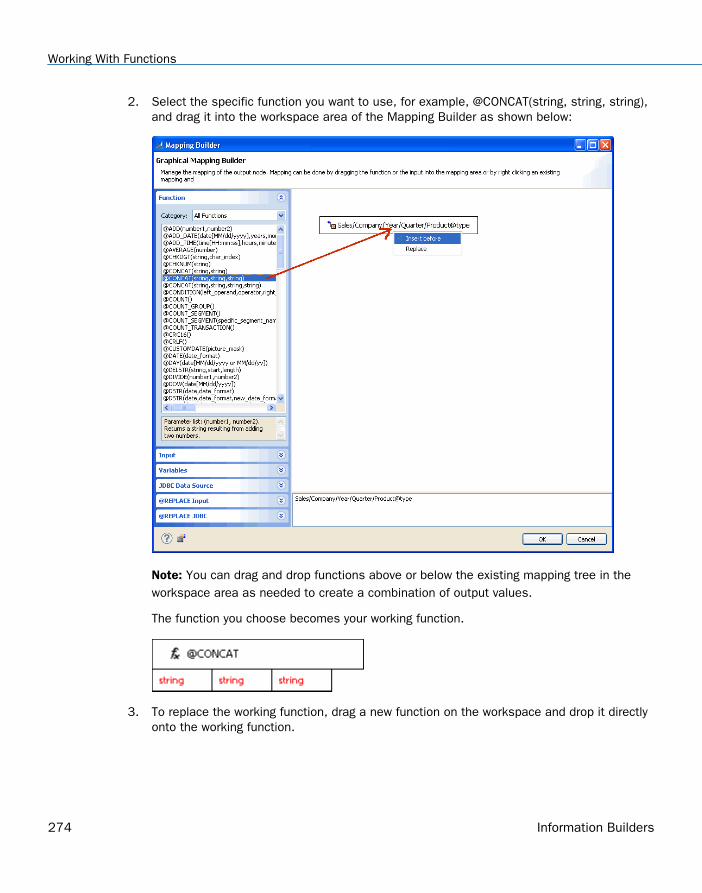
2. Select the specific function you want to use, for example, @CONCAT(string, string, string),and drag it into the workspace area of the Mapping Builder as shown below:
Note: You can drag and drop functions above or below the existing mapping tree in theworkspace area as needed to create a combination of output values.
The function you choose becomes your working function.
3. To replace the working function, drag a new function on the workspace and drop it directlyonto the working function.
Working With Functions
274 Information Builders

Procedure: How to Set an Input Node
To set an input node as the value for a function parameter:
1. Select an input node from the Input document tree area of the Mapping Builder.
2. Drag the input node onto the appropriate parameter in the workspace area of the MappingBuilder.
An alternate way to perform this task is to use Set Selected Input option from the contextmenu, which appears when you right-click the parameter in the workspace area.
Note: Another method for editing the mapping formula of your node is to type it directly inthe preview area located on the lower-right corner of the Mapping Builder window andpress Enter. The tree structure will be refreshed. However, this option is recommended foradvanced users only. Using the drag and drop interface instead is strongly encouraged.
4. iWay Transformer Tasks
iWay Integration Tools Transformer User’s Guide 275
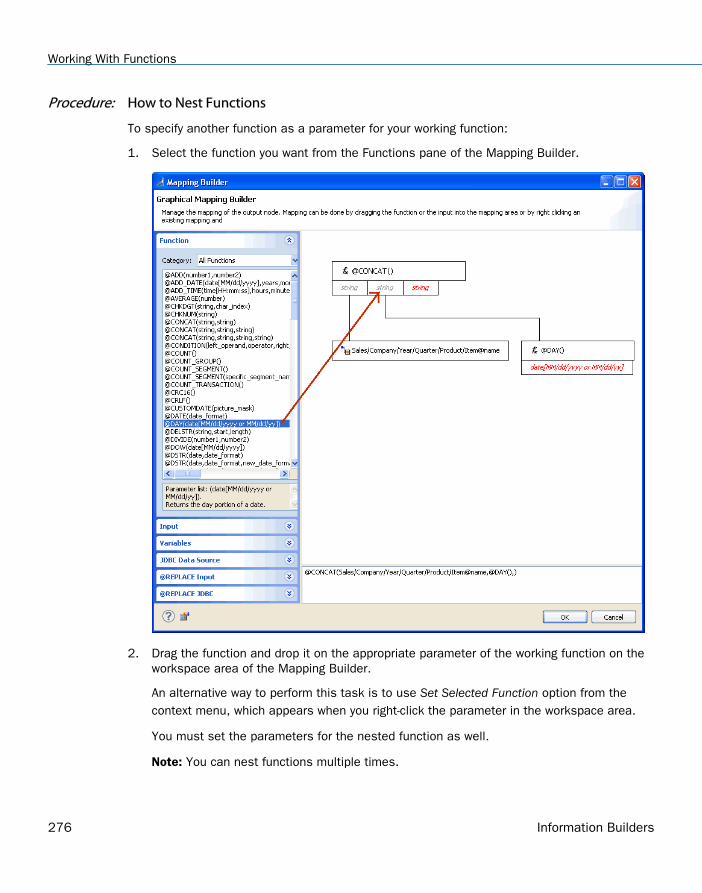
Procedure: How to Nest Functions
To specify another function as a parameter for your working function:
1. Select the function you want from the Functions pane of the Mapping Builder.
2. Drag the function and drop it on the appropriate parameter of the working function on theworkspace area of the Mapping Builder.
An alternative way to perform this task is to use Set Selected Function option from thecontext menu, which appears when you right-click the parameter in the workspace area.
You must set the parameters for the nested function as well.
Note: You can nest functions multiple times.
Working With Functions
276 Information Builders

Procedure: How to Set a Constant Value for a Function
To set a constant value:
1. Right-click the appropriate parameter box in the workspace area of the Mapping Builderand select Set Constant from the context menu.
You can also double-click the parameter box to set a constant.
The following image shows the Constant option selected and a field where you can enter avalue.
2. Type the value for your constant and click OK.
Procedure: How to Set an Expression for a Function
To set an expression:
1. Right-click the appropriate parameter box in the workspace area of the Mapping Builderand select Set Expression from the context menu.
You can also double-click the parameter box and select the Expression radio button to setan expression.
2. Type the value for your expression and press Enter.
An expression concatenation is typically used for any number of input items and constantvalues in any order, in the following format:
<input item>+'constant'+...
4. iWay Transformer Tasks
iWay Integration Tools Transformer User’s Guide 277

For example:
'For '+tree/fruit+tree/fruit/year+': '+tree/fruit/apple/yield+ ' bushels, '+tree/fruit/apple/avgweight+' grams avg.'
Procedure: How to Remove a Function Parameter
To remove a value for a function parameter:
1. Right-click the parameter in the workspace area of the Mapping Builder.
A context menu opens as shown in the following image.
2. Select Delete.
The parameter is removed from the function.
Procedure: How to Cancel and Restore an Action
To cancel and restore an action within the Mapping Builder:
1. To cancel your last action, right-click any component in the workspace, for example, theworking function.
Working With Functions
278 Information Builders
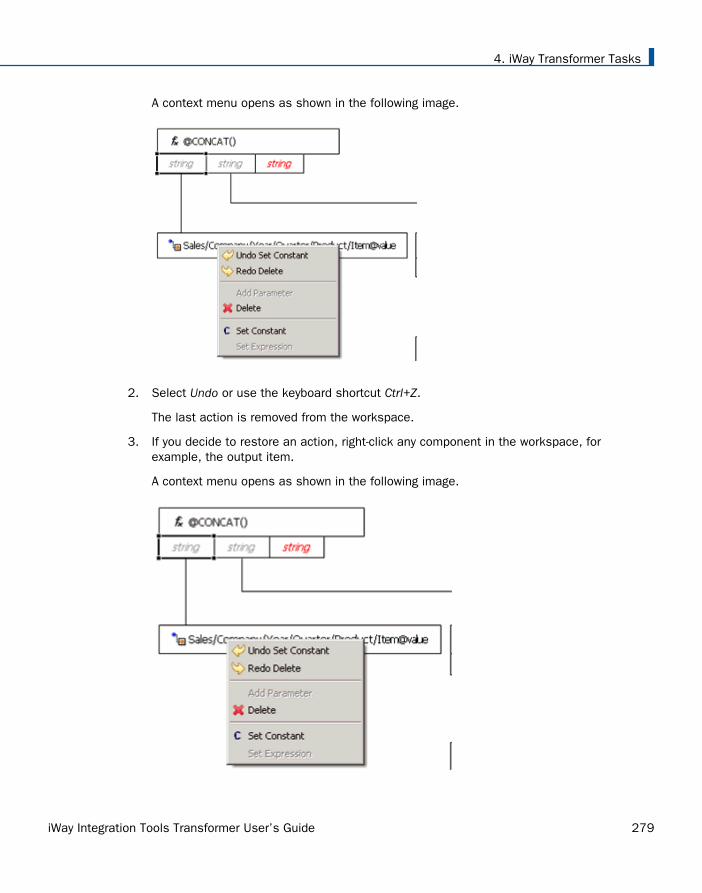
A context menu opens as shown in the following image.
2. Select Undo or use the keyboard shortcut Ctrl+Z.
The last action is removed from the workspace.
3. If you decide to restore an action, right-click any component in the workspace, forexample, the output item.
A context menu opens as shown in the following image.
4. iWay Transformer Tasks
iWay Integration Tools Transformer User’s Guide 279
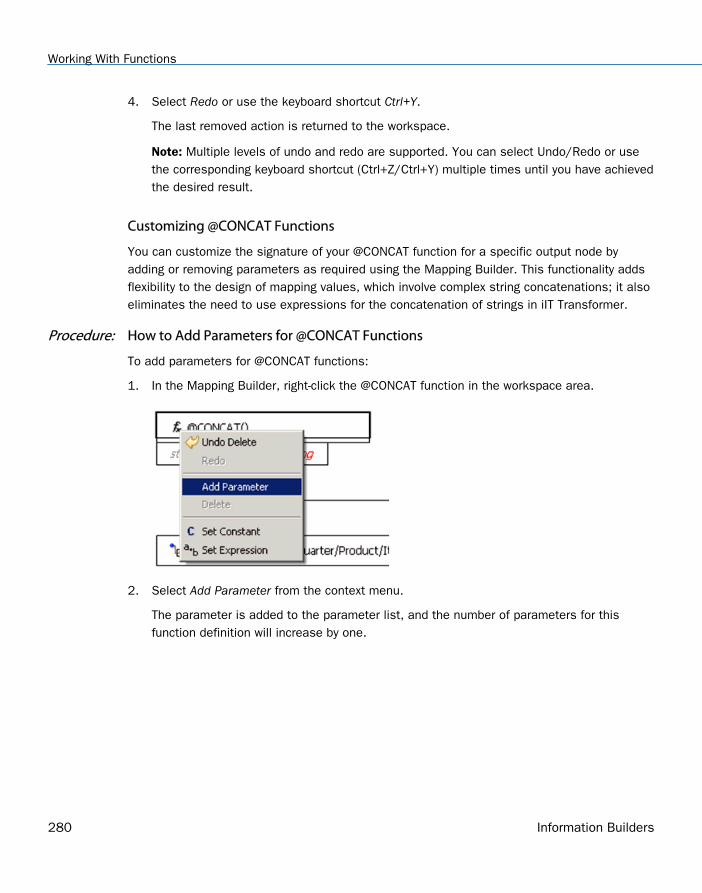
4. Select Redo or use the keyboard shortcut Ctrl+Y.
The last removed action is returned to the workspace.
Note: Multiple levels of undo and redo are supported. You can select Undo/Redo or usethe corresponding keyboard shortcut (Ctrl+Z/Ctrl+Y) multiple times until you have achievedthe desired result.
Customizing @CONCAT Functions
You can customize the signature of your @CONCAT function for a specific output node byadding or removing parameters as required using the Mapping Builder. This functionality addsflexibility to the design of mapping values, which involve complex string concatenations; it alsoeliminates the need to use expressions for the concatenation of strings in iIT Transformer.
Procedure: How to Add Parameters for @CONCAT Functions
To add parameters for @CONCAT functions:
1. In the Mapping Builder, right-click the @CONCAT function in the workspace area.
2. Select Add Parameter from the context menu.
The parameter is added to the parameter list, and the number of parameters for thisfunction definition will increase by one.
Working With Functions
280 Information Builders

Procedure: How to Remove Parameters for @CONCAT Functions
To remove parameters for @CONCAT functions:
1. In the Mapping Builder, right-click a parameter to delete from the @CONCAT function in theworkspace area.
2. Select Delete from the context menu.
The parameter is removed from the parameter list, and the number of parameters for thisparticular function definition will decrease by one.
Configuring Properties for JDBC
A JDBC replace function is a replace function in which the match and replace values are takenfrom columns of the specified database table or from the results of an SQL statement run onthe specified database. For example, you can configure iIT Transformer to use a databasecustomer information table, reading the value from the "Full Name" column and replacing itwith the value from the "Nickname" column. Unlike the regular replace functions where thematch and replace pairing is static, the JDBC replace functions read the data from thespecified columns of the next database row each time the transformation processing loopspast the JDBC replace function while producing your output document.
Replace functions are similar to custom functions in that you must first define the function andthen, apply it to the output node mapping value definition that you want to affect. In the caseof replace functions, this can be accomplished using the @REPLACE and @SIMPLE_REPLACEfunctions.
For more advanced database functionality, such as matching across multiple input nodes orrunning complex SQL queries, see Using the @JDBCLOOKUP Function on page 286.
4. iWay Transformer Tasks
iWay Integration Tools Transformer User’s Guide 281

The process of defining a particular replace function accounts for setting up the value tomatch, but not the mapping of it. You must map the replace functions to the specific nodeusing the Mapping Builder. For more information, see Using the Mapping Builder on page 269.
JDBC Replace Functions as Input Data Sources
Since a JDBC replace function can be defined and used no matter what the data format of yourinput is, by using JDBC replace functions you can access multiple input data sources. Forexample, if the input data format of your transform is XML, your incoming document is likely anXML file. By defining and using JDBC replace functions, you can read additional input data fromthe database. In fact, if you define multiple JDBC replace functions, you can use as manydatabase sources as you like.
Procedure: How to Define a JDBC Lookup
To define a JDBC lookup:
1. Select the Transform component and then, Properties from the Integration Project contextmenu.
The Properties dialog box opens.
2. Expand Transform Properties in the left pane and then select the @REPLACE Functioncategory.
Working With Functions
282 Information Builders
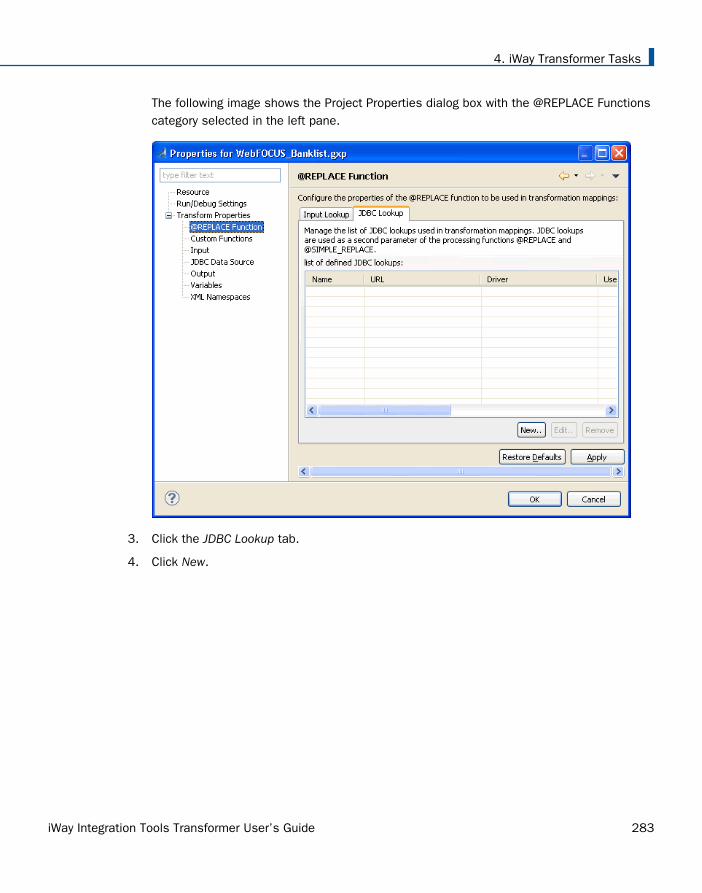
The following image shows the Project Properties dialog box with the @REPLACE Functionscategory selected in the left pane.
3. Click the JDBC Lookup tab.
4. Click New.
4. iWay Transformer Tasks
iWay Integration Tools Transformer User’s Guide 283

The JDBC Replace Function Dialog opens.
To access the particular database, you must provide the necessary information that isrequired for your JDBC lookup.
a. In the Name field, specify a name for the JDBC lookup.
b. In the URL field, specify the database URL.
Note: To define a predefined function (for example, @SREG) as the URL, click theBrowse button to the right of the URL field, which opens the Mapping Builder.
c. From the Driver drop-down list, select an available JDBC driver.
Note: iIT Transformer does not ship with any of the predefined drivers. The driver mustbe registered with iIT Transformer.
d. Specify a valid user name and password for accessing the database.
e. In the Match Column field, type the name of the source match column.
f. In the Replace Column field, specify either a database table name or an SQLstatement to run on the database.
g. From the Select Fields drop-down list, select one of the following methods to acquirethe match and replace values:
Working With Functions
284 Information Builders
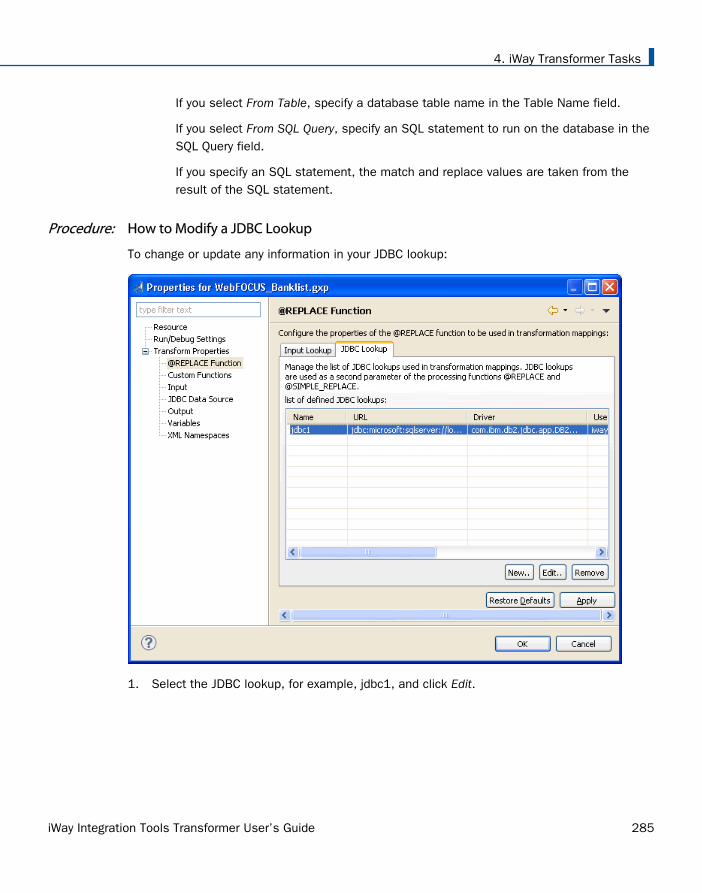
If you select From Table, specify a database table name in the Table Name field.
If you select From SQL Query, specify an SQL statement to run on the database in theSQL Query field.
If you specify an SQL statement, the match and replace values are taken from theresult of the SQL statement.
Procedure: How to Modify a JDBC Lookup
To change or update any information in your JDBC lookup:
1. Select the JDBC lookup, for example, jdbc1, and click Edit.
4. iWay Transformer Tasks
iWay Integration Tools Transformer User’s Guide 285

The JDBC Replace Function Dialog opens.
2. Click OK once you have completed the necessary modifications.
Procedure: How to Delete a JDBC Lookup
To delete a JDBC lookup, select the JDBC lookup, for example, JDBC1, and click Remove.
The JDBC lookup is removed from the list.
Using the @JDBCLOOKUP Function
The @JDBCLOOKUP function returns a matched value from a database using an SQLstatement. It takes the JDBC data source name and SQL statement in string form asparameters. The SQL statement can be set dynamically based on the input from otherfunctions within iIT Transformer. If more than one value is matching the query, then the lastmatching value is returned.
Working With Functions
286 Information Builders
When no result is found in the database, an empty string is returned. When more than oneresult is found, the last matching result is returned. Regardless of the number of columns inthe result set, the value of the first column is always returned. During the transformation withmultiple occurrences of @JDBC lookup, if the SQL statements are the same, then the returnedresult will be the same.
Parameters:
JDBC_data_source_name: String that represents a globally defined JDBC connectionconfiguration.
SQL_statement: SQL statement that can be created using SQL Builder.
Example:
@JDBCLOOKUP('LOOKUP_TEST', {'SELECT field1 FROM LOOKUP_TABLE WHERE field2 ' = '+@QUOTE(Customer/Person/Name)})})
where:
LOOKUP_TEST
Is the name of a JDBC connection configuration.
{'SELECT field1 FROM LOOKUP_TABLE WHERE field2 ' = '+@QUOTE(Customer/Person/Name)}
Is an SQL statement.
Procedure: How to Create an SQL Statement Using SQL Builder
To create an SQL statement, which can be used for the @JDBCLOOKUP function, you mustfollow the instructions below:
1. From the menu bar, click Project and select Properties.
The Properties dialog box opens.
2. Click the JDBC Data Source category in the left pane.
4. iWay Transformer Tasks
iWay Integration Tools Transformer User’s Guide 287

The following image shows the Properties dialog box with the JDBC Data Source categoryselected in the left pane.
3. Click New.
Working With Functions
288 Information Builders

The JDBC Data Source Dialog opens.
Perform the following steps:
a. In the Name field, provide a name for the JDBC connection.
This name is used as a string value for the JDBC_data_source_name parameter in the@JDBCLOOKUP function.
b. In the URL field, type the URL to the database.
Note: To define a predefined function (for example, @SREG) as the URL, click theBrowse button to the right of the URL field, which opens the Mapping Builder.
c. From the Driver drop-down list, select an available JDBC driver that is registered withiIT Transformer.
Note: iIT Transformer does not ship with any of the predefined drivers.
d. Type a valid user name and password to connect to the database.
e. Specify a timeout value in milliseconds.
Note: If the timeout value is omitted, or the value is 0 (default), then timeout is notenabled.
4. iWay Transformer Tasks
iWay Integration Tools Transformer User’s Guide 289

4. Click OK.
The JDBC lookup is added to the list of defined JDBC lookups.
5. Click OK.
6. In the Mapping Values pane of the Mappings tab, select an output node.
7. Click the ellipsis button.
The Mapping Builder opens.
8. From the Category drop-down list in the Functions pane of the Mapping Builder, select theProcessing Functions category.
9. Select the @JDBCLOOKUP function, and drag it onto the workspace area of the MappingBuilder.
10. Double-click the JDBC_data_source_name parameter.
Working With Functions
290 Information Builders

The JDBC Data Source dialog box opens as shown in the following image.
11. Select the name of a defined JDBC lookup, for example Oracle, and click OK.
The @JDBCLOOKUP function is updated as shown in the following image.
12. Double-click the SQL_statement parameter.
Since the SQL statement is an expression, the Where clause can contain the following:
Constant
Transformer Function
Input Node Context
Unlimited AND & OR
Note: In the Column Name field, you can also type * or Count (*) to return more advanceddata sets.
4. iWay Transformer Tasks
iWay Integration Tools Transformer User’s Guide 291

13. Click OK once you have finished creating your SQL statement.
Configuring Properties for Replace
Replace functions are used to match and replace specific values of the input data. Forexample, suppose your input data has a node called "car_age" with a value of either "new" or"used". If you decide to substitute the term "used" and want to use "pre-owned", you candefine a replace function with match and replace value pairing where the match value would bespecified as "used" and the replace value is "pre-owned."
Replace functions work similar to custom functions in that you must first define the functionitself and then, assign it in the output node mapping value which needs to be modified. Thistask can be accomplished with the @REPLACE and @SIMPLE_REPLACE functions.
The process of defining replace functions accounts for setting up the values to match andreplace, but not the mapping. You must map the replace functions using the Mapping Builder.For more information, see Using the Mapping Builder on page 269.
Procedure: How to Define A Replace Function
To define a replace function:
1. Right-click a Transform component and select Properties from the context menu.
The Properties dialog box opens.
2. Expand Transform Properties in the left pane and then select the @REPLACE Functioncategory.
Working With Functions
292 Information Builders
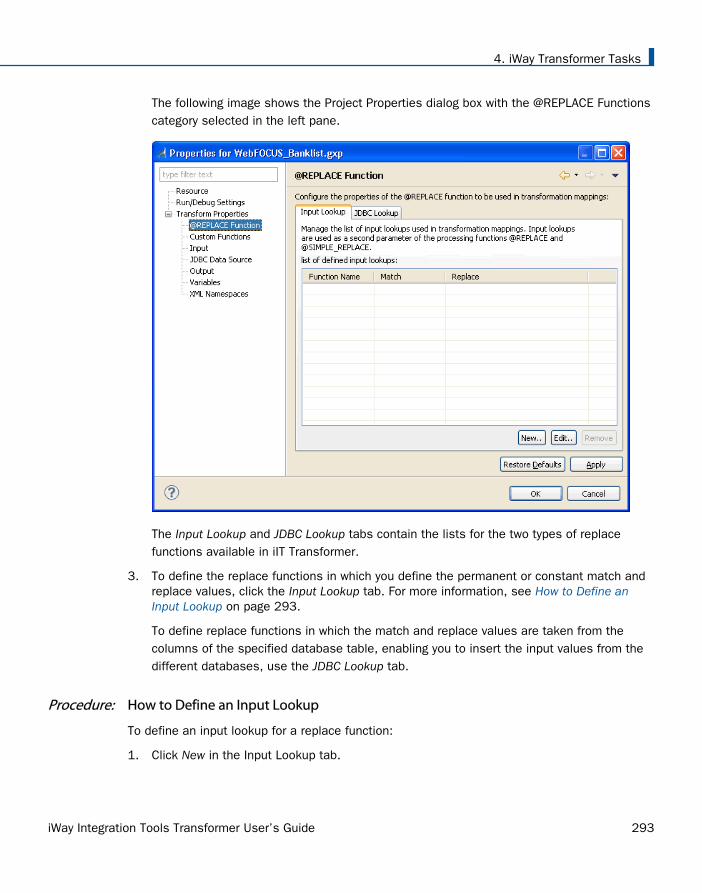
The following image shows the Project Properties dialog box with the @REPLACE Functionscategory selected in the left pane.
The Input Lookup and JDBC Lookup tabs contain the lists for the two types of replacefunctions available in iIT Transformer.
3. To define the replace functions in which you define the permanent or constant match andreplace values, click the Input Lookup tab. For more information, see How to Define anInput Lookup on page 293.
To define replace functions in which the match and replace values are taken from thecolumns of the specified database table, enabling you to insert the input values from thedifferent databases, use the JDBC Lookup tab.
Procedure: How to Define an Input Lookup
To define an input lookup for a replace function:
1. Click New in the Input Lookup tab.
4. iWay Transformer Tasks
iWay Integration Tools Transformer User’s Guide 293
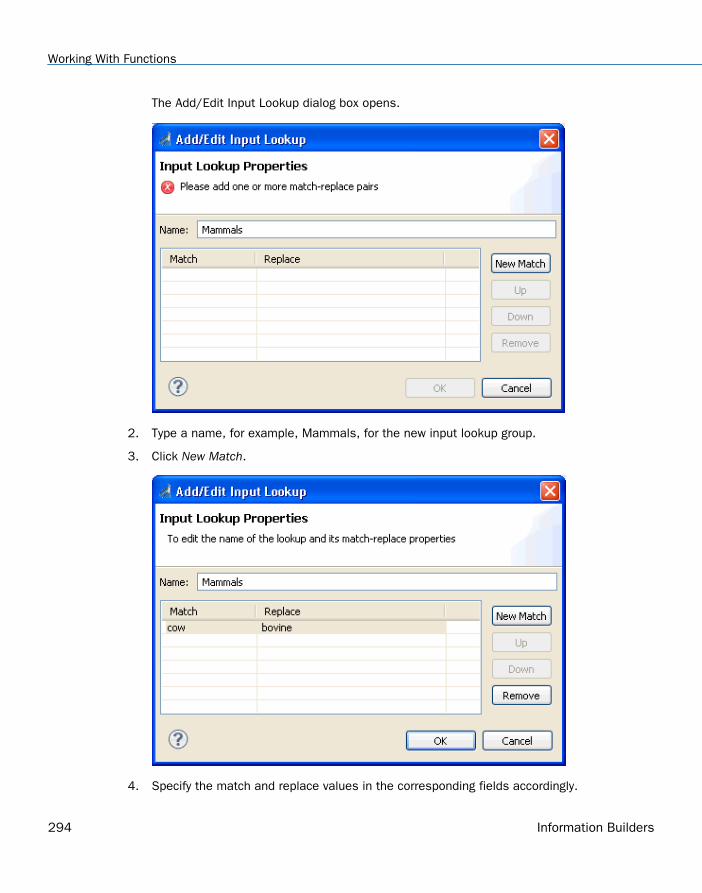
The Add/Edit Input Lookup dialog box opens.
2. Type a name, for example, Mammals, for the new input lookup group.
3. Click New Match.
4. Specify the match and replace values in the corresponding fields accordingly.
Working With Functions
294 Information Builders
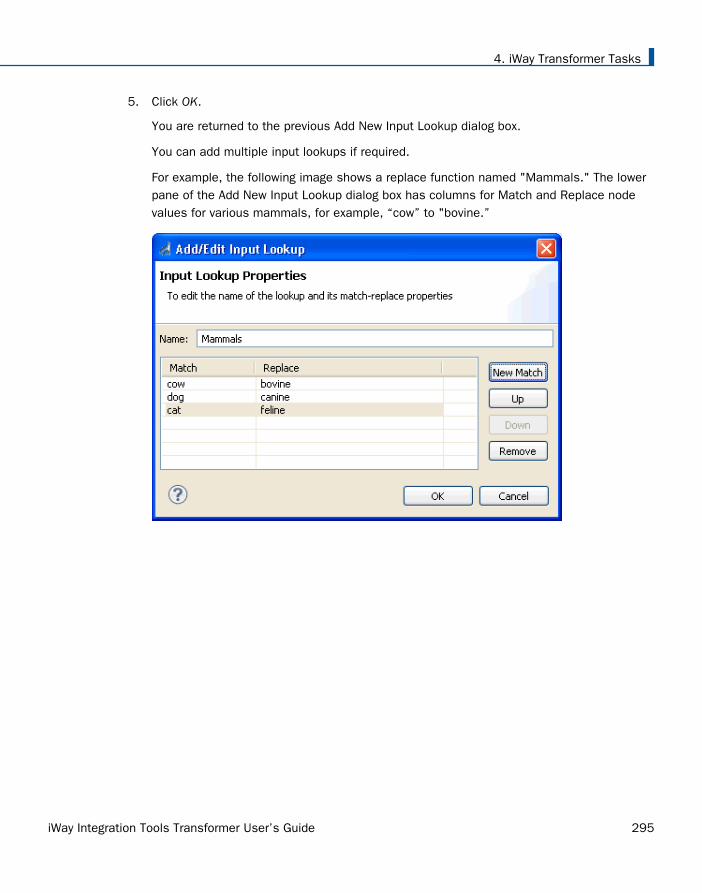
5. Click OK.
You are returned to the previous Add New Input Lookup dialog box.
You can add multiple input lookups if required.
For example, the following image shows a replace function named "Mammals." The lowerpane of the Add New Input Lookup dialog box has columns for Match and Replace nodevalues for various mammals, for example, “cow” to "bovine.”
4. iWay Transformer Tasks
iWay Integration Tools Transformer User’s Guide 295

Procedure: How to Modify an Input Lookup
To modify an input lookup:
1. Select the input lookup, for example, Mammals, and click Edit.
Working With Functions
296 Information Builders
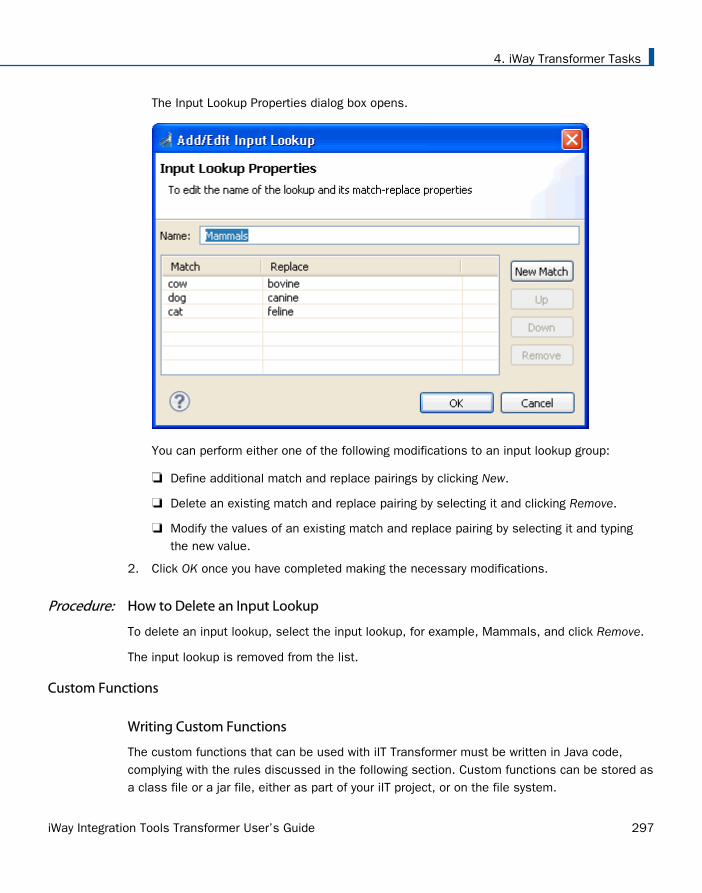
The Input Lookup Properties dialog box opens.
You can perform either one of the following modifications to an input lookup group:
Define additional match and replace pairings by clicking New.
Delete an existing match and replace pairing by selecting it and clicking Remove.
Modify the values of an existing match and replace pairing by selecting it and typingthe new value.
2. Click OK once you have completed making the necessary modifications.
Procedure: How to Delete an Input Lookup
To delete an input lookup, select the input lookup, for example, Mammals, and click Remove.
The input lookup is removed from the list.
Custom Functions
Writing Custom Functions
The custom functions that can be used with iIT Transformer must be written in Java code,complying with the rules discussed in the following section. Custom functions can be stored asa class file or a jar file, either as part of your iIT project, or on the file system.
4. iWay Transformer Tasks
iWay Integration Tools Transformer User’s Guide 297

Note: The following section is written assuming that you are familiar with the Javaprogramming language.
Each custom function you write must be a subclass of the AbstractFunction super class.
You must implement a constructor for your class and the two abstract methods, execute() andgetReturnType(), which are inherited from the AbstractFunction class. You may also choose toadd your own methods. The Java code for your custom function must conform to the followingformat:
import com.iwaysoftware.transform.common.function.AbstractFunction;public class MY_FUNCTION_NAME extends AbstractFunction{ public MY_FUNCTION_NAME() { setName("MY_FUNCTION_NAME"); setDescription("This is what my function does..."); } public Object execute() throws Exception { // perform function's execution here // and return desired output value } public Class getReturnType() { return MY_FUNCTION'S_RETURN_TYPE; }}
where:
MY_FUNCTION_NAME
Is the name of your custom function.
MY_FUNCTION'S_RETURN_TYPE
Is the data type of your custom function's return value.
Import Statement
You must include the following import statement in the beginning of your custom functionimplementation:
import com.iwaysoftware.transform.common.function.AbstractFunction;
This enables you access to the methods required for your custom function implementation.
Note: Optionally, you can utilize the logging capabilities of iIT Transformer in the code of yourcustom function by including the following import statements in the beginning of your customfunction implementation:
Working With Functions
298 Information Builders
import com.iwaysoftware.transform.common.log.LogUtil;import com.iwaysoftware.transform.common.log.TransformLogger;
Class Declaration
As stated previously, a custom function is a subclass of the AbstractFunction super class.Therefore, you can declare your custom function as follows:
public class MY_FUNCTION_NAME extends AbstractFunction {...}
where:
MY_FUNCTION_NAME
Is the name of your custom function.
Constructor
There are two methods you must call within the constructor of your custom function. They arethe setName(String name) and setDescription(String description) methods, which arepredefined in the AbstractFunction super class. The values provided as parameters for thesemethods are utilized when you access your custom function within iIT Transformer.
The name of the function used in iIT Transformer is the parameter that you set using thesetName method, and the description of the function used by iIT Transformer is the messageyou type as the parameter in setDescription.
execute()
The method execute(), is one of two abstract methods declared in the AbstractFunction superclass, which is supposed to contain the function procedures and instructions. Your customfunction, which is a subclass of AbstractFunction, must therefore, implement the execute()method as follows:
public Object execute() throws Exception {...}
When you are writing the body of this method, you can follow the same style that is used towrite any method in Java.
4. iWay Transformer Tasks
iWay Integration Tools Transformer User’s Guide 299
Getting Arguments
Retrieving arguments passed into your custom function is achieved through the methodsgetValueInstance(), getArgument(int index), and getFunctionContext(), which are the predefinedmethods from the functions package that your custom function is a part of. To store twoarguments as String variables argOne and argTwo, write the following:
String argOne = (String)getFunctionContext().getArgument(0).getValueInstance();
String argTwo = (String)getFunctionContext().getArgument(1).getValueInstance();
Other methods that you may find useful for your custom function implementation are:
getNumberOfArguments()
Returns an integer indicating the number of arguments passed to your function by the user,which is used in conjunction with method, getFunctionContext(), as follows:
int num = getFunctionContext().getNumberOfArguments();
getArguments()
Returns an array containing all of the arguments passed to your function by the user. Tostore your arguments in an array of objects called myArray, use the following format:
Object[] myArray = getFunctionContext().getArguments();
getReturnType()
getReturnType() is one of the abstract methods declared in the AbstractFunction class.Therefore your custom function, which is a subclass of AbstractFunction, must implement thismethod. The value returned by getReturnType() indicates the type of value you return in methodexecute(). The choices for your return value are:
java.lang.Boolean.class
java.lang.Character.class
java.lang.Double.class
java.lang.Float.class
java.lang.Integer.class
java.lang.Long.class
Working With Functions
300 Information Builders

java.lang.String.class
java.lang.StringBuffer.class
Associated Object Map
The custom function interface of iIT Transformer is now updated with the ability to utilize thedata structure of customizable global parameters. This data structure is implemented as aJava Map object, which is an object that maps keys to values. This object can be accessed byany custom function within your project. As a result, it can contain global reusable data orinformation that can be cached, such as your database connection string. The AssociatedObject Map can also be used to track the usage of the custom functions in your project, ifrequired. Use the following format to access the Associated Object Map:
Map objectMap = super.getAssociatedObjectMap();
Sample Custom Function
The following snippet of Java code is the implementation for a custom function that returns astring resulting from adding 25 to the input value of the function.
import java.math.BigDecimal;import java.util.Map;import com.iwaysoftware.transform.common.function.AbstractFunction;import com.iwaysoftware.transform.common.log.LogUtil;import com.iwaysoftware.transform.common.log.TransformLogger;public class ADD25 extends AbstractFunction{ private static final BigDecimal BD25 = new BigDecimal(25); public ADD25() { /* specifies the function name to be used within iAM */ setName("ADD25"); /* specifies the function description to be used within iAM */ setDescription("Return a string resulting from adding 25 to input value."); } public Object execute() throws Exception { /* * retrieves the first argument and assigns it to Double variable * 'input' */
4. iWay Transformer Tasks
iWay Integration Tools Transformer User’s Guide 301

// arguments are String always String inputArg = (String) getFunctionContext().getArgument(0).getValueInstance(); BigDecimal input; try { input = new BigDecimal(inputArg); } catch (Exception e) { input = new BigDecimal(0); } // Gets the instance of the logger TransformLogger logger = super.getLogger(); // Gets the debug flag boolean debug = LogUtil.canDebug(logger); // Fetches associate objects Map objectMap = super.getAssociatedObjectMap(); /* creates a variable to hold the value that will get returned */ String answerString; if (objectMap.containsKey(input)) {
// return stored result String result = (String) objectMap.get(input); if (debug) { LogUtil.debug(false, logger, "returning CACHED result: "); } return result; } else { answerString = input.add(BD25).toString(); objectMap.put(input, answerString); if (debug) {
LogUtil.debug(false, logger, "returning the value : " + answerString); } // return string return answerString; } } public Class getReturnType() { /* specifies that method execute() returns a String */ return java.lang.String.class; }
Working With Functions
302 Information Builders

Defining Custom Functions
If no predefined iIT Transformer function or their combination is sufficient to perform the taskyou require, you can write your own custom function containing the implementations of yourtask and returning the desired value. The custom functions must be written in Java code andcompiled to produce a .class file, which then must be stored in the following directory to beavailable for use in design time with iIT Transformer:
<iWaySMHome>/tools/transformer/custom_functions
where:
<iWaySMHome>
Is the directory where iWay Service Manager was installed.
Before using a custom function within iIT Transformer, test it to ensure it works properly. Formore information on creating or writing custom functions, see Writing Custom Functions onpage 297.
Defining a custom function in iIT Transformer creates a link to the actual customfunction .class file stored in the custom_functions directory. Custom functions are definedusing the Project Properties dialog box.
You can also import the custom functions from the other Transform components. For moreinformation, see How to Import a Custom Function in iIT Transformer on page 309.
Procedure: How to Define a Custom Function in iIT Transformer
To define a custom function:
1. Right-click a Transform component and select Properties from the context menu.
The Properties dialog box opens.
2. In the left pane, expand Transform Properties and select Custom Functions.
4. iWay Transformer Tasks
iWay Integration Tools Transformer User’s Guide 303

The following image shows the Properties dialog box with the Custom Functions categoryselected in the left pane.
3. Click Edit Functions.
Working With Functions
304 Information Builders

The Edit Custom Function dialog box opens.
Several options are provided to add one or multiple custom functions if they reside ina .jar file.
4. iWay Transformer Tasks
iWay Integration Tools Transformer User’s Guide 305

4. Click Add External JARs, select the location of your .jar file, and then click OK.
Working With Functions
306 Information Builders
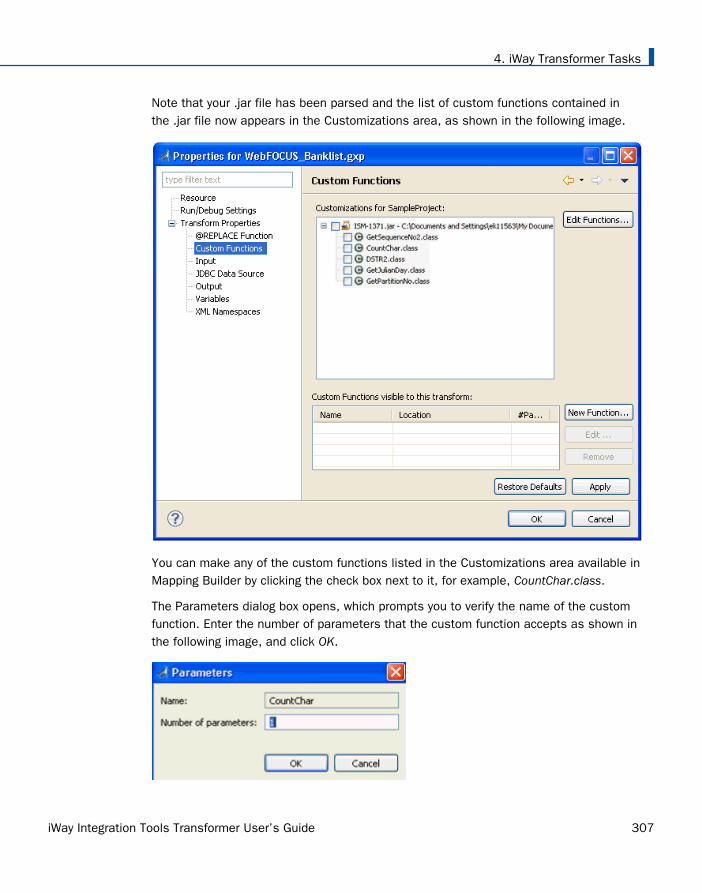
Note that your .jar file has been parsed and the list of custom functions contained inthe .jar file now appears in the Customizations area, as shown in the following image.
You can make any of the custom functions listed in the Customizations area available inMapping Builder by clicking the check box next to it, for example, CountChar.class.
The Parameters dialog box opens, which prompts you to verify the name of the customfunction. Enter the number of parameters that the custom function accepts as shown inthe following image, and click OK.
4. iWay Transformer Tasks
iWay Integration Tools Transformer User’s Guide 307
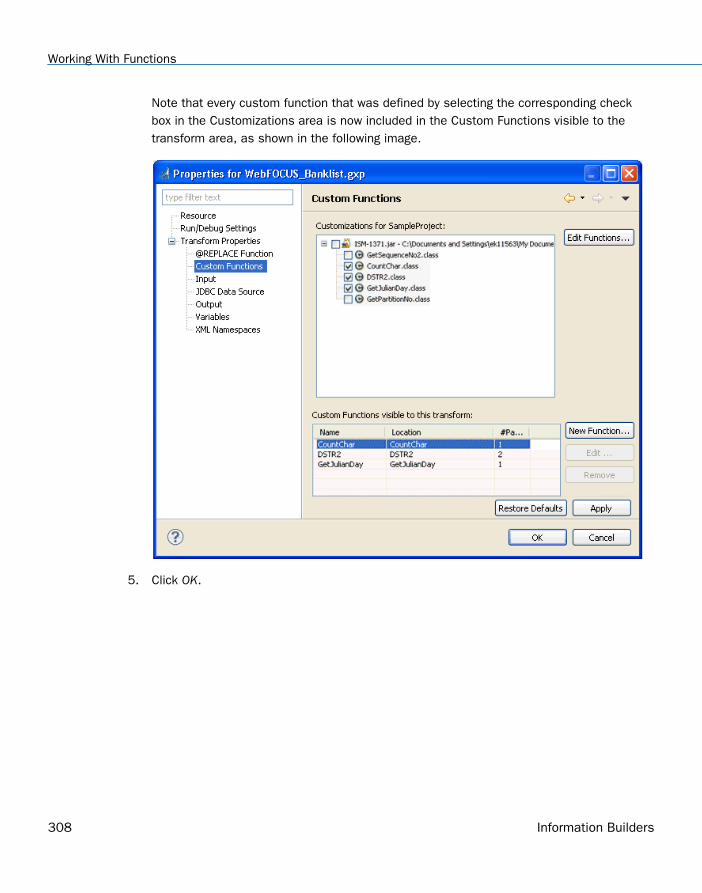
Note that every custom function that was defined by selecting the corresponding checkbox in the Customizations area is now included in the Custom Functions visible to thetransform area, as shown in the following image.
5. Click OK.
Working With Functions
308 Information Builders
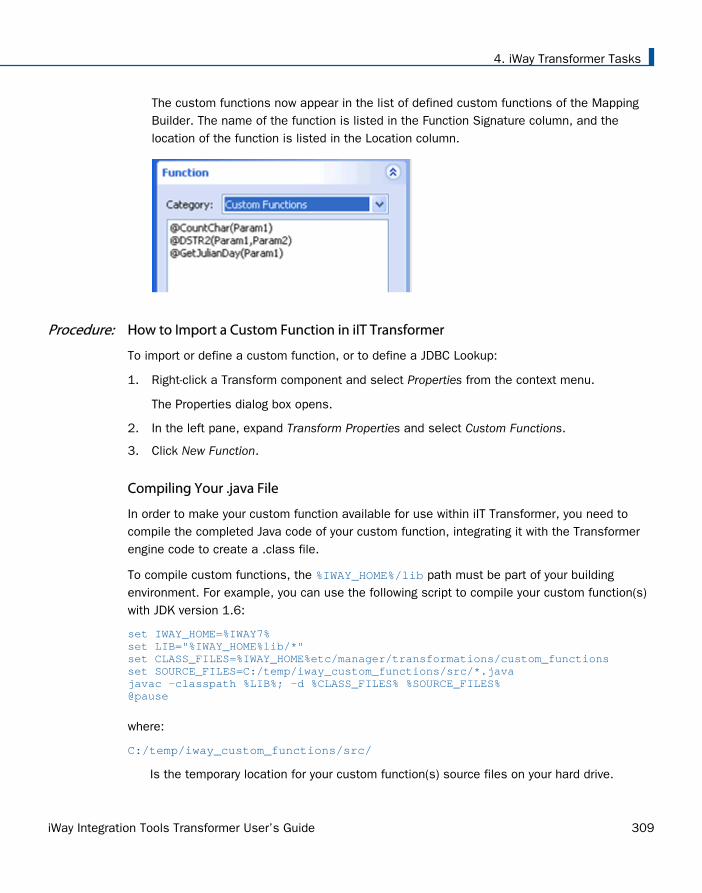
The custom functions now appear in the list of defined custom functions of the MappingBuilder. The name of the function is listed in the Function Signature column, and thelocation of the function is listed in the Location column.
Procedure: How to Import a Custom Function in iIT Transformer
To import or define a custom function, or to define a JDBC Lookup:
1. Right-click a Transform component and select Properties from the context menu.
The Properties dialog box opens.
2. In the left pane, expand Transform Properties and select Custom Functions.
3. Click New Function.
Compiling Your .java File
In order to make your custom function available for use within iIT Transformer, you need tocompile the completed Java code of your custom function, integrating it with the Transformerengine code to create a .class file.
To compile custom functions, the %IWAY_HOME%/lib path must be part of your buildingenvironment. For example, you can use the following script to compile your custom function(s)with JDK version 1.6:
set IWAY_HOME=%IWAY7%set LIB="%IWAY_HOME%lib/*"set CLASS_FILES=%IWAY_HOME%etc/manager/transformations/custom_functionsset SOURCE_FILES=C:/temp/iway_custom_functions/src/*.javajavac -classpath %LIB%; -d %CLASS_FILES% %SOURCE_FILES%@pause
where:
C:/temp/iway_custom_functions/src/
Is the temporary location for your custom function(s) source files on your hard drive.
4. iWay Transformer Tasks
iWay Integration Tools Transformer User’s Guide 309
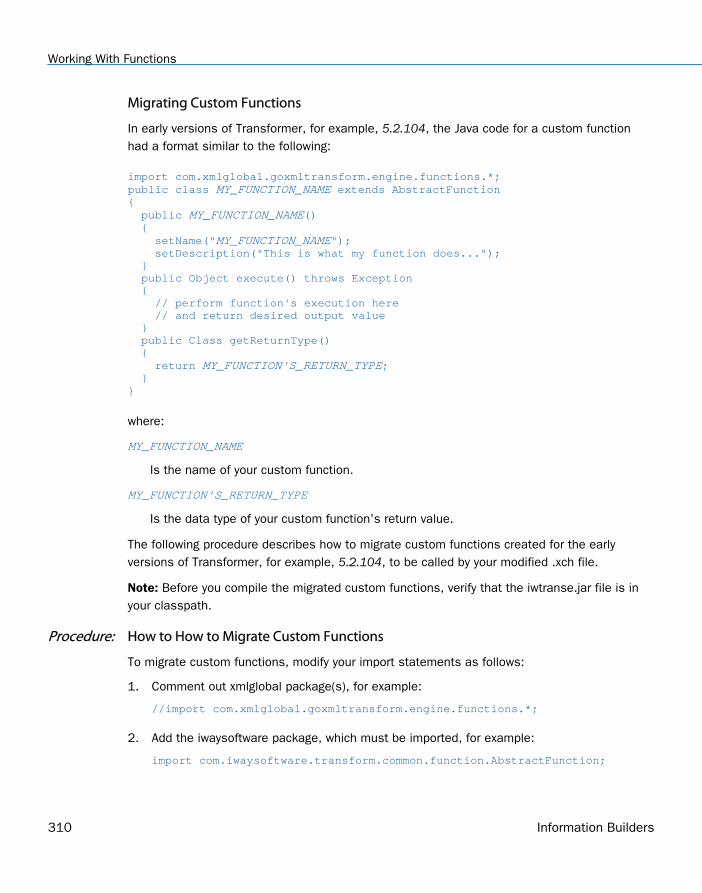
Migrating Custom Functions
In early versions of Transformer, for example, 5.2.104, the Java code for a custom functionhad a format similar to the following:
import com.xmlglobal.goxmltransform.engine.functions.*;public class MY_FUNCTION_NAME extends AbstractFunction{ public MY_FUNCTION_NAME() { setName("MY_FUNCTION_NAME"); setDescription("This is what my function does..."); } public Object execute() throws Exception { // perform function's execution here // and return desired output value } public Class getReturnType() { return MY_FUNCTION'S_RETURN_TYPE; }}
where:
MY_FUNCTION_NAME
Is the name of your custom function.
MY_FUNCTION'S_RETURN_TYPE
Is the data type of your custom function's return value.
The following procedure describes how to migrate custom functions created for the earlyversions of Transformer, for example, 5.2.104, to be called by your modified .xch file.
Note: Before you compile the migrated custom functions, verify that the iwtranse.jar file is inyour classpath.
Procedure: How to How to Migrate Custom Functions
To migrate custom functions, modify your import statements as follows:
1. Comment out xmlglobal package(s), for example:
//import com.xmlglobal.goxmltransform.engine.functions.*;
2. Add the iwaysoftware package, which must be imported, for example:
import com.iwaysoftware.transform.common.function.AbstractFunction;
Working With Functions
310 Information Builders

Using Custom Functions at Run Time
In iIT Transformer, the functionality of custom functions for run time purposes is the same asthe design time functionality. For more information on configuring custom functions, see Custom Functions on page 297.
4. iWay Transformer Tasks
iWay Integration Tools Transformer User’s Guide 311

Working With Functions
312 Information Builders
Chapter5iWay Transformer Tips and Tricks
This section provides useful tips and tricks that are related to iWay Transformer.
In this chapter:
XSLT Runtime Processing
XSLT Runtime Processing
Since iWay Service Manager (iSM) does not include a native XSLT engine for iWay Transformer,iSM invokes external libraries for XSLT runtime processing.
By default, iSM uses an XSLT engine for iWay Transformer that is compatible in Sun/Oracleand IBM Java Virtual Machines (JVMs). However, you can set any available XSLT engine forruntime processing to be used by iWay Transformer. You must ensure that the Java runtimeproperty is assigned as described and the implementation is added to the classpath.
Note: The default XSLT engine that is set by iSM points to a processing library that supportsXSLT Version 1.0. To enable support for XSLT Version 2.0, you must point to the processinglibrary that is identified in this topic (org.apache.xalan.processor.TransformerFactoryImpl).
To view the current library that is used by iSM for XSLT runtime processing, logon to the iSMAdministration Console, and click Java Properties in the left pane, as shown in the followingimage.
iWay Integration Tools Transformer User’s Guide 313

The Java Properties page opens, as shown in the following image.
Scroll down the list until you see the javax.xml.transform.TransformerFactory property and thecorresponding value that is currently being referenced. In the following image,javax.xml.transform.TransformerFactory is set toorg.apache.xalan.xsltc.trax.TransformerFactoryImpl.
If no value is assigned to the javax.xml.transform.TransformerFactory runtime property, thedefault behavior of iSM is to check for thecom.ibm.xtq.xslt.jaxp.compiler.TransformerFactoryImpl library, which is used in the IBMimplementation of Java. if this XSLT engine is not found, iSM sets the runtime property toorg.apache.xalan.xsltc.trax.TransformerFactoryImpl by default.
To point to a different library that will be used by iWay Transformer for XSLT runtimeprocessing, you can use one of the following options:
If iSM is running as a service, then use the iSM Administration Console to add the setting.
Note: This is the recommended option to use.
If iSM is running as an application, then add the setting to the iway7.cmd build script.
XSLT Runtime Processing
314 Information Builders

Option 1: Running iWay Service Manager as a Service
In the iSM Administration Console, click Java Settings in the left pane, as shown in thefollowing image.
The Java Settings page opens, as shown in the following image.
In the Java Virtual Machine Settings section, specify the following in the Startup field:
5. iWay Transformer Tips and Tricks
iWay Integration Tools Transformer User’s Guide 315

-Djavax.xml.transform.TransformerFactory=org.apache.xalan.processor.TransformerFactoryImpl
For example:
In this example, javax.xml.transform.TransformerFactory is now being set toorg.apache.xalan.processor.TransformerFactoryImpl.
Click Update when you are finished. As a best practice, restart iSM as well.
Option 2: Running iWay Service Manager as an Application
Edit the iway70.cmd build script and add the following command to the Java settings:
-Djavax.xml.transform.TransformerFactory=org.apache.xalan.processor.TransformerFactoryImpl
Save the iway70.cmd build script and restart iSM when you are finished.
XSLT Runtime Processing
316 Information Builders

FeedbackCustomer success is our top priority. Connect with us today!
Information Builders Technical Content Management team is comprised of many talentedindividuals who work together to design and deliver quality technical documentation products.Your feedback supports our ongoing efforts!
You can also preview new innovations to get an early look at new content products andservices. Your participation helps us create great experiences for every customer.
To send us feedback or make a connection, contact Sarah Buccellato, Technical Editor,Technical Content Management at [email protected].
To request permission to repurpose copyrighted material, please contact Frances Gambino,Vice President, Technical Content Management at [email protected].

Information Builders, Inc.Two Penn PlazaNew York, NY 10121-2898
iWay Integration Tools Transformer User’s GuideVersion 7.0.x and Higher
DN3502273.0418
Top Related