


Languages
Pages
Legal


INSTRUCTIONMANUAL
Intense IR 960H Series
HT7040H/HT7042H(960H Outdoor IR Bullet Camera)
HT671H/HT670H/HT672H(960H Outdoor IR Dome Camera)
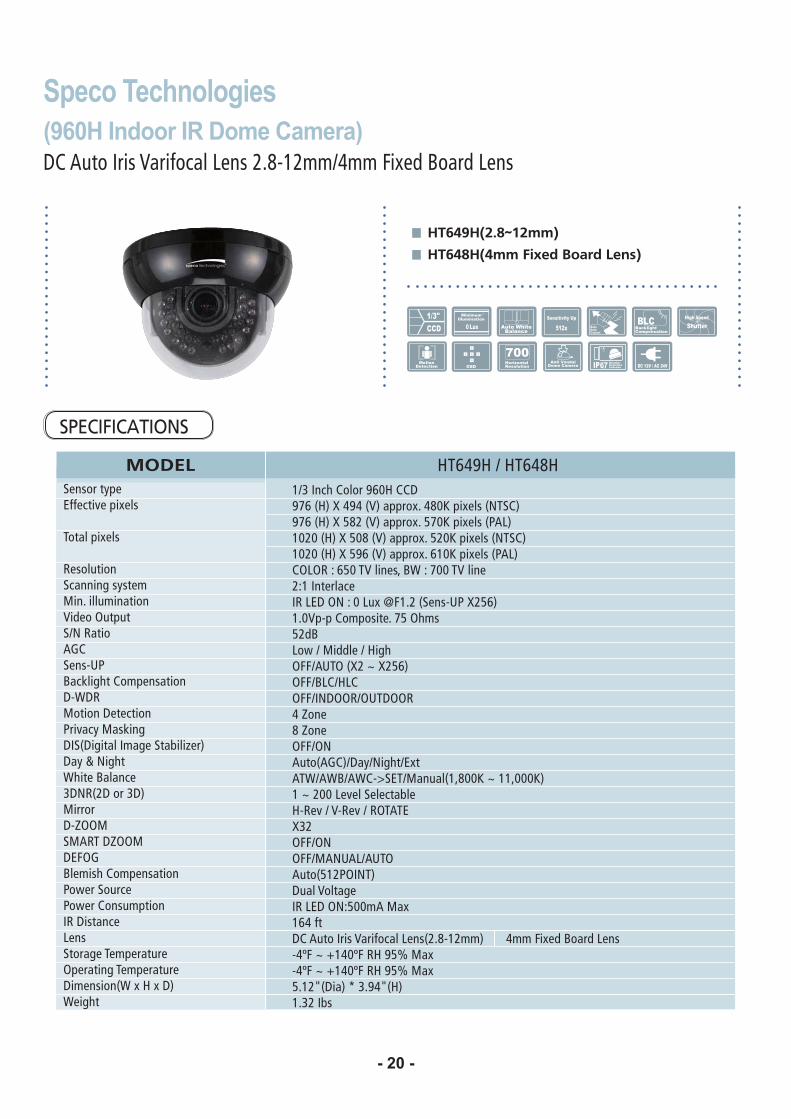
HT649H/HT648H(960H Indoor IR Dome Camera)
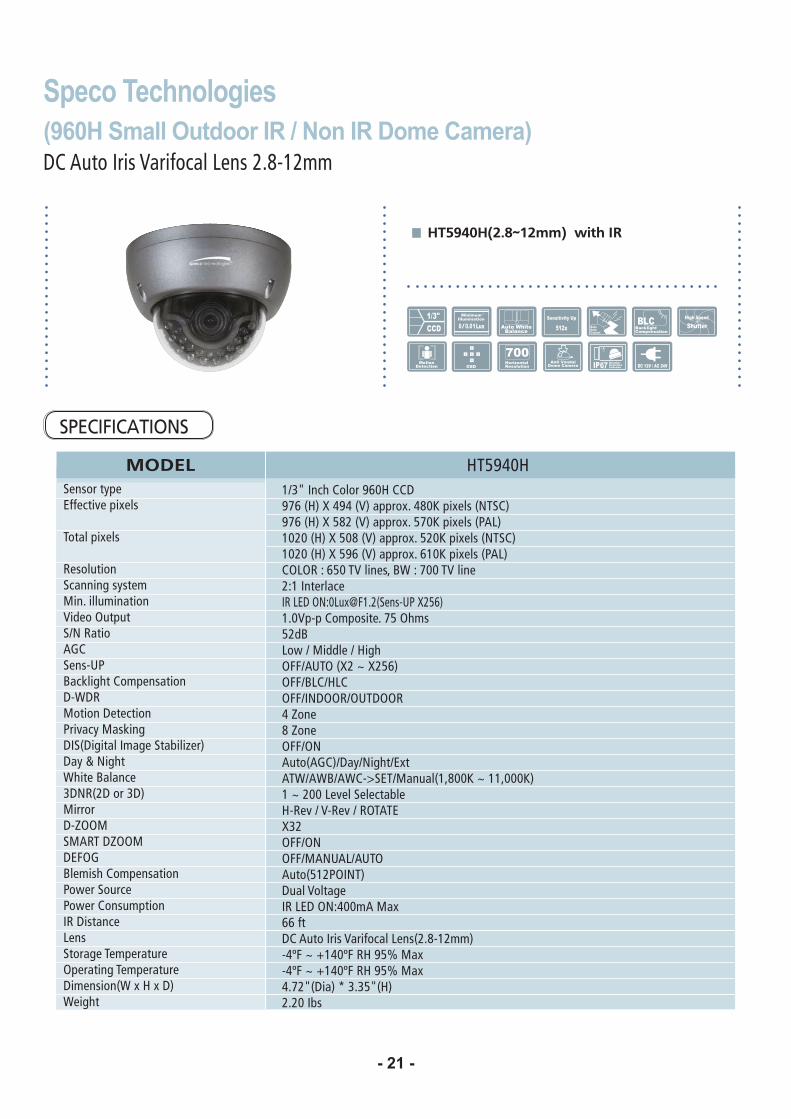
HT5940H(960H Small Outdoor IR )

Contents
- 1 -
�Contents ...................................................... 1
�Precautions ................................................. 2, 3
�Safety Instructions ...................................... 4
�Package Contents ....................................... 5
�Camera Installation ..................................... 6-12
�Lens Adjustment ......................................... 3-17
������������ .............................................. 18-21
�Camera Dimension ..................................... 22-23
�Features ...................................................... 24
�OSD Menu Details ...................................... 25-39
�Trouble Shooting ......................................... 40
- 2 -
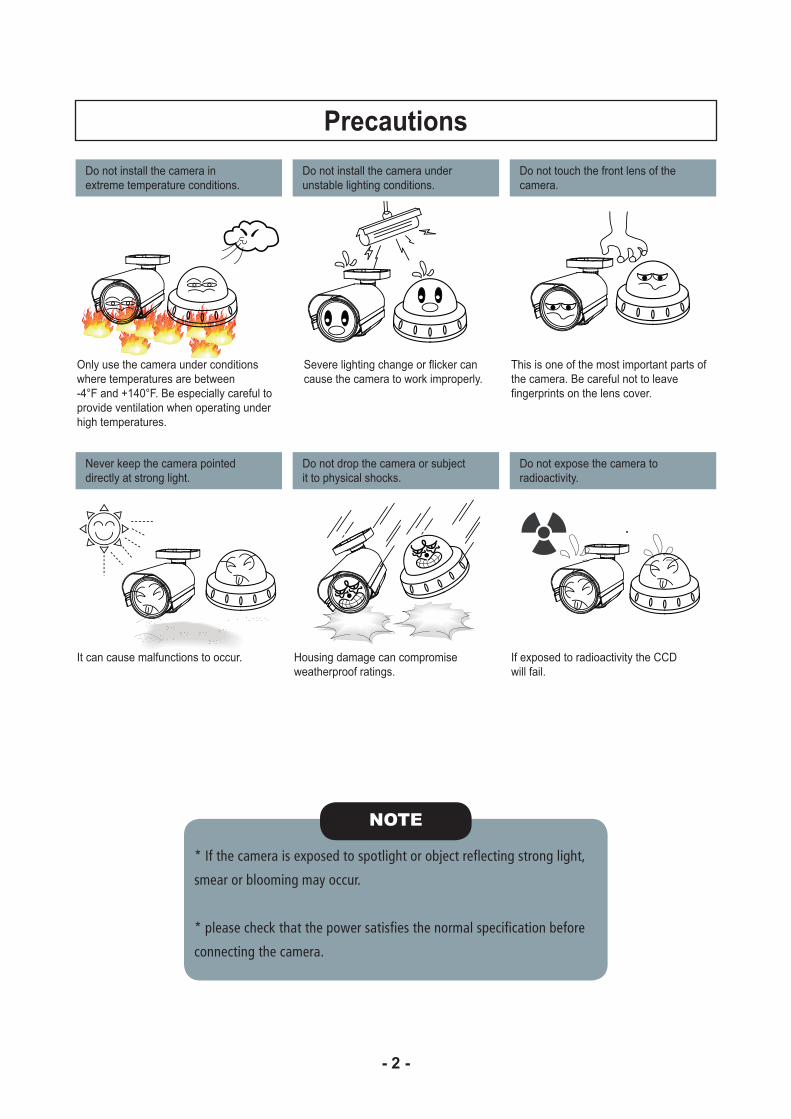
PrecautionsDo not install the camera inextreme temperature conditions.
Do not touch the front lens of thecamera.
Never keep the camera pointeddirectly at strong light.
Do not expose the camera toradioactivity.
Do not install the camera underunstable lighting conditions.
Do not drop the camera or subjectit to physical shocks.
Only use the camera under conditionswhere temperatures are between -4°F and +140°F. Be especially careful to provide ventilation when operating under high temperatures.
This is one of the most important parts of the camera. Be careful not to leavefingerprints on the lens cover.
It can cause malfunctions to occur. If exposed to radioactivity the CCDwill fail.
Severe lighting change or flicker cancause the camera to work improperly.
Housing damage can compromise weatherproof ratings.
NOTE
* If the camera is exposed to spotlight or object reflecting strong light,
smear or blooming may occur.
* please check that the power satisfies the normal specification before
connecting the camera.
- 3 -
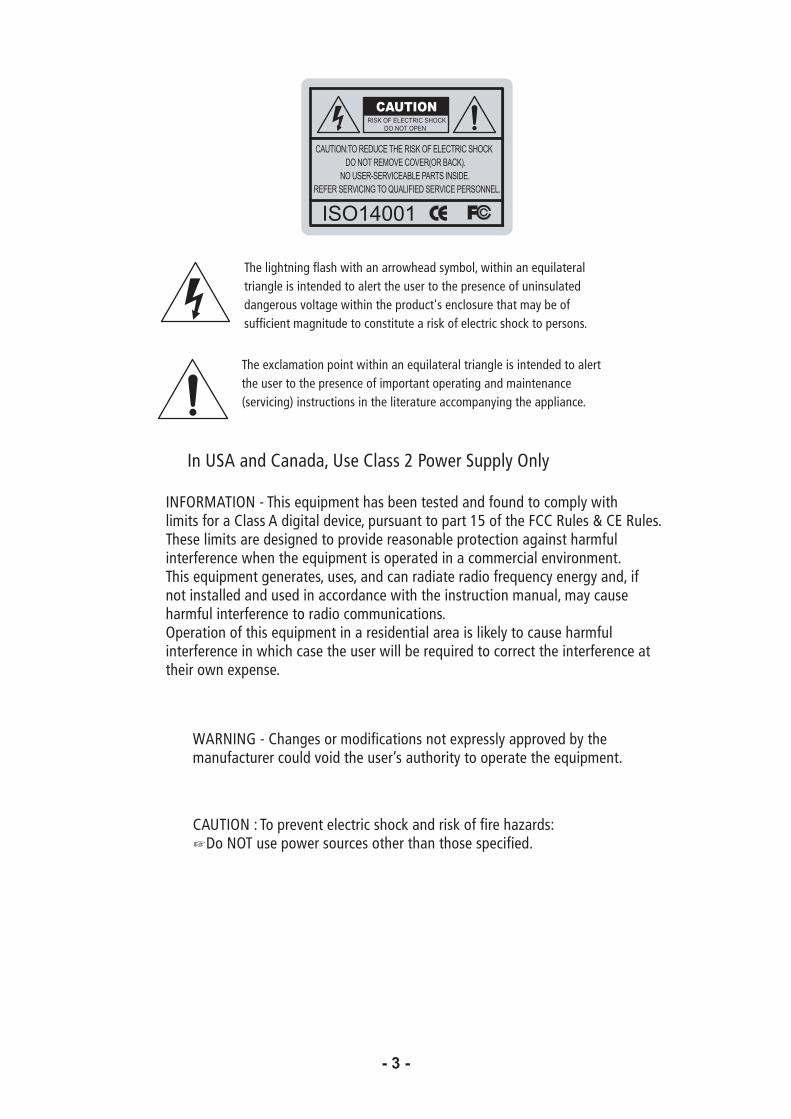
CAUTIONRISK OF ELECTRIC SHOCK DO NOT OPEN
CAUTION:TO REDUCE THE RISK OF ELECTRIC SHOCK DO NOT REMOVE COVER(OR BACK). NO USER-SERVICEABLE PARTS INSIDE. REFER SERVICING TO QUALIFIED SERVICE PERSONNEL.
ISO14001
The lightning flash with an arrowhead symbol, within an equilateraltriangle is intended to alert the user to the presence of uninsulateddangerous voltage within the product's enclosure that may be ofsufficient magnitude to constitute a risk of electric shock to persons.
The exclamation point within an equilateral triangle is intended to alertthe user to the presence of important operating and maintenance(servicing) instructions in the literature accompanying the appliance.
INFORMATION - This equipment has been tested and found to comply withlimits for a Class A digital device, pursuant to part 15 of the FCC Rules & CE Rules.These limits are designed to provide reasonable protection against harmfulinterference when the equipment is operated in a commercial environment.This equipment generates, uses, and can radiate radio frequency energy and, ifnot installed and used in accordance with the instruction manual, may causeharmful interference to radio communications.Operation of this equipment in a residential area is likely to cause harmfulinterference in which case the user will be required to correct the interference attheir own expense.
WARNING - Changes or modifications not expressly approved by themanufacturer could void the user’s authority to operate the equipment.
CAUTION : To prevent electric shock and risk of fire hazards:Do NOT use power sources other than those specified.
In USA and Canada, Use Class 2 Power Supply Only
- 4 -
Safety Instructions
���� ������ ����� �� �������� �� �������� �������� ��� There are no user serviceable parts inside Do not disassemble this camera other than to make initial adjustments Use a UL approved regulated 24 volt AC or 12 volt DC power supply ��� ��������� �� ����� ���� ����� ������ ��� � ��������� ���� Please insure that your installation area can support the weight of the camera
Do not use a strong or abrasive detergent when cleaning the camera Do not install near cooling or heating device
- 5 -
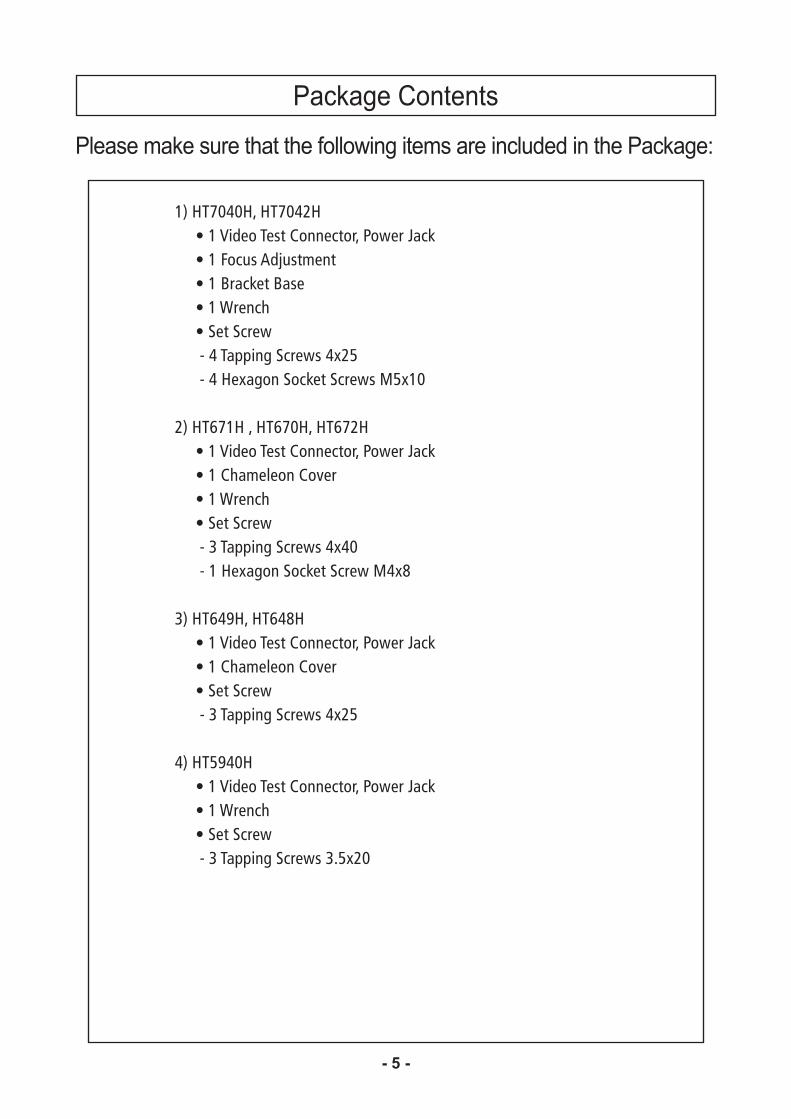
Package Contents
Please make sure that the following items are included in the Package:
1) HT7040H, HT7042H������������������ ���������������������������������������������������������������������������������������������� - 4 Tapping Screws 4x25 - 4 Hexagon Socket Screws M5x10 2) HT671H , HT670H, HT672H ������������������ �������������������������� ����!��� "��������������������������������� - 3 Tapping Screws 4x40 - 1 Hexagon Socket Screw M4x8 3) HT649H, HT648H������������������ �������������������������� ����!��� "������������������ - 3 Tapping Screws 4x25
4) HT5940H������������������ ������������������������������������������������ - 3 Tapping Screws 3.5x20
- 6 -
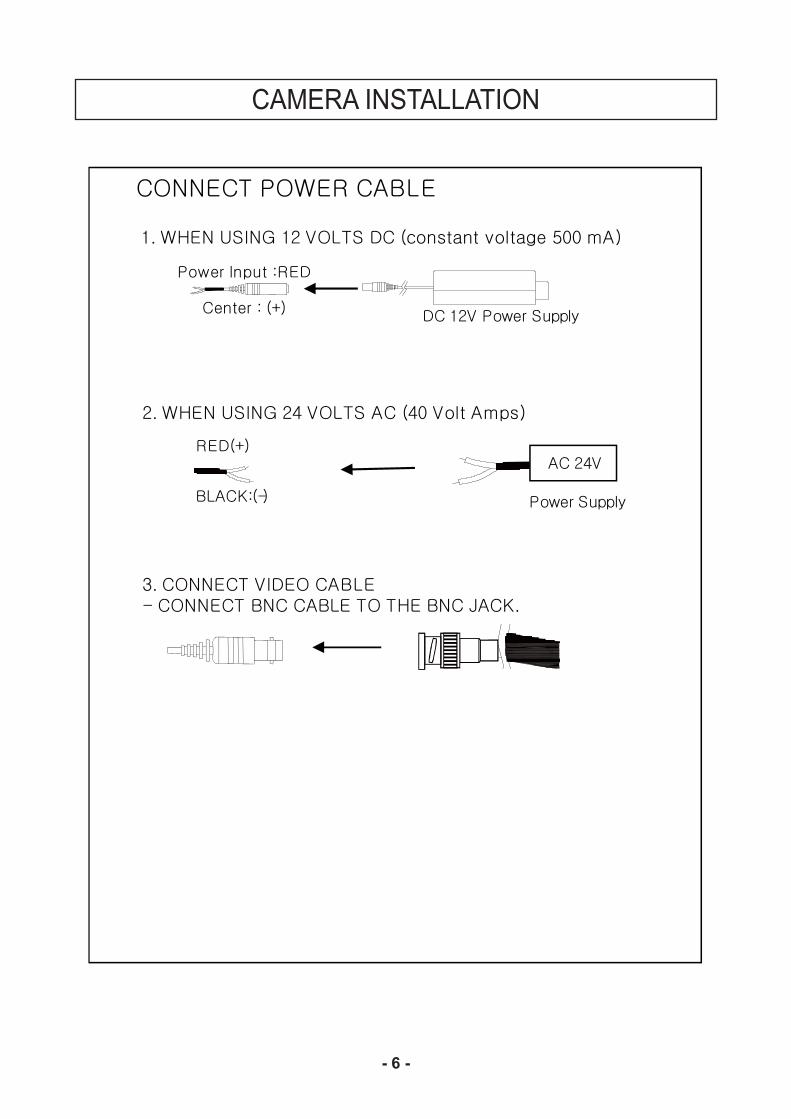
CAMERA INSTALLATION

- 7 -
CAMERA INSTALLATION
Compatibility
1) HT7040H, HT7042H
2) HT671H, HT670H, HT649H, HT648H, HT672H
INTCM
CVCJBD
INTJBS
INTPMDFM
CVCJBB
INTCMINTWM
- 8 -
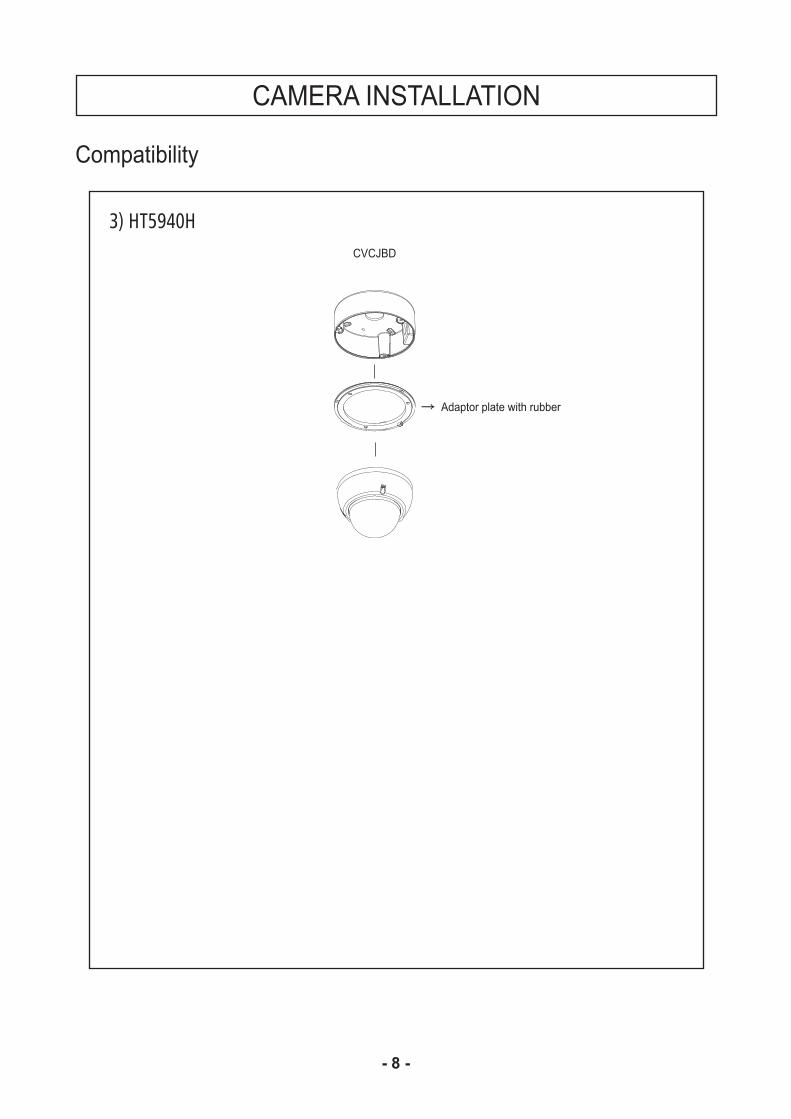
CAMERA INSTALLATION
Compatibility
3) HT5940HCVCJBD
Adaptor plate with rubber
- 9 -
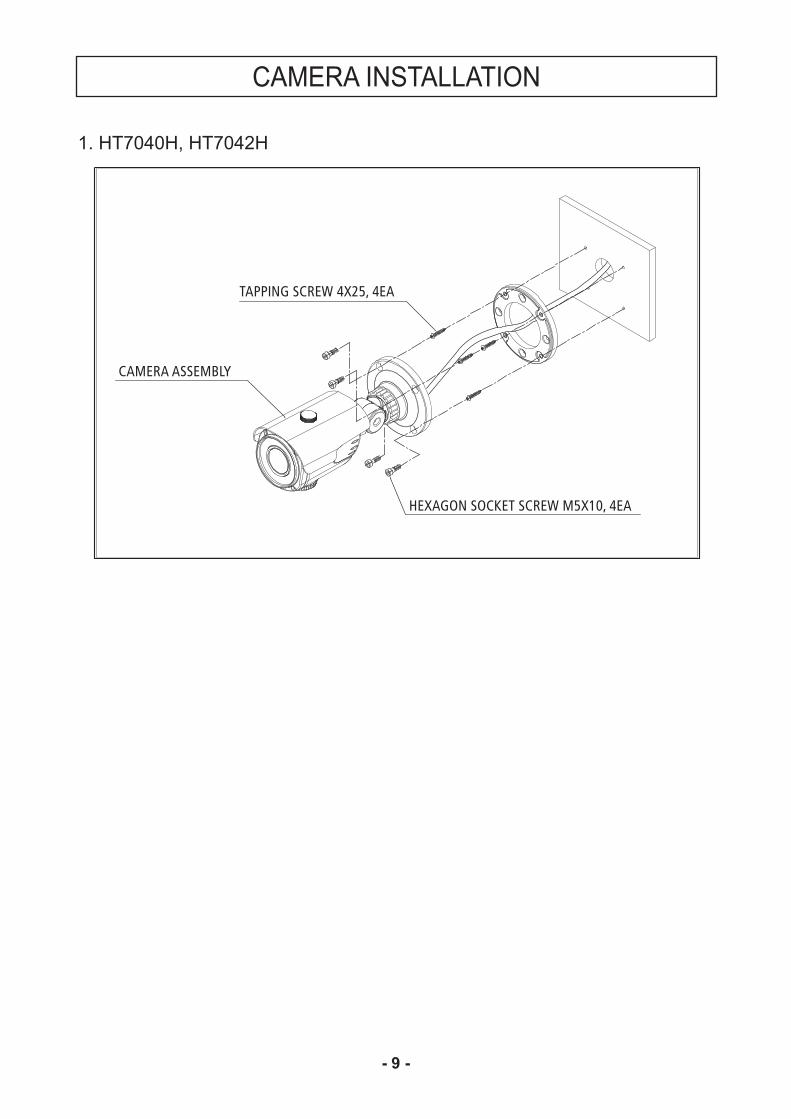
1. HT7040H, HT7042H
TAPPING SCREW 4X25, 4EA
HEXAGON SOCKET SCREW M5X10, 4EA
CAMERA ASSEMBLY
CAMERA INSTALLATION
- 10 -
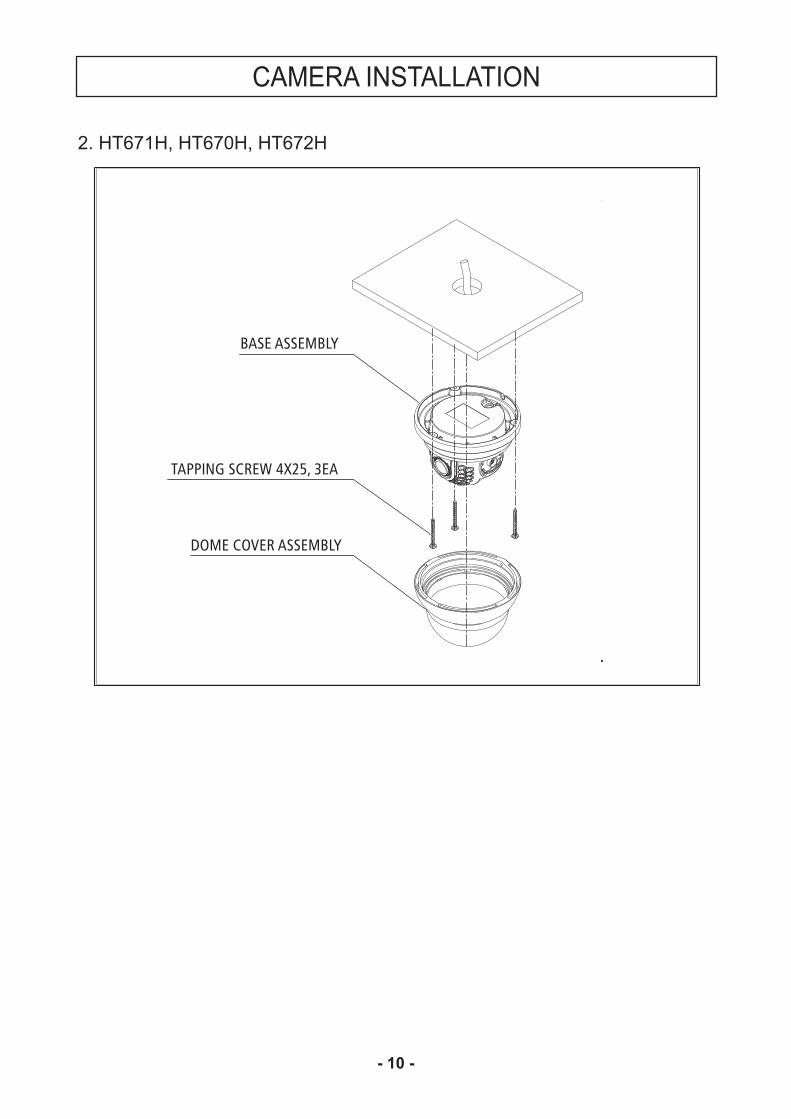
2. HT671H, HT670H, HT672H
BASE ASSEMBLY
TAPPING SCREW 4X25, 3EA
DOME COVER ASSEMBLY
CAMERA INSTALLATION
- 11 -
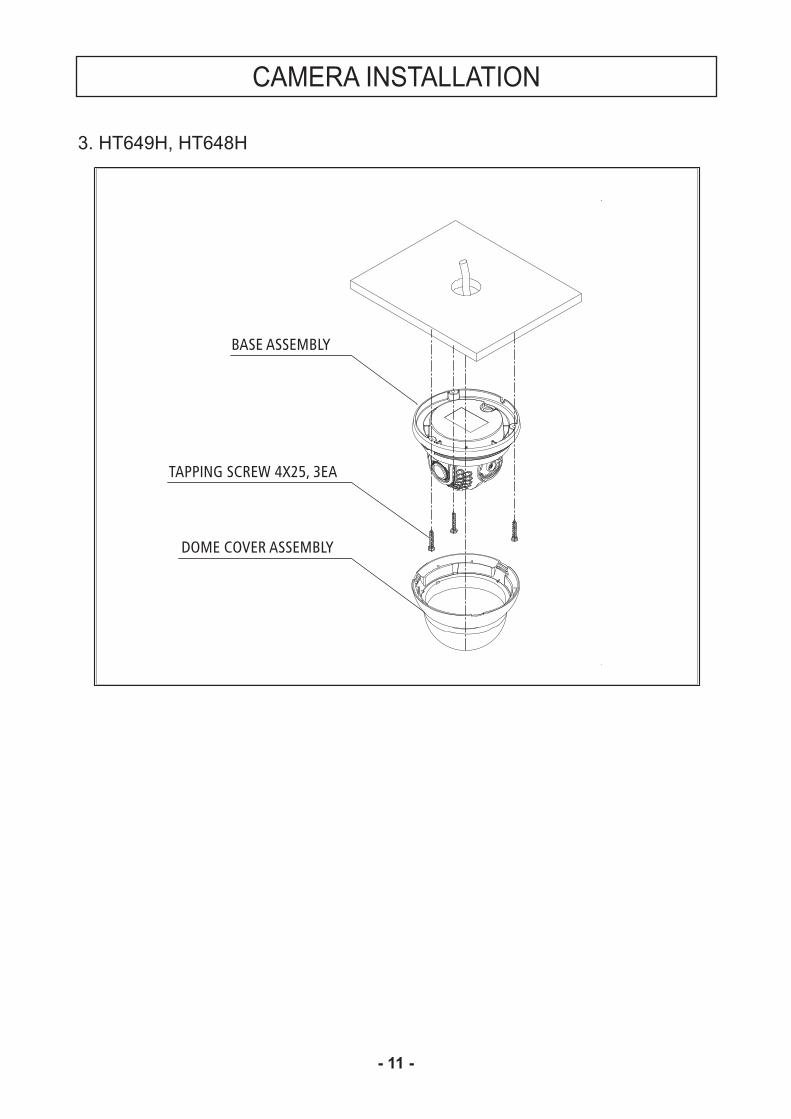
3. HT649H, HT648H
TAPPING SCREW 4X25, 3EA
DOME COVER ASSEMBLY
BASE ASSEMBLY
CAMERA INSTALLATION
- 12 -
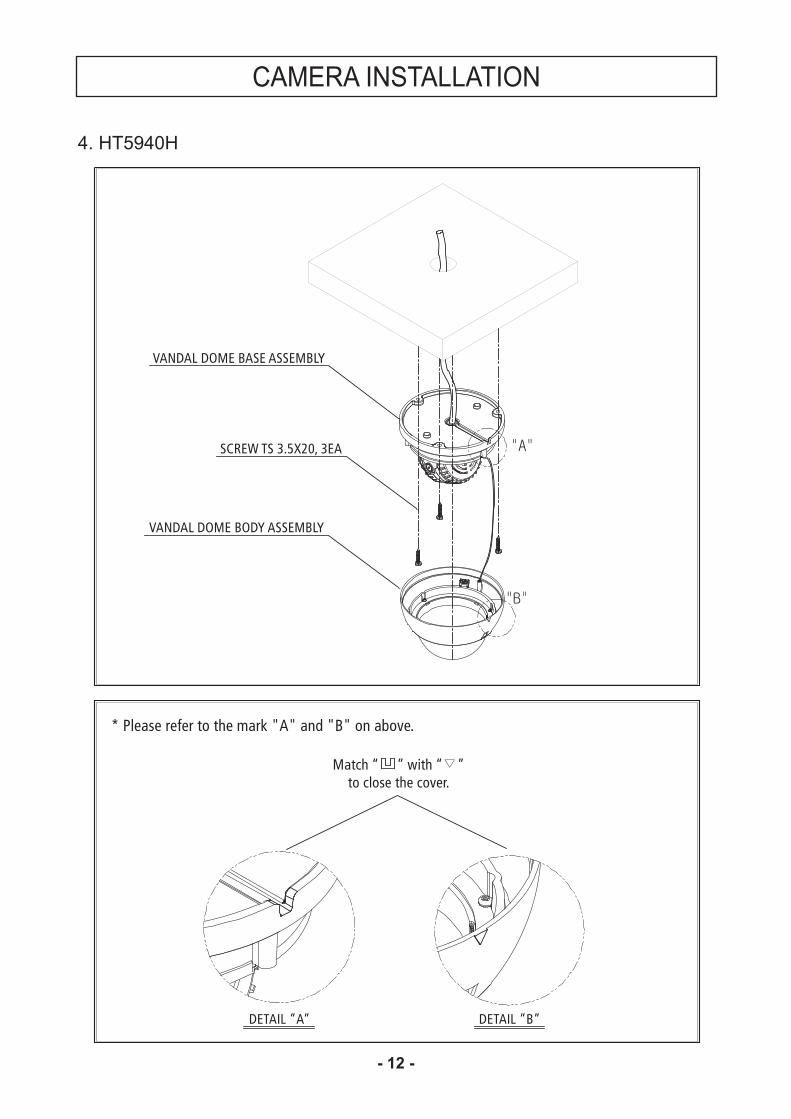
4. HT5940H
* Please refer to the mark "A" and "B" on above.
VANDAL DOME BASE ASSEMBLY
VANDAL DOME BODY ASSEMBLY
SCREW TS 3.5X20, 3EA
DETAIL ”A” DETAIL ”B”
Match “ ” with “ ”to close the cover.
CAMERA INSTALLATION
- 13 -
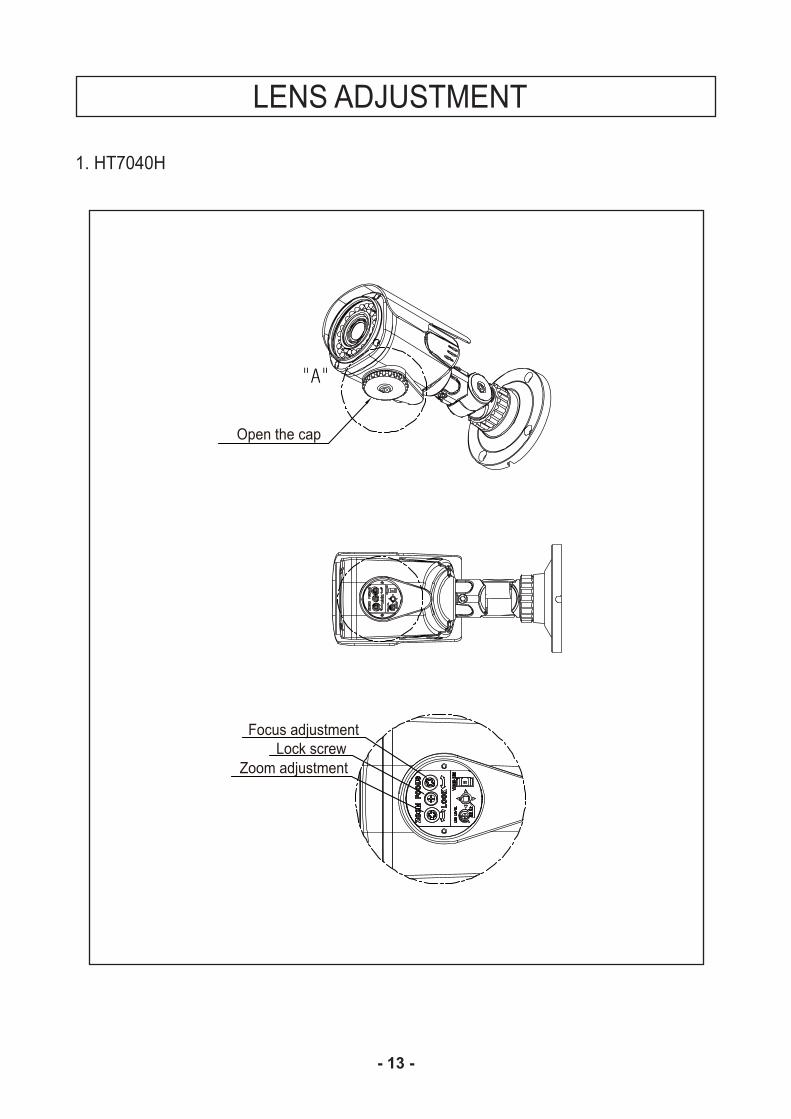
1. HT7040H
LENS ADJUSTMENT
Focus adjustment
Open the cap
Lock screwZoom adjustment
- 14 -
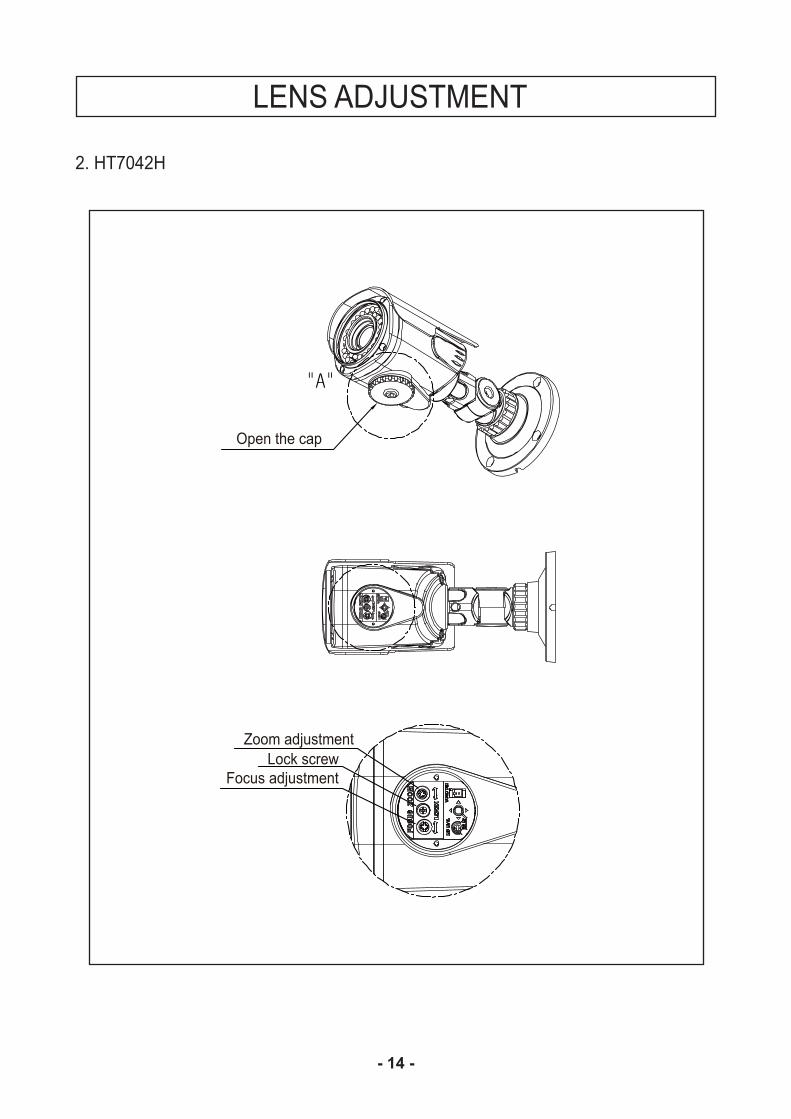
2. HT7042H
LENS ADJUSTMENT
Focus adjustment
Open the cap
Lock screwZoom adjustment
- 15 -
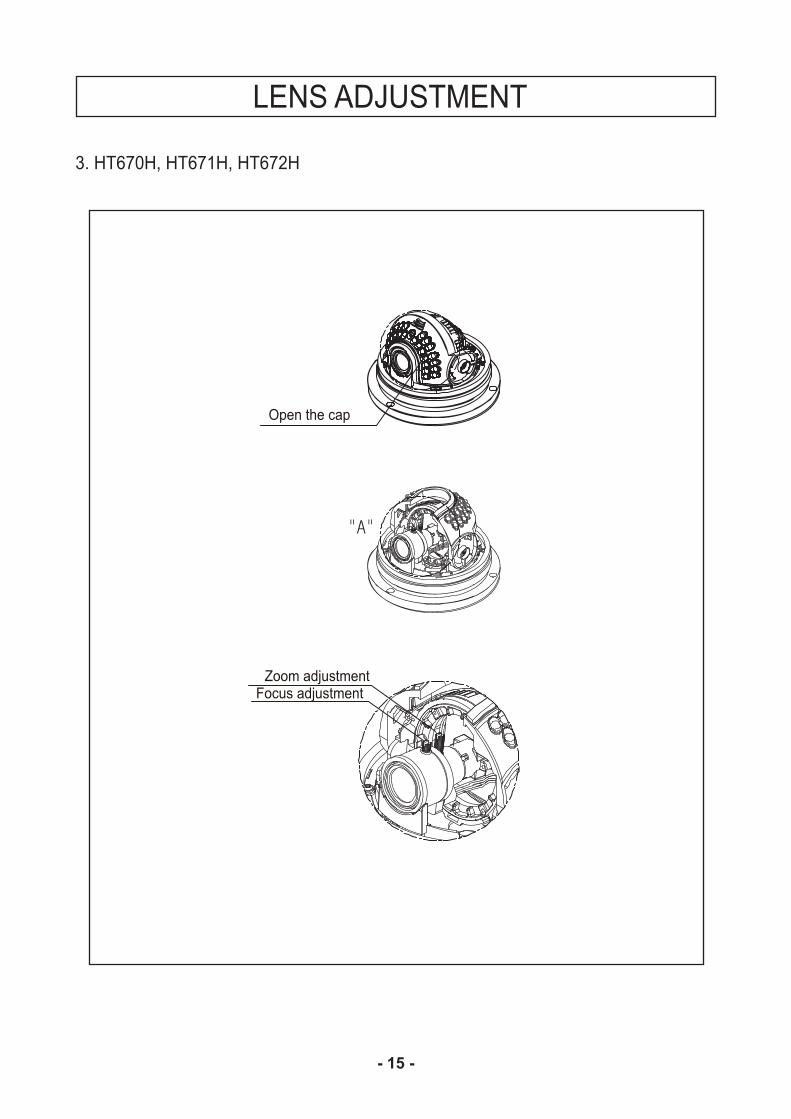
3. HT670H, HT671H, HT672H
LENS ADJUSTMENT
Focus adjustmentZoom adjustment
Open the cap
- 16 -
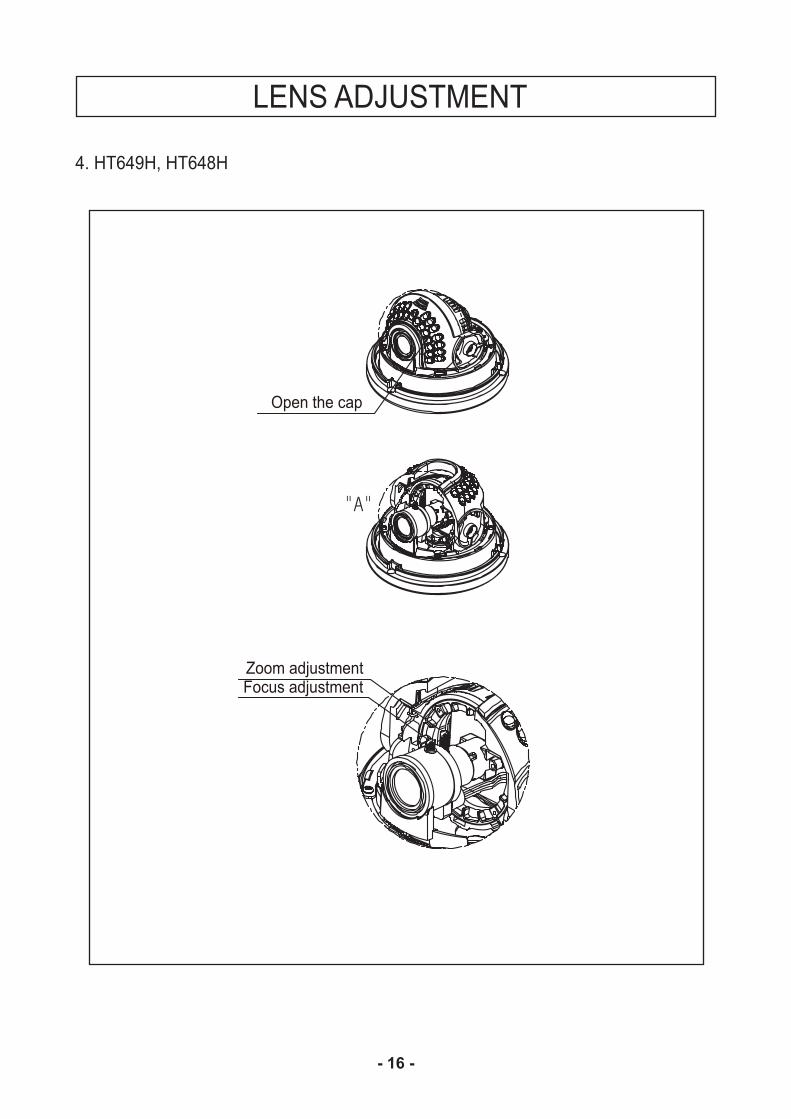
4. HT649H, HT648H
LENS ADJUSTMENT
Focus adjustmentZoom adjustment
Open the cap
- 17 -
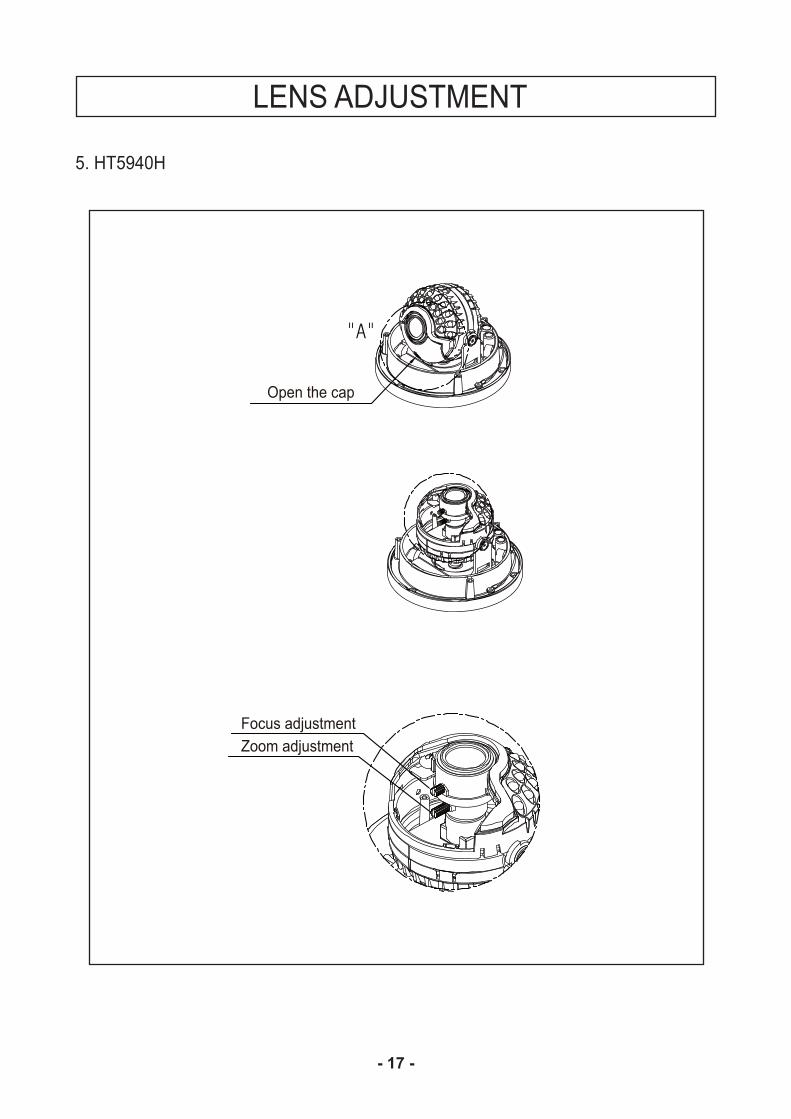
5. HT5940H
LENS ADJUSTMENT
Focus adjustmentZoom adjustment
Open the cap
- 18 -
SPECIFICATIONS
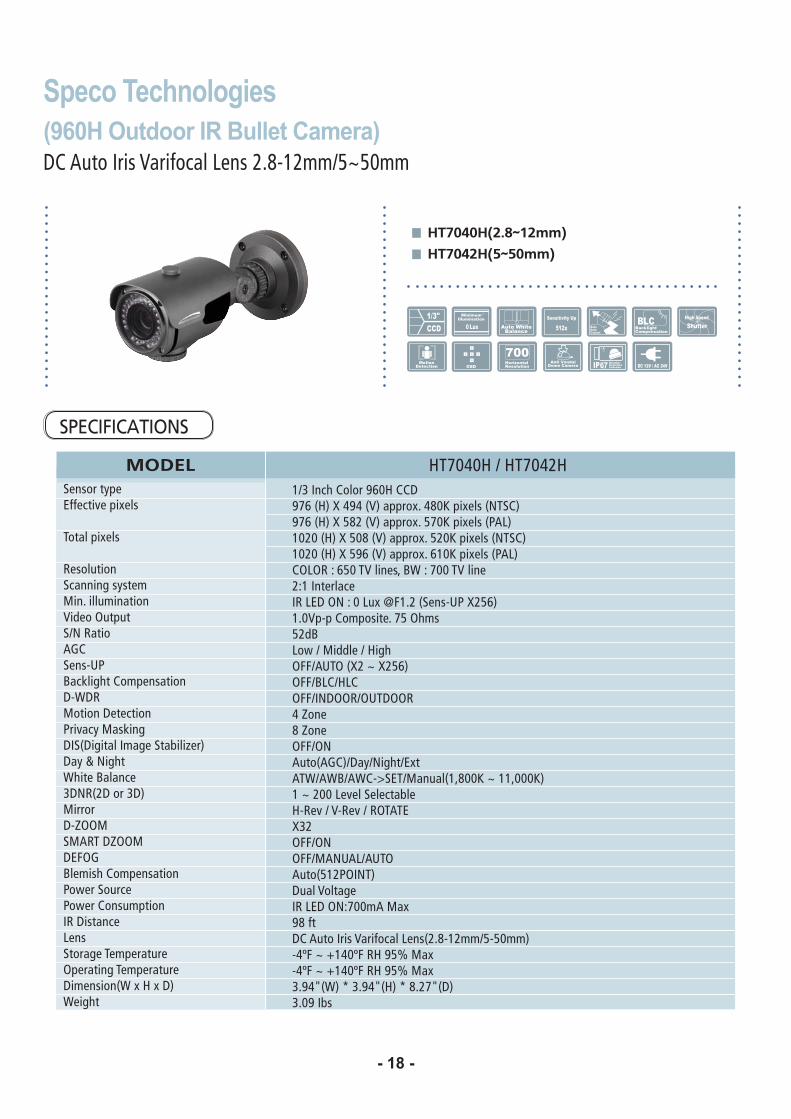
Speco Technologies(960H Outdoor IR Bullet Camera)$ �����%��������+��!�;����<=>?�<��@JQJZ��
������������ �
������������ �
��
����� HT7040H / HT7042H1/3 Inch Color 960H CCD [\]�^_`�{�|[|�^�`��}}�~=�|>Z��}�~�!��^�� `[\]�^_`�{�J><�^�`��}}�~=�J\Z��}�~�!��^��;`��Z<Z�^_`�{�JZ>�^�`��}}�~=�J<Z��}�~�!��^�� `�Z<Z�^_`�{�J[]�^�`��}}�~=�]�Z��}�~�!��^��;` �;�����]JZ���!�����������\ZZ���!���2:1 Interlace%��;�$������Z�;�~����=<�^����?���{<J]`�=Z�}?}� �}����=�\J�����52dB;��@�����!��@�_������@����^{<�Q�{<J]`���@�; @_; OFF/INDOOR/OUTDOOR4 Zone8 ZoneOFF/ONAuto(AGC)/Day/Night/Ext��@���@�� ?���@�����!^��>ZZ��Q����ZZZ�`��Q�<ZZ�;�"�!���!�����!�_?��"�@��?��"�@�����X32OFF/ON���@�����;@���Auto(512POINT)$��!��!����%��;�$����\ZZ�����~98 ft$ �����%��������+��!�;���^<=>?�<��@J?JZ��`?|���Q���|Z����_�[J����~?|���Q���|Z����_�[J����~3.94"(W) * 3.94"(H) * 8.27"(D)3.09 Ibs
Sensor typeEffective pixels
Total pixels
Resolution Scanning system Min. illumination ��������}���S/N Ratio AGCSens-UPBacklight CompensationD-WDRMotion DetectionPrivacy MaskingDIS(Digital Image Stabilizer)Day & NightWhite Balance3DNR(2D or 3D)Mirror D-ZOOMSMART DZOOMDEFOGBlemish CompensationPower Source Power ConsumptionIR Distance;���Storage Temperature Operating TemperatureDimension(W x H x D) Weight

- 19 -
SPECIFICATIONS
Speco Technologies(960H Outdoor IR Dome Camera)$ �����%��������+��!�;����<=>?�<��@J?JZ��@|�����~��������;���
����������� �
����������� �
�������� ��������������� !�
���
����� HT671H / HT672H / HT670H1/3 Inch Color 960H CCD [\]�^_`�{�|[|�^�`��}}�~=�|>Z��}�~�!��^�� `[\]�^_`�{�J><�^�`��}}�~=�J\Z��}�~�!��^��;`��Z<Z�^_`�{�JZ>�^�`��}}�~=�J<Z��}�~�!��^�� `�Z<Z�^_`�{�J[]�^�`��}}�~=�]�Z��}�~�!��^��;` �;�����]JZ���!�����������\ZZ���!���2:1 Interlace%��;�$������Z�;�~����=<�^����?���{<J]`�=Z�}?}� �}����=�\J�����52dB;��@�����!��@�_������@����^{<�Q�{<J]`���@�; @_; OFF/INDOOR/OUTDOOR4 Zone8 ZoneOFF/ONAuto(AGC)/Day/Night/Ext��@���@�� ?���@�����!^��>ZZ��Q����ZZZ�`��Q�<ZZ�;�"�!���!�����!�_?��"�@��?��"�@�����X32OFF/ON���@�����;@���Auto(512POINT)$��!��!����%��;�$����JZZ�����~98 ft$ �����%��������+��!�;���^<=>?�<��@JQJZ��@|�����~��������;���`�?|���Q���|Z����_�[J����~?|���Q���|Z����_�[J����~5.12"(Dia) * 3.94"(H)1.98 Ibs
Sensor typeEffective pixels
Total pixels
Resolution Scanning system Min. illumination ��������}���S/N Ratio AGCSens-UPBacklight CompensationD-WDRMotion DetectionPrivacy MaskingDIS(Digital Image Stabilizer)Day & NightWhite Balance3DNR(2D or 3D)Mirror D-ZOOMSMART DZOOMDEFOGBlemish CompensationPower Source Power ConsumptionIR Distance;���Storage Temperature Operating TemperatureDimension(W x H x D) Weight
- 20 -
SPECIFICATIONS
Speco Technologies(960H Indoor IR Dome Camera)$ �����%��������+��!�;����<=>?�<��@|�����~��������;���
����"������ �
������� ��������������� !�
��
����� HT649H / HT648H1/3 Inch Color 960H CCD [\]�^_`�{�|[|�^�`��}}�~=�|>Z��}�~�!��^�� `[\]�^_`�{�J><�^�`��}}�~=�J\Z��}�~�!��^��;`��Z<Z�^_`�{�JZ>�^�`��}}�~=�J<Z��}�~�!��^�� `�Z<Z�^_`�{�J[]�^�`��}}�~=�]�Z��}�~�!��^��;` �;�����]JZ���!�����������\ZZ���!���2:1 Interlace%��;�$������Z�;�~����=<�^����?���{<J]`�=Z�}?}� �}����=�\J�����52dB;��@�����!��@�_������@����^{<�Q�{<J]`���@�; @_; OFF/INDOOR/OUTDOOR4 Zone8 ZoneOFF/ONAuto(AGC)/Day/Night/Ext��@���@�� ?���@�����!^��>ZZ��Q����ZZZ�`��Q�<ZZ�;�"�!���!�����!�_?��"�@��?��"�@�����X32OFF/ON���@�����;@���Auto(512POINT)$��!��!����%��;�$����JZZ�����~164 ft$ �����%��������+��!�;���^<=>?�<��`�������|�����~��������;���?|���Q���|Z����_�[J����~?|���Q���|Z����_�[J����~5.12"(Dia) * 3.94"(H)1.32 Ibs
Sensor typeEffective pixels
Total pixels
Resolution Scanning system Min. illumination ��������}���S/N Ratio AGCSens-UPBacklight CompensationD-WDRMotion DetectionPrivacy MaskingDIS(Digital Image Stabilizer)Day & NightWhite Balance3DNR(2D or 3D)Mirror D-ZOOMSMART DZOOMDEFOGBlemish CompensationPower Source Power ConsumptionIR Distance;���Storage Temperature Operating TemperatureDimension(W x H x D) Weight
- 21 -
SPECIFICATIONS
Speco Technologies(960H Small Outdoor IR / Non IR Dome Camera)$ �����%��������+��!�;����<=>?�<��
���"�������� � �#�$%�&'�
����� HT5940H1/3" Inch Color 960H CCD [\]�^_`�{�|[|�^�`��}}�~=�|>Z��}�~�!��^�� `[\]�^_`�{�J><�^�`��}}�~=�J\Z��}�~�!��^��;`��Z<Z�^_`�{�JZ>�^�`��}}�~=�J<Z��}�~�!��^�� `�Z<Z�^_`�{�J[]�^�`��}}�~=�]�Z��}�~�!��^��;` �;�����]JZ���!�����������\ZZ���!���2:1 Interlace%��;�$����Z;�~���=<^����?���{<J]`���������=Z�}?}� �}����=�\J�����52dB;��@�����!��@�_������@����^{<�Q�{<J]`���@�; @_; OFF/INDOOR/OUTDOOR4 Zone8 ZoneOFF/ONAuto(AGC)/Day/Night/Ext��@���@�� ?���@�����!^��>ZZ��Q����ZZZ�`��Q�<ZZ�;�"�!���!�����!�_?��"�@��?��"�@�����X32OFF/ON���@�����;@���Auto(512POINT)$��!��!����%��;�$����|ZZ�����~���������������������66 ft$ �����%��������+��!�;���^<=>?�<��`?|���Q���|Z����_�[J����~?|���Q���|Z����_�[J����~4.72"(Dia) * 3.35"(H)2.20 Ibs
Sensor typeEffective pixels
Total pixels
Resolution Scanning system Min. illumination ��������}���S/N Ratio AGCSens-UPBacklight CompensationD-WDRMotion DetectionPrivacy MaskingDIS(Digital Image Stabilizer)Day & NightWhite Balance3DNR(2D or 3D)Mirror D-ZOOMSMART DZOOMDEFOGBlemish CompensationPower Source Power ConsumptionIR Distance;���Storage Temperature Operating TemperatureDimension(W x H x D) Weight
- 22 -
CAMERA DIMENSION
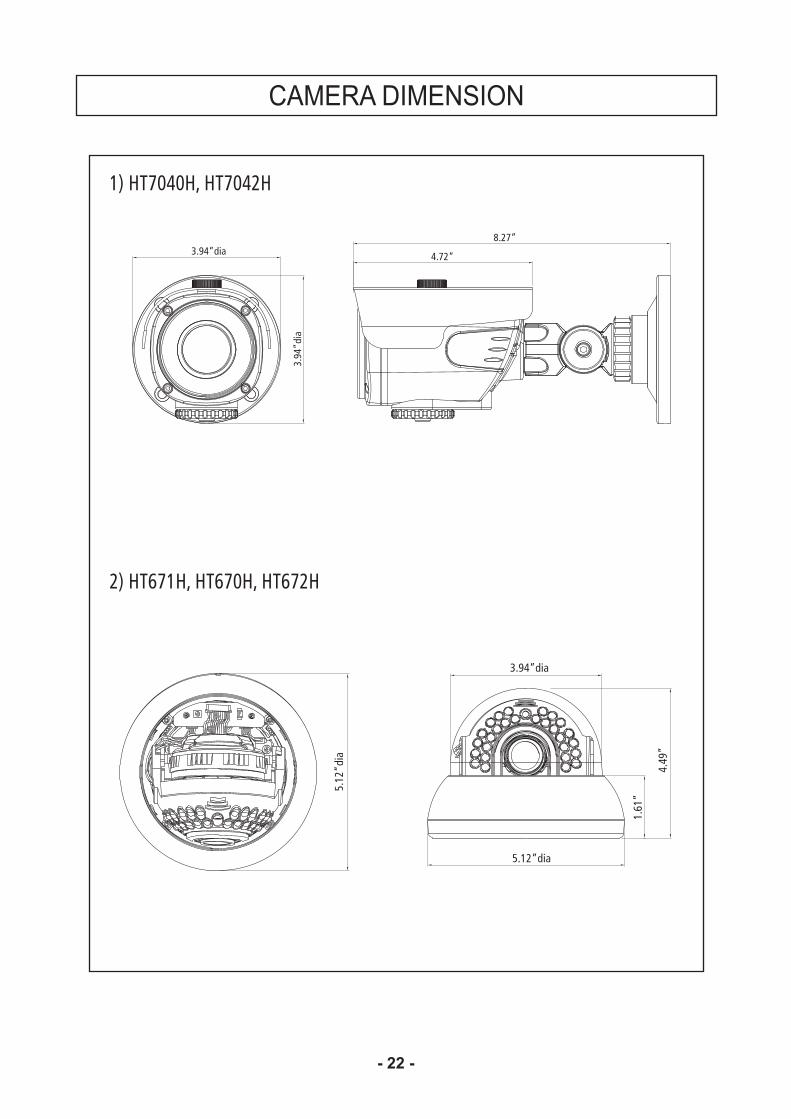
1) HT7040H, HT7042H
2) HT671H, HT670H, HT672H
3.94”dia8.27”
4.72”
3.94
”dia
5.12
”dia
5.12”dia
3.94”dia4.
49”
1.61
”
- 23 -
CAMERA DIMENSION
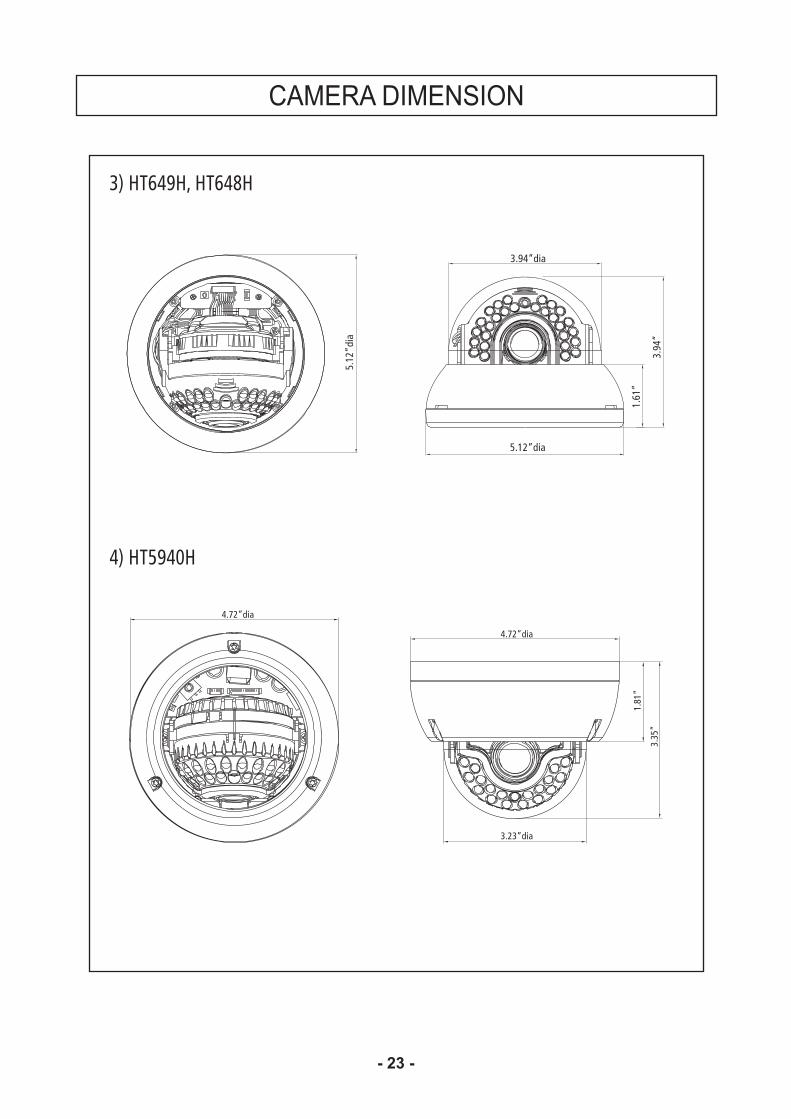
3) HT649H, HT648H
5.12
”dia
5.12”dia
3.94”dia
3.94
”
1.61
”
4) HT5940H
4.72”dia
4.72”dia
3.23”dia
1.81
”
3.35
”
- 24 -
\ZZ��;����The combination of a 960H CCD image sensor and SPECO DSP provides an excellent resolution
+�\ZZ��;����=
3D-DNRSmart 3DNR prevents the image blurring of moving object and activates only if moving objects
are appearing on the scene.
DIS(Digital Image Stabilizer) FunctionMakes a stabilizing clearer and the highest picture quality when out of focus by the wind or
climate changing.
Smart-IRNo saturation image, vivid image in darkness. "SPECO 960H" camera makes very sharp
video image in darkness. This technology eliminates saturation of video image of the closer
object in darkness by control of the IR sensitivity. Saturation never happens in our "SPECO
960H"cameras, you can enjoy vivid image in any dark condition.
Sens-UpDespite a limited & low light condition, Sens-Up - Max. x256 helps the viewer to get visible and
clear images.
DefogDefog function improve the clarity of images taken in poor conditions such as fog, smoke, rain or snow.
- 25 -
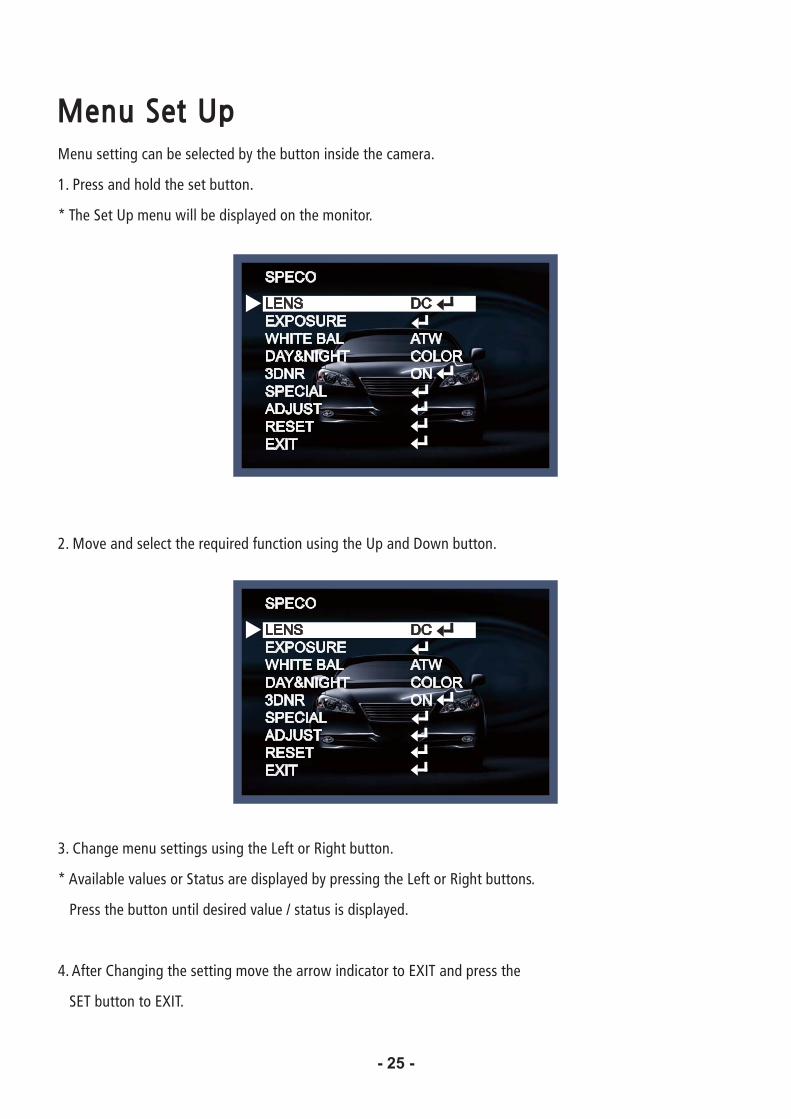
Menu setting can be selected by the button inside the camera.
1. Press and hold the set button.
* The Set Up menu will be displayed on the monitor.
2. Move and select the required function using the Up and Down button.
SPECO
SPECO
LENSEXPOSUREWHITE BALDAY&NIGHT3DNRSPECIALADJUSTRESETEXIT
LENSEXPOSUREWHITE BALDAY&NIGHT3DNRSPECIALADJUSTRESETEXIT
DCAUTO
ATWCOLORON
DCAUTO
ATWCOLORON
�=� ������������������������������;�+���������������=
���"��!��!��"�!��������������������}!��������}������������;�+����������������=
Press the button until desired value / status is displayed.
4. After Changing the setting move the arrow indicator to EXIT and press the
SET button to EXIT.
- 26 -
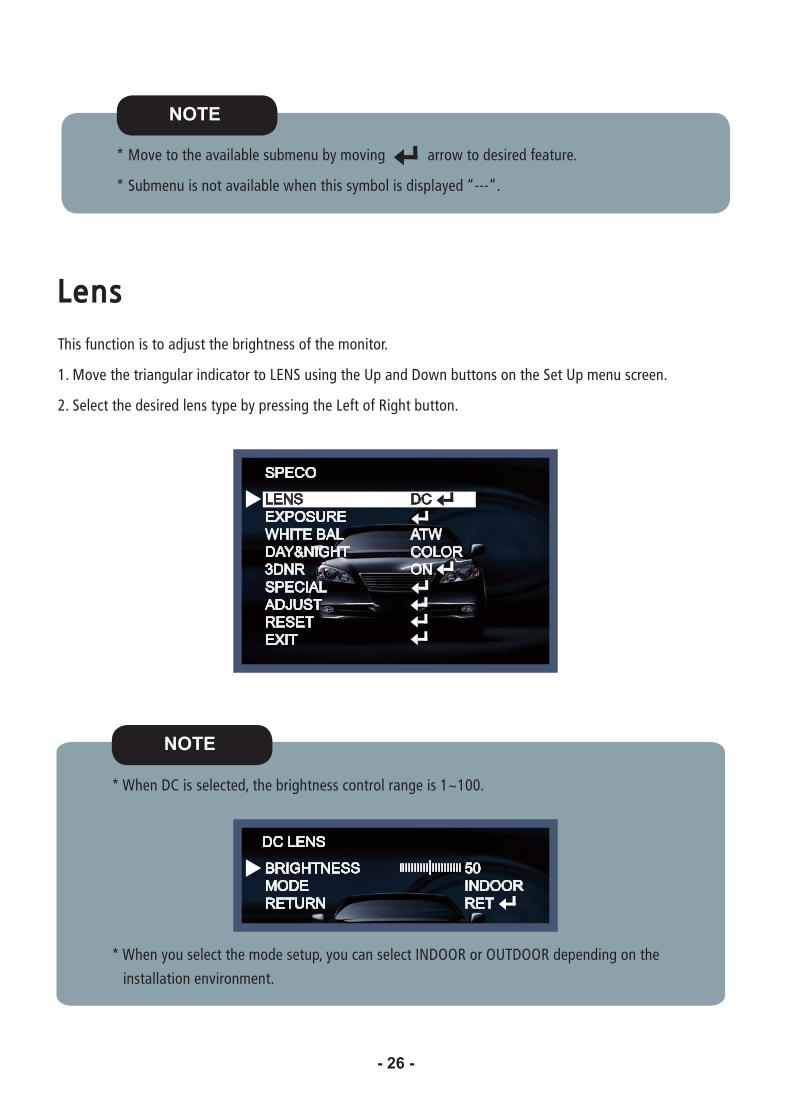
This function is to adjust the brightness of the monitor.
�=��"�������������!��������������;���������������}�����$���������������������}������������=
<=���!����������������!������}�����}������������;�+��+������������=
NOTE
* Move to the available submenu by moving arrow to desired feature.
* Submenu is not available when this symbol is displayed “---“.
SPECO
LENSEXPOSUREWHITE BALDAY&NIGHT3DNRSPECIALADJUSTRESETEXIT
DCAUTO
ATWCOLORON
NOTE
�������$ ������!��������������������������!�����������Q�ZZ=
* When you select the mode setup, you can select INDOOR or OUTDOOR depending on the
installation environment.
DC LENS
BRIGHTNESSMODERETURN
50INDOORRET
IIIIIIIIII IIIIIIIIII|
- 27 -
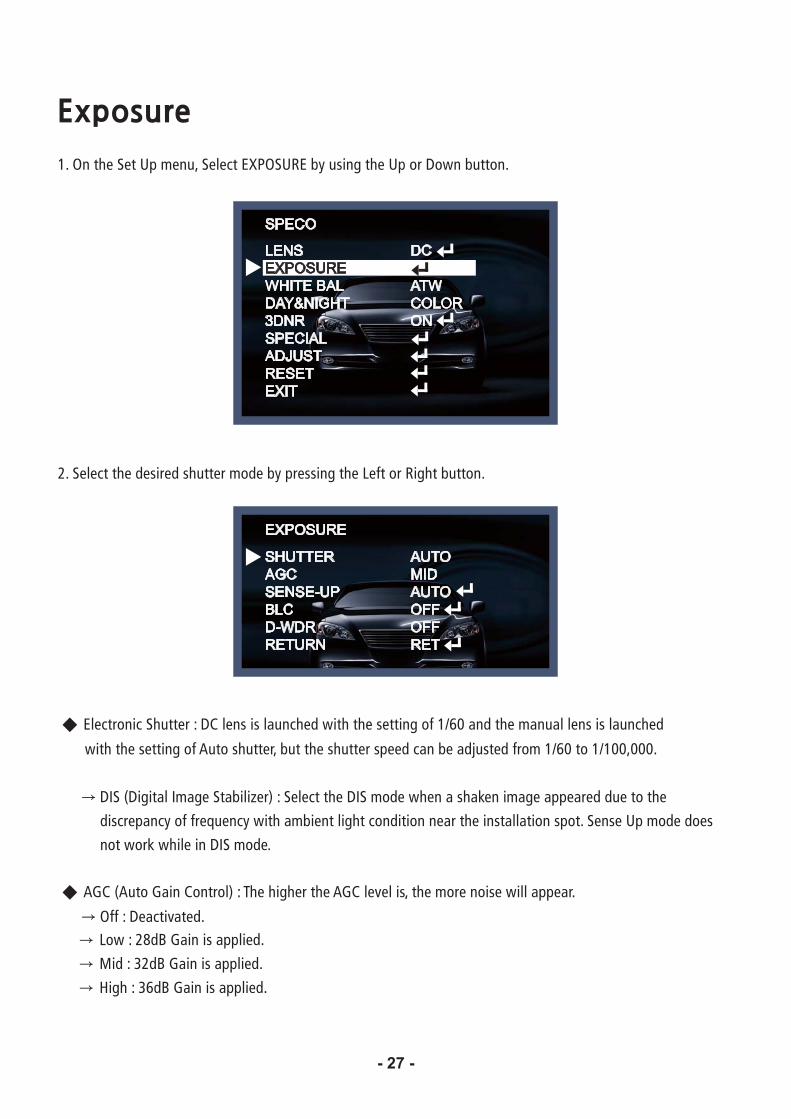
1. On the Set Up menu, Select EXPOSURE by using the Up or Down button.
SPECO
LENSEXPOSUREWHITE BALDAY&NIGHT3DNRSPECIALADJUSTRESETEXIT
DC
ATWCOLORON
<=���!�������������������������������}������������;�+���������������=
EXPOSURE
SHUTTERAGCSENSE-UPBLCD-WDRRETURN
AUTOMIDAUTOOFFOFFRET
Electronic Shutter : DC lens is launched with the setting of 1/60 and the manual lens is launched
with the setting of Auto shutter, but the shutter speed can be adjusted from 1/60 to 1/100,000.
DIS (Digital Image Stabilizer) : Select the DIS mode when a shaken image appeared due to the
discrepancy of frequency with ambient light condition near the installation spot. Sense Up mode does
not work while in DIS mode.
AGC (Auto Gain Control) : The higher the AGC level is, the more noise will appear.
Off : Deactivated.;����<>������������}}!���=
Mid : 32dB Gain is applied.
High : 36dB Gain is applied.

- 28 -
Sense-Up : The bright screen can be displayed by sensing the degree of the darkness automatically under
the circumstance of low light condition or at night.Off : Deactivated status.
Auto : Sense-Up auto mode status, The brightness degree is decided by the Sense Up setting value in
the low light condition.
SENSE-UP
SENSE-UPRETURN
x32RET
NOTE
*Sense Up mode does not work while the AGC mode is off.
NOTE
*Sense Up mode does not work while the Electronic shutter is set to Manual or DIS.
BLC
VALUEAREADEFAULTRETURN
MIDDLE
RET
�; �^�����;����� �}�������`�������������������$?$���}�"�������������!!������!�����!�"�!�����!��
overcome strong backlight conditions.Off : Deactivated status
�; �����������}������������������"�"��!�����������������������}����������������������}�������+�
the back light directly according to the installation environment.
- 29 -
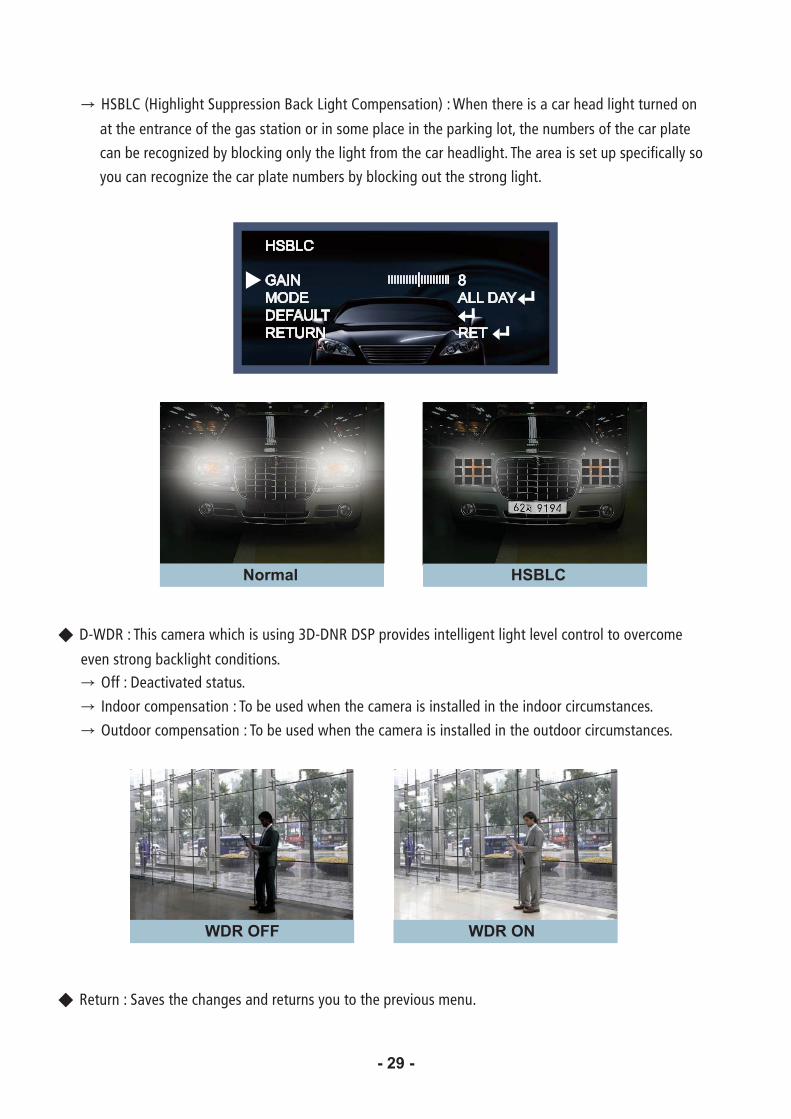
_��; �^_���!�������}}������������;����� �}�������`����������������������������!�������������
at the entrance of the gas station or in some place in the parking lot, the numbers of the car plate
can be recognized by blocking only the light from the car headlight. The area is set up specifically so
you can recognize the car plate numbers by blocking out the strong light.
Normal
HSBLC
GAINMODEDEFAULTRETURN
8ALL DAY
RET
IIIIIIIIII IIIIIIIIII|
HSBLC
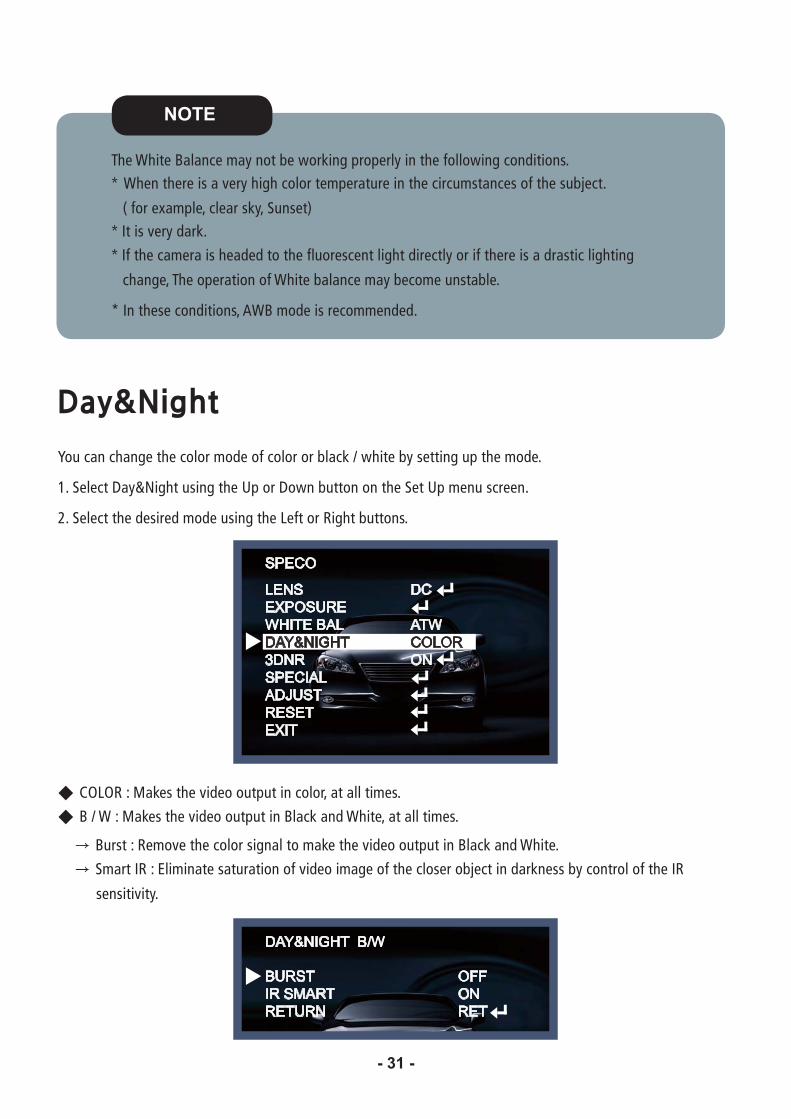
D-WDR : This camera which is using 3D-DNR DSP provides intelligent light level control to overcome
even strong backlight conditions.Off : Deactivated status.
Indoor compensation : To be used when the camera is installed in the indoor circumstances.
Outdoor compensation : To be used when the camera is installed in the outdoor circumstances.
WDR OFF WDR ON
Return : Saves the changes and returns you to the previous menu.

- 30 -
SPECO
LENSEXPOSUREWHITE BALDAY&NIGHT3DNRSPECIALADJUSTRESETEXIT
DC
ATWCOLORON
Use this function when the color adjustment of a screen is needed.
�=��"�������������!���������������_%����;�����������������������������������}�����$��������=
2. Select the desired mode by using the left or Right button.
Use the appropriate mode according to your purposes among these three modes.����������������������������!�����}�����������+�����>ZZ�����Z�JZZ�=
AWB : The function to search for the color which is matched well with the ambient environment. This
���������!��������������������!�����}�����������+�����ZZZ����\�ZZZ�=AWC SET : After letting the camera focus on the blank white paper to the best condition of current
lighting environment, press the SET button. If the lighting condition is changed, Re-adjustment is
recommended.�����;��������!����������!!���+�������������!����!������!=���������+�����������������
white balance using the ATW or AWB mode, change the mode into the manual compensation mode
and then press Set button.
MANUAL WB
BLUEREDRETURN
3120RET
IIIIIIIIII IIIIIIIIII|IIIIIIII IIIIIIIIIIII|
- 31 -
NOTE
The White Balance may not be working properly in the following conditions.When there is a very high color temperature in the circumstances of the subject.
( for example, clear sky, Sunset)%�����"��������=
%+����������������������������+!���������!�����������!�����+��������������������!��������
change, The operation of White balance may become unstable.
* In these conditions, AWB mode is recommended.
SPECO
LENSEXPOSUREWHITE BALDAY&NIGHT3DNRSPECIALADJUSTRESETEXIT
DC
ATWCOLORON
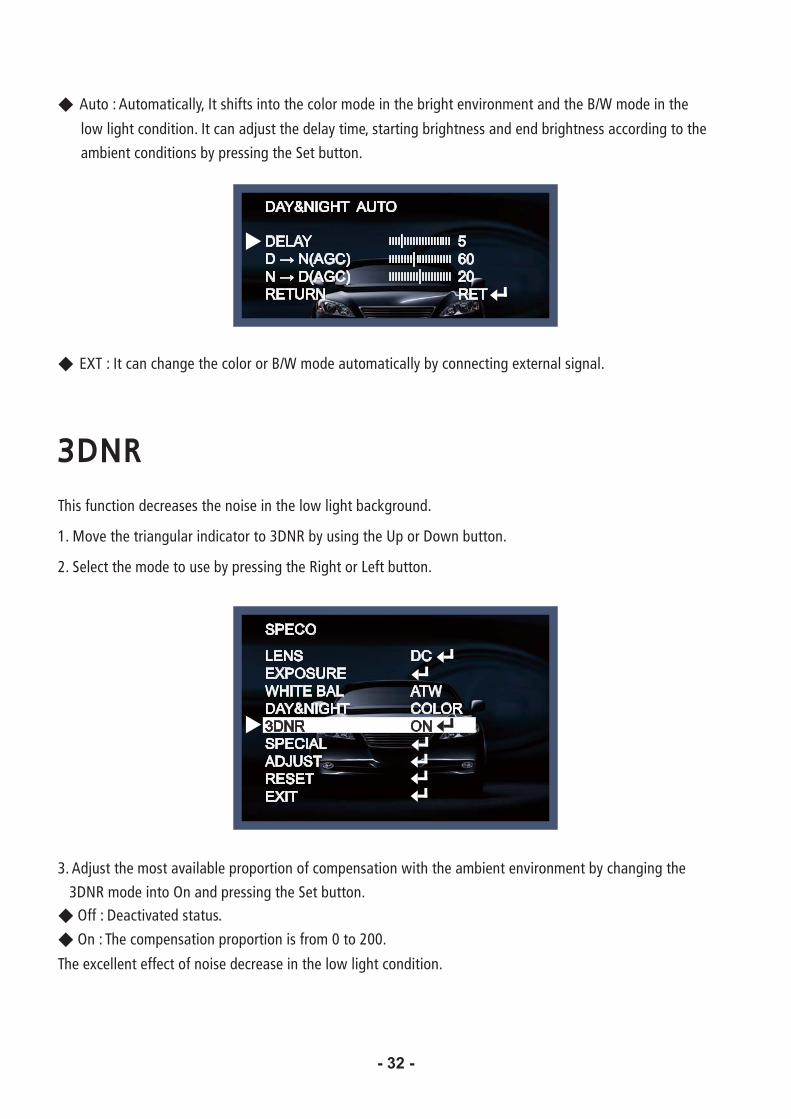
You can change the color mode of color or black / white by setting up the mode.
1. Select Day&Night using the Up or Down button on the Set Up menu screen.
<=���!������������������������������;�+����������������=
�;���������������"������}�������!�������!!������=
B / W : Makes the video output in Black and White, at all times.
DAY&NIGHT B/W
BURSTIR SMARTRETURN
OFFONRET
Burst : Remove the color signal to make the video output in Black and White.
Smart IR : Eliminate saturation of video image of the closer object in darkness by control of the IR
sensitivity.
- 32 -
Auto : Automatically, It shifts into the color mode in the bright environment and the B/W mode in the
low light condition. It can adjust the delay time, starting brightness and end brightness according to the
ambient conditions by pressing the Set button.
DAY&NIGHT AUTO
DELAY� � �!"#$%� � �!"#$%RETURN
56020RET
IIIIIIIIII IIIIIIIIII|IIIIIIII IIIIIIIIIIII|IIII IIIIIIIIIIIIIIII|
EXT : It can change the color or B/W mode automatically by connecting external signal.
This function decreases the noise in the low light background.
1. Move the triangular indicator to 3DNR by using the Up or Down button.
<=���!���������������������}��������������������;�+�������=
SPECO
LENSEXPOSUREWHITE BALDAY&NIGHT3DNRSPECIALADJUSTRESETEXIT
DC
ATWCOLORON
3. Adjust the most available proportion of compensation with the ambient environment by changing the
3DNR mode into On and pressing the Set button. Off : Deactivated status.
On : The compensation proportion is from 0 to 200.
The excellent effect of noise decrease in the low light condition.
- 33 -
3DNR
LEVELRETURN
200RET
IIIIIIIIII IIIIIIIIII|
NOTE
* If 3DNR function is used, the cancellation effect of noise is excellent. The higher the
compensation proportion raise, the better the effect of noise cancellation is, but the ghost
effect may occur.
SPECO
LENSEXPOSUREWHITE BALDAY&NIGHT3DNRSPECIALADJUSTRESETEXIT
DC
ATWCOLORON
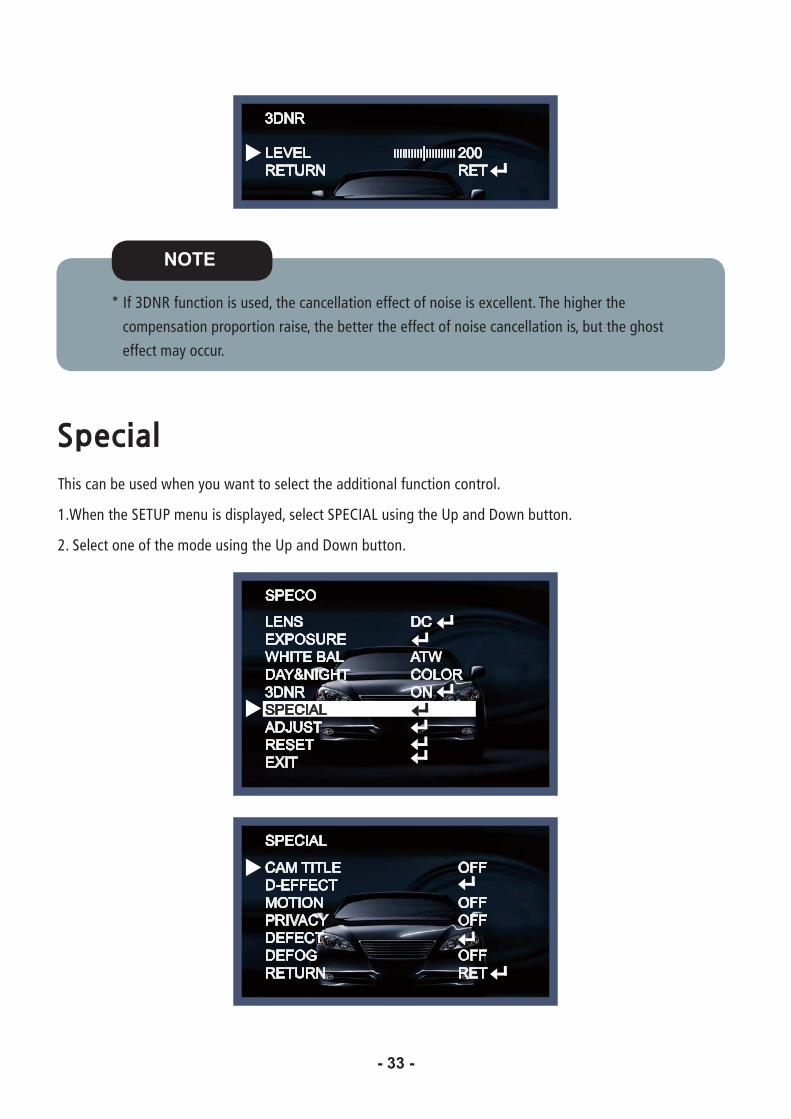
This can be used when you want to select the additional function control.
�=�������������������������}!��������!������� %�;������������}�����$��������=
2. Select one of the mode using the Up and Down button.
SPECIAL
CAM TITLED-EFFECTMOTIONPRIVACYDEFECTDEFOGRETURN
OFF
OFFOFF
OFFRET
- 34 -
CAM TITLE 0 1 2 3 4 5 6 7 8 9A B C D E F G H I J KL M N O P Q R S T U VW X Y Z
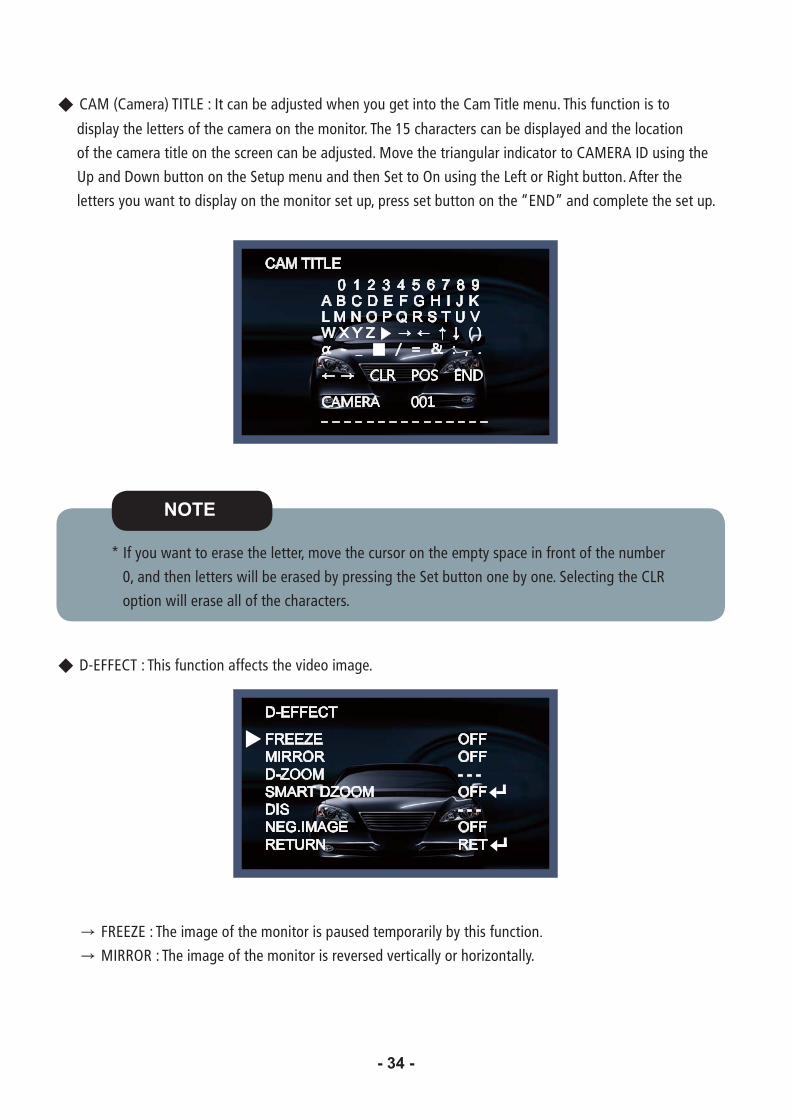
���^ �����`�%;����%�������������������������������������� �����!������=�����+�����������
display the letters of the camera on the monitor. The 15 characters can be displayed and the location
of the camera title on the screen can be adjusted. Move the triangular indicator to CAMERA ID using the
������}�����$�������������������}����������������������������������;�+���������������=��+��������
letters you want to display on the monitor set up, press set button on the “END” and complete the set up.
NOTE
* If you want to erase the letter, move the cursor on the empty space in front of the number
���Z�����������!���������!!��������������}������������������������������=���!����������� ;�
option will erase all of the characters.
D-EFFECT : This function affects the video image.
D-EFFECT
FREEZEMIRRORD-ZOOMSMART DZOOMDISNEG.IMAGERETURN
OFFOFF- - -OFF- - -OFFRET
FREEZE : The image of the monitor is paused temporarily by this function
MIRROR : The image of the monitor is reversed vertically or horizontally.
- 35 -
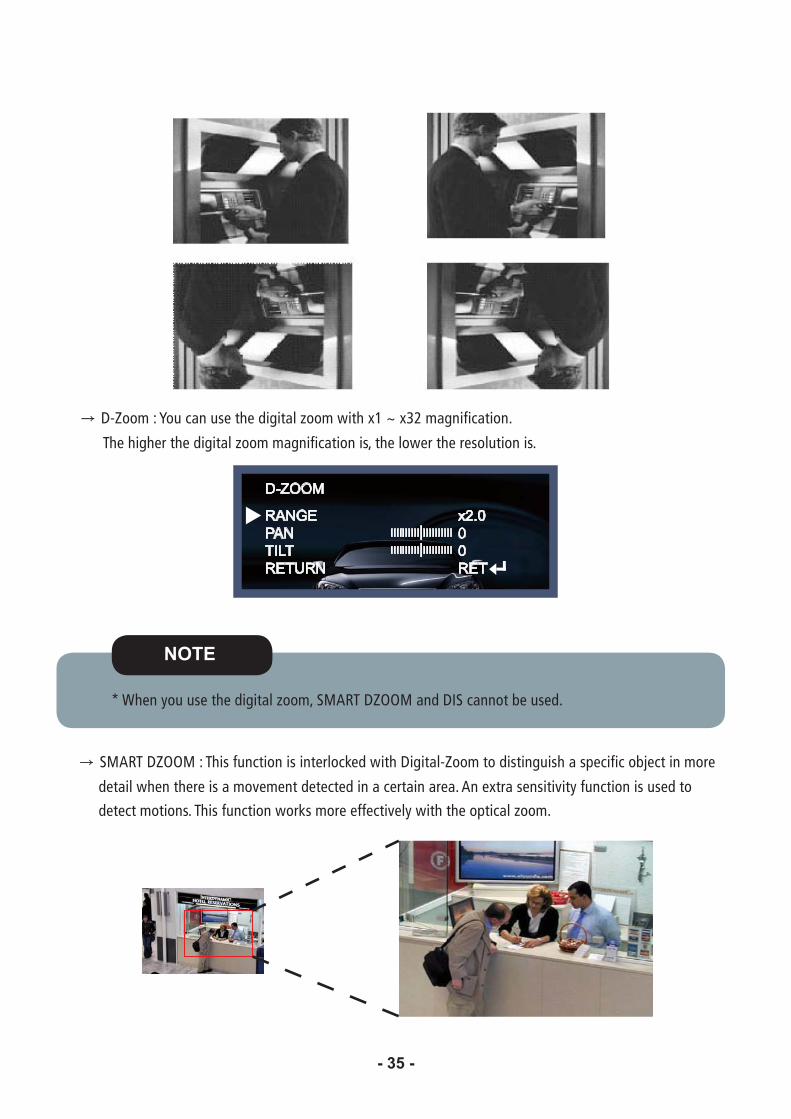
$?��������������������������!���������~��Q�~�<������+������=�
The higher the digital zoom magnification is, the lower the resolution is.
D-ZOOM
RANGEPANTILTRETURN
x2.000RET
IIIIIIIIII IIIIIIIIII|IIIIIIIIII IIIIIIIIII|
NOTE
* When you use the digital zoom, SMART DZOOM and DIS cannot be used.
SMART DZOOM : This function is interlocked with Digital-Zoom to distinguish a specific object in more
detail when there is a movement detected in a certain area. An extra sensitivity function is used to
detect motions. This function works more effectively with the optical zoom.
- 36 -
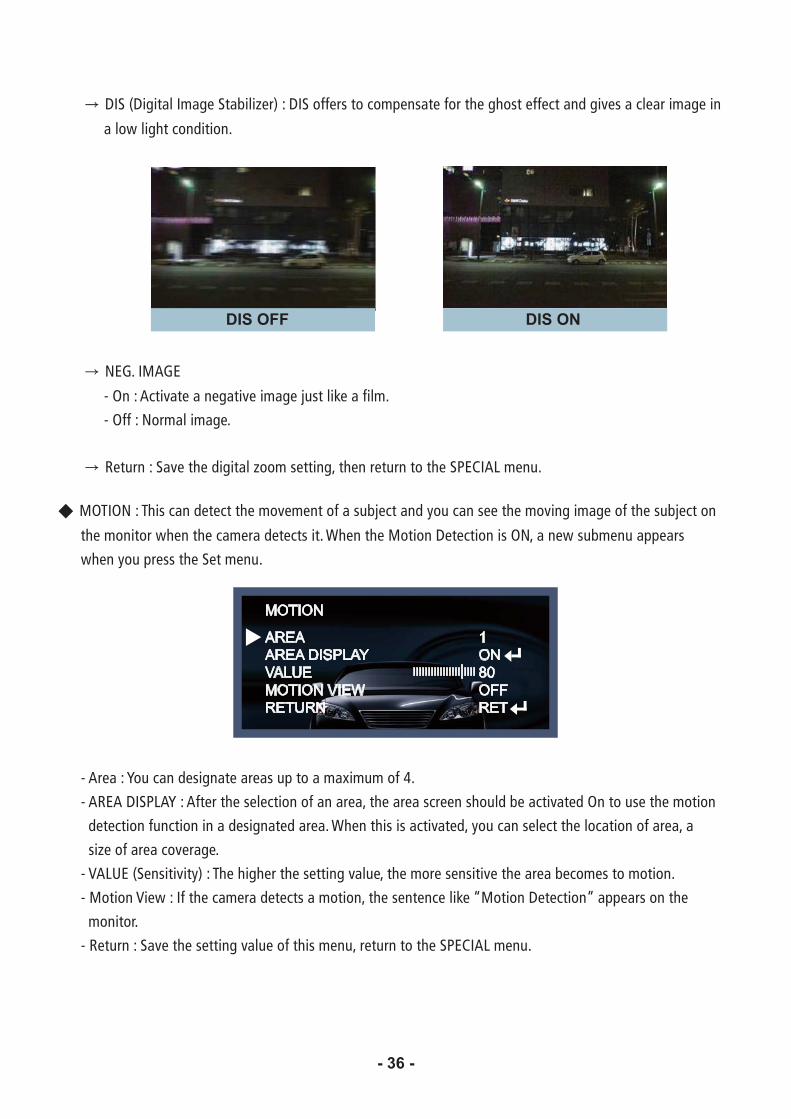
DIS (Digital Image Stabilizer) : DIS offers to compensate for the ghost effect and gives a clear image in
a low light condition.
NEG. IMAGE
- On : Activate a negative image just like a film.
- Off : Normal image.
�����������"������������!���������������������������������� %�;�����=
DIS OFF DIS ON
MOTION : This can detect the movement of a subject and you can see the moving image of the subject on
the monitor when the camera detects it. When the Motion Detection is ON, a new submenu appears
when you press the Set menu.
MOTION
AREAAREA DISPLAYVALUEMOTION VIEWRETURN
1ON80OFFRET
IIIIIIIIIIIIIIII IIII|
- Area : You can designate areas up to a maximum of 4.
������?������$%��;������+����������!������+�����������������������������!���������"����������������������
detection function in a designated area. When this is activated, you can select the location of area, a
size of area coverage.
������?���;���^�������"���`�������������������������"�!�������������������"������������������������=
������?�������������%+�����������������������������������������!����������$����������}}�����������
monitor.
������?������������"��������������"�!���+���������������������������� %�;�����=

- 37 -
��%�� ������������������������������������������������=�������������������}���>���++�����������=�
The size of a designated area can be adjusted. The color of a privacy area can be changed to 15 different
colors. When Return is selected, all the changes are saved.
DEFECT : You can eliminate white spots (defect) up to max.512 points.
PRIVACY
DEFECT
AREAAREA DISPLAYCOLORTRANSPARRETURN
SENSE UPDIFFTHRESHOLDSTARTRETURN
4ON83RET
x3212
RET
IIIIIIIIIIIIIIIIIIII|
IIIIIIIIIIIIIIIIIIII|
IIIIIIIIIIIIIIIIIIII|
IIIIII IIIIIIIIIIIIII|
- Sense Up : To eliminate defect, set the high level of Sense Up. You can set to max. 64x, but 32x is the
best setting value to eliminate defect.
- DIFF : You can set the size of DEFECT from 0 to 3.
������?�_���_�;$�����������������!�"�!���������������+������!!��}}���=
������?������������������������������� ��������%����!!����������!����������+��������� ���%���������
sentence will be displayed on the monitor.
������?������������"��������������"�!���+���������������������������� %�;�����=
DEFOG : This function helps to recognize the object in a foggy or dusty weather condition.
Return : Save the setting value and get out of the current menu.
DEFOG OFF DEFOG ON

- 38 -
SPECO
LENSEXPOSUREWHITE BALDAY&NIGHT3DNRSPECIALADJUSTRESETEXIT
DC
ATWCOLORON
This function is needed to control the brightness of the monitor.
�=����������������������������}!��������!�����$���������������}�����$��������=
2. Select the desired mode by using Up or Down button.
Sharpness : The outline of an image becomes sharp and more distinct as the level of sharpness increases.
Monitor : Change the setting value which is suitable for the monitor.
�; $�����!�������������������������; $������=����������^�������������������������;�"�!���!��������������������������` CRT : Select this when you use the CRT monitor.����������^������������������;�"�!���!���������������������������` USER : Use this unless you adjust two values above. If you use the monitor which don’t have a good ������������������������������������������������������������������;�"�!���!����������������������������=�
ADJUST
SHARPNESSMONITORRETURN
25LCDRET
IIIIIIIIII IIIIIIIIII|

- 39 -
The camera is set to the Factory Default value.
Press the Set button in the exit menu to save the current settings and exit the Set Up menu.

- 40 -
Nothing appears onthe screen.
Check the power cable, power supply output and videoconnection between the camera and monitor.
Is the camera lens or the lens glass dirty? Clean the lens / glass with a soft clean cloth.
Adjust the monitor controls, as required.If the camera is facing a very strong light, change
the camera position.Adjust the lens focus.
Adjust the contrast control of the monitor.'* ���� �� �� ���������� ������; ������� �� �� <=>@[�\]^
Has MOTION DET been set to ON in the menu?[�� _� "`z" ���� ������� ������{
Check that the AGC setting in the EXPOSURE menu is’t set to OFF.Check the EXPOSURE menu and make sure SHUTTER is set to------.
Make sure that the camera isn’t facing direct sunlight or }������� �������^ '* ���������;������ �� ������ �����^
Check the settings in WHITE BALANCE menu.
Check the camera is correctly connected to an appropriate regulated power source.
The image on thescreen is dim.
The camera is notworking properly
and the surface ofthe camera is hot.
The image on thescreen is dark.
Motion Detectionis not activated.
The color of thepicture is not correct.
The image on the������ }������^
The SENS-UP doesnot work.
- 41 -

- 42 -
- MEMO -

200 New HighwayAmityville, NY 11701
631-957-87001 800 645 5516
www.specotech.com
Top Related