


Languages
Pages
Legal


1
TREX® SIGNATURE® HORIZONTAL RAILINGInstallation Instructions
Have Questions? NOTE: Construction methods are always improving. Please ensure you1–800–BUY–TREX have the most up-to-date installation instructions by visiting: trex.com TR-HZSIGNATURE-0121
NOTES:
» TREX SIGNATURE POSTS CANNOT BE USED WITH TRADITIONAL OR COCKTAIL DESIGNS. ONLY PRESSURE TREATED POSTS/POST SLEEVES CAN BE USED. REFER TO DETAILED INSTRUCTIONS FOR MORE INFORMATION.
» TREX SIGNATURE RAILINGS ARE DESIGNED TO BE ATTACHED WITH POSTS INSTALLED AT A CLEAR SPAN OF 6' (1.83 M) OR 8' (2.44 M).
» IF INSTALLING AT EXACT SPAN LENGTHS OF 6' (1.83 M) OR 8' (2.44 M), AND USING POST-TO-POST CONFIGURATION, THE BOTTOM RAIL WILL NOT NEED TO BE CUT, BUT THE TOP RAIL WILL NEED TO BE MEASURED (MAKING SURE BALUSTERS LINE UP VERTICALLY) AND CUT.
» IF INSTALLING AT EXACT SPAN LENGTHS OF 6' (1.83 M) OR 8' (2.44 M), AND USING CROSSOVER POST CONFIGURATION (SPANS FROM ONE CROSSOVER POST TO ANOTHER CROSSOVER POST), BOTH THE BOTTOM RAIL AND TOP RAIL WILL NOT NEED TO BE CUT.
» IN ADDITION, AT ALL FINAL END POST CONFIGURATIONS, TOP RAIL WILL NEED TO BE MEASURED (MAKING SURE BALUSTERS LINE UP VERTICALLY) AND CUT.
» SEE DETAILED INSTRUCTIONS FOR MORE INFORMATION.
» ALL TREX SIGNATURE SPANS OVER 6' WILL REQUIRE THE USE OF A FOOT BLOCK. THUS THESE RAILING SPANS MUST BE INSTALLED OVER THE DECKING FRAME OR ON INSIDE OF RIM JOIST.
G
C
I
A
D
K
L
J
E
B
H
H
I
K
MN
O
P
F
Square Round
BALUSTER OPTIONS
DETERMINING BALUSTERS NEEDED
Baluster Type Per 6' Section Per 8' Section
Square 15 20
Round 15 20
A. Trex Signature top rail and crowned cover - 6' (actual length 73.5" [186.7 cm]) - 8' (actual length 97.5" [247.7 cm])B. Trex Signature bottom rail and fl at cover - 6' Rail (actual length 71.5" [181.6 cm]) - 6' Cover (actual length 71.5" [181.6 cm]) - 8' Rail (actual length 95.5" [242.6 cm]) - 8' Cover (actual length 95.5" [242.6 cm])C. Trex Signature upper rail bracket and coverD. Trex Signature lower rail bracket and coverE. Trex Signature balusters (square or round)F. Trex Signature center baluster (square or round)G. Trex Signature foot block**H. Trex Signature post skirt or post sleeve skirt*I. Trex Signature post*
- 36" (actual length 37" [94.0 cm]) - 42" (actual length 43" [109.2 cm]) or Trex 4" x 4" post sleeve*** - 36" (actual length 39" [99.1 cm]) - 42" (actual length 45" [114.3 cm])
NOTE: MUST USE TREX DECK MOUNT POST HARDWARE AND METAL PLATE WHEN ATTACHING Signature POSTS.
NOTE: THIS IS AN OVERVIEW OF ALL RAILING COMPONENTS FOR TREX SIGNATURE HORIZONTAL APPLICATIONS – REFER TO DETAILED INSTRUCTIONS FOR SPECIFIC RAILING CONFIGURATIONS.
J. Trex Signature crossover post* - 36" (actual length 34.5" [87.6 cm]) - 42" (actual length 40.5" [102.9 cm]) K. Trex Signature post cap or post sleeve cap*L. Trex deckingM. Trex fasciaN. Code-approved wood joist 2" x 8"
(5.1 cm x 20.3 cm) or largerO. Code-approved wood rim joist 2" x 8"
(5.1 cm x 20.3 cm) or largerP. Crossover bracket cover (supplied with crossover
post)
* Item not included in Trex Signature Railing kits. ** Required ONLY for All Clear Span Applications over 6' (1.83 m) when
smaller fixed baluster is fully centered, or unsupported spans greater than 5' (1.52 m) (example: 8' (2.44 m) span cut into one 5' (1.52 m) span and one 3' (0.91 m) span would require foot block under 5' (1.52 m) span since smaller fixed baluster is no longer centered). Included with 8' (2.44 m) railing kits.
*** Both 4" x 4" (10.2cm x 10.2cm) and 6" x 6" (15.2cm x 15.2 cm) post sleeves are designed to fit over a 4" x 4" pressure treated post.
NOTE: If installing 42" (106.7 cm) railing, and using pressure-treated posts with Trex post sleeves, ensure that a longer pressure-treated post is used along with longer post sleeve, both cut to a height of 46" (116.8 cm) from decking surface.
PARTS
TREX® SIGNATURE® HORIZONTAL RAILINGInstallation Instructions
Have Questions? NOTE: Construction methods are always improving. Please ensure you1–800–BUY–TREX have the most up-to-date installation instructions by visiting: trex.com TR-HZSIGNATURE-0121
2
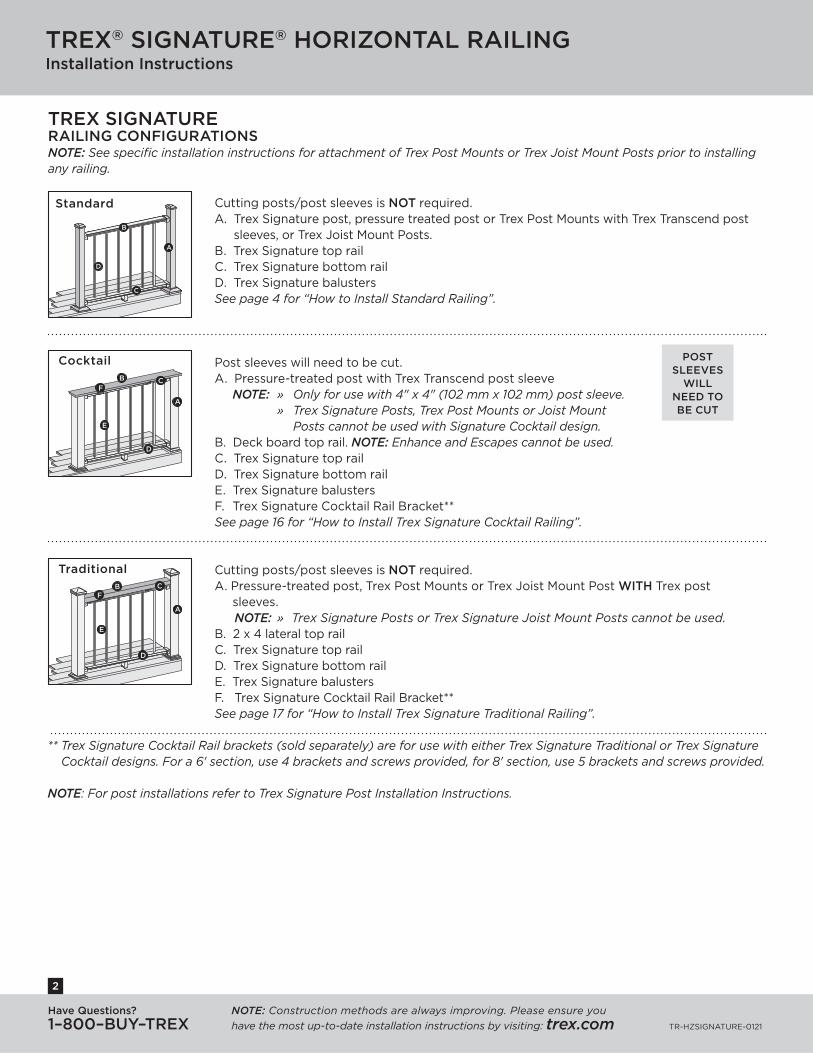
TREX SIGNATURE RAILING CONFIGURATIONS NOTE: See specifi c installation instructions for attachment of Trex Post Mounts or Trex Joist Mount Posts prior to installing any railing.
Cutting posts/post sleeves is NOT required. A. Trex Signature post, pressure treated post or Trex Post Mounts with Trex Transcend post
sleeves, or Trex Joist Mount Posts.B. Trex Signature top railC. Trex Signature bottom railD. Trex Signature balustersSee page 4 for “How to Install Standard Railing”.
Cutting posts/post sleeves is NOT required. A. Pressure-treated post, Trex Post Mounts or Trex Joist Mount Post WITH Trex post sleeves. NOTE: » Trex Signature Posts or Trex Signature Joist Mount Posts cannot be used.B. 2 x 4 lateral top railC. Trex Signature top railD. Trex Signature bottom railE. Trex Signature balustersF. Trex Signature Cocktail Rail Bracket**See page 17 for “How to Install Trex Signature Traditional Railing”.
Post sleeves will need to be cut. A. Pressure-treated post with Trex Transcend post sleeve NOTE: » Only for use with 4" x 4" (102 mm x 102 mm) post sleeve. » Trex Signature Posts, Trex Post Mounts or Joist Mount Posts cannot be used with Signature Cocktail design. B. Deck board top rail. NOTE: Enhance and Escapes cannot be used.C. Trex Signature top railD. Trex Signature bottom railE. Trex Signature balustersF. Trex Signature Cocktail Rail Bracket**See page 16 for “How to Install Trex Signature Cocktail Railing”.
A
B
D
C
E
F
A
B
D
C
E
F
POST SLEEVES
WILL NEED TO BE CUT
A
B
C
D
Standard
Cocktail
Traditional
** Trex Signature Cocktail Rail brackets (sold separately) are for use with either Trex Signature Traditional or Trex Signature Cocktail designs. For a 6' section, use 4 brackets and screws provided, for 8' section, use 5 brackets and screws provided.
NOTE: For post installations refer to Trex Signature Post Installation Instructions.
Have Questions? NOTE: Construction methods are always improving. Please ensure you 1–800–BUY–TREX have the most up-to-date installation instructions by visiting: trex.com TR-HZSIGNATURE-0121
3
AABB CC
DD
AA
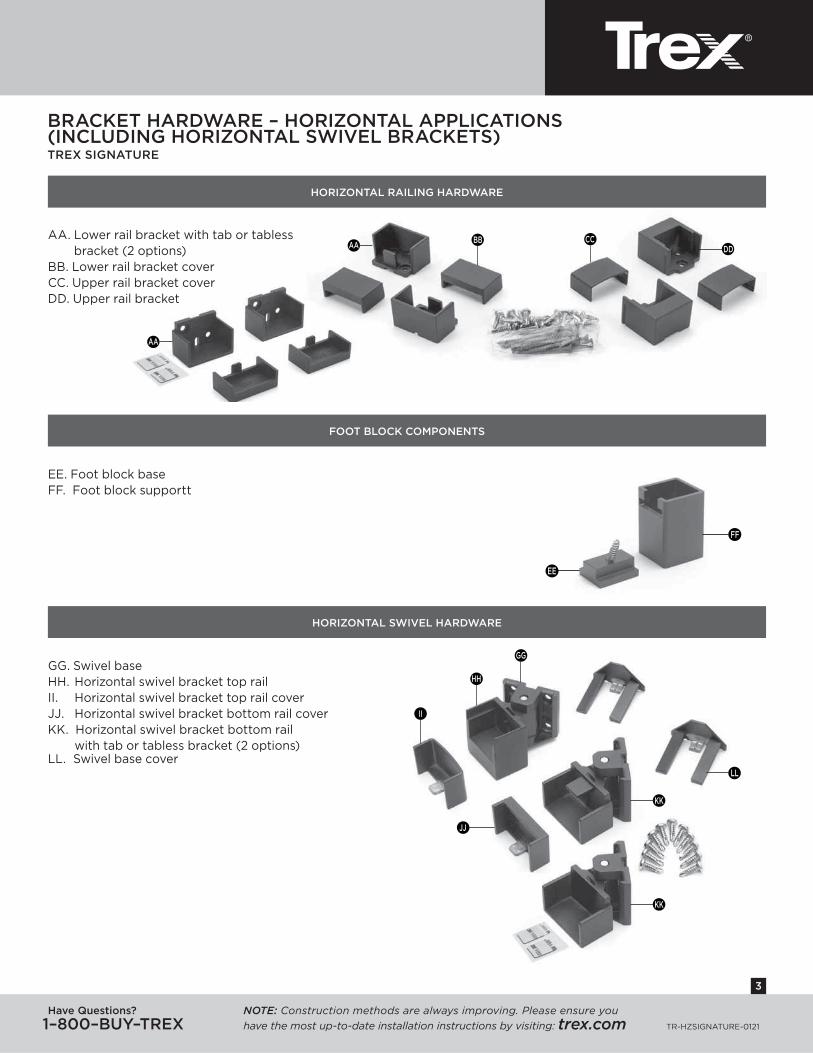
BRACKET HARDWARE – HORIZONTAL APPLICATIONS (INCLUDING HORIZONTAL SWIVEL BRACKETS)TREX SIGNATURE
HORIZONTAL RAILING HARDWARE
AA. Lower rail bracket with tab or tabless bracket (2 options)
BB. Lower rail bracket coverCC. Upper rail bracket coverDD. Upper rail bracket
FOOT BLOCK COMPONENTS
EE. Foot block baseFF. Foot block supportt
HORIZONTAL SWIVEL HARDWARE
GG. Swivel baseHH. Horizontal swivel bracket top railII. Horizontal swivel bracket top rail coverJJ. Horizontal swivel bracket bottom rail coverKK. Horizontal swivel bracket bottom rail with tab or tabless bracket (2 options)LL. Swivel base cover
FF
EE
GG
LL
KK
JJ
II
HH
KK

TREX® SIGNATURE® HORIZONTAL RAILINGInstallation Instructions
Have Questions? NOTE: Construction methods are always improving. Please ensure you1–800–BUY–TREX have the most up-to-date installation instructions by visiting: trex.com TR-HZSIGNATURE-0121
4
Attach Brackets Using Trex Signature PostsTIP: Use a clamp to help hold brackets in place while fastening with screws.
1. Measure 1-3/8" (3.5 cm) from top of post base plate or 1-7/8" (4.8 cm) from decking surface. Mark with light line.
2. Measure up from post base plate 33-7/16" (84.9 cm) for 36" (92 cm) rail height or 39-7/16" (100.2 cm) for 42" (107 cm) rail height. Mark with light line.
NOTE: If measuring from decking surface, measure up 33-15/16" (86.2 cm) for 36" (92 cm) rail height or 39-15/16" (101.4 cm) for 42" (107 cm) rail height.
3. Center lower bracket on post above the marked line and attach using two self-tapping screws (provided).
4. Center upper bracket on post above marked line and attach using (3) self-tapping screws (provided).
NOTE: Upper bracket is not required on crossover post confi guration.
Attach Brackets Using Pressure-Treated Postsand Post SleevesTIP: Use a clamp to help hold brackets in place while fastening with screws.
1. Measure 1-7/8" (4.8 cm) up from deck surface to bottom of bracket. Slide skirt up to allow for proper measurement. Mark with light line.
2. Measure up from decking surface 33-15/16" (862 cm) for 36" (92 cm) rail height or 39-15/16" (101.4 cm) for 42" (107 cm) rail height. Mark with light line.
NOTE: Push skirt back down onto surface of decking BEFORE ATTACHING BRACKETS.
3. Center lower bracket on post above the marked line and attach using two 2" (51 mm) wood screws (provided).
4. Center upper bracket on post above marked line and attach using three 2" (51 cm) wood screws (provided).
1-3/8"(3.5 cm)1-3/8"
(3.5 cm)2-1/2"Post
2-1/2"Post
1
1
4
2
1
3
2
33-7/16"(84.9 cm)
or39-7/16"
(100.2 cm)
33-7/16"(84.9 cm)
or39-7/16"
(100.2 cm)
2
33-15/16"(86.2 cm)
or39-15/16"(101.4 cm)
33-15/16"(86.2 cm)
or39-15/16"(101.4 cm)
2
1
4
2
1-7/8"(4.8 cm)
1-7/8"(4.8 cm)
1
1
3
2
HOW TO INSTALL HORIZONTAL RAILINGTREX SIGNATURE STANDARD
NOTE: FOR EASE OF INSTALLATION, IT IS RECOMMENDED TO USE THE TREX SIGNATURE RAIL TEMPLATES TO ATTACH BRACKETS (SOLD SEPARATELY).
Have Questions? NOTE: Construction methods are always improving. Please ensure you1–800–BUY–TREX have the most up-to-date installation instructions by visiting: trex.com TR-HZSIGNATURE-0121
5
HOW TO INSTALL HORIZONTAL RAILING POST TO POSTTREX SIGNATURE
NOTES:
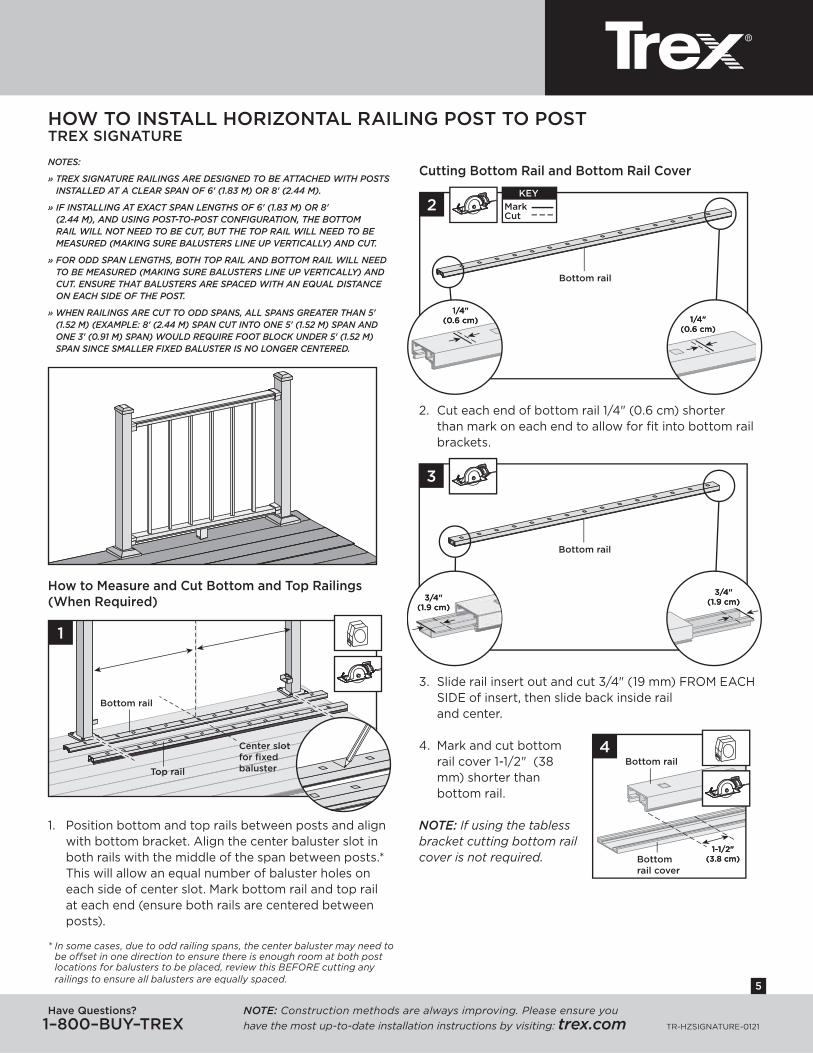
» TREX SIGNATURE RAILINGS ARE DESIGNED TO BE ATTACHED WITH POSTS INSTALLED AT A CLEAR SPAN OF 6' (1.83 M) OR 8' (2.44 M).
» IF INSTALLING AT EXACT SPAN LENGTHS OF 6' (1.83 M) OR 8' (2.44 M), AND USING POST-TO-POST CONFIGURATION, THE BOTTOM RAIL WILL NOT NEED TO BE CUT, BUT THE TOP RAIL WILL NEED TO BE MEASURED (MAKING SURE BALUSTERS LINE UP VERTICALLY) AND CUT.
» FOR ODD SPAN LENGTHS, BOTH TOP RAIL AND BOTTOM RAIL WILL NEED TO BE MEASURED (MAKING SURE BALUSTERS LINE UP VERTICALLY) AND CUT. ENSURE THAT BALUSTERS ARE SPACED WITH AN EQUAL DISTANCE ON EACH SIDE OF THE POST.
» WHEN RAILINGS ARE CUT TO ODD SPANS, ALL SPANS GREATER THAN 5' (1.52 M) (EXAMPLE: 8' (2.44 M) SPAN CUT INTO ONE 5' (1.52 M) SPAN AND ONE 3' (0.91 M) SPAN) WOULD REQUIRE FOOT BLOCK UNDER 5' (1.52 M) SPAN SINCE SMALLER FIXED BALUSTER IS NO LONGER CENTERED.
How to Measure and Cut Bottom and Top Railings (When Required)
1. Position bottom and top rails between posts and align with bottom bracket. Align the center baluster slot in both rails with the middle of the span between posts.* This will allow an equal number of baluster holes on each side of center slot. Mark bottom rail and top rail at each end (ensure both rails are centered between posts).
* In some cases, due to odd railing spans, the center baluster may need to be off set in one direction to ensure there is enough room at both post locations for balusters to be placed, review this BEFORE cutting any railings to ensure all balusters are equally spaced.
Cutting Bottom Rail and Bottom Rail Cover
2. Cut each end of bottom rail 1/4" (0.6 cm) shorter than mark on each end to allow for fi t into bottom rail brackets.
3. Slide rail insert out and cut 3/4" (19 mm) FROM EACH SIDE of insert, then slide back inside rail and center.
4. Mark and cut bottom rail cover 1-1/2" (38 mm) shorter than bottom rail.
NOTE: If using the tabless bracket cutting bottom rail cover is not required.
1
Top rail
Center slot for fixed baluster
Bottom rail
2
1/4"(0.6 cm)
1/4"(0.6 cm)
1/4"(0.6 cm)
1/4"(0.6 cm)
KEYMarkCut
KEY
Bottom rail
3
3/4"(1.9 cm)
3/4"(1.9 cm)3/4"
(1.9 cm)3/4"
(1.9 cm)
Bottom rail
1-1/2"(3.8 cm)
1-1/2"(3.8 cm)
4Bottom rail
Bottom rail cover
TREX® SIGNATURE® HORIZONTAL RAILINGInstallation InstructionsTREX® SIGNATURE® HORIZONTAL RAILINGInstallation Instructions
6
Have Questions? NOTE: Construction methods are always improving. Please ensure you1–800–BUY–TREX have the most up-to-date installation instructions by visiting: trex.com TR-HZSIGNATURE-1020
Have Questions? NOTE: Construction methods are always improving. Please ensure you1–800–BUY–TREX have the most up-to-date installation instructions by visiting: trex.com TR-HZSIGNATURE-0121
TREX® SIGNATURE® HORIZONTAL RAILINGInstallation Instructions
HOW TO INSTALL HORIZONTAL RAILING POST TO POST/CONTINUEDTREX SIGNATURE
1
9
3
2
1
8
Inverted Bottom viewInverted Bottom view
Center balluster slotCenter balluster slot
2
7
6
3/4"(1.9 cm)
3/4"(1.9 cm)3/4"
(1.9 cm)3/4"
(1.9 cm)
Top rail
5
1/4"(0.6 cm)
1/4"(0.6 cm)
1/4"(0.6 cm)
1/4"(0.6 cm)
KEYMarkCut
KEY
Top rail
Standard postStandard post
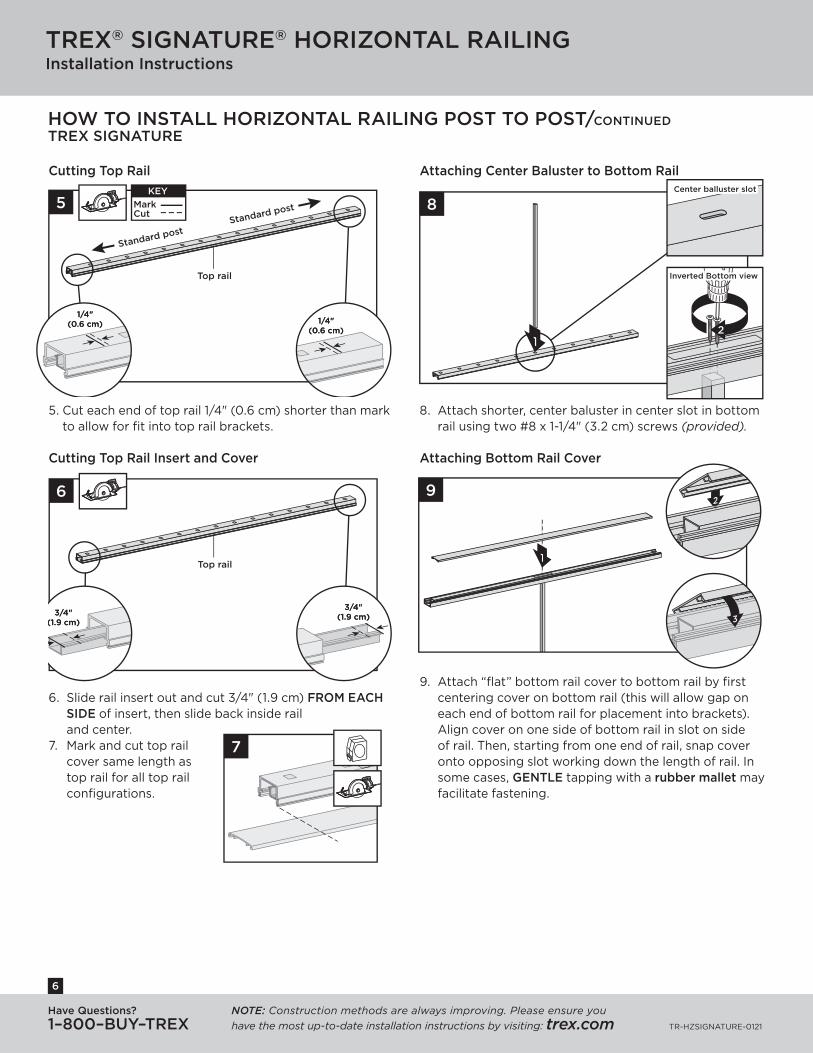
Cutting Top Rail
5. Cut each end of top rail 1/4" (0.6 cm) shorter than mark to allow for fi t into top rail brackets.
Cutting Top Rail Insert and Cover
6. Slide rail insert out and cut 3/4" (1.9 cm) FROM EACH SIDE of insert, then slide back inside rail and center.
7. Mark and cut top rail cover same length as top rail for all top rail confi gurations.
Attaching Center Baluster to Bottom Rail
8. Attach shorter, center baluster in center slot in bottom rail using two #8 x 1-1/4" (3.2 cm) screws (provided).
Attaching Bottom Rail Cover
9. Attach “fl at” bottom rail cover to bottom rail by fi rst centering cover on bottom rail (this will allow gap on each end of bottom rail for placement into brackets). Align cover on one side of bottom rail in slot on side of rail. Then, starting from one end of rail, snap cover onto opposing slot working down the length of rail. In some cases, GENTLE tapping with a rubber mallet may facilitate fastening.
Have Questions? NOTE: Construction methods are always improving. Please ensure you1–800–BUY–TREX have the most up-to-date installation instructions by visiting: trex.com TR-HZSIGNATURE-0121
7
HOW TO INSTALL HORIZONTAL RAILING POST TO POST/CONTINUEDTREX SIGNATURE
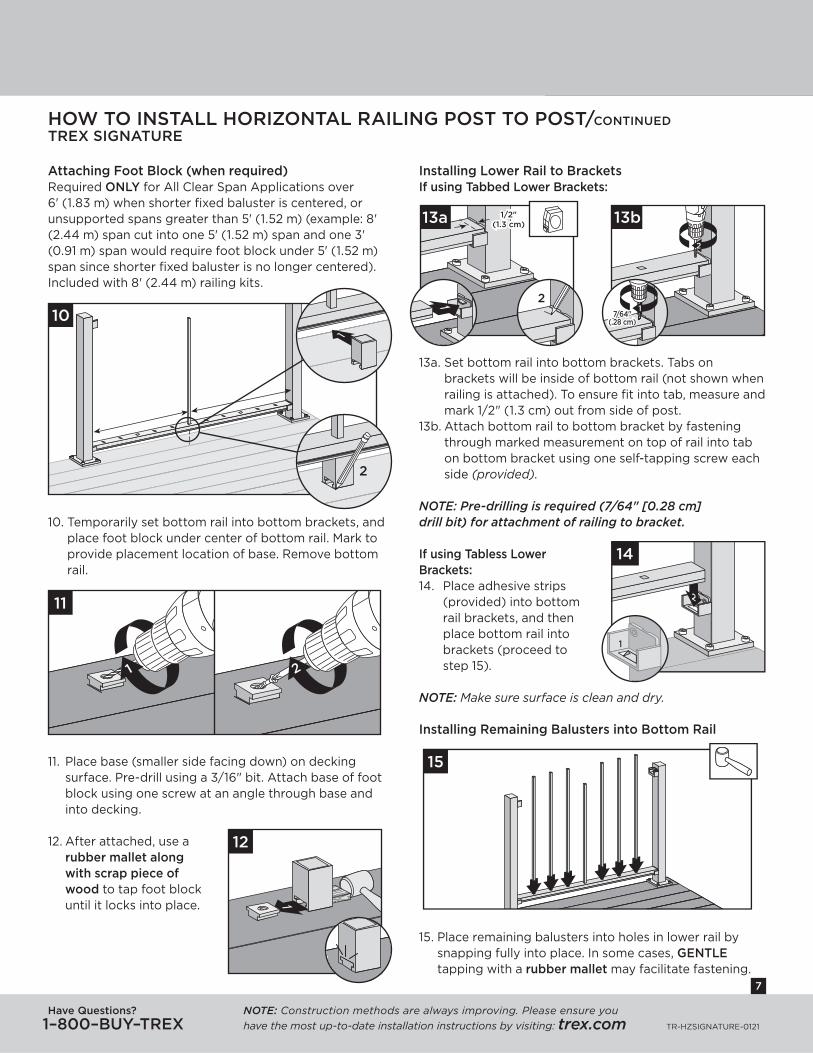
Attaching Foot Block (when required)Required ONLY for All Clear Span Applications over 6' (1.83 m) when shorter fi xed baluster is centered, or unsupported spans greater than 5' (1.52 m) (example: 8' (2.44 m) span cut into one 5' (1.52 m) span and one 3' (0.91 m) span would require foot block under 5' (1.52 m) span since shorter fi xed baluster is no longer centered). Included with 8' (2.44 m) railing kits.
10. Temporarily set bottom rail into bottom brackets, and place foot block under center of bottom rail. Mark to provide placement location of base. Remove bottom rail.
11. Place base (smaller side facing down) on decking surface. Pre-drill using a 3/16" bit. Attach base of foot block using one screw at an angle through base and into decking.
12. After attached, use a rubber mallet along with scrap piece of wood to tap foot block until it locks into place.
Installing Lower Rail to BracketsIf using Tabbed Lower Brackets:
13a. Set bottom rail into bottom brackets. Tabs on brackets will be inside of bottom rail (not shown when railing is attached). To ensure fi t into tab, measure and mark 1/2" (1.3 cm) out from side of post.
13b. Attach bottom rail to bottom bracket by fastening through marked measurement on top of rail into tab on bottom bracket using one self-tapping screw each side (provided).
NOTE: Pre-drilling is required (7/64" [0.28 cm] drill bit) for attachment of railing to bracket.
If using Tabless Lower Brackets:14. Place adhesive strips
(provided) into bottom rail brackets, and then place bottom rail into brackets (proceed to step 15).
NOTE: Make sure surface is clean and dry.
Installing Remaining Balusters into Bottom Rail
15. Place remaining balusters into holes in lower rail by snapping fully into place. In some cases, GENTLEtapping with a rubber mallet may facilitate fastening.
10
2
1
1
12
11
1 2
15
1/2"(1.3 cm)
1/2"(1.3 cm)13a
21
2
13b
17/64"
(.28 cm)7/64"
(.28 cm)
2
14
1

TREX® SIGNATURE® HORIZONTAL RAILINGInstallation Instructions
Have Questions? NOTE: Construction methods are always improving. Please ensure you1–800–BUY–TREX have the most up-to-date installation instructions by visiting: trex.com TR-HZSIGNATURE-0121
8
Attach Upper Railings
16. Working from one end of upper rail, snap balusters into upper rail working down length of rail. Fasten center baluster into center slot using two #8 x 1-1/4" (3.2 cm) screws (provided).
17. Fasten upper rail to each bracket by installing screws diagonally through upper rail into bracket using two self-tapping screws each side (provided).
NOTE: Pre-drilling is required (7/64" [0.28 cm] drill bit) for attachment of railing to bracket.
18. Attach “crowned” upper rail cover to upper rail by aligning cover on one side of rail. Then starting from one end of rail, snap cover onto opposing slot working down length of rail. GENTLE tapping with a rubber mallet may facilitate fastening.
Attachment of Bracket Covers, Skirts, and Caps
19. Attach corresponding bracket covers over opening in upper and bottom rails.
20. Attach provided post skirt to bottom of posts when using Trex Signature posts.
21. Attach post caps to Trex Signature posts. (Use of rubber mallet may be required for secure attachment.)
22. Attach post caps to post sleeves using external grade PVC construction adhesive.
HOW TO INSTALL HORIZONTAL RAILING POST TO POST/CONTINUEDTREX SIGNATURE
11
16
2
2
17
17/64"(.28 cm)
7/64"(.28 cm)
1
18
3
2
1
20 Trex Signature™
post
®
2
1
2
19
®
1
21
TrexSignature™
post
2Postsleeve
22
3
1
Have Questions? NOTE: Construction methods are always improving. Please ensure you1–800–BUY–TREX have the most up-to-date installation instructions by visiting: trex.com TR-HZSIGNATURE-0121
9
HOW TO INSTALL HORIZONTAL RAILING POST TO CROSSOVER POSTTREX SIGNATURE
NOTES:
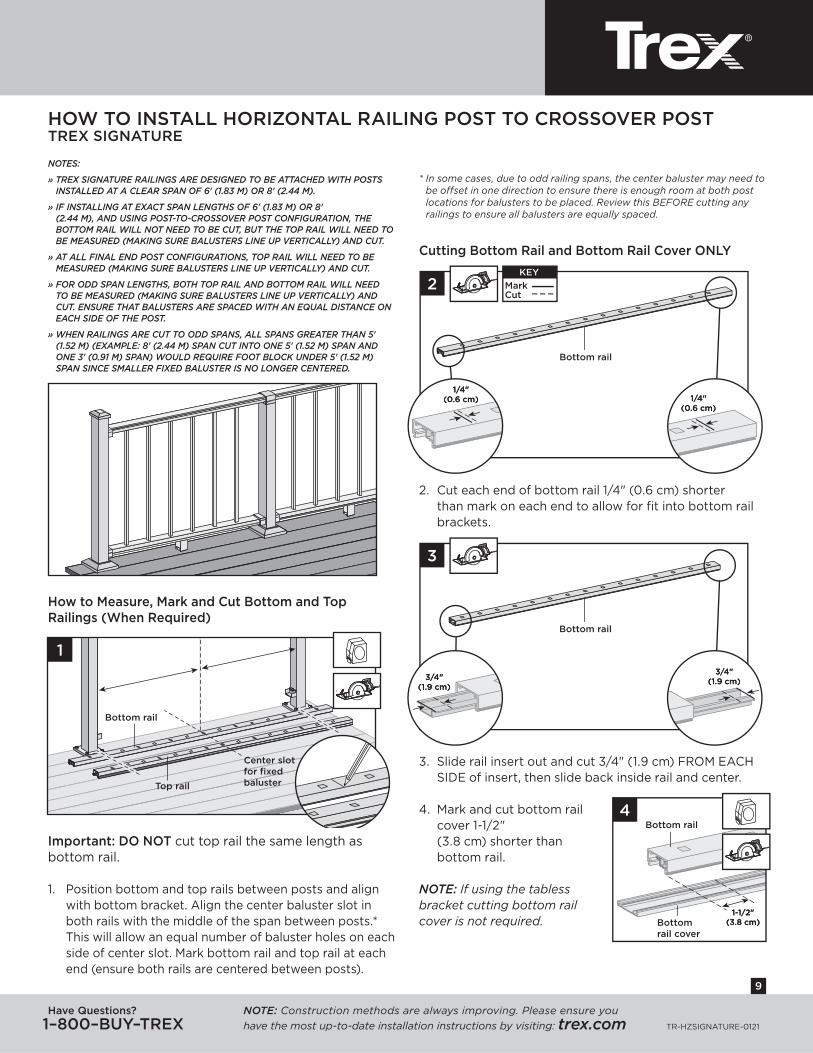
» TREX SIGNATURE RAILINGS ARE DESIGNED TO BE ATTACHED WITH POSTS INSTALLED AT A CLEAR SPAN OF 6' (1.83 M) OR 8' (2.44 M).
» IF INSTALLING AT EXACT SPAN LENGTHS OF 6' (1.83 M) OR 8' (2.44 M), AND USING POST-TO-CROSSOVER POST CONFIGURATION, THE BOTTOM RAIL WILL NOT NEED TO BE CUT, BUT THE TOP RAIL WILL NEED TO BE MEASURED (MAKING SURE BALUSTERS LINE UP VERTICALLY) AND CUT.
» AT ALL FINAL END POST CONFIGURATIONS, TOP RAIL WILL NEED TO BE MEASURED (MAKING SURE BALUSTERS LINE UP VERTICALLY) AND CUT.
» FOR ODD SPAN LENGTHS, BOTH TOP RAIL AND BOTTOM RAIL WILL NEED TO BE MEASURED (MAKING SURE BALUSTERS LINE UP VERTICALLY) AND CUT. ENSURE THAT BALUSTERS ARE SPACED WITH AN EQUAL DISTANCE ON EACH SIDE OF THE POST.
» WHEN RAILINGS ARE CUT TO ODD SPANS, ALL SPANS GREATER THAN 5' (1.52 M) (EXAMPLE: 8' (2.44 M) SPAN CUT INTO ONE 5' (1.52 M) SPAN AND ONE 3' (0.91 M) SPAN) WOULD REQUIRE FOOT BLOCK UNDER 5' (1.52 M) SPAN SINCE SMALLER FIXED BALUSTER IS NO LONGER CENTERED.
How to Measure, Mark and Cut Bottom and Top Railings (When Required)
Important: DO NOT cut top rail the same length as bottom rail.
1. Position bottom and top rails between posts and align with bottom bracket. Align the center baluster slot in both rails with the middle of the span between posts.* This will allow an equal number of baluster holes on each side of center slot. Mark bottom rail and top rail at each end (ensure both rails are centered between posts).
* In some cases, due to odd railing spans, the center baluster may need to be off set in one direction to ensure there is enough room at both post locations for balusters to be placed. Review this BEFORE cutting any railings to ensure all balusters are equally spaced.
Cutting Bottom Rail and Bottom Rail Cover ONLY
2. Cut each end of bottom rail 1/4" (0.6 cm) shorter than mark on each end to allow for fi t into bottom rail brackets.
3. Slide rail insert out and cut 3/4" (1.9 cm) FROM EACH SIDE of insert, then slide back inside rail and center.
4. Mark and cut bottom rail cover 1-1/2" (3.8 cm) shorter than bottom rail.
NOTE: If using the tabless bracket cutting bottom rail cover is not required.
1
Top rail
Center slot for fixed baluster
Bottom rail
2
1/4"(0.6 cm)
1/4"(0.6 cm)
1/4"(0.6 cm)
1/4"(0.6 cm)
KEYMarkCut
KEY
Bottom rail
3
3/4"(1.9 cm)
3/4"(1.9 cm)3/4"
(1.9 cm)3/4"
(1.9 cm)
Bottom rail
1-1/2"(3.8 cm)
1-1/2"(3.8 cm)
4Bottom rail
Bottom rail cover

TREX® SIGNATURE® HORIZONTAL RAILINGInstallation Instructions
Have Questions? NOTE: Construction methods are always improving. Please ensure you1–800–BUY–TREX have the most up-to-date installation instructions by visiting: trex.com TR-HZSIGNATURE-0121
10
HOW TO INSTALL HORIZONTAL RAILING POST TO CROSSOVER POST/CONTINUEDTREX SIGNATURE
Cutting Top Rail
5. Top rail must be cut differently on each side of the rail. Railing side that attaches to standard post should be cut 1/4" (0.6 cm) shorter than the mark to allow for fi t into top rail bracket. Railing side that attaches to the crossover post should be cut 3/4" (1.9 cm) LONGERthan the mark to allow for fi t into the crossover post bracket.
Cutting Top Rail Insert and Cover
6. Slide rail insert out and cut 3/4" (1.9 cm) FROM EACH SIDE of insert, then slide back inside rail and center.
7. Mark and cut top rail cover same length as top rail for all top rail confi gurations.
Attaching Center Baluster to Bottom Rail
8. Attach shorter, center baluster in center slot in bottom rail using two #8 x 1-1/4" (3.2 cm) screws (provided).
Attaching Bottom Rail Cover
9. Attach “fl at” bottom rail cover to bottom rail by fi rst centering cover on bottom rail (this will allow gap on each end of bottom rail for placement into brackets). Align cover on one side of bottom rail in slot on side of rail. Then starting from one end of rail snap cover onto opposing slot working down the length of rail. In some cases, GENTLE tapping with a rubber mallet may facilitate fastening.
10. Attaching Foot Block (when required)See instructions on page 7.7
5KEY
MarkCut
KEY
Top rail
Standard postCrossover post
3/4"(1.9 cm)
3/4"(1.9 cm)
1/4"(0.6 cm)
1/4"(0.6 cm)
6
3/4"(1.9 cm)
3/4"(1.9 cm)3/4"
(1.9 cm)3/4"
(1.9 cm)
Top rail
1
9
3
2
1
8
Inverted Bottom viewInverted Bottom view
Center balluster slotCenter balluster slot
2
Have Questions? NOTE: Construction methods are always improving. Please ensure you1–800–BUY–TREX have the most up-to-date installation instructions by visiting: trex.com TR-HZSIGNATURE-0121
11
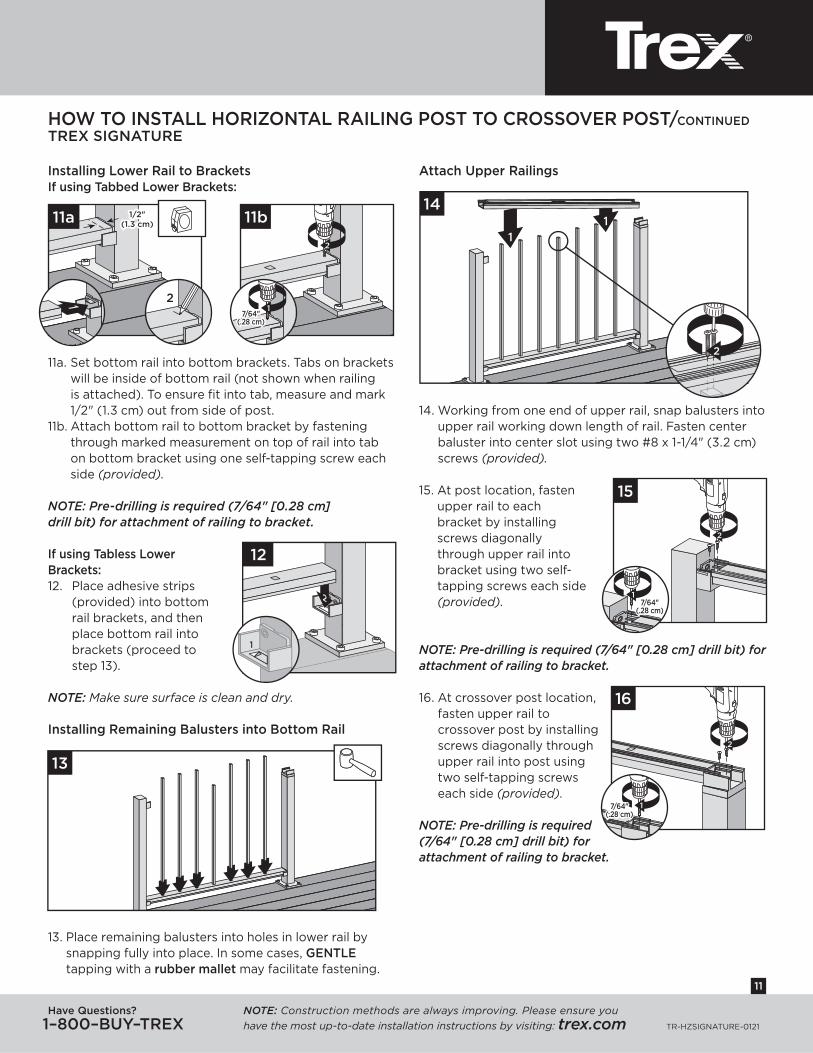
Installing Lower Rail to BracketsIf using Tabbed Lower Brackets:
11a. Set bottom rail into bottom brackets. Tabs on brackets will be inside of bottom rail (not shown when railing is attached). To ensure fi t into tab, measure and mark 1/2" (1.3 cm) out from side of post.
11b. Attach bottom rail to bottom bracket by fastening through marked measurement on top of rail into tab on bottom bracket using one self-tapping screw each side (provided).
NOTE: Pre-drilling is required (7/64" [0.28 cm] drill bit) for attachment of railing to bracket.
If using Tabless Lower Brackets:12. Place adhesive strips
(provided) into bottom rail brackets, and then place bottom rail into brackets (proceed to step 13).
NOTE: Make sure surface is clean and dry.
Installing Remaining Balusters into Bottom Rail
13. Place remaining balusters into holes in lower rail by snapping fully into place. In some cases, GENTLEtapping with a rubber mallet may facilitate fastening.
Attach Upper Railings
14. Working from one end of upper rail, snap balusters into upper rail working down length of rail. Fasten center baluster into center slot using two #8 x 1-1/4" (3.2 cm) screws (provided).
15. At post location, fasten upper rail to each bracket by installing screws diagonally through upper rail into bracket using two self-tapping screws each side (provided).
NOTE: Pre-drilling is required (7/64" [0.28 cm] drill bit) for attachment of railing to bracket.
16. At crossover post location, fasten upper rail to crossover post by installing screws diagonally through upper rail into post using two self-tapping screws each side (provided).
NOTE: Pre-drilling is required (7/64" [0.28 cm] drill bit) for attachment of railing to bracket.
HOW TO INSTALL HORIZONTAL RAILING POST TO CROSSOVER POST/CONTINUEDTREX SIGNATURE
2
15
17/64"
(.28 cm)7/64"
(.28 cm)
11
14
2
2
16
17/64"(.28 cm)
7/64"(.28 cm)
13
1/2"(1.3 cm)
1/2"(1.3 cm)11a
21
2
11b
17/64"
(.28 cm)7/64"
(.28 cm)
2
12
1

TREX® SIGNATURE® HORIZONTAL RAILINGInstallation Instructions
Have Questions? NOTE: Construction methods are always improving. Please ensure you1–800–BUY–TREX have the most up-to-date installation instructions by visiting: trex.com TR-HZSIGNATURE-0121
12
17. Attach “crowned” upper rail cover to upper rail by aligning cover on one side of rail. Then starting from one end of rail, snap cover onto opposing slot working down length of rail. In some cases, GENTLE tapping with a rubber mallet may facilitate fastening.
Attachment of Bracket Covers, Skirts, and Caps
18. Attach corresponding bracket covers over opening in upper and bottom rails.
19. Attach provided post skirt to bottom of posts when using Trex Signature posts.
20. Attach post caps to Trex Signature posts. (Use of rubber mallet may be required for secure attachment.)
21. Attach post caps to post sleeves using external grade PVC construction adhesive.
22. For crossover post confi guration, attach crossover post cap to crossover post.
HOW TO INSTALL HORIZONTAL RAILING POST TO CROSSOVER POST/CONTINUEDTREX SIGNATURE
1
17
3
2
19 TrexSignaturepost
2
1
2
1
18
1
20
TrexSignaturepost
2
Postsleeve
21
3
1
22
HOW TO INSTALL HORIZONTAL RAILING CROSSOVER POST TO CROSSOVER POST–TREX SIGNATURE STANDARD
NOTES:
» TREX SIGNATURE RAILINGS ARE DESIGNED TO BE ATTACHED WITH POSTS INSTALLED AT A CLEAR SPAN OF 6' (1.83 M) OR 8' (2.44 M).
» IF INSTALLING AT EXACT SPAN LENGTHS OF 6' (1.83 M) OR 8' (2.44 M), AND USING POST-TO-CROSSOVER POST CONFIGURATION, THE BOTTOM RAIL WILL NOT NEED TO BE CUT, BUT THE TOP RAIL WILL NEED TO BE MEASURED (MAKING SURE BALUSTERS LINE UP VERTICALLY) AND CUT.
» FOR ODD SPAN LENGTHS, BOTH TOP RAIL AND BOTTOM RAIL WILL NEED TO BE MEASURED (MAKING SURE BALUSTERS LINE UP VERTICALLY) AND CUT. ENSURE THAT BALUSTERS ARE SPACED WITH AN EQUAL DISTANCE ON EACH SIDE OF THE POST.
» WHEN RAILINGS ARE CUT TO ODD SPANS, ALL SPANS GREATER THAN 5' (1.52 M) (EXAMPLE: 8' (2.44 M) SPAN CUT INTO ONE 5' (1.52 M) SPAN AND ONE 3' (0.91 M) SPAN) WOULD REQUIRE FOOT BLOCK UNDER 5' (1.52 M) SPAN SINCE SMALLER FIXED BALUSTER IS NO LONGER CENTERED.
Have Questions? NOTE: Construction methods are always improving. Please ensure you1–800–BUY–TREX have the most up-to-date installation instructions by visiting: trex.com TR-HZSIGNATURE-0121
13
HOW TO INSTALL HORIZONTAL RAILING CROSSOVER POST TO CROSSOVER POST/CONTINUED – TREX SIGNATURE STANDARD
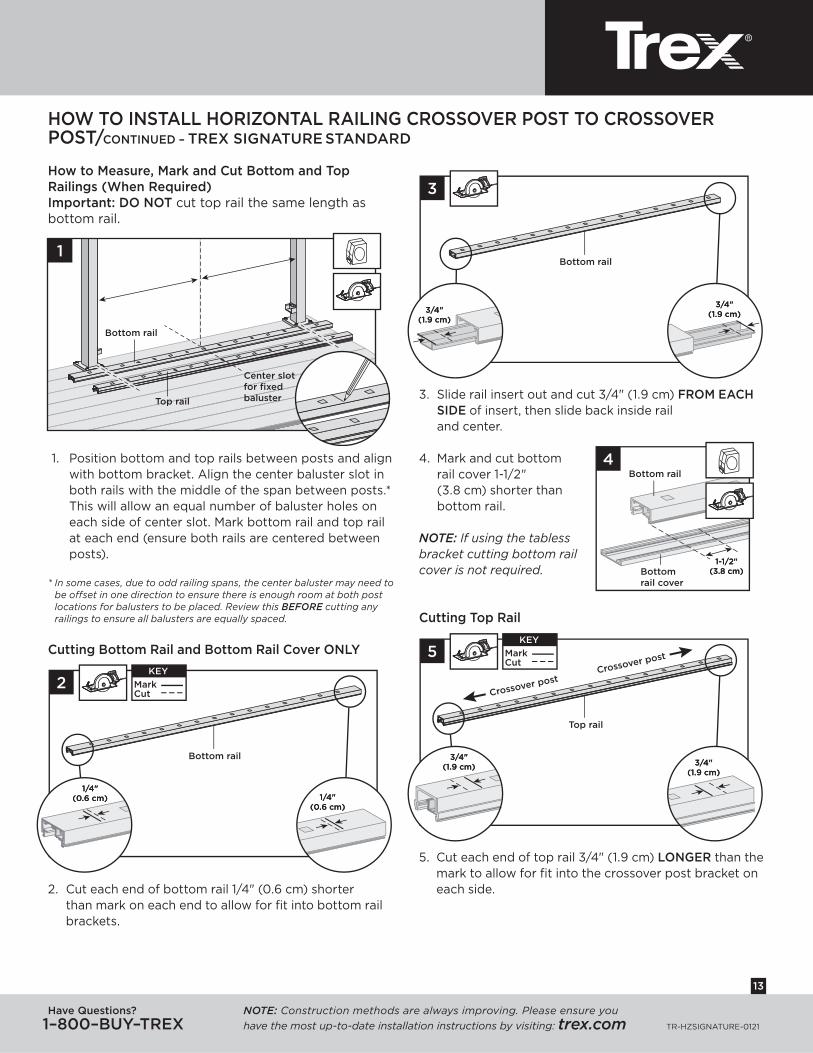
How to Measure, Mark and Cut Bottom and Top Railings (When Required)Important: DO NOT cut top rail the same length as bottom rail.
1. Position bottom and top rails between posts and align with bottom bracket. Align the center baluster slot in both rails with the middle of the span between posts.* This will allow an equal number of baluster holes on each side of center slot. Mark bottom rail and top rail at each end (ensure both rails are centered between posts).
* In some cases, due to odd railing spans, the center baluster may need to be off set in one direction to ensure there is enough room at both post locations for balusters to be placed. Review this BEFORE cutting any railings to ensure all balusters are equally spaced.
Cutting Bottom Rail and Bottom Rail Cover ONLY
2. Cut each end of bottom rail 1/4" (0.6 cm) shorter than mark on each end to allow for fi t into bottom rail brackets.
3. Slide rail insert out and cut 3/4" (1.9 cm) FROM EACH SIDE of insert, then slide back inside rail and center.
4. Mark and cut bottom rail cover 1-1/2" (3.8 cm) shorter than bottom rail.
NOTE: If using the tabless bracket cutting bottom rail cover is not required.
Cutting Top Rail
5. Cut each end of top rail 3/4" (1.9 cm) LONGER than the mark to allow for fi t into the crossover post bracket on each side.
1
Top rail
Center slot for fixed baluster
Bottom rail
2
1/4"(0.6 cm)
1/4"(0.6 cm)
1/4"(0.6 cm)
1/4"(0.6 cm)
KEYMarkCut
KEY
Bottom rail
3
3/4"(1.9 cm)
3/4"(1.9 cm)3/4"
(1.9 cm)3/4"
(1.9 cm)
Bottom rail
1-1/2"(3.8 cm)
1-1/2"(3.8 cm)
4Bottom rail
Bottom rail cover
5
3/4"(1.9 cm)
3/4"(1.9 cm)
3/4"(1.9 cm)
3/4"(1.9 cm)
KEY
MarkCut
KEY
Top rail
Crossover post Crossover post

TREX® SIGNATURE® HORIZONTAL RAILINGInstallation Instructions
Have Questions? NOTE: Construction methods are always improving. Please ensure you1–800–BUY–TREX have the most up-to-date installation instructions by visiting: trex.com TR-HZSIGNATURE-0121
14
Cutting Top Rail Insert and Cover
6. Slide rail insert out and cut 3/4" (1.9 cm) FROM EACH SIDE of insert, then slide back inside rail and center.
7. Mark and cut top rail cover same length as top rail for all top rail confi gurations.
Attaching Center Baluster to Bottom Rail
8. Attach shorter, center baluster in center slot in bottom rail using two #8 x 1-1/4" (3.2 cm) screws (provided).
Attaching Bottom Rail Cover
9. Attach “fl at” bottom rail cover to bottom rail by fi rst centering cover on bottom rail (this will allow gap on each end of bottom rail for placement into brackets). Align cover on one side of bottom rail in slot on side of rail. Then starting from one end of rail snap cover onto opposing slot working down the length of rail. In some cases, GENTLE tapping with a rubber mallet may facilitate fastening.
10. Attaching Foot Block (when required) See instructions on page 7.
Installing Lower Rail to BracketsIf using Tabbed Lower Brackets:
11a. Set bottom rail into bottom brackets. Tabs on brackets will be inside of bottom rail (not shown when railing is attached). To ensure fi t into tab, measure and mark 1/2" (1.3 cm) out from side of post.
11b. Attach bottom rail to bottom bracket by fastening through marked measurement on top of rail into tab on bottom bracket using one self-tapping screw each side (provided).
NOTE: Pre-drilling is required (7/64" [0.28 cm] drill bit) for attachment of railing to bracket.
HOW TO INSTALL HORIZONTAL RAILING CROSSOVER POST TO CROSSOVER POST/POST/CONTINUED – TREX SIGNATURE STANDARD
7
6
3/4"(1.9 cm)
3/4"(1.9 cm)3/4"
(1.9 cm)3/4"
(1.9 cm)
Top rail
1
8
Inverted Bottom viewInverted Bottom view
Center balluster slotCenter balluster slot
2
1
9
3
2
1/2"(1.3 cm)
1/2"(1.3 cm)11a
21
2
11b
17/64"
(.28 cm)7/64"
(.28 cm)
Have Questions? NOTE: Construction methods are always improving. Please ensure you1–800–BUY–TREX have the most up-to-date installation instructions by visiting: trex.com TR-HZSIGNATURE-0121
15
HOW TO INSTALL HORIZONTAL RAILING CROSSOVER POST TO CROSSOVER POST/CONTINUED – TREX SIGNATURE STANDARD
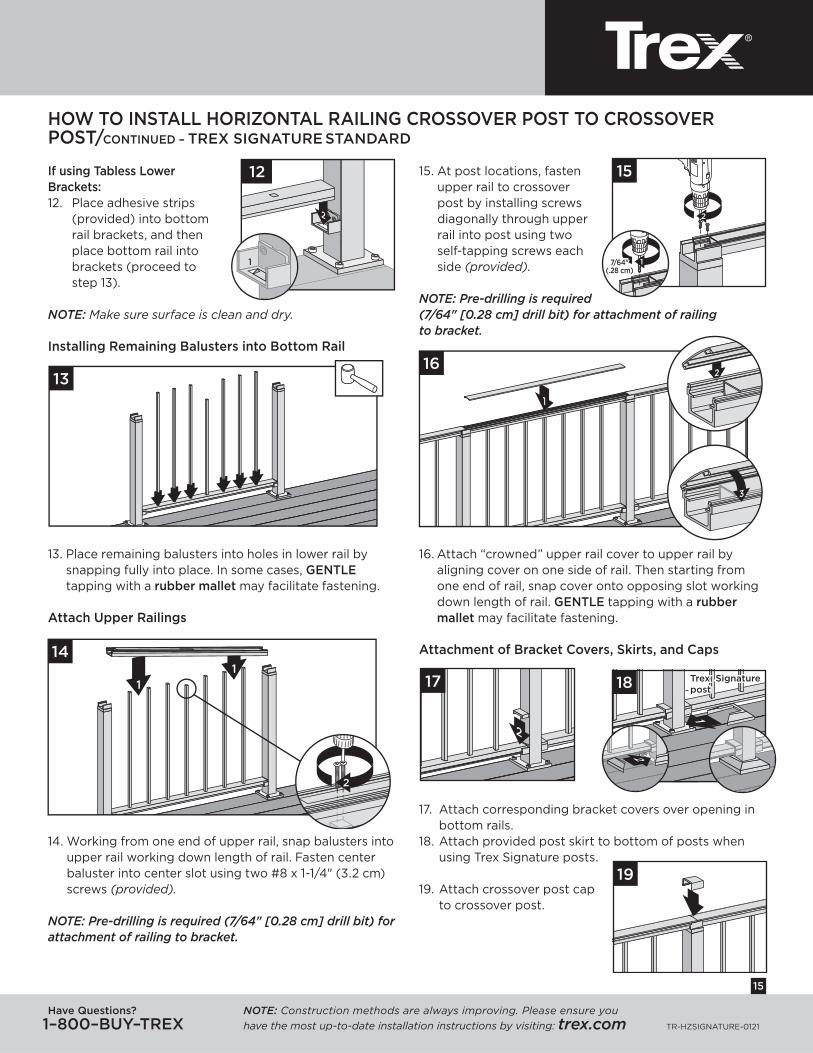
If using Tabless Lower Brackets:12. Place adhesive strips
(provided) into bottom rail brackets, and then place bottom rail into brackets (proceed to step 13).
NOTE: Make sure surface is clean and dry.
Installing Remaining Balusters into Bottom Rail
13. Place remaining balusters into holes in lower rail by snapping fully into place. In some cases, GENTLEtapping with a rubber mallet may facilitate fastening.
Attach Upper Railings
14. Working from one end of upper rail, snap balusters into upper rail working down length of rail. Fasten center baluster into center slot using two #8 x 1-1/4" (3.2 cm) screws (provided).
NOTE: Pre-drilling is required (7/64" [0.28 cm] drill bit) for attachment of railing to bracket.
15. At post locations, fasten upper rail to crossover post by installing screws diagonally through upper rail into post using two self-tapping screws each side (provided).
NOTE: Pre-drilling is required (7/64" [0.28 cm] drill bit) for attachment of railing to bracket.
16. Attach “crowned” upper rail cover to upper rail by aligning cover on one side of rail. Then starting from one end of rail, snap cover onto opposing slot working down length of rail. GENTLE tapping with a rubber mallet may facilitate fastening.
Attachment of Bracket Covers, Skirts, and Caps
17. Attach corresponding bracket covers over opening in bottom rails.
18. Attach provided post skirt to bottom of posts when using Trex Signature posts.
19. Attach crossover post cap to crossover post.
11
14
2
2
15
17/64"(.28 cm)
7/64"(.28 cm)
1
16
3
2
19
2
17
1
18 Trex SignaturepostTrex Signaturepost
2
13
2
12
1
TREX® SIGNATURE® HORIZONTAL RAILINGInstallation Instructions
Have Questions? NOTE: Construction methods are always improving. Please ensure you1–800–BUY–TREX have the most up-to-date installation instructions by visiting: trex.com TR-HZSIGNATURE-0121
16
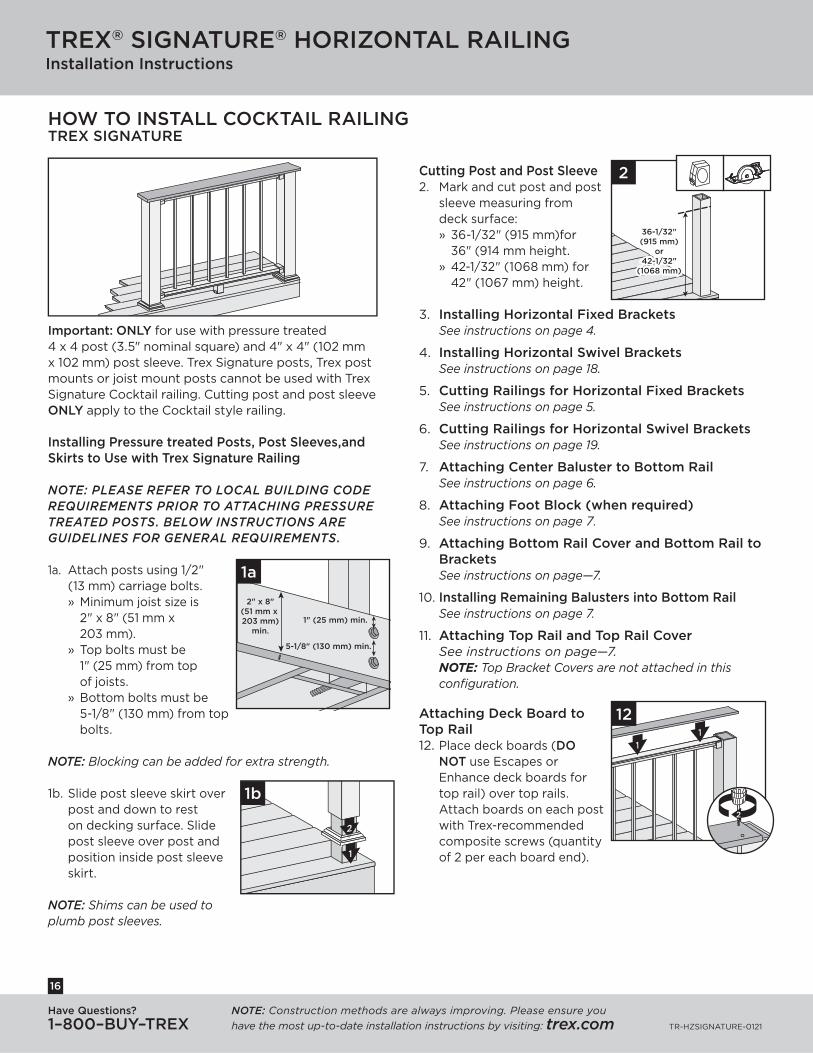
Important: ONLY for use with pressure treated 4 x 4 post (3.5" nominal square) and 4" x 4" (102 mm x 102 mm) post sleeve. Trex Signature posts, Trex post mounts or joist mount posts cannot be used with Trex Signature Cocktail railing. Cutting post and post sleeve ONLY apply to the Cocktail style railing.
Installing Pressure treated Posts, Post Sleeves,and Skirts to Use with Trex Signature Railing
NOTE: PLEASE REFER TO LOCAL BUILDING CODE REQUIREMENTS PRIOR TO ATTACHING PRESSURE TREATED POSTS. BELOW INSTRUCTIONS ARE GUIDELINES FOR GENERAL REQUIREMENTS.
1a. Attach posts using 1/2" (13 mm) carriage bolts.» Minimum joist size is 2" x 8" (51 mm x 203 mm).
» Top bolts must be 1" (25 mm) from top of joists.
» Bottom bolts must be 5-1/8" (130 mm) from top bolts.
NOTE: Blocking can be added for extra strength.
1b. Slide post sleeve skirt over post and down to rest on decking surface. Slide post sleeve over post and position inside post sleeve skirt.
NOTE: Shims can be used to plumb post sleeves.
Cutting Post and Post Sleeve 2. Mark and cut post and post
sleeve measuring from deck surface:» 36-1/32" (915 mm)for 36" (914 mm height.
» 42-1/32" (1068 mm) for 42" (1067 mm) height.
3. Installing Horizontal Fixed Brackets See instructions on page 4.
4. Installing Horizontal Swivel Brackets See instructions on page 18.
5. Cutting Railings for Horizontal Fixed BracketsSee instructions on page 5.
6. Cutting Railings for Horizontal Swivel Brackets See instructions on page 19.
7. Attaching Center Baluster to Bottom Rail See instructions on page 6.
8. Attaching Foot Block (when required) See instructions on page 7.
9. Attaching Bottom Rail Cover and Bottom Rail to BracketsSee instructions on page—7.
10. Installing Remaining Balusters into Bottom Rail See instructions on page 7.
11. Attaching Top Rail and Top Rail CoverSee instructions on page—7.NOTE: Top Bracket Covers are not attached in this confi guration.
Attaching Deck Board to Top Rail12. Place deck boards (DO
NOT use Escapes or Enhance deck boards for top rail) over top rails. Attach boards on each post with Trex-recommended composite screws (quantity of 2 per each board end).
HOW TO INSTALL COCKTAIL RAILINGTREX SIGNATURE
1a
5-1/8" (130 mm) min.
2" x 8"(51 mm x 203 mm)
min.1" (25 mm) min.
36-1/32"(915 mm)
or42-1/32"
(1068 mm)
36-1/32"(915 mm)
or42-1/32"
(1068 mm)
2
1
2
1b
1
1
12
2

Have Questions? NOTE: Construction methods are always improving. Please ensure you1–800–BUY–TREX have the most up-to-date installation instructions by visiting: trex.com TR-HZSIGNATURE-0121
17
HOW TO INSTALL COCKTAIL RAILING/CONTINUEDTREX SIGNATURE
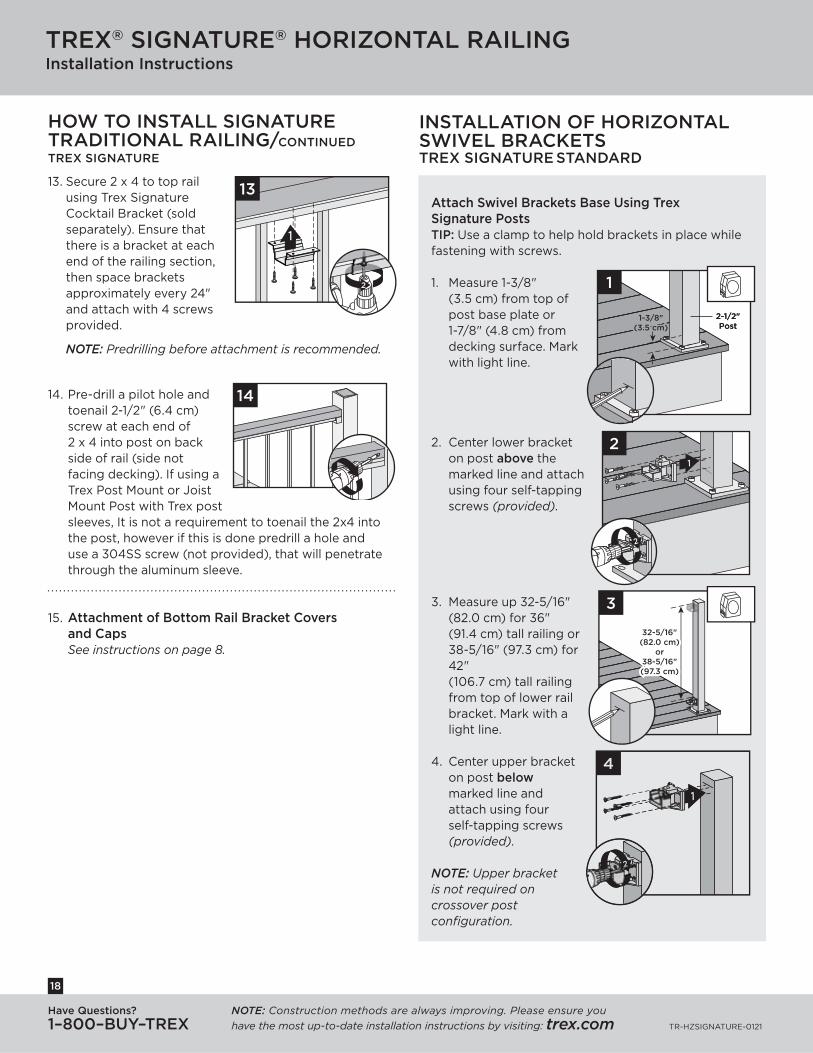
13. Secure boards to top rail using Trex SignatureCocktail Bracket (sold separately). Ensure that there is a bracket at each end of the railing section, then space brackets approximately every 24" and attach with 4 screws provided.
NOTE: Predrilling before attachment is recommended.
14. Use scarf cut for posts where two deck boards meet.
NOTES:» Leave 1/8" (3 mm) gap between deck boards.» Deck boards can
overhang end of last post maximum 1/2" (13 mm).
15. Attachment of Bottom Bracket Covers and SkirtsSee instructions on page 8.
1
13
2
14
Important: ONLY use with Pressure-treated post, Trex Post Mounts or Trex Joist Mount Post WITH Trex post sleeves. Trex Signature Posts or Joist Mount Posts cannot be used with Trex Signature Traditional railing.
1. Installing Posts, Post Sleeve Skirts and Post SleevesSee instructions on page 16 for pressure treated posts. Refer to detailed Trex Post Mount instructions if using these. Post and Post Sleeves are NOT CUT in this installation.
2. Installing Horizontal Fixed BracketsSee instructions on page 4.
3. Installing Horizontal Swivel BracketsSee instructions on page 18.
4. Cutting Railings for Horizontal Fixed BracketsSee instructions on page 5
5. Cutting Railings for Horizontal Swivel BracketsSee instructions on page 19.
6. Attaching Center Baluster to Bottom RailSee instructions on page 6.
7. Attaching Foot Block (when required)See instructions on page 7.
8. Attaching Bottom Rail Cover and Bottom Rail to BracketsSee instructions on page 7.
9. Installing Remaining Balusters into Bottom RailSee instructions on page 7.
10. Attaching Top Rail and Top Rail CoverSee instructions on page 7.
NOTE: Top Bracket Covers are not attached in this confi guration.
Attaching 2 x 4 to Top Rail
11. Measure between posts and cut 2 x 4 to length.12. Place 2 x 4 on Signature top rail.
HOW TO INSTALL SIGNATURE TRADITIONAL RAILINGTREX SIGNATURE
11
1
1
1
12
TREX® SIGNATURE® HORIZONTAL RAILINGInstallation Instructions
Have Questions? NOTE: Construction methods are always improving. Please ensure you1–800–BUY–TREX have the most up-to-date installation instructions by visiting: trex.com TR-HZSIGNATURE-0121
18
HOW TO INSTALL SIGNATURE TRADITIONAL RAILING/CONTINUEDTREX SIGNATURE
13. Secure 2 x 4 to top rail using Trex SignatureCocktail Bracket (sold separately). Ensure that there is a bracket at each end of the railing section, then space brackets approximately every 24" and attach with 4 screws provided.
NOTE: Predrilling before attachment is recommended.
14. Pre-drill a pilot hole and toenail 2-1/2" (6.4 cm) screw at each end of 2 x 4 into post on back side of rail (side not facing decking). If using a Trex Post Mount or Joist Mount Post with Trex post sleeves, It is not a requirement to toenail the 2x4 into the post, however if this is done predrill a hole and use a 304SS screw (not provided), that will penetrate through the aluminum sleeve.
15. Attachment of Bottom Rail Bracket Covers and Caps
See instructions on page 8.
1
13
2
14
INSTALLATION OF HORIZONTAL SWIVEL BRACKETSTREX SIGNATURE STANDARD
1
4
2
1
4
2
Attach Swivel Brackets Base Using Trex Signature PostsTIP: Use a clamp to help hold brackets in place while fastening with screws.
1. Measure 1-3/8" (3.5 cm) from top of post base plate or 1-7/8" (4.8 cm) from decking surface. Mark with light line.
2. Center lower bracket on post above the marked line and attach using four self-tapping screws (provided).
3. Measure up 32-5/16" (82.0 cm) for 36" (91.4 cm) tall railing or 38-5/16" (97.3 cm) for 42" (106.7 cm) tall railing from top of lower rail bracket. Mark with a light line.
4. Center upper bracket on post belowmarked line and attach using four self-tapping screws (provided).
NOTE: Upper bracket is not required on crossover post confi guration.
1-3/8"(3.5 cm)1-3/8"
(3.5 cm)
2-1/2"Post
2-1/2"Post
1
1
2
2
32-5/16"(82.0 cm)
or38-5/16"(97.3 cm)
32-5/16"(82.0 cm)
or38-5/16"(97.3 cm)
3
Have Questions? NOTE: Construction methods are always improving. Please ensure you1–800–BUY–TREX have the most up-to-date installation instructions by visiting: trex.com TR-HZSIGNATURE-0121
19
INSTALLATION OF HORIZONTAL SWIVEL BRACKETS/CONTINUEDTREX SIGNATURE STANDARD
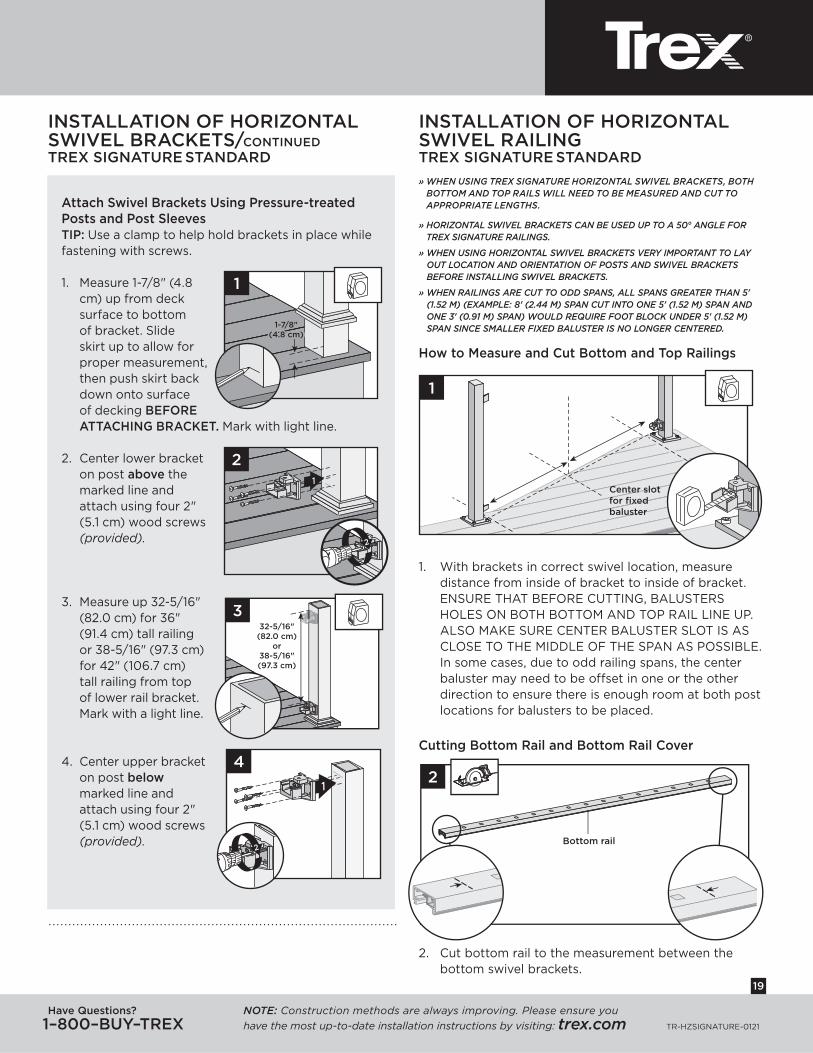
» WHEN USING TREX SIGNATURE HORIZONTAL SWIVEL BRACKETS, BOTH BOTTOM AND TOP RAILS WILL NEED TO BE MEASURED AND CUT TO APPROPRIATE LENGTHS.
» HORIZONTAL SWIVEL BRACKETS CAN BE USED UP TO A 50° ANGLE FOR TREX SIGNATURE RAILINGS.
» WHEN USING HORIZONTAL SWIVEL BRACKETS VERY IMPORTANT TO LAY OUT LOCATION AND ORIENTATION OF POSTS AND SWIVEL BRACKETS BEFORE INSTALLING SWIVEL BRACKETS.
» WHEN RAILINGS ARE CUT TO ODD SPANS, ALL SPANS GREATER THAN 5' (1.52 M) (EXAMPLE: 8' (2.44 M) SPAN CUT INTO ONE 5' (1.52 M) SPAN AND ONE 3' (0.91 M) SPAN) WOULD REQUIRE FOOT BLOCK UNDER 5' (1.52 M) SPAN SINCE SMALLER FIXED BALUSTER IS NO LONGER CENTERED.
How to Measure and Cut Bottom and Top Railings
1. With brackets in correct swivel location, measure distance from inside of bracket to inside of bracket. ENSURE THAT BEFORE CUTTING, BALUSTERS HOLES ON BOTH BOTTOM AND TOP RAIL LINE UP. ALSO MAKE SURE CENTER BALUSTER SLOT IS AS CLOSE TO THE MIDDLE OF THE SPAN AS POSSIBLE. In some cases, due to odd railing spans, the center baluster may need to be offset in one or the other direction to ensure there is enough room at both post locations for balusters to be placed.
Cutting Bottom Rail and Bottom Rail Cover
2. Cut bottom rail to the measurement between the bottom swivel brackets.
1
Center slot for fixed baluster
2
Bottom rail
Attach Swivel Brackets Using Pressure-treated Posts and Post SleevesTIP: Use a clamp to help hold brackets in place while fastening with screws.
1. Measure 1-7/8" (4.8 cm) up from deck surface to bottom of bracket. Slide skirt up to allow for proper measurement, then push skirt back down onto surface of decking BEFORE ATTACHING BRACKET. Mark with light line.
2. Center lower bracket on post above the marked line and attach using four 2" (5.1 cm) wood screws (provided).
3. Measure up 32-5/16" (82.0 cm) for 36" (91.4 cm) tall railing or 38-5/16" (97.3 cm) for 42" (106.7 cm) tall railing from top of lower rail bracket. Mark with a light line.
4. Center upper bracket on post belowmarked line and attach using four 2" (5.1 cm) wood screws (provided).
1-7/8"(4.8 cm)
1-7/8"(4.8 cm)
1
1
2
2
32-5/16"(82.0 cm)
or38-5/16"(97.3 cm)
32-5/16"(82.0 cm)
or38-5/16"(97.3 cm)
3
1
4
2
INSTALLATION OF HORIZONTAL SWIVEL RAILINGTREX SIGNATURE STANDARD
20
Have Questions? NOTE: Construction methods are always improving. Please ensure you1–800–BUY–TREX have the most up-to-date installation instructions by visiting: trex.com TR-HZSIGNATURE-0121
TREX® SIGNATURE® HORIZONTAL RAILINGInstallation Instructions
INSTALLATION OF HORIZONTAL SWIVEL RAILINGTREX SIGNATURE STANDARD/CONTINUED
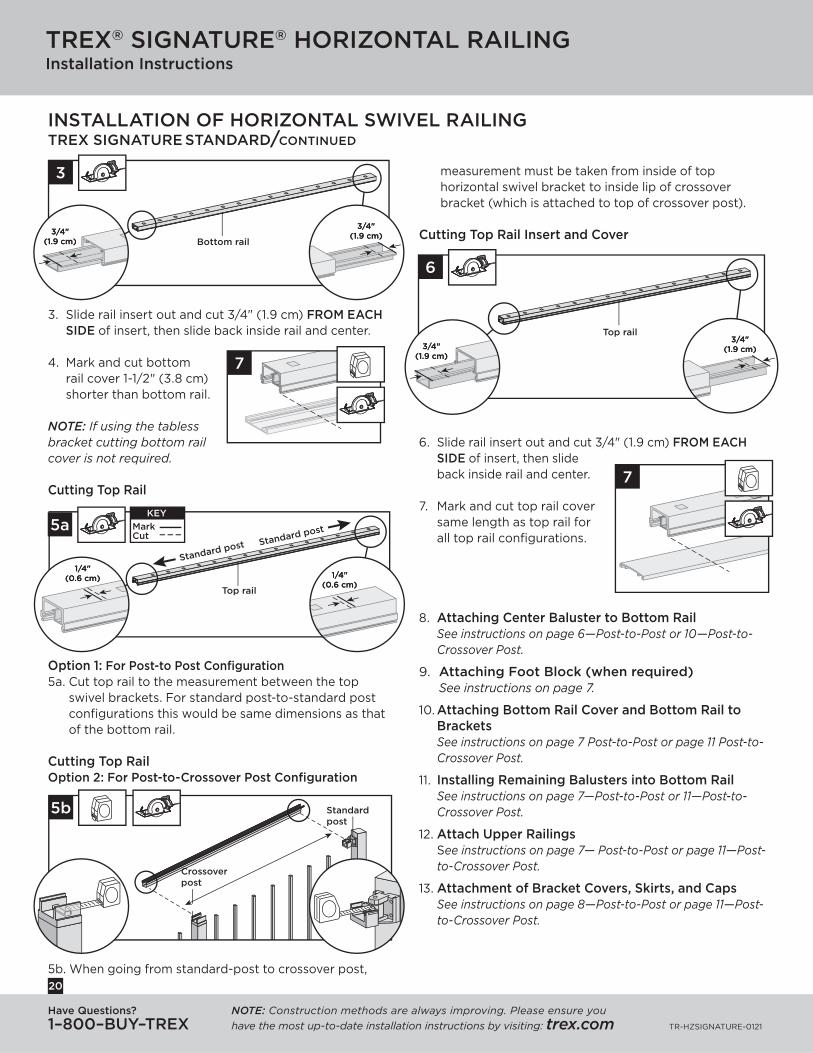
3. Slide rail insert out and cut 3/4" (1.9 cm) FROM EACH SIDE of insert, then slide back inside rail and center.
4. Mark and cut bottom rail cover 1-1/2" (3.8 cm) shorter than bottom rail.
NOTE: If using the tabless bracket cutting bottom rail cover is not required.
Cutting Top Rail
Option 1: For Post-to Post Confi guration5a. Cut top rail to the measurement between the top
swivel brackets. For standard post-to-standard post confi gurations this would be same dimensions as that of the bottom rail.
Cutting Top RailOption 2: For Post-to-Crossover Post Confi guration
5b. When going from standard-post to crossover post,
measurement must be taken from inside of top horizontal swivel bracket to inside lip of crossover bracket (which is attached to top of crossover post).
Cutting Top Rail Insert and Cover
6. Slide rail insert out and cut 3/4" (1.9 cm) FROM EACH SIDE of insert, then slide back inside rail and center.
7. Mark and cut top rail cover same length as top rail for all top rail confi gurations.
8. Attaching Center Baluster to Bottom RailSee instructions on page 6—Post-to-Post or 10—Post-to- Crossover Post.
9. Attaching Foot Block (when required) See instructions on page 7.
10. Attaching Bottom Rail Cover and Bottom Rail to BracketsSee instructions on page 7 Post-to-Post or page 11 Post-to- Crossover Post.
11. Installing Remaining Balusters into Bottom RailSee instructions on page 7—Post-to-Post or 11—Post-to- Crossover Post.
12. Attach Upper RailingsSee instructions on page 7— Post-to-Post or page 11—Post-to-Crossover Post.
13. Attachment of Bracket Covers, Skirts, and CapsSee instructions on page 8—Post-to-Post or page 11—Post-to-Crossover Post.
3
3/4"(1.9 cm)
3/4"(1.9 cm)3/4"
(1.9 cm)3/4"
(1.9 cm) Bottom rail
5a
1/4"(0.6 cm)
1/4"(0.6 cm)
1/4"(0.6 cm)
1/4"(0.6 cm)
KEY
MarkCut
KEY
Top rail
Standard post Standard post
5b
Crossoverpost
Standardpost
6
3/4"(1.9 cm)
3/4"(1.9 cm)3/4"
(1.9 cm)3/4"
(1.9 cm)
Top rail
7
7
Top Related