


Languages
Pages
Legal


Install Server Build Guide I/O device driver (SPARC Enterprise)
C120-E443-07ENZ2(A) February 2009
SPARC Enterprise

Preface
Preface
Purpose This book provides you with procedures to construct the environment where you install from
the network or start OS from the external file unit, after you installed the LAN cards
or the SCSI/SAS cards in SPARC Enterprise.
Target Reader This book targets the system construction person and the operation manager of SPARC
Enterprise.
Organization The structure and the content of this book are as follows.
Chapter 1 Outline
Chapter 1 explains the outline of the installation server.
Chapter 2 Hardware/software composition
Chapter 2 explains hardware/software composition of the installation server.
Chapter 3 Construction method
Chapter 3 explains the method of constructing the installation server.
Symbol The notation used in this book is as follows.
• An actual command input is printed by the bold-faced type.
# cd /cdrom/cdrom0/s0/Solaris_10/Tools <RETURN>
Abbreviated names
The official names of the following products are described in abbreviated names in this
book.
Official name : Solaris(TM) Operating System
Abbreviated name: Solaris OS
Official name : Solaris(TM) 10 Operating System
Abbreviated name: Solaris 10 OS
Official name : SPARC Enterprise M3000/M4000/M5000/M8000/M9000
Abbreviated name: SPARC Enterprise Mxxxx series
Official name : SPARC Enterprise T1000/T2000/T5120/T5220/T5140/T5240/T5440
Abbreviated name: SPARC Enterprise Txxxx series
Registered trademark • Sun, Sun Microsystems, the Sun Logo, Solaris and all Solaris based marks and logos
are trademarks or registered trademarks of Sun Microsystems, Inc. in the U.S. and
other countries, and are used under license.
i

Preface
Fujitsu Limited
February 2009
7th edition: February 2009
Attention
● Please do not reprint this book without permission.
● This book might be changed without a previous notice.
Copyright 2007-2009 FUJITSU LIMITED
ii

Revision History
Revision History
Edition Date Details
1 2007/2/15 First Release
2 2007/3/28 The article on the application procedure of the driver patch has been added.
3 2008/2/29 The method to set the driver of the FUJITSU PCI GigabitEthernet 4.0 has been
added in "3.2 Solaris Custom JumpStart".
4 2008/5/19 The method to set the Serial Attached SCSI card has been added.
5 2008/8/29 The version of driver of the FUJITSU PCI GigabitEthernet has been added in Note
of "2.1 Hardware environment".
The Quad Gigabit Ethernet card SE0X7GQ2X has been added in "2.1 Hardware
environment", "3.1.2 Setting of the install server", "3.2 Setting Solaris
Custom JumpStart" and "3.3 OS Installation".
6 2008/11/13 Because the installation procedure of the package and the patch to the miniroot
has been changed from Solaris 10 10/08, "3.1.2 Setting of the install server",
"3.2.2 Setting of Solaris Custom JumpStart files" and "3.2.3 Adding to install
server" have been updated.
7 2009/2/9 The method to set the 10 Gigabit Ethernet card has been added.
iii

Revision History
iv
Contents
Contents
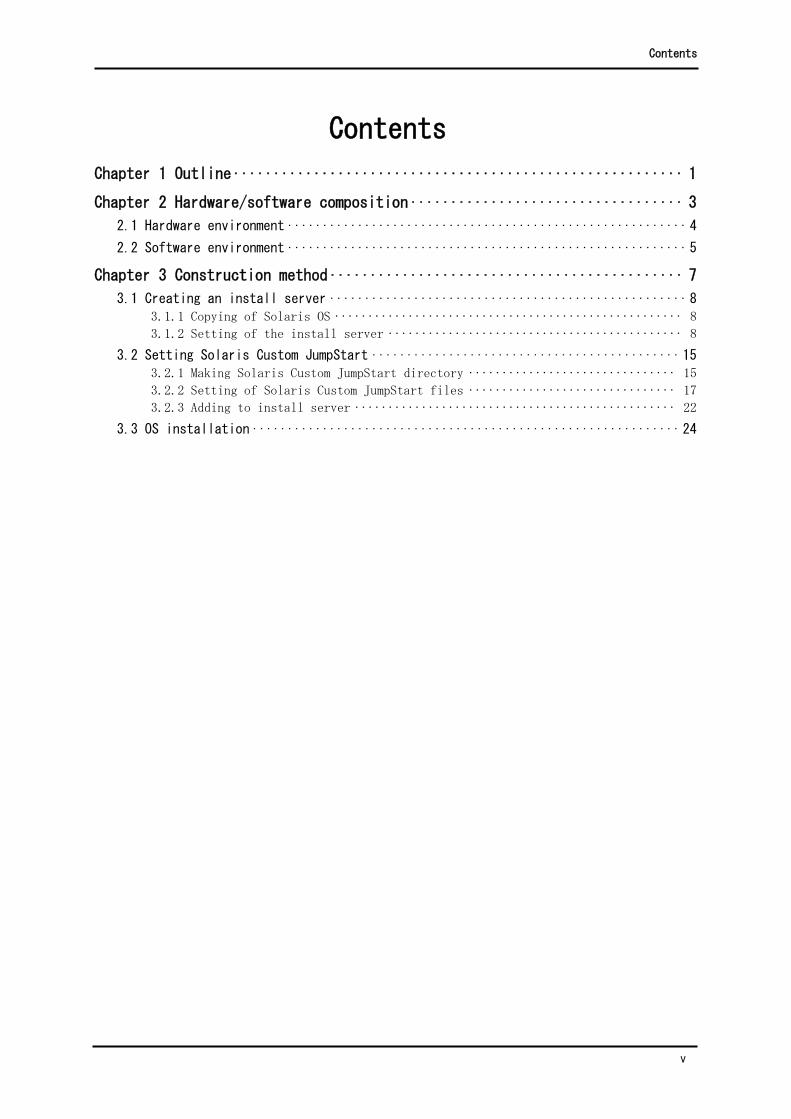
Chapter 1 Outline ························································ 1
Chapter 2 Hardware/software composition ·································· 3 2.1 Hardware environment ·························································4 2.2 Software environment ·························································5
Chapter 3 Construction method ············································ 7 3.1 Creating an install server ···················································8
3.1.1 Copying of Solaris OS ···················································· 8 3.1.2 Setting of the install server ············································ 8
3.2 Setting Solaris Custom JumpStart ············································15 3.2.1 Making Solaris Custom JumpStart directory ······························· 15 3.2.2 Setting of Solaris Custom JumpStart files ······························· 17 3.2.3 Adding to install server ················································ 22
3.3 OS installation ·····························································24
v

Contents
vi

Chapter 1 Outline
The SPARC Enterprise server can be operated by dividing one main unit into two or more
independent systems. In that case, the system volume can be composed of option cards and
option I/Os without using standard I/Os (internal disks). When the driver programs for
the option cards are built into the boot program and the system volume, it is necessary
to construct an install server for exclusive use and do prior settings. When a network
boot is executed from LAN cards described in "2.1 Hardware environment", it is also
necessary to construct an install server for exclusive use.
The following chapters explain the information of the option cards and their driver programs,
and the method of constructing an install server.


Chapter 2 Hardware/software composition
The hardware and software composition described in this chapter is necessary to perform
a network installation or to start OS from the external file unit by using the LAN cards
or the SCSI/SAS cards.

Chapter 2 Hardware/software composition
2.1 Hardware environment The following main units, LAN cards, the SCSI cards and the SAS cards can be used.
Type Unit name Note
Main unit SPARC Enterprise
LAN card
Dual Gigabit Ethernet card SE0X7GD1X, SE0X7GD2X
Quad Gigabit Ethernet card SE0X7GQ1X, SE0X7GQ2X
10 Gigabit Ethernet card SE0X7HE1X
SCSI card Dual channel Ultra320 SCSI card SE0X7SC1X, SE0X7SC2X
SAS card Serial Attached SCSI card SE0X7SA1X
4
2.2 Software environment
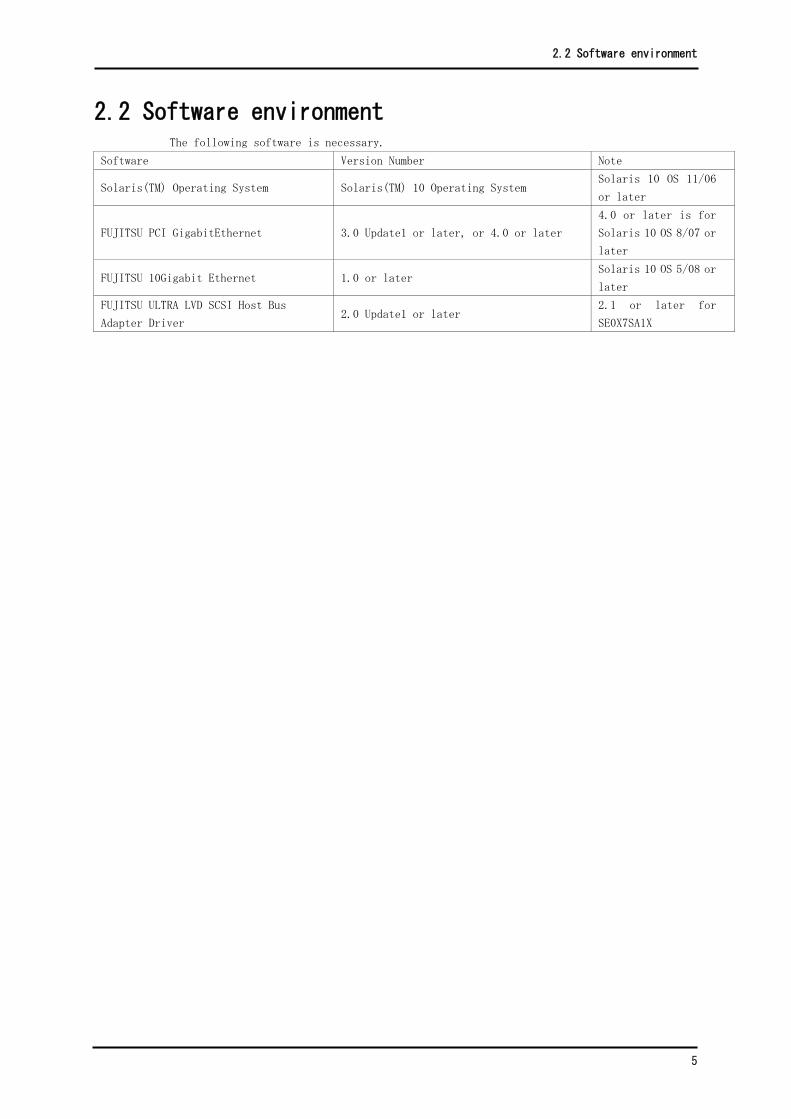
2.2 Software environment The following software is necessary.
Software Version Number Note
Solaris(TM) Operating System Solaris(TM) 10 Operating System Solaris 10 OS 11/06
or later
FUJITSU PCI GigabitEthernet 3.0 Update1 or later, or 4.0 or later
4.0 or later is for
Solaris 10 OS 8/07 or
later
FUJITSU 10Gigabit Ethernet 1.0 or later Solaris 10 OS 5/08 or
later
FUJITSU ULTRA LVD SCSI Host Bus
Adapter Driver 2.0 Update1 or later
2.1 or later for
SE0X7SA1X
5


Chapter 3 Construction method
Chapter 3 Construction method
3.1 Creating an install server You need to create an install server for the network installation. For more information
on creating an install server, please refer to the "Solaris 10 Installation Guide:
Network-Based Installations".
When you make a disk in a disk array device and a file unit with the Solaris 10 10/08 or
later, you need to have an install server with Solaris 10 10/08 or later, or apply a patch
equivalent to Solaris 10 10/08 or later (137137-09 or later).
3.1.1 Copying of Solaris OS
This section provides you with an instruction on how to create an install server by copying
the images of the Solaris 10 OS.
The following example shows that the OS image is copied to the /export/install/Sol10
directory by using the DVD-ROM of Solaris 10 OS.
(1) Become a super user on the install server.
% su - <RETURN>
Password: password
(2) Make the directory to which the image of Solaris 10 OS is copied.
# mkdir -p /export/install/Sol10 <RETURN>
(3) Insert the DVD-ROM of Solaris 10 OS into the server.
(4) Copy the image of Solaris 10 OS.
# cd /cdrom/cdrom0/s0/Solaris_10/Tools <RETURN>
# ./setup_install_server /export/install/Sol10 <RETURN>
(5) When the copy of the image of Solaris 10 OS is completed, take out the DVD-ROM.
# cd / <RETURN>
# eject cdrom <RETURN>
3.1.2 Setting of the install server
Install the following drivers into the Solaris 10 OS image miniroot (the minimum root file
system of Solaris OS that can be booted over the network) which has been copied to the
disk of the install server.
• FUJITSU PCI GigabitEthernet 3.0 Update1 or later, or FUJITSU PCI GigabitEthernet
4.0 or later
• FUJITSU 10Gigabit Ethernet 1.0 or later
• FUJITSU ULTRA LVD SCSI Host Bus Adapter Driver 2.0 Update1 or later
(2.1 or later for SE0X7SA1X)
By this procedure, the miniroot of Solaris OS image gets to be able to recognize the
following cards installed in the SPARC Enterprise server, when you install over the network.
• Dual Gigabit Ethernet card(SE0X7GD1X, SE0X7GD2X)
• Quad Gigabit Ethernet card(SE0X7GQ1X, SE0X7GQ2X)
• 10 Gigabit Ethernet card(SE0X7HE1X)
8
3.1 Creating an install server
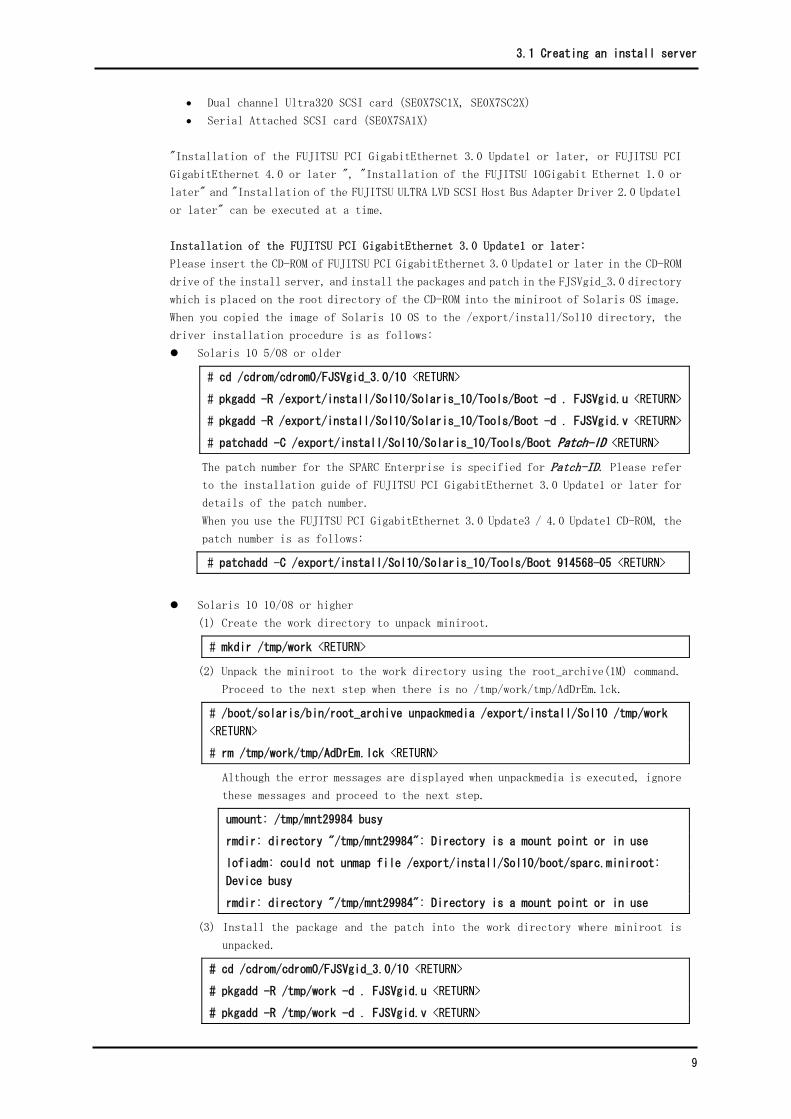
• Dual channel Ultra320 SCSI card(SE0X7SC1X, SE0X7SC2X)
• Serial Attached SCSI card(SE0X7SA1X)
"Installation of the FUJITSU PCI GigabitEthernet 3.0 Update1 or later, or FUJITSU PCI
GigabitEthernet 4.0 or later ", "Installation of the FUJITSU 10Gigabit Ethernet 1.0 or
later" and "Installation of the FUJITSU ULTRA LVD SCSI Host Bus Adapter Driver 2.0 Update1
or later" can be executed at a time.
Installation of the FUJITSU PCI GigabitEthernet 3.0 Update1 or later:
Please insert the CD-ROM of FUJITSU PCI GigabitEthernet 3.0 Update1 or later in the CD-ROM
drive of the install server, and install the packages and patch in the FJSVgid_3.0 directory
which is placed on the root directory of the CD-ROM into the miniroot of Solaris OS image.
When you copied the image of Solaris 10 OS to the /export/install/Sol10 directory, the
driver installation procedure is as follows:
Solaris 10 5/08 or older
# cd /cdrom/cdrom0/FJSVgid_3.0/10 <RETURN>
# pkgadd -R /export/install/Sol10/Solaris_10/Tools/Boot -d . FJSVgid.u <RETURN>
# pkgadd -R /export/install/Sol10/Solaris_10/Tools/Boot -d . FJSVgid.v <RETURN>
# patchadd -C /export/install/Sol10/Solaris_10/Tools/Boot Patch-ID <RETURN>
The patch number for the SPARC Enterprise is specified for Patch-ID. Please refer
to the installation guide of FUJITSU PCI GigabitEthernet 3.0 Update1 or later for
details of the patch number.
When you use the FUJITSU PCI GigabitEthernet 3.0 Update3 / 4.0 Update1 CD-ROM, the
patch number is as follows:
# patchadd -C /export/install/Sol10/Solaris_10/Tools/Boot 914568-05 <RETURN>
Solaris 10 10/08 or higher
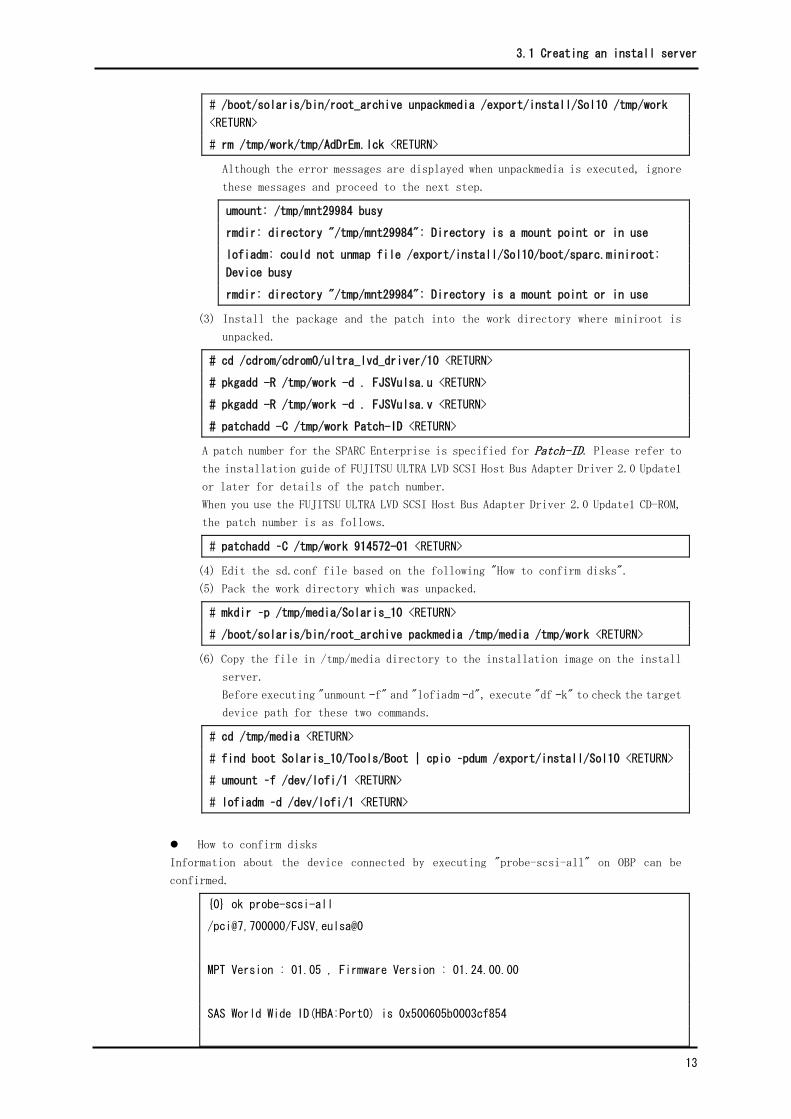
(1) Create the work directory to unpack miniroot.
# mkdir /tmp/work <RETURN>
(2) Unpack the miniroot to the work directory using the root_archive(1M) command.
Proceed to the next step when there is no /tmp/work/tmp/AdDrEm.lck.
# /boot/solaris/bin/root_archive unpackmedia /export/install/Sol10 /tmp/work
<RETURN>
# rm /tmp/work/tmp/AdDrEm.lck <RETURN>
Although the error messages are displayed when unpackmedia is executed, ignore
these messages and proceed to the next step.
umount: /tmp/mnt29984 busy
rmdir: directory "/tmp/mnt29984": Directory is a mount point or in use
lofiadm: could not unmap file /export/install/Sol10/boot/sparc.miniroot:
Device busy
rmdir: directory "/tmp/mnt29984": Directory is a mount point or in use
(3) Install the package and the patch into the work directory where miniroot is
unpacked.
# cd /cdrom/cdrom0/FJSVgid_3.0/10 <RETURN>
# pkgadd -R /tmp/work -d . FJSVgid.u <RETURN>
# pkgadd -R /tmp/work -d . FJSVgid.v <RETURN>
9

Chapter 3 Construction method
# patchadd -C /tmp/work Patch-ID <RETURN>
A patch number for the SPARC Enterprise is specified for Patch-ID. Please refer to
the installation guide of FUJITSU PCI GigabitEthernet 3.0 Update1 or later for details
of the patch number.
When you use the FUJITSU PCI GigabitEthernet 3.0 Update3 / 4.0 Update1 CD-ROM, the
patch number is as follows.
# patchadd –C /tmp/work 914568-05 <RETURN>
(4) Pack the work directory which was unpacked.
# mkdir –p /tmp/media/Solaris_10 <RETURN>
# /boot/solaris/bin/root_archive packmedia /tmp/media /tmp/work <RETURN>
(5) Copy the file in /tmp/media directory to the installation image on the install
server.
Before executing "unmount –f" and "lofiadm –d", execute "df –k" to check the target
device path for these two commands.
# cd /tmp/media <RETURN>
# find boot Solaris_10/Tools/Boot | cpio –pdum /export/install/Sol10 <RETURN>
# umount –f /dev/lofi/1 <RETURN>
# lofiadm –d /dev/lofi/1 <RETURN>
After the installation is completed, eject the CD-ROM.
There is no problem though the package names are displayed as "FJSVgid.2" and "FJSVgid.3"
when the drivers are installed.
Installation of the FUJITSU PCI GigabitEthernet 4.0 or later:
Please insert the CD-ROM of FUJITSU PCI GigabitEthernet 4.0 Update1 or later in the CD-ROM
drive of the install server, and install the packages and patch in the FJSVgid_4.0 directory
which is placed on the root directory of the CD-ROM into the miniroot of Solaris OS image.
When you copied the image of Solaris 10 OS to the /export/install/Sol10 directory, the
driver installation procedure is as follows:
Solaris 10 5/08 or older
# cd /cdrom/cdrom0/FJSVgid_4.0/10 <RETURN>
# pkgadd -R /export/install/Sol10/Solaris_10/Tools/Boot -d . FJSVgid.u <RETURN>
# pkgadd -R /export/install/Sol10/Solaris_10/Tools/Boot -d . FJSVgid.v <RETURN>
Solaris 10 10/08 or higher
(1) Create the work directory to unpack miniroot.
# mkdir /tmp/work <RETURN>
(2) Unpack the miniroot to the work directory using the root_archive(1M) command.
Proceed to the next step when there is no /tmp/work/tmp/AdDrEm.lck.
# /boot/solaris/bin/root_archive unpackmedia /export/install/Sol10 /tmp/work
<RETURN>
# rm /tmp/work/tmp/AdDrEm.lck <RETURN>
Although the error messages are displayed when unpackmedia is executed, ignore
these messages and proceed to the next step.
umount: /tmp/mnt29984 busy
rmdir: directory "/tmp/mnt29984": Directory is a mount point or in use
10

3.1 Creating an install server
lofiadm: could not unmap file /export/install/Sol10/boot/sparc.miniroot:
Device busy
rmdir: directory "/tmp/mnt29984": Directory is a mount point or in use
(3) Install the package and the patch into the work directory where miniroot is
unpacked.
# cd /cdrom/cdrom0/FJSVgid_4.0/10 <RETURN>
# pkgadd -R /tmp/work -d . FJSVgid.u <RETURN>
# pkgadd -R /tmp/work -d . FJSVgid.v <RETURN>
(4) Pack the work directory which was unpacked.
# mkdir –p /tmp/media/Solaris_10 <RETURN>
# /boot/solaris/bin/root_archive packmedia /tmp/media /tmp/work <RETURN>
(5) Copy the file in /tmp/media directory to the installation image on the install
server.
Before executing "unmount –f" and "lofiadm –d", execute "df –k" to check the target
device path for these two commands.
# cd /tmp/media <RETURN>
# find boot Solaris_10/Tools/Boot | cpio –pdum /export/install/Sol10 <RETURN>
# umount –f /dev/lofi/1 <RETURN>
# lofiadm –d /dev/lofi/1 <RETURN>
After the installation is completed, eject the CD-ROM.
There is no problem though the package names are displayed as "FJSVgid.2" and "FJSVgid.3"
when the drivers are installed.
Installation of the FUJITSU 10Gigabit Ethernet 1.0 or later:
Please insert the CD-ROM of FUJITSU 10Gigabit Ethernet 1.0 or later in the CD-ROM drive
of the install server, and install the packages and patch into the miniroot of Solaris
OS image.
When you copied the image of Solaris 10 OS to the /export/install/Sol10 directory, the
driver installation procedure is as follows:
Solaris 10 5/08 or older
# cd /cdrom/cdrom0 <RETURN>
# pkgadd -R /export/install/Sol10/Solaris_10/Tools/Boot <RETURN>
Solaris 10 10/08 or higher
(1) Create the work directory to unpack miniroot.
# mkdir /tmp/work <RETURN>
(2) Unpack the miniroot to the work directory using the root_archive(1M) command.
Proceed to the next step when there is no /tmp/work/tmp/AdDrEm.lck.
# /boot/solaris/bin/root_archive unpackmedia /export/install/Sol10 /tmp/work
<RETURN>
# rm /tmp/work/tmp/AdDrEm.lck <RETURN>
Although the error messages are displayed when unpackmedia is executed, ignore
these messages and proceed to the next step.
umount: /tmp/mnt29984 busy
11

Chapter 3 Construction method
rmdir: directory "/tmp/mnt29984": Directory is a mount point or in use
lofiadm: could not unmap file /export/install/Sol10/boot/sparc.miniroot:
Device busy
rmdir: directory "/tmp/mnt29984": Directory is a mount point or in use
(3) Install the package and the patch into the work directory where miniroot is
unpacked.
# cd /cdrom/cdrom0 <RETURN>
# pkgadd -R /tmp/work <RETURN>
(4) Pack the work directory which was unpacked.
# mkdir –p /tmp/media/Solaris_10 <RETURN>
# /boot/solaris/bin/root_archive packmedia /tmp/media /tmp/work <RETURN>
(5) Copy the file in /tmp/media directory to the installation image on the install
server.
Before executing "unmount –f" and "lofiadm –d", execute "df –k" to check the target
device path for these two commands.
# cd /tmp/media <RETURN>
# find boot Solaris_10/Tools/Boot | cpio –pdum /export/install/Sol10 <RETURN>
# umount –f /dev/lofi/1 <RETURN>
# lofiadm –d /dev/lofi/1 <RETURN>
After the installation is completed, eject the CD-ROM.
Installation of the FUJITSU ULTRA LVD SCSI Host Bus Adapter Driver 2.0 Update1 or later:
Please insert the CD-ROM of FUJITSU ULTRA LVD SCSI Host Bus Adapter Driver 2.0 Update1
or later in the CD-ROM drive of the install server, and install the packages and patch
in the ultra_lvd_driver directory which is placed on the root directory of the CD-ROM into
the miniroot of Solaris OS image.
When you copied the image of Solaris 10 OS to the /export/install/Sol10 directory, the
driver installation procedure is as follows:
Solaris 10 5/08 or older
# cd /cdrom/cdrom0/ultra_lvd_driver/10 <RETURN>
# pkgadd -R /export/install/Sol10/Solaris_10/Tools/Boot -d . FJSVulsa.u <RETURN>
# pkgadd -R /export/install/Sol10/Solaris_10/Tools/Boot -d . FJSVulsa.v <RETURN>
# patchadd -C /export/install/Sol10/Solaris_10/Tools/Boot Patch-ID <RETURN>
A patch number for the SPARC Enterprise is specified for Patch-ID. Please refer to
the installation guide of FUJITSU ULTRA LVD SCSI Host Bus Adapter Driver 2.0 Update1
or later for details of the patch number.
When you use the FUJITSU ULTRA LVD SCSI Host Bus Adapter Driver 2.0 Update1 CD-ROM,
the patch number is as follows.
# patchadd -C /export/install/Sol10/Solaris_10/Tools/Boot 914572-01 <RETURN>
Solaris 10 10/08 or higher
(1) Create the work directory to unpack miniroot.
# mkdir /tmp/work <RETURN>
(2) Unpack the miniroot to the work directory using the root_archive(1M) command.
Proceed to the next step when there is no /tmp/work/tmp/AdDrEm.lck.
12
3.1 Creating an install server
# /boot/solaris/bin/root_archive unpackmedia /export/install/Sol10 /tmp/work
<RETURN>
# rm /tmp/work/tmp/AdDrEm.lck <RETURN>
Although the error messages are displayed when unpackmedia is executed, ignore
these messages and proceed to the next step.
umount: /tmp/mnt29984 busy
rmdir: directory "/tmp/mnt29984": Directory is a mount point or in use
lofiadm: could not unmap file /export/install/Sol10/boot/sparc.miniroot:
Device busy
rmdir: directory "/tmp/mnt29984": Directory is a mount point or in use
(3) Install the package and the patch into the work directory where miniroot is
unpacked.
# cd /cdrom/cdrom0/ultra_lvd_driver/10 <RETURN>
# pkgadd -R /tmp/work -d . FJSVulsa.u <RETURN>
# pkgadd -R /tmp/work -d . FJSVulsa.v <RETURN>
# patchadd -C /tmp/work Patch-ID <RETURN>
A patch number for the SPARC Enterprise is specified for Patch-ID. Please refer to
the installation guide of FUJITSU ULTRA LVD SCSI Host Bus Adapter Driver 2.0 Update1
or later for details of the patch number.
When you use the FUJITSU ULTRA LVD SCSI Host Bus Adapter Driver 2.0 Update1 CD-ROM,
the patch number is as follows.
# patchadd –C /tmp/work 914572-01 <RETURN>
(4) Edit the sd.conf file based on the following "How to confirm disks".
(5) Pack the work directory which was unpacked.
# mkdir –p /tmp/media/Solaris_10 <RETURN>
# /boot/solaris/bin/root_archive packmedia /tmp/media /tmp/work <RETURN>
(6) Copy the file in /tmp/media directory to the installation image on the install
server.
Before executing "unmount –f" and "lofiadm –d", execute "df –k" to check the target
device path for these two commands.
# cd /tmp/media <RETURN>
# find boot Solaris_10/Tools/Boot | cpio –pdum /export/install/Sol10 <RETURN>
# umount –f /dev/lofi/1 <RETURN>
# lofiadm –d /dev/lofi/1 <RETURN>
How to confirm disks
Information about the device connected by executing "probe-scsi-all" on OBP can be
confirmed.
{0} ok probe-scsi-all
/pci@7,700000/FJSV,eulsa@0
MPT Version : 01.05 , Firmware Version : 01.24.00.00
SAS World Wide ID(HBA:Port0) is 0x500605b0003cf854
13

Chapter 3 Construction method
Target 0x1c
Unit 0x0 Disk FUJITSU E2000 0000 2097152 Blocks, 1073 MB
Unit 0x1 Disk FUJITSU E2000 0000 2097152 Blocks, 1073 MB
・
Modify the target driver's configuration file (sd.conf) that logical unit (LU) of the disk
array device and the file unit device for which you want to create the boot disk can be
recognized.
Example: How to recognize target ID 28 and logical unit number 0.
Solaris 10 5/08 or older
# vi /export/install/Sol10/Solaris_10/Tools/Boot/kernel/drv/sd.conf
Solaris 10 10/08 or higher Work in the directory you unpacked the miniroot (/tmp/work).
# vi /tmp/work/kernel/drv/sd.conf
#
# Copyright (c) 1992, by Sun Microsystems, Inc.
#ident "@(#)sd.conf 1.8 93/05/03 SMI"
name="sd" class="scsi"
target=0 lun=0;
name="sd" class="scsi"
target=1 lun=0;
・
name="sd" class="scsi"
target=28 lun=0;
・
After the installation is completed, eject the CD-ROM.
There is no problem though the package names are displayed as "FJSVulsa.2" and "FJSVulsa.3"
when the drivers are installed.
Notes when the install server is running the Solaris 10 OS:
Please confirm whether the NFS service is started if the install server is running the
Solaris 10 OS.
Confirm that the nfsd daemon is working.
# svcs -l svc:/network/nfs/server:default <RETURN>
When the nfsd daemon is not working, start the daemon.
# svcadm enable svc:/network/nfs/server <RETURN>
14
3.2 Setting Solaris Custom JumpStart
3.2 Setting Solaris Custom JumpStart You need to set Solaris Custom JumpStart. For more information of setting Solaris Custom
JumpStart, please refer to the "Solaris 10 Installation Guide: Custom JumpStart and
Advanced Installations".
When you use Solaris Custom JumpStart and install the Solaris OS, the following drivers
are automatically installed before the system is rebooted.
• FUJITSU PCI GigabitEthernet 3.0 Update1 or later, or FUJITSU PCI GigabitEthernet
4.0 or later
• FUJITSU 10Gigabit Ethernet 1.0 or later
• FUJITSU ULTRA LVD SCSI Host Bus Adapter Driver 2.0 Update1 or later
(2.1 or later for SE0X7SA1X)
By this procedure, the system gets to be able to recognize the following cards installed
in the SPARC Enterprise server, after you installed over the network.
• Dual Gigabit Ethernet card(SE0X7GD1X, SE0X7GD2X)
• Quad Gigabit Ethernet card(SE0X7GQ1X, SE0X7GQ2X)
• 10 Gigabit Ethernet card(SE0X7HE1X)
• Dual channel Ultra320 SCSI card(SE0X7SC1X, SE0X7SC2X)
• Serial Attached SCSI card(SE0X7SA1X)
This section provides you with an instruction on how to set Solaris Custom JumpStart on
an install server.
The following example shows that you make the "/jumpstart" directory for Solaris Custom
JumpStart.
3.2.1 Making Solaris Custom JumpStart directory
(1) Making Solaris Custom JumpStart directory
Make the JumpStart directory on the install server.
# mkdir /jumpstart <RETURN>
Share the Solaris Custom JumpStart directory.
Please add the following one line to the /etc/dfs/dfstab file on the install server.
share -F nfs -o ro,anon=0 /jumpstart
Please execute the following command on the install server.
# shareall <RETURN>
(2) Copy of driver packages, patches, and installation files
Copy the packages, the patches, and the installation files of the driver to the Solaris
Custom JumpStart directory on the install server.
FUJITSU PCI GigabitEthernet 3.0 Update1 or later:
Make the fjgi directory in the Solaris Custom JumpStart directory.
# mkdir /jumpstart/fjgi <RETURN>
Insert the CD-ROM of FUJITSU PCI GigabitEthernet 3.0 Update1 or later in the CD-ROM
drive of the install server, and execute the following commands to copy the packages,
the patches, and the installation files.
15
Chapter 3 Construction method
# cp -p /cdrom/cdrom0/install /jumpstart/fjgi/. <RETURN>
# cp -p /cdrom/cdrom0/admin /jumpstart/fjgi/. <RETURN>
# cp -pr /cdrom/cdrom0/FJSVgid_3.0/10/* /jumpstart/fjgi/. <RETURN>
After the copy is completed, eject the CD-ROM.
FUJITSU PCI GigabitEthernet 4.0 or later:
Make the fjgi directory in the Solaris Custom JumpStart directory.
# mkdir /jumpstart/fjgi <RETURN>
Insert the CD-ROM of FUJITSU PCI GigabitEthernet 3.0 Update1 or later / FUJITSU PCI
GigabitEthernet 4.0 in the CD-ROM drive of the install server, and execute the following
commands to copy the packages, the patches, and the installation files.
# cp -p /cdrom/cdrom0/install_v4 /jumpstart/fjgi/. <RETURN>
# cp -p /cdrom/cdrom0/admin /jumpstart/fjgi/. <RETURN>
# cp -pr /cdrom/cdrom0/FJSVgid_4.0/10/* /jumpstart/fjgi/. <RETURN>
After the copy is completed, eject the CD-ROM.
FUJITSU 10Gigabit Ethernet 1.0 or later:
Make the fjgi directory in the Solaris Custom JumpStart directory.
# mkdir /jumpstart/fjxge <RETURN>
Insert the CD-ROM of FUJITSU 10Gigabit Ethernet 1.0 or later in the CD-ROM drive of
the install server, and execute the following commands to copy the packages, the patches,
and the installation files.
# cp -pr /cdrom/cdrom0/* /jumpstart/fjxge/. <RETURN>
After the copy is completed, eject the CD-ROM.
FUJITSU ULTRA LVD SCSI Host Bus Adapter Driver 2.0 Update1 or later:
Make the fjulsa directory in the Solaris Custom JumpStart directory.
# mkdir /jumpstart/fjulsa <RETURN>
Insert the CD-ROM of FUJITSU ULTRA LVD SCSI Host Bus Adapter Driver 2.0 Update1 or
later in the CD-ROM drive of the install server, and execute the following commands
to copy the packages, the patches, and the installation files.
# cp -p /cdrom/cdrom0/install /jumpstart/fjulsa/. <RETURN>
# cp -p /cdrom/cdrom0/admin /jumpstart/fjulsa/. <RETURN>
# cp -pr /cdrom/cdrom0/ultra_lvd_driver/10/* /jumpstart/fjulsa/. <RETURN>
After the copy is completed, eject the CD-ROM.
(3) Copy of Solaris Custom JumpStart sample
Copy the Solaris Custom JumpStart sample files from the Solaris OS installation image.
When you create the image of Solaris 10 OS in the /export/install/Sol10 directory,
execute the command as follows.
# cp -r /export/install/Sol10/Solaris_10/Misc/jumpstart_sample/* /jumpstart
<RETURN>
16
3.2 Setting Solaris Custom JumpStart
3.2.2 Setting of Solaris Custom JumpStart files
Edit the Solaris Custom JumpStart files (profile, rules file, and finish script). Please
edit the Solaris Custom JumpStart files referring to " Solaris 10 Installation Guide: Custom
JumpStart and Advanced Installations".
(1) Edit of profile
Edit the /jumpstart/profile file with the text editor (vi etc.).
Please make the profile according to the composition of the target machine of the
installation.
Example of setting profile:
Installing with UFS file system:
install_type initial_install # The install_type parameter is indispensable.
# initial_install is specified.
system_type server # system_type is specified for server.
partitioning explicit # partitioning is specified for explicit.
cluster SUNWCXall # The cluster parameter is indispensable.
# Cluster of OS to be installed is specified for
# SUNWCXall
# (Entire Software Group Plus OEM Support).
filesys c7t0d0s1 4096 swap # The swap filesystem is allocated to c7t0d0s1
# by 4096MB.
filesys c7t0d0s0 free / # The disk area of the remainder is allocated
# to c7t0d0s0.
Installing with ZFS file system:
install_type initial_install # The install_type parameter is indispensable.
# initial_install is specified.
system_type server # system_type is specified for server.
partitioning explicit # partitioning is specified for explicit.
cluster SUNWCXall # The cluster parameter is indispensable.
# Cluster of OS to be installed is specified for
# SUNWCXall
# (Entire Software Group Plus OEM Support).
pool newpool auto auto auto c7t0d0s0 # Creating newpool automatically assigning
# size to c7t0d0s0. And automatically assigning swap,
# dump size created in newpool
bootenv installbe bename sxce_xx # Creating boot file system named
# sxce_xx(newpool/ROOT/sxce_xx)
(2) Edit of finish script file
Edit the finish script file with the text editor (vi etc.). Please make the finish
script in the /jumpstart directory by an arbitrary file name.
Example 1 - setting finish script:
When the installation destination is any of the SPARC Enterprise Txxxx series,
17

Chapter 3 Construction method
specify "sun4v" for "-p" option of the install commands for both fjgi driver and
fjulsa driver.
In this case, the finish script name is "sun4v_finish".
#!/bin/sh
BASE=/a
JUMPSTART=/a/mnt
mount -F nfs install-server-IP-address:/jumpstart ${JUMPSTART}
${JUMPSTART}/fjgi/install -R ${BASE} -d ${JUMPSTART}/fjgi -p sun4v
${JUMPSTART}/fjxge/install -R ${BASE}
${JUMPSTART}/fjulsa/install -R ${BASE} -d ${JUMPSTART}/fjulsa -p sun4v
umount ${JUMPSTART}
exit 0
FUJITSU PCI GigabitEthernet 3.0 Update1 or later:
The install command is specified for install.
${JUMPSTART}/fjgi/install -R ${BASE} -d ${JUMPSTART}/fjgi -p sun4v
FUJITSU PCI GigabitEthernet 4.0 or later:
The install_v4 command is specified for install.
${JUMPSTART}/fjgi/install_v4 -R ${BASE} -d ${JUMPSTART}/fjgi -p sun4v
Example 2 - setting finish script:
When the installation destination is any of the SPARC Enterprise Mxxxx series,
specify "sun4u" for "-p" option of the install commands for both fjgi driver and
fjulsa drivers.
In this case, the finish script name is "sun4u_finish".
#!/bin/sh
BASE=/a
JUMPSTART=/a/mnt
mount -F nfs install-server-IP-address:/jumpstart ${JUMPSTART}
${JUMPSTART}/fjgi/install -R ${BASE} -d ${JUMPSTART}/fjgi -p sun4u
${JUMPSTART}/fjxge/install -R ${BASE}
${JUMPSTART}/fjulsa/install -R ${BASE} -d ${JUMPSTART}/fjulsa -p sun4u
umount ${JUMPSTART}
exit 0
18
3.2 Setting Solaris Custom JumpStart
FUJITSU PCI GigabitEthernet 3.0 Update1 or later:
The install command is specified for install.
${JUMPSTART}/fjgi/install -R ${BASE} -d ${JUMPSTART}/fjgi -p sun4u
FUJITSU PCI GigabitEthernet 4.0 or later:
The install_v4 command is specified for install.
${JUMPSTART}/fjgi/install_v4 -R ${BASE} -d ${JUMPSTART}/fjgi -p sun4u
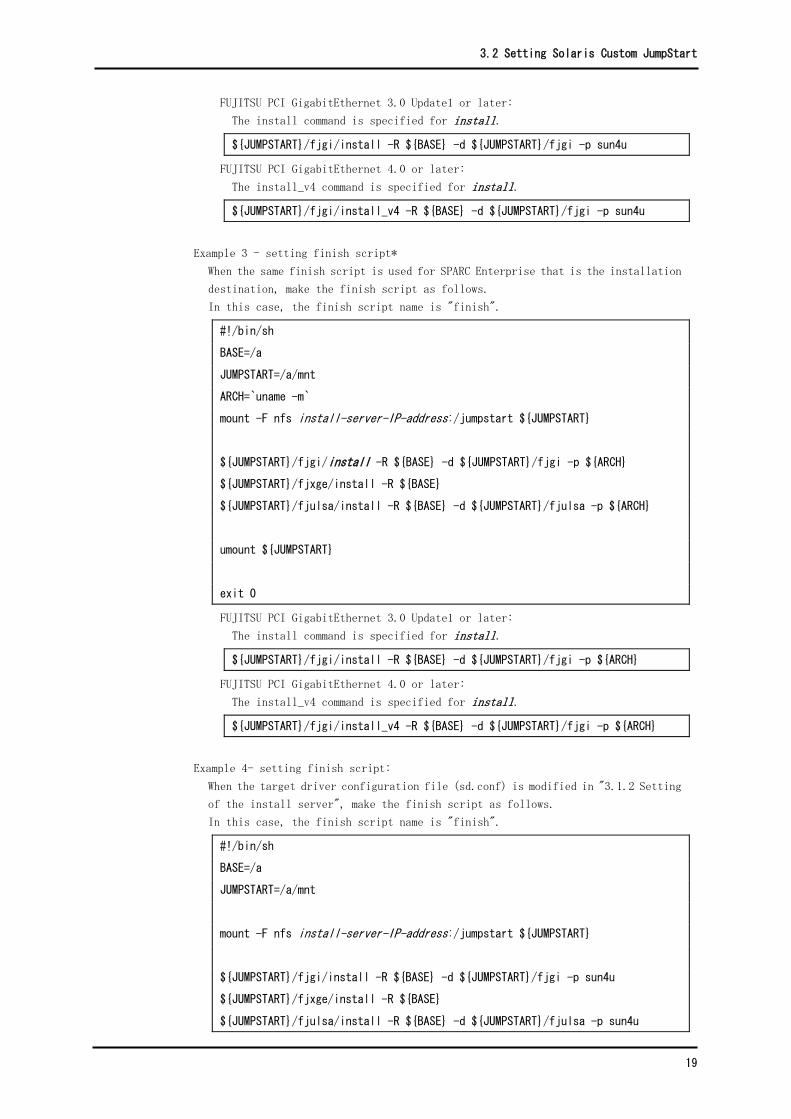
Example 3 - setting finish script*
When the same finish script is used for SPARC Enterprise that is the installation
destination, make the finish script as follows.
In this case, the finish script name is "finish".
#!/bin/sh
BASE=/a
JUMPSTART=/a/mnt
ARCH=`uname -m`
mount -F nfs install-server-IP-address:/jumpstart ${JUMPSTART}
${JUMPSTART}/fjgi/install -R ${BASE} -d ${JUMPSTART}/fjgi -p ${ARCH}
${JUMPSTART}/fjxge/install -R ${BASE}
${JUMPSTART}/fjulsa/install -R ${BASE} -d ${JUMPSTART}/fjulsa -p ${ARCH}
umount ${JUMPSTART}
exit 0
FUJITSU PCI GigabitEthernet 3.0 Update1 or later:
The install command is specified for install.
${JUMPSTART}/fjgi/install -R ${BASE} -d ${JUMPSTART}/fjgi -p ${ARCH}
FUJITSU PCI GigabitEthernet 4.0 or later:
The install_v4 command is specified for install.
${JUMPSTART}/fjgi/install_v4 -R ${BASE} -d ${JUMPSTART}/fjgi -p ${ARCH}
Example 4- setting finish script:
When the target driver configuration file (sd.conf) is modified in "3.1.2 Setting
of the install server", make the finish script as follows.
In this case, the finish script name is "finish".
#!/bin/sh
BASE=/a
JUMPSTART=/a/mnt
mount -F nfs install-server-IP-address:/jumpstart ${JUMPSTART}
${JUMPSTART}/fjgi/install -R ${BASE} -d ${JUMPSTART}/fjgi -p sun4u
${JUMPSTART}/fjxge/install -R ${BASE}
${JUMPSTART}/fjulsa/install -R ${BASE} -d ${JUMPSTART}/fjulsa -p sun4u
19

Chapter 3 Construction method
## Copy sd.conf
if [ -f /kernel/drv/sd.conf ]
then
echo "copying sd.conf "
cp /kernel/drv/sd.conf ${BASE}/kernel/drv/sd.conf
COPY_STATUS="$?"
if [ "$?" != "0" ]
then
echo "ERROR: sd.conf copy failed."
fi
else
echo "NOTICE: /kernel/drv/sd.conf does not exist."
fi
umount ${JUMPSTART}
exit 0
When the environment of Solaris Custom JumpStart has already been constructed, please
modify the content of the above-mentioned finish script according to your environment
and then add it to the existing finish script.
・ For example when the SAN Boot environment is constructed referring to "SPARC
Enterprise – ETERNUS SAN Boot Environment Build Guide".
(3) Edit of rules file
Edit the /jumpstart/rules file with the text editor (vi etc.). In the rules file,
specify the profile and the finish script for the SPARC Enterprise that is installation
destination.
Some examples are described in the original rules file, but they are unnecessary. Please
comment out them all.
Example 1 - setting rules file:
Write the following at the end of the rules file.
In this example, "sun4v_finish" script is set for the SPARC Enterprise Txxxx series
and "sun4u_finish" script is set for the SPARC Enterprise Mxxxx series.
# rule keywords and rule values begin script profile finish_script
# ----------------------------- ------------ ------- -------------
karch sun4v - profile sun4v_finish
karch sun4u - profile sun4u_finish
Example 2 - setting rules file:
Write the following at the end of the rules file.
In this example, a same finish script is set to be used for SPARC Enterprise.
hostname <installed-machine-host-name> - profile finish
20
3.2 Setting Solaris Custom JumpStart
(4) Checking and validating rules file
Execute the check script in the /jumpstart directory to make the rules file effective.
Solaris 10 5/08 or older:
When you copied the image of Solaris 10 OS to the /export/install/Sol10 directory,
the check script is executed as follows.
# cd /jumpstart <RETURN>
# ./check -p /export/install/Sol10 -r rules <RETURN>
Solaris 10 10/08 or higher:
The following example shows that unpacked directory is packed into the /tmp/media.
# cd /jumpstart <RETURN>
# ./check -p /tmp/media -r rules <RETURN>
When the check command displays the following error message, retry the check command
after the following procedure.
Error Message:
ERROR: /tmp/media is not a valid Solaris 2.x CD image
Procedure after error message:
# cd /tmp/media/Solaris_10/Tools/Boot <RETURN>
# bzcat lu.cpio.bz2 | cpio -idum <RETURN>
# ls usr/sbin/install.d/chkprobe <RETURN>
usr/sbin/install.d/chkprobe
When the error has not been detected by the check script, the rules.ok file has been
made in the /jumpstart directory.
3.2.3 Adding to install server
(1) Register IP address and MAC address of an install client to the install server.
How to register IP address of an install client:
Edit /etc/hosts with a text editor.
The following example shows that IP address of an install client is "192.168.1.1".
192.168.1.1 hostname
How to register MAC address of an install client:
Edit /etc/ethers with a text editor.
The following example shows that IP address of an install client is
"0:80:17:28:1:f8".
0:80:17:28:1:f8 hostname
(2) Adding the install client to the install server.
Specify the Solaris Custom JumpStart directory by "-c" option of the add_install_client
command.
When you copied the image of Solaris 10 OS to the /export/install/Sol10 directory,
execute the command as follows.
The settings are different depending on the installation target models.
21

Chapter 3 Construction method
Setting example for SPARC Enterprise Txxxx series:
# /export/install/Sol10/Solaris10/Tools/add_install_client -c
install-server-hostname:/jumpstart install-client-machine-hostname sun4v
<RETURN>
Setting example for SPARC Enterprise Mxxxx series:
# /export/install/Sol10/Solaris10/Tools/add_install_client -c
install-server-hostname:/jumpstart install-client-machine-hostname sun4u
<RETURN>
All necessary settings for installing over the network must be completed on the install
server beforehand. Please confirm the settings of "/etc/inet/hosts", "/etc/ethers"
and so on have been completed beforehand. Please refer to the following manuals for
details.
・ Solaris 10 Installation Guide: Network-Based Installations
・ Solaris 10 Installation Guide: Custom JumpStart and Advanced Installations
・ System Administration Guide: IP Services
22
3.3 OS installation
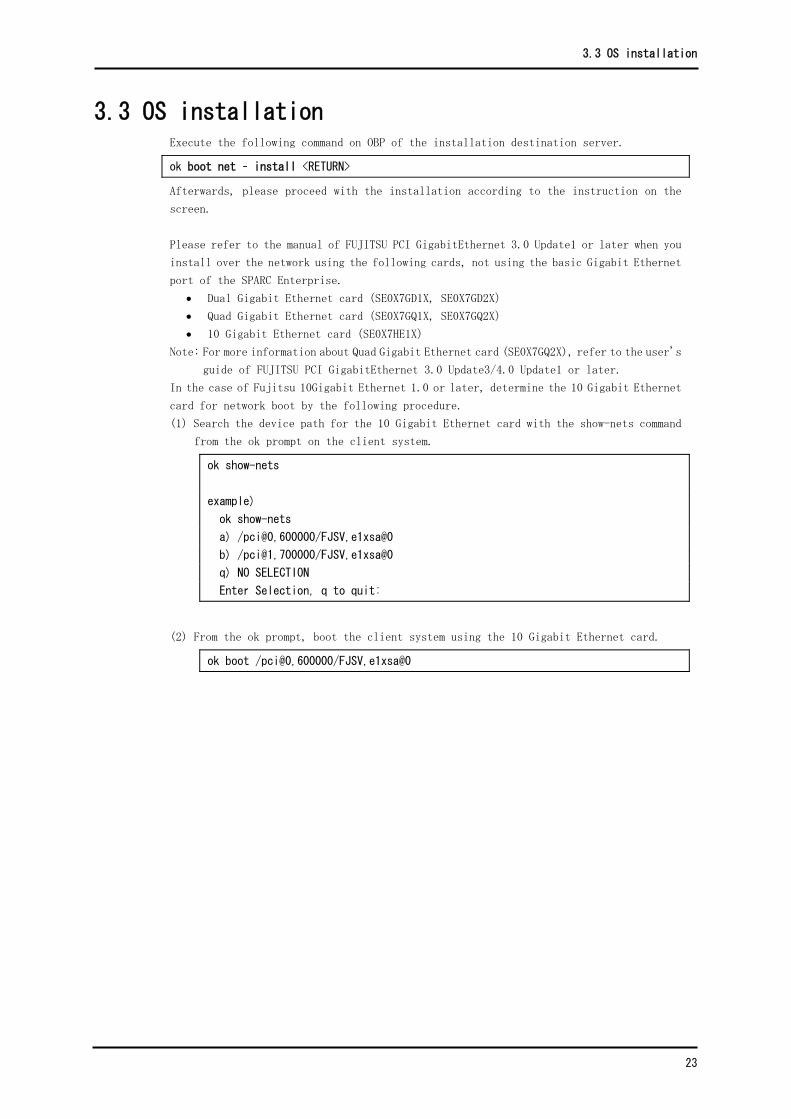
3.3 OS installation Execute the following command on OBP of the installation destination server.
ok boot net – install <RETURN>
Afterwards, please proceed with the installation according to the instruction on the
screen.
Please refer to the manual of FUJITSU PCI GigabitEthernet 3.0 Update1 or later when you
install over the network using the following cards, not using the basic Gigabit Ethernet
port of the SPARC Enterprise.
• Dual Gigabit Ethernet card(SE0X7GD1X, SE0X7GD2X)
• Quad Gigabit Ethernet card(SE0X7GQ1X, SE0X7GQ2X)
• 10 Gigabit Ethernet card(SE0X7HE1X)
Note: For more information about Quad Gigabit Ethernet card (SE0X7GQ2X), refer to the user's
guide of FUJITSU PCI GigabitEthernet 3.0 Update3/4.0 Update1 or later.
In the case of Fujitsu 10Gigabit Ethernet 1.0 or later, determine the 10 Gigabit Ethernet
card for network boot by the following procedure.
(1) Search the device path for the 10 Gigabit Ethernet card with the show-nets command
from the ok prompt on the client system.
ok show-nets
example)
ok show-nets
a) /pci@0,600000/FJSV,e1xsa@0
b) /pci@1,700000/FJSV,e1xsa@0
q) NO SELECTION
Enter Selection, q to quit:
(2) From the ok prompt, boot the client system using the 10 Gigabit Ethernet card.
ok boot /pci@0,600000/FJSV,e1xsa@0
23

Top Related