


Languages
Pages
Legal

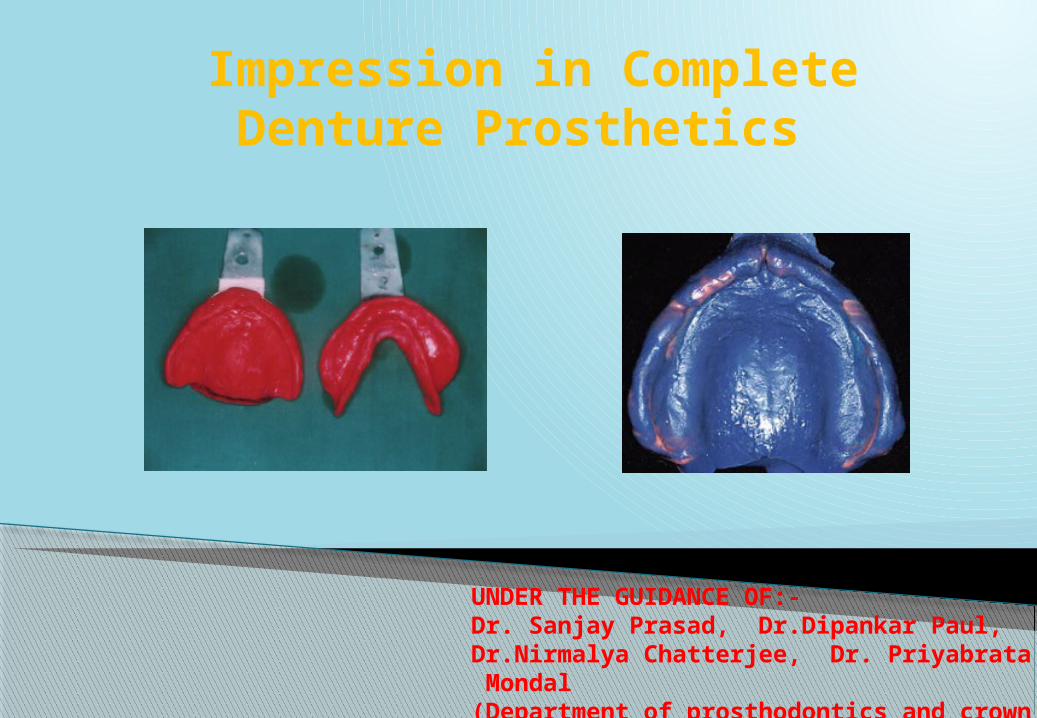
Impression in Complete Denture Prosthetics
UNDER THE GUIDANCE OF:-Dr. Sanjay Prasad, Dr.Dipankar Paul, Dr.Nirmalya Chatterjee, Dr. Priyabrata Mondal(Department of prosthodontics and crown and bridge)

Impression A negative likeness or copy in reverse of the surface
of an object; an imprint of the teeth and adjacent structures for use in dentistry(GPT-8)
Complete Denture ImpressionThe negative registration of the entire denture bearing
stabilizing and border seal areas of either the maxillae or mandible in a plastic material that
becomes relatively hard or set while in contact with these tissues

Preliminary impression or primary impressionA negative likeness made for the purpose of diagnosis,
treatment planning or for the fabrication of a tray.
Final impressionThe negative likeness made for the purpose of fabricating a
prosthesis.
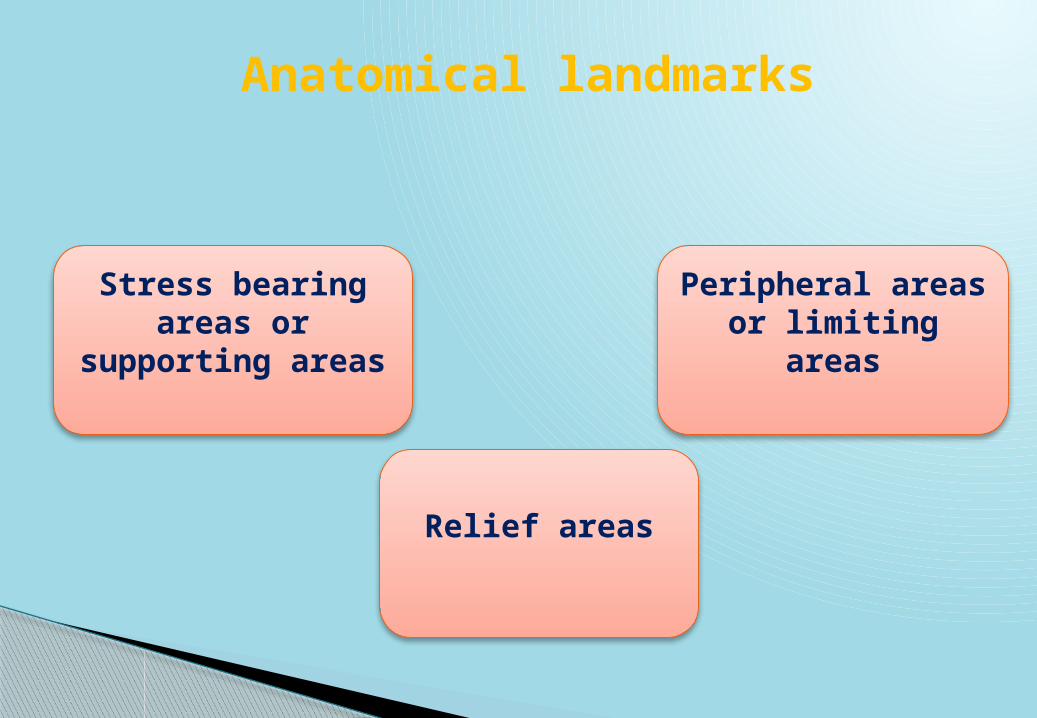
Anatomical landmarks
Relief areas
Stress bearing areas or supporting areas
Peripheral areas or limiting areas

Limiting structures:
• Labial frenum
• Labial vestibule
• Buccal frenum
• Buccal vestibule
• Hamular notch
• Posterior palatal seal areaSupporting structures
Primary stress bearing areas :• Posterolateral slopes of the Hard palate • residual alveolar ridge
Secondary stress bearing areas :• Rugae• Maxillary tuberosity Relief areas• Incisive papilla• Cuspid eminence• Mid palatine raphae• Fovea palatine
Anatomical landmarks in Maxilla

Limiting structures
Labial frenum
Labial vestibule
Lingual frenum
Buccal frenum
Buccal vestibule
Alveolo lingual sulcus
Retromolar padSupporting structures• Buccal shelf • Residual alveolar ridge
Relief areasMylohyoid ridgeMental foramenGenial tuberclesTorus mandibularis
Anatomical landmarks in mandible

PRESS P - Preservation of the alveolar ridges. R - RetentionE - Esthetics.S - Stability. S - Support.
- Carl O. Boucher in 1944
Objectives of impression making
M.M. De Van’s dictum “It is more important to preserve what already exists than to replace
what is missing”.
• Not to use heavy pressure
• Covering as much of the supporting areas as possible - minimize the possibility of soft tissue abuse and bone resorption.
Preservation of the alveolar ridges

Retention of a denture is that quality inherent in the dental prosthesis acting to resist the forces of dislodgment along the path of placement
• It depends upon factors that produce attachment of the denture to the mucosa.
• Resists the adhesiveness of foods, the force of gravity and the forces associated with the opening of the jaws
Factors affecting retention of dentures
Anatomical factors
Physiological factors
Physical factors
Mechanical factors
Muscular factors
Retention

Anatomical factors• Size of denture bearing area - Retentive force is directly proportional to the area covered.
• Quality of the denture bearing area Physiological factors• Saliva and its quality Physical factors• Adhesion
• Cohesion
• Interfacial surface tension
• Capillarity and capillary attraction
• Atmospheric pressure and peripheral seal

• Mechanical factors • Retentive springs• Undercuts• Magnetic forces• Denture adhesive• Suction chambers and suction discs• Muscular factors• The muscles apply supplementary retentive forces on the denture.• It is most effective in the neutral zone. Oral and facial musculature provides supplementary retentive forces
Denture bases must be properly extended to cover the maximum area possible
• The occlusal plane must be at the correct level
• The arch form of the teeth must be in the neutral zone

The quality of a dental prosthesis to be firm, steady or constant, to resist displacement by
functional horizontal or rotational stresses
• Relationship of the denture base to the underlying bone
• Attained by more intimate contact of labial and buccal flanges with the labial and buccal
slopes and of the lingual flanges with the lingual slopes of the ridge. To be stable a denture requires
• Good retention
• No interfering occlusion
• Proper tooth arrangement
• Proper form and contour of the polished surfaces
• Proper orientation of the occlusal plane
• Good control and coordination of the patient's musculature.
Stability

• The resistance to vertical forces of mastication and to occlusal or other forces applied in a
direction toward the basal seat.
• Enhanced by selective placement of pressures that are in harmony with the resiliency of the
tissues that make up the basal seat.
• Areas of support are divided into
Support
Areas of support Primary Maxillary: Posterior ridges and flat areas of the palate
Mandibular: Buccal shelf, posterior ridgesReason: These are the areas that are at right angles to the occlusal forces and usually do not resorb easily
Secondary Maxillary: Anterior ridge and all ridge slopes.Mandibular: Anterior ridge and all ridge slopes.Reason: These are the areas that are greater than at right angles to occlusal forces or are parallel to them; also the areas of edentulous ridge that are at right angles to occlusal forces but tend to resorb under load.
Slight All vestibular areas that provide very little support but are needed for the very important peripheral seal

• Thickness of the denture flanges
• Thicker denture flanges are preferred in long-term edentulous patients - labial fullness.
• Impression should perfectly reproduce the width and height of the entire sulcus for the proper fabrication of the flanges.
Esthetics

A. Based on the theories of impression.
Pressure theory- Mucocompressive
Minimal pressure- Mucostatic
Selective pressure
B. Based on the position of the mouth while making the impression.
Open mouth
Closed mouth
C. Based on the method of manipulation for border molding.
• Hand manipulation
• Functional movements
Classification of impressions
• The assumption that denture retention is tested most severely during mastication, many dentists formerly considered it essential for the tissue to remain in contact with the denture during chewing
• Greene in 1896 • Records the oral tissues in a functional and displaced
form• Materials used - impression compound, waxes and soft
liners.• Dentures made by this technique tend to get displaced
due to the tissue rebound at rest
Pressure theory :MucocompressiveDefinite pressure

Technique• Primary impression - impression compound• Special tray - base plate.• Second Impression - impression compound• Bite rims with uniform occlusal surfaces are then made.• Areas to be relieved are softened and the impression is inserted in mouth and held under biting pressure for one or
two minutes.• Borders are molded by asking the patient to perform functional movements.
Mucocompressive impression using impression compound

• Advantages • Better retention and support• Disadvantages• Excess pressure - increase alveolar bone resorption.
• Excess pressure on peripheral tissues and the palate - transient
ischaemia.
• Tissue rebound when the tissue resume their normal resting state.
• Pressure on sharp bony ridges - pain

• Page gave the concept of mucostatic based on
Pascal’s law
• “Mucostatic” Dr. Carrol W. Jones
• Retention is mainly due to interfacial surface tension.
The mucostatic technique results in a denture, which
is closely adapted to the mucosa of the denture-
bearing area but has poor peripheral seal.
Minimal pressure theory : Mucostatic or non pressure or passive technique

• Technique• A compound impression is made.
• A baseplate wax space is adapted.
• A special tray is adapted over the wax spacer.
• Spacer is removed and an impression is made with a free flowing
material with little pressure.
• Escape holes are made for relief.
Compound impression taken Wax spacer is fabricated on primary castCustom tray is made
Impression taken with light body impression material

• Advantage
• High regard for tissue health and preservation : better prognosis• Disadvantages Shorter flanges prevent the wider distribution of masticatory stresses. Reduced coverage Lack of border molding : reducing retention Lack of border seal: food to slip beneath the denture.
Short denture borders are readily accessible to the tongue which might
provoke some irritation.
Shorter flanges may reduce support for the face which can affect
esthetics.
The shorter flange would mean less lateral stability.
Patients with poor residual ridges and reduced areas of attached gingiva
were difficult to treat

Combines the principles of both pressure and minimal pressure techniques
Tissue preservation + mechanical factor of achieving retention with minimum pressure, which is within the physiologic limits of tissue tolerance
Philosophy of the selective pressure technique Certain areas of the maxilla and mandible, are by
nature better adapted for withstanding extra loads from the forces of mastication.
These tissues can be recorded under slight placement of pressure while other tissues must be recorded at rest
Selective pressure theory

Pressure is given in the load bearing area & relief is given in relief area.
Impression is taken with zinc oxide eugenol paste with custom tray

Advantages Technique considers the physiologic functions of the
tissues of the basal seat, and therefore appears more sound and appealing.
Disadvantages Some feel that it is impossible to record areas with
varying pressure. Since some areas are still recorded under functional
load, the denture still faces the potential danger of rebounding and loosing retention

Impressions are made with the tray that is held by the dentist
Advantage
Preferred because the operator can see whether muscle trimming is done properly
Open-mouth Impressions

Supporting tissues are recorded in a functional relationship
Wax occlusion rims that are made on preliminary casts.
Border molding and the final impressions are completed
McMillan - tongue movements are more forceful when teeth are together. Advantage
Saving of time
Disadvantage Appointment time may fatiguing the dentist and patient Tendency for overextensions Problem of limited space between the tuberosity and pear shaped pad No control over the amount of pressure during the final impressions Soft tissues – displaced- rebound bone resoption
Closed-mouth Impressions

Examination and conditioning of the patient and the mouth.
Seating of the patient Selection of impression material Selection of the impression tray Selection of impression technique Making the preliminary impression Constructing the primary cast Fabricating the custom tray Border molding Making the final impression
Steps in impression making

Inflammation of the mucosa
Distortion of denture-foundation tissues
Excessive amounts of hyperplastic tissue
Insufficient space between the upper and lower
ridges
Examination and conditioning of the patient and the mouth

Classification Elastic1. Reversible hydrocolloid2. Irreversible hydrocolloid3. Rubber impression materials a. Polyether b. Silicone
Non-elastic1. Gypsum products2. Metallic oxide pastes3. Impression compound
Impression material

Preliminary impression materials : Impression compound Alginate
Final impression materials: Plaster of paris, zinc oxide-eugenol paste, irreversible hydrocolloid, silicone, polysulfide rubber, polyether, tissue-conditioning material
Based on Prosthodontic use

A device that is used to carry, confine, and control impression material while making an impression (GPT-8).
Classification of impression traysBases on whether they are prefabricated or individualized Stock trays Custom traysDepending on the presence or absence of holes or perforations Perforated Non-perforated
Depending on whether they are meant for dentate or edentate individuals Dentulous trays Edentulous trays Combination trays
SELECTION OF THE IMPRESSION TRAY

Seating of the patient
Position of the operator for maxillary impression
Position of the operator for mandibular impression

Practice positioning of the tray
Labial frenum - guide.
Anterior fingers - 1st molar region
Adhesive - silicone putty material or alginate
Impression compound Posterior part of tray- contact with tissues Border moulding
Labial and buccal vestibules
Coronoid process
Impression poured - stone
Preliminary impression making :Maxillary

Posterior extent of tray – retromolar pad Tray loaded with material and catered over the ridge
with tongue slightly raised Alternating pressure on molar region with index finger Functional movements done to get the border limit
Primary impression : Mandibular

Outline for the wax spacer is drawn on the cast Posterior palatal seal area on the cast is not covered
with the wax spacer – maxilla Buccal shelf not covered - mandible Baseplate wax approximately 1 mm in thickness is
placed on the cast Self-curing acrylic resin tray material - uniformly
adapted over the cast Tray thickness - 2 to 3 mm Resin handle is attached in the anterior region of the
tray
Constructing the custom tray

Roy Mac Gregor recommends placement of a sheet of metal foil in the region of incisive papilla and mid palatine raphae
Neill recommends adaptation of 0.9 mm casing wax all over except PPS area
Boucher recommends placement of 1 mm base plate wax on the cast except PPS area
Spacer design

Morrow, Rudd, Rhoads recommends to block out undercut areas with wax ,adapt full wax spacer 2 mm short of resin special tray border all over & placement of 3 tissue stops equidistant from each other
Sharry recommended Base plate wax adapted over whole area, four stops 2mm width cut from wax : cuspid and molar region- extend from palatal aspect of ridge : mucobuccal fold

Custom tray fabrication

Border molding is the process by which the shape of the borders of the tray is made to conform accurately to the contours of the buccal and labial vestibules
Manipulation of the border tissues, against a moldable impression material
Borders of the tray are molded to a form that will be in harmony with the physiological action of the limiting anatomical structures
Border molding may be carried out in sections either recording one part of the border at a time or recording all parts of the borders simultaneously.
Recording all of the borders simultaneously has two general advantages:◦ The number of insertions of tray is reduced.◦ Developing all borders simultaneously avoids propagation of errors caused by a
mistake in one section affecting the borders contours in another.
Border molding

Sectional - with stick compound
Recording all borders simultaneously – with polyether
Border molding

Final impression1- Retention of custom tray is checked2- Patient is prepared & instructed.3- Removing the wax relief4- Removing the spacer wax5- Escape holes are made 6- Borders are reduced7-Adhesive is applied8- Impression material is mixed9-Material is loaded in the tray10- Tray is seated properly in the mouth11- Final impression is removed.

Enclosure of an impression by building up vertical walls- desired size, base of cast, preserve details of impression
Boxing impressions and making casts

CONCLUSION
“Ideal impression must be in the mind of the dentist before it is in his hand. He must literally make the impression rather than take it”
- M.M. De van

Zarb G, Hobkirk JA, Eckert SE, Jacob RF, editors. Prosthodontic treatment for edentulous patients. 13th ed. St. Louis: Elsevier Mosby; 2013 pp 161-179
Sheldon Winkler, Essentials of complete Denture prosthodontics, 2nd edition,2012, AITBS Publishers, India, pp 88-105
John J. Manappallil, Complete denture prosthodontics.
References
Top Related