


Languages
Pages
Legal

100137
Application Note
How to use FTP and TFTP
This application note describes hot to use FTP and TFTP
for file transfer with the Festo CODESYS V3 PLCs CECC-...
and CPX-CEC-...-V3
CECC-...
CPX-CEC-...-V3

Title .................................................................................................................................. How to use FTP and TFTP
Version ............................................................................................................................................................. 1.10
Document no. .............................................................................................................................................. 100137
Original .................................................................................................................................................................en
Author ............................................................................................................................................................. Festo
Last saved ............................................................................................................................................ 08.02.2017
Copyright Notice This documentation is the intellectual property of Festo AG & Co. KG, which also has the exclusive copyright. Any modification of the content, duplication or reprinting of this documentation as well as distribution to third par-ties can only be made with the express consent of Festo AG & Co. KG.
Festo AG & Co KG reserves the right to make modifications to this document in whole or in part. All brand and product names are trademarks or registered trademarks of their respective owners.
Legal Notice Hardware, software, operating systems and drivers may only be used for the applications described and only in conjunction with components recommended by Festo AG & Co. KG.
Festo AG & Co. KG does not accept any liability for damages arising from the use of any incorrect or incomplete information contained in this documentation or any information missing therefrom.
Defects resulting from the improper handling of devices and modules are excluded from the warranty.
The data and information specified in this document should not be used for the implementation of safety func-tions relating to the protection of personnel and machinery.
No liability is accepted for claims for damages arising from a failure or functional defect. In other respects, the regulations with regard to liability from the terms and conditions of delivery, payment and use of software of Festo AG & Co. KG, which can be found at www.festo.com and can be supplied on request, shall apply.
All data contained in this document do not represent guaranteed specifications, particularly with regard to func-tionality, condition or quality, in the legal sense.
The information in this document serves only as basic information for the implementation of a specific, hypo-thetical application and is in no way intended as a substitute for the operating instructions of the respective manufacturers and the design and testing of the respective application by the user.
The operating instructions for Festo products can be found at www.festo.com.
Users of this document (application note) must verify that all functions described here also work correctly in the application. By reading this document and adhering to the specifications contained therein, users are also solely responsible for their own application.
(Festo AG & CO. KG, D-73726 Esslingen, 2017) Internet: http://www.festo.com E-Mail: [email protected]

Components/Software used
Application Note – How to use FTP and TFTP – 1.10 Page 3 of 18
Table of contents
1 Components/Software used ................................................................................................................... 4
2 Overview................................................................................................................................................ 5
2.1 Architecture ................................................................................................................................................. 5
3 Start FTP/TFTP server of the device ......................................................................................................... 6
3.1 Step one – Establish telnet connection to device ........................................................................................ 6
3.2 Step two – Start the device's FTP/TFTP server ............................................................................................ 6
3.2.1 FTP server ...................................................................................................................................... 6 3.2.2 TFTP server .................................................................................................................................... 7
3.3 Step three – Start and connect the PC's FTP/TFTP client with the server ..................................................... 8
3.3.1 FTP clients ...................................................................................................................................... 8 3.3.2 TFTP clients .................................................................................................................................. 13
4 Stop FTP/TFTP server of the device ....................................................................................................... 15
4.1 Stop FTP server of the device .................................................................................................................... 15
4.2 Stop TFTP server of the device .................................................................................................................. 15
5 Start server automatically on every power up ........................................................................................ 16
6 Completely remove automatic start of the FTP/TFTP Server ................................................................... 18
6.1 Via CODESYS register "Files" .................................................................................................................... 18
6.2 Via telnet ................................................................................................................................................... 18

Components/Software used
Page 4 of 18 Application Note – How to use FTP and TFTP – 1.10
1 Components/Software used
Type/Name Version Software/Firmware Date of manufacture
CECC-X-... >= 2.1.0 29.10.2015
CECC-S/D/LK >= 1.3.8-cecc0 18.02.2015
CPX-CEC-...-V3 -- --
Table 1.1: 1 Components/Software used
Overview
Application Note – How to use FTP and TFTP – 1.10 Page 5 of 18
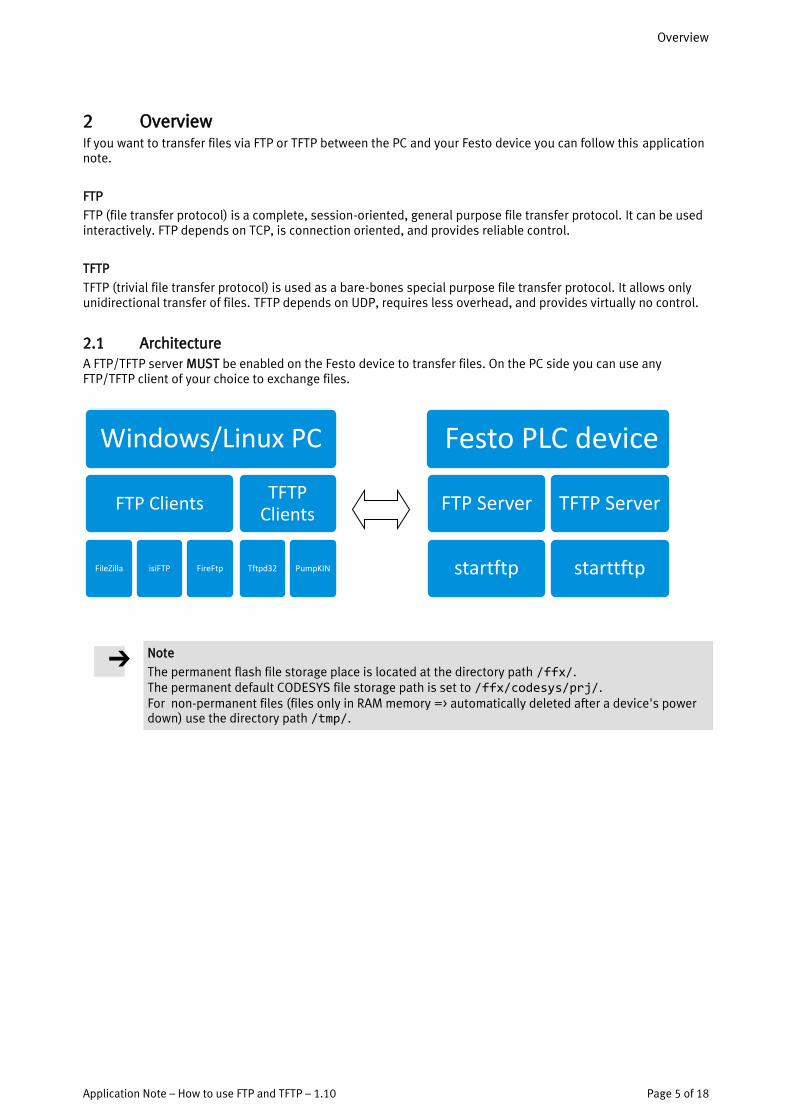
Festo PLC device
FTP Server
startftp
TFTP Server
starttftp
2 Overview If you want to transfer files via FTP or TFTP between the PC and your Festo device you can follow this application note.
FTP
FTP (file transfer protocol) is a complete, session-oriented, general purpose file transfer protocol. It can be used interactively. FTP depends on TCP, is connection oriented, and provides reliable control.
TFTP
TFTP (trivial file transfer protocol) is used as a bare-bones special purpose file transfer protocol. It allows only unidirectional transfer of files. TFTP depends on UDP, requires less overhead, and provides virtually no control.
2.1 Architecture A FTP/TFTP server MUST be enabled on the Festo device to transfer files. On the PC side you can use any FTP/TFTP client of your choice to exchange files.
Note
The permanent flash file storage place is located at the directory path /ffx/. The permanent default CODESYS file storage path is set to /ffx/codesys/prj/. For non-permanent files (files only in RAM memory => automatically deleted after a device's power down) use the directory path /tmp/.
Windows/Linux PC
FTP Clients
FileZilla isiFTP FireFtp
TFTP Clients
Tftpd32 PumpKIN
3
Start FTP/TFTP server of the device
Page 6 of 18 Application Note – How to use FTP and TFTP – 1.10
3 Start FTP/TFTP server of the device
3.1 Step one – Establish telnet connection to device Click on [Start] [Execute…]
Enter the command cmd (for Windows) to open a command shell and press ENTER.
To login to the device start a telnet connection with the command telnet <IP address>
Replace the part <IP address> with your appropriate settings like telnet 192.168.2.50
Remember the default IP settings for Festo devices:
Device Default IP address
CPX-CEC 192.168.2.50
CECC-X-... 192.168.4.2
CECC-S/D/LK 192.168.2.20
Bypass the login in screen finishing each input with key ENTER like:
Now you should be connected to the device in telnet terminal mode and see the blinking cursor at the command prompt like:
3.2 Step two – Start the device's FTP/TFTP server
3.2.1 FTP server
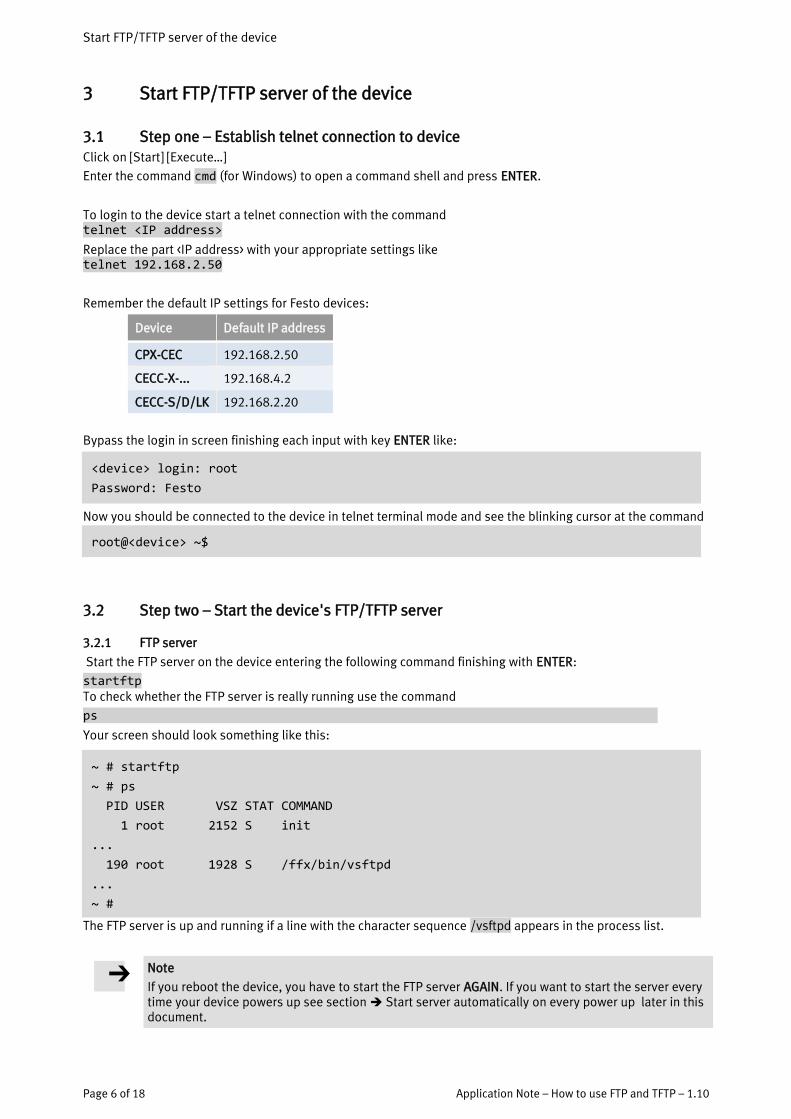
Start the FTP server on the device entering the following command finishing with ENTER:
startftp To check whether the FTP server is really running use the command
ps
Your screen should look something like this:
The FTP server is up and running if a line with the character sequence /vsftpd appears in the process list.
Note
If you reboot the device, you have to start the FTP server AGAIN. If you want to start the server every time your device powers up see section Start server automatically on every power up later in this document.
<device> login: root
Password: Festo
root@<device> ~$
~ # startftp
~ # ps
PID USER VSZ STAT COMMAND
1 root 2152 S init
...
190 root 1928 S /ffx/bin/vsftpd
...
~ #
3
Start FTP/TFTP server of the device
Application Note – How to use FTP and TFTP – 1.10 Page 7 of 18
3.2.2 TFTP server
Note
The TFTP server is only supported from the CECC-... .
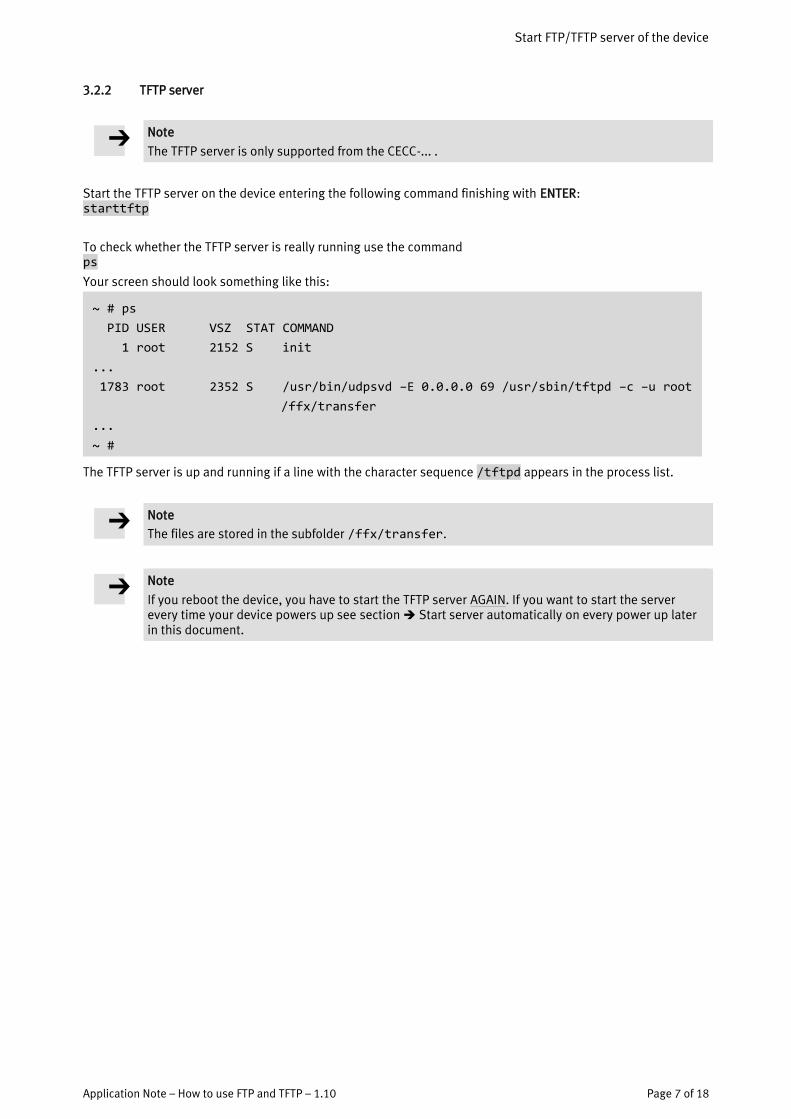
Start the TFTP server on the device entering the following command finishing with ENTER: starttftp
To check whether the TFTP server is really running use the command ps
Your screen should look something like this:
The TFTP server is up and running if a line with the character sequence /tftpd appears in the process list.
Note
The files are stored in the subfolder /ffx/transfer.
Note
If you reboot the device, you have to start the TFTP server AGAIN. If you want to start the server every time your device powers up see section Start server automatically on every power up later in this document.
~ # ps
PID USER VSZ STAT COMMAND
1 root 2152 S init
...
1783 root 2352 S /usr/bin/udpsvd –E 0.0.0.0 69 /usr/sbin/tftpd –c –u root
/ffx/transfer
...
~ #
3
3
3

Start FTP/TFTP server of the device
Page 8 of 18 Application Note – How to use FTP and TFTP – 1.10
3.3 Step three – Start and connect the PC's FTP/TFTP client with the server
3.3.1 FTP clients
There are many different FTP clients available for the PC. As an example all single steps to connect to and ex-change files with the PLC device of the following freely available FTP-clients will be performed
Filezilla
FireFTP (Firefox Plugin)
isiFTP
Filezilla
The FTP client FileZilla is an Open Source software and can be downloaded, for instance, at the following address:
http://filezilla-project.org/download.php?type=client
The following setup is for a PLC device with the IP address 192.168.2.10.
After the menu item [File] [Sitemanager…] the following dialogue box appears in which any number of connection profiles can be created.
If the button "New Site" is clicked, a new profile is created which can be given an individual name. The IP address of the PLC device is entered in the field "Host:". In the field "Server Type:", the item "FTP – File Transfer Protocol" has to be selected. The "Logon Type:" is "Normal". In the field "User:" enter "root", as no other user has been created on the device so far. The field "Password:" should actually be self-explanatory.
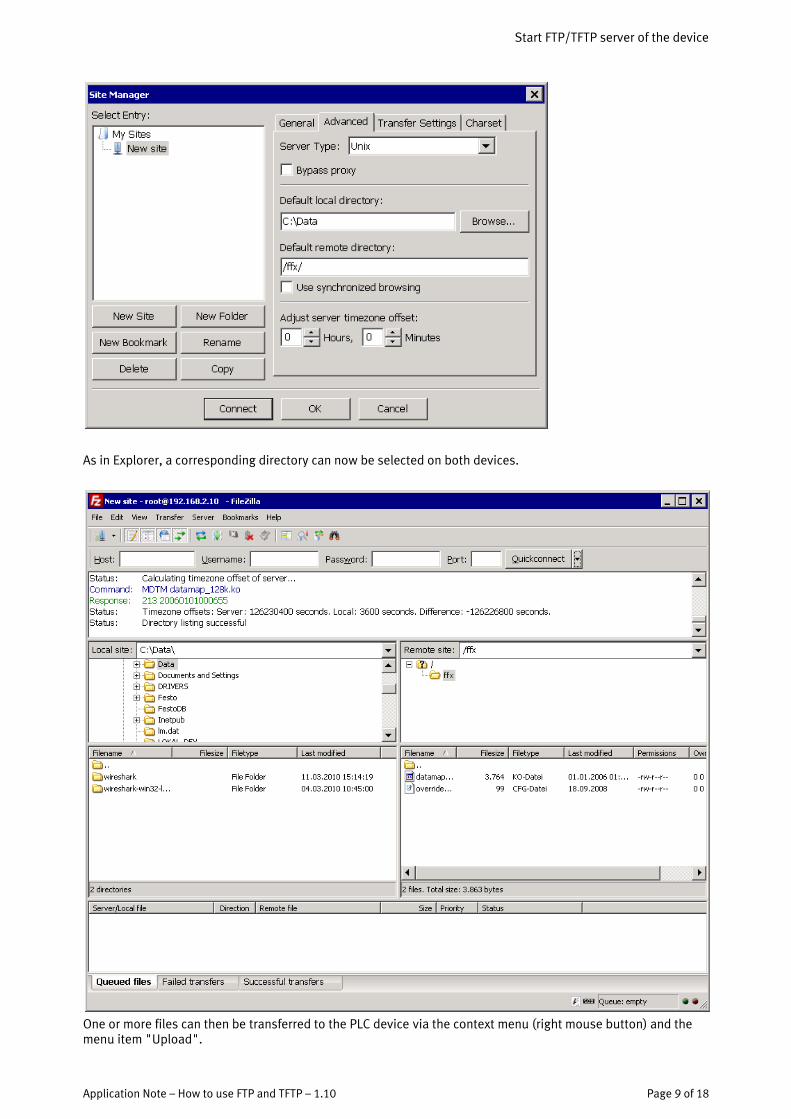
In the register "Advanced", the "Default local directory:" (= directory on the PC) and the "Default remote directory:" (= directory on the PLC device) can be specified.
Start FTP/TFTP server of the device
Application Note – How to use FTP and TFTP – 1.10 Page 9 of 18
As in Explorer, a corresponding directory can now be selected on both devices.
One or more files can then be transferred to the PLC device via the context menu (right mouse button) and the menu item "Upload".

Start FTP/TFTP server of the device
Page 10 of 18 Application Note – How to use FTP and TFTP – 1.10
The file transfer from the device to the PC is carried out accordingly with the command "Download".
Note
Unlike with the TFTP transfer, if the FTP client is used the connection between device and PC contin-ues to be sustained (depending on the configuration of the FTP client). If the connection is no longer required, it should be cut off manually.
FireFTP (Firefox Plugin)
The FTP client "FireFTP" is an Add-on for the web browser Firefox (https://www.mozilla.org) and can be down-loaded at the following address: https://addons.mozilla.org/de/firefox/addon/684
The following setup is for a PLC device with the IP address 192.168.2.50.
Start the Add-on at the menu [Tools] [FireFtp] and you get a new register like the following one:
Open the combo box on the left side and select the option "Create a new account…"
In the register "Main" fill in the following fields. Enter any character sequence to describe your connection at the field "Account Name:". The IP address of the PLC device is entered in the field "Host:". In the field "Login:" enter "root", as no other user has been created on the device so far. The field "Password:" should actually be self-explanatory.
3

Start FTP/TFTP server of the device
Application Note – How to use FTP and TFTP – 1.10 Page 11 of 18
In the register "Connection", you can setup the initial start-up directories. The "Local:" (= directory on the PC) and the "Remote:" (= directory on the PLC device) can be specified.
Finish the Account Manager setup with the button OK.
Select the new created account at the combo box (i. e. "CECC (Default)") and click on the button Connect.
At the two panel view the left side shows the local PC and the right side the connected device. You can exchange files per simple drag and drop or usage of the arrow buttons at the space between the two panels.
Click the Disconnect button to end the connection to the device.
isiFTP
The FTP client "isiFTP" is freeware and can be downloaded at the following address: http://www.pcfreunde.de/download/d14726/isiftp/
This program is available in German language ONLY.
The following setup is for a PLC device with IP 192.168.2.111.
After the menu item [Programme] [Optionen] has been selected, the following dialogue box appears in which any number of connection profiles can be created.
Start FTP/TFTP server of the device
Page 12 of 18 Application Note – How to use FTP and TFTP – 1.10
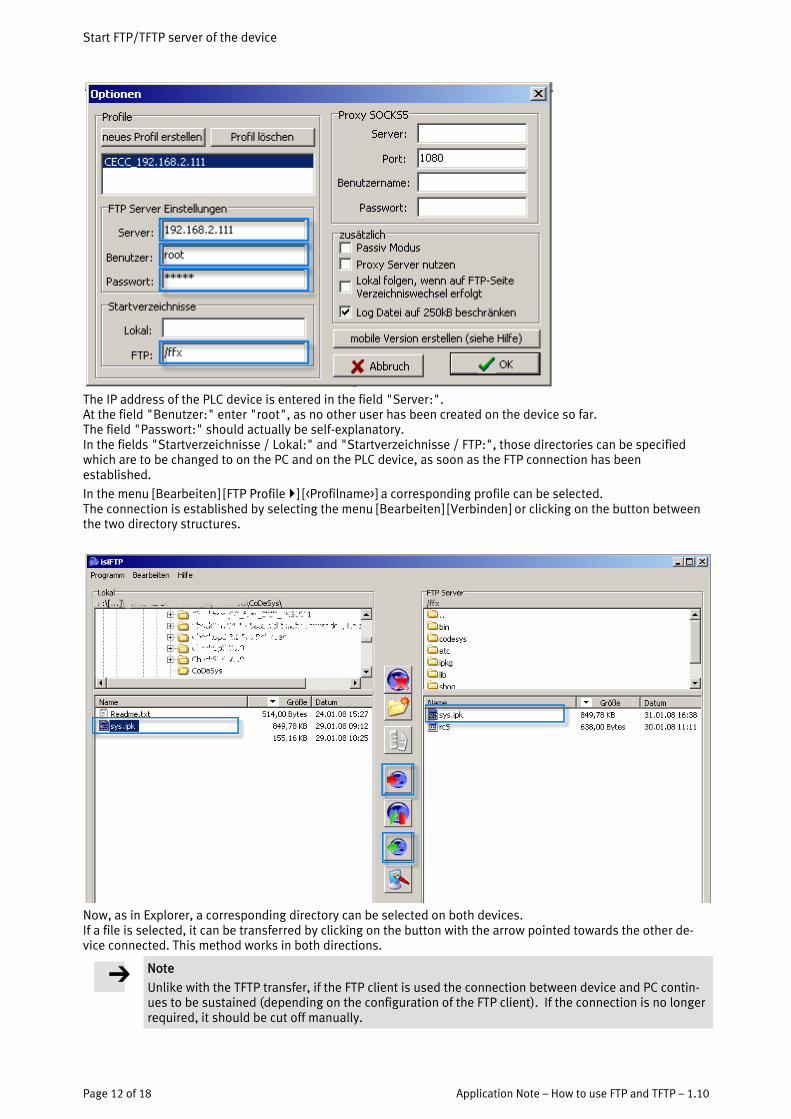
The IP address of the PLC device is entered in the field "Server:". At the field "Benutzer:" enter "root", as no other user has been created on the device so far. The field "Passwort:" should actually be self-explanatory. In the fields "Startverzeichnisse / Lokal:" and "Startverzeichnisse / FTP:", those directories can be specified which are to be changed to on the PC and on the PLC device, as soon as the FTP connection has been established.
In the menu [Bearbeiten] [FTP Profile ] [<Profilname>] a corresponding profile can be selected. The connection is established by selecting the menu [Bearbeiten] [Verbinden] or clicking on the button between the two directory structures.
Now, as in Explorer, a corresponding directory can be selected on both devices. If a file is selected, it can be transferred by clicking on the button with the arrow pointed towards the other de-vice connected. This method works in both directions.
Note
Unlike with the TFTP transfer, if the FTP client is used the connection between device and PC contin-ues to be sustained (depending on the configuration of the FTP client). If the connection is no longer required, it should be cut off manually.
3
Start FTP/TFTP server of the device
Application Note – How to use FTP and TFTP – 1.10 Page 13 of 18
3.3.2 TFTP clients
Tftpd32
Tftpd32 is freeware and available for download at the following address: http://tftpd32.jounin.net/tftpd32.html
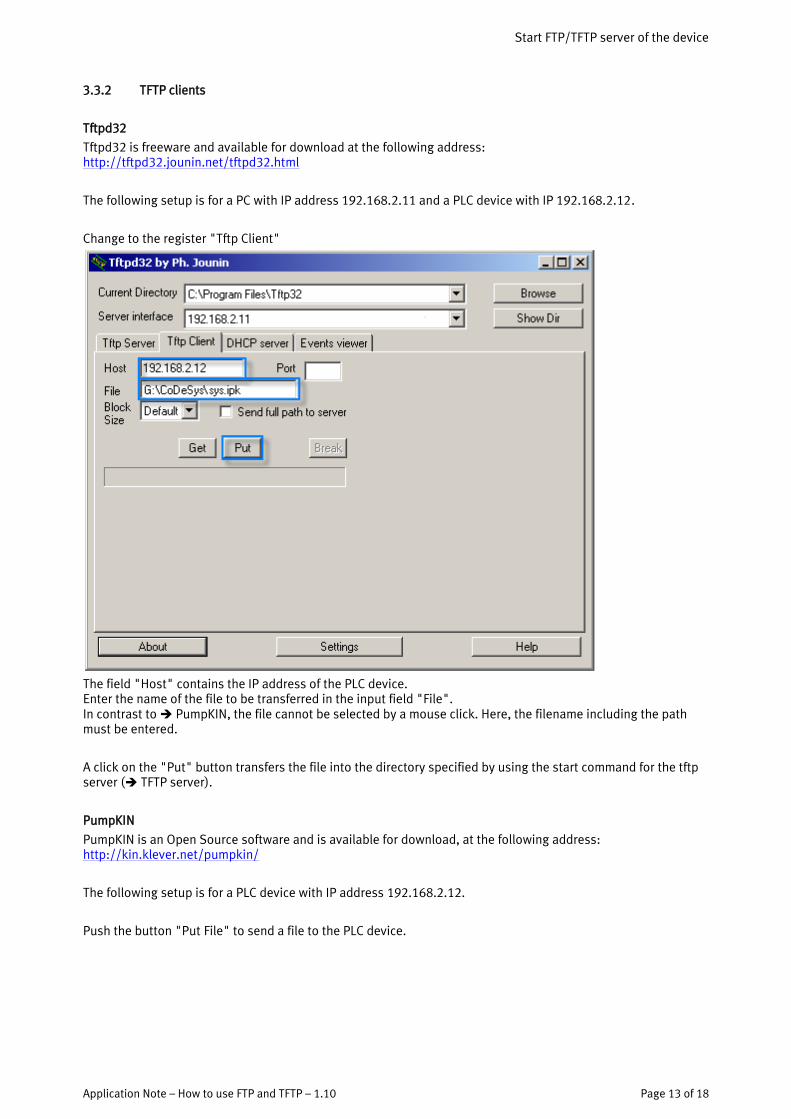
The following setup is for a PC with IP address 192.168.2.11 and a PLC device with IP 192.168.2.12.
Change to the register "Tftp Client"
The field "Host" contains the IP address of the PLC device. Enter the name of the file to be transferred in the input field "File". In contrast to PumpKIN, the file cannot be selected by a mouse click. Here, the filename including the path must be entered.
A click on the "Put" button transfers the file into the directory specified by using the start command for the tftp server ( TFTP server).
PumpKIN
PumpKIN is an Open Source software and is available for download, at the following address: http://kin.klever.net/pumpkin/
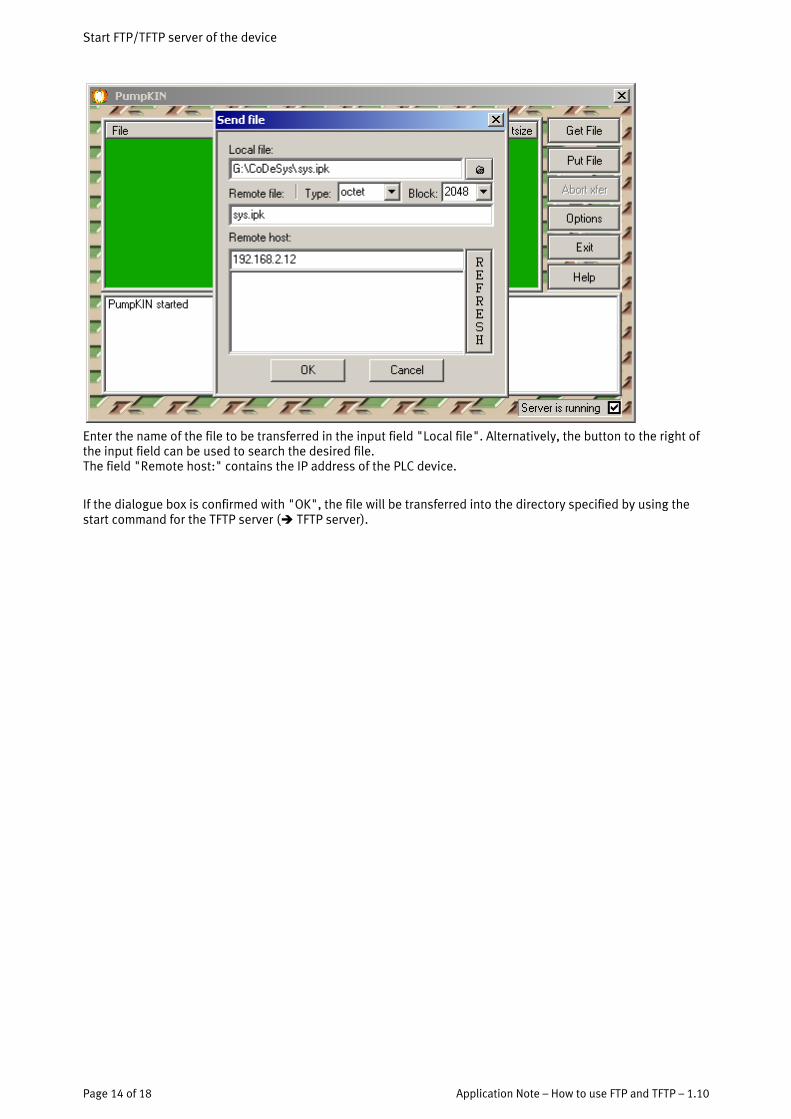
The following setup is for a PLC device with IP address 192.168.2.12.
Push the button "Put File" to send a file to the PLC device.
Start FTP/TFTP server of the device
Page 14 of 18 Application Note – How to use FTP and TFTP – 1.10
Enter the name of the file to be transferred in the input field "Local file". Alternatively, the button to the right of the input field can be used to search the desired file. The field "Remote host:" contains the IP address of the PLC device.
If the dialogue box is confirmed with "OK", the file will be transferred into the directory specified by using the start command for the TFTP server ( TFTP server).

Stop FTP/TFTP server of the device
Application Note – How to use FTP and TFTP – 1.10 Page 15 of 18
4 Stop FTP/TFTP server of the device If you don't need the server any more you should turn it off because it wastes system resources.
Therefore you can use several linux commands in the telnet terminal (you may need to establish a telnet connec-tion to the device if not already existing according to Step one – Establish telnet connection to device).
4.1 Stop FTP server of the device Stop the FTP server on the device entering the following command finishing with Enter: stopftp
If the command is not supported from the device use:
killall vsftpd
To check whether the FTP server is really stopped use the command
ps
The FTP server is stopped if no line with the character sequence /vsftpd appears in the process list.
4.2 Stop TFTP server of the device Stop the TFTP server on the device entering the following command finished with Enter:
stoptftp
To check whether the TFTP server is really stopped use the command
ps
The TFTP server is stopped if no line with the character sequence /tftpd appears in the process list.
Note
The TFTP server is only supported from the CECC-... .
3
Start server automatically on every power up
Page 16 of 18 Application Note – How to use FTP and TFTP – 1.10
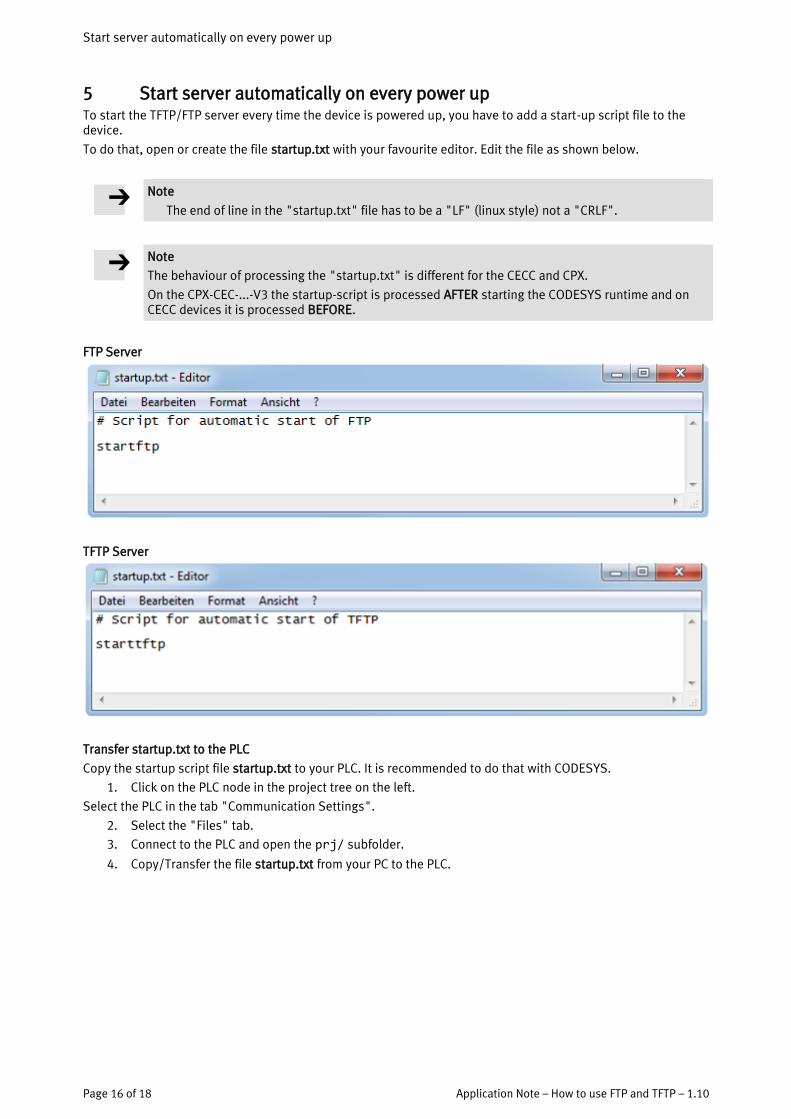
5 Start server automatically on every power up To start the TFTP/FTP server every time the device is powered up, you have to add a start-up script file to the device.
To do that, open or create the file startup.txt with your favourite editor. Edit the file as shown below.
Note
The end of line in the "startup.txt" file has to be a "LF" (linux style) not a "CRLF".
Note
The behaviour of processing the "startup.txt" is different for the CECC and CPX.
On the CPX-CEC-...-V3 the startup-script is processed AFTER starting the CODESYS runtime and on CECC devices it is processed BEFORE.
FTP Server
TFTP Server
Transfer startup.txt to the PLC
Copy the startup script file startup.txt to your PLC. It is recommended to do that with CODESYS.
1. Click on the PLC node in the project tree on the left.
Select the PLC in the tab "Communication Settings".
2. Select the "Files" tab.
3. Connect to the PLC and open the prj/ subfolder.
4. Copy/Transfer the file startup.txt from your PC to the PLC.
3
3

Start server automatically on every power up
Application Note – How to use FTP and TFTP – 1.10 Page 17 of 18
After transfer you have to reboot the device.

Completely remove automatic start of the FTP/TFTP Server
Page 18 of 18 Application Note – How to use FTP and TFTP – 1.10
6 Completely remove automatic start of the FTP/TFTP Server
6.1 Via CODESYS register "Files"
Click on the PLC node in the project tree on the left
Select the "Files" tab
Connect to the PLC and open the prj/ subfolder
Remove the file startup.txt
Reboot the device
6.2 Via telnet
Login via telnet to your device Following commands are used to delete the startup.txt file
rm –f /ffx/codesys/prj/startup.txt
sync
To check if the file was deleted just enter the following command ls –al /ffx/codesys/prj
There should be no file listed with "startup.txt" Reboot the device
Top Related