


Languages
Pages
Legal


Hovercraft
page 1/7 - a project designed and developed by Catherine Anderson and Noah Li-Leger - www.exploremaking.com - all imagery and content © copyright 2016 Explore MakingHovercraft
double sidedtape
press fit
x 11
press fit
double sidedtape
(on/off switch)
skirt
base
guard
propeller
shroud
housing
tower
Notes:To design your own base we recommend using Foam Board.
To design your own skirt we recommend using a disposable plastic table cloth or plastic bag.
Use 3D printed parts, basicelectronic components, and
step-by-step instructions to build your own hovercraft.
This project can be adapted to test 3D printed propeller designs
and develop custom bases, hovercraft skirts and aesthetics.
double sidedtape

Step 1: Making the Base from Foam Board
• create the Base by cutting a 14 x 14 inch square piece of foam board
• use a ruler to mark the centre points on all sides of the foam board (7 inch), then draw lines to divide the board into 4 equal sections
• it is important to measure correctly because it will determine the balance of the hoverboard
• place the Housing on the Base so that the 4 mounting holes cross with your center marks
* this will place the center of gravity of the motor assembly on the center of the base * note that the center of the fan duct is not centered on the base, this is because we’ve accounted for the weight of batteries and the breadboard to ballance with the weight of the motor
• trace the inner and outer profile of the housing
• carefully cut out the inner profile with a knife to create a circular hole for the fan to blow air through
page 2/7 - a project designed and developed by Catherine Anderson and Noah Li-Leger - www.exploremaking.com - all imagery and content © copyright 2016 Explore MakingHovercraft
align these holeson the center
lines of the base
trace theouter profile
trace and cut outthe inner profile
cut a 14x14inch square
mark centerlines
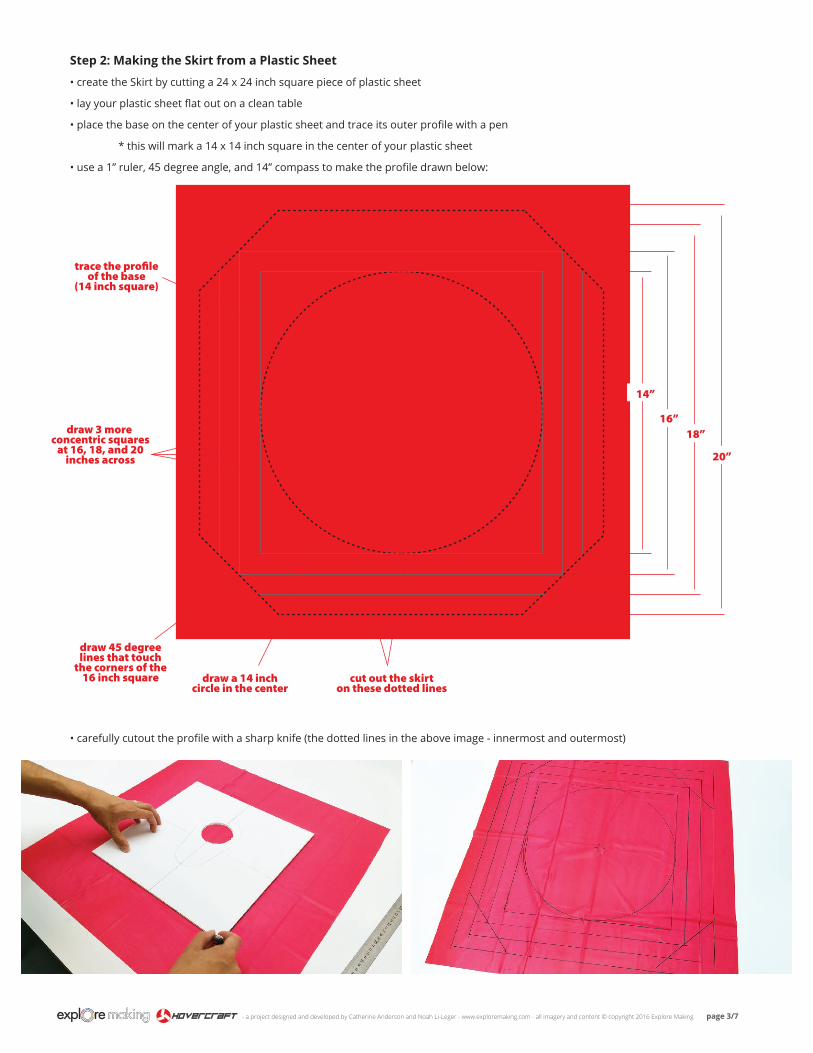
Step 2: Making the Skirt from a Plastic Sheet
• create the Skirt by cutting a 24 x 24 inch square piece of plastic sheet
• lay your plastic sheet flat out on a clean table
• place the base on the center of your plastic sheet and trace its outer profile with a pen
* this will mark a 14 x 14 inch square in the center of your plastic sheet
• use a 1” ruler, 45 degree angle, and 14” compass to make the profile drawn below:
• carefully cutout the profile with a sharp knife (the dotted lines in the above image - innermost and outermost)
14”
16”18”
20”
trace the profileof the base
(14 inch square)
draw 3 more concentric squares
at 16, 18, and 20inches across
draw 45 degreelines that touch
the corners of the16 inch square draw a 14 inch
circle in the centercut out the skirt
on these dotted lines
page 3/7 - a project designed and developed by Catherine Anderson and Noah Li-Leger - www.exploremaking.com - all imagery and content © copyright 2016 Explore MakingHovercraft

• fold the edges up so that the edges meet to make a tight seam * note that the fold line should be along the 16 inch square• place a this strip of tape along the seam line
fold all of the edges and place tape over
the seam
note that is should fold alongthe line for the 16 inch square
• your finished skirt should look like the image below• take some time to inspect your work and make sure all of the tape seams are sealed and folded smoothly
page 4/7 - a project designed and developed by Catherine Anderson and Noah Li-Leger - www.exploremaking.com - all imagery and content © copyright 2016 Explore MakingHovercraft

• place double sided tape around the bottom edge of the foam board base
• connect the base to the skirt with the double sided tape• Lay the skirt flat on your table * make sure there are no creases and the skirt is square• carefully place the base (tape side down) on the skirt * make sure they are centered to each other * the base should lign up pertectly with the 14 inch square lines you drew on the skirt
double sided tape goesaround the underside
of the base
this is the bottomside of the base
this is the topside of the base
double sided is betweenthe base and the skirt toconnect them together
make sure the baseand skirt are
centered
the base will lign up withthe 14 inch square lines
you drew on the skirt
page 5/7 - a project designed and developed by Catherine Anderson and Noah Li-Leger - www.exploremaking.com - all imagery and content © copyright 2016 Explore MakingHovercraft
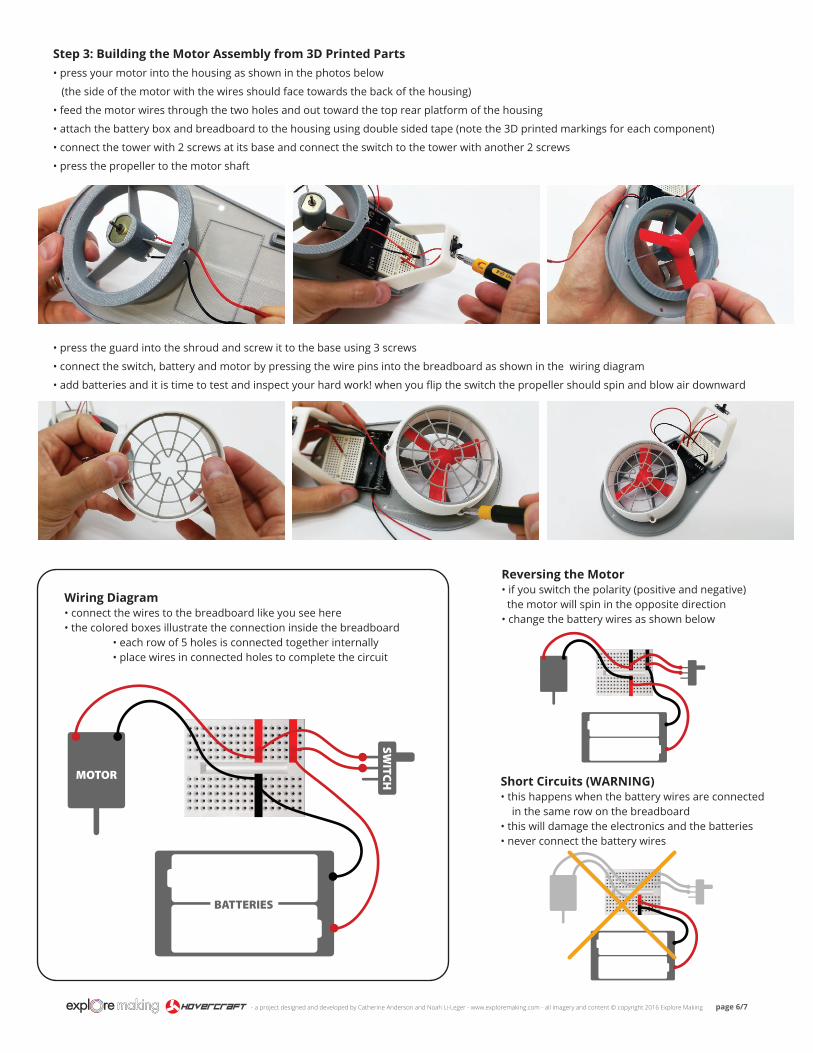
Wiring Diagram• connect the wires to the breadboard like you see here• the colored boxes illustrate the connection inside the breadboard • each row of 5 holes is connected together internally • place wires in connected holes to complete the circuit
Reversing the Motor • if you switch the polarity (positive and negative) the motor will spin in the opposite direction• change the battery wires as shown below
Short Circuits (WARNING)• this happens when the battery wires are connected in the same row on the breadboard• this will damage the electronics and the batteries• never connect the battery wires
BATTERIES
MOTOR
SWITC
H
Step 3: Building the Motor Assembly from 3D Printed Parts• press your motor into the housing as shown in the photos below
(the side of the motor with the wires should face towards the back of the housing)
• feed the motor wires through the two holes and out toward the top rear platform of the housing
• attach the battery box and breadboard to the housing using double sided tape (note the 3D printed markings for each component) • connect the tower with 2 screws at its base and connect the switch to the tower with another 2 screws
• press the propeller to the motor shaft
• press the guard into the shroud and screw it to the base using 3 screws
• connect the switch, battery and motor by pressing the wire pins into the breadboard as shown in the wiring diagram
• add batteries and it is time to test and inspect your hard work! when you flip the switch the propeller should spin and blow air downward
page 6/7 - a project designed and developed by Catherine Anderson and Noah Li-Leger - www.exploremaking.com - all imagery and content © copyright 2016 Explore MakingHovercraft
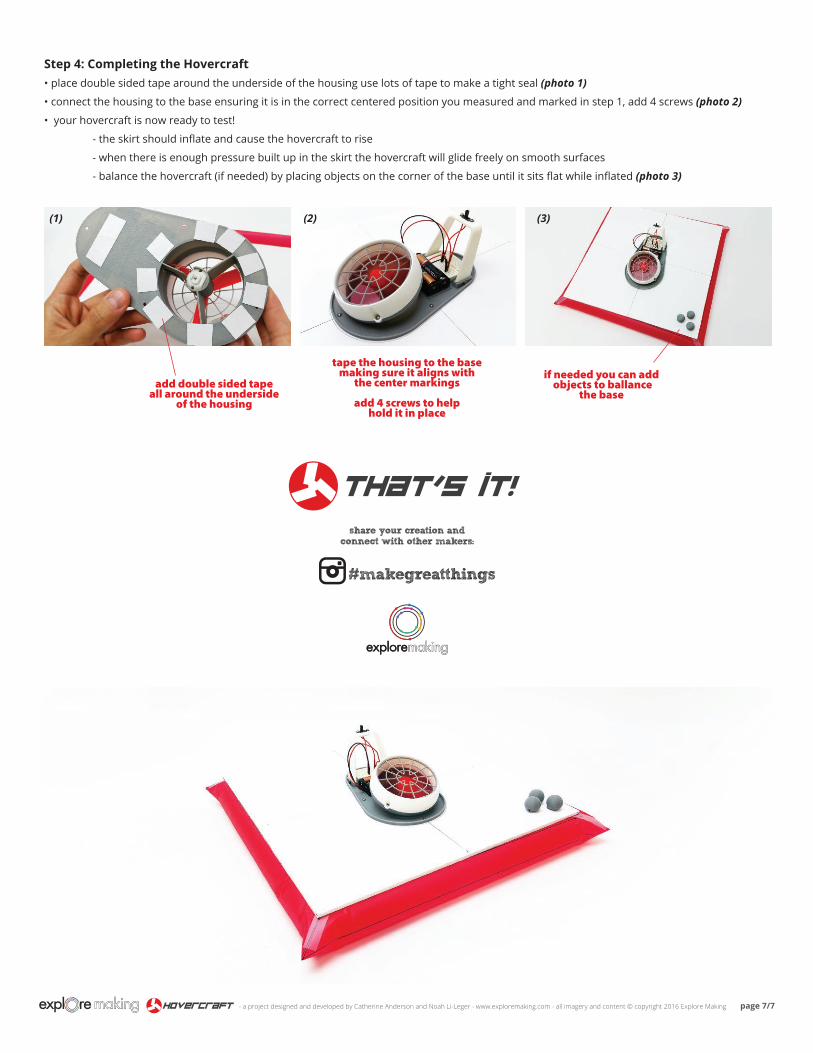
Step 4: Completing the Hovercraft• place double sided tape around the underside of the housing use lots of tape to make a tight seal (photo 1)
• connect the housing to the base ensuring it is in the correct centered position you measured and marked in step 1, add 4 screws (photo 2)
• your hovercraft is now ready to test! - the skirt should inflate and cause the hovercraft to rise
- when there is enough pressure built up in the skirt the hovercraft will glide freely on smooth surfaces - balance the hovercraft (if needed) by placing objects on the corner of the base until it sits flat while inflated (photo 3)
That’s it!
page 7/7 - a project designed and developed by Catherine Anderson and Noah Li-Leger - www.exploremaking.com - all imagery and content © copyright 2016 Explore MakingHovercraft
if needed you can add objects to ballance
the base
tape the housing to the basemaking sure it aligns with
the center markings
add 4 screws to helphold it in place
add double sided tapeall around the underside
of the housing
(1) (2) (3)
Top Related