


Languages
Pages
Legal


2 | P a g e Revised: 1/26/2010
Table of Contents Introduction ........................................................................................................................................................... 2
Links and Support .................................................................................................................................................. 2
Tutor Home Tab ..................................................................................................................................................... 3
My Calendar Tab .................................................................................................................................................... 6
Tutors Tab ............................................................................................................................................................. 8
Matching a Tutor with a Tutor Request .................................................................................................................. 9
Tutor Reports ........................................................................................................................................................12
Facebook Integration ............................................................................................................................................15
Tutor Notes...........................................................................................................................................................16
Introduction
Welcome and congratulations on using GradesFirst, a system that will help you monitor, use and report on all
your tutor information. The scope of this document is to provide you, the tutor, with a resource that will help you
get the most out of GradesFirst. Our application focuses on staying in constant communication with your
students to ensure their success in the classroom. The features described below in this guide are aimed to help
you do just that.
Links and Support
-To access the GradesFirst application, type this URL into your web browser: https://app.gradesfirst.com/
You will log in with your school specific User Name and Password setup by your GradesFirst Administrators.
How do I contact technical support?
1. Open a support ticket – Perhaps the best way to receive technical support is email us at
[email protected]. This will automatically create a ticket, viewable by our entire support staff, to
ensure a speedy reply (and resolution).
2. Pick up the phone – In the unlikely event you are not able to log in a support ticket, please feel free to call
for technical support. Our phone number is (800) 745-5180, press 9 for support.
Table of Contents

3 | P a g e Revised: 1/26/2010
After you receive your GradesFirst login, you will use that information to access your Tutor Home page.
Depending on the rights and privileges granted to you by your GradesFirst Administrators, your screen may look
similar to below. This Home page is where you, as the tutor, will spend the majority of your time. From here
you’ll be able to view your upcoming tutoring appointments, create tutoring reports for past appointments and
much more.
1. My Calendar. Not only will the calendar display your tutoring sessions, depending on your privileges, you
may also have the ability to create appointments from here as well.
2. Depending on the privileges granted to you by the GradesFirst Administrator, you may or may not see
tabs shown above and described below.
a. Tutors. If you have been granted the Tutor Administrator role, you will see and have access to the
Tutor tab. This is the Tutor Administrator tab that will enable the user to match tutor requests
with a tutor, view ‘Today’s Tutor Appointments’ and many more options. We’ll explore these
options later on in this guide.
b. Reports. As the name implies, this option will give you access to the myriad of reports in
GradesFirst. As noted above, we’ll also explore this option a little later on in this guide.
c. Search. This option will let the user search, and optionally contact and/or create appointments,
for users in GradesFirst. Again, we’ll explore this feature later in this guide.
4 | P a g e Revised: 1/26/2010
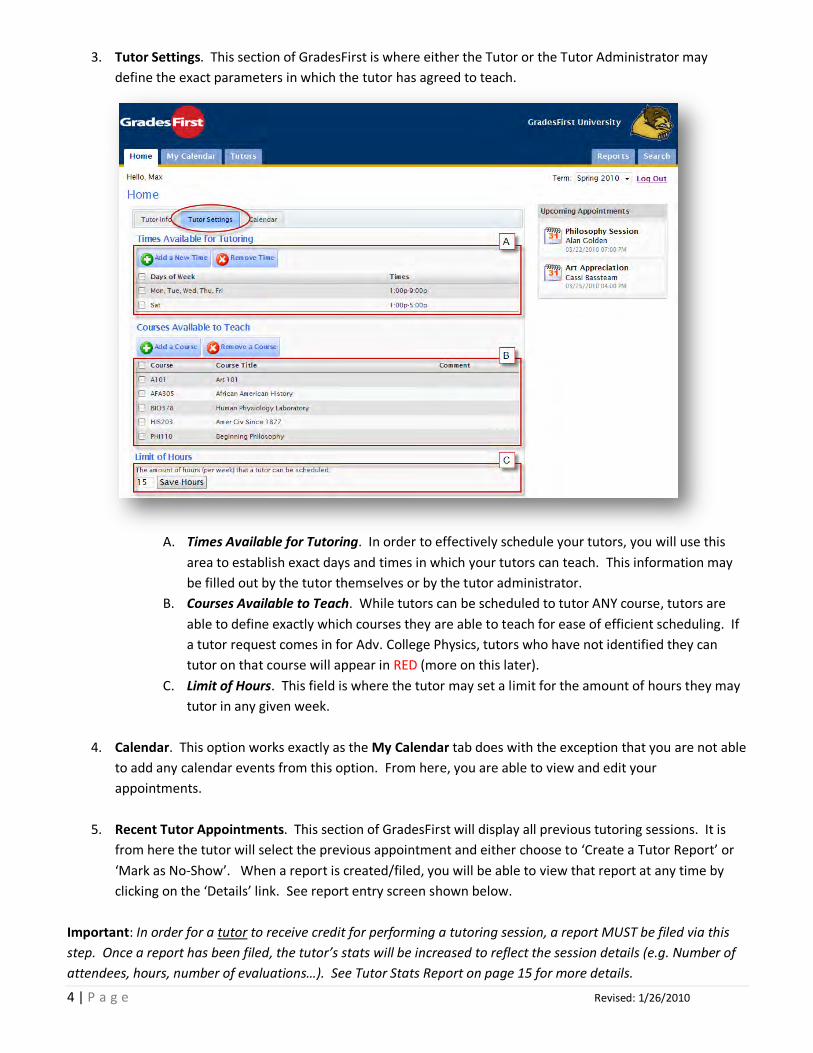
3. Tutor Settings. This section of GradesFirst is where either the Tutor or the Tutor Administrator may
define the exact parameters in which the tutor has agreed to teach.
A. Times Available for Tutoring. In order to effectively schedule your tutors, you will use this
area to establish exact days and times in which your tutors can teach. This information may
be filled out by the tutor themselves or by the tutor administrator.
B. Courses Available to Teach. While tutors can be scheduled to tutor ANY course, tutors are
able to define exactly which courses they are able to teach for ease of efficient scheduling. If
a tutor request comes in for Adv. College Physics, tutors who have not identified they can
tutor on that course will appear in RED (more on this later).
C. Limit of Hours. This field is where the tutor may set a limit for the amount of hours they may
tutor in any given week.
4. Calendar. This option works exactly as the My Calendar tab does with the exception that you are not able
to add any calendar events from this option. From here, you are able to view and edit your
appointments.
5. Recent Tutor Appointments. This section of GradesFirst will display all previous tutoring sessions. It is
from here the tutor will select the previous appointment and either choose to ‘Create a Tutor Report’ or
‘Mark as No-Show’. When a report is created/filed, you will be able to view that report at any time by
clicking on the ‘Details’ link. See report entry screen shown below.
Important: In order for a tutor to receive credit for performing a tutoring session, a report MUST be filed via this
step. Once a report has been filed, the tutor’s stats will be increased to reflect the session details (e.g. Number of
attendees, hours, number of evaluations…). See Tutor Stats Report on page 15 for more details.

5 | P a g e Revised: 1/26/2010
6. Upcoming Tutor Appointments. This will show a list view of tutor appointments that are up and coming.
You may also select to E-mail the attendees of a specific appointment if necessary. For example, if you
need to notify your students that you will be an hour late.
7. Upcoming Appointments. Another view, a graphical one, of your upcoming tutoring appointments.
6 | P a g e Revised: 1/26/2010
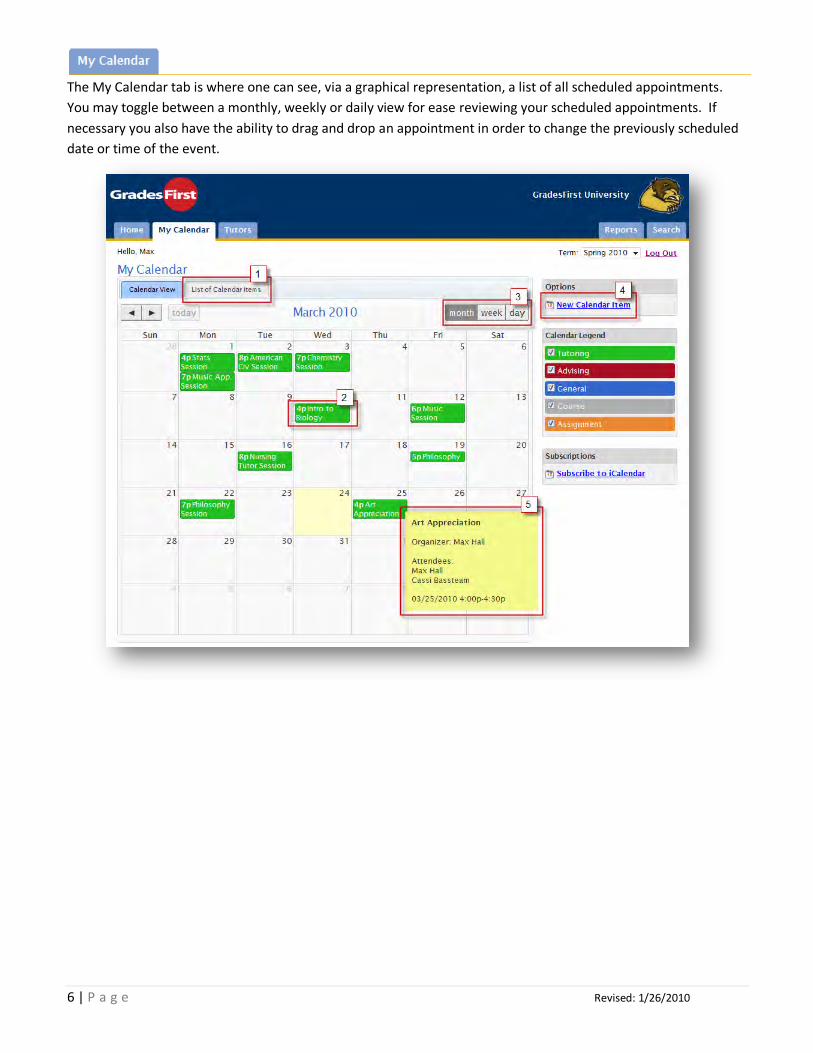
The My Calendar tab is where one can see, via a graphical representation, a list of all scheduled appointments.
You may toggle between a monthly, weekly or daily view for ease reviewing your scheduled appointments. If
necessary you also have the ability to drag and drop an appointment in order to change the previously scheduled
date or time of the event.

7 | P a g e Revised: 1/26/2010
1. List of Calendar Items. Clicking this tab will display, in a line item view, the following types of
appointments. Along with this view, you may edit any of the appointments displayed on this page by
clicking the ‘Edit’ link.
A. Appointments for ‘Today’. Shows appointments for today.
B. Appointments for ‘This Week’. Shows appointments for this week.
C. Appointments for ‘Next Week’. Shows appointments for next week.
2. Tutor Appointment. Each tutoring appointment will be displayed on the calendar in this fashion. If you
wish, you can move the appointment to a different day by simply dragging it to the desired day. After a
period of five minutes, GradesFirst will automatically send out an email to all attendees alerting them of
the appointment change. On the Month view, you are only able to change the date in which the
appointment meets.
If you left-click any appointment, GradesFirst will let you to edit or delete that appointment.
After any changes are made to the appointment, an email is sent out alerting the attendees of
the changes.
3. Different Calendar Views. By default when you click on the My Calendar tab, GradesFirst will display your
calendar as a monthly view. With these options, you are able to view each appointment in greater detail
by clicking on either the Weekly or Daily view. When viewing your appointments by either Week or Day,
you are able to change the date, time and duration for each appointment (unlike the Month view when
you are only able to change the date of the appointment).
4. New Calendar Item. Need to create a tutor appointment on the fly? Clicking this link will let you quickly
create a tutor appointment even without a specific tutor request.
5. Appointment Details. When you hover your mouse pointer over the top of an appointment, GradesFirst
will display its details.
8 | P a g e Revised: 1/26/2010
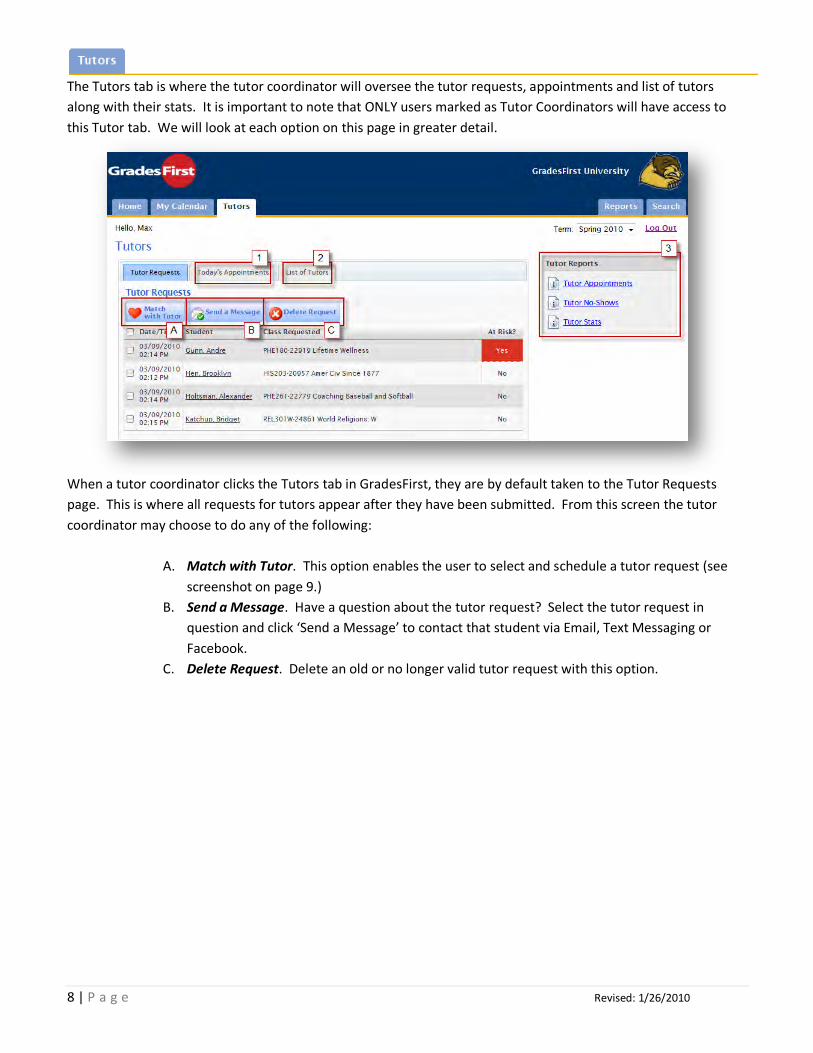
The Tutors tab is where the tutor coordinator will oversee the tutor requests, appointments and list of tutors
along with their stats. It is important to note that ONLY users marked as Tutor Coordinators will have access to
this Tutor tab. We will look at each option on this page in greater detail.
When a tutor coordinator clicks the Tutors tab in GradesFirst, they are by default taken to the Tutor Requests
page. This is where all requests for tutors appear after they have been submitted. From this screen the tutor
coordinator may choose to do any of the following:
A. Match with Tutor. This option enables the user to select and schedule a tutor request (see
screenshot on page 9.)
B. Send a Message. Have a question about the tutor request? Select the tutor request in
question and click ‘Send a Message’ to contact that student via Email, Text Messaging or
Facebook.
C. Delete Request. Delete an old or no longer valid tutor request with this option.

9 | P a g e Revised: 1/26/2010
Matching a Tutor with a Request. This screen appears when you choose the ‘Match with Tutor’ option.
A. Session Specific Details. This is where information specific to that particular tutoring session
should be entered.
i. Topic. This is the name, or title, that will appear on appointments, email notifications
and calendar listings. So be as specific as necessary when describing the tutoring
topic.
ii. Location. This is where the tutoring session will take place.
iii. Meeting Time/Day. The information is taken directly from the student’s tutor
request when they submitted the request. In other words, when the initial tutor
request was made, the student is given the opportunity to request a ‘Preferred
Meeting Time’. It is this information that will appear by default in this field.
iv. Date of Appointment. This will be date for which the appointment is scheduled.
v. Course. Again, this information is pulled directly from the student’s tutor request.
10 | P a g e Revised: 1/26/2010
B. Attendees. This will list all users who will be participating in this tutoring session. Each
attendee, along with the tutor, will receive an email notification when the appointment is
created and saved.
C. Tutors. This section will display all tutors currently defined in GradesFirst. Tutors who appear
in RED are those who have not identified they are able to tutor on the course for which the
tutor request was made. GradesFirst however still displays these tutors in the event you wish
for them to participate in the tutoring session.
D. Meeting Times. After a date for the appointment is selected, you will then be able to select a
meeting time for which the tutoring session will meet. In the example above, I have chosen
for this tutoring session to start at 7:00p and conclude at 8:00p.
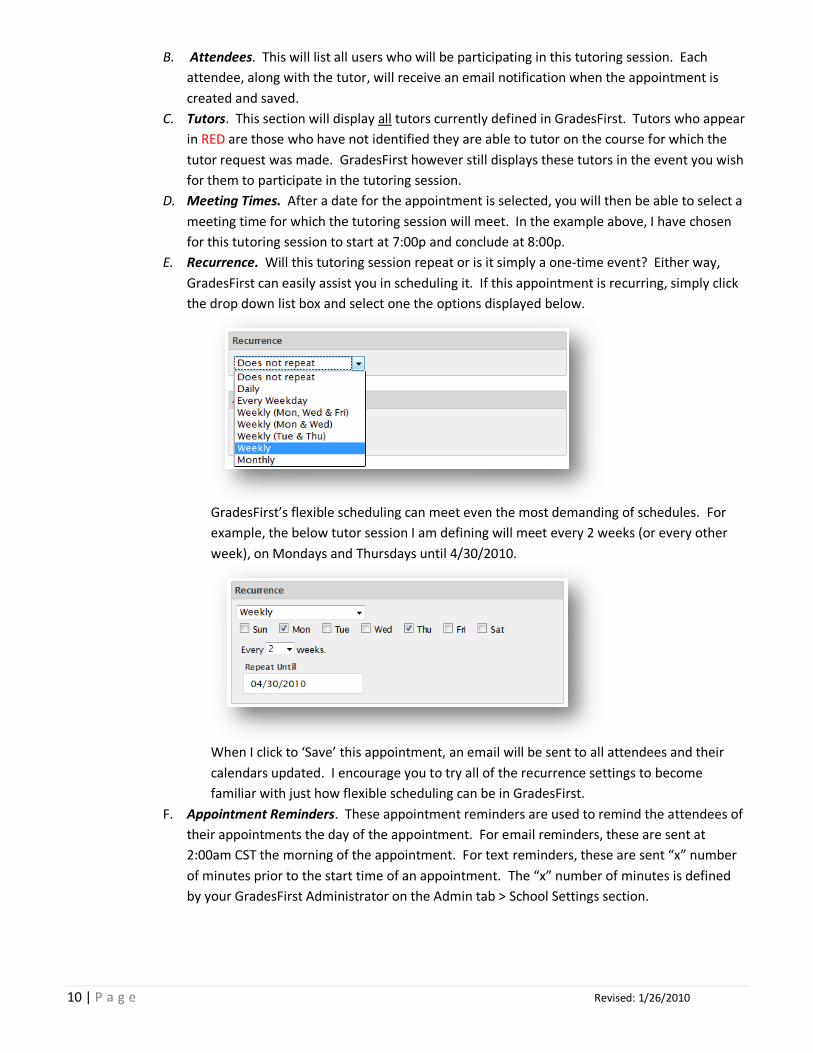
E. Recurrence. Will this tutoring session repeat or is it simply a one-time event? Either way,
GradesFirst can easily assist you in scheduling it. If this appointment is recurring, simply click
the drop down list box and select one the options displayed below.
GradesFirst’s flexible scheduling can meet even the most demanding of schedules. For
example, the below tutor session I am defining will meet every 2 weeks (or every other
week), on Mondays and Thursdays until 4/30/2010.
When I click to ‘Save’ this appointment, an email will be sent to all attendees and their
calendars updated. I encourage you to try all of the recurrence settings to become
familiar with just how flexible scheduling can be in GradesFirst.
F. Appointment Reminders. These appointment reminders are used to remind the attendees of
their appointments the day of the appointment. For email reminders, these are sent at
2:00am CST the morning of the appointment. For text reminders, these are sent “x” number
of minutes prior to the start time of an appointment. The “x” number of minutes is defined
by your GradesFirst Administrator on the Admin tab > School Settings section.

11 | P a g e Revised: 1/26/2010
1. Today’s Appointments. The next tab the tutor coordinator may select is the Today’s Appointment tab
which will display a listing of all tutor appointments scheduled for today.
Along with viewing each appointment, the tutor coordinator even has the ability to ‘Edit’ an appointment
by clicking the ‘Edit’ link to the right of each appointment. If edits are made to an appointment, an
update email is sent out to all attendees noting the changes.
2. List of Tutors. This is a single item list view of all tutors who are defined in GradesFirst. This screen will
also display basic utilization statistics. Further information on tutor utilization, may be viewed by running
the Tutor Stats report on the Reports tab.
A. New Tutor Appointment. This is a quick way to, while viewing your list of tutors,
create/schedule a new tutoring session for one of your tutors.
B. Send Message to Tutors. Need to send a quick message to all or some of your tutors? This is
an effective and easy way to do so. Simply select which tutors you wish to contact, click the
‘Send Message to Tutors’ button and enter your message.

12 | P a g e Revised: 1/26/2010
As noted above, you may or may not have access to the Tutor Reports. If access is granted, you will see a screen
that looks something similar to the below. Again, you may see more, or fewer, reports depending on your user
privileges.
GradesFirst gives you some very powerful filter options to use in conjunction with reports. These options can be
broken down into two distinct categories; a Simple Search and an Advanced Search. The Simple Search is a
keyword search that will query off of the following information:
-Student’s first name
-Student’s last name
-Classification (e.g. Freshman, Sophomore…)
-Category (e.g. Men’s Basketball, Woman’s Softball…)
-Tags
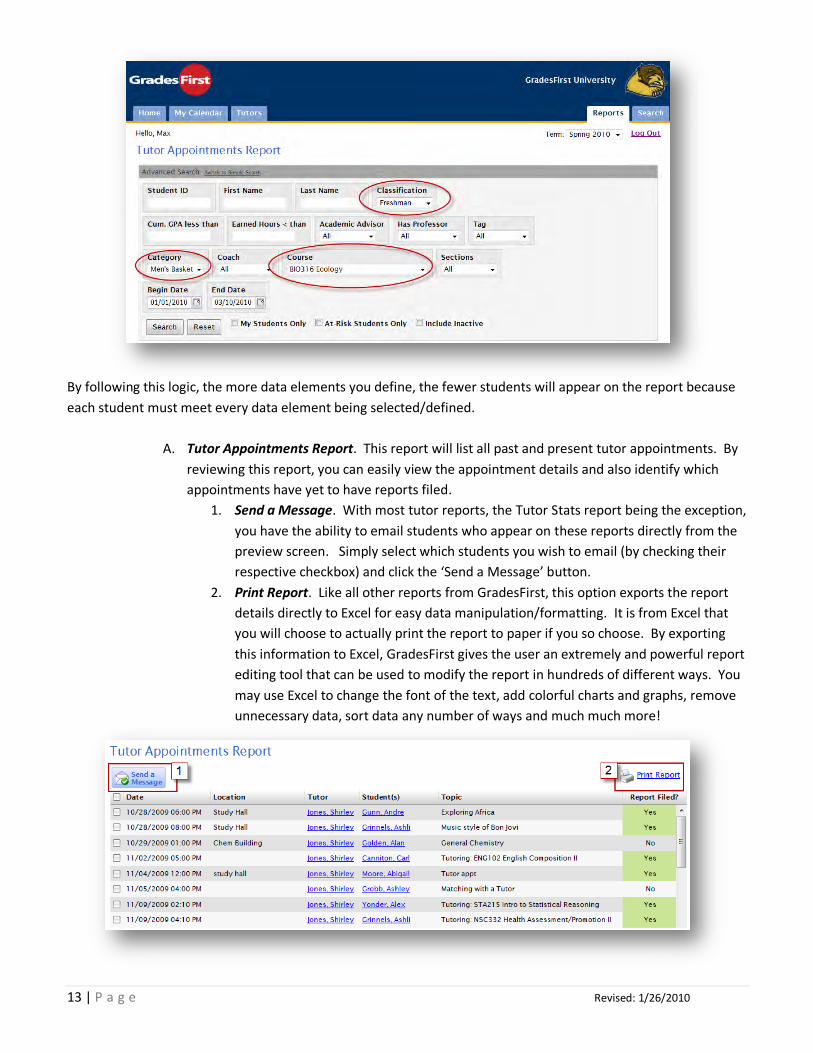
The Advanced Search, however is much more sophisticated. These screen options will let you search, and report
on, specific groups of students. To access the screen show below, click the Switch to Advanced Search link
towards the top of the page. These powerful screen options give the user the ability to search their entire student
population by selecting a variety of key data elements. When using these data elements, it is important to
remember the logic that joins them together. In other words, every data element you select to use is joined
together with an “And” statement. For instance, in the example shown below I have chosen to print my Tutor
Appointments for students who match the following criteria:
-Students who are Freshman AND
-Students who are on the Men’s Basketball team AND
-Students who are enrolled in BIO316 Ecology course
13 | P a g e Revised: 1/26/2010
By following this logic, the more data elements you define, the fewer students will appear on the report because
each student must meet every data element being selected/defined.
A. Tutor Appointments Report. This report will list all past and present tutor appointments. By
reviewing this report, you can easily view the appointment details and also identify which
appointments have yet to have reports filed.
1. Send a Message. With most tutor reports, the Tutor Stats report being the exception,
you have the ability to email students who appear on these reports directly from the
preview screen. Simply select which students you wish to email (by checking their
respective checkbox) and click the ‘Send a Message’ button.
2. Print Report. Like all other reports from GradesFirst, this option exports the report
details directly to Excel for easy data manipulation/formatting. It is from Excel that
you will choose to actually print the report to paper if you so choose. By exporting
this information to Excel, GradesFirst gives the user an extremely and powerful report
editing tool that can be used to modify the report in hundreds of different ways. You
may use Excel to change the font of the text, add colorful charts and graphs, remove
unnecessary data, sort data any number of ways and much much more!
14 | P a g e Revised: 1/26/2010
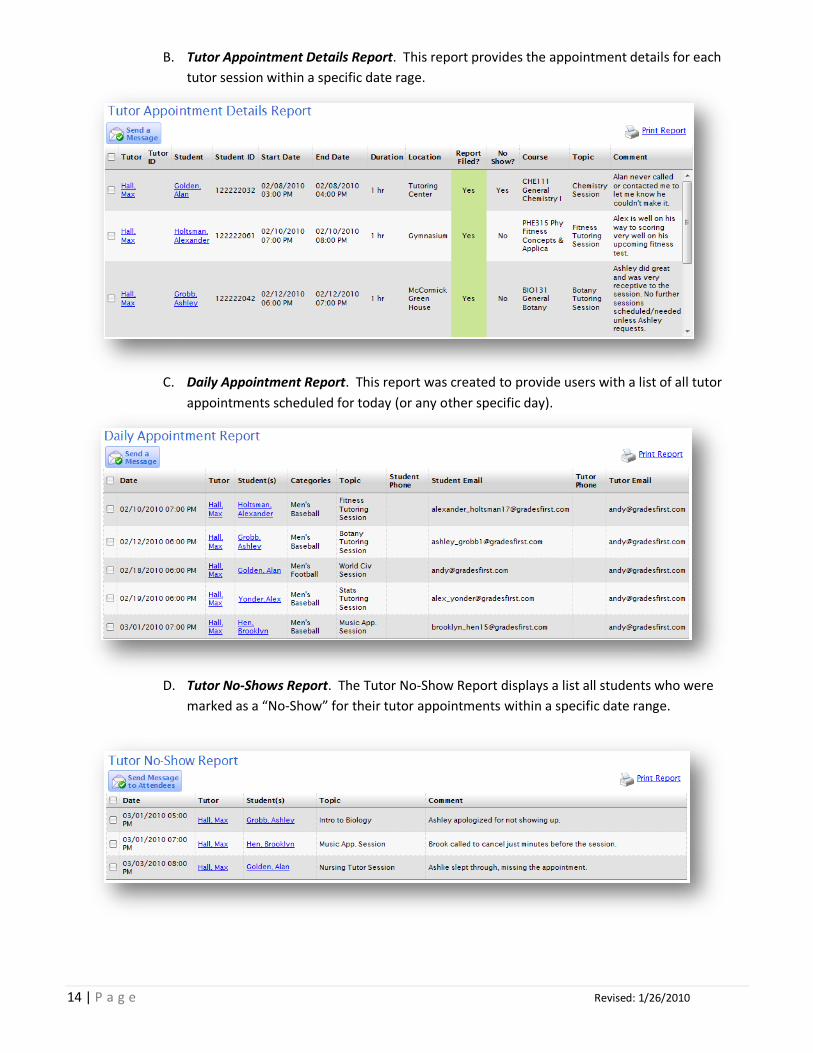
B. Tutor Appointment Details Report. This report provides the appointment details for each
tutor session within a specific date rage.
C. Daily Appointment Report. This report was created to provide users with a list of all tutor
appointments scheduled for today (or any other specific day).
D. Tutor No-Shows Report. The Tutor No-Show Report displays a list all students who were
marked as a “No-Show” for their tutor appointments within a specific date range.

15 | P a g e Revised: 1/26/2010
E. Tutor Stats Report. The Tutor Stats Report gives the tutor coordinator the ability to view
exactly how their tutors are being utilized in regards to tutor appointments. This report was
designed to help users manage/maintain specific tutor utilization levels. One can easily use
this report to ascertain which tutors are being utilized more than others.
As previously mentioned on page 4, in order for a tutor to receive proper credit for a specific
appointment, a report must be filled out for each session. The stats for that session are then
added up to produce the totals shown below.
Facebook Integration
In an effort to help our users stay in constant communication with their students, GradesFirst is utilizing the
popular social networking site Facebook. With our Facebook interface, staying in touch with your students
couldn’t be easier. Here is what you and your students can expect to see when interfacing GradesFirst with
Facebook. Before students can use the GradesFirst interface with Facebook, an invitation must be sent out and
accepted by the student. The invitation may be sent out in two different ways. The first way to invite a student to
use the GradesFirst interface within Facebook is via an individual request. See screenshot below.
On any student’s home page you will see a Facebook Application section in the lower right-hand corner on the
Quick Status Tab. If a student does not currently have the GradesFirst interface linked to their Facebook account,
the text will read “Send Alan an Invitation” (where Alan is the student’s name). If the Facebook interface is

16 | P a g e Revised: 1/26/2010
already installed, the text will simply read “Yes”. The second way to send out a Facebook requests is “in mass”.
To initiate this process, click on the Report Tabs and then choose the report named ‘Students without GradesFirst
Facebook.’
This next screen will look very familiar to you as it is the standard report filter page where you can select a specific
student or groups of students in which to send the Facebook requests. In the screenshot shown below, I have
chosen to send out Facebook requests to the entire Men’s basketball team.

17 | P a g e Revised: 1/26/2010
1. Category. This is just one of the filtering options one may use to target a specific group(s) of students in
which to send a Facebook request.
2. Send Facebook Install Request. Once you have identified and selected the student (by placing a
checkmark by each student’s name) for whom you wish to send a Facebook request, simply click the ‘Send
Facebook Install Request’ button and an email will be sent to each selected student.
GradesFirst will then email each student individually asking them to click a link (embedded within the
email) to ‘sync’ their GradesFirst account with Facebook. Please see a sample screenshot of what the
students will see when they receive their email.

18 | P a g e Revised: 1/26/2010
While this screenshot looks fairly busy, it is easier to understand when you “break it down.”
A. To and From. This will show who requested GradesFirst to send the Facebook request (“the
From”) and then who the email was intended for (“the To”).
B. Subject. Every email should contain a subject that is easily recognizable to the recipient, this
email is no different. We understand students receive many emails per day, so our intent was
to make this email stand out with a subject line that clearly identifies the purpose of this
email.
C. Your Institution’s Name and Logo. To make this email official, we have included both your
institution’s name and logo within the email so students will realize this is an official email
from your institution.
D. Salutation. The salutation will be the name of the student who will be receiving the email.
E. ‘The Link’. This is the link each student will click to initiate the linking process between
GradesFirst and Facebook. When the student clicks the link, they will be taken to the screen
entitled “Allow Access”? This screen is shown at the top of the next page.
F. User Code. This is the code the student will want to “Copy & Paste” into
GradesFirst/Facebook Log In screen on the next page. They will arrive at this Log In page
when they click ‘Allow’ on the “Allow Access?” page.
G. GradesFirst Logo. This is our official logo and support email address should the students
have any questions.

19 | P a g e Revised: 1/26/2010
When the link is clicked (refer above to outline ‘E’) in the invitation email, the student will be prompted to
either ‘Allow’ or Leave Application. The student should click ‘Allow’.
After clicking ‘Allow’, the student will be brought to the authentication (or Log In) screen shown below.
From the above Log In screen, the student/user can choose to login with either their User
Code (refer above to outline ‘F’) or their email address that is currently defined in GradesFirst.
It is strongly recommended the student copy and paste the user code that is shown in their
invitation email.
A. Activation Code. The user should enter the User Code that was displayed in their
Facebook request email.
B. GradesFirst Email. The user may alternatively enter their email address that is defined in
GradesFirst to receive an email, with a link, that they will use to ‘sync’ up their GradesFirst
and Facebook accounts.

20 | P a g e Revised: 1/26/2010
Once the user’s GradesFirst and Facebook account have been ‘synced’ up, their new
GradesFirst/Facebook page will look similar to the screenshot shown below.
A. Messages. The messages area of the Facebook home page will display all Facebook specific
messages sent from GradesFirst. In GradesFirst, when a user chooses to send a message to a
student(s) they have the option to either send an Email, Text message or Facebook message.
When the Facebook message is selected, the message is sent directly to the student’s
Facebook page. The number in parenthesis (shown above) is how many ‘new’ messages the
student has waiting for them. In the example shown above, Alan Golden has one new
message.
B. Class Schedule. This is where the student can view their class schedule for the current term.
C. Email your Professor. A really nice option on this page is the ability to send an email directly
to your professor. For instance, if you need help on an assignment, you can use this option to
contact your professor.
D. Request a Tutor. Need some help on a specific subject, request a tutor. When a student
clicks this link, a form will appear asking the student ‘Preferred Meeting Time’ of the tutoring
session (see screenshot on next page). Then, depending on how GradesFirst is setup, an
email will be sent to both the Tutor Coordinator and/or the student’s Advisor for review.

21 | P a g e Revised: 1/26/2010
E. Email All Professors. Not able to attend class today? Use the GradesFirst/Facebook interface
to send an email to ALL your professors! This option gives the student a convenient way to
contact all his/her professors with a single email.
F. Add a New Calendar Item. Need to block off a specific block of time so that others will know
not to schedule a conflicting activity for you? This option is for you. By creating an event via
the GradesFirst/Facebook interface, other users who can view your calendar will be able to
see the same event. This helps to prevent scheduling conflicts. A good example would be if a
student is participating in a study group session and wants to ensure no other event is
scheduled for him/her for the same time.
Tutor Notes:
Top Related