


Languages
Pages
Legal


Future proofing the Styx Living Laboratory Website
A summer scholarship funded by SLLT.
Final Report by
Chengyin Lin (Olivia)

1
Contents Report Summary ..................................................................................................................................... 2
Introduction ............................................................................................................................................ 3
1. WordPress ........................................................................................................................................... 4
2. Joomla ................................................................................................................................................. 5
3. Drupal .................................................................................................................................................. 6
4. Comparison of systems ....................................................................................................................... 7
4.1 Content ......................................................................................................................................... 7
4.1.1 Editor ...................................................................................................................................... 7
4.1.1.1 WordPress Editor ................................................................................................................ 7
4.1.1.2 Joomla Editor ...................................................................................................................... 7
4.1.1.3 Drupal Editor ....................................................................................................................... 8
4.1.2 Preview................................................................................................................................... 8
4.1.3 Version Control ...................................................................................................................... 8
4.1.4 Screen options ....................................................................................................................... 9
4.1.5 Interaction with users .......................................................................................................... 10
4.1.6 Mobile-friendly .................................................................................................................... 11
4.2 User ............................................................................................................................................. 11
4.2.1 Roles ..................................................................................................................................... 12
4.2.2 User Import .......................................................................................................................... 12
4.3 Levels of website access ......................................................................................................... 12
4.3 Data Visualization ....................................................................................................................... 13
4.4 Water Quality Monitoring Form ................................................................................................. 15
4.4.1 WordPress ............................................................................................................................ 16
4.4.2 Joomla .................................................................................................................................. 16
4.4.3 Drupal ................................................................................................................................... 17
4.5 Custom functions to interact with database for form ................................................................ 17
4.6 Add-ons ....................................................................................................................................... 18
4.7 Search Engine Optimization (SEO) .............................................................................................. 19
5. Potential Issues of using open source systems ................................................................................. 19
6. Recommendation .............................................................................................................................. 20
Acknowledgement ................................................................................................................................ 20
Bibliography .......................................................................................................................................... 21

2
Report Summary
Background: The Styx Living laboratory trust (SLLT) website was originally designed as a place where
users could access information about SLLT, both static and interactive. The interactive information
took the form or up to date graphs which charted data collected on a regular basis to monitor a
number of activities at a number of sites. Unfortunately, in recent times this functionality has not
worked as well as it should. It was decided, given the website was designed using a now obsolete
platform that a new fresh, cost effective approach should be investigated. The trust put forward
money to sponsor a summer student to investigate cost effective means by which information, both
static and interactive could be readily available to users making use of a platform which would be
easily learnable for volunteers to update.
Objective: The purpose of this project was to test a number of content management systems to see
which one is more suitable for migrating from current system. The main brief given for the new
content management system was that it should be cost effective and relatively simple for a range of
people to use and update information into.
Methods: Three CMSs (WordPress, Joomla and Drupal) are chosen to be trialled because of their
popularity. Each of these systems are available in their most basic form free as open systems. An
open source system is typically developed by a community of developers and made available for use
as a testing ground. The advantages of open source systems are they are free (in their basic form)
the main disadvantage is the level of support available. The features tested are mainly fundamental
content management functions (such as editing articles, menus, sidebars, etc.), and how to replicate
the water quality monitoring form and chart.
Results: After investigation, WordPress is found to be the easiest to build simple websites. However,
its limited default features make it difficult to build complex websites because a lot of add-on
features are required to enhance the functionality.
Joomla was found to be relatively straightforward to use, with a reasonable number of default
features as well as add-ons. However, Joomla does not have the functionality to build the type of
complex charting that is required for the SLLT website.
Drupal was found to have the most powerful and flexible functionality among these three options.
This functionality did include the availability of chart building add-ons which could be used with
some tuition for users. The main disadvantage of Drupal is that it is not as easy to learn or to use as
the other two systems trialled.
Conclusion: WordPress is ruled out for its limited functions. This leaves two choices from these three
Joomla or Drupal. The trade-off for picking Joomla over Drupal is the lack of charting functionality,
whereas the trade-off in picking Drupal over Joomla is that this tool is more difficult to learn and
therefore may put a novice user off.

3
Report Structure
This report is divided into to six sections and four appendices.
Section one is an introduction to the product, background on the current SLLT web site and an
introduction to possible new web platforms.
Section two provides a comprehensive overview of the three systems tested for this project. Section
three compares each of these systems for a number of different function requirements.
Section four provides an overview of potential issues, section concludes this report with
recommendations for the required system.
The final sections include project acknowledgments a bibliography and four appendices.
1 Appendix one provides a quick overview of how to migrate to a new system. Appendix two is a
how to for Drupal with append three giving instructions on form creation in Drupal. Appendix four is
a how to for Joomla.
1. Introduction
The purpose of this document is to report on the scoping exercise undertaken to source a different
web platform on which the Styx living laboratory trust (SLLT) website will run.
SLLT is a charitable trust created to develop a living laboratory focusing on the Styx River area of
Christchurch. As such the trust is staffed by volunteers who, amongst other things, to maintain a
public presence some time ago the trust invested in a public website. The idea of the website is to
provide information about the trust, the work they do and the general area they maintain to the
public. One of the most important features of this website are the interactive chart visualisations
that display updated data gathered from a number of the sites regularly monitored by SLLT
volunteers.
Currently the SLLT website is provided using a proprietary content management system that was
written and maintained by Cabbage Tree. The site was originally set up with the functionality to
display graphs that display, for a site, data relating to such things as water quality etc. The idea
behind this functionality is to allow a user to view updated data for a particular site (or sites) and for
a particular variable(s). Users (volunteers) can update the data by submitting this to the database
from which the webpage is extracting its information. Unfortunately this feature does not work as
well as it could, with several broken links etc. A screenshot of an example graph from the current
site is shown below:

4
The purpose of this project is to test several open-source free CMSs to see if they are suitable for
migration of the current website to an environment which is cost effective and easy for SLLT trust
members and volunteers to update and maintain.
As a part of the scoping exercise a meeting was held with a number of volunteers at the meeting
point on a day where they were collecting samples. At this time those present were asked, very
generally, for their views on the current website, what they saw as being useful and what kind of
features they thought would make the current site better.
2. Overview of systems tested
For this project three open source content management systems (CMS) are reviewed as suitable
replacements for the current system. The systems tested and reported on are WordPress, Joomla
and Drupal. These systems are all what is known as open-source software. Open-source software is
usually developed within a community of developers, with users able to make or suggest changes.
This software is usually freely available at little or no cost to the user. Each of these has basic
content management functionalities, including editing articles, displaying different content on
sidebars, header, and footer. They also have more complex features such as form or graph. The pros
and cons of each of these systems in relations to the current system will be discussed in the sections
that follow.
2.1. WordPress
WordPress was originally designed as a blog site, but has evolved into a fuller featured content
management system (CMS). The current WordPress platform can offer either simple or more
complicated solutions for people looking for a cost effective web solution. At its very basic level
WordPress is free and offers people the opportunity to create their own static web pages. They do
this by choosing a WordPress theme which controls the formatting for the pages used. At this level
the functionality is very, limited and restricted to static web authoring.
Below is a screen capture of the administrative view of WordPress. This CMS is praised by non-
technical persons because of its ease of use and ease by which a simple site can be set up. Users

5
should be able to figure out what most default functions are and be able to work through the
administrative interface without reading a large amount of documentation. Most of the sections
appear to be straightforward. The labels used in the navigation areas such as the sidebars, are in
most part self-explanatory.
Examples of the sections on offer include:
Media. This is where you store and edit pictures, videos, files, etc.
Appearance. This is where changes to the display of the website can be made.
Posts and pages are two types of content area. Posts are similar to blog, while pages are just static
pages.
Below is an example of the WordPress dashboard.
2.2. Joomla
Joomla was designed as primarily as a content management system (CMS). It is relatively
straightforward to set up and use, especially for websites that are more complex than fully static
sites. It should not be too difficult for a non-technical person to maintain and update the website
after it is built by a developer.
Below is a screen capture of the administrative view of Joomla. As can be seen, the structure is
organized and appears to be comprehensive. However, there are some terms used that may not be
fully understandable for a novice user, but are terms that people with some development
experience would easily understand after reading some documentations. For instance, the
complicated extension system in Joomla and the nuances between component, module and plugin.
Joomla only has one content type, article, which is a static page. And it is not easy to create user-
defined content types.

6
2.3. Drupal
Drupal is often used for the backend framework of websites ranging from blog sites to business
websites. It is very flexible and powerful, with the price of longer learning curve and complexity. It is
relatively difficult to install, configure and deploy. However, some of these issues will be taken care
of by the hosting company paid to host the site. To understand what Drupal is capable of and how to
implement certain complicated features would require the developer to read a large amount of
documentation. One of the downsides of Drupal is version incompatibility. The most current version
available is Drupal 8, but not all of the features available in the previous version (Drupal 7) are
compatible with Drupal 8. However, it is possible to get compatibility, this involves communicating
with the Drupal development community, which means you could wait for quite a while before it is
compatible.
Below is a screen capture of administrative view of Drupal. It is quite different from other two CMSs.
The first row with black background is the toolbar, which is the navigation menu. The second row
with grey background is the shortcut bar, which can be customized. By clicking the shortcut tabs, you
can go to commonly used links more quickly. The section with white background is called
administrative overlay, which would display after you click one of the navigation menu. The nice
thing is that every part has a brief description under it to help users to understand what it does.

7
3. Comparison of systems
3.1. Content
Content is usually entered on to websites in content management systems by using a graphical
editor. Often these editors have a similar look and feel to a word processor such as MSWord. Each of
the three systems tested have their version of a content editor. Each of these editors will be
discussed in the sections that follow.
3.2. Editor
Editor is the tool with which users edit the pages. Most CMSs nowadays come with a WYSIWYG
(what-you-see-is-what-you-get) editor. That means users do not have to write HTML (HyperText
Markup Language), which displays the content of the page.
3.2.1. WordPress Editor
WordPress has a basic what-you-see-is-what-you-get (WYSIWYG) editor, as shown below. As you can
see, there are only 13 options. These options include the standard things you might find in a word
processor such as bold or italic etc.
The page section of the editor includes publish information, page attributes, featured image, custom
fields if any, discussion, comments and an author area, generally speaking, functionality is limited.
This is probably because WordPress was originally designed to build blogs. Users need to download
an add-on just to insert a table without coding. WordPress has some editor add-ons to replace the
default one.
3.2.2. Joomla Editor
Joomla has a sophisticated content management system editor. Its default page editor is fairly
comprehensive with the user being able to insert tables as well as having access to basic formatting.
Joomla also has an editor add-on called JCE (Joomla Content Extension). This feature is more
convenient than the default one. For instance, to upload a file in the article for users to download,
you need to upload it to media manager, copy the URL (link address), then paste it as a link in the
article. JCE enables uploading and inserting files in situ.

8
3.2.3. Drupal Editor
It is interesting that Drupal 7 does not have a default editor. All you can write is purely HTML.
However, there are a lot of editor add-ons. In the later version of Drupal, Drupal 8, the developers
finally made CKEditor available as a default. Four text formats options are available in CKEditor,
including Full HTML, Filtered HTML, Plain text and PHP code. PHP code is a back-end scripting
language, which could be used to create events and make websites more dynamic.
3.3. Web Preview function
Preview is the function which users can view the results as they would appear in a browser before
they are published to the Web. This means that, rather than working live, you have the opportunity
to make changes that do not interfere with what is currently available, but are able to see how your
changes would look. This feature aids the ease of editing before you hit the publish button,
potentially the whole world can see it and it would be a bit late if something was seriously wrong.
Both WordPress and Drupal have a build-in preview function. WordPress’s preview would look
exactly like what it is like after publishing. Drupal shows the preview in administrative overlay. It has
both trimmed and full versions as the screen capture displayed.
In earlier versions of Joomla there was a default preview function. However this has been
discontinued in the later versions requiring Joomla users of version 1.6 and later to use an add-ons
such as Better Preview to achieve this goal.
3.4. Version Control
Each of the CMS trialled have the functionality to store different versions of content and to roll back
to a previous version.
In WordPress, all the versions are saved automatically, even when users has not used the update
function or the publish button. This means that a user can make changes, leave the page, and the
content would still be saved.
In Joomla, revisions are only stored when user save the article.
In Drupal, the previous version is only stored when user chose to. Otherwise, the new version would
overwrite the old one.

9
WordPress and Joomla both have functions to compare two revisions, but this is not available in
Drupal. This comparison involves the highlighting of the differences in the versions.
Automatic revision storage of WordPress is a double-edged sword. The advantage is obvious, while
the shortcoming is that a lot of unwanted revision would occupy too much memory of database over
time. Users need to install extra add-ons to clean them.
Drupal uses a different approach. It lays all the convenience and burden on users. A sensible user
would have a tidy database without the help of extra add-ons. However, when a user forgets to save
revisions, the previous version is gone for good.
3.5. Screen options
There are a lot of things can be shown on a web page, including tags, categories, author, create date,
publish date, print icon, email icon, voting, hits, etc.
In WordPress, the default is to show the author, publish date and comments on the posts (one of the
content type, like blog), but not pages (the other content type, static page). You cannot change the
setting. To add a printable link, you need an add-on like WP-Print, but it would not show up in
sidebars.
In Joomla, this feature is just called options. You can choose to show, hide them in every article or
use global (default setting of the template). Since these are all built-in features, so users do not need
to install add-ons.

10
In Drupal, there is no name for screen options. They just appear under the editor for users to
choose. The default setting is similar to that in WordPress. Comments are open to article while
closed to basic page. The difference is that user can change it. A module called “Printer, email and
PDF version” could add print link to page. The location of link could display in the main content or
sidebars.
3.6. Interaction with users
As a part of the scoping exercise a meeting was held with a number of volunteers at the meeting
point on a day where they were collecting samples. During this meeting with volunteers, it was
discovered that most volunteers seldom use the website because they felt there was no advantage
for them to do so. Some were unaware of its existence. Others who had used it in the past had
stopped doing so after a lot of the hyperlinks had stopped working correctly. One of the suggestions
from volunteers for additions to the site was for the provision of a blog facility where users could
add their own comments. They thought that a Blog type forum might be something that would
attract people to site. They also mentioned that the trade-off for this type of functionality was the
need for somebody to regularly monitor the site to prevent malicious comments etc.
WordPress has a built-in blog feature. Because WordPress was originally designed as a blog, it is
relatively easy to create a blog page and to keep a separation between static pages and blog posts.
Blog Posts are ordered in reverse chronological order and have comments, RSS (Really Simple
Syndication, enables publishes to syndicate data automatically, without users check the website for
new content manually), etc., while web pages do not have those features as they are designed to be
static.
Joomla, because it was designed as a Content management System does not have built-in blog
function. To have this functionality in a Joomla site it is necessary to download a blog add-ons such
as BSMyjspace. Fortunately, there is a subcategory just called “Blog” under the category of
“Authoring & Content” in Joomla Extensions Directory (Joomla official website’s add-on directory),
which makes searching for suitable add-ons easy. Below is a screen capture of the blog subcategory
add-ons search results, as you can see, there are quite a lot options.

11
Drupal has built-in blog feature and forum, but by default, they are disabled. In Drupal 8, the blog
has been removed, probably because it is similar to one of the content type, article.
3.7. Responsiveness to change in screen size
Both the latest versions of WordPress and Joomla are mobile-friendly. They are both responsive to
the changing of screen size and have something like a hamburger menu (an icon consists of three
horizontal lines, looks like double hamburger, and usually displays in extra-small size screen. When
you click it, it would show all the menu items).
The default theme of Drupal 7 is not completely responsive. The content would squeeze in tablet-
size screen, but not in cell phone-size screen. The menu is always responsive to the change of screen
size. However, it turns into three rows of menus if users browse the website in cell phone instead of
becoming a hamburger menu. Developers can download, install and enable a mobile-first theme.
Alternatively, they can redesign the website according to the Drupal documentation “Responsive
web design” 1. Now they made the default theme of Drupal 8 responsive as well.
3.8. User
Users of websites can fit into a number of different user categories. There are those who use the site
only for content, those we have the need to update some of the content and those who have the
need to access a lot of “backend” functions that make a website accessible. These users are divided
up into roles which have a level of access (rights) associated with them. Each of these, in the relation
to the SLLT site are described in the following section.

12
3.8.1. Roles
In the original website, at least four user roles are needed:
1. The site administrator, who build and maintain the website.
2. Trustees, who have access to all web pages.
3. Volunteers, who can upload or fill in the water monitor data, but not have access to secure zone.
4. The administrator, who helps volunteers to upload the water monitor data and update the
website.
WordPress has five different roles, which should be adequate for the Styx website. If you want to
change the permissions of a role or add a new role, an add-on like “User Role Editor” could be
helpful.
Joomla has nine default roles, which is more than enough. Specific permissions can be defined and
new roles can be created without any add-ons.
Drupal only has three default roles. However, permissions can be edited specifically and new roles
can be created without add-ons similar to Joomla.
3.8.2. User Import
If content from the current website was to be transferred into a new system, some consideration
needs to be given to how this information and the associated users (and rights) are migrated.
During migration of website, it is necessary to export existing users from the old CMS to the new
one. All three CMSs have default functions to add users one by one. However, in our case, to import
all the users at once might be more helpful.
In WordPress, an add-on called “Import users from CSV with meta” which can help to bulk import
users. However, you can either import users for one role or import all of them at once, then change
roles of some users to other roles later. There is a bulk action for that, but an add-on which enables
importing users with different roles would be more helpful.
In Joomla, all the user import extensions for Joomla are not free. The cheapest one is $8.99 USD. If
there are not many users, you can create accounts for them manually.
In Drupal, an add-on called Feeds can create user importer. You can create custom fields in it, like
first name, but you cannot assign user role with it. It does have some idiosyncrasies like if you want
to import users, you need to click “import” link hidden in a description or type the URL in address
bar if you can remember it, but it is free.
3.8.3. Levels of website access
In our original website, there are two zones. One of them is open to public, and shows “/new-
zealand” in the URL. The other one is a secure zone, only accessible to trustees. The URL for the
secure zone includes the word “/secure”. These different zones mean that the trustees or those
with editing rights for the current site can access update functions and areas and it is kept quite
separate from the way a user access the site.

13
Each of the three CMSs’ tested for this project uses different roles to restrict user access at the
different access levels. The default setting of WordPress is that a role can either access all the
pages/posts or none of them. However, in our case, I would prefer the public can access only certain
pages. The volunteers can have all the rights public have, plus have access to water quality
monitoring form. And trustees can access all the pages. This goal could be achieved with the help of
add-ons like “User Access Manager”.
In Joomla, it is possible to choose the access level for different roles from either articles or from the
menus. Moreover, they are all default settings, which means there are no concerns if the add-on is
incompatible with current version of CMS, or for update issues, or conflicts with other add-ons.
Drupal’s default setting is similar to WordPress’s. An add-on called “Nodeaccess” can help to restrict
access per node. Node is the term refers to a piece of content in Drupal, like page. It also includes
poll, forum, etc., but this is beyond the scope of this section. The add-on would add a “grant” tab
when you are editing as the screen capture displayed below.
3.8.4. Data Visualization
Data visualisation is a discipline that uses table and chart to display data in a clearer and more vivid
way. If the website is just paragraphs after paragraphs of plain text, it would become quite tedious.
Data visualization is quite common nowadays because it adds some spice to the website. The data
collected from water monitoring data is currently stored in some form of database. As it was not
possible to view this it is difficult to comment about this. However, it would be sensible that this
practice be continued and that the data be stored in a relational database. Relational database uses
Structured Query language (SQL) statements to create, read, update, and delete data. Because of
this, it was important to find add-ons in each of the three trial products that use SQL statements.
In WordPress, there is an add-on called “Display SQL Stats” which is free and intuitive. Although
users cannot add axes labels, it is not really a problem in our case since Jan, Feb, etc. are self-
explanatory. However, in the original website, there is a function that the data in chart and table
would change according to location and year chosen by users. Display SQL Stats does not have this
function and I could not reach the add-on author.

14
Another plugin in WordPress called “wpDataTables” which uses SQL statements to fetch data from
database as well, but the chart function is available only in full version. They have full-featured
online sandbox for users to try. According to their online demo, data can be filtered by user-defined
parameters 2. The price is AUD$35 3.
In Joomla, an add-on called Plotalot also uses SQL statements to fetch data to draw chart. The
advantage is that 1. It can connect to external database. 2. It has a nice graphic user interface (the
first screenshot below) which includes colour picker to change the colours of title, line and
background. The disadvantages are 1. Axis title on bar and line charts for free version is “Plotalot
Free”. 2. Free version does not include a plugin to insert into article and use variable. The price 4 is
from £8 (NZD $18.13). An example line chart with some dummy data is shown in the second
screenshot.

15
In Drupal, a free add-on called “Forena Reports” can fulfil almost every charting requirement except
tabs that SLLT have asked for. Features included are:
1. Can connect to internal and external databases.
2. Display data in charts and tables based on the parameters chosen by user. It does have some
idiosyncrasies such as a user can only generate one legend in the graphic user interface. To generate
more legends, users need to find the report in the backend files, and find the code which generate
the legends and change it.
3.9. Data entry Forms
Users need to be able to get and give information to a database and they do this usually by
submitting a form. Each field of a form is linked to a field in the database. To fill in the blanks of a
form is more straightforward than fill in the data in database directly. This way, users would not be
able to mess around the normalized database and accidentally change the structure. Moreover, a
free database like MySQL, which comes with all three CMSs, does not have an intuitive graphic user
interface to insert, update and delete data. Users usually need to write SQL statements to achieve
that.
A form is currently being used in the original website for volunteers and administrators to update
the water quality monitoring data, a screen capture is shown below.

16
All three CMSs have a lot of form add-ons. Most of them can only build simple contact forms. In our
scenario, I need to build a rather complicated form contains various of fields, including short text,
long text, date time picker, drop down list, check box, radio button and calculated fields (e.g. type in
three clarity values and calculated the average automatically). Also, I need to submit the form data
to internal or external database, so the chart add-on can use SQL statements to fetch the data and
display them in a line graph and a table.
3.9.1. WordPress
WordPress free form add-ons do not have functions to submit data to database. Some add-ons allow
users to view the data in the add-on user interface. Others add-ons email the data to users via email.
Many paid add-ons enable submission to database. The price is approximately USD $30 to 50. If you
are willing to purchase, I would recommend an add-on called Caldera Form. It has all the field types
needed in water quality monitoring form. You can use the add-on for free, but for the submission to
database feature, you might need to talk to the add-on author. Unfortunately, support is only
provided after purchase priority support subscription (USD 50/first month, 150/year). An example I
found online is shown below 5.
3.9.2. Joomla
Joomla is the only CMS tested that has free form add-on which can successfully submit data to
database. I would recommend the use of an add-on called ChronoForms. This add-on has built-in

17
functions to connect to internal and external databases. Although passing data to external database
requires writing own code, which in turn requires basic PHP knowledge.
An example with couple fields is shown below.
3.9.3. Drupal
I recommend use Webform + Form Builder add-ons. These two add-ons are free. Developers still
need to write own code to insert data to database. Webform is a well-established form module.
There are a lot of modules extend the functionality of Webform 6 including Webform Calculation
Components, which enables calculated field. Form Builder add-on add a drag and drop GUI (graphic
user interface) to it. Below is an image showing the Drupa form add-on interface. Information on
creating a Drupal is available in Appendix 4. form
3.9.4. Custom functions used to submit to database directly from web
page
None of the three CMSs tested for this project had any available add-ons that could be used to
submit data to database directly. Most of times developers need to write custom code. To submit
data from form to database usually requires PHP or JavaScript code. All the three CMSs are built with

18
PHP. The developers of those CMSs invented some custom functions to interact with database for
security reasons. In WordPress, the custom functions are quite straightforward, while they are a bit
trickier in Joomla and Drupal. Both WordPress and Joomla concluded how to create, read update
and delete data in one page of documentation. In Drupal, developers need to read larger amounts of
documentations to master how to interact with database.
3.9.5. Add-ons
Each of the CMS tested for this project have a number of add-ons available. An Add-on is a small
piece software which can be used to enhance system functionality. Each of the add-on is referred to
differently in each of the different CMSs. In WordPress, it is called plugin. WordPress has heaps of
plugins. At the time of writing, according to the WordPress Plugin official page 7, “41,734 plugins
with 1,112,315,749 total downloads are at your fingertips.” WordPress is a relatively limited
platform without plugins. Therefore, it is crucial to choose the right one to use.
Surprisingly, WordPress does not have a Graphic User Interface (GUI) to filter the search results of
plugins. I can only choose plugins based on the amount of active installs, ratings, last updated time
and if it is compatible with my version of WordPress. There is no function to filter all these
information. All I can do is scroll down the page and read them one by one. For one keyword I typed
in, there are usually dozens of or even over 100 pages of search results. I do not want to investigate
all of them considering I need at least one plugin for a single feature. This is obviously very time-
consuming and not cost-effective. What I usually do is to google it first, if the feature or plugin I am
looking for is quite common, there would be somebody already compared the plugins and wrote
some articles. For a less frequent feature, I would have to install and try by myself one by one.
In Joomla, the add-ons are called extensions. Joomla has a nice GUI to filter extension by category,
free / paid, has demo or not, new or updated, etc. It can also order the search results by overall
ratings, functionality, ease of use, support, etc.
The extension system is more complicated than plugins in WordPress. Extensions are divided into
components, modules, plugins, templates and languages. Components can be found directly in the
admin head menu, while all the rest located in admin head menu > “Extensions”. It is a bit confusing
that users download, install and activate all the extensions at the same place, but manage them at
different places.
Most extensions only have a whole package. It might only contains one element of extension (like a
component) or combine several elements together. Users only need to download, install and
activate once. However, some extensions separate those elements. For instance, “ChronoForms” has
component, module and plugin.
Components, modules and plugins are all used to enhance functionality. A template is for
appearance, which is basically the design of Joomla! powered website 9.
In Drupal, add-ons are called modules. Users often need several modules to work together to
implement a function. Users need to either read the documentation of modules very carefully or
check the description of module after installation. The description would tell users if other modules
required are missing or disabled. In addition, Drupal does not have a built-in GUI to select or install
modules. Users have to go to drupal.org to do that and go to drupalmodules.com to see the ratings
and reviews. Each modules is only compatible to certain version of Drupal. For example, modules

19
used in Drupal 7 are no longer compatible for Drupal 8. All the modules on drupal.org are free, but
there are some paid modules out there, although these are not endorsed by Drupal, but are likely to
have been developed by users with a need.
In conclusion, WordPress has large number of plugins, unfortunately these are presented in an
unorganised manner.[GS1] The absence of a filtering mechanism for add-ons made it difficult for a
user to find the appropriate one and may mean that the wrong choice is made. Users tend to
assume the popular ones are better than the unpopular ones, which is not always true and unfair to
the new ones. WordPress is being continually updated, this may mean that some plugins are not
compatible with the new version any more.
On the other hand, Joomla has a much organised filtering methodologies, with reasonable amount
of extensions.
Drupal’s modules are quite flexible, but it does not have a good category system.
For all the CMSs, add-ons could be a maintenance issue. When the add-ons have a new release, they
are not automatically updated. This will require the users to maintain them manually on a regular
basis, maybe when the water quality data are updated.
3.9.6. Search Engine Optimization (SEO)
SEO is the process to make the website appear higher ranked and more frequently in the search
results page.
WordPress and Drupal both have SEO add-on features ready to be installed. In the WordPress
version I tested (4.4), a plugin called “all in one seo pack” is preinstalled.
Joomla has built-in functions for SEO. Users can write meta tags (HTML attributes / tags, which
describe the web page content) without coding, including meta description (summary of the page
content), meta keywords (a list of important topics of the page content) and choose options for
robots (specify which content should not be scanned) in menu.
4. Potential Issues of using open source systems
The main advantage that most people see to open source software is that it is either free or low
cost, unlike a lot of bespoke systems or proprietary systems. This advantage may be offset
somewhat by a number of disadvantages. These disadvantages include:
Incompatibility between versions
Issues have been found regarding the incompatibility between versions of each of these
systems. It may mean that an add-on which worked perfectly well in one version of the
software does not work in an updated version.

20
Lack of support
If anything goes wrong, user are on their own. While users can ask questions from the user
community, often these question may go unanswered.
Limited functionality
Free CMSs are usually not designed for complicated features. There is no CMSs, even paid
ones can just fulfil all the features required by our website out-of-the-box. With paid CMS,
there would be a team of developers who help users to achieve what they want. With free
CMS, users need to spend more time on figuring out how to use the CMS by themselves.
5. Recommendations
Overall, all three CMSs tested can fulfil most fundamental features that most websites require. Two
web functions that may require code to be written are the form and the graph. The solution for the
form is simpler than the solution for the graph. Forms which are used to submit data to a database
through a webpage are integral parts of a website and something that most developers with
knowledge of HTML and PHP would, after reading documentations, be able to create.
Two recommendations are made, each of these does require a level of compromise. The initial brief
for this project was to source a system that would provide at the very least the same functionality
provided in the current system but be easy to use for a range of users and cost effective.
Two of the systems trialled fitted partly within the initial brief.
Joomal is recommended for its ease of use and learnability. There are several levels of functionality
available from the very base level to the number of relatively inexpensive add-ons available.
Unfortunately these add-ons, and there the functionality does not extend to charting. The level of
charting in this systems does not meet all the requirements of this website.
Druapl is recommended as the system which best meets the charting requirement for the SLLT
website. However, this system is more difficult to use, especially for novice users and does require
quite a bit of custom coding to be done to enable the required functionality. Forena reports (a
Drupal chart add-on) is the only free add-on I tested so far in 3 CMSs, which can fulfil almost every
requirements of charts in original website, except the tab feature. Drupal is the most powerful and
flexible CMS in 3 options, comes with the price of longer learning curve as it is fairly complicated.
6. Acknowledgement
I extend my thanks and gratitude to the Styx Living Laboratory Trust for providing this scholarship
and enabling me to work on this project.
This project was supported by Landcare Research and Lincoln University. I would like to express my
gratitude to Chris Phillips for offering me the exciting opportunity to cooperate with Landcare
Research on this interesting project, and Nick Spencer for giving me useful technical advices and
using his personal wifi data for presentation.

21
I would like to thank Shirley Gibbs, from Lincoln University for supervising this project, taking me to
the Styx Mill to talk to the volunteers, revising my report, and accompanying me to talk to the
clients.
I am thankful to Walter Abell for giving me materials from his PHP course and for his technical
advice.
Also, I appreciate Chris Phillips, Cynthia Cripps and Shirley Gibbs for listening to my tedious
presentation.
Bibliography
1. https://www.drupal.org/node/1388492
2. http://sandbox.wpdatatables.com/tables-and-charts-wordpress-demo/
3. http://codecanyon.net/item/wpdatatables-tables-and-charts-manager-for-
wordpress/3958969?s_phrase=&s_rank=9
4. http://www.lesarbresdesign.info/extensions/plotalot/downloads
5. https://github.com/Desertsnowman/Caldera-Forms/blob/current-stable/screenshot-1.png
6. https://www.drupal.org/node/1526208
7. WordPress.org. Retrieved December 9, 2015, from https://wordpress.org/plugins/
8. What are the Component, Module and Plug-in? Retrieved December 9, 2015, from
https://www.chronoengine.com/faqs/56-cfv4/cfv4-other-faqs/4375-what-are-the-
component-module-and-plug-in.html
9. Joomla! Documentation™. Retrieved December 9, 2015, from
https://docs.joomla.org/extension_types_(general_definitions)

22
Appendix1 - A quick guide to migrating to a new system 1. Choose a CMS
2. Download, install and configure the CMS
Ask the hosting company you are using that if they can download, install and configure the
CMS for you. Some companies are willing to do that. If you decide to do it yourself, the CMS
can be downloaded from official website. An alternative would be using some installation
package or library, like Bitnami.
3. Choose a theme / template
The original website uses 3-column website. If WordPress or Joomla was chosen, select a 3-
column theme / template and replace the default one. If Drupal was chosen, the default
theme is 3-column. In Drupal, to change what content appears in what location, go to
Structure > Blocks.
4. Import users
There may or may not be a free bulk-import user add-on, depending on which CMS was
selected. If not, you can just add users one by one and assign appropriate roles / user groups
to them.
5. Copy or download all the content from original website
Copy and paste all the text content, including articles and SEO data (if there is any) from
original website to the new one. Download all the pdf, csv and image files available, and
upload to the new site. All the images are located in Thrive CMS > Libraries > Images. Copy
all the details as well, including title, alternate text, category and caption.
6. Form
Firstly, to decide if you want to use an add-on or not. If not, you can build the form from
scratch after reading some documentations. If so, you may still need to write some custom
code.
7. Data Visualization
To begin with, copy or download all the data in water quality monitoring database. It would
be easier if Cabbage Tree is willing to give you the data directly. Otherwise, since these data
are typed in or imported from hand-write water quality monitoring form, the administrator
or whoever helps doing that may have a copy.
Import all the water quality monitoring data to new database (MySQL). Then, choose an
appropriate add-on to display data in line chart and table. There is no tab feature in all the
add-ons tested, you might need to develop this function by yourself.

23
Appendix 2 - Drupal How-to
1. Add an article or basic page
1.1. Click “Content” in head admin
1.2. Click “+ Add content” button
1.3. Choose type
1.4. Fill in title, body, etc.
1.5. Click “Preview” button to preview
1.6. Click “Save and Publish” button
2. Revise content and revert to previous edition
2.1. After editing content, click “Revision Information” link
2.2. Tick the checkbox before “Create new revision”
2.3. Fill in “Revision log message”
2.4. Click “Save” button
2.5. To revert to previous edition, in front end, click “Revisions” tab
2.6. Click “revert” for the previous edition you want to roll back to
3. Add a table
3.1. Repeat step 1.1 - 1.4. In editor, choose “Full HTML” for Text format
3.2. Click Table icon
3.3. Fill in numbers of rows, columns and choose header
4. Download, install and enable a module
4.1. In Drupal 7, click “Modules” in head admin. In Drupal 8, click “Extend”
4.2. Click “Install new module” button
4.3. Go to drupal.org and download a module
4.4. Click Browse to upload a module
4.5. Click “install” button
4.6. Click “Enable new added modules”
4.7. Tick the checkbox before the module just installed
4.8. Click “Submit” button
5. Theme
5.1. Use a new theme
5.1.1. Go to drupal.org and download a new theme
5.1.2. Click “Appearance” in the head menu
5.1.3. Click “+ Install new theme”
5.1.4. Click Browse button to select the theme
5.1.5. Click “install” button
5.1.6. Click “Enable and set default”
5.2. Use a different favicon
5.2.1. Click “Appearance” in the head menu
5.2.2. Click “Settings” tab
5.2.3. In “Shortcut icon Settings” section, uncheck the checkbox before “Use the
default shortcut icon”
5.2.4. Enter “Path to custom icon” or click Browse button to select and upload an
icon image

24
5.2.5. Click “Save configuration” button
6. Block
6.1. Edit the position of a block
6.1.1. Click “Structure” in head menu
6.1.2. Click “Blocks”
6.1.3. Select the block you want to edit, in “Region” drop down list, change to a
different region
6.2. Add a block
6.2.1. Click “+ Add block”
6.2.2. Fill in “Block description” and “Block body”
6.2.3. In “Region Settings”, choose a region for the theme you are using
6.2.4. In “Visibility settings”, choose which page(s), content types, roles or users
will display the block
6.2.5. Click “Save block” button
7. User
7.1. Add more fields for users
7.1.1. Click “Configuration” in head menu
7.1.2. Click “People”
7.1.3. Click “Account Settings”
7.1.4. Click “Manage Fields” tab on top right
7.1.5. In “Add new field” row, fill in label, select a field type
7.1.6. Click “Save” button
7.1.7. Adjust “Maximum length” if needed
7.1.8. Click “Save field settings” button
7.1.9. (Optionally) Tick the checkbox before “Required field”
7.1.10. Click “Save settings” button
7.2. Add one by one
7.2.1. In head menu, click “People”
7.2.2. Click “Add User” button
7.2.3. Fill in username, password, etc. and click “Create new account” button
7.3. Bulk import
7.3.1. Download, install and enable modules “Feeds” and “job_scheduler”
7.3.2. Click “Structure” in head menu
7.3.3. Click “Feeds importers”
7.3.4. Find “User import” row, Click “Override” in “Operations” column
7.3.5. Click “Mapping” beside “Create users”
7.3.6. Fill in “source”, and select a “target”
7.3.7. Click “Save” button to add another row
7.3.8. In “Target Configuration” column, choose the field you want to use as
unique id, click the gear icon
7.3.9. Tick the checkbox before “unique” and click “update” button
7.3.10. Click “Feeds importers” in the breadcrumb trail and click “import” or go to
yoursite/import (like http://127.0.0.1/drupal/import)
7.3.11. Click the importer you just created

25
7.3.12. Click “Browse” button to select a CSV file (first row would be title, which
match the fields in source”
7.3.13. Click “Import” button
8. Access
8.1. Download, install and enable module “Nodeaccess”
8.2. In front end, click “Grant” tab
8.3. Choose user role and actions allowed
8.4. Click “Save Grants” button
9. File
9.1. Download, install and enable module “File entity”
9.2. Add a File
9.2.1. Click “Content” on head menu
9.2.2. Click “Files” tab
9.2.3. Click “+ Add file”
9.2.4. Browse to select a file
9.2.5. Click “Upload” button
9.3. Add a link for file to be downloaded in article or basic page
9.3.1. Click the file you just uploaded
9.3.2. Right click, and choose “Copy link location”
9.3.3. Go to the article or basic page you want to add this file
9.3.4. Add a link and copy the URL
10. Print
10.1. Download and install module “Printer, e-mail and PDF versions”
10.2. At least enable “Printer-friendly pages” and “Printer-friendly pages UI”
10.3. Go to Configuration >> User Interface
10.4. Click “Web Page” tab
10.5. Tick the checkbox before “Send to printer”
10.6. Click “Save configuration” button
10.7. (Optionally) Click “Links” tab, in “Link Options” section, change “Link Location”, click
“Save configuration” button
10.8. In front end, click “printer-friendly version” to print
11. Data Visualization
11.1. Download, install and enable module “Forena reports”
11.2. Configuration
11.2.1. Configure Text Formats
11.2.1.1. Click “Configuration” on head menu
11.2.1.2. In “Content Authoring” section, click “Text formats”
11.2.1.3. Click “configure” for “Full HTML”
11.2.1.4. In “Enabled filters” section, tick the checkbox before “Embed Forena
Reports”
11.2.1.5. Uncheck the checkbox before “Convert line breaks into HTML (i.e.
<br> and <p>)”
11.2.1.6. Click “Save configuration” button
11.2.2. Configure Forena Reports

26
11.2.2.1. Click “Content Authoring” in breadcrumbs
11.2.2.2. Click “Forena Reports”
11.2.2.3. Click “General” tab
11.2.2.4. Enter the path for “Custom Data Block Repository”
11.2.2.5. Tick the checkbox before “Use Text Format filtering system”
11.2.2.6. In “Input Formats” section, choose “Full HTML” in “Text format”
drop down list
11.2.2.7. Click “Save configuration” button
11.2.2.8. Click “Data” tab
11.2.2.9. Click “+ Add data source”
11.2.2.10. Fill in name, title, path and choose driver. (For internal database,
choose Drupal for driver. For external database [mysql], choose
“PDO other than Drupal” for driver. Enter uri
[mysql:dbname=mysql;host=localhost:port], user and password.
11.2.2.11. Click “Save” button
11.3. Create a SQL query
11.3.1. Click “Structure” in head menu
11.3.2. Click “Forena Reports”
11.3.3. Click “Data” tab
11.3.4. Click “+ New SQL Query”
11.3.5. Choose “Data Source”, fill in “Block to create”
11.3.6. Click “Create” button
11.3.7. Enter SQL statements in “Source” (It has intellisense!)
11.3.8. Click “Test changes” button to preview
11.3.9. Click “Save” button
11.3.10. Go back to previous page twice
11.3.11. Click the block you just created
11.4. Create a table alone
11.4.1. Repeat step 11.3.1 - 11.3.2
11.4.2. Click “Reports” tab
11.4.3. Click “+ Create new report”
11.4.4. Enter title, report name, category
11.4.5. Click “Create” button
11.4.6. Click “+Data”
11.4.7. Click to choose a block
11.4.8. Click “Select” button
11.4.9. In “Template” drop down list, choose “simple table”
11.4.10. (Optionally) Enter header, caption, change labels
11.4.11. Click “Preview” button
11.4.12. Click “Add” button
11.4.13. Click Save to make your changes permanent. Click Cancel to discard your
changes.
11.5. Create a line graph with table

27
11.5.1. Go to the http://www.goat1000.com/downloads.php and download
SVGGraph library1
11.5.2. Unpack (extract) the downloaded SVGGraph library.
11.5.3. Transfer (upload) the extracted library in a subfolder of sites/all/libraries,
using SVGGraph (case sensitive!) as the name of the subfolder.
11.5.4. Repeat step 11.4.1 - 11.4.8
11.5.5. In “Template” drop down list, choose “graph (SVG)”
11.5.6. Choose “Line Graph” in “Graph Type” drop down list
11.5.7. If you want to display several columns as values, choose “Multi” in “Style”
drop down list
11.5.8. Tick the checkbox before “Include data table with graph”
11.5.9. Choose the column you want to be x axis as “label”
11.5.10. Choose the column you want to be y axis as “value”
11.5.11. Choose “ignore” for the columns you do not want to display
11.5.12. To add multiple legends, add one in the GUI. Open the FRX file in the
directory you chose (like sites/default/files/LineChart.frx). Find the sentence
frx:legend_entries="Legend1". Change it to frx:legend_entries_1="Legend1”
frx:legend_entries_2="Legend2" ...
11.5.13. Repeat step 11.4.11 - 11.4.13
11.6. Add parameters displayed in drop down list
11.6.1. Add a data source according to 11.3. The sql would be similar to ”select *
from table where param1=:param1 and param2=:param2…”
11.6.2. Add more data sources for parameters, like “select param1 from table”
11.6.3. Create a line chart with table following step 11.4.1 - 11.4.7
11.6.4. Fill in some dummy data, and click “Submit” button
11.6.5. Click “Select” button, repeat steps 11.5.5 - 11.5.10
11.6.6. Choose “ignore” for parameters fields
11.6.7. Repeat 11.5.12 - 11.5.13
11.6.8. When editing report, click “parameters” tab
11.6.9. Click the gear sign beside the parameter to configure
11.6.10. Choose “Yes” or “No” for require
11.6.11. For “Input Control Type”, Choose “Select”
11.6.12. For “Source Data”, fill in the path for parameter, like “ExternalDB/year”
11.6.13. Click “Update” button
11.6.14. Click “Update” button again
11.7. Show report (table / graph) in page
11.7.1. Download, install and enable module “Bean”
11.7.2. Click “Content” in head menu
11.7.3. Click “Blocks” tab
11.7.4. Click “+ Add Block”
11.7.5. Enter label, select a report
11.7.6. Click “Save” button
11.7.7. Click “Structure” in head menu
11.7.8. Click “Blocks”

28
11.7.9. Find the block you just created, choose “Content” for “Region”
11.7.10. Click “configure” in “Operations” column
11.7.11. In “Region Settings”, choose “Content” for the “default theme” drop down
list
11.7.12. In “Visibility settings”, click “Pages”
11.7.13. Choose the radio button before “Only the listed pages”
11.7.14. In textarea, specify the path (like “node/1”, not full URL)
11.7.15. Click “Save block” button
12. Blog (Drupal 7)
12.1. Click “Modules” in head menu
12.2. Tick the checkbox before “Blog” and click “Save configuration” button
12.3. Scroll up to the top, click “Rebuild permissions”
12.4. Click “People” in head menu
12.5. Click “Permission” tab
12.6. Give different user roles different permissions
12.7. Click “Save permissions” button
Reference
1. Forena Solutions. (n.d.). Retrieved January 06, 2016, from
http://forenasolutions.org/reports/help.setup#svggraph
Appendix 3 - Building a Drupal form
The common way to build a form is using HTML, which is quite easy. The CMS way is very different.
For security reasons, all these CMSs prefer the developer to wrap the form code in an add-on, and
using their own custom computer function instead of original PHP code. Firstly, the developer need
to read some documentations about how to build an add-on. Secondly, they need to read
documentations about how to code the front-end (Display, including all the field types and
validation) using custom code. Thirdly, they need to read documentations about how to code the
back-end (Logic, field 1 in form links to field 2 in database, etc.) using custom code, as described in
the next paragraph. One of the blog post I found might be useful to explain is shown below. The
HTML way only needs couple lines while the CMS way (In the post, the author talked about Drupal,
but it would be similar to other CMSs as well) is quite complicated. The example only showed the
front-end, which only includes two input field with text type.
http://www.wdtutorials.com/drupal/forms/how-to-create-forms-drupal-tutorial#.VrwheX0Xd1F

29
Appendix 4 - Joomla How-to
1. Create an article
1.1. In “Content” section, click “New Article”
1.2. Fill in title and content
1.3. Click “Save”
2. Edit an article
2.1. In “Insert” drop down list, you can insert image, link, horizontal line and special
character
2.2. In “Format” drop down list, you can choose bold, italic, underline, strikethrough,
superscript, subscript, heading 1 - 6, etc. to format
2.3. In “Table” drop down list, you can insert or edit table
2.4. Version
2.4.1. Record a version
2.4.1.1. (Optionally) Fill in “Version Note” in the right sidebar
2.4.1.2. Click “Save” or “Save & Close” or “Save & New” button, the version
is automatically saved
2.4.2. Roll back to a previous version of article
2.4.2.1. Click “Versions” button on the top
2.4.2.2. Tick the checkbox before the version you want to roll back to
2.4.2.3. Click “Restore” button
2.4.3. (Optionally) You can preview, compare and delete versions
3. Edit a menu
3.1. In “Structure” section, click “Menu(s)”
3.2. Click “New” button to create a new menu or use the default menu(s)
3.3. Click the title of a menu to edit it
3.4. Click “New” button to add a new menu item
3.5. Click the title of a menu item to edit it
3.6. In “Details” tab, select “Single Article” for “Menu Item Type”
3.7. Select the article you want for “Select Article”
3.8. Click “Save”
4. Print
4.1. In “Options” tab, choose “Show” for “Show Print Icon”
5. Find and download an extension from Joomla! Extensions Directory
5.1. In “Control Panel”, click “Help” drop down list, and click Joomla! Extensions, which
would lead the user to the following page
http://extensions.joomla.org/
5.2. Browse the categories and choose a subcategory
5.3. Filter the extensions according to type, compatibility, free / paid, has demo or not,
etc., you can even choose to order by overall ratings, functionality, ease of use, etc.
5.4. Download the suitable extension
6. Upload, install and use extensions
6.1. Install from web

30
6.1.1. In “Control Panel”, click “Extensions” drop down list
6.1.2. Click “Manage”
6.1.3. Click “Install” on the left sidebar, usually it is the 1st one
6.1.4. Click “Install from Web” tab, usually it is the 1st one
6.1.5. Browse by categories or type in a keyword
6.1.6. Sort by Score, Reviews, Name or order by newest first, or recently updated
6.1.7. Click the extension you want
6.1.8. Click “Install” button
6.2. Install from an existing file
6.2.1. Find an extension from Joomla! Extensions Directory or online
6.2.2. Download the extension (no need to extract)
6.2.3. Repeating steps 7.1.1 - 7.1.3
6.2.4. Click “Upload Package File”
6.2.5. Browse and find the extension just been downloaded
6.2.6. Click “Upload and Install” button, wait for the installation to complete, there
would be a message
6.2.7. Click “Manage” on the left sidebar, enable the extension just been
downloaded
6.2.8. If the extension is a component, it is in the control panel head menu /
Components. All the rest are in the control panel head menu / Extensions.
7. Alter the appearance of template “beez3”
7.1. Change the header picture of template “beez3” to your own
7.1.1. Add own picture into the directory, my path is C:/Bitnami/Joomla 3.4.5-
1/apps/joomla/htdocs/templates/beez3/images/personal. beez3 is the
template I am using. Alternative way is to do it in the control panel, but for
some reason, there is no scroll bar in the pop up window after I clicked the
“New File” button.
7.1.2. Go to the Template Manager (In control panel, click Extensions, then click
“Templates”.)
7.1.3. In the left sidebar, click “Templates”
7.1.4. Click the template currently being used (default)
7.1.5. In “Editor” tab, click “CSS” folder
7.1.6. Click “personal.css”
7.1.7. Find “.logoheader”, change the url to your own picture’s path
7.1.8. Click “Save” or “Save & Close” button
7.2. Edit the Site Title and Site Description
7.2.1. Go to the Template Manager
7.2.2. In the left sidebar, click “Styles”
7.2.3. Click the current template
7.2.4. Click “Advanced” tab
7.2.5. Edit “Site Title” and “Site Description” fields
7.3. Alter the module positions in sidebars
7.3.1. Go to Module Manager (In control panel, click Extensions, then click
“Modules”)

31
7.3.2. Click the module you want to change
7.3.3. Click “Menu Assignment” tab
7.3.4. For “Module Assignment”, choose On all pages, No pages, Only on the pages
selected, or On all pages except those selected
7.3.5. If you choose the latter two, for “Menu selection”, choose the pages you
want to display the module
7.4. Alter the right sidebar
7.4.1. In “Control Panel”, click “Extensions”
7.4.2. Click “Modules”
7.4.3. Click “Image Module” (In other template, this part could be the header)
7.4.4. Follow Step 3 “Edit an article” to edit the sidebar.
8. Upload a file
8.1. In “Control Panel”, click “Media” in “Content” section
8.2. (Optional) Click “Create New Folder”, fill in a name and click “Create Folder”, click
the folder just been created and click “Upload” button
8.3. Browse and find the file you want to upload and click “Start Upload” button
9. Use a more comprehensive editor
9.1. Download JCE (Joomla Content Editor) Extension using Step 6
9.2. In “Control Panel”, click “System” drop down list
9.3. Click “Global Configuration”
9.4. Click “Site” tab
9.5. In “Site settings”, choose “Editor - JCE” in drop down list for “default editor”
9.6. Click “Save” or “Save & Close” button
10. Link a file in an article for users to download
10.1. In the article you want to insert a file for users to download, click “Insert / Edit link”
10.2. Click “Browse” beside “URL”
10.3. Find the file you want to upload and click it. Alternatively, click “Upload” icon in the
dialogue box, drag and drop file(s), then click “Upload” button
10.4. Click the “Insert” button
10.5. Fill in the text associated with the link, then click the “Insert” button again
10.6. Click “Save” button
11. Add User(s)
11.1. In Control Panel, click “Users”
11.2. Click “+New” button
11.3. Enter name, login name, emails, etc.
11.4. Click “Assigned User Groups” tab, choose a user group
11.5. Click Save, Save & Close or Save & New button.
12. Access
12.1. Restrict article access
12.1.1. When editing articles, click “Content” tab, choose user group in “Access”
section on the right side.
12.1.2. (Optionally) Click “Permissions”tab, select Allowed, Inherited or Denied for
actions (Delete, Edit, and Edit State).
12.1.3. Click Save, Save & Close, Save & New or Save as Copy button
32
12.2. Restrict menu access
12.2.1. When editing menus, click “Details” tab, choose user group in “Access”
section on the right side
12.2.2. Click Save, Save & Close, Save & New or Save as Copy button
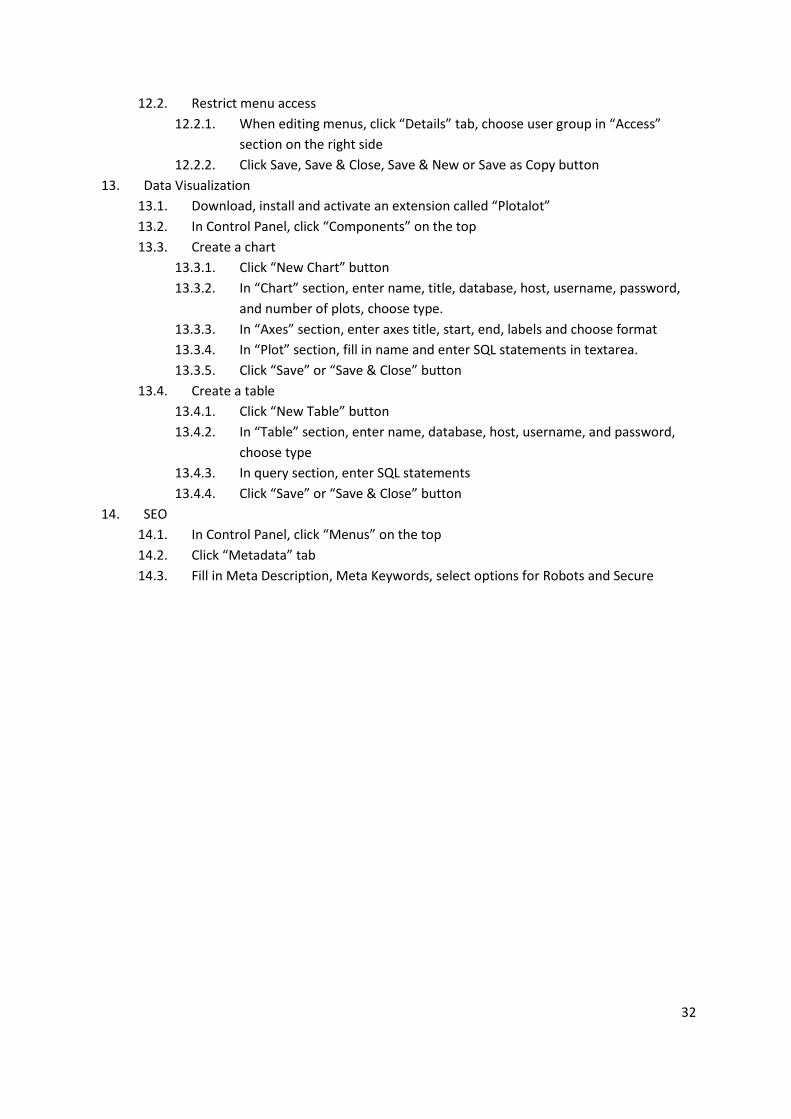
13. Data Visualization
13.1. Download, install and activate an extension called “Plotalot”
13.2. In Control Panel, click “Components” on the top
13.3. Create a chart
13.3.1. Click “New Chart” button
13.3.2. In “Chart” section, enter name, title, database, host, username, password,
and number of plots, choose type.
13.3.3. In “Axes” section, enter axes title, start, end, labels and choose format
13.3.4. In “Plot” section, fill in name and enter SQL statements in textarea.
13.3.5. Click “Save” or “Save & Close” button
13.4. Create a table
13.4.1. Click “New Table” button
13.4.2. In “Table” section, enter name, database, host, username, and password,
choose type
13.4.3. In query section, enter SQL statements
13.4.4. Click “Save” or “Save & Close” button
14. SEO
14.1. In Control Panel, click “Menus” on the top
14.2. Click “Metadata” tab
14.3. Fill in Meta Description, Meta Keywords, select options for Robots and Secure
Top Related