


Languages
Pages
Legal


F R E E P A T T E R N
f e a t u r i n g L A G O M C O L L E C T I O N B Y A G F S T U D I O
P I L L O W D E S I G N E D B Y A G F S T U D I O
AsphodelAsphodel

LAM-44280ASPHODEL DEPTH
LAM-54280ASPHODEL TRACE
LAM-44285REALIGNED BLUSHED
LAM-54285REALIGNED POWDERED
LAM-44281PILED EBON
LAM-54281PILED SHADOW
LAM-44286ETERN SOOT
LAM-54286ETERN STONE
LAM-44282CHADS JAMBOREE
LAM-54282CHADS RETREAT
LAM-44287COLLIDE PURITY
LAM-54287COLLIDE CINDER
LAM-54283BOUYANCY WAN
LAM-44288ATTACHED CONTRAST
LAM-54288ATTACHED CYANIC
LAM-44284SCATTERED SLOE
LAM-54284SCATTERED SKYWAY
LAM-44289VANTAGE PANEL
LAM-54290STICK FOREST OUTLINED
© 2016 Cutting Directions/ Instrucciones de Cortar
FO
ND
ST
ILL
F A B R I C S D E S I G N E D B Y A G F S T U D I O
P I L L O W D E S I G N E D B Y A G F S T U D I O
LAM-44283BUOYANCY OPPOSED
AsphodelAsphodel

ar tga l le ry fabr ics.com
FINISHED SIZE | 20" x 20"
FABR IC REQUIREMENTS
CUTT ING D IRECT IONS
Fabric A LAM-44281 ½ yd. Fabric B PE-420 ¼ yd. Fabric C PE-433 1 ¼ yd. Other Materials:Hi-loft batting (preferred)Black embroidery floss
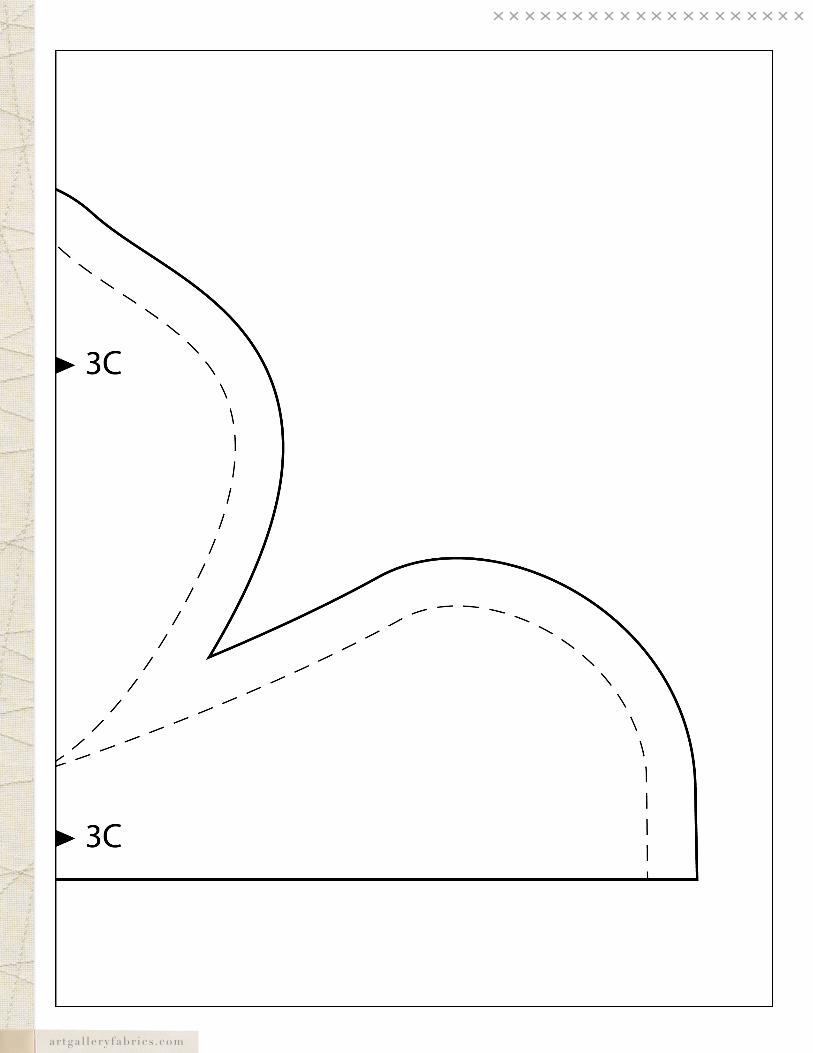
Prepare Patterns:Find the pattern pieces at the end of these instructions and tape them together, matching the letters & numbers. Cut out pattern pieces.
Cut Flower 1 from fabric A & Batting
Cut Flower 2 from fabric A & Batting
Cut Flower 3 from fabric A & Batting
Cut Flower Center from fabric B & Batting
Two (2) 22" x 22" rectangles from fabric COne (1) 21" x 16" rectangle from fabric COne (1) 21" x 10" rectangle from fabric C
One (1) 22" x 22" rectangle from Batting
CONSTRUCT ION
5. Now carefully trim away the excess fabric and batting with a sharp pair of little scissors. Cut with fabric laid out on a flat surface so as not to accidentally cut the white fabric background.
6. Thread your machine with black thread and set it to a satin stitch (a very tight zig-zag stitch). You may want to practice on a scrap version of the puffy flowers to work out any possible issues with stitch and tension settings before starting.
7. Cover the raw edges and stitching of flowers with your black satin stitch.
8. Match the flower center with batting piece and pin to the center of the flower.
9. Sew on stitching line with straight stitch, trim & sew edges with a black satin stitch.
10. With a disappering marker mark on the white background where you will place your embroidery crosses.
11. Thread an embroidery needle with black embroidery thread and sew simple crosses measuring approximately ⅜" - ½".
12. Trim the pillow top to a 21" square.
1. Make a quilty sandwich: Layer the 22" square batting piece between the 22" square fabric pieces. Baste or pin together.
2. Match up the fabric pattern pieces with their corresponding batting pieces. Pin together. Double check that you transferred the sewing line onto the fabric, or just refer visually to the sewing line when sewing if you prefer not to transfer.
3. Arrange the flower petals onto the 22" square top, right sides up, matching the raw edges.
4. Sew along your marked sewing lines with a long straight stitch. (Approx. ½" away from raw edge.)
P ILLOW ASSEMBLY
Sew rights sides together at ½" seam allowance.
• Take your fabric C rectangles and on one 21" side each press under ¼" and then again another ½".
• Edge stitch close to the fold & press to set stitches.• Now, with right sides together, line up the raw 21"
edges of the rectangles to the sides of the pillow top. The finished edges of the rectangles will overlap, creating an envelope pillow back.
• Sew around the edge of the pillow at ½". Finish the edges with an overcast stitch for reinforcement.
• Turn your pillow inside out, using a chopstick to help you pop out the corners, press & Voila!
AsphodelAsphodel
Steps 4-5
Step 7

ar tga l le ry fabr ics.com
Main Flower

ar tga l le ry fabr ics.com

ar tga l le ry fabr ics.com

ar tga l le ry fabr ics.com
Low
er R
igh
t Flo
we
r

ar tga l le ry fabr ics.com

ar tga l le ry fabr ics.com

ar tga l le ry fabr ics.com

ar tga l le ry fabr ics.com
Lower Left Flower
ar tga l le ry fabr ics.com

ar tga l le ry fabr ics.com
Flower Center
NOTE: While all possible care has been taken to ensure the accuracy of this pattern, We are not responsible for printing errors or the way in which individual work varies.Please read instructions carefully before starting the construction of this quilt. If desired, wash and iron your fabrics before starting to cut.
ar tga l le ry fabr ics.com © 2016 Courtesy of Art Gallery Quilts LLC. All Rights Reserved.
Top Related