


Languages
Pages
Legal


We make it easy to communicate
ESI Time and Attendance Manager IP Server 900 & Communications Server User’s Guide

© 2016 Estech Systems, Inc. All rights reserved • 3701 E. Plano Pkwy., Suite 100 • Plano, TX 75074-1819 • Main Number: (800) 374-0422 pg. 2
Technical Support: (800) 491-3609 • Fax: (972) 422-9705 • Website: www.esi-estech.com • Support Website: support.esi-estech.com
Document #0455-0022 • Rev. A
About
ESI (Estech Systems, Inc.) is a privately held corporation based in Plano, Texas. Founded in 1987, ESI designs and builds innovative telecommunications products for businesses like yours. Because of their powerful combination of value and features, ESI products are consistently recognized by industry publications and leaders.
Support
Thank you for choosing ESI. For product updates and web support, visit http://support.esi-estech.com/
Estech Systems, Inc. (ESI)
3701 E. Plano Parkway, Ste. 100 Plano, TX 75074-1819 Phone: 800-374-0422 | Fax: 972 422-9705
ESI Time and Attendance Manager User’s Guide
© 2016 Estech Systems, Inc. All rights reserved • 3701 E. Plano Pkwy., Suite 100 • Plano, TX 75074-1819 • Main Number: (800) 374-0422 pg. 3
Technical Support: (800) 491-3609 • Fax: (972) 422-9705 • Website: www.esi-estech.com • Support Website: support.esi-estech.com
Document #0455-0022 • Rev. A
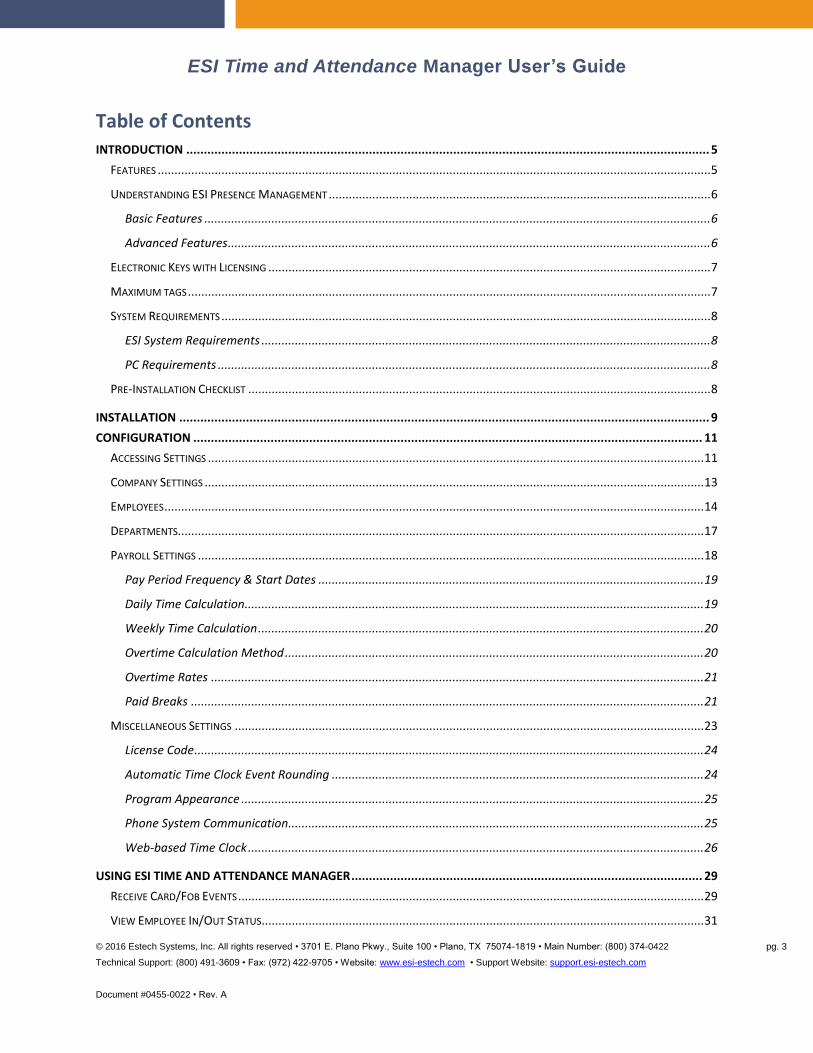
Table of Contents INTRODUCTION ..................................................................................................................................................... 5
FEATURES ..................................................................................................................................................................... 5
UNDERSTANDING ESI PRESENCE MANAGEMENT .................................................................................................................. 6
Basic Features ....................................................................................................................................................... 6
Advanced Features ................................................................................................................................................ 6
ELECTRONIC KEYS WITH LICENSING .................................................................................................................................... 7
MAXIMUM TAGS ............................................................................................................................................................ 7
SYSTEM REQUIREMENTS .................................................................................................................................................. 8
ESI System Requirements ...................................................................................................................................... 8
PC Requirements ................................................................................................................................................... 8
PRE-INSTALLATION CHECKLIST .......................................................................................................................................... 8
INSTALLATION ....................................................................................................................................................... 9
CONFIGURATION ................................................................................................................................................. 11
ACCESSING SETTINGS .................................................................................................................................................... 11
COMPANY SETTINGS ..................................................................................................................................................... 13
EMPLOYEES ................................................................................................................................................................. 14
DEPARTMENTS............................................................................................................................................................. 17
PAYROLL SETTINGS ....................................................................................................................................................... 18
Pay Period Frequency & Start Dates ................................................................................................................... 19
Daily Time Calculation......................................................................................................................................... 19
Weekly Time Calculation ..................................................................................................................................... 20
Overtime Calculation Method ............................................................................................................................. 20
Overtime Rates ................................................................................................................................................... 21
Paid Breaks ......................................................................................................................................................... 21
MISCELLANEOUS SETTINGS ............................................................................................................................................ 23
License Code ........................................................................................................................................................ 24
Automatic Time Clock Event Rounding ............................................................................................................... 24
Program Appearance .......................................................................................................................................... 25
Phone System Communication............................................................................................................................ 25
Web-based Time Clock ........................................................................................................................................ 26
USING ESI TIME AND ATTENDANCE MANAGER .................................................................................................... 29
RECEIVE CARD/FOB EVENTS ........................................................................................................................................... 29
VIEW EMPLOYEE IN/OUT STATUS .................................................................................................................................... 31

ESI Time and Attendance Manager User’s Guide
© 2016 Estech Systems, Inc. All rights reserved • 3701 E. Plano Pkwy., Suite 100 • Plano, TX 75074-1819 • Main Number: (800) 374-0422 pg. 4
Technical Support: (800) 491-3609 • Fax: (972) 422-9705 • Website: www.esi-estech.com • Support Website: support.esi-estech.com
Document #0455-0022 • Rev. A
TIME CARDS ................................................................................................................................................................ 33
Understanding the Time Cards View ................................................................................................................... 34
Making Adjustments ........................................................................................................................................... 36
REPORTS .................................................................................................................................................................... 39
Employee Report ................................................................................................................................................. 40
Event Report By Employee .................................................................................................................................. 42
Event Report By Reader ...................................................................................................................................... 46
Payroll Report ..................................................................................................................................................... 50
Unassigned Cards/Fobs ....................................................................................................................................... 54
CONFIGURATION FOR DEMO DATA ..................................................................................................................... 55
INTRODUCTION ............................................................................................................................................................ 55
DEMO DATA SETUP ...................................................................................................................................................... 55
TROUBLESHOOTING............................................................................................................................................. 56
ERROR RECEIVING CARD/FOB EVENTS ............................................................................................................................... 56
MISSING EVENTS OR WRONG TIME STAMP ......................................................................................................................... 57
INDEX .................................................................................................................................................................. 58
ESI Time and Attendance Manager User’s Guide
© 2016 Estech Systems, Inc. All rights reserved • 3701 E. Plano Pkwy., Suite 100 • Plano, TX 75074-1819 • Main Number: (800) 374-0422 pg. 5
Technical Support: (800) 491-3609 • Fax: (972) 422-9705 • Website: www.esi-estech.com • Support Website: support.esi-estech.com
Document #0455-0022 • Rev. A
Introduction
ESI Time and Attendance Manager is a PC application that integrates with the ESI Presence Management
RFID (Radio Frequency Identification) door readers. This application allows an administrator to: monitor
card fob activity; view entrance and exit events; track employee time and attendance; and assist in the
preparation of employee payroll.
Features
ESI Time and Attendance Manager includes the following capabilities:
Integrates with ESI phone systems and RFID door readers for fob reports
Improves efficiency and reduces errors in employee time tracking
Allows an administrator to easily review employee clock in/out events
Calculates employee time automatically based upon in/out events and allowed break periods
Allows an administrator to manually adjust hours worked
Reports in/out events by RFID reader or by employee
Enables up-to-the-minute viewing of each employee's current status
Allows employees to clock in and out via a web page
Assists in the preparation of payroll

ESI Time and Attendance Manager User’s Guide
© 2016 Estech Systems, Inc. All rights reserved • 3701 E. Plano Pkwy., Suite 100 • Plano, TX 75074-1819 • Main Number: (800) 374-0422 pg. 6
Technical Support: (800) 491-3609 • Fax: (972) 422-9705 • Website: www.esi-estech.com • Support Website: support.esi-estech.com
Document #0455-0022 • Rev. A
Understanding ESI Presence Management
ESI Presence Management is a suite of technologies and features which enhances an organization’s
communications mobility; provides valuable personnel presence information; and enables secure
management and control of all access points. These features are made available when an ESI system is
equipped with one or more special-purpose integrated terminals, called ESI Presence Management RFID
Readers.
Basic Features
ESI Presence Management’s basic features include hands-free doorphone (intercom) operation and
remote electric door lock operation, which allows a station user to unlock a door from anywhere in the
office by pressing a programmable feature key on an ESI desktop phone.
Advanced Features
Innovative RFID technology adds advanced features to the basic ESI Presence Management feature set.
These features include:
• Presence indication
• Personal Call Routing
• Automatic door lock control
• Time and attendance
• Access door report
• Door-ajar alarm
Each employee (or other authorized person) carries a unique RFID tag in the form of an electronic key
(see “Electronic Keys” below). The employee simply waves an electronic key near an ESI Presence
Management RFID Reader, which then “reads” the tag number embedded in the electronic key. One or
more of the following features can be activated when an electronic key is read:
• Automatically indicates the employees in/out status on an ESI desktop phone’s programmable
station keys.
• Automatically activate or deactivate various station features, such as automatically forwarding
calls from the ESI desktop phone to a cell phone.
• Automatically unlock a door (access control).
• Log time and attendance for automatic time sheet and payroll processing.

ESI Time and Attendance Manager User’s Guide
© 2016 Estech Systems, Inc. All rights reserved • 3701 E. Plano Pkwy., Suite 100 • Plano, TX 75074-1819 • Main Number: (800) 374-0422 pg. 7
Technical Support: (800) 491-3609 • Fax: (972) 422-9705 • Website: www.esi-estech.com • Support Website: support.esi-estech.com
Document #0455-0022 • Rev. A
Electronic Keys with Licensing
Electronic keys come in the form of either a credit-card-sized RFID card or key-ring fob. Each is encoded
with a unique RFID tag number. When the electronic key is held within four inches of the ESI Presence
Management RFID Reader, the RFID Reader will scan the electronic key’s RFID tag number, provide a
confirmation tone and optional prompt, and display an informational message (or greeting).
The electronic keys used with the RFID Readers are designed specifically for use with ESI Presence
Management, and must be obtained through ESI. Licensing is included with the purchase of each
electronic key, which is required for RFID feature operation. ESI offers electronic keys in packages of 5,
25, 100, and 500.
Each compatible ESI system supports a maximum number of RFID tags, as shown in the chart,
“Maximum tags,” below. If a tag is read on a system that has used all of its RFID tags, “LICENSE
EXCEEDED” will appear on the Reader, no time and attendance records will be sent, and no phone or
access control will be allowed with that tag.
No licensing is required for the ESI Presence Management RFID Readers themselves, or for RFID
features.
Maximum tags
IP Server 900 ESI-1000 ESI-200 ESI-100 ESI-50/50L
500 2000 500 500 500
For more details on ESI Presence Management please reference the:
ESI Presence Management Installation Manual and/or Presence Management User’s Guide

ESI Time and Attendance Manager User’s Guide
© 2016 Estech Systems, Inc. All rights reserved • 3701 E. Plano Pkwy., Suite 100 • Plano, TX 75074-1819 • Main Number: (800) 374-0422 pg. 8
Technical Support: (800) 491-3609 • Fax: (972) 422-9705 • Website: www.esi-estech.com • Support Website: support.esi-estech.com
Document #0455-0022 • Rev. A
System Requirements
In order to ensure a successful installation, please make sure your ESI System and PC meets the
following requirements:
ESI System Requirements
ESI Time and Attendance Manager is compatible with:
ESI Communications Servers: (ESI-50, ESI-100, ESI-200, ESI-600, ESI-1000)
IP Server 900
Call Processing software: For IP Server 900, all releases; For ESI Communications Servers, all
releases for digital RFID Readers and versions xx.5.3 (or Higher) for IP RFIDs
In order to use ESI Time and Attendance Manager, systems must be equipped with:
Licensing: Presence Management option
Hardware: one or more RFID Readers configured as “Entrance/Exit”
PC Requirements
The following are the minimum PC requirements in order to install and run ESI Time and Attendance
Manager:
Windows Operating Systems PC Hardware
Win 10 Pro
Win 8, 8.1 Pro
Win 7 Vista Processor Ram Free HDD
Space LAN
ESI Time and Attendance Mgr Yes
(64-bit) Yes
(64-bit) Yes
(32/64-bit) Yes
(32/64-bit) Multi-core 1 GB 500 MB YES
Pre-Installation Checklist
Before attempting to install ESI Time and Attendance Manager, perform the following steps:
1. Update your PC with all recommended Microsoft Windows updates. You can begin this process by
going to www.microsoftupdate.com.
2. Ensure that you have Administrator privileges on the local PC where you will install the software.

ESI Time and Attendance Manager User’s Guide
© 2016 Estech Systems, Inc. All rights reserved • 3701 E. Plano Pkwy., Suite 100 • Plano, TX 75074-1819 • Main Number: (800) 374-0422 pg. 9
Technical Support: (800) 491-3609 • Fax: (972) 422-9705 • Website: www.esi-estech.com • Support Website: support.esi-estech.com
Document #0455-0022 • Rev. A
Installation
As of this writing, the latest version of ESI Time and Attendance Manager can be obtained from the ESI
Reseller website by authorized ESI resellers.
After extracting all the files in the installation archive to their own folder, double-click on the file name
"Setup.exe" to launch it.
NOTE: If there are any additional Microsoft components that need to be present on your PC in order
for ESI Time and Attendance Manager to run correctly, you will be prompted to install them. If you
are, please allow those components to be downloaded and installed. (For example: Microsoft .NET
Framework 4.0, or Microsoft SQL CE).
Setup Screen Steps
1. After any prerequisites are installed on the PC, you will see the following screen:
2. Click on the “Next” button to proceed. The
following screen shows:
3. This is the End User License Agreement for the ESI Time and Attendance Manager software. Please read through it carefully to ensure that you agree with the terms of your use of this software.
4. Once completed, select the "I Agree" selection then click the "Next" button to proceed with the installation. Next, you will be asked to specify where you would like ESI Time and Attendance Manager to be installed:

ESI Time and Attendance Manager User’s Guide
© 2016 Estech Systems, Inc. All rights reserved • 3701 E. Plano Pkwy., Suite 100 • Plano, TX 75074-1819 • Main Number: (800) 374-0422 pg. 10
Technical Support: (800) 491-3609 • Fax: (972) 422-9705 • Website: www.esi-estech.com • Support Website: support.esi-estech.com
Document #0455-0022 • Rev. A
Setup Screen Steps
5. You may choose the default location and click the "Next” button.
6. On the following screen, click "Install" again to begin the installation:
7. After a few moments, the installation will complete and you will see the following screen:
8. Click "Finish". The installation is complete!
ESI Time and Attendance Manager User’s Guide
© 2016 Estech Systems, Inc. All rights reserved • 3701 E. Plano Pkwy., Suite 100 • Plano, TX 75074-1819 • Main Number: (800) 374-0422 pg. 11
Technical Support: (800) 491-3609 • Fax: (972) 422-9705 • Website: www.esi-estech.com • Support Website: support.esi-estech.com
Document #0455-0022 • Rev. A
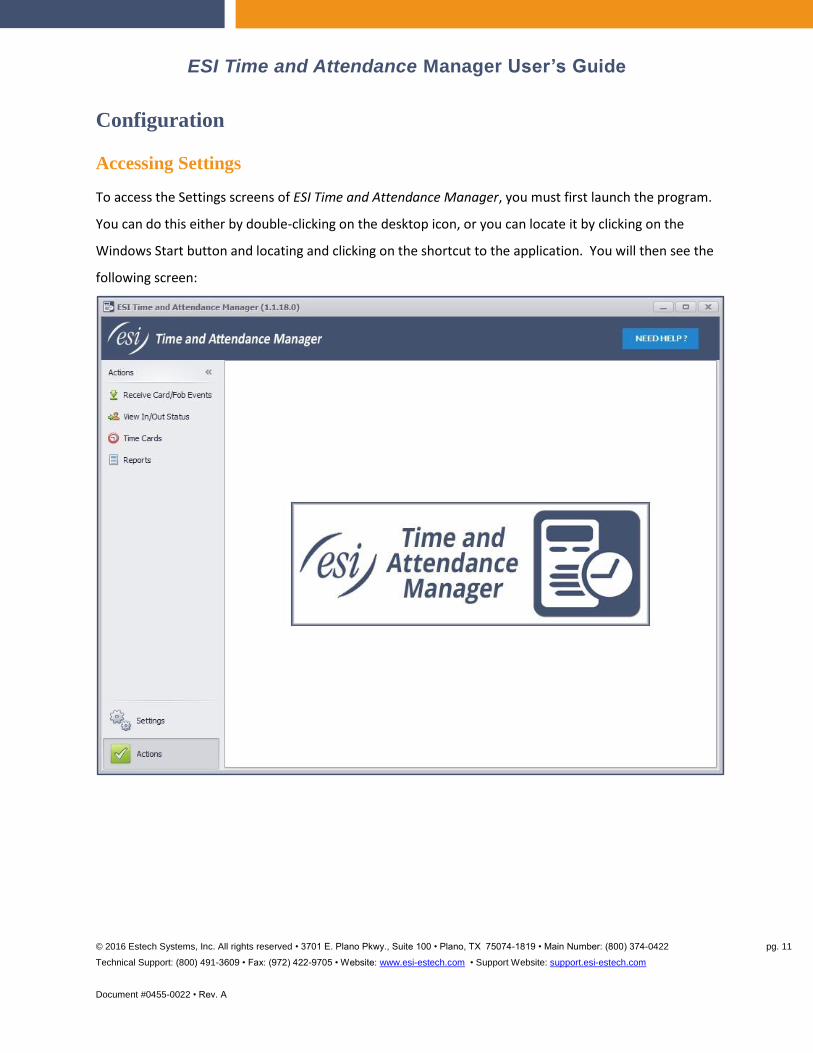
Configuration
Accessing Settings
To access the Settings screens of ESI Time and Attendance Manager, you must first launch the program.
You can do this either by double-clicking on the desktop icon, or you can locate it by clicking on the
Windows Start button and locating and clicking on the shortcut to the application. You will then see the
following screen:

ESI Time and Attendance Manager User’s Guide
© 2016 Estech Systems, Inc. All rights reserved • 3701 E. Plano Pkwy., Suite 100 • Plano, TX 75074-1819 • Main Number: (800) 374-0422 pg. 12
Technical Support: (800) 491-3609 • Fax: (972) 422-9705 • Website: www.esi-estech.com • Support Website: support.esi-estech.com
Document #0455-0022 • Rev. A
Click on the "Settings" tab at the bottom left of the window (this will refer to the left-hand section of the
application as a navigation bar), and you will be shown the Settings options:
By clicking on a specific tab in the Settings window, you can access and change the settings for that
section. In the following help sections, each Settings tab will be covered in detail.

ESI Time and Attendance Manager User’s Guide
© 2016 Estech Systems, Inc. All rights reserved • 3701 E. Plano Pkwy., Suite 100 • Plano, TX 75074-1819 • Main Number: (800) 374-0422 pg. 13
Technical Support: (800) 491-3609 • Fax: (972) 422-9705 • Website: www.esi-estech.com • Support Website: support.esi-estech.com
Document #0455-0022 • Rev. A
Company Settings
The Company Settings screen appears as follows:
Completing the information on this screen is purely optional. If the information is present, it will be
printed on any reports. The following is an example of the header of a report that contains this
information:
ESI Time and Attendance Manager User’s Guide
© 2016 Estech Systems, Inc. All rights reserved • 3701 E. Plano Pkwy., Suite 100 • Plano, TX 75074-1819 • Main Number: (800) 374-0422 pg. 14
Technical Support: (800) 491-3609 • Fax: (972) 422-9705 • Website: www.esi-estech.com • Support Website: support.esi-estech.com
Document #0455-0022 • Rev. A
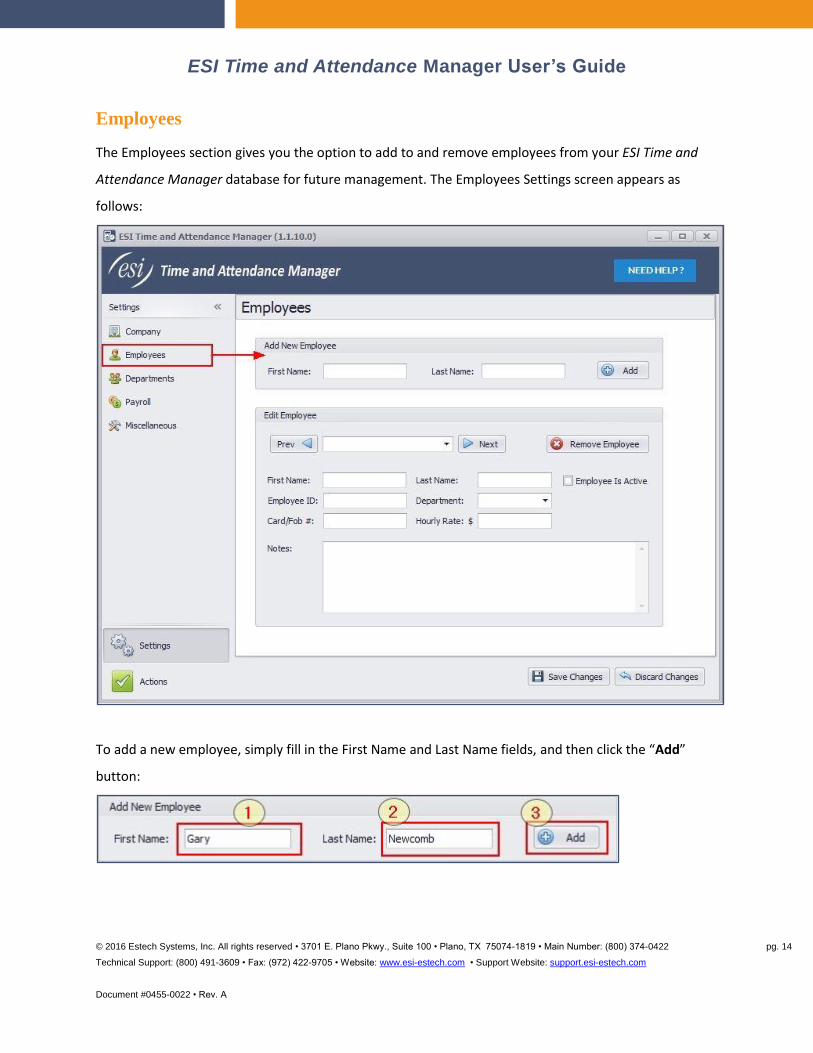
Employees
The Employees section gives you the option to add to and remove employees from your ESI Time and
Attendance Manager database for future management. The Employees Settings screen appears as
follows:
To add a new employee, simply fill in the First Name and Last Name fields, and then click the “Add”
button:
ESI Time and Attendance Manager User’s Guide
© 2016 Estech Systems, Inc. All rights reserved • 3701 E. Plano Pkwy., Suite 100 • Plano, TX 75074-1819 • Main Number: (800) 374-0422 pg. 15
Technical Support: (800) 491-3609 • Fax: (972) 422-9705 • Website: www.esi-estech.com • Support Website: support.esi-estech.com
Document #0455-0022 • Rev. A
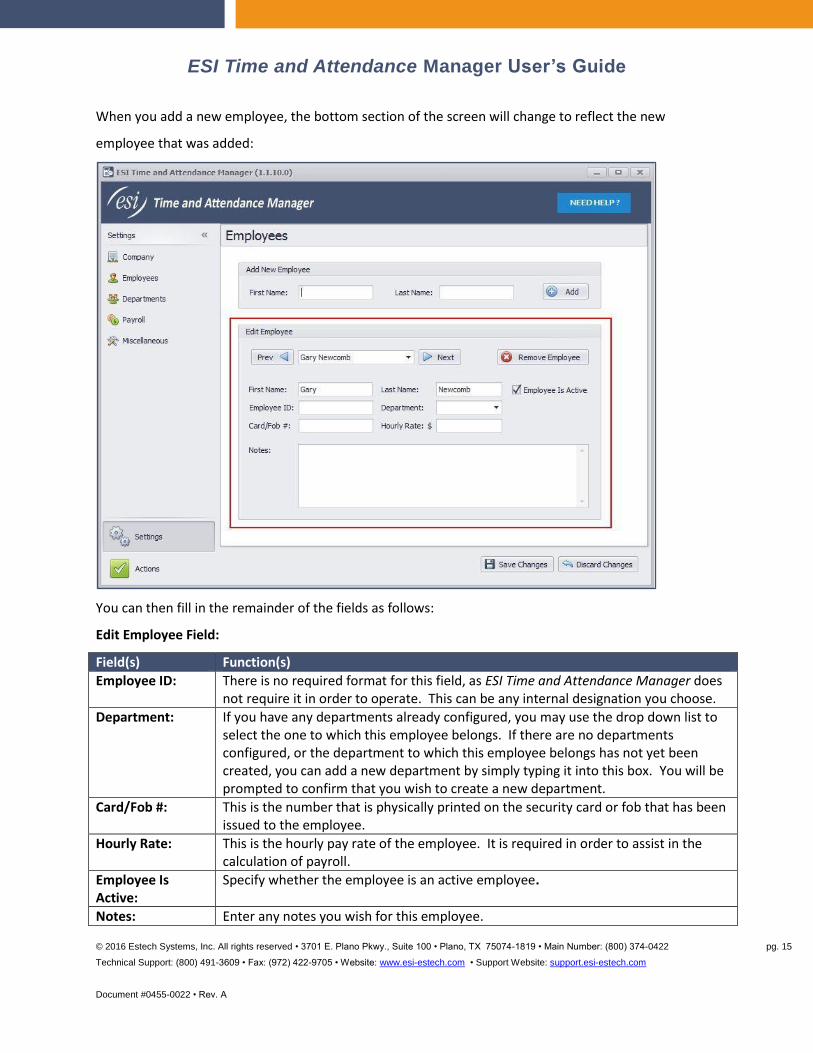
When you add a new employee, the bottom section of the screen will change to reflect the new
employee that was added:
You can then fill in the remainder of the fields as follows:
Edit Employee Field:
Field(s) Function(s)
Employee ID: There is no required format for this field, as ESI Time and Attendance Manager does not require it in order to operate. This can be any internal designation you choose.
Department: If you have any departments already configured, you may use the drop down list to select the one to which this employee belongs. If there are no departments configured, or the department to which this employee belongs has not yet been created, you can add a new department by simply typing it into this box. You will be prompted to confirm that you wish to create a new department.
Card/Fob #: This is the number that is physically printed on the security card or fob that has been issued to the employee.
Hourly Rate: This is the hourly pay rate of the employee. It is required in order to assist in the calculation of payroll.
Employee Is Active:
Specify whether the employee is an active employee.
Notes: Enter any notes you wish for this employee.

ESI Time and Attendance Manager User’s Guide
© 2016 Estech Systems, Inc. All rights reserved • 3701 E. Plano Pkwy., Suite 100 • Plano, TX 75074-1819 • Main Number: (800) 374-0422 pg. 16
Technical Support: (800) 491-3609 • Fax: (972) 422-9705 • Website: www.esi-estech.com • Support Website: support.esi-estech.com
Document #0455-0022 • Rev. A
Once an employee is added to your ESI Time and Attendance Manager database, you can navigate
among employees in the following ways:
If you wish to permanently remove an employee, click the “Remove Employee” button.
Alternatively, you may wish to simply uncheck the “Employee Is Active” check box.
Remember that you need to click the “Save Changes” button at the bottom of the screen in order to
save any changes, additions, or deletions you have made.
If you click on the “Discard Changes” button, you will undo any changes, additions and deletions made
since the last save.

ESI Time and Attendance Manager User’s Guide
© 2016 Estech Systems, Inc. All rights reserved • 3701 E. Plano Pkwy., Suite 100 • Plano, TX 75074-1819 • Main Number: (800) 374-0422 pg. 17
Technical Support: (800) 491-3609 • Fax: (972) 422-9705 • Website: www.esi-estech.com • Support Website: support.esi-estech.com
Document #0455-0022 • Rev. A
Departments
The Departments section allows you to group employees to make certain functions easier, such as
running reports or adjusting daily hours for a group of people. The Departments settings screen appears
as follows:
To add a new department, enter the department name in the Department Name field and click the
“Add” button.
When you do so, the department name will be added to the list below of Existing Departments. To
remove a department from the list, highlight the department name and click the “Remove Selected”
button.
Note: If you remove a department, it will remove any employees from the (now non-existent)
department and you will need to reassign them to a new department, if desired.
ESI Time and Attendance Manager User’s Guide
© 2016 Estech Systems, Inc. All rights reserved • 3701 E. Plano Pkwy., Suite 100 • Plano, TX 75074-1819 • Main Number: (800) 374-0422 pg. 18
Technical Support: (800) 491-3609 • Fax: (972) 422-9705 • Website: www.esi-estech.com • Support Website: support.esi-estech.com
Document #0455-0022 • Rev. A
Remember that you need to click the “Save Changes” button at the bottom of the screen in order to
save any changes, additions, or deletions you have made.
If you click on the “Discard Charges” button, you will undo any changes, additions and deletions made
since the last save.
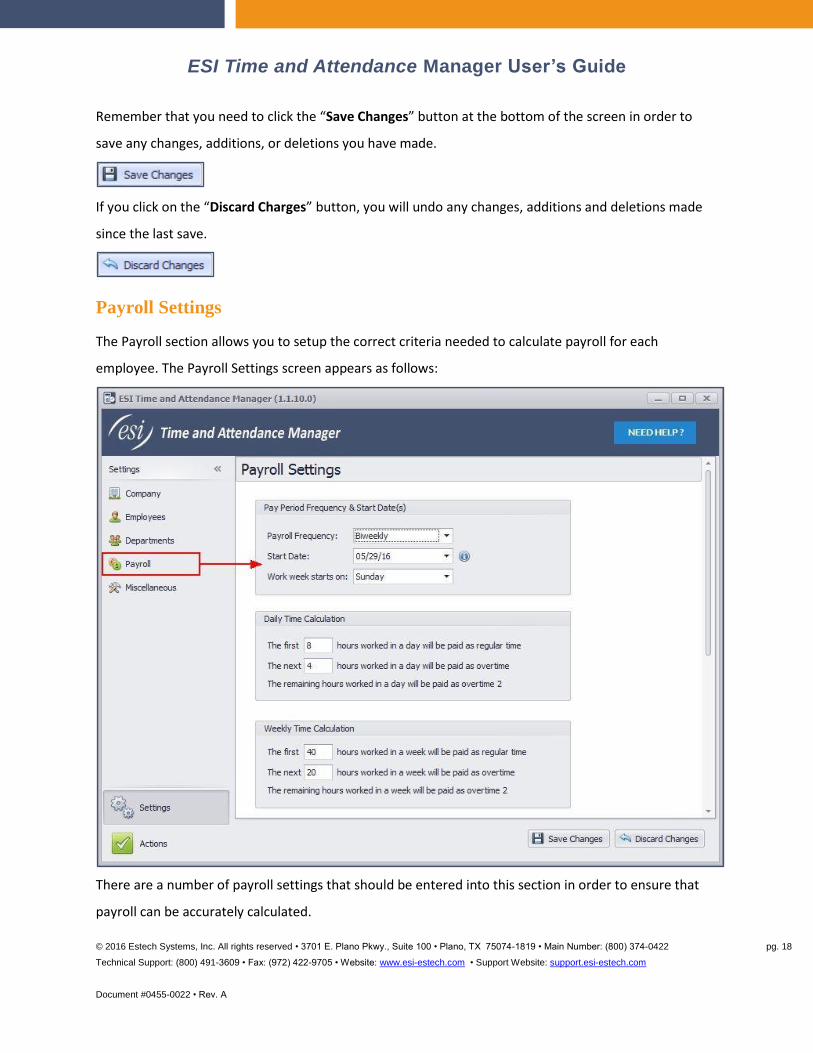
Payroll Settings
The Payroll section allows you to setup the correct criteria needed to calculate payroll for each
employee. The Payroll Settings screen appears as follows:
There are a number of payroll settings that should be entered into this section in order to ensure that
payroll can be accurately calculated.

ESI Time and Attendance Manager User’s Guide
© 2016 Estech Systems, Inc. All rights reserved • 3701 E. Plano Pkwy., Suite 100 • Plano, TX 75074-1819 • Main Number: (800) 374-0422 pg. 19
Technical Support: (800) 491-3609 • Fax: (972) 422-9705 • Website: www.esi-estech.com • Support Website: support.esi-estech.com
Document #0455-0022 • Rev. A
Pay Period Frequency & Start Dates
In this section, you will configure when a pay period starts and its frequency.
A description of each section follows.
Edit Pay Period Frequency & Start Date(s) Field:
Field(s) Function(s)
Payroll Frequency: This is the frequency with which your company runs payroll. The choices are Biweekly, Monthly, Semi-monthly, and Weekly.
Start Date: This can be the start date of any payroll. This software will automatically calculate all future payroll dates. Note that if you have chosen a Semi-monthly payroll frequency, the date you enter here should be the beginning day of the first payroll period of the month; this software will automatically add 15 days to determine the start day of the second payroll of the month.
Work week starts on: Enter the day of the week upon which the start of your work week falls.
Note: When calculating payroll, daily pay amounts are always calculated based on a workday that
runs from 12:00:00 AM to 11:59:59 PM.
Daily Time Calculation
The Daily Time Calculation section allows you to specify the hourly thresholds worked in a day after
which overtime (or overtime 2, such as double-time) will be calculated.
The laws for daily overtime calculation vary by jurisdiction, so you will need to enter the settings that
apply to your jurisdiction. If your jurisdiction does not require you to factor in the number of hours
worked daily as a basis for overtime, you can ignore this section; you will be given an opportunity to
specify that ESI Time and Attendance Manager should only calculate weekly amounts in overtime.

ESI Time and Attendance Manager User’s Guide
© 2016 Estech Systems, Inc. All rights reserved • 3701 E. Plano Pkwy., Suite 100 • Plano, TX 75074-1819 • Main Number: (800) 374-0422 pg. 20
Technical Support: (800) 491-3609 • Fax: (972) 422-9705 • Website: www.esi-estech.com • Support Website: support.esi-estech.com
Document #0455-0022 • Rev. A
If you are not required to pay overtime 2 in your jurisdiction and wish for this not to be calculated, you
can raise the second field to a high number (for example, "The next 24 hours worked in a day will be
paid as overtime").
Weekly Time Calculation
The Weekly Time Calculation section allows you to specify the hourly thresholds worked in a week after
which overtime (or overtime 2, such as double-time) will be calculated.
The laws for weekly overtime calculation vary by jurisdiction, so you will need to enter the settings that
apply to your jurisdiction. If your jurisdiction does not require you to factor in the number of hours
worked weekly as a basis for overtime, you can ignore this section; you will be given an opportunity to
specify that ESI Time and Attendance Manager should only calculate daily amounts in overtime.
If you are not required to pay overtime 2 in your jurisdiction and wish for this not to be calculated, you
can raise the second field to a high number (for example, "The next 168 hours worked in a week will be
paid as overtime").
Overtime Calculation Method
The Overtime Calculation Method section allows you to specify, according to the laws in your
jurisdiction, whether to calculate daily hour thresholds in overtime, weekly thresholds in overtime, or
both.

ESI Time and Attendance Manager User’s Guide
© 2016 Estech Systems, Inc. All rights reserved • 3701 E. Plano Pkwy., Suite 100 • Plano, TX 75074-1819 • Main Number: (800) 374-0422 pg. 21
Technical Support: (800) 491-3609 • Fax: (972) 422-9705 • Website: www.esi-estech.com • Support Website: support.esi-estech.com
Document #0455-0022 • Rev. A
Note: this software does not claim to be able to handle every possible combination of payroll rules
and/or laws as they may apply in your jurisdiction; nor can it be guaranteed that this software will be
amended to accurately calculate payroll based upon future changes in the law. Finally, note that this
software has a single set of payroll rules for all employees and, at this time, there is no mechanism to
apply different payroll rules to different classifications of employees.
Overtime Rates
The Overtime Rates section allows you to specify the multiplication amount to be applied to the
employee hourly rate in regards to overtime and overtime 2.
In the example above, if we assume an employee whose standard hourly wage is $20 per hour, the
overtime rate at a 1.5 multiplication would be 150% of the normal hourly wage, or $30 per hour. The
overtime 2 rate at a 2.0 multiplication would be 200% of the normal hourly wage, or $40 per hour.
Paid Breaks
The Paid Breaks section allows you to specify that employees should be paid for some of the time in a
day during which they are clocked out.
In the example above, employees are allowed to have one 15-minute break during each 4-hour interval
(with the 15 minutes being part of the 4-hour interval). Please note the following in regards to break
calculation:
Breaks are only calculated for clocked-out periods in which there is a clocked-in period both before and after the clocked-out period;
If the clocked-out period is in excess of 5 minutes less than or more than the time allotted for a break, the clocked-out period will not be considered a break and no break minutes will be given (in the example above of 15 minutes, anything less than 10 minutes or more than 20 minutes would not be considered a break and no break minutes would be given);

ESI Time and Attendance Manager User’s Guide
© 2016 Estech Systems, Inc. All rights reserved • 3701 E. Plano Pkwy., Suite 100 • Plano, TX 75074-1819 • Main Number: (800) 374-0422 pg. 22
Technical Support: (800) 491-3609 • Fax: (972) 422-9705 • Website: www.esi-estech.com • Support Website: support.esi-estech.com
Document #0455-0022 • Rev. A
If the clocked out period is greater than the number of minutes specified in the Paid Breaks section, the employee will not be given credit for the entire period, only the number of minutes specified in the Paid Breaks section; however, if they are over by a few minutes on one break and a few minutes under on another break in the same day, allowance will be given.
If you do not wish to allow for paid, clocked-out breaks, you may simply raise the first number in the
section to a high number, such as 24 hours.
Remember that you need to click the “Save Changes” button at the bottom of the screen in order to
save any changes, additions, or deletions you have made.
If you click on the “Discard Changes” button, you will undo any changes, additions and deletions made
since the last save.

ESI Time and Attendance Manager User’s Guide
© 2016 Estech Systems, Inc. All rights reserved • 3701 E. Plano Pkwy., Suite 100 • Plano, TX 75074-1819 • Main Number: (800) 374-0422 pg. 23
Technical Support: (800) 491-3609 • Fax: (972) 422-9705 • Website: www.esi-estech.com • Support Website: support.esi-estech.com
Document #0455-0022 • Rev. A
Miscellaneous Settings
The Miscellaneous Settings screen contains various configurable parameters, some of which are
required for the proper operation of ESI Time and Attendance Manager. The Miscellaneous Settings
screen appears as follows:
A description of each section is as follows:

ESI Time and Attendance Manager User’s Guide
© 2016 Estech Systems, Inc. All rights reserved • 3701 E. Plano Pkwy., Suite 100 • Plano, TX 75074-1819 • Main Number: (800) 374-0422 pg. 24
Technical Support: (800) 491-3609 • Fax: (972) 422-9705 • Website: www.esi-estech.com • Support Website: support.esi-estech.com
Document #0455-0022 • Rev. A
License Code
The License Code section allows you to activate ESI Time and Attendance Manager so that it is no longer
in trial mode.
In trial mode, the software is fully functional but after 14 days you will no longer be able to download
card/fob events from the phone system. To remove this restriction, please contact the ESI Reseller from
whom you purchased the software, and they will provide you with a license code to place in the License
Code field. When you have placed a valid license code in this field, the Product Status will become
"Unlocked", indicating that you are no longer in trial mode.
Automatic Time Clock Event Rounding
Automatic Time Clock Event Rounding allows you to specify that, when card/fob events are downloaded
from the phone system, they will be automatically adjusted (rounded to nearest min).
If you wish to do this, you may check the box and input the number of minutes to which you would like
events automatically rounded.
Note: Even with automatic rounding, ESI Time and Attendance Manager still keeps a record of the
time each user actually clocked in or out, for your reference. You can always revert back to an event’s
original time if needed. The Event Report by Employee will allow you to see the original times of
events, as well as the adjusted event times. The Event Report By Reader will always show the
original/actual times of each event, NOT the adjusted times. Please read the Reports section in this
help guide for further information on reports.

ESI Time and Attendance Manager User’s Guide
© 2016 Estech Systems, Inc. All rights reserved • 3701 E. Plano Pkwy., Suite 100 • Plano, TX 75074-1819 • Main Number: (800) 374-0422 pg. 25
Technical Support: (800) 491-3609 • Fax: (972) 422-9705 • Website: www.esi-estech.com • Support Website: support.esi-estech.com
Document #0455-0022 • Rev. A
Program Appearance
The Program Appearance section allows you to change the appearance of ESI Time and Attendance
Manager.
This is purely a cosmetic setting and does not affect the functionality of the software. There are a
number of style templates you can choose from in order to suit your visual preference.
Phone System Communication
The Phone System Communication section must be filled out in order for this application to successfully
communicate with your ESI phone system.
The IP Address field must be set to the IP address of the NSP (Network Services Processor) on your ESI
phone system; this is specified in system programming as the "NSP Private IP Address" in Installer
Function 824. ESI Time and Attendance Manager will attempt to locate the NSP IP address
automatically; if it is successful, this field will be filled in for you. If ESI Time and Attendance Manager is
unable to locate the NSP IP address, this usually means that (a.) there is a firewall port on the PC that is
blocked (see the troubleshooting section Error receiving card/fob events for more information on
firewall ports), or (b.) the Base Port setting is incorrect (see next paragraph).
The Base Port field must match the setting in the ESI system programming Installer Function 821, "Base
UDP Port". This is set to 59 by default and does not normally need to be changed.

ESI Time and Attendance Manager User’s Guide
© 2016 Estech Systems, Inc. All rights reserved • 3701 E. Plano Pkwy., Suite 100 • Plano, TX 75074-1819 • Main Number: (800) 374-0422 pg. 26
Technical Support: (800) 491-3609 • Fax: (972) 422-9705 • Website: www.esi-estech.com • Support Website: support.esi-estech.com
Document #0455-0022 • Rev. A
Web-based Time Clock
The Web-based Time Clock is a feature that gives employees an additional option to clock in and out.
When active, employees can access a web link that will allow them to clock in and out either locally or
remotely (when properly configured). Clocking in or out via the Web-based Time Clock does not change
the ESI phone user settings, like swiping a card or fob in front of an RFID (Presence Management) reader
would; it is simply an additional way to track employee time and attendance.
The default HTTP port number is 8080, but can be any port number from 1 to 65535. Please use caution
when changing this port, as there are other PC services that use various ports, and there is the
possibility of conflict. Please also avoid using port 443, as this has special meaning to web browsers. If
this field is blank, the Web-based Time Clock feature will be inactive.
The Web-based Time Clock runs as a Windows service, and therefore will remain active as long as the PC
itself is turned on, even if ESI Time and Attendance Manager is not running.
Local use:
To access the Web-based Time Clock locally (from a computer or other device within your local
network), the employee would need to open a web browser and enter the IP address of the PC upon
which ESI Time and Attendance Manager is running, followed by a colon, followed by the port number
you have chosen. For example, if the PC's IP address is 192.168.1.200, and the HTTP port is 8080, the
employee would enter the following into his browser:
192.168.1.200:8080
Note that if you choose 80 as the HTTP port, the employee would only need to enter:
192.168.1.200
If the colon and port number are not attached, the browser will assume that port 80 was intended.

ESI Time and Attendance Manager User’s Guide
© 2016 Estech Systems, Inc. All rights reserved • 3701 E. Plano Pkwy., Suite 100 • Plano, TX 75074-1819 • Main Number: (800) 374-0422 pg. 27
Technical Support: (800) 491-3609 • Fax: (972) 422-9705 • Website: www.esi-estech.com • Support Website: support.esi-estech.com
Document #0455-0022 • Rev. A
It is highly recommended that the PC on which ESI Time and Attendance Manager is installed be
configured with a static IP address; this allows the employees to enter the same address into their web
browsers without worrying about it changing. If you are unsure how to assign a static IP address to the
PC, please consult your local IT professional for assistance.
In order for employees to successfully reach the Web-based Time Clock, any firewall on the PC on which
ESI Time and Attendance Manager is installed must not be blocking the port you have chosen. During
the installation process of ESI Time and Attendance Manager, port 8080 is automatically unblocked in
the Windows firewall; if you choose a different port, or if you use a firewall other than the one built into
Windows, you may need to open that port on the firewall for inbound traffic.
Remote use:
In order for employees to access the Web-based time clock from outside the office, additional steps will
be required for initial setup:
1. Ensure that the PC on which ESI Time and Attendance Manager is installed has a static
(unchanging) private IP address;
2. You must have a static (unchanging) public IP address via your Internet Service Provider;
3. In your Internet router, the port number you have chosen must be "forwarded" to the
private IP address assigned to the PC on which ESI Time and Attendance Manager is
installed.
If you are unsure about any of the above steps, please consult your local IT professional for assistance.
Once the steps above have been accomplished, employees should be able to access the Web-based
Time Clock from outside the office; it does not matter where they are physically located, as long as they
have access to an Internet connection.
Accessing the Web-based Time Clock remotely is similar to how it would be accessed from within the
office, except that employees will need to enter the public IP address of the office Internet connection
into their browsers instead of the PC's private IP address. One can usually determine the public IP
address by going to a third-party website such as www.whatismyip.com from a PC within the office.

ESI Time and Attendance Manager User’s Guide
© 2016 Estech Systems, Inc. All rights reserved • 3701 E. Plano Pkwy., Suite 100 • Plano, TX 75074-1819 • Main Number: (800) 374-0422 pg. 28
Technical Support: (800) 491-3609 • Fax: (972) 422-9705 • Website: www.esi-estech.com • Support Website: support.esi-estech.com
Document #0455-0022 • Rev. A
If you wish to offer employees a "friendlier" alternative to typing in an IP address, you can register your
public IP address via a DNS service, for example dyndns.org. There, you can choose a "friendly" name
(for example, timeclockexample.dyndns.org) as long as it is not already used. Then, the employees
could type the friendly name into their browsers instead of the public IP address. An additional benefit
to using such a service would be that, if your Internet IP address ever changes, you can update it with
the third party, and the friendly name would not change. Note that there may be fees associated with
the third-party service.
When an employee accesses the Web-based Time Clock, he/she will see a page like the following:
Here an employee can enter either his/her card or fob number (it is printed on the card or fob), or they
can enter their Employee ID (as set up in the Employees section). Log in/out events that are entered via
the web will show up on reports as being from Reader extension 999.
Remember that after you make any changes to the Miscellaneous section, you need to click the “Save
Changes” button at the bottom of the screen in order to save any changes, additions, or deletions you
have made.
If you click on the “Discard Changes” button, you will undo any changes, additions and deletions made
since the last save.

ESI Time and Attendance Manager User’s Guide
© 2016 Estech Systems, Inc. All rights reserved • 3701 E. Plano Pkwy., Suite 100 • Plano, TX 75074-1819 • Main Number: (800) 374-0422 pg. 29
Technical Support: (800) 491-3609 • Fax: (972) 422-9705 • Website: www.esi-estech.com • Support Website: support.esi-estech.com
Document #0455-0022 • Rev. A
Using ESI Time and Attendance Manager
Receive Card/Fob Events
ESI Time and Attendance Manager needs to communicate with your ESI phone system in order to
retrieve in/out events. This is done by clicking on the Receive Card/Fob Events link:
Upon successful connection and downloading, you should see a window similar to the following:

ESI Time and Attendance Manager User’s Guide
© 2016 Estech Systems, Inc. All rights reserved • 3701 E. Plano Pkwy., Suite 100 • Plano, TX 75074-1819 • Main Number: (800) 374-0422 pg. 30
Technical Support: (800) 491-3609 • Fax: (972) 422-9705 • Website: www.esi-estech.com • Support Website: support.esi-estech.com
Document #0455-0022 • Rev. A
If you see one of the following windows:
Or
This indicates that there was a problem connecting to and retrieving events from the phone system. In
this case, refer to the troubleshooting section Error receiving card/fob events.

ESI Time and Attendance Manager User’s Guide
© 2016 Estech Systems, Inc. All rights reserved • 3701 E. Plano Pkwy., Suite 100 • Plano, TX 75074-1819 • Main Number: (800) 374-0422 pg. 31
Technical Support: (800) 491-3609 • Fax: (972) 422-9705 • Website: www.esi-estech.com • Support Website: support.esi-estech.com
Document #0455-0022 • Rev. A
View Employee In/Out Status
With ESI Time and Attendance Manager, you have the ability to get an up-to-the-minute view of the
in/out status of all active employees. Click on the View In/Out Status link:
In this view, all active employees are shown, along with the in or out status, time last clocked in or out,
the employee's fob or card number, and the employee's Employee ID number. The following Icons will
show for In/Out events:
Icon Function(s)
Means that the employee is clocked in,
Means that the employee is clocked out
If the Web-based Time Clock is active (see Miscellaneous Settings), the Reader extension will show as
999 if the employee clocked in or out last via the web.
ESI Time and Attendance Manager User’s Guide
© 2016 Estech Systems, Inc. All rights reserved • 3701 E. Plano Pkwy., Suite 100 • Plano, TX 75074-1819 • Main Number: (800) 374-0422 pg. 32
Technical Support: (800) 491-3609 • Fax: (972) 422-9705 • Website: www.esi-estech.com • Support Website: support.esi-estech.com
Document #0455-0022 • Rev. A
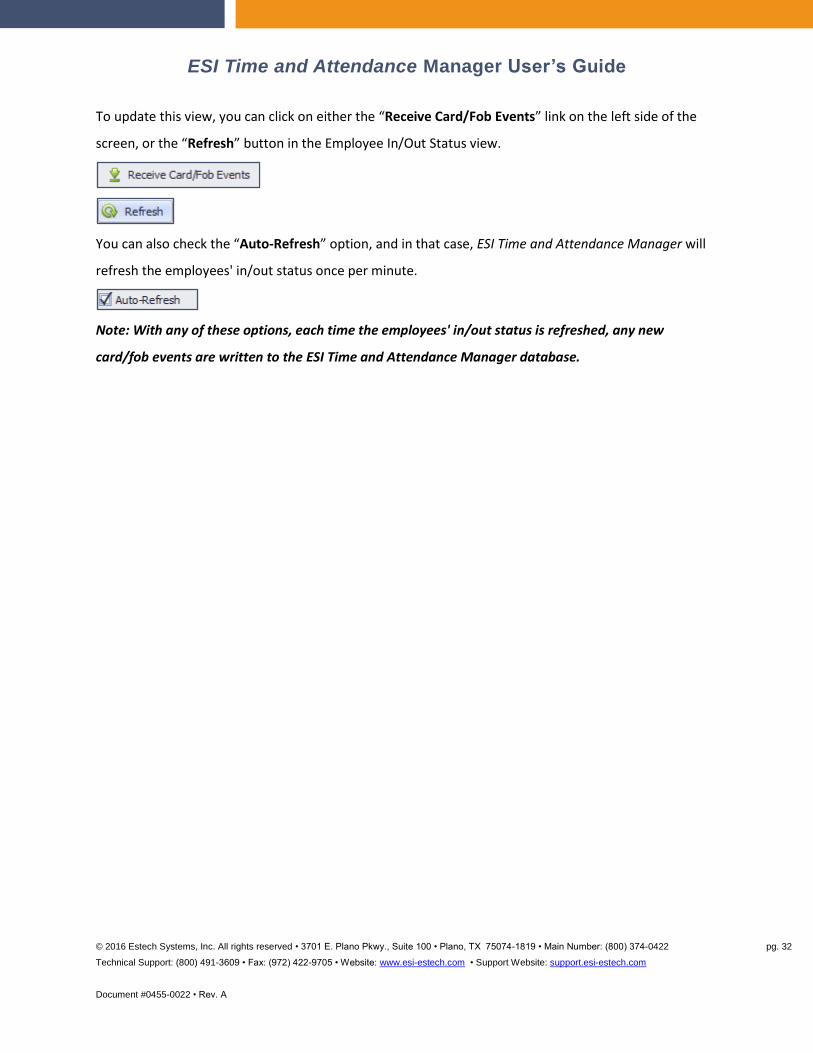
To update this view, you can click on either the “Receive Card/Fob Events” link on the left side of the
screen, or the “Refresh” button in the Employee In/Out Status view.
You can also check the “Auto-Refresh” option, and in that case, ESI Time and Attendance Manager will
refresh the employees' in/out status once per minute.
Note: With any of these options, each time the employees' in/out status is refreshed, any new
card/fob events are written to the ESI Time and Attendance Manager database.

ESI Time and Attendance Manager User’s Guide
© 2016 Estech Systems, Inc. All rights reserved • 3701 E. Plano Pkwy., Suite 100 • Plano, TX 75074-1819 • Main Number: (800) 374-0422 pg. 33
Technical Support: (800) 491-3609 • Fax: (972) 422-9705 • Website: www.esi-estech.com • Support Website: support.esi-estech.com
Document #0455-0022 • Rev. A
Time Cards
ESI Time and Attendance Manager works in conjunction with your ESI phone system and ESI Presence
Management readers to allow your company to track employee time and attendance. By distributing approved
security cards or fobs to your personnel, these Presence Management RFID readers can be used as a time clock.
The Time Cards view in ESI Time and Attendance Manager allows you to not only view in/out events for each
employee, but to adjust individual events or hours for individual days.
The Time Cards screen appears as follows:
ESI Time and Attendance Manager User’s Guide
© 2016 Estech Systems, Inc. All rights reserved • 3701 E. Plano Pkwy., Suite 100 • Plano, TX 75074-1819 • Main Number: (800) 374-0422 pg. 34
Technical Support: (800) 491-3609 • Fax: (972) 422-9705 • Website: www.esi-estech.com • Support Website: support.esi-estech.com
Document #0455-0022 • Rev. A
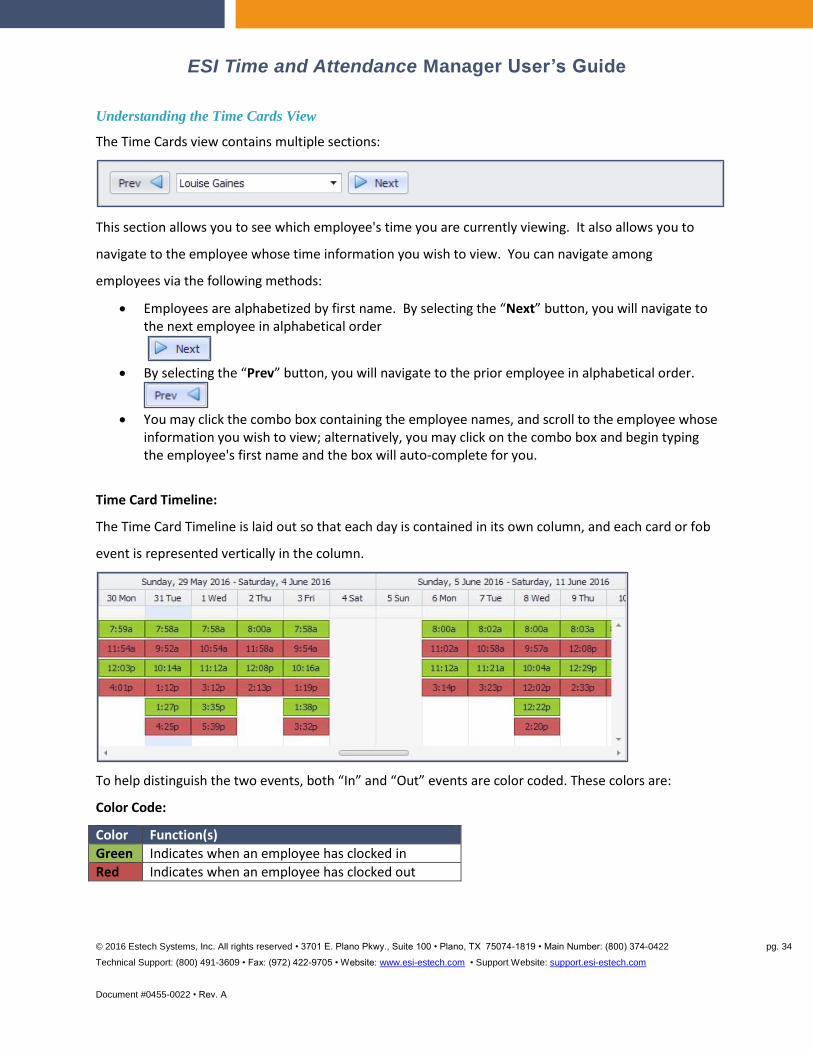
Understanding the Time Cards View
The Time Cards view contains multiple sections:
This section allows you to see which employee's time you are currently viewing. It also allows you to
navigate to the employee whose time information you wish to view. You can navigate among
employees via the following methods:
Employees are alphabetized by first name. By selecting the “Next” button, you will navigate to the next employee in alphabetical order
By selecting the “Prev” button, you will navigate to the prior employee in alphabetical order.
You may click the combo box containing the employee names, and scroll to the employee whose
information you wish to view; alternatively, you may click on the combo box and begin typing the employee's first name and the box will auto-complete for you.
Time Card Timeline:
The Time Card Timeline is laid out so that each day is contained in its own column, and each card or fob
event is represented vertically in the column.
To help distinguish the two events, both “In” and “Out” events are color coded. These colors are:
Color Code:
Color Function(s)
Green Indicates when an employee has clocked in
Red Indicates when an employee has clocked out

ESI Time and Attendance Manager User’s Guide
© 2016 Estech Systems, Inc. All rights reserved • 3701 E. Plano Pkwy., Suite 100 • Plano, TX 75074-1819 • Main Number: (800) 374-0422 pg. 35
Technical Support: (800) 491-3609 • Fax: (972) 422-9705 • Website: www.esi-estech.com • Support Website: support.esi-estech.com
Document #0455-0022 • Rev. A
"In" events are colored green, and "out" events are colored red. Let's take an example date:
In the example above, the employee clocked in at the following times: 7:58 AM, 10:14 AM, and 1:27 PM.
The employee clocked out at the following times: 9:52 AM, 1:12 PM, and 4:25 PM.
This section summarizes the hours worked by the selected employee. Within this section, the left side
shows the hours for the selected date (the date that is highlighted in the time line), and the right side
shows the hours for the entire pay period corresponding to the selected date. (Note: to select a
particular date, simply click in the column corresponding to that date.) You will also see the total pay for
the selected date and for the pay period.
Note that in order for the hours in this section, and the pay amount, to be accurate, you must have (a.)
accurately completed the Payroll Settings in this application, and (b.) assigned an hourly pay rate to this
employee via the Employees setup.

ESI Time and Attendance Manager User’s Guide
© 2016 Estech Systems, Inc. All rights reserved • 3701 E. Plano Pkwy., Suite 100 • Plano, TX 75074-1819 • Main Number: (800) 374-0422 pg. 36
Technical Support: (800) 491-3609 • Fax: (972) 422-9705 • Website: www.esi-estech.com • Support Website: support.esi-estech.com
Document #0455-0022 • Rev. A
Making Adjustments
There are two ways in which you can adjust employees' time and attendance:
1. Adjustment of individual events
2. Adjustment of daily hours.
In either case, adjustments are accomplished through the time line in the Time Cards section. When you
adjust events, you are modifying a specific event's time (in other words, the time stamp associated with
an employee waving his security card or fob in front of the ESI Presence Management RFID reader).
When you adjust daily hours, you are telling ESI Time and Attendance Manager to ignore the card/fob
events for that day, and to calculate hours and payroll based upon the number of hours you enter
manually.
To adjust a specific employee card/fob event, right-click on the particular event you wish to adjust. You
will be presented with a menu similar to the following:
This menu will allow you to adjust the time stamp to the nearest 5 minutes, the nearest 10 minutes, or
the nearest 15 minutes. In cases where the rounding overlaps (for example, rounding to the nearest 5
minutes produces the same time stamp as rounding to the nearest 10 minutes), only one or two
adjustment options will be presented.
Also in this menu, you can change the event type from In to Out, or from Out to In. This should not
normally be necessary.
ESI Time and Attendance Manager User’s Guide
© 2016 Estech Systems, Inc. All rights reserved • 3701 E. Plano Pkwy., Suite 100 • Plano, TX 75074-1819 • Main Number: (800) 374-0422 pg. 37
Technical Support: (800) 491-3609 • Fax: (972) 422-9705 • Website: www.esi-estech.com • Support Website: support.esi-estech.com
Document #0455-0022 • Rev. A
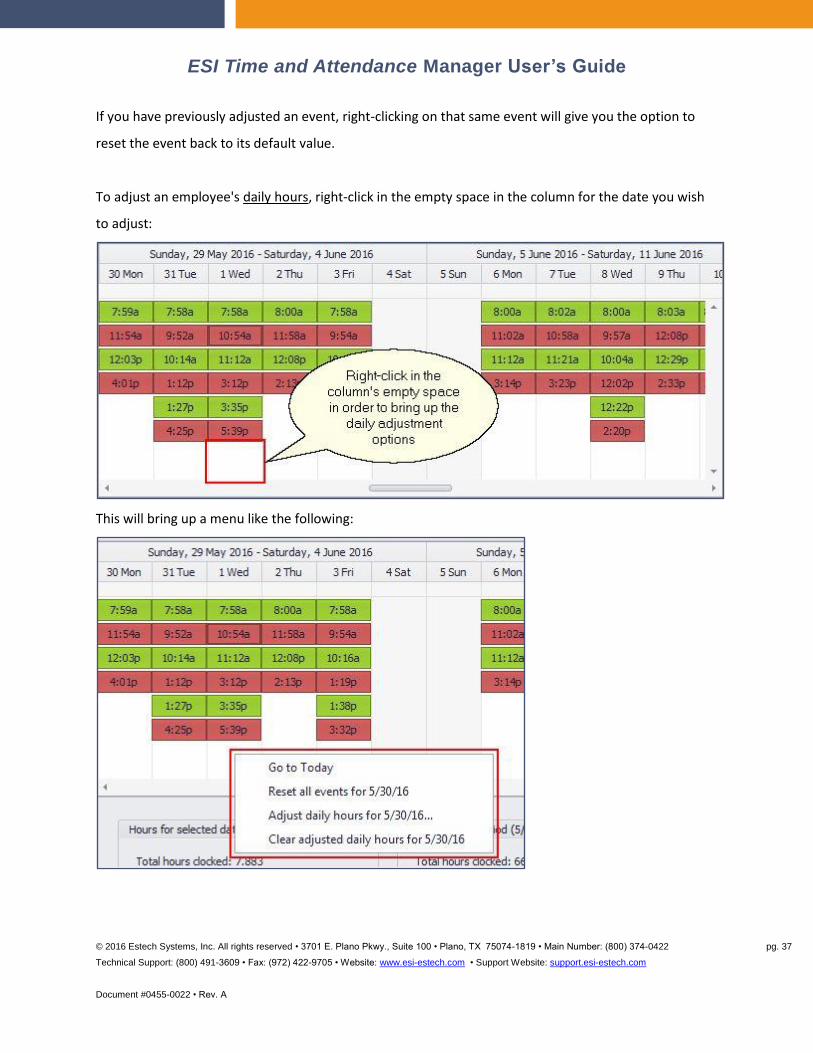
If you have previously adjusted an event, right-clicking on that same event will give you the option to
reset the event back to its default value.
To adjust an employee's daily hours, right-click in the empty space in the column for the date you wish
to adjust:
This will bring up a menu like the following:
ESI Time and Attendance Manager User’s Guide
© 2016 Estech Systems, Inc. All rights reserved • 3701 E. Plano Pkwy., Suite 100 • Plano, TX 75074-1819 • Main Number: (800) 374-0422 pg. 38
Technical Support: (800) 491-3609 • Fax: (972) 422-9705 • Website: www.esi-estech.com • Support Website: support.esi-estech.com
Document #0455-0022 • Rev. A
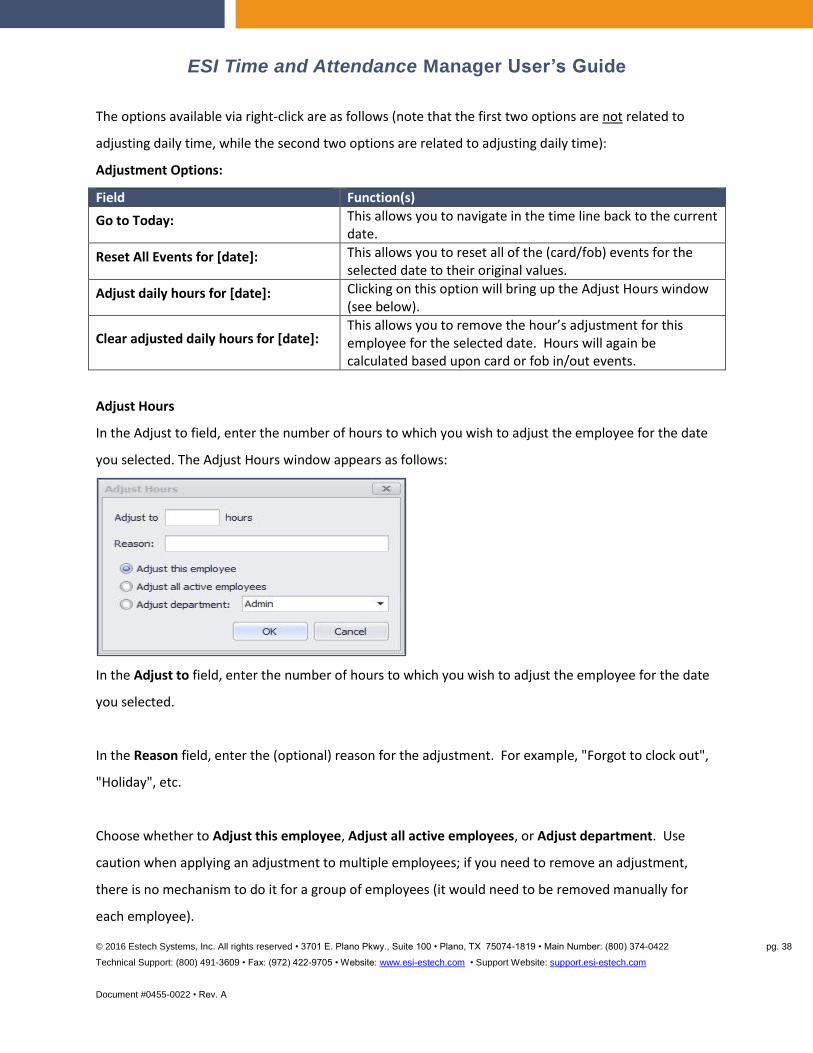
The options available via right-click are as follows (note that the first two options are not related to
adjusting daily time, while the second two options are related to adjusting daily time):
Adjustment Options:
Field Function(s)
Go to Today: This allows you to navigate in the time line back to the current date.
Reset All Events for [date]: This allows you to reset all of the (card/fob) events for the selected date to their original values.
Adjust daily hours for [date]: Clicking on this option will bring up the Adjust Hours window (see below).
Clear adjusted daily hours for [date]: This allows you to remove the hour’s adjustment for this employee for the selected date. Hours will again be calculated based upon card or fob in/out events.
Adjust Hours
In the Adjust to field, enter the number of hours to which you wish to adjust the employee for the date
you selected. The Adjust Hours window appears as follows:
In the Adjust to field, enter the number of hours to which you wish to adjust the employee for the date
you selected.
In the Reason field, enter the (optional) reason for the adjustment. For example, "Forgot to clock out",
"Holiday", etc.
Choose whether to Adjust this employee, Adjust all active employees, or Adjust department. Use
caution when applying an adjustment to multiple employees; if you need to remove an adjustment,
there is no mechanism to do it for a group of employees (it would need to be removed manually for
each employee).

ESI Time and Attendance Manager User’s Guide
© 2016 Estech Systems, Inc. All rights reserved • 3701 E. Plano Pkwy., Suite 100 • Plano, TX 75074-1819 • Main Number: (800) 374-0422 pg. 39
Technical Support: (800) 491-3609 • Fax: (972) 422-9705 • Website: www.esi-estech.com • Support Website: support.esi-estech.com
Document #0455-0022 • Rev. A
Reports
With ESI Time and Attendance you can pull Employee and Department reports. The Reports screen
appears as follows:
There are a number of reports available in ESI Time and Attendance Manager. The following topics
describe each report in detail.
Report types:
Report(s) Function(s)
Employee Report: Provides current logins for two types of reports: Active Employees, and All Employees.
Event Report by Employee: Provides a list of all card/fob events for the date range and scope you specify, grouped by individual employee and date
Event Report by Reader: Provides a list of all card/fob events for the date range and scope you specify, grouped by individual RFID (Presence Management) reader extension and date
Payroll Report: Provides a list of employee hours worked and pay for the date range and scope you specify, grouped by individual employee and sorted by date.
Unassigned Cards/Fobs: Provides a list of all security card or fob numbers that are not assigned to any employee, but for which in/out events have been retrieved from the phone system.

ESI Time and Attendance Manager User’s Guide
© 2016 Estech Systems, Inc. All rights reserved • 3701 E. Plano Pkwy., Suite 100 • Plano, TX 75074-1819 • Main Number: (800) 374-0422 pg. 40
Technical Support: (800) 491-3609 • Fax: (972) 422-9705 • Website: www.esi-estech.com • Support Website: support.esi-estech.com
Document #0455-0022 • Rev. A
Employee Report
There are two Employee reports available: Active Employees, and All Employees. When choosing this report type,
the Date Range and Report Scope sections will be disabled, as no additional parameters are required to run these
reports. Here is an example of the Employee report:

ESI Time and Attendance Manager User’s Guide
© 2016 Estech Systems, Inc. All rights reserved • 3701 E. Plano Pkwy., Suite 100 • Plano, TX 75074-1819 • Main Number: (800) 374-0422 pg. 41
Technical Support: (800) 491-3609 • Fax: (972) 422-9705 • Website: www.esi-estech.com • Support Website: support.esi-estech.com
Document #0455-0022 • Rev. A
These fields correspond directly to the fields in the Employees setup screen:

ESI Time and Attendance Manager User’s Guide
© 2016 Estech Systems, Inc. All rights reserved • 3701 E. Plano Pkwy., Suite 100 • Plano, TX 75074-1819 • Main Number: (800) 374-0422 pg. 42
Technical Support: (800) 491-3609 • Fax: (972) 422-9705 • Website: www.esi-estech.com • Support Website: support.esi-estech.com
Document #0455-0022 • Rev. A
By default, the Employee report is sorted by employee last name. By clicking on any column header,
you can sort by that column:
Event Report By Employee
The Event Report By Employee produces a list of all card/fob events for the date range and scope you specify,
grouped by individual employee and date. When choosing this report, you must also choose a Date Range and a
Report Scope:

ESI Time and Attendance Manager User’s Guide
© 2016 Estech Systems, Inc. All rights reserved • 3701 E. Plano Pkwy., Suite 100 • Plano, TX 75074-1819 • Main Number: (800) 374-0422 pg. 43
Technical Support: (800) 491-3609 • Fax: (972) 422-9705 • Website: www.esi-estech.com • Support Website: support.esi-estech.com
Document #0455-0022 • Rev. A
The Date Range can be the current pay period, the prior pay period, or a custom date range you specify. Note that
the current and prior pay periods are calculated based upon the settings you specify in Payroll Settings.
The Report Scope allows you to choose the employee or employees on which to report. You may choose a specific
employee, all employees, or a department of employees.
The following is an example page of an Event Report By Employee:

ESI Time and Attendance Manager User’s Guide
© 2016 Estech Systems, Inc. All rights reserved • 3701 E. Plano Pkwy., Suite 100 • Plano, TX 75074-1819 • Main Number: (800) 374-0422 pg. 44
Technical Support: (800) 491-3609 • Fax: (972) 422-9705 • Website: www.esi-estech.com • Support Website: support.esi-estech.com
Document #0455-0022 • Rev. A
For each event, the following information is included:
Report Sections:
Report(s) Function(s)
Time: The time that the employee waved his or her card/fob in front of an RFID reader.
In/Out: Whether the employee clocked in or out.
Hours Clocked: The number of hours between each In event and its corresponding Out event.
Reader Ext.: The extension number of the RFID reader that registered the event.
Original Time: If the event time has been modified, the original time of the event.
Original Event Type: If the event type has been modified, the original event type (Out or In).
Note: This report does not calculate break periods or payroll. As it is strictly an event report, it also
does not factor in any daily hour adjustments that may have been made by an administrator.
At the end of each employee section of the report, a total number of clocked-in hours is shown:

ESI Time and Attendance Manager User’s Guide
© 2016 Estech Systems, Inc. All rights reserved • 3701 E. Plano Pkwy., Suite 100 • Plano, TX 75074-1819 • Main Number: (800) 374-0422 pg. 45
Technical Support: (800) 491-3609 • Fax: (972) 422-9705 • Website: www.esi-estech.com • Support Website: support.esi-estech.com
Document #0455-0022 • Rev. A
This report also features a series of bookmarks to help you quickly navigate to a specific employee, or
date for that employee:
Clicking on an employee name or date will take you to the corresponding section of the report.
ESI Time and Attendance Manager User’s Guide
© 2016 Estech Systems, Inc. All rights reserved • 3701 E. Plano Pkwy., Suite 100 • Plano, TX 75074-1819 • Main Number: (800) 374-0422 pg. 46
Technical Support: (800) 491-3609 • Fax: (972) 422-9705 • Website: www.esi-estech.com • Support Website: support.esi-estech.com
Document #0455-0022 • Rev. A
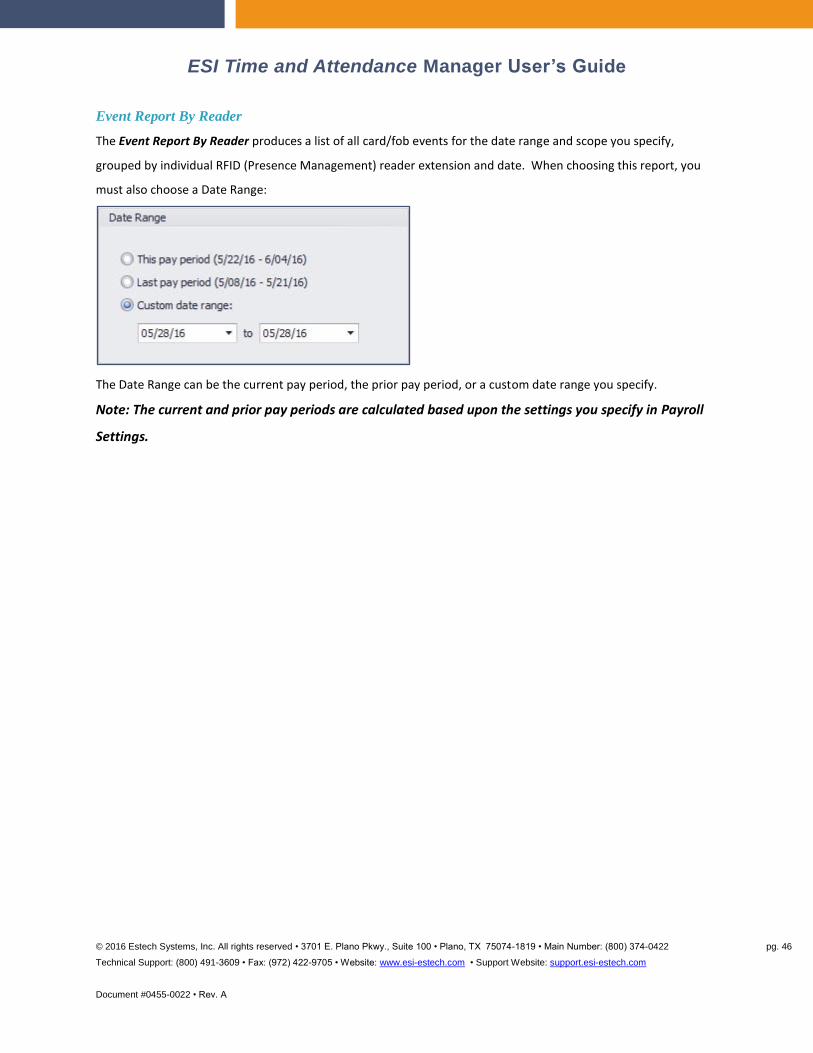
Event Report By Reader
The Event Report By Reader produces a list of all card/fob events for the date range and scope you specify,
grouped by individual RFID (Presence Management) reader extension and date. When choosing this report, you
must also choose a Date Range:
The Date Range can be the current pay period, the prior pay period, or a custom date range you specify.
Note: The current and prior pay periods are calculated based upon the settings you specify in Payroll
Settings.

ESI Time and Attendance Manager User’s Guide
© 2016 Estech Systems, Inc. All rights reserved • 3701 E. Plano Pkwy., Suite 100 • Plano, TX 75074-1819 • Main Number: (800) 374-0422 pg. 47
Technical Support: (800) 491-3609 • Fax: (972) 422-9705 • Website: www.esi-estech.com • Support Website: support.esi-estech.com
Document #0455-0022 • Rev. A
The following is an example page of an Event Report By Reader:

ESI Time and Attendance Manager User’s Guide
© 2016 Estech Systems, Inc. All rights reserved • 3701 E. Plano Pkwy., Suite 100 • Plano, TX 75074-1819 • Main Number: (800) 374-0422 pg. 48
Technical Support: (800) 491-3609 • Fax: (972) 422-9705 • Website: www.esi-estech.com • Support Website: support.esi-estech.com
Document #0455-0022 • Rev. A
Note: If the Web-based Time Clock is active (see Miscellaneous Settings), the Reader extension will
show as 999.
For each event, the following information is included:
Report Sections:
Report(s) Function(s)
Time: The time that the employee waved his or her card/fob in front of an RFID reader.
Card/Fob Number: The card or fob number of the recorded event.
Employee Name: The employee associated with the card or fob number (specified in Employees settings)
In/Out: Shows whether the employee clocked in or out.
This report is intended to be a factual record of events that took place on the system. It will show each
event as originally recorded and does not reflect any adjustments that may have subsequently been
made by an administrator.
At the end of each date, the total number of events is shown for that reader for that date. At the end of
each reader extension section, the total number of events for that reader for all reported dates is
shown:

ESI Time and Attendance Manager User’s Guide
© 2016 Estech Systems, Inc. All rights reserved • 3701 E. Plano Pkwy., Suite 100 • Plano, TX 75074-1819 • Main Number: (800) 374-0422 pg. 49
Technical Support: (800) 491-3609 • Fax: (972) 422-9705 • Website: www.esi-estech.com • Support Website: support.esi-estech.com
Document #0455-0022 • Rev. A
This report also features a series of bookmarks to help you quickly navigate to a specific RFID reader
extension, or date for that reader:
Clicking on a reader name or date will take you to the corresponding section of the report.

ESI Time and Attendance Manager User’s Guide
© 2016 Estech Systems, Inc. All rights reserved • 3701 E. Plano Pkwy., Suite 100 • Plano, TX 75074-1819 • Main Number: (800) 374-0422 pg. 50
Technical Support: (800) 491-3609 • Fax: (972) 422-9705 • Website: www.esi-estech.com • Support Website: support.esi-estech.com
Document #0455-0022 • Rev. A
Payroll Report
The Payroll Report produces a list of employee hours worked and pay for the date range and scope you
specify, grouped by individual employee and sorted by date. When choosing this report, you must also
choose a Date Range and a Report Scope:
Date Range:
The Date Range can be the current pay period, the prior pay period, or a custom date range you specify.
Note that the current and prior pay periods are calculated based upon the settings you specify in Payroll
Settings.
Report Scope:
The Report Scope allows you to choose the employee or employees on which to report. You can choose
a specific employee, all employees, or a department of employees.
ESI Time and Attendance Manager User’s Guide
© 2016 Estech Systems, Inc. All rights reserved • 3701 E. Plano Pkwy., Suite 100 • Plano, TX 75074-1819 • Main Number: (800) 374-0422 pg. 51
Technical Support: (800) 491-3609 • Fax: (972) 422-9705 • Website: www.esi-estech.com • Support Website: support.esi-estech.com
Document #0455-0022 • Rev. A
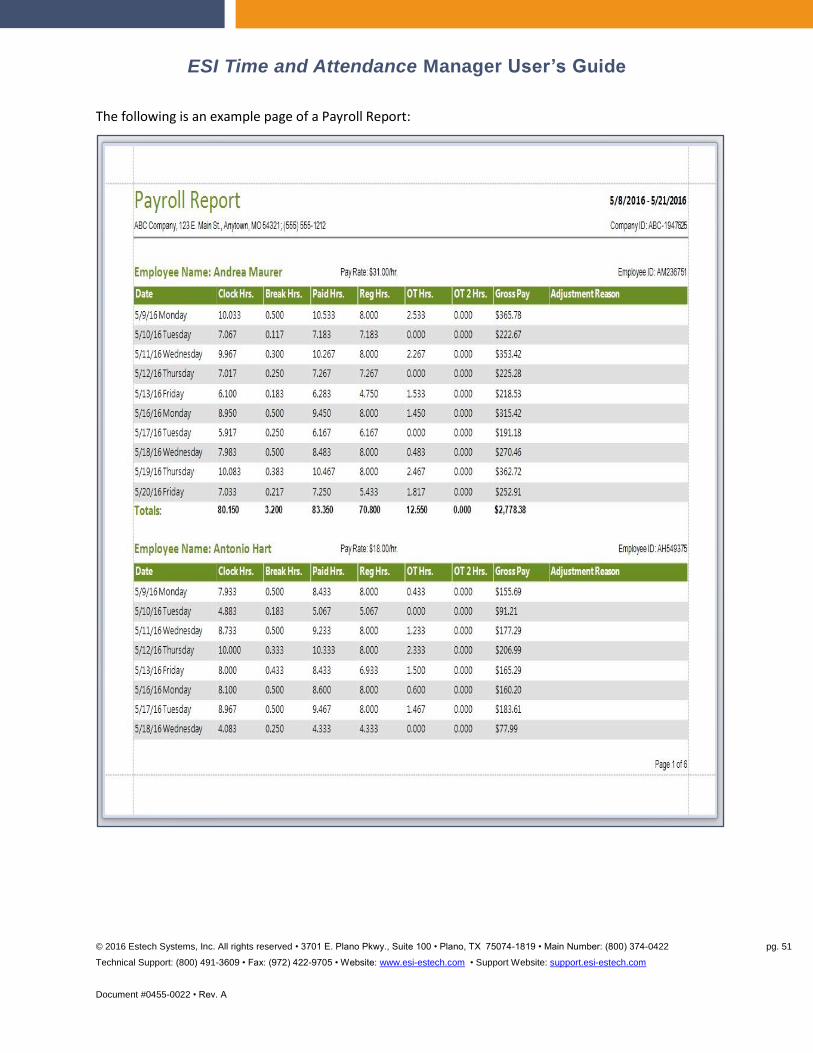
The following is an example page of a Payroll Report:

ESI Time and Attendance Manager User’s Guide
© 2016 Estech Systems, Inc. All rights reserved • 3701 E. Plano Pkwy., Suite 100 • Plano, TX 75074-1819 • Main Number: (800) 374-0422 pg. 52
Technical Support: (800) 491-3609 • Fax: (972) 422-9705 • Website: www.esi-estech.com • Support Website: support.esi-estech.com
Document #0455-0022 • Rev. A
For each employee, the following information is given for each date worked:
Payroll Reports:
Report(s) Function(s)
Clock Hours: The cumulative number of hours between each In event and its corresponding Out event for the day.
Break Hours: Number of clocked-out break hours calculated according to the rules specified in Payroll Settings, in the Paid Breaks section.
Paid Hours: Total hours for which the employee should be paid. It equals the sum of the two prior columns (Clock Hours + Break Hours). It is also the sum of Regular Hours + OT Hours + OT 2 Hours. The exception to this would be if a daily hours adjustment has been manually entered for this employee. In this case, this value will be outlined with a black box to indicate that an adjustment has been made.
Regular Hours: The employee's regular hours for this date as calculated according to the rules in Payroll Settings.
OT Hours: The employee's overtime hours for this date as calculated according to the rules in Payroll Settings.
OT 2 Hours: The employee's overtime 2 hours for this date as calculated according to the rules in Payroll Settings.
Gross Pay: The employee's gross pay for hours worked as calculated according to the rules in Payroll Settings
In order for the Payroll Report to be accurate, you must have accurately entered the required
information in Payroll Settings, as well as entered an hourly pay rate for each employee in the
Employees settings. Also, the Payroll Report is intended to be used as an aid in the preparation of
payroll. It should always be checked for accuracy.
At the end of each employee section of the report, totals for that employee are calculated for all dates
included in the report:
ESI Time and Attendance Manager User’s Guide
© 2016 Estech Systems, Inc. All rights reserved • 3701 E. Plano Pkwy., Suite 100 • Plano, TX 75074-1819 • Main Number: (800) 374-0422 pg. 53
Technical Support: (800) 491-3609 • Fax: (972) 422-9705 • Website: www.esi-estech.com • Support Website: support.esi-estech.com
Document #0455-0022 • Rev. A
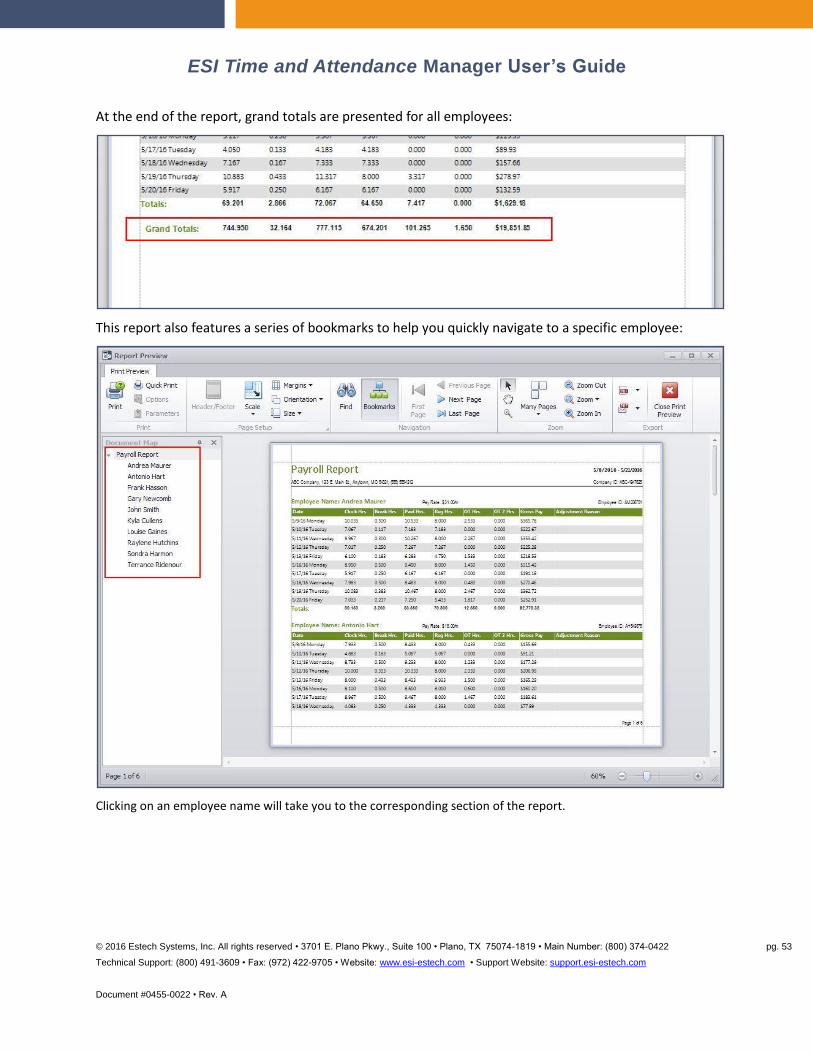
At the end of the report, grand totals are presented for all employees:
This report also features a series of bookmarks to help you quickly navigate to a specific employee:
Clicking on an employee name will take you to the corresponding section of the report.

ESI Time and Attendance Manager User’s Guide
© 2016 Estech Systems, Inc. All rights reserved • 3701 E. Plano Pkwy., Suite 100 • Plano, TX 75074-1819 • Main Number: (800) 374-0422 pg. 54
Technical Support: (800) 491-3609 • Fax: (972) 422-9705 • Website: www.esi-estech.com • Support Website: support.esi-estech.com
Document #0455-0022 • Rev. A
Unassigned Cards/Fobs
The Unassigned Cards/Fobs report gives a list of all security card or fob numbers that are not assigned to any
employee, but for which in/out events have been retrieved from the phone system. When choosing this report
type, the Date Range and Report Scope sections will be disabled, as no additional parameters are required to run
this report. Here is an example of the Unassigned Cards/Fobs report:

ESI Time and Attendance Manager User’s Guide
© 2016 Estech Systems, Inc. All rights reserved • 3701 E. Plano Pkwy., Suite 100 • Plano, TX 75074-1819 • Main Number: (800) 374-0422 pg. 55
Technical Support: (800) 491-3609 • Fax: (972) 422-9705 • Website: www.esi-estech.com • Support Website: support.esi-estech.com
Document #0455-0022 • Rev. A
Configuration for Demo Data
Introduction
The purposed of these steps is to configure demo call data for ESI Time and Attendance Manager
application. Please note that all data provided in the setup file is fictitious information and is only meant
for simulation purposes only.
Demo Data Setup
1. Install ESI Time and Attendance Manager from Setup file
2. Navigate to the Program Data folder for ESI Time and Attendance Manager (it’s normally at
“C:\ProgramData\ESI Time and Attendance Manager”; or, if you have ESI Time and Attendance
Manager running, you can press Ctrl-Alt-D)
3. Rename “Events.sdf” to “Events.sdf.bak”, and rename “Preferences.txt” to
“Preferences.txt.bak”
4. Rename “DemoEvents.sdf” to “Events.sdf”, and rename “DemoPreferences.txt” to
“Preferences.txt”
5. The dummy data is located in the time period 3/28/16 through 3/24/17

ESI Time and Attendance Manager User’s Guide
© 2016 Estech Systems, Inc. All rights reserved • 3701 E. Plano Pkwy., Suite 100 • Plano, TX 75074-1819 • Main Number: (800) 374-0422 pg. 56
Technical Support: (800) 491-3609 • Fax: (972) 422-9705 • Website: www.esi-estech.com • Support Website: support.esi-estech.com
Document #0455-0022 • Rev. A
Troubleshooting
Error receiving card/fob events
If you attempt to receive card/fob events via the “Receive Card/Fob Events” link
and get the following error:
Please attend to the following items:
1. Ensure that you have the correct IP address entered in Miscellaneous Settings, in the Phone
System Communication section. The IP Address field must be set to the IP address of the NSP
(Network Services Processor) on your ESI phone system; this is specified in ESI phone system
programming as the "NSP Private IP Address" in Installer Function 824. The Base Port field also
must match the setting in the ESI system programming Installer Function 821, "Base UDP Port".
2. If there is an active firewall on your PC, ensure that UDP ports 59005, 59091, and 59094 are
unblocked. If the Base UDP Port setting in ESI phone system programming function 821 is not
set to 59, these port numbers will be different; in that case, you will need to unblock UDP ports
xx005, xx091, and xx094, where xx is the Base UDP Port.
If you attempt to receive card/fob events via the “Receive Card/Fob Events” link and get the following
error:
Please ensure that you have enabled Time and Attendance in the phone system programming, Function 374.
ESI Time and Attendance Manager User’s Guide
© 2016 Estech Systems, Inc. All rights reserved • 3701 E. Plano Pkwy., Suite 100 • Plano, TX 75074-1819 • Main Number: (800) 374-0422 pg. 57
Technical Support: (800) 491-3609 • Fax: (972) 422-9705 • Website: www.esi-estech.com • Support Website: support.esi-estech.com
Document #0455-0022 • Rev. A
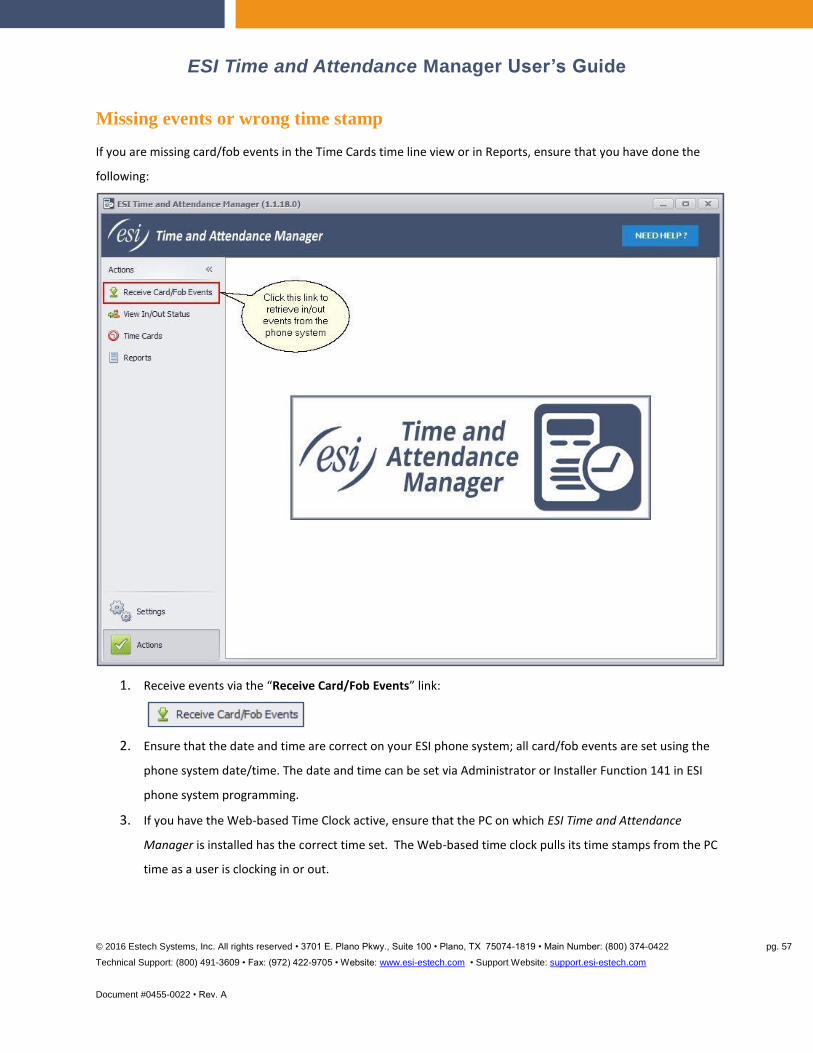
Missing events or wrong time stamp
If you are missing card/fob events in the Time Cards time line view or in Reports, ensure that you have done the
following:
1. Receive events via the “Receive Card/Fob Events” link:
2. Ensure that the date and time are correct on your ESI phone system; all card/fob events are set using the
phone system date/time. The date and time can be set via Administrator or Installer Function 141 in ESI
phone system programming.
3. If you have the Web-based Time Clock active, ensure that the PC on which ESI Time and Attendance
Manager is installed has the correct time set. The Web-based time clock pulls its time stamps from the PC
time as a user is clocking in or out.

ESI Time and Attendance Manager User’s Guide
© 2016 Estech Systems, Inc. All rights reserved • 3701 E. Plano Pkwy., Suite 100 • Plano, TX 75074-1819 • Main Number: (800) 374-0422 pg. 58
Technical Support: (800) 491-3609 • Fax: (972) 422-9705 • Website: www.esi-estech.com • Support Website: support.esi-estech.com
Document #0455-0022 • Rev. A
Index
Adjust daily hours for [date], 38
Break Hours, 52
Card/Fob, 15, 29, 32, 39, 48, 54, 56, 57
Clear adjusted daily hours for [date], 38
Clock Hours, 52
Department, 15, 17, 39
Electronic Keys, 6, 7
Employee ID, 15, 28, 31
Employee Is Active, 15, 16
Employee Name, 48
Employee Report, 39, 40
Employees, 14, 28, 34, 35, 39, 40, 41, 48, 52
Error, 56
ESI Communications Servers, 8
Event Report by Employee, 24, 39
Event Report by Reader, 39
Go to Today, 38
Gross Pay, 52
Hourly Rate, 15
Hours Clocked, 44
In/Out, 31, 32, 44, 48
installation, 9, 10
IP Server 900, 7, 8
License, 9
License Exceeded, 7
Local, 26
Maximum tags, 7
Notes, 15
Original Event Type, 44
OT 2 Hours, 52
OT Hours, 52
Paid Hours, 52
Payroll Frequency, 19
Payroll Report, 39, 50, 51, 52
Payroll Settings, 18, 35, 43, 46, 50, 52
PC Requirements, 8
Reader Ext, 44
Receive Card/Fob Events, 29, 32, 56, 57
Regular Hours, 52
Reset All Events for [date], 38
RFID, 5, 6, 7, 8, 26, 33, 36, 39, 44, 46, 48, 49
Settings, 11, 12, 13, 14, 23, 31, 48, 56
Start Date, 19
Time, 5, 6, 8, 9, 11, 14-16, 19, 20, 23-29, 31-34,
36, 39, 44, 48, 56, 57
Time Cards, 33, 34, 36, 57
Timeline, 34
Unassigned Cards/Fobs, 54
Work week starts on, 19
Top Related