


Languages
Pages
Legal


ePayroll
Batch Input for Overtime, Additional Hours and Absences
User Guide for School Administrators & Approvers
Business Operations
Version 2.0
June 2017

Contents
INTRODUCTION ...............................................................................................................................................4
SCOPE .................................................................................................................................................................. 4
MANAGEMENT CONTROL PROCEDURES ....................................................................................................................... 4
SYSTEM CONCEPTS & KEY FEATURES .......................................................................................................................... 5
THE MONTHLY DATA INPUT CYCLE............................................................................................................................... 8
HOW TO ACCESS THE BATCH INPUT FORM ......................................................................................................9
THE BATCH INPUT CONTROL FORM ............................................................................................................... 10
TRACK SUBMITTED BATCH ENTRIES .......................................................................................................................... 10
SAVED BATCH DATA .............................................................................................................................................. 11
BATCH ENTRY NOTIFICATIONS ................................................................................................................................. 12
HOW TO CREATE A NEW BATCH FILE ............................................................................................................. 13
GENERAL CONCEPTS .............................................................................................................................................. 13
THE DATE WORKED CONCEPT ................................................................................................................................. 13
CREATE A NEW BATCH............................................................................................................................................ 14
HOW TO ENTER ADDITIONAL HOURS CLAIMS INTO A BATCH ........................................................................ 15
SCOPE ................................................................................................................................................................ 15
DATA INPUT FIELD FORMATS ................................................................................................................................... 15
ENTERING DATA.................................................................................................................................................... 16
HOW TO EDIT OR DELETE A CLAIM/ABSENCE ................................................................................................ 19
SCOPE ................................................................................................................................................................ 19
EDIT A CLAIM ....................................................................................................................................................... 19
DELETE A CLAIM.................................................................................................................................................... 20
HOW TO ENTER ABSENCES INTO A BATCH ..................................................................................................... 22
SCOPE ................................................................................................................................................................ 22
ENTERING DATA FOR A NEW ABSENCE ....................................................................................................................... 22
HOW TO CLOSE AN ABSENCE ................................................................................................................................... 25
HOW TO CLOSE A BATCH AND SUBMIT IT FOR APPROVAL ............................................................................. 26
SCOPE ................................................................................................................................................................ 26
DUPLICATE CLAIM VALIDATION ................................................................................................................................ 26
APPROVAL ROUTING .............................................................................................................................................. 26
CLOSE A BATCH AND SUBMIT IT FOR APPROVAL ........................................................................................................... 27
HOW TO APPROVE A BATCH FOR PAYROLL TO PROCESS ............................................................................... 29
SCOPE ................................................................................................................................................................ 29
APPROVALS CONCEPT ............................................................................................................................................ 29
APPROVE A BATCH ................................................................................................................................................ 30
REJECT A BATCH.................................................................................................................................................... 31
RETURN FOR CORRECTION ...................................................................................................................................... 31
REQUEST INFORMATION......................................................................................................................................... 32
CLOSE A NOTIFICATION........................................................................................................................................... 32
HOW TO EXPORT A BATCH TO MS EXCEL ....................................................................................................... 33
SCOPE ................................................................................................................................................................ 33
WHERE THE FEATURE IS AVAILABLE ........................................................................................................................... 33

- 3 -
METHOD............................................................................................................................................................. 34
HINTS & TIPS FOR EXCEL ........................................................................................................................................ 35
EMPLOYEE HISTORY ....................................................................................................................................... 37
SCOPE ................................................................................................................................................................ 37
HOW TO ACCESS EMPLOYEE HISTORY ........................................................................................................................ 37
DUPLICATE, WITHDRAW AND DELETE BATCHES ............................................................................................ 39
DUPLICATE A BATCH .............................................................................................................................................. 39
WITHDRAW A BATCH ............................................................................................................................................. 40
DELETE A BATCH ................................................................................................................................................... 40

- 4 -
Introduction
Scope
This document provides guidance to school administrators in the operation of
ePayroll’s Batch Input system for entering, submitting and approving overtime &
additional hours claims and for the bulk input of sickness absence returns.
It assumes that you are already familiar with the standard ePayroll data input and
approval techniques, guidance for which can be found on the Essex Schools
InfoLink.
Additional ePayroll help and guidance can be obtained by contacting the Schools Service Centre
Telephone: 033301 35859
Email: [email protected]
Management control procedures
Schools’ financial regulations should be reviewed to ensure they reflect this new
process.
As with other transaction types in ePayroll, school users can have joint responsibility
for submissions and approvals for Overtime & Absences. This feature has been
included to allow schools to adopt physical signature audit trails outside of the system
with a single user performing both parts of the process in ePayroll.
Wherever resources allow and make it practicable to do so, schools should however
strive to adopt strict separation of duties so that submissions and approvals are
electronically made by different employees. This helps to guard against fraud and/or
error.
The Batch Input system maintains a full audit trail of entries made, submitted and
approved. However, where it is not possible to adopt duty separation within the
ePayroll system schools should ensure that appropriate management checks and
other controls are in place to mitigate the associated risks. This can be achieved by
retaining a copy of the authorised input form to support the entries submitted via e-
Payroll.

- 5 -
System Concepts & Key Features
General The system replaces the spreadsheet system for additional hours and provides an
alternative method for entering absences. The “one entry at a time” menu item for
absences is still available although we would recommend that you take advantage of
the benefits that the batch input method provides.
Users create a batch, in effect an online file, into which additional hours and/or
absence entries can be added. Entries can be built up, added to and “saved for
later” over a period of time until you are ready to submit the batch for approval. The
approvals process follows the same Approver1 and Approver2 principles as used
elsewhere in ePayroll except that the entire batch is approved with a single
authorisation regardless of how many individual entries there are in the batch.
Absence and overtime claims can be contained in a single batch or kept separate as
you may prefer. There are no limits on the number of batches that you can submit in
a single period although we would anticipate most schools normally submitting either
1 combined absence & overtime batch else 1 absence plus 1 overtime batch per
month. Real-time validation
All entries are fully validated either at the data entry stage else when the batch is
submitted for approval, allowing you to take any necessary corrective action before
they are transferred to the payroll system, which minimises the risk of payments not
being made.
Quick, intuitive and easy data entry techniques Employees are selected by their last name with the employee assignment number
being automatically generated rather than manually keyed in. The payment type you
want to claim is selected by drop-down menu from which the system determines the
input fields to be displayed (e.g. hours, rate, cash value etc) along with identifying
those fields which are mandatory and those that are optional.
The entire process is contained within a single form and without having to repeatedly
return to the main menu for each successive employee.
Cost codes are automatically derived for schools using the Essex cost code structure
which further reduces the volume of keyed data input. Provision is included for all
schools to manually enter or override codes as found necessary.
The combination of drop-down selection techniques and real-time validation will
eliminate most, if not all, non-payment issues. Payroll will continually monitor the
effectiveness of these controls to ensure that error reduction benefits are realised to
their maximum potential.

- 6 -
Duplicated Claims System validation includes comprehensive techniques to prevent the accidental
duplication of an entry in the same batch or within a separate batch. Error messages
are provided for duplicated items forcing you to correct the entry before being able to
submit the batch for approval. Warning messages are similarly provided to advise you
of other potential duplications so that these can be investigated and amended if
necessary. Error and warning messages quote the batch reference number that
contains the duplicate or similar entry so that the previous claim can quickly be found
and reviewed.
Improved process for absences By batching up absence data into a single submission the approval of those entries
is made in a single authorisation. Batches can be updated on a daily or weekly
basis should you prefer else created in a single exercise at each month end.
Within a single batch, absence periods for a given employee can be entered in any
date order, with the system automatically ordering them in ascending order when the
batch is submitted.
Provision has also been made to enable previously reported open absences to be
closed.
Approvals process Approvals are managed by the same “Worklist Notifications”, Approver1 and
Approver2 concepts used elsewhere in ePayroll. For users with joint Administrator
and Approver responsibilities, overtime and absence approval requests are
additionally shown at the foot of the batch input form and can be selected from there
or from ePayroll’s main menu as preferred.
Archived worklist items (closed notifications) can be obtained using the main menu’s
“Full List” button and these will display the full detail of the claims and absences
submitted.
History In addition to viewing archived submissions via ePayroll’s “Worklist” as described
above, the contents of all current and historic batches can be viewed via the Batch
Input form. This section of the form also helps you to keep track of the batches you
are still working on or that are awaiting approval.
Using simple query techniques you can also view all historical items submitted
through the system for a particular employee.
Audit trail The history display features described above provide a detailed audit trail of who
submitted what and when, along with who ultimately approved the batch.

- 7 -
In addition, an Export function is available which allows you to download the contents
of a batch into MS Excel. This report can be used as part of your physical signature
approvals process in much the same way that many schools have adopted for new
appointments and assignment changes etc. Once in MS Excel the data can, of
course, be manipulated and analysed as you may require.
User responsibility options For school administrators, access to ePayroll’s features can be restricted to absences
only, overtime only or both absences & overtime. These 3 options can be in addition
to the standard School Administrator privileges or instead of them. In this way, for
example, a school user could be responsible for creating and submitting overtime
claims without having access to the new hire, assignment change and bank detail
forms.
ePayroll’s Assignment Change form has been updated to reflect this additional
flexibility and allows you to update user responsibility settings as required.

- 8 -
The monthly data input cycle
Create Batch
Add or edit
entries
Open saved
batch
Save for
later
Submit for
approval
Approve
Processed
by payroll

- 9 -
How to access the batch input form
After logging onto ePayroll you will provided with a menu selection page similar to
the following example:
Click the menu item* After a short delay the screen will display the batch input control form.
* The exact contents of the main menu will vary according to the responsibilities that
you have been given. There are 3 variations for the Absences and Additional Hours
feature:
Access to both features:
Absences
Only: Overtime Only:
Instructions for setting up new users and for amending user responsibilities are
contained in the ePayroll Complete User Guide on the Essex Schools InfoLink.

- 10 -
The batch input control form
The control form is broken down into 3 sections:
Track Submitted Batch Entries
Saved Batch Data
Batch Entry Notifications (Worklist)
Track Submitted Batch Entries
This section displays summary level information of the 5 most recently submitted
batches highlighting, in particular, the current status of each of them. Once a batch
has been fully processed by payroll the status will change to “Processed”.
Older submissions can be obtained via the feature.
Clicking the appropriate link provides additional summary level information
relating to that batch. You can return to the standard view by clicking
Clicking the appropriate batch number link ( in the example shown) displays the
claim and/or absence details contained within the batch:

- 11 -
From here you can scroll through all the records in read-only mode, switching
between the Overtime & Payments and Absences tabs as desired. Once Payroll
have transferred the claims onto the employee’s payroll record the Request ID
column will show a reference number to confirm that action. When the payroll has
been run for that month the Processed column will change to a value of Yes.
You can also use the feature to download the contents of the batch into MS
Excel format for data analysis or physical signature approvals. The Export feature is
fully described in this user guide in the section entitled How to export a batch to
MS Excel.
This section also provides options to Duplicate, Withdraw and Delete batches.
These features are fully described elsewhere in this guide.
Saved Batch Data
This section displays any batches that you are currently working on. i.e. those that
you have not yet completed or submitted for approval.
Click the appropriate icon to open a saved batch for further editing and/or to
submit it for approval.
This section also provides options to Duplicate or Delete batches. These features
are fully described elsewhere in this guide.

- 12 -
Batch Entry Notifications
These are similar to the notifications shown on ePayroll’s main menu page except
they are limited to just those relating to Additional Hours, Payments and Absences.
If you are an Approver1 as well as an Administrator then, as with other ePayroll
transaction types, two notifications are reported for each submission. Items from
SYSADMIN are those confirming that you have made a submission and the item with
your name shown against it is the approval request itself.
Clicking on the approval request link provides you with a review page displaying all
the claims and absences along with the following options:
These options are all fully described in the How to approve a batch for payroll to
process section of this guide. .

- 13 -
How to create a new batch file
General concepts
A single batch can include additional hours claims as well as absences although, for
control purposes, we anticipate most users will choose to keep them separate.
There are no limits to the number of batches that you can submit each month; one
per month per submission type (additional hours and absences) is the expected
approach but one per week is acceptable should that method work better for your
organisation.
Remember that you can build up a batch over a period of time, utilising the “save for
later” feature and then supplementing and/or editing the contents until you are ready
to submit the batch for approval. Make sure, of course, that you leave sufficient
time to complete the batch AND to get it approved well before the deadline. As ever,
always strive to work with the deadlines and not to them.
As fully described later in this section, each batch can be given a descriptive title.
Typical usage might be along the lines of Overtime April 2012, Overtime Month 1
2012/13, Absences April 2012 etc. There are absolutely no rules for this although
adopting a convention will become increasingly beneficial as the volume of history
available to refer back to builds up over a period of time. You are likely to make
reference to a period name or number in the description and you should consider
whether that should refer to the period the return relates to or the period it was
submitted for payment.
The Date Worked Concept
The Oracle Payroll System includes powerful date worked capabilities that could be
used to record the number of additional hours worked each day. You are free to
make use of that flexibility should you wish to although we anticipate that you are
more likely to submit period totals for each employee rather than a daily breakdown.
On that basis, the Date Worked value on each employee claim then simply becomes
a means to instruct payroll as to the date to use when calculating the appropriate
hourly rate. For example, if the employee received an increment on 1st April then
you could use a date worked entry of 31st March, or earlier, to ensure that payment is
made at the pre-increment rate. This method similarly applies in controlling the
applicable rate following a re-grading, promotion or pay award.
By consolidating entries for each employee a date worked of the 1st of the month in
which the hours were worked will normally suffice. e.g. 20 hours overtime worked
over the period 1st to 31st May could all be consolidated into a single claim with a
date worked of 1st May. Entries must however fall between the employee’s
assignment start and leaving dates so you may occasionally receive appropriate

- 14 -
validation error messages for recent new appointments or leavers asking you to
amend the date accordingly.
Create a new batch
1. Check that the Organization name box at the top of the screen is displaying
the correct school name.
If you have access permissions to more than 1 organization the list box will allow you
to amend it. Users with multiple school access should note that a single batch can
only contain entries for one organization. Once the batch has been created the
system automatically restricts the employee records that you can enter into that
batch.
2. Click
3. Enter a description for the new batch. This is a free-format, 60 character,
optional field. See also the recommendations under General Concepts earlier
in this section.
4. Change the Date Worked Default value as required. Note that you can
amend this default at any time and as often as you need to throughout the life
cycle of the batch. This is designed to help minimise the number of
keystrokes that you would otherwise have to make when creating each claim
entry. See also the notes shown under The Date W orked Concept earlier in
this section.
You are now ready to start entering claims and absence details.

- 15 -
How to enter additional hours claims into a batch
Scope
This section of the guide provides step by step instructions to create additional hours
or other payment claim entries including how you can move between different
employees and different claim types. The principles described are exactly the same
regardless of whether you need to enter 1, 5, 50 or more claims.
The methods for Absences are very similar but, for clarity, these are separately
described in the How to enter absences into a batch section of this guide.
Data input field formats
Each payment type (element) will have varying input field requirements, hours and
minutes being the most commonly used.
Some input fields are completed by selecting from a simple drop-down list but most
of the more commonly used input fields will require you to key values in and these
have very specific format requirements which are explained below:
Field
Format Notes
Hours
HH:MM
Hours and minutes must be separated by a colon and
must be completed in full even where the number of
minutes is zero. e.g. 5:00 and not 5 10:00 and not 10:0
Rate
££.pppp
Entries can be made without completing all decimal
place value. e.g. 10 10.0 and 10.00 are all acceptable.
Cash payments can obviously only be expressed to 2
decimal places but Rate values can be expressed to 4.
Do not prefix values with £
Cash
££.pp
Cost Code
12 character alphanumeric. Where entries contain
fewer than 12 characters the system will add the
appropriate number of zeros to the end of the entry
made.
Date
dd-mmm-yy
Input fields accept entries in dd/mm/yy dd-mm-yy
dd.mm.yy and dd-mmm-yy format.
Regardless of which input style you choose the system
will adjust it to the Oracle standard format dd-mmm-yy

- 16 -
Entering data
Note: If you are entering a large volume of entries in one session we would
recommend that you click every 10 minutes or so to prevent accidental
loss of work in the event of a power loss or session timeout.
1. Select the batch. For brand new batches the data entry page is automatically
displayed after you click (see How to create a new batch section for
details).
To edit a previously saved batch click the appropriate link in the Saved
Batch Data section of the form.
2. Select the employee.
Enter a minimum of the first 3 characters of the employee’s last name in the
Employee field. When you have finished typing, the system will provide a list- box
containing any records that match the entry you have made.
Click the record you require else press the Esc key to cancel.
3. The list-box determines what items (elements) are then shown in
the field. The most commonly used elements are held
against claim type Additional Hours with a different selection choice being provided
if you change claim type to Payments.
4. Select the Element using the list-box. If the item you
require is not shown then select a different Claim Type and then re-try.
- 17 -
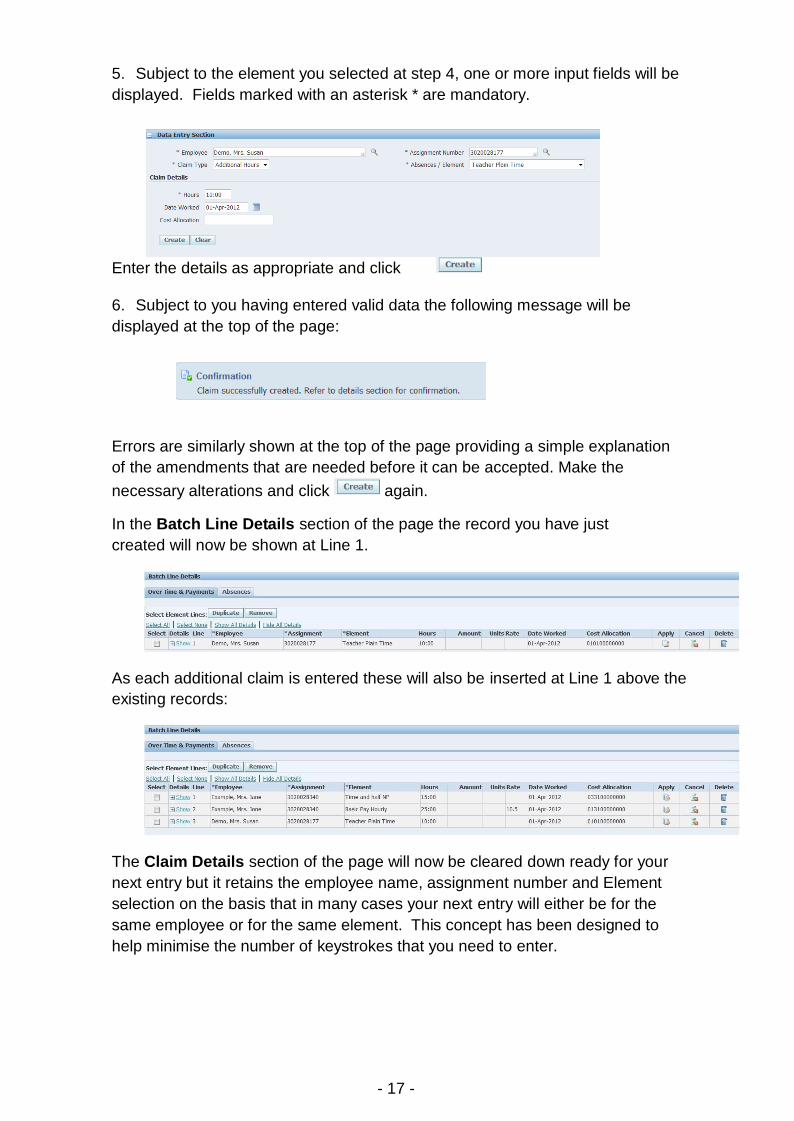
5. Subject to the element you selected at step 4, one or more input fields will be
displayed. Fields marked with an asterisk * are mandatory.
Enter the details as appropriate and click
6. Subject to you having entered valid data the following message will be
displayed at the top of the page:
Errors are similarly shown at the top of the page providing a simple explanation
of the amendments that are needed before it can be accepted. Make the
necessary alterations and click again.
In the Batch Line Details section of the page the record you have just
created will now be shown at Line 1.
As each additional claim is entered these will also be inserted at Line 1 above the
existing records:
The Claim Details section of the page will now be cleared down ready for your
next entry but it retains the employee name, assignment number and Element
selection on the basis that in many cases your next entry will either be for the
same employee or for the same element. This concept has been designed to
help minimise the number of keystrokes that you need to enter.

- 18 -
7. The Data Entry section is now ready for you to:
select a different employee assignment and/or
select a different element or
select a different claim type
8. Return to step 2 and repeat steps 2 to 7 as often as required. If you are entering
a large volume of entries in one session we would recommend that you click
every 10 minutes or so to prevent accidental loss of work in the event
of a power loss or session timeout.
9. At the top of the page click The system will respond with the
following message at the top of the page:
10. Click to return to the batch input control page.
11. The saved batch will be shown in the Saved Batch Data section of the page
ready for you to re-open and update as and when you need to.

- 19 -
How to edit or delete a claim / absence
Scope
This section of the guide describes how to edit or remove a claim or absence line
that you have previously created. The screen shot examples are for overtime entries
but the principle is exactly the same for absences.
The circumstances where you might find this necessary include where:
you’ve detected that the hours or other input fields have been entered incorrectly
you now know the end date of an absence that you previously saved in the batch
as unclosed
you previously selected the wrong employee or employee assignment
the payment is no longer required and you need to delete the entry altogether
system validation identified that you had attempted to create a duplicate claim or
some other error
the cost code generated by the system is not the one you require
Where the batch has been submitted for approval but not yet approved you can use
the Withdraw feature to remove it from the approvals process, edit as necessary
and then resubmit it for approval. The Withdraw feature is fully described in the
Duplicate, Withdraw and Delete Batches section of this guide.
You can edit claim lines as often as needed prior to submitting the batch for
approval. Once the batch has been approved then amendments can only be made
by creating a new batch and entering contra or additional entries as necessary.
If, exceptionally, you need to withdraw a complete batch after it has been approved,
and submitting contra entries in a new batch is not viable then you should telephone
the Corporate Service Centre to seek their assistance, quoting the appropriate batch
reference number.
Edit a claim
1. Open the batch. If the batch is not already open for editing then on the batch
control page click the appropriate link in the Saved Batch Data section.

- 20 -
2. In the Batch Line Details section of the page select on the appropriate
claim line. This will expand the record and provide input fields into which you can
modify existing values as required.
3. Make the required changes and click This will return the display to
standard view.
4. Repeat steps 2 and 3 for each record as required.
5. If you are happy with the changes you have made click else click
6. Click to return to the batch input control page else you can continue
adding additional entries via the form’s Data Entry section.
Delete a claim
1. Open the batch. If the batch is not already open for editing then on the batch
control page click the appropriate link in Saved Batch Data section.
2. Either:
tick the appropriate Select box(es) and then click
(ideal for selecting and removing multiple lines in one go)

- 21 -
OR just click the appropriate recycle icon
3. Repeat step 2 as required
4. If you are happy with the changes you have made click else click
to revert back to the original contents.
5. Click to return to the batch input control page else you can continue
adding additional entries via the form’s Data Entry section.

- 22 -
How to enter absences into a batch
Scope
This section of the guide provides step by step instructions to create absence
entries. The principles described are exactly the same regardless of whether you
need to enter 1, 5, 50 or more absences. The methods are also broadly similar to
those for overtime and additional hours claims.
Separate instructions are also provided for how to close a previously created
absence. i.e. an absence where you had not previously supplied an end date.
Entering data for a new absence
Note: If you are entering a large volume of entries in one session we would
recommend that you click every 10 minutes or so to prevent accidental
loss of work in the event of a power loss or session timeout.
1. Select the batch. For brand new batches the data entry page is automatically
displayed after you click (see the How to create a new batch section for
details).
To edit a previously saved batch click the appropriate link in the Saved
Batch Data section of the form. 2. Select the employee.
Enter a minimum of the first 3 characters of the employee’s last name in the
Employee field. When you have finished typing the system will provide a list- box
containing any records that match the entry you have made.
Click the record you require else press the Esc key to cancel.
3. If it is not already shown, change the selection in the list box to
Absences.

- 23 -
4. If it is not already shown, change the selection in the list
box to Sickness
5. Select an Absence Reason and enter the First Day of Absence date.
If the Last Day of Absence is already known then enter this as well else leave it
blank.
6. Optionally change the defaulted Planned Absence entry to Yes if necessary.
Optionally set the Impairment/Pregnancy/W ork related flags to Yes where this is
necessary else leave them blank as shown above.
7. Where either the first or last day of the absence was only a half day then select
Days in the Part Days Unit of Measure field. The system will then provide 2
additional fields for you to indicate whether the start and end days were half or
complete days.
8. Click

- 24 -
9. Subject to you having entered valid data the following message will be
displayed at the top of the page:
Errors are similarly shown at the top of the page providing a simple explanation
of the amendments that are needed before it can be accepted. Make the
necessary alterations and click again.
In the Batch Line Details section of the page the record you have just created
will now be shown at Line 1 of the Absences tab (you may need to click the tab
to display absences instead of Overtime).
As each additional claim is entered these will also be inserted at Line 1 above the
existing records:
The Claim Details section of the page will now be cleared down ready for your
next entry but it retains the employee name and assignment number.
10. The Data Entry section is now ready for you to:
select a different employee assignment and/or select a different element or
select a different claim type
11. Return to step 2 and repeat steps 2 to 9 as often as required. If you are
entering a large volume of entries in one session we would recommend that you
click every 10 minutes or so to prevent accidental loss of work in the
event of a power loss or session timeout.
12. At the top of the page click The system will respond with the
following message at the top of the page:

- 25 -
13. Click to return to the batch input control page.
14. The saved batch will be shown in the Saved Batch Data section of the page
ready for you to re-open and update as and when you need to.
How to close an absence
An unclosed absence is one where you have previously set up a record without a
known end date. Techniques for closing the absence vary slightly according to
whether the record you previously established is in a batch that has already been
submitted or whether it is in a saved “work in progress” batch.
If the unclosed absence was first established in a batch that has not yet been
submitted for approval then you can edit the entry using the techniques described
in How to edit or delete a claim/absence.
If the unclosed absence was first established in a batch that already been
submitted for approval or has been approved or has already been processed by
Payroll then you should follow the techniques shown for creating a new absence and
re-enter the same absence start date as originally notified
enter an absence reason (it should really be the same as originally notified but
a different item can be selected)
enter an end date Provided you enter the same start date as originally supplied AND enter an end date
the system will detect that you are closing a previously notified absence.

- 26 -
How to close a batch and submit it for approval
Scope
This section of the guide describes how to close a batch and submit it for approval.
The process described is the same for all batches regardless of whether they contain
additional hours claims, absences or a mixture of both.
Duplicate claim validation
This stage of the process includes further data validation to ensure that the entries you
have made are acceptable. Validation includes comprehensive checks against all
other batches (including any saved but not yet submitted for approval) to minimise the
risk of accidentally submitting duplicate claims.
Duplicate errors are reported where an employee assignment is identified as
having:
two or more exactly identical claims with the same element, date worked and cost
code values
two or more claims in the same batch with the same element, date worked
and cost code values. The exception to this rule is for elements that allow you to enter
an hourly rate or similar additional variable. In these cases, one
claim can additionally be entered for each variable. two or more absences in the same batch with the same start date or
overlapping dates
Warning messages are provided where an employee assignment is identified as
having:
two or more claims in the same batch with the same element and date worked values
but with different cost codes
a similar entry in another batch with the same element and date worked values
but a different number of hours
Approval routing
The approvals concept is identical to the other transaction types in ePayroll. i.e.
- 27 -
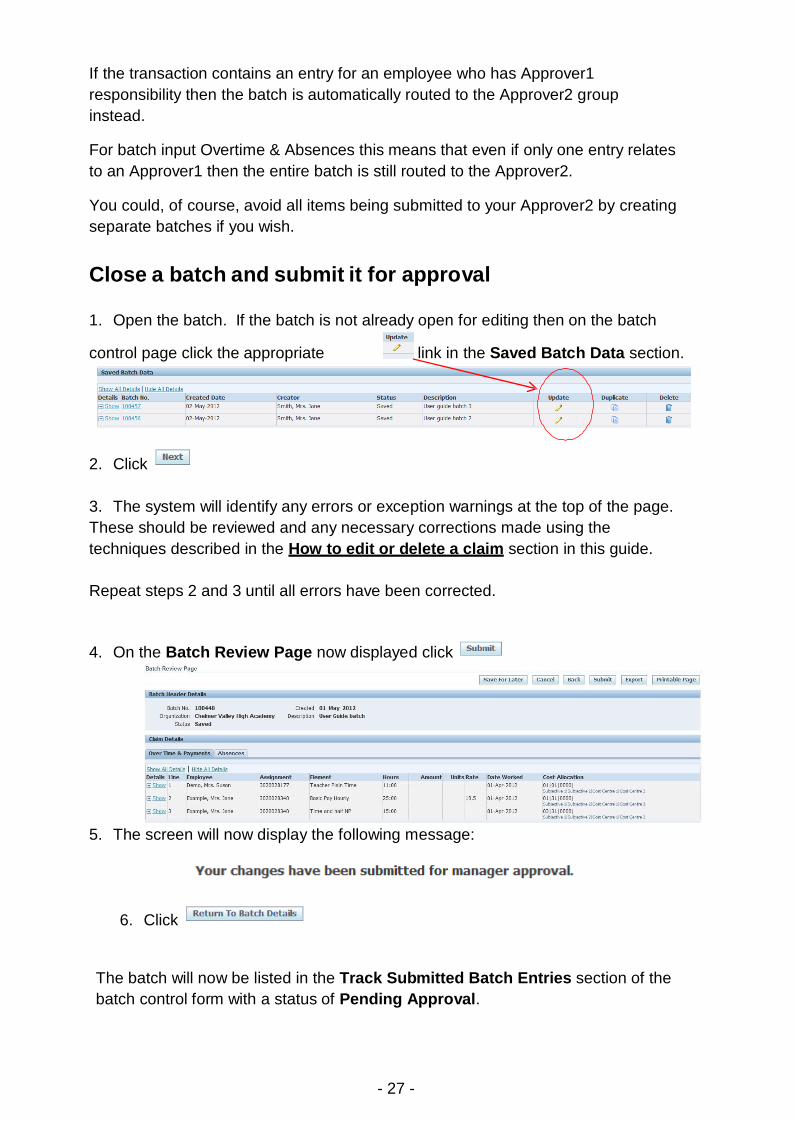
If the transaction contains an entry for an employee who has Approver1
responsibility then the batch is automatically routed to the Approver2 group
instead.
For batch input Overtime & Absences this means that even if only one entry relates
to an Approver1 then the entire batch is still routed to the Approver2.
You could, of course, avoid all items being submitted to your Approver2 by creating
separate batches if you wish.
Close a batch and submit it for approval
1. Open the batch. If the batch is not already open for editing then on the batch
control page click the appropriate link in the Saved Batch Data section.
2. Click
3. The system will identify any errors or exception warnings at the top of the page.
These should be reviewed and any necessary corrections made using the
techniques described in the How to edit or delete a claim section in this guide.
Repeat steps 2 and 3 until all errors have been corrected.
4. On the Batch Review Page now displayed click
5. The screen will now display the following message:
6. Click
The batch will now be listed in the Track Submitted Batch Entries section of the
batch control form with a status of Pending Approval.

- 28 -
The Batch Entry Notifications section of the form will now include an item sent to
you by SYSADMIN confirming that you have submitted the batch for approval. This
item will also be shown on ePayroll’s main menu page.
If you are an Approver1 as well as an Administrator then, as with other ePayroll
transaction types, a second notification will also be shown as being sent from you.
This is the approval request itself.
Clicking on the approval request link provides you with a review page displaying all
the claims and absences along with the following options:
These options are all fully described in the How to approve a batch for payroll to
process section of this guide.

- 29 -
How to approve a batch for payroll to process
Scope
This section of the guide describes how an approver can open a batch that has been
submitted to them, review the contents and mark it as approved.
It also describes how the approver can request further information from the
submitter, return it with comments for correction or to reject the request altogether.
Approvers select and review the batch from ePayroll’s main menu “Worklist” whilst
users with joint responsibility for submission can also access them directly from the
batch input control form. Both methods are shown.
Closing your notifications once they’re completed is good practice to keep your
worklist up to date and clear of items that you have already dealt with. This process
is also described.
Approvals Concept
The approvals concept is identical to the other transaction types in ePayroll. i.e.
If the transaction contains an entry for an employee who has Approver1
responsibility then the batch is automatically routed to the Approver2 group instead.
For batch input Overtime & Absences this means that even if only one entry relates
to an Approver1 then the entire batch is still routed to the Approver2.
You can avoid all items being submitted to your Approver2 by creating separate
batches.
If you are an Approver1 as well as an Administrator then, as with other ePayroll
transaction types, two notifications are reported for each submission. Items from
SYSADMIN are those confirming that you have made a submission and the item with
your name shown against it is the approval request itself.

- 30 -
Approve a batch
1. In ePayroll’s main menu Worklist section OR in the Batch Input form’s Batch
Entry Notification section click the approval request link:
Both of these methods work the same way.
2. Review the contents of the batch. For mixed content batches you can
alternate between the Overtime and Absence tabs as necessary.
3. Click
Where you have access to it, the Batch Entry Notifications section of the form will
now confirm that the batch has been approved.

- 31 -
ePayroll’s main menu page Worklist will similarly confirm that the batch has been
approved.
The Status of the batch in the Track Submitted Batch Entries section at the top of
the Batch Input form will display Approved.
Reject a batch
Note: rejecting a batch is not reversible. To avoid unnecessary re-work you should
previously consider whether the return for correction method may be the better
option.
Follow steps 1 and 2 as described for Approve a batch
3. Click
The Worklist and Track Submitted Batch Entries sections will confirm that the
batch has been Rejected (as opposed to Approved).
Return for Correction
Follow steps 1 and 2 as described for Approve a batch.
3. Optionally enter a comment in the Response section of the review form for the
submitter to consider/action.
4. Click
The Worklist and Track Submitted Batch Entries sections will confirm the batch
now has a Status of Return for Correction.
- 32 -
Request Information
Note: This feature is not currently suitable for schools and we recommend that you
use the Return for Correction feature instead, else refer your question in person.
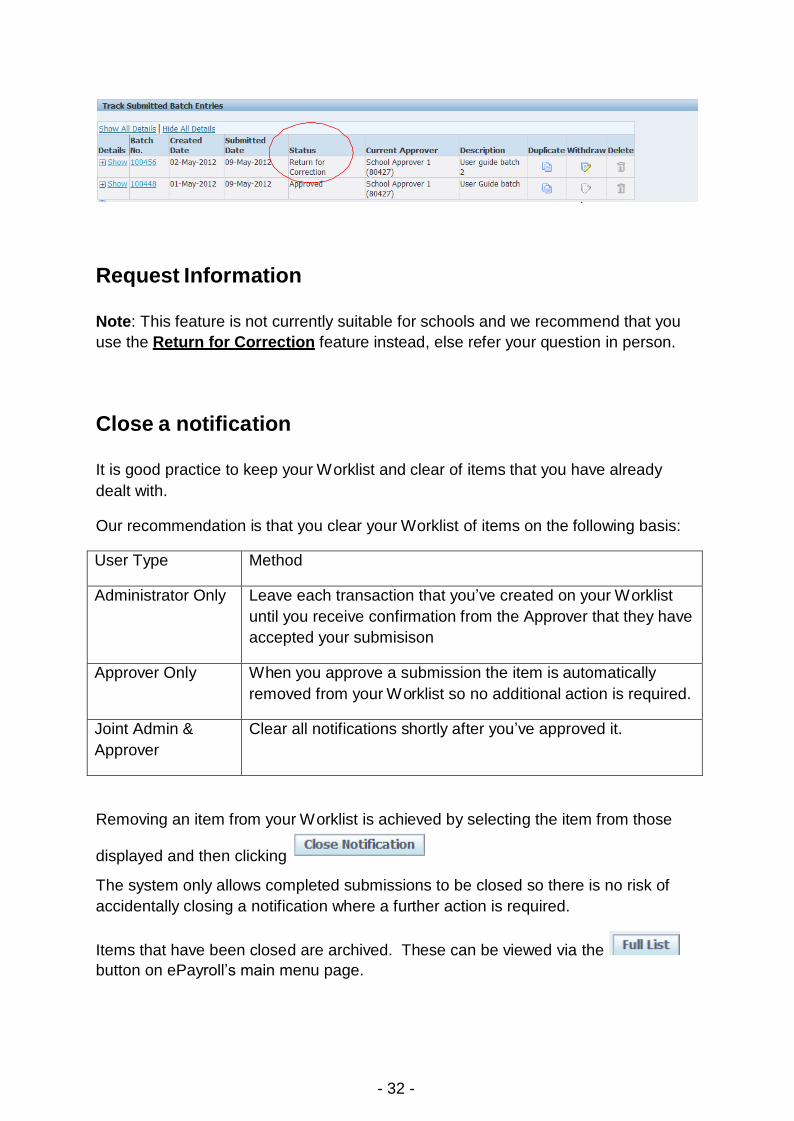
Close a notification
It is good practice to keep your Worklist and clear of items that you have already
dealt with.
Our recommendation is that you clear your Worklist of items on the following basis:
User Type Method
Administrator Only Leave each transaction that you’ve created on your Worklist
until you receive confirmation from the Approver that they have
accepted your submisison
Approver Only When you approve a submission the item is automatically
removed from your Worklist so no additional action is required.
Joint Admin &
Approver
Clear all notifications shortly after you’ve approved it.
Removing an item from your Worklist is achieved by selecting the item from those
displayed and then clicking
The system only allows completed submissions to be closed so there is no risk of
accidentally closing a notification where a further action is required.
Items that have been closed are archived. These can be viewed via the
button on ePayroll’s main menu page.

- 33 -
How to export a batch to MS Excel
Scope
This section of the guide describes the process for downloading the contents of a
batch into MS Excel.
Once the data is in Excel it can be manipulated, analysed or printed as required and
the guidance includes some useful hints and tips for how this might best be
achieved.
The export feature can be accessed via 3 different sections of the system and these
are all clearly demonstrated.
Assumed knowledge: Because of variations in operating systems no guidance is
provided on how to save a downloaded file or how to alternate between applications,
for example between MS Excel and Internet Explorer.
Where the feature is available
An button is provided when you access the read-only display form from
one of the 3 areas of the system where this feature has been enabled. This flexibility
allows you to download the contents of historic batches and saved “work in progress”
batches. It is also automatically provided as an option during the submission for
approval process.
The batch can be a submitted or approved item listed in the Track Submitted Batch
Entries section of the control form or an item that you are currently working on that’s
listed in the Saved Batch Data section of the control form.
In both cases, clicking the required link will provide a read-only view of
the batch contents.

- 34 -
The option to export is also included on the review page when you’re submitting a
batch for Approval.
Method
Having opened the batch contents review page as described above:
1. Click
A dialog box similar to this will then be shown:
2. Click Open, Save or Cancel as required.
3. If you selected at step 2 then go to step 5.
4. If you selected or at step 2 then MS Excel may now be
the active window on your computer screen.
Return to your Oracle Payroll window
5. Click to return to the batch input control page.

- 35 -
Hints & Tips for Excel
Making it suitable for printing The downloaded file is preformatted as shown below to assist your on-screen
interrogation of the data, but it is not ready-made for printing.
Prior to printing you may wish to consider the following suggestions so that each claim line is output on one sheet of paper in a font size that is easily read:
Take advantage of Excel’s Print Preview feature before sending output to the
printer
In many cases columns K to O (Spinal Point to Type) will not contain any
values. Consider deleting these columns else set the Print Area to only
include columns A through to J
In Page Setup, change Orientation to “Landscape” and Scaling to “Fit to 1
page(s) wide”. Change the “page(s) tall” setting as necessary for best fit.
Adding Totals
Hours & Minutes entries are held in Oracle in a format that Excel interprets as date &
time. The downloaded file displays the values correctly although you may notice that
values greater than 23:59 display a little oddly: for example, 25 hours will display
25:00:00 in the body of the report and as 01/01/1900 01:00:00 in Excel’s formula

- 36 -
bar; 50 hours will likewise display as 50:00:00 and 02/01/1900 02:00:00 This is all
standard and expected behaviour for Excel.
When adding a total to the Hours column (column F), Excel needs a helping hand to
display a meaningful total. The simplest solution is to format the cell containing the
total to [h]:mm
To format the cell:
right-click the cell containing the formula
select Format Cells…
In the Custom Category select the [h]:mm option. If it’s not shown as an
option then key [h]:mm into the Type: field
Click
You could of course also format the entire column using the techniques described
here.

- 37 -
Employee History
Scope
All claims submitted through the Batch Input system are indefinitely held in the
Oracle Payroll database. This provides the ability to interrogate all batches held in
the system and to return details of entries submitted for any of your employees.
See also the section in this guide entitled Track Submitted Batch Entries if you
want to review the contents of an entire batch rather than those for a given
employee.
How to access employee history
1. At the top of the Batch Input Control form click the Employee Batch Entry
History tab
2. Select the employee.
Enter a minimum of the first 3 characters of the employee’s last name in the
Employee field. When you have finished typing the system will provide a list- box
containing any records that match the entry you have made.
Click the record you require else press the Esc key to cancel.
3. Optionally, restrict the search to a specific Batch Number, Batch Status and/or
Batch Started values as desired. (These may prove to become increasingly useful as
the system builds up a volume of history).
4. Click
5. Review the contents. Optionally use the printable page feature if desired.
- 38 -
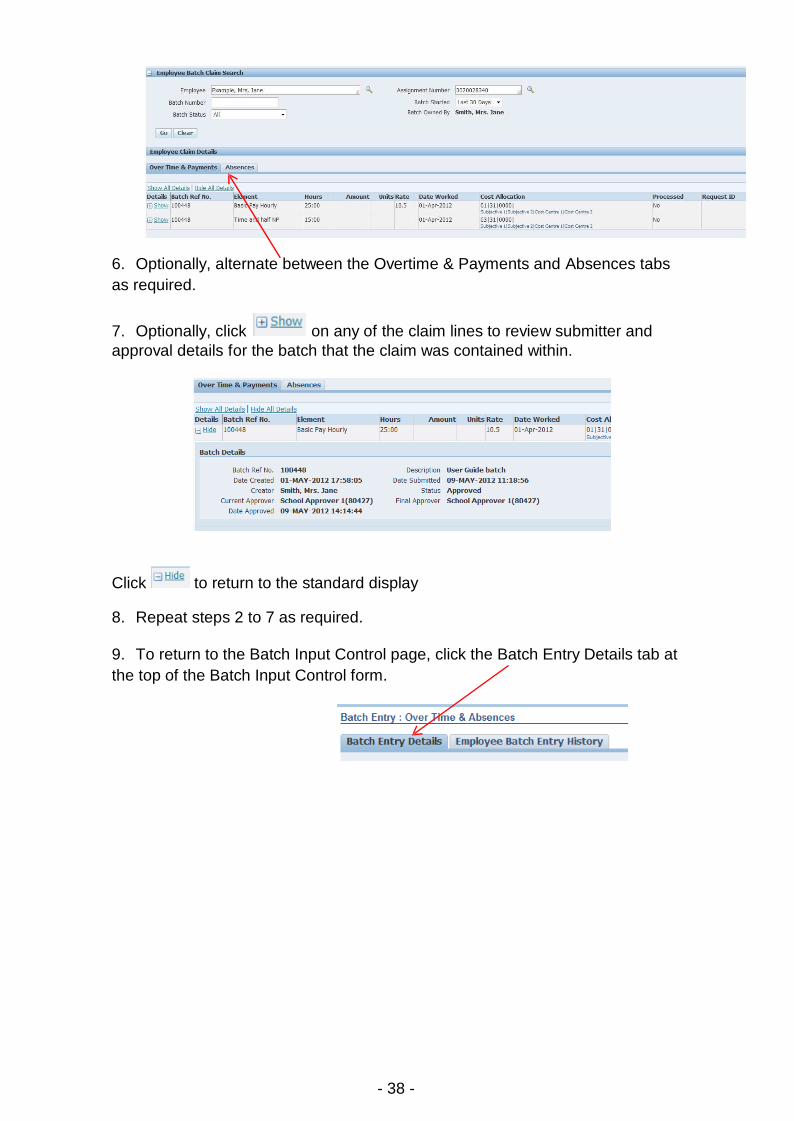
6. Optionally, alternate between the Overtime & Payments and Absences tabs
as required.
7. Optionally, click on any of the claim lines to review submitter and
approval details for the batch that the claim was contained within.
Click to return to the standard display 8. Repeat steps 2 to 7 as required.
9. To return to the Batch Input Control page, click the Batch Entry Details tab at
the top of the Batch Input Control form.

- 39 -
Duplicate, Withdraw and Delete Batches
Duplicate a batch
This feature is primarily designed to assist those organisations that regularly submit
returns for the same employees and claim types every month. By duplicating a
previous batch it avoids repeating the selection of employee assignments and their
claim types that you’ve performed before. In a single click the system will create a
new batch based on the employees and their claim types held in the source batch
that you indicate.
The source batch can be selected from those previously submitted or from those that
are currently being worked on.
The new batch creates a claim line for each item found in the source batch but does
not copy across hours or cash payment values. From here you can use the
techniques described in How to edit or delete a claim to add in the appropriate
hours and cash values.
Date Worked Values
To avoid you having to manually type Date Worked entries on each new claim the
system makes some assumptions during the copying process.
If today’s date is less than the 13th of the month then each new record is
created with a date worked value of 1st of the previous month else
each new record is created with a date worked value of 1st of the current
month
The assumptions made by the system can be individually edited as necessary.

- 40 -
Withdraw a batch
After submitting a batch but before it has been approved, the initiator can withdraw it from the approvals process. Withdrawn submissions are returned to the Saved Batch Data section where they can be selected for further editing, corrections or for making other amendments.
1. In the Track Submitted Batch Entries section of the form click the
appropriate icon.
2. The following warning will be provided:
3. Click to cancel or to proceed with the withdraw action.
4. Open, edit and resubmit the batch using the techniques described in the How
to edit or delete a claim section of this guide.
Delete a batch
Unwanted batches that are listed in the Saved Batch Details section or that are
listed in the Track Submitted Batch Entries section as having been rejected by
the approver can be removed from the system.
1. Click the appropriate delete icon
The system will display the following prompt:
2. Click to cancel the delete action or to proceed.
Top Related