


Languages
Pages
Legal


UNIVERSITYOFGEORGIA
ElectronicTicketSystemNewOptionsAvailableasofJanuary2010
‐ Insert the complete email address (valid UGA address only) instead of the UGA MyID to
send tickets to Approvers. The UGA MyID will continue to work as well.
‐ Upload Debit/Credit Data (CSV format). See Page 12.
‐ Bulk Change Object Codes. See Page 18.
‐ Export Line Items to Excel. See Page 10.
‐ Create Copy was changed to Create Duplicate eTicket to avoid confusion with printing.
Page 1 of 20
Instructions for the Electronic Ticket System (eTicket)
1. Go to the following URL address. https://eticket.uga.edu
2. Once you are able to see the login page, enter your UGA MyID for your login and your UGA MyID password for the
password. For example, if you are [email protected], you would enter jdoe as your login and your password for that
email account as the password. (If you do not know your UGA MyID, please visit the MyID website at
https://myid.uga.edu. There will be a selection on the left that says Forgotten my MyID or MyID password. Click on
it and follow the prompts).
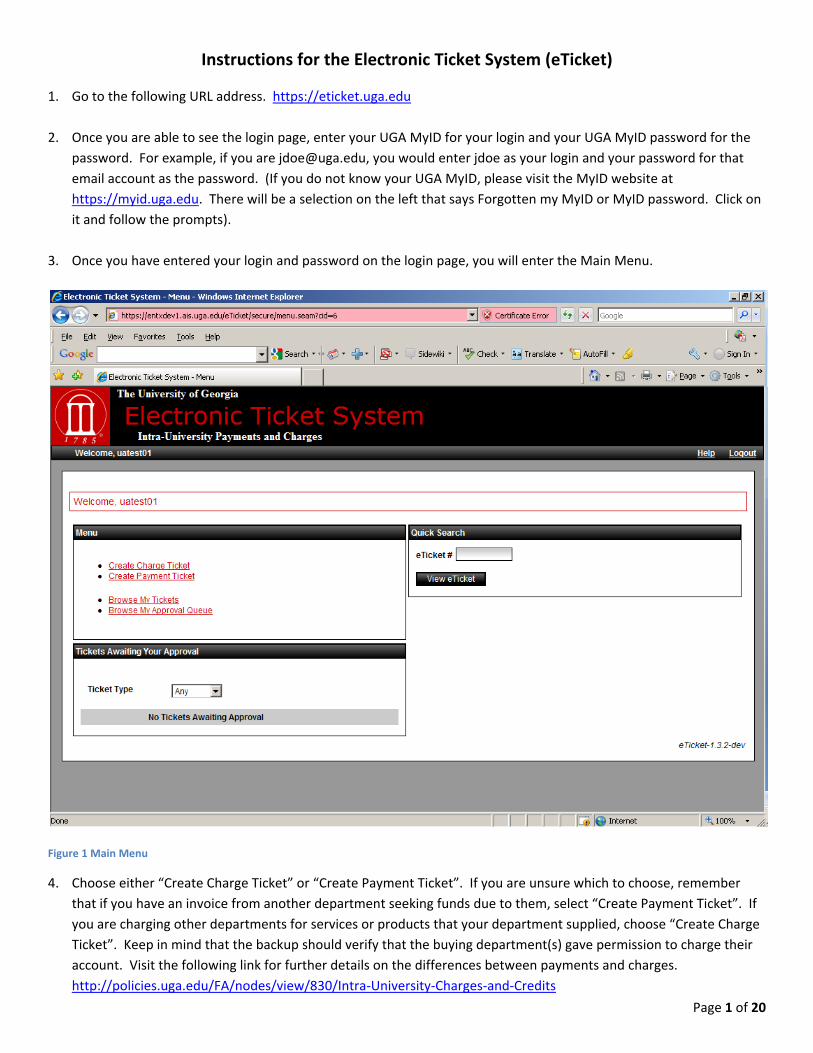
3. Once you have entered your login and password on the login page, you will enter the Main Menu.
Figure 1 Main Menu
4. Choose either “Create Charge Ticket” or “Create Payment Ticket”. If you are unsure which to choose, remember
that if you have an invoice from another department seeking funds due to them, select “Create Payment Ticket”. If
you are charging other departments for services or products that your department supplied, choose “Create Charge
Ticket”. Keep in mind that the backup should verify that the buying department(s) gave permission to charge their
account. Visit the following link for further details on the differences between payments and charges.
http://policies.uga.edu/FA/nodes/view/830/Intra‐University‐Charges‐and‐Credits
Page 2 of 20
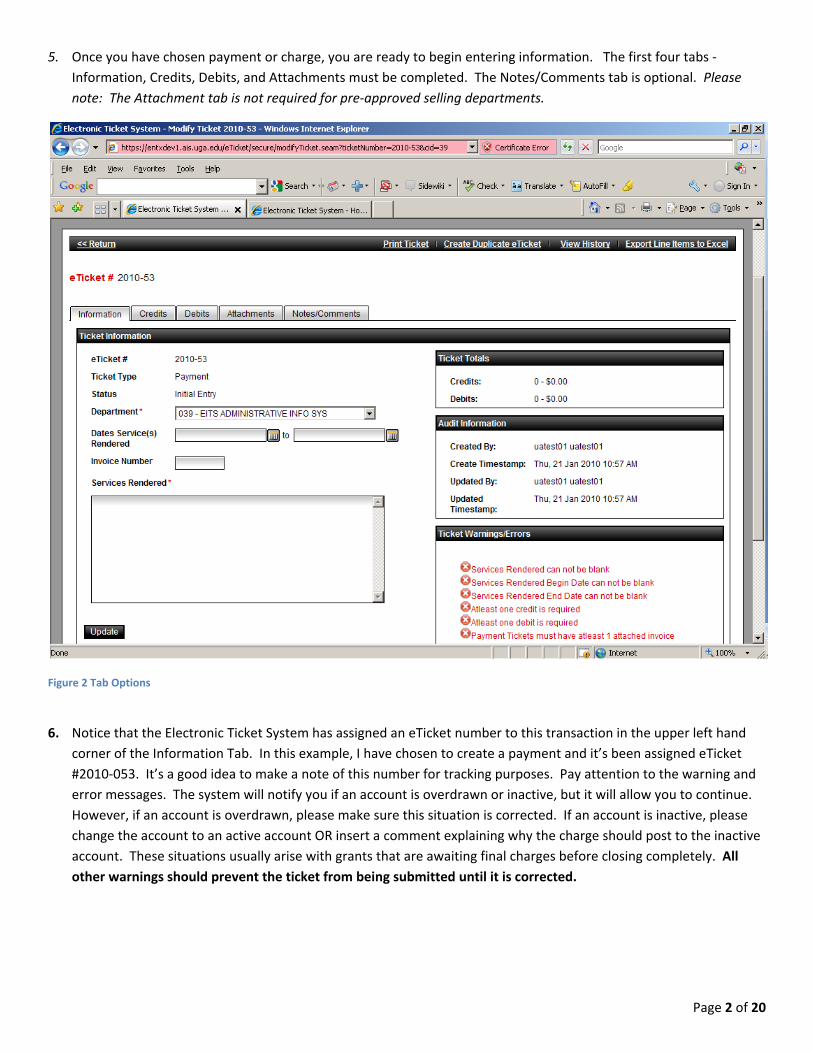
5. Once you have chosen payment or charge, you are ready to begin entering information. The first four tabs ‐
Information, Credits, Debits, and Attachments must be completed. The Notes/Comments tab is optional. Please
note: The Attachment tab is not required for pre‐approved selling departments.
Figure 2 Tab Options
6. Notice that the Electronic Ticket System has assigned an eTicket number to this transaction in the upper left hand
corner of the Information Tab. In this example, I have chosen to create a payment and it’s been assigned eTicket
#2010‐053. It’s a good idea to make a note of this number for tracking purposes. Pay attention to the warning and
error messages. The system will notify you if an account is overdrawn or inactive, but it will allow you to continue.
However, if an account is overdrawn, please make sure this situation is corrected. If an account is inactive, please
change the account to an active account OR insert a comment explaining why the charge should post to the inactive
account. These situations usually arise with grants that are awaiting final charges before closing completely. All
other warnings should prevent the ticket from being submitted until it is corrected.

Page 3 of 20
A. Information Tab – See Figure 3 below.
1. Choose your department number by keying it into the Department field or using the pull down
menu.
2. Enter the dates of service(s) manually or using the calendar. You will need to enter a To and
From date. If it’s one date, you will need to put the same date for To and From.
3. Enter the Invoice Number, if applicable. **Please note: If one invoice number should appear
for all accounts involved, type the invoice number in the Information tab only. You do NOT have
to retype this invoice number in the credit and debit tabs by each account. If there are different
invoice numbers for different accounts (mainly useful for direct charges that are posting more
than one invoice for several accounts), then you will need to type the invoice numbers with the
appropriate accounts within the Credit and Debit tabs. If no invoice number is indicated, the
Financial Accounting System will default to inserting the eTicket number as the invoice number.
It will appear on the account status report with an E, the last digit of the fiscal year, and the
remaining eTicket number (for example, E0‐53).
4. Enter a description for Services Rendered.
5. Choose the Update button at the bottom of the screen and then continue to the next tab.
Figure 3 Information Tab

Page 4 of 20
B. Credits Tab ‐ Enter the account(s), object(s), and amount(s) to be credited. See the note on A3 regarding
invoice numbers. See Figure 4 for screen shot.
Figure 4 Credits Tab
C. Debits Tab ‐ Enter the account(s), object(s), and amount(s) to be debited. See the note on A3 regarding
invoice numbers. See Figure 5.
Figure 5 Debits Tab
Page 5 of 20
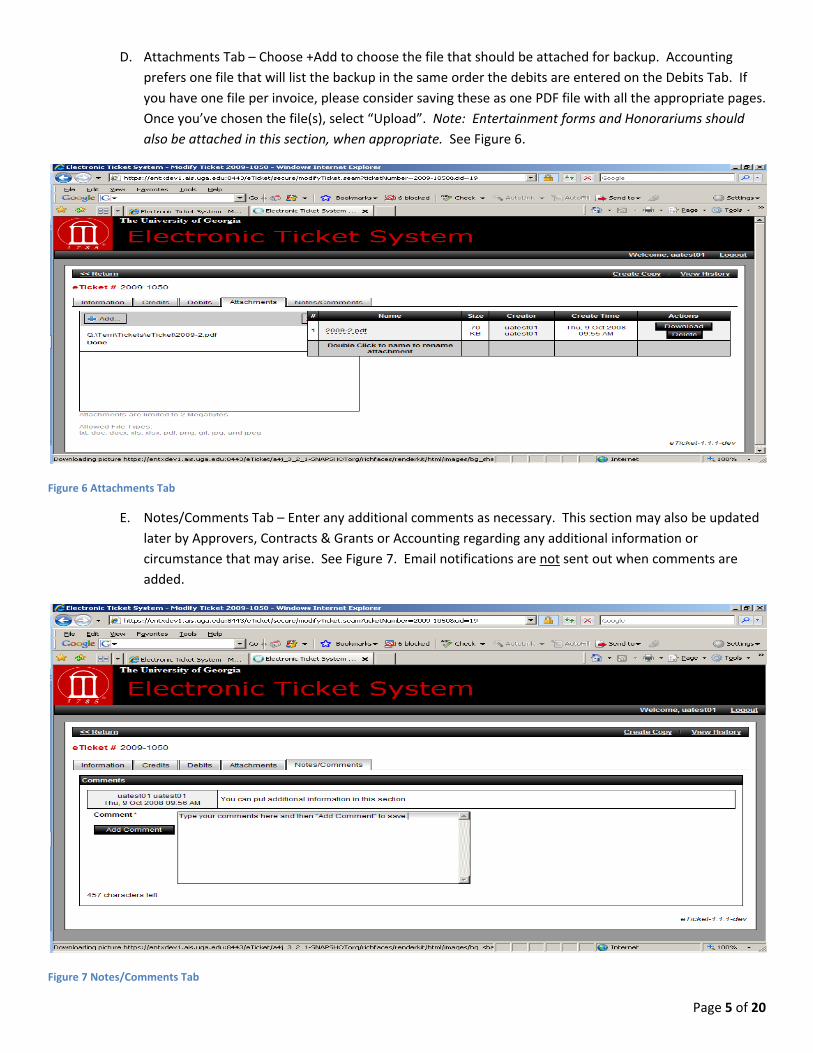
D. Attachments Tab – Choose +Add to choose the file that should be attached for backup. Accounting
prefers one file that will list the backup in the same order the debits are entered on the Debits Tab. If
you have one file per invoice, please consider saving these as one PDF file with all the appropriate pages.
Once you’ve chosen the file(s), select “Upload”. Note: Entertainment forms and Honorariums should
also be attached in this section, when appropriate. See Figure 6.
Figure 6 Attachments Tab
E. Notes/Comments Tab – Enter any additional comments as necessary. This section may also be updated
later by Approvers, Contracts & Grants or Accounting regarding any additional information or
circumstance that may arise. See Figure 7. Email notifications are not sent out when comments are
added.
Figure 7 Notes/Comments Tab

Page 6 of 20
7. Once the payment or charge eTicket is complete, go back to the Information Tab and at the bottom right of the
screen you should see the Workflow Actions now say “Submit for Approval”. Insert the complete email address or
UGA MyID of the person who is responsible for approving such charges/payments and select the “Submit for
Approval” button. You can also choose Search to find your Approver. A second individual MUST approve the
eTicket. The initiator and approver may not be the same person. Once the approver reviews the ticket, they may
send it to another approver by choosing “Approve and Forward”, if necessary. See Figure 8.
Figure 8 Submit for Approval
Page 7 of 20
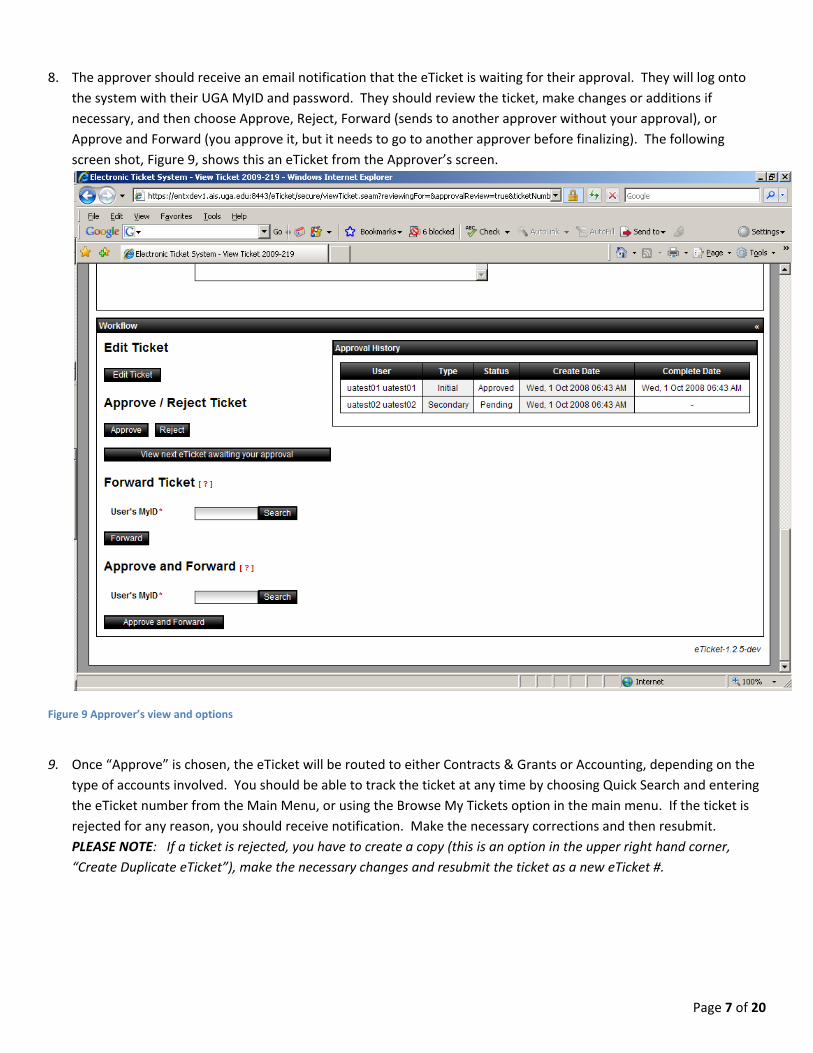
8. The approver should receive an email notification that the eTicket is waiting for their approval. They will log onto
the system with their UGA MyID and password. They should review the ticket, make changes or additions if
necessary, and then choose Approve, Reject, Forward (sends to another approver without your approval), or
Approve and Forward (you approve it, but it needs to go to another approver before finalizing). The following
screen shot, Figure 9, shows this an eTicket from the Approver’s screen.
Figure 9 Approver’s view and options
9. Once “Approve” is chosen, the eTicket will be routed to either Contracts & Grants or Accounting, depending on the
type of accounts involved. You should be able to track the ticket at any time by choosing Quick Search and entering
the eTicket number from the Main Menu, or using the Browse My Tickets option in the main menu. If the ticket is
rejected for any reason, you should receive notification. Make the necessary corrections and then resubmit.
PLEASE NOTE: If a ticket is rejected, you have to create a copy (this is an option in the upper right hand corner,
“Create Duplicate eTicket”), make the necessary changes and resubmit the ticket as a new eTicket #.

Page 8 of 20
Other options:
Quick Search – This option is available on the Main Menu. Enter the eTicket number to view the ticket and see the
details, status or history of a ticket. See Figure 1 for the Quick Search option and Figure 10 for the results of a Quick
Search. The workflow information is at the bottom of the eTicket.
Figure 10 Quick Search result
Print Ticket – Allows you to print the ticket and/or save it as a PDF. See Figure 12, upper right hand corner.
Create Duplicate eTicket – Allows you to create an exact copy of a payment or charge form. You will have to reattach
backup. This is typically useful for departments who bill services on a quarterly basis and have little to no changes to
make to a prior charge transaction. See Figure 12, upper right hand corner.
Page 9 of 20
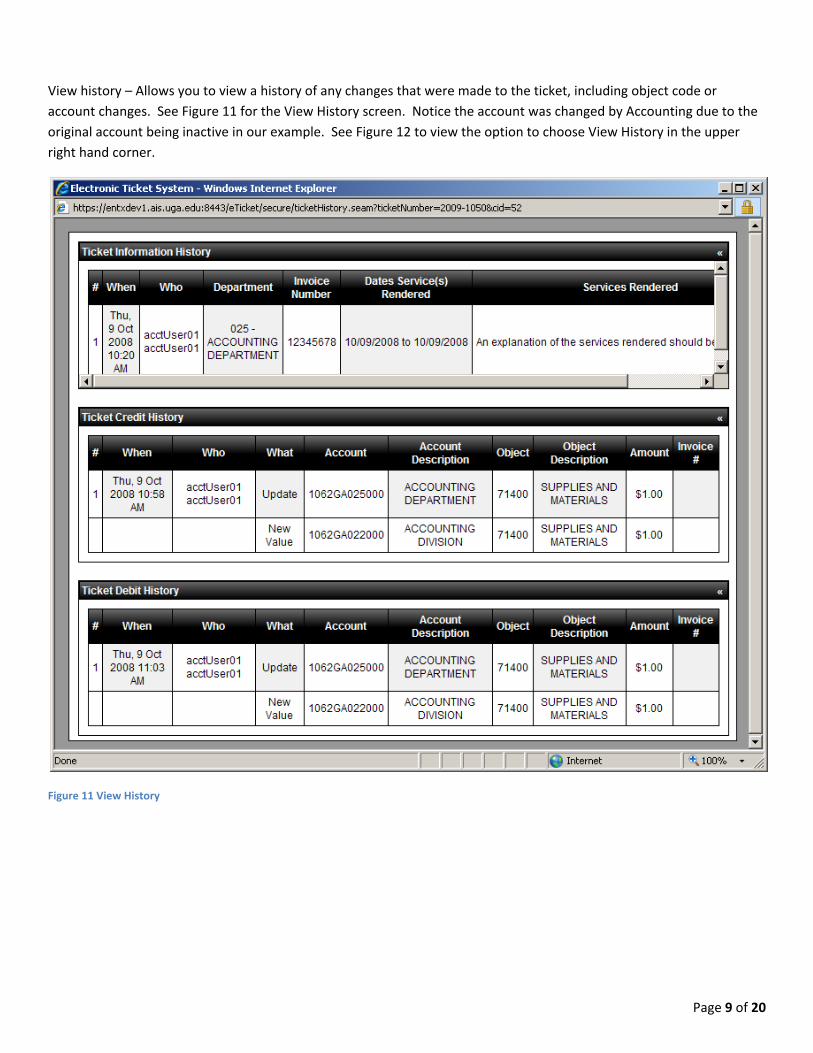
View history – Allows you to view a history of any changes that were made to the ticket, including object code or
account changes. See Figure 11 for the View History screen. Notice the account was changed by Accounting due to the
original account being inactive in our example. See Figure 12 to view the option to choose View History in the upper
right hand corner.
Figure 11 View History

Page 10 of 20
Export Line Items to Excel – This new feature allows users to export debit and credit information (account numbers,
object codes, amounts and invoice numbers) from the eTicket System to Excel. See Figure 12 for the option to choose
Export Line Items to Excel in the upper right hand corner. See Figure 13 for an example of the output export to Excel.
Figure 12 Other Options
Figure 13 Export Line Items to Excel results
Page 11 of 20
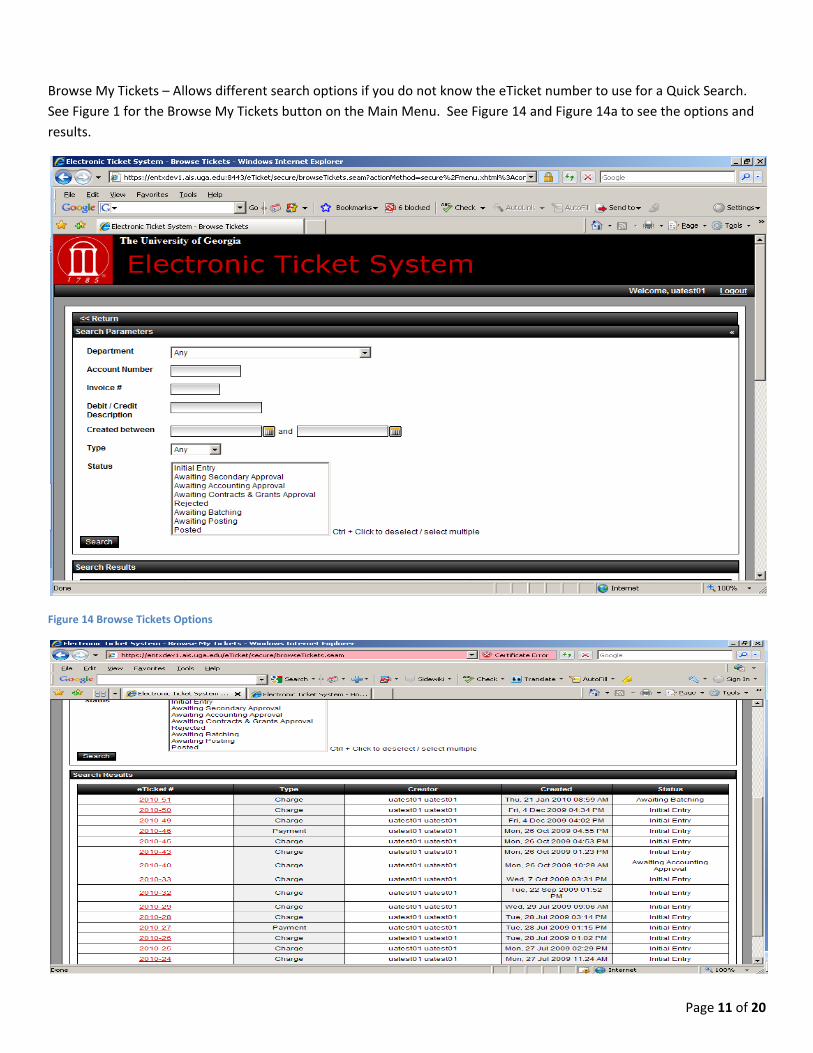
Browse My Tickets – Allows different search options if you do not know the eTicket number to use for a Quick Search.
See Figure 1 for the Browse My Tickets button on the Main Menu. See Figure 14 and Figure 14a to see the options and
results.
Figure 14 Browse Tickets Options
Page 12 of 20
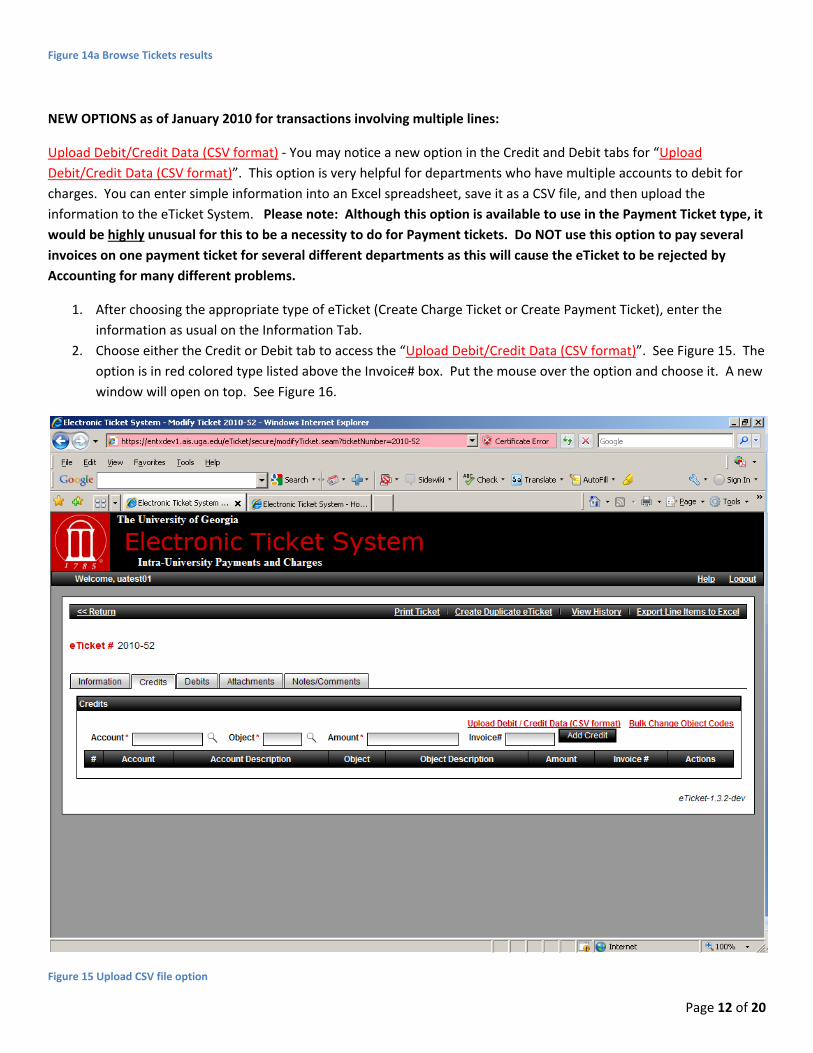
Figure 14a Browse Tickets results
NEW OPTIONS as of January 2010 for transactions involving multiple lines:
Upload Debit/Credit Data (CSV format) ‐ You may notice a new option in the Credit and Debit tabs for “Upload
Debit/Credit Data (CSV format)”. This option is very helpful for departments who have multiple accounts to debit for
charges. You can enter simple information into an Excel spreadsheet, save it as a CSV file, and then upload the
information to the eTicket System. Please note: Although this option is available to use in the Payment Ticket type, it
would be highly unusual for this to be a necessity to do for Payment tickets. Do NOT use this option to pay several
invoices on one payment ticket for several different departments as this will cause the eTicket to be rejected by
Accounting for many different problems.
1. After choosing the appropriate type of eTicket (Create Charge Ticket or Create Payment Ticket), enter the
information as usual on the Information Tab.
2. Choose either the Credit or Debit tab to access the “Upload Debit/Credit Data (CSV format)”. See Figure 15. The
option is in red colored type listed above the Invoice# box. Put the mouse over the option and choose it. A new
window will open on top. See Figure 16.
Figure 15 Upload CSV file option

Page 13 of 20
Figure 16 Upload CSV file box
3. When the Upload CSV box opens, you may need to choose Template if you need it or Sample File. The file
download box will open and ask if you want to Open, Save, or Cancel either file. You may choose Save and
browse where you want the file to be saved (keep this file for future use) and then open it in Excel to input the
data, or you may go ahead and Open it. Either way, be sure to save this template. The template already has the
headers in place for guidance and the Sample File can be used as a starting template as well. See Figure 17.
Figure 17 Blank Template
Page 14 of 20
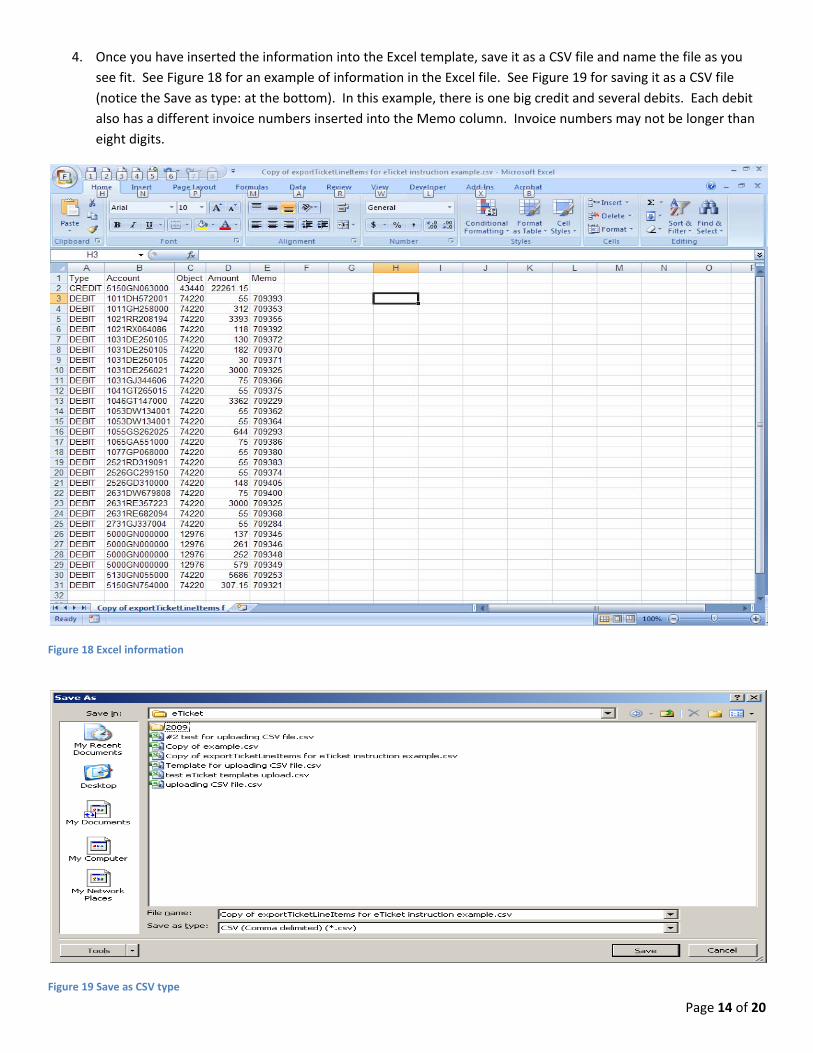
4. Once you have inserted the information into the Excel template, save it as a CSV file and name the file as you
see fit. See Figure 18 for an example of information in the Excel file. See Figure 19 for saving it as a CSV file
(notice the Save as type: at the bottom). In this example, there is one big credit and several debits. Each debit
also has a different invoice numbers inserted into the Memo column. Invoice numbers may not be longer than
eight digits.
Figure 18 Excel information
Figure 19 Save as CSV type
Page 15 of 20
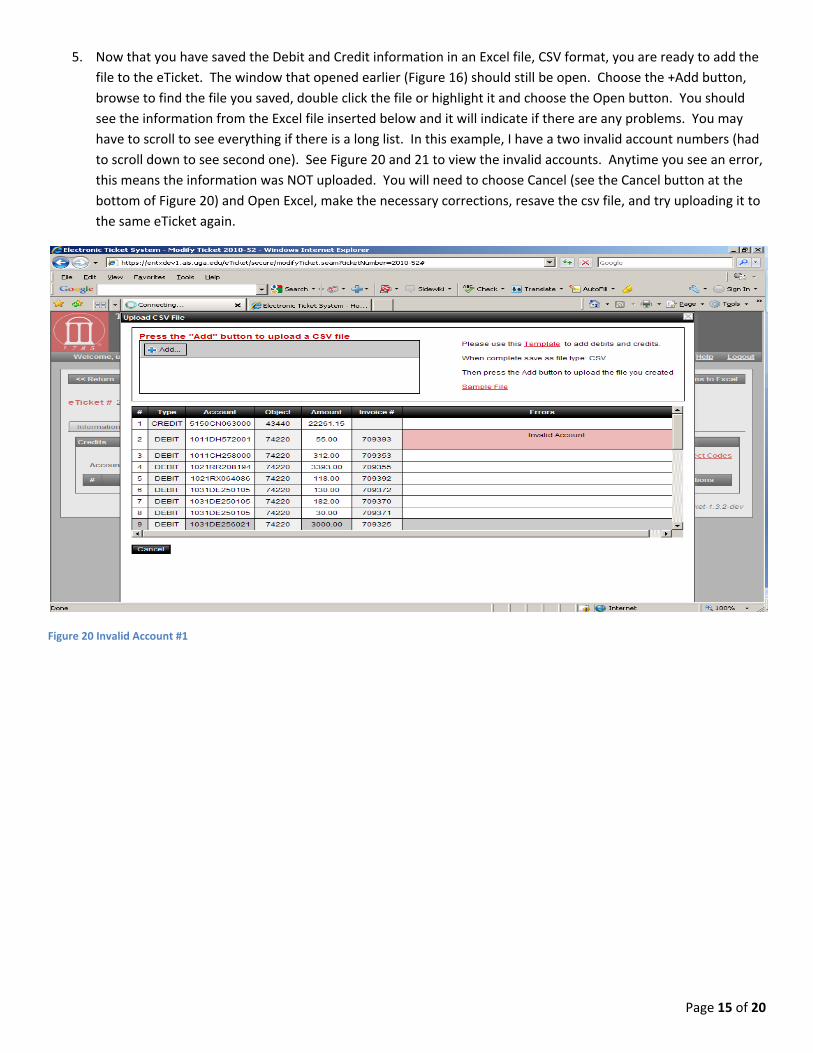
5. Now that you have saved the Debit and Credit information in an Excel file, CSV format, you are ready to add the
file to the eTicket. The window that opened earlier (Figure 16) should still be open. Choose the +Add button,
browse to find the file you saved, double click the file or highlight it and choose the Open button. You should
see the information from the Excel file inserted below and it will indicate if there are any problems. You may
have to scroll to see everything if there is a long list. In this example, I have a two invalid account numbers (had
to scroll down to see second one). See Figure 20 and 21 to view the invalid accounts. Anytime you see an error,
this means the information was NOT uploaded. You will need to choose Cancel (see the Cancel button at the
bottom of Figure 20) and Open Excel, make the necessary corrections, resave the csv file, and try uploading it to
the same eTicket again.
Figure 20 Invalid Account #1

Page 16 of 20
Figure 21 Invalid Account #2
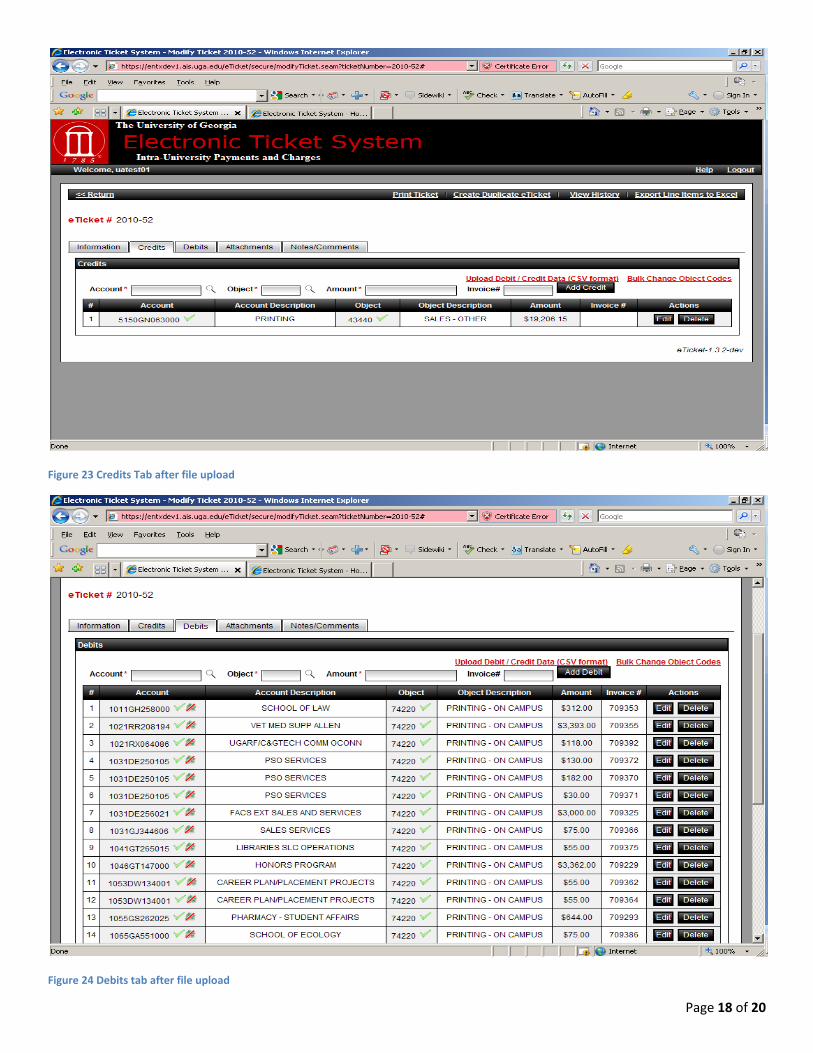
6. After choosing the Cancel button when errors have prevented progress, the eTicket System reverts back to the
Credits or Debits tab depending on which one you had opened when you first chose the Upload Option. After
correcting the errors in Excel, choose the Upload option in the same eTicket once again and then choose +Add
when the Upload CSV file window reopens. If there are no errors that will prevent further progress, the data will
be listed once again at the bottom and there will be two buttons, Submit and Cancel, listed below the data. See
Figure 22. If all appears to be fine, choose Submit. The Upload window will close and you should see the
account(s) that were listed in the Excel file as a credits will be in the Credits tab and the debits will be in the
Debits Tab of the eTicket System just as they would appear if you had keyed them directly into the system. See
Figure 23 and Figure 24.

Page 17 of 20
Figure 22 Upload with no errors indicated
Page 18 of 20
Figure 23 Credits Tab after file upload
Figure 24 Debits tab after file upload

Page 19 of 20
7. At this point you should complete the eTicket as usual (Attachments, any applicable Notes/Comments that you
want to add, and then submit to an approver).
Bulk Change Object Codes – This option is very helpful if there are multiple accounts listed with an incorrect object code.
Instead of editing each line for each account, you may use this option to perform a mass edit. For example, let’s say an
Initiator notices after uploading a CSV file that the wrong object code was listed; or perhaps an Approver notices that
the Initiator submitted a ticket for approval and had the object code incorrect for all the accounts debited. You may edit
the ticket, choose either the Credits or Debits tab depending on where the error is, and choose Bulk Change Object
Codes.
1. See Figure 25 for an example of debit listed with an incorrect object code 71400 when it should
be 74220 for the Printing Department.
Figure 25 Incorrect codes for multiple lines
2. Choose “Bulk Change Object Codes”. A window will open and you should insert the Old Object
Code (which would be the object code that you want to change) and insert the New Object Code
(the code you want to change to use). See Figure 26.

Page 20 of 20
Figure 26 Bulk changing object codes
3. Choose Submit and the object codes should be changed. See earlier Figure 24.
4. If you were the Initiator who made the change, complete the ticket as usual and submit to your
Approver. If you were the Approver who made the change, complete your review of the ticket
and then make the appropriate Workflow decision as usual (Approve, Reject, Forward, Approve
and Forward).
Top Related