


Languages
Pages
Legal


EDB Postgres™ Advanced Server Installation Guide
EDB Postgres™ Advanced Server 9.5 formerly Postgres Plus Advanced Server 9.5
February 23, 2017

Copyright © 2009 - 2017 EnterpriseDB Corporation. All rights reserved.
2
EDB Postgres™ Advanced Server Installation Guide by EnterpriseDB® Corporation
Copyright © 2009 - 2017 EnterpriseDB Corporation. All rights reserved.
EnterpriseDB Corporation, 34 Crosby Drive Suite 100, Bedford, MA 01730, USA
T +1 781 357 3390 F +1 978 589 5701 E [email protected] www.enterprisedb.com

EDB Postgres Advanced Server Installation Guide
Copyright © 2009 - 2017 EnterpriseDB Corporation. All rights reserved.
3
Table of Contents
1 Introduction ........................................................................................................................................... 6
1.1 Typographical Conventions Used in this Guide ............................................................................... 7
2 Requirements Overview ........................................................................................................................ 8
2.1 Supported Platforms ......................................................................................................................... 8
2.2 Supported Locales ............................................................................................................................ 9
2.3 RPM Installation Pre-Requisites .....................................................................................................10
3 Using a Package Manager to Install Advanced Server ........................................................................11
3.1 Installing an RPM Package .............................................................................................................12
3.1.1 Performing a Minor Version Update of an RPM Installation ................................................16
3.1.2 Installing Advanced Server on an Isolated Network .............................................................17
3.2 Configuring a Package Installation .................................................................................................19
3.2.1 Specifying initdb Options in the Service Configuration File .................................................20
3.2.2 Creating a Database Cluster and Starting the Service ............................................................21
3.3 Advanced Server RPM Installers ....................................................................................................22
4 Installing Advanced Server with the Interactive Installer ....................................................................26
4.1 Graphical Installation Prerequisites .................................................................................................27
4.2 Locales Requiring Product Keys .....................................................................................................29
4.3 Performing a Graphical Installation ................................................................................................31
4.3.1 Using the Graphical Installer with Windows .........................................................................32
4.3.2 Using the Graphical Installer on a Linux System ..................................................................51
4.4 Invoking the Installer from the Command Line ..............................................................................72
4.4.1 Performing a Text Mode Installation .....................................................................................73
4.4.2 Performing an Unattended Installation ..................................................................................88
4.4.3 Performing an Installation with Limited Privileges ...............................................................91
4.4.4 Reference - Command Line Options ...................................................................................107
4.5 Using StackBuilder Plus ...............................................................................................................116
4.6 Using the Update Monitor .............................................................................................................124
4.7 Installation Troubleshooting .........................................................................................................127
5 Managing an Advanced Server Installation .......................................................................................129
5.1 Starting and Stopping Advanced Server and Supporting Components .........................................129
5.2 Controlling a Service on Linux .....................................................................................................130
5.2.1 Controlling a Service on CentOS or RHEL 7.x ...................................................................130
5.2.2 Controlling a Service on CentOS or RHEL 6.x ...................................................................131
5.2.3 Using pg_ctl to Control Advanced Server ...........................................................................133
5.2.4 Using the edbstart and edbstop Utilities ..............................................................................134
5.2.5 Configuring Component Services to AutoStart at System Reboot ......................................137
5.3 Controlling a Service on Windows ...............................................................................................138
EDB Postgres Advanced Server Installation Guide
Copyright © 2009 - 2017 EnterpriseDB Corporation. All rights reserved.
4
5.3.1 Controlling Server Startup Behavior on Windows ..............................................................140
5.4 Using initdb to Create a Cluster ....................................................................................................142
6 Configuring Advanced Server ...........................................................................................................144
6.1 Modifying the postgresql.conf File ...............................................................................................145
6.2 Modifying the pg_hba.conf File ....................................................................................................148
6.3 Setting Advanced Server Environment Variables .........................................................................149
6.4 Connecting to Advanced Server ....................................................................................................151
6.4.1 Connecting to an Oracle or MySQL Database.....................................................................152
7 Advanced Server Supporting Components ........................................................................................153
7.1 EDB*Plus - Configuring an RPM Installation ..............................................................................153
7.2 Infinite Cache ................................................................................................................................155
7.3 Language Pack ..............................................................................................................................157
7.4 Migration Toolkit - Configuring an RPM Installation ..................................................................160
7.5 pgAgent .........................................................................................................................................162
7.6 PgBouncer .....................................................................................................................................168
7.7 pgpool-II........................................................................................................................................172
7.8 pgsnmpd ........................................................................................................................................183
7.9 PL/Java ..........................................................................................................................................186
7.9.1 Installing PL/Java on Linux .................................................................................................186
7.9.2 Installing PL/Java on Windows ...........................................................................................189
7.9.3 Using PL/Java ......................................................................................................................192
7.10 PL/Perl ......................................................................................................................................194
7.11 PL/Python .................................................................................................................................195
7.12 PL/Tcl .......................................................................................................................................197
7.13 PostGIS.....................................................................................................................................198
7.13.1 Upgrading to PostGIS 2.0 ....................................................................................................201
7.14 Slony ........................................................................................................................................206
7.15 SQL Profiler .............................................................................................................................207
7.16 sslutils .......................................................................................................................................209
8 Upgrading an Installation With pg_upgrade ......................................................................................211
8.1 Performing an Upgrade - Overview ..............................................................................................212
8.1.1 Linking versus Copying .......................................................................................................213
8.2 Invoking pg_upgrade ....................................................................................................................214
8.2.1 Command Line Options - Reference ...................................................................................216
8.3 Upgrading to Advanced Server 9.5 ...............................................................................................219
8.4 pg_upgrade Troubleshooting .........................................................................................................227
8.4.1 Upgrade Error - There seems to be a postmaster servicing the cluster ................................227
8.4.2 Upgrade Error - fe_sendauth: no password supplied ...........................................................227
8.4.3 Upgrade Error - New cluster is not empty; exiting ..............................................................227

EDB Postgres Advanced Server Installation Guide
Copyright © 2009 - 2017 EnterpriseDB Corporation. All rights reserved.
5
8.4.4 Upgrade Error - Failed to load library .................................................................................227
8.5 Reverting to the Old Cluster ..........................................................................................................229
9 Un-Installing Advanced Server ..........................................................................................................230
9.1 Uninstalling a Package with rpm...................................................................................................230
9.2 Uninstalling a Package with yum ..................................................................................................231
9.3 Un-Installing Advanced Server at the Command Line .................................................................232
9.4 Un-installing Advanced Server on a Windows System .................................................................234

EDB Postgres Advanced Server Installation Guide
Copyright © 2009 - 2017 EnterpriseDB Corporation. All rights reserved.
6
1 Introduction
Notice: The names for EDB™’s products have changed. The product formerly referred to as Postgres Plus
Advanced Server is now referred to as EDB Postgres™ Advanced Server. Until a new version of this
documentation is published, wherever you see Postgres Plus Advanced Server you may substitute it with
EDB Postgres Advanced Server. Name changes in software and software outputs will be phased in over
time.
The EDB Postgres Advanced Server Installation Guide is a comprehensive guide to
installing EDB Postgres Advanced Server (Advanced Server). In this guide you will find
detailed information about:
Software prerequisites for Advanced Server 9.5
Using a package manager to install and update Advanced Server and its
supporting components or utilities
Installation options available through the interactive installation wizard on both
Linux and Windows
Managing an Advanced Server installation
Configuring an Advanced Server installation
Configuring Advanced Server supporting components
Using pg_upgrade to upgrade from an earlier version of Advanced Server to
Advanced Server 9.5
Uninstalling Advanced Server and its components

EDB Postgres Advanced Server Installation Guide
Copyright © 2009 - 2017 EnterpriseDB Corporation. All rights reserved.
7
1.1 Typographical Conventions Used in this Guide
Certain typographical conventions are used in this manual to clarify the meaning and
usage of various commands, statements, programs, examples, etc. This section provides a
summary of these conventions.
In the following descriptions a term refers to any word or group of words that are
language keywords, user-supplied values, literals, etc. A term’s exact meaning depends
upon the context in which it is used.
Italic font introduces a new term, typically, in the sentence that defines it for the
first time.
Fixed-width (mono-spaced) font is used for terms that must be given
literally such as SQL commands, specific table and column names used in the
examples, programming language keywords, etc. For example, SELECT * FROM emp;
Italic fixed-width font is used for terms for which the user must
substitute values in actual usage. For example, DELETE FROM table_name;
A vertical pipe | denotes a choice between the terms on either side of the pipe. A
vertical pipe is used to separate two or more alternative terms within square
brackets (optional choices) or braces (one mandatory choice).
Square brackets [ ] denote that one or none of the enclosed term(s) may be
substituted. For example, [ a | b ], means choose one of “a” or “b” or neither
of the two.
Braces {} denote that exactly one of the enclosed alternatives must be specified.
For example, { a | b }, means exactly one of “a” or “b” must be specified.
Ellipses ... denote that the proceeding term may be repeated. For example, [ a |
b ] ... means that you may have the sequence, “b a a b a”.
EDB Postgres Advanced Server Installation Guide
Copyright © 2009 - 2017 EnterpriseDB Corporation. All rights reserved.
8
2 Requirements Overview
The following sections detail the supported platforms and installation requirements for
EDB Postgres Advanced Server 9.5.
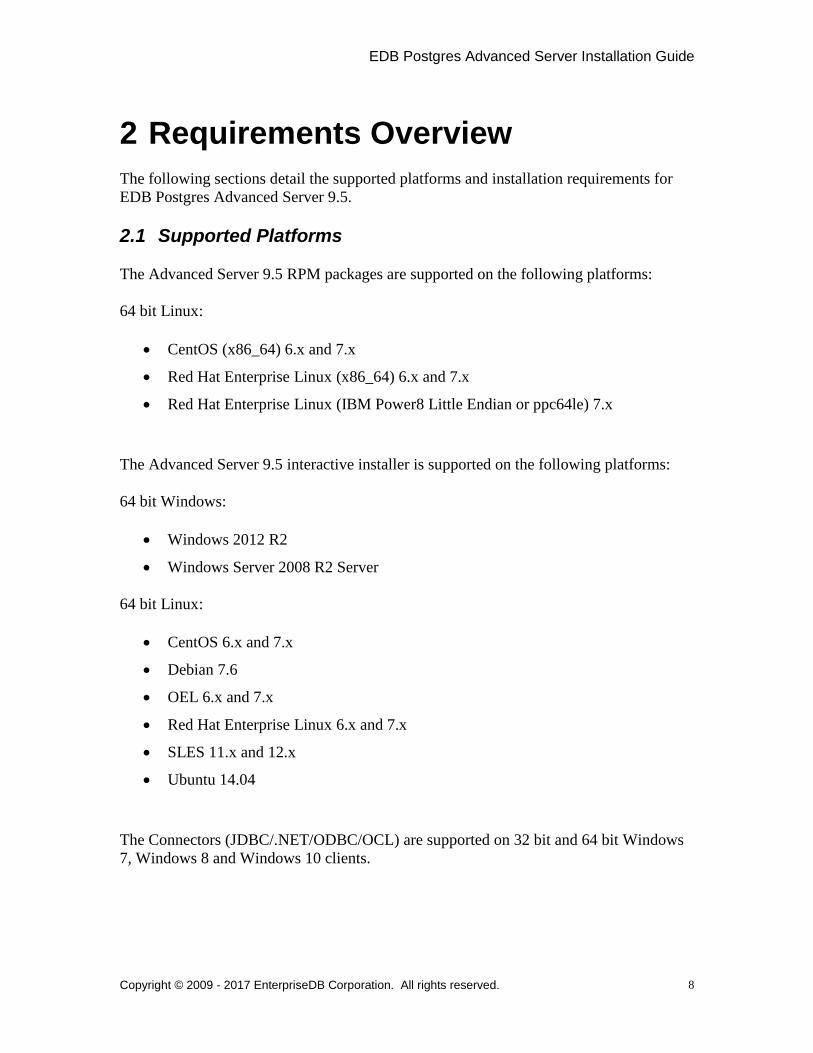
2.1 Supported Platforms
The Advanced Server 9.5 RPM packages are supported on the following platforms:
64 bit Linux:
CentOS (x86_64) 6.x and 7.x
Red Hat Enterprise Linux (x86_64) 6.x and 7.x
Red Hat Enterprise Linux (IBM Power8 Little Endian or ppc64le) 7.x
The Advanced Server 9.5 interactive installer is supported on the following platforms:
64 bit Windows:
Windows 2012 R2
Windows Server 2008 R2 Server
64 bit Linux:
CentOS 6.x and 7.x
Debian 7.6
OEL 6.x and 7.x
Red Hat Enterprise Linux 6.x and 7.x
SLES 11.x and 12.x
Ubuntu 14.04
The Connectors (JDBC/.NET/ODBC/OCL) are supported on 32 bit and 64 bit Windows
7, Windows 8 and Windows 10 clients.
EDB Postgres Advanced Server Installation Guide
Copyright © 2009 - 2017 EnterpriseDB Corporation. All rights reserved.
9
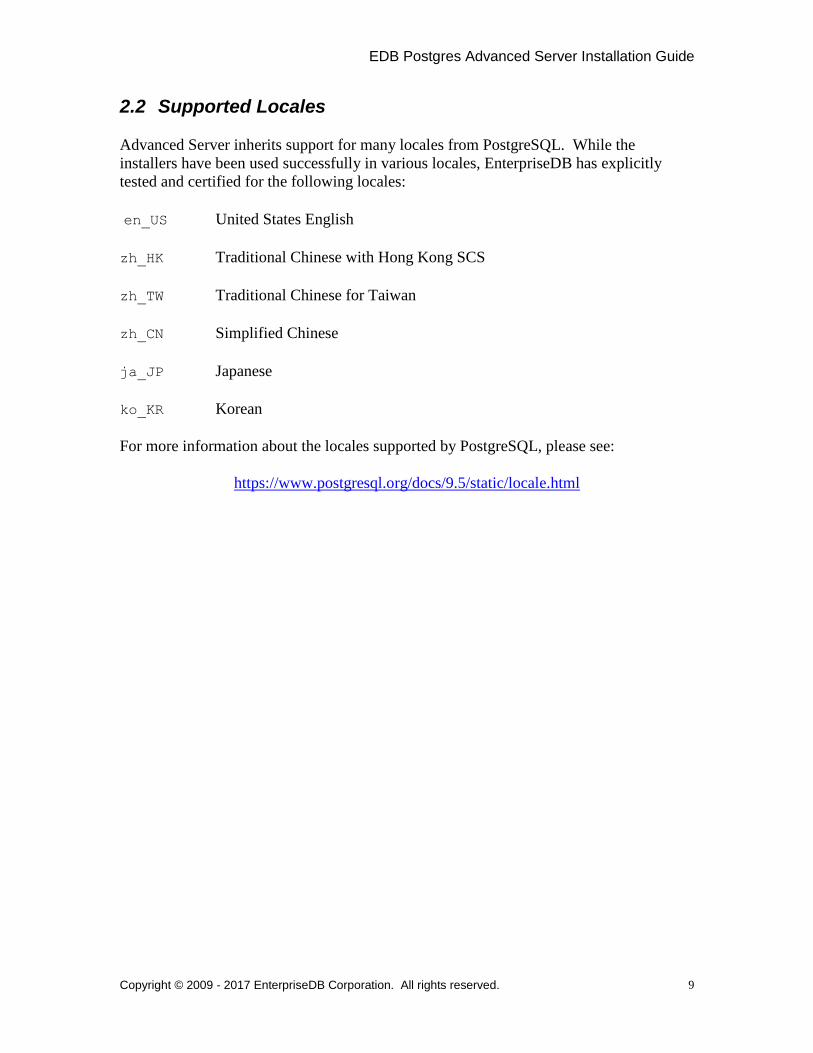
2.2 Supported Locales
Advanced Server inherits support for many locales from PostgreSQL. While the
installers have been used successfully in various locales, EnterpriseDB has explicitly
tested and certified for the following locales:
en_US United States English
zh_HK Traditional Chinese with Hong Kong SCS
zh_TW Traditional Chinese for Taiwan
zh_CN Simplified Chinese
ja_JP Japanese
ko_KR Korean
For more information about the locales supported by PostgreSQL, please see:
https://www.postgresql.org/docs/9.5/static/locale.html

EDB Postgres Advanced Server Installation Guide
Copyright © 2009 - 2017 EnterpriseDB Corporation. All rights reserved.
10
2.3 RPM Installation Pre-Requisites
Installing EPEL
Before installing Advanced Server components that include or support pgAgent or
PostGIS, you may be required to install the EPEL (Extra Packages for Enterprise Linux)
repository. If your platform has yum access to the EPEL repository, you can assume
superuser privileges and enter:
yum install epel-release
If yum cannot access the EPEL repository, you will get an error message:
No package epel available.
Error: Nothing to do
If you receive this error, you can download the EPEL RPM package, and install it
manually. To manually install EPEL, download the RPM package, assume superuser
privileges, navigate into the directory that contains the package, and install EPEL with
the command:
yum install epel-release-latest-7.noarch.rpm
Alternatively, you can download the EPEL RPM package and install it with one
command as shown by the following:
rpm -Uvh https://dl.fedoraproject.org/pub/epel/epel-
release-latest-7.noarch.rpm
For more information about installing EPEL, visit:
https://fedoraproject.org/wiki/EPEL#How_can_I_use_these_extra_packages.3F
EDB Postgres Advanced Server Installation Guide
Copyright © 2009 - 2017 EnterpriseDB Corporation. All rights reserved.
11
3 Using a Package Manager to Install Advanced Server
You can use the Yum (Yellowdog Updater, Modified) package manager to install
Advanced Server or Advanced Server supporting components. Yum will attempt to
satisfy package dependencies as it installs a package, but requires access to the Advanced
Server repositories. If your system does not have access to a repository via the Internet,
you can use RPM to install a package or create a local repository, but you may be
required to manually satisfy package dependencies.
The ppas95 meta RPM installs Advanced Server, and its core supporting components.
You can use the Advanced Server meta RPM for installation convenience, or pick and
choose any sub-component that you need on a particular machine. Note that some sub-
components require the installation of other Advanced Server component packages, while
other packages may be installed individually. For a complete list of the RPM installers
available for Advanced Server and its supporting components, see Section 3.3.
The installation of the server package creates a database superuser named
enterprisedb. The user is assigned a UID and a GID of 26. The user has no default
password; use the passwd command to assign a password for the user. The default shell
for the user is bash, and the user's home directory is /var/lib/ppas.
By default, Advanced Server logging is configured to write files to the pg_log
subdirectory of the data directory, rotating the files each day and retaining one week of
log entries. You can customize the logging behavior of the server by modifying the
postgresql.conf file, located in /var/lib/ppas/9.5/data.
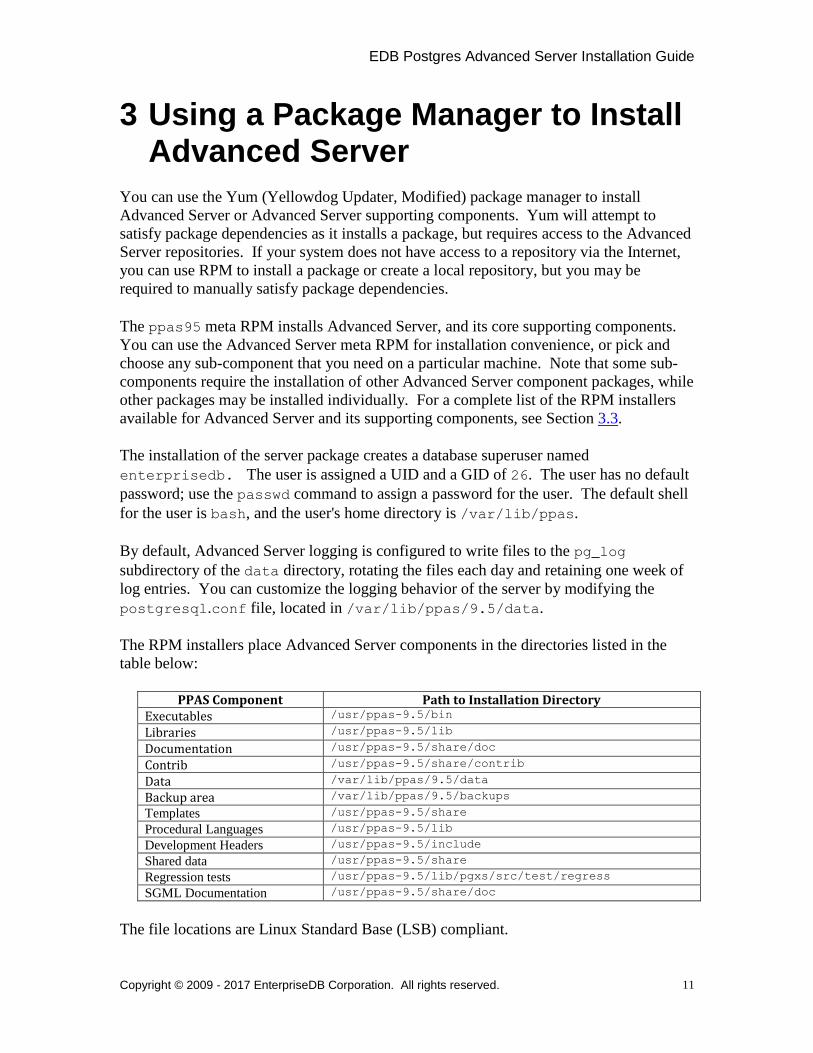
The RPM installers place Advanced Server components in the directories listed in the
table below:
PPAS Component Path to Installation Directory
Executables /usr/ppas-9.5/bin
Libraries /usr/ppas-9.5/lib
Documentation /usr/ppas-9.5/share/doc
Contrib /usr/ppas-9.5/share/contrib
Data /var/lib/ppas/9.5/data
Backup area /var/lib/ppas/9.5/backups
Templates /usr/ppas-9.5/share
Procedural Languages /usr/ppas-9.5/lib
Development Headers /usr/ppas-9.5/include
Shared data /usr/ppas-9.5/share
Regression tests /usr/ppas-9.5/lib/pgxs/src/test/regress
SGML Documentation /usr/ppas-9.5/share/doc
The file locations are Linux Standard Base (LSB) compliant.

EDB Postgres Advanced Server Installation Guide
Copyright © 2009 - 2017 EnterpriseDB Corporation. All rights reserved.
12
3.1 Installing an RPM Package
Using yum to install Advanced Server (or its supporting components) is a simple process:
1. Download the edb-repo installation package from:
http://yum.enterprisedb.com/
The edb-repo RPM creates the repository configuration file (named edb-
repo). The edb-repo file contains connection information for the EnterpriseDB
repository. You must create this file if you are installing any or all of the
following:
Advanced Server
EDB*Plus
EnterpriseDB Backup and Restore
EnterpriseDB Failover Manager
Infinite Cache
The JDBC Connector
Migration Toolkit
PgAgent
PgBouncer
PgPool
PL/Java
PL/pgSQL Debugger
PostGIS
Slony Replication
SQL Profiler
The OCI Connector
The ODBC Connector
The PEM Client
xDB Replication Server
2. Assume superuser privileges and install the repository configuration files. Use
the following command to install the edb.repo file:
rpm -Uvh edb-repo-9.5-x.noarch.rpm
3. Use your choice of editor to modify the repository configuration file, enabling
each repository from which you will install packages. The repository
configuration file is named edb.repo; it resides in the following directory:
/etc/yum.repos.d

EDB Postgres Advanced Server Installation Guide
Copyright © 2009 - 2017 EnterpriseDB Corporation. All rights reserved.
13
To enable a repository, change the value of the enabled parameter to 1 and
replace the username and password placeholders in the baseurl specification
with your user name and the repository password.
The [ppas95] repository
Modify the [ppas95] entry in the edb.repo file to install:
Advanced Server
EDB*Plus
Infinite Cache
PgAgent
PL/Java
PL/pgSQL Debugger
PostGIS
Slony Replication
SQL Profiler
[ppas95]
Name=Postgres Plus Advanced Server 9.5 $releasever -
$basearch
baseurl=http://user_name:[email protected]/9.5/
redhat/rhel-$releasever-$basearch
enabled=1
gpgcheck=1
gpgkey=file:///etc/pki/rpm-gpg/ENTERPRISEDB-GPG-KEY
Note that you must also modify the [enterprise-tools] entry for a complete
installation of Advanced Server that includes EDB*Plus and PostGIS.
The [enterprisedb-tools] repository
Modify the [enterprisedb-tools] entry in the edb.repo file to install:
EnterpriseDB Backup and Restore
EnterpriseDB Failover Manager
Migration Toolkit
PgBouncer
PgPool
The JDBC Connector
The OCI Connector
The ODBC Connector
The PEM Client
xDB Replication Server
EDB Postgres Advanced Server Installation Guide
Copyright © 2009 - 2017 EnterpriseDB Corporation. All rights reserved.
14
[enterprisedb-tools]
name=EnterpriseDB Tools $releasever - $basearch
baseurl=http://user_name:[email protected]/tool
s/redhat/rhel-$releasever-$basearch
enabled=1
gpgcheck=1
gpgkey=file:///etc/pki/rpm-gpg/ENTERPRISEDB-GPG-KEY
The [enterprisedb-dependencies] repository
To install a package on a ppc64le (IBM Power) system, you must also enable the
enterprisedb-dependencies repo.
[enterprisedb-dependencies]
name=EnterpriseDB Dependencies $releasever - $basearch
baseurl=http://user_name:[email protected]/depe
ndencies/redhat/rhel-$releasever-$basearch
enabled=1
gpgcheck=1
gpgkey=file:///etc/pki/rpm-gpg/ENTERPRISEDB-GPG-KEY
4. After you modify any applicable entries, save the configuration file and exit the
editor.
5. To confirm that the repository has been configured properly, you can use the
command:
yum search package_name
Where package_name specifies the name of a package. The repository search
should return a list of available packages that are prefixed by the specified
package_name.
For information about the available packages, see Section 3.3.
6. After modifying the content of the repository configuration file, you can use the
yum install command to install Advanced Server or its supporting components.
For example, to install the server and its core components, invoke the command:
yum install ppas95
When you install an RPM package that is signed by a source that is not recognized by
your system, yum may ask for your permission to import the key to your local server. If
prompted, and you are satisfied that the packages come from a trustworthy source, enter a
y, and press Return to continue.

EDB Postgres Advanced Server Installation Guide
Copyright © 2009 - 2017 EnterpriseDB Corporation. All rights reserved.
15
After installing Advanced Server, you must configure the installation; see Section 3.2,
Configuring an Advanced Server Installation, for details.
During the installation, yum may encounter a dependency that it cannot resolve. If it
does, it will provide a list of the required dependencies that you must manually resolve.

EDB Postgres Advanced Server Installation Guide
Copyright © 2009 - 2017 EnterpriseDB Corporation. All rights reserved.
16
3.1.1 Performing a Minor Version Update of an RPM Installation
If you used an RPM package to install Advanced Server and its supporting components,
you can use yum to perform a minor version upgrade to a more recent version. To review
a list of the package updates that are available for your system, open a command line,
assume root privileges, and enter the command:
yum check-update package_name
Where package_name is the search term for which you wish to search for updates.
Please note that you can include wild-card values in the search term.
To use yum update to install an updated package, use the command:
yum update package_name
Where package_name is the name of the package you wish to update. Include wild-
card values in the update command to update multiple related packages with a single
command. For example, use the following command:
yum update ppas*
To update all packages whose names include the expression ppas.
Please note that the yum update command will only perform an update between minor
releases; to update between major releases, you should use pg_upgrade. For more
information about using pg_upgrade, see Section 8.
For more information about using yum commands and options, enter yum --help on
your command line, or visit:
https://access.redhat.com/documentation/en-
US/Red_Hat_Enterprise_Linux/6/html/Deployment_Guide/ch-yum.html

EDB Postgres Advanced Server Installation Guide
Copyright © 2009 - 2017 EnterpriseDB Corporation. All rights reserved.
17
3.1.2 Installing Advanced Server on an Isolated Network
You can create a local yum repository to act as a host for the Advanced Server RPM
packages if the server on which you wish to install Advanced Server (or supporting
components) cannot directly access the EnterpriseDB repository. Please note that this is
a high-level listing of the steps required; you will need to modify the process for your
individual network.
To create and use a local repository, you must:
1. Use yum to install the yum-utils and createrepo packages:
yum install yum-utils
yum install createrepo
2. Create a directory in which to store the repository:
mkdir /srv/repos
3. Copy the RPM installation packages to your local network repository. You can
download the individual RPM files from:
yum.enterprisedb.com
4. Sync the RPM packages and create the repository.
reposync -r ppas95 -p /srv/repos
createrepo /srv/repos
5. Install your preferred webserver on the host that will act as your local repository,
and ensure that the repository directory is accessible to the other servers on your
network. For example, you might install lighttpd:
yum install lighttpd
6. If you are using lighttpd, you must provide a configuration file that identifies
the location of the repository on your local network. For example, the
configuration file might contain:
$HTTP["host"] == "yum.domain.com"{
server.document-root = "/srv/repos"
server.errorlog="/var/log/lighttpd/yum_error.log"
accesslog.filename =
"/var/log/lighttpd/yum_access.log"}

EDB Postgres Advanced Server Installation Guide
Copyright © 2009 - 2017 EnterpriseDB Corporation. All rights reserved.
18
For detailed information about installing, configuring and using lighttpd, visit the
official project site at:
http://redmine.lighttpd.net/projects/1/wiki/Docs
7. On each isolated database server, configure yum to pull updates from the mirrored
repository on your local network. For example, you might create a file called
/etc/yum.repos.d/edb-repo with connection information that specifies:
[ppas95]
name=EnterpriseDB Advanced Server 9.5
baseurl=http://yum.domain.com/ppas95
enabled=1
gpgcheck=0
After specifying the location and connection information for your local repository, you
can use yum commands to install Advanced Server and its supporting components on the
isolated servers. For example:
yum install ppas95
For more information about creating a local repository, visit:
http://yum.baseurl.org/
EDB Postgres Advanced Server Installation Guide
Copyright © 2009 - 2017 EnterpriseDB Corporation. All rights reserved.
19
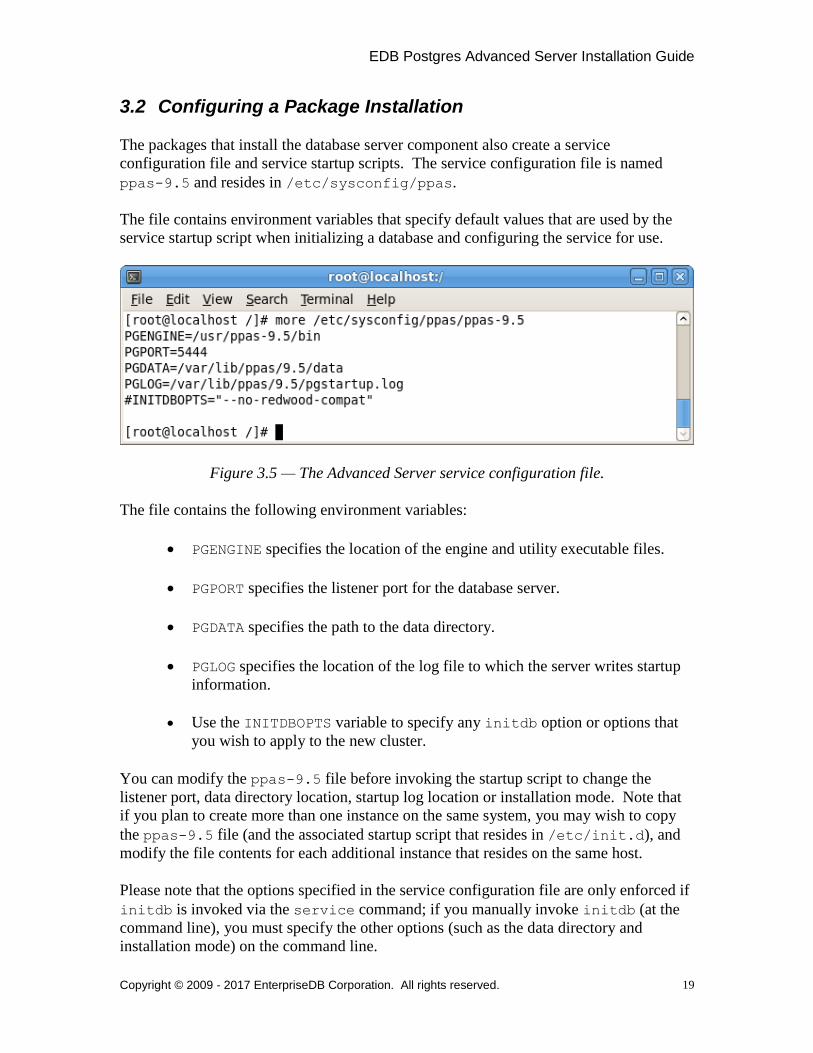
3.2 Configuring a Package Installation
The packages that install the database server component also create a service
configuration file and service startup scripts. The service configuration file is named
ppas-9.5 and resides in /etc/sysconfig/ppas.
The file contains environment variables that specify default values that are used by the
service startup script when initializing a database and configuring the service for use.
Figure 3.5 — The Advanced Server service configuration file.
The file contains the following environment variables:
PGENGINE specifies the location of the engine and utility executable files.
PGPORT specifies the listener port for the database server.
PGDATA specifies the path to the data directory.
PGLOG specifies the location of the log file to which the server writes startup
information.
Use the INITDBOPTS variable to specify any initdb option or options that
you wish to apply to the new cluster.
You can modify the ppas-9.5 file before invoking the startup script to change the
listener port, data directory location, startup log location or installation mode. Note that
if you plan to create more than one instance on the same system, you may wish to copy
the ppas-9.5 file (and the associated startup script that resides in /etc/init.d), and
modify the file contents for each additional instance that resides on the same host.
Please note that the options specified in the service configuration file are only enforced if
initdb is invoked via the service command; if you manually invoke initdb (at the
command line), you must specify the other options (such as the data directory and
installation mode) on the command line.

EDB Postgres Advanced Server Installation Guide
Copyright © 2009 - 2017 EnterpriseDB Corporation. All rights reserved.
20
3.2.1 Specifying initdb Options in the Service Configuration File
By default, the INITDBOPTS variable is commented out in the service configuration file;
unless modified, when you run the service startup script, the new cluster will be created
in a mode compatible with Oracle databases. Clusters created in this mode will contain a
database named edb, and have a database superuser named enterprisedb.
To create a new cluster in PostgreSQL mode, remove the pound sign (#) in front of the
INITDBOPTS variable, enabling the "--no-redwood-compat" option. Clusters
created in PostgreSQL mode will contain a database named postgres, and have a
database superuser named enterprisedb.
You may also specify multiple initdb options. For example, the following statement:
INITDBOPTS="--no-redwood-compat -U alice --locale=en_US.UTF-8"
Creates a database cluster (without compatibility features for Oracle) that contains a
database named postgres that is owned by a user named alice; the cluster uses UTF-
8 encoding.
For more information about creating a custom cluster with initdb, see Section 5.4.

EDB Postgres Advanced Server Installation Guide
Copyright © 2009 - 2017 EnterpriseDB Corporation. All rights reserved.
21
3.2.2 Creating a Database Cluster and Starting the Service
After specifying any options in the service configuration file, you must create the
database cluster and start the service; these steps are platform specific.
On RHEL or CentOS 6.x
To create a database cluster in the PGDATA directory that listens on the port specified by
the PGPORT specified in the service configuration file described in Section 3.2, assume
root privileges, navigate into the /usr/ppas-9.5/bin directory, and invoke the
service script:
service ppas-9.5 initdb
You can also assign a locale to the cluster when invoking initdb. By default, initdb
will use the value specified by the $LANG operating system variable, but if you append a
preferred locale when invoking the script, the cluster will use the alternate value. For
example, to create a database cluster that uses simplified Chinese, invoke the command:
service ppas-9.5 initdb zh_CH.UTF-8
After creating a database cluster, start the database server with the command:
service ppas-9.5 start
The command starts a postmaster listening on the port specified in the service
configuration file; by default, an Advanced Server postmaster listens on port 5444.
For more information about using the service command, please see Section 5.2.
On RHEL or CentOS 7.x
To invoke initdb on a RHEL or CentOS 7.x system, with the options specified in the
service configuration file, assume the identity of the operating system superuser:
su - root
Then, invoke initdb:
/usr/lib/systemd/system/ppas-9.5.sh initdb
After creating the cluster, use systemctl to start the service:
For more information about using initdb, see Section 5.4.

EDB Postgres Advanced Server Installation Guide
Copyright © 2009 - 2017 EnterpriseDB Corporation. All rights reserved.
22
3.3 Advanced Server RPM Installers
The tables that follow list the packages that are available from EnterpriseDB. Please note
that you can also use the yum search command to access a list of the packages that are
currently available from your configured repository. To use the yum search command,
open a command line, assume root privileges, and enter:
yum search package
Where package is the search term that specifies the name (or partial name) of a package.
The repository search will return a list of available packages that include the specified
search term.
The following table lists the packages that are stored in the ppas95 repository:
Package Name Package Installs ppas95 The ppas95 meta RPM installs Advanced Server, and its core
supporting components. This package installs: Database server
Client programs (edb-psql, pg_dump, pg_restore, and other client utilities)
Community contributed modules
Community documentation
ecpg/ecpgPlus
EDB*Plus
Index Advisor
Infinite Cache
pgAgent pgsnmpd
PL Debugger
PL/Java
PL/Perl PL/Python
PL/Tcl pgpool-extensions
Slony Replication
SQL Profiler
SQL Protect sslutils
Supporting library files Before installing this package, you must install EPEL; for detailed information about installing EPEL, see Section 2.3.
ppas95-server This package contains an Advanced Server meta installer that installs the database server.
ppas95-server-client The ppas95-server-client package contains client programs and utilities that you can use to access and manage Advanced Server.
ppas95-server-contrib The ppas95-contrib package installs contributed tools and utilities that are distributed with Advanced Server. Files for these modules are installed in: Documentation: /usr/ppas-9.5/share/doc
EDB Postgres Advanced Server Installation Guide
Copyright © 2009 - 2017 EnterpriseDB Corporation. All rights reserved.
23
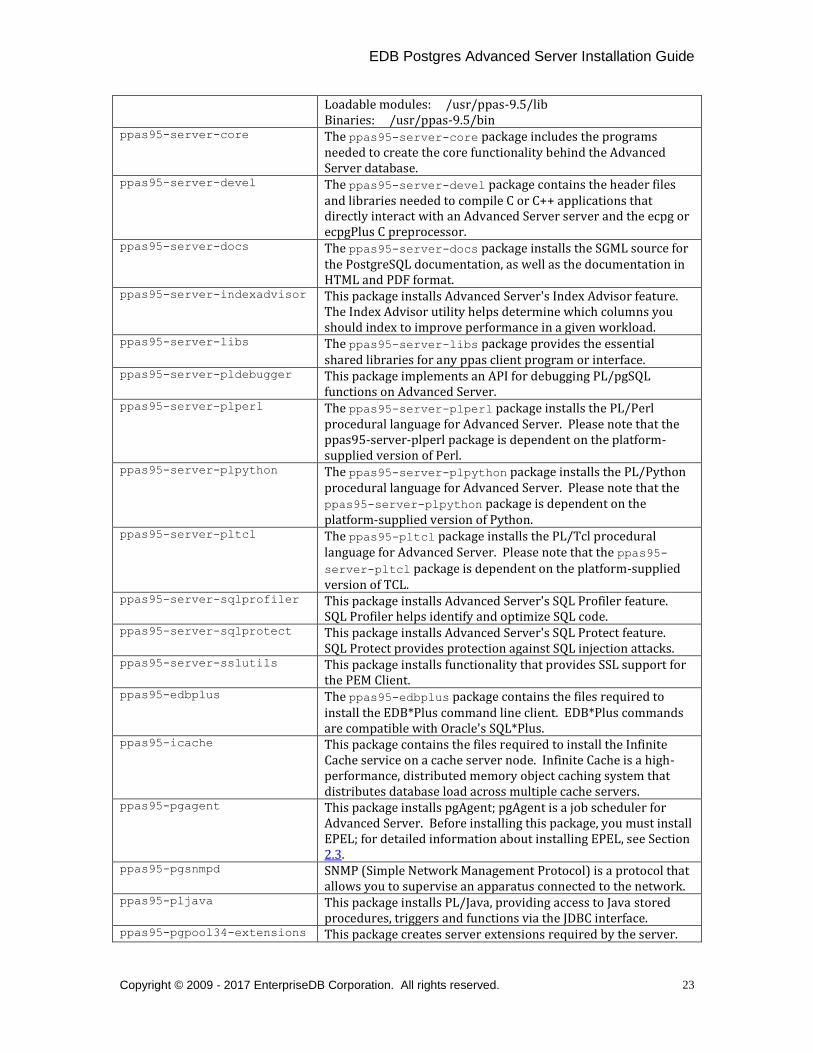
Loadable modules: /usr/ppas-9.5/lib Binaries: /usr/ppas-9.5/bin
ppas95-server-core The ppas95-server-core package includes the programs needed to create the core functionality behind the Advanced Server database.
ppas95-server-devel The ppas95-server-devel package contains the header files and libraries needed to compile C or C++ applications that directly interact with an Advanced Server server and the ecpg or ecpgPlus C preprocessor.
ppas95-server-docs The ppas95-server-docs package installs the SGML source for the PostgreSQL documentation, as well as the documentation in HTML and PDF format.
ppas95-server-indexadvisor This package installs Advanced Server's Index Advisor feature. The Index Advisor utility helps determine which columns you should index to improve performance in a given workload.
ppas95-server-libs The ppas95-server-libs package provides the essential shared libraries for any ppas client program or interface.
ppas95-server-pldebugger This package implements an API for debugging PL/pgSQL functions on Advanced Server.
ppas95-server-plperl The ppas95-server-plperl package installs the PL/Perl procedural language for Advanced Server. Please note that the ppas95-server-plperl package is dependent on the platform-supplied version of Perl.
ppas95-server-plpython The ppas95-server-plpython package installs the PL/Python procedural language for Advanced Server. Please note that the ppas95-server-plpython package is dependent on the platform-supplied version of Python.
ppas95-server-pltcl The ppas95-pltcl package installs the PL/Tcl procedural language for Advanced Server. Please note that the ppas95-server-pltcl package is dependent on the platform-supplied version of TCL.
ppas95-server-sqlprofiler This package installs Advanced Server's SQL Profiler feature. SQL Profiler helps identify and optimize SQL code.
ppas95-server-sqlprotect This package installs Advanced Server's SQL Protect feature. SQL Protect provides protection against SQL injection attacks.
ppas95-server-sslutils This package installs functionality that provides SSL support for the PEM Client.
ppas95-edbplus The ppas95-edbplus package contains the files required to install the EDB*Plus command line client. EDB*Plus commands are compatible with Oracle's SQL*Plus.
ppas95-icache This package contains the files required to install the Infinite Cache service on a cache server node. Infinite Cache is a high-performance, distributed memory object caching system that distributes database load across multiple cache servers.
ppas95-pgagent This package installs pgAgent; pgAgent is a job scheduler for Advanced Server. Before installing this package, you must install EPEL; for detailed information about installing EPEL, see Section 2.3.
ppas95-pgsnmpd SNMP (Simple Network Management Protocol) is a protocol that allows you to supervise an apparatus connected to the network.
ppas95-pljava This package installs PL/Java, providing access to Java stored procedures, triggers and functions via the JDBC interface.
ppas95-pgpool34-extensions This package creates server extensions required by the server.
EDB Postgres Advanced Server Installation Guide
Copyright © 2009 - 2017 EnterpriseDB Corporation. All rights reserved.
24
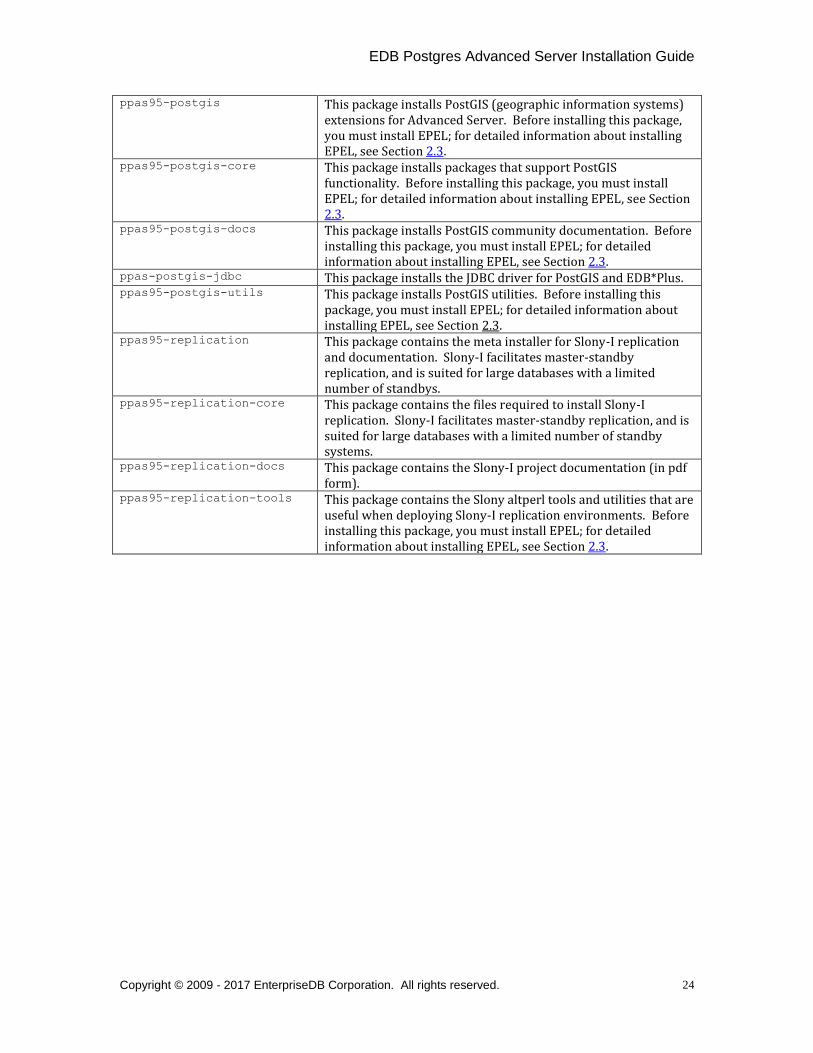
ppas95-postgis This package installs PostGIS (geographic information systems) extensions for Advanced Server. Before installing this package, you must install EPEL; for detailed information about installing EPEL, see Section 2.3.
ppas95-postgis-core This package installs packages that support PostGIS functionality. Before installing this package, you must install EPEL; for detailed information about installing EPEL, see Section 2.3.
ppas95-postgis-docs This package installs PostGIS community documentation. Before installing this package, you must install EPEL; for detailed information about installing EPEL, see Section 2.3.
ppas-postgis-jdbc This package installs the JDBC driver for PostGIS and EDB*Plus. ppas95-postgis-utils This package installs PostGIS utilities. Before installing this
package, you must install EPEL; for detailed information about installing EPEL, see Section 2.3.
ppas95-replication This package contains the meta installer for Slony-I replication and documentation. Slony-I facilitates master-standby replication, and is suited for large databases with a limited number of standbys.
ppas95-replication-core This package contains the files required to install Slony-I replication. Slony-I facilitates master-standby replication, and is suited for large databases with a limited number of standby systems.
ppas95-replication-docs This package contains the Slony-I project documentation (in pdf form).
ppas95-replication-tools This package contains the Slony altperl tools and utilities that are useful when deploying Slony-I replication environments. Before installing this package, you must install EPEL; for detailed information about installing EPEL, see Section 2.3.
EDB Postgres Advanced Server Installation Guide
Copyright © 2009 - 2017 EnterpriseDB Corporation. All rights reserved.
25
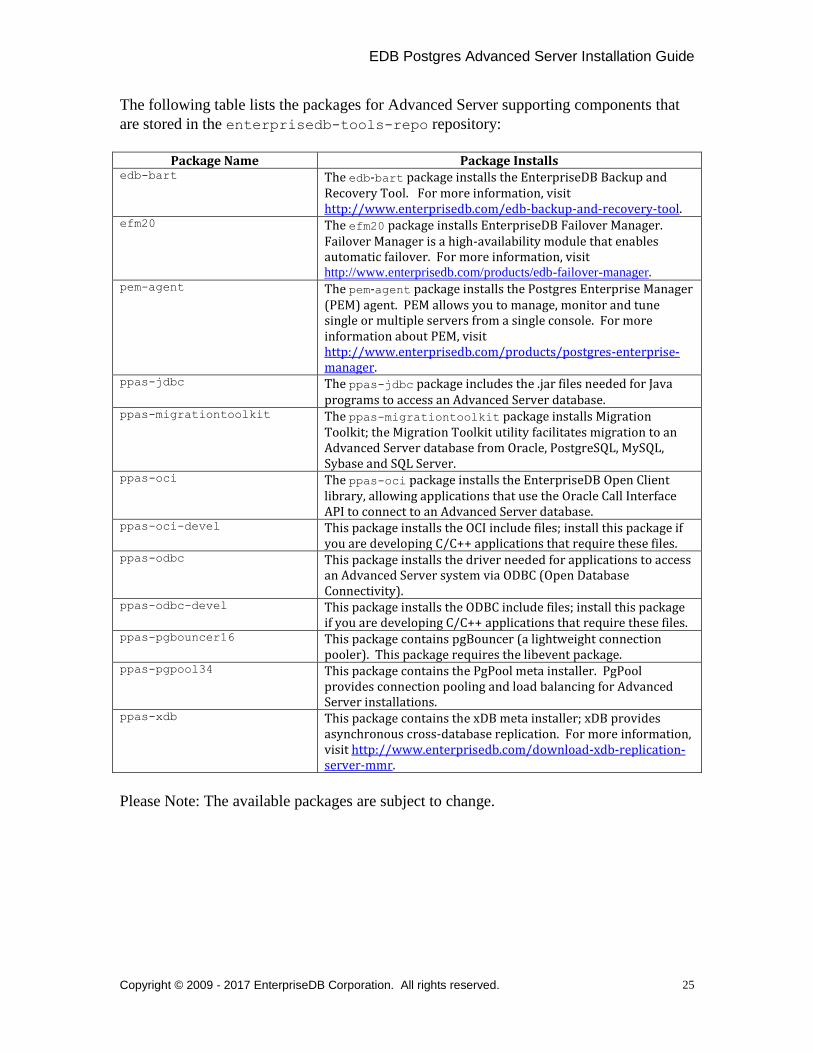
The following table lists the packages for Advanced Server supporting components that
are stored in the enterprisedb-tools-repo repository:
Package Name Package Installs edb-bart The edb-bart package installs the EnterpriseDB Backup and
Recovery Tool. For more information, visit http://www.enterprisedb.com/edb-backup-and-recovery-tool.
efm20 The efm20 package installs EnterpriseDB Failover Manager. Failover Manager is a high-availability module that enables automatic failover. For more information, visit http://www.enterprisedb.com/products/edb-failover-manager.
pem-agent The pem-agent package installs the Postgres Enterprise Manager (PEM) agent. PEM allows you to manage, monitor and tune single or multiple servers from a single console. For more information about PEM, visit http://www.enterprisedb.com/products/postgres-enterprise-manager.
ppas-jdbc The ppas-jdbc package includes the .jar files needed for Java programs to access an Advanced Server database.
ppas-migrationtoolkit The ppas-migrationtoolkit package installs Migration Toolkit; the Migration Toolkit utility facilitates migration to an Advanced Server database from Oracle, PostgreSQL, MySQL, Sybase and SQL Server.
ppas-oci The ppas-oci package installs the EnterpriseDB Open Client library, allowing applications that use the Oracle Call Interface API to connect to an Advanced Server database.
ppas-oci-devel This package installs the OCI include files; install this package if you are developing C/C++ applications that require these files.
ppas-odbc This package installs the driver needed for applications to access an Advanced Server system via ODBC (Open Database Connectivity).
ppas-odbc-devel This package installs the ODBC include files; install this package if you are developing C/C++ applications that require these files.
ppas-pgbouncer16 This package contains pgBouncer (a lightweight connection pooler). This package requires the libevent package.
ppas-pgpool34 This package contains the PgPool meta installer. PgPool provides connection pooling and load balancing for Advanced Server installations.
ppas-xdb This package contains the xDB meta installer; xDB provides asynchronous cross-database replication. For more information, visit http://www.enterprisedb.com/download-xdb-replication-server-mmr.
Please Note: The available packages are subject to change.
EDB Postgres Advanced Server Installation Guide
Copyright © 2009 - 2017 EnterpriseDB Corporation. All rights reserved.
26
4 Installing Advanced Server with the Interactive Installer
The Advanced Server installer is available from the EnterpriseDB website at:
http://www.enterprisedb.com/downloads/postgres-postgresql-downloads
After navigating to the Software Downloads page, choose the Advanced Server
installation that corresponds to your platform. After selecting a download, you will be
invited to register as an Advanced Server user. Enter your current EnterpriseDB login
information, or complete an online registration form to start the download.
When the download completes, extract the files using your system-specific file extractor.
You can use the extracted installer in different installation modes to perform an
Advanced Server installation:
For information about using the extracted files to perform a graphical installation
on Windows, See Section 4.3.1.
For information about performing a graphical installation on Linux, see Section
4.3.2.
For information about using the installer to perform a command line installation,
see Section 4.4.1.
For information about performing an unattended installation, see Section 4.4.2.
For information about performing an installation with limited privileges, see
Section 4.4.3.
For information about the command line options you can use when invoking the
installer, see Section 4.4.4.
During the installation process, the Advanced Server installer program copies a number
of temporary files to the location specified by the TEMP or TMP environment variable (on
Windows), or to the /tmp directory (on Linux). You can optionally specify an alternate
location for the installer to place the temporary files by modifying or creating the TEMP
environment variable.
If invoking the installer from the command line, you can set the value of the variable on
the command line:
EDB Postgres Advanced Server Installation Guide
Copyright © 2009 - 2017 EnterpriseDB Corporation. All rights reserved.
27
On Windows, use the command:
SET TEMP=temp_file_location
On Linux, use the command:
export TEMP=temp_file_location
Where temp_file_location specifies the alternate location for the temporary files.
Please Note: If you are invoking the installer to perform a system upgrade, the installer
will preserve the configuration options specified during the previous installation.
4.1 Graphical Installation Prerequisites
User Privileges
Before invoking the installer on a Linux system, you must have superuser privileges to
perform an Advanced Server installation. To perform an Advanced Server installation on
a Windows system, you must have administrator privileges. If you are installing
Advanced Server into a Windows system that is configured with User Account Control
(UAC) enabled, you can assume sufficient privileges to invoke the graphical installer by
right clicking on the name of the installer and selecting Run as administrator from
the context menu. When prompted, enter an administrator password to continue.
SELinux Permissions
Before invoking the installer on a system that is running SELinux, you must set SELinux
to permissive mode.
The following example works on Redhat Enterprise Linux, Fedora Core or CentOS
distributions. Use comparable commands that are compatible with your Linux
distribution to set SELinux to permissive mode during installation and return it to
enforcing mode when installation is complete.
Before installing Advanced Server, set SELinux to permissive mode with the
command:
# setenforce Permissive
When the installation is complete, return SELinux to enforcing mode with the
command:
# setenforce Enforcing
EDB Postgres Advanced Server Installation Guide
Copyright © 2009 - 2017 EnterpriseDB Corporation. All rights reserved.
28
Linux-specific Software Requirements
You must install xterm, konsole, or gnome-terminal before executing any console-
based program installed by the Advanced Server installer. Without a console program,
you will not be able to access Advanced Server configuration files through menu
selections.
Before invoking StackBuilder Plus on a Linux system, you must install the redhat-lsb
package. To install the package, open a terminal window, assume superuser privileges,
and enter:
# yum install redhat-lsb
For more information about using StackBuilder Plus, see Section 4.5.
Windows-specific Software Requirements
Be sure to apply Windows operating system updates before invoking the Advanced
Server installer. If (during the installation process) the installer encounters errors, exit
the installation, and ensure that your version of Windows is up-to-date before restarting
the installer.
Migration Toolkit or EDB*Plus Installation Pre-requisites
Before using the Advanced Server installer to install Migration Toolkit or EDB*Plus, you
must first install Java (version 1.7 or later). On a Linux system, you can use the yum
package manager to install Java. Open a terminal window, assume superuser privileges,
and enter:
# yum install java-1.7.0
Follow the onscreen instructions to complete the installation.
If you are using Windows, Java installers and instructions are available online at:
http://www.java.com/en/download/manual.jsp
EDB Postgres Advanced Server Installation Guide
Copyright © 2009 - 2017 EnterpriseDB Corporation. All rights reserved.
29
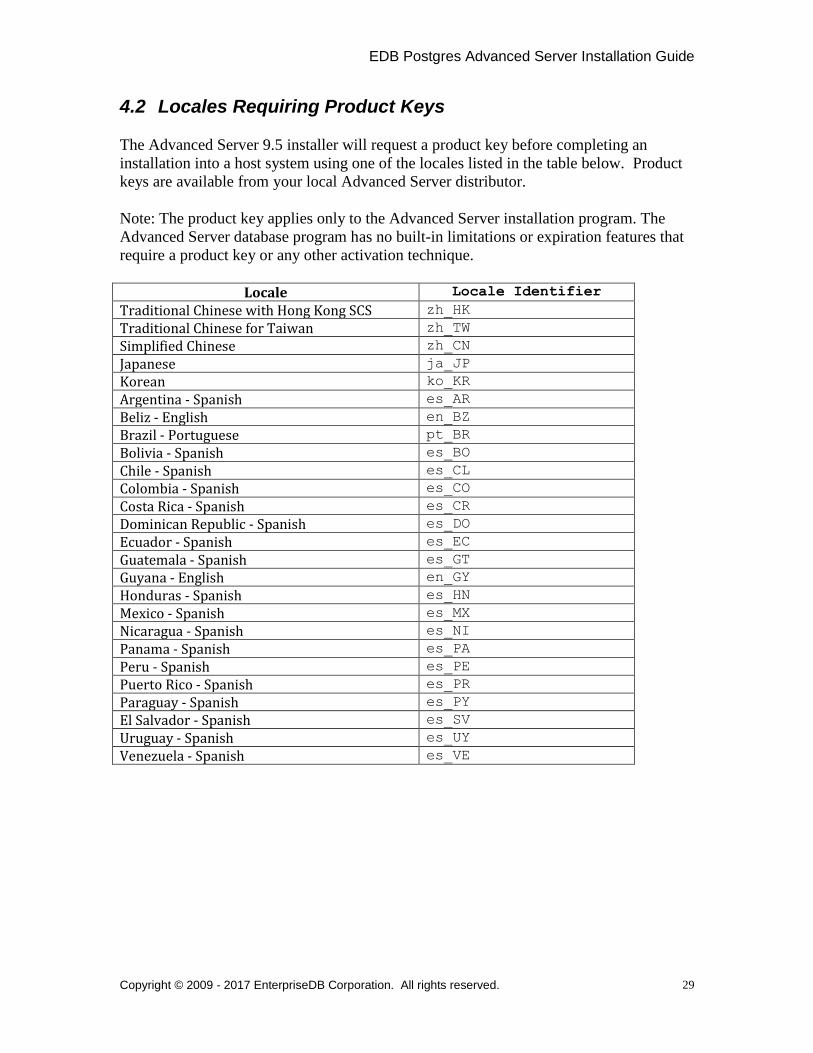
4.2 Locales Requiring Product Keys
The Advanced Server 9.5 installer will request a product key before completing an
installation into a host system using one of the locales listed in the table below. Product
keys are available from your local Advanced Server distributor.
Note: The product key applies only to the Advanced Server installation program. The
Advanced Server database program has no built-in limitations or expiration features that
require a product key or any other activation technique.
Locale Locale Identifier
Traditional Chinese with Hong Kong SCS zh_HK
Traditional Chinese for Taiwan zh_TW
Simplified Chinese zh_CN
Japanese ja_JP
Korean ko_KR
Argentina - Spanish es_AR
Beliz - English en_BZ
Brazil - Portuguese pt_BR
Bolivia - Spanish es_BO
Chile - Spanish es_CL
Colombia - Spanish es_CO
Costa Rica - Spanish es_CR
Dominican Republic - Spanish es_DO
Ecuador - Spanish es_EC
Guatemala - Spanish es_GT
Guyana - English en_GY
Honduras - Spanish es_HN
Mexico - Spanish es_MX
Nicaragua - Spanish es_NI
Panama - Spanish es_PA
Peru - Spanish es_PE
Puerto Rico - Spanish es_PR
Paraguay - Spanish es_PY
El Salvador - Spanish es_SV
Uruguay - Spanish es_UY
Venezuela - Spanish es_VE

EDB Postgres Advanced Server Installation Guide
Copyright © 2009 - 2017 EnterpriseDB Corporation. All rights reserved.
30
During an installation in one of the listed locales, the Product Key window (shown in
Figure 4.1) will open, prompting you to provide a valid product key. Enter a product
key, and press Next to continue with the installation.
Figure 4.1 — The Advanced Server Product Key Window

EDB Postgres Advanced Server Installation Guide
Copyright © 2009 - 2017 EnterpriseDB Corporation. All rights reserved.
31
4.3 Performing a Graphical Installation
The graphical installation wizard provides a quick and easy way to install Advanced
Server 9.5 on a Linux or Windows system. As the installation wizard’s easy-to-follow
dialogs lead you through the installation process, specify information about your system,
your system usage, and the modules that will best complement your installation of
Advanced Server. When you complete the dialogs, the installer performs an installation
based on the selections made during the setup process.
When the Advanced Server installation finishes, you will be offered the option to invoke
the StackBuilder Plus package manager. StackBuilder Plus provides an easy-to-use
graphical interface that downloads and installs applications, drivers and utilities and their
dependencies. See Section 4.5 for more information about using StackBuilder Plus.
EDB Postgres Advanced Server Installation Guide
Copyright © 2009 - 2017 EnterpriseDB Corporation. All rights reserved.
32
4.3.1 Using the Graphical Installer with Windows
To perform an installation using the graphical installation wizard on a Windows system,
you must have administrator privileges. To start the installation wizard, assume
administrator privileges, and double-click the ppasmeta-9.5.x.x-windows
executable file.
To install Advanced Server on some versions of Windows, you may be required to right click on the installer file and select Run as
Administrator from the context menu to invoke the installer with
Administrator privileges.
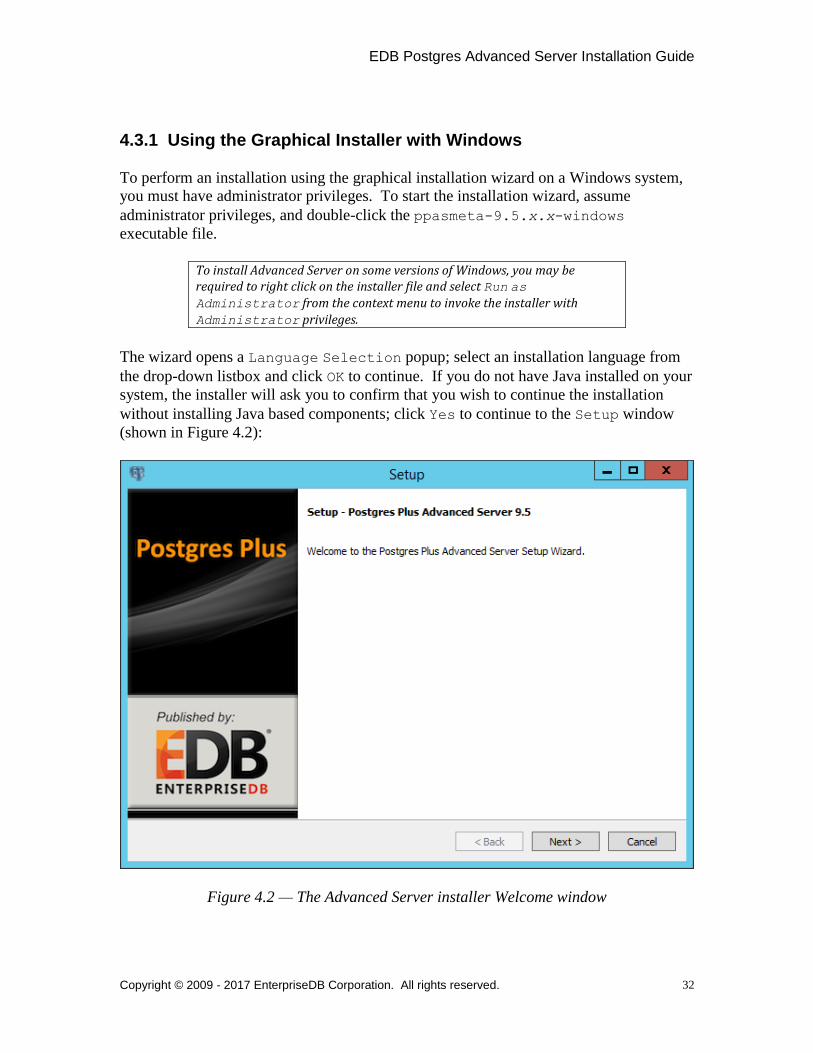
The wizard opens a Language Selection popup; select an installation language from
the drop-down listbox and click OK to continue. If you do not have Java installed on your
system, the installer will ask you to confirm that you wish to continue the installation
without installing Java based components; click Yes to continue to the Setup window
(shown in Figure 4.2):
Figure 4.2 — The Advanced Server installer Welcome window

EDB Postgres Advanced Server Installation Guide
Copyright © 2009 - 2017 EnterpriseDB Corporation. All rights reserved.
33
Click Next to continue. The EnterpriseDB License Agreement (Figure 4.3) opens.
Figure 4.3 — The EnterpriseDB License Agreement
Carefully review the license agreement before highlighting the appropriate radio button;
click Next to continue.

EDB Postgres Advanced Server Installation Guide
Copyright © 2009 - 2017 EnterpriseDB Corporation. All rights reserved.
34
The User Authentication window opens, as shown in Figure 4.4.
Figure 4.4 — The User Authentication window.
Before continuing, you must provide the email address and password associated with
your EnterpriseDB user account. Registration is free; if you do not have an EnterpriseDB
user account, click the link provided to open a web browser, and supply your user
information.
Enter the email address of a registered account in the Email field, and the corresponding
password in the Password field, and click Next to continue.
EDB Postgres Advanced Server Installation Guide
Copyright © 2009 - 2017 EnterpriseDB Corporation. All rights reserved.
35
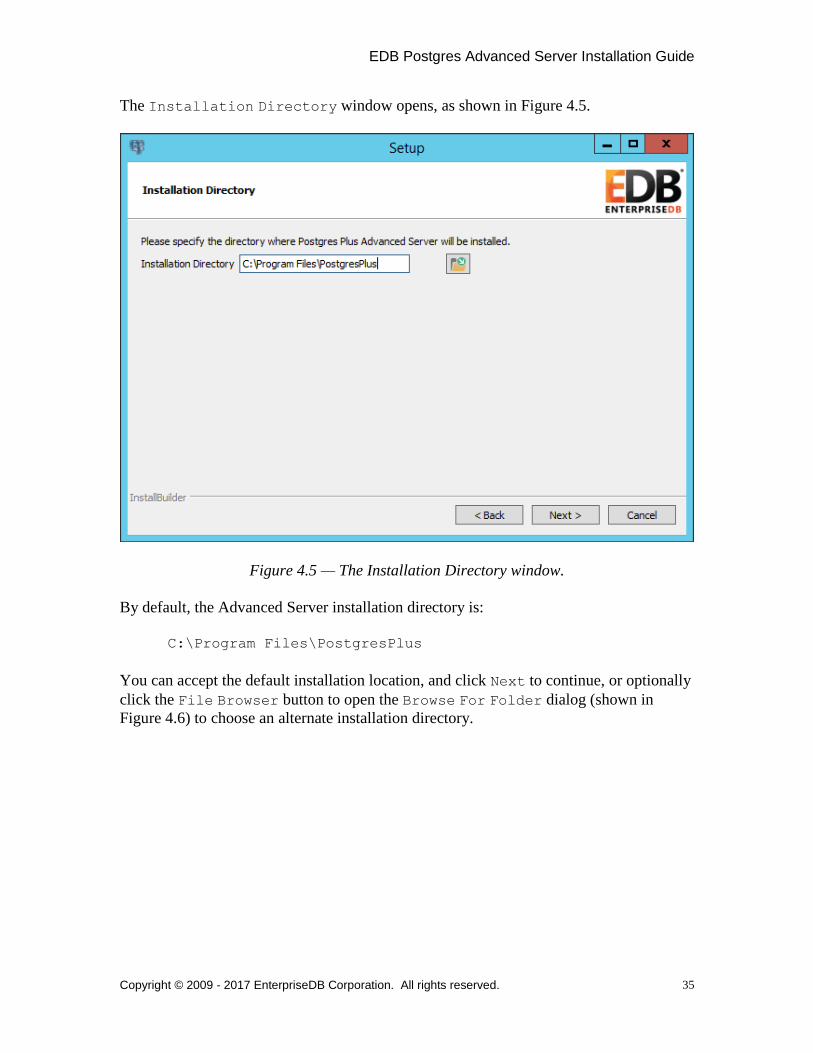
The Installation Directory window opens, as shown in Figure 4.5.
Figure 4.5 — The Installation Directory window.
By default, the Advanced Server installation directory is:
C:\Program Files\PostgresPlus
You can accept the default installation location, and click Next to continue, or optionally
click the File Browser button to open the Browse For Folder dialog (shown in
Figure 4.6) to choose an alternate installation directory.

EDB Postgres Advanced Server Installation Guide
Copyright © 2009 - 2017 EnterpriseDB Corporation. All rights reserved.
36
Figure 4.6 — The Browse For Folder dialog
Use the tree control displayed on the Browse For Folder dialog to navigate to an
alternate installation directory, or create a new installation directory by selecting the
Make New Folder button, and entering a name for the new folder.
After selecting an alternate installation directory, click OK to continue. When you return
to the Installation Directory window, click Next to open the Select
Components window.

EDB Postgres Advanced Server Installation Guide
Copyright © 2009 - 2017 EnterpriseDB Corporation. All rights reserved.
37
Figure 4.7 — The Select Components window
The Select Components window (shown in Figure 4.7) contains a list of the optional
components that you can install with the Advanced Server installation wizard. Note that
if you do not have Java installed on your system, those components that require Java are
disabled and will not be installed. You can omit a module from the Advanced Server
installation by de-selecting the box next to the components name.
The installation wizard can install the following components while installing Advanced
Server 9.5:
Database Server
Select the Database Server option to install Advanced Server 9.5.
Connectors
Select the Connectors option to install the client connector API’s for JDBC,
.NET, OCI and ODBC. The client connectors facilitate application connectivity
for Advanced Server.

EDB Postgres Advanced Server Installation Guide
Copyright © 2009 - 2017 EnterpriseDB Corporation. All rights reserved.
38
Migration Toolkit
If you have Java installed on your system, you can use the Migration Toolkit
option to install Migration Toolkit. Migration Toolkit is a command line
migration utility that facilitates migration from MySQL, Oracle, Microsoft SQL
Server and Sybase databases.
See the EDB Postgres (Postgres Plus) Migration Guide for more information
about Migration Toolkit, available from the EnterpriseDB website at:
http://www.enterprisedb.com/products-services-
training/products/documentation/enterpriseedition
Postgres Enterprise Manager Client
Select the Postgres Enterprise Manager Client option to install the PEM
Client application. The PEM Client provides a powerful graphical interface for
database management and monitoring.
EDB*Plus
If you have Java installed on your system, you can select the EDB*Plus option to
install EDB*Plus. EDB*Plus is the Advanced Server SQL command line
interface that offers compatibility with Oracle’s SQL Plus commands.
Slony Replication
Check the box next to Slony Replication to specify that Slony-I should be
included in the installation process. Slony-I facilitates master-standby replication
suited for large databases with a limited number of standby systems.
PgBouncer
PgBouncer is a lightweight connection pooling utility for Advanced Server.
Connection pooling can dramatically reduce processing time and resources for
systems maintaining client connections to one or more databases.
The StackBuilder Plus package manager is a graphical tool that can easily download and
add any omitted modules (and the resulting dependencies) after the installation is
complete. StackBuilder Plus is included in the Advanced Server installation. See
Section 4.5 for more information about StackBuilder Plus.

EDB Postgres Advanced Server Installation Guide
Copyright © 2009 - 2017 EnterpriseDB Corporation. All rights reserved.
39
After adjusting the list of modules or accepting the default and installing all modules,
click Next to open the Data Directory window (shown in Figure 4.8).
Figure 4.8 — The Data Directory window.
By default, the Advanced Server data files are saved to:
C:\Program Files\PostgresPlus\9.5AS\data
You can accept the default location for the data files, or use the File Browser button to
open the Browse For Folder dialog.
The default location of the Advanced Server Write-Ahead Log Directory is C:\Program
Files\PostgresPlus\9.5AS\data\pg_xlog.
Advanced Server uses write-ahead logs to help ensure transaction safety and speed
transaction processing; when you make a change to a table, the change is stored in shared
memory and a record of the change is written to the write-ahead log. When you do a
COMMIT, Advance Server writes contents of the write-ahead log to disk.
EDB Postgres Advanced Server Installation Guide
Copyright © 2009 - 2017 EnterpriseDB Corporation. All rights reserved.
40
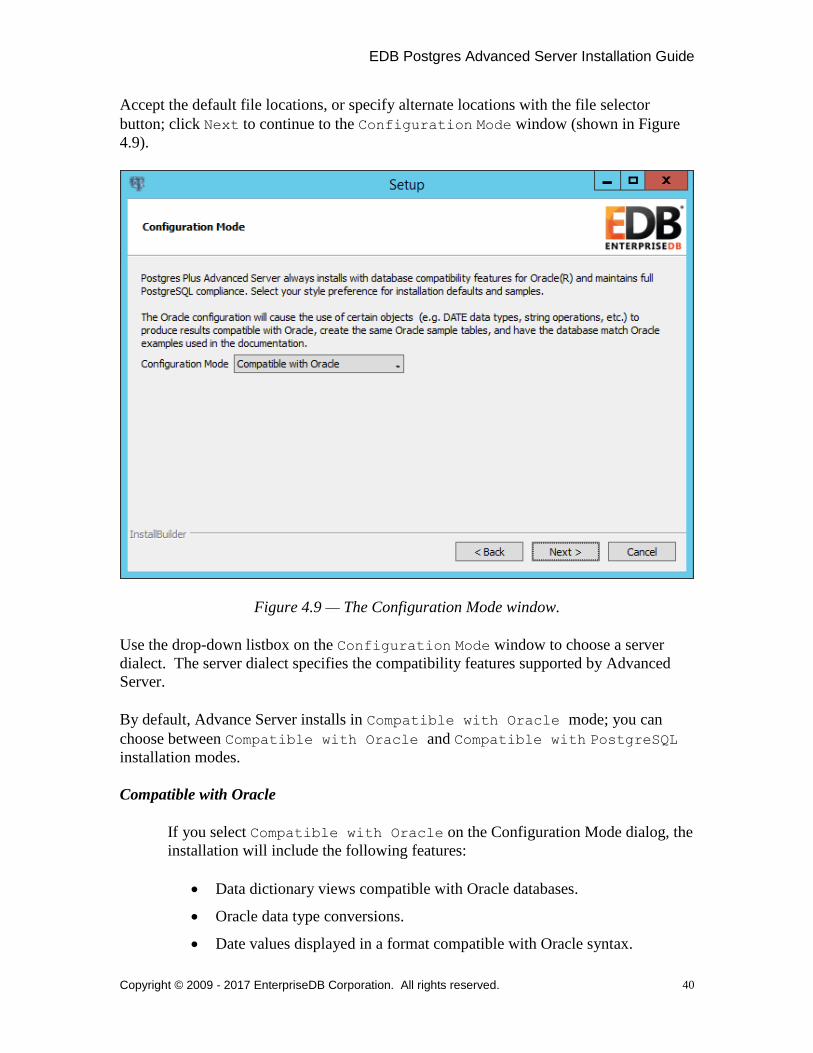
Accept the default file locations, or specify alternate locations with the file selector
button; click Next to continue to the Configuration Mode window (shown in Figure
4.9).
Figure 4.9 — The Configuration Mode window.
Use the drop-down listbox on the Configuration Mode window to choose a server
dialect. The server dialect specifies the compatibility features supported by Advanced
Server.
By default, Advance Server installs in Compatible with Oracle mode; you can
choose between Compatible with Oracle and Compatible with PostgreSQL
installation modes.
Compatible with Oracle
If you select Compatible with Oracle on the Configuration Mode dialog, the
installation will include the following features:
Data dictionary views compatible with Oracle databases.
Oracle data type conversions.
Date values displayed in a format compatible with Oracle syntax.
EDB Postgres Advanced Server Installation Guide
Copyright © 2009 - 2017 EnterpriseDB Corporation. All rights reserved.
41
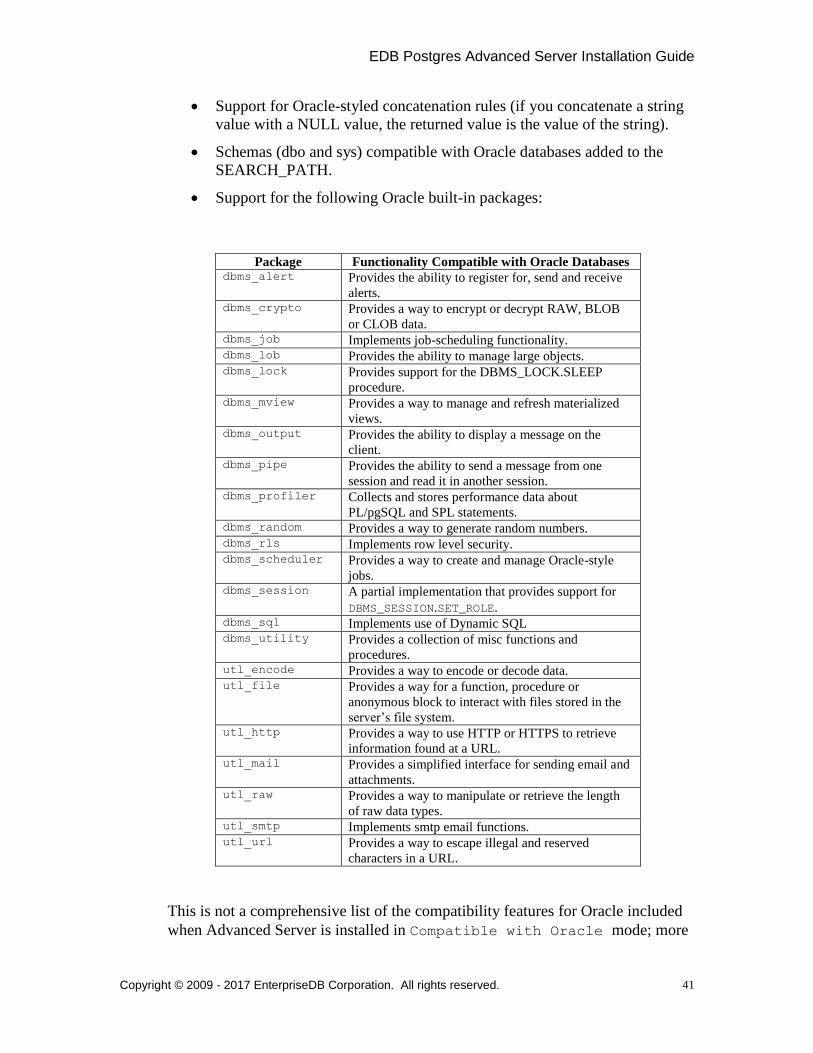
Support for Oracle-styled concatenation rules (if you concatenate a string
value with a NULL value, the returned value is the value of the string).
Schemas (dbo and sys) compatible with Oracle databases added to the
SEARCH_PATH.
Support for the following Oracle built-in packages:
Package Functionality Compatible with Oracle Databases dbms_alert Provides the ability to register for, send and receive
alerts. dbms_crypto Provides a way to encrypt or decrypt RAW, BLOB
or CLOB data. dbms_job Implements job-scheduling functionality. dbms_lob Provides the ability to manage large objects. dbms_lock Provides support for the DBMS_LOCK.SLEEP
procedure. dbms_mview Provides a way to manage and refresh materialized
views. dbms_output Provides the ability to display a message on the
client. dbms_pipe Provides the ability to send a message from one
session and read it in another session. dbms_profiler Collects and stores performance data about
PL/pgSQL and SPL statements. dbms_random Provides a way to generate random numbers. dbms_rls Implements row level security. dbms_scheduler Provides a way to create and manage Oracle-style
jobs. dbms_session A partial implementation that provides support for
DBMS_SESSION.SET_ROLE. dbms_sql Implements use of Dynamic SQL dbms_utility Provides a collection of misc functions and
procedures. utl_encode Provides a way to encode or decode data. utl_file Provides a way for a function, procedure or
anonymous block to interact with files stored in the
server’s file system. utl_http Provides a way to use HTTP or HTTPS to retrieve
information found at a URL. utl_mail Provides a simplified interface for sending email and
attachments. utl_raw Provides a way to manipulate or retrieve the length
of raw data types. utl_smtp Implements smtp email functions. utl_url Provides a way to escape illegal and reserved
characters in a URL.
This is not a comprehensive list of the compatibility features for Oracle included
when Advanced Server is installed in Compatible with Oracle mode; more

EDB Postgres Advanced Server Installation Guide
Copyright © 2009 - 2017 EnterpriseDB Corporation. All rights reserved.
42
information about Advanced Server is found in the Database Compatibility for
Oracle Developer’s Guide, available from the EnterpriseDB website at:
http://www.enterprisedb.com/products-services-
training/products/documentation/enterpriseedition
If you choose to install in Compatible with Oracle mode, the Advanced
Server superuser name is enterprisedb.
Compatible with PostgreSQL
When installed in Compatible with PostgreSQL mode, Advanced Server
exhibits complete compatibility with PostgreSQL version 9.5.
For more information about PostgreSQL functionality, visit the official
PostgreSQL website at http://www.postgresql.org.
If you choose to install in Compatible with PostgreSQL mode, the
Advanced Server superuser name is postgres.
After specifying a configuration mode, click Next to continue to the Password window
(shown in Figure 4.10).
Figure 4.10 — The Password window.
EDB Postgres Advanced Server Installation Guide
Copyright © 2009 - 2017 EnterpriseDB Corporation. All rights reserved.
43
Advanced Server uses the password specified on the Password window for the database
superuser and pgAgent service. The specified password must conform to any security
policies existing on the Advanced Server host.
After entering a password in the Password field, and confirming the password in the
Retype Password field, click Next to continue.
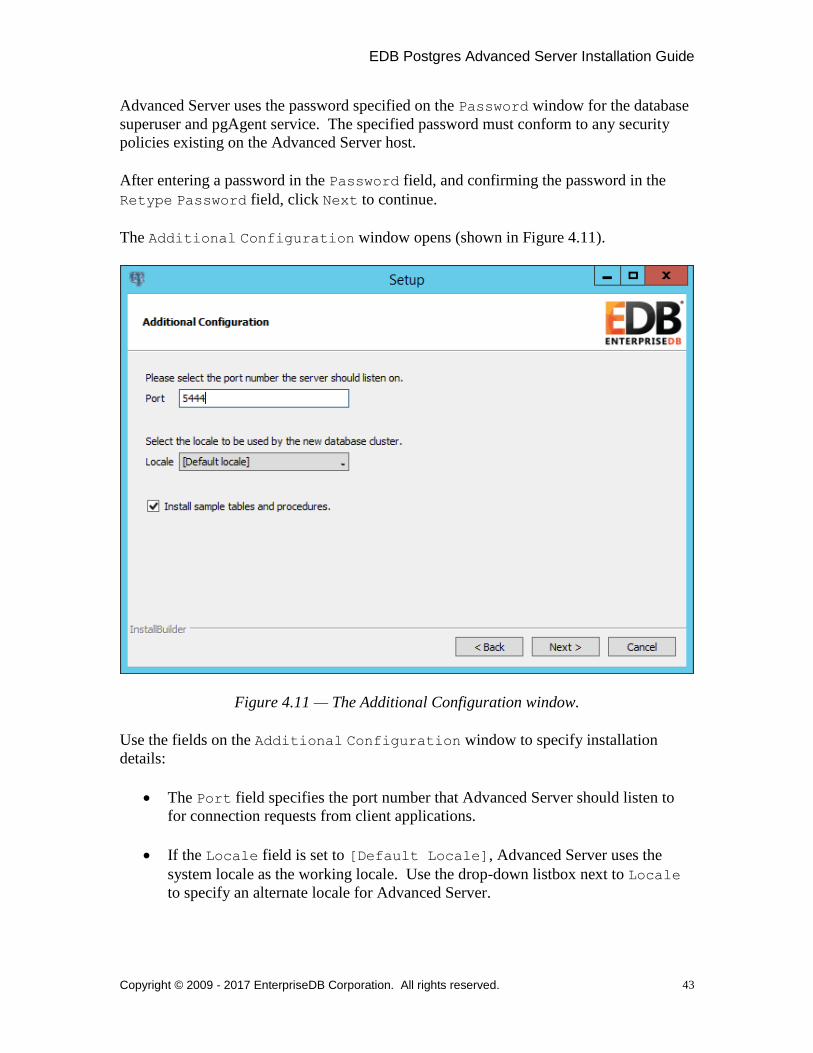
The Additional Configuration window opens (shown in Figure 4.11).
Figure 4.11 — The Additional Configuration window.
Use the fields on the Additional Configuration window to specify installation
details:
The Port field specifies the port number that Advanced Server should listen to
for connection requests from client applications.
If the Locale field is set to [Default Locale], Advanced Server uses the
system locale as the working locale. Use the drop-down listbox next to Locale
to specify an alternate locale for Advanced Server.
EDB Postgres Advanced Server Installation Guide
Copyright © 2009 - 2017 EnterpriseDB Corporation. All rights reserved.
44
Check the box next to Install sample tables and procedures to instruct
the installation wizard to install the corresponding sample data for the server
dialect specified on the Compatibility Mode window.
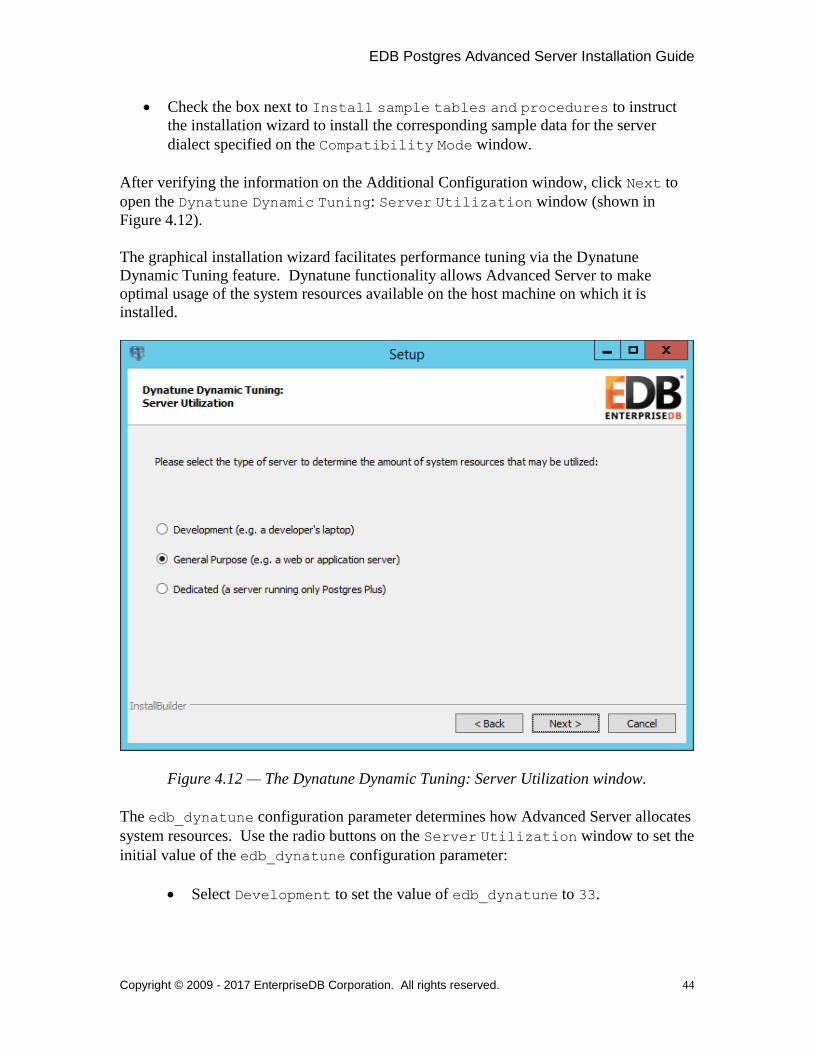
After verifying the information on the Additional Configuration window, click Next to
open the Dynatune Dynamic Tuning: Server Utilization window (shown in
Figure 4.12).
The graphical installation wizard facilitates performance tuning via the Dynatune
Dynamic Tuning feature. Dynatune functionality allows Advanced Server to make
optimal usage of the system resources available on the host machine on which it is
installed.
Figure 4.12 — The Dynatune Dynamic Tuning: Server Utilization window.
The edb_dynatune configuration parameter determines how Advanced Server allocates
system resources. Use the radio buttons on the Server Utilization window to set the
initial value of the edb_dynatune configuration parameter:
Select Development to set the value of edb_dynatune to 33.

EDB Postgres Advanced Server Installation Guide
Copyright © 2009 - 2017 EnterpriseDB Corporation. All rights reserved.
45
A low value dedicates the least amount of the host machine’s resources to the
database server. This is a good choice for a development machine.
Select General Purpose to set the value of edb_dynatune to 66.
A mid-range value dedicates a moderate amount of system resources to the
database server. This would be a good setting for an application server with a
fixed number of applications running on the same host as Advanced Server.
Select Dedicated to set the value of edb_dynatune to 100.
A high value dedicates most of the system resources to the database server.
This is a good choice for a host machine that is dedicated to running
Advanced Server.
After the installation is complete, you can adjust the value of edb_dynatune by editing
the postgresql.conf file. After editing the postgresql.conf file, you must restart
the server for the changes to take effect.
Select the appropriate setting for your system, and click Next to continue to the
Dynatune Dynamic Tuning: Workload Profile window (shown in Figure 4.13).
Figure 4.13 — The Dynatune Dynamic Tuning: Workload Profile window.

EDB Postgres Advanced Server Installation Guide
Copyright © 2009 - 2017 EnterpriseDB Corporation. All rights reserved.
46
Use the radio buttons on the Workload Profile window to specify the initial value of
the edb_dynatune_profile configuration parameter. The edb_dynatune_profile
parameter controls performance-tuning aspects based on the type of work that the server
performs.
Select Transaction Processing (OLTP systems) to specify an
edb_dynatune_profile value of oltp.
Recommended when Advanced Server is processing heavy online transaction
processing workloads.
Select General Purpose (OLTP and reporting workloads) to specify
an edb_dynatune_profile value of mixed.
Recommended for servers that provide a mix of transaction processing and
data reporting.
Select Reporting (Complex queries or OLAP workloads) to specify an
edb_dynatune_profile value of reporting.
Recommended for database servers used for heavy data reporting.
After the installation is complete, you can adjust the value of edb_dynatune_profile
by editing the postgresql.conf file. After editing the postgresql.conf file, you
must restart the server for the changes to take effect.
For more information about edb_dynatune and other performance-related topics, see
the EDB Postgres (Postgres Plus) Enterprise Edition Guide available from the
EnterpriseDB website at:
http://www.enterprisedb.com/products-services-
training/products/documentation/enterpriseedition
Click Next to continue. The Advanced Configuration window (shown in Figure
4.14) opens.

EDB Postgres Advanced Server Installation Guide
Copyright © 2009 - 2017 EnterpriseDB Corporation. All rights reserved.
47
Figure 4.14 — The Advanced Configuration window.
PgBouncer is a lightweight connection pooling utility for Advanced Server. Connection
pooling can dramatically reduce processing time and resources for systems maintaining
client connections to one or more databases. By default, Advanced Server expects
PgBouncer to listen on port 6432.
Please note that the pgbouncer program stores a list of users and passwords in clear-text
form in the following file:
C:\Program Files\PostgresPlus\pgbouncer\etc\userlist.txt
By default, the file is located in a directory that is accessible only to the cluster owner (by
default, enterprisedb), but administrators should take note of the file and maintain
permissions in a manner that secures the file from un-trusted users.
For more information about PgBouncer, visit the project site at:
https://wiki.postgresql.org/wiki/PgBouncer
pgAgent is a job scheduling agent for Postgres, capable of running multi-step batch/shell
and SQL tasks on complex schedules. pgAgent also provides background support for the
DBMS_JOB built-in package that is compatible with Oracle databases.
When enabled, the Update Notification Service notifies you of any new updates
and security patches available for your installation of Advanced Server.
EDB Postgres Advanced Server Installation Guide
Copyright © 2009 - 2017 EnterpriseDB Corporation. All rights reserved.
48
By default, Advanced Server is configured to start the the pgBouncer, pgAgent and
Update Notification services when the system boots; clear applicable Autostart
checkboxes, or accept the defaults, and click Next to continue.
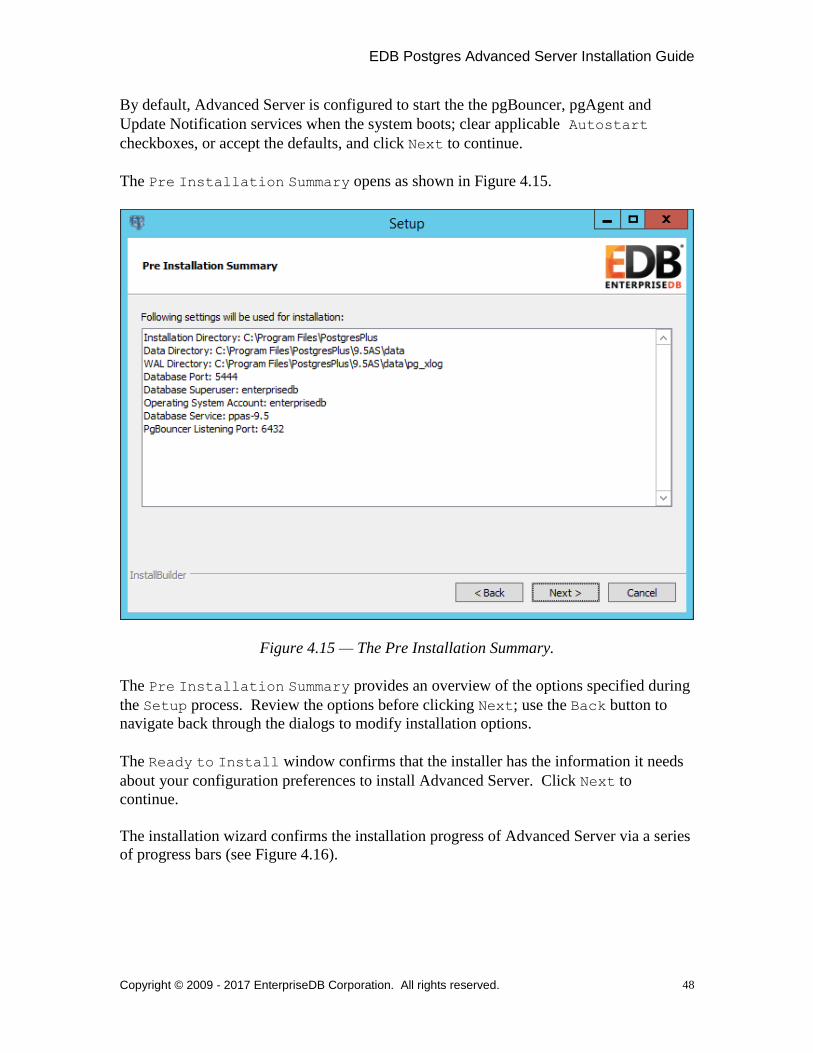
The Pre Installation Summary opens as shown in Figure 4.15.
Figure 4.15 — The Pre Installation Summary.
The Pre Installation Summary provides an overview of the options specified during
the Setup process. Review the options before clicking Next; use the Back button to
navigate back through the dialogs to modify installation options.
The Ready to Install window confirms that the installer has the information it needs
about your configuration preferences to install Advanced Server. Click Next to
continue.
The installation wizard confirms the installation progress of Advanced Server via a series
of progress bars (see Figure 4.16).
EDB Postgres Advanced Server Installation Guide
Copyright © 2009 - 2017 EnterpriseDB Corporation. All rights reserved.
49
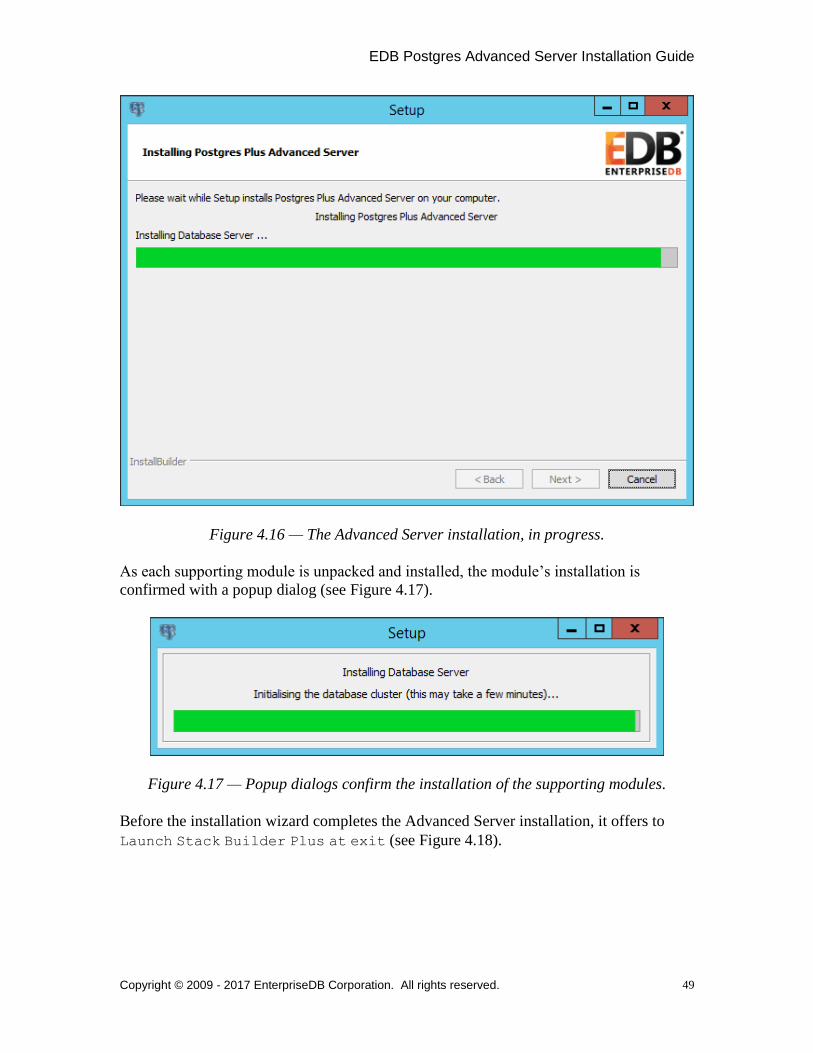
Figure 4.16 — The Advanced Server installation, in progress.
As each supporting module is unpacked and installed, the module’s installation is
confirmed with a popup dialog (see Figure 4.17).
Figure 4.17 — Popup dialogs confirm the installation of the supporting modules.
Before the installation wizard completes the Advanced Server installation, it offers to
Launch Stack Builder Plus at exit (see Figure 4.18).

EDB Postgres Advanced Server Installation Guide
Copyright © 2009 - 2017 EnterpriseDB Corporation. All rights reserved.
50
Figure 4.18 — The installation wizard offers to Launch StackBuilder Plus at exit.
You can optionally clear the StackBuilder Plus checkbox and click Finish to
complete the Advanced Server installation or accept the default and proceed to
StackBuilder Plus.
The StackBuilder Plus utility provides a graphical interface that downloads and installs
applications and drivers that work with Advanced Server. You can invoke StackBuilder
Plus at installation time or (after the installation completes) through the Advanced Server
9.5 menu. For more information about StackBuilder Plus, see Section 4.5, Using
StackBuilder Plus.

EDB Postgres Advanced Server Installation Guide
Copyright © 2009 - 2017 EnterpriseDB Corporation. All rights reserved.
51
4.3.2 Using the Graphical Installer on a Linux System
To use the graphical installation wizard on a Linux system, you must have superuser
privileges. To invoke the installation wizard, open a Terminal window, navigate to the
directory that contains the unpacked Advanced Server binary file, and enter the
command:
./ppasmeta-9.5.x.x-linux.run
The wizard opens a Language Selection popup; select an installation language from
the drop-down listbox and click OK to continue. If you do not have Java installed on your
system, the installer will ask you to confirm that you wish to continue the installation
without installing Java based components; click Yes to continue to the Setup window
(shown in Figure 4.19).
Figure 4.19 — The Postgres Plus Advanced Server installer Welcome window.
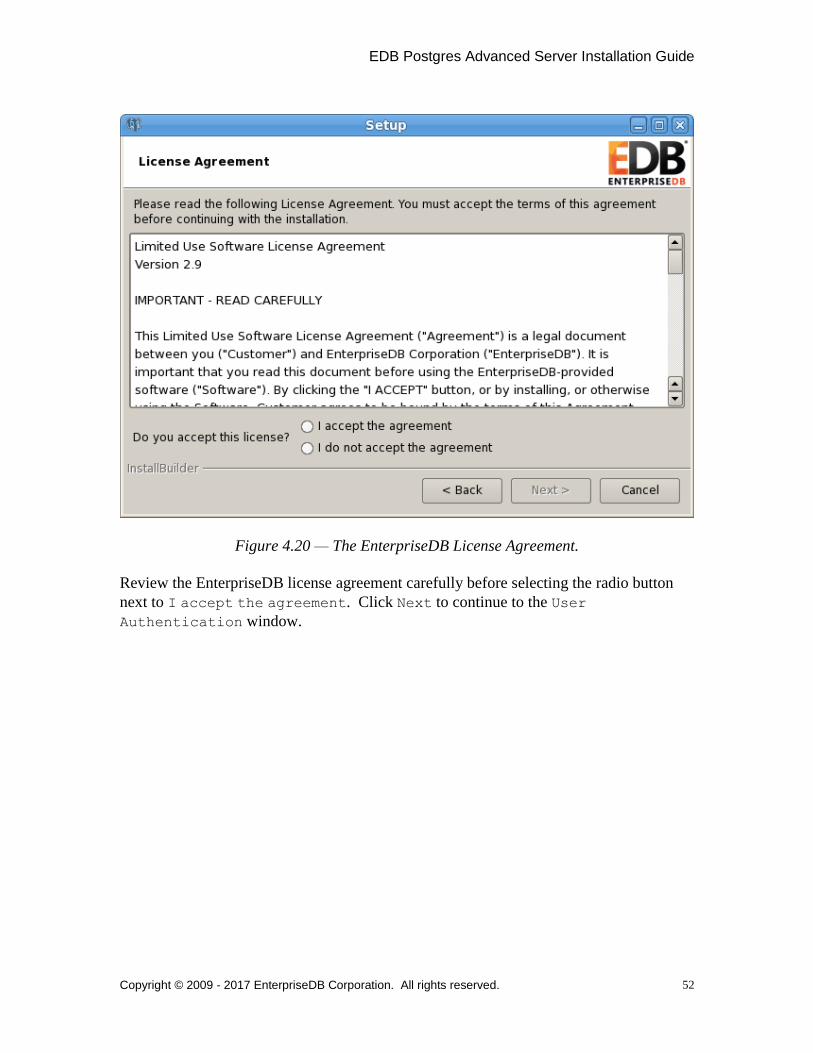
Click Next to continue. The License Agreement window (shown in Figure 4.20)
opens.
EDB Postgres Advanced Server Installation Guide
Copyright © 2009 - 2017 EnterpriseDB Corporation. All rights reserved.
52
Figure 4.20 — The EnterpriseDB License Agreement.
Review the EnterpriseDB license agreement carefully before selecting the radio button
next to I accept the agreement. Click Next to continue to the User
Authentication window.

EDB Postgres Advanced Server Installation Guide
Copyright © 2009 - 2017 EnterpriseDB Corporation. All rights reserved.
53
The User Authentication window opens, as shown in Figure 4.21:
Figure 4.21 — The User Authentication window.
Before continuing, you must provide the email address and password associated with
your EnterpriseDB user account. Registration is free; if you do not have an EnterpriseDB
user account, click the link provided to open a web browser, and enter your user
information.
Enter the email address of a registered account in the Email field, and the corresponding
password in the Password field, and click Next to continue to the Installation
Directory window (see Figure 4.22).

EDB Postgres Advanced Server Installation Guide
Copyright © 2009 - 2017 EnterpriseDB Corporation. All rights reserved.
54
Figure 4.22 — The Installation Directory window.
By default, the Advanced Server installation directory is:
/opt/PostgresPlus
You can accept the default installation location, and click Next to continue, or
optionally click the File Browser button to open the Browse For Folder dialog
(shown in Figure 4.23) to choose an alternate installation directory.

EDB Postgres Advanced Server Installation Guide
Copyright © 2009 - 2017 EnterpriseDB Corporation. All rights reserved.
55
Figure 4.23 — The file browser dialog.
Use the file browser dialog to navigate to an alternate installation directory, or create a
new installation directory by selecting the Add Folder icon, and entering a name for
the new folder.
After selecting an alternate installation directory, click OK to continue. When you return
to the Installation Directory window, click Next to open the Select
Components window.

EDB Postgres Advanced Server Installation Guide
Copyright © 2009 - 2017 EnterpriseDB Corporation. All rights reserved.
56
Figure 4.24 — The Select Components window.
The Select Components window (shown in Figure 4.24) contains a list of the utilities
that you can install with the Advanced Server installation wizard. If your system does
not include a Java installation, those components that are dependent on Java will be
disabled. You can skip the installation of a module by clearing the checkmark next to the
component name.
The installation wizard can install the following components while installing Advanced
Server 9.5:
Database Server
Select the Database Server option to install Advanced Server 9.5.
Connectors
Select the Connectors option to install the client connector API’s for JDBC,
OCI and ODBC. The client connectors facilitate application connectivity for
Advanced Server.

EDB Postgres Advanced Server Installation Guide
Copyright © 2009 - 2017 EnterpriseDB Corporation. All rights reserved.
57
Infinite Cache
Select the Infinite Cache option to install the icache daemon.
The installation wizard can optionally install the icache daemon on a remote
icache server without including a complete installation of Advanced Server. To
install only the icache daemon, deselect the other components shown on the
Select Components window before clicking Next.
For more information about using Infinite Cache and the icache daemon, see the
EDB Postgres (Postgres Plus) Enterprise Edition Guide, available at:
http://www.enterprisedb.com/products-services-
training/products/documentation/enterpriseedition
Migration Toolkit
If you have Java installed on your system, you can use the Migration Toolkit
option to install Migration Toolkit. Migration Toolkit is a command line
migration utility that facilitates migration from MySQL, Oracle, SQL Server and
Sybase databases. See the EDB Postgres Migration Toolkit Guide for more
information about Migration Toolkit, available at:
http://www.enterprisedb.com/products-services-
training/products/documentation/enterpriseedition
Postgres Enterprise Manager Client
Select the Postgres Enterprise Manager Client option to install the PEM Client
application. The PEM Client provides a powerful graphical interface for database
management and monitoring.
pgpool-II
Use the pgpool-II option to include pgpool-II in the Advanced Server
installation. pgpool-II provides load balancing, connection pooling, high
availability, and connection limits for Advanced Server databases.
pgpool-II Extensions
If you are installing pgpool-II, check the box next to pgpool-II Extensions
to include the server extensions required by the server to implement pgpool-II
functionality.

EDB Postgres Advanced Server Installation Guide
Copyright © 2009 - 2017 EnterpriseDB Corporation. All rights reserved.
58
EDB*Plus
Select the EDB*Plus option to install EDB*Plus. EDB*Plus is the Advanced
Server command line interface that offers compatibility with Oracle’s SQL Plus
commands.
Please Note that the EDB*Plus installation option will only be enabled if your
system contains Java.
Slony Replication
Check the box next to Slony Replication to specify that Slony-I should be
included in the Advanced Server installation. Slony-I facilitates master-standby
replication suited for large databases with a limited number of standby systems.
PgBouncer
PgBouncer is a lightweight connection pooling utility for Advanced Server.
Connection pooling can dramatically reduce processing time and resources for
systems maintaining client connections to one or more databases.
The StackBuilder Plus package manager is a graphical tool that can easily download and
add any omitted modules (and the resulting dependencies) after the installation is
complete. StackBuilder Plus is included in the Advanced Server installation. See
Section 4.5, Using StackBuilder Plus for more information about StackBuilder Plus.
After editing the list of supporting components, click Next to open the Additional
Directories window (shown in Figure 4.25).

EDB Postgres Advanced Server Installation Guide
Copyright © 2009 - 2017 EnterpriseDB Corporation. All rights reserved.
59
Figure 4.25 — The Additional Directories window.
Use the fields on the Additional Directories window to specify locations for the
Advanced Server data directory and write-ahead log directory.
The default Data Directory is /opt/PostgresPlus/9.5AS/data. You can
optionally use the file selector button to specify an alternate location.
The default location of the Advanced Server Write-Ahead Log Directory is
/PostgresPlus/9.5AS/data/pg_xlog. Accept the default location, or specify an
alternate location with the file selector button.
Advanced Server uses write-ahead logs to help ensure transaction safety and speed
transaction processing; when you make a change to a table, the change is stored in shared
memory and a record of the change is written to the write-ahead log. When you do a
COMMIT, Advance Server writes contents of the write-ahead log to disk.
Click Next to continue to the Configuration Mode window (shown in Figure 4.26).
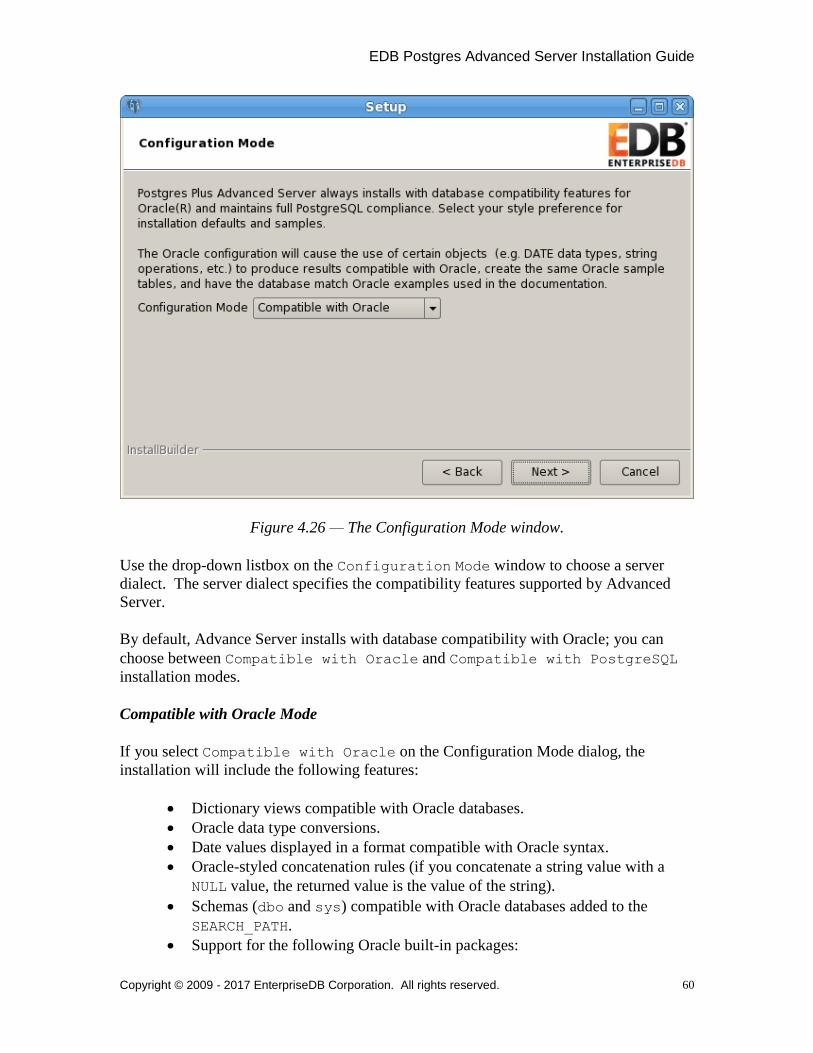
EDB Postgres Advanced Server Installation Guide
Copyright © 2009 - 2017 EnterpriseDB Corporation. All rights reserved.
60
Figure 4.26 — The Configuration Mode window.
Use the drop-down listbox on the Configuration Mode window to choose a server
dialect. The server dialect specifies the compatibility features supported by Advanced
Server.
By default, Advance Server installs with database compatibility with Oracle; you can
choose between Compatible with Oracle and Compatible with PostgreSQL
installation modes.
Compatible with Oracle Mode
If you select Compatible with Oracle on the Configuration Mode dialog, the
installation will include the following features:
Dictionary views compatible with Oracle databases.
Oracle data type conversions.
Date values displayed in a format compatible with Oracle syntax.
Oracle-styled concatenation rules (if you concatenate a string value with a
NULL value, the returned value is the value of the string).
Schemas (dbo and sys) compatible with Oracle databases added to the
SEARCH_PATH.
Support for the following Oracle built-in packages:
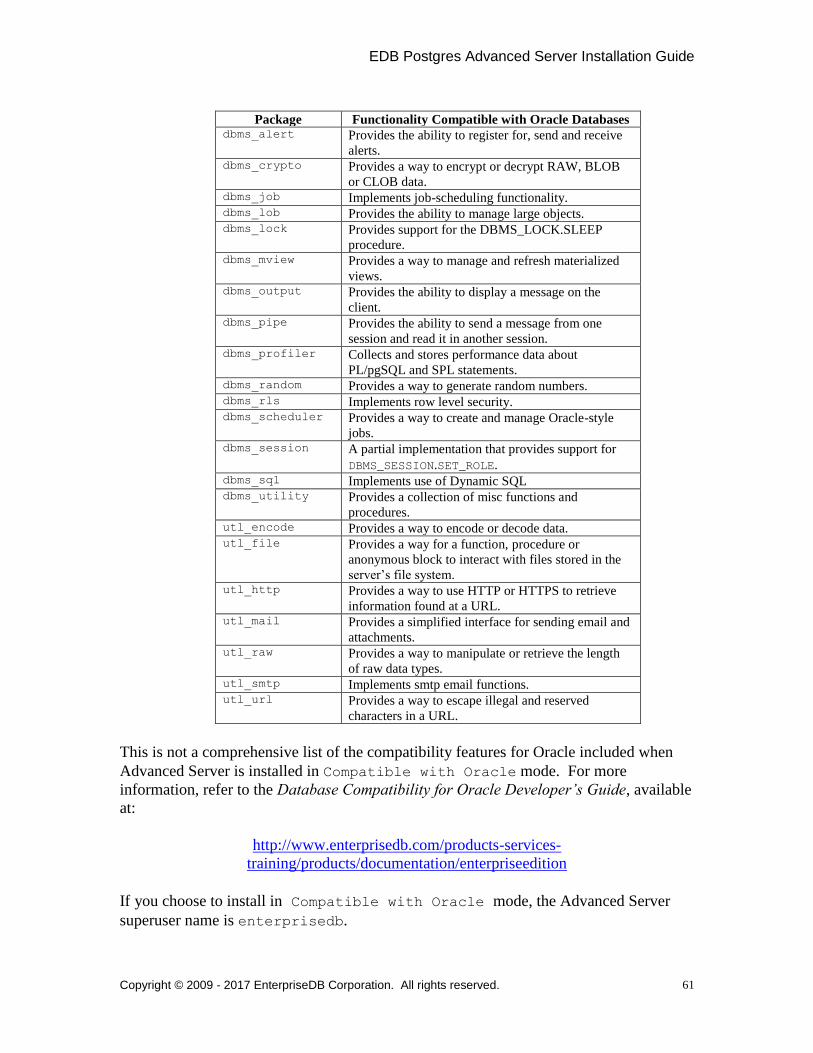
EDB Postgres Advanced Server Installation Guide
Copyright © 2009 - 2017 EnterpriseDB Corporation. All rights reserved.
61
Package Functionality Compatible with Oracle Databases dbms_alert Provides the ability to register for, send and receive
alerts. dbms_crypto Provides a way to encrypt or decrypt RAW, BLOB
or CLOB data. dbms_job Implements job-scheduling functionality. dbms_lob Provides the ability to manage large objects. dbms_lock Provides support for the DBMS_LOCK.SLEEP
procedure. dbms_mview Provides a way to manage and refresh materialized
views. dbms_output Provides the ability to display a message on the
client. dbms_pipe Provides the ability to send a message from one
session and read it in another session. dbms_profiler Collects and stores performance data about
PL/pgSQL and SPL statements. dbms_random Provides a way to generate random numbers. dbms_rls Implements row level security. dbms_scheduler Provides a way to create and manage Oracle-style
jobs. dbms_session A partial implementation that provides support for
DBMS_SESSION.SET_ROLE. dbms_sql Implements use of Dynamic SQL dbms_utility Provides a collection of misc functions and
procedures. utl_encode Provides a way to encode or decode data. utl_file Provides a way for a function, procedure or
anonymous block to interact with files stored in the
server’s file system. utl_http Provides a way to use HTTP or HTTPS to retrieve
information found at a URL. utl_mail Provides a simplified interface for sending email and
attachments. utl_raw Provides a way to manipulate or retrieve the length
of raw data types. utl_smtp Implements smtp email functions. utl_url Provides a way to escape illegal and reserved
characters in a URL.
This is not a comprehensive list of the compatibility features for Oracle included when
Advanced Server is installed in Compatible with Oracle mode. For more
information, refer to the Database Compatibility for Oracle Developer’s Guide, available
at:
http://www.enterprisedb.com/products-services-
training/products/documentation/enterpriseedition
If you choose to install in Compatible with Oracle mode, the Advanced Server
superuser name is enterprisedb.
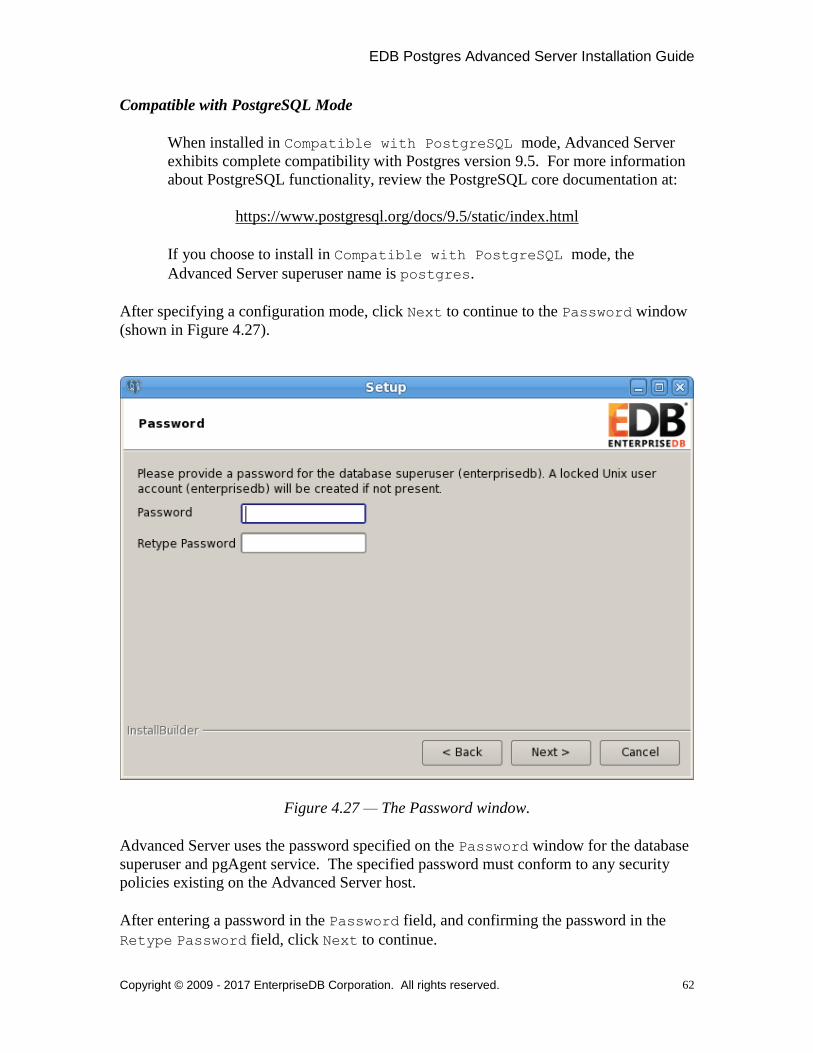
EDB Postgres Advanced Server Installation Guide
Copyright © 2009 - 2017 EnterpriseDB Corporation. All rights reserved.
62
Compatible with PostgreSQL Mode
When installed in Compatible with PostgreSQL mode, Advanced Server
exhibits complete compatibility with Postgres version 9.5. For more information
about PostgreSQL functionality, review the PostgreSQL core documentation at:
https://www.postgresql.org/docs/9.5/static/index.html
If you choose to install in Compatible with PostgreSQL mode, the
Advanced Server superuser name is postgres.
After specifying a configuration mode, click Next to continue to the Password window
(shown in Figure 4.27).
Figure 4.27 — The Password window.
Advanced Server uses the password specified on the Password window for the database
superuser and pgAgent service. The specified password must conform to any security
policies existing on the Advanced Server host.
After entering a password in the Password field, and confirming the password in the
Retype Password field, click Next to continue.
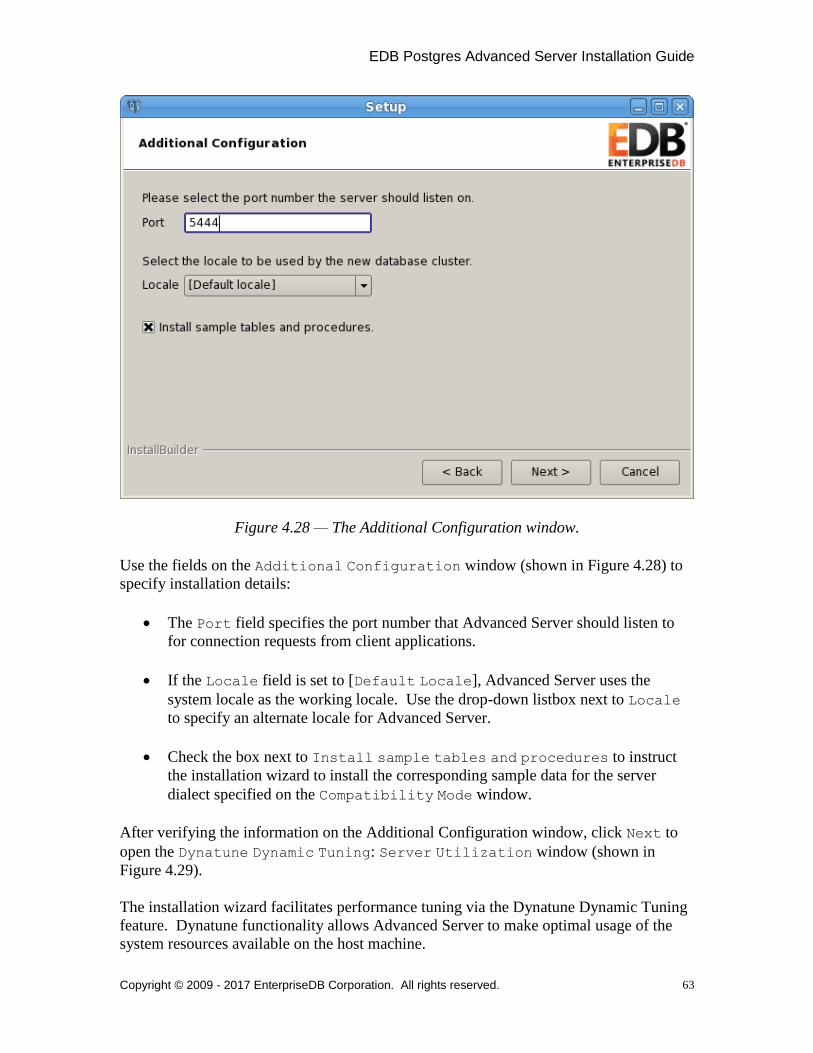
EDB Postgres Advanced Server Installation Guide
Copyright © 2009 - 2017 EnterpriseDB Corporation. All rights reserved.
63
Figure 4.28 — The Additional Configuration window.
Use the fields on the Additional Configuration window (shown in Figure 4.28) to
specify installation details:
The Port field specifies the port number that Advanced Server should listen to
for connection requests from client applications.
If the Locale field is set to [Default Locale], Advanced Server uses the
system locale as the working locale. Use the drop-down listbox next to Locale
to specify an alternate locale for Advanced Server.
Check the box next to Install sample tables and procedures to instruct
the installation wizard to install the corresponding sample data for the server
dialect specified on the Compatibility Mode window.
After verifying the information on the Additional Configuration window, click Next to
open the Dynatune Dynamic Tuning: Server Utilization window (shown in
Figure 4.29).
The installation wizard facilitates performance tuning via the Dynatune Dynamic Tuning
feature. Dynatune functionality allows Advanced Server to make optimal usage of the
system resources available on the host machine.
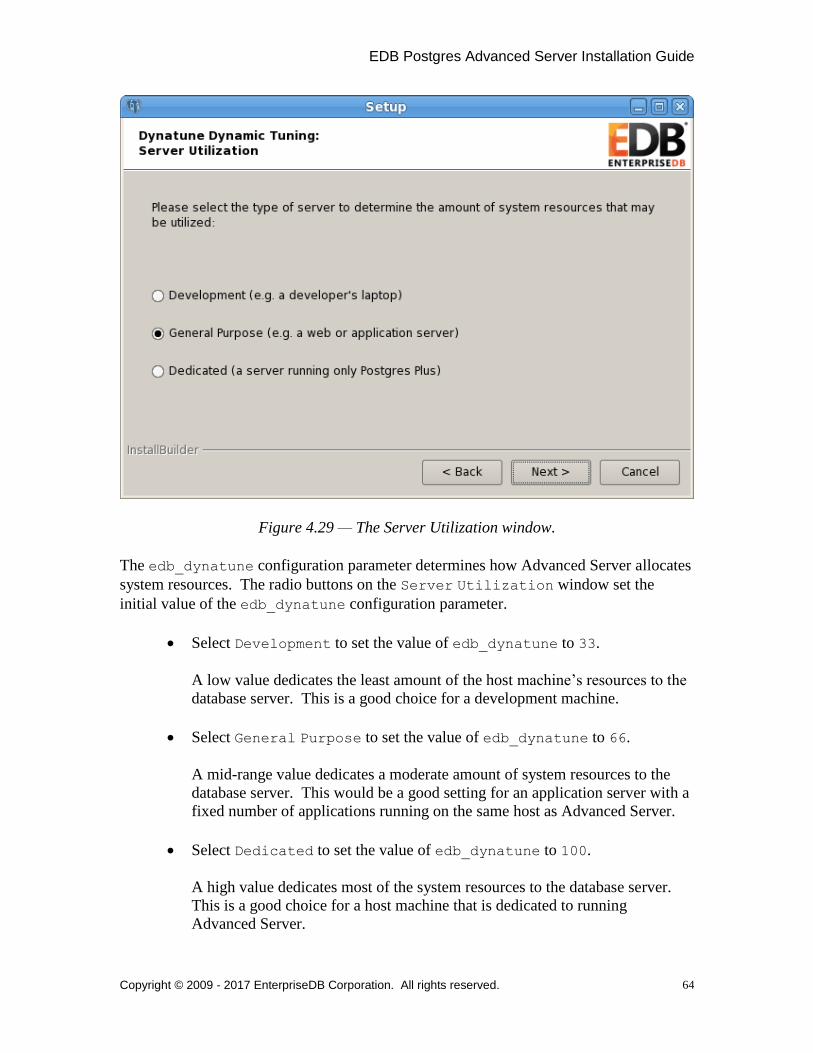
EDB Postgres Advanced Server Installation Guide
Copyright © 2009 - 2017 EnterpriseDB Corporation. All rights reserved.
64
Figure 4.29 — The Server Utilization window.
The edb_dynatune configuration parameter determines how Advanced Server allocates
system resources. The radio buttons on the Server Utilization window set the
initial value of the edb_dynatune configuration parameter.
Select Development to set the value of edb_dynatune to 33.
A low value dedicates the least amount of the host machine’s resources to the
database server. This is a good choice for a development machine.
Select General Purpose to set the value of edb_dynatune to 66.
A mid-range value dedicates a moderate amount of system resources to the
database server. This would be a good setting for an application server with a
fixed number of applications running on the same host as Advanced Server.
Select Dedicated to set the value of edb_dynatune to 100.
A high value dedicates most of the system resources to the database server.
This is a good choice for a host machine that is dedicated to running
Advanced Server.
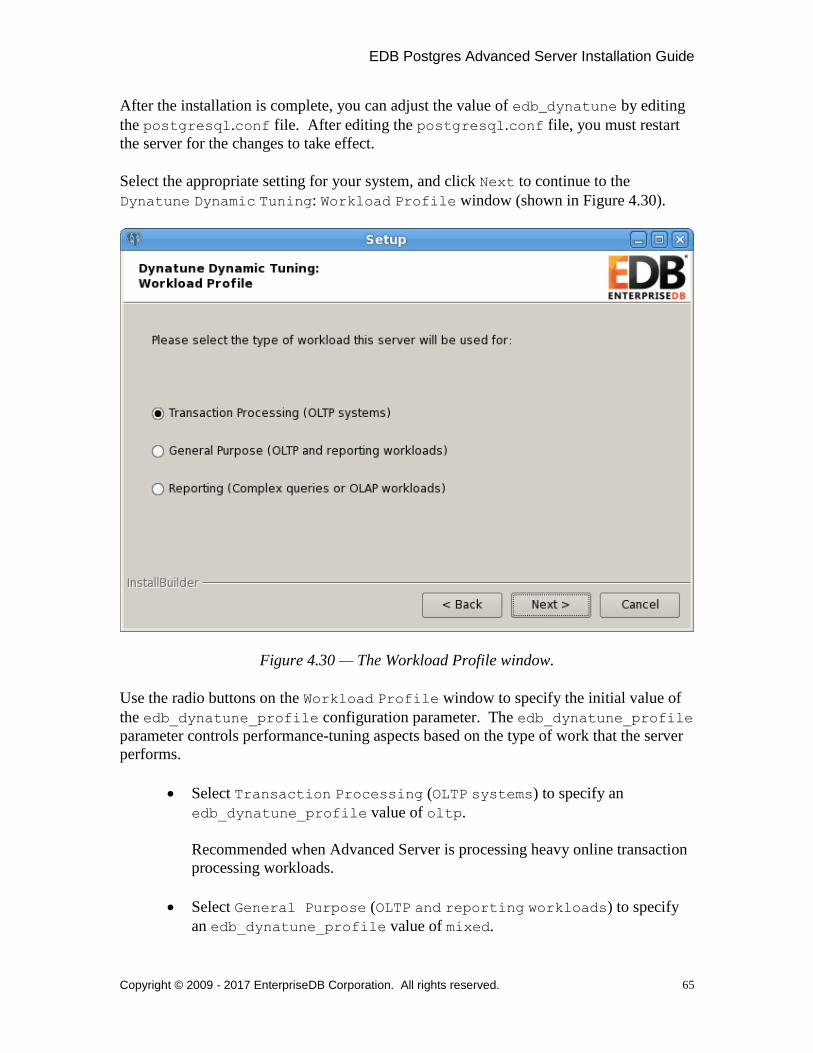
EDB Postgres Advanced Server Installation Guide
Copyright © 2009 - 2017 EnterpriseDB Corporation. All rights reserved.
65
After the installation is complete, you can adjust the value of edb_dynatune by editing
the postgresql.conf file. After editing the postgresql.conf file, you must restart
the server for the changes to take effect.
Select the appropriate setting for your system, and click Next to continue to the
Dynatune Dynamic Tuning: Workload Profile window (shown in Figure 4.30).
Figure 4.30 — The Workload Profile window.
Use the radio buttons on the Workload Profile window to specify the initial value of
the edb_dynatune_profile configuration parameter. The edb_dynatune_profile
parameter controls performance-tuning aspects based on the type of work that the server
performs.
Select Transaction Processing (OLTP systems) to specify an
edb_dynatune_profile value of oltp.
Recommended when Advanced Server is processing heavy online transaction
processing workloads.
Select General Purpose (OLTP and reporting workloads) to specify
an edb_dynatune_profile value of mixed.

EDB Postgres Advanced Server Installation Guide
Copyright © 2009 - 2017 EnterpriseDB Corporation. All rights reserved.
66
Recommended for servers that provide a mix of transaction processing and
data reporting.
Select Reporting (Complex queries or OLAP workloads) to specify an
edb_dynatune_profile value of reporting.
Recommended for database servers used for heavy data reporting.
After the installation is complete, you can adjust the value of edb_dynatune_profile
by editing the postgresql.conf file. After editing the postgresql.conf file, you
must restart the server for the changes to take effect.
For more information about edb_dynatune and other performance-related topics, see
the EDB Postgres (Postgres Plus) Enterprise Edition Guide, available at:
http://www.enterprisedb.com/products-services-
training/products/documentation/enterpriseedition
After selecting the radio button that best describes the use of the system, click Next to
continue. The Advanced Configuration window (shown in Figure 4.31) opens.
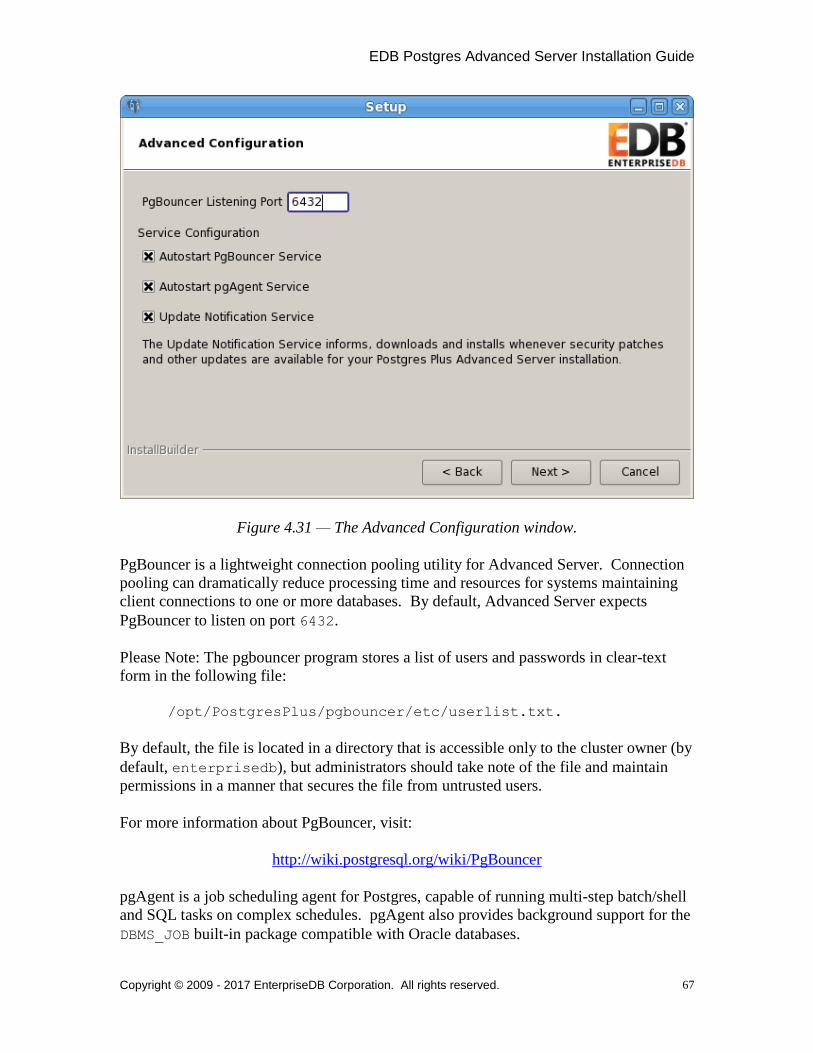
EDB Postgres Advanced Server Installation Guide
Copyright © 2009 - 2017 EnterpriseDB Corporation. All rights reserved.
67
Figure 4.31 — The Advanced Configuration window.
PgBouncer is a lightweight connection pooling utility for Advanced Server. Connection
pooling can dramatically reduce processing time and resources for systems maintaining
client connections to one or more databases. By default, Advanced Server expects
PgBouncer to listen on port 6432.
Please Note: The pgbouncer program stores a list of users and passwords in clear-text
form in the following file:
/opt/PostgresPlus/pgbouncer/etc/userlist.txt.
By default, the file is located in a directory that is accessible only to the cluster owner (by
default, enterprisedb), but administrators should take note of the file and maintain
permissions in a manner that secures the file from untrusted users.
For more information about PgBouncer, visit:
http://wiki.postgresql.org/wiki/PgBouncer
pgAgent is a job scheduling agent for Postgres, capable of running multi-step batch/shell
and SQL tasks on complex schedules. pgAgent also provides background support for the
DBMS_JOB built-in package compatible with Oracle databases.

EDB Postgres Advanced Server Installation Guide
Copyright © 2009 - 2017 EnterpriseDB Corporation. All rights reserved.
68
When enabled, the Update Notification Service notifies you of any new updates
and security patches available for your installation of Advanced Server.
By default, Advanced Server is configured to start the pgBouncer, pgAgent and Update
Notification services when the system boots; clear applicable Service
Configuration checkboxes, or accept the defaults, and click Next to continue.
The Pre Installation Summary opens (shown in Figure 4.32).
Figure 4.32 — The Pre Installation Summary.
The Pre Installation Summary provides an overview of the options specified during
the Setup process. Review the options before clicking Next; use the Back button to
navigate back through the dialogs to modify installation options.
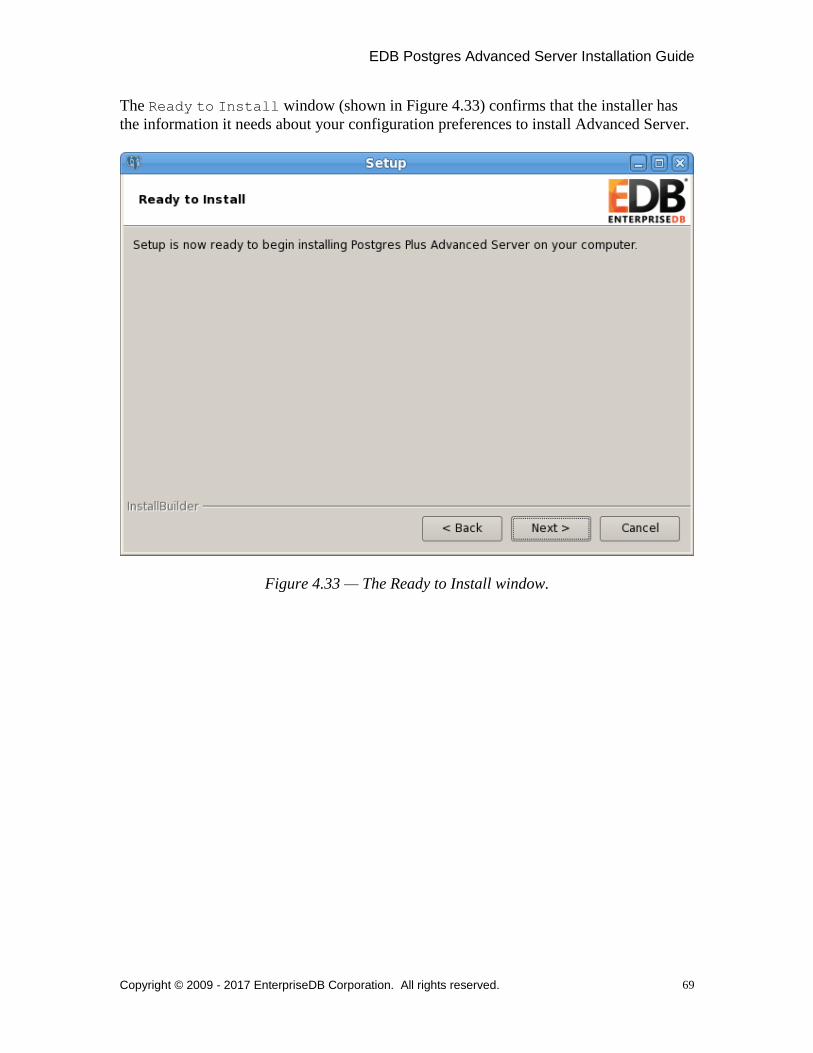
EDB Postgres Advanced Server Installation Guide
Copyright © 2009 - 2017 EnterpriseDB Corporation. All rights reserved.
69
The Ready to Install window (shown in Figure 4.33) confirms that the installer has
the information it needs about your configuration preferences to install Advanced Server.
Figure 4.33 — The Ready to Install window.

EDB Postgres Advanced Server Installation Guide
Copyright © 2009 - 2017 EnterpriseDB Corporation. All rights reserved.
70
Click Next to continue. The installation wizard confirms the installation progress of
Advanced Server via a series of progress bars (shown in Figure 4.34).
Figure 4.34 — The installation wizard confirms the installation progress.
Pop-up dialogs confirm the installation of the server and individual components (shown
in Figure 4.35).
Figure 4.35 — Popup dialogs confirm the installation progress.
Before the installation wizard completes the Advanced Server installation, it offers to
Launch Stack Builder Plus at exit (see Figure 4.36).

EDB Postgres Advanced Server Installation Guide
Copyright © 2009 - 2017 EnterpriseDB Corporation. All rights reserved.
71
Figure 4.36 — The installation wizard offers to Launch StackBuilder Plus at exit.
You can optionally clear the StackBuilder Plus box and click Finish to complete
the Advanced Server installation or accept the default and proceed to StackBuilder Plus.
StackBuilder Plus provides a graphical interface that downloads and installs applications
and drivers that work with Advanced Server. For more information about StackBuilder
Plus, see Section 4.5, Using StackBuilder Plus.
EDB Postgres Advanced Server Installation Guide
Copyright © 2009 - 2017 EnterpriseDB Corporation. All rights reserved.
72
4.4 Invoking the Installer from the Command Line
The command line options of the Advanced Server installer offer functionality in
situations where a graphical installation may not work because of limited resources or
privileges. You can:
Include the --mode unattended option when invoking the installer to perform
an installation without user input.
Include the --mode text option when invoking the installer to perform an
installation from the command line.
Invoke the installer with the --extract-only option to perform a minimal
installation when you don’t hold the privileges required to perform a complete
installation.
Not all command line options are suitable for all platforms. For a complete reference
guide to the command line options, see Section 4.4.4, Reference - Command Line
Options.
Please Note: If you are invoking the installer from the command line to perform a system
upgrade, the installer will ignore command line options, and preserve the configuration of
the previous installation.

EDB Postgres Advanced Server Installation Guide
Copyright © 2009 - 2017 EnterpriseDB Corporation. All rights reserved.
73
4.4.1 Performing a Text Mode Installation
To specify that the installer should run in text mode, include the -mode text command
line option when invoking the installer. Text-mode installations are useful if you need to
install on a remote server using ssh tunneling (and have access to a minimal amount of
bandwidth), or if you do not have access to a graphical interface.
In text mode, the installer uses a series of command line questions to establish the
configuration parameters. Text-mode installations are valid only on Linux systems.
You must assume superuser privileges before performing a text-mode installation. To
perform a text-mode installation on a Linux system, navigate to the directory that
contains the installation binary file and enter:
# ./ppasmeta-9.5.x.x-linux.run --mode text
At any point during the installation process, you can press Ctrl-C to abort the
installation.
The installer starts, prompting you to select an installation language (see Figure 4.37).
Figure 4.37 — The text mode installer prompts you to select an installation language.
The installation language is the language used by the installer during the installation
process. The default value for English is displayed in square braces immediately to the
left of the prompt ([1]); press Enter to accept the default value and continue, or change
the value to specify an alternate installation language.
If the installer detects that you do not have Java installed on your system, it will alert you
that it will not install Java-based components. Select Y or Enter to continue, or exit the
installation and install Java before re-opening the installer.

EDB Postgres Advanced Server Installation Guide
Copyright © 2009 - 2017 EnterpriseDB Corporation. All rights reserved.
74
Figure 4.38 — The text mode installer welcomes you to the Setup Wizard.
The text mode installer welcomes you to the Setup Wizard (shown in Figure 4.38), and
introduces the License agreement. Use the Enter key to page through the License
agreement.
Figure 4.39 — Accept the license agreement to continue.
After reading the license agreement, enter y to accept the agreement and proceed with the
installation (see Figure 4.39). Enter n if you do not accept the license agreement; this
will abort the installation. Press Enter to proceed.
Next, Advanced Server will prompt you for the User Authentication information
associated with your EnterpriseDB user account (see Figure 4.40). There is no charge to
register for an EnterpriseDB user account; if you do not have a user account, visit
http://www.enterprisedb.com/user-login-registration to register.
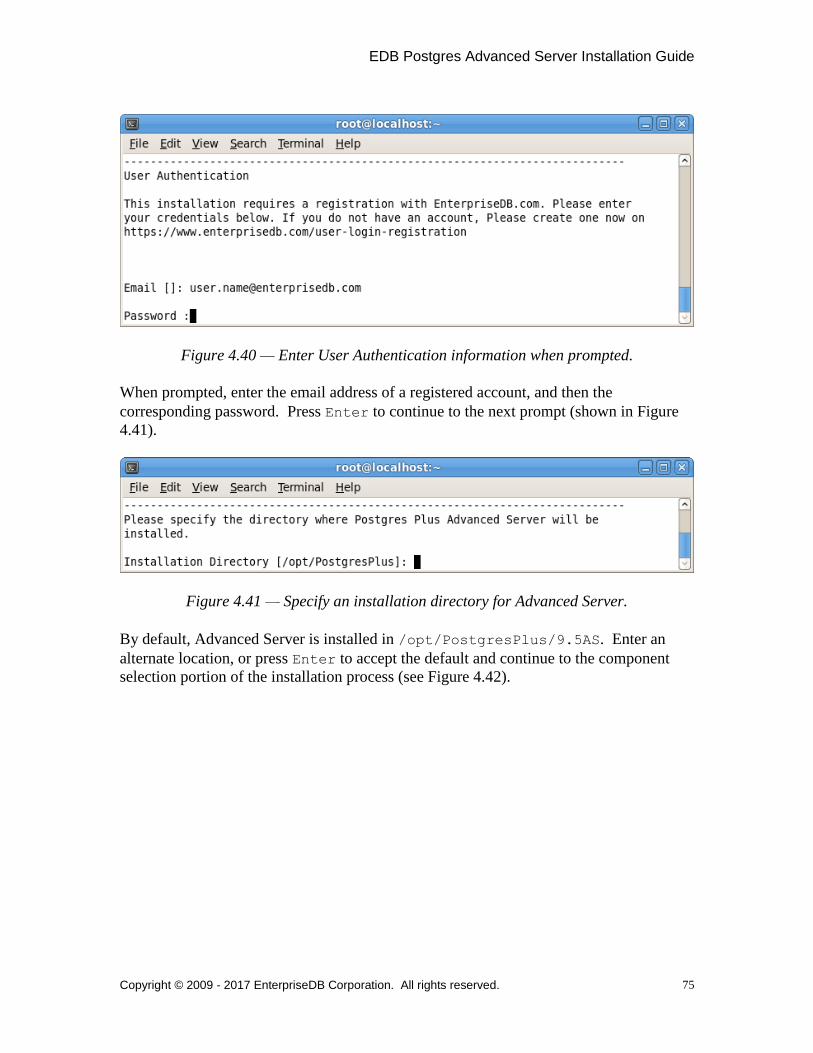
EDB Postgres Advanced Server Installation Guide
Copyright © 2009 - 2017 EnterpriseDB Corporation. All rights reserved.
75
Figure 4.40 — Enter User Authentication information when prompted.
When prompted, enter the email address of a registered account, and then the
corresponding password. Press Enter to continue to the next prompt (shown in Figure
4.41).
Figure 4.41 — Specify an installation directory for Advanced Server.
By default, Advanced Server is installed in /opt/PostgresPlus/9.5AS. Enter an
alternate location, or press Enter to accept the default and continue to the component
selection portion of the installation process (see Figure 4.42).

EDB Postgres Advanced Server Installation Guide
Copyright © 2009 - 2017 EnterpriseDB Corporation. All rights reserved.
76
Figure 4.42 — Select supporting components for installation.
The installer prompts you individually for each component that is to be installed with
Advanced Server; enter Y (or press Enter to accept the default value of yes) after each
component that you wish to include with the installation. Enter n to omit a component
from the installation.
The Advanced Server components are:
Database Server
Select the Database Server option to install Advanced Server 9.5.
Connectors
Select the Connectors option to install the client connector API’s for JDBC,
.NET, OCI and ODBC. The client connectors facilitate application connectivity
for Advanced Server.
Infinite Cache Daemon
Select the Infinite Cache option to install the icache daemon.
EDB Postgres Advanced Server Installation Guide
Copyright © 2009 - 2017 EnterpriseDB Corporation. All rights reserved.
77
The installation wizard can optionally install the icache daemon on a remote
icache server without including a complete installation of Advanced Server. To
install only the icache daemon, deselect the other components shown on the
Select Components window before clicking Next.
For more information about using Infinite Cache and the icache daemon, see the
EDB Postgres (Postgres Plus) Migration Guide, available at:
http://www.enterprisedb.com/products-services-
training/products/documentation/enterpriseedition
Migration Toolkit
Select the Migration Toolkit option to install Migration Toolkit. Migration
Toolkit is a command line migration utility that facilitates migration from
MySQL, Oracle, SQL Server and Sybase databases. See the EDB Postgres
Migration Toolkit Guide for more information about Migration Toolkit, available
at:
http://www.enterprisedb.com/products-services-
training/products/documentation/enterpriseedition
Postgres Enterprise Manager Client
Select the Postgres Enterprise Manager Client option to install the PEM
Client application. The PEM Client provides a powerful graphical interface for
database management and monitoring.
pgpool-II
pgpool-II provides load balancing, connection pooling, high availability, and
connection limits for Advanced Server databases.
pgpool-II Extensions
If you are installing pgpool-II, include the pgpool-II Extensions to provide
the extensions required by the server to implement pgpool-II functionality.
EDB*Plus
Select the EDB*Plus option to install EDB*Plus. EDB*Plus is the Advanced
Server command line interface that offers compatibility with Oracle’s SQL Plus
commands.

EDB Postgres Advanced Server Installation Guide
Copyright © 2009 - 2017 EnterpriseDB Corporation. All rights reserved.
78
Slony Replication
Check the box next to Slony Replication to specify that Slony-I should be
included in the Advanced Server installation. Slony-I facilitates master-standby
replication suited for large databases with a limited number of standby systems.
PgBouncer
PgBouncer is a lightweight connection pooling utility for Advanced Server.
Connection pooling can dramatically reduce processing time and resources for
systems maintaining client connections to one or more databases.
After selecting components for installation, confirm that the list is correct by entering Y;
enter n to iterate through the list of components a second time. Press Enter to continue.
Next, the installer prompts you to specify the location of the additional directories
required by Advanced Server (see Figure 4.43).
Figure 4.43 — The installer prompts you for additional directory locations.
The default data directory is /opt/PostgresPlus/9.5AS/data. You can specify an
alternate location, or press Enter to accept the default and continue.
The default location of the Advanced Server Write-Ahead Log Directory is
/opt/PostgresPlus/9.5AS/data/pg_xlog. Press Enter to accept the default
location and continue, or specify an alternate location.
Advanced Server uses write-ahead logs to help ensure transaction safety and speed
transaction processing; when you make a change to a table, the change is stored in shared
memory and a record of the change is written to the write-ahead log. When you COMMIT
a transaction, Advance Server writes contents of the write-ahead log to disk.
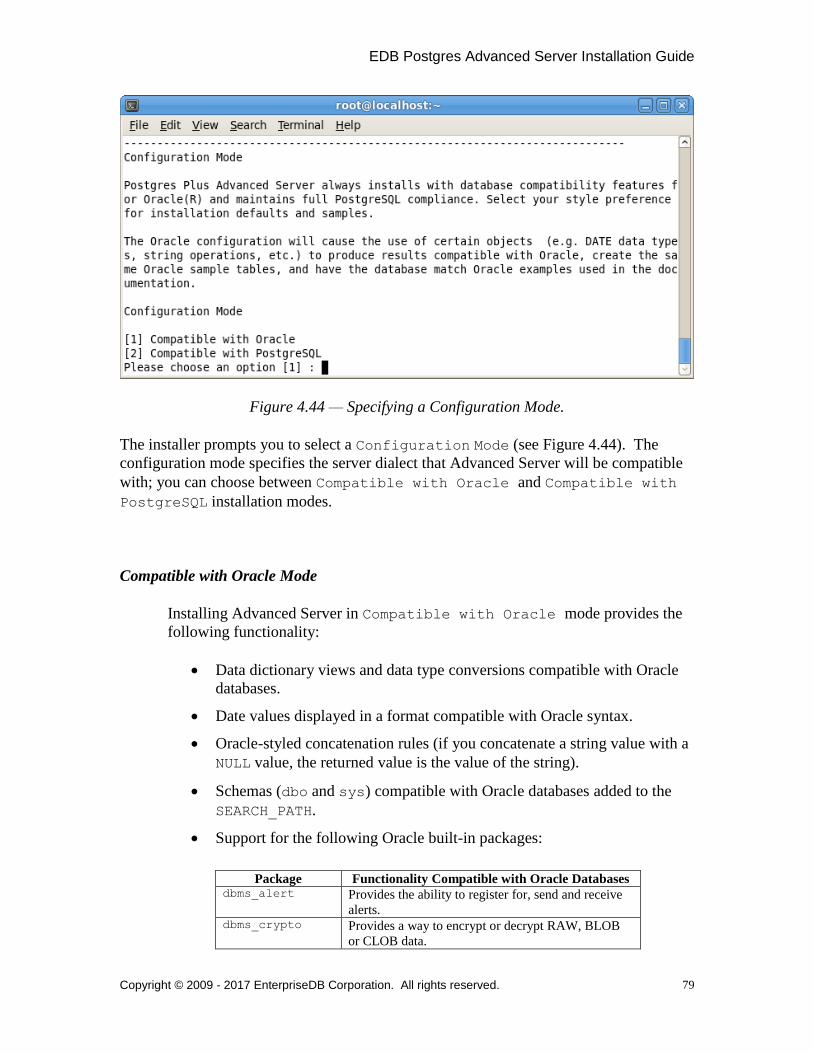
EDB Postgres Advanced Server Installation Guide
Copyright © 2009 - 2017 EnterpriseDB Corporation. All rights reserved.
79
Figure 4.44 — Specifying a Configuration Mode.
The installer prompts you to select a Configuration Mode (see Figure 4.44). The
configuration mode specifies the server dialect that Advanced Server will be compatible
with; you can choose between Compatible with Oracle and Compatible with
PostgreSQL installation modes.
Compatible with Oracle Mode
Installing Advanced Server in Compatible with Oracle mode provides the
following functionality:
Data dictionary views and data type conversions compatible with Oracle
databases.
Date values displayed in a format compatible with Oracle syntax.
Oracle-styled concatenation rules (if you concatenate a string value with a
NULL value, the returned value is the value of the string).
Schemas (dbo and sys) compatible with Oracle databases added to the
SEARCH_PATH.
Support for the following Oracle built-in packages:
Package Functionality Compatible with Oracle Databases dbms_alert Provides the ability to register for, send and receive
alerts. dbms_crypto Provides a way to encrypt or decrypt RAW, BLOB
or CLOB data.
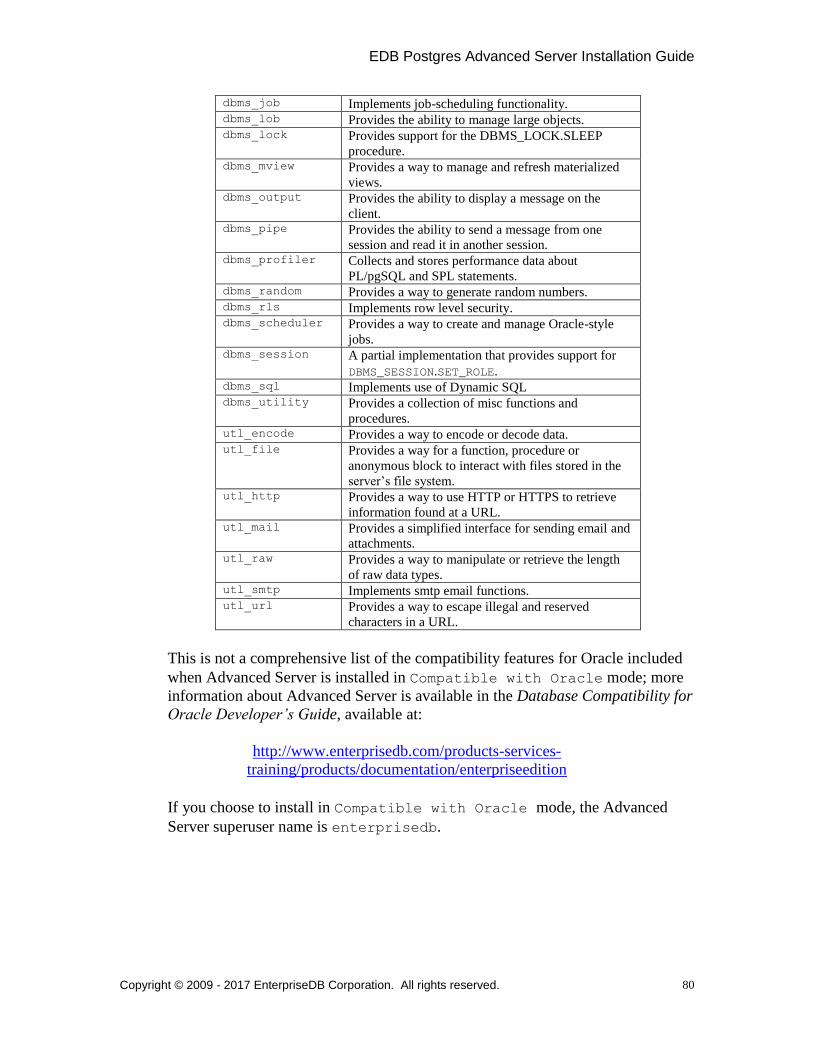
EDB Postgres Advanced Server Installation Guide
Copyright © 2009 - 2017 EnterpriseDB Corporation. All rights reserved.
80
dbms_job Implements job-scheduling functionality. dbms_lob Provides the ability to manage large objects. dbms_lock Provides support for the DBMS_LOCK.SLEEP
procedure. dbms_mview Provides a way to manage and refresh materialized
views. dbms_output Provides the ability to display a message on the
client. dbms_pipe Provides the ability to send a message from one
session and read it in another session. dbms_profiler Collects and stores performance data about
PL/pgSQL and SPL statements. dbms_random Provides a way to generate random numbers. dbms_rls Implements row level security. dbms_scheduler Provides a way to create and manage Oracle-style
jobs. dbms_session A partial implementation that provides support for
DBMS_SESSION.SET_ROLE. dbms_sql Implements use of Dynamic SQL dbms_utility Provides a collection of misc functions and
procedures. utl_encode Provides a way to encode or decode data. utl_file Provides a way for a function, procedure or
anonymous block to interact with files stored in the
server’s file system. utl_http Provides a way to use HTTP or HTTPS to retrieve
information found at a URL. utl_mail Provides a simplified interface for sending email and
attachments. utl_raw Provides a way to manipulate or retrieve the length
of raw data types. utl_smtp Implements smtp email functions. utl_url Provides a way to escape illegal and reserved
characters in a URL.
This is not a comprehensive list of the compatibility features for Oracle included
when Advanced Server is installed in Compatible with Oracle mode; more
information about Advanced Server is available in the Database Compatibility for
Oracle Developer’s Guide, available at:
http://www.enterprisedb.com/products-services-
training/products/documentation/enterpriseedition
If you choose to install in Compatible with Oracle mode, the Advanced
Server superuser name is enterprisedb.
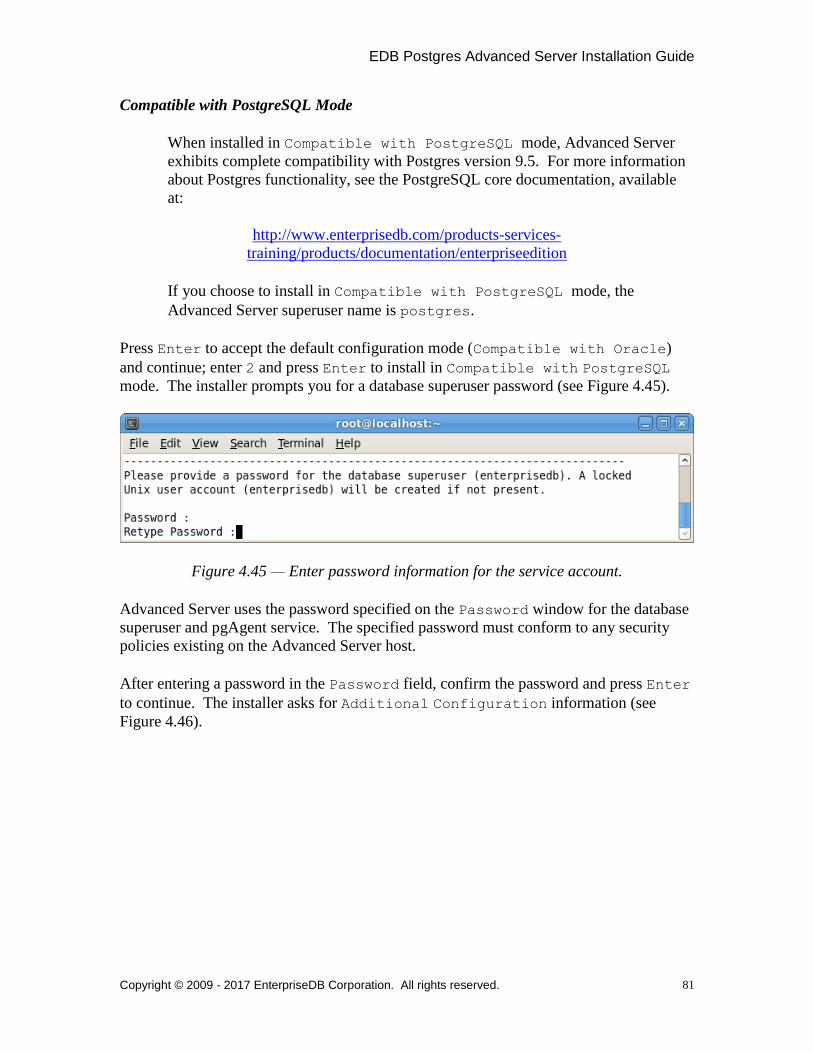
EDB Postgres Advanced Server Installation Guide
Copyright © 2009 - 2017 EnterpriseDB Corporation. All rights reserved.
81
Compatible with PostgreSQL Mode
When installed in Compatible with PostgreSQL mode, Advanced Server
exhibits complete compatibility with Postgres version 9.5. For more information
about Postgres functionality, see the PostgreSQL core documentation, available
at:
http://www.enterprisedb.com/products-services-
training/products/documentation/enterpriseedition
If you choose to install in Compatible with PostgreSQL mode, the
Advanced Server superuser name is postgres.
Press Enter to accept the default configuration mode (Compatible with Oracle)
and continue; enter 2 and press Enter to install in Compatible with PostgreSQL
mode. The installer prompts you for a database superuser password (see Figure 4.45).
Figure 4.45 — Enter password information for the service account.
Advanced Server uses the password specified on the Password window for the database
superuser and pgAgent service. The specified password must conform to any security
policies existing on the Advanced Server host.
After entering a password in the Password field, confirm the password and press Enter
to continue. The installer asks for Additional Configuration information (see
Figure 4.46).

EDB Postgres Advanced Server Installation Guide
Copyright © 2009 - 2017 EnterpriseDB Corporation. All rights reserved.
82
Figure 4.46 — The installer prompts for Additional Configuration information.
When prompted, enter the Port that the Advanced Server service will monitor for
connections. By default, Advanced Server chooses the first available port after
port number 5444.
Specify a Locale by entering a locale number from the list shown. Accept the
Default locale value to instruct the installer to use the system locale as the
server locale.
When prompted, enter Y (or press Enter to accept the default value) to install the
sample tables and procedures for the database dialect specified by the
compatibility mode (Oracle or PostgreSQL).
When the Update Notification Service prompt appears, enter Y to indicate
that Advanced Server should notify you of any available updates and security
patches for your installation of Advanced Server.
Dynatune functionality allows Advanced Server to make optimal usage of the system
resources available on the host machine. To facilitate performance tuning through
Dynatune, the installer prompts you for Server Utilization and Workload
Profile information (see Figure 4.47).

EDB Postgres Advanced Server Installation Guide
Copyright © 2009 - 2017 EnterpriseDB Corporation. All rights reserved.
83
Figure 4.47 — Specify Dynatune configuration information.
The edb_dynatune configuration parameter determines how Advanced Server allocates
system resources. Specify a usage type for the Advanced Server installation to establish
the initial value of edb_dynatune.
Specify Development to set the value of edb_dynatune to 33.
A low value dedicates the least amount of the host machine’s resources to the
database server. This is a good choice for a development machine.
Specify General Purpose to set the value of edb_dynatune to 66.
A mid-range value dedicates a moderate amount of system resources to the
database server. This would be a good setting for an application server with a
fixed number of applications running on the same host as Advanced Server.
Specify Dedicated to set the value of edb_dynatune to 100.
A high value dedicates most of the system resources to the database server.
This is a good choice for a host machine that is dedicated to running
Advanced Server.
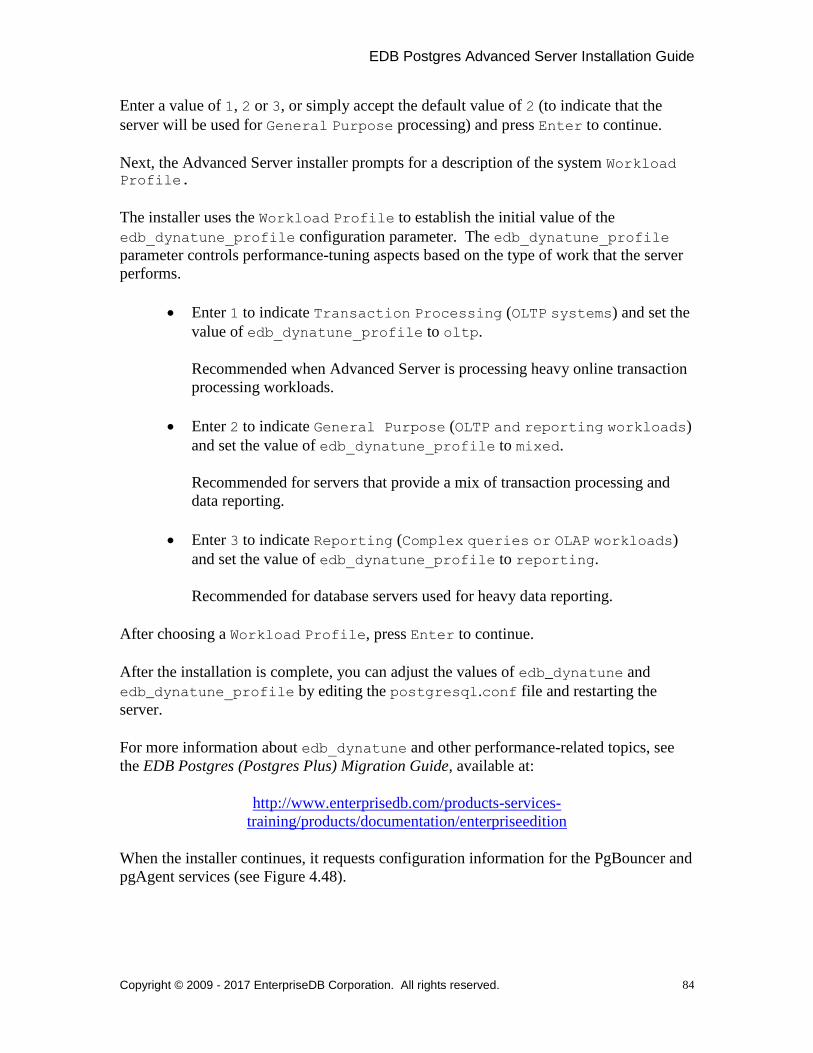
EDB Postgres Advanced Server Installation Guide
Copyright © 2009 - 2017 EnterpriseDB Corporation. All rights reserved.
84
Enter a value of 1, 2 or 3, or simply accept the default value of 2 (to indicate that the
server will be used for General Purpose processing) and press Enter to continue.
Next, the Advanced Server installer prompts for a description of the system Workload Profile.
The installer uses the Workload Profile to establish the initial value of the
edb_dynatune_profile configuration parameter. The edb_dynatune_profile
parameter controls performance-tuning aspects based on the type of work that the server
performs.
Enter 1 to indicate Transaction Processing (OLTP systems) and set the
value of edb_dynatune_profile to oltp.
Recommended when Advanced Server is processing heavy online transaction
processing workloads.
Enter 2 to indicate General Purpose (OLTP and reporting workloads)
and set the value of edb_dynatune_profile to mixed.
Recommended for servers that provide a mix of transaction processing and
data reporting.
Enter 3 to indicate Reporting (Complex queries or OLAP workloads)
and set the value of edb_dynatune_profile to reporting.
Recommended for database servers used for heavy data reporting.
After choosing a Workload Profile, press Enter to continue.
After the installation is complete, you can adjust the values of edb_dynatune and
edb_dynatune_profile by editing the postgresql.conf file and restarting the
server.
For more information about edb_dynatune and other performance-related topics, see
the EDB Postgres (Postgres Plus) Migration Guide, available at:
http://www.enterprisedb.com/products-services-
training/products/documentation/enterpriseedition
When the installer continues, it requests configuration information for the PgBouncer and
pgAgent services (see Figure 4.48).
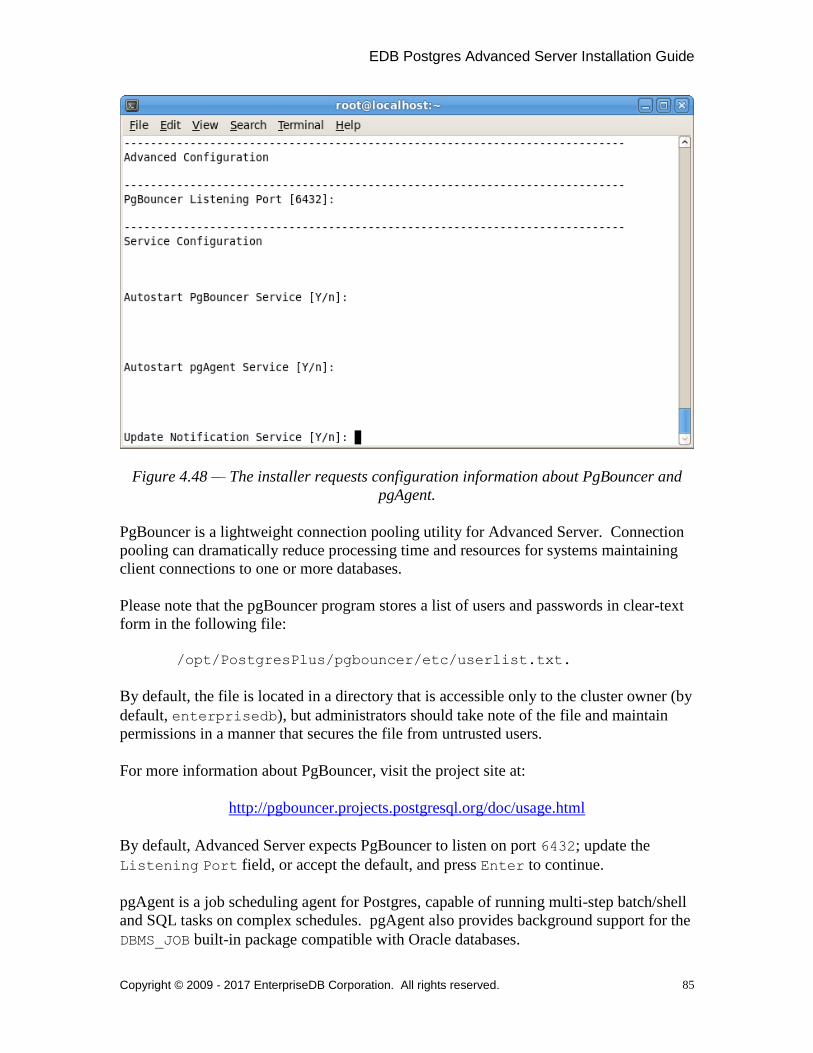
EDB Postgres Advanced Server Installation Guide
Copyright © 2009 - 2017 EnterpriseDB Corporation. All rights reserved.
85
Figure 4.48 — The installer requests configuration information about PgBouncer and
pgAgent.
PgBouncer is a lightweight connection pooling utility for Advanced Server. Connection
pooling can dramatically reduce processing time and resources for systems maintaining
client connections to one or more databases.
Please note that the pgBouncer program stores a list of users and passwords in clear-text
form in the following file:
/opt/PostgresPlus/pgbouncer/etc/userlist.txt.
By default, the file is located in a directory that is accessible only to the cluster owner (by
default, enterprisedb), but administrators should take note of the file and maintain
permissions in a manner that secures the file from untrusted users.
For more information about PgBouncer, visit the project site at:
http://pgbouncer.projects.postgresql.org/doc/usage.html
By default, Advanced Server expects PgBouncer to listen on port 6432; update the
Listening Port field, or accept the default, and press Enter to continue.
pgAgent is a job scheduling agent for Postgres, capable of running multi-step batch/shell
and SQL tasks on complex schedules. pgAgent also provides background support for the
DBMS_JOB built-in package compatible with Oracle databases.
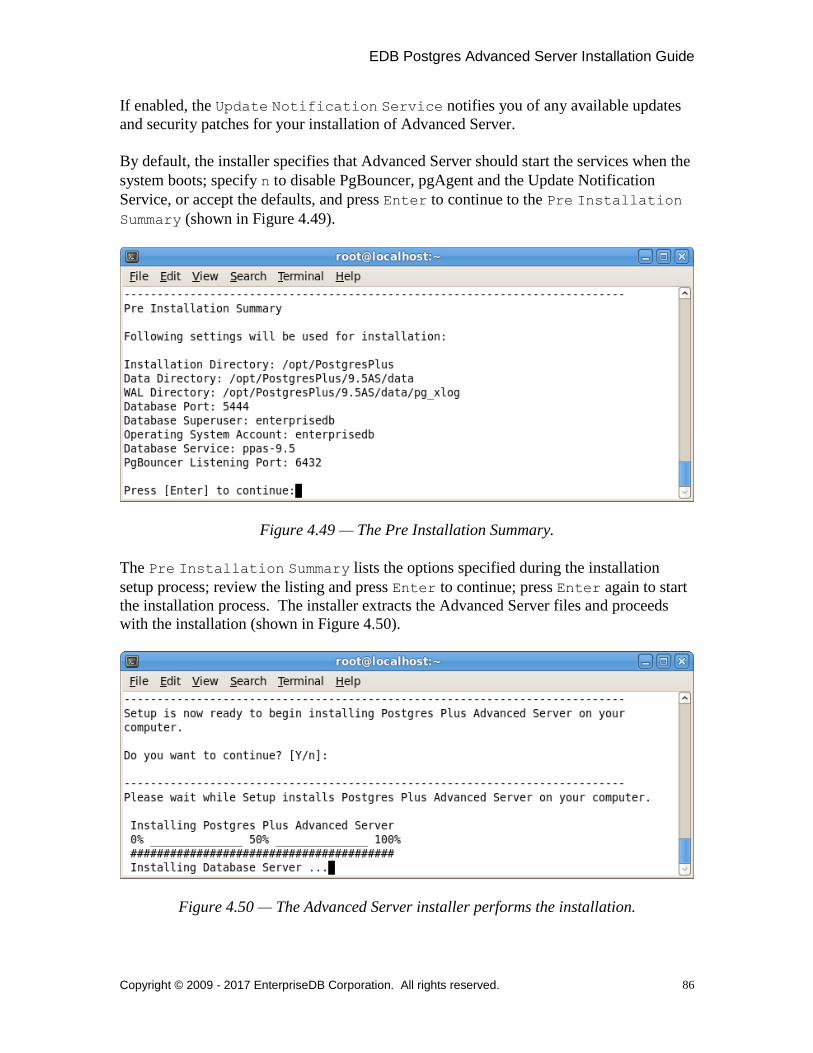
EDB Postgres Advanced Server Installation Guide
Copyright © 2009 - 2017 EnterpriseDB Corporation. All rights reserved.
86
If enabled, the Update Notification Service notifies you of any available updates
and security patches for your installation of Advanced Server.
By default, the installer specifies that Advanced Server should start the services when the
system boots; specify n to disable PgBouncer, pgAgent and the Update Notification
Service, or accept the defaults, and press Enter to continue to the Pre Installation
Summary (shown in Figure 4.49).
Figure 4.49 — The Pre Installation Summary.
The Pre Installation Summary lists the options specified during the installation
setup process; review the listing and press Enter to continue; press Enter again to start
the installation process. The installer extracts the Advanced Server files and proceeds
with the installation (shown in Figure 4.50).
Figure 4.50 — The Advanced Server installer performs the installation.

EDB Postgres Advanced Server Installation Guide
Copyright © 2009 - 2017 EnterpriseDB Corporation. All rights reserved.
87
The dialog lists each module as it is being installed, and informs you when the
installation is complete (see Figure 4.51).
Figure 4.51 — The text mode installation is complete.
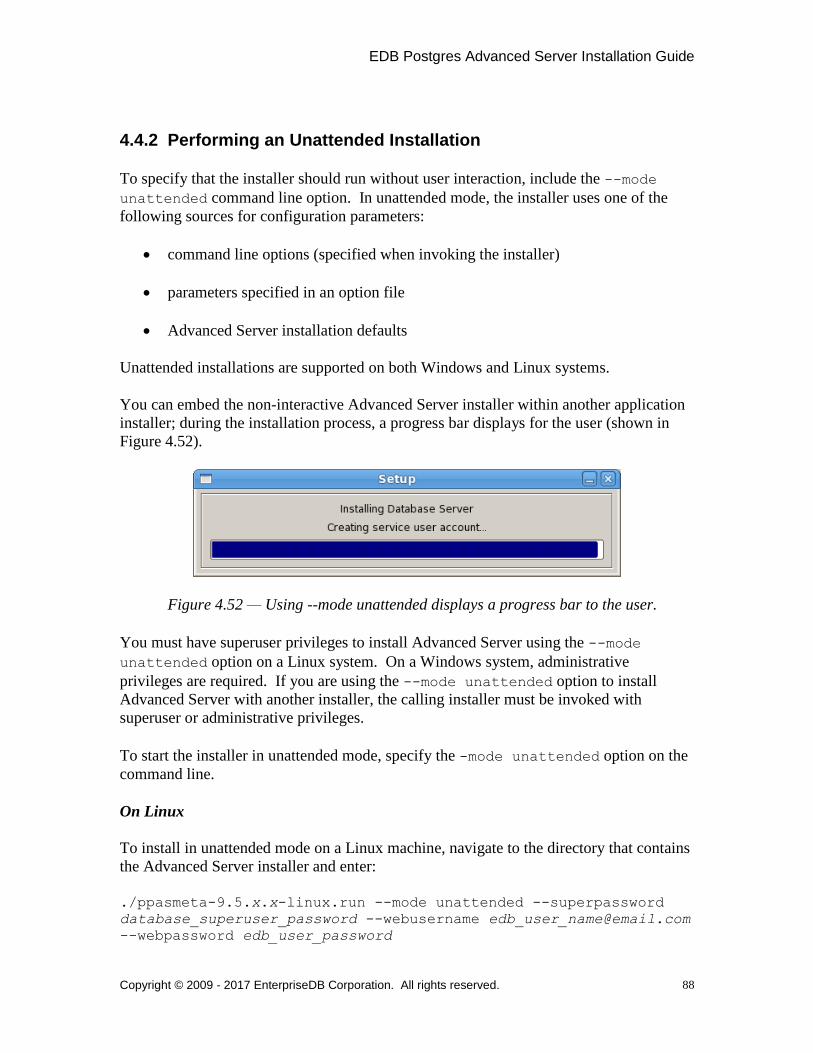
EDB Postgres Advanced Server Installation Guide
Copyright © 2009 - 2017 EnterpriseDB Corporation. All rights reserved.
88
4.4.2 Performing an Unattended Installation
To specify that the installer should run without user interaction, include the --mode
unattended command line option. In unattended mode, the installer uses one of the
following sources for configuration parameters:
command line options (specified when invoking the installer)
parameters specified in an option file
Advanced Server installation defaults
Unattended installations are supported on both Windows and Linux systems.
You can embed the non-interactive Advanced Server installer within another application
installer; during the installation process, a progress bar displays for the user (shown in
Figure 4.52).
Figure 4.52 — Using --mode unattended displays a progress bar to the user.
You must have superuser privileges to install Advanced Server using the --mode
unattended option on a Linux system. On a Windows system, administrative
privileges are required. If you are using the --mode unattended option to install
Advanced Server with another installer, the calling installer must be invoked with
superuser or administrative privileges.
To start the installer in unattended mode, specify the -mode unattended option on the
command line.
On Linux
To install in unattended mode on a Linux machine, navigate to the directory that contains
the Advanced Server installer and enter:
./ppasmeta-9.5.x.x-linux.run --mode unattended --superpassword
database_superuser_password --webusername [email protected]
--webpassword edb_user_password

EDB Postgres Advanced Server Installation Guide
Copyright © 2009 - 2017 EnterpriseDB Corporation. All rights reserved.
89
The --superpassword option specifies a password for the database superuser. If you
omit the option, the database superuser password defaults to enterprisedb. The
default password can be easily guessed by a potential intruder; be sure to provide a
stronger password with the --superpassword option.
You must include the --webusername and --webpassword options to specify the
identity of a registered EnterpriseDB user. There is no charge to register for an
EnterpriseDB user account; if you do not have an account, you can create one at:
http://www.enterprisedb.com/user-login-registration
You can control configuration parameters for Advanced Server by specifying options at
the command line, or by including the parameters in a configuration file. Specify the
parameters within the configuration file in option=value pairs (shown in Figure 4.53).
Figure 4.53 — A sample configuration parameter file.
When you invoke the installer, include the --optionfile parameter, and the complete
path to the configuration parameter file:
# ./ppasmeta-9.5.x.x-linux.run --optionfile /$HOME/config_param
For more information about the command line options supported during an unattended
installation, see Section 4.4.4, Reference - Command Line Options.
On Windows
To start the installer in unattended mode on a Windows system, navigate to the directory
that contains the executable file, and enter:
ppasmeta-windows.exe --mode unattended --superpassword
database_superuser_password --servicepassword
system_password --webusername [email protected] --webpassword
edb_user_password
EDB Postgres Advanced Server Installation Guide
Copyright © 2009 - 2017 EnterpriseDB Corporation. All rights reserved.
90
Include the --servicepassword option to specify an operating system password for the
user installing Advanced Server. Omitting the option can lead to authentication problems
on some Windows systems, and enforced password policies may not accept the default
password (enterprisedb).
Use the --webusername and --webpassword options to specify the identity of a
registered EnterpriseDB user; if you do not have an account, you can create one at:
http://www.enterprisedb.com/user-login-registration

EDB Postgres Advanced Server Installation Guide
Copyright © 2009 - 2017 EnterpriseDB Corporation. All rights reserved.
91
4.4.3 Performing an Installation with Limited Privileges
To perform an abbreviated installation of Advanced Server without access to root or
administrative privileges, invoke the installer from the command line and include
the --extract-only option. Invoking the installer with the --extract-only option
extracts the binary files in an unaltered form, allowing you to experiment with a minimal
installation of Advanced Server.
If you invoke the installer with the --extract-only option, you must manually start
and stop the server with pg_ctl. For more information about starting the Advanced
Server service, see Section 5.2.3, Using pg_ctl to Control Advanced Server.
If you include the --extract-only option when you invoke the installer, the installer
steps through a shortened form of the installation wizard. During the brief installation
process, the installer generates an installation script that can be later used to complete a
more complete installation. To invoke the installation script, you must have superuser
privileges on Linux or administrative privileges on Windows.
The installation script:
Initializes the database cluster if the cluster is empty.
Configures the server to start at boot-time.
Creates services for the supporting components (such as pgAgent and
PgBouncer).
Establishes initial values for Dynatune (dynamic tuning) variables.
The scripted Advanced Server installation does not include menu shortcuts or access to
StackBuilder Plus, and no modifications are made to registry files. The Advanced Server
Update Monitor will not detect components installed by the scripted installation, and will
not issue alerts for available updates to those components.
To perform a limited installation and generate an installation script, download and
unpack the Advanced Server installer. Navigate into the directory that contains the
installer, and invoke the installer with the command:
On Linux:
./ppasmeta-9.5.x.x-linux.run --extract-only yes

EDB Postgres Advanced Server Installation Guide
Copyright © 2009 - 2017 EnterpriseDB Corporation. All rights reserved.
92
On Windows:
ppasmeta-9.5.x.x-windows.exe --extract-only yes
A dialog opens, prompting you to choose an installation language. Select a language for
the installation from the drop-down listbox, and click OK to continue. The Setup Wizard
opens (shown in Figure 4.54).
Figure 4.54 — The Welcome window.
Click Next to continue to the Advanced Server license agreement (shown in Figure
4.55).

EDB Postgres Advanced Server Installation Guide
Copyright © 2009 - 2017 EnterpriseDB Corporation. All rights reserved.
93
Figure 4.55 — The Advanced Server license agreement.
After reading the license agreement, select the appropriate radio button and click Next to
continue to the User Authentication window (shown in Figure 4.56).

EDB Postgres Advanced Server Installation Guide
Copyright © 2009 - 2017 EnterpriseDB Corporation. All rights reserved.
94
Figure 4.56 — The Advanced Server User Authentication window.
Before continuing, you must provide the email address and password associated with
your EnterpriseDB user account. Registration is free; if you do not have a user account,
click the link provided to open a web browser, and register your user information.
Enter the email address of a registered account in the Email field, and the corresponding
password in the Password field, and click Next to continue.

EDB Postgres Advanced Server Installation Guide
Copyright © 2009 - 2017 EnterpriseDB Corporation. All rights reserved.
95
Figure 4.57 — The Extract Mode confirmation window.
The Extract Mode window (shown in Figure 4.57) serves as a reminder that this is a
limited installation, and as such, Update Monitor will not be able to notify you of
available updates for the software included in this installation. Click Next to continue to
the Installation Directory window (shown in Figure 4.58).
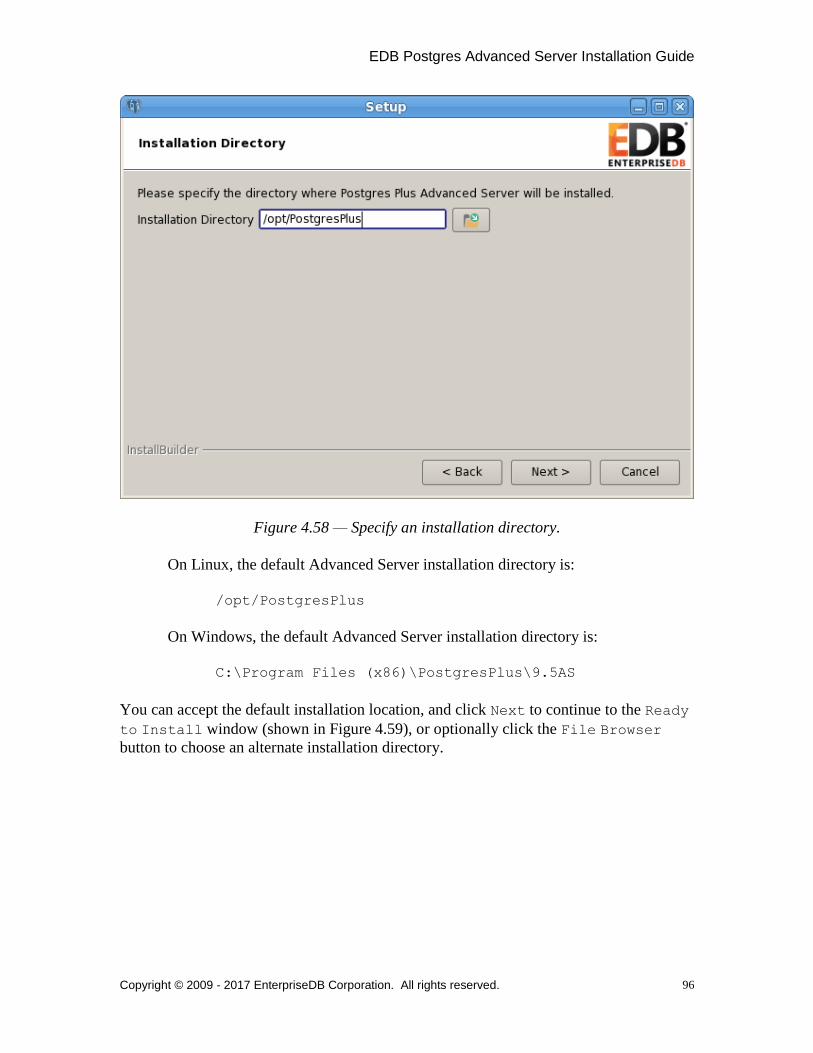
EDB Postgres Advanced Server Installation Guide
Copyright © 2009 - 2017 EnterpriseDB Corporation. All rights reserved.
96
Figure 4.58 — Specify an installation directory.
On Linux, the default Advanced Server installation directory is:
/opt/PostgresPlus
On Windows, the default Advanced Server installation directory is:
C:\Program Files (x86)\PostgresPlus\9.5AS
You can accept the default installation location, and click Next to continue to the Ready
to Install window (shown in Figure 4.59), or optionally click the File Browser
button to choose an alternate installation directory.

EDB Postgres Advanced Server Installation Guide
Copyright © 2009 - 2017 EnterpriseDB Corporation. All rights reserved.
97
Figure 4.59 — The installation wizard is ready to install Advanced Server.
Click Next to proceed with the Advanced Server installation.

EDB Postgres Advanced Server Installation Guide
Copyright © 2009 - 2017 EnterpriseDB Corporation. All rights reserved.
98
Figure 4.60 — Progress bars mark installation progress.
During the installation, progress bars and popups mark the installation progress (Figure
4.60).
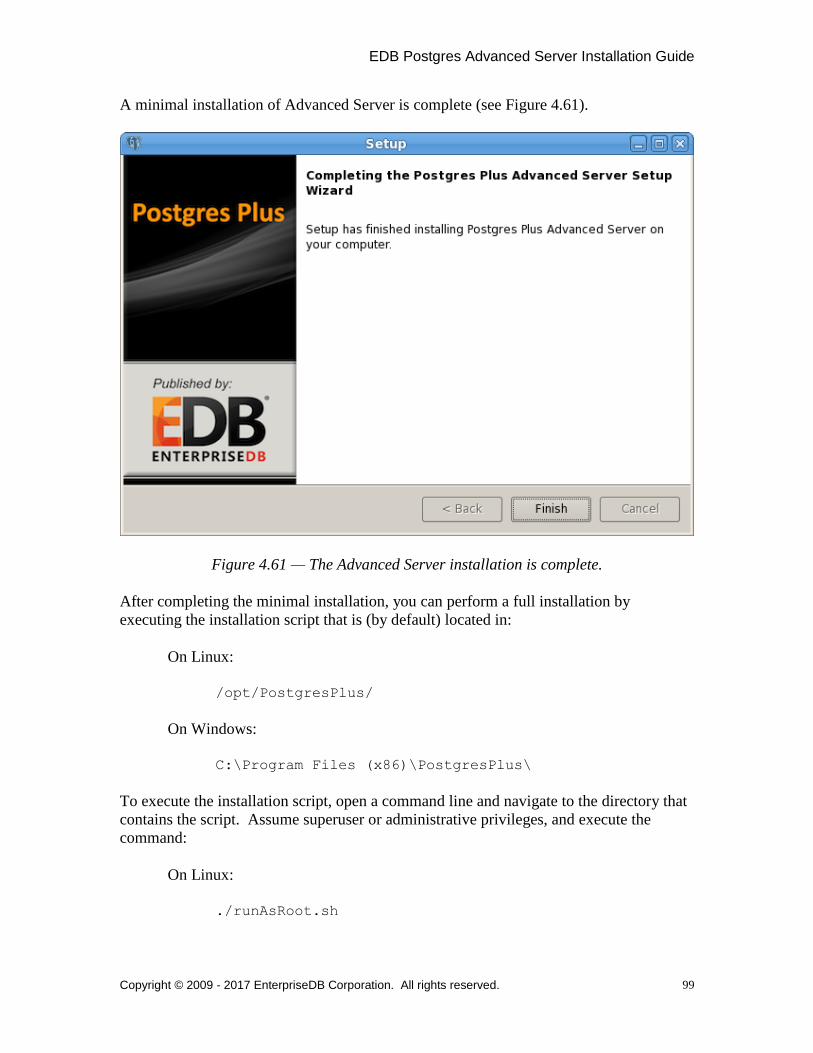
EDB Postgres Advanced Server Installation Guide
Copyright © 2009 - 2017 EnterpriseDB Corporation. All rights reserved.
99
A minimal installation of Advanced Server is complete (see Figure 4.61).
Figure 4.61 — The Advanced Server installation is complete.
After completing the minimal installation, you can perform a full installation by
executing the installation script that is (by default) located in:
On Linux:
/opt/PostgresPlus/
On Windows:
C:\Program Files (x86)\PostgresPlus\
To execute the installation script, open a command line and navigate to the directory that
contains the script. Assume superuser or administrative privileges, and execute the
command:
On Linux:
./runAsRoot.sh
EDB Postgres Advanced Server Installation Guide
Copyright © 2009 - 2017 EnterpriseDB Corporation. All rights reserved.
100
On Windows:
cscript runAsAdmin.vbs
The installation script executes at the command line, prompting you for installation
configuration information. The default configuration value is displayed in square braces
after each prompt; update the default value or press Enter to accept the default value and
continue.
The following dialog is an example of a scripted installation on a Linux system. The
actual installation dialog will vary by platform and reflect the options specified during the
installation.
======================
INSTALLATION DIRECTORY
======================
Please enter the installation directory:
[ /opt/PostgresPlus ] :
The installation directory is the directory where Advanced Server is installed.
==============
DATA DIRECTORY
==============
NOTE: If data directory exists and postgresql.conf file exists in
that directory, we will not initialize the cluster.
Please enter the data directory path:
[ /opt/PostgresPlus/9.5AS/data ] :
The data directory is the directory where Advanced Server data is stored.
=============
WAL DIRECTORY
=============
Please enter the Write-Ahead Log (WAL) directory path:
[ /opt/PostgresPlus/9.5AS/data/pg_xlog ] :
The WAL directory is where the write-ahead log will be written.
=============
DATABASE MODE
=============
Please enter Database Mode [oracle]:
Database mode specifies the database dialect with which the Advanced Server
installation is compatible. The optional values are oracle or postgresql.
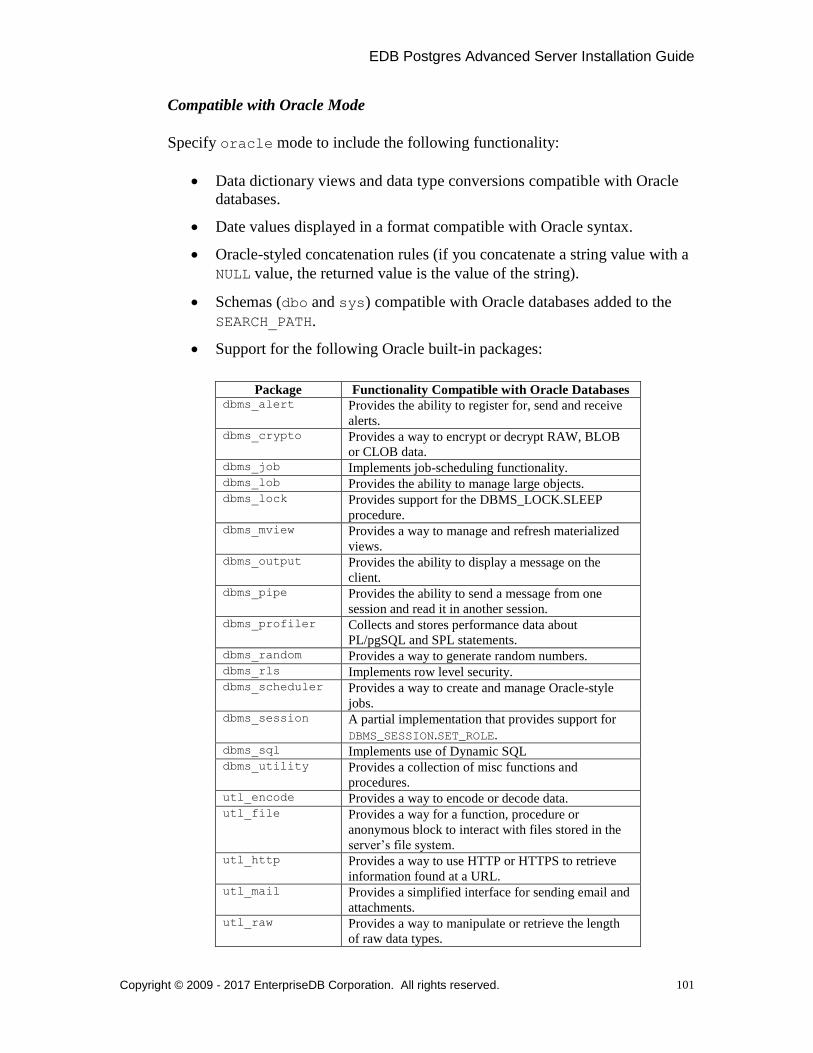
EDB Postgres Advanced Server Installation Guide
Copyright © 2009 - 2017 EnterpriseDB Corporation. All rights reserved.
101
Compatible with Oracle Mode
Specify oracle mode to include the following functionality:
Data dictionary views and data type conversions compatible with Oracle
databases.
Date values displayed in a format compatible with Oracle syntax.
Oracle-styled concatenation rules (if you concatenate a string value with a
NULL value, the returned value is the value of the string).
Schemas (dbo and sys) compatible with Oracle databases added to the
SEARCH_PATH.
Support for the following Oracle built-in packages:
Package Functionality Compatible with Oracle Databases dbms_alert Provides the ability to register for, send and receive
alerts. dbms_crypto Provides a way to encrypt or decrypt RAW, BLOB
or CLOB data. dbms_job Implements job-scheduling functionality. dbms_lob Provides the ability to manage large objects. dbms_lock Provides support for the DBMS_LOCK.SLEEP
procedure. dbms_mview Provides a way to manage and refresh materialized
views. dbms_output Provides the ability to display a message on the
client. dbms_pipe Provides the ability to send a message from one
session and read it in another session. dbms_profiler Collects and stores performance data about
PL/pgSQL and SPL statements. dbms_random Provides a way to generate random numbers. dbms_rls Implements row level security. dbms_scheduler Provides a way to create and manage Oracle-style
jobs. dbms_session A partial implementation that provides support for
DBMS_SESSION.SET_ROLE. dbms_sql Implements use of Dynamic SQL dbms_utility Provides a collection of misc functions and
procedures. utl_encode Provides a way to encode or decode data. utl_file Provides a way for a function, procedure or
anonymous block to interact with files stored in the
server’s file system. utl_http Provides a way to use HTTP or HTTPS to retrieve
information found at a URL. utl_mail Provides a simplified interface for sending email and
attachments. utl_raw Provides a way to manipulate or retrieve the length
of raw data types.

EDB Postgres Advanced Server Installation Guide
Copyright © 2009 - 2017 EnterpriseDB Corporation. All rights reserved.
102
utl_smtp Implements smtp email functions. utl_url Provides a way to escape illegal and reserved
characters in a URL.
This is not a comprehensive list of the compatibility features for Oracle included
when Advanced Server is installed in Compatible with Oracle mode; more
information about Advanced Server is available in the Database Compatibility for
Oracle Developer’s Guide, available at:
http://www.enterprisedb.com/products-services-
training/products/documentation/enterpriseedition
If you choose to install in Compatible with Oracle mode, the Advanced
Server superuser name is enterprisedb.
Compatible with PostgreSQL Mode
Specify Postgresql to install Advanced Server with complete compatibility
with Postgres version 9.5.
For more information about PostgreSQL functionality, see the PostgreSQL core
documentation, available at:
https://www.postgresql.org/docs/9.5/static/index.html
If you choose to install in Compatible with PostgreSQL mode, the
Advanced Server superuser name is postgres.
====
PORT
====
NOTE: We will not be able to examine, if port is currently used
by other application.
Please enter port: [5444]:
Specify a port number for the Advanced Server listener to listen on.
======
LOCALE
======
Please enter the locale: [DEFAULT]:
Specify a locale for the Advanced Server installation. If you accept the DEFAULT
value, the locale defaults to the locale of the host system.
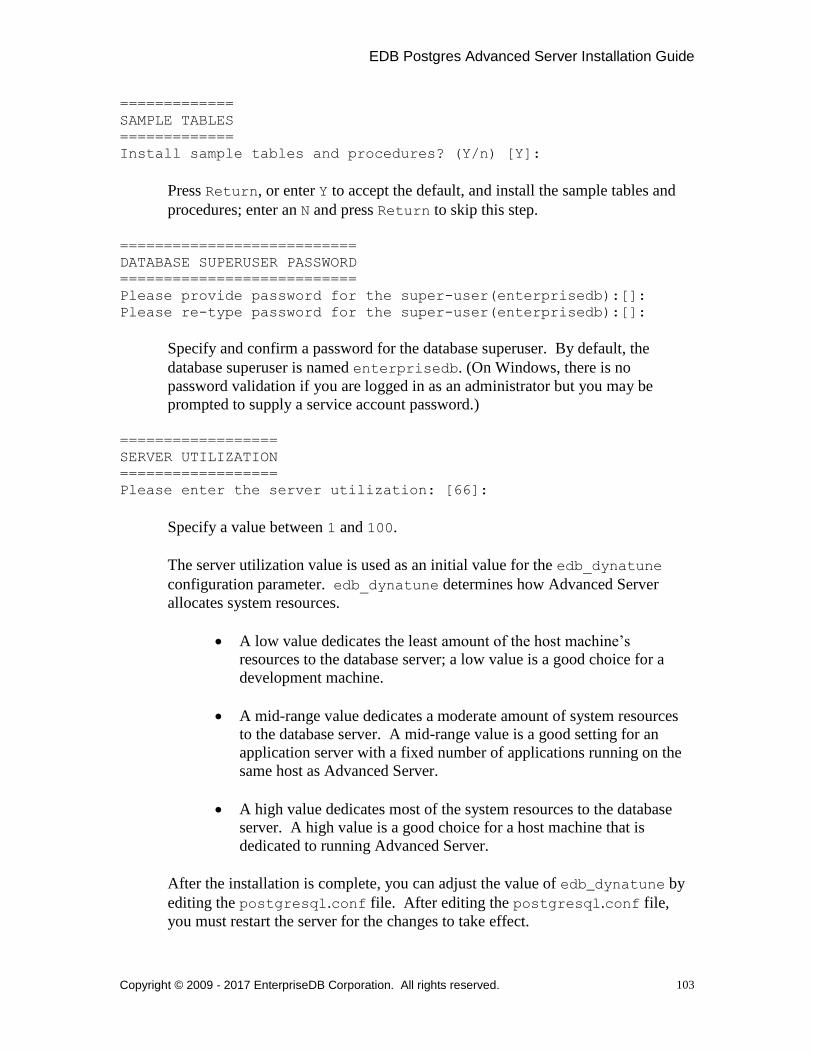
EDB Postgres Advanced Server Installation Guide
Copyright © 2009 - 2017 EnterpriseDB Corporation. All rights reserved.
103
=============
SAMPLE TABLES
=============
Install sample tables and procedures? (Y/n) [Y]:
Press Return, or enter Y to accept the default, and install the sample tables and
procedures; enter an N and press Return to skip this step.
===========================
DATABASE SUPERUSER PASSWORD
===========================
Please provide password for the super-user(enterprisedb):[]:
Please re-type password for the super-user(enterprisedb):[]:
Specify and confirm a password for the database superuser. By default, the
database superuser is named enterprisedb. (On Windows, there is no
password validation if you are logged in as an administrator but you may be
prompted to supply a service account password.)
==================
SERVER UTILIZATION
==================
Please enter the server utilization: [66]:
Specify a value between 1 and 100.
The server utilization value is used as an initial value for the edb_dynatune
configuration parameter. edb_dynatune determines how Advanced Server
allocates system resources.
A low value dedicates the least amount of the host machine’s
resources to the database server; a low value is a good choice for a
development machine.
A mid-range value dedicates a moderate amount of system resources
to the database server. A mid-range value is a good setting for an
application server with a fixed number of applications running on the
same host as Advanced Server.
A high value dedicates most of the system resources to the database
server. A high value is a good choice for a host machine that is
dedicated to running Advanced Server.
After the installation is complete, you can adjust the value of edb_dynatune by
editing the postgresql.conf file. After editing the postgresql.conf file,
you must restart the server for the changes to take effect.
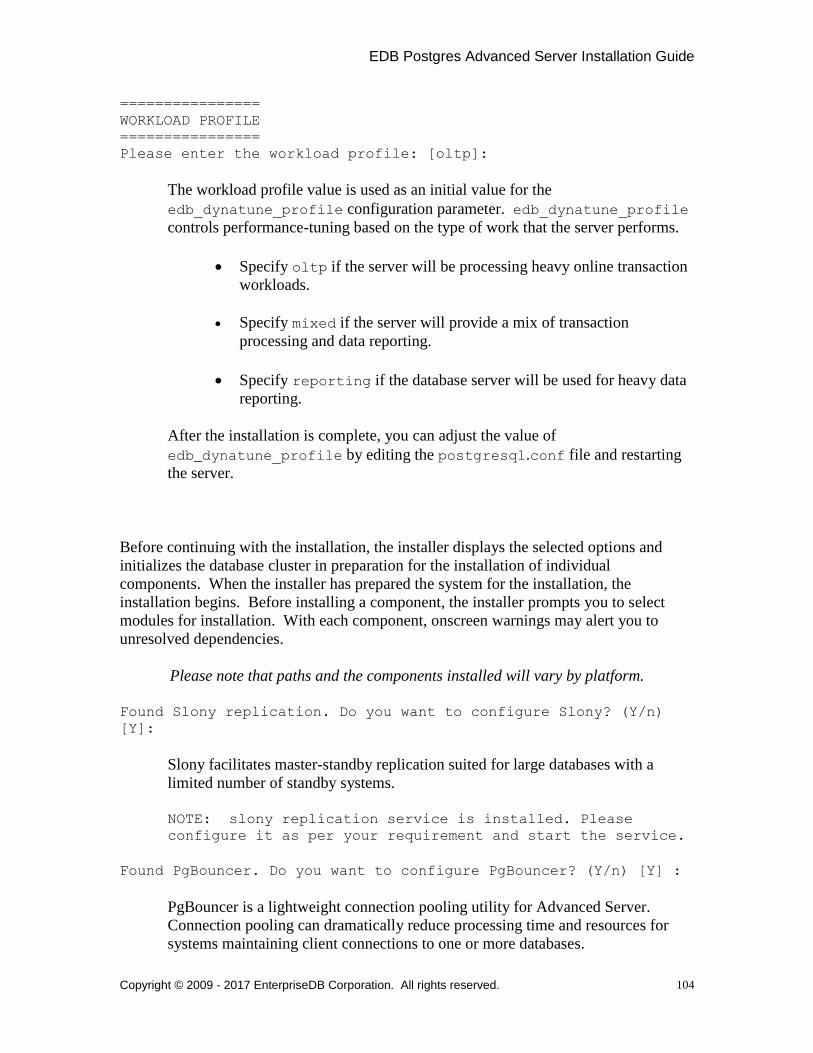
EDB Postgres Advanced Server Installation Guide
Copyright © 2009 - 2017 EnterpriseDB Corporation. All rights reserved.
104
================
WORKLOAD PROFILE
================
Please enter the workload profile: [oltp]:
The workload profile value is used as an initial value for the
edb_dynatune_profile configuration parameter. edb_dynatune_profile
controls performance-tuning based on the type of work that the server performs.
Specify oltp if the server will be processing heavy online transaction
workloads.
Specify mixed if the server will provide a mix of transaction
processing and data reporting.
Specify reporting if the database server will be used for heavy data
reporting.
After the installation is complete, you can adjust the value of
edb_dynatune_profile by editing the postgresql.conf file and restarting
the server.
Before continuing with the installation, the installer displays the selected options and
initializes the database cluster in preparation for the installation of individual
components. When the installer has prepared the system for the installation, the
installation begins. Before installing a component, the installer prompts you to select
modules for installation. With each component, onscreen warnings may alert you to
unresolved dependencies.
Please note that paths and the components installed will vary by platform.
Found Slony replication. Do you want to configure Slony? (Y/n)
[Y]:
Slony facilitates master-standby replication suited for large databases with a
limited number of standby systems.
NOTE: slony replication service is installed. Please
configure it as per your requirement and start the service.
Found PgBouncer. Do you want to configure PgBouncer? (Y/n) [Y] :
PgBouncer is a lightweight connection pooling utility for Advanced Server.
Connection pooling can dramatically reduce processing time and resources for
systems maintaining client connections to one or more databases.
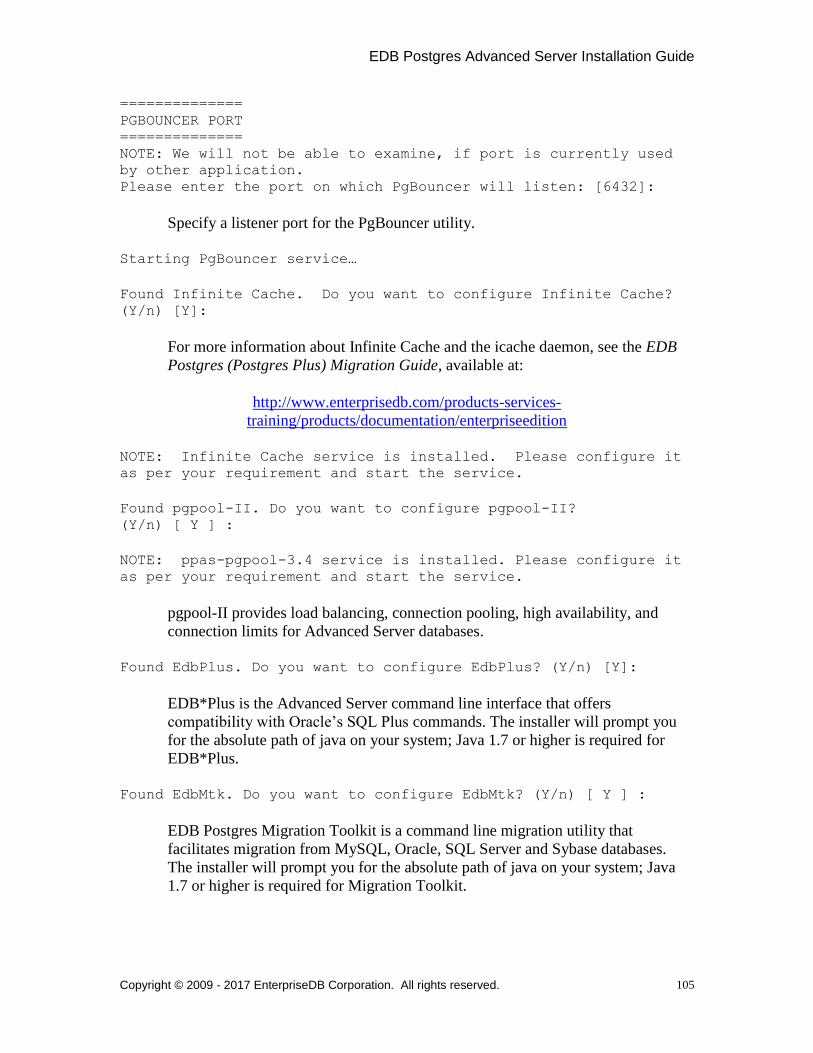
EDB Postgres Advanced Server Installation Guide
Copyright © 2009 - 2017 EnterpriseDB Corporation. All rights reserved.
105
==============
PGBOUNCER PORT
==============
NOTE: We will not be able to examine, if port is currently used
by other application.
Please enter the port on which PgBouncer will listen: [6432]:
Specify a listener port for the PgBouncer utility.
Starting PgBouncer service…
Found Infinite Cache. Do you want to configure Infinite Cache?
(Y/n) [Y]:
For more information about Infinite Cache and the icache daemon, see the EDB
Postgres (Postgres Plus) Migration Guide, available at:
http://www.enterprisedb.com/products-services-
training/products/documentation/enterpriseedition
NOTE: Infinite Cache service is installed. Please configure it
as per your requirement and start the service.
Found pgpool-II. Do you want to configure pgpool-II?
(Y/n) [ Y ] :
NOTE: ppas-pgpool-3.4 service is installed. Please configure it
as per your requirement and start the service.
pgpool-II provides load balancing, connection pooling, high availability, and
connection limits for Advanced Server databases.
Found EdbPlus. Do you want to configure EdbPlus? (Y/n) [Y]:
EDB*Plus is the Advanced Server command line interface that offers
compatibility with Oracle’s SQL Plus commands. The installer will prompt you
for the absolute path of java on your system; Java 1.7 or higher is required for
EDB*Plus.
Found EdbMtk. Do you want to configure EdbMtk? (Y/n) [ Y ] :
EDB Postgres Migration Toolkit is a command line migration utility that
facilitates migration from MySQL, Oracle, SQL Server and Sybase databases.
The installer will prompt you for the absolute path of java on your system; Java
1.7 or higher is required for Migration Toolkit.

EDB Postgres Advanced Server Installation Guide
Copyright © 2009 - 2017 EnterpriseDB Corporation. All rights reserved.
106
Found Postgres Enterprise Manager Client. Do you want to
configure Postgres Enterprise Manager Client? (Y/n)[Y]:
Select the Postgres Enterprise Manager Client option to install the PEM Client
application. The PEM Client provides a powerful graphical interface for database
management and monitoring.
Options saved in '/opt/PostgresPlus/9.5AS/.rar_options_xxxxx'
file.
After continued processing, the Advanced Server installation is complete.

EDB Postgres Advanced Server Installation Guide
Copyright © 2009 - 2017 EnterpriseDB Corporation. All rights reserved.
107
4.4.4 Reference - Command Line Options
You can optionally include the following parameters for an Advanced Server installation
on the command line, or in a configuration file when invoking the Advanced Server
installer.
--autostart_pgagent { yes | no }
Use the --autostart_pgagent parameter to specify whether the installer
should start the pgAgent service at boot-time. The default is yes.
--autostart_pgbouncer { yes | no }
Use the --autostart_pgbouncer parameter to specify whether the installer
should start the PgBouncer service. The default is yes.
--create_samples { yes | no }
Use the --create_samples option to specify whether the installer should
create the sample tables and procedures for the database dialect specified with
the --databasemode parameter. The default is yes.
--databasemode { oracle | postgresql }
Use the --databasemode parameter to specify a database dialect. The default is
oracle.
--datadir data_directory
Use the --datadir parameter to specify a location for the cluster's data
directory. data_directory is the name of the directory; include the complete
path to the desired directory.
--debuglevel { 0 | 1 | 2 | 3 | 4 }
Use the --debuglevel parameter to set the level of detail written to the
debug_log file (see --debugtrace). Higher values produce more detail
(producing a longer trace file). The default is 2.
--debugtrace debug_log
Use the --debugtrace parameter to troubleshoot installation problems.
debug_log is the name of the file that contains installation troubleshooting
details.

EDB Postgres Advanced Server Installation Guide
Copyright © 2009 - 2017 EnterpriseDB Corporation. All rights reserved.
108
--disable-components component_list
Use the --disable-components parameter to specify a list of Advanced
Server components to exclude from the installation. By default,
component_list contains'' (the empty string). component_list is a
comma-separated list containing one or more of the following components:
dbserver
EDB Postgres Advanced Server 9.5.
connectors
The Advanced Server client connector API’s for JDBC, .NET, OCI and
ODBC.
infinitecache
Linux only. InfiniteCache allows you to increase the amount of data
maintained as in-memory cache by distributing the cache across multiple
commodity hardware farms.
edbmtk
Migration Toolkit is a command line migration utility that facilitates
migration from MySQL, Oracle, SQL Server and Sybase databases.
pem_client
Linux and Windows only. The Postgres Enterprise Manager Client
provides a powerful graphical interface for database management and
monitoring.
edbplus
EDB*Plus is the Advanced Server command line interface that offers
compatibility with Oracle’s SQL Plus commands.
pgpool
Linux only. pgpool-II provides load balancing, connection pooling, high
availability, and connection limits for Advanced Server databases.
EDB Postgres Advanced Server Installation Guide
Copyright © 2009 - 2017 EnterpriseDB Corporation. All rights reserved.
109
pgpool-extensions
Include the pgpool-extensions option to install server extensions required
by the server when running pgpool-II.
replication
Slony-I facilitates master-standby replication suited for large databases
with a limited number of standby systems.
pgbouncer
PgBouncer is a lightweight connection pooler for Advanced Server that
can dramatically reduce the processing time and resources required to
maintain a large number of client connections to one or more databases.
--enable_acledit { 1 | 0 }
The --enable_acledit 1 option instructs the installer to grant permission to
the user specified by the --serviceaccount option to access the Advanced
Server binaries and data directory. By default, this option is disabled if --
enable_acledit 0 is specified or if the --enable_acledit option is
completely omitted. Note: Specification of this option is valid only when
installing on Windows. This option cannot be specified when installing on Linux.
--enable-components component_list
Use the --enable-components parameter to specify a list of Advanced Server
components to include in the installation. By default, all components are included
in a standard Advanced Server. component_list is a comma-separated list
containing one or more of the following components:
dbserver
EDB Postgres Advanced Server 9.5.
connectors
The Advanced Server client connector API’s for JDBC, .NET, OCI and
ODBC.
infinitecache
Linux only. InfiniteCache allows you to increase the amount of data
maintained as in-memory cache by distributing the cache across multiple
commodity hardware farms.
EDB Postgres Advanced Server Installation Guide
Copyright © 2009 - 2017 EnterpriseDB Corporation. All rights reserved.
110
edbmtk
Migration Toolkit is a command line migration utility that facilitates
migration from MySQL, Oracle, SQL Server and Sybase databases.
pem_client
Linux and Windows only. The Postgres Enterprise Manager Client
provides a powerful graphical interface for database management and
monitoring.
edbplus
EDB*Plus is the Advanced Server command line interface that offers
compatibility with Oracle’s SQL Plus commands.
pgpool
Linux only. PgPool provides connection pooling, load balancing, and
connection limitations functionality for Advanced Server databases.
pgpool-extensions
Include the pgpool-extensions option to install server extensions required
by the server when running pgpool-II.
replication
Slony-I facilitates master-standby replication suited for large databases
with a limited number of standby systems.
pgbouncer
PgBouncer is a lightweight connection pooler for Advanced Server that
can dramatically reduce the processing time and resources required to
maintain a large number of client connections to one or more databases.
--extract-only { yes | no }
Include the --extract-only parameter to indicate that the installer should
extract the Advanced Server binaries without performing a complete installation.
Superuser privileges are not required for the --extract-only option. The
default value is no.
EDB Postgres Advanced Server Installation Guide
Copyright © 2009 - 2017 EnterpriseDB Corporation. All rights reserved.
111
--help
Include the --help parameter to view a list of the optional parameters.
--installer-language { en | ja | zh_CN | zh_TW | ko }
Use the --installer-language parameter to specify an installation language
for Advanced Server. The default is en.
en specifies English.
ja specifies Japanese
zh_CN specifies Chinese Simplified.
zh_TW specifies Traditional Chinese.
ko specifies Korean.
--install_runtimes { yes | no }
Windows only. Include --install_runtimes to specify whether the installer
should install the Microsoft Visual C++ runtime libraries. Default is yes.
--locale locale
Specifies the locale for the Advanced Server cluster. By default, the installer will
use to the locale detected by initdb.
--mode {qt | gtk | xwindow | text | unattended}
Use the --mode parameter to specify an installation mode. The following modes
are supported:
qt - Specify qt to tell the installer to use the Qt graphical toolkit
gtk - Specify gtk to tell the installer to use the GTK graphical toolkit.
xwindow - Specify xwindow to tell the installer to use the X Window graphical
toolkit.
text - Specify text to perform a text mode installation in a console window.
This is a Linux-only option.
unattended - Specify unattended to specify that the installer should perform
an installation that requires no user input during the installation process.
EDB Postgres Advanced Server Installation Guide
Copyright © 2009 - 2017 EnterpriseDB Corporation. All rights reserved.
112
--optionfile config_file
Use the --optionfile parameter to specify the name of a file that contains the
installation configuration parameters. config_file must specify the complete
path to the configuration parameter file.
--pgbouncerport
Use the --pgbouncerport parameter to specify a listener port for the
PgBouncer service. The default value is 6432.
--prefix installation_dir
Use the --prefix parameter to specify an installation directory for Advanced
Server. The default installation directory on a Linux system is:
/opt/PostgresPlus/9.5AS
The default installation directory on a Windows system is:
C:\Program Files\PostgresPlus
--productkey product_key
Use the --productkey parameter to specify a value for the product key.
The --productkey parameter is only required when the specified system locale
is Japanese, Chinese or Korean.
--serverport port_number
Use the --serverport parameter to specify a listener port number for
Advanced Server.
If you are installing Advanced Server in unattended mode, and do not specify a
value using the --serverport parameter, the installer will use port 5444, or the
first available port after port 5444 as the default listener port.
--server_utilization {33 | 66 | 100}
EDB Postgres Advanced Server Installation Guide
Copyright © 2009 - 2017 EnterpriseDB Corporation. All rights reserved.
113
Use the --server_utilization parameter to specify a value for the
edb_dynatune configuration parameter. The edb_dynatune configuration
parameter determines how Advanced Server allocates system resources.
A value of 33 is appropriate for a system used for development. A low
value dedicates the least amount of the host machine’s resources to the
database server.
A value of 66 is appropriate for an application server with a fixed number
of applications. A mid-range value dedicates a moderate amount of
system resources to the database server.
The default value is 66.
A value of 100 is appropriate for a host machine that is dedicated to
running Advanced Server. A high value dedicates most of the system
resources to the database server.
When the installation is complete, you can adjust the value of edb_dynatune by
editing the postgresql.conf file. After editing the postgresql.conf file,
you must restart the server for the changes to take effect.
--serviceaccount user_account_name
Use the --serviceaccount parameter to specify the name of the user account
that owns the server process.
If --databasemode is set to oracle (the default), the default value
of --serviceaccount is enterprisedb.
If -databasemode is set to postgresql, the default value
of --serviceaccount is set to postgres.
Please note that for security reasons, the --serviceaccount parameter must
specify the name of an account that does not hold administrator privileges.
If you specify both the --serviceaccount option and the --
enable_acledit 1 option when invoking the installer, the database service and
pgAgent will use the same service account, thereby having the required
permissions to access the Advanced Server binaries and data directory. Note:
Specification of the --enable_acledit option is permitted only when
installing on Windows. The --enable_acledit option cannot be specified
when installing on Linux.

EDB Postgres Advanced Server Installation Guide
Copyright © 2009 - 2017 EnterpriseDB Corporation. All rights reserved.
114
Please note that if you do not include the --serviceaccount option when
invoking the installer, the NetworkService account will own the database
service, and the pgAgent service will be owned by either enterprisedb or
postgres (depending on the installation mode).
--servicename service_name
Use the --servicename parameter to specify the name of the Advanced Server
service. The default is ppas-9.5.
--servicepassword user_password
Windows only. Use --servicepassword to specify the OS system password.
If unspecified, the value of --servicepassword defaults to the value
of --superpassword.
--superaccount super_user_name
Use the --superaccount parameter to specify the user name of the database
superuser.
If --databasemode is set to oracle (the default), the default value
of --superaccount is enterprisedb.
If -databasemode is set to postgresql, the default value
of --superaccount is set to postgres.
--superpassword superuser_password
Use --superpassword to specify the database superuser password. If you are
installing in non-interactive mode, --superpassword defaults to
enterprisedb.
--unattendedmodeui { none | minimal | minimalWithDialogs }
Use the --unattendedmodeui parameter to specify the installer's behavior
during an unattended installation.
Include --unattendedmodeui none to specify that the installer should not
display progress bars during the Advanced Server installation.
Include --unattendedmodeui minimal to specify that the installer should
display progress bars during the installation process. This is the default behavior.

EDB Postgres Advanced Server Installation Guide
Copyright © 2009 - 2017 EnterpriseDB Corporation. All rights reserved.
115
Include --unattendedmodeui minimalWithDialogs to specify that the
installer should display progress bars and report any errors encountered during the
installation process (in additional dialogs).
--version
Include the --version parameter to retrieve version information about the
installer:
Postgres Plus Advanced Server 9.5 --- Built on 2015-01-09
18:41:19 IB: 7.2.1-201106070924
--webusername {registered_username}
You must specify the name of a registered user and password when performing an
installation of EDB Postgres Advanced Server 9.5. Use the --webusername
parameter to specify the name of the registered EnterpriseDB user that is
performing the installation.
registered_username must be an email address.
If you do not have a registered user name, visit the EnterpriseDB website at:
http://www.enterprisedb.com/user-login-registration
--webpassword {associated_password}
Use the --webpassword parameter to specify the password associated with the
registered EnterpriseDB user that is performing the installation.
--workload_profile {oltp | mixed | reporting}
Use the --workload_profile parameter to specify an initial value for the
edb_dynatune_profile configuration parameter. edb_dynatune_profile
controls aspects of performance-tuning based on the type of work that the server
performs.
Specify oltp if the Advanced Server installation will be used to process
heavy online transaction processing workloads.
The default value is oltp.

EDB Postgres Advanced Server Installation Guide
Copyright © 2009 - 2017 EnterpriseDB Corporation. All rights reserved.
116
Specify mixed if Advanced Server will provide a mix of transaction
processing and data reporting.
Specify reporting if Advanced Server will be used for heavy data
reporting.
After the installation is complete, you can adjust the value of
edb_dynatune_profile by editing the postgresql.conf file. After editing
the postgresql.conf file, you must restart the server for the changes to take
effect.
For more information about edb_dynatune and other performance-related
topics, see the EDB Postgres (Postgres Plus) Migration Guide, available at:
http://www.enterprisedb.com/products-services-
training/products/documentation/enterpriseedition
--xlogdir directory_name
Linux only. Use the --xlogdir parameter to specify a location for the write-
ahead log. The default value is datadir/pg_xlog.
4.5 Using StackBuilder Plus
The StackBuilder Plus utility provides a graphical interface that simplifies the process of
downloading and installing modules that complement your Advanced Server installation.
When you install a module with StackBuilder Plus, StackBuilder Plus automatically
resolves any software dependencies.
Please note: If your installation resides on a Linux system, you must install the redhat-
lsb package before invoking StackBuilder Plus. For more information, see Section 4.1.
You can invoke StackBuilder Plus at any time after the installation has completed by
selecting the StackBuilder Plus menu option from the Postgres Plus Add-ons
menu (Linux) or from the Apps menu (Windows). Enter your system password (if
prompted), and the StackBuilder Plus welcome window opens (shown in Figure 4.62).

EDB Postgres Advanced Server Installation Guide
Copyright © 2009 - 2017 EnterpriseDB Corporation. All rights reserved.
117
Figure 4.62 — The StackBuilder Plus welcome window.
Use the drop-down listbox on the welcome window to select your Advanced Server
installation.
StackBuilder Plus requires Internet access; if your installation of Advanced Server
resides behind a firewall (with restricted Internet access), StackBuilder Plus can
download program installers through a proxy server. The module provider determines if
the module can be accessed through an HTTP proxy or an FTP proxy; currently, all
updates are transferred via an HTTP proxy and the FTP proxy information is not used.
If the selected Advanced Server installation has restricted Internet access, use the Proxy
Servers button on the Welcome window to open the Proxy servers dialog (shown in
Figure 4.63).
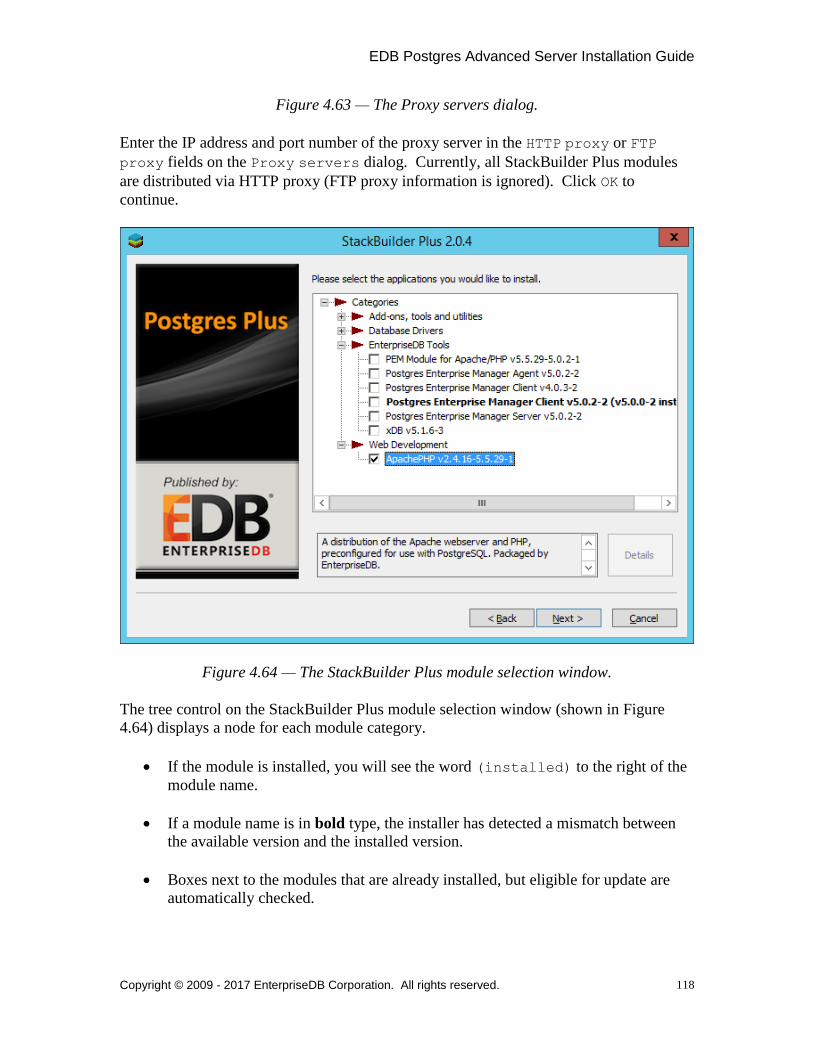
EDB Postgres Advanced Server Installation Guide
Copyright © 2009 - 2017 EnterpriseDB Corporation. All rights reserved.
118
Figure 4.63 — The Proxy servers dialog.
Enter the IP address and port number of the proxy server in the HTTP proxy or FTP
proxy fields on the Proxy servers dialog. Currently, all StackBuilder Plus modules
are distributed via HTTP proxy (FTP proxy information is ignored). Click OK to
continue.
Figure 4.64 — The StackBuilder Plus module selection window.
The tree control on the StackBuilder Plus module selection window (shown in Figure
4.64) displays a node for each module category.
If the module is installed, you will see the word (installed) to the right of the
module name.
If a module name is in bold type, the installer has detected a mismatch between
the available version and the installed version.
Boxes next to the modules that are already installed, but eligible for update are
automatically checked.

EDB Postgres Advanced Server Installation Guide
Copyright © 2009 - 2017 EnterpriseDB Corporation. All rights reserved.
119
To add new modules to the selected Advanced Server installation, check the box to the
left of the module name and click Next. A window opens, requesting your EnterpriseDB
registration information (as shown in Figure 4.65).
Figure 4.65 — The User Authentication window.
Before downloading and installing modules and updates with StackBuilder Plus, you
must enter the user information associated with your EnterpriseDB account. If you do
not have an EnterpriseDB user account, click the link provided to open a web browser,
and enter your user information.
Enter the email address of a registered account in the Email field, and the corresponding
password in the Password field, and click Next to continue. The next dialog confirms
the packages selected (Figure 4.66).

EDB Postgres Advanced Server Installation Guide
Copyright © 2009 - 2017 EnterpriseDB Corporation. All rights reserved.
120
Figure 4.66 — A summary window displays a list of selected packages.
By default, the selected package installers are downloaded to:
On Windows:
%TEMP%
On Linux:
/tmp
You can change the directory; use the button to the right of the Download directory
field to open a file selector, and choose an alternate location to store the downloaded
installers. Click Next to connect to the server and download the required installation
files. (see Figure 4.67).
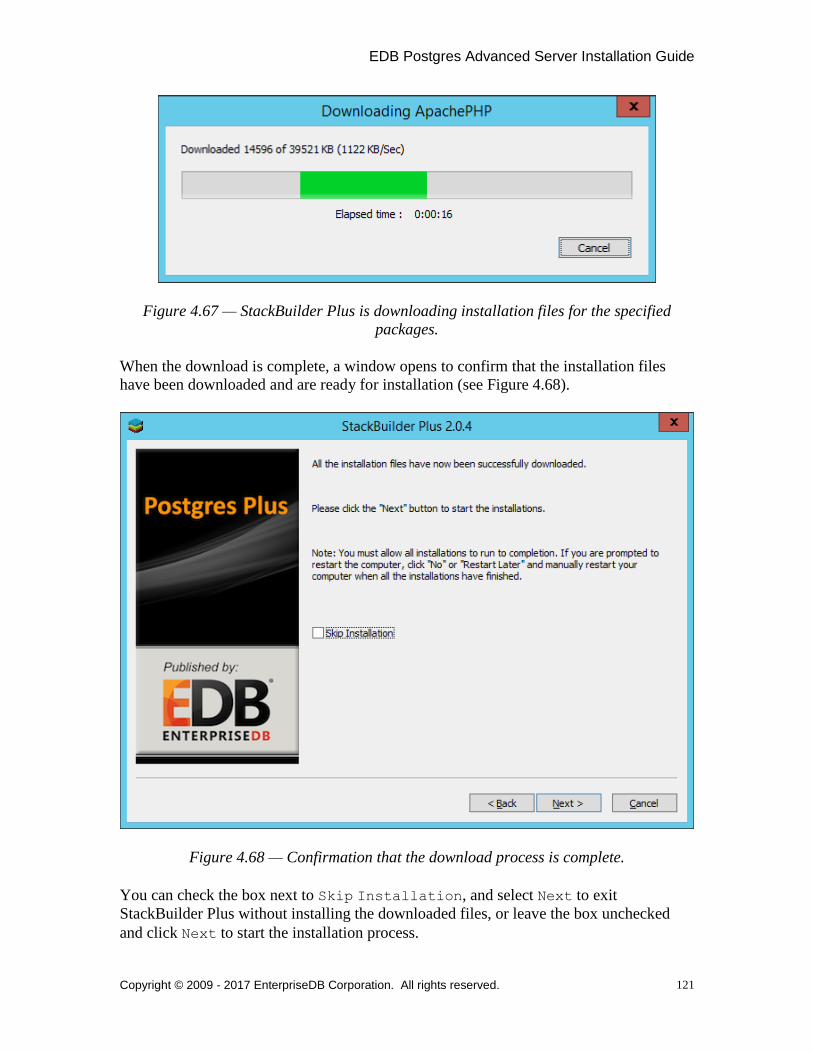
EDB Postgres Advanced Server Installation Guide
Copyright © 2009 - 2017 EnterpriseDB Corporation. All rights reserved.
121
Figure 4.67 — StackBuilder Plus is downloading installation files for the specified
packages.
When the download is complete, a window opens to confirm that the installation files
have been downloaded and are ready for installation (see Figure 4.68).
Figure 4.68 — Confirmation that the download process is complete.
You can check the box next to Skip Installation, and select Next to exit
StackBuilder Plus without installing the downloaded files, or leave the box unchecked
and click Next to start the installation process.

EDB Postgres Advanced Server Installation Guide
Copyright © 2009 - 2017 EnterpriseDB Corporation. All rights reserved.
122
Each downloaded installer has different requirements. As the installers execute, they
may prompt you to confirm acceptance of license agreements, to enter passwords, and
enter configuration information.
During the installation process, you may be prompted by one (or more) of the installers to
restart your system. Select No or Restart Later until all installations are completed.
When the last installation has completed, re-boot the system to apply all of the updates.
You may occasionally encounter packages that don’t install successfully. If a package
fails to install, StackBuilder Plus will alert you to the installation error with a popup
dialog, and write a message to the log file at:
On Windows: %TEMP%
On Linux: /root
Figure 4.69 — StackBuilder Plus confirms the completed installation.
When the installation is complete, StackBuilder Plus will alert you to the success or
failure of the installations of the requested packages (see Figure 4.69). If you were
prompted by an installer to restart your computer, re-boot now.
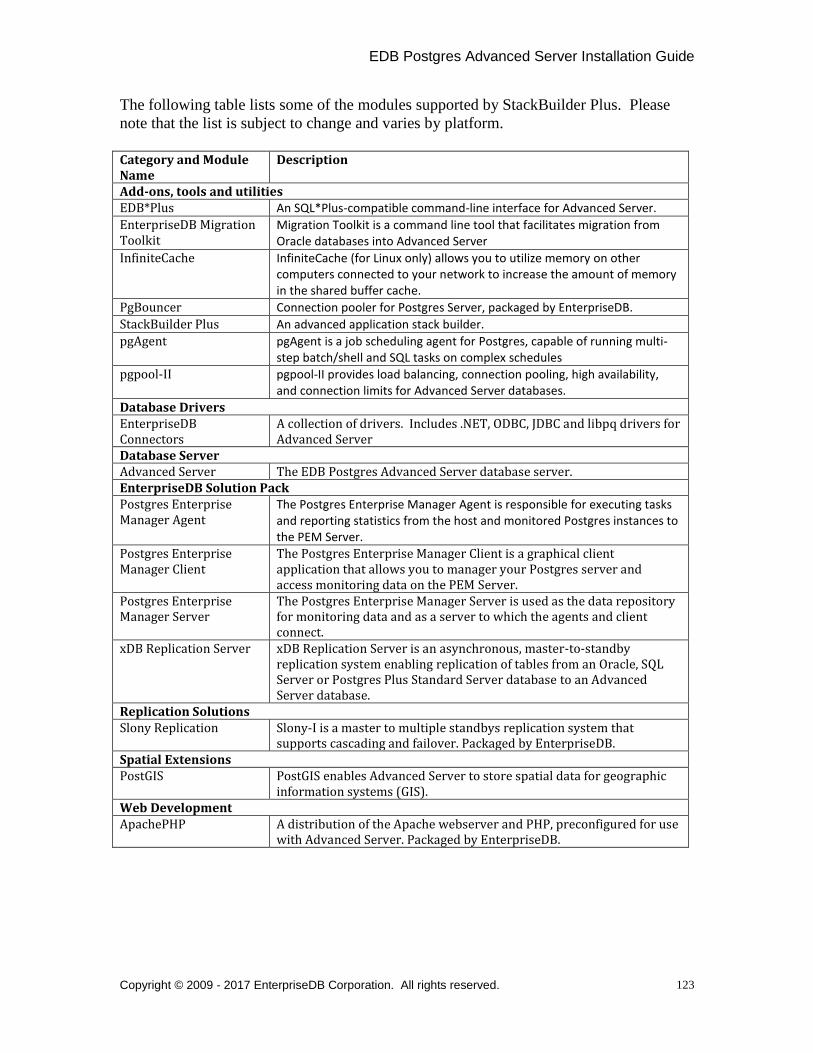
EDB Postgres Advanced Server Installation Guide
Copyright © 2009 - 2017 EnterpriseDB Corporation. All rights reserved.
123
The following table lists some of the modules supported by StackBuilder Plus. Please
note that the list is subject to change and varies by platform.
Category and Module Name
Description
Add-ons, tools and utilities EDB*Plus An SQL*Plus-compatible command-line interface for Advanced Server.
EnterpriseDB Migration Toolkit
Migration Toolkit is a command line tool that facilitates migration from Oracle databases into Advanced Server
InfiniteCache InfiniteCache (for Linux only) allows you to utilize memory on other computers connected to your network to increase the amount of memory in the shared buffer cache.
PgBouncer Connection pooler for Postgres Server, packaged by EnterpriseDB.
StackBuilder Plus An advanced application stack builder.
pgAgent pgAgent is a job scheduling agent for Postgres, capable of running multi-step batch/shell and SQL tasks on complex schedules
pgpool-II pgpool-II provides load balancing, connection pooling, high availability, and connection limits for Advanced Server databases.
Database Drivers
EnterpriseDB Connectors
A collection of drivers. Includes .NET, ODBC, JDBC and libpq drivers for Advanced Server
Database Server
Advanced Server The EDB Postgres Advanced Server database server. EnterpriseDB Solution Pack
Postgres Enterprise Manager Agent
The Postgres Enterprise Manager Agent is responsible for executing tasks and reporting statistics from the host and monitored Postgres instances to the PEM Server.
Postgres Enterprise Manager Client
The Postgres Enterprise Manager Client is a graphical client application that allows you to manager your Postgres server and access monitoring data on the PEM Server.
Postgres Enterprise Manager Server
The Postgres Enterprise Manager Server is used as the data repository for monitoring data and as a server to which the agents and client connect.
xDB Replication Server
xDB Replication Server is an asynchronous, master-to-standby replication system enabling replication of tables from an Oracle, SQL Server or Postgres Plus Standard Server database to an Advanced Server database.
Replication Solutions
Slony Replication Slony-I is a master to multiple standbys replication system that supports cascading and failover. Packaged by EnterpriseDB.
Spatial Extensions
PostGIS PostGIS enables Advanced Server to store spatial data for geographic information systems (GIS).
Web Development
ApachePHP A distribution of the Apache webserver and PHP, preconfigured for use with Advanced Server. Packaged by EnterpriseDB.

EDB Postgres Advanced Server Installation Guide
Copyright © 2009 - 2017 EnterpriseDB Corporation. All rights reserved.
124
4.6 Using the Update Monitor
The Update Monitor utility polls the Enterprise DB website and alerts you to security
updates and enhancements as they become available for Advanced Server 9.5. Update
Monitor is automatically installed and invoked with Advanced Server.
When Update Monitor is actively monitoring, the Postgres elephant icon is displayed in
the system tray (see Figure 4.71).
Figure 4.71 — The Update Monitor icon.
If you have installed more than one version of Advanced Server, Update Monitor watches
for updates and alerts for all installed versions. When Update Monitor finds an update or
alert, it displays an alert symbol to let you know that an update or alert is available for
one of the Advanced Server installations (see Figure 4.72).
Figure 4.72- The Update Monitor icon displays an alert.
Right click on the symbol to open the context menu (shown in Figure 4.73).
Figure 4.73 — The Update Monitor context menu.
If updates are available for your Advanced Server installation, the update count is
displayed after the Install components menu item. Click Install components to
start the installation process.
A system dialog opens, prompting you to enter your password (Figure 4.74).

EDB Postgres Advanced Server Installation Guide
Copyright © 2009 - 2017 EnterpriseDB Corporation. All rights reserved.
125
Figure 4.74 — Enter a superuser password.
Enter a superuser password, and click OK to continue. StackBuilder Plus opens (shown in
Figure 4.75).
Figure 4.75 — The StackBuilder Plus welcome window.

EDB Postgres Advanced Server Installation Guide
Copyright © 2009 - 2017 EnterpriseDB Corporation. All rights reserved.
126
The StackBuilder Plus wizard walks you through installing the latest versions of the
Advanced Server component software; see Section 4.5, Using StackBuilder Plus for more
information about the update process.
When the update is complete and there are no new updates available, the Update Monitor
icon returns to a non-alerted state.
Update Monitor also monitors the EnterpriseDB website for alerts. If an alert is available
for your Advanced Server installation, the Update Monitor icon displays an alert symbol.
Right-click on the icon to access the context menu, where the alert count is displayed
after the View alerts menu item. Choose the View alerts option to display the
Postgres Plus Alerts window (see Figure 4.76).
Figure 4.76 — An EnterpriseDB alert.
The Postgres Plus Alerts window displays helpful hyperlinks that can direct
you to more information relevant to the alert.
Use the Run StackBuilder Plus button to open StackBuilder Plus from the
alert to run applicable updates to your current Advanced Server installation.

EDB Postgres Advanced Server Installation Guide
Copyright © 2009 - 2017 EnterpriseDB Corporation. All rights reserved.
127
4.7 Installation Troubleshooting
Difficulty Displaying Java-based Applications
If you encounter difficulty displaying Java-based applications (controls or text not being
displayed correctly, or blank windows), upgrading to the latest libxcb-xlib libraries
should correct the problem on most Linux distributions.
Please visit the following link for other possible work-arounds:
http://bugs.sun.com/bugdatabase/view_bug.do?bug_id=6532373
--mode unattended Authentication Errors
Authentication errors from component modules during unattended installations may
indicate that the specified values of --servicepassword or --superpassword may
be incorrect.
Errors During an Advanced Server Installation on Windows
If you encounter an error during the installation process on a Windows system, exit the
installation, and ensure that your version of Windows is up-to-date. After applying any
outstanding operating system updates, re-invoke the Advanced Server installer.
Applications Fail to Launch During an Advanced Server Installation on Linux
If applications fail to launch (such as StackBuilder Plus or your web browser) during the
installation process on a Linux system, verify that the xdg-open program is on your
system. If xdg-open is missing, install the xdg-utils package.
If you are using the GNOME desktop, load the root profile before running the
Advanced Server installation script. To load the root profile, issue the command, su -
root instead of su root before installing Advanced Server.
Configuration File Editors Close Spontaneously
If you are using a Linux system with the gnome console, a bug in the gnome shell may
cause configuration file editors accessed via the Expert Configuration menu (under
the Postgres Plus Advanced Server Application menu) to close spontaneously. To
correct this error, open a terminal window and enter:
dconf write /org/gnome/settings-daemon/plugins/cursor/active false
Please note that each time you reboot your system, you must invoke the command,
resetting the value.

EDB Postgres Advanced Server Installation Guide
Copyright © 2009 - 2017 EnterpriseDB Corporation. All rights reserved.
128
The Installation Fails to Complete Due to Existing data Directory Contents
If an installation fails to complete due to existing content in the data directory, the
server will write an error message to the server logs:
A data directory is neither empty, or a recognisable data
directory.
If you encounter a similar message, you should confirm that the data directory is empty;
the presence of files (including the system-generated lost+found folder) will prevent
the installation from completing. Either remove the files from the data directory, or
specify a different location for the data directory before re-invoking the installer to
complete the installation.

EDB Postgres Advanced Server Installation Guide
Copyright © 2009 - 2017 EnterpriseDB Corporation. All rights reserved.
129
5 Managing an Advanced Server Installation
Unless otherwise noted, the commands and paths noted in the following section assume
that you have performed an installation with the interactive installer.
5.1 Starting and Stopping Advanced Server and Supporting Components
A service is a program that runs in the background and requires no user interaction (in
fact, a service provides no user interface); a service can be configured to start at boot
time, or manually on demand. Services are best controlled using the platform-specific
operating system service control utility. Many of the Advanced Server supporting
components are services.
The following table lists the names of the services that control Advanced Server and
services that control many of the Advanced Server supporting components:
Component Name
Linux Service Name (installed by interactive
installer)
Linux Service Name (installed by RPM)
Windows Service Name
Advanced Server ppas-9.5 ppas-9.5 ppas-9.5
Infinite Cache ppas-infinitecache ppas95-icache N/A
pgAgent ppas-agent-9.5 ppas95-pgagent Postgres Plus
Advanced Server 9.5
Scheduling Agent
PgBouncer pgbouncer16 ppas-pgbouncer16 pgbouncer16
PgPool ppas-pgpool34 or
ppas-pgpool-3.4
ppas-pgpool34 N/A
Slony ppas-replication-9.5 ppas95-replication ppas-replication-9.5
Advanced Server's database server, and the services of Advanced Server's supporting
components can be controlled at the command line or through operating system-specific
graphical interfaces.
EDB Postgres Advanced Server Installation Guide
Copyright © 2009 - 2017 EnterpriseDB Corporation. All rights reserved.
130
5.2 Controlling a Service on Linux
The commands that control the Advanced Server service on a Linux platform are version
specific.
5.2.1 Controlling a Service on CentOS or RHEL 7.x
Advanced Server 9.5 is the first release that is supported on a Linux version that
implements the systemd service manager. If your installation of Advanced Server
resides on version 7.x of RHEL and CentOS, you must use the systemctl command to
control the Advanced Server service and supporting components.
The systemctl command must be in your search path and must be invoked with
superuser privileges. To use the command, open a command line, and enter:
systemctl action service_name
Where:
service_name
service_name specifies the name of the service.
action
action specifies the action taken by the service command. Specify:
start to start the service.
stop to stop the service.
restart to stop and then start the service.
status to discover the current status of the service.
EDB Postgres Advanced Server Installation Guide
Copyright © 2009 - 2017 EnterpriseDB Corporation. All rights reserved.
131
5.2.2 Controlling a Service on CentOS or RHEL 6.x
On version 6.x of RHEL or CentOS Linux, you can control a service at the command line
with the service command. The service command can be used to manage an
Advanced Server cluster, as well as the services of component software installed with
Advanced Server.
The Linux service controller mechanism allows you to start and stop the server
gracefully. Using the service command to change the status of a service allows the
service controller to keep track of the server status (the pg_ctl command does not alert
the service controller to changes in the status of a server).
The command must be in your search path and must be invoked with superuser
privileges. Open a command line, and issue the command:
service service_name action
The Linux service command invokes a script (with the same name as the service) that
resides in /etc/init.d. If your Linux distribution does not support the service
command, you can call the script directly by entering:
/etc/init.d/service_name action
Where:
service_name
service_name specifies the name of the service.
action
action specifies the action taken by the service command. Specify:
start to start the service.
stop to stop the service.
condstop to stop the service without displaying a notice if the server is
already stopped.
restart to stop and then start the service.
condrestart to restart the service without displaying a notice if the
server is already stopped.

EDB Postgres Advanced Server Installation Guide
Copyright © 2009 - 2017 EnterpriseDB Corporation. All rights reserved.
132
try-restart to restart the service without displaying a notice if the
server is already stopped.
status to discover the current status of the service.
EDB Postgres Advanced Server Installation Guide
Copyright © 2009 - 2017 EnterpriseDB Corporation. All rights reserved.
133
5.2.3 Using pg_ctl to Control Advanced Server
You can use the pg_ctl utility to control an Advanced Server service from the
command line on any platform. pg_ctl allows you to start, stop, or restart the
Advanced Server database server, reload the configuration parameters, or display the
status of a running server. You can invoke the utility with the command:
pg_ctl -D data_directory action
data_directory
data_directory is the location of the data controlled by the Advanced Server
cluster.
action
action specifies the action taken by the pg_ctl utility. Specify:
start to start the service.
stop to stop the service.
restart to stop and then start the service.
reload sends the server a SIGHUP signal, reloading configuration parameters
status to discover the current status of the service.
For more information about using the pg_ctl utility, or the command line options
available, please see the official PostgreSQL core documentation, available at:
https://www.postgresql.org/docs/9.5/static/app-pg-ctl.html
Choosing Between pg_ctl and the service Command
You can use the pg_ctl utility to manage the status of an Advanced Server cluster, but it
is important to note that pg_ctl does not alert the operating system service controller to
changes in the status of a server, so it is beneficial to use the service command
whenever possible.
Note that when you invoke the installer with the --extract-only option, the installer
does not create a service, it merely unpacks the server. If you have installed Advanced
Server by invoking the installer with the --extract-only option, and not completed
the installation with the installation script (runAsRoot.sh or runAsAdmin.sh) you
must use the pg_ctl command to control the server.
EDB Postgres Advanced Server Installation Guide
Copyright © 2009 - 2017 EnterpriseDB Corporation. All rights reserved.
134
5.2.4 Using the edbstart and edbstop Utilities
Note: edbstart and edbstop functionality is supported only on Linux hosts that are
running Advanced Server installations performed with the Interactive installer. RPM
installations do not support edbstart and edbstop.
While the autostart scripts created during an Advanced Server installation control a single
database cluster, the edbstart and edbstop utilities can control multiple database
clusters on the same host, with a single configuration file.
The edbstart and edbstop utilities use a file named edbtab (described below) to
determine which instances of Advanced Server should start when the operating system
boots, and stop when the host is shut down.
Before using the edbstart or edbstop utilities, you should disable the Advanced
Server autostart scripts. The commands that disable the scripts are platform specific;
open a command line, assume superuser privileges and enter the command:
On Fedora/Redhat:
chkconfig --level 2345 ppas-9.5 off
On Debian/Ubuntu:
update-rc.d ppas-9.5 disable
After disabling the Advanced Server service, use an editor to create a file named edbtab
in the /etc directory, or copy the sample file located in:
/opt/PostgresPlus/9.5AS/scripts/server/autostart/edbtab
Edit the edbtab file, (shown in Figure 5.1) specifying a list of the Advanced Server
clusters that the edbstart and edbstop programs will control, and an indicator that
designates if the cluster should be automatically started and stopped.
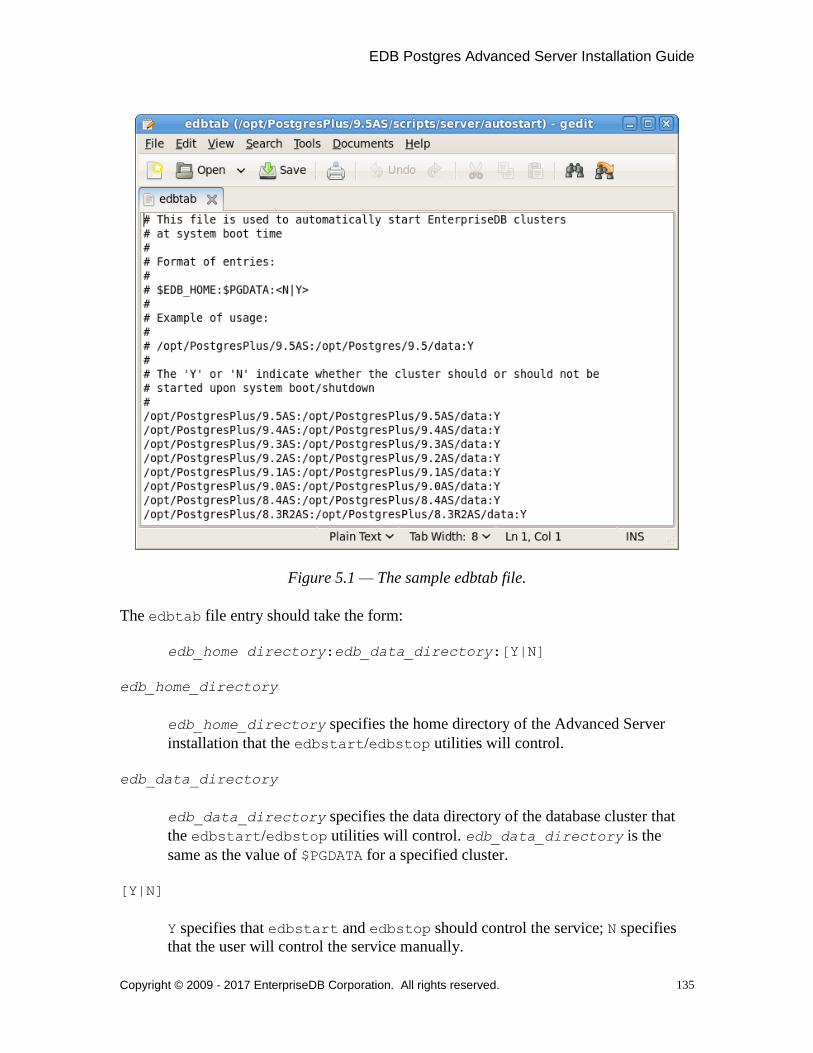
EDB Postgres Advanced Server Installation Guide
Copyright © 2009 - 2017 EnterpriseDB Corporation. All rights reserved.
135
Figure 5.1 — The sample edbtab file.
The edbtab file entry should take the form:
edb_home directory:edb_data_directory:[Y|N]
edb_home_directory
edb_home_directory specifies the home directory of the Advanced Server
installation that the edbstart/edbstop utilities will control.
edb_data_directory
edb_data_directory specifies the data directory of the database cluster that
the edbstart/edbstop utilities will control. edb_data_directory is the
same as the value of $PGDATA for a specified cluster.
[Y|N]
Y specifies that edbstart and edbstop should control the service; N specifies
that the user will control the service manually.
EDB Postgres Advanced Server Installation Guide
Copyright © 2009 - 2017 EnterpriseDB Corporation. All rights reserved.
136
Include a separate entry in the edbtab file for each Advanced Server cluster that you
wish to control with edbstart and edbstop.
After editing the edbtab file, copy the edb_autostart script to /etc/init.d. By
default, the edb_autostart script is located in:
/opt/PostgresPlus/9.5AS/scripts/server/autostart
Copy the edbstart and edbstop scripts to $EDBHOME. Make the scripts executable
with the following command:
chmod +x edbstart
chmod +x edbstop
chmod+x edbstart edbstop /etc/init.d/edb_autostart
Enable the edb_autostart service with the commands:
chkconfig --level 2345 edb_autostart on
chkconfig --add edb_autostart
For the service to take effect, you must restart your system.
Manually Controlling the Server with edbstart and edbstop
You can use edbstart and edbstop at the command line to manually control all of the
clusters specified in the edbtab file, or to control an individual cluster. Call edbstart
without an argument to start all of the clusters listed within the edbtab file; invoke
edbstop without an argument to stop all of the clusters listed in the edbtab file. You
can control an individual cluster by specifying the cluster's data directory as an argument.
The following command starts a cluster:
edbstart /opt/PostgresPlus/9.5AS/data
While the following command stops a cluster:
edbstop /opt/PostgresPlus/9.5AS/data

EDB Postgres Advanced Server Installation Guide
Copyright © 2009 - 2017 EnterpriseDB Corporation. All rights reserved.
137
5.2.5 Configuring Component Services to AutoStart at System Reboot
After installing, configuring and starting the Slony, pgpool-II or Infinite Cache services
on a Linux system, you must manually configure your system to autostart the service
when your system reboots.
To configure a service to autostart on a Linux system, open a command line, assume
superuser privileges, and enter the following command.
On a Redhat-compatible Linux system:
/sbin/chkconfig service_name on
On a Debian-compatible Linux system, use the command:
/usr/sbin/update-rc.d service_name enable
Where service_name specifies the name of the service.
Please note: If you are using a Windows system, the Slony service will be configured to
autostart by default. On Windows, you can use the Service Properties dialog to
control the service startup type. For more information about controlling a service on
Windows, see Section 5.3.

EDB Postgres Advanced Server Installation Guide
Copyright © 2009 - 2017 EnterpriseDB Corporation. All rights reserved.
138
5.3 Controlling a Service on Windows
The Windows operating system includes a graphical service controller that offers point-
and-click control of Advanced Server and the services associated with Advanced Server
components. The service controller simplifies changing the status of a server and
configuring server start up behavior.
The Services utility can be accessed through the Windows Control Panel, or by
navigating through the Start menu to Run; when the Run dialog opens, enter
services.msc and click OK. When the Services window opens, use the scroll bar to
move through the listed services to highlight ppas-9.5 (see Figure 5.2).
Figure 5.2 — The Advanced Server service in the Windows Services window.
The Services window shows that the Advanced Server service (ppas-9.5) is currently
Running, and has a Startup Type of Automatic.
Use the Stop the service option to stop the instance of Advanced Server.
Please note that any user (or client application) connected to the Advanced Server
instance will be abruptly disconnected if you stop the service.
Use the Start the service option to start the Advanced Server service.
Use the Pause the service option to tell Advanced Server to reload the
server configuration parameters. The Pause the service option is an
effective way to reset the server parameters without disrupting user sessions for
many of the configuration parameters. See Section 6, Configuring Advanced
Server for more information about the parameters that can be updated with a
server reload.
Please Note: A limitation in Windows causes Advanced Server to generate an
error message after performing a parameter reload. To confirm that the reload
command has successfully updated the parameters, query the pg_settings table
to verify that the change has taken effect.

EDB Postgres Advanced Server Installation Guide
Copyright © 2009 - 2017 EnterpriseDB Corporation. All rights reserved.
139
Use the Restart the service option to stop and then start the Advanced
Server. Please note that any user sessions will be terminated when you stop the
service. This option is useful to reset server parameters that only take effect on
server start.
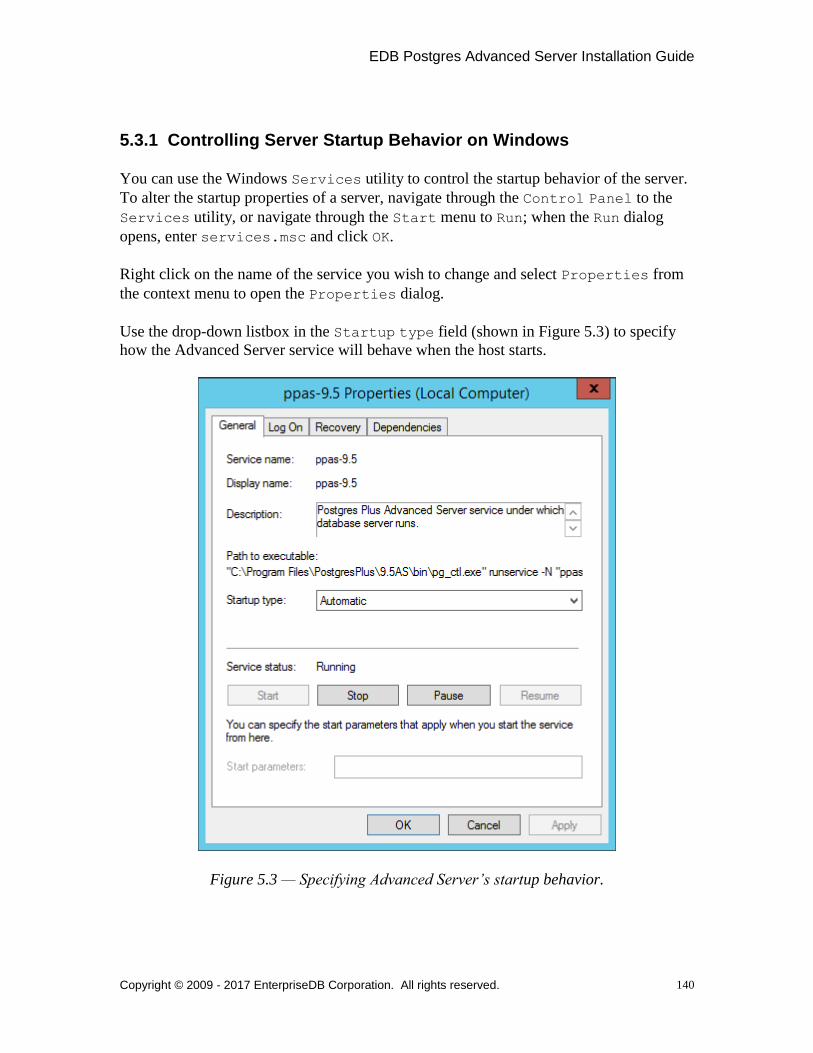
EDB Postgres Advanced Server Installation Guide
Copyright © 2009 - 2017 EnterpriseDB Corporation. All rights reserved.
140
5.3.1 Controlling Server Startup Behavior on Windows
You can use the Windows Services utility to control the startup behavior of the server.
To alter the startup properties of a server, navigate through the Control Panel to the
Services utility, or navigate through the Start menu to Run; when the Run dialog
opens, enter services.msc and click OK.
Right click on the name of the service you wish to change and select Properties from
the context menu to open the Properties dialog.
Use the drop-down listbox in the Startup type field (shown in Figure 5.3) to specify
how the Advanced Server service will behave when the host starts.
Figure 5.3 — Specifying Advanced Server’s startup behavior.

EDB Postgres Advanced Server Installation Guide
Copyright © 2009 - 2017 EnterpriseDB Corporation. All rights reserved.
141
Specify Automatic (Delayed Start) to instruct the service controller to
start after boot.
Specify Automatic to instruct the service controller to start and stop the server
whenever the system starts or stops.
Specify Manual to instruct the service controller that the server must be started
manually.
Specify Disabled to instruct the service controller to disable the service; after
disabling the service, you must stop the service or restart the server to make the
change take effect. Once disabled, the server’s status cannot be changed until
Startup type is reset to Automatic (Delayed Start), Automatic or
Manual.

EDB Postgres Advanced Server Installation Guide
Copyright © 2009 - 2017 EnterpriseDB Corporation. All rights reserved.
142
5.4 Using initdb to Create a Cluster
The PostgreSQL initdb command creates a database cluster. If you are using the
graphical installer to install Advanced Server, the installer will invoke initdb to create a
cluster for you. If you are using an RPM package to install Advanced Server, you must
manually configure the service and invoke initdb to create your cluster; for more
information, see Section 3.2.
When invoking initdb, you can:
Specify environment options on the command line.
Use the service command on RHEL or CentOS 6.x, and the service
configuration file to configure the environment.
Use the systemd service manager on RHEL or CentOS 7.x and the service
configuration file to configure the environment.
For example, to invoke initdb on a RHEL or CentOS 7.x system, using the options
specified in the service configuration file, assume the identity of the operating system
superuser:
su - root
Then, invoke initdb:
/usr/lib/systemd/system/ppas-9.5.sh initdb
For more information about specifying options in the service configuration file, see
Section 3.2.
Advanced Server includes the following initdb options that allow you to customize
your clusters.
--no-redwood-compat
Include the --no-redwood-compat keywords to instruct the server to create the cluster in
PostgreSQL mode. When the cluster is created in PostgreSQL mode, the name of the
database superuser will be postgres, the name of the default database will be postgres,
and Advanced Server’s features compatible with Oracle databases will not be available to
the cluster.

EDB Postgres Advanced Server Installation Guide
Copyright © 2009 - 2017 EnterpriseDB Corporation. All rights reserved.
143
--redwood-like
Include the --redwood-like keywords to instruct the server to use an escape character
(an empty string ('')) following the LIKE (or PostgreSQL-compatible ILIKE) operator
in a SQL statement that is compatible with Oracle syntax.
--icu-short-form
Include the --icu-short-form keywords to create a cluster that uses a default ICU
(International Components for Unicode) collation for all databases in the cluster. For
more information about Unicode collations, please refer to the EDB Postgres (Postgres
Plus) Migration Guide, available at:
http://www.enterprisedb.com/products-services-
training/products/documentation/enterpriseedition
For more information about using initdb, see the PostgreSQL Core Documentation, available at:
https://www.postgresql.org/docs/9.5/static/app-initdb.html
You can also view online help for initdb by assuming superuser privileges and
entering:
/path_to_initdb_installation_directory/initdb -help
Where path_to_initdb_installation_directory specifies the location of the
initdb binary file.

EDB Postgres Advanced Server Installation Guide
Copyright © 2009 - 2017 EnterpriseDB Corporation. All rights reserved.
144
6 Configuring Advanced Server
If you have performed an installation with a package manager, you can use your choice
of editor to access and modify the configuration files. By default, when installed with a
package manager, the configuration files are located in:
/var/lib/ppas/9.5/data
Unless otherwise noted, the commands and paths noted in the following section assume
that you have performed an installation with the interactive installer.
You can easily update configuration parameters that Advanced Server uses to decide the
behavior of its component software by modifying the following configuration files:
The postgresql.conf file determines the initial values of Advanced Server
configuration parameters.
The pg_hba.conf file controls network authentication and authorization.
The pg_ident.conf file maps operating system identities (user names) to
Advanced Server identities (roles) when using ident-based authentication.
On a Windows system, the configuration files can be accessed from the Apps menu. To
update these configuration files in Linux, navigate through the Postgres Plus
Advanced Server 9.5 menu to the Expert Configuration menu and choose the
menu selection that specifies the configuration file that you would like to edit (see Figure
6.1).
Figure 6.1 — Edit the configuration files through the Expert Configuration menu
selection.
If superuser or administrative privileges are required to edit the file, a dialog opens
prompting you for your password.

EDB Postgres Advanced Server Installation Guide
Copyright © 2009 - 2017 EnterpriseDB Corporation. All rights reserved.
145
6.1 Modifying the postgresql.conf File
Configuration parameters in the postgresql.conf file specify server behavior with
regards to auditing, authentication, encryption, and other behaviors. The
postgresql.conf file resides in the data directory under your Advanced Server
installation; you can use your editor of choice to open the postgresql.conf file
directly, or navigate through the Postgres Plus Advanced Server menu to the
Expert Configuration menu, and select the Edit postgresql.conf menu
selection.
If prompted, enter your password to access the configuration file (shown in Figure 6.2).
Figure 6.2 — The postgresql.conf file.
Parameters that are preceded by a pound sign (#) are set to their default value (as shown
in the parameter setting). To change a parameter value, remove the pound sign and enter
a new value. After setting or changing a parameter, you must either reload or restart the
server for the new parameter value to take effect.

EDB Postgres Advanced Server Installation Guide
Copyright © 2009 - 2017 EnterpriseDB Corporation. All rights reserved.
146
Within the postgresql.conf file, some parameters contain comments that indicate
change requires restart. To view a list of the parameters that require a server
restart, execute the following query at the EDB-PSQL command line (see Figure 6.3):
SELECT name FROM pg_settings WHERE context = 'postmaster';
Figure 6.3 — Configuration parameters that require a server restart.

EDB Postgres Advanced Server Installation Guide
Copyright © 2009 - 2017 EnterpriseDB Corporation. All rights reserved.
147
If you are changing a parameter that requires a server restart, see Section 5.1, Starting
and Stopping Advanced Server for information about restarting Advanced Server.
You can reload the system configuration parameter values by navigating through the
Postgres Plus Advanced Server 9.5 menu to the Expert Configuration
menu, and choosing the Reload Configuration menu selection. Reloading the
configuration parameters does not require Advanced Server users to log out of their
current Advanced Server sessions.
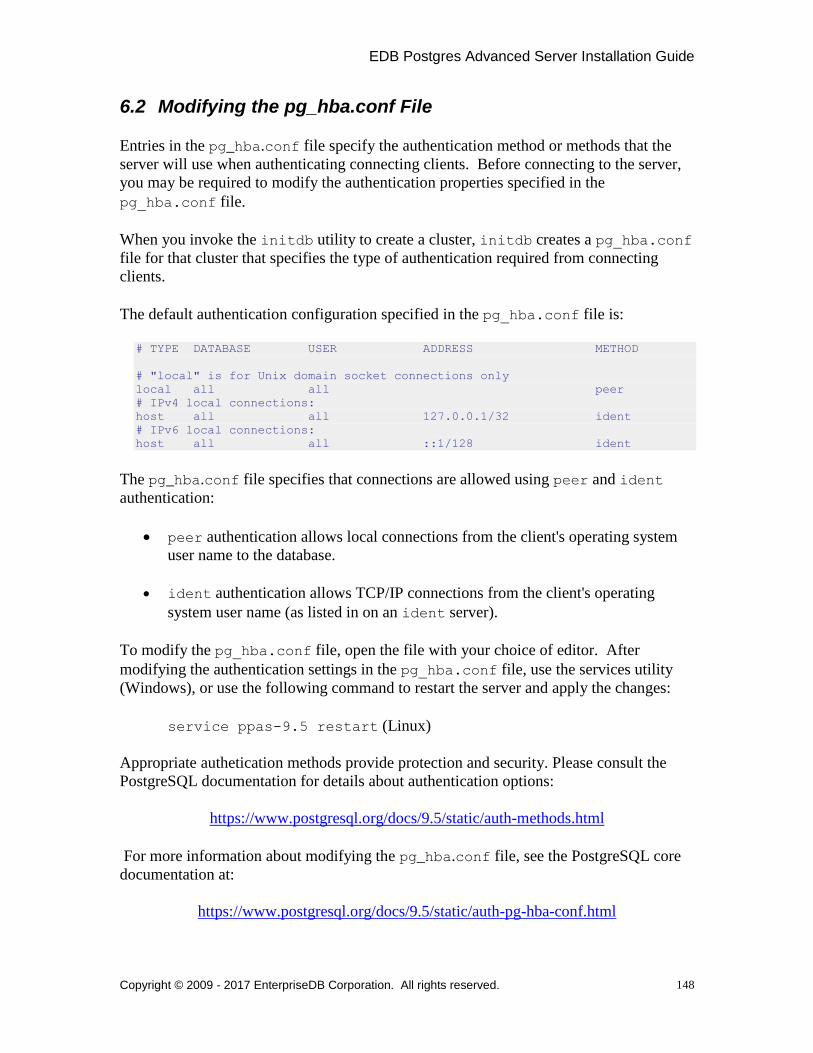
EDB Postgres Advanced Server Installation Guide
Copyright © 2009 - 2017 EnterpriseDB Corporation. All rights reserved.
148
6.2 Modifying the pg_hba.conf File
Entries in the pg_hba.conf file specify the authentication method or methods that the
server will use when authenticating connecting clients. Before connecting to the server,
you may be required to modify the authentication properties specified in the
pg_hba.conf file.
When you invoke the initdb utility to create a cluster, initdb creates a pg_hba.conf
file for that cluster that specifies the type of authentication required from connecting
clients.
The default authentication configuration specified in the pg_hba.conf file is:
# TYPE DATABASE USER ADDRESS METHOD
# "local" is for Unix domain socket connections only
local all all peer
# IPv4 local connections:
host all all 127.0.0.1/32 ident
# IPv6 local connections:
host all all ::1/128 ident
The pg_hba.conf file specifies that connections are allowed using peer and ident
authentication:
peer authentication allows local connections from the client's operating system
user name to the database.
ident authentication allows TCP/IP connections from the client's operating
system user name (as listed in on an ident server).
To modify the pg_hba.conf file, open the file with your choice of editor. After
modifying the authentication settings in the pg_hba.conf file, use the services utility
(Windows), or use the following command to restart the server and apply the changes:
service ppas-9.5 restart (Linux)
Appropriate authetication methods provide protection and security. Please consult the
PostgreSQL documentation for details about authentication options:
https://www.postgresql.org/docs/9.5/static/auth-methods.html
For more information about modifying the pg_hba.conf file, see the PostgreSQL core
documentation at:
https://www.postgresql.org/docs/9.5/static/auth-pg-hba-conf.html
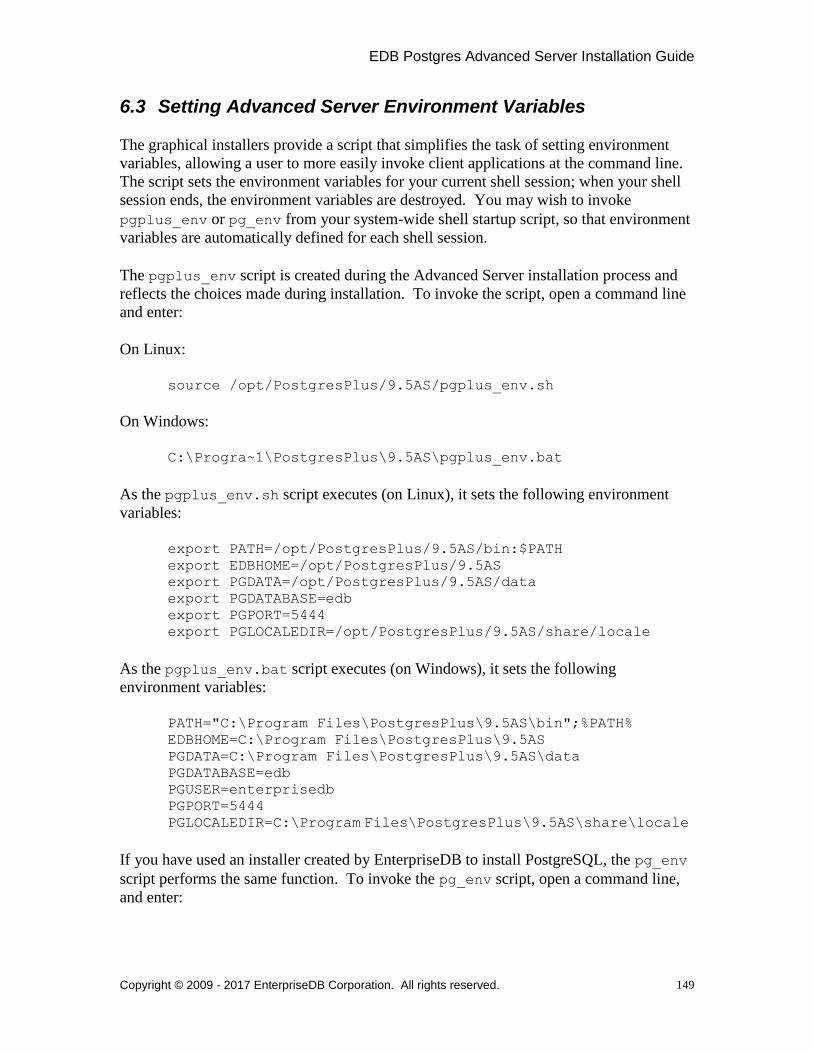
EDB Postgres Advanced Server Installation Guide
Copyright © 2009 - 2017 EnterpriseDB Corporation. All rights reserved.
149
6.3 Setting Advanced Server Environment Variables
The graphical installers provide a script that simplifies the task of setting environment
variables, allowing a user to more easily invoke client applications at the command line.
The script sets the environment variables for your current shell session; when your shell
session ends, the environment variables are destroyed. You may wish to invoke
pgplus_env or pg_env from your system-wide shell startup script, so that environment
variables are automatically defined for each shell session.
The pgplus_env script is created during the Advanced Server installation process and
reflects the choices made during installation. To invoke the script, open a command line
and enter:
On Linux:
source /opt/PostgresPlus/9.5AS/pgplus_env.sh
On Windows:
C:\Progra~1\PostgresPlus\9.5AS\pgplus_env.bat
As the pgplus_env.sh script executes (on Linux), it sets the following environment
variables:
export PATH=/opt/PostgresPlus/9.5AS/bin:$PATH
export EDBHOME=/opt/PostgresPlus/9.5AS
export PGDATA=/opt/PostgresPlus/9.5AS/data
export PGDATABASE=edb
export PGPORT=5444
export PGLOCALEDIR=/opt/PostgresPlus/9.5AS/share/locale
As the pgplus_env.bat script executes (on Windows), it sets the following
environment variables:
PATH="C:\Program Files\PostgresPlus\9.5AS\bin";%PATH%
EDBHOME=C:\Program Files\PostgresPlus\9.5AS
PGDATA=C:\Program Files\PostgresPlus\9.5AS\data
PGDATABASE=edb
PGUSER=enterprisedb
PGPORT=5444
PGLOCALEDIR=C:\Program Files\PostgresPlus\9.5AS\share\locale
If you have used an installer created by EnterpriseDB to install PostgreSQL, the pg_env
script performs the same function. To invoke the pg_env script, open a command line,
and enter:

EDB Postgres Advanced Server Installation Guide
Copyright © 2009 - 2017 EnterpriseDB Corporation. All rights reserved.
150
On Linux:
source /opt/PostgreSQL/9.5/pg_env.sh
On Windows:
C:\Progra~1\PostgreSQL\9.5\pg_env.bat
As the pg_env.sh script executes (on Linux), it sets the following environment
variables:
PATH=/home/opt/PostgreSQL/9.5/bin:$PATH
PGDATA=/home/opt/PostgreSQL/9.5/data
PGDATABASE=postgres
PGUSER=postgres
PGPORT=5432
PGLOCALEDIR=/home/opt/PostgreSQL/9.5/share/locale
MANPATH=$MANPATH:/home/opt/PostgreSQL/9.5/share/man
As the pg_env.bat script executes (on Windows), it sets the following environment
variables:
PATH="C:\Program Files\PostgreSQL\9.5\bin";%PATH%
PGDATA=C:\Program Files\PostgreSQL\9.5\data
PGDATABASE=postgres
PGUSER=postgres
PGPORT=5432
PGLOCALEDIR=C:\Program Files\PostgreSQL\9.5\share\locale
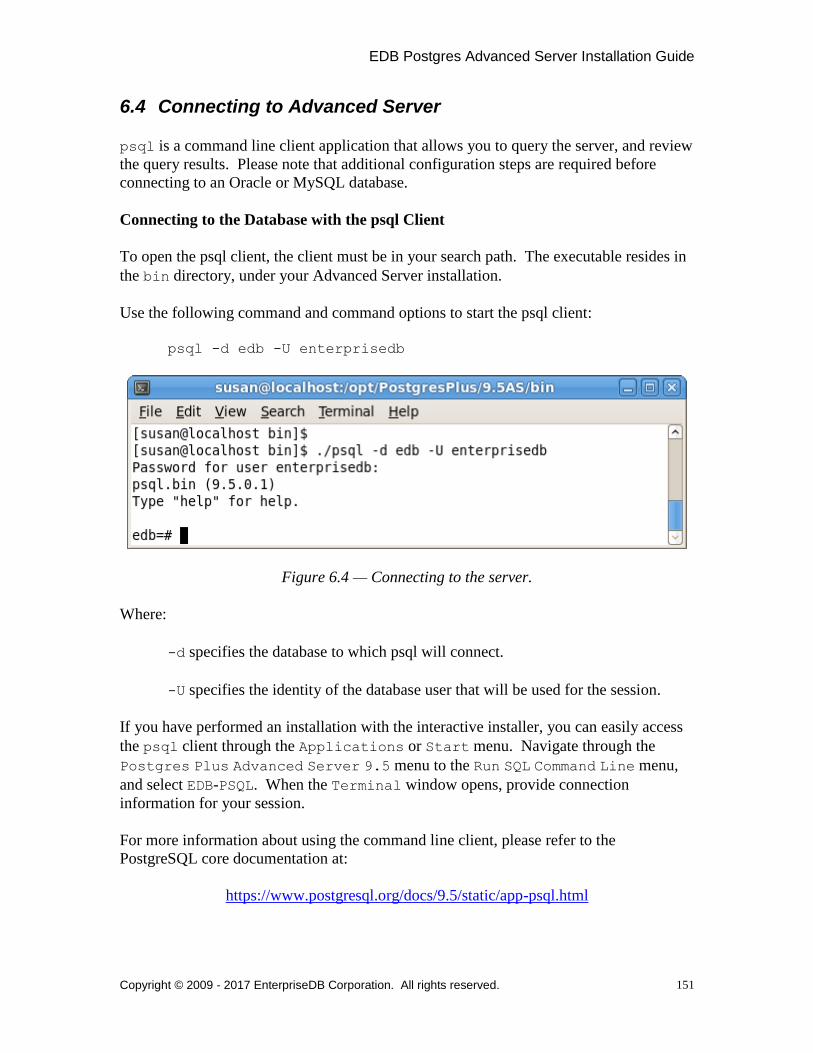
EDB Postgres Advanced Server Installation Guide
Copyright © 2009 - 2017 EnterpriseDB Corporation. All rights reserved.
151
6.4 Connecting to Advanced Server
psql is a command line client application that allows you to query the server, and review
the query results. Please note that additional configuration steps are required before
connecting to an Oracle or MySQL database.
Connecting to the Database with the psql Client
To open the psql client, the client must be in your search path. The executable resides in
the bin directory, under your Advanced Server installation.
Use the following command and command options to start the psql client:
psql -d edb -U enterprisedb
Figure 6.4 — Connecting to the server.
Where:
-d specifies the database to which psql will connect.
-U specifies the identity of the database user that will be used for the session.
If you have performed an installation with the interactive installer, you can easily access
the psql client through the Applications or Start menu. Navigate through the
Postgres Plus Advanced Server 9.5 menu to the Run SQL Command Line menu,
and select EDB-PSQL. When the Terminal window opens, provide connection
information for your session.
For more information about using the command line client, please refer to the
PostgreSQL core documentation at:
https://www.postgresql.org/docs/9.5/static/app-psql.html

EDB Postgres Advanced Server Installation Guide
Copyright © 2009 - 2017 EnterpriseDB Corporation. All rights reserved.
152
6.4.1 Connecting to an Oracle or MySQL Database
Oracle Client Connectivity
Before connecting Advanced Server to an Oracle database, you must download and
install the Oracle JDBC driver (ojdbc14.jar) from the Oracle website. You can find a
link to the free JDBC driver at:
http://www.enterprisedb.com/downloads/third-party-jdbc-drivers
Download the ojdbc14.jar file and place it in the JAVA_HOME\jre\lib\ext
directory.
MySQL Client Connectivity
Before connecting Advanced Server to a MySQL database, you must download and
install the MySQL JDBC driver (mysql-connector-java-5.0.8-bin.jar) from
the MySQL website. You can find a link to the free JDBC driver at:
http://www.enterprisedb.com/downloads/third-party-jdbc-drivers
Download the mysql-connector-java-5.0.8-bin.jar file and place it in the
JAVA_HOME\jre\lib\ext directory.

EDB Postgres Advanced Server Installation Guide
Copyright © 2009 - 2017 EnterpriseDB Corporation. All rights reserved.
153
7 Advanced Server Supporting Components
After installing Advanced Server, you must configure and manually start the services of
some supporting components. The following sections list the Advanced Server
components that require post-installation configuration, and information about their
services.
Please note that you must install a Java environment before invoking EDB*Plus or
Migration Toolkit or before using PL/Java or the JDBC connector.
7.1 EDB*Plus - Configuring an RPM Installation
If you have performed an RPM installation of EDB*Plus, you must perform the
following steps before invoking EDB*Plus.
Setting the Session Environment Variables
Before invoking EDB*Plus on a Linux system, you must set the values of environment
variables. Use the following commands to set variable values:
export JAVA_HOME=<path_to_java>
export PATH=<path_to_java>/bin:$PATH
Configuring EDB*Plus Authentication
By default, the pg_hba.conf file for the RPM installer enforces IDENT authentication.
Before invoking EDB*Plus, you must either modify the pg_hba.conf file, changing the
authentication method to a form other than IDENT (and restarting the server), or perform
the following steps to ensure that an IDENT server is accessible:
1. Confirm that an identd server is installed and running. For example, you can use the
yum package manager to install an identd server by invoking the command:
yum install xinetd authd
The command should create a file named /etc/xinetd.d/auth that contains:
service auth
{
disable = no
socket_type = stream
wait = no
user = ident
cps = 4096 10
EDB Postgres Advanced Server Installation Guide
Copyright © 2009 - 2017 EnterpriseDB Corporation. All rights reserved.
154
instances = UNLIMITED
server = /usr/sbin/in.authd
server_args = -t60 --xerror --os
}
Note: if the file includes a -E argument at the end of server_args, please erase the -E.
Then, to start the identd server, invoke the commands:
systemctl enable xinetd
systemctl start xinetd
2. Open the pg_ident.conf file and create a user mapping:
# map_name system_username postgres_username
ppas enterprisedb enterprisedb
Where:
The name specified in the map_name column is a user-defined name that will
identify the mapping in the pg_hba.conf file.
The name specified in the system_username column is enterprisedb.
The name specified in the postgres_username is enterprisedb.
3. Open the pg_hba.conf file and modify the IDENT entries.
If you are using an IPv4 local connection, modify the file entry to read:
host all all 127.0.0.0/0 ident map=ppas
If you are using an IPv6 local connection:
host all all ::1/128 ident map=ppas
4. Restart the Advanced Server service before invoking EDB*Plus.
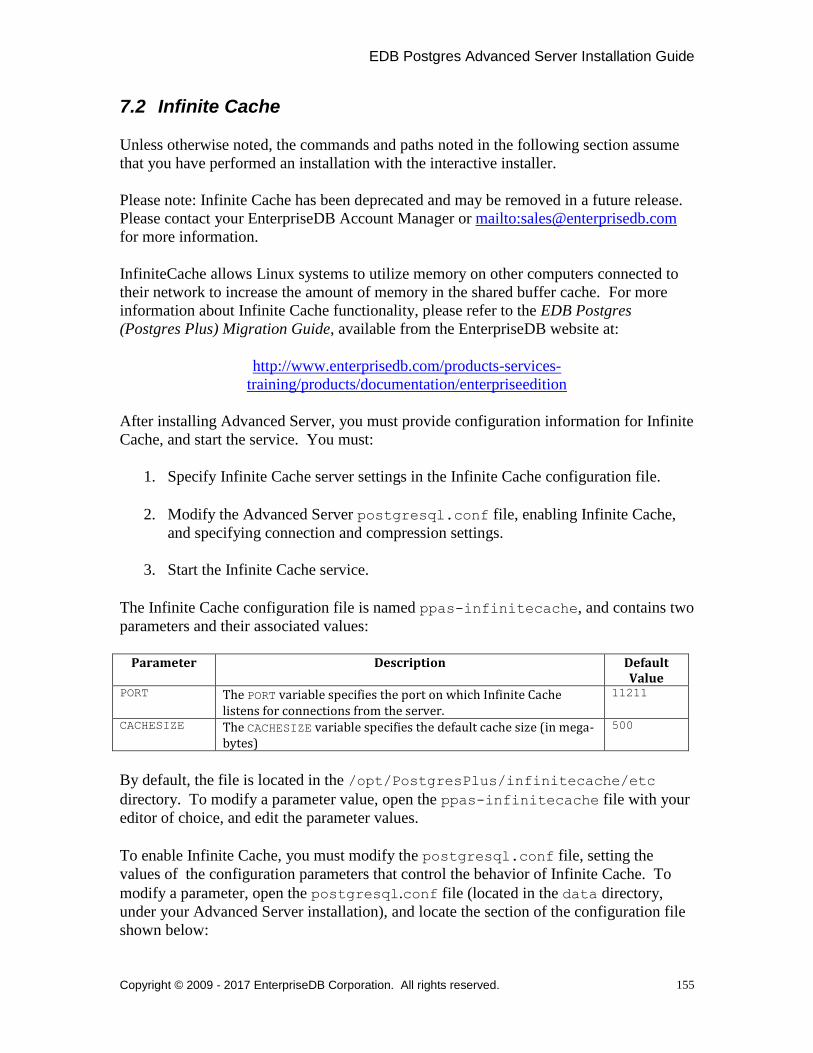
EDB Postgres Advanced Server Installation Guide
Copyright © 2009 - 2017 EnterpriseDB Corporation. All rights reserved.
155
7.2 Infinite Cache
Unless otherwise noted, the commands and paths noted in the following section assume
that you have performed an installation with the interactive installer.
Please note: Infinite Cache has been deprecated and may be removed in a future release.
Please contact your EnterpriseDB Account Manager or mailto:[email protected]
for more information.
InfiniteCache allows Linux systems to utilize memory on other computers connected to
their network to increase the amount of memory in the shared buffer cache. For more
information about Infinite Cache functionality, please refer to the EDB Postgres
(Postgres Plus) Migration Guide, available from the EnterpriseDB website at:
http://www.enterprisedb.com/products-services-
training/products/documentation/enterpriseedition
After installing Advanced Server, you must provide configuration information for Infinite
Cache, and start the service. You must:
1. Specify Infinite Cache server settings in the Infinite Cache configuration file.
2. Modify the Advanced Server postgresql.conf file, enabling Infinite Cache,
and specifying connection and compression settings.
3. Start the Infinite Cache service.
The Infinite Cache configuration file is named ppas-infinitecache, and contains two
parameters and their associated values:
Parameter Description Default Value
PORT The PORT variable specifies the port on which Infinite Cache listens for connections from the server.
11211
CACHESIZE The CACHESIZE variable specifies the default cache size (in mega-bytes)
500
By default, the file is located in the /opt/PostgresPlus/infinitecache/etc
directory. To modify a parameter value, open the ppas-infinitecache file with your
editor of choice, and edit the parameter values.
To enable Infinite Cache, you must modify the postgresql.conf file, setting the
values of the configuration parameters that control the behavior of Infinite Cache. To
modify a parameter, open the postgresql.conf file (located in the data directory,
under your Advanced Server installation), and locate the section of the configuration file
shown below:

EDB Postgres Advanced Server Installation Guide
Copyright © 2009 - 2017 EnterpriseDB Corporation. All rights reserved.
156
# - Infinite Cache
#edb_enable_icache = off
#edb_icache_servers = '' #'host1:port1,host2,ip3:port3,ip4'
#edb_icache_compression_level = 6
Within the postgresql.conf file, lines that begin with a pound sign (#) are treated as a
comment; to edit a given parameter, remove the pound sign and specify a value for the
parameter. When you've updated and saved the configuration file, restart the database
server for the changes to take effect.
Parameter Description edb_enable_icache Use the edb_enable_icache parameter to enable or disable
Infinite Cache. When edb_enable_icache is set to on, Infinite Cache is enabled; if the parameter is set to off, Infinite Cache is disabled. If you enable Infinite Cache, you must use the edb-icache_servers parameter to specify a list of cache servers. The default value is off.
edb_icache_servers Use the edb_icache_servers parameter to specify a list of one or more servers with active edb-icache daemons. Specify a string value that takes the form of a comma-separated list of hostname:port pairs. You may specify a maximum of 128 cache nodes.
edb_icache_compression_level edb_icache_compression_level controls the compression level that is applied to each page before storing it in the distributed cache. The parameter must be greater than or equal to 0 or less than or equal to 9. A compression level of 0 disables compression, while a compression level of 9 invokes the maximum amount of compression. By default, this parameter is set to 6.
The following example shows a typical collection of Infinite Cache settings:
edb_enable_icache = on
edb_icache_servers = 'localhost,192.168.2.1:11200,192.168.2.2'
edb_icache_compression_level = 6
After specifying configuration options, you must start the Infinite Cache service. Before
starting the service, ensure that the edb-icache daemons are running on each server
specified in edb_icache_servers parameter.
The Infinite Cache service script is named ppas-infinitecache. The service script
resides in the /etc/init.d directory. For detailed information about stopping or
starting a service on your platform, please see Section 5.
EDB Postgres Advanced Server Installation Guide
Copyright © 2009 - 2017 EnterpriseDB Corporation. All rights reserved.
157
7.3 Language Pack
Language Pack installers contain supported languages that may be used with the
Advanced Server and PostgreSQL database installers. The Language Pack installer
allows you to create languages for PL/Perl, PL/Tcl, and PL/Python without installing
supporting software from third party vendors.
The Language Pack installer includes:
Tcl with TK, version 8.5
Perl, version 5.20
Python, version 3.3
You can use StackBuilder Plus to invoke the Language Pack installer. For information
about using StackBuilder Plus, see Section 4.5.
The Perl package contains the cpan package manager, and Python contains pip and
easy_install package managers. There is no package manager for Tcl/TK.
Configuring Language Pack on Linux
On Linux, the installer places the languages in:
/opt/EnterpriseDB/LanguagePack/9.5/
If you install Language Pack before Advanced Server, the Advanced Server installer will
detect the Language Pack installation, and set the paths in the plLanguages.config
file for you.
If you are invoking the Advanced Server installer using the --extract-only option, or
if you install Language Pack after installing Advanced Server, you must manually
configure the installation. The Language Pack configuration file is named:
/opt/PostgresPlus/9.5AS/etc/sysconfig/plLanguages.config
If you are installing Language Pack on a system that already hosts an Advanced Server
installation, use your editor of choice to modify the plLanguages.config file, and
modify the entries to include the locations of each language:
EDB_PERL_VERSION=5.20
EDB_PYTHON_VERSION=3.3
EDB_TCL_VERSION=8.5
EDB_PERL_PATH=/opt/EnterpriseDB/LanguagePack/9.5/Perl-5.20
EDB_PYTHON_PATH=/opt/EnterpriseDB/LanguagePack/9.5/Python-3.3
EDB_TCL_PATH=/opt/EnterpriseDB/LanguagePack/9.5/Tcl-8.5

EDB Postgres Advanced Server Installation Guide
Copyright © 2009 - 2017 EnterpriseDB Corporation. All rights reserved.
158
After modifying the plLanguages.config file, restart the server for the changes to take
effect. See Section 5 for detailed information about restarting the server.
Configuring Language Pack on Windows
On Windows, the Language Pack installer places the languages in:
C:\EnterpriseDB\PostgreSQL\LanguagePack\9.5\x64
After installing Language Pack, you must set the following variables:
set PYTHONHOME=C:\EnterpriseDB\PostgreSQL\LanguagePack\9.5\x64\Python-
3.3
Use the following commands to add Python, Perl and Tcl to your search path:
set PATH=C:\EnterpriseDB\PostgreSQL\LanguagePack\9.5\x64\Python-
3.3\bin:C:\EnterpriseDB\PostgreSQL\LanguagePack\9.5\x64\Perl-
5.20\bin:C:\EnterpriseDB\PostgreSQL\LanguagePack\9.5\x64\Tcl-
8.5\bin:%PATH%
After performing the system-specific steps required to configure Language Pack on
Windows, restart the Advanced Server database server; see Section 5 for detailed
information about restarting the server.
Configuring Language Pack on OSX
If you are installing Language Pack on a PostgreSQL host on OSX, the Language Pack
installer places the languages in:
/Library/PostgreSQL/LanguagePack/9.5
After installing Language Pack, you must set the following variables:
export PERLHOME=/Library/PostgreSQL/LanguagePack/9.5/Perl-5.20
export PYTHONHOME=/Library/PostgreSQL/LanguagePack/9.5/Python-3.3
export TCLHOME=/Library/PostgreSQL/LanguagePack/9.5/Tcl-8.5
Use the following commands to add Python, Perl and Tcl to your search path:
export PATH=$PYTHONHOME/bin:$PERLHOME/bin:$TCLHOME/bin:$PATH
export DYLD_LIBRARY_PATH=$PYTHONHOME/lib:$DYLD_LIBRARY_PATH
export DYLD_LIBRARY_PATH=$PERLHOME/lib/CORE:$DYLD_LIBRARY_PATH
export DYLD_LIBRARY_PATH=$TCLHOME/lib:$DYLD_LIBRARY_PATH

EDB Postgres Advanced Server Installation Guide
Copyright © 2009 - 2017 EnterpriseDB Corporation. All rights reserved.
159
After performing the system-specific steps required to configure Language Pack on OSX,
restart the Advanced Server database server; for information about restarting the server,
consult the documentation available at:
http://www.enterprisedb.com/products-services-
training/products/documentation/enterpriseedition
Known Language Pack Restrictions:
(1) The current set of installers can only be installed in a fixed location. The packages are
not relocatable.
(2) There is no package manager for Tcl.
(3) The installer will only extract in the stated installation path.
Known Bugs:
(1) On Windows, the pythonw.exe, pyw.exe and other binaries may produce an error,
reporting fault module in a MSVCR120.dll.
EDB Postgres Advanced Server Installation Guide
Copyright © 2009 - 2017 EnterpriseDB Corporation. All rights reserved.
160
7.4 Migration Toolkit - Configuring an RPM Installation
Please note that you must install a Java environment before invoking EDB*Plus or
Migration Toolkit or before using PL/Java or the JDBC connector.
If you have performed an RPM installation of Migration Toolkit, you must perform the
following steps before invoking Migration Toolkit.
Using Migration Toolkit with IDENT Authentication
By default, the pg_hba.conf file for the RPM installer enforces IDENT authentication
for remote clients. Before invoking Migration Toolkit, you must either modify the
pg_hba.conf file, changing the authentication method to a form other than IDENT (and
restarting the server), or perform the following steps to ensure that an IDENT server is
accessible:
1. Confirm that an identd server is installed and running. For example, you can use the
yum package manager to install an identd server by invoking the command:
yum install xinetd authd
The command should create a file named /etc/xinetd.d/auth that contains:
service auth
{
disable = no
socket_type = stream
wait = no
user = ident
cps = 4096 10
instances = UNLIMITED
server = /usr/sbin/in.authd
server_args = -t60 --xerror --os
}
Note: if the file includes a -E argument at the end of server_args, please erase the -E.
Then, to start the identd server, invoke the commands:
systemctl enable xinetd
systemctl start xinetd

EDB Postgres Advanced Server Installation Guide
Copyright © 2009 - 2017 EnterpriseDB Corporation. All rights reserved.
161
2. Open the pg_ident.conf file and create a user mapping:
# map_name system_username postgres_username
ppas enterprisedb enterprisedb
Where:
The name specified in the map_name column is a user-defined name that will
identify the mapping in the pg_hba.conf file.
The name specified in the system_username column is enterprisedb.
The name specified in the postgres_username is enterprisedb.
3. Open the pg_hba.conf file and modify the IDENT entries.
If you are using an IPv4 local connection, modify the file entry to read:
host all all 127.0.0.0/0 ident map=ppas
If you are using an IPv6 local connection:
host all all ::1/128 ident map=ppas
4. Restart the Advanced Server service before invoking Migration Toolkit.
For more information about using Migration Toolkit, see the EDB Postgres Migration
Toolkit Guide, available at:
http://www.enterprisedb.com/products-services-
training/products/documentation/enterpriseedition

EDB Postgres Advanced Server Installation Guide
Copyright © 2009 - 2017 EnterpriseDB Corporation. All rights reserved.
162
7.5 pgAgent
Unless otherwise noted, the commands and paths in the following section assume that
you have performed an installation with the interactive installer.
pgAgent is a job scheduling agent for Advanced Server. When you schedule a pgAgent
job, the scheduling agent records the job definition in a scheduling table. The pgAgent
service (running in the background) monitors the scheduling table and executes jobs at
their scheduled time.
The Advanced Server installer creates the scheduling tables required by the pgAgent
service under schema pgagent. If you are installing Advanced Server in Compatible
with Oracle mode (the default), the scheduling tables are created in the edb database;
if you are installing in PostgreSQL mode, the tables are created in the postgres
database.
You can use the Postgres Enterprise Manager Client (available from EnterpriseDB) to
conveniently schedule and manage pgAgent jobs. The PEM Client also offers online
documentation for pgAgent.
To use the DBMS_JOB package compatible with Oracle databases from a database other
than the edb database, you must install the pgAgent schema into each additional database
in which you wish to schedule jobs. To install the pgAgent schema, you must:
1) Connect to the target database.
2) Invoke the pgagent.sql script.
When installed with the RPM package, the pgagent.sql script is located in
/usr/share/ppas95-pgagent-3.4.1. When installed with the interactive installer,
the script is located in /opt/PostgresPlus/9.5AS/share/extension.
The pgAgent script will install the scheduling tables in the target database.
Installing the pgAgent Service on Linux
If you installed Advanced Server using the interactive installer, pgAgent is installed as
well. The pgagent program is installed under the bin subdirectory of the Advanced
Server installation directory along with the required startup scripts, subdirectories for
logging, etc.
Similarly, if you installed Advanced Server using the ppas95 RPM package or the
ppas95-pgagent RPM package, pgAgent is installed. The pgagent program is
installed under the bin subdirectory of the Advanced Server installation directory along
with the required startup scripts, subdirectories for logging, etc.
EDB Postgres Advanced Server Installation Guide
Copyright © 2009 - 2017 EnterpriseDB Corporation. All rights reserved.
163
As already stated, when the interactive installer is used, the pgagent schema and its
scheduling tables are created in either the edb database or the postgres database.
When the RPM package is used, the pgagent schema and its scheduling tables are not
automatically created. The scheduling tables must be created by connecting to the desired
database and executing the pgagent.sql script as previously described.
When the interactive installer is used, a script named servicemanager.sh along with
other supporting files is installed under the installer/pgAgent subdirectory of the
Advanced Server location for providing an alternative method for managing pgAgent.
The servicemanager.sh script can be used to install pgAgent, uninstall pgAgent, start
the pgAgent service, stop the pgAgent service, or disable the automatic startup of
pgAgent.
Note: The servicemanager.sh script is only provided when the interactive installer is
used, and the same functionality provided by this script can be accomplished using the
methods described in Chapter 5.
The following section describes the usage of this script.
Using Script servicemanager.sh on Linux
You must have superuser privileges to manage the pgAgent service using the
servicemanager.sh script.
When invoking the servicemanager.sh script, the current working directory from
where the script is invoked must be
/opt/PostgresPlus/9.5AS/installer/pgAgent.
If for whatever reason, you need to reinstall pgAgent using the servicemanager.sh
script, you must create the pgpass file in the following directory:
/opt/PostgresPlus/9.5AS/installer/pgAgent/
The file should contain a set of connection properties that reflect the properties specified
during the Advanced Server installation process. The format of an entry in the pgpass
file is as follows:
hostname:port:database:username:password
Where:
hostname specifies name of the Advanced Server host.
port specifies the port on which the Advanced Server host is listening.
EDB Postgres Advanced Server Installation Guide
Copyright © 2009 - 2017 EnterpriseDB Corporation. All rights reserved.
164
database specifies the name of the database.
username specifies the name of an Advanced Server user.
password specifies the password of the database in which the scheduling table
resides.
For example:
localhost:5444:*:enterprisedb:edb
After creating the pgpass file, execute the following commands as the root user to
install the pgAgent service and create the startup file. The script configures the pgAgent
executor to run in the background at system startup.
cd /opt/PostgresPlus/9.5AS/installer/pgAgent
./servicemanager.sh component_name user_name install_dir
service_name action_type version data_dir pg_host pg_port pg_user
pg_database
This command takes the following arguments:
component_name - Specify pgAgent.
user_name - Specify the Linux operating system account that runs Advanced
Server. For example, this is enterprisedb if installed with the mode
compatible with Oracle databases. This is postgres if installed with the mode
compatible with PostgreSQL databases.
install_dir - Specify the Advanced Server installation directory.
service_name - Specify ppas-agent-9.5.
action_type - Specify install to install pgAgent, uninstall to uninstall
pgAgent, start to start up the pgAgent service, stop to stop the pgAgent
service, or disable_autostart to prevent automatic startup of the pgAgent
service.
version - Specify 9.5.
data_dir - Specify the Advanced Server data directory (for example,
/opt/PostgresPlus/9.5AS/data).
pg_host - Specify the name or IP address of the target database server's host.

EDB Postgres Advanced Server Installation Guide
Copyright © 2009 - 2017 EnterpriseDB Corporation. All rights reserved.
165
pg_port - Specify the port number of the target database server.
pg_user - Specify the name of the database user listed in the pgpass file (for
example, enterprisedb).
pg_database - Specify the name of the target database.
The following is an example of an installation:
[root@localhost ~]# cd /opt/PostgresPlus/9.5AS/installer/pgAgent
[root@localhost pgAgent]# ./servicemanager.sh pgAgent enterprisedb \
> /opt/PostgresPlus/9.5AS ppas-agent-9.5 \
> install 9.5 /opt/PostgresPlus/9.5AS/data \
> 127.0.0.1 5444 enterprisedb edb
./servicemanager.sh ran to completion
After installing the service, you should remove the password from the pgpass file so that
the password is not available to other users.
The following example starts the pgAgent service:
[root@localhost pgAgent]# ./servicemanager.sh pgAgent enterprisedb \
> /opt/PostgresPlus/9.5AS ppas-agent-9.5 \
> start 9.5 /opt/PostgresPlus/9.5AS/data \
> 127.0.0.1 5444 enterprisedb edb
Starting ppas-agent-9.5 [ OK ]
INFO: [PID: 11135]
INFO: [CMD: /opt/PostgresPlus/9.5AS/bin/pgagent -l 1 -s /var/log/ppas-agent-9.5/ppas-
agent-9.5.log hostaddr=127.0.0.1 port=5444 dbname=edb user=enterprisedb]
MSG: [ppas-agent-9.5 started]
INFO: [Please see service script file /var/log/ppas-agent-9.5/ppas-agent-9.5_script.log
for details]
./servicemanager.sh ran to completion
The following example stops the pgAgent service:
[root@localhost pgAgent]# ./servicemanager.sh pgAgent enterprisedb \
> /opt/PostgresPlus/9.5AS ppas-agent-9.5 \
> stop 9.5 /opt/PostgresPlus/9.5AS/data \
> 127.0.0.1 5444 enterprisedb edb
INFO: [PID: 11135]
INFO: [CMD: /opt/PostgresPlus/9.5AS/bin/pgagent -l 1 -s /var/log/ppas-agent-9.5/ppas-
agent-9.5.log hostaddr=127.0.0.1 port=5444 dbname=edb user=enterprisedb]
Stopping ppas-agent-9.5 [ OK ]
MSG: [ppas-agent-9.5 stopped]
INFO: [Please see service script file /var/log/ppas-agent-9.5/ppas-agent-9.5_script.log
for details]
./servicemanager.sh ran to completion
Installing the pgAgent Service on Windows

EDB Postgres Advanced Server Installation Guide
Copyright © 2009 - 2017 EnterpriseDB Corporation. All rights reserved.
166
pgAgent also provides an alternate command line argument that allows you to install or
remove the pgAgent service on a Windows system. Use the following command to
install the pgAgent service:
pgagent INSTALL service_name [options] connection_string
Where:
service_name specifies the name of the pgAgent service.
options
Option Description -u specifies a user or DOMAIN\user -p specifies a password associated with that user -d specifies a display name for the user -t specifies a poll time interval (in seconds). The default value is 10. -r specifies a retry period after connection abort (in seconds) Specify a value greater
than or equal to 10; the default is 30. -l specifies a logging verbosity. Specify a 0 to log ERROR messages, 1 to log WARNING
messages, or 2 to log DEBUG messages. The default is 0.
connection_string specifies connection information for an Advanced Server host.
For example, the following command creates a pgAgent service on a Windows platform:
%EDB_HOME%\bin\pgagent INSTALL jobscheduler -u enterprisedb -p
1safepassword hostaddr=127.0.0.1 dbname=edb user=enterprisedb
The example is:
Running on the localhost.
Connecting to a database called edb.
Connecting as user enterprisedb.
Using the password 1safepassword.
You can optionally include the REMOVE keyword to remove a pgAgent service:
pgAgent REMOVE <serviceName>
Controlling the pgAgent Service
EDB Postgres Advanced Server Installation Guide
Copyright © 2009 - 2017 EnterpriseDB Corporation. All rights reserved.
167
After installing the pgAgent service on either Linux or Windows, you must start the
service. Please Note: if you stop or restart the Advanced Server service, the dependent
pgAgent service is also stopped; you must manually restart the pgAgent service.
For detailed information about controlling the pgAgent service, see Section 5.

EDB Postgres Advanced Server Installation Guide
Copyright © 2009 - 2017 EnterpriseDB Corporation. All rights reserved.
168
7.6 PgBouncer
Unless otherwise noted, the commands and paths noted in the following section assume
that you have performed an installation with the interactive installer.
PgBouncer is a lightweight connection pooler for Advanced Server. During an Advanced
Server installation, the Advanced Configuration window will offer you the
opportunity to specify a PgBouncer Listening Port, and allow you to specify a
PgBouncer autostart preference. By default, PgBouncer is configured to monitor port
6432, and to start automatically when the operating system starts.
Configuring PgBouncer
When the PgBouncer service is running, any Postgres Client connecting to the
PgBouncer listener port specified in the configuration file will use connection pooling.
PgBouncer connection and configuration information is stored in the pgbouncer.ini
file, located under in the share directory, under your Advanced Server installation.
The PgBouncer configuration file is divided into two sections: [databases] and
[pgbouncer].
The [databases] section of the configuration file contains a list of databases and the
associated connection information; in an Advanced Server installation, the configuration
file contains an entry for the installation of Advanced Server that installed PgBouncer:
edb = host=127.0.0.1 port=5444
You can specify additional database connection information in the configuration file in
the form of keyword=value pairs. You can include the following parameters:
Parameter Description name The name of the database to which the client application will connect. host The IP address of the host. port The port on which the host is listening. dbname The (optional) database name. user A username (if different than the information specified by the connecting
client ). password A password (if different than the information specified by the connecting
client).
The following example demonstrates the syntax allowed in the [databases] section of
the configuration file:
[databases]
edb = host=127.0.0.1 port=5444
acctg = host=192.168.10.101 port=5432 user=lola
password=1safe_pwd!
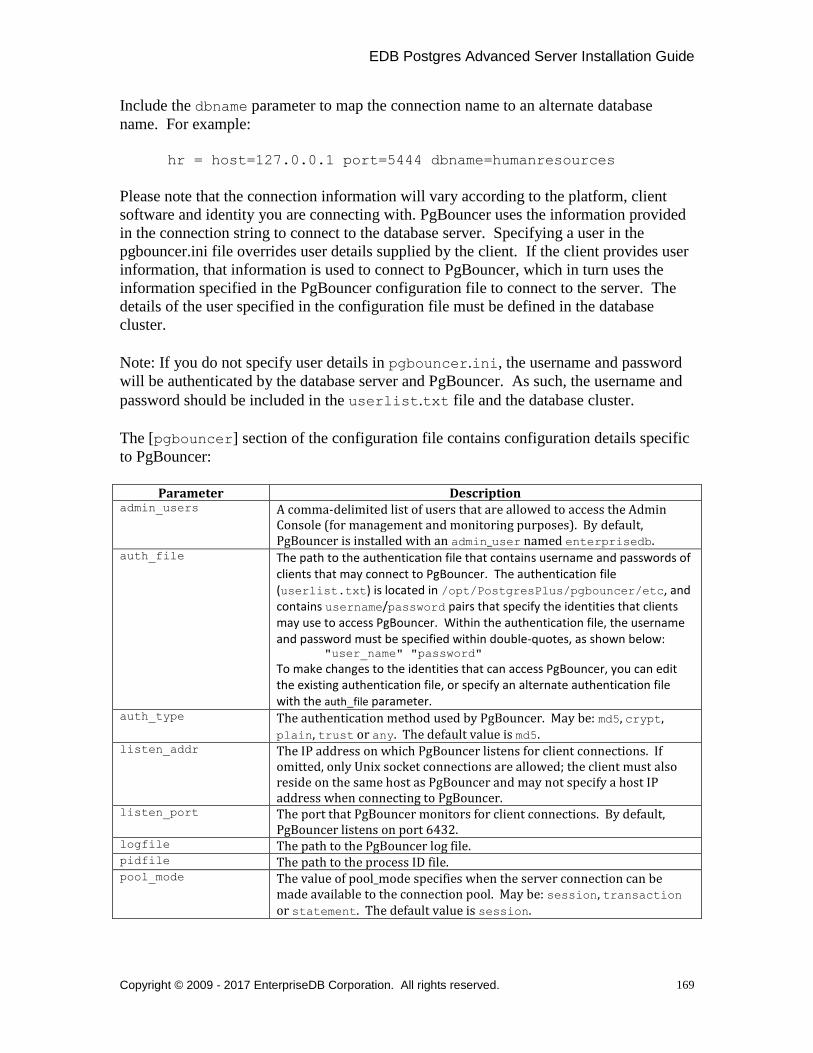
EDB Postgres Advanced Server Installation Guide
Copyright © 2009 - 2017 EnterpriseDB Corporation. All rights reserved.
169
Include the dbname parameter to map the connection name to an alternate database
name. For example:
hr = host=127.0.0.1 port=5444 dbname=humanresources
Please note that the connection information will vary according to the platform, client
software and identity you are connecting with. PgBouncer uses the information provided
in the connection string to connect to the database server. Specifying a user in the
pgbouncer.ini file overrides user details supplied by the client. If the client provides user
information, that information is used to connect to PgBouncer, which in turn uses the
information specified in the PgBouncer configuration file to connect to the server. The
details of the user specified in the configuration file must be defined in the database
cluster.
Note: If you do not specify user details in pgbouncer.ini, the username and password
will be authenticated by the database server and PgBouncer. As such, the username and
password should be included in the userlist.txt file and the database cluster.
The [pgbouncer] section of the configuration file contains configuration details specific
to PgBouncer:
Parameter Description admin_users A comma-delimited list of users that are allowed to access the Admin
Console (for management and monitoring purposes). By default, PgBouncer is installed with an admin_user named enterprisedb.
auth_file The path to the authentication file that contains username and passwords of clients that may connect to PgBouncer. The authentication file (userlist.txt) is located in /opt/PostgresPlus/pgbouncer/etc, and contains username/password pairs that specify the identities that clients may use to access PgBouncer. Within the authentication file, the username and password must be specified within double-quotes, as shown below:
"user_name" "password"
To make changes to the identities that can access PgBouncer, you can edit the existing authentication file, or specify an alternate authentication file with the auth_file parameter.
auth_type The authentication method used by PgBouncer. May be: md5, crypt, plain, trust or any. The default value is md5.
listen_addr The IP address on which PgBouncer listens for client connections. If omitted, only Unix socket connections are allowed; the client must also reside on the same host as PgBouncer and may not specify a host IP address when connecting to PgBouncer.
listen_port The port that PgBouncer monitors for client connections. By default, PgBouncer listens on port 6432.
logfile The path to the PgBouncer log file. pidfile The path to the process ID file. pool_mode The value of pool_mode specifies when the server connection can be
made available to the connection pool. May be: session, transaction or statement. The default value is session.

EDB Postgres Advanced Server Installation Guide
Copyright © 2009 - 2017 EnterpriseDB Corporation. All rights reserved.
170
The following example demonstrates the syntax allowed in the [pgbouncer] section of
the configuration file:
[pgbouncer]
logfile = /var/log/pgbouncer-1.6/pgbouncer.log
pidfile = /var/run/pgbouncer-1.6/pgbouncer-1.6.pid
listen_addr = *
listen_port = 6432
auth_type = md5
auth_file = /opt/PostgresPlus/PgBouncer-1.6/etc/userlist.txt
admin_users = enterprisedb
pool_mode = session
After editing the PgBouncer configuration file to reflect your environment, you must
restart the PgBouncer service for the changes to take effect. For detailed information
about controlling the PgBouncer service, see Section 5.
Using the PgBouncer Admin Console
The Admin Console allows you to retrieve statistical information about PgBouncer
activity, and to control the PgBouncer process. You can use the psql client to access the
PgBouncer Admin Console by connecting to the pgbouncer database. The following
example connects to the pgbouncer database with the psql client on a Linux system.
PgBouncer is listening on port 6432, with a user name of enterprisedb:
# ./psql -p 6432 -U enterprisedb pgbouncer
Please note that the required connection information will vary according to the
connecting client, platform and authentication information required by the server.
After connecting to the pgbouncer database, you can use the SHOW CLIENTS command
to retrieve client-related information:
# SHOW CLIENTS;
The SHOW CLIENTS command returns:
--[ RECORD 1]-+--------------------
type | C
user | postgres
database | pgbouncer
state | active
addr | unix
port | 6432
local_addr | unix
local_port | 6432
connect_time | 2010-05-25 05:26:20
request_time | 2010-05-25 05:39:46

EDB Postgres Advanced Server Installation Guide
Copyright © 2009 - 2017 EnterpriseDB Corporation. All rights reserved.
171
ptr | 0x8655d20
link |
You can use other variations of the SHOW command to retrieve information about
PgBouncer:
SHOW STATS
SHOW SERVERS
SHOW POOLS
SHOW LISTS
SHOW USERS
SHOW DATABASES
SHOW FDS
SHOW CONFIG
You can use the following commands to control the PgBouncer process:
PAUSE
Use the PAUSE command to disconnect all servers after waiting for current
queries to complete.
SUSPEND
Use the SUSPEND command to flush the socket buffers and suspend the
PgBouncer process.
RESUME
Use the RESUME command to resume work after a PAUSE or SUSPEND command.
SHUTDOWN
Use the SHUTDOWN command to stop the PgBouncer process and exit.
RELOAD
Use the RELOAD command to reload the PgBouncer configuration files.
For more information about using PgBouncer, visit:
http://pgbouncer.projects.pgfoundry.org/doc/usage.html

EDB Postgres Advanced Server Installation Guide
Copyright © 2009 - 2017 EnterpriseDB Corporation. All rights reserved.
172
7.7 pgpool-II
Unless otherwise noted, the commands and paths noted in the following section assume
that you have performed an installation with the interactive installer.
The pgpool-II utility package acts as a middleman between client applications and Server
database servers. pgpool-II functionality is transparent to client applications; client
applications connect to pgpool-II instead of directly to Advanced Server, and pgpool-II
manages the connection. EnterpriseDB supports the following pgpool-II features:
Load balancing
Connection pooling
High availability
Connection limits
pgpool-II runs as a service on Linux systems, and is not supported on Windows systems.
pgpool-II functionality is controlled via configuration parameter settings made in the
configuration files. If you have used the graphical installer, the configuration files are
located in:
/opt/PostgresPlus/pgpool-II-3.4/etc/pgpool.conf
/opt/PostgresPlus/pgpool-II-3.4/etc/pool_hba.conf
/opt/PostgresPlus/pgpool-II-3.4/etc/pcp.conf
If you have used an RPM package to install pgpool-II, the configuration files are located
in:
/etc/ppas-pgpool34/pgpool.conf
/etc/ppas-pgpool34/pool_hba.conf
/etc/ppas-pgpool34/pcp.conf
After modifying the parameter settings that implement pgpool-II functionality for your
installation, you must restart the pgpool service. For detailed information about
controlling the pgpool service, see Section 5.
Please note that the configuration options for pgpool-II are extensive; the options listed
below should be considered a starting point only. For more information about
configuring and using pgpool-II, please consult the project website at:
http://www.pgpool.net/mediawiki/index.php/Main_Page
EDB Postgres Advanced Server Installation Guide
Copyright © 2009 - 2017 EnterpriseDB Corporation. All rights reserved.
173
pgpool-II Host Setup
When pgpool-II starts, it records its process ID in a file whose name is determined by the
pid_file_name configuration parameter. The initial value of the pid_file_name
parameter in the sample file is:
pid_file_name = '/var/run/pgpool/pgpool.pid'
Please note that the contents of the /var/run directory (including the pgpool directory)
may be removed by the operating system during a reboot. The /var/run/pgpool
directory should NOT be used as the location for the pgpool.pid file.
Modify the pid_file_name parameter to specify a safer directory location. For
example:
pid_file_name = '/var/run/ppas-pgpool34/ppas-pgpool34.pid'
The /var/run directory will persist after a system reboot, and if removed by the
operating system, the pgpool.pid file will be recreated by pgpool-II upon startup.
Configuring Connection Pooling
pgpool-II provides a set of child processes that maintain cached connections to one or
more database servers. When a client connects, pgpool-II attempts to reuse a connection
from its pool, thus avoiding the overhead of opening and closing client connections.
A connection in the pool can be reused only if the target database and the connection user
match a prior connection that is currently in the pool. Connection pooling configuration
options (such as the number of child processes, and the maximum number of cached
connections per child) are specified in the pgpool.conf file.
To configure connection pooling with one database server:
1. Configure the pg_hba.conf file on the pgpool host to permit connections
between the clients and the server.
2. Copy the pgpool.conf.sample file to pgpool.conf, and modify the file,
setting the connection_cache parameter to on, and specifying connection
properties for your database server.
For example:
connection_cache = on
backend_hostname0 = 'localhost'
backend_port0 = 5444
EDB Postgres Advanced Server Installation Guide
Copyright © 2009 - 2017 EnterpriseDB Corporation. All rights reserved.
174
backend_weight0 = 1
backend_data_directory0 = '/opt/PostgresPlus/9.5AS/data'
Note that in the pgpool.conf file, connection parameters have an appended digit
that specifies a cluster node identifier. Database node 0 specifies values for the
master node.
3. Optionally, configure pgpool-II client authentication.
4. Optionally, configure the PCP administrative interface.
5. Start pgpool-II and begin using your application.
Configuring Streaming Replication and pgpool-II Load Balancing
EnterpriseDB supports replication scenarios that use pgpool-II load balancing with
PostgreSQL streaming replication or Slony replication. The supported replication
methods ensure that database updates made by client applications are applied to multiple
backend servers. For detailed information about the benefits of each replication method
and detailed configuration instructions, please review project documentation for each
utility.
When load balancing is enabled, pgpool-II distributes some types of SELECT statements
to backend servers, allowing multiple database servers and hosts to share the processing
load of SELECT statements issued by client applications.
When configuring pgpool-II load balancing, it is crucial that the initial database
environments in all backend servers are identical:
Tables must have the same name, definition, and row content.
Schemas must exist in each backend application database.
Roles and privileges must be comparably configured on each backend server to
ensure that the result set of SQL statements are identical on all servers.
If you use password authentication, the same password must be assigned to an
associated user name on each database server. The same user name/password pair is used
to connect pgpool-II to each backend connection.
Within a replication scenario, each backend is uniquely identified by the host name (or IP
address) and port number on which the database server instance is listening for
connections. You must ensure that the pool_hba.conf and pg_hba.conf files allow
a connection between that server and the host on which pgpool-II will be running.

EDB Postgres Advanced Server Installation Guide
Copyright © 2009 - 2017 EnterpriseDB Corporation. All rights reserved.
175
The following example demonstrates how to implement pgpool-II load balancing with
two servers (the master and replica nodes) in a Streaming Replication scenario.
Configuring pgpool-II load balancing for a Slony replication scenario is similar; please
consult the Slony documentation for information about configuring Slony replication.
Step 1 - Configuring the Master Node of the Replication Scenario
Open an SSH session with the master node of the replication scenario, and modify the
pg_hba.conf file (located in the /opt/PostgresPlus/9.5AS/data directory),
adding connection information for the replication user (in the example that follows,
edbrepuser resides on a standby node with an IP address of 107.178.217.178):
host replication edbrepuser 107.178.217.178/32 md5
The connection information should specify the address of the standby node of the
replication scenario, and your preferred authentication method.
Modify the postgresql.conf file (located in /opt/PostgresPlus/9.5AS/data),
adding the following replication parameter and values to the end of the file:
wal_level = hot_standby
max_wal_senders = 3
checkpoint_segments = 8
wal_keep_segments = 8
Save the configuration file, and issue the following command in the OS Terminal
window to restart the server:
/etc/init.d/ppas-9.5 restart
Use the sudo su - command to assume the identity of the enterprisedb database
superuser:
sudo su - enterprisedb
Then, start a psql session, connecting to the edb database:
psql -d edb
At the psql command line, create a user with the replication attribute:
CREATE ROLE edbrepuser WITH REPLICATION LOGIN PASSWORD
'password';

EDB Postgres Advanced Server Installation Guide
Copyright © 2009 - 2017 EnterpriseDB Corporation. All rights reserved.
176
Step 2 - Configuring the Standby Node of the Replication Scenario
Open an SSH session with the Standby server, and assume the identity of the database
superuser (enterprisedb):
sudo su - enterprisedb
With your choice of editor, create a .pgpass file in the home directory of the
enterprisedb user. The .pgpass file holds the password of the replication user in
plain-text form; if you are using a .pgpass file, you should ensure that only trusted
users have access to the .pgpass file:
Add an entry that specifies connection information for the replication user:
*:5444:*:edbrepuser:password
The server will enforce restrictive permissions on the .pgpass file; use the following
command to set the file permissions:
chmod 600 .pgpass
Relinquish the identity of the database superuser:
exit
Then, assume superuser privileges:
sudo su -
Use your platform-specific command to stop the database server before replacing the
data directory on the Standby node with the data directory of the Master node. For
information about controlling the service, see Section 5.
Then, delete the data directory on the Standby node:
rm -rf /opt/PostgresPlus/9.5AS/data
After deleting the existing data directory, use the pg_basebackup utility to copy the
data directory of the Master node to the Standby:
pg_basebackup --pgdata=/opt/PostgresPlus/9.5AS/data
--format=p --label=standby --host=146.148.46.44
--username=edbrepuser --password --xlog-method=stream
The call to pg_basebackup specifies the IP address of the Master node and the name of
the replication user created on the Master node.

EDB Postgres Advanced Server Installation Guide
Copyright © 2009 - 2017 EnterpriseDB Corporation. All rights reserved.
177
For more information about the options available with the pg_basebackup utility, see
the PostgreSQL core documentation at:
https://www.postgresql.org/docs/9.5/static/app-pgbasebackup.html
When prompted by pg_basebackup, provide the password associated with the
replication user.
After copying the data directory, change ownership of the directory to the database
superuser (enterprisedb):
chown -R enterprisedb /opt/PostgresPlus/9.5AS/data
Navigate into the data directory:
cd /opt/PostgresPlus/9.5AS/data
With your choice of editor, create a file named recovery.conf( in the
/opt/PostgresPlus/9.5AS/data directory) that includes:
standby_mode = on
trigger_file = /tmp/trigger_file
primary_conninfo = 'host=146.148.46.44 port=5444
user=edbrepuser password=password'
Please note: the primary_conninfo parameter specifies connection information for the
replication user on the master node of the replication scenario (in our example,
edbrepuser resides on 146.148.46.44).
Change ownership of the recovery.conf file to enterprisedb:
chown enterprisedb:enterprisedb recovery.conf
Modify the postgresql.conf file (located in /opt/PostgresPlus/9.5AS/data),
specifying the following values at the end of the file:
wal_level = hot_standby
hot_standby = on
The data file has been copied from the Master node, and will contain the replication
parameters specified previously.
Then, restart the server:
/etc/init.d/ppas-9.5 start
At this point, the Master node will be replicating data to the Standby node.
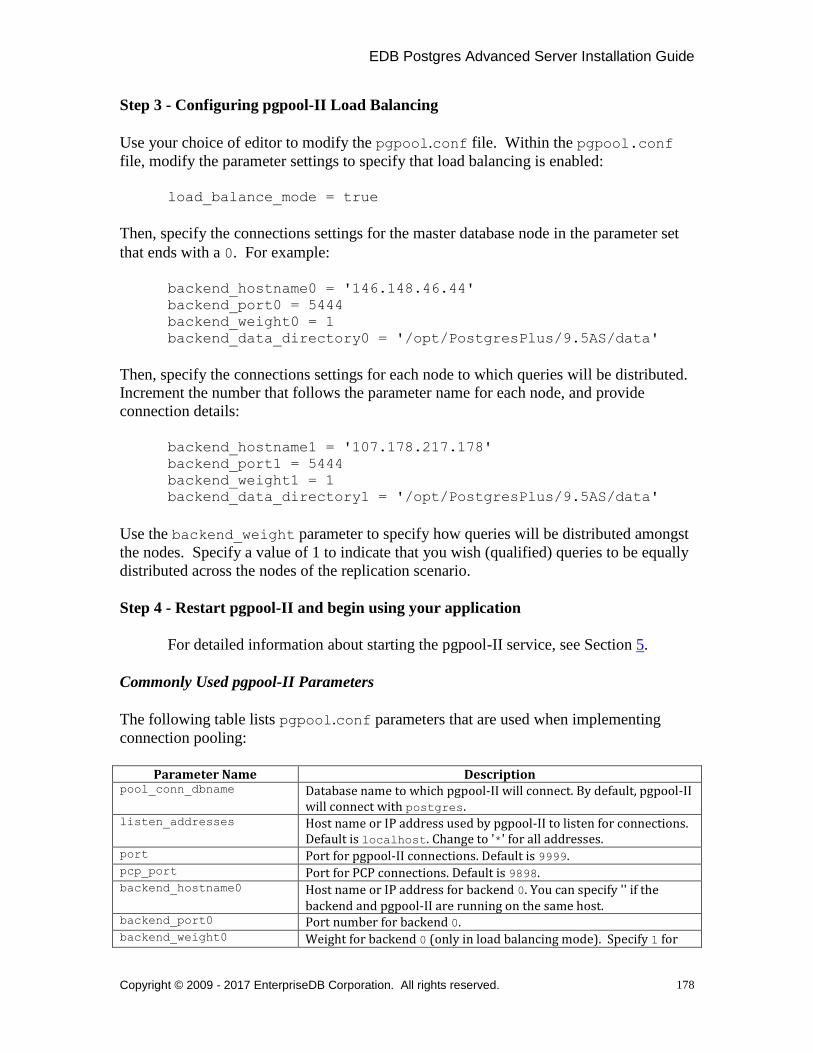
EDB Postgres Advanced Server Installation Guide
Copyright © 2009 - 2017 EnterpriseDB Corporation. All rights reserved.
178
Step 3 - Configuring pgpool-II Load Balancing
Use your choice of editor to modify the pgpool.conf file. Within the pgpool.conf
file, modify the parameter settings to specify that load balancing is enabled:
load_balance_mode = true
Then, specify the connections settings for the master database node in the parameter set
that ends with a 0. For example:
backend_hostname0 = '146.148.46.44'
backend_port0 = 5444
backend_weight0 = 1
backend_data_directory0 = '/opt/PostgresPlus/9.5AS/data'
Then, specify the connections settings for each node to which queries will be distributed.
Increment the number that follows the parameter name for each node, and provide
connection details:
backend_hostname1 = '107.178.217.178'
backend_port1 = 5444
backend_weight1 = 1
backend_data_directory1 = '/opt/PostgresPlus/9.5AS/data'
Use the backend_weight parameter to specify how queries will be distributed amongst
the nodes. Specify a value of 1 to indicate that you wish (qualified) queries to be equally
distributed across the nodes of the replication scenario.
Step 4 - Restart pgpool-II and begin using your application
For detailed information about starting the pgpool-II service, see Section 5.
Commonly Used pgpool-II Parameters
The following table lists pgpool.conf parameters that are used when implementing
connection pooling:
Parameter Name Description pool_conn_dbname Database name to which pgpool-II will connect. By default, pgpool-II
will connect with postgres. listen_addresses Host name or IP address used by pgpool-II to listen for connections.
Default is localhost. Change to '*' for all addresses. port Port for pgpool-II connections. Default is 9999. pcp_port Port for PCP connections. Default is 9898. backend_hostname0 Host name or IP address for backend 0. You can specify '' if the
backend and pgpool-II are running on the same host. backend_port0 Port number for backend 0. backend_weight0 Weight for backend 0 (only in load balancing mode). Specify 1 for
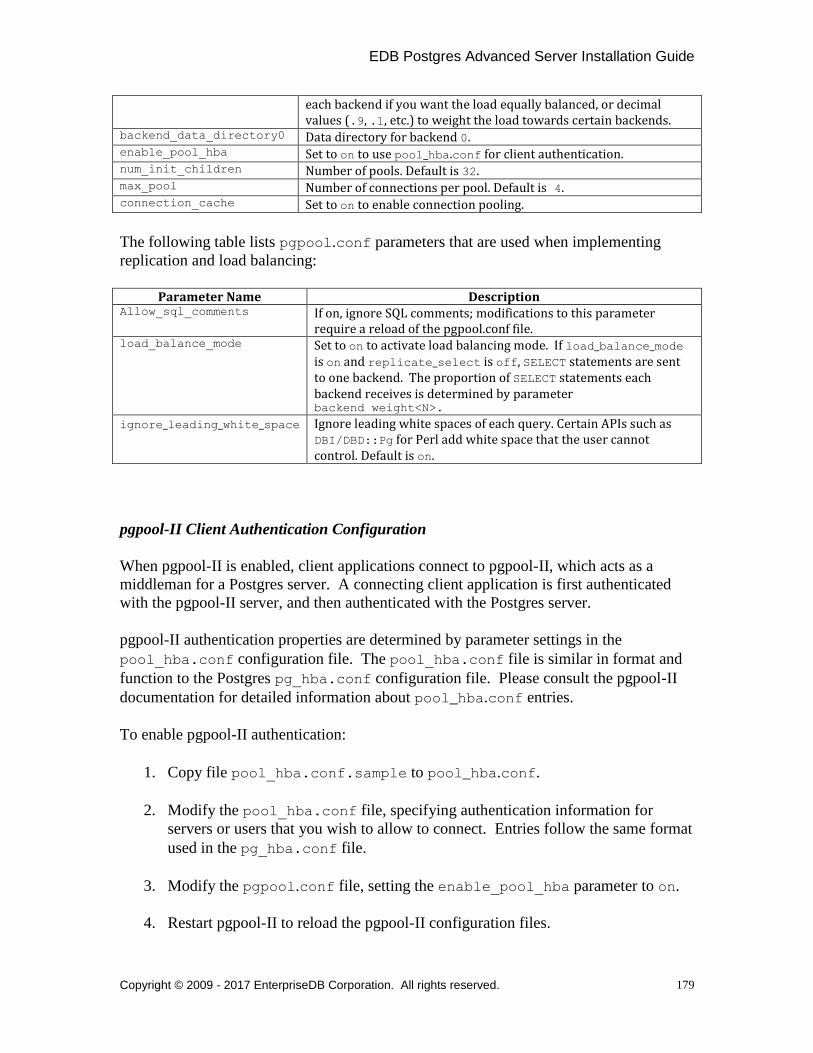
EDB Postgres Advanced Server Installation Guide
Copyright © 2009 - 2017 EnterpriseDB Corporation. All rights reserved.
179
each backend if you want the load equally balanced, or decimal values (.9, .1, etc.) to weight the load towards certain backends.
backend_data_directory0 Data directory for backend 0. enable_pool_hba Set to on to use pool_hba.conf for client authentication. num_init_children Number of pools. Default is 32. max_pool Number of connections per pool. Default is 4. connection_cache Set to on to enable connection pooling.
The following table lists pgpool.conf parameters that are used when implementing
replication and load balancing:
Parameter Name Description Allow_sql_comments If on, ignore SQL comments; modifications to this parameter
require a reload of the pgpool.conf file. load_balance_mode Set to on to activate load balancing mode. If load_balance_mode
is on and replicate_select is off, SELECT statements are sent to one backend. The proportion of SELECT statements each backend receives is determined by parameter backend_weight<N>.
ignore_leading_white_space Ignore leading white spaces of each query. Certain APIs such as DBI/DBD::Pg for Perl add white space that the user cannot control. Default is on.
pgpool-II Client Authentication Configuration
When pgpool-II is enabled, client applications connect to pgpool-II, which acts as a
middleman for a Postgres server. A connecting client application is first authenticated
with the pgpool-II server, and then authenticated with the Postgres server.
pgpool-II authentication properties are determined by parameter settings in the
pool_hba.conf configuration file. The pool_hba.conf file is similar in format and
function to the Postgres pg_hba.conf configuration file. Please consult the pgpool-II
documentation for detailed information about pool_hba.conf entries.
To enable pgpool-II authentication:
1. Copy file pool_hba.conf.sample to pool_hba.conf.
2. Modify the pool_hba.conf file, specifying authentication information for
servers or users that you wish to allow to connect. Entries follow the same format
used in the pg_hba.conf file.
3. Modify the pgpool.conf file, setting the enable_pool_hba parameter to on.
4. Restart pgpool-II to reload the pgpool-II configuration files.

EDB Postgres Advanced Server Installation Guide
Copyright © 2009 - 2017 EnterpriseDB Corporation. All rights reserved.
180
Note: user names and passwords specified in the pool_hba.conf file will be used for
authentication with the database server; you must also specify those user names and
passwords in the database server's pg_hba.conf file.
Connecting a Client to pgpool-II
Client applications should connect directly to the pgpool-II listener port on the pgpool-II
host. For example, to connect to the edb database (while using pgpool-II functionality),
enter:
psql -d edb -U enterprisedb -h localhost -p 9999
When invoked at the psql prompt, the following SHOW command keywords will display
pgpool-II information:
Command Information Provided SHOW pool_status Displays pgpool-II configuration parameters and their name,
value, and description. SHOW pool_nodes Displays a list of all configured nodes. SHOW pool_processes Displays a list of all pgpool-II processes waiting for connections or
dealing with a connection. SHOW pool_pools Displays a list of pools. SHOW pool_version Displays the pgpool-II release number.
PCP Configuration
PCP is an administrative interface for pgpool-II that allows you to retrieve information
about database nodes, pgpool-II child processes, etc. You should issue PCP commands
from the Linux command line.
Before using PCP commands, you must modify the pcp.conf file, providing user names
and passwords that you supply whenever you issue a PCP command. The user names in
the pcp.conf file are completely independent of the database server user names and
passwords.
Use the following steps to enable PCP:
1. Copy the pcp.conf.sample file to pcp.conf.
2. Add an entry to the pcp.conf file of the following form:
username:md5_password
where:
username is a PCP user name.

EDB Postgres Advanced Server Installation Guide
Copyright © 2009 - 2017 EnterpriseDB Corporation. All rights reserved.
181
md5_password is the PCP password in md5 format
You can use the pg_md5 program to generate the encrypted password from the
clear-text form as shown below:
$ pg_md5 mypassword
34819d7beeabb9260a5c854bc85b3e44
For example, the entry in the pcp.conf file for a PCP user named pcpuser with
the password of mypassword is:
# USERID:MD5PASSWD
pcpuser:34819d7beeabb9260a5c854bc85b3e44
3. Restart the pgpool service. For information about restarting the pgpool service,
see Section 5.
4. When issuing a PCP command, specify the PCP user name and the unencrypted
form of the password:
$ pcp_node_info 5 localhost 9898 pcpuser mypassword 0
localhost 5432 1 1.000000
After configuring PCP, you can use PCP commands to control pgpool-II and retrieve
information. Specify the following arguments when calling PCP commands:
Argument Description timeout Timeout value in seconds. PCP will disconnect if pgpool-II does not respond
within the specified number of seconds. host The name of the pgpool-II host. port The PCP port number; the default value is 9898. username The PCP user name (as specified in pcp.conf.) password The password associated with the user name (as specified in pcp.conf).
PCP recognizes the following commands:
PCP Command Description pcp_node_count timeout host port
username password Total number of nodes defined in pgpool.conf
pcp_node_info timeout host port
username password nodeid Displays information on the node given by <nodeid>
pcp_proc_count timeout host port
username password Displays the pgpool-II child process IDs
pcp_proc_info timeout host port Displays information on the pgpool-II child process
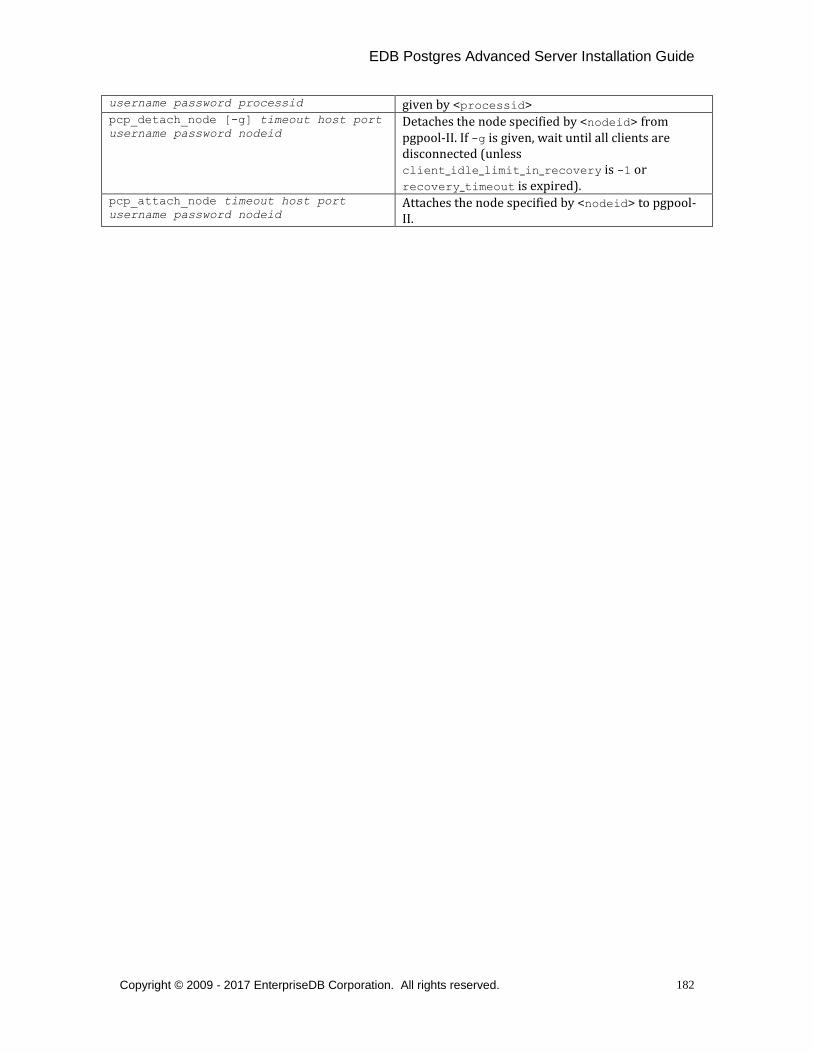
EDB Postgres Advanced Server Installation Guide
Copyright © 2009 - 2017 EnterpriseDB Corporation. All rights reserved.
182
username password processid given by <processid> pcp_detach_node [-g] timeout host port
username password nodeid Detaches the node specified by <nodeid> from pgpool-II. If -g is given, wait until all clients are disconnected (unless client_idle_limit_in_recovery is -1 or recovery_timeout is expired).
pcp_attach_node timeout host port
username password nodeid Attaches the node specified by <nodeid> to pgpool-II.

EDB Postgres Advanced Server Installation Guide
Copyright © 2009 - 2017 EnterpriseDB Corporation. All rights reserved.
183
7.8 pgsnmpd
pgsnmpd is an SNMP agent that can return hierarchical information about the current
state of Advanced Server on a Linux system. pgsnmpd is distributed with and installed
by the Advanced Server installer as part of the Database Server component. The
pgsnmpd agent can operate as a stand-alone SNMP agent, as a pass-through sub-agent, or
as an AgentX sub-agent.
After installing Advanced Server, you will need to update the LD_LIBRARY_PATH
variable. Use the command:
$export LD_LIBRARY_PATH=/opt/PostgresPlus/9.xAS/lib:$LD_LIBRARY_PATH
Where x specifies the server version.
This command does not persistently alter the value of LD_LIBRARY_PATH; consult the
documentation for your distribution of Linux for information about persistently setting
the value of LD_LIBRARY_PATH.
The examples that follow demonstrate the simplest usage of pgsnmpd, implementing read
only access. pgsnmpd is based on the net-snmp library; for more information about net-
snmp, please visit:
http://net-snmp.sourceforge.net
Configuring pgsnmpd
The pgsnmpd configuration file is named snmpd.conf. For information about the
directives that you can specify in the configuration file, please review the snmpd.conf
man page (man snmpd.conf).
You can create the configuration file by hand, or you can use the snmpconf perl script to
create the configuration file. The perl script is distributed with net-snmp package. net-
snmp is an open-source package available from:
http://www.net-snmp.org
To use the snmpconf configuration file wizard, download and install net-snmp. When the
installation completes, open a command line and enter:
snmpconf
When the configuration file wizard opens, it may prompt you to read in an existing
configuration file. Enter none to generate a new configuration file (not based on a
previously existing configuration file).

EDB Postgres Advanced Server Installation Guide
Copyright © 2009 - 2017 EnterpriseDB Corporation. All rights reserved.
184
snmpconf is a menu-driven wizard. Select menu item 1: snmpd.conf to start the
configuration wizard. As you select each top-level menu option displayed by snmpconf,
the wizard walks through a series of questions, prompting you for information required to
build the configuration file. When you have provided information in each of the category
relevant to your system, enter Finished to generate a configuration file named
snmpd.conf. Copy the file to:
/opt/PostgresPlus/9.xAS/share
Where x specifies the server version.
Setting the Listener address
By default, pgsnmpd listens on port 161. If the listener port is already being used by
another service, you may receive the following error:
Error opening specified endpoint "udp:161".
You can specify an alternate listener port by adding the following line to your
snmpd.conf file:
agentaddress $host_address:2000
The example instructs pgsnmpd to listen on UDP port 2000, where $host_address is
the IP address of the server (e.g. 127.0.0.1).
Invoking pgsnmpd
Ensure that an instance of Advanced Server is up and running (pgsnmpd will connect to
this server). Open a command line and assume super-user privileges, before invoking
pgsnmpd with a command that takes the following form:
path_to_PPAS/bin/pgsnmpd -b -c path_to_PPAS/share/snmpd.conf -C
"user=enterprisedb dbname=edb password=safe_password port=5444"
Where path_to_PPAS specifies the Advanced Server installation directory.
Include the -b option to specify that pgsnmpd should run in the background.
Include the -c option, specifying the path and name of the pgsnmpd configuration file.
Include connection information for your installation of Advanced Server (in the form of a
libpq connection string) after the -C option.

EDB Postgres Advanced Server Installation Guide
Copyright © 2009 - 2017 EnterpriseDB Corporation. All rights reserved.
185
Viewing pgsnmpd Help
Include the --help option when invoking the pgsnmpd utility to view other pgsnmpd
command line options:
pgsnmpd --help Version PGSQL-SNMP-Ver1.0 usage: pgsnmpd [-s] [-b] [-c FILE ] [-x address ] [-g] [-C "Connect
String"] -s : run as AgentX sub-agent of an existing snmpd process -b : run in the background -c : configuration file name -g : use syslog -C : libpq connection string -x : address:port of a network interface -V : display version strings
Requesting information from pgsnmpd
You can use net-snmp commands to query the pgsnmpd service. For example:
snmpgetnext -v 2c -c public localhost .1.3.6.1.4.1.5432.1.4.2.1.1.0
In the above example:
-v 2c option instructs the snmpgetnext client to send the request in SNMP version 2c
format.
-c public specifies the community name.
localhost indicates the host machine running the pgsnmpd server.
.1.3.6.1.4.1.5432.1.4.2.1.1.0 is the identity of the requested object. To see a
list of all databases, increment the last digit by one (e.g. .1.1, .1.2, .1.3 etc.).
The encodings required to query any given object are defined in the MIB (Management
Information Base). An SNMP client can monitor a variety of servers; the server type
determines the information exposed by a given server. Each SNMP server describes the
exposed data in the form of a MIB (Management information base). By default,
pgsnmpd searches for MIB's in the following locations:
/usr/share/snmp/mibs
$HOME/.snmp/mibs
EDB Postgres Advanced Server Installation Guide
Copyright © 2009 - 2017 EnterpriseDB Corporation. All rights reserved.
186
7.9 PL/Java
The PL/Java package allows you to create and execute Java stored procedures, triggers
and functions via the JDBC interface. Unless otherwise noted, the commands and paths
noted in the following section assume that you have performed an installation with the
interactive installer.
Before installing PL/Java for use with a standard Java virtual machine (JVM) on a Linux
system, you must first confirm that a Java runtime environment (version 1.5 or later) is
installed on your system. Installation of a Java development kit also provides a Java
runtime environment.
7.9.1 Installing PL/Java on Linux
The following steps outline the process of installing PL/Java on a Linux system:
1. Edit the postgresql.conf file and add (or modify) the following settings:
pljava.classpath='path_to_PPAS/lib/pljava.jar'
Where path_to_PPAS specifies the location of the Advanced Server installation.
2. Restart the database server.
3. If your Java installation is not located in the system default location, you must
ensure that Advanced Server can locate the JRE shared libraries. To instruct the
server where to find the Java libraries, modify the Advanced Server service
startup script or the user profile, setting the path to the Java library.
Please note: If you include the command that sets the path in the service startup
script, any user that invokes the startup script will set the path when the service
restarts. If you include the command that sets the path in a user profile, the path
will only be set for the session that belongs to the user that connects using that
profile.
You can use your editor of choice to open the Advanced Server service script.
The script is named:
ppas-9.x
Open the script file, and add the following line to the beginning of the script:
{ export LD_LIBRARY_PATH=
<<path_to_libjvm.so>>:$LD_LIBRARY_PATH }
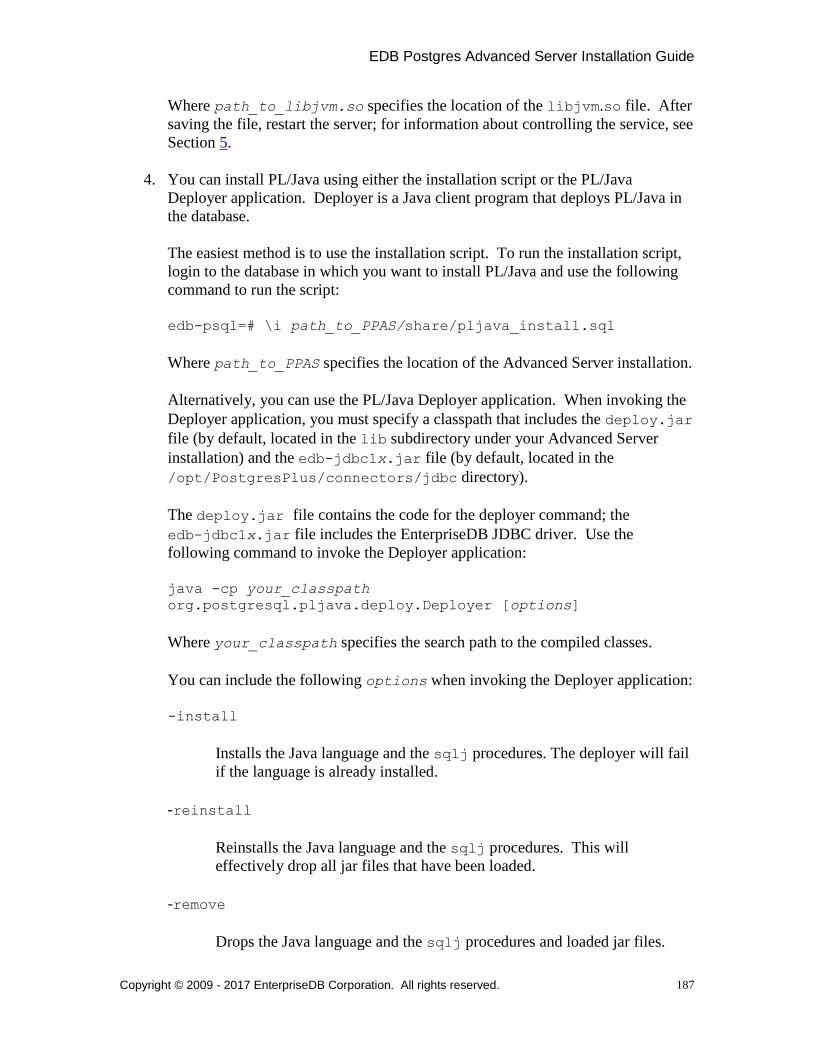
EDB Postgres Advanced Server Installation Guide
Copyright © 2009 - 2017 EnterpriseDB Corporation. All rights reserved.
187
Where path_to_libjvm.so specifies the location of the libjvm.so file. After
saving the file, restart the server; for information about controlling the service, see
Section 5.
4. You can install PL/Java using either the installation script or the PL/Java
Deployer application. Deployer is a Java client program that deploys PL/Java in
the database.
The easiest method is to use the installation script. To run the installation script,
login to the database in which you want to install PL/Java and use the following
command to run the script:
edb-psql=# \i path_to_PPAS/share/pljava_install.sql
Where path_to_PPAS specifies the location of the Advanced Server installation.
Alternatively, you can use the PL/Java Deployer application. When invoking the
Deployer application, you must specify a classpath that includes the deploy.jar
file (by default, located in the lib subdirectory under your Advanced Server
installation) and the edb-jdbc1x.jar file (by default, located in the
/opt/PostgresPlus/connectors/jdbc directory).
The deploy.jar file contains the code for the deployer command; the
edb-jdbc1x.jar file includes the EnterpriseDB JDBC driver. Use the
following command to invoke the Deployer application:
java -cp your_classpath
org.postgresql.pljava.deploy.Deployer [options]
Where your_classpath specifies the search path to the compiled classes.
You can include the following options when invoking the Deployer application:
-install
Installs the Java language and the sqlj procedures. The deployer will fail
if the language is already installed.
-reinstall
Reinstalls the Java language and the sqlj procedures. This will
effectively drop all jar files that have been loaded.
-remove
Drops the Java language and the sqlj procedures and loaded jar files.

EDB Postgres Advanced Server Installation Guide
Copyright © 2009 - 2017 EnterpriseDB Corporation. All rights reserved.
188
-user user_name
user_name specifies the name of the user that is connecting to the
database. Default is the current user.
-password password
password specifies the password of the user that is connecting to the
database. Default is no password.
-database database
database specifies the name of the database to which to connect. The
default value is edb.
-host host_name
host_name specifies the name of the host. The default value is
localhost.
-port port_number
port_number specifies the Advanced Server port number. The default
value is 5444.
The following example uses the Deployer application to install PL/Java:
java -cp /opt/PostgresPlus/connectors/connectors/jdbc/edb-
jdbc16.jar:/opt/PostgresPlus/connectors/lib/deploy.jar
org.postgresql.pljava.deploy.Deployer -install -user
enterprisedb -password password -database edb -host
localhost -port 5444
Because of the complexity of this command line, we recommend storing the
command line in a shell script or a .bat script.
5. Open the psql client and connect to the database in which PL/Java is installed.
You can invoke the following command to display two rows indicating that Java
and "Java Untrusted" have been installed in the database:
select * from pg_language where lanname like 'java%';

EDB Postgres Advanced Server Installation Guide
Copyright © 2009 - 2017 EnterpriseDB Corporation. All rights reserved.
189
7.9.2 Installing PL/Java on Windows
The following steps outline the process of installing PL/Java on a Windows system:
1. Edit the postgresql.conf file and add (or modify) the following settings:
pljava.classpath='path_to_PPAS/lib/pljava.jar'
Where path_to_PPAS specifies the location of the Advanced Server installation.
2. Restart the database server.
3. Modify the PATH setting used by the edb-postmaster backend (if it runs as a
service, you will normally change the System Environment setting) so that it
contains the following two entries:
%JRE_HOME%\bin;%JRE_HOME%\bin\client
Where JRE_HOME specifies the installation directory of your Java runtime
environment. If you have a Java development kit, substitute the location of
$JDK_HOME/jre for JRE_HOME.
4. You can use either the installation script or the PL/Java Deployer application to
install PL/Java. Deployer is a Java client program that deploys PL/Java in the
database.
The easiest method is to use the installation script. To run the installation script,
login to the database in which you want to install PL/Java and use the following
command to run the script:
edb-psql=# \i path_to_PPAS/share/pljava_install.sql
Where path_to_PPAS specifies the location of the Advanced Server installation.
Alternatively, you can use the PL/Java Deployer application. When invoking the
Deployer application, you must specify a classpath that includes the deploy.jar
file (by default, located in the lib subdirectory under your Advanced Server
installation) and the edb-jdbc1x.jar file (located in the connectors/jdbc
subdirectory under your Advanced Server installation).
The deploy.jar file contains the code for the deployer command; the
edb-jdbc1x.jar file includes the EnterpriseDB JDBC driver. Use the
following command to invoke the Deployer application:
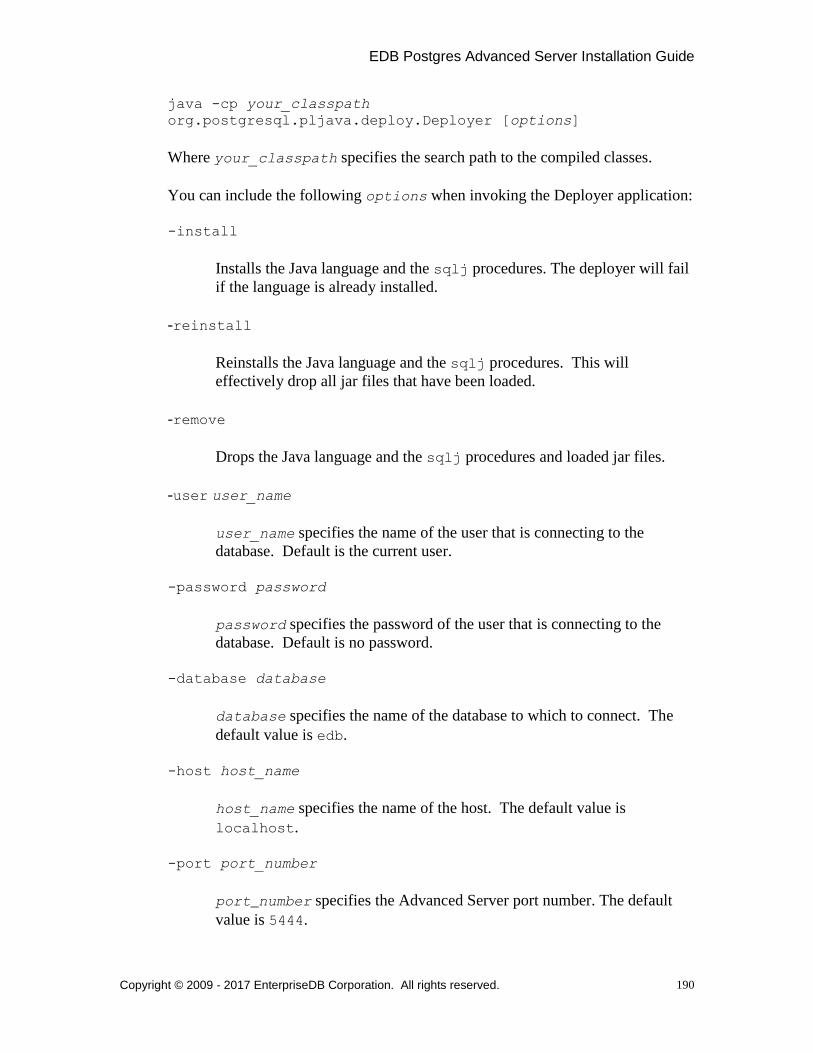
EDB Postgres Advanced Server Installation Guide
Copyright © 2009 - 2017 EnterpriseDB Corporation. All rights reserved.
190
java -cp your_classpath
org.postgresql.pljava.deploy.Deployer [options]
Where your_classpath specifies the search path to the compiled classes.
You can include the following options when invoking the Deployer application:
-install
Installs the Java language and the sqlj procedures. The deployer will fail
if the language is already installed.
-reinstall
Reinstalls the Java language and the sqlj procedures. This will
effectively drop all jar files that have been loaded.
-remove
Drops the Java language and the sqlj procedures and loaded jar files.
-user user_name
user_name specifies the name of the user that is connecting to the
database. Default is the current user.
-password password
password specifies the password of the user that is connecting to the
database. Default is no password.
-database database
database specifies the name of the database to which to connect. The
default value is edb.
-host host_name
host_name specifies the name of the host. The default value is
localhost.
-port port_number
port_number specifies the Advanced Server port number. The default
value is 5444.

EDB Postgres Advanced Server Installation Guide
Copyright © 2009 - 2017 EnterpriseDB Corporation. All rights reserved.
191
The following example uses the Deployer application to install PL/Java:
java -cp
"/opt/PostgresPlus/connectors\\connectors\\jdbc\\edb-
jdbc16.jar;/opt/PostgresPlus/connectors\\lib\\deploy.jar"
org.postgresql.pljava.deploy.Deployer -install -user
enterprisedb -password password -database edb -host
localhost -port 5444
Because of the complexity of this command line, we recommend storing the
command line in a shell script or a .bat script.
5. Open the psql client and connect to the database in which PL/Java is installed.
You can invoke the following command to display two rows indicating that Java
and "Java Untrusted" have been installed in the database:
select * from pg_language where lanname like 'java%';

EDB Postgres Advanced Server Installation Guide
Copyright © 2009 - 2017 EnterpriseDB Corporation. All rights reserved.
192
7.9.3 Using PL/Java
To create a PL/Java program, you must first create a Java class that contains at least one
static method, and then you must compile that class into a .class or .jar file. Next,
you declare the Java function within SQL using the CREATE FUNCTION command. The
CREATE FUNCTION command gives a SQL name to the function and associates the
compiled class (and method name) with that function name.
For example, the following CREATE FUNCTION statement creates a function names
getsysprop:
CREATE FUNCTION getsysprop(VARCHAR)
RETURNS VARCHAR
AS 'java.lang.System.getProperty'
LANGUAGE java;
SELECT getsysprop('user.home');
When invoked, getsysprop will execute the getProperty (static) method defined
within the java.lang.System class.
Creating and Installing a PL/Java Program
The example that follows demonstrates the procedures used to create and install a simple
HelloWorld program:
1. Save the following code sample to a file named HelloWorld.java
package com.mycompany.helloworld;
public class HelloWorld
{
public static String helloWorld()
{
return "Hello World";
}
}
2. Compile the file:
$ javac HelloWorld.java
and save it in a folder hierarchy as:
com/mycompany/helloworld/HelloWorld.class
3. Create an archive file (a JAR file) named helloworld.jar :
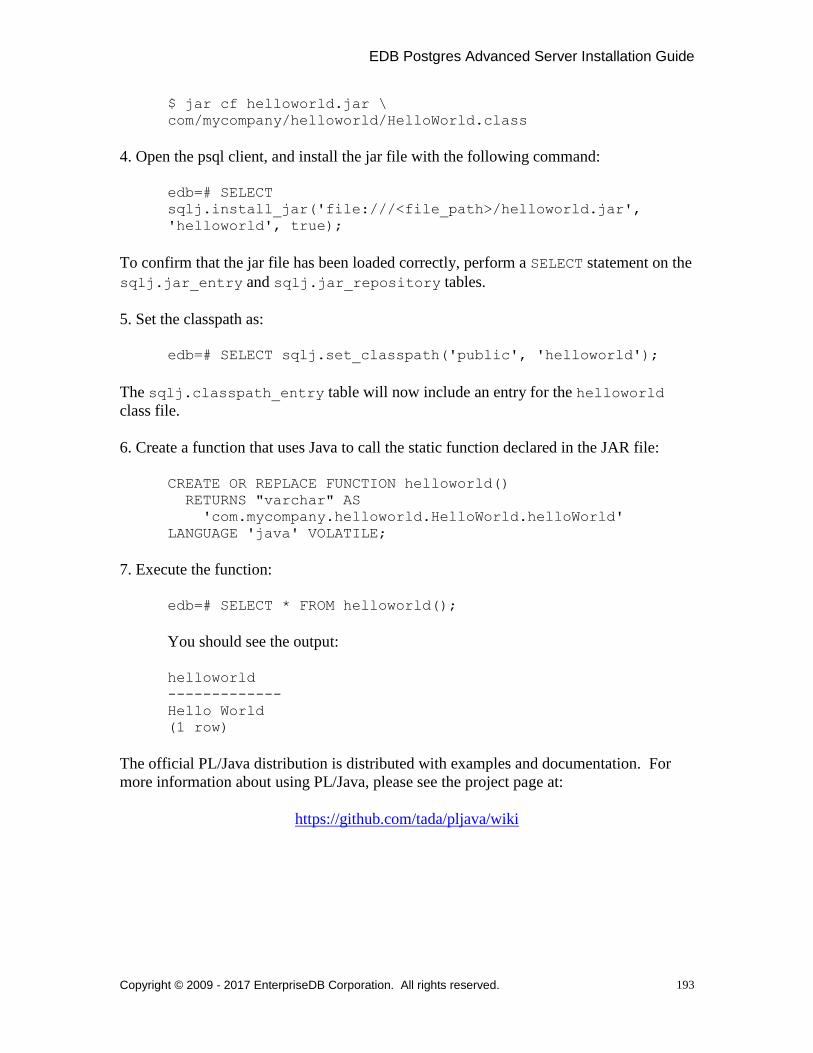
EDB Postgres Advanced Server Installation Guide
Copyright © 2009 - 2017 EnterpriseDB Corporation. All rights reserved.
193
$ jar cf helloworld.jar \
com/mycompany/helloworld/HelloWorld.class
4. Open the psql client, and install the jar file with the following command:
edb=# SELECT
sqlj.install_jar('file:///<file_path>/helloworld.jar',
'helloworld', true);
To confirm that the jar file has been loaded correctly, perform a SELECT statement on the
sqlj.jar_entry and sqlj.jar_repository tables.
5. Set the classpath as:
edb=# SELECT sqlj.set_classpath('public', 'helloworld');
The sqlj.classpath_entry table will now include an entry for the helloworld
class file.
6. Create a function that uses Java to call the static function declared in the JAR file:
CREATE OR REPLACE FUNCTION helloworld()
RETURNS "varchar" AS
'com.mycompany.helloworld.HelloWorld.helloWorld'
LANGUAGE 'java' VOLATILE;
7. Execute the function:
edb=# SELECT * FROM helloworld();
You should see the output:
helloworld
-------------
Hello World
(1 row)
The official PL/Java distribution is distributed with examples and documentation. For
more information about using PL/Java, please see the project page at:
https://github.com/tada/pljava/wiki
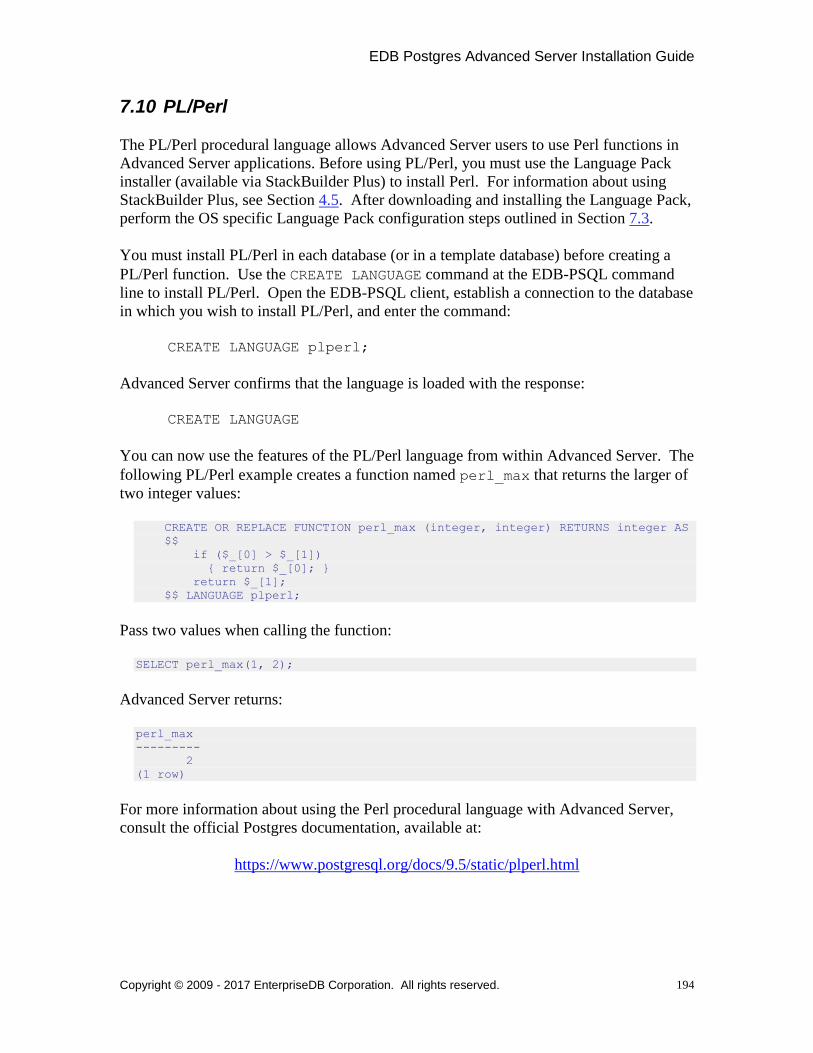
EDB Postgres Advanced Server Installation Guide
Copyright © 2009 - 2017 EnterpriseDB Corporation. All rights reserved.
194
7.10 PL/Perl
The PL/Perl procedural language allows Advanced Server users to use Perl functions in
Advanced Server applications. Before using PL/Perl, you must use the Language Pack
installer (available via StackBuilder Plus) to install Perl. For information about using
StackBuilder Plus, see Section 4.5. After downloading and installing the Language Pack,
perform the OS specific Language Pack configuration steps outlined in Section 7.3.
You must install PL/Perl in each database (or in a template database) before creating a
PL/Perl function. Use the CREATE LANGUAGE command at the EDB-PSQL command
line to install PL/Perl. Open the EDB-PSQL client, establish a connection to the database
in which you wish to install PL/Perl, and enter the command:
CREATE LANGUAGE plperl;
Advanced Server confirms that the language is loaded with the response:
CREATE LANGUAGE
You can now use the features of the PL/Perl language from within Advanced Server. The
following PL/Perl example creates a function named perl_max that returns the larger of
two integer values:
CREATE OR REPLACE FUNCTION perl_max (integer, integer) RETURNS integer AS
$$
if ($_[0] > $_[1])
{ return $_[0]; }
return $_[1];
$$ LANGUAGE plperl;
Pass two values when calling the function:
SELECT perl_max(1, 2);
Advanced Server returns:
perl_max
---------
2
(1 row)
For more information about using the Perl procedural language with Advanced Server,
consult the official Postgres documentation, available at:
https://www.postgresql.org/docs/9.5/static/plperl.html
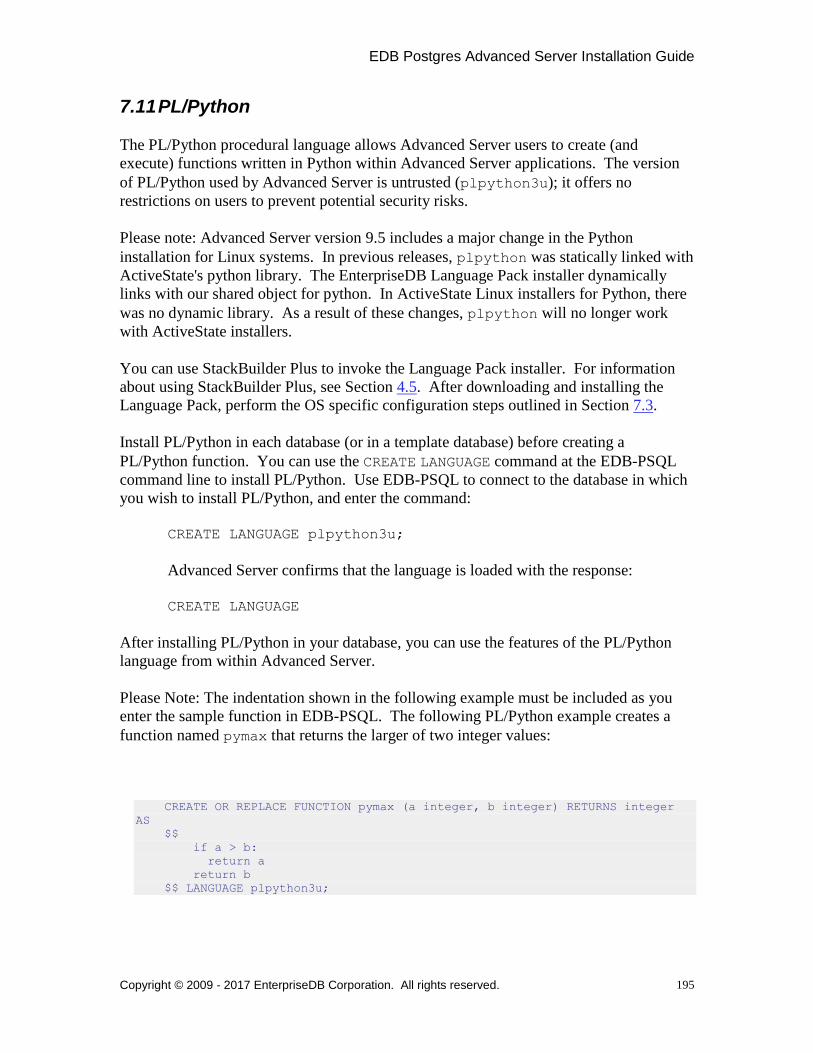
EDB Postgres Advanced Server Installation Guide
Copyright © 2009 - 2017 EnterpriseDB Corporation. All rights reserved.
195
7.11 PL/Python
The PL/Python procedural language allows Advanced Server users to create (and
execute) functions written in Python within Advanced Server applications. The version
of PL/Python used by Advanced Server is untrusted (plpython3u); it offers no
restrictions on users to prevent potential security risks.
Please note: Advanced Server version 9.5 includes a major change in the Python
installation for Linux systems. In previous releases, plpython was statically linked with
ActiveState's python library. The EnterpriseDB Language Pack installer dynamically
links with our shared object for python. In ActiveState Linux installers for Python, there
was no dynamic library. As a result of these changes, plpython will no longer work
with ActiveState installers.
You can use StackBuilder Plus to invoke the Language Pack installer. For information
about using StackBuilder Plus, see Section 4.5. After downloading and installing the
Language Pack, perform the OS specific configuration steps outlined in Section 7.3.
Install PL/Python in each database (or in a template database) before creating a
PL/Python function. You can use the CREATE LANGUAGE command at the EDB-PSQL
command line to install PL/Python. Use EDB-PSQL to connect to the database in which
you wish to install PL/Python, and enter the command:
CREATE LANGUAGE plpython3u;
Advanced Server confirms that the language is loaded with the response:
CREATE LANGUAGE
After installing PL/Python in your database, you can use the features of the PL/Python
language from within Advanced Server.
Please Note: The indentation shown in the following example must be included as you
enter the sample function in EDB-PSQL. The following PL/Python example creates a
function named pymax that returns the larger of two integer values:
CREATE OR REPLACE FUNCTION pymax (a integer, b integer) RETURNS integer
AS
$$
if a > b:
return a
return b
$$ LANGUAGE plpython3u;

EDB Postgres Advanced Server Installation Guide
Copyright © 2009 - 2017 EnterpriseDB Corporation. All rights reserved.
196
When calling the pymax function, pass two values as shown below:
SELECT pymax(12, 3);
Advanced Server returns:
pymax
-------
12
(1 row)
For more information about using the Python procedural language with Advanced Server,
consult the official PostgreSQL documentation, available at:
https://www.postgresql.org/docs/9.5/static/plpython.html
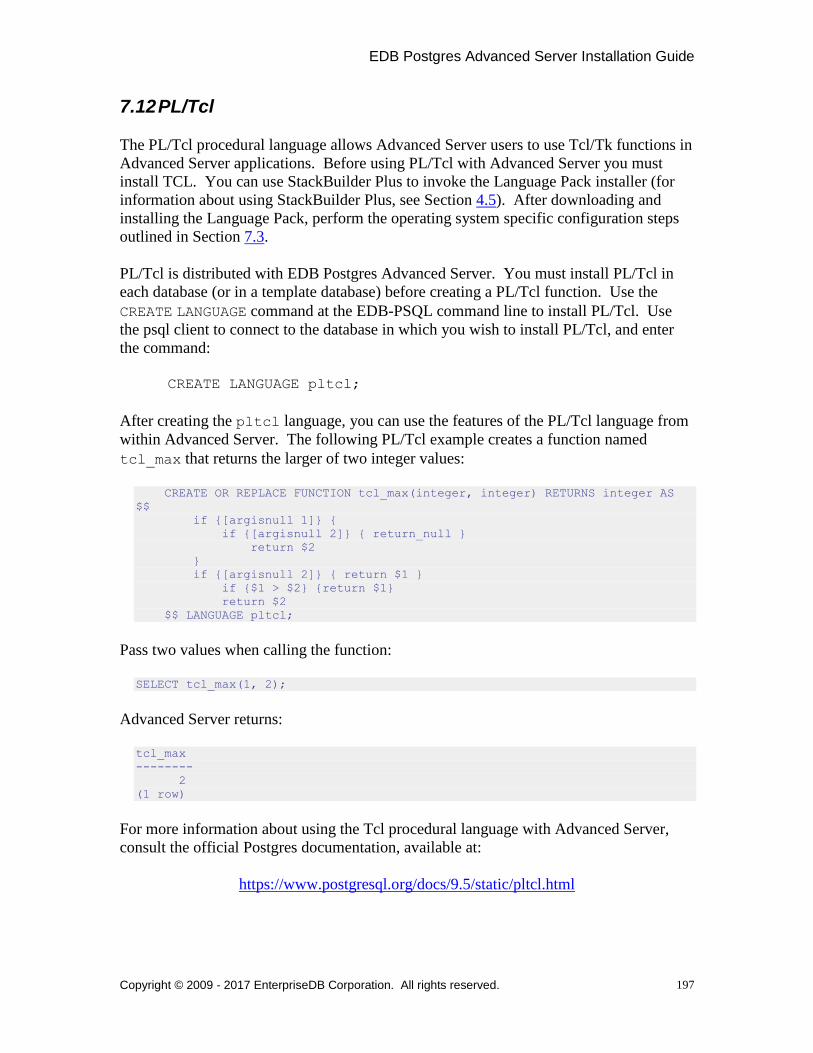
EDB Postgres Advanced Server Installation Guide
Copyright © 2009 - 2017 EnterpriseDB Corporation. All rights reserved.
197
7.12 PL/Tcl
The PL/Tcl procedural language allows Advanced Server users to use Tcl/Tk functions in
Advanced Server applications. Before using PL/Tcl with Advanced Server you must
install TCL. You can use StackBuilder Plus to invoke the Language Pack installer (for
information about using StackBuilder Plus, see Section 4.5). After downloading and
installing the Language Pack, perform the operating system specific configuration steps
outlined in Section 7.3.
PL/Tcl is distributed with EDB Postgres Advanced Server. You must install PL/Tcl in
each database (or in a template database) before creating a PL/Tcl function. Use the
CREATE LANGUAGE command at the EDB-PSQL command line to install PL/Tcl. Use
the psql client to connect to the database in which you wish to install PL/Tcl, and enter
the command:
CREATE LANGUAGE pltcl;
After creating the pltcl language, you can use the features of the PL/Tcl language from
within Advanced Server. The following PL/Tcl example creates a function named
tcl_max that returns the larger of two integer values:
CREATE OR REPLACE FUNCTION tcl_max(integer, integer) RETURNS integer AS
$$
if {[argisnull 1]} {
if {[argisnull 2]} { return_null }
return $2
}
if {[argisnull 2]} { return $1 }
if {$1 > $2} {return $1}
return $2
$$ LANGUAGE pltcl;
Pass two values when calling the function:
SELECT tcl_max(1, 2);
Advanced Server returns:
tcl_max
--------
2
(1 row)
For more information about using the Tcl procedural language with Advanced Server,
consult the official Postgres documentation, available at:
https://www.postgresql.org/docs/9.5/static/pltcl.html
EDB Postgres Advanced Server Installation Guide
Copyright © 2009 - 2017 EnterpriseDB Corporation. All rights reserved.
198
7.13 PostGIS
PostGIS is a PostgreSQL extension that allows you to store Geographic Information
Systems (GIS) objects in an Advanced Server database. PostGIS includes functions for
analyzing and processing GIS objects, and support for GiST-based R-Tree spatial
indexes.
Installing PostGIS with a Package Manager
You can use EnterpriseDB packages to add PostGIS to your Advanced Server
installation.
Note: Before using a package to install PostGIS, you must install the EPEL repository.
For information about installing the EPEL repository, see Section 2.3.
Then, invoke the PostGIS meta installer package with the command:
yum install ppas95-postgis
The ppas95-postgis package installs the following supporting Advanced Server
packages:
ppas95-postgis-2.1.5
ppas95-postgis-utils
ppas95-postgis-docs
ppas95-postgis-core
Additional support for PostGIS is also provided by the following packages:
Package Provides cfitsio Library for manipulating FITS data files gdal GIS file format library geos A C++ port of the Java Topology Suite hdf5 General purpose library and file format for scientific data libdap The C++ DAP2 library libgeotiff GeoTIFF format library librx POSIX regexp functions netcdf Libraries for the Unidata network Common Data Form ogdi Open Geographic Datastore Interface proj Cartographic projection software (PROJ.4)
If you are installing PostGIS with a package manager, please note that you must
manually create the template_postgis database and any PostGIS extensions required.
For complete information about managing your PostGIS installation, please visit the
official project website at:
http://postgis.net/documentation/
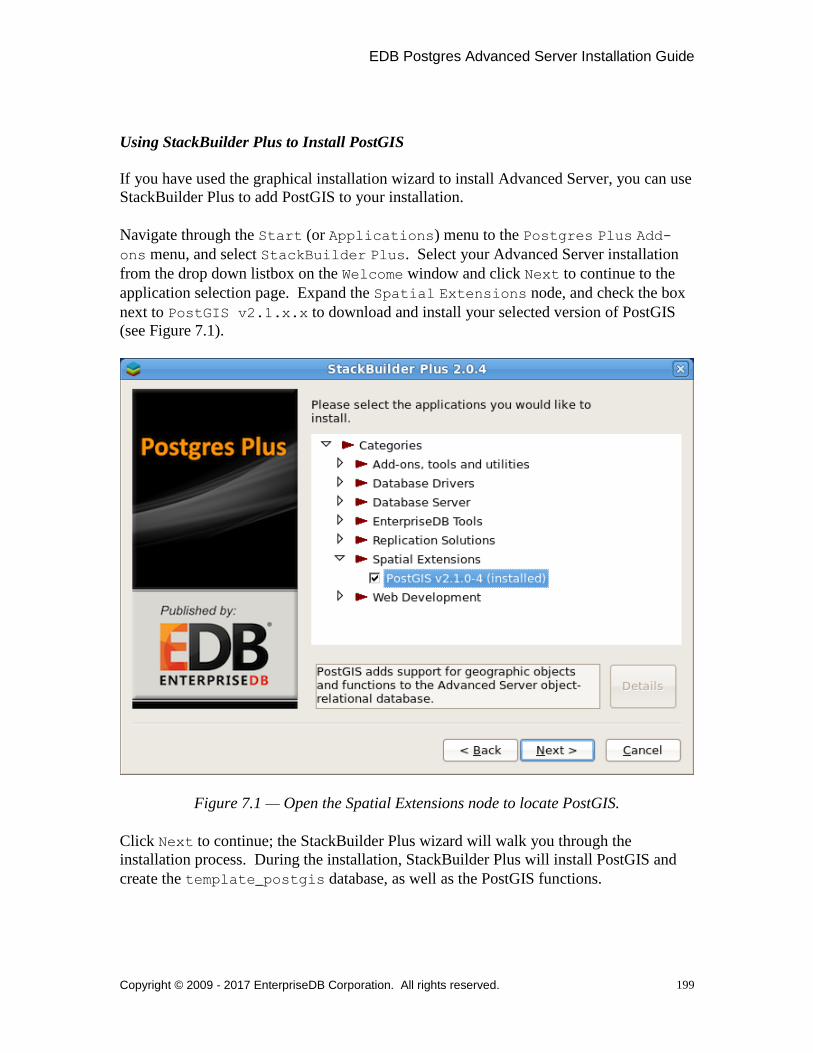
EDB Postgres Advanced Server Installation Guide
Copyright © 2009 - 2017 EnterpriseDB Corporation. All rights reserved.
199
Using StackBuilder Plus to Install PostGIS
If you have used the graphical installation wizard to install Advanced Server, you can use
StackBuilder Plus to add PostGIS to your installation.
Navigate through the Start (or Applications) menu to the Postgres Plus Add-
ons menu, and select StackBuilder Plus. Select your Advanced Server installation
from the drop down listbox on the Welcome window and click Next to continue to the
application selection page. Expand the Spatial Extensions node, and check the box
next to PostGIS v2.1.x.x to download and install your selected version of PostGIS
(see Figure 7.1).
Figure 7.1 — Open the Spatial Extensions node to locate PostGIS.
Click Next to continue; the StackBuilder Plus wizard will walk you through the
installation process. During the installation, StackBuilder Plus will install PostGIS and
create the template_postgis database, as well as the PostGIS functions.

EDB Postgres Advanced Server Installation Guide
Copyright © 2009 - 2017 EnterpriseDB Corporation. All rights reserved.
200
EDB Postgres Advanced Server Installation Guide
Copyright © 2009 - 2017 EnterpriseDB Corporation. All rights reserved.
201
7.13.1 Upgrading to PostGIS 2.0
If you are upgrading an existing Advanced Server installation (version 9.1 or prior) that
contains PostGIS to a later version of Advanced Server, you must perform a manual
upgrade. The pg_upgrade tool does not support upgrades of spatially enabled databases
(a database that contains PostGIS database objects (functions, types, operators, tables,
etc.).
To upgrade a database using PostGIS 1.x to PostGIS 2.x, use the pg_dump and
pg_restore commands to perform a dump and restore of the PostGIS database. Please
note: the host must contain an installation of Perl to perform this upgrade.
For complete information about PostGIS and performing an upgrade, see the PostGIS
documentation at:
http://postgis.refractions.net/documentation/manual-2.0
The following summarizes the basic steps required to perform an upgrade to Advanced
Server 9.5 when your current version of Advanced Server has PostGIS 1.x installed along
with PostGIS databases:
In your current Advanced Server cluster, use pg_dump to create a custom-format
backup of each PostGIS 1.x database.
Drop the PostGIS databases that were backed up, drop database template
template_postgis, and uninstall PostGIS.
Install Advanced Server 9.5, but do not install PostGIS at this time.
Perform the upgrade to Advanced Server 9.5 using pg_upgrade as described in
Section 8.3, Upgrading to Advanced Server 9.5. This upgrades all non-PostGIS
databases to Advanced Server 9.5.
Start up Advanced Server 9.5 and use StackBuilder Plus to install PostGIS 2.0.
For each backup file created from a PostGIS 1.x database, create a new, empty
PostGIS 2.0 database and restore each backup file into a new PostGIS database
using Perl script postgis_restore.pl.
The following example illustrates an upgrade from Advanced Server 9.1 to Advanced
Server 9.5 when PostGIS 1.5 is installed in Advanced Server 9.1, and a PostGIS database
named roadmaps exists in the Advanced Server 9.1 cluster.
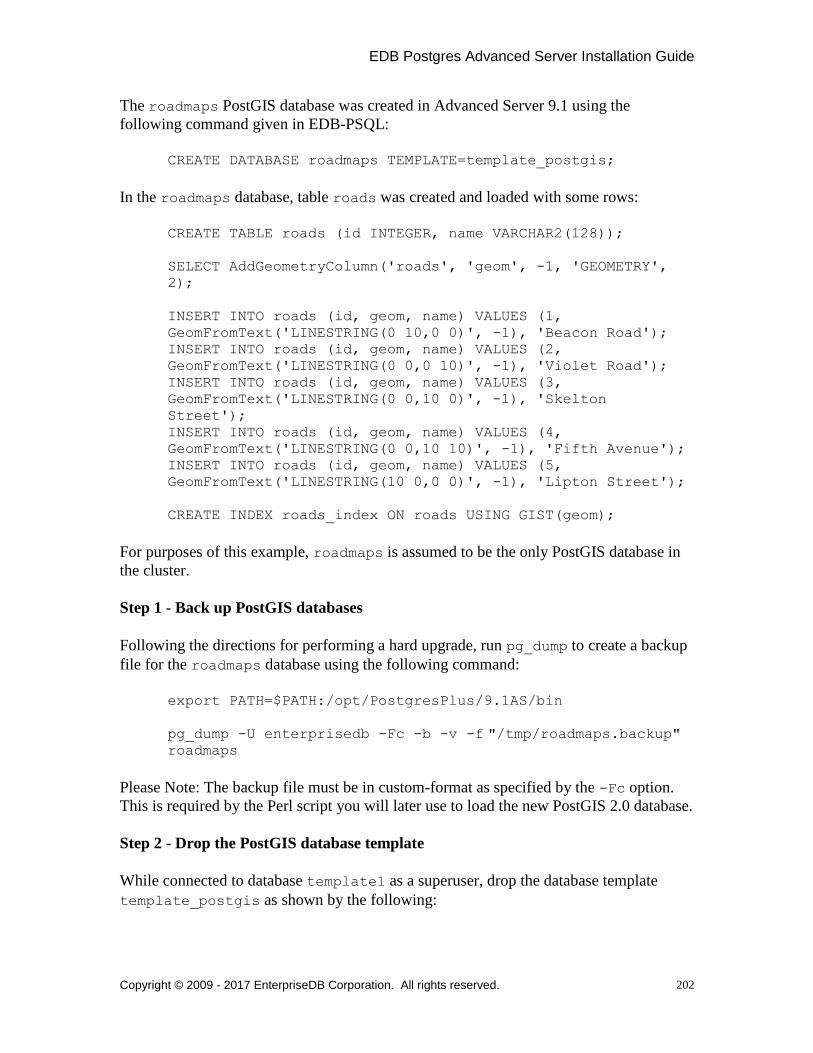
EDB Postgres Advanced Server Installation Guide
Copyright © 2009 - 2017 EnterpriseDB Corporation. All rights reserved.
202
The roadmaps PostGIS database was created in Advanced Server 9.1 using the
following command given in EDB-PSQL:
CREATE DATABASE roadmaps TEMPLATE=template_postgis;
In the roadmaps database, table roads was created and loaded with some rows:
CREATE TABLE roads (id INTEGER, name VARCHAR2(128));
SELECT AddGeometryColumn('roads', 'geom', -1, 'GEOMETRY',
2);
INSERT INTO roads (id, geom, name) VALUES (1,
GeomFromText('LINESTRING(0 10,0 0)', -1), 'Beacon Road');
INSERT INTO roads (id, geom, name) VALUES (2,
GeomFromText('LINESTRING(0 0,0 10)', -1), 'Violet Road');
INSERT INTO roads (id, geom, name) VALUES (3,
GeomFromText('LINESTRING(0 0,10 0)', -1), 'Skelton
Street');
INSERT INTO roads (id, geom, name) VALUES (4,
GeomFromText('LINESTRING(0 0,10 10)', -1), 'Fifth Avenue');
INSERT INTO roads (id, geom, name) VALUES (5,
GeomFromText('LINESTRING(10 0,0 0)', -1), 'Lipton Street');
CREATE INDEX roads_index ON roads USING GIST(geom);
For purposes of this example, roadmaps is assumed to be the only PostGIS database in
the cluster.
Step 1 - Back up PostGIS databases
Following the directions for performing a hard upgrade, run pg_dump to create a backup
file for the roadmaps database using the following command:
export PATH=$PATH:/opt/PostgresPlus/9.1AS/bin
pg_dump -U enterprisedb -Fc -b -v -f "/tmp/roadmaps.backup" roadmaps
Please Note: The backup file must be in custom-format as specified by the -Fc option.
This is required by the Perl script you will later use to load the new PostGIS 2.0 database.
Step 2 - Drop the PostGIS database template
While connected to database template1 as a superuser, drop the database template
template_postgis as shown by the following:
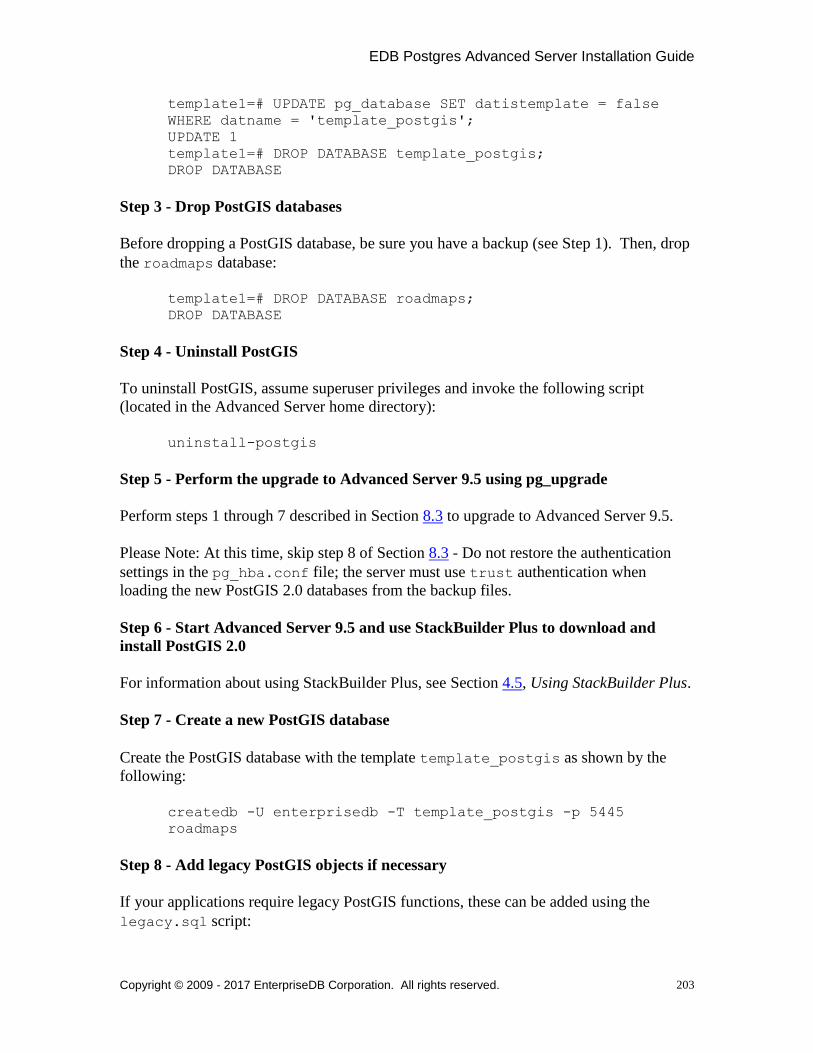
EDB Postgres Advanced Server Installation Guide
Copyright © 2009 - 2017 EnterpriseDB Corporation. All rights reserved.
203
template1=# UPDATE pg_database SET datistemplate = false
WHERE datname = 'template_postgis';
UPDATE 1
template1=# DROP DATABASE template_postgis;
DROP DATABASE
Step 3 - Drop PostGIS databases
Before dropping a PostGIS database, be sure you have a backup (see Step 1). Then, drop
the roadmaps database:
template1=# DROP DATABASE roadmaps;
DROP DATABASE
Step 4 - Uninstall PostGIS
To uninstall PostGIS, assume superuser privileges and invoke the following script
(located in the Advanced Server home directory):
uninstall-postgis
Step 5 - Perform the upgrade to Advanced Server 9.5 using pg_upgrade
Perform steps 1 through 7 described in Section 8.3 to upgrade to Advanced Server 9.5.
Please Note: At this time, skip step 8 of Section 8.3 - Do not restore the authentication
settings in the pg_hba.conf file; the server must use trust authentication when
loading the new PostGIS 2.0 databases from the backup files.
Step 6 - Start Advanced Server 9.5 and use StackBuilder Plus to download and
install PostGIS 2.0
For information about using StackBuilder Plus, see Section 4.5, Using StackBuilder Plus.
Step 7 - Create a new PostGIS database
Create the PostGIS database with the template template_postgis as shown by the
following:
createdb -U enterprisedb -T template_postgis -p 5445
roadmaps
Step 8 - Add legacy PostGIS objects if necessary
If your applications require legacy PostGIS functions, these can be added using the
legacy.sql script:
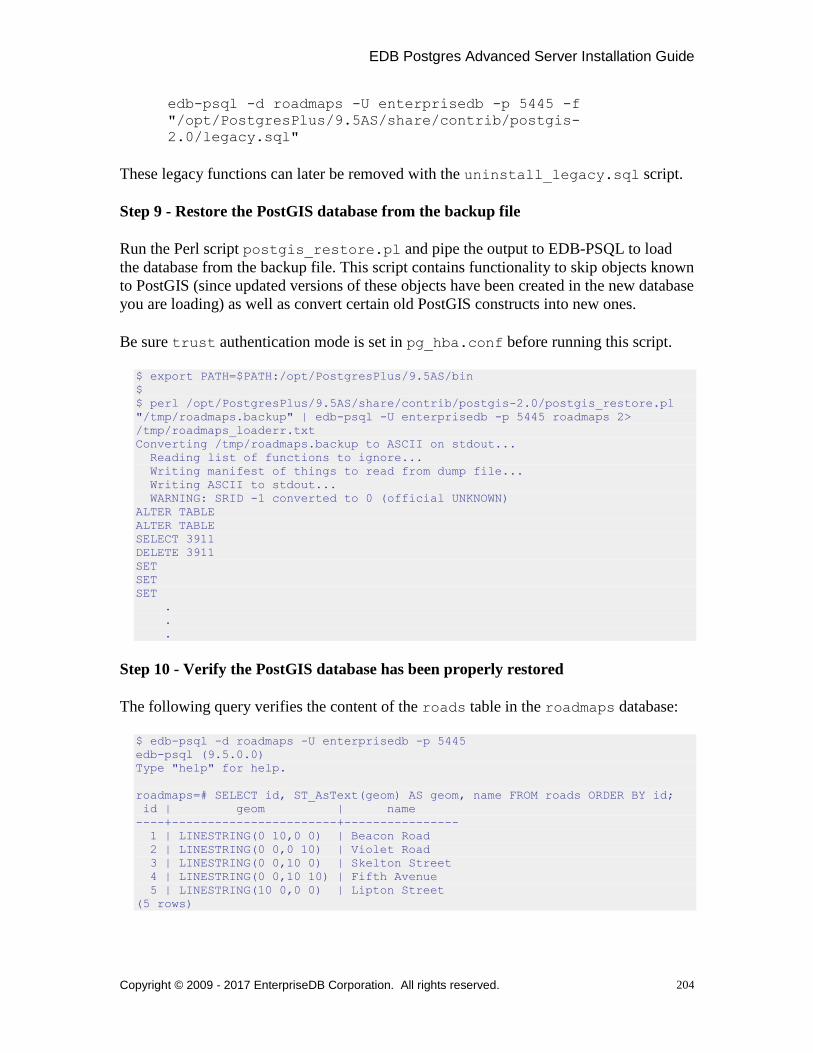
EDB Postgres Advanced Server Installation Guide
Copyright © 2009 - 2017 EnterpriseDB Corporation. All rights reserved.
204
edb-psql -d roadmaps -U enterprisedb -p 5445 -f
"/opt/PostgresPlus/9.5AS/share/contrib/postgis-
2.0/legacy.sql"
These legacy functions can later be removed with the uninstall_legacy.sql script.
Step 9 - Restore the PostGIS database from the backup file
Run the Perl script postgis_restore.pl and pipe the output to EDB-PSQL to load
the database from the backup file. This script contains functionality to skip objects known
to PostGIS (since updated versions of these objects have been created in the new database
you are loading) as well as convert certain old PostGIS constructs into new ones.
Be sure trust authentication mode is set in pg_hba.conf before running this script.
$ export PATH=$PATH:/opt/PostgresPlus/9.5AS/bin
$
$ perl /opt/PostgresPlus/9.5AS/share/contrib/postgis-2.0/postgis_restore.pl
"/tmp/roadmaps.backup" | edb-psql -U enterprisedb -p 5445 roadmaps 2>
/tmp/roadmaps_loaderr.txt
Converting /tmp/roadmaps.backup to ASCII on stdout...
Reading list of functions to ignore...
Writing manifest of things to read from dump file...
Writing ASCII to stdout...
WARNING: SRID -1 converted to 0 (official UNKNOWN)
ALTER TABLE
ALTER TABLE
SELECT 3911
DELETE 3911
SET
SET
SET
.
.
.
Step 10 - Verify the PostGIS database has been properly restored
The following query verifies the content of the roads table in the roadmaps database:
$ edb-psql -d roadmaps -U enterprisedb -p 5445
edb-psql (9.5.0.0)
Type "help" for help.
roadmaps=# SELECT id, ST_AsText(geom) AS geom, name FROM roads ORDER BY id;
id | geom | name
----+-----------------------+----------------
1 | LINESTRING(0 10,0 0) | Beacon Road
2 | LINESTRING(0 0,0 10) | Violet Road
3 | LINESTRING(0 0,10 0) | Skelton Street
4 | LINESTRING(0 0,10 10) | Fifth Avenue
5 | LINESTRING(10 0,0 0) | Lipton Street
(5 rows)

EDB Postgres Advanced Server Installation Guide
Copyright © 2009 - 2017 EnterpriseDB Corporation. All rights reserved.
205
Step 11 - Repeat for each PostGIS database backup
Repeat steps 7 through 10 for each PostGIS database backup file created in Step 1.
Step 12 - Restore the authentication settings in the pg_hba.conf file
Update the contents of the pg_hba.conf file to reflect your preferred authentication
settings.

EDB Postgres Advanced Server Installation Guide
Copyright © 2009 - 2017 EnterpriseDB Corporation. All rights reserved.
206
7.14 Slony
Unless otherwise noted, the commands and paths noted in the following section assume
that you have performed an installation with the interactive installer.
Slony is a master-standby replication environment that is well-suited for large databases
with a limited number of standby systems. Slony replication:
Shares data in one direction only: from a master node to a standby node.
Is cascading; a standby node may pass data to another standby node.
Does not allow modification of data on standby nodes.
For more information about Slony replication features, visit the Slony website at:
http://slony.info/
By default, the Advanced Server installation wizard installs Slony and the Slony
configuration files, but does not start the Slony service. After configuring the replication
environment, you must manually start the service.
On Linux, the Slony connection configuration file is named ppas-
replication-9.5.ini, and resides in the /etc directory, under the Advanced
Server installation. Use the configuration file to specify connection information
for the master and standby nodes.
On Windows, the configuration files are named master.conf.sample and
slave.conf.sample, and reside in the \share directory, under the Advanced
Server installation; prior to configuring Slony, you must rename the configuration
files to master.conf and slave.conf.
For information about configuring a Slony replication environment, please refer to the
official project documentation, available at:
http://slony.info/documentation/
Starting the Slony Service
After specifying configuration options, you must start the Slony service on each node of
the replication environment. For detailed information about controlling the service, see
Section 5.

EDB Postgres Advanced Server Installation Guide
Copyright © 2009 - 2017 EnterpriseDB Corporation. All rights reserved.
207
7.15 SQL Profiler
SQL Profiler helps locate and optimize poorly running SQL code. Before using SQL
Profiler, you must:
1. Modify the postgresql.conf parameter file for the instance to include the SQL
Profiler library in the shared_preload_libraries configuration parameter.
For Linux installations, the parameter value should include:
$libdir/sql-profiler
On Windows, the parameter value should include:
$libdir/sql-profiler.dll
2. Create the functions used by SQL Profiler. The SQL Profiler installation program
places a SQL script (named sql-profiler.sql) in the share/contrib
subdirectory of the main PostgreSQL installation directory on Linux systems. On
Windows systems, this script is located in the share subdirectory.
Using the PEM Client Query Tool or the psql command line interface, run the
sql-profiler.sql script in the database specified as the Maintenance
Database on the server you wish to profile. If you are using Advanced Server, the
default maintenance database is named edb. If you are using a PostgreSQL
instance, the default maintenance database is named postgres.
To use the PEM Query Tool to run the script, highlight the name of the
maintenance database in the PEM Client tree control, and navigate through the
Tools menu, selecting Query tool. When the Query Tool opens, use the Open
option on the Files menu to open a web browser and navigate to the sql-
profiler.sql script. When the script opens in the SQL Editor panel of the
Query Tool, select the Execute option from the Query menu to invoke the script
and configure SQL Profiler.
You can also use the psql command line to invoke the configuration script. The
following command uses the psql command line to invoke the sql-
profiler.sql script on a Linux system:
$ /opt/PostgresPlus/9.5AS/bin/psql -U user_name
database_name <
/opt/PostgresPlus/9.5AS/share/contrib/sql-profiler.sql
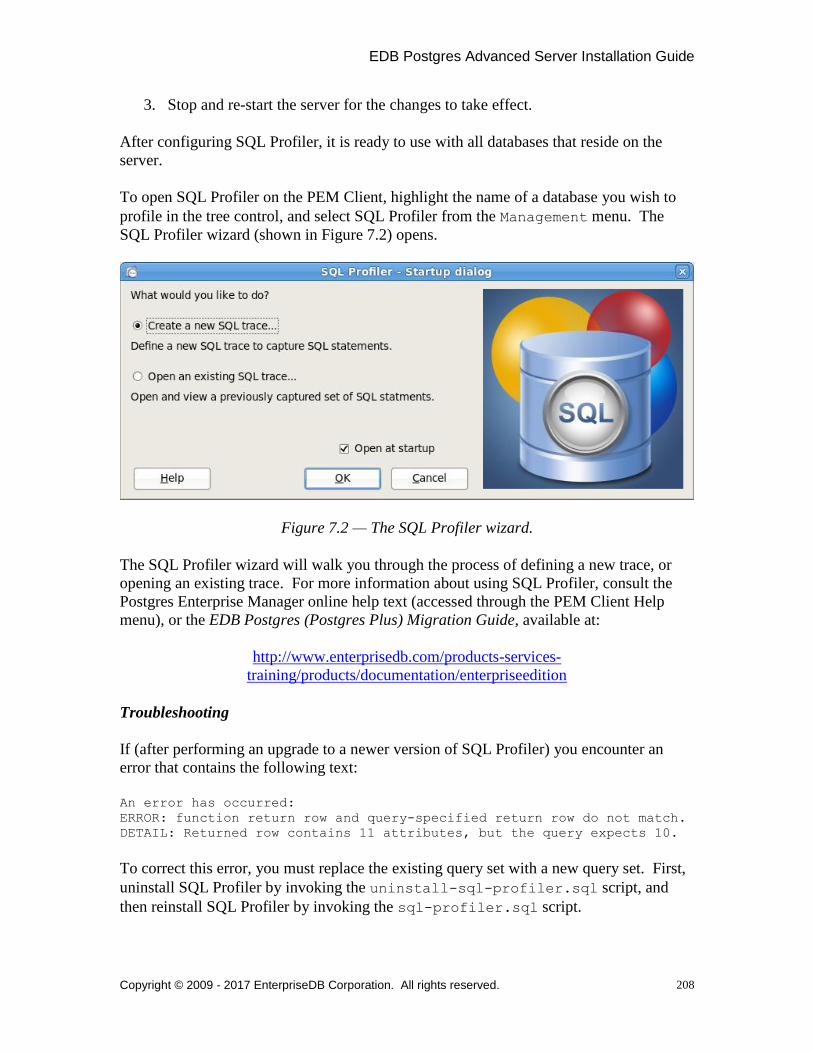
EDB Postgres Advanced Server Installation Guide
Copyright © 2009 - 2017 EnterpriseDB Corporation. All rights reserved.
208
3. Stop and re-start the server for the changes to take effect.
After configuring SQL Profiler, it is ready to use with all databases that reside on the
server.
To open SQL Profiler on the PEM Client, highlight the name of a database you wish to
profile in the tree control, and select SQL Profiler from the Management menu. The
SQL Profiler wizard (shown in Figure 7.2) opens.
Figure 7.2 — The SQL Profiler wizard.
The SQL Profiler wizard will walk you through the process of defining a new trace, or
opening an existing trace. For more information about using SQL Profiler, consult the
Postgres Enterprise Manager online help text (accessed through the PEM Client Help
menu), or the EDB Postgres (Postgres Plus) Migration Guide, available at:
http://www.enterprisedb.com/products-services-
training/products/documentation/enterpriseedition
Troubleshooting
If (after performing an upgrade to a newer version of SQL Profiler) you encounter an
error that contains the following text:
An error has occurred:
ERROR: function return row and query-specified return row do not match.
DETAIL: Returned row contains 11 attributes, but the query expects 10.
To correct this error, you must replace the existing query set with a new query set. First,
uninstall SQL Profiler by invoking the uninstall-sql-profiler.sql script, and
then reinstall SQL Profiler by invoking the sql-profiler.sql script.

EDB Postgres Advanced Server Installation Guide
Copyright © 2009 - 2017 EnterpriseDB Corporation. All rights reserved.
209
7.16 sslutils
sslutils is a Postgres extension that provides SSL certicate generation functions to
Advanced Server, for use by the Postgres Enterprise Manager server. sslutils is installed
by the Advanced Server RPM server meta installer and the Advanced Server graphical
installer.
sslutils Functions
The sslutils package provides the functions described below.
openssl_rsa_generate_key
The openssl_rsa_generate_key function generates an RSA private key. The
function signature is:
openssl_rsa_generate_key(integer) RETURNS text
When invoking the function, pass the number of bits as an integer value; the function
returns the generated key.
openssl_rsa_key_to_csr
The openssl_rsa_key_to_csr function generates a certificate signing request (CSR). The
signature is:
openssl_rsa_key_to_csr
(text, text, text, text, text, text, text) RETURNS text
The text arguments expected by the rsa_key_to_csr function are:
Argument 1: The name of the RSA key file.
Argument 2: The common name (e.g. agentN) of the agent that will use the
signing request.
Argument 3: The name of the country in which the server resides.
Argument 4: The name of the state in which the server resides.
Argument 5: The location (city) within the state in which the server resides.
Argument 6: The name of the organization unit requesting the certificate.
Argument 7: The email address of the user requesting the certificate.
EDB Postgres Advanced Server Installation Guide
Copyright © 2009 - 2017 EnterpriseDB Corporation. All rights reserved.
210
The function generates and returns the certificate signing request.
openssl_csr_to_crt
The openssl_csr_to_crt function generates a self-signed certificate or a certificate
authority certificate. The signature is:
openssl_csr_to_crt(text, text, text) RETURNS text
The text arguments expected by the rsa_key_to_csr function are:
Argument 1: The name of the certificate signing request.
Argument 2: The path to the certificate authority certificate, or NULL if generating
a certificate authority certificate.
Argument 3: The path to the certificate authority's private key or (if parameter 2 is
NULL) the path to a private key.
The function returns the self-signed certificate or certificate authority certificate.
openssl_rsa_generate_crl
The openssl_rsa_generate_crl function generates a default certificate revocation
list. The signature is:
openssl_rsa_generate_crl(text, text) RETURNS text
The text arguments expected by the openssl_rsa_generate_crl function are:
Argument 1: The path to the certificate authority certificate.
Argument 2: The path to the certificate authority private key.
The function returns the certificate revocation list.

EDB Postgres Advanced Server Installation Guide
Copyright © 2009 - 2017 EnterpriseDB Corporation. All rights reserved.
211
8 Upgrading an Installation With pg_upgrade
While minor upgrades between versions are fairly simple, and require only the
installation of new executables, past major version upgrades have been both expensive
and time consuming. pg_upgrade facilitates migration between any version of Advanced
Server (version 9.0 or later), and any subsequent release of Advanced Server that is
supported on the same platform.
Without pg_upgrade, to migrate from an earlier version of Advanced Server to Advanced
Server 9.5, you must export all of your data using pg_dump, install the new release, run
initdb to create a new cluster, and then import your old data. If you have a significant
amount of data, that can take a considerable amount of time and planning. You may also
have to use additional storage to temporarily accommodate both the original data and the
exported data.
pg_upgrade can reduce both the amount of time required and the disk space required for
many major-version upgrades.
The pg_upgrade utility performs an in-place transfer of existing data between Advanced
Server and any subsequent version.
Several factors determine if an in-place upgrade is practical:
The on-disk representation of user-defined tables must not change between the
original version and the upgraded version.
The on-disk representation of data types must not change between the original
version and the upgraded version.
To upgrade between major versions of Advanced Server with pg_upgrade, both
versions must share a common binary representation for each data type.
Therefore, you cannot use pg_upgrade to migrate from a 32-bit to a 64-bit Linux
platform.
Before performing a version upgrade, pg_upgrade will verify that the two clusters (the
old cluster and the new cluster) are compatible.
If the upgrade involves a change in the on-disk representation of database objects or data,
or involves a change in the binary representation of data types, pg_upgrade will be unable
to perform the upgrade; to upgrade, you will have to pg_dump the old data and then
import that data into the new cluster.
EDB Postgres Advanced Server Installation Guide
Copyright © 2009 - 2017 EnterpriseDB Corporation. All rights reserved.
212
The pg_upgrade executable is distributed with Advanced Server 9.5, and is installed as
part of the Database Server component; no additional installation or configuration
steps are required.
8.1 Performing an Upgrade - Overview
To upgrade an earlier version of Advanced Server to the current version, you must:
Install the current version of Advanced Server. The new installation must contain
the same supporting server components as the old installation.
Empty the target database or create a new target cluster with initdb.
Place the pg_hba.conf file for both databases in trust authentication mode (to
avoid authentication conflicts.
Shut down the old and new Advanced Server services.
Invoke the pg_upgrade utility.
When pg_upgrade starts, it performs a compatibility check to ensure that all required
executables are present and contain the expected version numbers. The verification
process also checks the old and new $PGDATA directories to ensure that the expected files
and subdirectories are in place. If the verification process succeeds, pg_upgrade starts
the old postmaster and runs pg_dumpall --schema-only to capture the metadata
contained in the old cluster. The script produced by pg_dumpall is used in a later step
to recreate all user-defined objects in the new cluster.
Note that the script produced by pg_dumpall recreates only user-defined objects and not
system-defined objects. The new cluster will already contain the system-defined objects
created by the latest version of Advanced Server.
After extracting the metadata from the old cluster, pg_upgrade performs the bookkeeping
tasks required to sync the new cluster with the existing data.
pg_upgrade runs the pg_dumpall script against the new cluster to create (empty)
database objects of the same shape and type as those found in the old cluster. Then,
pg_upgrade links or copies each table and index from the old cluster to the new cluster.

EDB Postgres Advanced Server Installation Guide
Copyright © 2009 - 2017 EnterpriseDB Corporation. All rights reserved.
213
8.1.1 Linking versus Copying
When invoking pg_upgrade, you can use a command-line option to specify whether
pg_upgrade should copy or link each table and index in the old cluster to the new cluster.
Linking is much faster because pg_upgrade simply creates a second name (a hard link)
for each file in the cluster; linking also requires no extra workspace because pg_upgrade
does not make a copy of the original data. When linking the old cluster and the new
cluster, the old and new clusters share the data; note that after starting the new cluster,
your data can no longer be used with the previous version of Advanced Server.
If you choose to copy data from the old cluster to the new cluster, pg_upgrade will still
reduce the amount of time required to perform an upgrade compared to the traditional
dump/restore procedure. pg_upgrade uses a file-at-a-time mechanism to copy data
files from the old cluster to the new cluster (versus the row-by-row mechanism used by
dump/restore). When you use pg_upgrade, you avoid building indexes in the new
cluster; each index is simply copied from the old cluster to the new cluster. Finally, using
a dump/restore procedure to upgrade requires a great deal of workspace to hold the
intermediate text-based dump of all of your data, while pg_upgrade requires very little
extra workspace.
Data that is stored in user-defined tablespaces is not copied to the new cluster; it stays in
the same location in the file system, but is copied into a subdirectory whose name reflects
the version number of the new cluster. To manually relocate files that are stored in a
tablespace after upgrading, move the files to the new location and update the symbolic
links (located in the pg_tblspc directory under your cluster's data directory) to point
to the files.
EDB Postgres Advanced Server Installation Guide
Copyright © 2009 - 2017 EnterpriseDB Corporation. All rights reserved.
214
8.2 Invoking pg_upgrade
When invoking pg_upgrade, you must specify the location of the old and new cluster's
PGDATA and executable (/bin) directories, as well as the name of the Advanced Server
superuser, and the ports on which the installations are listening. A typical call to invoke
pg_upgrade to migrate from Advanced Server 9.4 to Advanced Server 9.5 takes the form:
pg_upgrade --old-datadir path_to_9.4_data_directory --new-datadir
path_to_9.5_data_directory --user superuser_name --old-bindir
path_to_9.4_bin_directory --new-bindir path_to_9.5_bin_directory
--old-port 9.4_port --new-port 9.5_port
Where:
--old-datadir path_to_9.4_data_directory
Use the --old-datadir option to specify the complete path to the data
directory within the Advanced Server 9.4 installation.
--new-datadir path_to_9.5_data_directory
Use the --new-datadir option to specify the complete path to the data
directory within the Advanced Server 9.5 installation.
--username superuser_name
Include the --username option to specify the name of the Advanced Server
superuser. The superuser name should be the same in both versions of Advanced
Server. By default, when Advanced Server is installed in Oracle mode, the
superuser is named enterprisedb. If installed in PostgreSQL mode, the
superuser is named postgres.
If the Advanced Server superuser name is not the same in both clusters, the
clusters will not pass the pg_upgrade consistency check.
--old-bindir path_to_9.4_bin_directory
Use the --old-bindir option to specify the complete path to the bin directory
in the Advanced Server 9.4 installation.
--new-bindir path_to_9.5_bin_directory
Use the --new-bindir option to specify the complete path to the bin directory
in the Advanced Server 9.5 installation.

EDB Postgres Advanced Server Installation Guide
Copyright © 2009 - 2017 EnterpriseDB Corporation. All rights reserved.
215
--old-port 9.4_port
Include the --old-port option to specify the port on which Advanced Server
9.4 listens for connections.
--new-port 9.5_port
Include the --new-port option to specify the port on which Advanced Server
9.5 listens for connections.

EDB Postgres Advanced Server Installation Guide
Copyright © 2009 - 2017 EnterpriseDB Corporation. All rights reserved.
216
8.2.1 Command Line Options - Reference
pg_upgrade accepts the following command line options; each option is available
in a long form or a short form:
-b path_to_old_bin_directory
--old-bindir path_to_old_bin_directory
Use the -b or --old-bindir keyword to specify the location of the old cluster's
executable directory.
-B path_to_new_bin_directory
--new-bindir path_to_new_bin_directory
Use the -B or --new-bindir keyword to specify the location of the new
cluster's executable directory.
-c
--check
Include the -c or --check keyword to specify that pg_upgrade should perform a
consistency check on the old and new cluster without performing a version
upgrade.
-d path_to_old_data_directory
--old-datadir path_to_old_data_directory
Use the -d or --old-datadir keyword to specify the location of the old
cluster's data directory.
-D path_to_new_data_directory
--new-datadir path_to_new_data_directory
Use the -D or --new-datadir keyword to specify the location of the new
allows you to create and execute.
Please note: Data that is stored in user-defined tablespaces is not copied to the
new cluster; it stays in the same location in the file system, but is copied into a
subdirectory whose name reflects the version number of the new cluster. To
manually relocate files that are stored in a tablespace after upgrading, you must
move the files to the new location and update the symbolic links (located in the
pg_tblspc directory under your cluster's data directory) to point to the files.
EDB Postgres Advanced Server Installation Guide
Copyright © 2009 - 2017 EnterpriseDB Corporation. All rights reserved.
217
-j
--jobs
Include the -j or --jobs keyword to specify the number of simultaneous
processes or threads to use during the upgrade.
-k
--link
Include the -k or --link keyword to create a hard link from the new cluster to the old
cluster. See Section 8.1.1, Linking versus Copying for more information about using a
symbolic link.
-o options
--old-options options
Use the -o or --old-options keyword to specify options that will be passed to
the old postgres command. Enclose options in single or double quotes to
ensure that they are passed as a group.
-O options
--new-options options
Use the -O or --new-options keyword to specify options to be passed to the
new postgres command. Enclose options in single or double quotes to ensure
that they are passed as a group.
-p old_port_number
--old-port old_port_number
Include the -p or --old-port keyword to specify the port number of the
Advanced Server installation that you are upgrading.
-P new_port_number
--new-port new_port_number
Include the -P or --new-port keyword to specify the port number of the new
Advanced Server installation.
Please note: If the original Advanced Server installation is using port number
5444 when you invoke the Advanced Server 9.5 installer, the installer will
recommend using listener port 5445 for the new installation of Advanced Server.

EDB Postgres Advanced Server Installation Guide
Copyright © 2009 - 2017 EnterpriseDB Corporation. All rights reserved.
218
-r
--retain
During the upgrade process, pg_upgrade creates four append-only log files; when
the upgrade is completed, pg_upgrade deletes these files. Include the -r or --
retain option to specify that the server should retain the pg_upgrade log files.
-U user_name
--username user_name
Include the -U or --username keyword to specify the name of the Advanced
Server database superuser. The same superuser must exist in both clusters.
-v
--verbose
Include the -v or --verbose keyword to enable verbose output during the
upgrade process.
-V
--version
Use the -V or --version keyword to display version information for
pg_upgrade.
-?
-h
--help
Use -?, -h or --help options to display pg_upgrade help information.
EDB Postgres Advanced Server Installation Guide
Copyright © 2009 - 2017 EnterpriseDB Corporation. All rights reserved.
219
8.3 Upgrading to Advanced Server 9.5
You can use pg_upgrade to upgrade from an existing installation of Advanced Server into
the cluster built by the Advanced Server 9.5 installer or into an alternate cluster created
using the initdb command. In this section, we will provide the details of upgrading
into the cluster provided by the installer.
The basic steps to perform an upgrade into an empty cluster created with the initdb
command are the same as the steps to upgrade into the cluster created by the Advanced
Server 9.5 installer, but you can omit Step 2 (Empty the edb database), and substitute the
location of the alternate cluster when specifying a target cluster for the upgrade.
If a problem occurs during the upgrade process, you can revert to the previous version.
See Section 8.5, Reverting to the Old Cluster for detailed information about this process.
You must be an operating system superuser or Windows Administrator to perform an
Advanced Server upgrade.
Step 1 - Install the New Server
Install Advanced Server 9.5, specifying the same non-server components that were
installed during the previous Advanced Server installation. Please note that the new
cluster and the old cluster must reside in different directories.
Step 2 - Empty the target database
The target cluster must not contain any data; you can create an empty cluster using the
initdb command, or you can empty a database that was created during the installation
of Advanced Server 9.5. If you have installed Advanced Server in PostgreSQL mode, the
installer creates a single database named postgres; if you have installed Advanced
Server in Oracle mode, it creates a database named postgres and a database named
edb.
The easiest way to empty the target database is to drop the database and then create a new
database. Before invoking the DROP DATABASE command, you must disconnect any
users or services that are currently using the database.
By default, the Advanced Server installation process installs and starts the following
services:
pgbouncer - The PgBouncer service
ppas-agent-9.5 - The PgAgent service
Before dropping the target database, halt any services that are included in your
installation.
EDB Postgres Advanced Server Installation Guide
Copyright © 2009 - 2017 EnterpriseDB Corporation. All rights reserved.
220
On Windows, navigate through the Control Panel to the Services manager;
highlight each service in the Services list, and select Stop.
On Linux, open a terminal window, assume superuser privileges, and navigate to the
/etc/init.d directory. Manually stop each service; for example, invoke the
command:
./ppas-agent-9.5 stop
To stop the pgAgent service.
After stopping any services that are currently connected to Advanced Server, you can use
the EDB-PSQL command line client to drop and re-create the database.
To open the EDB-PSQL command line, navigate through the Start menu and select
Run SQL Command Line; select EDB-PSQL to open the command line client. When the
client opens, connect to the template1 database as the database superuser. If prompted,
provide authentication information; then, use the following command to drop the
database:
DROP DATABASE database_name;
Where database_name is the name of the database.
Then, create an empty database based on the contents of the template1 database:
CREATE DATABASE database_name;
Step 3 - Set both servers in trust mode
During the upgrade process, pg_upgrade will connect to the old and new servers several
times; to make the connection process easier, you should edit the pg_hba.conf file,
setting the authentication mode to trust. To modify the pg_hba.conf file, navigate
through the Start menu to each Postgres Plus Advanced Server menu, and open
the Expert Configuration menu; select the Edit pg_hba.conf menu option to
open the pg_hba.conf file.
You should allow trust authentication for the previous Advanced Server installation,
and Advanced Server 9.5 servers. Edit the pg_hba.conf file for both installations of
Advanced Server as shown in Figure 8.1.
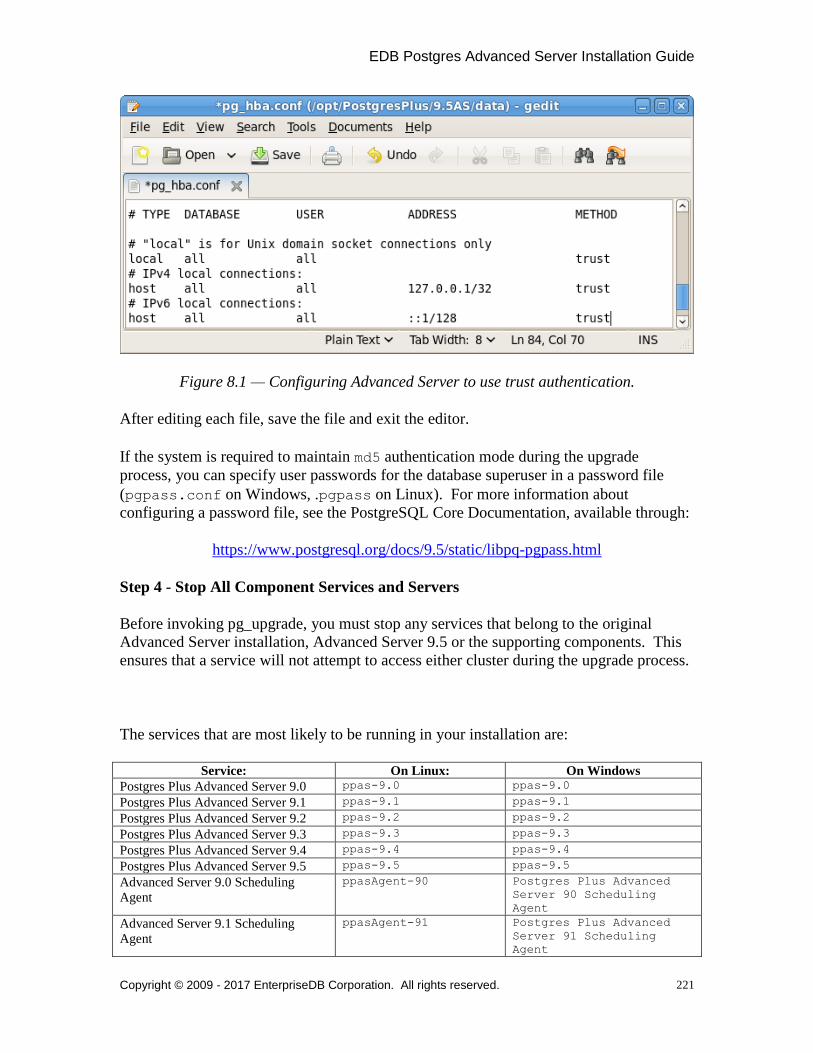
EDB Postgres Advanced Server Installation Guide
Copyright © 2009 - 2017 EnterpriseDB Corporation. All rights reserved.
221
Figure 8.1 — Configuring Advanced Server to use trust authentication.
After editing each file, save the file and exit the editor.
If the system is required to maintain md5 authentication mode during the upgrade
process, you can specify user passwords for the database superuser in a password file
(pgpass.conf on Windows, .pgpass on Linux). For more information about
configuring a password file, see the PostgreSQL Core Documentation, available through:
https://www.postgresql.org/docs/9.5/static/libpq-pgpass.html
Step 4 - Stop All Component Services and Servers
Before invoking pg_upgrade, you must stop any services that belong to the original
Advanced Server installation, Advanced Server 9.5 or the supporting components. This
ensures that a service will not attempt to access either cluster during the upgrade process.
The services that are most likely to be running in your installation are:
Service: On Linux: On Windows
Postgres Plus Advanced Server 9.0 ppas-9.0 ppas-9.0
Postgres Plus Advanced Server 9.1 ppas-9.1 ppas-9.1
Postgres Plus Advanced Server 9.2 ppas-9.2 ppas-9.2
Postgres Plus Advanced Server 9.3 ppas-9.3 ppas-9.3
Postgres Plus Advanced Server 9.4 ppas-9.4 ppas-9.4
Postgres Plus Advanced Server 9.5 ppas-9.5 ppas-9.5
Advanced Server 9.0 Scheduling
Agent
ppasAgent-90 Postgres Plus Advanced
Server 90 Scheduling
Agent
Advanced Server 9.1 Scheduling
Agent
ppasAgent-91 Postgres Plus Advanced
Server 91 Scheduling
Agent
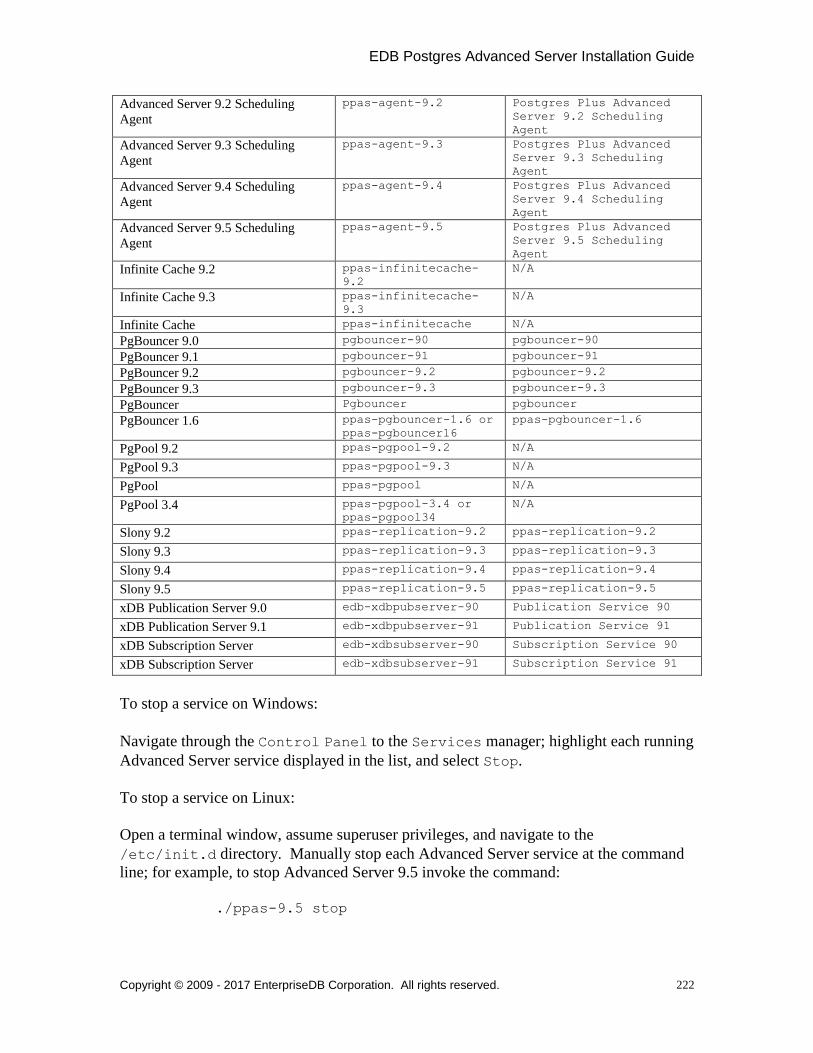
EDB Postgres Advanced Server Installation Guide
Copyright © 2009 - 2017 EnterpriseDB Corporation. All rights reserved.
222
Advanced Server 9.2 Scheduling
Agent
ppas-agent-9.2 Postgres Plus Advanced
Server 9.2 Scheduling
Agent
Advanced Server 9.3 Scheduling
Agent
ppas-agent-9.3 Postgres Plus Advanced
Server 9.3 Scheduling
Agent
Advanced Server 9.4 Scheduling
Agent
ppas-agent-9.4 Postgres Plus Advanced
Server 9.4 Scheduling
Agent
Advanced Server 9.5 Scheduling
Agent
ppas-agent-9.5 Postgres Plus Advanced
Server 9.5 Scheduling
Agent
Infinite Cache 9.2 ppas-infinitecache-
9.2
N/A
Infinite Cache 9.3 ppas-infinitecache-
9.3
N/A
Infinite Cache ppas-infinitecache N/A
PgBouncer 9.0 pgbouncer-90 pgbouncer-90
PgBouncer 9.1 pgbouncer-91 pgbouncer-91
PgBouncer 9.2 pgbouncer-9.2 pgbouncer-9.2
PgBouncer 9.3 pgbouncer-9.3 pgbouncer-9.3
PgBouncer Pgbouncer pgbouncer
PgBouncer 1.6 ppas-pgbouncer-1.6 or
ppas-pgbouncer16
ppas-pgbouncer-1.6
PgPool 9.2 ppas-pgpool-9.2 N/A
PgPool 9.3 ppas-pgpool-9.3 N/A
PgPool ppas-pgpool N/A
PgPool 3.4 ppas-pgpool-3.4 or
ppas-pgpool34
N/A
Slony 9.2 ppas-replication-9.2 ppas-replication-9.2
Slony 9.3 ppas-replication-9.3 ppas-replication-9.3
Slony 9.4 ppas-replication-9.4 ppas-replication-9.4
Slony 9.5 ppas-replication-9.5 ppas-replication-9.5
xDB Publication Server 9.0 edb-xdbpubserver-90 Publication Service 90
xDB Publication Server 9.1 edb-xdbpubserver-91 Publication Service 91
xDB Subscription Server edb-xdbsubserver-90 Subscription Service 90
xDB Subscription Server edb-xdbsubserver-91 Subscription Service 91
To stop a service on Windows:
Navigate through the Control Panel to the Services manager; highlight each running
Advanced Server service displayed in the list, and select Stop.
To stop a service on Linux:
Open a terminal window, assume superuser privileges, and navigate to the
/etc/init.d directory. Manually stop each Advanced Server service at the command
line; for example, to stop Advanced Server 9.5 invoke the command:
./ppas-9.5 stop
EDB Postgres Advanced Server Installation Guide
Copyright © 2009 - 2017 EnterpriseDB Corporation. All rights reserved.
223
Step 5 - Assume the identity of the cluster owner
Assume the identity of the Advanced Server cluster owner, and add the directory in
which the pg_upgrade executable resides to the search path.
If you are using Windows, open a terminal window, assume the identity of the Advanced
Server cluster owner and set the path to the pg_upgrade executable:
RUNAS /USER:enterprisedb "CMD.EXE"
SET PATH=%PATH%;C:\Program Files\PostgresPlus\9.5AS\bin
If you are using Linux, assume the identity of the Advanced Server cluster owner:
su - enterprisedb
Enter the Advanced Server cluster owner password if prompted. Then, set the path to
include the location of the pg_upgrade executable:
export PATH=$PATH:/opt/PostgresPlus/9.5AS/bin
During the upgrade process, pg_upgrade writes a file to the current working directory of
the enterprisedb user; you must invoke pg_upgrade from a directory where the
enterprisedb super user has write privileges. After performing the above
commands, navigate to a directory in which the enterprisedb user has sufficient
privileges to write a file.
On Windows:
cd %TEMP%
On Linux:
cd /tmp
Step 6 - Perform a consistency check
Before attempting an upgrade, perform a consistency check to assure that the old and new
clusters are compatible and properly configured. Include the --check option to instruct
pg_upgrade to perform the consistency check.
The following example demonstrates invoking pg_upgrade to perform a consistency
check on Linux:
pg_upgrade -d /opt/PostgresPlus/9.4AS/data -D
/opt/PostgresPlus/9.5AS/data -U enterprisedb -b
/opt/PostgresPlus/9.4AS/bin -B /opt/PostgresPlus/9.5AS/bin -p
5444 -P 5445 --check
EDB Postgres Advanced Server Installation Guide
Copyright © 2009 - 2017 EnterpriseDB Corporation. All rights reserved.
224
If you are using Windows, you must quote any directory names that contain a space:
pg_upgrade.exe -d "C:\Program Files\PostgresPlus\9.4AS\data"
-D "C:\Program Files\PostgresPlus\9.5AS\data" -U enterprisedb
-b "C:\Program Files\PostgresPlus\9.4AS\bin" -B "C:\Program
Files\PostgresPlus\9.5AS\bin" -p 5444 -P 5445 --check
During the consistency checking process, pg_upgrade will log any discrepancies that it
finds to a file located in the directory from which pg_upgrade was invoked. When the
consistency check completes, review the file to identify any missing components or
upgrade conflicts. You must resolve any conflicts before invoking pg_upgrade to
perform a version upgrade.
If pg_upgrade alerts you to a missing component, you can use StackBuilder Plus to add
the component that contains the component. Before using StackBuilder Plus, you must
restart the Advanced Server 9.5 service. After restarting the service, open StackBuilder
Plus by navigating through the Start menu to the Postgres Plus Advanced Server
9.5 menu, and selecting StackBuilder Plus. Follow the onscreen advice of the
StackBuilder Plus wizard to download and install the missing components.
For more information about using StackBuilder Plus, please see Chapter 4.5, Using
StackBuilder Plus.
When pg_upgrade has confirmed that the clusters are compatible, you can perform a
version upgrade.
Step 7 - Run pg_upgrade
After confirming that the clusters are compatible, you can invoke pg_upgrade to upgrade
the old cluster to the new version of Advanced Server.
On Linux:
pg_upgrade -d /opt/PostgresPlus/9.4AS/data -D
/opt/PostgresPlus/9.5AS/data -U enterprisedb -b
/opt/PostgresPlus/9.4AS/bin -B /opt/PostgresPlus/9.5AS/bin -p
5444 -P 5445
On Windows:
pg_upgrade.exe -d "C:\Program Files\PostgresPlus\9.4AS\data"
-D "C:\Program Files\PostgresPlus\9.5AS\data" -U enterprisedb
-b "C:\Program Files\PostgresPlus\9.4AS\bin" -B "C:\Program
Files\PostgresPlus\9.5AS\bin" -p 5444 -P 5445
pg_upgrade will display the progress of the upgrade onscreen:

EDB Postgres Advanced Server Installation Guide
Copyright © 2009 - 2017 EnterpriseDB Corporation. All rights reserved.
225
$ pg_upgrade -d /opt/PostgresPlus/9.4AS/data -D /opt/PostgresPlus/9.5AS/data
-U enterprisedb -b /opt/PostgresPlus/9.4AS/bin -B /opt/PostgresPlus/9.5AS/bin
-p 5444 -P 5445
Performing Consistency Checks
-----------------------------
Checking current, bin, and data directories ok
Checking cluster versions ok
Checking database user is a superuser ok
Checking for prepared transactions ok
Checking for reg* system OID user data types ok
Checking for contrib/isn with bigint-passing mismatch ok
Creating catalog dump ok
Checking for presence of required libraries ok
Checking database user is a superuser ok
Checking for prepared transactions ok
If pg_upgrade fails after this point, you must re-initdb the
new cluster before continuing.
Performing Upgrade
------------------
Analyzing all rows in the new cluster ok
Freezing all rows on the new cluster ok
Deleting files from new pg_clog ok
Copying old pg_clog to new server ok
Setting next transaction ID for new cluster ok
Resetting WAL archives ok
Setting frozenxid counters in new cluster ok
Creating databases in the new cluster ok
Adding support functions to new cluster ok
Restoring database schema to new cluster ok
Removing support functions from new cluster ok
Copying user relation files
ok
Setting next OID for new cluster ok
Creating script to analyze new cluster ok
Creating script to delete old cluster ok
Upgrade Complete
----------------
Optimizer statistics are not transferred by pg_upgrade so,
once you start the new server, consider running:
analyze_new_cluster.sh
Running this script will delete the old cluster's data files:
delete_old_cluster.sh
While pg_upgrade runs, it may generate SQL scripts that handle special circumstances
that it has encountered during your upgrade. For example, if the old cluster contains
large objects, you may need to invoke a script that defines the default permissions for the
objects in the new cluster. When performing the pre-upgrade consistency check
pg_upgrade will alert you to any script that you may be required to run manually.
You must invoke the scripts after pg_upgrade completes. To invoke the scripts, connect
to the new cluster as a database superuser with the EDB-PSQL command line client, and
invoke each script using the \i option:
\i complete_path_to_script/script.sql

EDB Postgres Advanced Server Installation Guide
Copyright © 2009 - 2017 EnterpriseDB Corporation. All rights reserved.
226
It is generally unsafe to access tables referenced in rebuild scripts until the rebuild scripts
have completed; accessing the tables could yield incorrect results or poor performance.
Tables not referenced in rebuild scripts can be accessed immediately.
Please Note: If pg_upgrade fails to complete the upgrade process, the old cluster will be
unchanged, except that $PGDATA/global/pg_control is renamed to
pg_control.old and each tablespace is renamed to tablespace.old. To revert to
the pre-invocation state:
Delete any tablespace directories created by the new cluster.
Rename $PGDATA/global/pg_control, removing the .old suffix.
Rename the old cluster tablespace directory names, removing the .old suffix.
Remove any database objects (from the new cluster) that may have been moved before
the upgrade failed.
After performing these steps, resolve any upgrade conflicts encountered before
attempting the upgrade again.
When the upgrade is complete, pg_upgrade may also recommend vacuuming the new
cluster, and will provide a script that allows you to delete the old cluster.
Before removing the old cluster, ensure that the cluster has been upgraded as expected,
and that you have preserved a backup of the cluster in case you need to revert to a
previous version.
Step 8 - Restore the authentication settings in the pg_hba.conf file
If you modified the pg_hba.conf file to permit trust authentication, update the
contents of the pg_hba.conf file to reflect your preferred authentication settings.
Step 9 - Move and identify user-defined tablespaces (Optional)
If you have data stored in a user-defined tablespace, you must manually relocate
tablespace files after upgrading; move the files to the new location and update the
symbolic links (located in the pg_tblspc directory under your cluster's data directory)
to point to the files.

EDB Postgres Advanced Server Installation Guide
Copyright © 2009 - 2017 EnterpriseDB Corporation. All rights reserved.
227
8.4 pg_upgrade Troubleshooting
The troubleshooting tips in this section address problems you may encounter when using
pg_upgrade.
8.4.1 Upgrade Error - There seems to be a postmaster servicing the cluster
If pg_upgrade reports that a postmaster is servicing the cluster, please stop all Advanced
Server services and try the upgrade again. See Step 4 in Section 8.3, Upgrading to
Advanced Server 9.5 for detailed information about stopping a service.
8.4.2 Upgrade Error - fe_sendauth: no password supplied
If pg_upgrade reports an authentication error that references a missing password, please
modify the pg_hba.conf files in the old and new cluster to enable trust
authentication, or configure the system to use a pgpass.conf file. See Step 3 in
Section 8.3, Upgrading to Advanced Server 9.5 for detailed information about editing the
pg_hba.conf file.
8.4.3 Upgrade Error - New cluster is not empty; exiting
If pg_upgrade reports that the new cluster is not empty, please empty the new cluster.
For details about providing an empty target cluster, see Step 2 in Section 8.3, Upgrading
to Advanced Server 9.5. Please note: the target cluster may not contain any user-defined
databases.
8.4.4 Upgrade Error - Failed to load library
If the original Advanced Server cluster included libraries that are not included in the
Advanced Server 9.5 cluster, pg_upgrade will alert you to the missing component during
the consistency check by writing an entry to the loadable_libraries.txt file in the
directory from which you invoked pg_upgrade.
In the example shown, the old cluster contains PostGIS, while the new installation does
not. Generally, for missing libraries that are not part of a major component upgrade,
perform the following steps:
1. Restart the Advanced Server service.
Use StackBuilder Plus to download and install the missing module as described in
Chapter 4, Using StackBuilder Plus.
2. Stop the Advanced Server service.

EDB Postgres Advanced Server Installation Guide
Copyright © 2009 - 2017 EnterpriseDB Corporation. All rights reserved.
228
3. Resume the upgrade process: invoke pg_upgrade to perform consistency
checking.
4. When you have resolved any remaining problems noted in the consistency checks,
invoke pg_upgrade to perform the data migration from the old cluster to the new
cluster.
Please Note: Advanced Server (version 9.2 and later) is compatible with PostGIS 2.0.
For detailed instructions about upgrading to PostGIS 2.0, see Section 7.13.1.

EDB Postgres Advanced Server Installation Guide
Copyright © 2009 - 2017 EnterpriseDB Corporation. All rights reserved.
229
8.5 Reverting to the Old Cluster
The method used to revert to a previous cluster varies with the options specified when
invoking pg_upgrade:
If you specified the --check option when invoking pg_upgrade, an upgrade has
not been performed, and no modifications have been made to the old cluster; you
can re-use the old cluster at any time.
If you included the --link option when invoking pg_upgrade, the data files are
shared between the old and new cluster after the upgrade completes. If you have
started the server that is servicing the new cluster, the new server has written to
those shared files and it is unsafe to use the old cluster.
If you ran pg_upgrade without the --link specification or have not started the
new server, the old cluster is unchanged, except that the .old suffix has been
appended to the $PGDATA/global/pg_control and tablespace directories.
To reuse the old cluster, delete the tablespace directories created by the new
cluster and remove the .old suffix from $PGDATA/global/pg_control and
the old cluster tablespace directory names and restart the server that services the
old cluster...

EDB Postgres Advanced Server Installation Guide
Copyright © 2009 - 2017 EnterpriseDB Corporation. All rights reserved.
230
9 Un-Installing Advanced Server
You can use either the rpm or yum command to remove RPM packages. Note that
removing a package does not damage the Advanced Server data directory.
The Advanced Server interactive installer creates uninstallers that you can use to remove
Advanced Server or any of its individual components. If you uninstall an Advanced
Server component, the remainder of the Advanced Server installation will remain intact.
Note that after uninstalling Advanced Server, the cluster data files remain intact and the
service user persists. You may manually remove the cluster data and service user from
the system.
9.1 Uninstalling a Package with rpm
Include the -e option on the rpm command to remove installed packages; the command
syntax is:
rpm -e package_name [package_name…]
Where package_name is the name of the package that you would like to remove. The
package name is the name of the .rpm file used when installing the package, with the
version number and file extension (.rpm) removed; for example, the command:
rpm -e ppas95
Removes the package installed with the command:
rpm -i ppas95-9.5.x.x.rhel6.rpm
To instruct rpm to remove multiple packages, provide a list of packages you wish to
remove when invoking the command.
EDB Postgres Advanced Server Installation Guide
Copyright © 2009 - 2017 EnterpriseDB Corporation. All rights reserved.
231
9.2 Uninstalling a Package with yum
You can use the yum remove command to remove an RPM package. To remove a
package, open a terminal window, assume superuser privileges, and enter the command:
yum remove package_name
Where package_name is the name of the package that you would like to remove. The
package name is the name of the .rpm file used when installing the package, with the file
extension (.rpm) removed; for example, the command:
yum remove ppas95
Removes the package installed with the command:
yum install ppas95-9.5.x.x.rhel6.rpm
Note: yum and RPM will not remove a package that is required by another package. If
you attempt to remove a package that satisfies a package dependency, yum or RPM will
provide a warning.
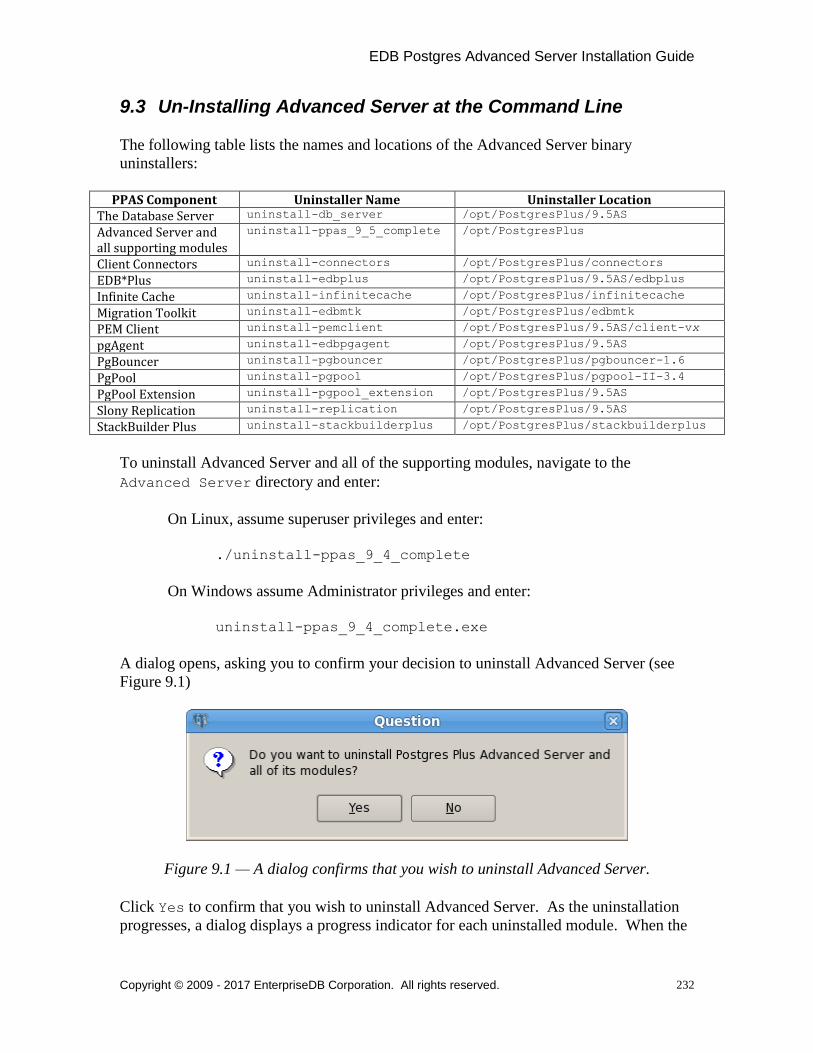
EDB Postgres Advanced Server Installation Guide
Copyright © 2009 - 2017 EnterpriseDB Corporation. All rights reserved.
232
9.3 Un-Installing Advanced Server at the Command Line
The following table lists the names and locations of the Advanced Server binary
uninstallers:
PPAS Component Uninstaller Name Uninstaller Location The Database Server uninstall-db_server /opt/PostgresPlus/9.5AS
Advanced Server and all supporting modules
uninstall-ppas_9_5_complete /opt/PostgresPlus
Client Connectors uninstall-connectors /opt/PostgresPlus/connectors
EDB*Plus uninstall-edbplus /opt/PostgresPlus/9.5AS/edbplus
Infinite Cache uninstall-infinitecache /opt/PostgresPlus/infinitecache
Migration Toolkit uninstall-edbmtk /opt/PostgresPlus/edbmtk
PEM Client uninstall-pemclient /opt/PostgresPlus/9.5AS/client-vx
pgAgent uninstall-edbpgagent /opt/PostgresPlus/9.5AS
PgBouncer uninstall-pgbouncer /opt/PostgresPlus/pgbouncer-1.6
PgPool uninstall-pgpool /opt/PostgresPlus/pgpool-II-3.4
PgPool Extension uninstall-pgpool_extension /opt/PostgresPlus/9.5AS
Slony Replication uninstall-replication /opt/PostgresPlus/9.5AS
StackBuilder Plus uninstall-stackbuilderplus /opt/PostgresPlus/stackbuilderplus
To uninstall Advanced Server and all of the supporting modules, navigate to the
Advanced Server directory and enter:
On Linux, assume superuser privileges and enter:
./uninstall-ppas_9_4_complete
On Windows assume Administrator privileges and enter:
uninstall-ppas_9_4_complete.exe
A dialog opens, asking you to confirm your decision to uninstall Advanced Server (see
Figure 9.1)
Figure 9.1 — A dialog confirms that you wish to uninstall Advanced Server.
Click Yes to confirm that you wish to uninstall Advanced Server. As the uninstallation
progresses, a dialog displays a progress indicator for each uninstalled module. When the
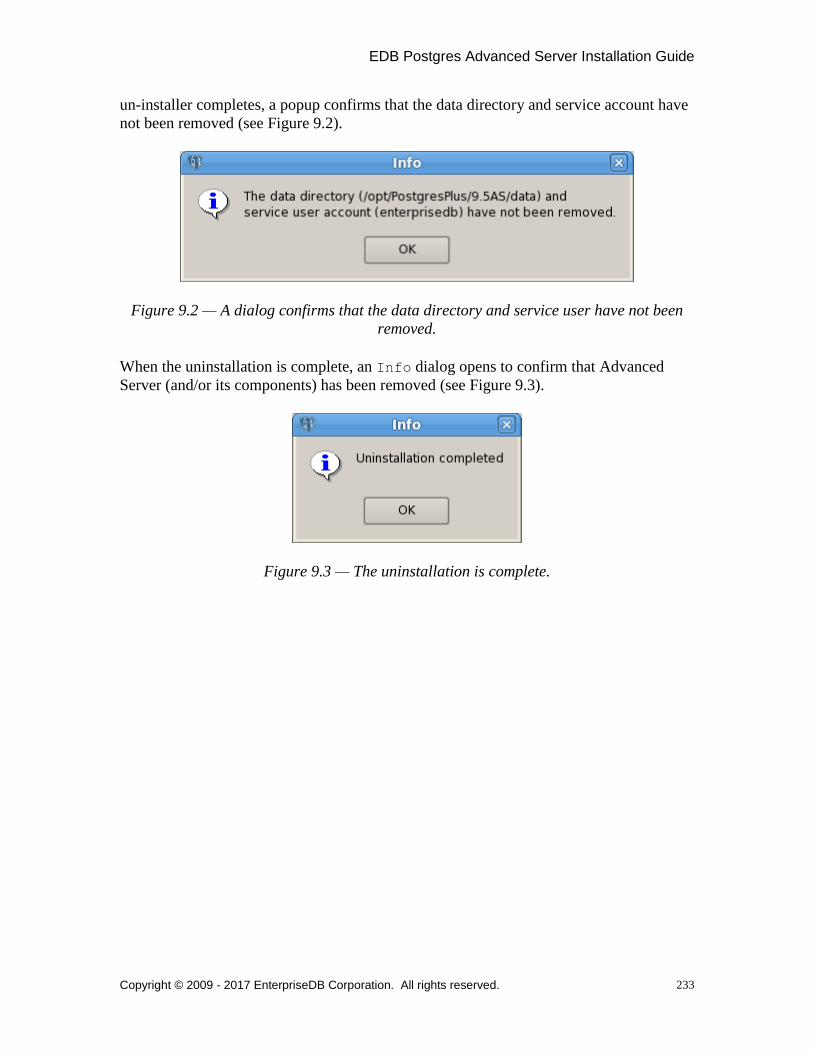
EDB Postgres Advanced Server Installation Guide
Copyright © 2009 - 2017 EnterpriseDB Corporation. All rights reserved.
233
un-installer completes, a popup confirms that the data directory and service account have
not been removed (see Figure 9.2).
Figure 9.2 — A dialog confirms that the data directory and service user have not been
removed.
When the uninstallation is complete, an Info dialog opens to confirm that Advanced
Server (and/or its components) has been removed (see Figure 9.3).
Figure 9.3 — The uninstallation is complete.
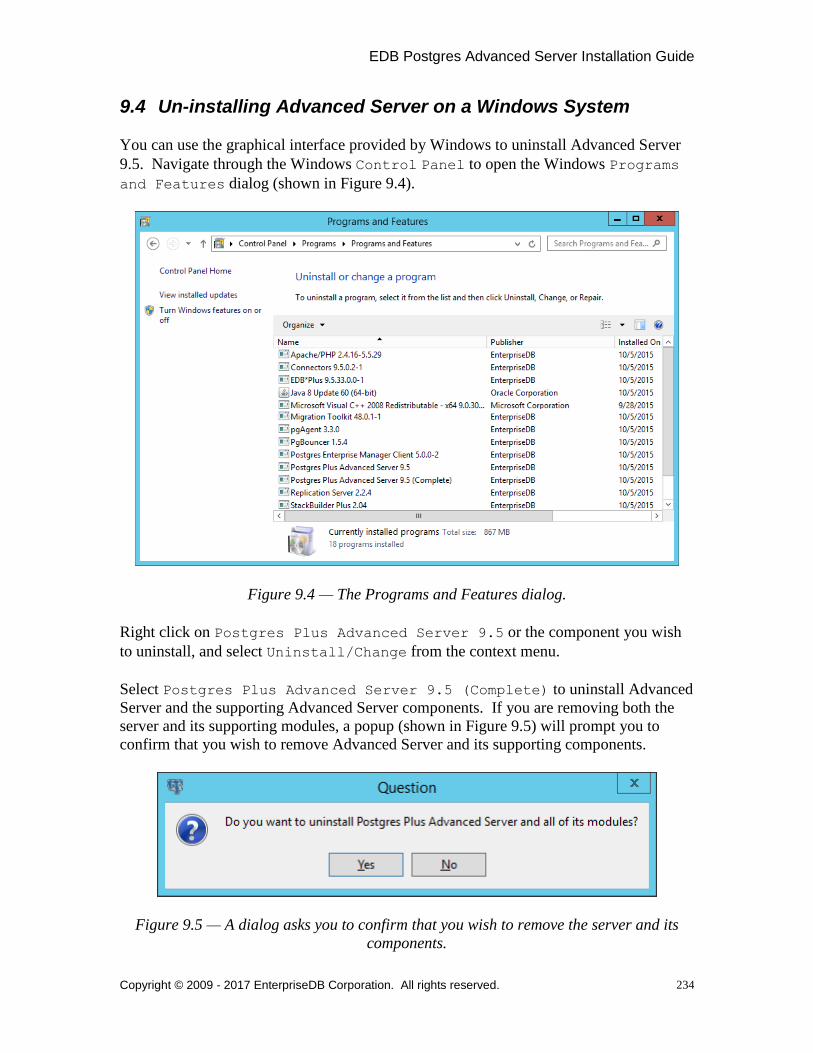
EDB Postgres Advanced Server Installation Guide
Copyright © 2009 - 2017 EnterpriseDB Corporation. All rights reserved.
234
9.4 Un-installing Advanced Server on a Windows System
You can use the graphical interface provided by Windows to uninstall Advanced Server
9.5. Navigate through the Windows Control Panel to open the Windows Programs
and Features dialog (shown in Figure 9.4).
Figure 9.4 — The Programs and Features dialog.
Right click on Postgres Plus Advanced Server 9.5 or the component you wish
to uninstall, and select Uninstall/Change from the context menu.
Select Postgres Plus Advanced Server 9.5 (Complete) to uninstall Advanced
Server and the supporting Advanced Server components. If you are removing both the
server and its supporting modules, a popup (shown in Figure 9.5) will prompt you to
confirm that you wish to remove Advanced Server and its supporting components.
Figure 9.5 — A dialog asks you to confirm that you wish to remove the server and its
components.

EDB Postgres Advanced Server Installation Guide
Copyright © 2009 - 2017 EnterpriseDB Corporation. All rights reserved.
235
Select Postgres Plus Advanced Server 9.5 to uninstall only the Advanced
Server database server. A system restart may be required to complete the removal of
some Advanced Server components; if prompted, click OK to continue.
Please note that uninstalling Advanced Server will leave the data directory and database
service user intact; you will be prompted for a confirmation (as shown in Figure 9.6).
Figure 9.6 — A popup confirms that the data directory and service user account have not
been removed from the host system.
Popup dialogs signal the removal of each Advanced Server component. When the
uninstallation process is complete, an Info dialog opens to confirm (shown in Figure
9.7)
Figure 9.7 — An Info dialog confirms the uninstallation.
Top Related