

![NDT.net - Nondestructive Testing (NDT) Portal & Open ......Optical NDT techniques such as holography [7], electronic speckle pattern interferometry (ESPI) [8], shearography [9], and](https://static.fdocuments.us/doc/165x107/60fe1617d7f0e82fe34d818d/ndtnet-nondestructive-testing-ndt-portal-open-optical-ndt-techniques.jpg)


Languages
Pages
Legal


CALIFORNIA POLYTECHNIC STATE UNIVERSITY
Digital Holography and Applications in
Microscopic Interferometry
Cody Jenkins
Dept. of Physics, California Polytechnic State University, San Luis Obispo
E-mail: [email protected]
Abstract
In this project I demonstrate recording holograms using an electronic camera as the
photosensitive element and subsequent numerical reconstruction in a digital computer.
The technique is employed to show extended depth of field imaging as well as phase
contrast imaging via microscopic interferometry.

CALIFORNIA POLYTECHNIC STATE UNIVERSITY
1. Theory
1.1. Traditional Transmission Holography
In a traditional hologram setup, a beam of coherent, monochromatic light (from a HeNe laser
source, for example) is passed into an optical system and split into two beams: an object beam
and a reference beam. These beams are expanded and then re-collimated. The reference beam
travels through the optical system unobstructed, while the object beam passes through one or
more opaque and semitransparent objects in the path of the beam. The two beams are then mixed
together on a photographic film. (see figure 1.1.1)
Figure 1.1.1 Schematic design of a typical transmission holography
setup
When the beams are recombined, an interference pattern results and is recorded
onto the film. After the film is developed, the points on the emulsion where constructive
interference occurred are darkened and the points where destructive interference occurred are
transparent. This interference pattern is an exact compliment to the interference pattern produced
by the recombined beams, and the features are small enough to cause diffraction of coherent,
monochromatic light. The pattern on the film is a hologram. When coherent light of the same
wavelength is passed through the hologram on the film, the beam is diffracted in such a way as
to approximately reconstruct the object beam as it would have been as it passed the film plane in
the absence of the reference beam. (see figure 1.1.2)
Laser source
Object beam
Beam
splitter
Object
Reference beam
Film plate
Interference pattern
formed on film

CALIFORNIA POLYTECHNIC STATE UNIVERSITY
Figure 1.1.2 “Replaying” of a transmission hologram; note the virtual
image that is present where the object was relative to the
film during the construction of the hologram
Advances in modern electronics opened up the possibility of replacing
photographic emulsion films with charge-coupled devices (CCDs) in holography setups. With a
CCD, a holographer could create a hologram setup as described above, but instead record the
hologram pattern in digital form to a computer for later analysis. As the processing power of
computers increased, it also became feasible to reconstruct the object beam using numerical
methods rather than by using physical diffraction.
1.2. The Fresnel-Kirchhoff Integral and Digital Holography
One such method of reconstructing the object beam’s light field makes of the Fresnel-Kirchhoff
integral shown below in equation 1.1
��, �� � i ���, ����, � exp������ ��
��
���
��� ��
� � �� cos #$ d� d (1.1)
where
� � '�� � ��� � � � ��� � (� (1.2)
There are a lot of pieces, so we will go through each:
�, � Coordinate system in the reconstruction plane
�, Coordinate system in the hologram plane
��, �� The field distribution of the reconstruction; this is what we
calculate to reconstruct an image from a hologram
���, � The amplitude transmittance of the hologram
���, � The field distribution of the reference wave. For our setup, we
will simply use unity
Laser source
Beam
splitter
Virtual image
Reference beam
Developed hologram
Blocker
Diffracted light

CALIFORNIA POLYTECHNIC STATE UNIVERSITY
� The distance between a point in the hologram plane and a point
in the reconstruction plane
#
The angle between the optical axis and the line segment drawn
from ��, � in the hologram plane to ��, �� in the
reconstruction plane
The wavelength of the laser source; this is 633nm in our setup
( The distance from the hologram to the reconstruction plane
The Fresnel-Kirchhoff integral may be adapted to be used in a computational setting by making
some simplifications and other substitutions that are detailed in the referenced review article by
Schnars and Jüptner [1]. For the sake of brevity, we will skip to the final equation used to
compute an image from a digital hologram:
Γ�), *� �
i( exp +��, ( - )�
.�Δ�� � *�0�Δ �12
� 3 3 ��4, 5� ��4, 5� exp 6�� ,( �4�Δ�� � 5�Δ ��7
8��
9:;
<��
=:;� exp >i2, @4)
. � 5*0AB
(1.3)
One additional element that Schnars and Jüptner include in their equation is a “numerical”
imaging lens to bring the light diffracted from the hologram to a focus forming a real image in
the m, n plane. The arguments ) and * in the function Γ�), *� are integer pixel coordinates of a
point in a digital representation of that image. . and 0 are the width and height respectively of
the digital hologram image in pixels. Δ� and Δ are the horizontal and vertical widths
respectively of the CCD pixels. is the wavelength of the laser used to expose the CCD. ( is a
parameter that we will vary depending on the distance between the image focal plane we wish to
resolve and the CCD. We created a MATLAB algorithm to compute this numerical integral
given an input hologram. It is attached in appendix A.
1.3. Microscopic Interferometry
The interference pattern caused by the intersection of the object and reference beams may also be
used to measure the depth profile or optical thickness of a transparent object. This measurement
technique is known as microscopic interferometry. Again, a beam of coherent, monochromatic
light is split into an object beam and a reference beam. The reference beam travels through the
optical system unobstructed, while the object beam passes through a transparent object in its
path. The two beams are then recombined and directed towards a recording medium. However,
in this setup, the light passing through the sample must come to a focus on the CCD.
CALIFORNIA POLYTECHNIC STATE UNIVERSITY
In the image of the transparent sample, the interference pattern shifts depending
on the optical thickness. It is possible to determine the phase shift introduced by a path through
the transparent object directly by comparing the positions of the shifted fringes with the positions
original fringes. We may infer the optical thickness of the object at a point in the interference
pattern using equation 1.4.
( � )*� � *� (1.4)
Here, m is the number of cycles the phase was retarded by, is the wavelength of the light, *� is
the refractive index of the sample material, and *� is the refractive index of the surroundings of
the material.
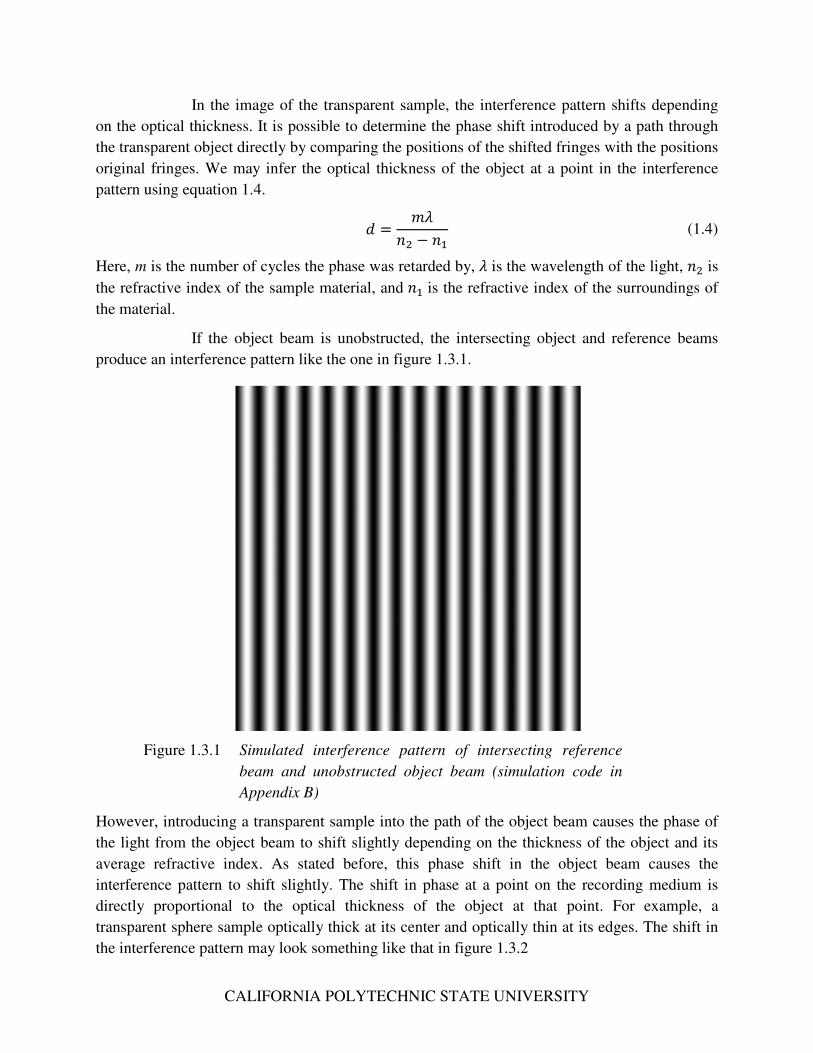
If the object beam is unobstructed, the intersecting object and reference beams
produce an interference pattern like the one in figure 1.3.1.
Figure 1.3.1 Simulated interference pattern of intersecting reference
beam and unobstructed object beam (simulation code in
Appendix B)
However, introducing a transparent sample into the path of the object beam causes the phase of
the light from the object beam to shift slightly depending on the thickness of the object and its
average refractive index. As stated before, this phase shift in the object beam causes the
interference pattern to shift slightly. The shift in phase at a point on the recording medium is
directly proportional to the optical thickness of the object at that point. For example, a
transparent sphere sample optically thick at its center and optically thin at its edges. The shift in
the interference pattern may look something like that in figure 1.3.2

CALIFORNIA POLYTECHNIC STATE UNIVERSITY
Figure 1.3.2 Simulated interference pattern with a transparent,
spherical obstruction in the object beam. The red line
denotes the vertical center and the green line denotes the
horizontal center (simulation code in Appendix C)
The red line in figure 1.3.3 initially runs through a bright fringe at the top of the
image. This bright fringe “bends” away from the red line reaching a maximum displacement at
the horizontal center of the image along the green line. Moving back from this point towards the
red line in the horizontal direction, we count a dark fringe, a bright fringe, and a final dark fringe.
The light passing through the center of the sphere, then, must have had its phase retarded by 1.5
cycles.
2. Experiment
2.1. Recording and Reconstructing a transmission Hologram
We prepared our optical system as shown below in figure 2.1.1. In this setup, the vertically
polarized HeNe beam is split into the usual reference and object beams. The reference beam is
expanded and collimated before being recombined with the object beam at the second beam
splitter. The object beam is expanded and collimated before passing through the sample and
finally through the second beam splitter. Information about the CCD used, the capture software,
and capture machine may be found in Appendix D.

CALIFORNIA POLYTECHNIC STATE UNIVERSITY
Figure 2.1.1 Our slightly off-axis transmission holography optical setup.
Drawing not to scale.
The object beam is oriented such that the path of the object beam is at a slight
angle to the reference beam. To make the calculation of the image simpler, it is assumed that this
angle is small enough that the cos # term from equation 1.1 is approximately 1. The interference
of an unobstructed object beam and the reference beam produces the interference pattern shown
previously in figure 1.3.2.
We placed a USAF resolution chart in the path of the object beam and recorded
the hologram shown in figure 2.1.3
Figure 2.1.3 Hologram of the USAF resolution chart as recoreded by
the CCD. On the left is the full hologram. On the right is a
small section of the hologram from the left showing the
interference pattern detail.
HeNe
B.S. 2
USAF Resolution
chart
B.S. 1
CCD
Microscope
objective +
spatial filter
Microscope
objective +
spatial filter
Reference beam
500mm
Object beam
600mm
260mm

CALIFORNIA POLYTECHNIC STATE UNIVERSITY
We then used the MATLAB program in Appendix A to compute the intensity of
the light field on various focal planes near and parallel to the resolution chart. By varying the
parameter d (the distance from the focal plane to the hologram plane) we could specify the focal
plane we wished to observe. Figure 2.1.4 shows several images that we computed using different
values of the parameter d. Notice the chart coming into and then going out of focus.
Figure 2.1.4 Images computed by the MATLAB program using the
Fresnel-Kirchhoff integral method. The image of the
resolution chart comes into focus at 258mm and goes back
out of focus past that point. In these images, z corresponds
to the hologram-focal plane distance parameter d. At
258mm we see Groups 2, 3, and 4 clearly. The finest
element that we were able to resolve from this hologram
was Group 4 Element 3 which has a resolution of 20.16
line pairs per millimeter. That translates to a separation
between bars of less than 25µm.

CALIFORNIA POLYTECHNIC STATE UNIVERSITY
The ability to select the focal plane allows us to resolve different parts of a 3-D
sample using a single hologram. To demonstrate this principle, we prepared a set of four small
semitransparent “flags” arrange one behind the other as shown in figure 2.1.5.
Figure 2.1.5 Four small “flags” with transparent letters and opaque
surroundings arranged at various position. The letters spell
out “POLY”. From farthest to nearest, the letters are P, L,
Y, O.
We introduced this set of flags into the object beam as we did with the USAF resolution chart
and captured the hologram shown in figure 2.1.6.

CALIFORNIA POLYTECHNIC STATE UNIVERSITY
Figure 2.1.6 Hologram produced with POLY flags. On the left is the full
POLY hologram. On the right is a small section of the
hologram from the left showing the interference pattern
detail.
We ran this hologram through the same MATLAB program and varied d to focus on each flag.
Figure 2.1.7 shows the computed images with each of the letters of “POLY” in focus.

CALIFORNIA POLYTECHNIC STATE UNIVERS
Figure 2.1.7 Each of the four letter
MATLAB program
hologram-focal plane
It should be noted that these four images were generated from the same hologram.
This emphasizes the idea that a hologram contains information
the sample and not just a single focal plane.
2.2. Microscopic Interferometry
The setup for microscopic interferometry is slightly different than for transmission holography,
but many components are the same. Figure 2.2.1 shows our setup. The main difference is the
introduction of the “Imaging lens
to image the sample onto the CCD.
then, so that the CCD lens collimates the light from the reference beam.
CALIFORNIA POLYTECHNIC STATE UNIVERSITY
Each of the four letters in focus as computed by the
MATLAB program. In these images, z corresponds to the
-focal plane distance parameter d.
It should be noted that these four images were generated from the same hologram.
This emphasizes the idea that a hologram contains information about the whole light field around
the sample and not just a single focal plane.
Microscopic Interferometry
microscopic interferometry is slightly different than for transmission holography,
but many components are the same. Figure 2.2.1 shows our setup. The main difference is the
lens” (as shown in the figure just after B.S. 2) in front of the CCD
to image the sample onto the CCD. The reference beam must be refocused after its expansion,
then, so that the CCD lens collimates the light from the reference beam.
computed by the
corresponds to the
It should be noted that these four images were generated from the same hologram.
about the whole light field around
microscopic interferometry is slightly different than for transmission holography,
but many components are the same. Figure 2.2.1 shows our setup. The main difference is the
in front of the CCD
The reference beam must be refocused after its expansion,

CALIFORNIA POLYTECHNIC STATE UNIVERSITY
Figure 2.2.1 Our slightly off-axis microscopic interferometry setup. The
sample is placed at the left focal point of the microscope
objective and is brought to a focus on the CCD (green).
The left focal point of the imaging lens coincides with the
right focal point of the microscope objective so that the
collimated light from the object beam (red) that enters the
microscope objective is re-collimated before falling on the
CCD. The reference beam (blue) is also brought to a focus
so that the imaging lens collimates it before it falls on the
CCD. Drawing not to scale.
To analyze the effectiveness of this setup, we prepared a solution of silica beads
suspended in nanopure water. Then, we added a drop of this solution onto a microscopic slide
and placed that in the object beam. Figure 2.2.2 shows an isolated silica sphere we captured with
the expected interference pattern.
HeNe
B.S. 2
Sample on microscope slide at
microscope objective focal point
B.S. 1
CCD
Imaging lens (400mm)
Reference beam
Object beam
Microscope
objective
20x / 0.45
∞ / 0.17
300mm 125mm
Microscope
objective +
spatial filter
Microscope
objective +
spatial filter
150mm

CALIFORNIA POLYTECHNIC STATE UNIVERSITY
Figure 2.2.2 Real and simulated images of a single isolated silica sphere
suspended in water. The top row shows actual captures and
the bottom row shows simulated images. The left images
show deflected vertical fringes while the right images show
deflected horizontal fringes.
The fringes are deflected along the sphere as in the simulated image in figure 1.3.2. As before,
we may calculate the optical thickness of the sphere and from that the diameter of the sphere
using the known refractive index of silica glass and by counting the number of fringes the
interference pattern is shifted by.

CALIFORNIA POLYTECHNIC STATE UNIVERSITY
Figure 2.2.3 5 micron silica sphere with overlaid lines to indicate the
introduced phase shift
From the image, we measured an approximate phase shift of 1.5, radians or 0.75
cycles. The wavelength of our HeNe was 633nm. The refractive index of water at 633nm is 1.33.
The refractive index of the silica spheres according to Bangs Laboratories Product Data Sheet
702 for Uniform Silica Microspheres is between 1.43 and 1.46. Plugging the extremes of the
refractive index into equation 1.4 yields
(�.FG � �0.75��633 � 10�L�1.43 � 1.33 � 4.75µm
(�.FP � �0.75��633 � 10�L�1.46 � 1.33 � 3.65µm
which has an average of
( � �4.2 Q 0.5�µm
The spheres we used were 4.74µm in diameter, so this result is in good agreement with what we
would expect. It is difficult to measure precisely the number of cycles by which the phase was
retarded. One method to determine the phase shift more precisely is discussed in section 4.
Without knowing the refractive index of the material, it is still possible to measure
the optical thickness of the object and get an idea of the shape of the object. One possible
application of this method involves imaging biological cells. Figure 2.2.4 shows the interference
pattern formed when introducing a buccal epithelial cell into the object beam. The interference
fringes in the center of the cell are deflected more than those on the edges suggesting the cell is
optically deeper at the center. Given the known shape of this type of cell, this is not surprising. It
is also possible to highlight the cell by adjusting the angle between the object and reference beam
so that they are parallel. Figure 2.2.5 shows this effect. The cell may be imaged easily without
staining.

CALIFORNIA POLYTECHNIC STATE UNIVERSITY
Figure 2.2.4 Buccal epithelial cell with interference pattern overlay.
Figure 2.1.5 Two images of the same buccal epithelial cell from figure
2.2.4 but with very wide fringes. The cell stands out clearly
from the background without staining.
3. Conclusion
We were able to capture a number of well formed holograms using our setup and we were able to
reconstruct them using numerical methods based on the Fresnel-Kirchhoff integral and work

CALIFORNIA POLYTECHNIC STATE UNIVERSITY
done by Schnars and Jüptner. We were also able to resolve multiple focal planes of a 3-D sample
using a single hologram.
Using related concepts and techniques, we were able to build an optical
interferometry setup and get a rough estimate of the optical thickness of 5µm silica spheres that
agreed closely with the manufacturer’s specifications. We were also able to image buccal
epithelial cells and demonstrate the use of phase shifting techniques to highlight those biological
cells against their surroundings.
4. Possible Further Research
4.1. Continuous Phase Shifting using liquid-crystal device
One difficulty we encountered when attempting to measure the optical thickness of the silica
spheres involved determining the phase shift introduced by the sample. One possible solution
could involve the use of a continuous phase shifting liquid-crystal device. In this setup, a phase
shifting liquid crystal device would be placed in the path of the reference beam. Adjusting the
phase of the reference beam through one cycle would cause each pixel to go through one cycle of
dark-light-dark or light-dark-light. Using several sequential images of the interferogram, each
with a further phase shift, one could determine more accurately the phase shift of each pixel.
Knowing the phase shift accurately, one could then more precisely determine the optical
thickness of the sample at that point and potentially obtain an optical thickness profile for the
sample.
CALIFORNIA POLYTECHNIC STATE UNIVERSITY
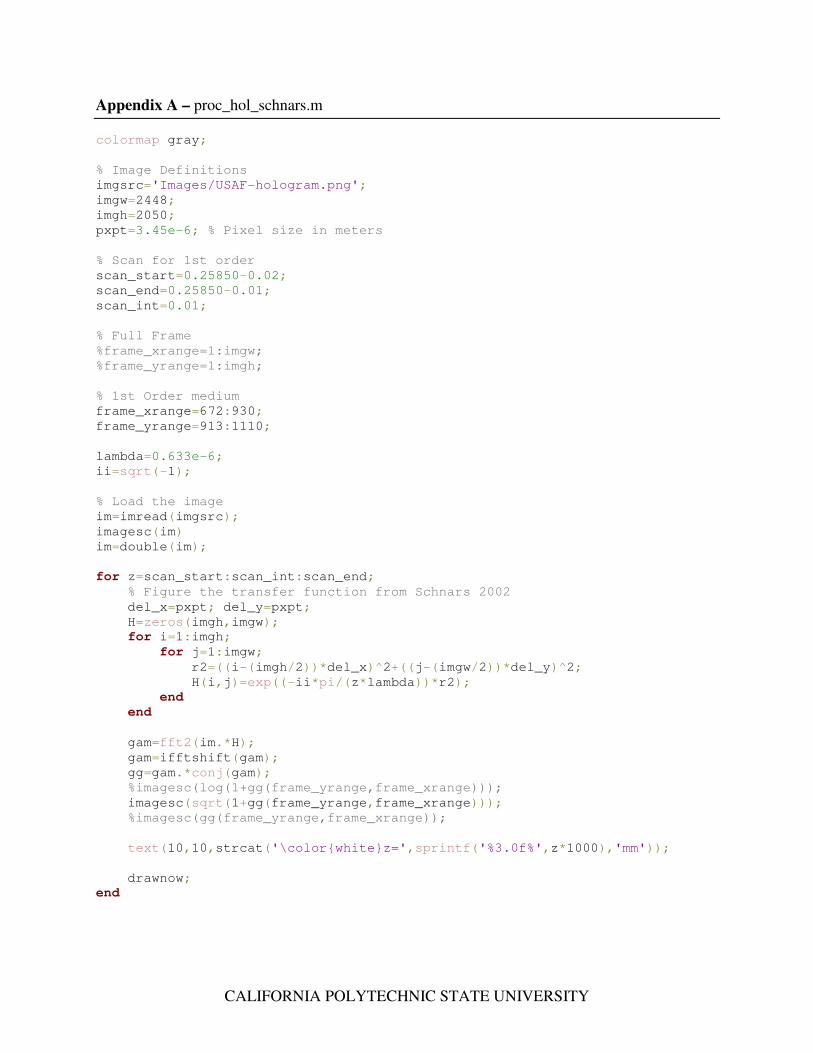
Appendix A – proc_hol_schnars.m
colormap gray;
% Image Definitions
imgsrc='Images/USAF-hologram.png';
imgw=2448;
imgh=2050;
pxpt=3.45e-6; % Pixel size in meters
% Scan for 1st order
scan_start=0.25850-0.02;
scan_end=0.25850-0.01;
scan_int=0.01;
% Full Frame
%frame_xrange=1:imgw;
%frame_yrange=1:imgh;
% 1st Order medium
frame_xrange=672:930;
frame_yrange=913:1110;
lambda=0.633e-6;
ii=sqrt(-1);
% Load the image
im=imread(imgsrc);
imagesc(im)
im=double(im);
for z=scan_start:scan_int:scan_end;
% Figure the transfer function from Schnars 2002
del_x=pxpt; del_y=pxpt;
H=zeros(imgh,imgw);
for i=1:imgh;
for j=1:imgw;
r2=((i-(imgh/2))*del_x)^2+((j-(imgw/2))*del_y)^2;
H(i,j)=exp((-ii*pi/(z*lambda))*r2);
end
end
gam=fft2(im.*H);
gam=ifftshift(gam);
gg=gam.*conj(gam);
%imagesc(log(1+gg(frame_yrange,frame_xrange)));
imagesc(sqrt(1+gg(frame_yrange,frame_xrange)));
%imagesc(gg(frame_yrange,frame_xrange));
text(10,10,strcat('\color{white}z=',sprintf('%3.0f%',z*1000),'mm'));
drawnow;
end

CALIFORNIA POLYTECHNIC STATE UNIVERSITY
Appendix B – Mathematica unobstructed interference pattern code
Appendix C – Mathematica transparent spherical sample interference pattern code

CALIFORNIA POLYTECHNIC STATE UNIVERSITY
Appendix D – Hologram Capture Equipment Details
• Capture Device
Basler piA2400-17gm http://www.graftek.com/pdf/Brochures/basler/pilot_1.pdf
Sensor Size (H x V pixels) 2448 x 2050
Pixel Size (µm) 3.45 x 3.45
Max. Frame Rate (at full resolution) 17 fps
Data Output Type (Interface) Gigabit Ethernet (GigE Vision
compliant)
• Capture Software
o National Instruments Measurement & Automation Explorer
• Central Processing Unit
o Intel® Pentium® 4 CPU 3.80GHz (2 CPUs)

CALIFORNIA POLYTECHNIC STATE UNIVERSITY
References
[1] Ulf Schnars and Werner P O Jüptner “Digital recording and numerical reconstruction of
holograms,” Meas. Sci. Technol, Vol. 13, Issue 9 (2002)
[2] N. Shaked, Y. Zhu, M. Rinehart, and A. Wax, “Two-step-only phase-shifting interferometry
with optimized detector bandwidth for microscopy of live cells,” Optics Express, Vol. 17,
Issue 18, pp. 15585-15591 (2009)
Top Related