


Languages
Pages
Legal

Directorate for Quality and Standards in Education - Curriculum Management and eLearning Department – Graphical Communication – 2011
1
Curriculum for Graphical Communication Form 2
Directorate for Quality and Standards in Education - Curriculum Management and eLearning Department – Graphical Communication – 2011
2
Directorate for Quality and Standards in Education
Curriculum Management and eLearning Department
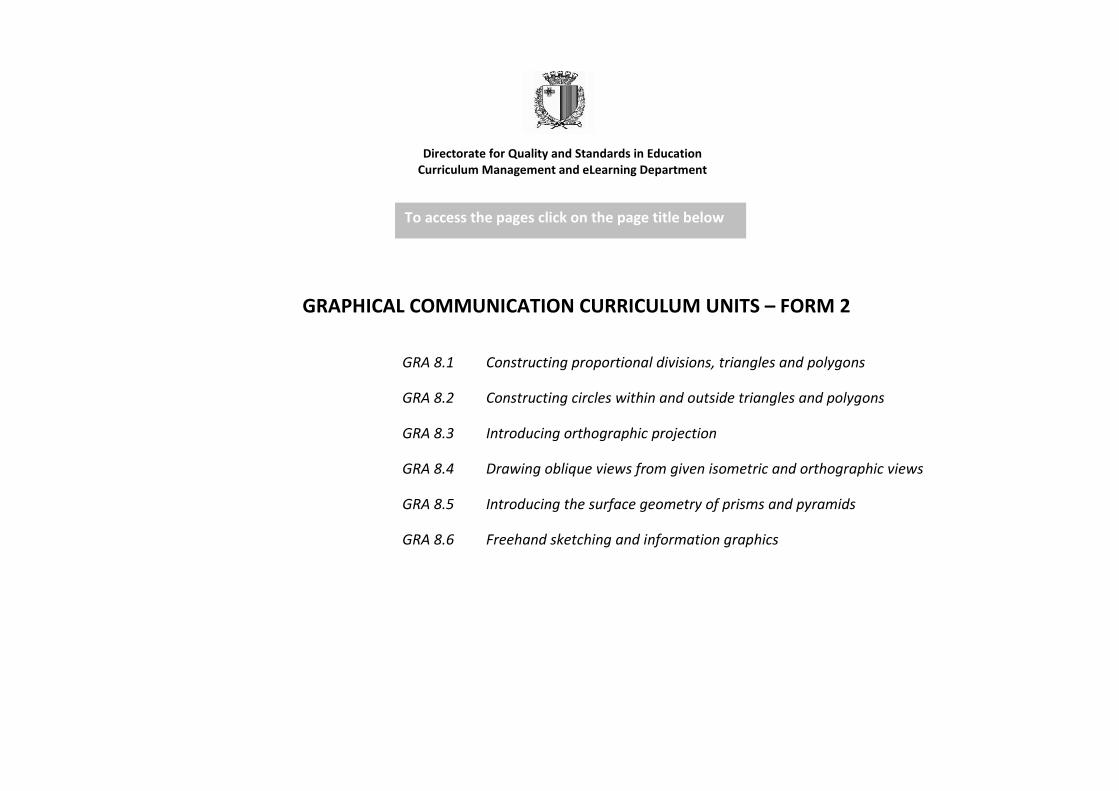
GRAPHICAL COMMUNICATION CURRICULUM UNITS – FORM 2
GRA 8.1 Constructing proportional divisions, triangles and polygons
GRA 8.2 Constructing circles within and outside triangles and polygons
GRA 8.3 Introducing orthographic projection
GRA 8.4 Drawing oblique views from given isometric and orthographic views
GRA 8.5 Introducing the surface geometry of prisms and pyramids
GRA 8.6 Freehand sketching and information graphics
To access the pages click on the page title below
Directorate for Quality and Standards in Education Curriculum Management and eLearning Department – Graphical Communication – 2012
1
Subject: GRAPHICAL COMMUNICATION Form 2 Unit code and title: GRA 8.1 Constructing proportional divisions, triangles and polygons Strand: Geometry Unit Duration: 9 sessions of 40 minutes (6 hours) Objectives The teacher will:
1. help students divide straight lines into a given ratio. 2. help students construct triangles given two base angles and the altitude.
3. help students construct isosceles triangles given the altitude and apex angle. 4. help students construct regular polygons in a given circle. 5. help students construct regular polygons on a given line.
Key Words Points to Note Resources
Ratio Proportional divisions Base Altitude Base angle Apex angle Geometrical construction Compass angles Polygons
The teacher revises the fundamental principles of geometrical constructions and stresses the importance of improving certain skills such as accuracy, neatness and problem solving. The exercises given by the teacher are to be structured in such a way that, apart from reaching the new objective, the students will be continuously revising what they have learnt during the previous year. Where possible, the teacher should give practical examples so that the students will appreciate the utility of the subject in both aesthetic and functional aspects. Cross-curricular Links: Mathematics and Art. Approach to teaching and learning: For the first part of the unit, direct instruction is used, however, as the unit unfolds, the teacher can encourage the students to adopt a hands-on approach, especially to construct, cut, fold and glue the Telstar football.
Equipment needed:
Interactive whiteboard Whiteboard, large drawing instruments to be used on the whiteboard. Cardboard A2, cutting mat, scalpel, raised steel rule, scissors, double sided sticky tape and glue. Textbooks: Graphical Communication 1 Stuart Bland Technical Drawing (omnibus) F.B.Mayock Understanding Technical Graphics J.&T. O’Sullivan Understanding Technical Graphics Workbook Graphical Communication Handouts Graphical Communication Website link:
http://graphicalcommunication.skola.edu.mt/
Directorate for Quality and Standards in Education Curriculum Management and eLearning Department – Graphical Communication – 2012
2
Teaching Objective Examples of teaching experiences and activities Indicators of Learning outcomes
The teacher will:
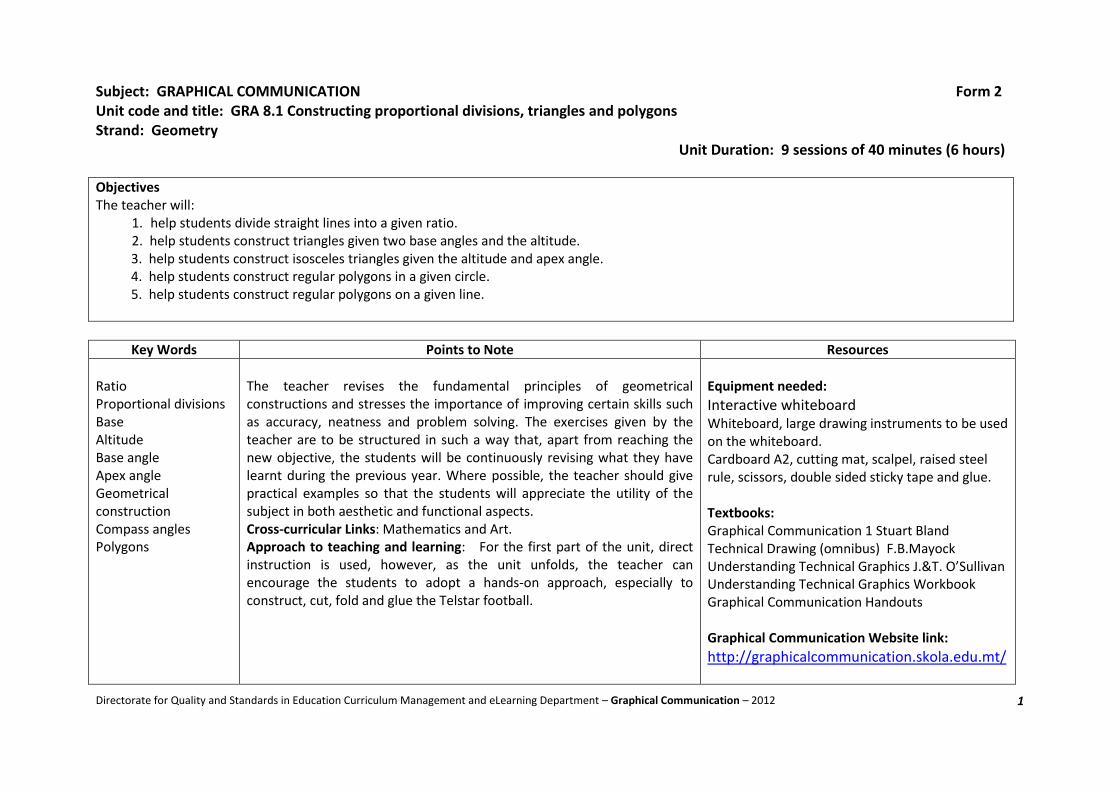
help students divide straight lines into a given ratio.
The teacher revises the basic geometric constructions of line bisection and line division and later introduces the concept of proportional division of a line.
Possible Activities:
The students are given a number of simple exercises so that they will get accustomed with the method. It is to be noted that the division of a line (set square method) requires dexterity, a skill which some students find difficulty to master.
Finally the students are given practical examples which have elements of revision geometry together with the newly acquired knowledge about the proportional divisions of lines.
Students will divide lines with a high degree of accuracy, neatness and presentation. The students will be able to calculate the proportional divisions and manipulate the set squares with speed and dexterity. (Level 7)
Students will divide lines with a good degree of accuracy, neatness and presentation. The students will be able to calculate the proportional divisions and manipulate the set squares with reasonable dexterity. (Level 7)
Students will divide lines with a fair degree of accuracy, neatness and presentation. The students will require intermittent support in order to calculate the proportional divisions and to manipulate the set squares. (Level 6)
Students will divide lines with a low degree of accuracy, neatness and presentation. The students will require continuous support to calculate the proportional divisions and to manipulate the set squares. (Level 5)
A B
CD
01
23
45
6
4
3
2
1
0
Directorate for Quality and Standards in Education Curriculum Management and eLearning Department – Graphical Communication – 2012
3
A B
C
60°4
5°
Teaching Objective Examples of teaching experiences and activities Indicators of Learning outcomes
The teacher will:
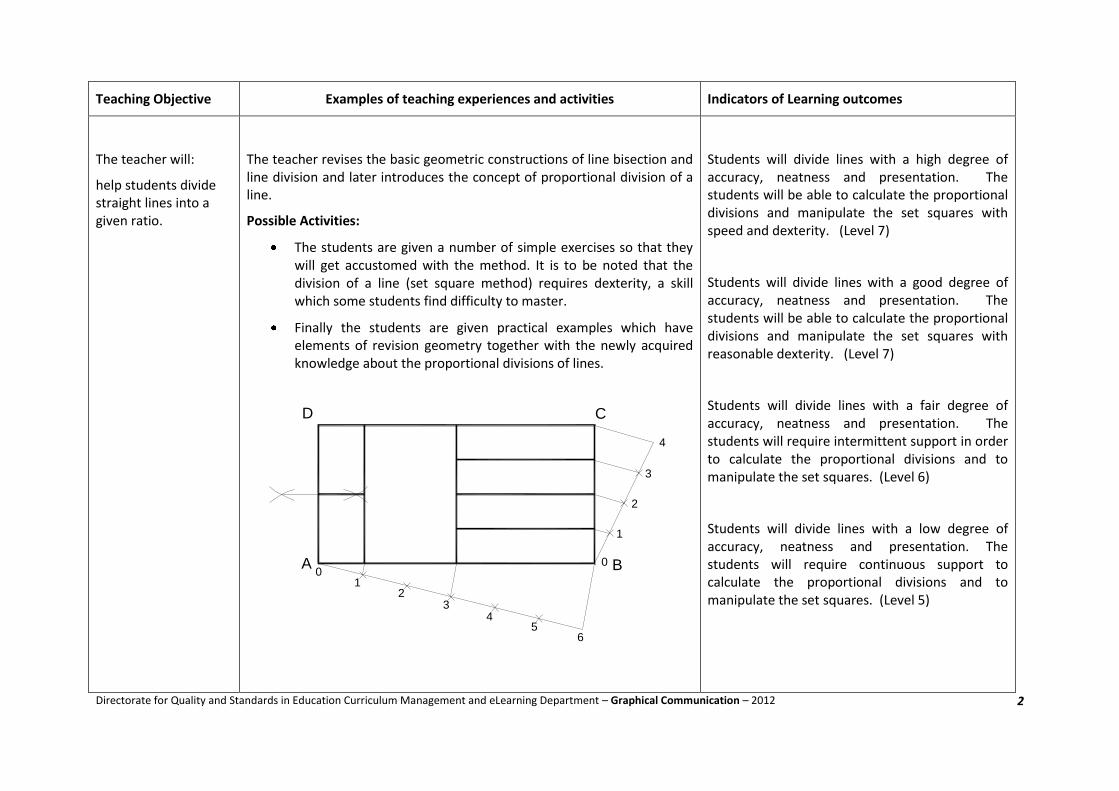
help students construct triangles given two base angles and the altitude.
The teacher will:
help students construct isosceles triangles given the altitude and apex angle .
The lesson starts off with a set induction consisting of a short video documentary which highlights the importance of triangles in building structures. http://www.learnalberta.ca/content/mejhm/index.html?l=0&ID1=AB.MATH.JR.SHAP&ID2=AB.MATH.JR.SHAP.TRI&lesson=html/video_interactives/triangles/trianglesSmall.html
Possible Activities:
The students are encouraged to identify the types of triangles and discuss their structural and aesthetic importance. The teacher proceeds by explaining how to construct triangles according to the following data:
Altitude and two base angles.
Altitude and apex angle of an isosceles triangle.
Where possible, the teacher uses geometric constructions to construct angles and parallel lines, thus revising previous geometry topics. The students are given a number of exercises from textbooks, workbooks or handouts.
Students will construct accurately and neatly triangles when given the altitude, the apex and two base angles. The angles will be constructed either by means of compasses, by means of a protractor or by means of set squares. (Level 8)
Students will construct triangles when given the altitude, the apex and two base angles. The angles will be constructed by means of compasses. (Level 7)
Students will require minimum support to construct triangles by means of a protractor using the altitude, the apex and two base angles. (Level 6)
Students will identify triangles and will require continuous support to construct triangles by means of a protractor using the altitude, the apex and two base angles. (Level 5)
A B
C
Directorate for Quality and Standards in Education Curriculum Management and eLearning Department – Graphical Communication – 2012
4
Teaching Objective
Examples of teaching experiences and activities Indicators of Learning outcomes
The teacher will:
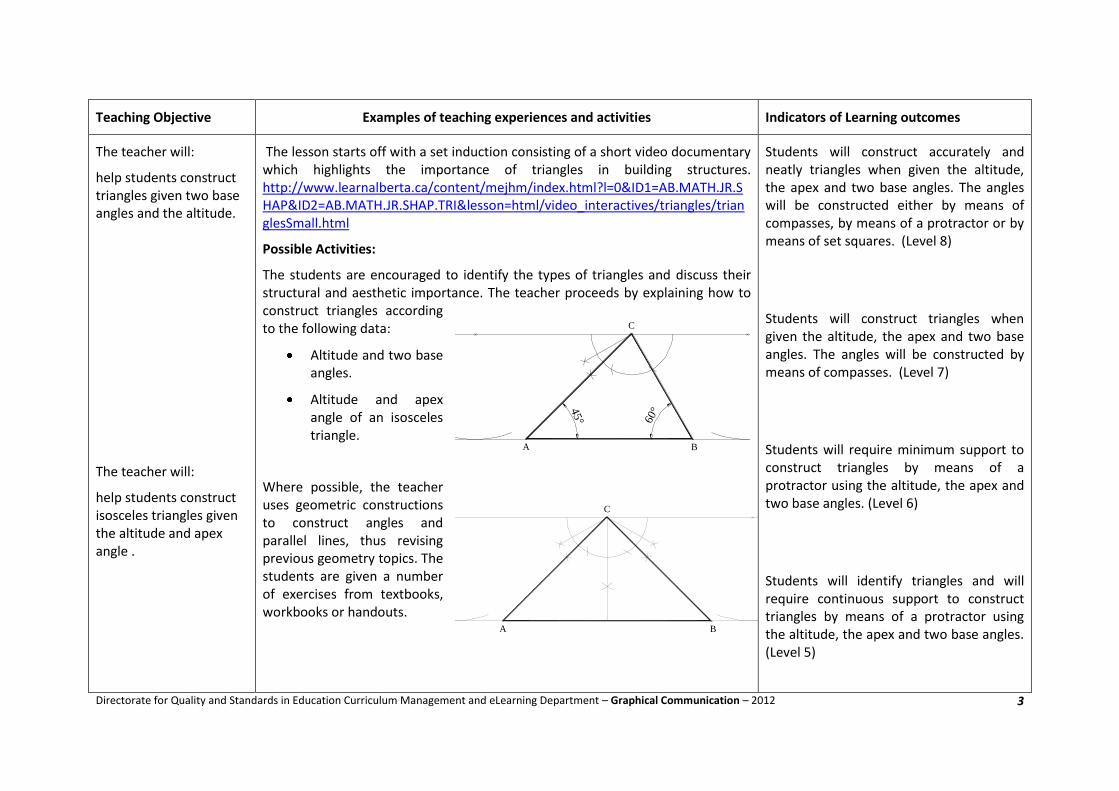
help students construct regular polygons in a given circle.
The lesson starts off with a set induction consisting of a picture of the Telstar Football which was the official match ball of the 1970 FIFA World Cup in Mexico. This ball consists of 32 polygons (20 white hexagons and 12 black pentagons) stiched together to form a sphere. The teacher explains the method of constructing polygons inside a given circle. It is recommended that, to avoid commonly made mistakes, for the first examples, the diameters of the circles are exactly divisible by the number of sides thus initially eliminating the need to divide the diameter by means of the set square method.
Possible Activities: The students are asked to construct a number of polygons in given circles. The final task is to construct part of the football surface development, consisting of one central pentagon (using the newly learnt method) surrounded by five hexagons (revising the method used in Form 1). When the exercise is ready, the students can photocopy their work, colour it, cut it and fold it to form a spherical segment.
Students will construct accurately a range of polygons (five to eight sides) inside a given circle using the universal method. They will also construct accurately the part surface development of the Telstar Football. (Level 8)
Students will construct a range of polygons (five to eight sides) inside a given circle using the universal method. They will also construct the part surface development of the Telstar Football. (Level 7)
Students will construct a range of polygons (five to eight sides) inside a given circle using the universal method, with support. (Level 6)
Students will construct a range of polygons (five to eight sides) inside a given circle using the universal method, with continuous support. (Level 5)
0
1
2
3
4
5
0
1
2
3
4
5
Directorate for Quality and Standards in Education Curriculum Management and eLearning Department – Graphical Communication – 2012
5
Teaching Objective Examples of teaching experiences and activities Indicators of Learning outcomes
The teacher will:
help students construct regular polygons on a given line.
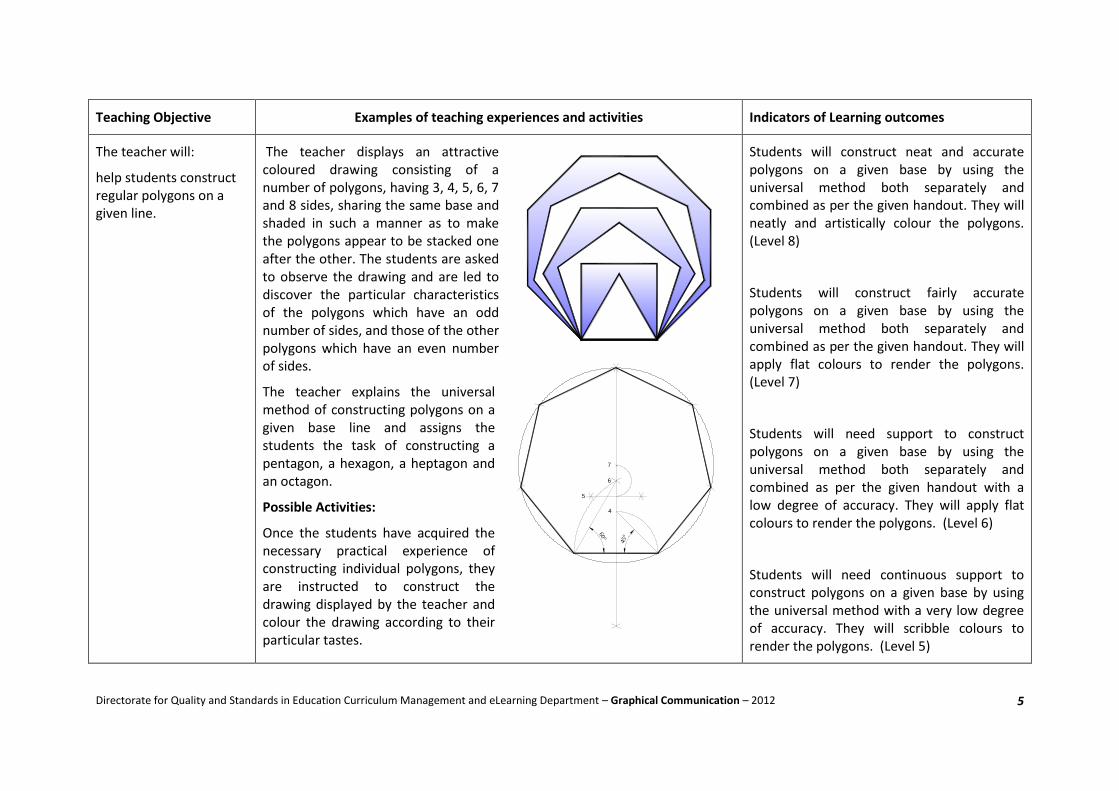
The teacher displays an attractive coloured drawing consisting of a number of polygons, having 3, 4, 5, 6, 7 and 8 sides, sharing the same base and shaded in such a manner as to make the polygons appear to be stacked one after the other. The students are asked to observe the drawing and are led to discover the particular characteristics of the polygons which have an odd number of sides, and those of the other polygons which have an even number of sides.
The teacher explains the universal method of constructing polygons on a given base line and assigns the students the task of constructing a pentagon, a hexagon, a heptagon and an octagon.
Possible Activities:
Once the students have acquired the necessary practical experience of constructing individual polygons, they are instructed to construct the drawing displayed by the teacher and colour the drawing according to their particular tastes.
Students will construct neat and accurate polygons on a given base by using the universal method both separately and combined as per the given handout. They will neatly and artistically colour the polygons. (Level 8)
Students will construct fairly accurate polygons on a given base by using the universal method both separately and combined as per the given handout. They will apply flat colours to render the polygons. (Level 7)
Students will need support to construct polygons on a given base by using the universal method both separately and combined as per the given handout with a low degree of accuracy. They will apply flat colours to render the polygons. (Level 6)
Students will need continuous support to construct polygons on a given base by using the universal method with a very low degree of accuracy. They will scribble colours to render the polygons. (Level 5)
45°
60°4
6
7
5
Directorate for Quality and Standards in Education Curriculum Management and eLearning Department – Graphical Communication – 2012
6
Subject: GRAPHICAL COMMUNICATION Form 2 Unit code and title: GRA 8.2 Constructing circles within and outside triangles and polygons Strand: Geometry Unit Duration: 9 sessions of 40 minutes (6 hours) Objectives The teacher will: 1 help students locate geometrically the centre of a given circle (3 point circle method).
2. help students locate geometrically the centre of a circle touching the three corners of a triangle (circumscribed). 3. help students locate geometrically the centre of a circle touching the three sides of a triangle (inscribed). 4. help students locate geometrically the centre of a circle touching one side and two extended sides of a triangle (escribed).
5. help students construct regular polygons given two sides and the interior angle (3 point circle method) .
Key Words Points to Note Resources
3 point circle circumscribed inscribed escribed interior angle exterior angle
This unit concludes the topic of plane geometry for Form 2. Neatness and accuracy cannot be over emphasized, as the results of all the exercises that are to be covered during this unit depend mainly upon the precision of pencil and compass work. To maintain the students’ interest, the teacher needs to provide practical examples which may be related to everyday objects, the building industry and graphic design. Where possible, throughout this unit, the teacher should try to encourage students to learn through experimentation. Cross-curricular Links: Mathematics, Art & Crafts. Approach to teaching and learning: Most of the lessons included in this unit start with a learning by guided discovery activity. The teacher later formalises the students’ findings and distributes the appropriate worksheets. It is important to note that, since the learning by discovery approach may take relatively longer time to conduct, the worksheets have to be designed in a manner that make the most effective use of the remaining time of the lesson.
Equipment needed:
Interactive whiteboard Whiteboard, large drawing instruments to be used on the whiteboard. Cardboard A2, cutting mat, scalpel, raised steel rule, scissors, double sided sticky tape and glue. Textbooks: Graphical Communication 1 Stuart Bland Technical Drawing (omnibus) F.B. Mayock Understanding Technical Graphics J.&T. O’Sullivan Understanding Technical Graphics Workbook Graphical Communication Handouts Graphical Communication Website link:
http://graphicalcommunication.skola.edu.mt/
Directorate for Quality and Standards in Education Curriculum Management and eLearning Department – Graphical Communication – 2012
7
Teaching Objective Examples of teaching experiences and activities Indicators of Learning outcomes
The teacher will:
help students locate geometrically the centre of a given circle (3 point circle method).
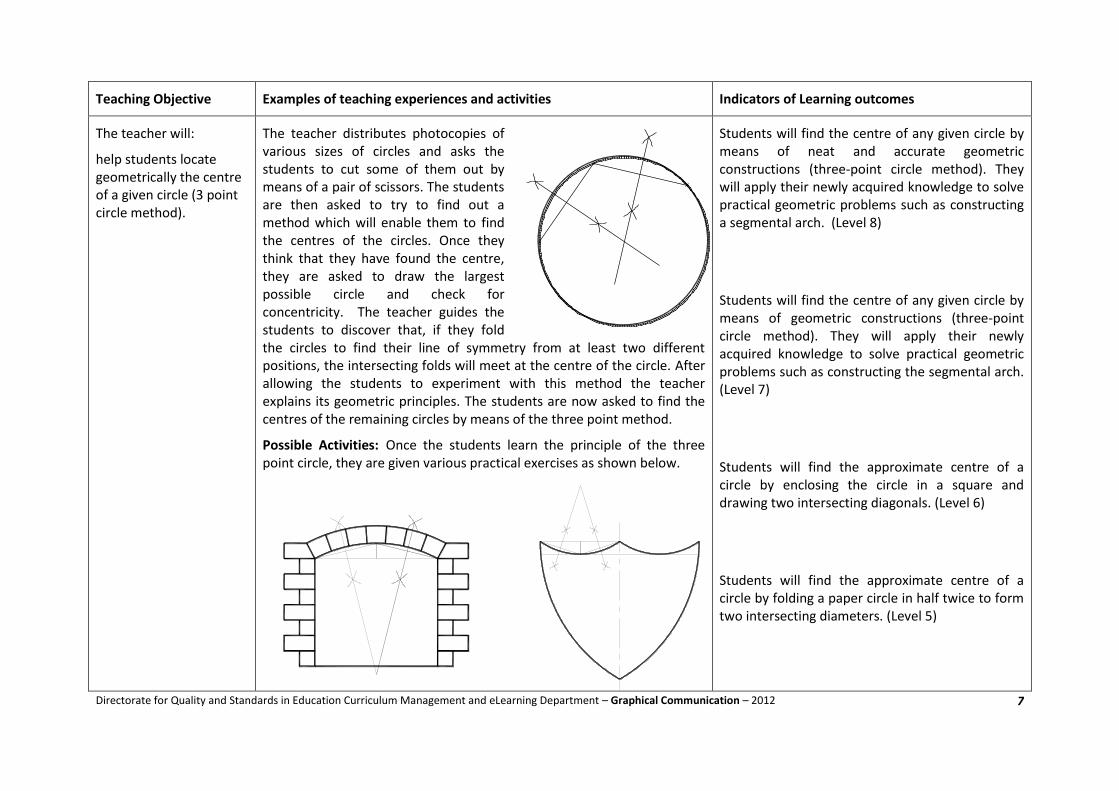
The teacher distributes photocopies of various sizes of circles and asks the students to cut some of them out by means of a pair of scissors. The students are then asked to try to find out a method which will enable them to find the centres of the circles. Once they think that they have found the centre, they are asked to draw the largest possible circle and check for concentricity. The teacher guides the students to discover that, if they fold the circles to find their line of symmetry from at least two different positions, the intersecting folds will meet at the centre of the circle. After allowing the students to experiment with this method the teacher explains its geometric principles. The students are now asked to find the centres of the remaining circles by means of the three point method.
Possible Activities: Once the students learn the principle of the three point circle, they are given various practical exercises as shown below.
Students will find the centre of any given circle by means of neat and accurate geometric constructions (three-point circle method). They will apply their newly acquired knowledge to solve practical geometric problems such as constructing a segmental arch. (Level 8)
Students will find the centre of any given circle by means of geometric constructions (three-point circle method). They will apply their newly acquired knowledge to solve practical geometric problems such as constructing the segmental arch. (Level 7)
Students will find the approximate centre of a circle by enclosing the circle in a square and drawing two intersecting diagonals. (Level 6)
Students will find the approximate centre of a circle by folding a paper circle in half twice to form two intersecting diameters. (Level 5)
Directorate for Quality and Standards in Education Curriculum Management and eLearning Department – Graphical Communication – 2012
8
Teaching Objective Examples of teaching experiences and activities Indicators of Learning outcomes
The teacher will:
help students locate geometrically the centre of a circle touching the three corners of a triangle (circumscribed).
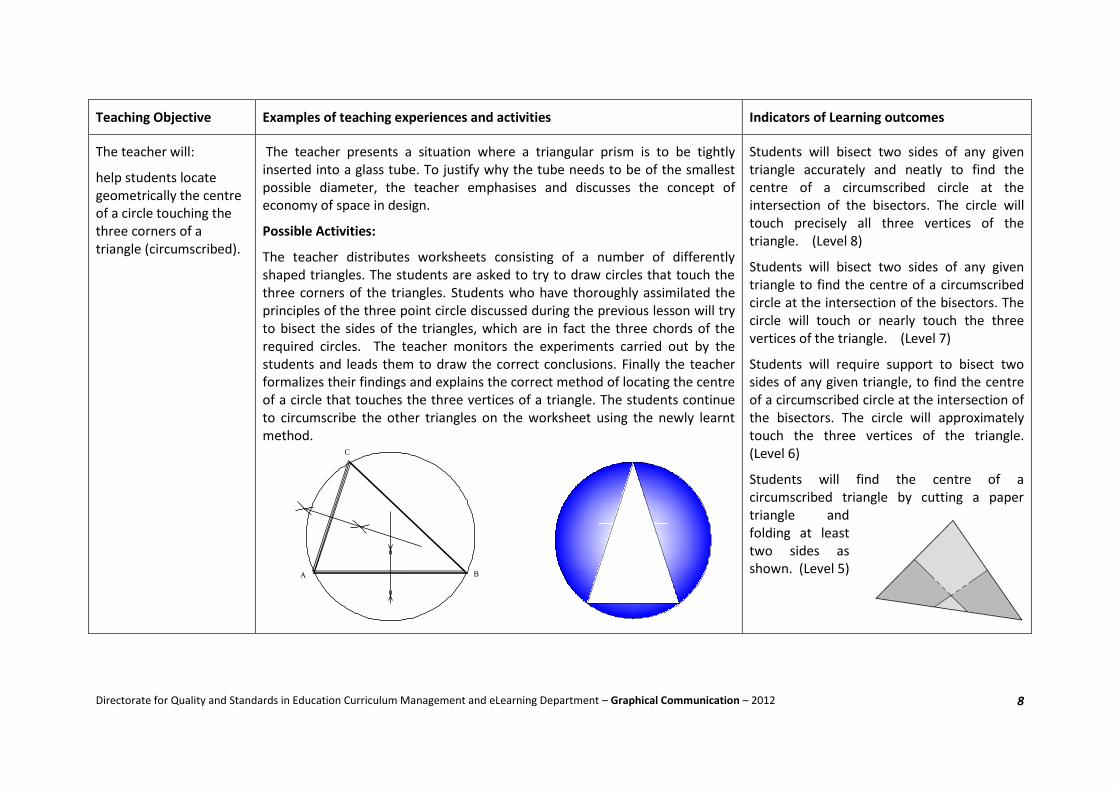
The teacher presents a situation where a triangular prism is to be tightly inserted into a glass tube. To justify why the tube needs to be of the smallest possible diameter, the teacher emphasises and discusses the concept of economy of space in design.
Possible Activities:
The teacher distributes worksheets consisting of a number of differently shaped triangles. The students are asked to try to draw circles that touch the three corners of the triangles. Students who have thoroughly assimilated the principles of the three point circle discussed during the previous lesson will try to bisect the sides of the triangles, which are in fact the three chords of the required circles. The teacher monitors the experiments carried out by the students and leads them to draw the correct conclusions. Finally the teacher formalizes their findings and explains the correct method of locating the centre of a circle that touches the three vertices of a triangle. The students continue to circumscribe the other triangles on the worksheet using the newly learnt method.
Students will bisect two sides of any given triangle accurately and neatly to find the centre of a circumscribed circle at the intersection of the bisectors. The circle will touch precisely all three vertices of the triangle. (Level 8)
Students will bisect two sides of any given triangle to find the centre of a circumscribed circle at the intersection of the bisectors. The circle will touch or nearly touch the three vertices of the triangle. (Level 7)
Students will require support to bisect two sides of any given triangle, to find the centre of a circumscribed circle at the intersection of the bisectors. The circle will approximately touch the three vertices of the triangle. (Level 6)
Students will find the centre of a circumscribed triangle by cutting a paper triangle and folding at least two sides as shown. (Level 5)
A B
C
Directorate for Quality and Standards in Education Curriculum Management and eLearning Department – Graphical Communication – 2012
9
A B
C
Teaching Objective Examples of teaching experiences and activities Indicators of Learning outcomes
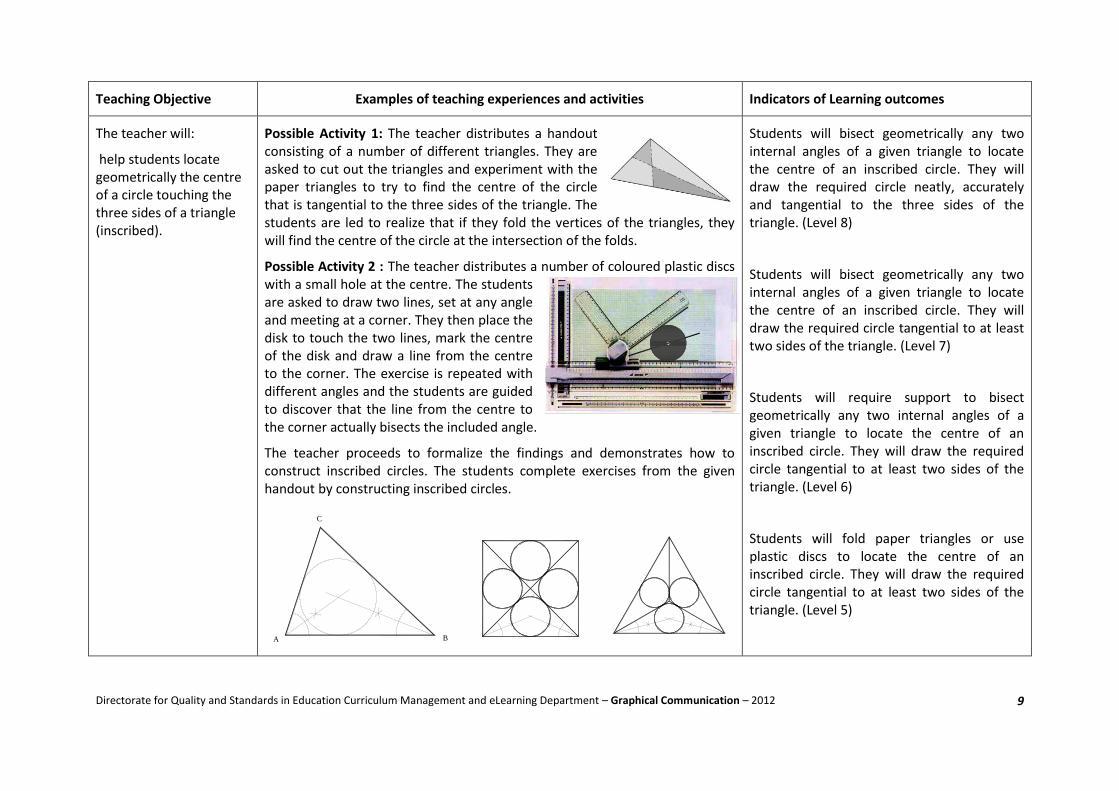
The teacher will:
help students locate geometrically the centre of a circle touching the three sides of a triangle (inscribed).
Possible Activity 1: The teacher distributes a handout consisting of a number of different triangles. They are asked to cut out the triangles and experiment with the paper triangles to try to find the centre of the circle that is tangential to the three sides of the triangle. The students are led to realize that if they fold the vertices of the triangles, they will find the centre of the circle at the intersection of the folds.
Possible Activity 2 : The teacher distributes a number of coloured plastic discs with a small hole at the centre. The students are asked to draw two lines, set at any angle and meeting at a corner. They then place the disk to touch the two lines, mark the centre of the disk and draw a line from the centre to the corner. The exercise is repeated with different angles and the students are guided to discover that the line from the centre to the corner actually bisects the included angle.
The teacher proceeds to formalize the findings and demonstrates how to construct inscribed circles. The students complete exercises from the given handout by constructing inscribed circles.
Students will bisect geometrically any two internal angles of a given triangle to locate the centre of an inscribed circle. They will draw the required circle neatly, accurately and tangential to the three sides of the triangle. (Level 8)
Students will bisect geometrically any two internal angles of a given triangle to locate the centre of an inscribed circle. They will draw the required circle tangential to at least two sides of the triangle. (Level 7)
Students will require support to bisect geometrically any two internal angles of a given triangle to locate the centre of an inscribed circle. They will draw the required circle tangential to at least two sides of the triangle. (Level 6)
Students will fold paper triangles or use plastic discs to locate the centre of an inscribed circle. They will draw the required circle tangential to at least two sides of the triangle. (Level 5)
Directorate for Quality and Standards in Education Curriculum Management and eLearning Department – Graphical Communication – 2012
10
Teaching Objective Examples of teaching experiences and activities Indicators of Learning outcomes
The teacher will:
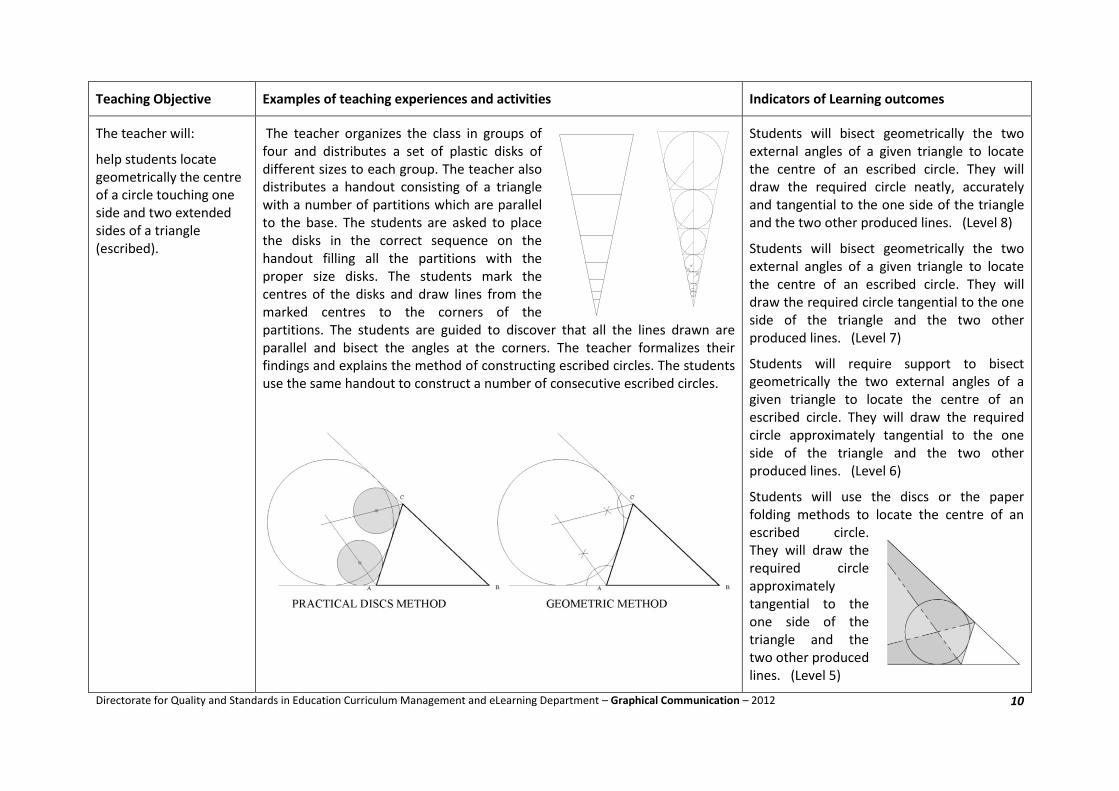
help students locate geometrically the centre of a circle touching one side and two extended sides of a triangle (escribed).
The teacher organizes the class in groups of four and distributes a set of plastic disks of different sizes to each group. The teacher also distributes a handout consisting of a triangle with a number of partitions which are parallel to the base. The students are asked to place the disks in the correct sequence on the handout filling all the partitions with the proper size disks. The students mark the centres of the disks and draw lines from the marked centres to the corners of the partitions. The students are guided to discover that all the lines drawn are parallel and bisect the angles at the corners. The teacher formalizes their findings and explains the method of constructing escribed circles. The students use the same handout to construct a number of consecutive escribed circles.
Students will bisect geometrically the two external angles of a given triangle to locate the centre of an escribed circle. They will draw the required circle neatly, accurately and tangential to the one side of the triangle and the two other produced lines. (Level 8)
Students will bisect geometrically the two external angles of a given triangle to locate the centre of an escribed circle. They will draw the required circle tangential to the one side of the triangle and the two other produced lines. (Level 7)
Students will require support to bisect geometrically the two external angles of a given triangle to locate the centre of an escribed circle. They will draw the required circle approximately tangential to the one side of the triangle and the two other produced lines. (Level 6)
Students will use the discs or the paper folding methods to locate the centre of an escribed circle. They will draw the required circle approximately tangential to the one side of the triangle and the two other produced lines. (Level 5)
Directorate for Quality and Standards in Education Curriculum Management and eLearning Department – Graphical Communication – 2012
11
Teaching Objective Examples of teaching experiences and activities Indicators of Learning outcomes
The teacher will:
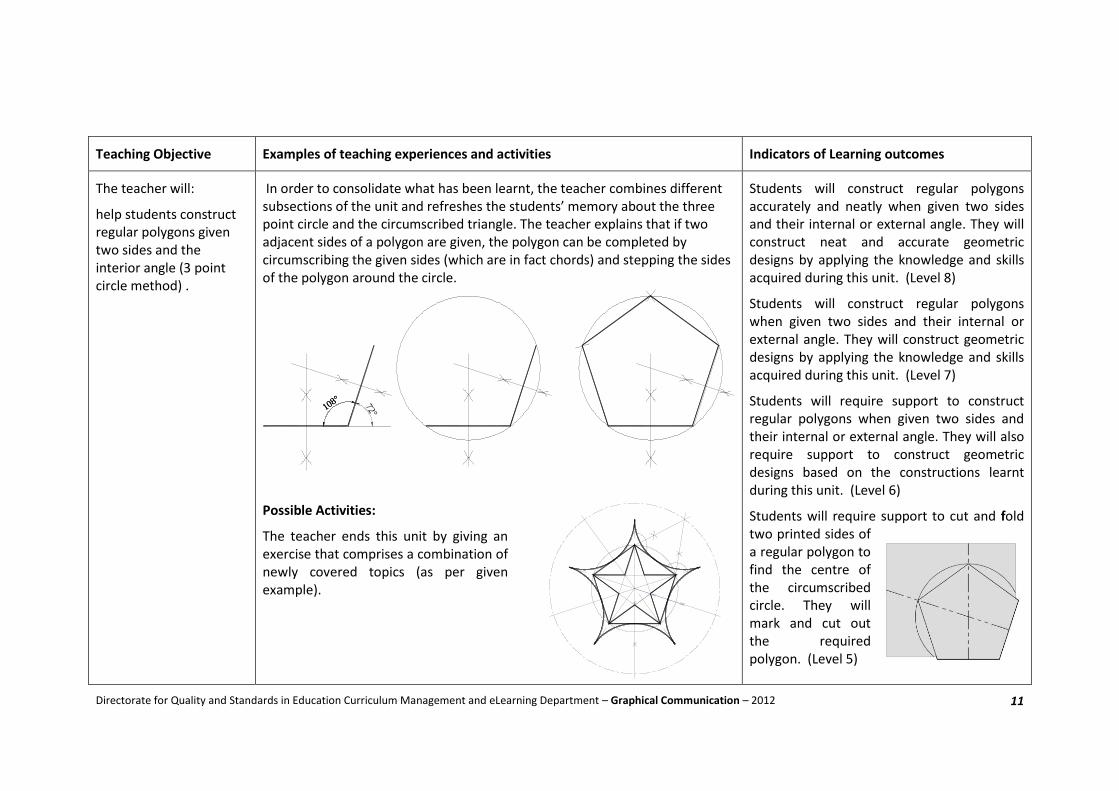
help students construct regular polygons given two sides and the interior angle (3 point circle method) .
In order to consolidate what has been learnt, the teacher combines different subsections of the unit and refreshes the students’ memory about the three point circle and the circumscribed triangle. The teacher explains that if two adjacent sides of a polygon are given, the polygon can be completed by circumscribing the given sides (which are in fact chords) and stepping the sides of the polygon around the circle.
Possible Activities:
The teacher ends this unit by giving an exercise that comprises a combination of newly covered topics (as per given example).
Students will construct regular polygons accurately and neatly when given two sides and their internal or external angle. They will construct neat and accurate geometric designs by applying the knowledge and skills acquired during this unit. (Level 8)
Students will construct regular polygons when given two sides and their internal or external angle. They will construct geometric designs by applying the knowledge and skills acquired during this unit. (Level 7)
Students will require support to construct regular polygons when given two sides and their internal or external angle. They will also require support to construct geometric designs based on the constructions learnt during this unit. (Level 6)
Students will require support to cut and fold two printed sides of a regular polygon to find the centre of the circumscribed circle. They will mark and cut out the required polygon. (Level 5)
108°108° 72°
Directorate for Quality and Standards in Education Curriculum Management and eLearning Department – Graphical Communication – 2012
12
Subject: GRAPHICAL COMMUNICATION Form 2 Unit code and title: GRA 8.3 Introducing orthographic projection Strand: Geometry Unit Duration: 9 sessions of 40 minutes (6 hours) Objectives The teacher will: 1 help students understand the principles of orthographic projection.
2. help students project isometric and orthographic views on grid paper (vertical and horizontal edges). 3. help students project isometric and orthographic views on grid paper (vertical, horizontal and inclined). 4. help students project isometric and orthographic views on grid paper (including hidden edges).
5. help students isometric and orthographic views on plain A3 drawing paper.
Key Words Points to Note Resources
Orthographic projection Projection lines Projection angles Projection symbol Front elevation End elevation Plan Grid paper BS / ISO regulations
The topic covered during this unit is extremely important and it is essential that the teacher uses all possible means to make it memorable for the students, so that they will learn the principles of orthographic projection correctly the first time round. It is advisable that the students are given a considerable number of graded exercises, on custom prepared worksheets, so that they can strengthen their visualisation skills. Cross curricular Links: Art, Mathematics and Geography. Approach to teaching and learning: The teacher needs to make use of all necessary resources such as physical 2D and 3D coloured models, glass/Perspex box, computer generated models and any other creative resources to positively impress the students so that the lesson retention is long-lasting. Apart from physical and computer generated models, the resourceful teacher makes use of short symbolic stories and illustrative anecdotes which will help the students remember the principles of projection angles.
Equipment needed:
Interactive whiteboard Whiteboard, large drawing instruments to be used on the whiteboard. Cardboard A2, cutting mat, scalpel, raised steel rule, scissors, double sided sticky tape and glue. Perspex box, shaped blocks wooden/ plastic/cardboard models. Textbooks: Graphical Communication 1 Stuart Bland Technical Drawing (omnibus) F.B.Mayock Understanding Technical Graphics J.&T. O’Sullivan Understanding Technical Graphics Workbook Graphical Communication Handouts Graphical Communication Website link:
http://graphicalcommunication.skola.edu.mt/
Directorate for Quality and Standards in Education Curriculum Management and eLearning Department – Graphical Communication – 2012
13
Teaching Objective Examples of teaching experiences and activities Indicators of Learning outcomes
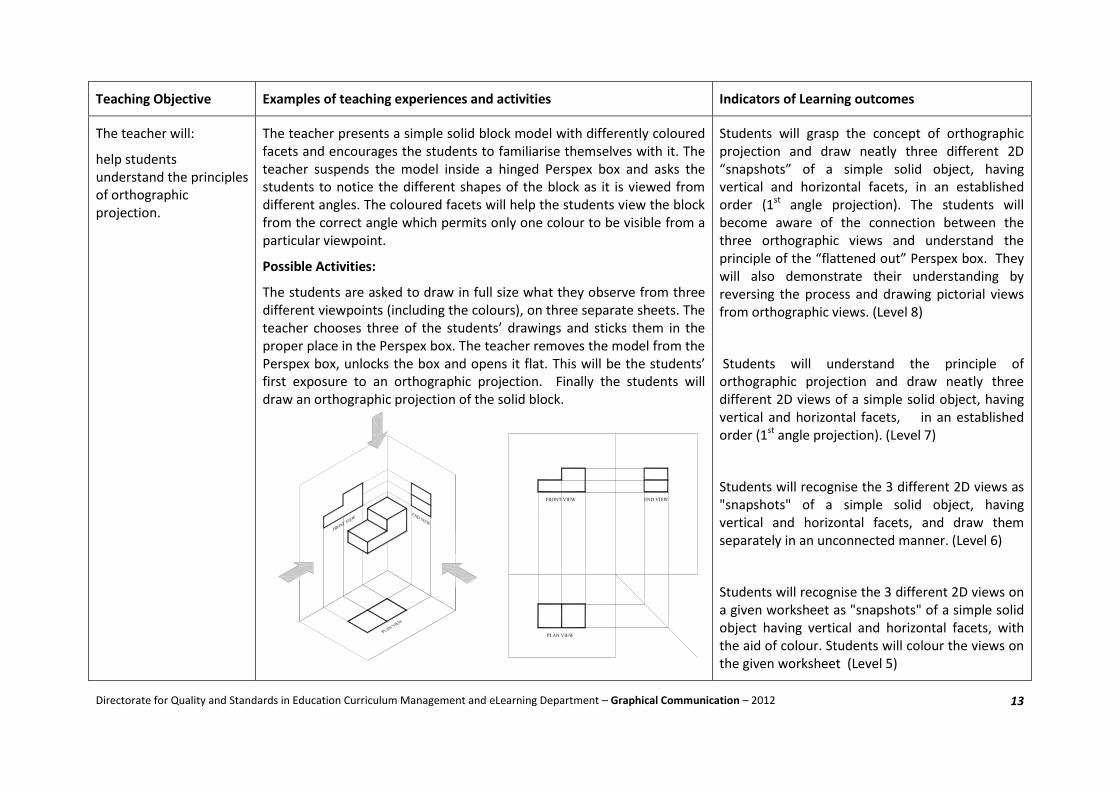
The teacher will:
help students understand the principles of orthographic projection.
The teacher presents a simple solid block model with differently coloured facets and encourages the students to familiarise themselves with it. The teacher suspends the model inside a hinged Perspex box and asks the students to notice the different shapes of the block as it is viewed from different angles. The coloured facets will help the students view the block from the correct angle which permits only one colour to be visible from a particular viewpoint.
Possible Activities:
The students are asked to draw in full size what they observe from three different viewpoints (including the colours), on three separate sheets. The teacher chooses three of the students’ drawings and sticks them in the proper place in the Perspex box. The teacher removes the model from the Perspex box, unlocks the box and opens it flat. This will be the students’ first exposure to an orthographic projection. Finally the students will draw an orthographic projection of the solid block.
Students will grasp the concept of orthographic projection and draw neatly three different 2D “snapshots” of a simple solid object, having vertical and horizontal facets, in an established order (1st angle projection). The students will become aware of the connection between the three orthographic views and understand the principle of the “flattened out” Perspex box. They will also demonstrate their understanding by reversing the process and drawing pictorial views from orthographic views. (Level 8)
Students will understand the principle of orthographic projection and draw neatly three different 2D views of a simple solid object, having vertical and horizontal facets, in an established order (1st angle projection). (Level 7)
Students will recognise the 3 different 2D views as "snapshots" of a simple solid object, having vertical and horizontal facets, and draw them separately in an unconnected manner. (Level 6)
Students will recognise the 3 different 2D views on a given worksheet as "snapshots" of a simple solid object having vertical and horizontal facets, with the aid of colour. Students will colour the views on the given worksheet (Level 5)

Directorate for Quality and Standards in Education Curriculum Management and eLearning Department – Graphical Communication – 2012
14
Teaching Objective Examples of teaching experiences and activities Indicators of Learning outcomes
The teacher will:
help students project
isometric and
orthographic views on
grid paper (vertical and
horizontal edges).
As indicated earlier in the points to note, the students need to do a
considerable number of graded orthographic exercises so that they will
develop their spatial ability. This objective can be reached better and
more efficiently if the students work on custom made worksheets (similar
to the one shown below) which are also supported by 3D physical or
computer generated models.
Possible Activities:
The students first copy and colour (3 colour) the given isometric view,
thus familiarising themselves with the particular shape. The initial
exercises should consist of solid blocks with vertical and horizontal edges.
Secondly the students will draw three orthographic views of the same
object.
Students will complete the isometric and
orthographic views of simple solid objects, having
vertical and horizontal edges, neatly, accurately
and in an established order. They will use the 45°
line correctly and project the plan from the front
and end elevations. Students will colour and shade
the views in an impeccable manner. (Level 8)
Students will complete the isometric and
orthographic views of simple solid objects, having
vertical and horizontal edges, correctly. They will
use the 45° line correctly and project the plan from
the front and end elevations. Students will render
the views by neatly applying flat colours. (Level 7)
Students will copy the isometric view of simple
solid objects, having vertical and horizontal edges,
and draw the 2D orthographic views separately
and in an unconnected manner. Students will
render the views by applying colours haphazardly.
(Level 6)
Students will copy the isometric view and apply a
different colour to each different visible face on
the isometric block. (Level 5)
Directorate for Quality and Standards in Education Curriculum Management and eLearning Department – Graphical Communication – 2012
15
Teaching Objective Examples of teaching experiences and activities Indicators of Learning outcomes
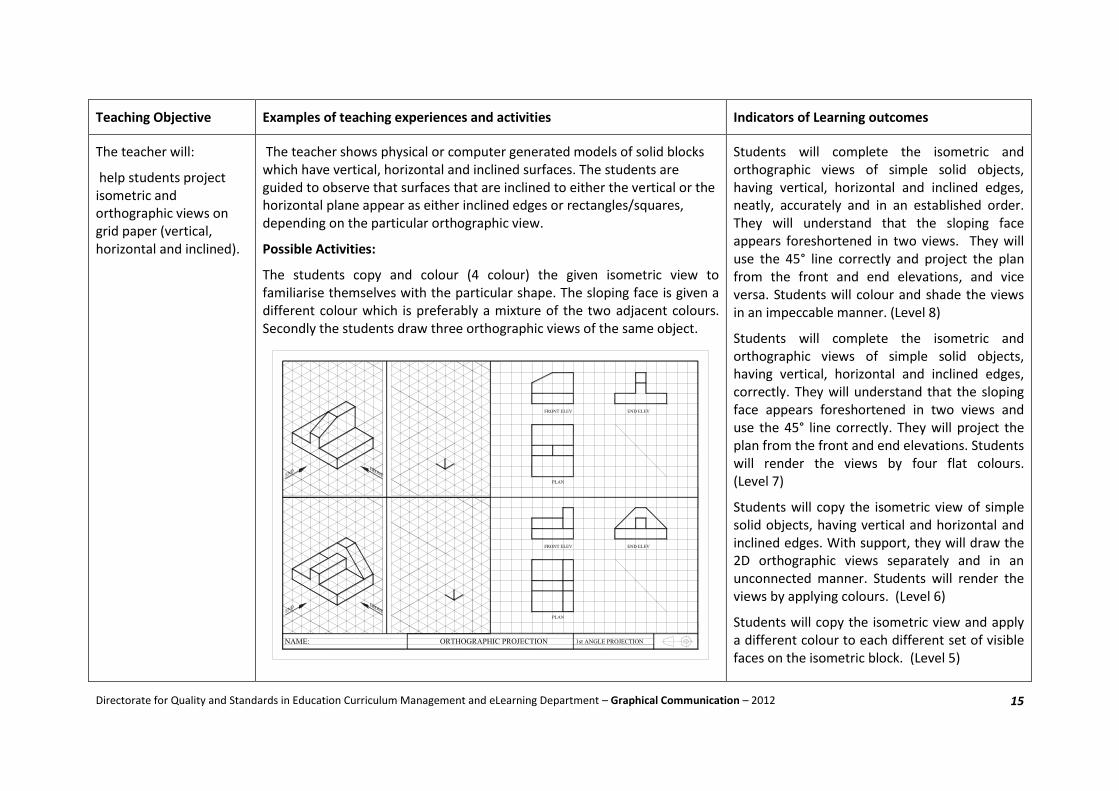
The teacher will:
help students project isometric and orthographic views on grid paper (vertical, horizontal and inclined).
The teacher shows physical or computer generated models of solid blocks which have vertical, horizontal and inclined surfaces. The students are guided to observe that surfaces that are inclined to either the vertical or the horizontal plane appear as either inclined edges or rectangles/squares, depending on the particular orthographic view.
Possible Activities:
The students copy and colour (4 colour) the given isometric view to familiarise themselves with the particular shape. The sloping face is given a different colour which is preferably a mixture of the two adjacent colours. Secondly the students draw three orthographic views of the same object.
Students will complete the isometric and orthographic views of simple solid objects, having vertical, horizontal and inclined edges, neatly, accurately and in an established order. They will understand that the sloping face appears foreshortened in two views. They will use the 45° line correctly and project the plan from the front and end elevations, and vice versa. Students will colour and shade the views in an impeccable manner. (Level 8)
Students will complete the isometric and orthographic views of simple solid objects, having vertical, horizontal and inclined edges, correctly. They will understand that the sloping face appears foreshortened in two views and use the 45° line correctly. They will project the plan from the front and end elevations. Students will render the views by four flat colours. (Level 7)
Students will copy the isometric view of simple solid objects, having vertical and horizontal and inclined edges. With support, they will draw the 2D orthographic views separately and in an unconnected manner. Students will render the views by applying colours. (Level 6)
Students will copy the isometric view and apply a different colour to each different set of visible faces on the isometric block. (Level 5)
Directorate for Quality and Standards in Education Curriculum Management and eLearning Department – Graphical Communication – 2012
16
Teaching Objective Examples of teaching experiences and activities Indicators of Learning outcomes
The teacher will:
help students project
isometric and
orthographic views on
grid paper (including
hidden edges).
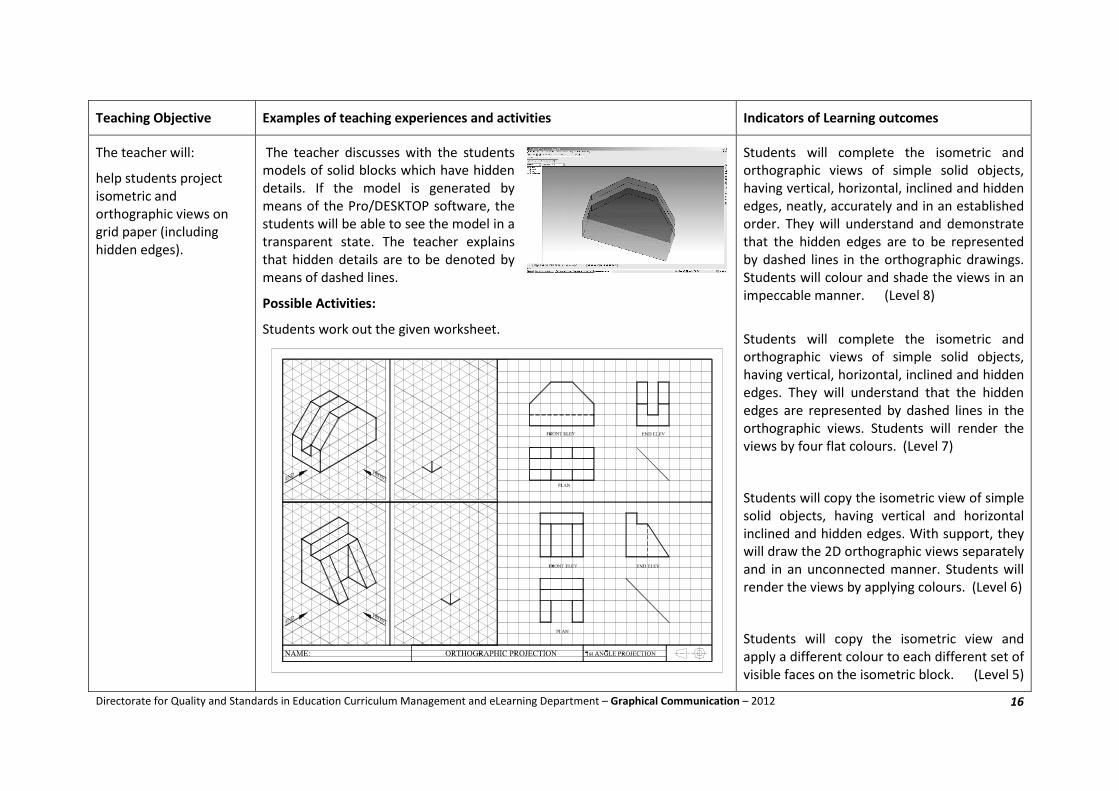
The teacher discusses with the students
models of solid blocks which have hidden
details. If the model is generated by
means of the Pro/DESKTOP software, the
students will be able to see the model in a
transparent state. The teacher explains
that hidden details are to be denoted by
means of dashed lines.
Possible Activities:
Students work out the given worksheet.
Students will complete the isometric and
orthographic views of simple solid objects,
having vertical, horizontal, inclined and hidden
edges, neatly, accurately and in an established
order. They will understand and demonstrate
that the hidden edges are to be represented
by dashed lines in the orthographic drawings.
Students will colour and shade the views in an
impeccable manner. (Level 8)
Students will complete the isometric and
orthographic views of simple solid objects,
having vertical, horizontal, inclined and hidden
edges. They will understand that the hidden
edges are represented by dashed lines in the
orthographic views. Students will render the
views by four flat colours. (Level 7)
Students will copy the isometric view of simple
solid objects, having vertical and horizontal
inclined and hidden edges. With support, they
will draw the 2D orthographic views separately
and in an unconnected manner. Students will
render the views by applying colours. (Level 6)
Students will copy the isometric view and
apply a different colour to each different set of
visible faces on the isometric block. (Level 5)
Directorate for Quality and Standards in Education Curriculum Management and eLearning Department – Graphical Communication – 2012
17
Teaching Objective Examples of teaching experiences and activities Indicators of Learning outcomes
The teacher will:
help students project
dimensioned isometric
and orthographic views
on plain A3 drawing
paper.
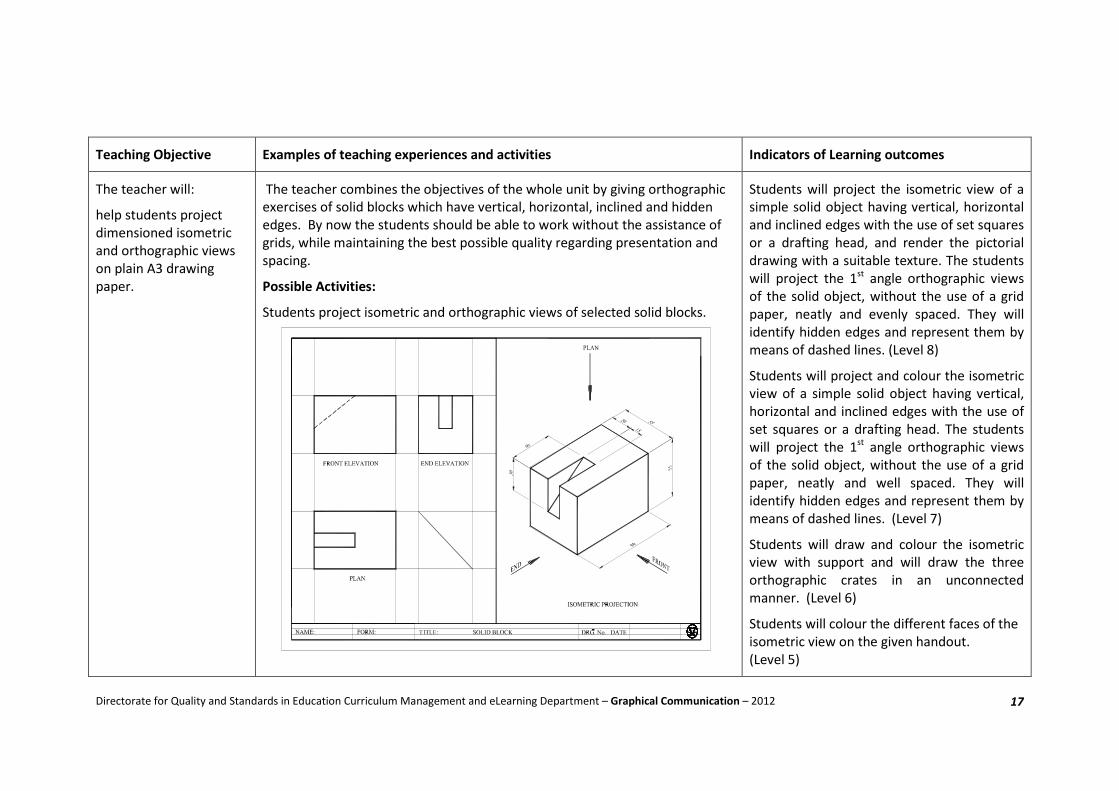
The teacher combines the objectives of the whole unit by giving orthographic
exercises of solid blocks which have vertical, horizontal, inclined and hidden
edges. By now the students should be able to work without the assistance of
grids, while maintaining the best possible quality regarding presentation and
spacing.
Possible Activities:
Students project isometric and orthographic views of selected solid blocks.
Students will project the isometric view of a
simple solid object having vertical, horizontal
and inclined edges with the use of set squares
or a drafting head, and render the pictorial
drawing with a suitable texture. The students
will project the 1st
angle orthographic views
of the solid object, without the use of a grid
paper, neatly and evenly spaced. They will
identify hidden edges and represent them by
means of dashed lines. (Level 8)
Students will project and colour the isometric
view of a simple solid object having vertical,
horizontal and inclined edges with the use of
set squares or a drafting head. The students
will project the 1st
angle orthographic views
of the solid object, without the use of a grid
paper, neatly and well spaced. They will
identify hidden edges and represent them by
means of dashed lines. (Level 7)
Students will draw and colour the isometric
view with support and will draw the three
orthographic crates in an unconnected
manner. (Level 6)
Students will colour the different faces of the
isometric view on the given handout.
(Level 5)
Directorate for Quality and Standards in Education Curriculum Management and eLearning Department – Graphical Communication – 2012
18
Subject: GRAPHICAL COMMUNICATION Form 2 Unit code and title: GRA 8.4 Drawing oblique views from given isometric and orthographic views Strand: Geometry Unit Duration: 9 sessions of 40 minutes (6 hours) Objectives The teacher will:
2. help students draw 3-D block letters by using a square grid. 2. help students draw cavalier and cabinet oblique views.
3. help students draw a cabinet oblique view of a solid shape from isometric and orthographic views. 4. help students draw two different oblique views of a solid shape from isometric and orthographic views. 5. help students draw four different oblique views of a solid shape from isometric and orthographic views.
Key Words Points to Note Resources
Oblique 45° set square Cavalier oblique Cabinet oblique Foreshortening Forced depth Optical illusion Mental rotation Spatial ability
This unit helps the students to consolidate their learning about 3D drawing and to further develop their spatial ability. Towards the end of this unit, the students will be tested for their ability to mentally rotate solid objects and record their mental imagery by means of oblique views. To make the topic more interesting, the teacher needs to emphasize the relevance of oblique 3D representations in many aspects of life from simple school projects to the industrial world, where oblique drawing is very popular in furniture illustrations and in portraying three dimensional letters. Cross curricular Links: Art and Mathematics. Approach to teaching and learning: Apart from the 3-D drawing activities using pencils and drawing instruments, the students should be encouraged to build 3D models either physically, using cardboard, modelling clay, etc, or through computer generation, so as to develop their spatial visualisation skills.
Equipment needed:
Interactive whiteboard Whiteboard, large drawing instruments to be used on the whiteboard. Three dimensional models (computer generated/physical). Textbooks: Graphical Communication 1 Stuart Bland Technical Drawing (omnibus) F.B.Mayock Understanding Technical Graphics J.&T. O’Sullivan Understanding Technical Graphics Workbook Graphical Communication Handouts Graphical Communication Website link:
http://graphicalcommunication.skola.edu.mt/
Directorate for Quality and Standards in Education Curriculum Management and eLearning Department – Graphical Communication – 2012
19
Teaching Objective Examples of teaching experiences and activities Indicators of Learning outcomes
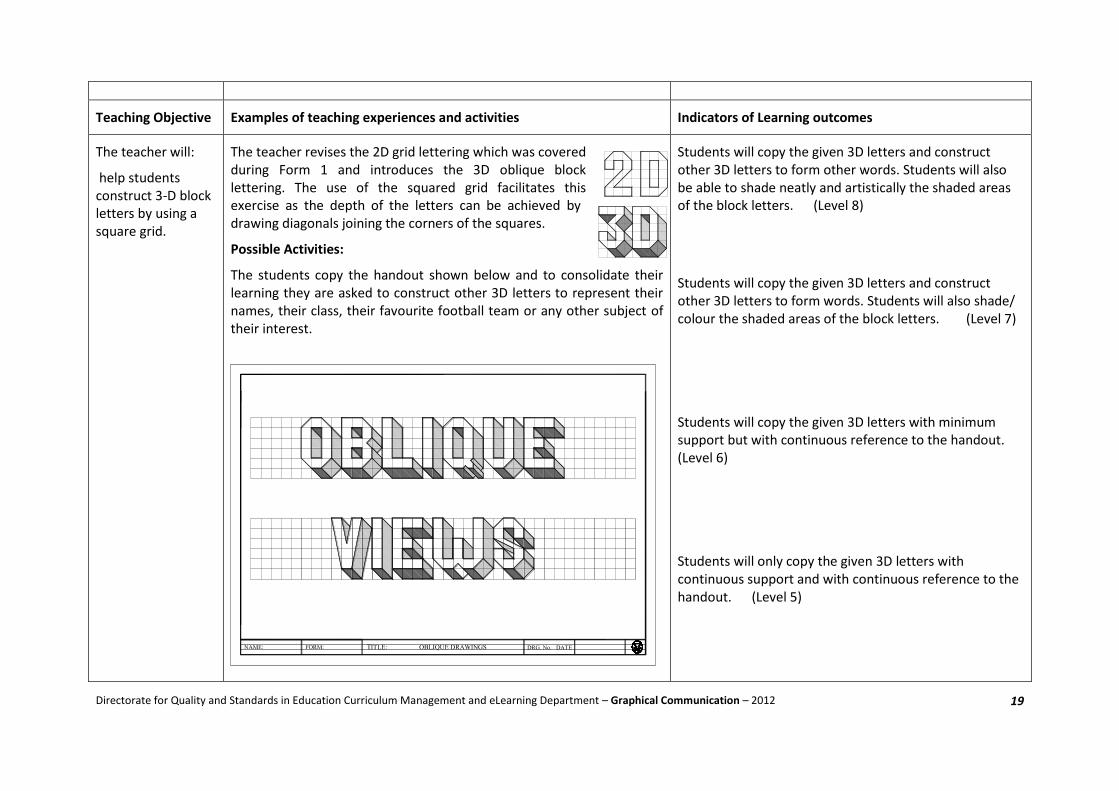
The teacher will:
help students construct 3-D block letters by using a square grid.
The teacher revises the 2D grid lettering which was covered during Form 1 and introduces the 3D oblique block lettering. The use of the squared grid facilitates this exercise as the depth of the letters can be achieved by drawing diagonals joining the corners of the squares.
Possible Activities:
The students copy the handout shown below and to consolidate their learning they are asked to construct other 3D letters to represent their names, their class, their favourite football team or any other subject of their interest.
Students will copy the given 3D letters and construct other 3D letters to form other words. Students will also be able to shade neatly and artistically the shaded areas of the block letters. (Level 8)
Students will copy the given 3D letters and construct other 3D letters to form words. Students will also shade/ colour the shaded areas of the block letters. (Level 7)
Students will copy the given 3D letters with minimum support but with continuous reference to the handout. (Level 6)
Students will only copy the given 3D letters with continuous support and with continuous reference to the handout. (Level 5)
Directorate for Quality and Standards in Education Curriculum Management and eLearning Department – Graphical Communication – 2012
20
Teaching Objective Examples of teaching experiences and activities Indicators of Learning outcomes
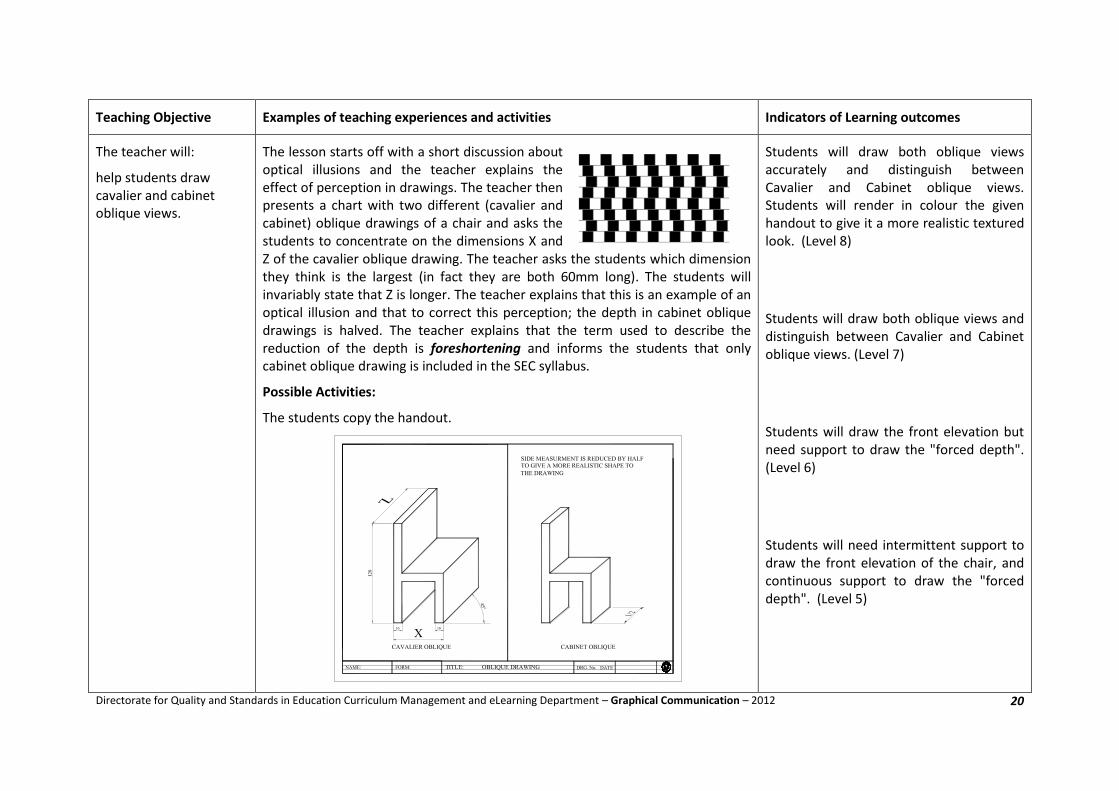
The teacher will:
help students draw cavalier and cabinet oblique views.
The lesson starts off with a short discussion about optical illusions and the teacher explains the effect of perception in drawings. The teacher then presents a chart with two different (cavalier and cabinet) oblique drawings of a chair and asks the students to concentrate on the dimensions X and Z of the cavalier oblique drawing. The teacher asks the students which dimension they think is the largest (in fact they are both 60mm long). The students will invariably state that Z is longer. The teacher explains that this is an example of an optical illusion and that to correct this perception; the depth in cabinet oblique drawings is halved. The teacher explains that the term used to describe the reduction of the depth is foreshortening and informs the students that only cabinet oblique drawing is included in the SEC syllabus.
Possible Activities:
The students copy the handout.
Students will draw both oblique views accurately and distinguish between Cavalier and Cabinet oblique views. Students will render in colour the given handout to give it a more realistic textured look. (Level 8)
Students will draw both oblique views and distinguish between Cavalier and Cabinet oblique views. (Level 7)
Students will draw the front elevation but need support to draw the "forced depth". (Level 6)
Students will need intermittent support to draw the front elevation of the chair, and continuous support to draw the "forced depth". (Level 5)
Directorate for Quality and Standards in Education Curriculum Management and eLearning Department – Graphical Communication – 2012
21
Teaching Objective Examples of teaching experiences and activities Indicators of Learning outcomes
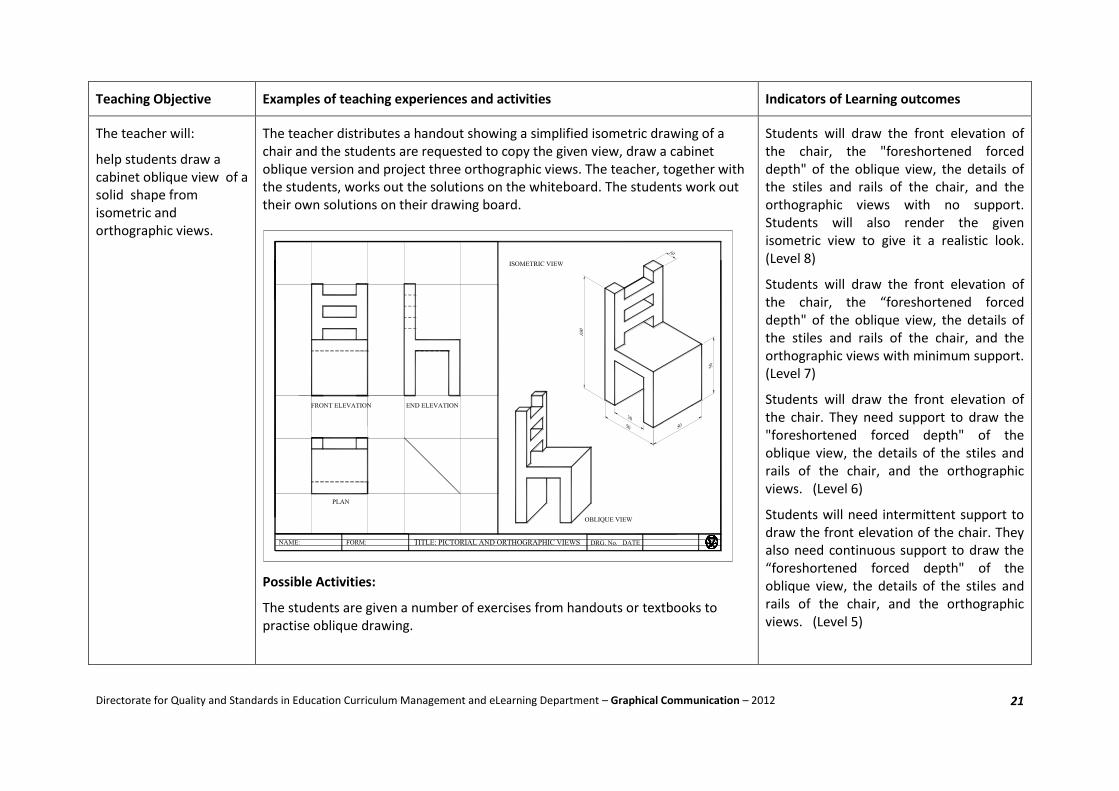
The teacher will:
help students draw a cabinet oblique view of a solid shape from isometric and orthographic views.
The teacher distributes a handout showing a simplified isometric drawing of a chair and the students are requested to copy the given view, draw a cabinet oblique version and project three orthographic views. The teacher, together with the students, works out the solutions on the whiteboard. The students work out their own solutions on their drawing board.
Possible Activities:
The students are given a number of exercises from handouts or textbooks to practise oblique drawing.
Students will draw the front elevation of the chair, the "foreshortened forced depth" of the oblique view, the details of the stiles and rails of the chair, and the orthographic views with no support. Students will also render the given isometric view to give it a realistic look. (Level 8)
Students will draw the front elevation of the chair, the “foreshortened forced depth" of the oblique view, the details of the stiles and rails of the chair, and the orthographic views with minimum support. (Level 7)
Students will draw the front elevation of the chair. They need support to draw the "foreshortened forced depth" of the oblique view, the details of the stiles and rails of the chair, and the orthographic views. (Level 6)
Students will need intermittent support to draw the front elevation of the chair. They also need continuous support to draw the “foreshortened forced depth" of the oblique view, the details of the stiles and rails of the chair, and the orthographic views. (Level 5)
Directorate for Quality and Standards in Education Curriculum Management and eLearning Department – Graphical Communication – 2012
22
Teaching Objective
Examples of teaching experiences and activities Indicators of Learning outcomes
The teacher will:
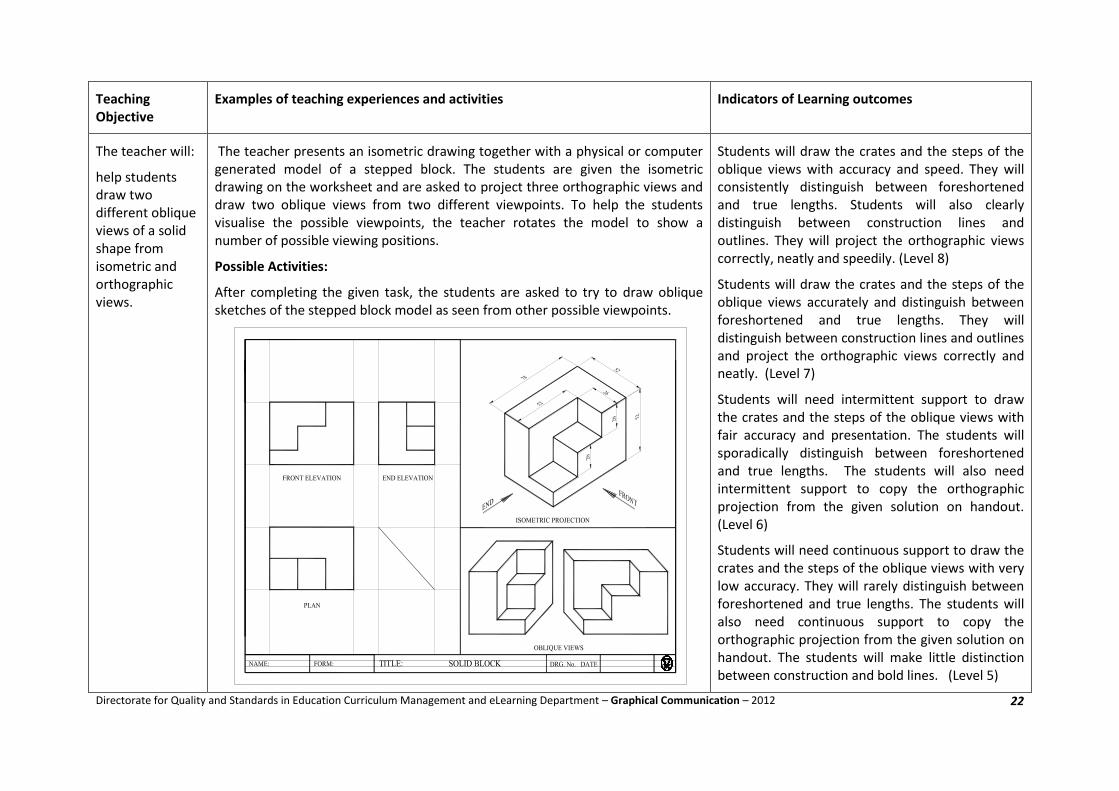
help students draw two different oblique views of a solid shape from isometric and orthographic views.
The teacher presents an isometric drawing together with a physical or computer generated model of a stepped block. The students are given the isometric drawing on the worksheet and are asked to project three orthographic views and draw two oblique views from two different viewpoints. To help the students visualise the possible viewpoints, the teacher rotates the model to show a number of possible viewing positions.
Possible Activities:
After completing the given task, the students are asked to try to draw oblique sketches of the stepped block model as seen from other possible viewpoints.
Students will draw the crates and the steps of the oblique views with accuracy and speed. They will consistently distinguish between foreshortened and true lengths. Students will also clearly distinguish between construction lines and outlines. They will project the orthographic views correctly, neatly and speedily. (Level 8)
Students will draw the crates and the steps of the oblique views accurately and distinguish between foreshortened and true lengths. They will distinguish between construction lines and outlines and project the orthographic views correctly and neatly. (Level 7)
Students will need intermittent support to draw the crates and the steps of the oblique views with fair accuracy and presentation. The students will sporadically distinguish between foreshortened and true lengths. The students will also need intermittent support to copy the orthographic projection from the given solution on handout. (Level 6)
Students will need continuous support to draw the crates and the steps of the oblique views with very low accuracy. They will rarely distinguish between foreshortened and true lengths. The students will also need continuous support to copy the orthographic projection from the given solution on handout. The students will make little distinction between construction and bold lines. (Level 5)
Directorate for Quality and Standards in Education Curriculum Management and eLearning Department – Graphical Communication – 2012
23
Teaching Objective Examples of teaching experiences and activities Indicators of Learning outcomes
The teacher will:
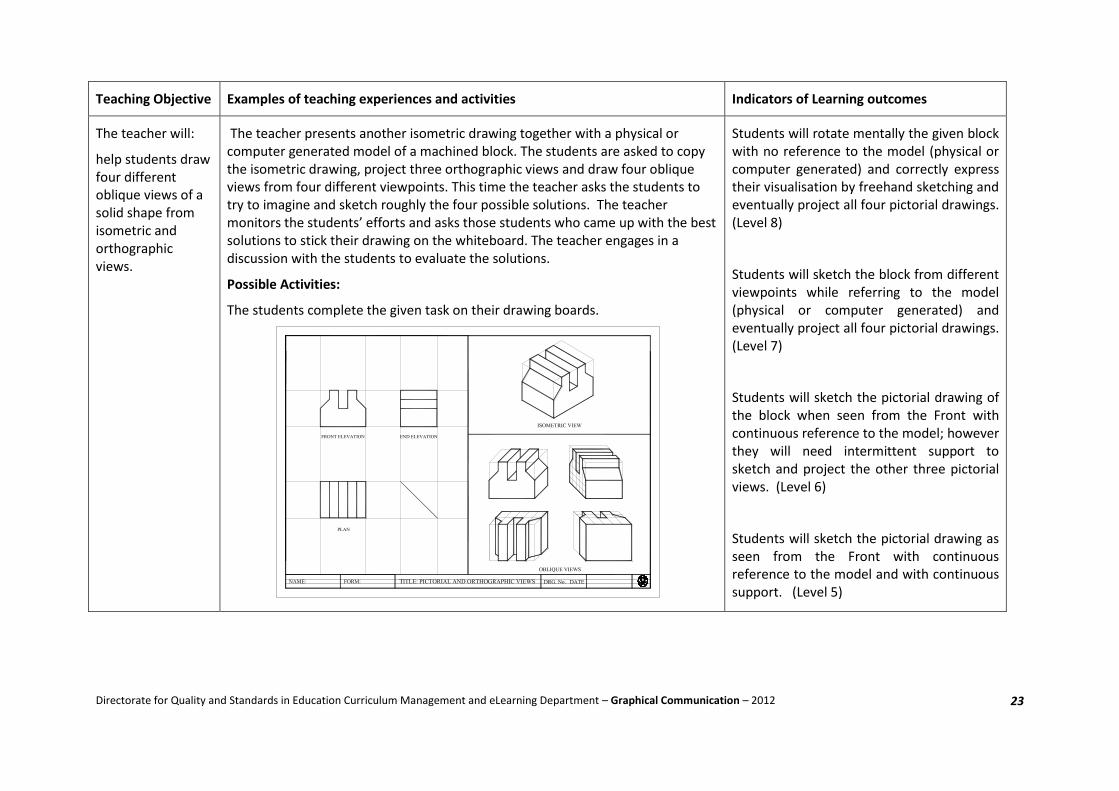
help students draw four different oblique views of a solid shape from isometric and orthographic views.
The teacher presents another isometric drawing together with a physical or computer generated model of a machined block. The students are asked to copy the isometric drawing, project three orthographic views and draw four oblique views from four different viewpoints. This time the teacher asks the students to try to imagine and sketch roughly the four possible solutions. The teacher monitors the students’ efforts and asks those students who came up with the best solutions to stick their drawing on the whiteboard. The teacher engages in a discussion with the students to evaluate the solutions.
Possible Activities:
The students complete the given task on their drawing boards.
Students will rotate mentally the given block with no reference to the model (physical or computer generated) and correctly express their visualisation by freehand sketching and eventually project all four pictorial drawings. (Level 8)
Students will sketch the block from different viewpoints while referring to the model (physical or computer generated) and eventually project all four pictorial drawings. (Level 7)
Students will sketch the pictorial drawing of the block when seen from the Front with continuous reference to the model; however they will need intermittent support to sketch and project the other three pictorial views. (Level 6)
Students will sketch the pictorial drawing as seen from the Front with continuous reference to the model and with continuous support. (Level 5)

Directorate for Quality and Standards in Education Curriculum Management and eLearning Department – Graphical Communication – 2012
24
Subject: GRAPHICAL COMMUNICATION Form 2 Unit code and title: GRA 8.5 Introducing the surface geometry of prisms and pyramids Strand: Geometry Unit Duration: 9 sessions of 40 minutes (6 hours) Objectives The teacher will:
1 help students discover the shapes of surface developments of prisms. 2 help students construct the surface developments of triangular, square, rectangular and hexagonal prisms. 3 help students construct the entire, one piece, surface development of an octagonal prism, including the top and the bottom. 4 help students discover the shapes of surface developments of pyramids. 5 help students construct entire, one piece, surface developments of triangular, square, rectangular and hexagonal pyramids, including the bottom. 6 help students construct entire, one piece, surface developments of an octagonal pyramid, including the bottom.
Key Words Points to Note Resources
Surface development Radial development Parallel development Prisms Pyramids Fold lines True lengths Faces Edges Vertices
In this unit the students learn the two methods of surface development required by the SEC ‘O` level syllabus, that is, the parallel line development and the radial line development. It is important that the students are shown practical examples of surface developments (such as Chicken and Chips boxes, Tea Bags boxes, Chocolate boxes etc) and that they are actively engaged in hands-on activities such as wrapping prismatic and pyramidal objects and constructing cardboard or paper models of simple geometric solids. If possible, the initial surface developments, which the students construct, are photocopied, cut out, folded, glued and even coloured to make them look more attractive and memorable. These practical activities help the students understand better the basic principles of this topic and its relevance to everyday life. Cross curricular Links: Mathematics and Crafts Approach to teaching and learning: Most of the lessons included in this unit start with learning by guided discovery activities, involving solid prisms and pyramids. The teacher later formalises the students’ findings and distributes the appropriate worksheets.
Equipment needed:
Interactive whiteboard Whiteboard, large drawing instruments to be used on the whiteboard. Cardboard A2, cutting mat, scalpel, raised steel rule, scissors, double sided sticky tape and glue. Three dimensional models (computer generated/ physical). Textbooks: Graphical Communication 1 Stuart Bland Technical Drawing (omnibus) F.B.Mayock Understanding Technical Graphics J.&T. O’Sullivan Understanding Technical Graphics Workbook Graphical Communication Handouts Graphical Communication Website link:
http://graphicalcommunication.skola.edu.mt/

Directorate for Quality and Standards in Education Curriculum Management and eLearning Department – Graphical Communication – 2012
25
Teaching Objective Examples of teaching experiences and activities Indicators of Learning outcomes
The teacher will:
help students discover the shapes of surface developments of prisms.
The teacher defines and explains the characteristics and technical terms related to prisms and organises the class in small groups and gives each group wooden or plastic prismatic models of a triangular, square, rectangular, hexagonal and octagonal cross section. The students are asked to wrap the prisms with an A4 paper, covering the whole surface area without overlapping, and cutting off the excess paper. When the wrapping exercise is completed, the students remove the wooden prisms and open the wrapping paper flat on their table. The teacher instructs the students to draw fold lines wherever the paper has been folded and collects the best efforts from each group to display them on the whiteboard. The teacher explains that these cut and folded papers are in fact the surface developments of the triangular, square, rectangular, hexagonal and octagonal prisms. The teacher leads the students to notice and understand that the fold lines of the surface developments (excluding the lid and the bottom) are parallel.
Students will identify the types of prisms by the shape of their bases. They will understand the term "surface development" and will be able to physically wrap neatly and tightly a sheet of paper around the given prism and identify (by creasing) all the edges underneath the paper. They will make an allowance for glue flaps, cut off the excess paper, and mark out the folding lines. Finally the students will fold and glue the prism, thus making a hollow replica of the original model. (Level 8)
Students will identify the types of prisms by the shape of their bases. They will understand the term "surface development" and will be able to physically wrap neatly a sheet of paper around the given prism and identify (by creasing) all the edges underneath the paper. They will mark out the folding lines, cut off the excess paper and lay the surface development in the flat position. (Level 7)
Students will identify the types of prisms by the shape of their bases. They will be able to physically wrap a sheet of paper around the given prism and, with support, identify (by creasing) all the edges underneath the paper. They will cut off the excess paper and lay the surface development in the flat position. (Level 6)
Students will identify the types of prisms by the shape of their bases. (Level 5)
Directorate for Quality and Standards in Education Curriculum Management and eLearning Department – Graphical Communication – 2012
26
Teaching Objective Examples of teaching experiences and activities Indicators of Learning outcomes
The teacher will:
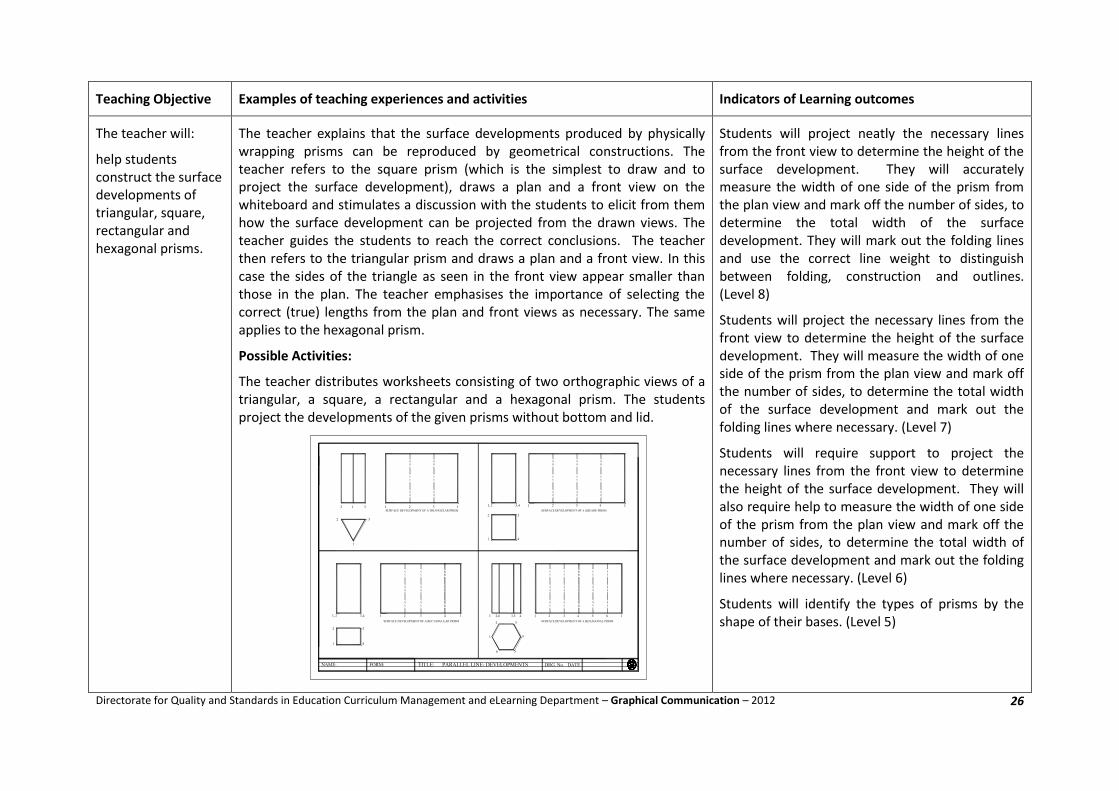
help students construct the surface developments of triangular, square, rectangular and hexagonal prisms.
The teacher explains that the surface developments produced by physically wrapping prisms can be reproduced by geometrical constructions. The teacher refers to the square prism (which is the simplest to draw and to project the surface development), draws a plan and a front view on the whiteboard and stimulates a discussion with the students to elicit from them how the surface development can be projected from the drawn views. The teacher guides the students to reach the correct conclusions. The teacher then refers to the triangular prism and draws a plan and a front view. In this case the sides of the triangle as seen in the front view appear smaller than those in the plan. The teacher emphasises the importance of selecting the correct (true) lengths from the plan and front views as necessary. The same applies to the hexagonal prism.
Possible Activities:
The teacher distributes worksheets consisting of two orthographic views of a triangular, a square, a rectangular and a hexagonal prism. The students project the developments of the given prisms without bottom and lid.
Students will project neatly the necessary lines from the front view to determine the height of the surface development. They will accurately measure the width of one side of the prism from the plan view and mark off the number of sides, to determine the total width of the surface development. They will mark out the folding lines and use the correct line weight to distinguish between folding, construction and outlines. (Level 8)
Students will project the necessary lines from the front view to determine the height of the surface development. They will measure the width of one side of the prism from the plan view and mark off the number of sides, to determine the total width of the surface development and mark out the folding lines where necessary. (Level 7)
Students will require support to project the necessary lines from the front view to determine the height of the surface development. They will also require help to measure the width of one side of the prism from the plan view and mark off the number of sides, to determine the total width of the surface development and mark out the folding lines where necessary. (Level 6)
Students will identify the types of prisms by the shape of their bases. (Level 5)
Directorate for Quality and Standards in Education Curriculum Management and eLearning Department – Graphical Communication – 2012
27
Teaching Objective Examples of teaching experiences and activities Indicators of Learning outcomes
The teacher will:
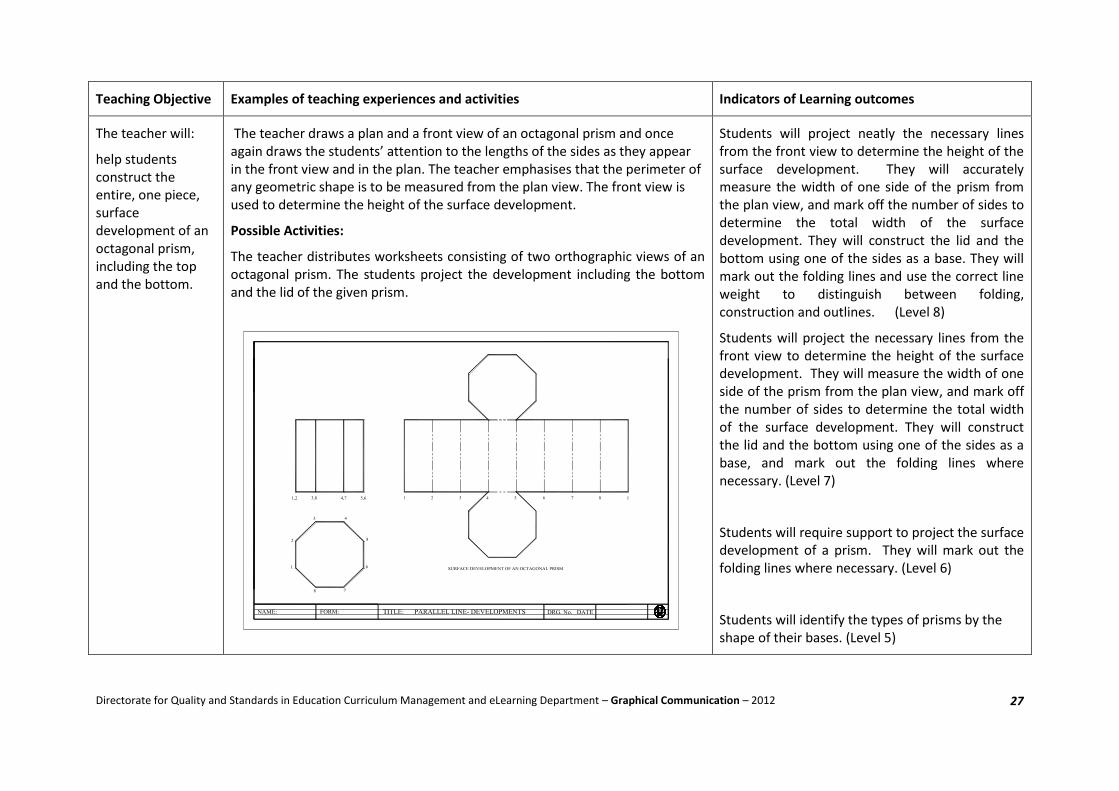
help students construct the entire, one piece, surface development of an octagonal prism, including the top and the bottom.
The teacher draws a plan and a front view of an octagonal prism and once again draws the students’ attention to the lengths of the sides as they appear in the front view and in the plan. The teacher emphasises that the perimeter of any geometric shape is to be measured from the plan view. The front view is used to determine the height of the surface development.
Possible Activities:
The teacher distributes worksheets consisting of two orthographic views of an octagonal prism. The students project the development including the bottom and the lid of the given prism.
Students will project neatly the necessary lines from the front view to determine the height of the surface development. They will accurately measure the width of one side of the prism from the plan view, and mark off the number of sides to determine the total width of the surface development. They will construct the lid and the bottom using one of the sides as a base. They will mark out the folding lines and use the correct line weight to distinguish between folding, construction and outlines. (Level 8)
Students will project the necessary lines from the front view to determine the height of the surface development. They will measure the width of one side of the prism from the plan view, and mark off the number of sides to determine the total width of the surface development. They will construct the lid and the bottom using one of the sides as a base, and mark out the folding lines where necessary. (Level 7)
Students will require support to project the surface development of a prism. They will mark out the folding lines where necessary. (Level 6)
Students will identify the types of prisms by the shape of their bases. (Level 5)

Directorate for Quality and Standards in Education Curriculum Management and eLearning Department – Graphical Communication – 2012
28
Teaching Objective
Examples of teaching experiences and activities Indicators of Learning outcomes
The teacher will:
help students discover the shapes of surface developments of pyramids.
The teacher organises the class in small groups and gives each group wooden or plastic pyramids having a triangular, square, rectangular, hexagonal and octagonal base. The students are asked to wrap the pyramids with an A4 paper, covering the whole surface area without overlapping, and cutting off the excess paper. When the wrapping exercise is completed, the students remove the wooden pyramids and open the wrapping paper flat on their table. The teacher instructs the students to draw fold lines wherever the paper has been folded and collects the best efforts from each group to display them on the whiteboard. The teacher explains that these cut and folded papers are in fact the surface developments of the triangular, square, rectangular, hexagonal and octagonal pyramids. The teacher draws the students’ attention to the fact that the fold lines of the surface developments (excluding the base) are radial.
Students will identify the types of pyramids by the shape of their bases. They will understand the term "surface development" and will be able to physically wrap neatly and tightly a sheet of paper around the given pyramid and identify (by creasing) all the edges underneath the paper. They will make an allowance for glue flaps, cut off the excess paper and mark out the folding lines. Finally the students will fold and glue the paper pyramid, thus making a hollow replica of the original model. (Level 8)
Students will identify the types of pyramids by the shape of their bases. They will understand the term "surface development" and will be able to physically wrap neatly a sheet of paper around the given pyramid and identify (by creasing) all the edges underneath the paper. They will mark out the folding lines, cut off the excess paper and lay the surface development in the flat position. (Level 7)
Students will identify the types of pyramids by the shape of their bases. They will require support to wrap a sheet of paper around the given pyramid and identify (by creasing) all the edges underneath the paper. They will cut off the excess paper and lay the surface development in the flat position. (Level 6)
Students will identify the types of pyramids by the shape of their bases. (Level 5)

Directorate for Quality and Standards in Education Curriculum Management and eLearning Department – Graphical Communication – 2012
29
Teaching Objective
Examples of teaching experiences and activities Indicators of Learning outcomes
The teacher will:
help students construct entire, one piece, surface developments of triangular, square, rectangular and hexagonal pyramids, including the bottom.
The teacher explains terms related to pyramids, such as faces, edges and vertices and refers to the triangular pyramid, draws a plan and a front view on the whiteboard and stimulates a discussion with the students to elicit from them how the surface development can be constructed from the drawn views. The teacher reminds the students of the importance of picking up the true lengths and guides the students to reach the correct conclusions. The teacher discusses with the students the surface developments of the square, rectangular and hexagonal pyramids.
Possible Activities:
The teacher distributes worksheets consisting of two orthographic views of a triangular, a square, a rectangular and a hexagonal pyramid. The students construct the developments of the given pyramids with the bottom.
Students will identify the true length of the slanting edge of the pyramid, and use the true length as the radius to draw the arc of the radial development. They will measure the sides from the plan view, to determine the perimeter. They will join the necessary lines accurately and neatly, mark out the folding lines, and use the correct line weights to distinguish between folding, construction and outlines. (Level 8)
Students will identify the true length of the slanting edge of the pyramid, and use the true length as the radius to draw the arc of the radial development. They will measure the sides from the plan to determine the perimeter. They will join the necessary lines, mark out the folding lines and outlines by using the correct line thicknesses. (Level 7)
Students will require support to identify the true length of the slanting edge of the pyramid and to use the true length as the radius, to draw the arc of the radial development. They will measure the sides from the plan to determine the perimeter. They will join the necessary lines and mark out the folding lines and outlines. (Level 6)
Students will identify the types of pyramids by the shape of their bases. (Level 5)
Directorate for Quality and Standards in Education Curriculum Management and eLearning Department – Graphical Communication – 2012
30
Teaching Objective Examples of teaching experiences and activities Indicators of Learning outcomes
The teacher will:
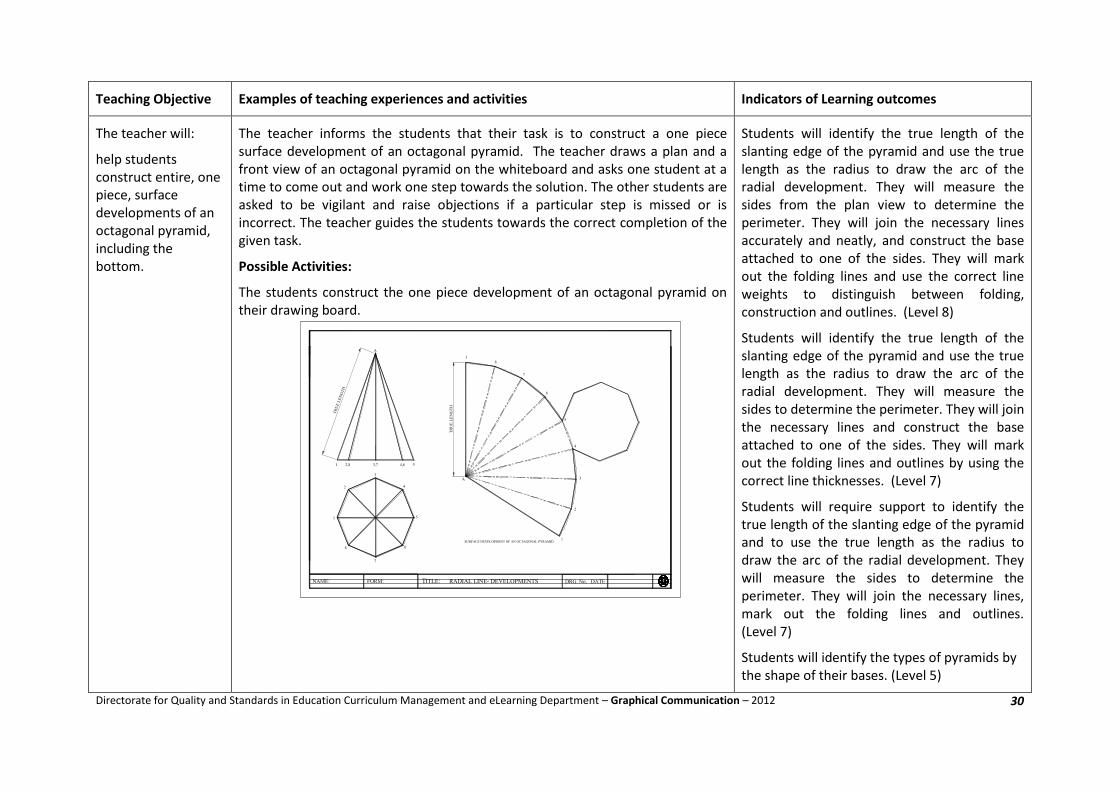
help students construct entire, one piece, surface developments of an octagonal pyramid, including the bottom.
The teacher informs the students that their task is to construct a one piece surface development of an octagonal pyramid. The teacher draws a plan and a front view of an octagonal pyramid on the whiteboard and asks one student at a time to come out and work one step towards the solution. The other students are asked to be vigilant and raise objections if a particular step is missed or is incorrect. The teacher guides the students towards the correct completion of the given task.
Possible Activities:
The students construct the one piece development of an octagonal pyramid on their drawing board.
Students will identify the true length of the slanting edge of the pyramid and use the true length as the radius to draw the arc of the radial development. They will measure the sides from the plan view to determine the perimeter. They will join the necessary lines accurately and neatly, and construct the base attached to one of the sides. They will mark out the folding lines and use the correct line weights to distinguish between folding, construction and outlines. (Level 8)
Students will identify the true length of the slanting edge of the pyramid and use the true length as the radius to draw the arc of the radial development. They will measure the sides to determine the perimeter. They will join the necessary lines and construct the base attached to one of the sides. They will mark out the folding lines and outlines by using the correct line thicknesses. (Level 7)
Students will require support to identify the true length of the slanting edge of the pyramid and to use the true length as the radius to draw the arc of the radial development. They will measure the sides to determine the perimeter. They will join the necessary lines, mark out the folding lines and outlines. (Level 7)
Students will identify the types of pyramids by the shape of their bases. (Level 5)
Directorate for Quality and Standards in Education Curriculum Management and eLearning Department – Graphical Communication – 2012
31
Subject: GRAPHICAL COMMUNICATION Form 2 Unit code and title: GRA 8.6 Freehand sketching and information graphics
Strand: Information and Computer Graphics
Unit Duration: 9 sessions of 40 minutes (6 hours) Objectives The teacher will:
1. help students draw and shade simple geometric solids made of different materials. 2. help students draw matchstick figures and convert them into stylized pictogrammatic figures. 3. help students draw and colour prohibition signs from given graphical and written information. 4. help students draw and colour mandatory signs from given graphical and written information. 5. help students draw and colour Safe Condition signs from given graphical and written information.
Key Words Points to Note Resources
Shading Colour Texture Stick figures Pictograms Safety signs Symbols Prohibition Mandatory Safe condition Standard conventions
During this unit the teacher helps students develop their artistic skills by cultivating creative expression and fostering an understanding of textures, shapes and colours. Students are to be encouraged to draw simple common objects found in the class and home environment, paying particular attention to the form, structure, colour and texture. However, the teacher has to emphasize that when drawing safety signs, creativity has to be limited to the drawing of the graphic symbol inside the sign, as the colours and the frame shapes must strictly comply with standard conventions. Cross curricular Links: Art and Science Approach to teaching and learning: Apart from direct instruction, the teacher should encourage the students to research about pictograms and safety signs by accessing the internet and by directly observing the signs used in construction sites, airports, cinemas, cargo handling, packaging etc.
Equipment needed:
Interactive whiteboard Whiteboard, large drawing instruments to be used on the whiteboard. Cardboard A2, cutting mat, scalpel, raised steel rule, scissors, double sided sticky tape and glue. Solid blocks of different materials. Storyboards and safety signs. Textbooks: Graphical Communication 1 Stuart Bland Technical Drawing (omnibus) F.B.Mayock Understanding Technical Graphics J.&T. O’Sullivan Understanding Technical Graphics Workbook Graphical Communication Handouts Graphical Communication Website link:
http://graphicalcommunication.skola.edu.mt/
Directorate for Quality and Standards in Education Curriculum Management and eLearning Department – Graphical Communication – 2012
32
Teaching Objective Examples of teaching experiences and activities Indicators of Learning outcomes
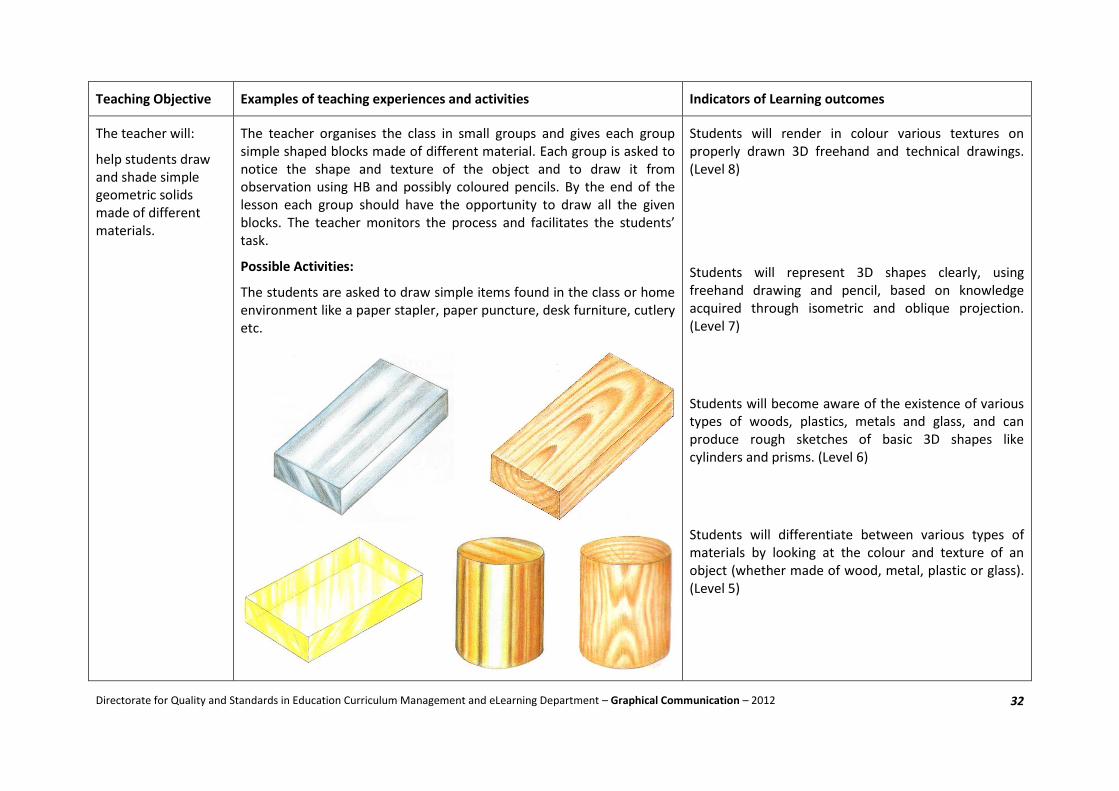
The teacher will:
help students draw and shade simple geometric solids made of different materials.
The teacher organises the class in small groups and gives each group simple shaped blocks made of different material. Each group is asked to notice the shape and texture of the object and to draw it from observation using HB and possibly coloured pencils. By the end of the lesson each group should have the opportunity to draw all the given blocks. The teacher monitors the process and facilitates the students’ task.
Possible Activities:
The students are asked to draw simple items found in the class or home environment like a paper stapler, paper puncture, desk furniture, cutlery etc.
Students will render in colour various textures on properly drawn 3D freehand and technical drawings. (Level 8)
Students will represent 3D shapes clearly, using freehand drawing and pencil, based on knowledge acquired through isometric and oblique projection. (Level 7)
Students will become aware of the existence of various types of woods, plastics, metals and glass, and can produce rough sketches of basic 3D shapes like cylinders and prisms. (Level 6)
Students will differentiate between various types of materials by looking at the colour and texture of an object (whether made of wood, metal, plastic or glass). (Level 5)
Directorate for Quality and Standards in Education Curriculum Management and eLearning Department – Graphical Communication – 2012
33
Teaching Objective Examples of teaching experiences and activities Indicators of Learning outcomes
The teacher will:
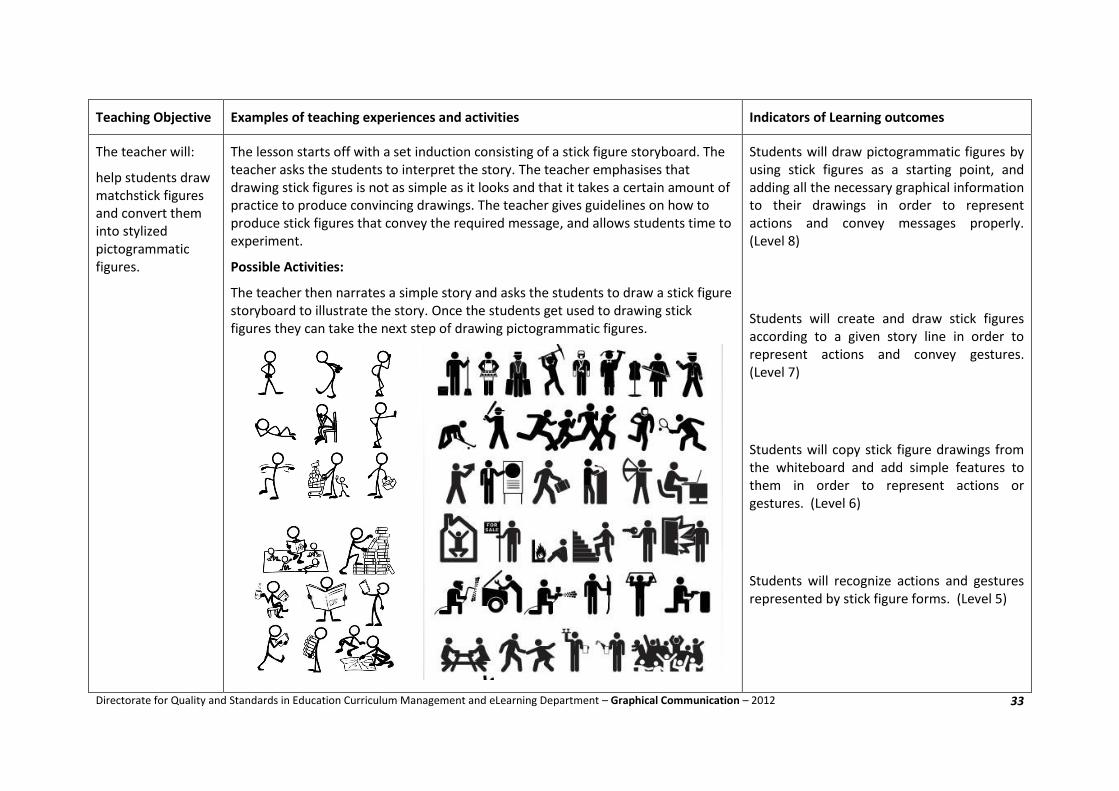
help students draw matchstick figures and convert them into stylized pictogrammatic figures.
The lesson starts off with a set induction consisting of a stick figure storyboard. The teacher asks the students to interpret the story. The teacher emphasises that drawing stick figures is not as simple as it looks and that it takes a certain amount of practice to produce convincing drawings. The teacher gives guidelines on how to produce stick figures that convey the required message, and allows students time to experiment.
Possible Activities:
The teacher then narrates a simple story and asks the students to draw a stick figure storyboard to illustrate the story. Once the students get used to drawing stick figures they can take the next step of drawing pictogrammatic figures.
Students will draw pictogrammatic figures by using stick figures as a starting point, and adding all the necessary graphical information to their drawings in order to represent actions and convey messages properly. (Level 8)
Students will create and draw stick figures according to a given story line in order to represent actions and convey gestures. (Level 7)
Students will copy stick figure drawings from the whiteboard and add simple features to them in order to represent actions or gestures. (Level 6)
Students will recognize actions and gestures represented by stick figure forms. (Level 5)

Directorate for Quality and Standards in Education Curriculum Management and eLearning Department – Graphical Communication – 2012
34
Teaching Objective Examples of teaching experiences and activities Indicators of Learning outcomes
The teacher will:
help students draw and colour prohibition signs from given graphical and written information.
While reminding the students about the information and safety signs covered during Form 1, the teacher introduces the prohibition signs by screening a short video.
http://www.youtube.com/watch?v=QF6vCM8uFTU
The teacher gives details about the dimensions, proportions and colours used for prohibition signs while giving examples.
Possible Activities:
The students are given graded worksheets divided into three sections as shown below:
students are asked to colour a set of prohibition signs
students are asked to copy another set of prohibition signs
students are asked to create a set of prohibition signs for specific safety requirements.
Students will create harder examples of prohibition signs like those involving human figures (e.g. no swimming / no loose hair allowed), after generating a number of ideas through rough sketching. (Level 8)
Students will create simple prohibition signs after generating a number of ideas through rough sketching (e.g. no smoking / no mobiles allowed). (Level 7)
Students will copy simple prohibition signs and apply colour to any uncoloured signs given. (Level 6)
Students will recognize prohibition signs by their shape and colour and read the message embedded in the pictograms. (Level 5)
Directorate for Quality and Standards in Education Curriculum Management and eLearning Department – Graphical Communication – 2012
35
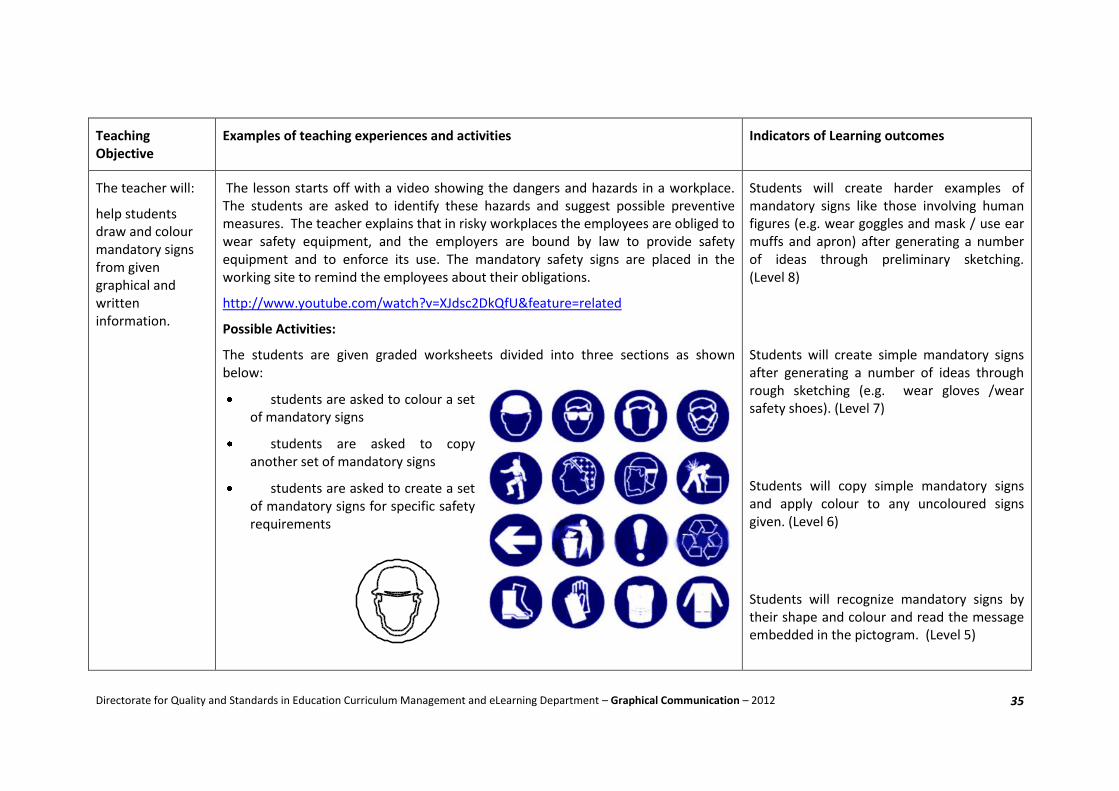
Teaching Objective
Examples of teaching experiences and activities Indicators of Learning outcomes
The teacher will:
help students draw and colour mandatory signs from given graphical and written information.
The lesson starts off with a video showing the dangers and hazards in a workplace. The students are asked to identify these hazards and suggest possible preventive measures. The teacher explains that in risky workplaces the employees are obliged to wear safety equipment, and the employers are bound by law to provide safety equipment and to enforce its use. The mandatory safety signs are placed in the working site to remind the employees about their obligations.
http://www.youtube.com/watch?v=XJdsc2DkQfU&feature=related
Possible Activities:
The students are given graded worksheets divided into three sections as shown below:
students are asked to colour a set of mandatory signs
students are asked to copy another set of mandatory signs
students are asked to create a set of mandatory signs for specific safety requirements
Students will create harder examples of mandatory signs like those involving human figures (e.g. wear goggles and mask / use ear muffs and apron) after generating a number of ideas through preliminary sketching. (Level 8)
Students will create simple mandatory signs after generating a number of ideas through rough sketching (e.g. wear gloves /wear safety shoes). (Level 7)
Students will copy simple mandatory signs and apply colour to any uncoloured signs given. (Level 6)
Students will recognize mandatory signs by their shape and colour and read the message embedded in the pictogram. (Level 5)
Directorate for Quality and Standards in Education Curriculum Management and eLearning Department – Graphical Communication – 2012
36
Teaching Objective Examples of teaching experiences and activities Indicators of Learning outcomes
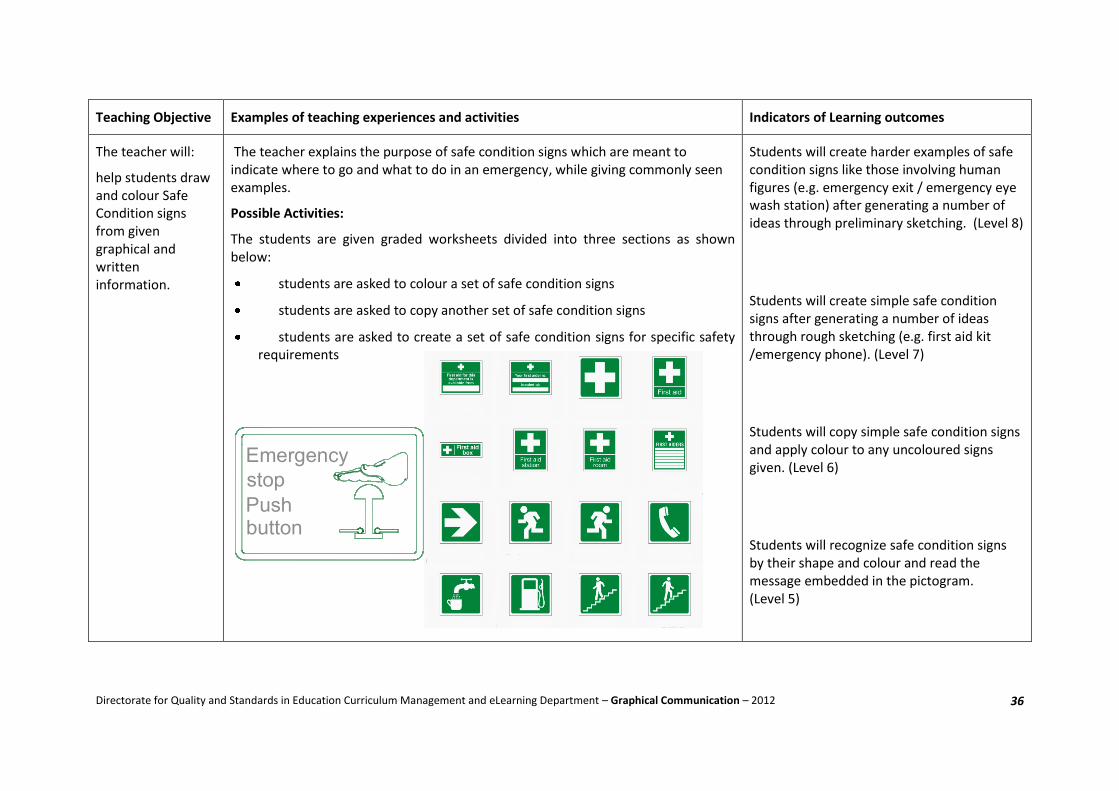
The teacher will:
help students draw and colour Safe Condition signs from given graphical and written information.
The teacher explains the purpose of safe condition signs which are meant to indicate where to go and what to do in an emergency, while giving commonly seen examples.
Possible Activities:
The students are given graded worksheets divided into three sections as shown below:
students are asked to colour a set of safe condition signs
students are asked to copy another set of safe condition signs
students are asked to create a set of safe condition signs for specific safety requirements
Students will create harder examples of safe condition signs like those involving human figures (e.g. emergency exit / emergency eye wash station) after generating a number of ideas through preliminary sketching. (Level 8)
Students will create simple safe condition signs after generating a number of ideas through rough sketching (e.g. first aid kit /emergency phone). (Level 7)
Students will copy simple safe condition signs and apply colour to any uncoloured signs given. (Level 6)
Students will recognize safe condition signs by their shape and colour and read the message embedded in the pictogram. (Level 5)
Emergency
stop
Push button
Top Related