


Languages
Pages
Legal


PINHOLE
BRIAN J. KRUMMEL
THE
CameraA Practical How-To Book for Making Pinhole Cameras and Images


PINHOLE
BRIAN J. KRUMMEL
THE
CameraA Practical How-To Book for Making Pinhole Cameras and Images

The Pinhole Ca mer a
2
2D Illustrator: Sean Krummel
Book Design: Group 2 Design, Inc.
Editor: Devon Christopher Adams
For general information, visit us on the web at www.ThePinholeCamera.com Copyright © 2009 Brian J. Krummel. All images are by the author unless otherwise noted. All images in the Featured Artists spreads are © their respective artists.
Notice of Rights
No part of this publication may be reproduced in whole or in part, or stored in a retrieval system, or transmitted in any form or by any means, electronic, mechanical, photocopying, recording, or otherwise, without written permission of the author.
Notice of Liability
The information in this book is distributed on an “as is” basis, without warranty. While every precaution has been taken in the preparation of this book, neither the author nor the publisher shall have any liability to any person or entity with respect to any liability, loss, or damage caused or alleged to be caused directly or indirectly by the instructions contained in this book or by the computer software and hardware products described herein.
ISBN 1442187662
Printed by CreateSpace
Cover Image: Castle Among The Tulips I. 2008.
Opposite: He Said/She Said. 2008.

3
To my wife, Susanne, and our three wonderful children.
John 3:16-21
The Pinhole Ca mer a
4
No book would be complete without a proper thanks to my friends and
family. Writing a book is a huge undertaking, with hundreds of micro-tasks,
that requires much time and extreme patience. I had several key people
help me in the creation of this book and I am truly grateful for their
contributions, criticism, and suggestions.
* Devon Christopher Adams for kindly editing my book and finessing
my rough thoughts and ideas into a polished gem
* Linda Delaney, Kristen Cooke, and Ron Grice of Group 2 Design for
designing this book layout and making my work shine
* Diana Krummel for lending your knowledge of proper page layout,
printing practices, and InDesign file preparation
* Sean Krummel for your Red Hot Tip camera illustration
* My father for introducing me to the mystery and magic of photography
* Susanne Krummel for your immeasurable patience, constructive and
honest criticism, and proofreading/editing contributions throughout
the entire project
I would also like to thank each featured artist for contributing an
autobiography and a photographic image. The selected artists lend a broad
diversity to this book and to the pinhole art form on a global scale. Without
the combined efforts of everyone previously mentioned, this book would
simply have remained a concept.
An extensive historical record of pinhole can be found in the wonderful
book Pinhole Photography: Rediscovering a Historic Technique by Eric Renner.
His devotion to the art form is reflected in the renewed interest of many
pinhole photographers worldwide. Any attempt to re-document the history
of pinhole photography would diminish Renner’s organization, Pinhole
Resource, and the preservation of pinhole photography accomplished
through that organization. Pinhole Resource published the Pinhole
Journal, a valuable resource dedicated to the craft, from 1985 until 2006.
The concepts found in Renner’s book and within the complete archive of
Pinhole Journal have served as a solid foundation, a fountain of ideas, and
an endless source of inspiration for my own work.
Acknowledgements
This is my sincerest thank you to those who helped me complete the task of writing and organizing this book:

5
Honestly, I never thought that I would write a book and I do not consider
myself a stellar writer. I presume that all writers wonder why they are
creating a particular piece, if it will be read, if it will be worth the effort,
and if anyone will care. I personally had all of those thoughts and doubts
although the reason that I wrote this book has always remained clear and
firm— create a clean and easy to understand how-to manual that anyone
could follow and understand.
The pinhole process began for me when I grew tired of the predictability of
conventional cameras and lenses. Going back to the basics, I found a book
on the pinhole technique. After the initial learning curve, I felt invigorated
with the potential of this art form. Once I understood the principles of
camera and pinhole creation, my mind flourished with ideas of how I could
make cameras out of anything.
I held a pinhole workshop in conjunction with a gallery exhibition. It was
surprising how many people showed up from the local photo community
to learn about this simple yet enigmatic form of art. With the success of
that workshop, I held another series where I opened the curriculum to
include advanced topics such as curved film planes and 35 mm matchbox
cameras. I was overwhelmed with the expressed interest in my work (what
I would only classify as science experiments in many cases).
My initial audience and feedback for pinhole imaging was the online photo
community of Flickr.com. On Flickr, I met so many additional people from
around the world who were interested in my ideas as well as sharing their
own concepts and creations. It was my goal to consolidate all of the lessons
that I had learned in my exploration of the art form into a condensed how-to
handbook for new pinhole artists.
I am not the first nor the last artist to explore pinhole photography. Many
talented artists have been around longer than myself. I am grateful for
the artists who began forging the way for pinhole photography. It is now
your duty to carry that creative torch and chart new and exciting paths
of progress.
~ Brian J. Krummel, 2009
Forward
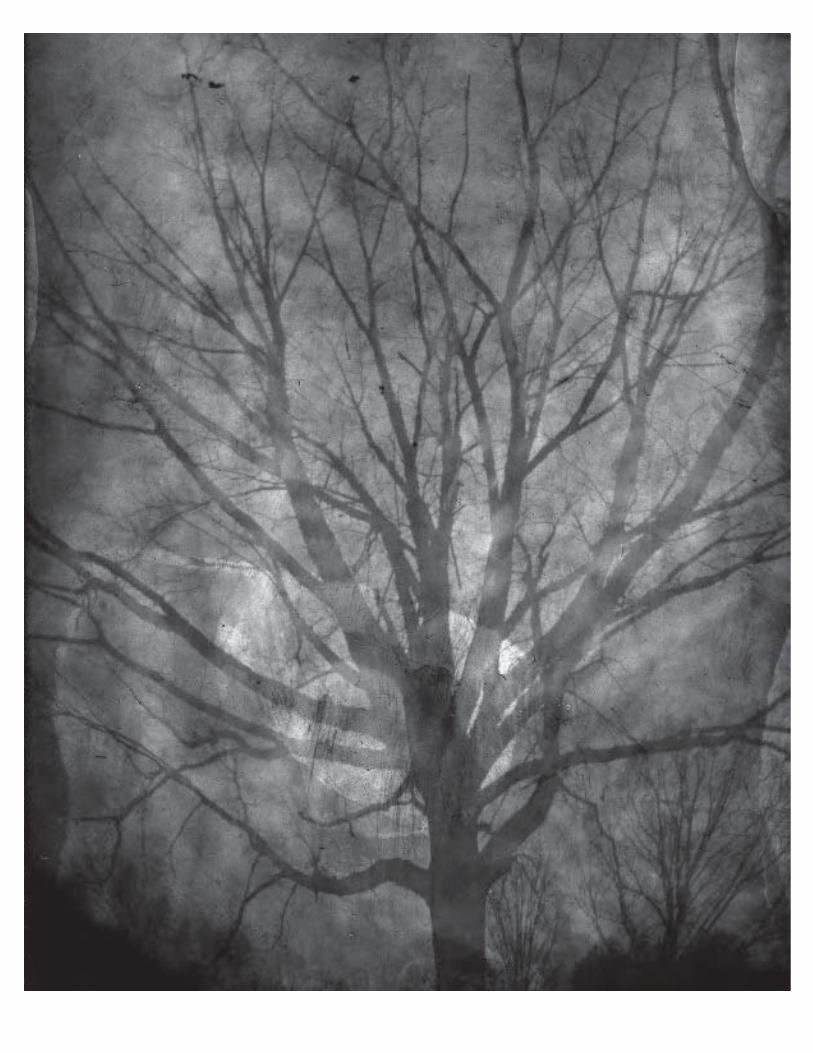
Spring Trees I. 2008
Common subjects such as trees can be captured in a new fascinating way with some simple pinhole techniques. This image was captured with a simple tin can and a paper negative. The scanned negative was left as a negative image to enhance the mystery of spring.

6 Contents
The Pinhole Ca mer a
Table of Contents
2
1Part One : Introduction to Pinhole PhotographyIn a Nutshell . . . . . . . . . . . . . . . . . . . . . . . . . . . . . . . . . . . . . . . . 10
Signature Characteristics . . . . . . . . . . . . . . . . . . . . . . . . . . . . . . 12 Soft & Surreal . . . . . . . . . . . . . . . . . . . . . . . . . . . . . . . . . . . . 12 Motion Blur . . . . . . . . . . . . . . . . . . . . . . . . . . . . . . . . . . . . . . 13 Extreme Depth of Field . . . . . . . . . . . . . . . . . . . . . . . . . . . . . 13 Lack of Linear Distortion . . . . . . . . . . . . . . . . . . . . . . . . . . . . 15 Exaggerated Scale . . . . . . . . . . . . . . . . . . . . . . . . . . . . . . . . . 16
Why Shoot Pinhole? . . . . . . . . . . . . . . . . . . . . . . . . . . . . . . . . . . . 18 Refocusing on Fundamentals . . . . . . . . . . . . . . . . . . . . . . . . . 18 Cost Effectiveness . . . . . . . . . . . . . . . . . . . . . . . . . . . . . . . . . 18 Portable & Inconspicuous . . . . . . . . . . . . . . . . . . . . . . . . . . . 19 Alternative Printing. . . . . . . . . . . . . . . . . . . . . . . . . . . . . . . . . 20
The Modern Digital Age . . . . . . . . . . . . . . . . . . . . . . . . . . . . . . . . 22 Got GAS? . . . . . . . . . . . . . . . . . . . . . . . . . . . . . . . . . . . . . . . . 22 Embrace Technology . . . . . . . . . . . . . . . . . . . . . . . . . . . . . . . 24
About This Book. . . . . . . . . . . . . . . . . . . . . . . . . . . . . . . . . . . . . . 25 Beginner Track. . . . . . . . . . . . . . . . . . . . . . . . . . . . . . . . . . . . 25 Advanced Track . . . . . . . . . . . . . . . . . . . . . . . . . . . . . . . . . . . 25 Creative Opportunities . . . . . . . . . . . . . . . . . . . . . . . . . . . . . . 25 Red Hot Tips . . . . . . . . . . . . . . . . . . . . . . . . . . . . . . . . . . . . . 25 Author’s Words of Advice . . . . . . . . . . . . . . . . . . . . . . . . . . . . 25
Part Two : The Pinhole ProcessCHAPTER 1 : CameraBeginner Track . . . . . . . . . . . . . . . . . . . . . . . . . . . . . . . . . . . . . . 28 Material List . . . . . . . . . . . . . . . . . . . . . . . . . . . . . . . . . . . . . . 28 Selecting a Tin Can . . . . . . . . . . . . . . . . . . . . . . . . . . . . . . . . 28 Painting Your Can. . . . . . . . . . . . . . . . . . . . . . . . . . . . . . . . . . 30 Pinhole Preparation . . . . . . . . . . . . . . . . . . . . . . . . . . . . . . . . 30
Advanced Track . . . . . . . . . . . . . . . . . . . . . . . . . . . . . . . . . . . . . . 32 Patching Light Leaks . . . . . . . . . . . . . . . . . . . . . . . . . . . . . . . 32 Film Plane . . . . . . . . . . . . . . . . . . . . . . . . . . . . . . . . . . . . . . . 34 Focal Length . . . . . . . . . . . . . . . . . . . . . . . . . . . . . . . . . . . . . 35 Filters . . . . . . . . . . . . . . . . . . . . . . . . . . . . . . . . . . . . . . . . . . 37 Tripods & Support Systems . . . . . . . . . . . . . . . . . . . . . . . . . . 38 Viewfinders . . . . . . . . . . . . . . . . . . . . . . . . . . . . . . . . . . . . . . 40 Commercial Products. . . . . . . . . . . . . . . . . . . . . . . . . . . . . . . 40
Creative Opportunities . . . . . . . . . . . . . . . . . . . . . . . . . . . . . . . . . 46 Alternative Containers . . . . . . . . . . . . . . . . . . . . . . . . . . . . . . 46 Modified Film Plane . . . . . . . . . . . . . . . . . . . . . . . . . . . . . . . . 52 Folded Plane . . . . . . . . . . . . . . . . . . . . . . . . . . . . . . . . . . 52 Coned Plane . . . . . . . . . . . . . . . . . . . . . . . . . . . . . . . . . . 53 Angled Plane . . . . . . . . . . . . . . . . . . . . . . . . . . . . . . . . . . 53 Anamorphic Plane . . . . . . . . . . . . . . . . . . . . . . . . . . . . . . 54
CHAPTER 2 : PinholeBeginner Track . . . . . . . . . . . . . . . . . . . . . . . . . . . . . . . . . . . . . . 56 Pinhole Overview . . . . . . . . . . . . . . . . . . . . . . . . . . . . . . . . . . 56 Material List . . . . . . . . . . . . . . . . . . . . . . . . . . . . . . . . . . . . . . 56 Pinhole Construction . . . . . . . . . . . . . . . . . . . . . . . . . . . . . . . 56 Finishing Your Pinhole . . . . . . . . . . . . . . . . . . . . . . . . . . . . . . 59
Advanced Track . . . . . . . . . . . . . . . . . . . . . . . . . . . . . . . . . . . . . . 60 Image Circle. . . . . . . . . . . . . . . . . . . . . . . . . . . . . . . . . . . . . . 60 Determining the Diagonal Measurement . . . . . . . . . . . . . . 60 Determining Minimal Focal Length . . . . . . . . . . . . . . . . . . 61 Vignette & Light Intensity . . . . . . . . . . . . . . . . . . . . . . . . . 63 Field of View. . . . . . . . . . . . . . . . . . . . . . . . . . . . . . . . . . . 63 Calculating Pinhole Diameter . . . . . . . . . . . . . . . . . . . . . . . . . 64 Calculating the F-stop . . . . . . . . . . . . . . . . . . . . . . . . . . . . . . 64 Optimal Pinhole Size . . . . . . . . . . . . . . . . . . . . . . . . . . . . . . . 65 Online Software Tools. . . . . . . . . . . . . . . . . . . . . . . . . . . . . . . 66 Commercial Products. . . . . . . . . . . . . . . . . . . . . . . . . . . . . . . 66
Creative Opportunities . . . . . . . . . . . . . . . . . . . . . . . . . . . . . . . . . 68 Multiple Pinholes . . . . . . . . . . . . . . . . . . . . . . . . . . . . . . . . . . 68 Zone Plates . . . . . . . . . . . . . . . . . . . . . . . . . . . . . . . . . . . . . . 69 Pinhole Obstruction . . . . . . . . . . . . . . . . . . . . . . . . . . . . . . . . 70
CHAPTER 3 : Light-Sensitive MaterialBeginner Track . . . . . . . . . . . . . . . . . . . . . . . . . . . . . . . . . . . . . . 72 Photographic Paper . . . . . . . . . . . . . . . . . . . . . . . . . . . . . . . . 73 Selecting a Paper Stock . . . . . . . . . . . . . . . . . . . . . . . . . . . . . 74
Advanced Track . . . . . . . . . . . . . . . . . . . . . . . . . . . . . . . . . . . . . . 76 Why Use Film? . . . . . . . . . . . . . . . . . . . . . . . . . . . . . . . . . . . . 76 Film Types . . . . . . . . . . . . . . . . . . . . . . . . . . . . . . . . . . . . . . . 77 Black and White Film . . . . . . . . . . . . . . . . . . . . . . . . . . . . 77 Color Film. . . . . . . . . . . . . . . . . . . . . . . . . . . . . . . . . . . . . 77 Infrared Film . . . . . . . . . . . . . . . . . . . . . . . . . . . . . . . . . . 78 Instant Film . . . . . . . . . . . . . . . . . . . . . . . . . . . . . . . . . . . 78
Creative Opportunities . . . . . . . . . . . . . . . . . . . . . . . . . . . . . . . . . 80 Redscale Technique. . . . . . . . . . . . . . . . . . . . . . . . . . . . . . . . 80 Sprocket Holes. . . . . . . . . . . . . . . . . . . . . . . . . . . . . . . . . . . . 80 Distressing Negatives. . . . . . . . . . . . . . . . . . . . . . . . . . . . . . . 82 Liquid Emulsion . . . . . . . . . . . . . . . . . . . . . . . . . . . . . . . . . . . 82
CHAPTER 4 : Loading & ExposingBeginner Track . . . . . . . . . . . . . . . . . . . . . . . . . . . . . . . . . . . . . . 84 Loading Your Camera . . . . . . . . . . . . . . . . . . . . . . . . . . . . . . . 84 Checking for Light Tightness . . . . . . . . . . . . . . . . . . . . . . . . . 84 What to Photograph . . . . . . . . . . . . . . . . . . . . . . . . . . . . . . . . 85 Making an Exposure. . . . . . . . . . . . . . . . . . . . . . . . . . . . . . . . 85
Advanced Track . . . . . . . . . . . . . . . . . . . . . . . . . . . . . . . . . . . . . . 86 Calculating Proper Exposures. . . . . . . . . . . . . . . . . . . . . . . . . 86 What is Reciprocity?. . . . . . . . . . . . . . . . . . . . . . . . . . . . . . . . 87 Zen of Pinholing . . . . . . . . . . . . . . . . . . . . . . . . . . . . . . . . . . . 88 Field Kit . . . . . . . . . . . . . . . . . . . . . . . . . . . . . . . . . . . . . . . . . 89
Creative Opportunities . . . . . . . . . . . . . . . . . . . . . . . . . . . . . . . . . 90 Photograms . . . . . . . . . . . . . . . . . . . . . . . . . . . . . . . . . . . . . . 90 Split Frame Collaboration . . . . . . . . . . . . . . . . . . . . . . . . . . . . 93 Solargraphy . . . . . . . . . . . . . . . . . . . . . . . . . . . . . . . . . . . . . . 94 Photographing Underwater . . . . . . . . . . . . . . . . . . . . . . . . . . 97

7
4
3
CHAPTER 5 : Developing & EvaluatingBeginner Track . . . . . . . . . . . . . . . . . . . . . . . . . . . . . . . . . . . . . . 98 Developing a Paper Negative . . . . . . . . . . . . . . . . . . . . . . . . . 98 Evaluating a Paper Negative . . . . . . . . . . . . . . . . . . . . . . . . . 100
Advanced Track . . . . . . . . . . . . . . . . . . . . . . . . . . . . . . . . . . . . . 102 Film Tanks . . . . . . . . . . . . . . . . . . . . . . . . . . . . . . . . . . . . . . 102 Loading Film Reels. . . . . . . . . . . . . . . . . . . . . . . . . . . . . . . . 102 Choosing & Mixing Chemicals . . . . . . . . . . . . . . . . . . . . . . . 103 Development Process . . . . . . . . . . . . . . . . . . . . . . . . . . . . . 104
Creative Opportunities . . . . . . . . . . . . . . . . . . . . . . . . . . . . . . . . 106 Cross Processing Film . . . . . . . . . . . . . . . . . . . . . . . . . . . . . 106 Sabattier Print . . . . . . . . . . . . . . . . . . . . . . . . . . . . . . . . . . . 106 Selectively Applied Developer. . . . . . . . . . . . . . . . . . . . . . . . 109
CHAPTER 6 : PrintingBeginner Track . . . . . . . . . . . . . . . . . . . . . . . . . . . . . . . . . . . . . 110 Making a Contact Print. . . . . . . . . . . . . . . . . . . . . . . . . . . . . 110
Advanced Track . . . . . . . . . . . . . . . . . . . . . . . . . . . . . . . . . . . . . 112 Scanning Your Negative . . . . . . . . . . . . . . . . . . . . . . . . . . . . 112 Adobe Photoshop Adjustments . . . . . . . . . . . . . . . . . . . . . . 113 Creating Digital Negatives . . . . . . . . . . . . . . . . . . . . . . . . . . 115 Digital Output. . . . . . . . . . . . . . . . . . . . . . . . . . . . . . . . . . . . 115
Creative Opportunities . . . . . . . . . . . . . . . . . . . . . . . . . . . . . . . . 116 Contact Printing . . . . . . . . . . . . . . . . . . . . . . . . . . . . . . . . . . 116 Cyanotype . . . . . . . . . . . . . . . . . . . . . . . . . . . . . . . . . . . 117 Van Dyke . . . . . . . . . . . . . . . . . . . . . . . . . . . . . . . . . . . . 119 Toning . . . . . . . . . . . . . . . . . . . . . . . . . . . . . . . . . . . . . . . . . 119 Tea & Coffee . . . . . . . . . . . . . . . . . . . . . . . . . . . . . . . . . 119 Transfers . . . . . . . . . . . . . . . . . . . . . . . . . . . . . . . . . . . . . . . 119 Acrylic . . . . . . . . . . . . . . . . . . . . . . . . . . . . . . . . . . . . . . 119 Inkjet . . . . . . . . . . . . . . . . . . . . . . . . . . . . . . . . . . . . . . . 125 Lazertran . . . . . . . . . . . . . . . . . . . . . . . . . . . . . . . . . . . . 129 Photocopy . . . . . . . . . . . . . . . . . . . . . . . . . . . . . . . . . . . 131 Polaroid Emulsion Transfer . . . . . . . . . . . . . . . . . . . . . . . 131 Polaroid Emulsion Lift. . . . . . . . . . . . . . . . . . . . . . . . . . . 132
Part Three : WorkshopsCHAPTER 7 : 35 mm Matchbox Material List . . . . . . . . . . . . . . . . . . . . . . . . . . . . . . . . . . . . . . . . 136Building the Camera . . . . . . . . . . . . . . . . . . . . . . . . . . . . . . . . . 136Loading Your Camera. . . . . . . . . . . . . . . . . . . . . . . . . . . . . . . . . 138Making an Exposure . . . . . . . . . . . . . . . . . . . . . . . . . . . . . . . . . 140Completing a Roll. . . . . . . . . . . . . . . . . . . . . . . . . . . . . . . . . . . . 141Additional Resources . . . . . . . . . . . . . . . . . . . . . . . . . . . . . . . . . 141
CHAPTER 8 : Retrofitting CamerasDigital SLR. . . . . . . . . . . . . . . . . . . . . . . . . . . . . . . . . . . . . . . . . 142 Roll Film . . . . . . . . . . . . . . . . . . . . . . . . . . . . . . . . . . . . . . . . . . 143 Converting & Repairing . . . . . . . . . . . . . . . . . . . . . . . . . . . . 143 Finding Film Stock . . . . . . . . . . . . . . . . . . . . . . . . . . . . . . . . 144 Camera Gallery . . . . . . . . . . . . . . . . . . . . . . . . . . . . . . . . . . 144
CHAPTER 9 : PinholgaWhat’s a Holga? . . . . . . . . . . . . . . . . . . . . . . . . . . . . . . . . . . . . . 146Removing the Lens . . . . . . . . . . . . . . . . . . . . . . . . . . . . . . . . . . 146Finishing Your Camera . . . . . . . . . . . . . . . . . . . . . . . . . . . . . . . . 148Additional Reference . . . . . . . . . . . . . . . . . . . . . . . . . . . . . . . . . 148
CHAPTER 10 : Setting Up a Black and White DarkroomPlanning Your Space . . . . . . . . . . . . . . . . . . . . . . . . . . . . . . . . . 150Photographic Suppliers . . . . . . . . . . . . . . . . . . . . . . . . . . . . . . . 150Material List . . . . . . . . . . . . . . . . . . . . . . . . . . . . . . . . . . . . . . . . 151Mixing Chemicals. . . . . . . . . . . . . . . . . . . . . . . . . . . . . . . . . . . . 151Preparing Your Trays . . . . . . . . . . . . . . . . . . . . . . . . . . . . . . . . . 151
Part Four : Featured Pinhole ArtistsCHAPTER 11 : Africa, Asia, and AustralasiaXiao Shan . . . . . . . . . . . . . . . . . . . . . . . . . . . . . . . . . . . . . . . . . 154 Noriko Ohba . . . . . . . . . . . . . . . . . . . . . . . . . . . . . . . . . . . . . . . 155Danne Dhirgahayu . . . . . . . . . . . . . . . . . . . . . . . . . . . . . . . . . . . 156Pierre Lagace . . . . . . . . . . . . . . . . . . . . . . . . . . . . . . . . . . . . . . 157Nathaniel Stern . . . . . . . . . . . . . . . . . . . . . . . . . . . . . . . . . . . . . 158Ben Du Ross . . . . . . . . . . . . . . . . . . . . . . . . . . . . . . . . . . . . . . . 159William Mellott . . . . . . . . . . . . . . . . . . . . . . . . . . . . . . . . . . . . . . 160Landry Dunand . . . . . . . . . . . . . . . . . . . . . . . . . . . . . . . . . . . . . 161
CHAPTER 12 : EuropeBalazs Sprenc . . . . . . . . . . . . . . . . . . . . . . . . . . . . . . . . . . . . . . 162Marie-Noelle Leroy. . . . . . . . . . . . . . . . . . . . . . . . . . . . . . . . . . . 163Geert van Hurck . . . . . . . . . . . . . . . . . . . . . . . . . . . . . . . . . . . . 164Rudy Ramos . . . . . . . . . . . . . . . . . . . . . . . . . . . . . . . . . . . . . . . 165Danilo Pedruzzi . . . . . . . . . . . . . . . . . . . . . . . . . . . . . . . . . . . . . 166Tarquin Coates. . . . . . . . . . . . . . . . . . . . . . . . . . . . . . . . . . . . . . 167Alan Cooper. . . . . . . . . . . . . . . . . . . . . . . . . . . . . . . . . . . . . . . . 168Nhung Dang . . . . . . . . . . . . . . . . . . . . . . . . . . . . . . . . . . . . . . . 169Tony Kemplen . . . . . . . . . . . . . . . . . . . . . . . . . . . . . . . . . . . . . . 170Michaela Lewis . . . . . . . . . . . . . . . . . . . . . . . . . . . . . . . . . . . . . 171Mark Lorch . . . . . . . . . . . . . . . . . . . . . . . . . . . . . . . . . . . . . . . . 172Dante Penman. . . . . . . . . . . . . . . . . . . . . . . . . . . . . . . . . . . . . . 173Ian Goulden. . . . . . . . . . . . . . . . . . . . . . . . . . . . . . . . . . . . . . . . 174Ivan Vano. . . . . . . . . . . . . . . . . . . . . . . . . . . . . . . . . . . . . . . . . . 175Robert Vilaplana . . . . . . . . . . . . . . . . . . . . . . . . . . . . . . . . . . . . 176Peter Wiklund . . . . . . . . . . . . . . . . . . . . . . . . . . . . . . . . . . . . . . 177
CHAPTER 13 : North AmericaBruce Berrien . . . . . . . . . . . . . . . . . . . . . . . . . . . . . . . . . . . . . . 178Maria Luisa Santos Cuellar. . . . . . . . . . . . . . . . . . . . . . . . . . . . . 179M. M. Adjarian. . . . . . . . . . . . . . . . . . . . . . . . . . . . . . . . . . . . . . 180Chris Keeney . . . . . . . . . . . . . . . . . . . . . . . . . . . . . . . . . . . . . . . 181Jon Krummel . . . . . . . . . . . . . . . . . . . . . . . . . . . . . . . . . . . . . . . 182Eben Ostby . . . . . . . . . . . . . . . . . . . . . . . . . . . . . . . . . . . . . . . . 183Delio Ansovini . . . . . . . . . . . . . . . . . . . . . . . . . . . . . . . . . . . . . . 184Odile Donis . . . . . . . . . . . . . . . . . . . . . . . . . . . . . . . . . . . . . . . . 185Scott F. Speck . . . . . . . . . . . . . . . . . . . . . . . . . . . . . . . . . . . . . . 186Scott Stillman . . . . . . . . . . . . . . . . . . . . . . . . . . . . . . . . . . . . . . 187Henrieke I. Strecker . . . . . . . . . . . . . . . . . . . . . . . . . . . . . . . . . . 188Arunas Kulikauskas . . . . . . . . . . . . . . . . . . . . . . . . . . . . . . . . . . 189Victor Milin . . . . . . . . . . . . . . . . . . . . . . . . . . . . . . . . . . . . . . . . 190Zeb Andrews . . . . . . . . . . . . . . . . . . . . . . . . . . . . . . . . . . . . . . . 191Danielle Hughson . . . . . . . . . . . . . . . . . . . . . . . . . . . . . . . . . . . 192Buzzy Sullivan . . . . . . . . . . . . . . . . . . . . . . . . . . . . . . . . . . . . . . 193Wayne Mackeson. . . . . . . . . . . . . . . . . . . . . . . . . . . . . . . . . . . . 194Leslie Bastress. . . . . . . . . . . . . . . . . . . . . . . . . . . . . . . . . . . . . . 195Rebecca Pendel . . . . . . . . . . . . . . . . . . . . . . . . . . . . . . . . . . . . 196Michael J. Wolszon . . . . . . . . . . . . . . . . . . . . . . . . . . . . . . . . . . 197Steven White . . . . . . . . . . . . . . . . . . . . . . . . . . . . . . . . . . . . . . . 198Steve Degenhardt . . . . . . . . . . . . . . . . . . . . . . . . . . . . . . . . . . . 199
CHAPTER 14 : South AmericaAlex Rubio . . . . . . . . . . . . . . . . . . . . . . . . . . . . . . . . . . . . . . . . . 200Alicia Elgueta Acevedo. . . . . . . . . . . . . . . . . . . . . . . . . . . . . . . . 201Luciano de Sampaio Soares . . . . . . . . . . . . . . . . . . . . . . . . . . . . 202Marcos Campos. . . . . . . . . . . . . . . . . . . . . . . . . . . . . . . . . . . . . 203
Epilogue. . . . . . . . . . . . . . . . . . . . . . . . . . . . . . . . . . . . . . . . 204
Index . . . . . . . . . . . . . . . . . . . . . . . . . . . . . . . . . . . . . . . . . . . 205

The Pinhole Ca mer a
8

91Part One : Introduction to Pinhole Photography
This section is designed to give you an overview
of pinholing. You will learn about the signature
trademarks of a pinhole image and how these
characteristics can be used creatively.
A brief synopsis of pinhole cameras, techniques,
and printing methods will be introduced to give
you an idea of the many possibilities.
Finally, the practical organization of this book
is described, allowing you to plan and work
through the many examples and exercises.
With this brief introduction, you can start
creating your own cameras in Part Two.

The Pinhole Ca mer a
10 Introduction to Pinhole Photography
In a Nutshell
* A pinhole camera is simply
a camera without a lens
* A pinhole camera can be
constructed from practically
any light-tight container
* A pinhole camera is
fundamentally a very
sophisticated light leak
THIS IS THE ART FORM, ESSENTIALLY, IN A NUTSHELL:
* A pinhole is created by drilling a
tiny hole in a piece of thin metal
* A pinhole converges light
rays to form an image within
the camera
* A pinhole image can be
captured on sensitized materials
such as film and paper
* A pinhole image exposure
can range widely from seconds
to months
* A pinhole image features
an extreme depth of field
* A pinhole photographer is
limited only by his imagination
Every advanced concept from multiple pinholes to solargraphy, found further
in this book, will build off of these simple principles and open endless
options for variation and experimentation. There are other subtle
points that serve as an advantage: pinhole photography is
relatively inexpensive compared to current digital cameras
and media, the do-it-yourself nature of the hobby is fun
while challenging your inner creativity, the scientific
principles simultaneously educate children and
adults, and your images will truly be one-of-a-kind
photographic enigmas that will draw attention and
stand out from the crowd.
I get mixed reactions when I say that I am a pinhole photographer and that I create images with a tin
can. Some people think that I am joking and simply laugh, while others are intrigued by the creative
possibilities. They want to know how to make a camera, what kind of film to use for the images, and
the difficulty level in getting started. They are curious, bright-eyed, and eager to learn about the
many possibilities; these people are probably just like you. Hopefully you are reading this book to
broaden your photographic skills, to push into a new realm of art, and to try something new.
Let’s start with the basics. This is all you really need to remember about pinhole photography.

11
David. 2007
This full-sized reproduction of David is located in the Forest Lawn Cemetery in Glendale, CA. A tin can was loaded with black and white paper. The camera was placed at the statue’s feet and exposed for several minutes under an overcast sky. The curved film plane heavily distorts the image; notice the tree line at the top of the frame. The ominous clouds are rendered as a fluid-motion twirl, almost like a ladder reaching towards Heaven.
Previous Page:
This whimsical plastic egg was converted
into a pinhole camera. I painted the interior
with several coats of black spray paint.
I drilled a hole in the dinosaur’s eye and
placed a small pinhole in position. The
camera accepts small paper negatives,
approximately 1" x 1".

The Pinhole Ca mer a
12 Introduction to Pinhole Photography
Signature Characteristics
Now you should be familiar with the building blocks of a pinhole image and camera. Most likely when
you see a pinhole photograph, you immediately notice that something is different. Different can be
very good, especially for an open-minded artist! Explore these differences and characteristics that
make pinhole photography exciting.
Welcome Home War Hero. 2008
While visiting Cocoa Beach, FL, I found a picturesque park near the water. I captured this stoic hero’s pose, gazing into the skies, on my Pinholga camera loaded with Arista EDU Ultra 400 film. A combination of creative elements led to this pleasant surprise: the 400 speed film was too fast and the negative was overexposed, the camera was hand-held so motion blur occurred, and the grainy film was developed in Agfa Rodinal which only accentuated the grittiness. The dark mood was enhanced with Adobe Photoshop tools.
Soft & SurrealA pinhole image is typically characterized by a soft
focus or dreamlike effect. This surrealism can be
attributed to many variables: motion blur, extreme
depth of field, lack of linear distortion, or exaggerated
scale. Vignetting is sometimes used to enhance the
final image. This can be added digitally or simply
appear as a natural occurrence.
The usual imperfection of an inexact pinhole lends to
the softness of an image. While you can buy precise
laser-drilled pinholes, most artists choose to create
their own. Chapter 2 addresses the topic of homemade
pinholes versus commercial grade products.
Combine two or more of the above characteristics
and freely photograph mundane daily activities.
Transform them into magical scenes, full of expression
and feeling, with pinhole photography.

13
Railroad Bridge. 2007
This typical Pittsburgh, PA, river scene was captured with a popcorn can camera on a 11" x 14" paper negative. The choppy river was reduced to a placid sheen with this 5 minute exposure under cloudy skies.
Motion BlurA typical pinhole exposure can take five to 60 seconds
depending on the camera’s focal length, light-sensitive
material, and lighting conditions. Compare this to the
accelerated shutter speeds of current cameras: 1/250,
1/500, and 1/1000 of a second. The inherent nature
of the small pinhole extends the exposure, although
faster film can help you in decreasing the exposure
time. Learn more about exposure in Chapter 4.
Motion is accentuated by long exposure times,
rendering the movement of people and objects into
blurred shapes and distorted figures. This is one
benefit of pinhole photography that can be exploited.
It is possible to eliminate all people from a crowded
street or room, simply by extending the duration of
your exposure.
Move your camera during an exposure for an
alternative in motion blur. It is more than likely that
you will end up with an interesting double exposure
too! Chapter 2 offers suggestions on cameras featuring
multiple pinholes where the contrast between subject
and exposure adds drama to your final image. Be bold
and brave! Your primary goal should be employing
unconventional techniques.
Extreme Depth of FieldDepth of field is defined as the portion of an image
that appears sharp. A pinhole will render everything
in your image with the same relative sharpness,
from foreground to background. Of course, there
are variables that effect the amount of sharpness
such as your pinhole diameter in relation to the focal
length of your camera. The extreme depth of field
is one of the most powerful concepts available in
pinhole photography, setting the art form apart from
conventional image-making.
Love of Trains. 2007
This is a scenic train ride through the eyes of a five-year-old boy. The image was taken with a modified Holga and Polaroid back.

The Pinhole Ca mer a
14 Introduction to Pinhole Photography
Volkswagen Graveyard II. 2007
While driving through rural Pennsylvania, I found this VW graveyard in a front yard. I placed my camera on the car, directly behind the chrome hood emblem. The foreground of the image is filled with the black car, but multiple derelicts are still captured in the background.
15
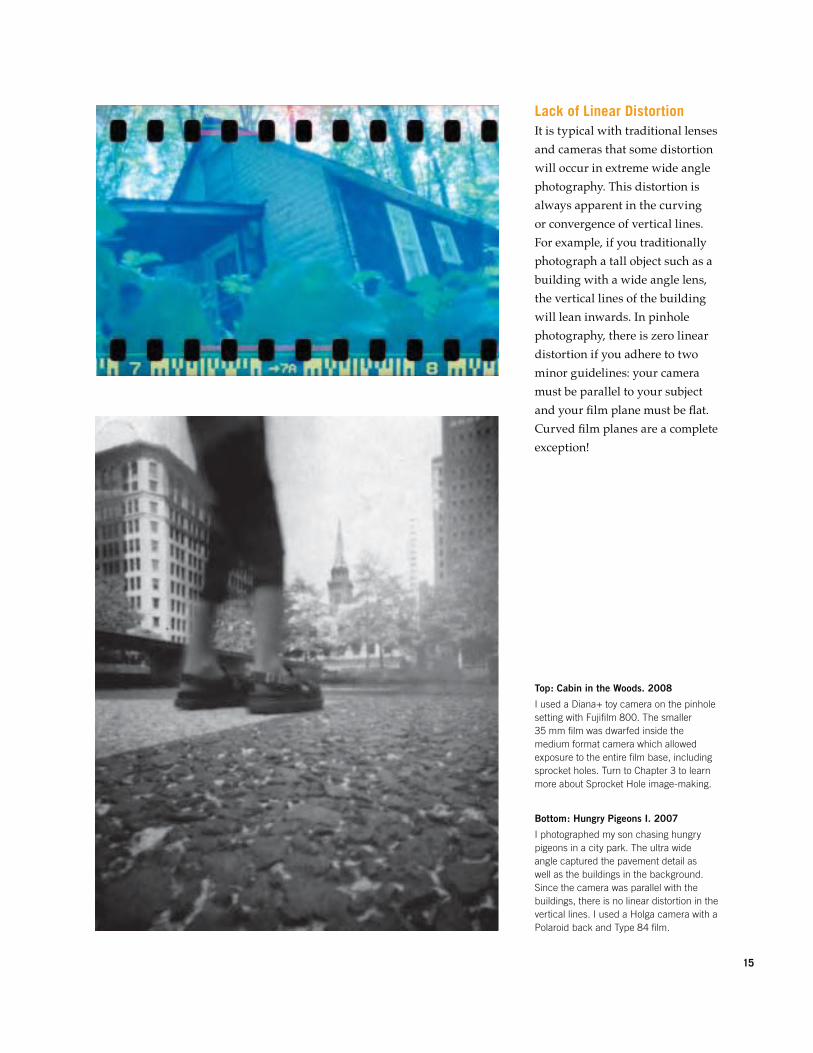
Top: Cabin in the Woods. 2008
I used a Diana+ toy camera on the pinhole setting with Fujifilm 800. The smaller 35 mm film was dwarfed inside the medium format camera which allowed exposure to the entire film base, including sprocket holes. Turn to Chapter 3 to learn more about Sprocket Hole image-making.
Bottom: Hungry Pigeons I. 2007
I photographed my son chasing hungry pigeons in a city park. The ultra wide angle captured the pavement detail as well as the buildings in the background. Since the camera was parallel with the buildings, there is no linear distortion in the vertical lines. I used a Holga camera with a Polaroid back and Type 84 film.
Lack of Linear DistortionIt is typical with traditional lenses
and cameras that some distortion
will occur in extreme wide angle
photography. This distortion is
always apparent in the curving
or convergence of vertical lines.
For example, if you traditionally
photograph a tall object such as a
building with a wide angle lens,
the vertical lines of the building
will lean inwards. In pinhole
photography, there is zero linear
distortion if you adhere to two
minor guidelines: your camera
must be parallel to your subject
and your film plane must be flat.
Curved film planes are a complete
exception!

The Pinhole Ca mer a
16 Introduction to Pinhole Photography
Exaggerated ScaleManipulation of scale can be employed to create
unique and wonderful images. The scale of an object
in your image is directly related to the proximity of
the pinhole. Objects closer to the pinhole will be larger
than those further away. With this simple reality, a
rock or toy in the foreground can be transformed into
something menacing or dominant in relation to the
other objects in your composition. Keep in mind that
every subject in a pinhole image is in the same relative
focus. With a wide angle camera, you can be certain
that everything immediately past the pinhole will
begin to project on to your film or paper, appearing in
your final image.
Top: Dinosaur Parade II. 2008
This image was created with a matchbox camera and the two frame exposure overlaps in the middle. The frayed black edges are created by the cardboard cutout, which acts as a mask, inside the matchbox. Learn how to make your own 35 mm matchbox camera in Chapter 7.
Lower Left: A simple matchbox can be transformed into a camera with minimal effort. This camera was used to create the image above of 2" tall plastic dinosaurs, on inexpensive color negative film.
Right: Barren Tree. 2007
For this image, I used a cylindrical popcorn tin can and a 10" x 5" paper negative. The exposure time was ten minutes under a cloudy spring sky. The curved film plane distorted the vertical lines in the tree, elongating the branches into a bizarre life-like creature. Ironically, this negative was extremely overexposed and nearly unsalvageable, but today I consider it one of my finest lo-fi photographs. Review Chapter 6 for tips on reviving dead negatives through the magic of Adobe Photoshop.
17

The Pinhole Ca mer a
18 Introduction to Pinhole Photography
Refocusing on FundamentalsThe do-it-yourself philosophy is usually the main
attraction for new students. You will find a comfort
and ownership in your work by experiencing the
complete process, from camera construction to
image creation. This freedom has become a creative
elixir for many photographers with a background in
conventional image-making.
A gigantic realm of opportunities will become apparent
when you design and create your own camera. The
shape of a container, size of the pinhole, and duration
of exposure are creative choices that will enable you
to capture extraordinary images that are usually
impossible to create with traditional cameras and
lenses. Pinhole imaging requires no focus, framing or
composition. The artistic possibilities of this art form
will challenge your creativity and allow you to see
commonplace surroundings from a novel perspective.
Cost EffectivenessIt is inexpensive to build a pinhole camera compared
to the cost of traditional cameras and lenses.
Supplies can be found around the house and at most
hardware and department stores. Peruse flea markets,
secondhand stores, and garage sales year-round for tin
cans and unusual containers that can be transformed
into imaginative cameras. It becomes easier to
Why Shoot Pinhole?
Now that you are moderately familiar with
pinhole and its characteristics, let’s get honest.
Is pinhole photography for you? If you are still
undecided, review this last set of reasons to
make the leap to pinhole. Here are a few more
points to ponder about getting back to the
basics of image-making.
Mystery of LA IV. 2007
Magic happens when you relinquish exacting control of your image-making and let accidents happen. This unpredictable image was taken in Los Angeles, CA, and shot inside a cylindrical container. All that I recognize is a single palm tree at the bottom. The rest is a mystery to me!
Cameras are everywhere! A simple camera can be made from any tin can or any light-tight container. Look around your house and find something that you never expected to use as a camera and give it a try! Learn about basic camera construction in Chapter 1.

19
In the end, you should feel a freedom from the
sometimes prohibitive and extraordinary costs
associated with photography.
Portable & InconspicuousTo boldly go where no camera has gone before!
When I was young, my father was a fanatic of both
the Star Trek television series and James Bond movies.
Pinhole photography is like space exploration in the
fact that there is a small percentage of conquered
territory and much left to be discovered. The flexibility
of the art form allows you to improvise your own rules
regarding camera construction and image-making.
Much like science fiction, pinhole introduces a whole
new world of pictorial opportunities.
Super Round Up. 2007
This image was taken, with a 35 mm film canister camera, while in motion on an amusement park ride. I stood upright and grabbed the bars with two hands. Each hand contained a film canister as my thumb, substituted for a shutter, covered the pinhole. As the ride went vertical and spun around, I released my thumbs from the pinholes to create the exposure on photographic paper. One camera received a 20 second exposure, while this final image received a ten second exposure which proved to be fine for the cloudy sky conditions. Toning was added in Adobe Photoshop. The 35 mm film canister is inconspicuous for extreme duration exposures. Learn how to create exposures that last months, with the Solargraphy technique, in Chapter 4.
experiment with different film formats, focal lengths,
and creative apertures when you build your own
cameras from scratch.
Once you exhaust the possibilities of your homemade
camera, simply recycle the camera or give it away to
a friend. Pinhole photography is defined as a series
of endless experiments. Try a technique and either
master it or move on to other concepts and avenues
of expression.
In Chapter 10, you will learn how to assemble a basic
black and white darkroom for a minimal investment
of time and money. A darkroom will extend your
opportunities for creating interesting work while
minimizing your dependence on pricey professional labs.

The Pinhole Ca mer a
20 Introduction to Pinhole Photography
Most of us have seen James Bond, maneuvering from
one precarious situation to another, employing one of
many fantastic gadgets including a miniature camera
ring, laser Polaroid camera, tape recorder camera,
and an underwater infrared camera. With the creation
of fine art, we must flex the imagination and think
along the same lines of science fiction, James Bond,
and Star Trek. You will find the oddity of pinhole
photography as a viable means of self-expression and
worthy of pursuit.
The portability of some pinhole cameras provide a
few advantages over traditional cameras. Imagine the
following scenarios that are possible with pinhole:
take your camera on a roller coaster, take your camera
underwater, or leave your camera outside for months
at a time (recording the sun’s path across the sky).
Truly amazing and original images can be obtained
by thinking in an unconventional manner. Review
the Creative Opportunities in each chapter for ideas,
inspiration, and experiments.
With pinhole cameras created from household objects,
less attention will be drawn to your creative attempts.
This is of course assuming that your camera is not
ostentatious and that you are not trying to draw
attention. One of my favorite approaches to candid
street portraiture is to use a camera made from a coffee
cup, soda can, or other familiar consumer product.
The disadvantage of making an inconspicuous
camera is that you will be eventually misunderstood.
In our post 9/11 society, the world has adopted a
uniform paranoia especially towards photographers.
Common sense should always be used along with
ample good judgement when photographing in public
spaces. Authorities have little interest in or leniency
towards strange cameras or suspicious objects
constructed from household objects that do not match
the environment.
Once while visiting Santa Monica Pier in California,
I left a cylindrical tin can in the middle of the
boardwalk. A security guard immediately stopped
me and asked what I was doing. Even with an
extensive description, she did not fully understand
(or possibly believe) my intentions. Should you find
yourself confronted with a zealous authority figure, it
would be wise to have an unloaded camera available
for discussion.
Alternative PrintingOnce you understand the principles of pinhole, you
can create a camera in any shape or size of your
choosing that produces a specific sized negative
suitable for contact printing. There are many beautiful
and intriguing alternative printing processes available
to the creative photographer including: cyanotype,
gum bichromate, platinum, palladium, and Van Dyke.
The contact printing process is encapsulated in the
next few sentences. Ordinary cotton paper is coated
with a non silver-based emulsion. A contact print is
made by sandwiching the coated paper and a pinhole
negative, while a piece of thick glass or printing frame
holds everything in precise position. The combination
is then exposed to ordinary white light. Light transfers
the negative image to the coated paper and forms a
positive image.
For each process, you must make a contact print
from a negative of equal size. If you want to make an
alternative process print that measures 16" x 20" in
size, you will need an equivalent negative. Traditional
master photographers such as Ansel Adams and
Edward Weston used expensive large format
equipment that produced 8" x 10" or 11" x 14" film
negatives. However, they were not shooting pinhole,
so it is not an exact apple-to-apple comparison. With
pinhole photography, we eliminate the need for such
cumbersome and cost-prohibitive cameras, lenses,
and film.

21
You should make a conscious effort to try new
techniques and printing processes. The sense of
adventure and experimentation partners well with
the adventure of shooting pinhole since you never
can be sure of your result.
In addition to the traditional and historical alternative
processes previously mentioned, there are many
more that should be researched and explored. These
unconventional techniques are a marriage of the
analog and digital worlds. This combination of analog
and digital is exciting and should not be dismissed.
By using the liquid emulsion or Lazertran processes,
you can apply your photographs to 3D surfaces such
as wood and bone. Even though Polaroid technology
Wyeth’s Tree House III. 2008
Mod podge transfer from inkjet print. I found this ancient tree house in a backyard of a home that we once considered buying. The digital image was modified in Adobe Photoshop to boost colors and contrast. The image was inspired by the work of American painter, Andrew Wyeth, who I was researching at the time. Explore the acrylic transfer process, similar to the mod podge technique, in Chapter 6.
is fading quickly, we will touch on the transfer and
emulsion lift processes. With a few household supplies
and some photocopied images, you will learn the
photocopy transfer method. Finally, you will see how
to tone your artwork with ordinary black tea.
You will find a richer collection of creative options
once you have filtered through everything in this
book. Hopefully you will see that you have endless
possibilities for creating your own masterpieces.
The processes of acrylic transfer, inkjet transfer,
cyanotype, Van Dyke, tea toning, Polaroid techniques,
photocopy transfer, and Lazertran will be explained in
Chapter 6.

The Pinhole Ca mer a
22 Introduction to Pinhole Photography
Try pinhole and cave into creativity rather than craving materialism.
Low-fi pinhole image-making is a soothing remedy for the fast paced, digital world of today.
Technology does not make you an artist; your creativity and ingenuity shapes your path. By practicing
pinhole photography, the obstacles of camera and lens will be removed and replaced by optimism and
enthusiasm for your art form.
Got GAS?Our current society subscribes to overabundance
and dependency on the more-is-better philosophy.
It is easy to get entangled in the digital revolution,
finding ourselves surrounded and influenced by
emerging technologies.
Gear Acquisition Syndrome (GAS) is a psychological
condition, that affects many creative individuals
including musicians and artists, characterized by
the constant purchasing of new gadgets in hope of
improving their art form.
If you find yourself obsessing about any of the points
to the right, you may be fixating on your camera gear.
One foolproof way to beat a case of GAS is to make
a change in the way you photograph. Rather than
feeling paralyzed by your lack of camera gear, take
a time-out from what you are accustomed to and try
something new.
Left: This Trail’s End Popcorn camera was used to create The Obelisk. Paper negatives are approximately 10" x 5" and curved in the camera.
Right: The Obelisk. 2007
I made this image at a local cemetery in Pittsburgh, PA. Exposure was 30 seconds in full sun. The curved film plane distorted all vertical lines and created this dreamlike image. I did not flip the image horizontally after scanning, so the writing appears backwards and adds to the surreal feeling. Here are the secret ingredients to making this cool image: a popcorn tin, a pinhole, and a piece of black and white photographic paper. That’s all!
Determine if you have GAS by considering the following questions:
* Do you feel that if you had a better camera
(such as a medium format, large format, or one
with more megapixels) that you could produce a
better photograph?
* Do you feel that if you had a better lens for your
camera (the newest or fastest) that you would be
able to capture more unique images?
* Is it imperative that you have a digital camera so
that you are able to see your image immediately
upon completing the exposure?
* Do you feel that image quality is important in
a print larger than 11" x 14", but you rarely find
yourself making large works of art?
* Do you feel that you need a specific brand of camera
to create images with a specific feel to them?
The Modern Digital Age

23

The Pinhole Ca mer a
24 Introduction to Pinhole Photography
There is a resurgence of traditional photographic
artists and interest in alternative processes. I consider
it a privilege to have received my formal education in
traditional photographic techniques including film,
camera, and darkroom processes prior to the advent of
digital photography. Some photographers are opposed
to the use of technology for image creation, editing, or
printing. I believe that there can be a balance between
the old and the new and that pinhole photography can
be a combination of historic processes and emergent
technologies.
Top: This is a homemade pinhole body cap. I drilled a 1/4" hole in the stock Canon body cap and then mounted a homemade pinhole in the center. Digital pinhole offers the advantage of instant image review and accurate exposures, although there are several limitations as well. Learn more about retrofitting your SLR in Chapter 8.
Left, Top: Collecting Shells. 2007
This digital pinhole image was shot on a Canon EOS 300D camera. I photographed my daughter collecting shells on Ocracoke Island, NC, in the bright summer sun. The levels, color, and contrast were adjusted in Adobe Photoshop.
Left, Bottom: Collecting Shells. Inkjet Transfer, 2009
Inkjet transfers bridge the gap between analog image-making and digital printing. Learning a new printing technique may give you a fresh interpretation of your old images. Jump over to Chapter 6 for a step-by-step guide to the complete process.
Embrace TechnologyThis book is not a collection of anti-digital photography
propaganda, but merely a focus on alternative ways
to see more creatively. There are more people today
adopting photography as a hobby than ever before. This
can be widely attributed to the affordability, usability,
convenience, and progress of digital photography.
Digital technology can be a feasible tool for pinhole
imaging, but it must serve the artist in creative self-
expression. It can not simply serve as a substitution or
function as a tool of convenience over quality.

25
About This Book
Beginner TrackThis book is outlined in a logical, linear way so that
you can learn as much as you need to in order to get
started. In the Beginner Track, the focus is on basic
pinhole techniques that will get you started quickly.
The non-technical approach to this track will allow
you to by-pass the specifics and simply see results
without concentrating on the scientific or creative
aspects. Black and white photographic paper has been
adopted as the light-sensitive material for beginners
as it is more forgiving to exposure times and less
expensive than film.
Advanced TrackWhen you have grasped the fundamentals, you can
easily jump back into a section to learn more advanced
concepts. The Advanced Track will augment the
Beginner Track information while expanding your
knowledge and understanding of pinhole techniques,
materials, and ideas.
Creative OpportunitiesEach Creative Opportunities section is a
conglomeration of beginner and advanced techniques,
concept application, and innovative approaches
designed to broaden your artistic purview.
Author’s Words of AdviceIt is quite easy, as an artistic creature, to get carried
away with your art. There will always be the urge to
buy new equipment as frontiers in digital technology
expand rapidly. The creative voice inside of you will
always demand to be satisfied. Pinhole photography is
a remedy for today. You will not need to invest much
money in materials to complete most of the exercises
found in this book.
Photography should be a social event. If you have
a network of creative friends, study this book with
another artist. I believe that you have enough of an
introduction to the art form, so dive right into
Chapter 1 and best of luck!
I would love to hear what you think about the
book and proposed concepts. General suggestions,
questions, and comments are always welcomed at
our website www.ThePinholeCamera.com!
Artists of all ages can comfortably complete most techniques within this book. If you are a
complete novice, start with the Beginner Tracks to become familiar with basic concepts. As you
feel comfortable with the basics, tackle the Advanced Tracks and finally dive into each Creative
Opportunity. Keep an eye out for the Red Hot Tips which will offer an extended perspective.
RED HOT TIPS The Red Hot Tips are a collection of useful suggestions, hints, and points to ponder. These wisdom nuggets will be scattered throughout the book and will be bound in a red box, formatted just like this one. The content will range from building your own gear to highlighting new techniques.

205
Index
C camera
35 mm film canister . . . . . . . . . . . 19, 37, 95
35 mm matchbox . . . . . . . . . . . . . 5, 16, 20, 42, 136-141, 160, 162, 168, 168, 171, 173-175, 179, 200-201
cigar box. . . . . . . . . . . . . . . . . . . . 54, 69, 181, 189
construction basics. . . . . . . . . . . . 28-31
digital SLR . . . . . . . . . . . . . . . . . . 24, 67-68, 142-143, 156, 156, 198, 198
focal length. . . . . . . . . . . . . . . . . . 13, 19, 35, 35-36, 40, 48, 60-66, 70, 100, 136, 140, 142, 162, 163, 167, 170, 172, 176, 184, 186, 187, 189, 191, 200, 203
large format . . . . . . . . . . . . . . . . . 20, 22, 162, 187
loading . . . . . . . . . . . . . . . . . . . . . 84, 143
omniscope . . . . . . . . . . . . . . . . . . 45, 54, 177, 178
painting . . . . . . . . . . . . . . . . . . . . 11, 28, 30, 30, 32, 32, 47, 49, 50, 100
portability . . . . . . . . . . . . . . . . . . . 19-20, 147
sealing . . . . . . . . . . . . . . . . . . . . . 32, 47
shutter . . . . . . . . . . . . . . . . . . . . . 19, 38, 40, 41, 43-44, 56, 59, 59, 64, 68, 84, 85, 85, 89, 94, 100, 136, 140, 142, 143, 148, 149, 150, 160, 167
shutter speed . . . . . . . . . . . . . . . . 13, 64, 86, 87-88, 143, 145
tin cans. . . . . . . . . . . . . . . . . . . . . 5, 10, 11, 16, 18, 18, 20, 28-30, 38, 39, 42, 53, 54, 59, 62, 73, 77, 95, 97, 155, 170, 185, 203
tin cans, commercial products . . . 29
toys. . . . . . . . . . . . . . . . . . . . . . . . 16, 32, 50-51, 61, 71, 93
toy camera . . . . . . . . . . . . . . . . . . 15, 43, 79, 146-149, 162, 168, 196
viewfinder. . . . . . . . . . . . . . . . . . . 40, 41, 145, 181
camera, alternative containers
coffee cup . . . . . . . . . . . . . . . . . . 20, 32, 32
coffee pot . . . . . . . . . . . . . . . . . . . 47
creamer container. . . . . . . . . . . . . 50
deer skull . . . . . . . . . . . . . . . . . . . 49, 51
plastic brick . . . . . . . . . . . . . . . . . 46
shoeshine box. . . . . . . . . . . . . . . . 47
soup can. . . . . . . . . . . . . . . . . . . . 48
sourdough roll. . . . . . . . . . . . . . . . 47
AAdobe Photoshop
image adjustments . . . . . . . . . . . . 90, 96, 112-115, 187
image enhancement . . . . . . . . . . . 12, 16, 19, 21, 24, 48, 70, 71, 111, 125, 125, 128, 156, 170, 177, 182
measuring pinholes. . . . . . . . . . . . 64
scanner care. . . . . . . . . . . . . . . . . 31, 37, 115
scanner setup. . . . . . . . . . . . . . . . 96, 112, 112, 115, 141
scanner usage . . . . . . . . . . . . . . . 64, 96, 115, 158
alternative processes . . . . . . . . . . . . . see printing, alternative processes
anamorphic . . . . . . . . . . . . . . . . . . . . see film plane
artists, featured . . . . . . . . . . . . . . . . . 154-203
artists, professional
Adams, Ansel . . . . . . . . . . . . . . . . 20
Atkins, Anna . . . . . . . . . . . . . . . . . 117
Mitchell, Blue . . . . . . . . . . . . . . . . 67
Renner, Eric . . . . . . . . . . . . . . . . . 4
Samuels, Diane. . . . . . . . . . . . . . . 51
Warhol, Andy . . . . . . . . . . . . . . . . 48
Weston, Edward . . . . . . . . . . . . . . 20
Wyeth, Andrew . . . . . . . . . . . . . . . 21
Bbaren . . . . . . . . . . . . . . . . . . . . . . . . . 131
blur . . . . . . . . . . . . . . . . . . . . . . . . . . 12-13, 38, 53, 65, 65, 71, 81, 97, 100, 140, 146, 148, 157, 174
body cap. . . . . . . . . . . . . . . . . . . . . . . 24, 67, 68, 125, 142, 145, 156, 166, 183
brayer. . . . . . . . . . . . . . . . . . . . . . . . . 126-127, 132

206 Index
The Pinhole Ca mer a
camera, commercial products
4M . . . . . . . . . . . . . . . . . . . . . . . . 160
8Banners . . . . . . . . . . . . . . . . . . . 41, 45, 81
Abelson Scope Works . . . . . . . . . . 177, 177-178
Blind Wino Cameras . . . . . . . . . . . 45, 76, 81
Diana and Diana+. . . . . . . . . . . . . 15, 42-43, 45, 67, 76, 80, 171, 180, 180, 196
Gakken . . . . . . . . . . . . . . . . . . . . . 160
Holga . . . . . . . . . . . . . . . . . . . . . . 45, 67, 76, 80, 146, 160, 162, 180, 196,
P-Sharan . . . . . . . . . . . . . . . . . . . 160, 160, 180
Pinhole Blender . . . . . . . . . . . . . . 42, 42, 45, 167, 170
Zero Image Company . . . . . . . . . . 39, 44, 45, 70, 71, 76, 88, 111, 118, 155, 155, 164-166, 170, 181, 181, 186, 190, 191, 191-194, 199, 199
camera, retrofitting
converting basics . . . . . . . . . . . . . 70, 131, 142-145
digital SLR . . . . . . . . . . . . . . . . . . 24, 142-143
holga to pinholga . . . . . . . . . . . . . 12, 13, 15, 58, 60, 65, 72, 79, 81, 76, 94, 94, 97, 97, 107, 111, 130, 132, 146-149, 154-155, 157, 173
camera obscura . . . . . . . . . . . . . . . . . 159, 159, 161, 161, 164, 184
changing bag . . . . . . . . . . . . . . . . . . . 89, 89, 102
chemicals
Citra Solv . . . . . . . . . . . . . . . . . . . 131
developer, film . . . . . . . . . . . . . . . 60, 103, 103, 105-106, 166
developer, paper . . . . . . . . . . . . . . 98, 98, 109, 109, 147, 151
exhausted. . . . . . . . . . . . . . . . . . . 98, 103
fixer, film. . . . . . . . . . . . . . . . . . . . 103, 105
fixer, paper . . . . . . . . . . . . . . . . . . 98, 151
hypo clearing agent. . . . . . . . . . . . 103, 105, 118
lacquer thinner . . . . . . . . . . . . . . . 131, 131
stop bath, film. . . . . . . . . . . . . . . . 103, 105
stop bath, paper . . . . . . . . . . . . . . 98, 151, 151
turpentine. . . . . . . . . . . . . . . . . . . 129
cost-effectiveness . . . . . . . . . . . . . . . 10, 16, 18, 29, 42, 56-57, 67, 73-74, 77, 81, 93, 102, 117, 126, 126, 133, 141, 146, 149, 159
D darkroom
creating . . . . . . . . . . . . . . . . . . . . 19, 29, 101, 108, 109, 150-151
enlarger . . . . . . . . . . . . . . . . . . . . 82, 92, 92, 106, 110-111, 195
measuring devices . . . . . . . . . . . . 103, 147, 147, 151, 151
safe light . . . . . . . . . . . . . . . . . . . . 52, 82, 84, 90, 92, 98, 110, 151
thermometer. . . . . . . . . . . . . . . . . 103, 104
tongs . . . . . . . . . . . . . . . . . . . . . . 98, 101, 132, 132, 151
depth of field . . . . . . . . . . . . . . . . . . . 10, 12-13, 64, 65, 157, 163, 168, 170, 181
developing, film
Acufine Diafine . . . . . . . . . . . . . . . 103
Agfa Rodinal . . . . . . . . . . . . . . . . . 12, 42-43, 60, 65, 97, 103, 103, 147
agitation . . . . . . . . . . . . . . . . . . . . 104-105
evaluating negatives . . . . . . . . . . . 105
film tanks . . . . . . . . . . . . . . . . . . . 102-105
Ilford ID-11 . . . . . . . . . . . . . . . . . . 103
Ilford Ilfotec DD-X . . . . . . . . . . . . . 187
Kodak D-76 . . . . . . . . . . . . . . . . . 103
Kodak HC110 . . . . . . . . . . . . . . . . 103
loading film reels. . . . . . . . . . . . . . 102, 103
mixing chemicals . . . . . . . . . . . . . 103-104, 103
process of. . . . . . . . . . . . . . . . . . . 102-105
R09 . . . . . . . . . . . . . . . . . . . . . . . 184
Tetenal Ultrafin . . . . . . . . . . . . . . . 176
developing, paper
evaluating negatives . . . . . . . . . . . 84, 92, 100, 101
process of. . . . . . . . . . . . . . . . . . . 98-101
distortion . . . . . . . . . . . . . . . . . . . . . . 12, 15, 15, 16, 34-35, 53

207
E exposure
advanced tips . . . . . . . . . . . . . . . . 86-88
beginner tips. . . . . . . . . . . . . . . . . 85
documenting. . . . . . . . . . . . . . . . . 88, 89
double, multiple . . . . . . . . . . . . . . 3, 10, 13, 44, 81, 107, 174, 181
scales . . . . . . . . . . . . . . . . . . . . . . 66, 88
sunny 16 rule . . . . . . . . . . . . . . . . 86-87
F field of view . . . . . . . . . . . . . . . . . . . . 40, 40-41, 60, 62, 63, 66
film
120 mm . . . . . . . . . . . . . . . . . . . . 41, 45, 54, 70, 78, 80, 89, 96, 102, 102, 111, 144-145, 146, 155, 157, 173, 177, 179, 180, 183, 191, 199, 202
220 mm . . . . . . . . . . . . . . . . . . . . 78, 80
35 mm . . . . . . . . . . . . . . . . . . . . . 15, 36, 41-42, 45, 46, 61, 67, 77, 80, 81, 102, 102, 107, 136-141, 144-145, 148, 157, 162, 170-173, 179, 187, 196, 200-203, 203
advantages of . . . . . . . . . . . . . . . . 76-77
changing bag . . . . . . . . . . . . . . . . 89, 89, 102
chromogenic black and white . . . . 77, 106
cross processing. . . . . . . . . . . . . . see techniques
distressing . . . . . . . . . . . . . . . . . . see techniques
drying, storage of . . . . . . . . . . . . . 105
expired . . . . . . . . . . . . . . . . . . . . . 78, 78, 106, 132, 168, 180, 180
for classic cameras . . . . . . . . . . . . 144, 144
infrared. . . . . . . . . . . . . . . . . . . . . 20, 37, 37, 76, 78, 78, 144, 148, 191, 191
instant, Instax . . . . . . . . . . . . . . . . 78, 160
Polaroid . . . . . . . . . . . . . . . . . . . . 13, 15, 20-21, 58, 72, 78, 79, 119-120, 129, 129, 131-133, 144, 162, 183, 187, 188-189, 193, 196-197, 196, 201
reciprocity. . . . . . . . . . . . . . . . . . . 63, 86-87, 87-88, 140
sheet . . . . . . . . . . . . . . . . . . . . . . 44, 45, 77, 89, 89, 127
types of film . . . . . . . . . . . . . . . . . 77-79
film plane
anamorphic . . . . . . . . . . . . . . . . . 34, 45, 54, 54-55, 114, 170, 177
angled . . . . . . . . . . . . . . . . . . . . . 53, 53
coned . . . . . . . . . . . . . . . . . . . . . . 53, 53
convex . . . . . . . . . . . . . . . . . . . . . 34, 42, 171
curved . . . . . . . . . . . . . . . . . . . . . 5, 11, 15, 16, 22, 31, 33, 34, 51, 52, 54, 63, 77, 84, 94, 96, 99, 100, 101, 145, 150, 171, 173, 201
definition of. . . . . . . . . . . . . . . . . . 34-35
flat . . . . . . . . . . . . . . . . . . . . . . . . 15, 34, 35, 52-53, 63, 142, 170
folded . . . . . . . . . . . . . . . . . . . . . . 52-53
modified . . . . . . . . . . . . . . . . . . . . 52-55
filters . . . . . . . . . . . . . . . . . . . . . . . . . 37, 37, 78, 78, 80, 191
focal length . . . . . . . . . . . . . . . . . . . . 13, 19, 35, 35-36, 40, 48, 60-66, 70, 100, 136, 140, 142, 162, 176, 187, 191, 200
Ggear acquisition syndrome . . . . . . . . . 22
GPS . . . . . . . . . . . . . . . . . . . . . . . . . . 96
HHolga . . . . . . . . . . . . . . . . . . . . . . . . . see camera, commercial
products
LLazertran . . . . . . . . . . . . . . . . . . . . . . see printing, transfer
techniques
Lexmark . . . . . . . . . . . . . . . . . . . . . . . 126
light intensity . . . . . . . . . . . . . . . . . . . 60, 62, 63, 87, 92, 106, 186
liquid emulsion . . . . . . . . . . . . . . . . . . see printing, darkroom techniques
lo-fi, low-fidelity . . . . . . . . . . . . . . . . . 16, 22, 67, 146, 146, 148, 160
lomography . . . . . . . . . . . . . . . . . . . . 43, 45, 146, 148

208 Index
The Pinhole Ca mer a
Mmotion . . . . . . . . . . . . . . . . . . . . . . . . see blur
O online communities
Alternative Photography . . . . . . . . 116
f295 . . . . . . . . . . . . . . . . . . . . . . . 58, 184
Flickr.com. . . . . . . . . . . . . . . . . . . 5, 58, 153
Digitaltruth Photo . . . . . . . . . . . . . 103
Toy Camera . . . . . . . . . . . . . . . . . 148
Without Lenses . . . . . . . . . . . . . . . 58
P paper
bristol board . . . . . . . . . . . . . . . . . 118, 126, 128, 131
fiber based . . . . . . . . . . . . . . . . . . 74, 99, 109
formats . . . . . . . . . . . . . . . . . . . . . 36, 61
loading in camera . . . . . . . . . . . . . 84
resin-coated . . . . . . . . . . . . . . . . . 74, 99, 109, 159
watercolor. . . . . . . . . . . . . . . . . . . 116, 126, 126, 131
photographic suppliers
Adorama Camera . . . . . . . . . . . . . 150
ArtCraft Chemicals . . . . . . . . . . . . 117
B&H Photo Video . . . . . . . . . . . . . 45, 144, 150
Calumet Photographic. . . . . . . . . . 150
Central Camera Company . . . . . . . 144
Freestyle Photographic Supplies . . 45, 150
Lomographic Society International 43, 45
Pinhole Resource . . . . . . . . . . . . . 4, 45, 66, 66, 70, 88
PolaPremium . . . . . . . . . . . . . . . . 78
Zero Image Company . . . . . . . . . . 39, 45, 70, 88
photographing
diorama . . . . . . . . . . . . . . . . . . . . 94
field kit . . . . . . . . . . . . . . . . . . . . . 89
philosophy . . . . . . . . . . . . . . . . . . 18, 22, 88, 146, 153
suitable subjects . . . . . . . . . . . . . . 5, 28, 85, 90
pinhole
alternative apertures . . . . . . . . . . . 68-69, 70
calculating f-stop . . . . . . . . . . . . . 64
calculating diameter . . . . . . . . . . . 64
characteristics of. . . . . . . . . . . . . . 12-17
commercial grade . . . . . . . . . . . . . 12, 66, 66, 184
creating . . . . . . . . . . . . . . . . . . . . 56-59
diameter . . . . . . . . . . . . . . . . . . . . 64
digital . . . . . . . . . . . . . . . . . . . . . . 24, 142-143, 156, 187, 198, 198
fundamentals . . . . . . . . . . . . . . . . 10, 18
image circle . . . . . . . . . . . . . . . . . 35, 60-62, 62
in a nutshell . . . . . . . . . . . . . . . . . 10
Lennox Laser . . . . . . . . . . . . . . . . 66
needles. . . . . . . . . . . . . . . . . . . . . 56-58, 64, 64, 198, 203
obstruction . . . . . . . . . . . . . . . . . . 68, 70, 71, 93
optimal size. . . . . . . . . . . . . . . . . . 65, 57
patterns . . . . . . . . . . . . . . . . . . . . 68, 68
use of multiple . . . . . . . . . . . . . . . 10, 13, 68, 68, 136, 171
Polaroid . . . . . . . . . . . . . . . . . . . . . . . see film, Polaroid
publications, magazines and journals
Diffusion. . . . . . . . . . . . . . . . . . . . 67, 67
Light Leaks . . . . . . . . . . . . . . . . . . 67
Pinhole Journal . . . . . . . . . . . . . . . 4
printing, alternative processes
argyrotype . . . . . . . . . . . . . . . . . . 116
cyanotype. . . . . . . . . . . . . . . . . . . 20-21, 115-117, 117
introduction to . . . . . . . . . . . . . . . 20-21, 116-119
Fotospeed Limited . . . . . . . . . . . . 117
gum bichromate . . . . . . . . . . . . . . 20, 116
kallitype . . . . . . . . . . . . . . . . . . . . 116
mixing and handling . . . . . . . . . . . 116, 119
salt printing. . . . . . . . . . . . . . . . . . 116
Sunprint . . . . . . . . . . . . . . . . . . . . 117
surfaces, 3D . . . . . . . . . . . . . . . . . 21, 82, 122-123, 129, 129, 132
palladium . . . . . . . . . . . . . . . . . . . 20, 116
Photographers’ Forumlary . . . . . . . 117
platinum . . . . . . . . . . . . . . . . . . . . 20, 116
Van Dyke . . . . . . . . . . . . . . . . . . . 20-21, 115-116, 118-119

209
printing, darkroom techniques
contact print . . . . . . . . . . . . . . . . . 20, 67, 73, 110-111, 111, 115-116, 117, 118, 127, 158-159, 195
liquid emulsion . . . . . . . . . . . . . . . 21, 82, 82
photogram . . . . . . . . . . . . . . . . . . 71, 90-93, 108-109, 159, 159
sabattier . . . . . . . . . . . . . . . . . . . . 106-108, 108
selectively applied developer. . . . . 106, 109, 109
printing, digital
digital negative . . . . . . . . . . . . . . . 115-116
digital output. . . . . . . . . . . . . . . . . 112, 115
Pictorico Inkjet Media . . . . . . . . . . 115
printing, lift techniques
acrylic. . . . . . . . . . . . . . . . . . . . . . 121-122
Lazertran . . . . . . . . . . . . . . . . . . . 21, 129, 129-130
Polaroid . . . . . . . . . . . . . . . . . . . . 21, 78, 129, 132-133, 133
printing, transfer techniques
acrylic. . . . . . . . . . . . . . . . . . . . . . 122-124
inkjet . . . . . . . . . . . . . . . . . . . . . . 21, 24, 119, 125-127, 128, 132
photocopy. . . . . . . . . . . . . . . . . . . 21, 119, 131, 131
Polaroid . . . . . . . . . . . . . . . . . . . . 21, 78, 129, 131-132, 132
Pythagorean theorem . . . . . . . . . . . . . 35, 36, 60
Rreciprocity . . . . . . . . . . . . . . . . . . . . . see film
Red Hot Tips . . . . . . . . . . . . . . . . . . . . 25, 29, 38, 51, 58, 67, 69, 74, 77, 80, 85, 88, 94, 101, 103, 108, 112, 127, 141, 143
Sscale, size . . . . . . . . . . . . . . . . . . . . . 4, 12, 16, 83, 94, 112, 157,
159
scanning . . . . . . . . . . . . . . . . . . . . . . see Adobe Photoshop
shutter . . . . . . . . . . . . . . . . . . . . . . . . see camera
slit . . . . . . . . . . . . . . . . . . . . . . . . . . . 159, 181, 195, 202
step-up ring . . . . . . . . . . . . . . . . . . . . see filters
software
Mr. Pinhole . . . . . . . . . . . . . . . . . . 66
PinholeCalc . . . . . . . . . . . . . . . . . 66
PinholeDesigner . . . . . . . . . . . . . . 66, 88
T techniques
cross processing film . . . . . . . . . . 41, 76, 81-82, 106, 107, 191, 193, 202
distressing film . . . . . . . . . . . . . . . 82, 82
redscaling film . . . . . . . . . . . . . . . 76, 80-81, 81, 162, 171
solargraphy. . . . . . . . . . . . . . . . . . 10, 19, 20, 94-96, 95-96
split frame collaboration . . . . . . . . 93, 93-94
sprocket hole . . . . . . . . . . . . . . . . 15, 80, 81, 144, 144, 148
underwater . . . . . . . . . . . . . . . . . . 20, 97, 97
tracks
Advanced . . . . . . . . . . . . . . . . . . . 25, 32, 60, 76, 86, 102, 112
Beginner. . . . . . . . . . . . . . . . . . . . 25, 28, 56, 72, 84, 98, 110
Creative Opportunities . . . . . . . . . 25, 46, 68, 80, 90, 106, 116
Red Hot Tips. . . . . . . . . . . . . . . . . see Red Hot Tips
tripod . . . . . . . . . . . . . . . . . . . . . . . . . 38-39, 39, 118
toning
basics. . . . . . . . . . . . . . . . . . . . . . 119
digital . . . . . . . . . . . . . . . . . . . . . . 19
duotone . . . . . . . . . . . . . . . . . . . . 70, 111
gold . . . . . . . . . . . . . . . . . . . . . . . 119
tea and coffee. . . . . . . . . . . . . . . . 21, 119
selenium. . . . . . . . . . . . . . . . . . . . 119

210 Index
The Pinhole Ca mer a
troubleshooting
ghosted shapes. . . . . . . . . . . . . . . 30, 54-55, 100, 157, 197
light leaks . . . . . . . . . . . . . . . . . . . 10, 32, 46, 81, 84, 84, 89, 100, 105, 138, 140, 143, 174, 198, 201, 204
streaks of light . . . . . . . . . . . . . . . 30, 95, 95, 140, 204
Uunit conversions . . . . . . . . . . . . . . . . . 36
Vviewfinder . . . . . . . . . . . . . . . . . . . . . see camera
vignette . . . . . . . . . . . . . . . . . . . . . . . 60, 62, 63, 71, 100, 101, 146
Wwide angle . . . . . . . . . . . . . . . . . . . . . 15-16, 15, 29, 34, 35, 40,
40-41, 45, 63, 154, 157, 168, 174, 177, 196, 200
Worldwide Pinhole Photography Day. . 85, 140
Worldwide Toy Camera Day. . . . . . . . . 79
Zzone plate . . . . . . . . . . . . . . . . . . . . . 39, 42, 44, 60, 67, 68-70,
70-71, 125, 159, 181, 184, 193


Part Three is the workshop section that highlights
topics such as converting cameras and setting up a
black and white darkroom.
Part Four illustrates the community of pinhole
photographers worldwide. Each featured artist shares
with you one image along with their own personal
pinhole philosophy. The combination of artists and
selected subject matter is a wonderful testimony to the
creative images achieved with pinhole photography.
THE PINHOLE CAMERA is a practical how-to manual for making pinhole cameras
and images. The techniques contained here are not difficult to master, and soon you will find yourself constructing your
own cameras and making wonderful, innovative images. | The content is divided into four parts, spanning fourteen
comprehensive chapters. The Beginner Track, Advanced Track, and Creative Opportunities serve as an intuitive structure
to the topics and techniques introduced so that both beginners and advanced artists can work at their own pace.
Brian J. Krummel, a photographer by
formal training, completed a BA in Arts
from Pennsylvania State University
in 1996, focusing on photography as
a creative discipline. Brian’s passion
about photography has led him to continue his own photographic
experimentations and explorations over the years with a variety of
tools and techniques, which most recently included branching off
into the interests of lo-fi, toy camera, and pinhole photography.
Brian has gained media exposure through television, newspapers,
and websites for his on-going work that has been published in
photographic magazines and online media. He also teaches
workshops where emerging artists can learn the hands-on basics of
pinhole photography.
Like many artists, Brian enjoys a parallel creative career and owns
his own interactive firm. Brian works in the Pittsburgh, PA area and
lives with his wife and three children in a quiet city suburb. Brian can
be reached online at www.thepinholecamera.com.
ISBN AREA
Part One introduces the art form of pinhole
photography, discussing the benefits and opportunities.
Part Two thoroughly describes the pinhole process:
from creating your own camera and pinhole, selecting
a light-sensitive material, exposing your image,
developing and evaluating negatives, and finally,
printing your own photographs.
“ I highly recommend this how-to book to
educators looking for innovative pinhole techniques as well
as the DIY photographer. The big bonus is that because
of the images throughout and the showcase section, The
Pinhole Camera doubles as a photography coffee table book.
Get two, one for the darkroom, and one for the coffee table.”
~ Blue Mitchell, Editor, Diffusion magazine
“ The Pinhole Camera is so much more than a pinhole book. Though the whole and simple
process of pinholing is summed up on one of the first pages
of the book, Brian Krummel manages to squeeze in just
about every aspect of pinholing in this encyclopedia.”~ Malin Fabbri, Editor, AlternativePhotography.com
Author of From Pinhole to Print and Blueprint to Cyanotypes
Top Related