


Languages
Pages
Legal


QUICK DIY BREAKDOWN
Most of us now have bitten the bullet and got some perfor-
mance shocks whether they are smoothies or remote reser-
voir they all are basically the same inside. But after a year or
two instead of just throwing them away like a basic twin tube,
a quick refresh or tune up just before you head off on the
next big trip may be all that’s needed. This is really one of
those things that anyone can do with the right instruction and
a bit of patience. So here is a quick breakdown...

TOOLS REQUIRED
Safety glasses, latex gloves, assembly lube / lithium based
grease, Loctite ™ #271, gas or propane torch, pin spanner
wrench (profender combination tool), 2.5mm hex key (“Al-
len wrench”), scribe or seal pick, flat blade screwdriver, pin
punch, 14 & 17mm socket, circlip pliers - small external,
oil stone, rubber mallet, nitrogen tank w/ regulator, clean-
ing solvent, vice w/ soft jaws, tape measure, shock oil (5 to
10wt).

STEP 1 - SHOCK SERVICING
Read through all of these instructions first to familiar-
ise yourself with the rebuild procedure.
STEP 2 - SHOCK SERVICING
Make sure you have a clean work area, and all of the
necessary tools are available. Always use proper safe-
ty equipment when working on shock absorbers.
STEP 3 - SHOCK SERVICING
Clean the entire shock assembly with soapy water,
cleanliness is critical! Before you even think about pull-
ing anything apart, it is important to release all the ni-
trogen out of the reservoir. CAUTION: pressures range
from 100-300psi.

STEP 4 - SHOCK SERVICING
Once the nitrogen is safely removed you can sim-
ply push the schrader cap in with your fingers, about
30mm - enough to get to the wire spring clip. Using
a pick / screwdriver remove the clip and pull the cap
out gently with pliers (on the cap) or an air-valve tool.
Once removed, look inside the reservoir tube, there
should be almost no oil in here. If you see more than a
few drops then you need to replace the seal.


STEP 5 - SHOCK SERVICING
Now that’s apart, it’s time to pull the shock itself down.
Hold the base / mount of the shock in a vice, NOT the
body! Be sure to use soft jaws and do not over tight-
en. Use soft jaws and a rag / towel as it’s easier on the
shock base and will catch some of the oil that may spill
when you pull out the piston.
STEP 6 - SHOCK SERVICING
With the shock held securely, undo the small locking
grub screw from the dust cap. Then using a pin-span-
ner unwind the cap and slide up the shaft. The neck-
bush assembly should now be visible. Push it down
a little and remove the wire clip. Next, slowly pull the
shaft and piston vertically out of the shock body. You
may spill a little oil, but keeping everything vertical and
taking your time will reduce the amount lost.

STEP 7 - SHOCK SERVICING
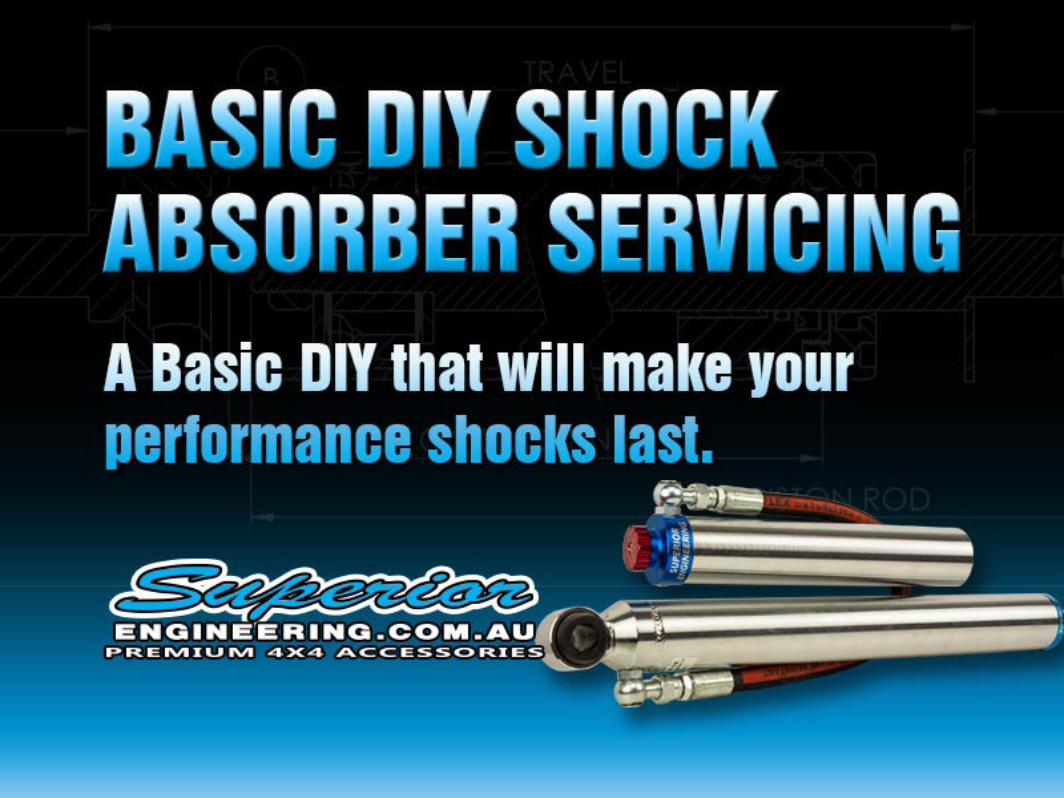
The main shaft assembly can now be inspected and
taken apart to allow changing of the seals in the neck-
bush assembly and the dust-cap assembly, at the
same time it is also easy to do any tuning or valving
changes. This is all done by holding the shaft in a vice
by the rod-end or pin-end, NEVER clamp the shaft!
STEP 7 (Cont.) - SHOCK SERVICING
Inspect the shaft for any dents or damage, high points
that cut seals can be gently buffed out with the use of
a fine oil stone. Remove the piston nut (heat may be
required) and lift off the piston, keeping the shims and
washers in correct order. The neckbush and dustcap
assemblies can now slide off.
STEP 8 - SHOCK SERVICING
Using a pick remove and replace any seals, lubricate
with oil and re-assemble onto the shaft. CAUTION! Do
not scratch the surface of the seal groove as this will
cause the new seal to leak or fail. If you need to tune
the shocks, now is the time to change any shims in
the stacks, easy to do but this is where the tuning gets
technical so we will leave that for another article.

STEP 8 (CONT.) - SHOCK SERVICING
Install the piston shim assembly and do up the nut,
add Loctite as per manufacturers specs. Install back
into the shock gently and slowly keeping an eye on the
seals as well as allowing the air to escape. Add any oil
that may have been lost - don’t overfill! With the neck-
bush nearly seated on the seal, slowly push the shaft
into the body until oil touches the neckbush and all the
air is out of the shock.

STEP 8 (CONT.) - SHOCK SERVICING
Seat the seal and push the neckbush home. Finish
putting the shock together, making sure all the ring
clips are well seated. Extend and compress fully to
test for air pockets. Clean off excess oil and be sure to
pressure test once you are happy with the re-assem-
bly. If you require more comprehensive rebuild instruc-
tions contact your shock supplier or visit Superior Engi-
neering.


CONTACT SUPERIOR ENGINEERING
Phone: (07) 5433 1411
1/116 Lipscombe Road
Deception Bay Queensland 4508
Australia
ASK THE EXPERTS:
4X4 Suspension Tech Talk With Superior Engineering
www.superiorengineering.com.au