


Languages
Pages
Legal


Autodesk FBX Converter Help

Contents
Chapter 1 Autodesk FBX Converter Help . . . . . . . . . . . . . . . . . . . 1What’s New . . . . . . . . . . . . . . . . . . . . . . . . . . . . . . . . . 2About the FBX format . . . . . . . . . . . . . . . . . . . . . . . . . . . 4
Chapter 2 Converter basics . . . . . . . . . . . . . . . . . . . . . . . . . . 5FBX Converter preferences . . . . . . . . . . . . . . . . . . . . . . . . . 7
Chapter 3 Installation . . . . . . . . . . . . . . . . . . . . . . . . . . . . . 9Windows installation . . . . . . . . . . . . . . . . . . . . . . . . . . . . 9Macintosh installation . . . . . . . . . . . . . . . . . . . . . . . . . . 11
Chapter 4 FBX Converter . . . . . . . . . . . . . . . . . . . . . . . . . . . 13Converting files . . . . . . . . . . . . . . . . . . . . . . . . . . . . . . 14Creating a conversion preset . . . . . . . . . . . . . . . . . . . . . . . 19Conversion options . . . . . . . . . . . . . . . . . . . . . . . . . . . . 20
FBX to FBX conversion options . . . . . . . . . . . . . . . . . . . 203DS conversion options . . . . . . . . . . . . . . . . . . . . . . . 20DXF conversion options . . . . . . . . . . . . . . . . . . . . . . 22OBJ conversion options . . . . . . . . . . . . . . . . . . . . . . . 24COLLADA conversion notes . . . . . . . . . . . . . . . . . . . . 26
i

Chapter 5 FBX Explorer . . . . . . . . . . . . . . . . . . . . . . . . . . . . 31Comparing files . . . . . . . . . . . . . . . . . . . . . . . . . . . . . . 32Changing FBX Explorer Preferences . . . . . . . . . . . . . . . . . . . 33
Chapter 6 FBX Take manager . . . . . . . . . . . . . . . . . . . . . . . . 37Using the FBX Take Manager . . . . . . . . . . . . . . . . . . . . . . . 38Renaming takes . . . . . . . . . . . . . . . . . . . . . . . . . . . . . . 40Prefix/Suffix options . . . . . . . . . . . . . . . . . . . . . . . . . . . 41Searching for takes . . . . . . . . . . . . . . . . . . . . . . . . . . . . 42
Chapter 7 FBX Viewer . . . . . . . . . . . . . . . . . . . . . . . . . . . . 43Viewing FBX files . . . . . . . . . . . . . . . . . . . . . . . . . . . . . 44FBX Viewer controls . . . . . . . . . . . . . . . . . . . . . . . . . . . . 48Controlling multiple scenes at the same time . . . . . . . . . . . . . . 49Sharing camera position . . . . . . . . . . . . . . . . . . . . . . . . . 50Triggering devices in the FBX Viewer . . . . . . . . . . . . . . . . . . . 51Changing FBX Viewer preferences . . . . . . . . . . . . . . . . . . . . 51Default FBX options . . . . . . . . . . . . . . . . . . . . . . . . . . . 53
Chapter 8 Command line . . . . . . . . . . . . . . . . . . . . . . . . . . . 55FBX options . . . . . . . . . . . . . . . . . . . . . . . . . . . . . . . . 563DS import and export options . . . . . . . . . . . . . . . . . . . . . . 58OBJ import and export options . . . . . . . . . . . . . . . . . . . . . . 60DXF import and export options . . . . . . . . . . . . . . . . . . . . . 61Take extractor . . . . . . . . . . . . . . . . . . . . . . . . . . . . . . . 63
Index . . . . . . . . . . . . . . . . . . . . . . . . . . . . . . . . 65
ii | Contents

Autodesk FBXConverter Help
Copyright
Autodesk ® FBX
® Converter 2012
© 2011 Autodesk, Inc. All rights reserved. Except as otherwise permitted by Autodesk,Inc., this publication, or parts thereof, may not be reproduced in any form, by any method,for any purpose.
Certain materials included in this publication are reprinted with the permission of thecopyright holder.
The following are registered trademarks or trademarks of Autodesk, Inc., and/or its subsidiariesand/or affiliates in the USA and other countries: 3DEC (design/logo), 3December,3December.com, 3ds Max, Algor, Alias, Alias (swirl design/logo), AliasStudio, Alias|Wavefront(design/logo), ATC, AUGI, AutoCAD, AutoCAD Learning Assistance, AutoCAD LT, AutoCAD
1
1

Simulator, AutoCAD SQL Extension, AutoCAD SQL Interface, Autodesk, Autodesk Intent,Autodesk Inventor, Autodesk MapGuide, Autodesk Streamline, AutoLISP, AutoSnap,AutoSketch, AutoTrack, Backburner, Backdraft, Beast, Built with ObjectARX (logo), Burn,Buzzsaw, CAiCE, Civil 3D, Cleaner, Cleaner Central, ClearScale, Colour Warper, Combustion,Communication Specification, Constructware, Content Explorer, Dancing Baby (image),DesignCenter, Design Doctor, Designer's Toolkit, DesignKids, DesignProf, DesignServer,DesignStudio, Design Web Format, Discreet, DWF, DWG, DWG (logo), DWG Extreme, DWGTrueConvert, DWG TrueView, DXF, Ecotect, Exposure, Extending the Design Team, FaceRobot, FBX, Fempro, Fire, Flame, Flare, Flint, FMDesktop, Freewheel, GDX Driver, GreenBuilding Studio, Heads-up Design, Heidi, HumanIK, IDEA Server, i-drop, Illuminate LabsAB (design/logo), ImageModeler, iMOUT, Incinerator, Inferno, Inventor, Inventor LT,Kynapse, Kynogon, LandXplorer, LiquidLight, LiquidLight (design/logo), Lustre, MatchMover,Maya, Mechanical Desktop, Moldflow, Moldflow Plastics Advisers, MPI, Moldflow PlasticsInsight, Moldflow Plastics Xpert, Moondust, MotionBuilder, Movimento, MPA, MPA(design/logo), MPX, MPX (design/logo), Mudbox, Multi-Master Editing, Navisworks,ObjectARX, ObjectDBX, Opticore, Pipeplus, PolarSnap, PortfolioWall, Powered with AutodeskTechnology, Productstream, ProMaterials, RasterDWG, RealDWG, Real-time Roto, Recognize,Render Queue, Retimer, Reveal, Revit, Robot, Showcase, Show Me, ShowMotion, SketchBook,Smoke, Softimage, Softimage|XSI (design/logo), Sparks, SteeringWheels, Stitcher, Stone,StudioTools, ToolClip, Topobase, Toxik, TrustedDWG, U-Vis, ViewCube, Visual, Visual LISP,Volo, Vtour, Wire, Wiretap, WiretapCentral, XSI.
Python is a registered trademark of Python Software Foundation.
All other brand names, product names or trademarks belong to their respective holders.
Disclaimer
THIS PUBLICATION AND THE INFORMATION CONTAINED HEREIN IS MADE AVAILABLEBY AUTODESK, INC. "AS IS". AUTODESK, INC. DISCLAIMS ALL WARRANTIES, EITHEREXPRESS OR IMPLIED, INCLUDING BUT NOT LIMITED TO ANY IMPLIED WARRANTIESOF MERCHANTABILITY OR FITNESS FOR A PARTICULAR PURPOSE REGARDING THESEMATERIALS.
What’s NewThis section lists changes and enhancements for this version of the AutodeskFBX Converter.
2 | Chapter 1 Autodesk FBX Converter Help
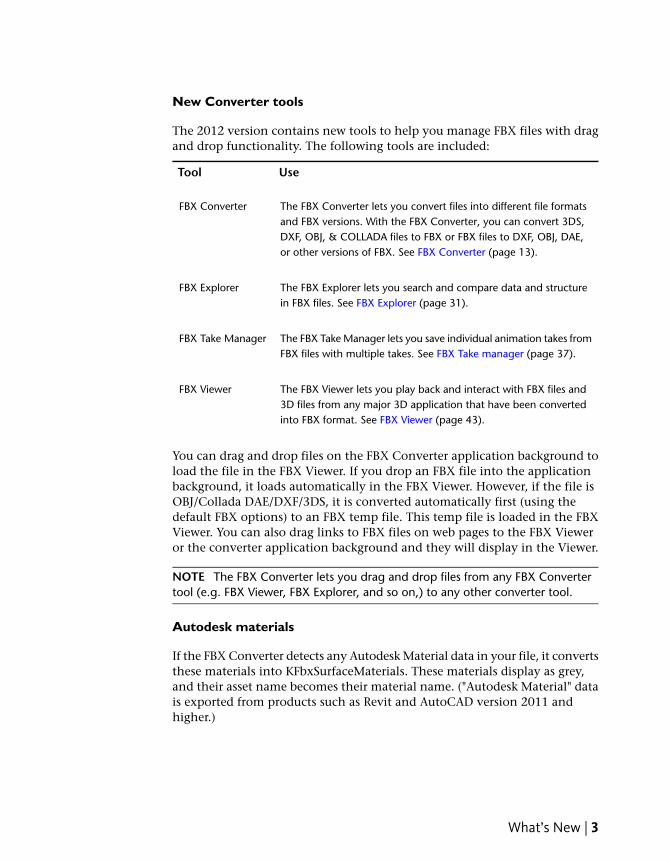
New Converter tools
The 2012 version contains new tools to help you manage FBX files with dragand drop functionality. The following tools are included:
UseTool
The FBX Converter lets you convert files into different file formatsand FBX versions. With the FBX Converter, you can convert 3DS,
FBX Converter
DXF, OBJ, & COLLADA files to FBX or FBX files to DXF, OBJ, DAE,or other versions of FBX. See FBX Converter (page 13).
The FBX Explorer lets you search and compare data and structurein FBX files. See FBX Explorer (page 31).
FBX Explorer
The FBX Take Manager lets you save individual animation takes fromFBX files with multiple takes. See FBX Take manager (page 37).
FBX Take Manager
The FBX Viewer lets you play back and interact with FBX files and3D files from any major 3D application that have been convertedinto FBX format. See FBX Viewer (page 43).
FBX Viewer
You can drag and drop files on the FBX Converter application background toload the file in the FBX Viewer. If you drop an FBX file into the applicationbackground, it loads automatically in the FBX Viewer. However, if the file isOBJ/Collada DAE/DXF/3DS, it is converted automatically first (using thedefault FBX options) to an FBX temp file. This temp file is loaded in the FBXViewer. You can also drag links to FBX files on web pages to the FBX Vieweror the converter application background and they will display in the Viewer.
NOTE The FBX Converter lets you drag and drop files from any FBX Convertertool (e.g. FBX Viewer, FBX Explorer, and so on,) to any other converter tool.
Autodesk materials
If the FBX Converter detects any Autodesk Material data in your file, it convertsthese materials into KFbxSurfaceMaterials. These materials display as grey,and their asset name becomes their material name. ("Autodesk Material" datais exported from products such as Revit and AutoCAD version 2011 andhigher.)
What’s New | 3
Version support
The following versions have been combined into FBX 2006:
■ FBX 2005.08_MB70
■ FBX200602_MB75
■ FBX 200608
■ FBX 6
These have been merged to version FBX 2006. You can now use FBX 2006 toprocess all the conversions with no loss of support.
Embed media
You can now embed media with files converted to ASCII format if you convertto version FBX 2011 and higher.
About the FBX formatAutodesk FBX is a platform-independent 3D authoring and interchange formatthat provides access to 3D content from all major 3D vendors and platforms.FBX is a file format that supports all major 3D data elements, as well as 2D,audio, and video media elements.
For more information on the FBX format, visit the FBX SDK and Plug-ins pageat the Autodesk web site: www.autodesk.com/fbx.
4 | Chapter 1 Autodesk FBX Converter Help
Converter basics
The FBX Converter application is a multi-purpose file management tool. It combinesfour tools, an FBX Converter, an FBX Viewer, an FBX Explorer and an FBX TakeManager.
The FBX Converter is the default tool when you launch the application for the firsttime. You can find the other tools on the menu bar (A):
UseTool
The FBX Converter lets you convert files into different file formats and FBX versions.With the FBX Converter, you can convert 3DS, DXF, OBJ, & COLLADA files to FBX
FBX Converter
or FBX files to DXF, OBJ, DAE, or other versions of FBX. See FBX Converter (page13).
The FBX Explorer lets you search and compare data and structure in FBX files. SeeFBX Explorer (page 31).
FBX Explorer
The FBX Take Manager lets you save individual animation takes from FBX fileswith multiple takes. See FBX Take manager (page 37).
FBX Take Manager
2
5

UseTool
The FBX Viewer lets you play back and interact with FBX files and 3D files fromany major 3D application that have been converted into FBX format. See FBXViewer (page 43).
FBX Viewer
FBX Converter A. Menu bar tools
The FBX Converter main application background is a "backdrop" for these othertools. Having the Converter as a backdrop with the other applications lets youbenefit from drag and drop functionality. The FBX Converter main applicationbackground is where you can find tips and instructions for using the otherConverter tools as you work.
All file conversion operations are performed in the background by the FBXConverter application using command lines. All commands are recorded and canbe viewed by opening the Log tool. This lets you copy and use these operations asa script with the FBXConverter.exe in a batch file.
NOTE The FBX Converter lets you drag and drop files from any FBX Converter tool(e.g. FBX Viewer, FBX Explorer, and so on,) to any other converter tool.
Other hints:
■ Right-click the toolbar to show/hide the toolbar.
■ Double-click the application background to expand/collapse all info items
6 | Chapter 2 Converter basics

■ Use FBX files found in the Samples directory.
FBX Converter preferences
You can configure the FBX Converter with the Preferences window. Select File > Preferencesto open the Preferences window.
FBX Converter preferences
The FBX Converter preferences window lets you set general options. ThePreferences window has three tabs:
■ General
■ FBX Explorer
■ FBX Viewer
FBX Converter preferences | 7

General preferences
Use the FBX Converter preferences to specify general settings for the FBXConverter application, such as whether the current layout is saved and usedat next launch and the preferred file path for downloaded FBX files.
FBX Explorer preferences
Use the FBX Explorer preferences to specify things such as data displaymaximums, files to exclude, and file types for comparison.See Changing explorer preferences (page 33) for more.
FBX Viewer preferences
Use the FBX Viewer preferences to specify whether files start playingimmediately on load or whether instances of the FBX Viewer should close onexit.See Changing viewer preferences (page 51) for more.
8 | Chapter 2 Converter basics

Installation
This chapter describes how to install the Autodesk FBX Converter on Microsoft®Windows®, and Apple® Macintosh® OS X systems.
Windows installationThe FBX Converter is compatible with the following versions of MicrosoftWindows:■ Windows 7 (32/64-bit)
■ Windows Vista (32/64-bit)
■ Windows XP (32/64-bit)
To install the FBX Converter:
1 Download the install file from the Autodesk web site(www.autodesk.com/fbx).
2 Select x64 for the 64-bit version.
3 Double-click the install file to launch the FBX Converter installer.
3
9

4 Click I accept to accept the terms of the license agreement, and thenclick Next.
License agreement window
5 The next window shows the recommended installation location for theFBX Converter. If you want to specify another location, click Browse tolaunch the file browser. Click Next.
6 The next window asks if you want to "Add the Explorer shell extensionfor ADSK FBX Converter 2012 ?". Click Yes if you want to createright-click options for FBX files in Windows Explorer.
These contextual options let you launch the FBX Converter for theselected file. Clicking Yes also adds a new "FBX Information" tab in theFile Properties dialog box that displays statistics for the FBX file.
7 The installation completed window appears. Click Close to exit theinstaller.
10 | Chapter 3 Installation

NOTE
To start the application, click Start > All Programs > Autodesk > Autodesk FBXConverter > FBXConverterUI. You can also double-click the FBX icon on thedesktop.
Macintosh installationThe FBX Converter is compatible with the following Macintosh OS:■ Mac OS X 10.6
■ Mac OS X 10.5
1 Download the .tgz file from the Autodesk web site to your desktopwww.autodesk.com/fbx.
2 Double-click the .tgz file to extract the Installation disk image.
3 Double-click the package icon to start the installation. The Welcomepane appears.
4 Click Continue to start the installation process. The Software LicenseAgreement pane appears.
5 Read the License Agreement and click Continue. A dialog box appearsasking if you accept the terms and continue with the installation.
6 Click Agree to accept. The Select a Destination pane appears. Select thedestination disk where you want to install the FBX Converter and clickContinue.
7 A dialog box appears asking you to enter your name and login passwordto continue the installation.
NOTE
You must obtain administrator privileges to continue installation.
8 The installation begins. A progress bar indicates the time remaining ofthe installation. When the progress reaches 100%, the Finish Up paneappears.
9 Click Close to exit the installation program.
NOTE
The FBX Converter installs to the following directory: <Macintosh Drive>/Applications/Autodesk/FbxConverter.
Macintosh installation | 11

12

FBX Converter
The FBX Converter lets you convert 3DS, DXF, OBJ, or DAE (COLLADA) files to theFBX file format. You can also use it to convert FBX files to DXF, OBJ or DAE(COLLADA) format, as well as convert FBX files to previous FBX versions.
Supported FBX conversion formats
Click the Destination format dropdown menu to select an FBX version.
The FBX Converter converts files to the following FBX formats:
DescriptionVersion
Select this FBX version to export a file that is compat-ible with Autodesk 2012 products, plug-ins, and
FBX 2012
MotionBuilder 2012 files. This is the default FBX ver-sion.
NOTE The FBX 2012 version lets you save in ASCII,but you can also embed media with your file if youactivate the Embed Media option
Select this FBX version to export a file that is compat-ible with Autodesk 2011 products, plug-ins, andMotionBuilder 2011 files.
NOTE
The FBX 2011 version lets you save in ASCII, butyou can also embed media with your file if youactivate the Embed Media option.
FBX 2011
4
13

DescriptionVersion
Select this FBX version to export a file that is com-patible with Autodesk 2010 applications, 2010 FBXplug-ins, and MotionBuilder 2009.
FBX 2010
Select this FBX version to export a file that is com-patible with the 2009.00 FBX plug-ins.
FBX 2009
Select this FBX version to export a file that is com-patible with Autodesk 2006 FBX plug-ins and Mo-tionBuilder versions 7.5, 7.0, and 6.0.
FBX 2006
Converting filesThe FBX Converter lets you drag and drop files to convert them to supportedfile formats. You can convert an FBX file to FBX, DXF, OBJ, or DAE (COLLADA)but you can only convert 3DS, DXF, OBJ, or DAE (COLLADA) to FBX format.
To convert files:
1 Drag a file into the Source Files area, or click the Add button to open abrowser to locate files.
14 | Chapter 4 FBX Converter
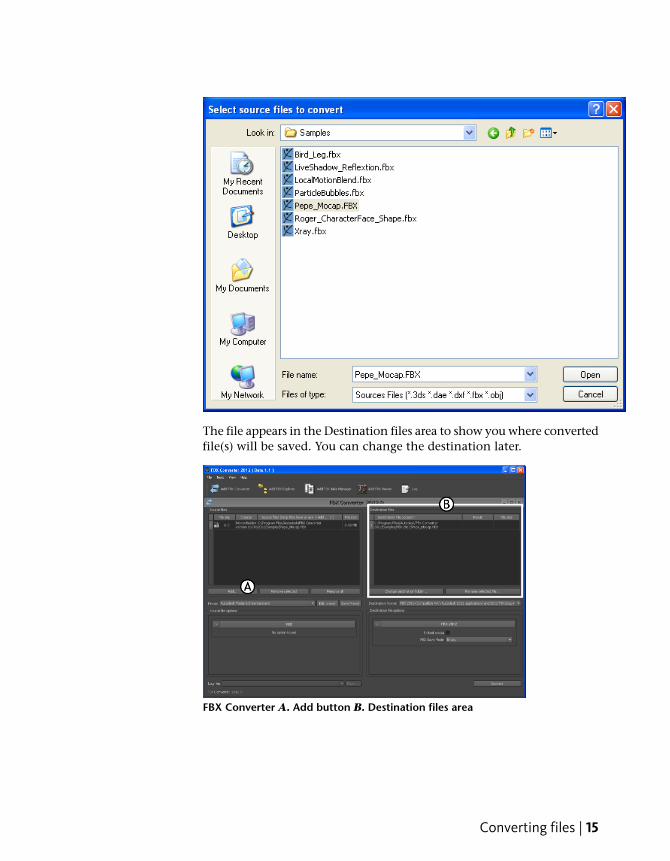
The file appears in the Destination files area to show you where convertedfile(s) will be saved. You can change the destination later.
FBX Converter A. Add button B. Destination files area
Converting files | 15

NOTE
To remove files from the Source Files list, select the files and clickRemove Selected. Click Remove All to clear the list.
2 Select a preset from the Presets drop-down menu, if applicable. SeeCreating a conversion preset (page 19).■ To save your converted file to another location, click Change
Destination Folder to open a file browser where you can specifya location.
NOTE
When you perform an FBX to FBX conversion, the files are stored ina folder named for the FBX version you specified.
■ To save your converted file with a different name from the original,click Rename Selected File.
3 Select a conversion format from the Destination Format menu.
Expand the Destination format menu (A) to view a list of available conversionformats.
4 Activate or disable any conversion options from the Source File Optionsmenu (if applicable). See Conversion options (page 20) for a list ofavailable options.
16 | Chapter 4 FBX Converter

FBX Converter A. Source file options. In this case, no options are offered.
NOTE
When you convert more than one file, your conversion options arelimited based on the format of the files you are converting. To expandyour options, convert files in batches by format, such as all 3DS or allFBX.
5 Activate or disable any conversion options from the Destination fileoptions (if applicable). See Conversion options (page 20) for a list ofavailable options.
FBX Converter A. Destination file options
Converting files | 17

6 Click Convert.
Completed conversion
If the files already exist in the destination folder, a dialog box appears askingyou to Overwrite, Skip, or Rename the file. You can also abort the conversionprocess which would cancel the remainder of the conversions.
Conversion errors
If any conversion errors occurred, they are displayed in the Destination fileResult column and an error log is created. View this file in the FBX Converter’sLog file menu.
Conversion errors appear in the Result column.
If a file converts successfully, the result column turns green and the word“Converted” appears. If the conversion is unsuccessful, the corresponding cellbecomes red. Skipped files are shown as “Skipped”.
18 | Chapter 4 FBX Converter
Creating a conversion presetYou can create a preset that you can apply when you wish to use the sameconversion options repeatedly.
To create a conversion preset:
1 From the main FBX Converter menu, select Presets.
2 Select Edit.
3 A list of all applicable options for import and export appears.
Select any desired options to uses these as your preset settings.
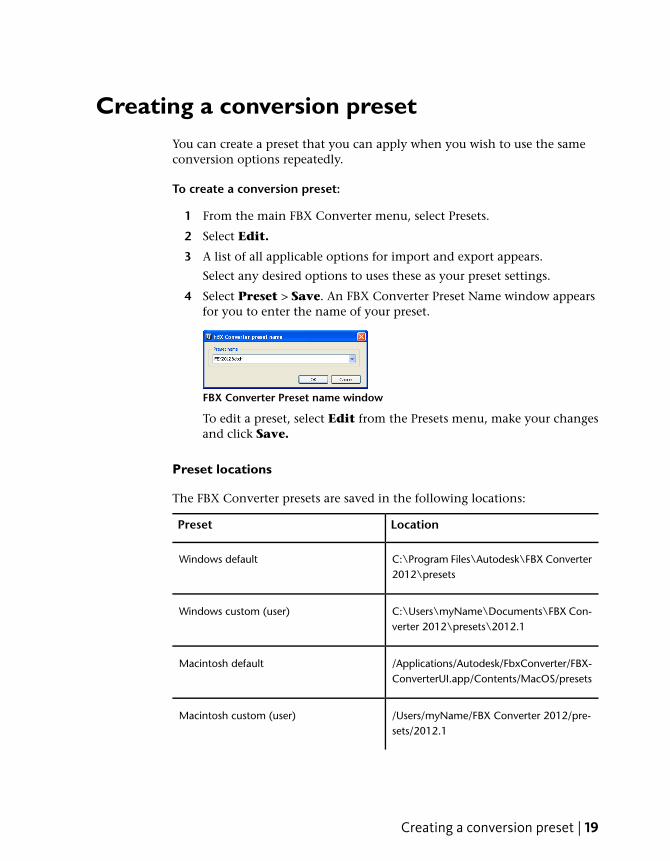
4 Select Preset > Save. An FBX Converter Preset Name window appearsfor you to enter the name of your preset.
FBX Converter Preset name window
To edit a preset, select Edit from the Presets menu, make your changesand click Save.
Preset locations
The FBX Converter presets are saved in the following locations:
LocationPreset
C:\Program Files\Autodesk\FBX Converter2012\presets
Windows default
C:\Users\myName\Documents\FBX Con-verter 2012\presets\2012.1
Windows custom (user)
/Applications/Autodesk/FbxConverter/FBX-ConverterUI.app/Contents/MacOS/presets
Macintosh default
/Users/myName/FBX Converter 2012/pre-sets/2012.1
Macintosh custom (user)
Creating a conversion preset | 19

Conversion optionsThe following section describes each conversion option and their relatedsettings. This section also contains a special section on naming conventionsfor FBX files that are converted into other FBX versions. We recommendleaving the default conversion options as they are, except in special cases. Forexample, if your scene is large and you do not need textures or materialsimported, you would alter the default conversion settings.
FBX to FBX conversion options
The following option is available if you are converting FBX files to anotherFBX format:
BehaviorOption
Activate this option to include (or embed,)all media associated with your scene in theFBX file.
NOTE
You can embed media with files conver-ted to ASCII if you convert to the FBX2012 and 2011 versions. The FBX Convert-er has no other conversion types that letyou embed media with ASCII files.
Embed Media
Select Binary to save the FBX file in thestandard format. Select ASCII to save theFBX file in ASCII format.
FBX Save Mode
3DS conversion options
The following are the options for converting files from the 3DS file format.
NOTE
You can only export to FBX format when converting from 3DS format.
20 | Chapter 4 FBX Converter
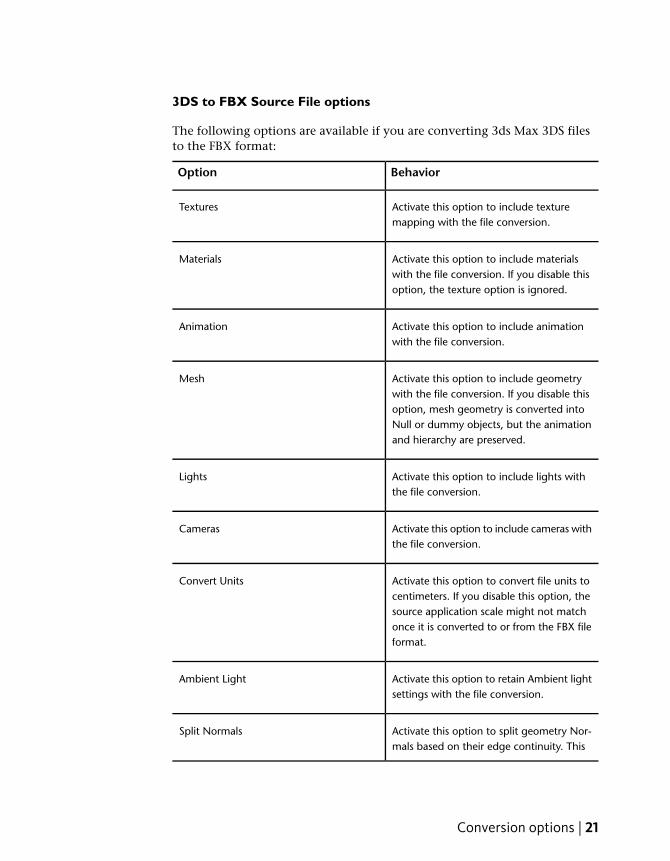
3DS to FBX Source File options
The following options are available if you are converting 3ds Max 3DS filesto the FBX format:
BehaviorOption
Activate this option to include texturemapping with the file conversion.
Textures
Activate this option to include materialswith the file conversion. If you disable thisoption, the texture option is ignored.
Materials
Activate this option to include animationwith the file conversion.
Animation
Activate this option to include geometrywith the file conversion. If you disable this
Mesh
option, mesh geometry is converted intoNull or dummy objects, but the animationand hierarchy are preserved.
Activate this option to include lights withthe file conversion.
Lights
Activate this option to include cameras withthe file conversion.
Cameras
Activate this option to convert file units tocentimeters. If you disable this option, the
Convert Units
source application scale might not matchonce it is converted to or from the FBX fileformat.
Activate this option to retain Ambient lightsettings with the file conversion.
Ambient Light
Activate this option to split geometry Nor-mals based on their edge continuity. This
Split Normals
Conversion options | 21

BehaviorOption
option splits per-vertex Normals and shouldbe used only in specific workflows whereyou want to ensure visual fidelity of surfacecontinuity in applications that do not sup-port Smoothing Group conversion.
Activate this option to apply the ConstantKey Reducer filter to animation curves. This
Apply Constant Key Reducer
reduces the number of redundant key-frames.
Activate this option to add a root node toall elements of your scene in the file conver-
Add Root Node
sion. Doing this adds a null or dummy ob-ject at the top of the hierarchy.
3DS to FBX Destination file options
The following options are available if you are converting 3ds Max 3DS filesto the FBX format:
BehaviorOption
Select Binary to save the FBX file in thestandard format. Select ASCII to save theFBX file in ASCII format.
FBX Save Mode
DXF conversion options
The following are the options for converting files to and from the AutoCADDXF file format.
NOTE
You can only export to FBX format when converting from DXF format.
22 | Chapter 4 FBX Converter

DXF to FBX Source Files options
The following options are available if you are converting AutoCAD DXF filesto the FBX format:
BehaviorOption
Activate this option to add a root node toall elements of your scene in the file conver-
Add Root Node
sion. Doing this adds a null or dummy ob-ject at the top of the hierarchy.
Activate this option to compare and mergevertices if they are found to be of equalvalue.
Weld Vertices
Activate Layer to derive one object fromeach layer. Activate Block to group all entit-
Derive Primitives
ies into one single object. Only block im-ports are considered separate objects. Activ-ate Entity to derive one object from eachentity in the file.
DXF to FBX Destination Files options
The following options are available if you are converting AutoCAD DXF filesto the FBX format:
BehaviorOption
Activate this option to include (or embed,)all media associated with your scene in theFBX file.
NOTE
You can embed media with ASCII if youconvert to the FBX 2012 and 2011 ver-sions. The FBX Converter offers no otherconversion versions that let you embedmedia with ASCII files.
Embed Media
Conversion options | 23

BehaviorOption
Select Binary to save the FBX file in thestandard format. Select ASCII to save theFBX file in ASCII format.
FBX Save Mode
FBX to DXF Destination Files options
The following options are available if you are converting FBX files to AutoCADDXF format:
BehaviorOption
Activate this option to force the conversionof quads to triangles. The FBX converter al-
Triangulate
ways triangulates NURBS and Patch geomet-ries, regardless of how you set this option.The FBX Converter approximates NURBSand Patch geometry using a polygon meshmade of triangles since the DXF format doesnot support NURBS or Patch geometry.
Activate this option to “bake” (or Plot) linkand shape deformations on the resultinggeometry.
Bake Deformations
OBJ conversion options
The following are the options for converting files to and from the OBJ fileformat.
NOTE
You can only export to FBX format when converting from OBJ format.
24 | Chapter 4 FBX Converter

OBJ to FBX Source files options
The following options are available if you are converting OBJ files to the FBXformat:
BehaviorOption
Activate this option to add a root node toall elements of your scene in the file conver-
Add Root Node
sion. Doing this adds a null or dummy ob-ject at the top of the hierarchy.
OBJ to FBX Destination files options
The following options are available if you are converting OBJ files to the FBXformat:
BehaviorOption
Activate this option to include (or embed,)all media associated with your scene in theFBX file.
NOTE
You can embed media with ASCII if youconvert to the FBX 2012 and 2011 ver-sions. The FBX Converter offers no otherconversion versions that let you embedmedia with ASCII files.
Embed Media
Select Binary to save the FBX file in thestandard format. Select ASCII to save theFBX file in ASCII format.
FBX Save Mode
Conversion options | 25

FBX to OBJ
The following options are available if you are converting FBX files to the OBJformat:
BehaviorOption
Activate this option to force the conversionof quads to triangles. The FBX converter al-
Triangulate
ways triangulates NURBS and Patch geomet-ries, regardless of how you set this option.The FBX Converter approximates NURBSand Patch geometry using a polygon meshmade of triangles since the OBJ format doesnot support NURBS or Patch geometry.
Activate this option to “bake” (or Plot) linkand shape deformations on the resultinggeometry.
Bake Deformations
COLLADA conversion notes
COLLADA (DAE) files converted to the FBX format are limited to what theFBX format supports. The conversion process loses anything that is notsupported by the current FBX version, even if it was previously supported bythe DAE format before conversion.
COLLADA conversion can export meshes, bones, skin and morph controllers,as well as basic assets, materials, light and cameras with transforms animation(without shearing). It can re-import what has been exported. Only a Y-up axisis supported.
NOTE You can only export to FBX format when converting from DAE format.
26 | Chapter 4 FBX Converter

The following is a list of what is supported in the COLLADA
COLLADA writerCOLLADA readerFeatureCategory
Animation 1 Supported1 Supported1 Single An-imation 22 Unsuppor-
tedSupported
2 AnimationClip*
3 Supported3 Supported4 Supported
3 Step Inter-polation
4 Supported5 Supported5 Supported6 Unsuppor-
ted4 Linear Inter-
polation 6 Unsuppor-ted7 Supported5 Bezier Inter-
polation 7 Unsuppor-ted
8 Supported
9 Supported6 B-Spline In-terpolation 8 Unsuppor-
ted7 Hermite In-
terpolation 9 Unsuppor-ted
8 CombinedInterpola-tion
9 AnimationInstances
* corresponds to theFBX animationstack.
Camera 1 Supported1 Supported1 Ortho-graphic 22 SupportedSupported
2 Perspective 33 SupportedSupported3 Camera
Target*44 Unsuppor-
tedSupported
4 Camera In-stance
* with FBX exten-sion.
Controller 1 Supported1 Supported1 Morph*
Conversion options | 27

COLLADA writerCOLLADA readerFeatureCategory
Supported2 22Skin Supported
333 Unsuppor-ted
Unsuppor-ted
Controllorinstance
*corresponds to FBXShape Deformation.
Geometry 1 Unsuppor-ted
1 Supported1 Lines
2 2Linestrips Supported2 Unsuppor-
ted33 SupportedMesh
44 Unsuppor-ted
Spline3 Supported
5 NURBS*4 Unsuppor-
ted5 Unsuppor-
ted6 Multiple
Geometries5 Unsuppor-
ted6 Supported7 Geometry
Instances 7 Supported6 Unsuppor-
ted* no NURBS supportwith COLLADA.
7 Unsuppor-ted
Lighting 1 Supported1 Supported1 Ambient
2 22Directional SupportedSupported
33 3SupportedSpot Supported
444 SupportedSupportedPoint
5 55Light In-stance
Unsuppor-ted
Supported
Material 1 Unsuppor-ted
1 Supported*1 Constant
2 2Lambert Supported2 Supported33 SupportedPhong3 Supported44 Unsuppor-
tedBlinn
4 Unsuppor-ted
5 Transpar-ency 5 Supported
5 Supported66 Unsuppor-2D Texture
28 | Chapter 4 FBX Converter

COLLADA writerCOLLADA readerFeatureCategory
ParameterBinding*
6ted7 Supported
77 Unsuppor-ted
Supported8 External
ShaderPath**
8 Supported8 Unsuppor-
ted9 Supported
* converts to Lam-bert
9 Material In-stance
9 Unsuppor-ted
* for Shaders** with NVidia exten-sion.
Transform 1 Supported1 Supported1 Visibility*
2 22Rotationorder
SupportedSupported
* with COL-LADA/Maya exten-sion.
Physics 111 Unsuppor-ted
Unsuppor-ted
n/a
Metadata 1 n/a1 n/a1 Meta
2 22Unit SupportedSupported
NOTE
Export or import to DAE (COLLADA) can destroy or produce unpredictableresults for some elements.
Conversion options | 29

30

FBX Explorer
The FBX Explorer lets you browse the contents of your ASCII or binary FBX files,search for items and compare files with each other.
FBX Explorer
NOTE If you load large (more that 100mb) FBX files, the process is slow. You can speedthis up if you use the Load data structure only option from the FBX Explorerpreferences. This option lets you load only the data structure without all the data contents.
With the FBX explorer you can:■ Search for a string in the data structure or the data content for all nodes.
■ Compare the data structure or the data content of all nodes between two different FBXfiles.
5
31
■ Only the first 20 data items load for each node, by default. (You can change this defaultsetting in the Preferences window. See Changing explorer preferences (page 33).)
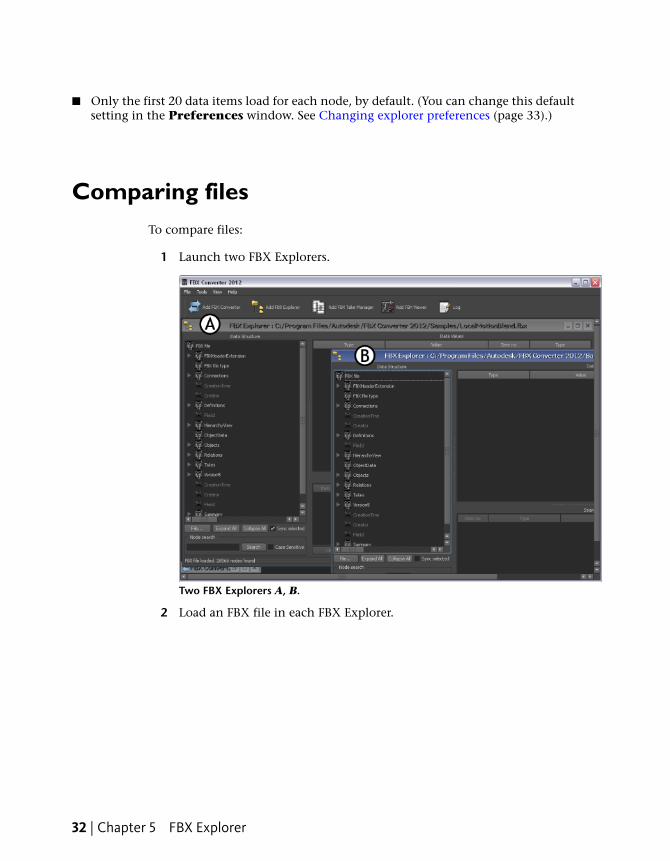
Comparing filesTo compare files:
1 Launch two FBX Explorers.
Two FBX Explorers A, B.
2 Load an FBX file in each FBX Explorer.
32 | Chapter 5 FBX Explorer
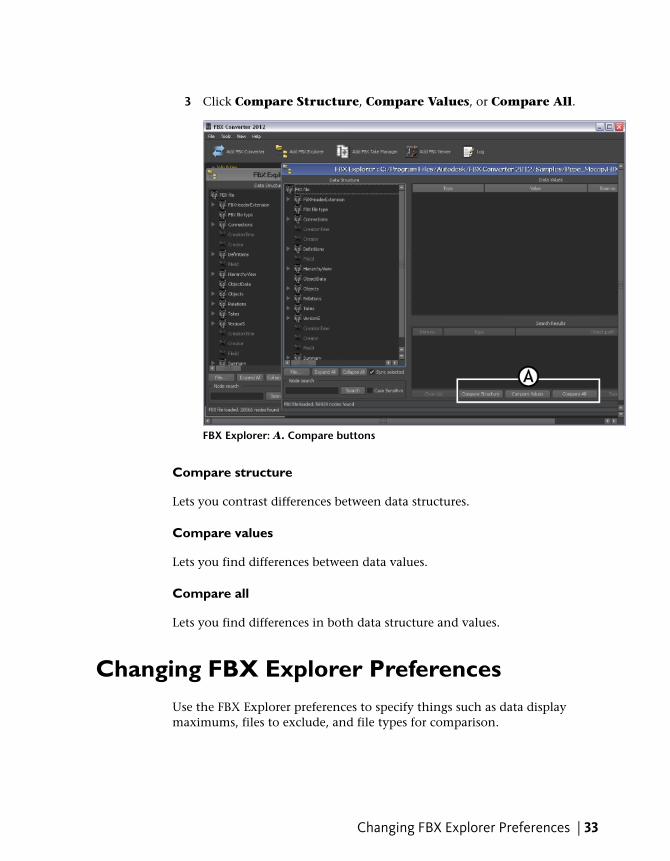
3 Click Compare Structure, Compare Values, or Compare All.
FBX Explorer: A. Compare buttons
Compare structure
Lets you contrast differences between data structures.
Compare values
Lets you find differences between data values.
Compare all
Lets you find differences in both data structure and values.
Changing FBX Explorer PreferencesUse the FBX Explorer preferences to specify things such as data displaymaximums, files to exclude, and file types for comparison.
Changing FBX Explorer Preferences | 33
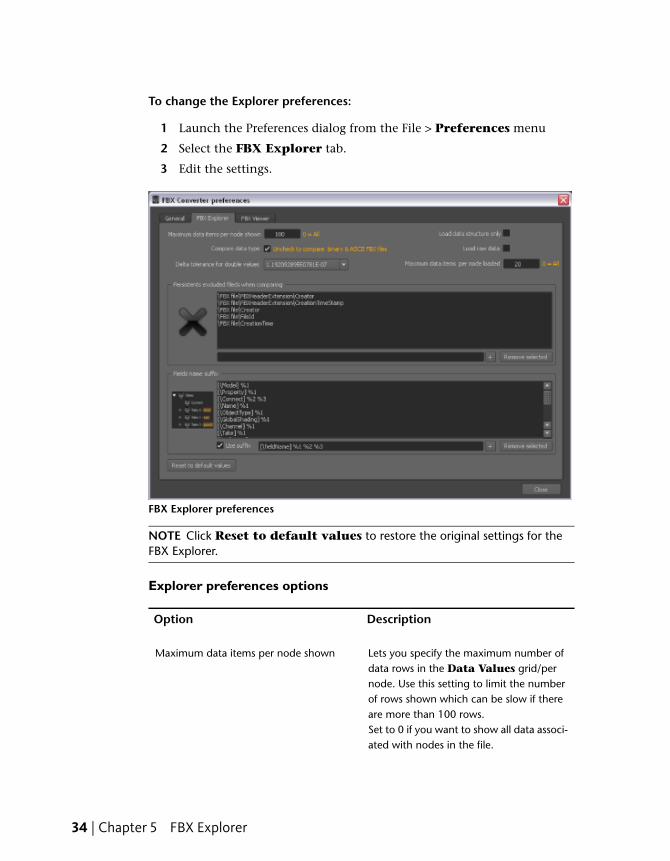
To change the Explorer preferences:
1 Launch the Preferences dialog from the File > Preferences menu
2 Select the FBX Explorer tab.
3 Edit the settings.
FBX Explorer preferences
NOTE Click Reset to default values to restore the original settings for theFBX Explorer.
Explorer preferences options
DescriptionOption
Lets you specify the maximum number ofdata rows in the Data Values grid/per
Maximum data items per node shown
node. Use this setting to limit the numberof rows shown which can be slow if thereare more than 100 rows.Set to 0 if you want to show all data associ-ated with nodes in the file.
34 | Chapter 5 FBX Explorer

DescriptionOption
Use this option to load the data structurewithout the data values. This is helpful if
Load data structure only
you have a large file with millions of verticeswhere you only want to check the datastructure.This is a quick way to large files.
Lets you compare binary and ASCII fileswithout checking the data type.
NOTE In ASCII all data types are "STRING",so if you try to compare the same file inASCII and binary errors occur.
Compare data type
Lets you load a suite of bytes (as in blobdata, or for example, when a texture is
Load raw data
embedded in an FBX file) in the rare casewhere you need to load and compare thiskind of data.
When two double values are compared, thetwo double values are subtracted. If the
Delta tolerance for double values
difference is greater than the delta toler-ance, errors are reported. Otherwise thetwo double values are considered equal.This can be useful when there is roundingapplied to double values.
Lets you specify the maximum number ofdata read for a node on load.
Maximum data items per node loaded
This setting is used to limit the memory us-age of the FBX Explorer by applying a limitfor large file, as data can require manybytes.
TIP Generally, the first 1 to 10 data itemsper node are of some interest.
The default value is 20. Set this option to 0if you want to load all data associated withnodes in the file.
Changing FBX Explorer Preferences | 35

DescriptionOption
Lets you exclude data from a comparison.For example, the creation time of two files.
Persistents excluded fields when comparing
This list of excluded fields lets you comparetwo files and report a perfect match evenif some data are not equal.
Use this field to configure what is shown tothe right of the node label and number inthe tree view.
Field name suffix
For example, setting [\P] %1 shows all nodenamed "P" with its first data value.
Restores the original FBX Explorer values.Reset to default values
36 | Chapter 5 FBX Explorer

FBX Take manager
The Take Manager lets you store FBX files with single or multiple takes without theneed to open the file in MotionBuilder. This tool was created because of the needfor an efficient way to extract animation takes from FBX files and create separateFBX files with each of them.
FBX Take Manager
In the past, extracting animation takes required opening MotionBuilder. But usingMotionBuilder can be time-consuming when working with several FBX files thatcontain a large number of animation takes.
Select the FBX file in the left pane, and the takes contained in the file display in theright pane.■ Save data from any take from the loaded FBX file. For example, you can save data with or
without characters. See Supported Take Elements for more information.
■ Rename a take without opening the file in MotionBuilder.
■ Add prefixes or suffixes to multiple take names in single or multiple FBX files.
6
37
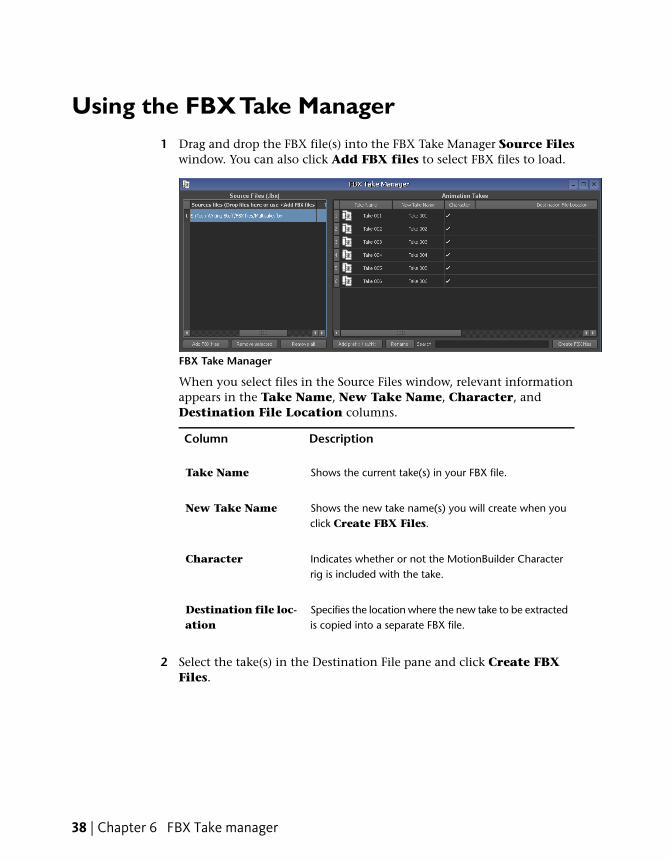
Using the FBX Take Manager1 Drag and drop the FBX file(s) into the FBX Take Manager Source Files
window. You can also click Add FBX files to select FBX files to load.
FBX Take Manager
When you select files in the Source Files window, relevant informationappears in the Take Name, New Take Name, Character, andDestination File Location columns.
DescriptionColumn
Shows the current take(s) in your FBX file.Take Name
Shows the new take name(s) you will create when youclick Create FBX Files.
New Take Name
Indicates whether or not the MotionBuilder Characterrig is included with the take.
Character
Specifies the location where the new take to be extractedis copied into a separate FBX file.
Destination file loc-ation
2 Select the take(s) in the Destination File pane and click Create FBXFiles.
38 | Chapter 6 FBX Take manager

The Create options dialog box appears. There are three options:
Create options dialog box
■ Save one FBX file for every selected take in the tool
■ Save multiple selected takes to one FBX file
■ Save one FBX file per take for every file listed in the Source Fileswindow
NOTE You can save the resulting FBX files in FBX version 2012, 2011, 2010,and 2009.
3 In the Animation Takes pane, click any of the Takes to:■ Add a prefix/suffix to the file: click Add Prefix/Suffix and enter
■ Rename a take: double-click and enter a new name. Or click RenameTake for more options. See Renaming takes (page 40).
■ Remove the character: Disable the checkbox in the take'scorresponding Character column.
The Destination File Location and File Size columns display relevantinformation.
NOTE If the files already exist in the folder, you have the choice to overwrite, skip,or rename the file. You can also end the conversion process which cancels the restof the conversion.
Every file extracted by the Take Manager contains every object used in thescene but with only one extracted take.
You can also use the Prefix/Suffix renaming tool at this point. SeePrefix/Suffix options (page 41)
Using the FBX Take Manager | 39

Renaming takesClick Rename Take to open the Rename options dialog box for more waysto rename your take:
Rename options
DescriptionOption
Restores the original take name, for ex-ample, "Take 001".
Reset to Take Name
Applies your changes only to selected takes.Apply to Selected Takes only
Applies your changes only to takes in thefile selected in the Source file pane.
Apply to takes of selected FBX file
Applies your changes to all the takes con-tained within files in the Source pane.
Apply to all takes of all files
40 | Chapter 6 FBX Take manager

Prefix/Suffix optionsTo apply a prefix or suffix to your extracted take names:
1 Click Prefix/Suffix in the Take Manger to access the Prefix/Suffixoptions.
Prefix/Suffix options dialog box
The Prefix/Suffix options let you customize the names of your extractedtakes. The renamed takes appear in the New Take Name column. To addtext to the beginning of the take name, enter text in the Prefix field.To add text to the end of the take name, enter text in the Suffix field.
2 Select from the following options:
DescriptionOption
Clears changes and restores the originaltake name.
Reset to take name
Adds the prefix/suffix to the highlightedfiles
Apply to selected takes only
Adds the prefix/suffix to every take in theselected file.
Apply to takes of the selected FBX file
Prefix/Suffix options | 41
DescriptionOption
Adds the prefix/suffix to all files in the TakeManager.
Apply to all takes of all files
3 Click Apply.
Searching for takesEnter text in the Take Manager Search field to locate a take. The Searchfunction examines only the takes listed in Take Name column. When thequeried text is located, these takes are exclusively selected.
For example, if you had three takes named Jogging, Walk, and WalkResult,and then searched for the text Walk, the last two takes would be selected. Thefirst take, Jogging is not. This is a quick way to select specific takes from filesthat contain hundreds of takes.
NOTE The search updates as you enter the text in the Search field, so that theselection changes in as you type. This is useful if you do not know the exact spellingof a take name.
42 | Chapter 6 FBX Take manager
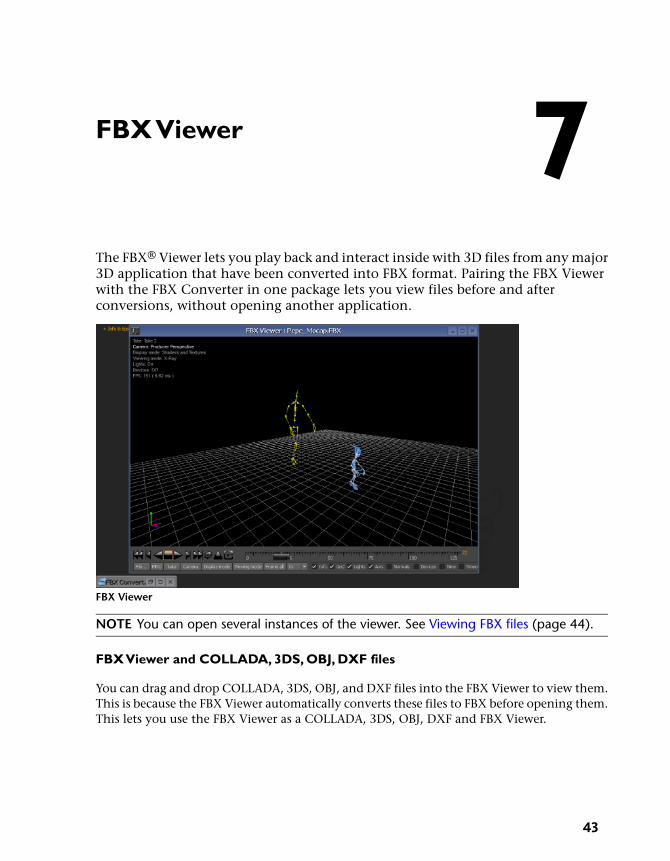
FBX Viewer
The FBX® Viewer lets you play back and interact inside with 3D files from any major3D application that have been converted into FBX format. Pairing the FBX Viewerwith the FBX Converter in one package lets you view files before and afterconversions, without opening another application.
FBX Viewer
NOTE You can open several instances of the viewer. See Viewing FBX files (page 44).
FBX Viewer and COLLADA, 3DS, OBJ, DXF files
You can drag and drop COLLADA, 3DS, OBJ, and DXF files into the FBX Viewer to view them.This is because the FBX Viewer automatically converts these files to FBX before opening them.This lets you use the FBX Viewer as a COLLADA, 3DS, OBJ, DXF and FBX Viewer.
7
43

When you drop a native FBX file on the FBX Converter application background, the file isloaded automatically in the FBX Viewer. If the file is OBJ/Collada DAE/DXF/3DS format, itis converted automatically using the FBX default options to an FBX temporary file. Thistemp file then loads in the FBX Viewer.
See Default FBX options (page 53) for a list of the FBX defaults that are applied to theCOLLADA, 3DS, OBJ, and DXF files.
Viewing FBX filesTo load FBX files into the Viewer, do the one of the following:
■ Click the File button to load an FBX file in the Viewer.
■ Drag a native FBX file onto FBX Converter application background.
■ Drag an OBJ/COLLADA DAE/DXF/3DS file onto the FBX Converterapplication background and the file is converted automatically, creatingan FBX temp file using default options. This temp file is then displayed inthe FBX Viewer. See Default FBX options (page 53) for a list of the FBXdefault options.
■ Drag links to FBX files from web pages into the FBX Viewer or the FBXConverter application background, and the FBX file downloads to the localhard drive, and loads in the FBX Viewer.
You can also:
Use the Transport Controls to frame advance, play, loop, eject or switch tofull screen.
■ Click the Take button to play different takes.
■ Click the Camera button to move through the camera views associatedwith the file.
■ Click the Display mode to select a different display for the scene.
DescriptionDisplay mode
Displays selected objects as wireframe.Wireframe
Displays selected objects using a constantcolor. This option ignores light sources in
Flat
a scene, and overrides any custom shad-
44 | Chapter 7 FBX Viewer
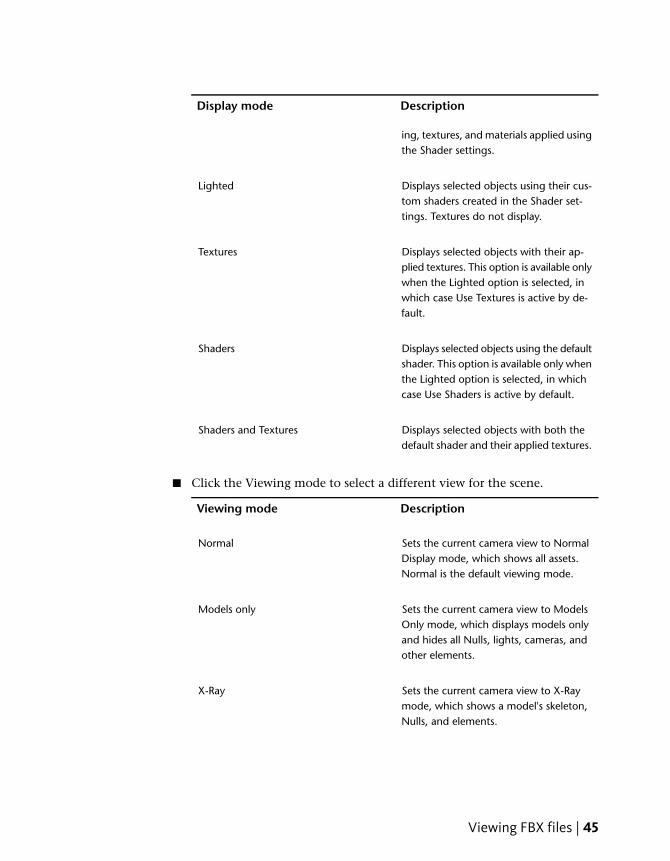
DescriptionDisplay mode
ing, textures, and materials applied usingthe Shader settings.
Displays selected objects using their cus-tom shaders created in the Shader set-tings. Textures do not display.
Lighted
Displays selected objects with their ap-plied textures. This option is available only
Textures
when the Lighted option is selected, inwhich case Use Textures is active by de-fault.
Displays selected objects using the defaultshader. This option is available only when
Shaders
the Lighted option is selected, in whichcase Use Shaders is active by default.
Displays selected objects with both thedefault shader and their applied textures.
Shaders and Textures
■ Click the Viewing mode to select a different view for the scene.
DescriptionViewing mode
Sets the current camera view to NormalDisplay mode, which shows all assets.Normal is the default viewing mode.
Normal
Sets the current camera view to ModelsOnly mode, which displays models only
Models only
and hides all Nulls, lights, cameras, andother elements.
Sets the current camera view to X-Raymode, which shows a model's skeleton,Nulls, and elements.
X-Ray
Viewing FBX files | 45

■ Frame the objects in the scene with the Frame all button.
See FBX Viewer controls (page 48) for more information.
NOTE You cannot manipulate animated cameras, as the camera position is drivenby animation constraints in the file.
The Take name, Camera view, Display mode, and Viewing mode, lights, devicesand real time frame rate display in the top left corner.
NOTE Drag the splitter up to display tips, shortcuts, and information.
Viewer A. Drag the splitter bar upward.
46 | Chapter 7 FBX Viewer

Viewing multiple FBX files simultaneously
You can open multiple instances of the FBX Viewer at the same time. This isuseful when you want to compare takes from the same file or the result of afile conversion.
Two FBX Viewers A. playing Take 001 B. playing Take 2
1 Select the first file in the FBX Viewer that is playing an FBX file and dropit into another FBX Viewer so that both viewers play the same file.
2 Click the Share checkbox in both FBX Viewers, then click the Go toFirst Frame Button in one viewers.
NOTE On systems running Windows, a firewall warning dialog appears. To unblockthe communication between the two FBX Viewers, click unblock. Once done,the warning will not appear again.
3 Click play in any viewer.
The players play the animations in sync, since the Share checkbox is active.
NOTE Any controls you activate are applied across all shared viewers. This includesthe transport controls, so you can navigate to the same frame accurately andcompare scenes.
Viewing FBX files | 47

FBX Viewer controlsThe following are descriptions of the FBX Viewer controls.
DescriptionOption
Displays scene information in the upper leftof the Viewer.
Info
Shows/Hides the scene grid.Grid
Uses the scene's lights.Lights
Shows/Hides the axis in the lower left of theViewer.
Axis
Activates keyboard triggering of the scene.(If applicable.)
Devices
Switches the Timeline between frames andtime display mode.Shows the display rate at the beginning ofthe timeline if checked. The timeline scalesaccording to the rate selected.
Time
To specify the timecode display value andmode, see Changing viewer preferences(page 51).
Activates/disables sharing of all commandsbetween FBX Viewers in Share mode.SeeSharing XYZ camera values (page 50).
Share
Activates/disables sharing of camera navig-ation controls.
Camera
Shows/hides the current timecode.Timecode
Shows/hides mesh normals.Normals
48 | Chapter 7 FBX Viewer
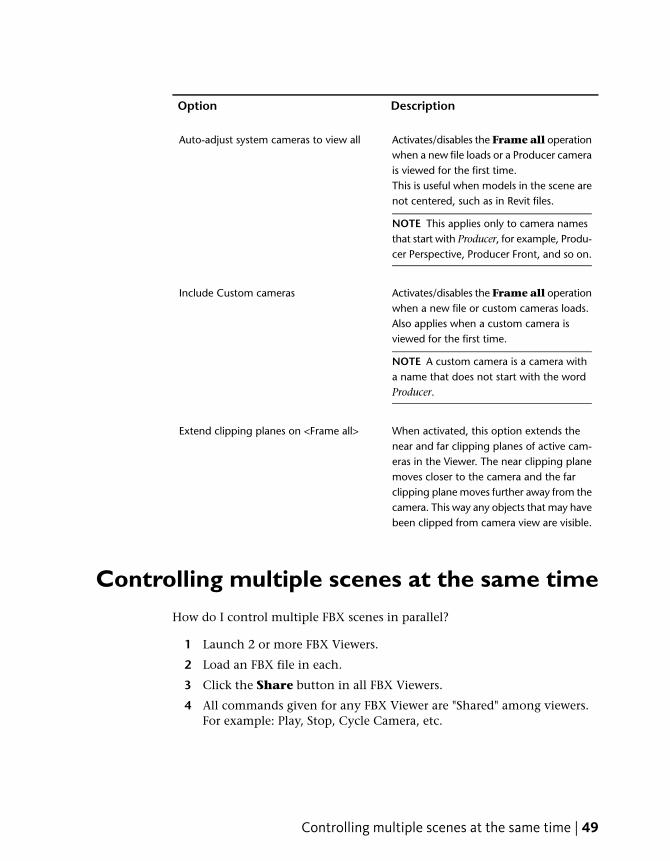
DescriptionOption
Activates/disables the Frame all operationwhen a new file loads or a Producer camerais viewed for the first time.
Auto-adjust system cameras to view all
This is useful when models in the scene arenot centered, such as in Revit files.
NOTE This applies only to camera namesthat start with Producer, for example, Produ-cer Perspective, Producer Front, and so on.
Activates/disables the Frame all operationwhen a new file or custom cameras loads.
Include Custom cameras
Also applies when a custom camera isviewed for the first time.
NOTE A custom camera is a camera witha name that does not start with the wordProducer.
When activated, this option extends thenear and far clipping planes of active cam-
Extend clipping planes on <Frame all>
eras in the Viewer. The near clipping planemoves closer to the camera and the farclipping plane moves further away from thecamera. This way any objects that may havebeen clipped from camera view are visible.
Controlling multiple scenes at the same timeHow do I control multiple FBX scenes in parallel?
1 Launch 2 or more FBX Viewers.
2 Load an FBX file in each.
3 Click the Share button in all FBX Viewers.
4 All commands given for any FBX Viewer are "Shared" among viewers.For example: Play, Stop, Cycle Camera, etc.
Controlling multiple scenes at the same time | 49

NOTE If you temporarily want to control only one of the shared FBX Viewers,disable Share, perform the operation, then reactivate the Share button. Thislets you apply commands to a single Viewer.
FBX Viewer controls A. Share button.
A dialog box appears after a file is selected in the File open dialog to give youthe option to load a file in all shared FBX Viewers.
Sharing camera positionYou can share the position of the current camera.
3 shared Viewers A. Activate Camera and Share.
1 Check the Share option on all FBX Viewers.
50 | Chapter 7 FBX Viewer

2 Check the Camera option on every shared FBX Viewer.
NOTE You cannot control the position of an animated camera.
Triggering devices in the FBX Viewer1 Activate the Device checkbox.
2 Click the scene to switch the Viewer's focus.
3 Use the special keyboard keys to trigger the scene.
NOTE All trigger keys are shared among all FBX Viewers when in share mode.When the focus is on the scene, all keyboard shortcut keys are used to drive thescene. To switch the focus away from a scene, click anywhere below the scene inthe control area.
Changing FBX Viewer preferencesUse the FBX Viewer preferences to specify whether files start playingimmediately on load or whether instances of the FBX Viewer should close onexit.
To change the Viewer preferences:
1 Launch the Preferences dialog from the File > Preferences menu.
2 Select the FBX Viewer tab.
Triggering devices in the FBX Viewer | 51
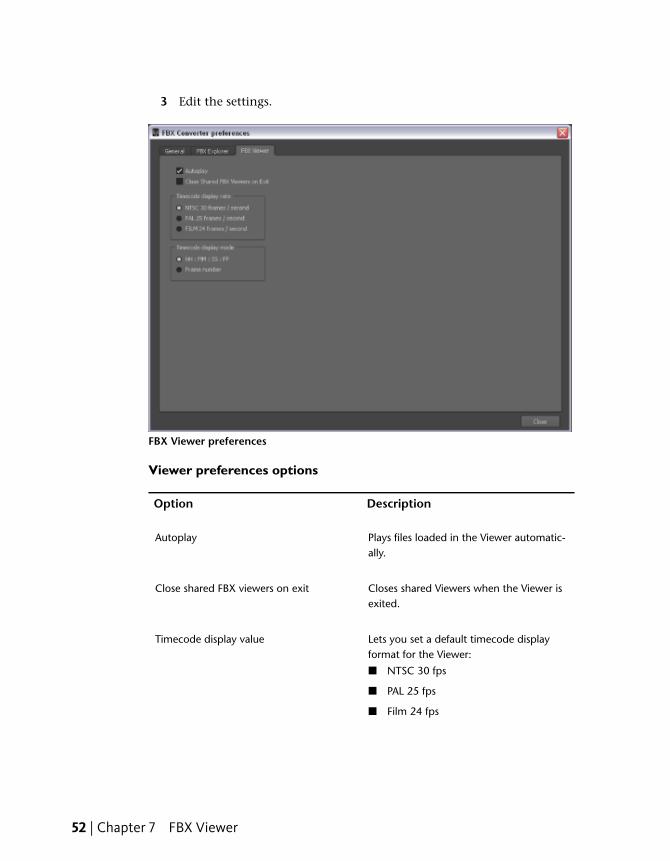
3 Edit the settings.
FBX Viewer preferences
Viewer preferences options
DescriptionOption
Plays files loaded in the Viewer automatic-ally.
Autoplay
Closes shared Viewers when the Viewer isexited.
Close shared FBX viewers on exit
Lets you set a default timecode displayformat for the Viewer:
Timecode display value
■ NTSC 30 fps
■ PAL 25 fps
■ Film 24 fps
52 | Chapter 7 FBX Viewer

DescriptionOption
Lets you set a default timecode displaymode for the Viewer:
Timecode display mode
■ HH:MM:SS:FF(Hours:Minutes:Seconds:Frames)
■ Frame number
FBX Viewer timnecode display A. Frames B. HH:SS:MM:FF.
Default FBX optionsWhen the FBX Converter performs an automatic conversion, such as whenyou drag a non-native (OBJ/COLLADA DAE/DXF/3DS) file into the FBX Viewerdefaults are applied.
The following are default FBX conversion settings:
Converted by defaultFormat
3DS ■ Textures
■ Materials
■ Animation
■ Mesh
■ Lights
■ Cameras
■ Convert Units
■ Split Normals
DXF ■ Add Root node
■ Weld vertices
Default FBX options | 53
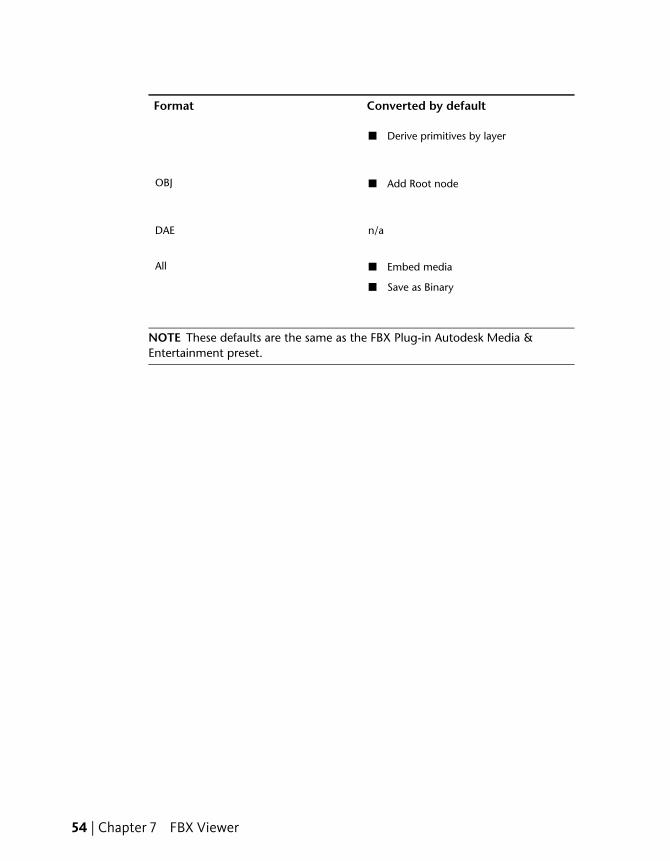
Converted by defaultFormat
■ Derive primitives by layer
OBJ ■ Add Root node
n/aDAE
All ■ Embed media
■ Save as Binary
NOTE These defaults are the same as the FBX Plug-in Autodesk Media &Entertainment preset.
54 | Chapter 7 FBX Viewer

Command line
The following is information on the FBX Command line.
These commands perform conversions between FBX and other file formats. Supportedfile formats are FBX, DXF, OBJ, 3DS and COLLADA.
Use the following commands:
■ FBXCONVERTER source_file fbx_file [global_options] [import_options] [export_options]
■ FBXCONVERTER fbx_file destination_file [global_options] [export_options]
■ FBXCONVERTER /? (to access help)
Definitions
DescriptionCommand
The name of the FBX file that you want to convert.fbx_file
The name of the source file (FBX, DXF, OBJ, 3DS orDAE).
source_file
The name of the destination file (FBX, DXF, OBJ, orDAE)
NOTE Specify the format of the source and/or des-tination file(s) by the /sff and /dff switches. If you donot specify these switches, the application tries todetermine what types of files it needs to process bychecking the file extension. Note: If both the sourceand destination files are FBX files, the /f option ismandatory.
destination_file
Global options
8
55

DescriptionCommand
Source file format. This switch needs to be com-pleted with one of the symbols listed below.
/sff
Destination file format. This switch needs to becompleted with one of the symbols listed below.FBX, DXF, OBJ and COLLADA
/dff
Example1: /sffFBX /dffCOLLADA. The source file isan FBX file and the destination is a COLLADA.Example2: /sffOBJ /dffFBX. The source file is an OBJfile and the destination is an FBX file.
Verbose mode. This switch activates the display ofmessages from the FBX Converter to the standardcommand line output.
/v
Create log file. This switch writes messages from theFBX Converter into a log file: "<dest_file-
/l
name>.log.txt". The file is created only if messagesare generated.
FBX optionsThe available options specific to the FBX file format and are detailed below:
FBX writer options
DescriptionCommand
Embed media. Activate this option to in-clude (or embed,) all media associated with
/e
your scene in the FBX file. You cannot em-bed media if the file is saved in ASCII formatfor FBX versions before 2011. You can em-bed media if the file is saved in ASCII formatfor FBX 2012 and 2011 versions.This option is disabled by default.
56 | Chapter 8 Command line

DescriptionCommand
Activate this option if you do NOT want toembed media associated with your scenein the FBX fileThis option is enabled by default.
/-e
FBX to FBX conversion options
DescriptionCommand
Destination FBX file is saved as FBX200611version (file version 6).This option is disabled by default.
/f200611
Destination FBX file is saved as FBX200900version (file version 6).This option is disabled by default.
/f200900
Destination FBX file is saved as FBX201000version (file version 6).This option is disabled by default.
/f201000
Destination FBX file is saved as FBX201100version (file version 7.1).This option is disabled by default.
/f201100
Destination FBX file is saved as FBX201200version (file version 7.2).This option is active by default.
/f201200
The destination FBX file is written in ASCIIfile format.This option is disabled by default.
/ascii
The destination FBX file is written based ontake options.
/tk
FBX options | 57

DescriptionCommand
The destination FBX file has converted seri-alized data into basic objects.This option is disabled by default.
/matconvert
FBX writer options
DescriptionCommand
Embed media. Activate this option to in-clude (or embed,) all media associated with
/e
your scene in the FBX file. You cannot em-bed media if the file is saved in ASCII formatfor FBX versions before 2011. You can em-bed media if the file is saved in ASCII formatfor FBX 2012 and 2011 versions.This option is disabled by default.
Activate this option if you do NOT want toembed media associated with your scenein the FBX fileThis option is enabled by default.
/-e
3DS import and export optionsThe available reader and writer options specific to the 3DS file format aredetailed below:
Import options
DescriptionCommand
Texture. Activate this option to includetexture mapping with the file conversion.This option is active by default.
/tex
58 | Chapter 8 Command line

DescriptionCommand
Material. Activate this option to includematerials with the file conversion. If you
/mat
disable this option, the texture option is ig-nored.This option is active by default.
Animation. Activate this option to includeanimation with the file conversion.This option is active by default.
/anim
Mesh. Activate this option to include geo-metry with the file conversion. If you disable
/mesh
this option, mesh geometry is convertedinto Null or dummy objects, but the anim-ation and hierarchy are preserved.This option is active by default.
Light. Activate this option to include lightswith the file conversion.This option is active by default.
/light
Camera. Activate this option to includecameras with the file conversion.This option is active by default.
/cam
Filter. Activate this option to apply theConstant Key Reducer filter to animation
/filter
curves. This reduces the number of redund-ant keyframes.This option is disabled by default.
Ambient light. Activate this option to retainAmbient light settings with the file conver-sion.This option is disabled by default.
/ambientlight
Split Normals. Activate this option to splitgeometry Normals based on their edge
/splitnormals
3DS import and export options | 59

DescriptionCommand
continuity. This option splits per-vertexNormals and should be used only in specificworkflows where you want to ensure visualfidelity of surface continuity in applicationsthat do not support Smoothing Groupconversion.This option is active by default.
Add root. Activate this option to add a rootnode to all elements of your scene in the
/addroot
file conversion. Doing this adds a Null ordummy object at the top of the hierarchy.This option is disabled by default.
Convert Units. Activate this option to con-vert file units to centimeters. If you disable
/convertunit
this option, the source application scalemight not match once it is converted to orfrom the FBX file format.This option is active by default.
OBJ import and export optionsThe available reader and writer options specific to the OBJ file format aredetailed below:
Import options
DescriptionCommand
Add root. Activate this option to add a rootnode to all elements of your scene during
/r
the file conversion. Doing this adds a Nullor dummy object at the top of the hier-archy.This option is active by default.
60 | Chapter 8 Command line

Export options
DescriptionCommand
Force triangulation of exported Triangulate.Activate this option to force the conversion
/t
of quads to triangles. The FBX converter al-ways triangulates NURBS and Patch geomet-ries, regardless of how you set this option.The FBX Converter approximates NURBSand Patch geometry using a polygon meshmade of triangles since the OBJ format doesnot support NURBS or Patch geometry.This option is active by default. To overridethe default setting, use /-t.
Bake deformations. Activate this option to"bake" (or Plot) link and shape deformationson the resulting geometry.This option is active by default. To overridethe default setting, use /-d.
/d
DXF import and export optionsThe available reader and writer options specific to the DXF file format aredetailed below:
Import options
DescriptionCommand
Add root. Activate this option to add a rootnode to all elements of your scene in the
/r
file conversion. Doing this adds a Null ordummy object at the top of the hierarchy.This option is active by default.
DXF import and export options | 61
DescriptionCommand
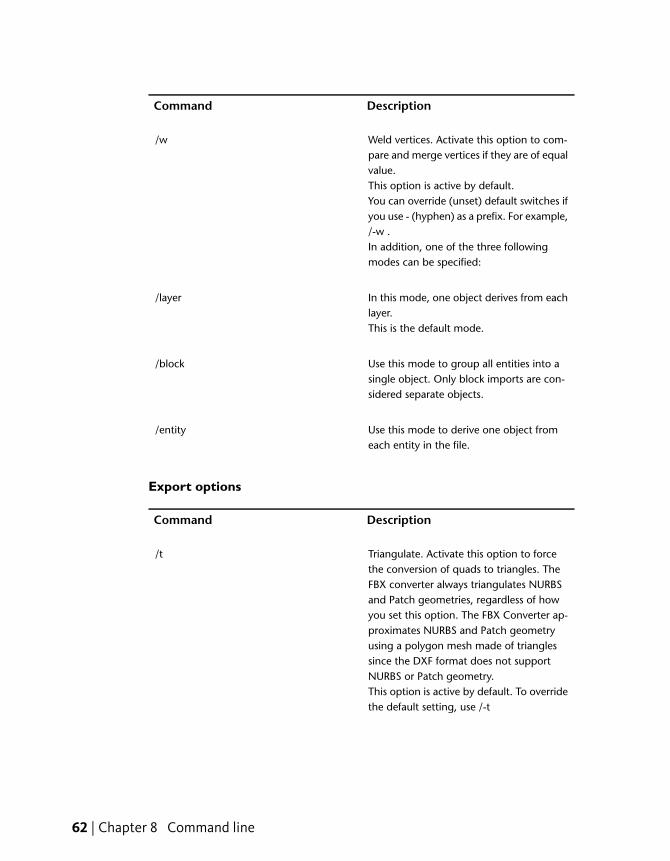
Weld vertices. Activate this option to com-pare and merge vertices if they are of equalvalue.This option is active by default.
/w
You can override (unset) default switches ifyou use - (hyphen) as a prefix. For example,/-w .In addition, one of the three followingmodes can be specified:
In this mode, one object derives from eachlayer.This is the default mode.
/layer
Use this mode to group all entities into asingle object. Only block imports are con-sidered separate objects.
/block
Use this mode to derive one object fromeach entity in the file.
/entity
Export options
DescriptionCommand
Triangulate. Activate this option to forcethe conversion of quads to triangles. The
/t
FBX converter always triangulates NURBSand Patch geometries, regardless of howyou set this option. The FBX Converter ap-proximates NURBS and Patch geometryusing a polygon mesh made of trianglessince the DXF format does not supportNURBS or Patch geometry.This option is active by default. To overridethe default setting, use /-t
62 | Chapter 8 Command line

DescriptionCommand
Bake deformations. Activate this option to"bake" (or Plot) link and shape deformations
/d
on the resulting geometry. This option isactive by default. To override the defaultsetting, use /-d
Take extractorActivate the Take extractor option to copy takes from an FBX source file intoan FBX destination file. For example, the command:
C:/MyDir/Test.fbx C:/MyDir/Take/Test.fbx /tk /f201200{0,^new take name^,-ch}{3,^new take name^,-ch}
only extracts takes 0 and 3 from C:/MyDir/Test.fbx, to theC:/MyDir/Take/Test.fbx file. This will then rename take 0 and 3 to "new takename". The destination file will be FBX 2012 format since /f201200 can be/f201200 or /f201100 or /f201000
No Characters are saved since -ch is found in every take option.■ To extract only one take per file, use a single take option. For example:
{3,^new take name^,-ch}
■ To include all Characters in the saved file, use <ch>. For example:
{3,^new take name^,ch}
■ To list all take indices and take names of a file, use /tkln. For example:
C:/MyDir/Test.fbx /tkln
You can also use FBX Take Manager to extract takes. Visit www.autodesk.com/fbxto download the FBX Converter.
Take extractor | 63

64

Index
3DScommand line options 58
3ds Max conversion options 203ds to FBX 21, 22
A
about FBX format 4
C
camera positions 50COLLADA
conversion notes 27support 27
command line 55FBX options 56
Command linetake extractor 63
Command line options3DS 58DXF 61OBJ 60
comparing files 32controls
FBX viewer 48conversion
3ds to FBX 21, 22DXF to FBX 23FBX to DAE, OBJ, DXF
(Windows) 13FBX to DXF 24
conversion errors 18conversion options
DAE to FBX 27DXF 22FBX to FBX 20FBX to OBJ 26introduction 20OBJ 24OBJ to FBX 25
creating a conversion preset 19
D
DAEsupport 27
DAE to FBX 27default FBX options 53devices
triggering 51DXF
command line options 61conversion options 22
DXF to FBX 23
E
error log file 18
F
FBX command line options 56FBX Converter 13
description 3, 5Macintosh installation 11Windows installation 9
FBX Explorer 31comparing files 32description 3, 5preferences 33
FBX file version (export) 13FBX format
about 4FBX Take manager 37
prefix/suffix options 41renaming 40Search 42using 38
FBX Take Managerdescription 3, 5
FBX to DXF 24
65 | Index

FBX to FBX 20FBX to OBJ 26FBX viewer 43
collada, 3ds, obj, and dxf 43controlling multiple scenes 49controls 48default FBX options 53preferences 51sharing camera position 50triggering devices 51viewing files 44viewing multiple files 47
FBX Viewerdescription 3, 6
I
installationMacintosh 11Windows 9
Installation 9
M
Macintoshinstallation 11
multi-scene control 49
O
OBJcommand line options 60conversion options 24
OBJ to FBX 25options
3ds Max conversion 20
DXF 22OBJ 24
P
preferencesFBX explorer 33Viewer 51
prefix/suffix options 41presets 19
S
Search field 42sharing camera position 50
T
Take extractorcommand line options 63
triggeringdevices 51
V
viewingmultiple files 47
viewing files 44
W
what’s new 2Windows
convert FBX to DAE, OBJ, or DXF 13installation 9
66 | Index
Top Related