


Languages
Pages
Legal


apache-camel
#apache-
camel
Table of Contents
About 1
Chapter 1: Getting started with apache-camel 2
Remarks 2
Examples 2
Installation or Setup 2
Maven Dependency 2
Gradle 2
Spring Boot 3
Camel Domain Specific Language 3
Chapter 2: Integration testing on existing routes with Apache-Camel and Spring (And DBUnit 4
Introduction 4
Parameters 4
Remarks 4
Examples 5
Camel route example 5
Camel Processor example 5
Camel Integration test class example 7
Chapter 3: Pub/Sub using Camel + Redis 11
Remarks 11
Examples 11
RedisPublisher 11
RedisSubscriber 11
Subscriber spring context 12
Publisher spring context 12
ManagedCamel 13
Credits 15
About
You can share this PDF with anyone you feel could benefit from it, downloaded the latest version from: apache-camel
It is an unofficial and free apache-camel ebook created for educational purposes. All the content is extracted from Stack Overflow Documentation, which is written by many hardworking individuals at Stack Overflow. It is neither affiliated with Stack Overflow nor official apache-camel.
The content is released under Creative Commons BY-SA, and the list of contributors to each chapter are provided in the credits section at the end of this book. Images may be copyright of their respective owners unless otherwise specified. All trademarks and registered trademarks are the property of their respective company owners.
Use the content presented in this book at your own risk; it is not guaranteed to be correct nor accurate, please send your feedback and corrections to [email protected]
https://riptutorial.com/ 1
Chapter 1: Getting started with apache-camel
Remarks
Apache Camel is a framework that primarily facilitates solving enterprise integration challenges. At its core it can be thought of as a routing engine engine builder. In essence it allows you to connect systems(endpoints) via routes. These routes accept messages which can be of any data type.
The Apache Camel framework also contains a complete set of EIP(Enterprise integration patterns) such as splitter, aggregators, content based routing and so on. Since the framework can be deployed in various standalone in Java applications, in various application servers such as WildFly and Tomcat or on a fully fledged enterprise service bus it can be seen as a integration framework.
To get started with the framework you would need to add it to a project using one of the following methods:
Maven1. Gradle2. Spring Boot3. Plain Old JAR library reference added to your project.4.
Examples
Installation or Setup
Detailed instructions on adding the required Camel dependencies.
Maven Dependency
One of the most common ways to include Apache Camel in your application is through a Maven dependency. By adding the dependency block below, Maven will resolve the Camel libraries and dependencies for you.
<dependency> <groupId>org.apache.camel</groupId> <artifactId>camel-core</artifactId> <version>2.17.3</version> </dependency>
Gradle
Another common way to include Apache Camel in your application is through a Gradle dependency. Simply add the dependency line below and Gradle will import the Camel library and
https://riptutorial.com/ 2
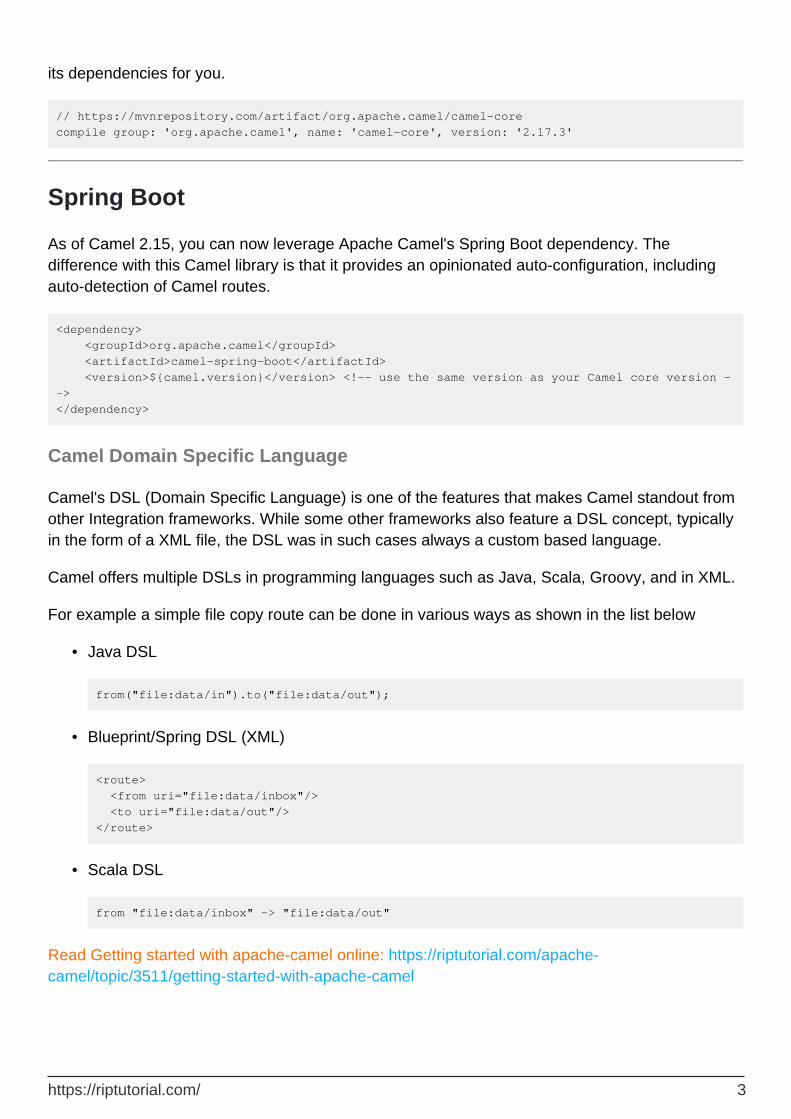
its dependencies for you.
// https://mvnrepository.com/artifact/org.apache.camel/camel-core compile group: 'org.apache.camel', name: 'camel-core', version: '2.17.3'
Spring Boot
As of Camel 2.15, you can now leverage Apache Camel's Spring Boot dependency. The difference with this Camel library is that it provides an opinionated auto-configuration, including auto-detection of Camel routes.
<dependency> <groupId>org.apache.camel</groupId> <artifactId>camel-spring-boot</artifactId> <version>${camel.version}</version> <!-- use the same version as your Camel core version --> </dependency>
Camel Domain Specific Language
Camel's DSL (Domain Specific Language) is one of the features that makes Camel standout from other Integration frameworks. While some other frameworks also feature a DSL concept, typically in the form of a XML file, the DSL was in such cases always a custom based language.
Camel offers multiple DSLs in programming languages such as Java, Scala, Groovy, and in XML.
For example a simple file copy route can be done in various ways as shown in the list below
Java DSL
from("file:data/in").to("file:data/out");
•
Blueprint/Spring DSL (XML)
<route> <from uri="file:data/inbox"/> <to uri="file:data/out"/> </route>
•
Scala DSL
from "file:data/inbox" -> "file:data/out"
•
Read Getting started with apache-camel online: https://riptutorial.com/apache-camel/topic/3511/getting-started-with-apache-camel
https://riptutorial.com/ 3
Chapter 2: Integration testing on existing routes with Apache-Camel and Spring (And DBUnit)
Introduction
The point of this wiki is to show you how to execute integration tests using Apache Camel.
More precisely, doing this you will be able to launch an existing route from beginning to end (With or without your real database) or intercept the exchange between each part of the route and test if your headers or body are correct or not.
The project I have been doing this on uses classic Spring with xml configuration and DBUnit to mock a test database. Hope this will give you a few leads.
Parameters
Parameter/Function Details
ExchangeThe exchange is used inside the camel processor to pass objects between parts of your route
CamelContextThe camel context is used in the test to manually start and stop the context.
ProducerTemplateAllows you to send messages in your route, setting the complete exchange manually or sending dummy headers/body
AdviceWith Helps you redefine an existing route with the current context
WeaveByIdUsed inside the advice with configuration, tells pieces of your route how to behave (Can also use weaveByToString)
MockEndpoint
The mockendpoint is a point you define for your test. In your weaveById, you can tell your route to its usual processing and go into a mockEnpoint rather than following the usual route. This way you can check the message count, the exchange status ...
Remarks
Some definitions given here are not perfectly accurate, but they will help you understand the code above. Here are a few links for more detailed information :
https://riptutorial.com/ 4
About the use of AdviceWith and weaveById (Or other ways to trigger routes), have a look at the official apache-camel documentation : see this link
•
About the use of ProducerTemplate, see the official documentation again : see this link•
To really understand what camel is all about : Entreprise Integration Patterns detailed documentation
•
This particular way of testing is pretty hard to find, even on stack overflow. This is pretty specific but don't hesitate to ask for more details, maybe I'll be able to help.
Examples
Camel route example
The following route has a simple goal :
First, it checks if and ImportDocumentProcess object is present in the database and adds it as an exchange header
•
Then, it adds an ImportDocumentTraitement (Which is linked to the previous ImportDocumentProcess) in the database
•
Here is the code of this route :
@Component public class TestExampleRoute extends SpringRouteBuilder { public static final String ENDPOINT_EXAMPLE = "direct:testExampleEndpoint"; @Override public void configure() throws Exception { from(ENDPOINT_EXAMPLE).routeId("testExample") .bean(TestExampleProcessor.class, "getImportDocumentProcess").id("getImportDocumentProcess") .bean(TestExampleProcessor.class, "createImportDocumentTraitement").id("createImportDocumentTraitement") .to("com.pack.camel.routeshowAll=true&multiline=true"); } }
The id on the routes are not mandatory, you can use the bean strings afterwards too. However I think using ids can be considered a good practice, in case your route strings change in the future.
Camel Processor example
The processor just contains just contains the methods needed by the route. It is just a classic Java Bean containing several methods. You can also implement Processor and override the process method.
See the code below :
https://riptutorial.com/ 5
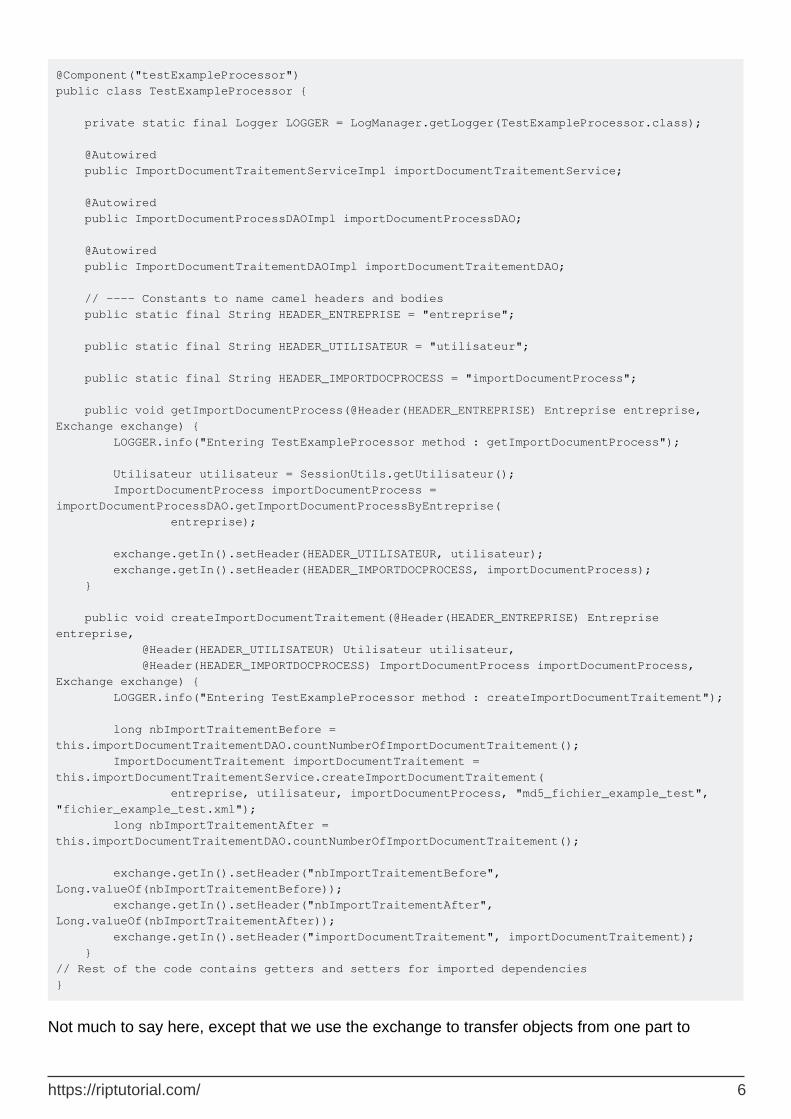
@Component("testExampleProcessor") public class TestExampleProcessor { private static final Logger LOGGER = LogManager.getLogger(TestExampleProcessor.class); @Autowired public ImportDocumentTraitementServiceImpl importDocumentTraitementService; @Autowired public ImportDocumentProcessDAOImpl importDocumentProcessDAO; @Autowired public ImportDocumentTraitementDAOImpl importDocumentTraitementDAO; // ---- Constants to name camel headers and bodies public static final String HEADER_ENTREPRISE = "entreprise"; public static final String HEADER_UTILISATEUR = "utilisateur"; public static final String HEADER_IMPORTDOCPROCESS = "importDocumentProcess"; public void getImportDocumentProcess(@Header(HEADER_ENTREPRISE) Entreprise entreprise, Exchange exchange) { LOGGER.info("Entering TestExampleProcessor method : getImportDocumentProcess"); Utilisateur utilisateur = SessionUtils.getUtilisateur(); ImportDocumentProcess importDocumentProcess = importDocumentProcessDAO.getImportDocumentProcessByEntreprise( entreprise); exchange.getIn().setHeader(HEADER_UTILISATEUR, utilisateur); exchange.getIn().setHeader(HEADER_IMPORTDOCPROCESS, importDocumentProcess); } public void createImportDocumentTraitement(@Header(HEADER_ENTREPRISE) Entreprise entreprise, @Header(HEADER_UTILISATEUR) Utilisateur utilisateur, @Header(HEADER_IMPORTDOCPROCESS) ImportDocumentProcess importDocumentProcess, Exchange exchange) { LOGGER.info("Entering TestExampleProcessor method : createImportDocumentTraitement"); long nbImportTraitementBefore = this.importDocumentTraitementDAO.countNumberOfImportDocumentTraitement(); ImportDocumentTraitement importDocumentTraitement = this.importDocumentTraitementService.createImportDocumentTraitement( entreprise, utilisateur, importDocumentProcess, "md5_fichier_example_test", "fichier_example_test.xml"); long nbImportTraitementAfter = this.importDocumentTraitementDAO.countNumberOfImportDocumentTraitement(); exchange.getIn().setHeader("nbImportTraitementBefore", Long.valueOf(nbImportTraitementBefore)); exchange.getIn().setHeader("nbImportTraitementAfter", Long.valueOf(nbImportTraitementAfter)); exchange.getIn().setHeader("importDocumentTraitement", importDocumentTraitement); } // Rest of the code contains getters and setters for imported dependencies }
Not much to say here, except that we use the exchange to transfer objects from one part to
https://riptutorial.com/ 6
another. This is the way it is usually done on my project, since we have really complex processes to handle.
Camel Integration test class example
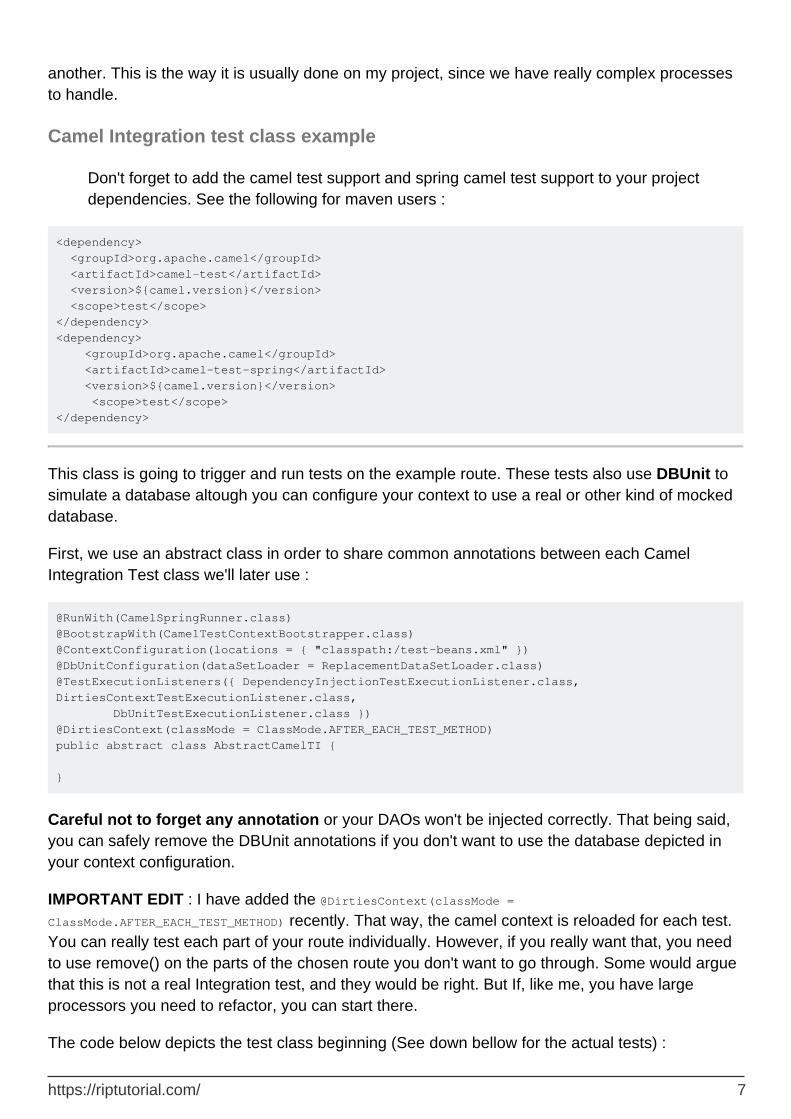
Don't forget to add the camel test support and spring camel test support to your project dependencies. See the following for maven users :
<dependency> <groupId>org.apache.camel</groupId> <artifactId>camel-test</artifactId> <version>${camel.version}</version> <scope>test</scope> </dependency> <dependency> <groupId>org.apache.camel</groupId> <artifactId>camel-test-spring</artifactId> <version>${camel.version}</version> <scope>test</scope> </dependency>
This class is going to trigger and run tests on the example route. These tests also use DBUnit to simulate a database altough you can configure your context to use a real or other kind of mocked database.
First, we use an abstract class in order to share common annotations between each Camel Integration Test class we'll later use :
@RunWith(CamelSpringRunner.class) @BootstrapWith(CamelTestContextBootstrapper.class) @ContextConfiguration(locations = { "classpath:/test-beans.xml" }) @DbUnitConfiguration(dataSetLoader = ReplacementDataSetLoader.class) @TestExecutionListeners({ DependencyInjectionTestExecutionListener.class, DirtiesContextTestExecutionListener.class, DbUnitTestExecutionListener.class }) @DirtiesContext(classMode = ClassMode.AFTER_EACH_TEST_METHOD) public abstract class AbstractCamelTI { }
Careful not to forget any annotation or your DAOs won't be injected correctly. That being said, you can safely remove the DBUnit annotations if you don't want to use the database depicted in your context configuration.
IMPORTANT EDIT : I have added the @DirtiesContext(classMode = ClassMode.AFTER_EACH_TEST_METHOD) recently. That way, the camel context is reloaded for each test. You can really test each part of your route individually. However, if you really want that, you need to use remove() on the parts of the chosen route you don't want to go through. Some would argue that this is not a real Integration test, and they would be right. But If, like me, you have large processors you need to refactor, you can start there.
The code below depicts the test class beginning (See down bellow for the actual tests) :
https://riptutorial.com/ 7
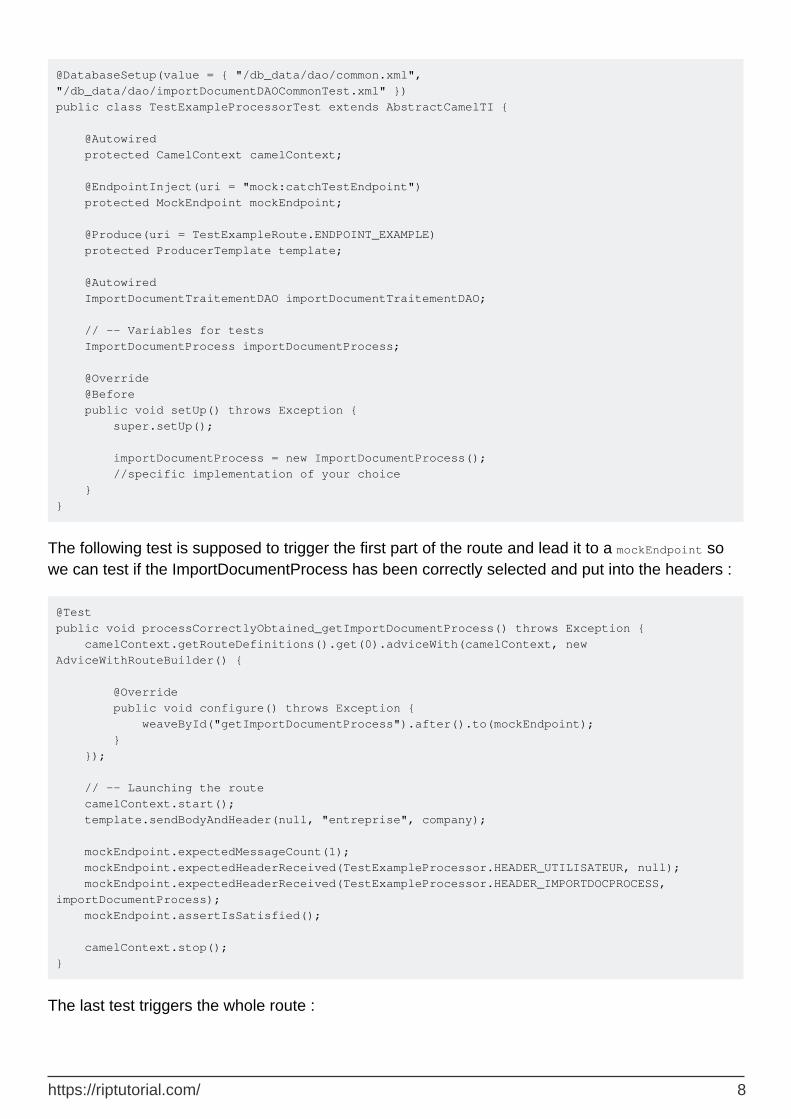
@DatabaseSetup(value = { "/db_data/dao/common.xml", "/db_data/dao/importDocumentDAOCommonTest.xml" }) public class TestExampleProcessorTest extends AbstractCamelTI { @Autowired protected CamelContext camelContext; @EndpointInject(uri = "mock:catchTestEndpoint") protected MockEndpoint mockEndpoint; @Produce(uri = TestExampleRoute.ENDPOINT_EXAMPLE) protected ProducerTemplate template; @Autowired ImportDocumentTraitementDAO importDocumentTraitementDAO; // -- Variables for tests ImportDocumentProcess importDocumentProcess; @Override @Before public void setUp() throws Exception { super.setUp(); importDocumentProcess = new ImportDocumentProcess(); //specific implementation of your choice } }
The following test is supposed to trigger the first part of the route and lead it to a mockEndpoint so we can test if the ImportDocumentProcess has been correctly selected and put into the headers :
@Test public void processCorrectlyObtained_getImportDocumentProcess() throws Exception { camelContext.getRouteDefinitions().get(0).adviceWith(camelContext, new AdviceWithRouteBuilder() { @Override public void configure() throws Exception { weaveById("getImportDocumentProcess").after().to(mockEndpoint); } }); // -- Launching the route camelContext.start(); template.sendBodyAndHeader(null, "entreprise", company); mockEndpoint.expectedMessageCount(1); mockEndpoint.expectedHeaderReceived(TestExampleProcessor.HEADER_UTILISATEUR, null); mockEndpoint.expectedHeaderReceived(TestExampleProcessor.HEADER_IMPORTDOCPROCESS, importDocumentProcess); mockEndpoint.assertIsSatisfied(); camelContext.stop(); }
The last test triggers the whole route :
https://riptutorial.com/ 8
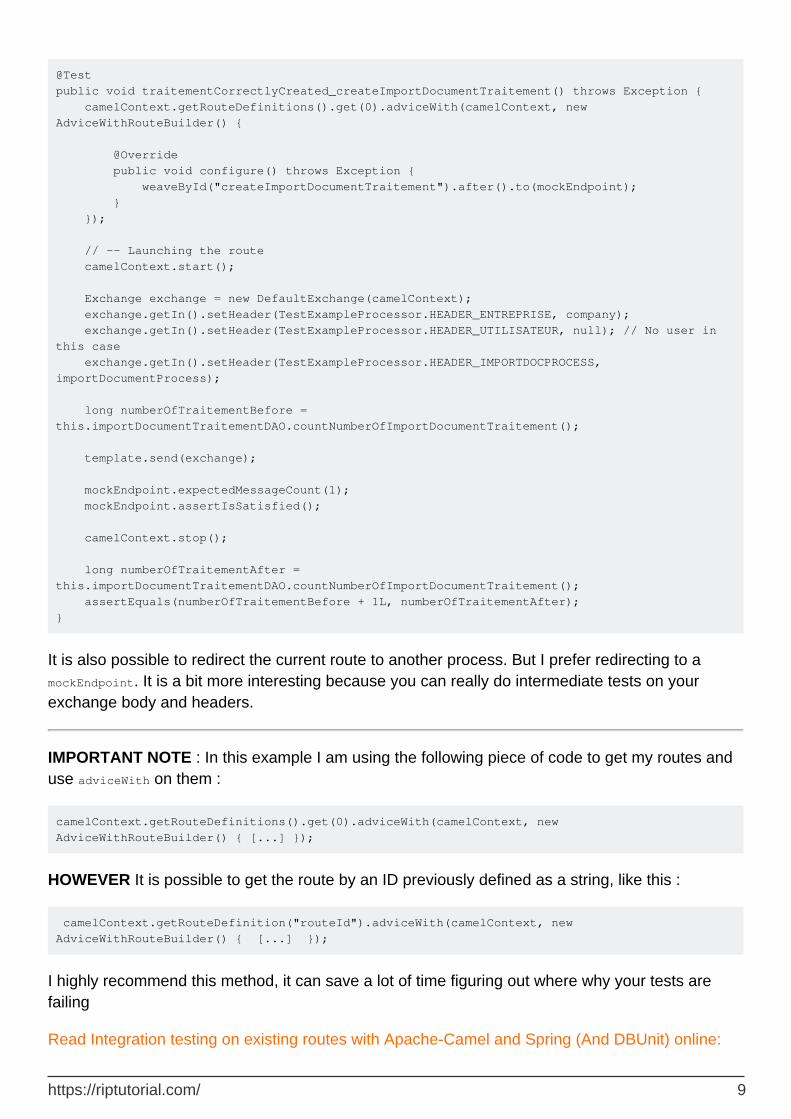
@Test public void traitementCorrectlyCreated_createImportDocumentTraitement() throws Exception { camelContext.getRouteDefinitions().get(0).adviceWith(camelContext, new AdviceWithRouteBuilder() { @Override public void configure() throws Exception { weaveById("createImportDocumentTraitement").after().to(mockEndpoint); } }); // -- Launching the route camelContext.start(); Exchange exchange = new DefaultExchange(camelContext); exchange.getIn().setHeader(TestExampleProcessor.HEADER_ENTREPRISE, company); exchange.getIn().setHeader(TestExampleProcessor.HEADER_UTILISATEUR, null); // No user in this case exchange.getIn().setHeader(TestExampleProcessor.HEADER_IMPORTDOCPROCESS, importDocumentProcess); long numberOfTraitementBefore = this.importDocumentTraitementDAO.countNumberOfImportDocumentTraitement(); template.send(exchange); mockEndpoint.expectedMessageCount(1); mockEndpoint.assertIsSatisfied(); camelContext.stop(); long numberOfTraitementAfter = this.importDocumentTraitementDAO.countNumberOfImportDocumentTraitement(); assertEquals(numberOfTraitementBefore + 1L, numberOfTraitementAfter); }
It is also possible to redirect the current route to another process. But I prefer redirecting to a mockEndpoint. It is a bit more interesting because you can really do intermediate tests on your exchange body and headers.
IMPORTANT NOTE : In this example I am using the following piece of code to get my routes and use adviceWith on them :
camelContext.getRouteDefinitions().get(0).adviceWith(camelContext, new AdviceWithRouteBuilder() { [...] });
HOWEVER It is possible to get the route by an ID previously defined as a string, like this :
camelContext.getRouteDefinition("routeId").adviceWith(camelContext, new AdviceWithRouteBuilder() { [...] });
I highly recommend this method, it can save a lot of time figuring out where why your tests are failing
Read Integration testing on existing routes with Apache-Camel and Spring (And DBUnit) online:
https://riptutorial.com/ 9

https://riptutorial.com/apache-camel/topic/10630/integration-testing-on-existing-routes-with-apache-camel-and-spring--and-dbunit-
https://riptutorial.com/ 10
Chapter 3: Pub/Sub using Camel + Redis
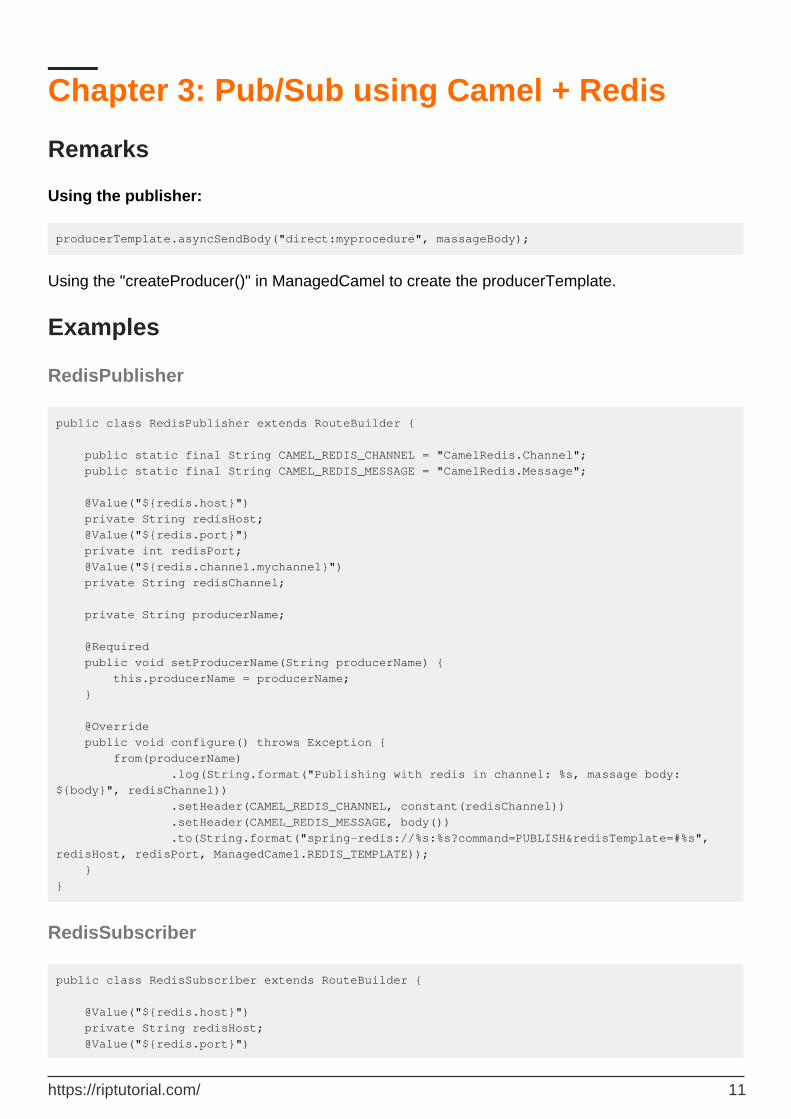
Remarks
Using the publisher:
producerTemplate.asyncSendBody("direct:myprocedure", massageBody);
Using the "createProducer()" in ManagedCamel to create the producerTemplate.
Examples
RedisPublisher
public class RedisPublisher extends RouteBuilder { public static final String CAMEL_REDIS_CHANNEL = "CamelRedis.Channel"; public static final String CAMEL_REDIS_MESSAGE = "CamelRedis.Message"; @Value("${redis.host}") private String redisHost; @Value("${redis.port}") private int redisPort; @Value("${redis.channel.mychannel}") private String redisChannel; private String producerName; @Required public void setProducerName(String producerName) { this.producerName = producerName; } @Override public void configure() throws Exception { from(producerName) .log(String.format("Publishing with redis in channel: %s, massage body: ${body}", redisChannel)) .setHeader(CAMEL_REDIS_CHANNEL, constant(redisChannel)) .setHeader(CAMEL_REDIS_MESSAGE, body()) .to(String.format("spring-redis://%s:%s?command=PUBLISH&redisTemplate=#%s", redisHost, redisPort, ManagedCamel.REDIS_TEMPLATE)); } }
RedisSubscriber
public class RedisSubscriber extends RouteBuilder { @Value("${redis.host}") private String redisHost; @Value("${redis.port}")
https://riptutorial.com/ 11
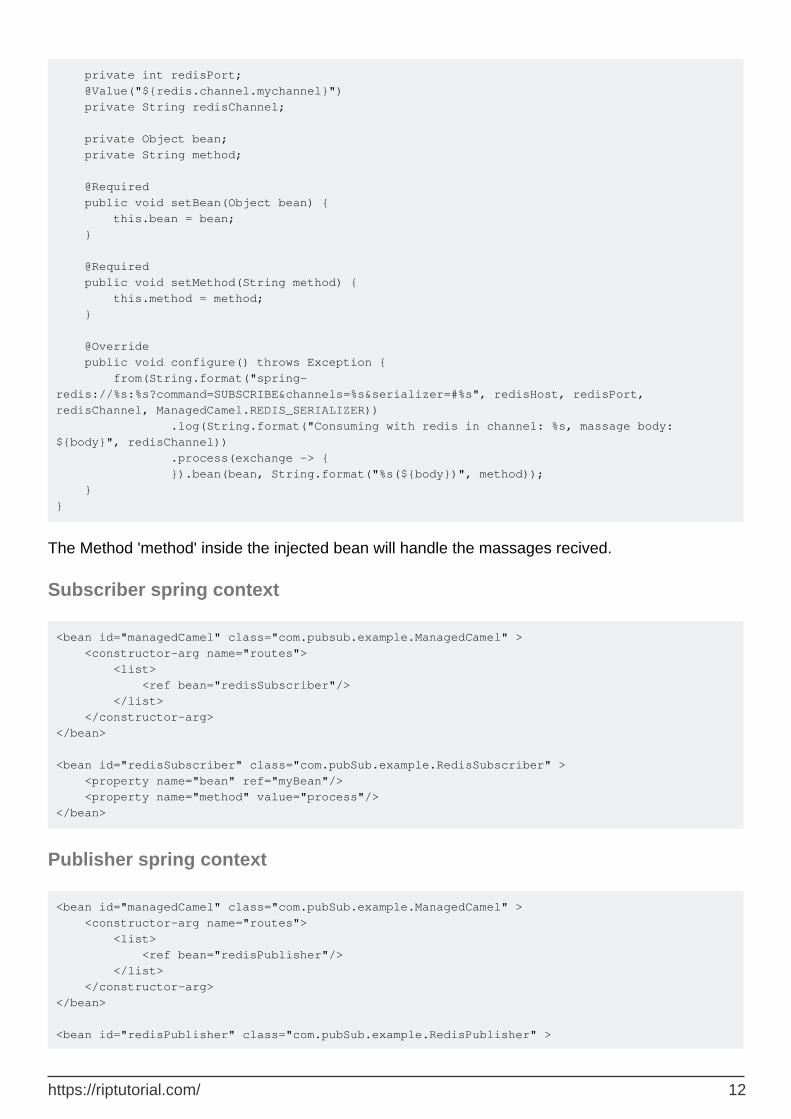
private int redisPort; @Value("${redis.channel.mychannel}") private String redisChannel; private Object bean; private String method; @Required public void setBean(Object bean) { this.bean = bean; } @Required public void setMethod(String method) { this.method = method; } @Override public void configure() throws Exception { from(String.format("spring-redis://%s:%s?command=SUBSCRIBE&channels=%s&serializer=#%s", redisHost, redisPort, redisChannel, ManagedCamel.REDIS_SERIALIZER)) .log(String.format("Consuming with redis in channel: %s, massage body: ${body}", redisChannel)) .process(exchange -> { }).bean(bean, String.format("%s(${body})", method)); } }
The Method 'method' inside the injected bean will handle the massages recived.
Subscriber spring context
<bean id="managedCamel" class="com.pubsub.example.ManagedCamel" > <constructor-arg name="routes"> <list> <ref bean="redisSubscriber"/> </list> </constructor-arg> </bean> <bean id="redisSubscriber" class="com.pubSub.example.RedisSubscriber" > <property name="bean" ref="myBean"/> <property name="method" value="process"/> </bean>
Publisher spring context
<bean id="managedCamel" class="com.pubSub.example.ManagedCamel" > <constructor-arg name="routes"> <list> <ref bean="redisPublisher"/> </list> </constructor-arg> </bean> <bean id="redisPublisher" class="com.pubSub.example.RedisPublisher" >
https://riptutorial.com/ 12

<property name="producerName" value="direct:myprocedure"/> </bean>
ManagedCamel
public class ManagedCamel implements Managed { public static final String REDIS_TEMPLATE = "redisTemplate"; public static final String LISTENER_CONTAINER = "listenerContainer"; public static final String REDIS_SERIALIZER = "redisSerializer"; private DefaultCamelContext camelContext; private List<RouteBuilder> routes; @Value("${redis.host}") private String redisHost; @Value("${redis.port}") private int redisPort; @Value("${redis.password}") private String redisPassword; public ManagedCamel(List<RouteBuilder> routes) throws Exception { this.routes = routes; } @PostConstruct private void postInit() throws Exception { JndiRegistry registry = new JndiRegistry(); final StringRedisSerializer serializer = new StringRedisSerializer(); RedisTemplate<String, Object> redisTemplate = getRedisTemplate(serializer); registry.bind(REDIS_TEMPLATE, redisTemplate); RedisMessageListenerContainer messageListenerContainer = new RedisMessageListenerContainer(); registry.bind(LISTENER_CONTAINER, messageListenerContainer); registry.bind(REDIS_SERIALIZER, serializer); camelContext = new DefaultCamelContext(registry); for (RouteBuilder routeBuilder : routes) { camelContext.addRoutes(routeBuilder); } start(); } private RedisTemplate<String, Object> getRedisTemplate(StringRedisSerializer serializer) { RedisTemplate<String, Object> redisTemplate = new RedisTemplate<String, Object>(); redisTemplate.setConnectionFactory(redisConnectionFactory()); redisTemplate.setKeySerializer(new StringRedisSerializer()); redisTemplate.setValueSerializer(serializer); redisTemplate.setEnableDefaultSerializer(false); redisTemplate.afterPropertiesSet(); return redisTemplate; } private RedisConnectionFactory redisConnectionFactory() { final JedisConnectionFactory jedisConnectionFactory = new JedisConnectionFactory(); jedisConnectionFactory.setHostName(redisHost); jedisConnectionFactory.setPort(redisPort); jedisConnectionFactory.setPassword(redisPassword); jedisConnectionFactory.afterPropertiesSet(); return jedisConnectionFactory;
https://riptutorial.com/ 13
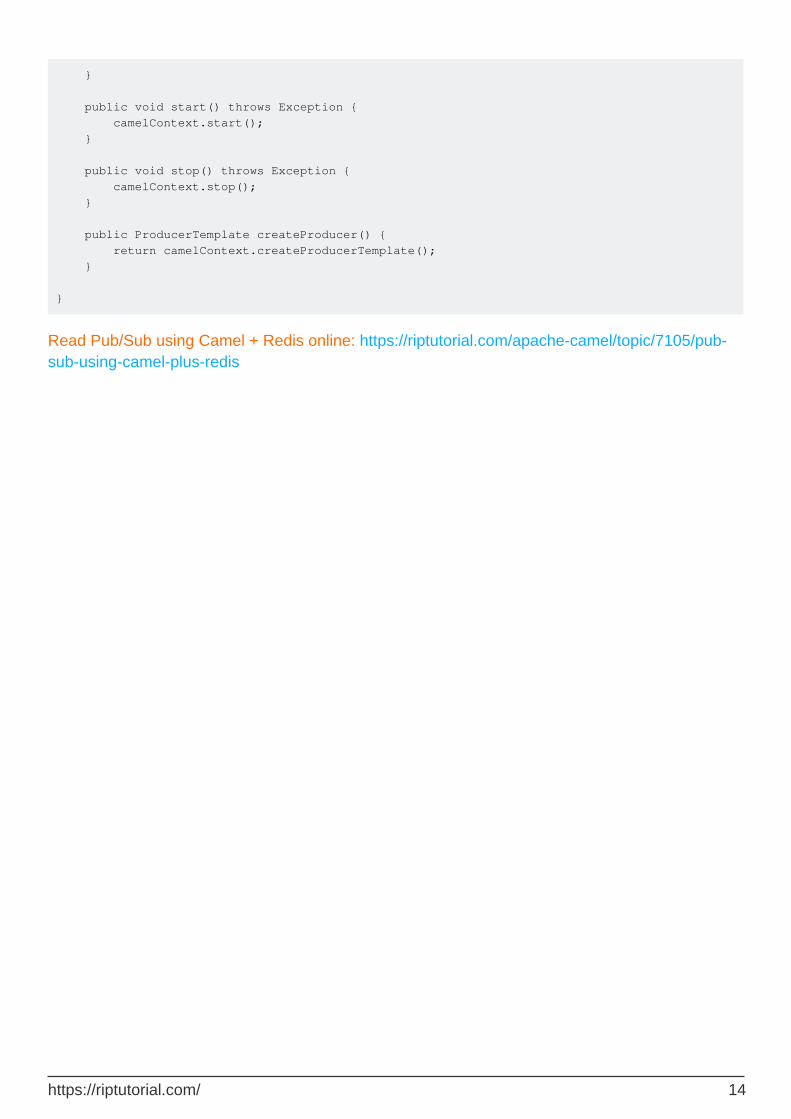
} public void start() throws Exception { camelContext.start(); } public void stop() throws Exception { camelContext.stop(); } public ProducerTemplate createProducer() { return camelContext.createProducerTemplate(); } }
Read Pub/Sub using Camel + Redis online: https://riptutorial.com/apache-camel/topic/7105/pub-sub-using-camel-plus-redis
https://riptutorial.com/ 14
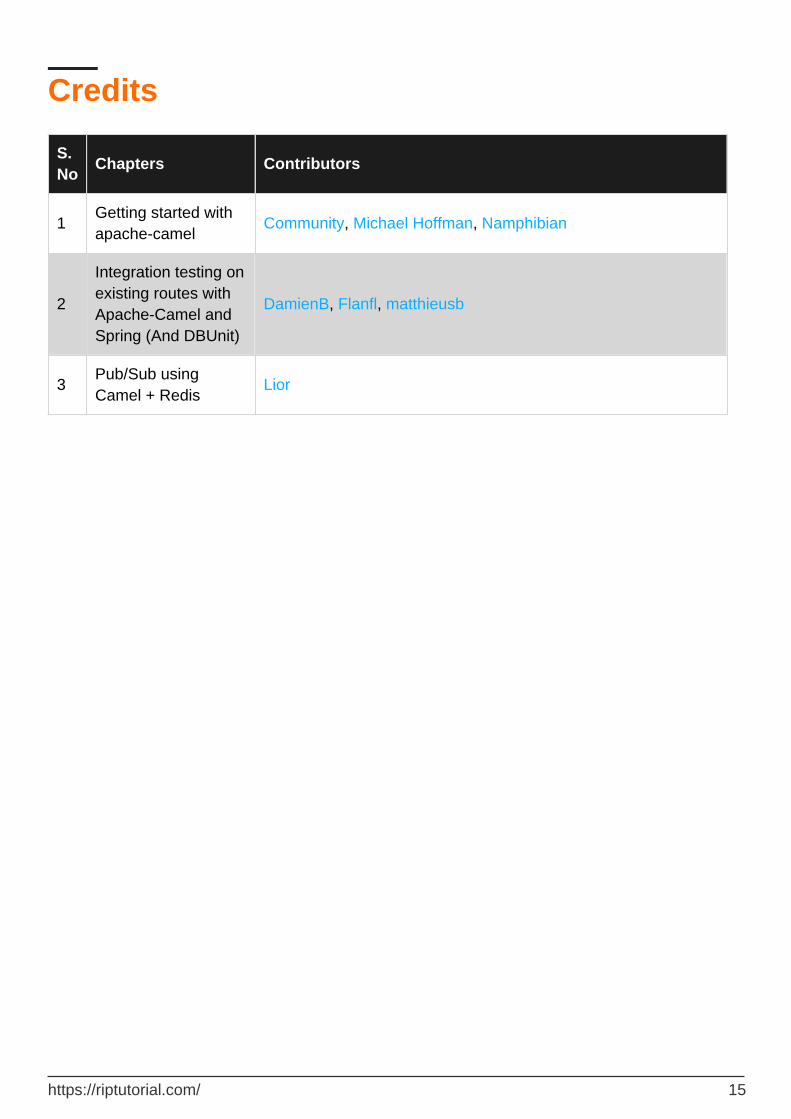
Credits
S. No
Chapters Contributors
1Getting started with apache-camel
Community, Michael Hoffman, Namphibian
2
Integration testing on existing routes with Apache-Camel and Spring (And DBUnit)
DamienB, Flanfl, matthieusb
3Pub/Sub using Camel + Redis
Lior
https://riptutorial.com/ 15