


Languages
Pages
Legal


Analog ON/OFF control system
conversion to
Digital ON/OFF control system
ELCT 201 week 13

SP = Vin 2
Vin 1
Dead Band(Window height)
WindowMaker
Subsystem 1
WindowComparator
U.L.
L.L.
H Bridge(L298n)
andDC Motor
Subsystem 2 Subsystem 3
Forward
Reverse
Mechanical Linkage
Feedback
Analog ON/OFF Control System(Using op amps and a H Bridge)
(Window position)

SP = Vin 2
Vin 1
Dead Band(Window height)
WindowMaker
Subsystem 1
WindowComparator
U.L.
L.L.
H Bridge(L298n)
andDC Motor
Subsystem 2 Subsystem 3
Forward
Reverse
Mechanical Linkage
Feedback
Analog ON/OFF Control System(Using op amps and a H Bridge)
(Window position)

SP = Vin 2
Vin 1
Dead Band(Window height)
WindowMaker
Subsystem 1
WindowComparator
U.L.
L.L.
H Bridge(L298n)
andDC Motor
Subsystem 2 Subsystem 3
Forward
Reverse
Mechanical Linkage
Feedback
Analog ON/OFF Control System(Using op amps and a H Bridge)
(Window position)
SP = Vin 2
Vin 1
Dead Band(Window height)
WindowMaker
Subsystem 1
WindowComparator
U.L.
L.L.
H Bridge(L298n)
andDC Motor
Subsystem 2 Subsystem 3
Forward
Reverse
Mechanical Linkage
Feedback
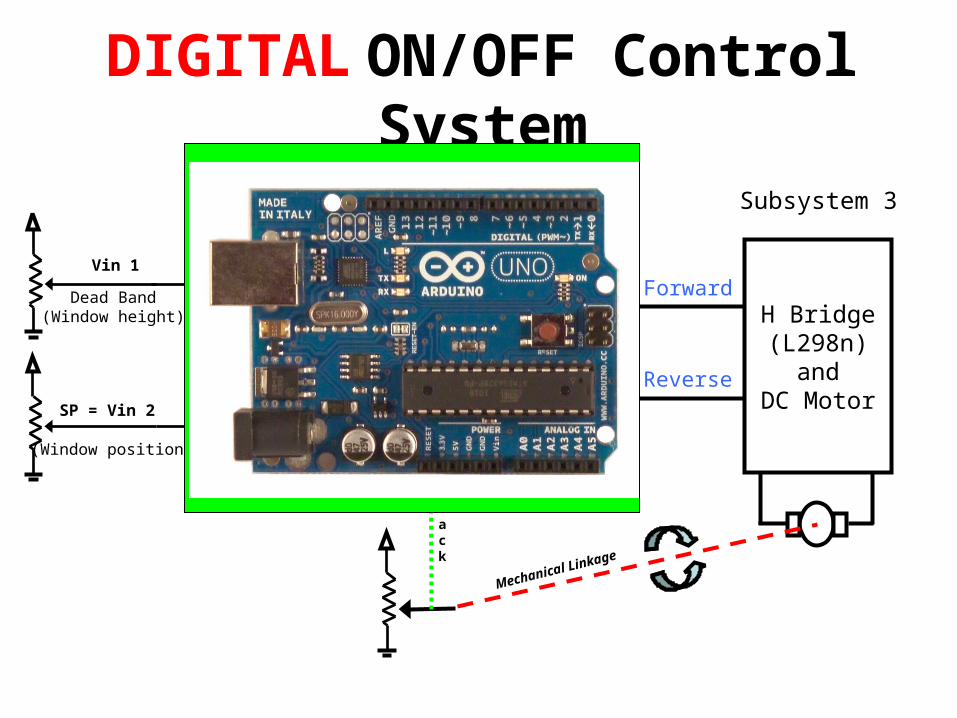
DIGITAL ON/OFF Control System
(Window position)
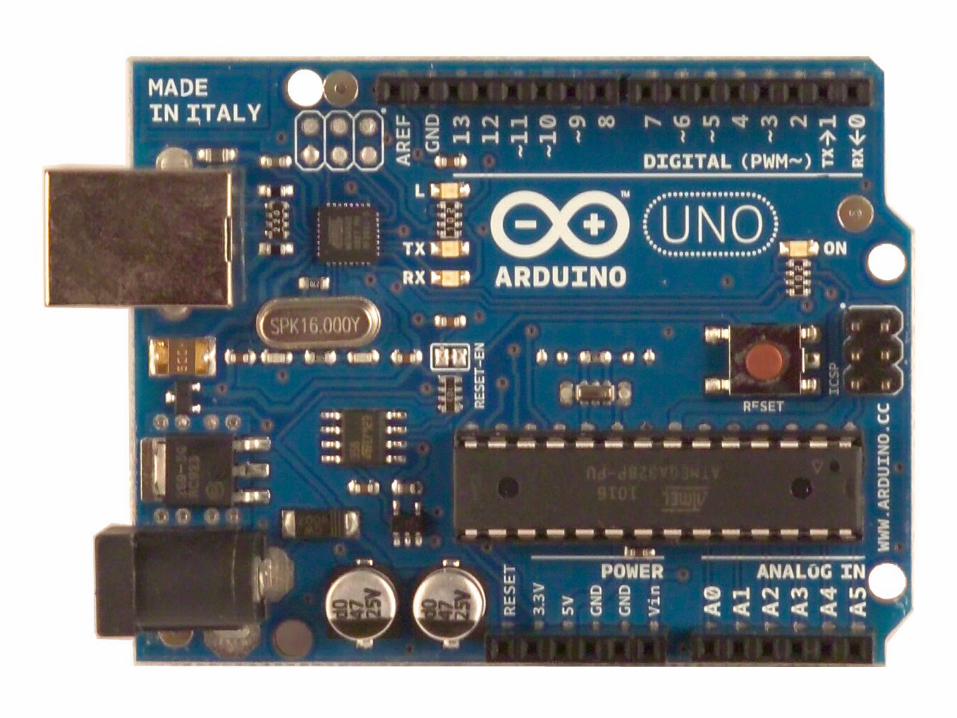

Intro to Arduino“Hardy Friend”
• Arduino– http://arduino.cc/
• Specifically, the UNO– http://arduino.cc/en/Main/ArduinoBoardUno
• Getting Started– http://arduino.cc/en/Guide/Windows
• Blink– http://arduino.cc/en/Tutorial/Blink

• /*• Blink• • Turns on an LED on for one second, then off for one second, repeatedly.• • The circuit:• * LED connected from digital pin 13 to ground.• • * Note: On most Arduino boards, there is already an LED on the board• connected to pin 13, so you don't need any extra components for this example.• • • Created 1 June 2005• By David Cuartielles• • http://arduino.cc/en/Tutorial/Blink• • based on an orginal by H. Barragan for the Wiring i/o board• • This example code is in the public domain.
• • */
• int ledPin = 13; // LED connected to digital pin 13
• // The setup() method runs once, when the sketch starts
• void setup() { • // initialize the digital pin as an output:• pinMode(ledPin, OUTPUT); • }
• // the loop() method runs over and over again,• // as long as the Arduino has power
• void loop() • {• digitalWrite(ledPin, HIGH); // set the LED on• delay(1000); // wait for a second• digitalWrite(ledPin, LOW); // set the LED off• delay(1000); // wait for a second• }
A good first program to download and run

SP = Vin 2
Vin 1
Dead Band(Window height)
WindowMaker
Subsystem 1
WindowComparator
U.L.
L.L.
H Bridge(L298n)
andDC Motor
Subsystem 2 Subsystem 3
Forward
Reverse
Mechanical Linkage
Feedback
DIGITAL ON/OFF Control System
(Window position)
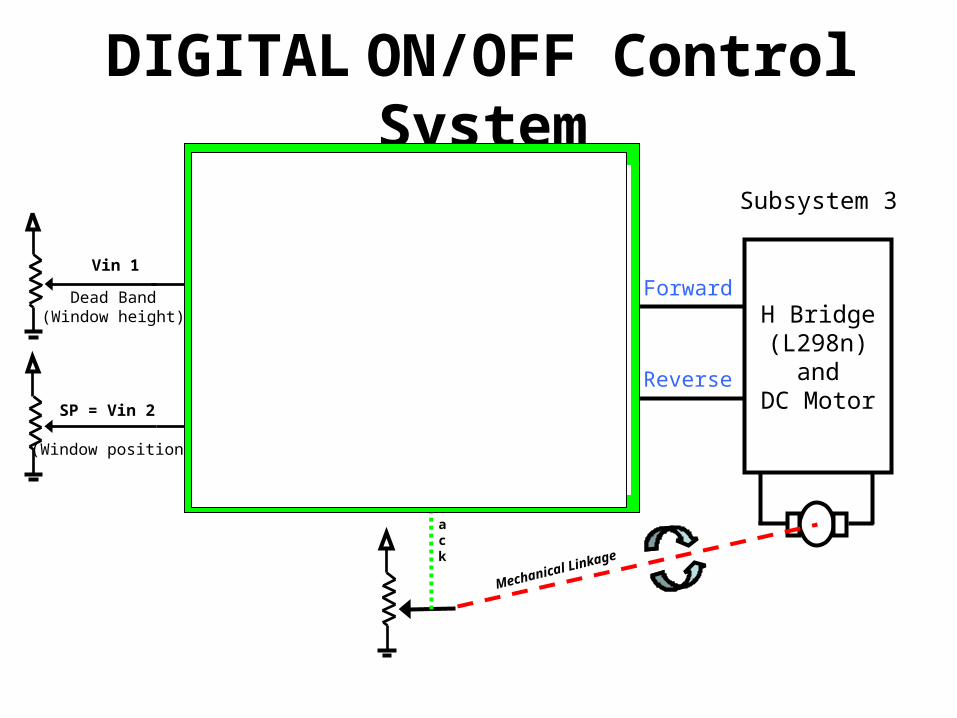
SP = Vin 2
Vin 1
Dead Band(Window height)
WindowMaker
Subsystem 1
WindowComparator
U.L.
L.L.
H Bridge(L298n)
andDC Motor
Subsystem 2 Subsystem 3
Forward
Reverse
Mechanical Linkage
Feedback
DIGITAL ON/OFF Control System
(Window position)

SP = Vin 2
Vin 1
Dead Band(Window height)
WindowMaker
Subsystem 1
WindowComparator
U.L.
L.L.
H Bridge(L298n)
andDC Motor
Subsystem 2 Subsystem 3
Forward
Reverse
Mechanical Linkage
DIGITAL ON/OFF Control System
(Window position)
Arduino Controller
Feedback

Conversion topics
• Hardware
• Software
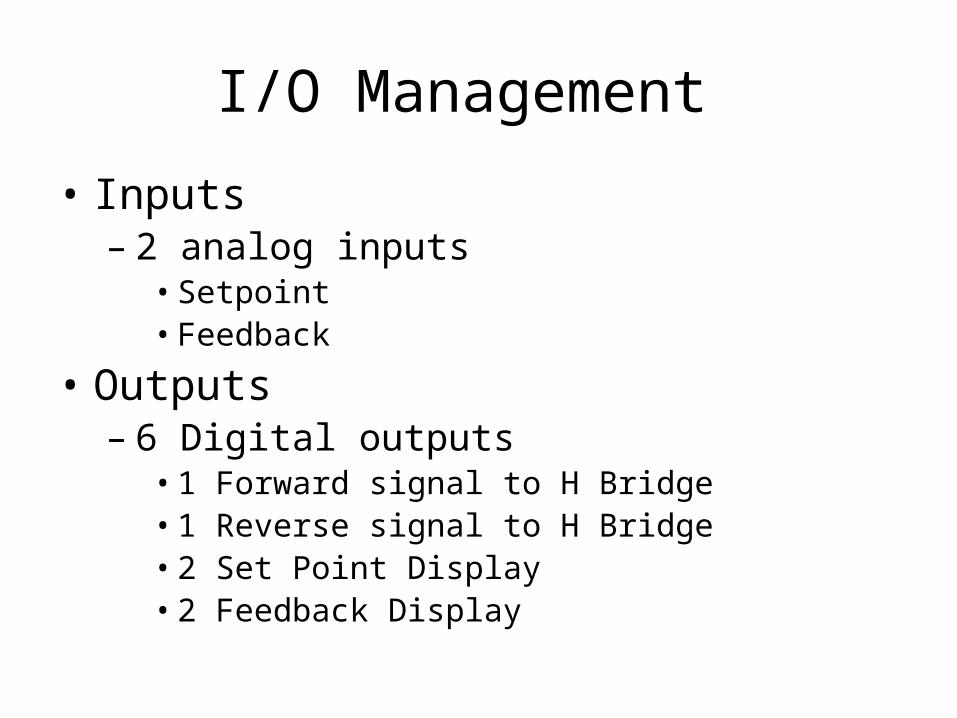
I/O Management
• Inputs– 2 analog inputs
• Setpoint• Feedback
• Outputs– 6 Digital outputs
• 1 Forward signal to H Bridge• 1 Reverse signal to H Bridge• 2 Set Point Display• 2 Feedback Display
WindowMaker
Subsystem 1
WindowComparator
U.L.
L.L.
H Bridge(L298n)
andDC Motor
Subsystem 2 Subsystem 3
Forward
Reverse
Mechanical Linkage
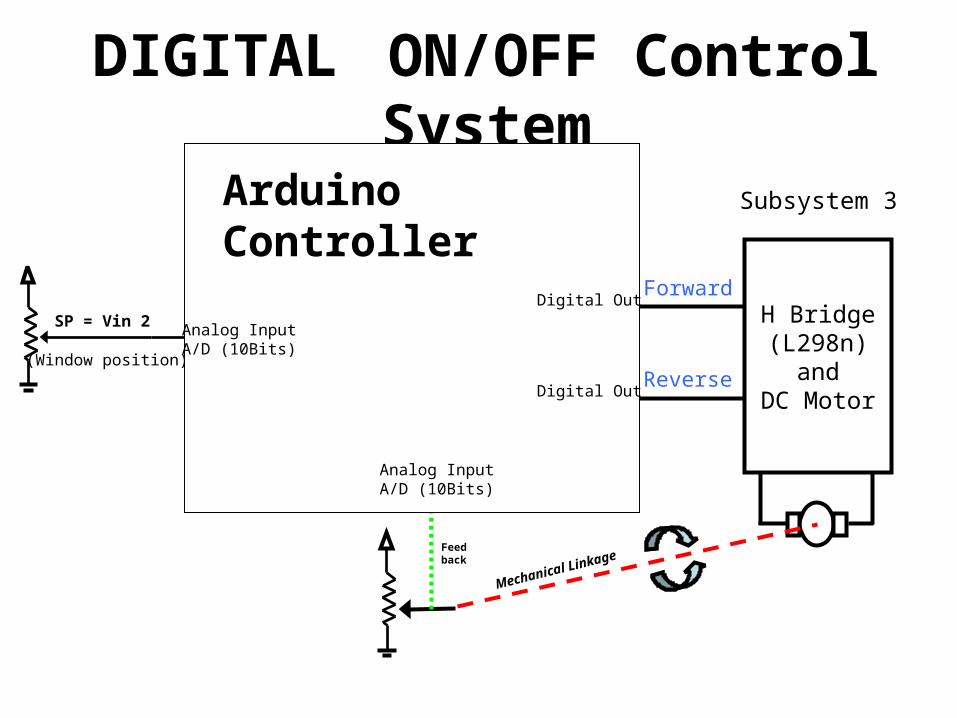
DIGITAL ON/OFF Control System
SP = Vin 2
(Window position)
Arduino Controller
Feedback
Analog InputA/D (10Bits)
Analog InputA/D (10Bits)
Digital Out
Digital Out

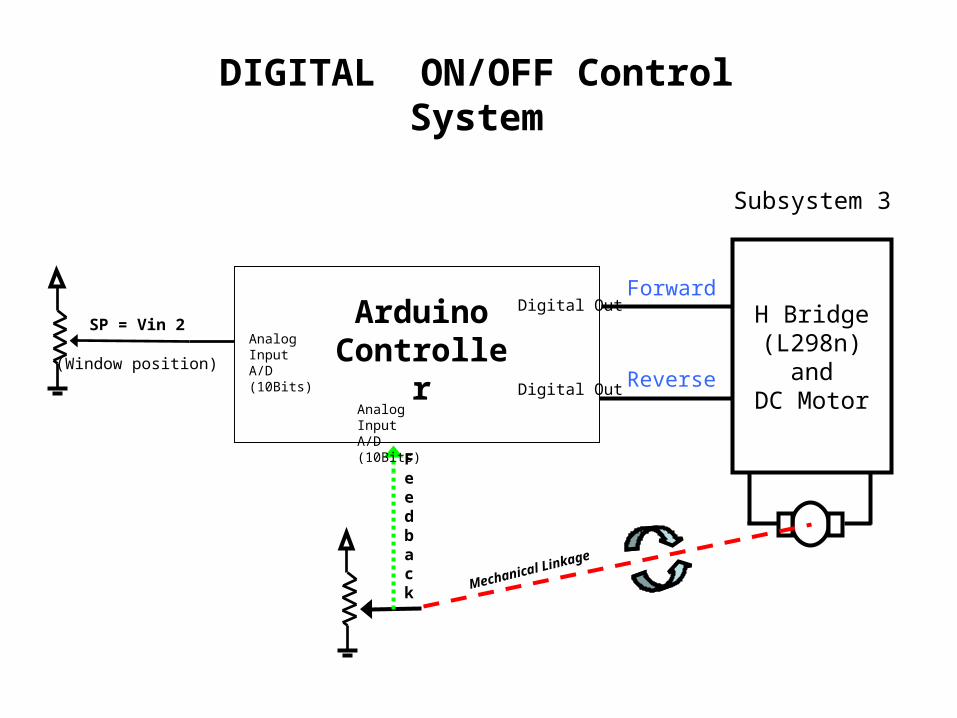
DIGITAL ON/OFF Control System
H Bridge(L298n)
andDC Motor
Subsystem 3
Forward
Reverse
Mechanical Linkage
SP = Vin 2
(Window position)
Arduino Controller
Feedback
Analog InputA/D (10Bits)
Analog InputA/D (10Bits)
Digital Out
Digital Out
DIGITAL ON/OFF Control System
H Bridge(L298n)
andDC Motor
Subsystem 3
Forward
Reverse
Mechanical Linkage
SP = Vin 2
(Window position)
Arduino Controller
Feedback
Analog InputA/D (10Bits)
Analog InputA/D (10Bits)
Digital Out
Digital Out

DIGITAL ON/OFF Control System
H Bridge(L298n)
andDC Motor
Subsystem 3
Forward
Reverse
Mechanical Linkage
SP = Vin 2
(Window position)
Arduino Controller
Feedback
Analog InputA/D (10Bits)
Analog InputA/D (10Bits)
Digital Out
Digital Out
Top Related