


Languages
Pages
Legal

EL8040-02 8/23/2013
Installation & Setup Guide Version 1.0
EL8040-02 8/23/2013
Epicor Tablet Point of Sale Installation and Setup Guide
ii
This manual contains reference information about software products from Epicor ®.
The software described in this manual and the manual itself are furnished under the terms and
conditions of a license agreement. The software consists of software options that are separately
licensed. It is against the law to copy the software on any medium, or to enable any software options,
except as specifically permitted under the license agreement. In addition, no part of this manual may
be copied or transmitted in any form or by any means without the prior written permission of Epicor.
From time to time, Epicor makes changes to its software products. Therefore, information in this
manual is subject to change, and the illustrations and screens that appear in the manual may differ
somewhat from the version of the software provided to you.
©2013 Epicor Software Corporation. All rights reserved.
Epicor, the Epicor stylized logo design, Eagle, and Epicor Eagle are registered trademarks of Epicor
Software Corporation. All other trademarks are property of their respective owners.
Epicor
4120 Dublin Boulevard
Dublin, CA 94568
Document No. EL8040-02
Publication Date: August 2013
EL8040-02 8/23/2013
Epicor Tablet Point of Sale Installation and Setup Guide
iii
Table of Contents
Welcome to Tablet Point of Sale ............................................................................. 4 Preparing for Installation of Tablet POS ................................................................ 5 Setting Up Tablet POS Security & Options ............................................................ 7 Installing Tablet POS from the App Store ............................................................ 10 Setting Up Tablet POS Fields................................................................................ 12 Setting Up Printers and Scanners for Tablet POS .............................................. 25 Signing On and Launching Tablet POS ............................................................... 30 Notes ....................................................................................................................... 32
EL8040-02 8/23/2013
Epicor Tablet Point of Sale Installation and Setup Guide
4
Welcome to Tablet Point of Sale
Tablet Point of Sale (Tablet POS) is a mobile point-of-sale solution (Version 1 is iPAD only) that
allows retailers to quickly look up items, look up customers, and perform simple retail checkout
anywhere there is a WiFi or cellular connection to the internet. With Tablet POS, you can quickly
scan items, perform a credit card or house account checkout, and print or email the receipt to the
customer.
Features
Tablet POS has the added feature of taking credit cards. Tablet POS has many other features
that can make point of sale easy and quick. These features include:
Operating a portable point of sale on an iPad
Reducing lines at checkout with LineBuster
Browsing inventory and viewing images
Completing checkout for non-cash customers by:
swiping key card numbers
capturing customer signatures
printing receipts or invoices
providing customers with an email receipt
EL8040-02 8/23/2013
Epicor Tablet Point of Sale Installation and Setup Guide
5
Preparing for Installation of Tablet POS
Software Requirements
TFP Database – with all files (MSY option 2001 is set to Yes)
Role-Based Security (option 550 is set to Yes)
Standard Eagle-based invoice printing to MPS network printers
Eagle for Windows release 22 or higher
WiFi internet connection
Hardware Requirements
iPad with iOS 6.1 or higher
(Optional) Receipt Printers
Wireless - Epson P60II WiFi mobile receipt printer. This printer only works
in WiFi mode (not Cellular mode) so you will need WiFi.
Wireless - Zebra QL320 WiFi receipt printer w/WiFi
Wired - Epson TM-T88V network receipt printer. This is a wired receipt
printer that needs to be plugged into an Ethernet jack.
(Optional) Scanner
Bluetooth Socket 7Xi barcode scanner
(Optional) Credit Card Magnetic Stripe Reader (MSR)
If you use Epicor Payment Exchange for Tablet POS credit card
processing, you will need the encrypted credit card MSR available from
Epicor OR you can enter the credit card information manually for Epicor
Payment Exchange.
If you use Authorize.net, you will need to enter credit card information
manually because no encrypted credit card MSR exists.

EL8040-02 8/23/2013
Epicor Tablet Point of Sale Installation and Setup Guide
6
Remote Epicor Set-Up Requirements
To connect Tablet POS to your Eagle server, Epicor must configure your firewall and allow
access from your Eagle to Epicor’s datacenter. This is done remotely after the service has been
ordered. You will be notified after setup is complete.
Support During Installation
If you would like to have Epicor perform the Tablet POS installation, please contact your Local
Platform Specialist (LPS) for a quote. If you encounter errors during installation, please call the
Eagle Advice Line at 1-800-322-3077. When contacting the Advice Line, be sure to have the
following information handy:
Your customer number and store name
The business application you are using (Eagle for Windows, etc.)
The Tablet POS version number
Description of the problem, including any error messages
EL8040-02 8/23/2013
Epicor Tablet Point of Sale Installation and Setup Guide
7
Setting Up Tablet POS Security & Options
Tablet POS can assist in quick checkout for simple sales/orders. It is not a full version of Point of
Sale and does not have the ability to do manager overrides. It only supports the Point-of-Sale
security bits functionality as listed below.
Security Bits
To make sure that Tablet POS runs correctly, set up the following security bits on the Security
Maintenance window. To access this window, do the following:
1. Open the Eagle Browser.
2. In the Launch bar, type RBS, and press Enter. The Role Based Security Maintenance
window displays.
3. In the Role Based Security Maintenance window, find the security bits below and change
the settings accordingly.
Security Bit 531- Allow transaction for customer who is past due
If you set this bit to Yes, the past due warning displays. When the clerk totals the transaction,
they can save or select Pay on Account or Credit Card Charge (if these are set up).
If you set this bit to No, the past due warning still displays. When the clerk totals the transaction,
they can save or select Credit Card Charge (if this is set up).
Security Bit 532 - Allow transaction for customer who is over credit limit
If you set this bit to Yes, the “over credit limit” warning displays. When the clerk totals the
transaction, they can save or select pay on Account or Credit Card Charge (if these are set up).
If you set this bit to No, the “over credit limit warning” still displays. When the clerk totals the
transaction, they can save or select Credit Card Charge (if this is set up).
Security Bit 536 - Allow override of price less than cost message
If you set this bit to Yes, the Tablet POS Item Information window displays the Discount button.
If you set this bit to No, the Tablet POS Item Information window does not display the Discount
button.
EL8040-02 8/23/2013
Epicor Tablet Point of Sale Installation and Setup Guide
8
Security Bit 817 - Ability to manually type in a different price
If you set this bit to Yes, the Tablet POS Item Information window displays the Discount button.
If you set this bit to No, the Tablet POS Item Information window does not display the Discount
button.
Security Bit 622 - Ability to continue when posted quantity is insufficient
If this bit is set to Yes, Tablet POS still posts and/or sells the item, regardless of whether the
quantity available is sufficient.
If this bit is set to No, Tablet POS does not post and/or sell the item due to insufficient quantity.
Options
To make sure that Tablet POS runs correctly, certain options must be set up in Options
Configuration.
Options Set Up by an Epicor Representative
Option 2001 - Compass Database on System.
This option must be set to T or Y.
Option 1028 - Compass Web Services Platform on System.
This option must be set to Y.
Options Set Up by You
Set up the following options in Options Configuration. To access this window, do the following:
1. Open the Eagle Browser.
2. In the Launch bar, type OPT, and press Enter. The Options Configuration window
displays.
3. In the Options Configuration window, find the options listed below, and change the
settings according to the information below.

EL8040-02 8/23/2013
Epicor Tablet Point of Sale Installation and Setup Guide
9
Option 1191 - Mobile Point of Sale Listener 1 of 3.
During the setup of Tablet POS, an invoice printer similar to the iNet Invoice Printer must be set
up. For every transaction that is processed in Tablet POS, an invoice prints. Option 1191 “Mobile
Point-of-Sale Listener 1 of 3” must indicate the printer number to which invoices will print. At this
time, you can only have one invoice Listener for Tablet POS.
Option 9835 - Alternate Tender Code for Credit and Debit Cards with Mobile POS Code.
This option determines the tender code used when a customer pays with a credit or debit card in
Tablet POS. The tender code used must correspond to a tender type you set up as “Other.” For
example, if you set Alternate Tender type 6 to “Other” (in option 5616), set this option to “6-
Alternate Tender 6.”
EL8040-02 8/23/2013
Epicor Tablet Point of Sale Installation and Setup Guide
10
Installing Tablet POS from the App Store
Installing the Tablet POS application to your iPad is quick and easy.
1. Tap the App Store icon.
2. Search for "Epicor.”
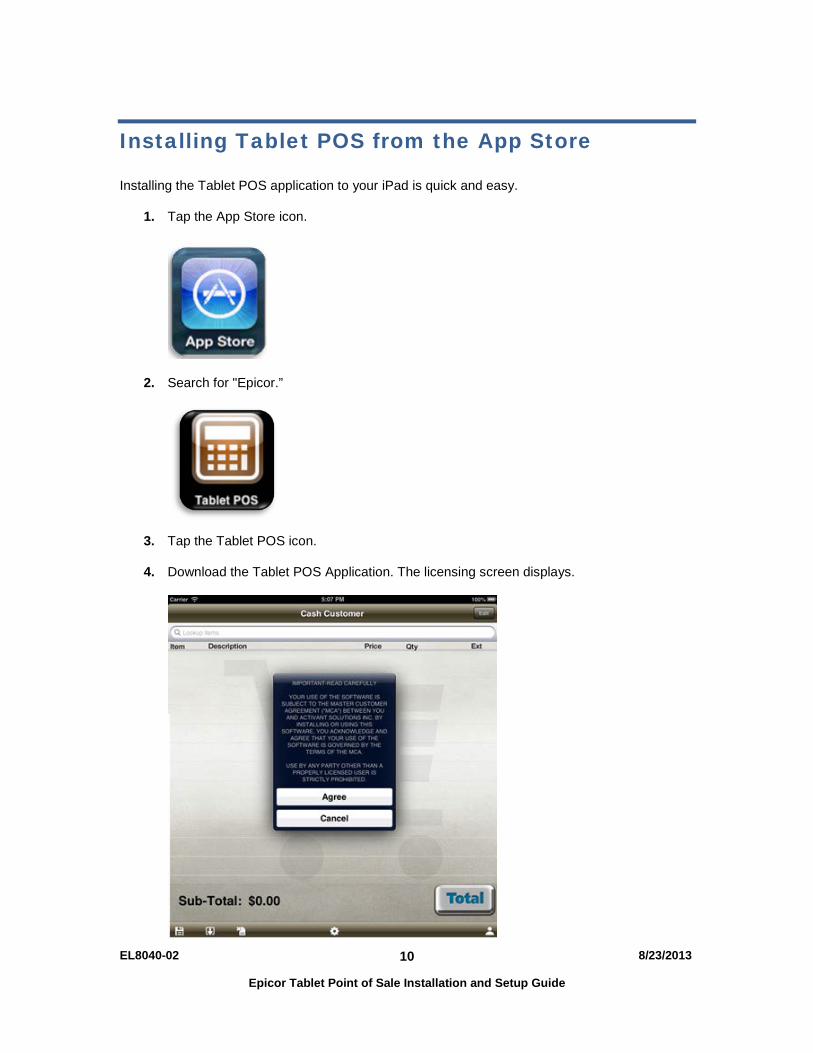
3. Tap the Tablet POS icon.
4. Download the Tablet POS Application. The licensing screen displays.

EL8040-02 8/23/2013
Epicor Tablet Point of Sale Installation and Setup Guide
11
5. Read the license agreement.
6. Select Agree.
7. Close the application, and then continue with the next section “Setting Up Tablet POS
Fields.”
EL8040-02 8/23/2013
Epicor Tablet Point of Sale Installation and Setup Guide
12
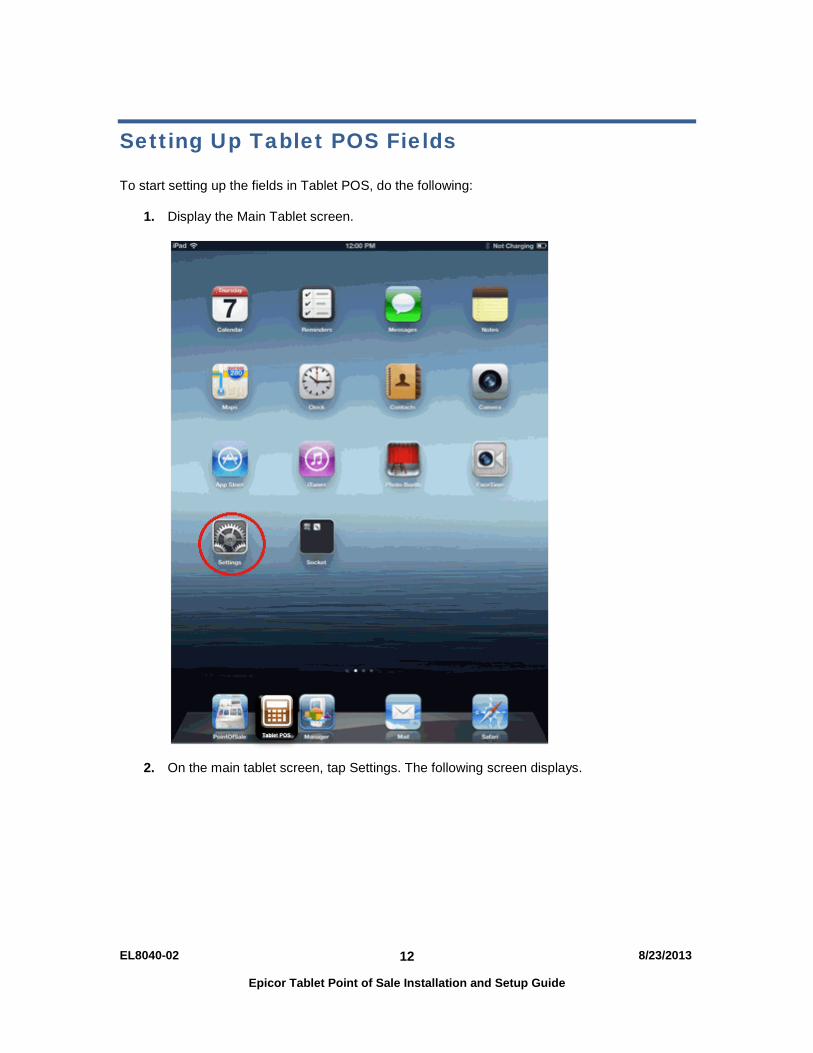
Setting Up Tablet POS Fields
To start setting up the fields in Tablet POS, do the following:
1. Display the Main Tablet screen.
2. On the main tablet screen, tap Settings. The following screen displays.
EL8040-02 8/23/2013
Epicor Tablet Point of Sale Installation and Setup Guide
13
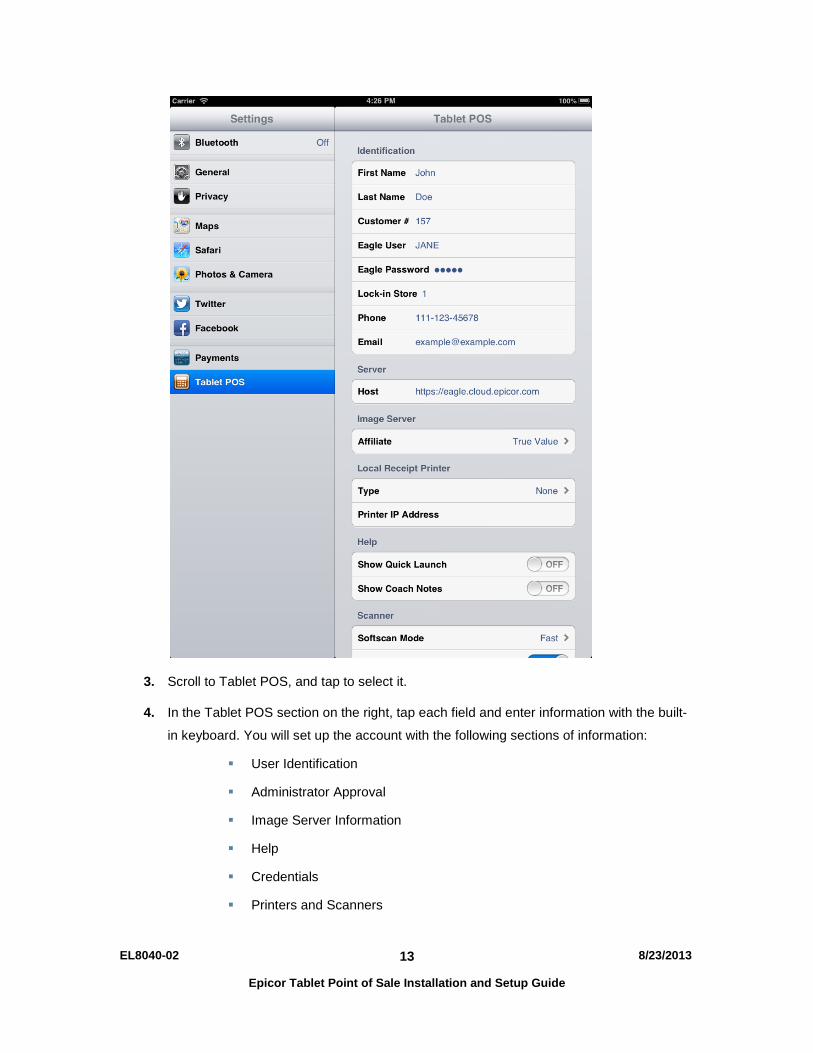
3. Scroll to Tablet POS, and tap to select it.
4. In the Tablet POS section on the right, tap each field and enter information with the built-
in keyboard. You will set up the account with the following sections of information:
User Identification
Administrator Approval
Image Server Information
Help
Credentials
Printers and Scanners
EL8040-02 8/23/2013
Epicor Tablet Point of Sale Installation and Setup Guide
14
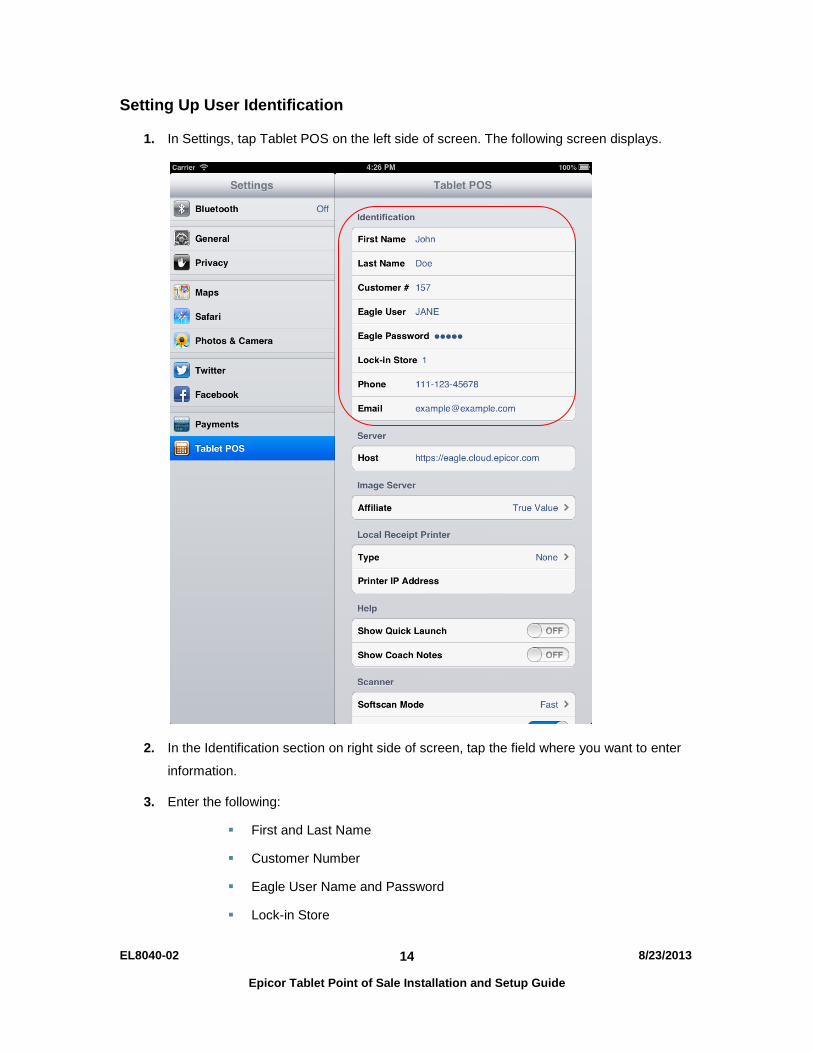
Setting Up User Identification
1. In Settings, tap Tablet POS on the left side of screen. The following screen displays.
2. In the Identification section on right side of screen, tap the field where you want to enter
information.
3. Enter the following:
First and Last Name
Customer Number
Eagle User Name and Password
Lock-in Store
EL8040-02 8/23/2013
Epicor Tablet Point of Sale Installation and Setup Guide
15
Phone Number
Email address
IMPORTANT Start the Tablet POS application once you have entered all the set-up
information and before you set up administrator approval. If it is not
started, you will not see your device in the list and you will not be able
to approve.
4. Make sure you have an internet connection, go back to Tablet POS and start it.
5. Inform your Administrator of your mobile devices to approve your access to the store’s
Eagle data. After the Administrator has approved your mobile device, you will be able to
access Tablet POS.
Setting Up Administrator Approval
1. If you are the Administrator of mobile devices in your business, you must approve
employee access to the store's Eagle data by going to the Epicor licensing site.
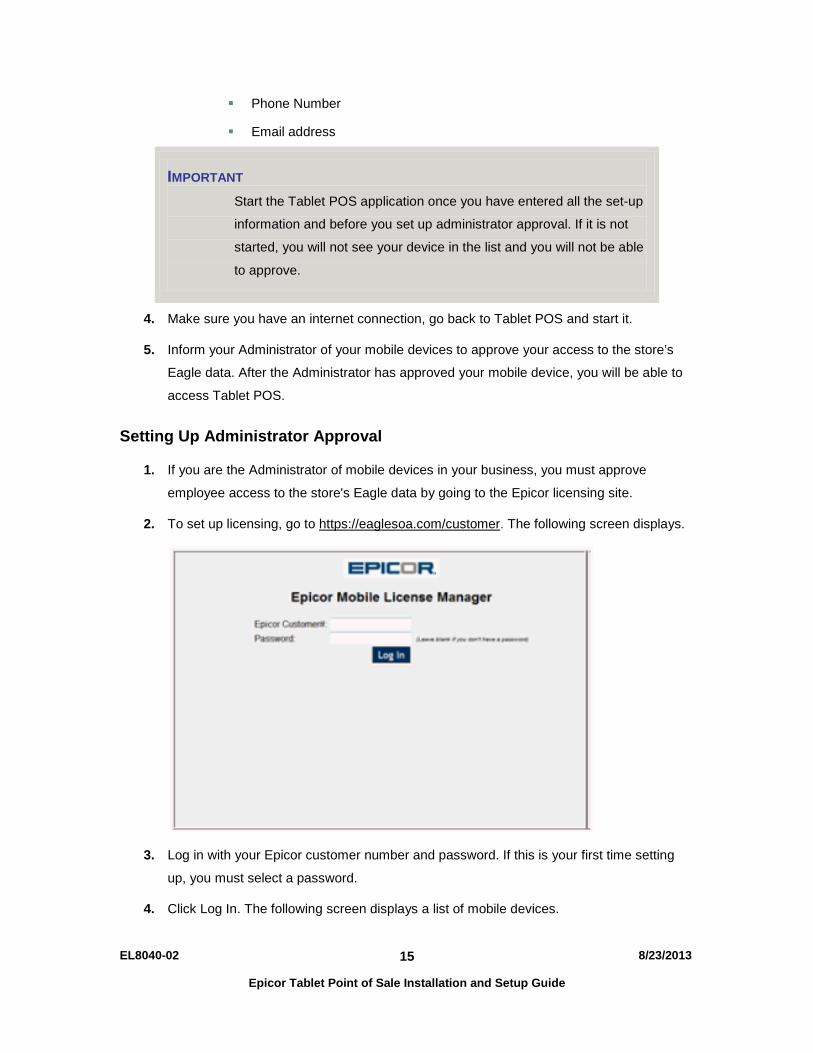
2. To set up licensing, go to https://eaglesoa.com/customer. The following screen displays.
3. Log in with your Epicor customer number and password. If this is your first time setting
up, you must select a password.
4. Click Log In. The following screen displays a list of mobile devices.
EL8040-02 8/23/2013
Epicor Tablet Point of Sale Installation and Setup Guide
16
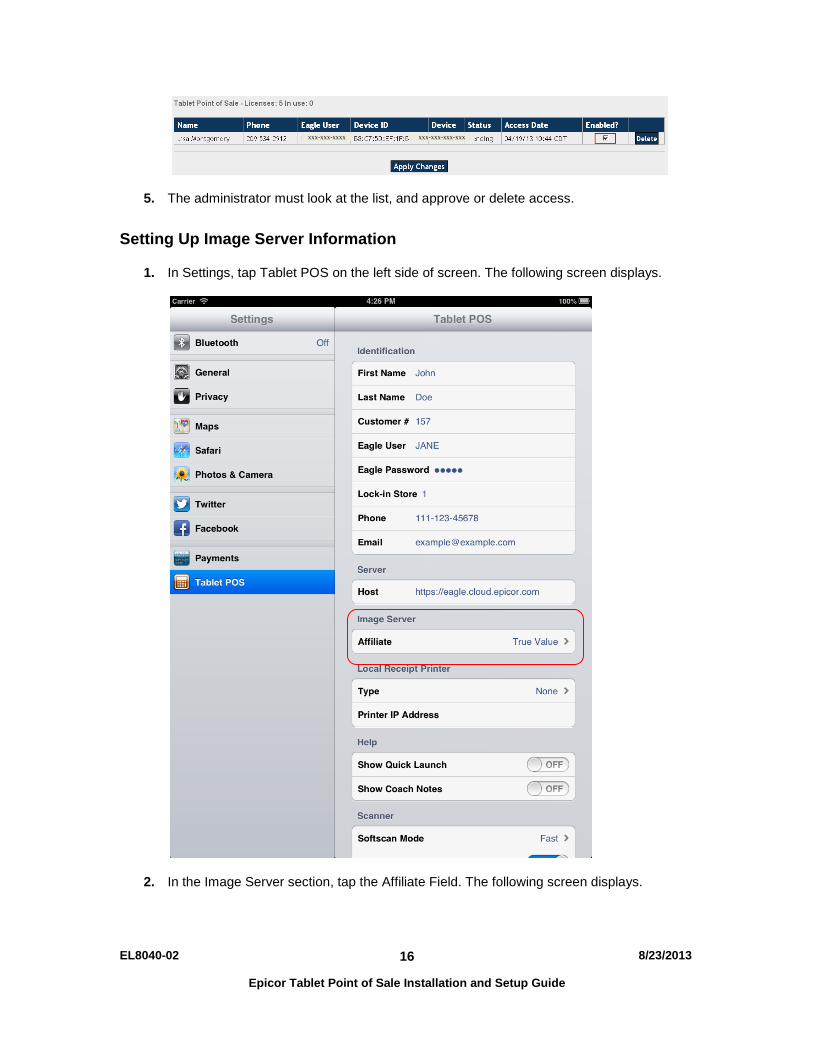
5. The administrator must look at the list, and approve or delete access.
Setting Up Image Server Information
1. In Settings, tap Tablet POS on the left side of screen. The following screen displays.
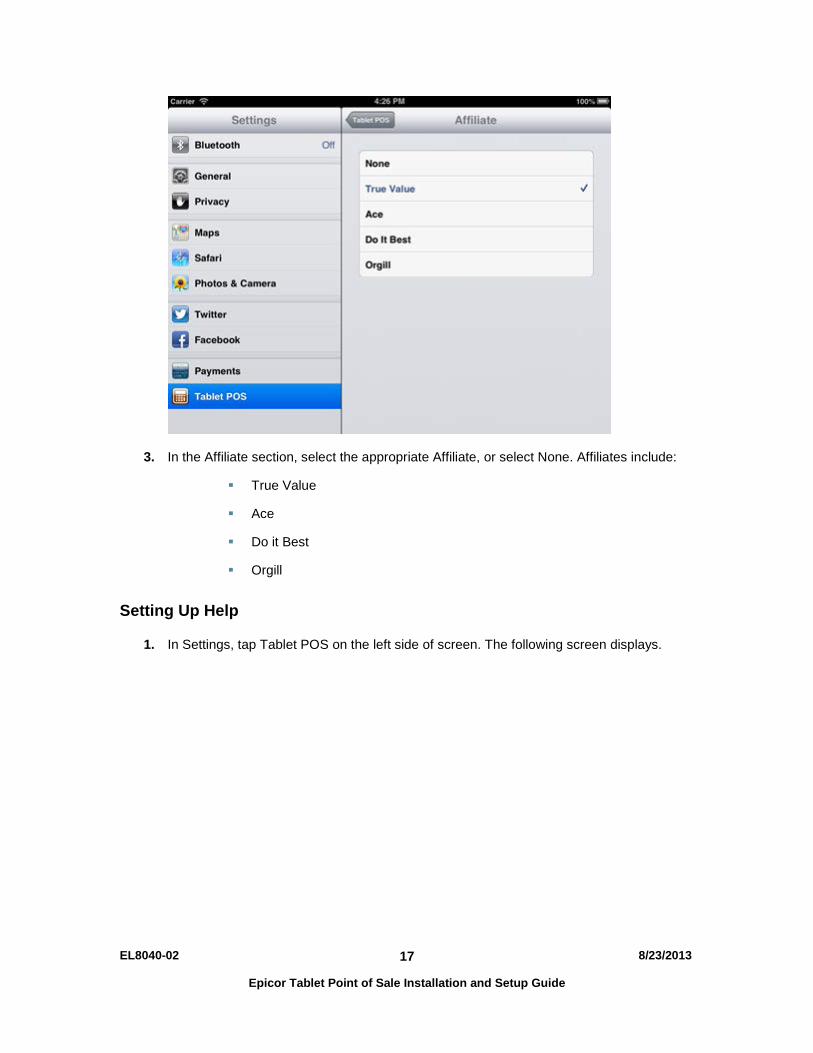
2. In the Image Server section, tap the Affiliate Field. The following screen displays.
xxx-xxx-xxxx xxx-xxx-xxx-xxx
EL8040-02 8/23/2013
Epicor Tablet Point of Sale Installation and Setup Guide
17
3. In the Affiliate section, select the appropriate Affiliate, or select None. Affiliates include:
True Value
Ace
Do it Best
Orgill
Setting Up Help
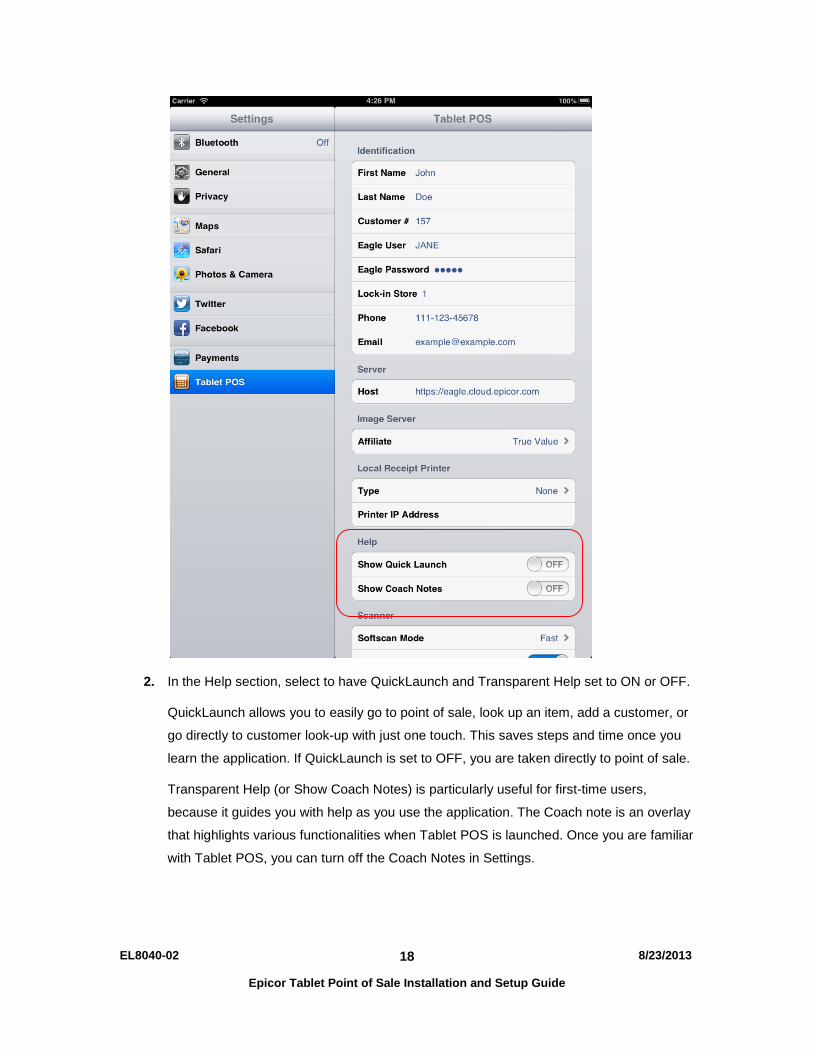
1. In Settings, tap Tablet POS on the left side of screen. The following screen displays.
EL8040-02 8/23/2013
Epicor Tablet Point of Sale Installation and Setup Guide
18
2. In the Help section, select to have QuickLaunch and Transparent Help set to ON or OFF.
QuickLaunch allows you to easily go to point of sale, look up an item, add a customer, or
go directly to customer look-up with just one touch. This saves steps and time once you
learn the application. If QuickLaunch is set to OFF, you are taken directly to point of sale.
Transparent Help (or Show Coach Notes) is particularly useful for first-time users,
because it guides you with help as you use the application. The Coach note is an overlay
that highlights various functionalities when Tablet POS is launched. Once you are familiar
with Tablet POS, you can turn off the Coach Notes in Settings.
EL8040-02 8/23/2013
Epicor Tablet Point of Sale Installation and Setup Guide
19
Setting Up Credentials
This feature allows you to set up processing for credit cards. You can select Epicor Payment
Exchange OR Authorize.net to handle your payment processing. It is important to keep in mind
that Tablet POS credit card processing does not send any credit card data to the Eagle. Instead,
the credit card tendering occurs between the tablet and the processor. Tracking information is
passed with the transaction. To accurately and separately track Tablet POS credit card
transactions, use option 9835 “Alternate Tender Type for Tablet Point of Sale” to set all Tablet
POS tender type codes to a unique alternate tender. This option was already described in the
Options section at the beginning of this document.
Epicor Payment Exchange Setup If you choose Epicor Payment Exchange to do payment processing, follow the steps below.
NOTE The Epicor Payment Exchange team provides you with the ID, Token,
and Acceptor field numbers that you will need for this procedure.
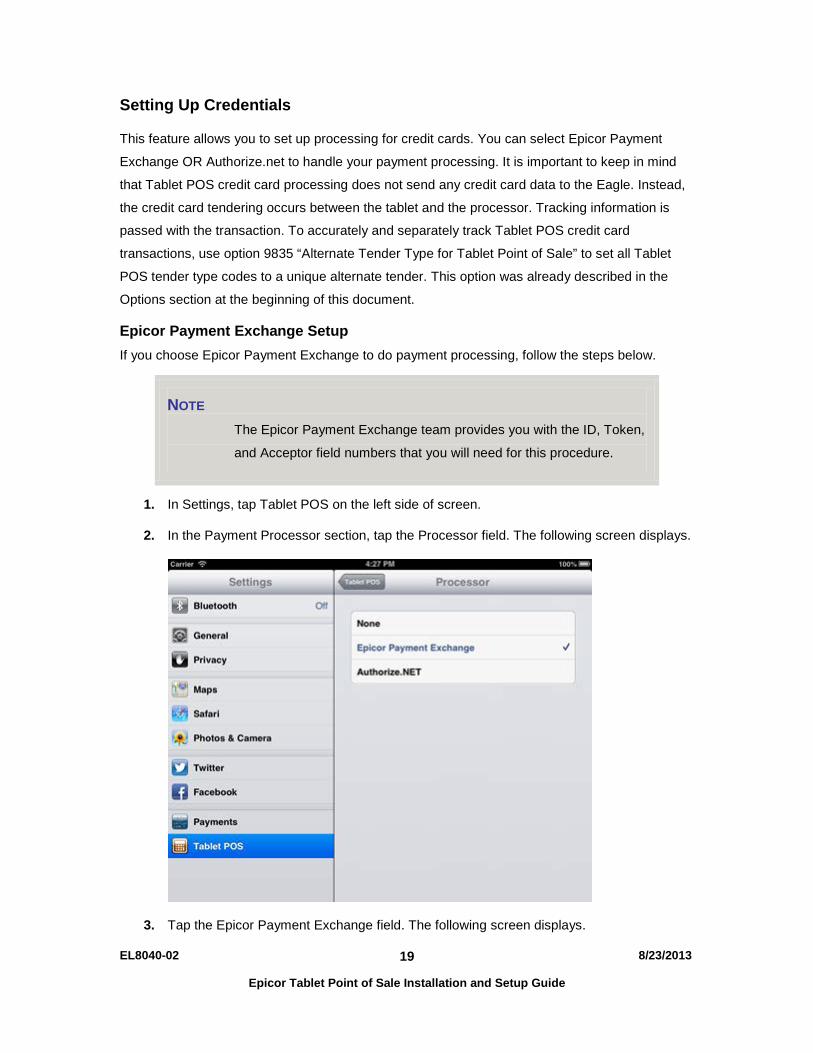
1. In Settings, tap Tablet POS on the left side of screen.
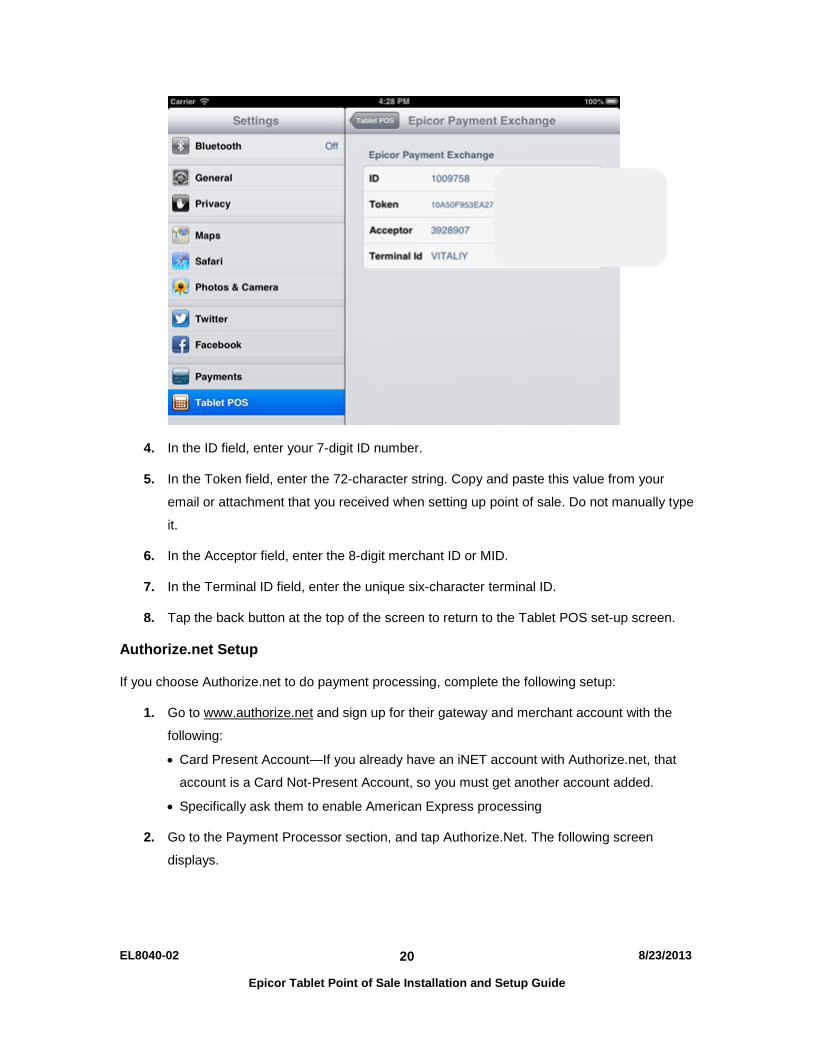
2. In the Payment Processor section, tap the Processor field. The following screen displays.
3. Tap the Epicor Payment Exchange field. The following screen displays.
EL8040-02 8/23/2013
Epicor Tablet Point of Sale Installation and Setup Guide
20
4. In the ID field, enter your 7-digit ID number.
5. In the Token field, enter the 72-character string. Copy and paste this value from your
email or attachment that you received when setting up point of sale. Do not manually type
it.
6. In the Acceptor field, enter the 8-digit merchant ID or MID.
7. In the Terminal ID field, enter the unique six-character terminal ID.
8. Tap the back button at the top of the screen to return to the Tablet POS set-up screen.
Authorize.net Setup
If you choose Authorize.net to do payment processing, complete the following setup:
1. Go to www.authorize.net and sign up for their gateway and merchant account with the
following:
• Card Present Account—If you already have an iNET account with Authorize.net, that
account is a Card Not-Present Account, so you must get another account added.
• Specifically ask them to enable American Express processing
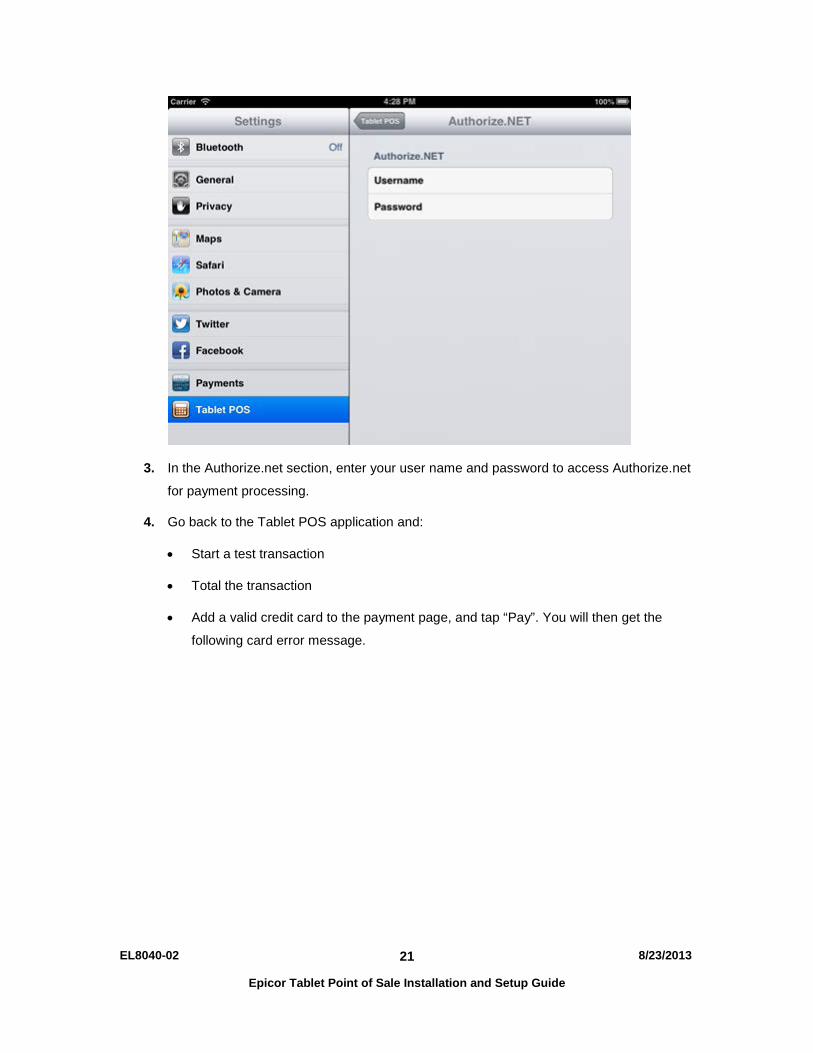
2. Go to the Payment Processor section, and tap Authorize.Net. The following screen
displays.
EL8040-02 8/23/2013
Epicor Tablet Point of Sale Installation and Setup Guide
21
3. In the Authorize.net section, enter your user name and password to access Authorize.net
for payment processing.
4. Go back to the Tablet POS application and:
• Start a test transaction
• Total the transaction
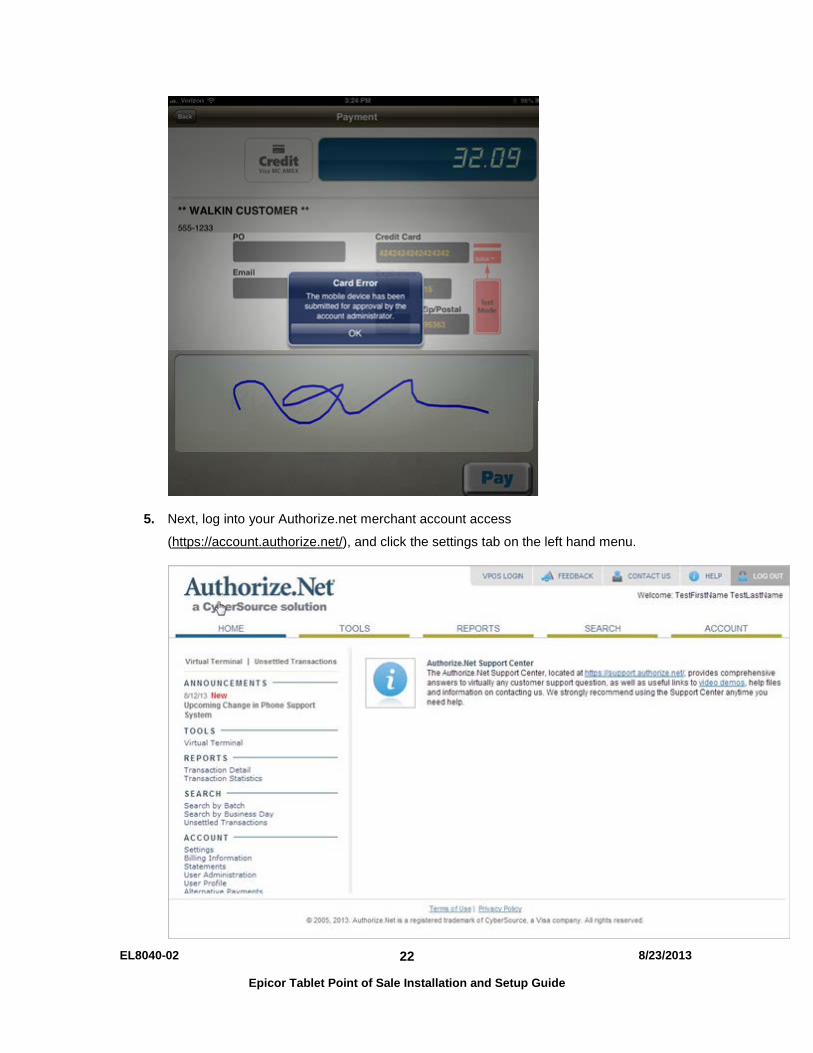
• Add a valid credit card to the payment page, and tap “Pay”. You will then get the
following card error message.
EL8040-02 8/23/2013
Epicor Tablet Point of Sale Installation and Setup Guide
22
5. Next, log into your Authorize.net merchant account access
(https://account.authorize.net/), and click the settings tab on the left hand menu.
EL8040-02 8/23/2013
Epicor Tablet Point of Sale Installation and Setup Guide
23
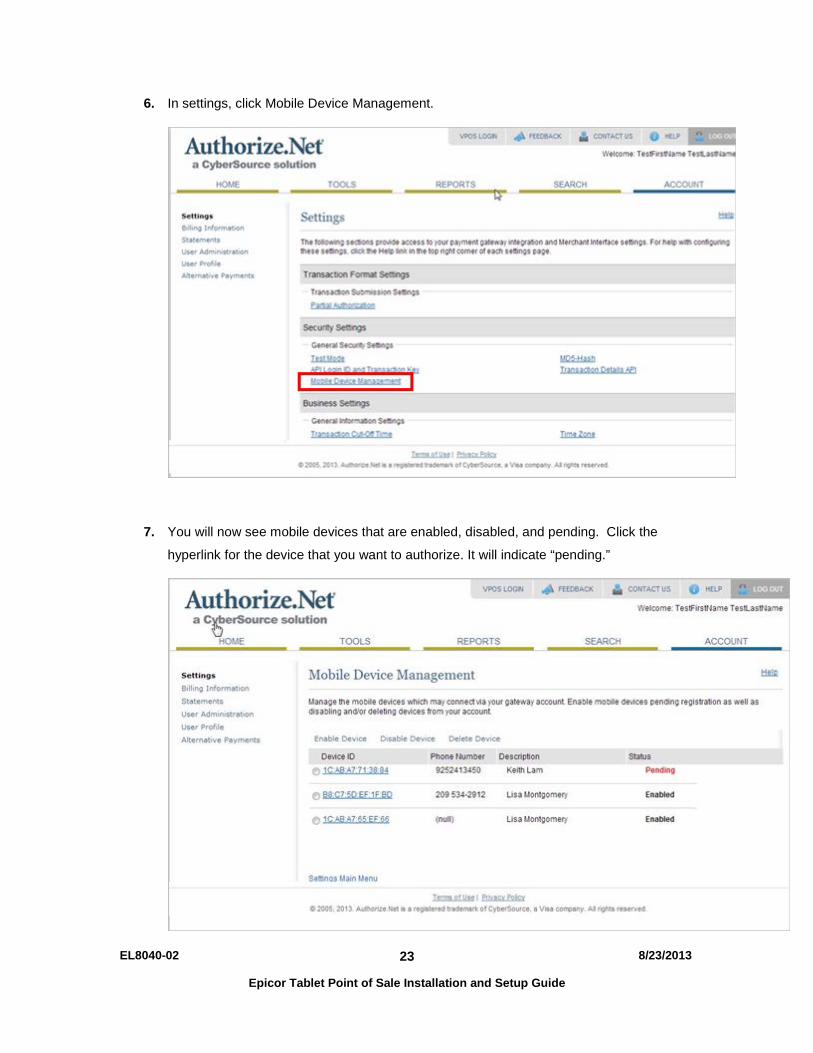
6. In settings, click Mobile Device Management.
7. You will now see mobile devices that are enabled, disabled, and pending. Click the
hyperlink for the device that you want to authorize. It will indicate “pending.”

EL8040-02 8/23/2013
Epicor Tablet Point of Sale Installation and Setup Guide
24
8. Enable the device from the drop down choices in the pop-up menu.
9. You can now process credit cards with Authorize.net and Tablet POS.

EL8040-02 8/23/2013
Epicor Tablet Point of Sale Installation and Setup Guide
25
Setting Up Printers and Scanners for Tablet POS
It is convenient to be able to scan and print with your tablet. You can complete setup from the
Settings screen. During the setup of Tablet POS, an invoice printer similar to the iNet Invoice
Printer must be set up. For every transaction that is processed on Tablet POS, an invoice will
print.
Setting Up the Receipt Printer in Tablet POS
1. In Settings, tap Tablet POS on left side of screen. The following screen displays.
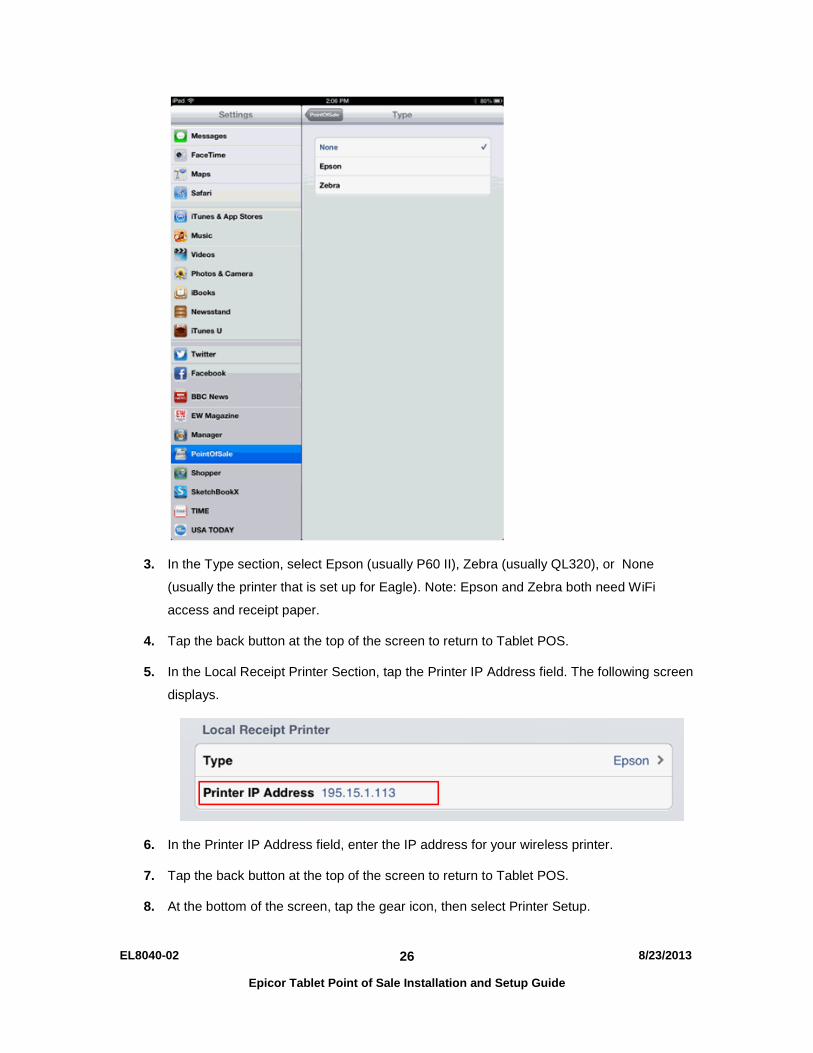
2. In the Local Receipt Printer section, tap the Type field. The following screen displays.
EL8040-02 8/23/2013
Epicor Tablet Point of Sale Installation and Setup Guide
26
3. In the Type section, select Epson (usually P60 II), Zebra (usually QL320), or None
(usually the printer that is set up for Eagle). Note: Epson and Zebra both need WiFi
access and receipt paper.
4. Tap the back button at the top of the screen to return to Tablet POS.
5. In the Local Receipt Printer Section, tap the Printer IP Address field. The following screen
displays.
6. In the Printer IP Address field, enter the IP address for your wireless printer.
7. Tap the back button at the top of the screen to return to Tablet POS.
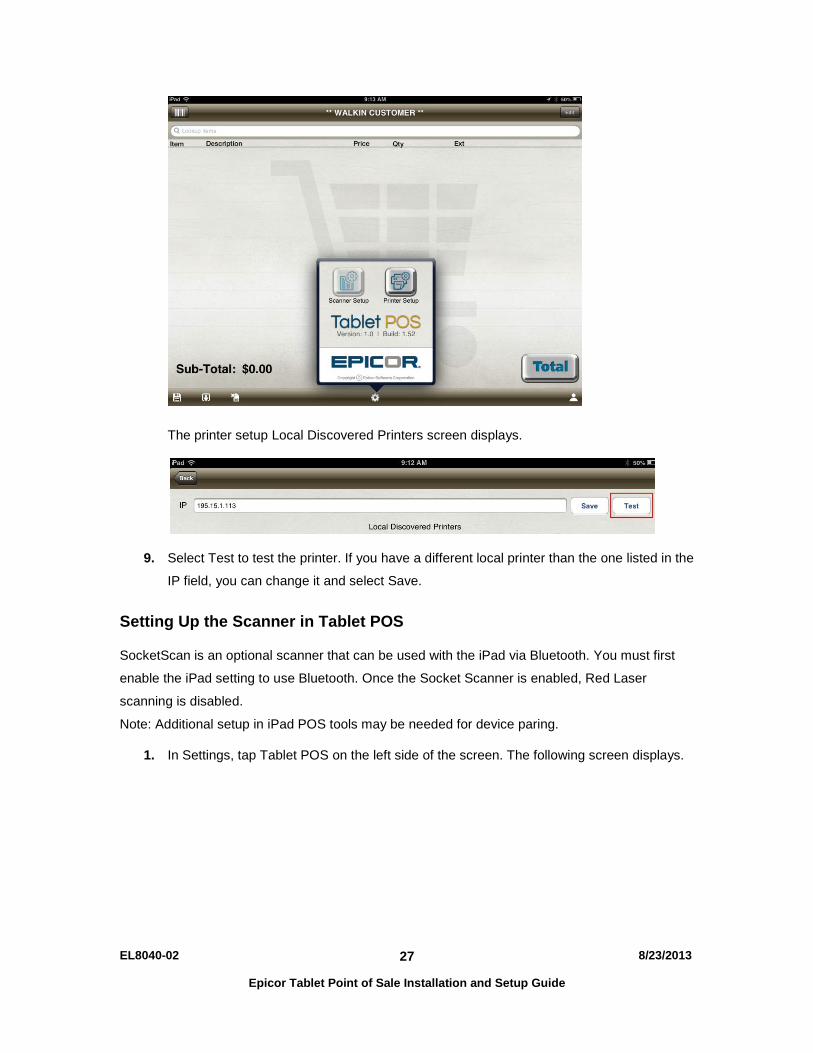
8. At the bottom of the screen, tap the gear icon, then select Printer Setup.
EL8040-02 8/23/2013
Epicor Tablet Point of Sale Installation and Setup Guide
27
The printer setup Local Discovered Printers screen displays.
9. Select Test to test the printer. If you have a different local printer than the one listed in the
IP field, you can change it and select Save.
Setting Up the Scanner in Tablet POS
SocketScan is an optional scanner that can be used with the iPad via Bluetooth. You must first
enable the iPad setting to use Bluetooth. Once the Socket Scanner is enabled, Red Laser
scanning is disabled.
Note: Additional setup in iPad POS tools may be needed for device paring.
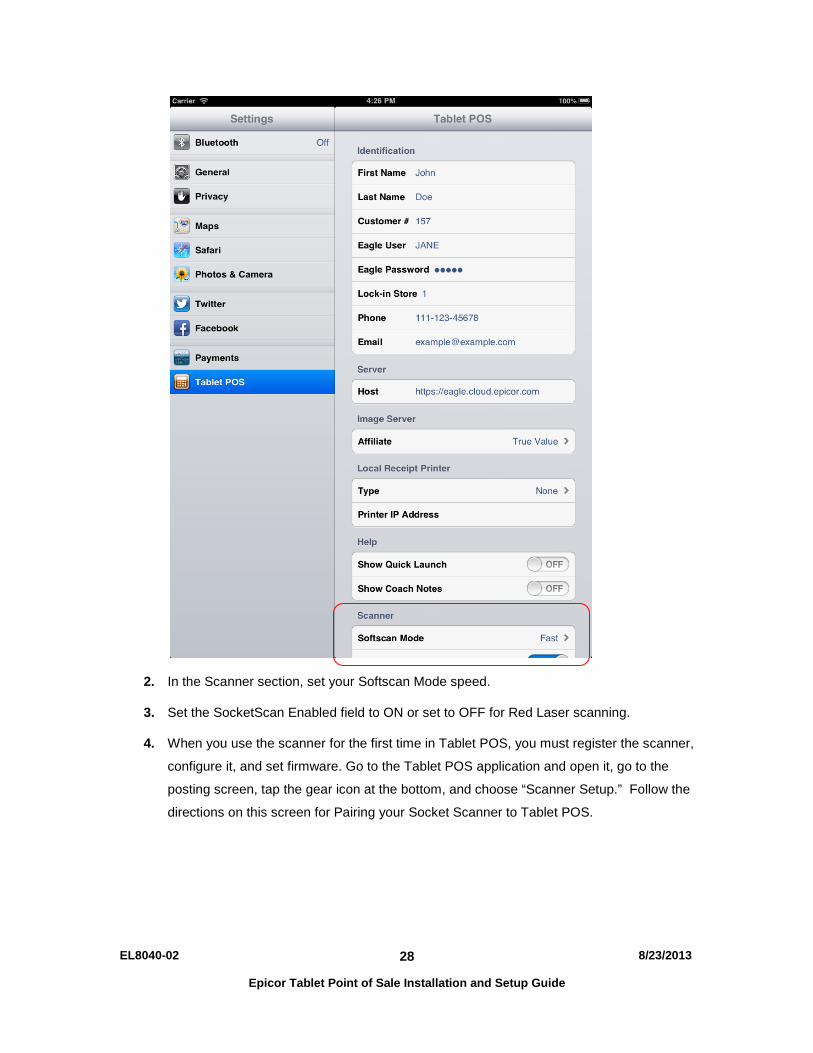
1. In Settings, tap Tablet POS on the left side of the screen. The following screen displays.
EL8040-02 8/23/2013
Epicor Tablet Point of Sale Installation and Setup Guide
28
2. In the Scanner section, set your Softscan Mode speed.
3. Set the SocketScan Enabled field to ON or set to OFF for Red Laser scanning.
4. When you use the scanner for the first time in Tablet POS, you must register the scanner,
configure it, and set firmware. Go to the Tablet POS application and open it, go to the
posting screen, tap the gear icon at the bottom, and choose “Scanner Setup.” Follow the
directions on this screen for Pairing your Socket Scanner to Tablet POS.
EL8040-02 8/23/2013
Epicor Tablet Point of Sale Installation and Setup Guide
29

EL8040-02 8/23/2013
Epicor Tablet Point of Sale Installation and Setup Guide
30
Signing On and Launching Tablet POS
1. Tap the Tablet POS icon to start the application.
The Tablet POS sign-on screen displays.
2. Enter your User ID and password. This information can be stored in settings for
automatic login.
3. Select Login. If you set Show Quick Launch to ON in Settings, the following Quick
Launch screen displays.
EL8040-02 8/23/2013
Epicor Tablet Point of Sale Installation and Setup Guide
31
4. Select the appropriate task to complete. All tasks are available from any point in the
system. The tasks are:
Point of Sale
Item Lookup
Add Customer & Checkout
Customer Lookup & Checkout
EL8040-02 8/23/2013
Epicor Tablet Point of Sale Installation and Setup Guide
32
Notes
Use this area for your own notes and reminders.
Top Related